#gnuradio
Explore tagged Tumblr posts
Text
oh no I just realized I can build guitar pedal-y audio modulators in gnuradio. There goes my evening.
19 notes
·
View notes
Text
RDS Data Extraction with RFtap and Wireshark
RDS (Radio Data System) is a communication protocol standard used for embedding small amounts of digital information in traditional FM radio broadcasts. It enables radio stations to transmit data such as station identification, program information, and traffic updates.
To capture and decode RDS data, one method involves using a Software Defined Radio (SDR) along with GNU Radio and RFtap. GNU Radio provides a framework for creating software radios, while RFtap acts as a bridge between GNU Radio and conventional network monitoring and packet analysis tools like Wireshark.

Unfortunately, as of the time of writing, RFtap is no longer being maintained and does not work with the latest version of GNU Radio (version 3.10.10). This post offers guidelines for rebuild and using RFtap with the new GNU Radio release.
This post assumes that the reader has access to DVB-T dongles based on the Realtek RTL2832U and a PC running Ubuntu or Debian Linux. For this, I used an RTL dongle with Rafael Micro R820T tuner and Ubuntu 24.04 LTS release.
As the first step install the following GNU Radio build dependencies into the OS:
sudo apt-get install cmake libboost-all-dev \ liblog4cpp5-dev qtcreator qtbase5-dev \ qt5-qmake python3-cheetah python3-numpy \ python3-pygtk python3-gi python3-gi-cairo \ gir1.2-gtk-4.0
sudo apt install git g++ libgmp-dev swig \ python3-mako python3-sphinx python3-lxml \ doxygen libfftw3-dev libsdl1.2-dev \ libgsl-dev libqwt-qt5-dev libqt5opengl5-dev \ python3-pyqt5 liblog4cpp5-dev libzmq3-dev \ python3-yaml python3-click \ python3-click-plugins python3-zmq python3-scipy \ libcodec2-dev libgsm1-dev libusb-1.0-0 \ libusb-1.0-0-dev libudev-dev \ python3-setuptools
sudo apt install pybind11-dev python3-matplotlib \ libsndfile1-dev libsoapysdr-dev soapysdr-tools \ python3-pygccxml python3-pyqtgraph
sudo apt install libiio-dev libad9361-dev \ libspdlog-dev python3-packaging python3-jsonschema \ python3-qtpy
sudo apt remove swig
Next, clone and build Volk (Vector-Optimized Library of Kernels)
mkdir ~/rf cd rf git clone --recursive https://github.com/gnuradio/volk.git cd volk mkdir build cd build cmake -DCMAKE_BUILD_TYPE=Release -DPYTHON_EXECUTABLE=/usr/bin/python3 ../ make sudo make install sudo ldconfig
After installing the Volk library, we can proceed to build GNU Radio.
cd ~/rf wget https://github.com/gnuradio/gnuradio/archive/refs/tags/v3.10.10.0.tar.gz tar -xvf ./v3.10.10.0.tar.gz cd gnuradio-3.10.10.0 mkdir build cd build cmake -DCMAKE_BUILD_TYPE=Release -DPYTHON_EXECUTABLE=/usr/bin/python3 ../ make -j8 make test sudo make install sudo ldconfig

Now GNU Radio is installed with all necessary components. To enable RTL SDR support, we must build and install Osmocom RTL SDR libraries and SDR components.
cd ~/rf git clone https://gitea.osmocom.org/sdr/rtl-sdr.git cd rtl-sdr mkdir build cd build cmake ../ -DINSTALL_UDEV_RULES=ON make sudo make install sudo ldconfig
cd ~/rf git clone https://gitea.osmocom.org/sdr/gr-osmosdr cd gr-osmosdr mkdir build cd build cmake ../ make sudo make install sudo ldconfig
Before plugging in the RTL-SDR dongle, we need to prevent the kernel modules for the RTL-SDR USB device from being loaded into the kernel and taking ownership of the device. To do this, simply navigate to the /etc/modprobe.d directory and create a file called rtl-sdr-blacklist.conf with the following content:
# This system has librtlsdr0 installed in order to # use digital video broadcast receivers as generic # software defined radios. blacklist dvb_usb_rtl28xxu blacklist e4000 blacklist rtl2832 blacklist rtl2830 blacklist rtl2838
Next, you should clone and build the FM RDS/TMC transceiver module for GNU Radio.
cd ~/rf wget https://github.com/bastibl/gr-rds/archive/refs/tags/v3.10.tar.gz tar -xvf ./gr-rds\ -v3.10.tar.gz cd gr-rds-3.10 mkdir build cd build cmake .. make sudo make install sudo ldconfig
For the next steps, we need to have Wireshark and RFTap. Wireshark can be installed using a package manager.
sudo apt-get install wireshark
To run Wireshark without requiring root user permissions, use the following set of commands:
sudo dpkg-reconfigure wireshark-common sudo usermod -a -G wireshark $USER newgrp wireshark
A message may be prompted in the first step above and proceed by selecting the "Yes" option.
Now restart the OS and continue with the RFTap installation.
The official RFTap repository is no longer being maintained and is not compatible with newer versions of GNU Radio. For this step, please use the RFTap fork available in my GitHub repository. This version has been successfully tested with GNU Radio 3.10.10 and Wireshark 4.2.2.
cd ~/rf git clone https://github.com/dilshan/gr-rftap.git cd gr-rftap mkdir build cd build cmake .. make sudo make install sudo ldconfig
Now get the modifier version of rds_rx_rftap.grc from the above repository.

The Wireshark Dissector file for RDS data is also available in the repository. Copy it to the ~/.config/wireshark/plugins directory. Create the directories if they do not exist.
Launch Wireshark and monitor the loopback (lo) adapter. Start GNU Radio and execute the rds_rx.grc file, which was downloaded in the above step.
youtube
If all the steps are performed correctly, the RDS data should appear in the packet list pane as UDP messages. The dissected messages can be observed through the packet bytes pane.
0 notes
Text
GNU Radioの入門に是非!解説記事をRFワールドNo44特集「GRCで広がるSDRの世界」に寄稿しました
CQ出版社の季刊誌「RFワールド」最新刊No.44に、特集記事を寄稿させていただきました。GNU Radioの解説記事「GRCで広がるSDRの世界」です。計85ページもの分量です。

GRCとはgnuradio-companionのことです。グラフィカルなパッチプログラミングにより、お手軽にSDR信号処理の実験や実装が可能です。
GNU Radioについては、こちらでも少し紹介しています。ただ、日本語によるまとまった解説が、Webや雑誌を含め存在しないことを残念に思っていました。どこかで紹介や解説を書かせていただければなー、と思っていました。そんなところに、あのRFワールド誌からお声がけ��いただき、O編集長のご尽力により、このような形で記事にしていただくことができました。
SDRのフロントエンドも安価なものが入手しやすくなっています。今回はいろいろ比較した結果、HackRF Oneを使うことにしました。性能のバランスもよく、秋月で購入可能で入手性も良く、オススメです。

特集記事の内容はGNU Radio入門ということで、アマチュア無線にお馴染みのアナログ方式についての変復調をメインに取り上げました。それから、ちょっとだけデジタルもということで、ワンセグの受信とデコードをGNU RadioとRTLドングルで行う方法を紹介しています。GNU Radioはソフトウェアフレームワークなので、ちょっとだけPythonコードの雰囲気や、ブロックの開発についても紹介しています。
あのカンガルー先輩の挿絵も入っていますよ!

電波の扱いにはくれぐれもご留意ください。
発売は2018/10/29です。ぜひお手にとってご高覧いただければ幸いです。
コメントは是非Amazonレビューにお願いします。
RFワールド No.44 http://www.rf-world.jp/bn/RFW44/RFW44A.shtml
CQ出版社販売ページ https://shop.cqpub.co.jp/hanbai/books/MTR/MTRZ201811.html
Amazon https://amzn.to/2RiOqyS
8 notes
·
View notes
Text
TELIVE - Decodificação Tetra
TELIVE - Decodificação Tetra Saiba como xeretar comunicações de serviços oficiais, como Policias Civil, Militar, Federal, Ministério da Defesa, Metrô, etc.
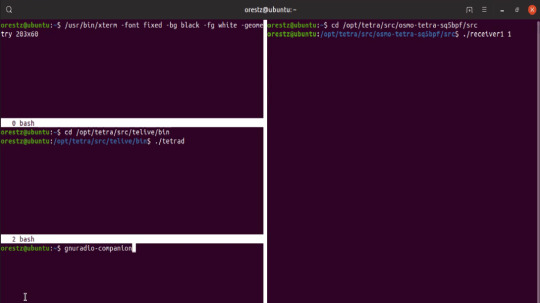
Os tranceivers de Rádio Definido por Software (SDR) tornaram-se populares, e eu tenho a preferência pelo que se pode fazer com eles usando o Linux.
Este post é um tutorial de instalação dos componentes para decodificação TETRA usando o Gnuradio no Ubuntu 19.04 como plataforma e um RTL2832u que custa algo em torno de R$100,00.
Não entrarei em detalhes sobre o Gnuradio, pois a instalação é simples…
View On WordPress
0 notes
Video
youtube
GNURADIO Tutorial 7 [ PSK Modulator ]
2 notes
·
View notes
Photo

Pulling Data From News Feed Telemetry #Audio #DigitalAudioHacks #GnuRadio #telemetry https://t.co/o08sREdSUN http://twitter.com/iandroideu1/status/1267403213046603778
Pulling Data From News Feed Telemetry #Audio #DigitalAudioHacks #GnuRadio #telemetry https://t.co/o08sREdSUN
— iAndroid.eu (@iandroideu1) June 1, 2020
0 notes
Text
GNU Radio
https://github.com/gnuradio/gnuradio Comments
1 note
·
View note
Photo

Making progress already! First picture is the short little 433mHz signal (line on the waterfall picture). Second picture is a #LoRa packet for SolarMAX with a lot more data than the other signal. This is a software defined radio and I’m using a #raspberrypi to scan and interpret 433mHz signals using ASK ( Amplitude Shift Keying). Next I will decode the ASK signal using GNURadio. 🤓. We will then build this receiver into a new board. Exciting #engineering. This a pretty standard inexpensive SDR. #switchdoclabs #weather #science #wireless #makersgonnamake https://www.instagram.com/p/B7MuBnsHZUc/?igshid=k57nq92y4iwj
1 note
·
View note
Photo

RT @edy555: GNURadioでワンセグのデコードに成功した https://t.co/lje6Es4NoY
0 notes
Text
LimeSDRをGQRXで使ってみる
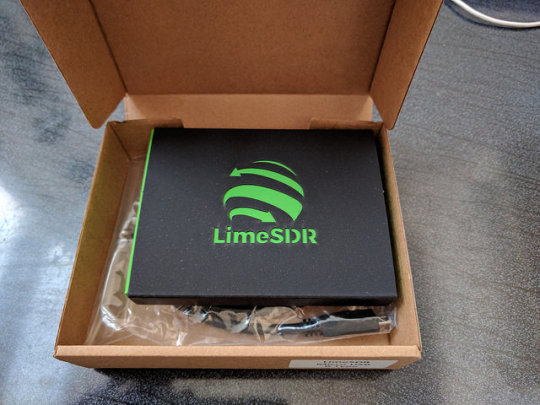
キャンペーンは昨年の4月でした。デリバリは11月予定だったはずなのでちょっと遅れたというところです。
2016/4/29 キャンペーン開始
2016/4/29 さっそくBackする
2016/6/22 ファンディング成功
2016/7/29 コネクタをMicro-Bに変更
2017/1/27 出荷
2017/2/5 受領
箱は黒いスリーブにレーザカッターでロゴが抜かれて内箱の緑が見えています。添付はUSB micro-Bのケーブルのみです。電源補助用のAプラグが二股になっています。

内側には携帯やWiFiなどのバンド番号と周波数(DL/UL)の表が書かれています。地味に有り難いです。
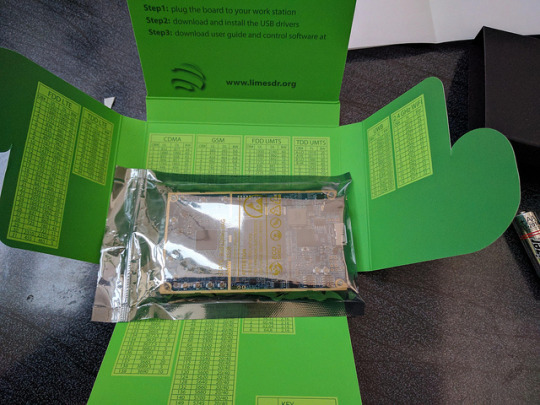
基板は小さく密度は高いです。購入時にUSBコネクタを選べますが、USB micro-Bにしました。他にUSB Aプラグタイプが選択肢にあります。
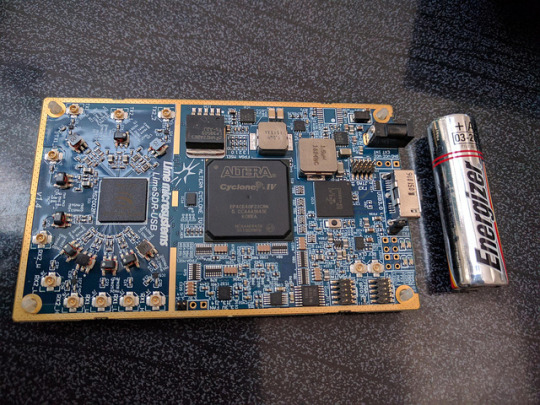

裏面にも部品が詰まっています。プラの6角スタッドが足として付いています。おぉっと思ったのは、おなじみのSi5351が使われています(AではなくC)。
bladeRFとくらべるとかなり小さいです。bladeRFは部品の配置に余裕があり、さらに拡張コネクタも装備されていました(結局使いませんでしたが)。それに対してLimeSDRは部品の密度も高く、拡張コネクタもFPGAから出ている10ピンのGPIOのみです(JTAGと同じコネクタ形状)。
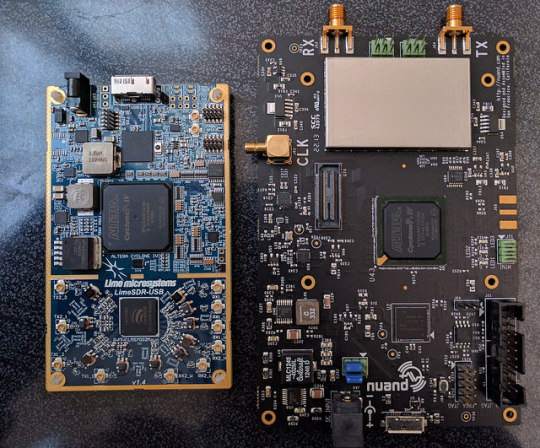
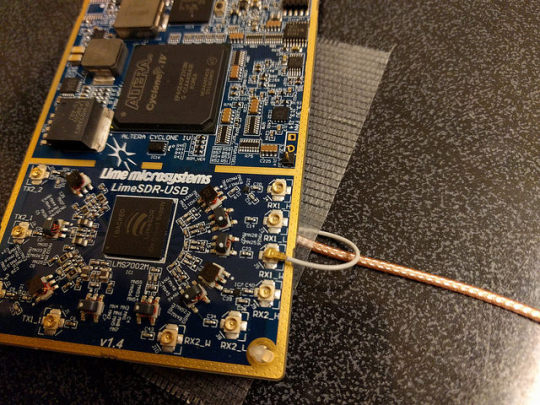
肝心のRFコネクタですが、なんとU.FL(IPX)でごく小さいのです。TX,RXともに2チャネルずつ用意され、さらにTXはチャネル毎に2つ、RXもチャネル毎に3つコネクタが装備されているので、合計2x2+3x2=10個もあります。このようにポート数がとても多いため、SMAではスペースが確保できずU.FLを選択したのだと思われますが、ちょっとやり過ぎの感も否めません。U.FLは機械的強度がとても弱いので、何度も付け外しを繰り返すことができません。早急にケースに入れてケーブルを固定してしまうことが必須だと思われます���今回は仮にUFLのついたケーブルを机にテープで仮止めして外れないようにしています。
ソフトウェアは、例によってmacosにセットアップします。これを機会にようやくsierra(10.12)にバージョンアップしました。
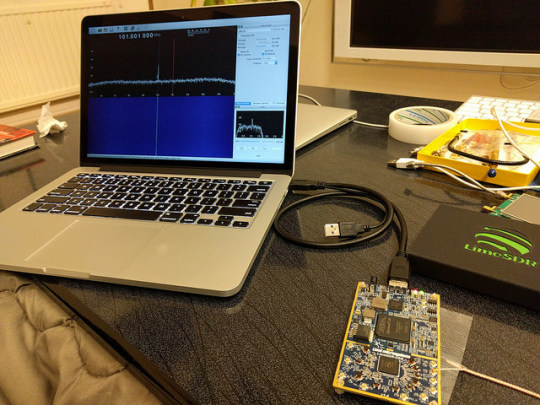
LimeSDR用にLimeSuiteとしてツールがいくつか用意されています。これも公式ページに従ってbrewでインストールしておきます。
$ brew tap pothosware/homebrew-pothos $ brew update $ brew install limesuite
コマンドラインツールのLimeUtilでボードが認識できたら、さっそくファームウェアをアップデートしておきます。
$ LimeUtil -info $ LimeUtil -update
LimeSuiteGUIというグラフィカルツールも用意されています。ボードに載っている各デバイスを細かくコントロールできるようです。動作させるためには、メニューのOptionsからConnection Setupでまずは接続を行う必要があるようです。ちょっとまごつきます。
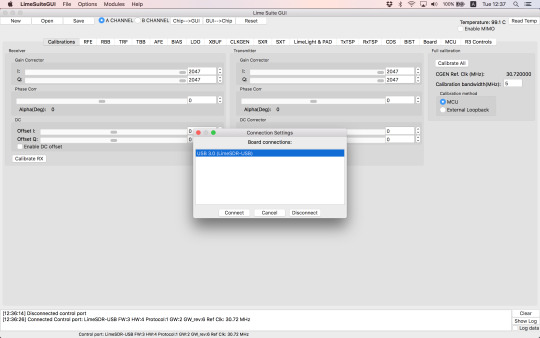
SDRソフトウェアとしてgqrxをlimesdrで動作させることができるようです。そのためにはソースからビルドする必要があるため、各種ツールキットをインストールします。下記はbrewであっさりとインストール可能です。soapysdrは、SDR関連のライブラリやツールをまとめたSuiteとのことです。
gnuradio
soapysdr
下記はコードからビルド必要でしたが、今回brewのFormulaを用意/アップデートしました。githubに上げてありますので、brew tap ttrftech/gqrxで利用可能です。
gr-iqbal
gr-osmosdr
gqrx
インストールに成功したら、gqrxを起動します。LimeSDRはsoapyというインターフェースで使用する必要があるので、デバイス設定として、
driver=lime,soapy=0
を指定します。起動がうまくいかないことがたまにありますが、もう一度実行するとOKだったりします。Input rateは8000000(8Msps)から55000000(55Msps)程度が指定可能でした。仕様上は上限60Mspsだったはずですが、これを指定すると起動できませんでした。

50Mspsの指定で動作させてみます。RTLドングルに付属していたアンテナをU.FLコネクタに接続します。最初は何も受信できずに焦りました。

設定が2箇所必要でした。まずアンテナポートを選択する必要があります。デフォルトではNONEになっているので何も受かりません。アンテナを接続したポートをプルダウンメニューで選択します。LNAH,LNAL,LNAWがRX1-H,L,Wにそれぞれ対応しているようです。RX2には未対応のようです。
そしてもう一つは、ゲイン設定を上げる必要があります。必須なのはLNAでこれは最大にします。他の設定ではレベルは変化しますが、NFは変化しないようです。適宜設定します。


そうすると受信できるようになりました。この画面では地上デジタルTVの3波がわずかの隙間を空けて並んでいるのが見えています。
ちょっと周波数を上げるとこちらも地デジが1チャネル分の隙間を空けて並んでいます。サンプリングレートが高いので、50MHzの帯域を一度に見ることができます。
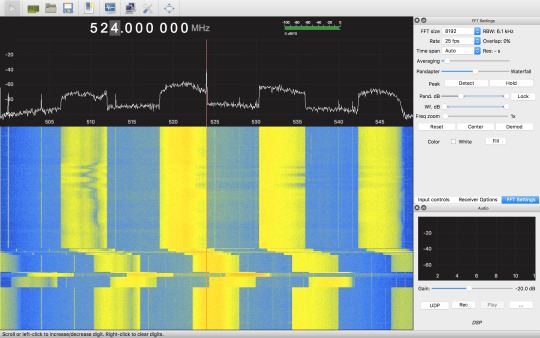
もっと周波数を上げると携帯の周波数が見えてきます。 4つの帯の左からKDDIのLTE, 3G, Docomoの3G,LTEのDL(Down Link)です。
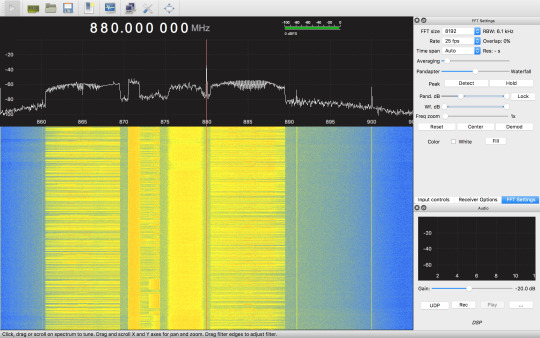
1.5G帯にも携帯の太い帯が見えています。

2.4Gでは室内の通信が見えています。一瞬出る横幅の太い線はWiFi(11gの20MHz幅)。点々と散らばっているのはおそらくBluetoothの周波数ホッピング(FH)です。

とりあえず、受信機として正常に使えているようです。
LimeSDRは0.1〜3800MHzというとても広い帯域に対応していることが謳われていました。気になる低い周波数ですが、300MHz以下を受信可能なことは一応確認しました。しかし顕著に感度は下がって行くようです。特にHF帯ではちょっと実用性は無さそうな感じです。資料を読むと30MHz以下の低い周波数の対応は、チューナではなく信号処理段で特別な処理を行うようですので、もしかすると使い方が足りていないか、まだ対応がされていない可能性もあります。
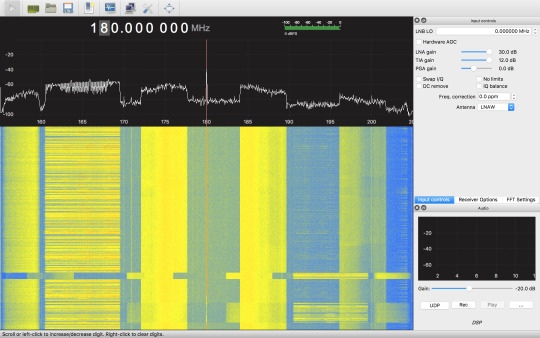
もう一つ気になることは、300MHz以下では���メージが顕著に出ることです。例えば180MHzにチューニングすると明らかに地デジの帯が出てきます。右には違う周波数帯の携帯も見えています。チューニングをずらすとばらばらにズレていきます。このチップ(LMS7002)のチューニングスキームを理解できていませんが、300MHz以下の受信をしたい場合には、広帯域信号では不都合があります。適当なLPFで帯域を絞った信号を入れる必要があるようです。
使っているとチューナチップとFPGAどちらも結構発熱します。USBからは7〜800mA消費しているようです。
gqrxでの受信を試してみた印象ですが、300MHz以上の周波数帯では感度も良く、快適に使えそうです。元来WiFiやBluletoothの実験に供することを主眼に設計されているようですので、当然かもしれません。一方、低い周波数での応用は、特に無線用途では難しいと思われます。謳われているスペックを鵜呑みにするとがっかりすることになると思います。
さて、LimeSDRは受信だけでなく、信号生成機能もあります。bladerfではコマンドを使ってデータストリームを送受できたのですが、limesdrでは見当たりません。おそらくgnuradioを使うことで利用できるのではと思うのですが、こちらはまた探ってみたいと思います。
リファレンス
クラウドファンディングサイト CrowdSupplyでのLimeSDRキャンペーン https://www.crowdsupply.com/lime-micro/limesdr
LimeSDR公式 https://wiki.myriadrf.org/LimeSDR
ユーザガイド https://wiki.myriadrf.org/LimeSDR-USB_User_Guide
クイックスタートガイド https://wiki.myriadrf.org/LimeSDR_Quick_Start
LMS7002 Datasheet (wiki) https://wiki.myriadrf.org/LimeMicro:LMS7002M_Datasheet
公式のLimeSuiteインストール手順 https://wiki.myriadrf.org/Lime_Suite#OSX_homebrew
Gqrx http://gqrx.dk/
参考にした先人のgqrx構築手順 https://discourse.myriadrf.org/t/anyone-been-successful-in-getting-limesdr-osx-gqrx-working/657/14
今回作成してみたHomebrewのFormula https://github.com/ttrftech/homebrew-gqrx
3 notes
·
View notes
Text
Analisador de Espectro de Banda Larga com um RTL-SDR
Para a maioria dos utilizadores do RTL-SDR, a cascata (waterfall) é o auge do software de rádio. Mas há alguns problemas que me incomodam.
– Exibição de frequência limitada. Normalmente, não pode fazer mais do que a largura de banda nativa do seu SDR permite.
– Exibição por tempo limitado. Ela simplesmente rola da borda para o vazio.
– Blocos (bins) de FFT limitados.…
View On WordPress
#Analisador de Espectro de Banda Larga#bin#FFT#flatten.py#Gambas#gambas3#gnuradio#gqrx#GUI do rtl_power#heatmap.py#matlab#RTL-SDR#rtl_power#rtl_sdr#RTL_SDR_Wide_Spectrum_Analyzer#RTL_SpectrumSweeper#ubuntu#waterfall
0 notes
Video
youtube
GNURADIO Tutorial 6 [ FM, interpolation, NBFM Trasmit]
0 notes
Photo

Universal Radio Hacker — легкий способ исследовать цифровые радиопротоколы Universal Radio Hacker (URH) — невероятно простой и понятный инструмент для анализа цифровых радиопротоколов. В отличие от монстров вроде GnuRadio, освоить его можно за пять минут без мучений. Главные особенности URH: Работает на всех платформах — на macOS/Linux/Windows из коробки! Не нужно часами компилять километры зависимостей. Поддерживает популярные SDR — нативная поддержка RTL-SDR, HackRF, LimeSDR, AirSpy и других. Все в одном — все нужные инструменты встроены в одну программу: анализатор спектра для поиска частот, запись сигнала, интерпретатор цифрового сигнала для автоматического преобразования записанного сигнала в цифровые данные Поддерживает передачу — для проведения replay-атаки, достаточно выделить мышкой нужный отрезок сигнала и нажать Replay. Великолепно! Читать дальше → #hooppy #hooppyru #hooppytest #хуппи
0 notes
Text
Bitcoin and Weak Frequency Signals: Bypassing Network Censorship With Radio This past weekend at the Scaling Bitcoin 2017 conference at Stanford University, two individuals discussed a new method of providing the Bitcoin network with more censorship resistance by utilizing weak signal radio communications. Stanford University’s Elaine Ou, and the computer scientist, Nick Szabo, introduced a project they are testing which secures consensus proofs with weak signal radio propagation. Also read: UK & Taiwanese Regulators Weigh-in on Bitcoin Laundering, France ponders ICOs Tethering Bitcoin to Weak Signal Radio for Network Resilience Bitcoin is a fascinating network of verification nodes all working together to secure the blockchain, and its tethered sets of consensus proofs. At the moment, the network is pretty secure, but there are concerns it can be attacked in the future or blocked by things like firewalls, ISP gateways, governments, and telecommunication monopolies. During the scaling conference this past weekend, researchers Nick Szabo and Elaine Ou explain how the Bitcoin network could be broadcasted utilizing “Weak-Signal-Propagation” through radio broadcasts. The two researchers are currently testing and developing the radio-based platform. Stanford University’s Elaine Ou and computer scientist Nick Szabo (left) discuss bitcoin and radio broadcasts. Weak signal radio communications started coming to life around 2008 when the developer Joe Taylor open sourced “Whisper,” a weak signal propagation reporter. Whisper is a computer program that tethers weak signal radio broadcasts between amateur radio users. To propagate the Bitcoin network using similar technology, Szabo explains the goals are long range broadcasts with a relationship tied to the radio community. “Our goals are long-range broadcasts, and mesh relay, and you want to allow censorship resistance participation in the network — You want to send short messages in particular,” explains Szabo. “To do this, we are going to propose using skywave communication using the ionosphere where the sun hits the upper atmosphere of the earth near space with ultraviolet radiation — the layer it ionizes particles and creates this layer that acts as a mirror for certain radio wavelengths like the kind we want to use.” The radio community — the two regimes we are interested in, in the radio community it’s near-vertical incidence skywave, this is the 70 degree angle there, it’s nearly vertical. You get a range of about 5 or 600 km — The most reliable frequency are 40-80 m — That’s what we’re targeting. Testing the Weak Signal Broadcast Modulator Following Szabo’s introduction to the project, he then gives the mic to Stanford University’s Elaine Ou, who reveals more about the protocol design and signal processing. The researcher explains any digital data can be transmitted over radio waves and her work focuses on binary phase shift keying. The decision to use phase shifting is because the technology confines bandwidth efficiently and keeps it out of the way of other communications. Elaine Ou details the team used a gnuradio flow graph to exemplify the modulator they used in testing. “We set up a simple loopback test using 70 cm antennas for the transmitter, and we used a hacker RF one,” the Stanford researcher explains. “Then we ran the transmitter off of a 21Inc bitcoin computer — We didn’t know that the 21 computer was going to turn into a $400 paperweight, but we planned to package bitcoin protocol messages over radio.” We did a loopback test and we added an additional block that injects gaussian white noise and we can estimate the expected bit error rate versus the signal-noise ratio. The Kryptoradio Effort in Finland, and Radio’s Ability to Bypass Traditional Controls Elaine Ou and Nick Szabo are not the first to introduce the concept of running the bitcoin blockchain over radio broadcasts. Back in 2013-2014, a project called “Kryptoradio” from Finland transmitted the bitcoin blockchain’s data over the DVB-T network. The DVB-T audio and video system is used by radio operators and television broadcasters all around the world. Kryptoradio’s project connected to the blockchain and transformed the transaction and blocks into a streaming broadcast. The project is no longer operational as the creator said it was initially run by Kryptoradio operators voluntarily, and it required more funding to continue. During the scaling conference, Szabo emphasizes that he believes the use of Bitcoin-based radio communications can help the technology jump over geographical borders, political boundaries, traditional legal systems, and telephone monopolies. Bitcoin users “won’t be happy,” Szabo details, if the protocol was blocked or deemed unusable due to denial-of-service attacks, router controlled attacks and more which could effect the network’s censorship-resistance benefits going forward. What do you think about broadcasting weak signal radio communications for bitcoin network resilience? Let us know what you think about this concept in the comments below. Images via Shutterstock, and Stanford University’s Elaine Ou and the computer scientist Nick Szabo Scaling Bitcoin 2017 presentation. At Bitcoin.com there’s a bunch of free helpful services. For instance, check out our Tools page! The post Bitcoin and Weak Frequency Signals: Bypassing Network Censorship With Radio appeared first on Bitcoin News. https://news.bitcoin.com/bitcoin-and-weak-signals-bypass-network-censorship-with-radio/ To get started: http://bit.ly/unlibitcoin To double its value: http://bit.ly/btc-gold
from Earn Bitcoin Philippines http://www.facebook.com/pages/p/134403977174420 via Rodrigo M. Palacio Tumblr
0 notes
Link
srsLTE is a free and open-source LTE library for SDR UE and eNodeB. The library is highly modular with minimum inter-module or external dependencies. It is entirely written in C and, if available in the system, uses the acceleration library VOLK distributed in GNURadio.
0 notes