#getbodied
Explore tagged Tumblr posts
Visit Tumblr Blog
Explore Tumblr blogs with no restrictions, modern design and the best experience.
Last Seen Tumblr Blogs


Fun Fact
Celebrities use Tumblr as well.
Text
Inviare Dati da un Form del Sito WordPress a un Foglio Google con Slim PHP: Una Guida Completa
Introduzione
In un'epoca in cui i dati sono fondamentali per il successo di qualsiasi strategia di marketing, raccogliere e gestire efficacemente le informazioni dei lead è cruciale. Una delle soluzioni più efficaci e flessibili per raccogliere dati da un sito WordPress è inviarli a un Foglio Google, dove possono essere facilmente organizzati, segmentati e utilizzati per le campagne di marketing. Questa guida vi mostrerà come integrare un form del vostro sito WordPress con un Foglio Google utilizzando Slim PHP, una microframework per applicazioni web.
Cosa Serve
Un sito WordPress attivo.
Un account Google con accesso a Google Sheets.
Un server con PHP e Composer installati.
Familiarità con PHP e WordPress.
Step 1: Creare il Form su WordPress
Il primo passo è creare un form sul vostro sito WordPress per raccogliere i dati dei lead. Questo può essere fatto utilizzando un plugin come Contact Form 7, Gravity Forms, o semplicemente scrivendo del codice personalizzato.
Esempio di Form con Contact Form 7
Installate e attivate il plugin Contact Form 7. Poi, create un nuovo form nel pannello di amministrazione di WordPress. Ecco un esempio di un form semplice:
[contact-form-7 id="123" title="Lead Form"] <label>Nome [text* nome] </label> <label>Email [email* email] </label> <label>Messaggio [textarea messaggio] </label> [submit "Invia"]
Step 2: Configurare Google Sheets API
Creare un Progetto su Google Cloud
Accedete a Google Cloud Console.
Create un nuovo progetto.
Abilitate l'API di Google Sheets e l'API di Google Drive.
Creare le Credenziali
Andate su "APIs & Services" > "Credentials".
Cliccate su "Create Credentials" e selezionate "Service Account".
Compilate il modulo e create il vostro account di servizio.
Una volta creato, andate su "Keys" e generate una nuova chiave JSON. Scaricate questo file e salvatelo in un posto sicuro.
Condividere il Foglio Google con il Service Account
Create un nuovo Foglio Google.
Condividete il foglio con l'email del vostro account di servizio (trovate l'email nel file JSON delle credenziali).
Step 3: Configurare Slim PHP
Installare Slim PHP
Andate nella directory del vostro progetto sul server.
Eseguite il comando:
composer require slim/slim:"4.*"
Creare un Endpoint per Ricevere i Dati
Create un file index.php nella root del vostro progetto e configurate Slim PHP per ricevere i dati del form.
<?php require __DIR__ . '/vendor/autoload.php'; use Psr\Http\Message\ResponseInterface as Response; use Psr\Http\Message\ServerRequestInterface as Request; use Slim\Factory\AppFactory; $app = AppFactory::create(); $app->post('/submit', function (Request $request, Response $response, $args) { $data = $request->getParsedBody(); $nome = $data['nome'] ?? ''; $email = $data['email'] ?? ''; $messaggio = $data['messaggio'] ?? ''; // Inserire i dati nel foglio Google $result = insertIntoGoogleSheet($nome, $email, $messaggio); $response->getBody()->write(json_encode(['success' => $result])); return $response->withHeader('Content-Type', 'application/json'); }); function insertIntoGoogleSheet($nome, $email, $messaggio) { $client = new \Google_Client(); $client->setAuthConfig('path_to_your_credentials.json'); $client->addScope(\Google_Service_Sheets::SPREADSHEETS); $service = new \Google_Service_Sheets($client); $spreadsheetId = 'your_spreadsheet_id'; $range = 'Sheet1!A1:C1'; $values = [ [$nome, $email, $messaggio] ]; $body = new \Google_Service_Sheets_ValueRange([ 'values' => $values ]); $params = [ 'valueInputOption' => 'RAW' ]; $result = $service->spreadsheets_values->append($spreadsheetId, $range, $body, $params); return $result->getUpdates()->getUpdatedCells() > 0; } $app->run();
Step 4: Collegare il Form al Backend
Modificare il Form di Contact Form 7
Aggiungere uno script JavaScript per inviare i dati del form al vostro endpoint Slim PHP.
<script> document.addEventListener( 'wpcf7submit', function( event ) { event.preventDefault(); const formData = new FormData(event.target); fetch('https://yourdomain.com/submit', { method: 'POST', body: JSON.stringify(Object.fromEntries(formData)), headers: { 'Content-Type': 'application/json' } }) .then(response => response.json()) .then(data => { if (data.success) { alert('Dati inviati con successo!'); } else { alert('Errore nell\'invio dei dati.'); } }) .catch(error => console.error('Errore:', error)); }, false ); </script>
Vantaggi della Segmentazione dei Dati per le Campagne di Marketing
Organizzazione Efficiente dei Dati
L'invio dei dati a un Foglio Google permette di avere una visione chiara e organizzata delle informazioni raccolte. Potete facilmente filtrare e ordinare i dati per creare segmenti specifici basati su criteri come:
Demografia (età, sesso, località)
Interessi (basati sui messaggi lasciati)
Comportamento (interazione con il sito)
Personalizzazione delle Campagne
Con i dati ben segmentati, potete creare campagne di marketing altamente mirate. Ad esempio, se notate che un certo gruppo di utenti è più interessato a un particolare prodotto, potete inviare loro email promozionali specifiche per quel prodotto.
Miglioramento del Tasso di Conversione
Le campagne mirate e personalizzate tendono ad avere tassi di conversione più alti. I clienti si sentono compresi e valorizzati quando ricevono comunicazioni rilevanti e personalizzate.
Analisi e Ottimizzazione
Con i dati raccolti e segmentati, è più facile analizzare le performance delle vostre campagne di marketing. Potete identificare quali segmenti rispondono meglio e ottimizzare le vostre strategie di conseguenza.
Conclusioni
Integrare un form di raccolta dati su WordPress con Google Sheets utilizzando Slim PHP è un processo relativamente semplice che può portare grandi benefici alla vostra strategia di marketing. Non solo vi permette di raccogliere dati in modo efficiente, ma vi offre anche la flessibilità di segmentare e analizzare queste informazioni per ottimizzare le vostre campagne. Seguite i passaggi descritti in questa guida per iniziare a sfruttare al meglio i dati dei vostri lead e migliorare le performance delle vostre attività di marketing.
0 notes
Text
Flutter Navigation Bar: A Guide to Create Interactive Navigation Items in Flutter Web
In Flutter web, using the navigation bar at the top of the page is common. We aim to create simple web apps with interactive Flutter navigation items, such as showing a mouse pointer. Change the text style on hover and highlight the current selection.
Flutter NavigationBar In web applications, it plays an important role, and different frameworks have different implementation styles. In Flutter, we must mention the differences between mobile and the web. But we can use the same navigation item in the drawer with packages adaptive_navbar in Flutter.
Also, Read This Post:
What is Bottom Navigation Bar in Flutter?
The bottom navigation bar helps us navigate from the top-level view of the app. in the navigation bar below. We display a row of widgets by clicking on those widgets. Usually, we show 3 to 5 items in the bottom navigation bar. Let’s see how we can implement the bottom navigation bar.
It is very easy to implement in a Flutter. You can select them individually, navigate to the desired screen, and add text and labels.
The important points to remember while using the navigation bar below:
We can only show a small number of widgets in the bottom navigation, which can be 2 to 5
There must be at least two bottom navigation items; otherwise, we will get an error.
The icon and title properties are required; we must set corresponding widgets for these.
Add a bottom navigation bar and a bottom navigation bar item in your outline.
Now shows the selected item using the current index, two properties, and the onTap property.
Now we need to show some pages by tapping on an item.
That’s all, and now we can check and run our code.
Also, Read This Post:
How to Add Bottom Navigation Bar in Flutter?
First, we will learn how to create a basic bottom navigation bar, its components, and its properties. We will then learn to navigate the pages and create an animated bottom navigation bar. Here we create a simple page with the App Bar and add the name ‘Demo.’
Step 1: Create Scaffold Widgets
We create a Stateful Widget, and within a stateful widget, we create a Scaffold widget. This structure has properties such as a bottom navigation bar.
Step 2: Add Bottom Navigation Bar Widget
Then we create the bottom navigation bar widget. In this widget, we need an item to add to BottomNavigationBar
Step 3: Fill the bottom navigation bar with items
This is a widget, now the BottomNavigationBar item. There are two arguments, an icon, and a label. These arguments should not be null.
Every item has an icon and a label. The icon argument contains an icon widget, and the label argument contains a text widget.
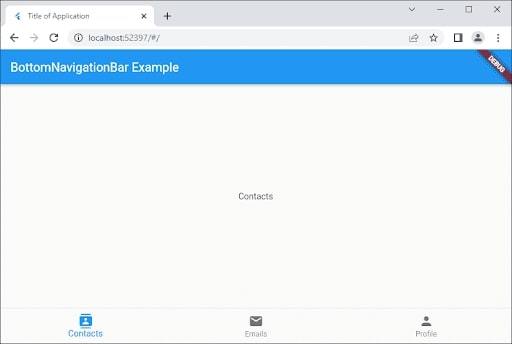
Example
import 'package:flutter/material.dart'; void main() { runApp(const MyApp()); } class MyApp extends StatelessWidget { const MyApp({super.key}); @override Widget build(BuildContext context) { return MaterialApp( title: 'Title of Application', theme: ThemeData( primarySwatch: Colors.blue, visualDensity: VisualDensity.adaptivePlatformDensity, ), home: const MyHomePage(), ); } } class MyHomePage extends StatefulWidget { const MyHomePage({Key? key}) : super(key: key); @override State<statefulwidget> createState() { return MyHomePageState(); } } class MyHomePageState extends State<myhomepage> { int selectedIndex = 0; Widget myContacts = const MyContacts(); Widget myEmails = const MyEmails(); Widget myProfile = const MyProfile(); @override Widget build(BuildContext context) { return Scaffold( appBar: AppBar( title: const Text("BottomNavigationBar Example"), ), body: getBody(), bottomNavigationBar: BottomNavigationBar( type: BottomNavigationBarType.fixed, currentIndex: selectedIndex, items: const [ BottomNavigationBarItem( icon: Icon(Icons.contacts), label: "Contacts", ), BottomNavigationBarItem( icon: Icon(Icons.mail), label: "Emails", ), BottomNavigationBarItem( icon: Icon(Icons.person), label: "Profile", ) ], onTap: (int index) { onTapHandler(index); }, ), ); } Widget getBody() { if (selectedIndex == 0) { return myContacts; } else if (selectedIndex == 1) { return myEmails; } else { return myProfile; } } void onTapHandler(int index) { setState(() { selectedIndex = index; }); } } class MyContacts extends StatelessWidget { const MyContacts({super.key}); @override Widget build(BuildContext context) { return const Center(child: Text("Contacts")); } } class MyEmails extends StatelessWidget { const MyEmails({super.key}); @override Widget build(BuildContext context) { return const Center(child: Text("Emails")); } } class MyProfile extends StatelessWidget { const MyProfile({super.key}); @override Widget build(BuildContext context) { return const Center(child: Text("Profile")); } } </myhomepage></statefulwidget>
Output
Conclusion
Interactive navigation item in Flutter web is utilized to make a better user experience for the website. The users will navigate rapidly and provide a more organized and visually appealing layout. It makes them easier to use and will make them more intuitive. Hence, with the help of an interactive navigation feature, the website’s usage becomes user-friendly and simple to use.
However, Flutter is getting a lot of attention all over the world. It means that Flutter engineers will be in high demand. But, before you partner with a reliable Flutter app development company, you need to clearly understand the project or requirement and your expectations from the Flutter development team.
Frequently Asked Questions (FAQs)
1. What is the interactive navigation bar in Flutter?
The interactive navigation bar component has all the important sections or subsection states, organized components and styles. However, sections inside the navbar are interactive. “Hover”, “Pressed”, and many more states are in the sections and subsections.
2. What are navigation menu items?
A Salesforce object, topics, sections on your website, URLs to other websites, and menu labels are all included in the navigation menu elements. However, menu labels are the parent headings under which you can wrap the other menu items. Enables an app launcher to make it simple for the members to switch between its sites and their salesforce org.
3. What is a dynamic navigation menu?
The dynamic menu is a modified concept of a menu component, sued when the number of actions available to a user is variable or dynamic. It is also helpful when several actions n the Menu are huge enough to be needed by search functionality.
Originally Published At: https://flutteragency.com/flutter-navigation-bar-interactive-navigation-items-flutter-web/
0 notes
Text
a solution has been found and will be explained under the cut :
massive thanks to redd/t user cthans for providing the code that may help us fix templates that break upon changing page colour.
i think i've written this tutorial a hundred times, but hopefully this is the last. it's somewhat of a tedious process but i'll provide a video tutorial at the bottom of this post.
01. grab the template you'd like to change the page colour on and make a copy of it just in case anything goes wrong.
02. go to file -> page setup -> page colour + change the colour to your desired one. the page will break upon doing this, but that's to be expected.
03. navigate to extensions -> apps script and it will open up a new tab. here is a screenshot of where that is:

04. delete everything ( it's just a couple of lines ) in the untitled project until it looks like this:

05. input the code provided by cthans. i've already added my measurements in there, and the only thing you change in the code is just the width and length:
function myFunction() { DocumentApp. getActiveDocument(). getBody(). setAttributes({ "PAGE_WIDTH": 648, "PAGE_HEIGHT": 914 }); }
06. how do i find my measurements? there's no simple answer :( i found mine by beginning with a width of 500 and adjusting the number until it looked... semi correct. i'd imagine the length is the same process. just bumping up and down until it looks right. ( for now, don't change it. you won't see the change until you hit the "run" button but that's locked until step 8. )
tip: take note of this ruler BEFORE changing your page colour because when you're bumping up and down it will also change. so try bumping it until it reaches (for the example shown below) just about 3 / 4 more lines after the 8.5 mark ( note: the longer line indicates the .5 mark ) but not before it becomes 9.
i know this ruler is supposed to indicate inches, but don't rely on it. i tried to convert the inches to pixels and do it that way, but the measurements simply were not correct and i haven't figured out why.
07. when you have input the code, select the big blue deploy button to the right of your screen -> new deployment -> select the small gear icon next to select type -> add - on.
08. there will be a button to change project type. select it and it will open project settings. scroll to the bottom and a small black box might appear on your screen saying, "save pending changes?" select save. you will now have the ability to run your code.
warning: it will likely pop up with "authorization required" and ask to access your data. select -> review permissions -> click your google account -> and it will say that google hasn't verified the app, and that it is asking for sensitive info. i choose to trust it because... apps script is literally a google product? it's strange that it says it's not verified. but upon clicking advanced + "go to untitled project (unsafe)" it's just apps script asking for the ability to change your documents. which it needs to do in order to resize. this may be an oversight on google's part, but if you don't want to trust it that's fine, but your code will not work without it.
09. so to recap my ramble... -> select run which can be found here:

09 cont. run -> review permissions -> choose your google account -> advanced -> go to untitled project (unsafe) -> allow.
10. now your run command has completed and your document should be fixed ! i regret to tell you though, your page will still break every time you change the color. but as long as you have app script open, you can just re - hit the run button without changing anything and it'll fix.
i hope this tutorial could be of some help to the people who need it. the video process for this is below just in case you need visual aid alongside this tutorial.
my google docs templates that have been affected will be listed in an upcoming post soon, with their size fixes detailed so that you don't have to go through the bother of finding it out yourself.
youtube
uh oh ...
hello everyone! while i was answering an ask today about how to change border colours, i stumbled upon the revelation that the google documents add - on page resizer is no longer on the store. this is a problem because about 90% of my documents have this add - on applied.
what does this mean?
my document templates can be easily broken until i can find a work - around. this may also apply to other creators who used this add - on, and i would urge everybody who had it to check if their page resizer has disappeared.
luckily, the pages will remain the same size unless you try and change the page colour. if you do this, the page will resize to an awkward setting and break if you don't hit ctrl + z.
i think i know a work - around for how to change background colours but i will need to investigate first.
tldr; gdocs add - on page resizer is no longer on the store, and if you change the page colour of a template then your document sizing may break.
please boost to spread the word for those who use my templates.
31 notes
·
View notes
Photo
#Consistency is the Key to your #Success! #Drink plenty of #water Wear your #cincher 8+ hours a day ✅ Hit the #gym a few times a #week #Workout #Exercise #Train #workout #Challenge #Getfit #Grind #Getbodied #Getwaisted #Getsnatched #Change your #eating #habits. #EAT #CLEAN & set #Goals #MySexyWaist #Start your #Waist #Training #Now order your #Trainer at www.MySexyWaist.com
#water#habits#change#waist#getbodied#drink#challenge#cincher#mysexywaist#gym#clean#now#workout#getfit#getwaisted#consistency#train#eat#success#eating#week#exercise#getsnatched#start#trainer#grind#training#goals
1 note
·
View note
Photo

And YES, ITS POSSIBLE. And No, it isn't easy. 💪🏿 #fitnessmotivation #getbodied #blackwomenworkout #fitnesswomen #atthegym #womenfitness #womemover50 #latenightworkout #blackwomenfitness #shesstrong #beautifulbody #tightbody #goals (at Planet Fitness) https://www.instagram.com/p/CMBx5SnnRba/?igshid=4dczinixhwuo
#fitnessmotivation#getbodied#blackwomenworkout#fitnesswomen#atthegym#womenfitness#womemover50#latenightworkout#blackwomenfitness#shesstrong#beautifulbody#tightbody#goals
0 notes
Video
instagram
✨ The glow up bodied ✨ In Makeup.. we use different mediums and mix in what we like, to get what we want. For the ultimate bonzzzeeeddd up glow. ✨✨ I mixed: ••@sheamoisture Sweet Almond Oil ••@makeuprevolution Pearl Lights in Peach Champagne and Savanna Nights •• @elfcosmetics Stardust Topped it (on the high plains) with ••@lauramercier Warm Bronze • • • • • #headshots #photoshoots #womanentrepreneur #getbodied #instabeauty #lhhatl #baltimoremakeupstudio #engagementshoot #essencefestival #baltimorehair #makeupartist #danessamyricks #dcmakeupartist #marylandmakeupartist #baltimoremakeupartist #dmvmua #weddingmakeup #baltimoremua #essence #dmvwedding #fentybeauty #makeupforwoc #nycmakeupartist #dcnights #makeupforblackwomen #patmcgrath #makeupart #brooklynwedding #makeuptips #makeuplesson
#marylandmakeupartist#instabeauty#lhhatl#baltimoremua#makeupartist#essencefestival#dmvmua#essence#brooklynwedding#baltimoremakeupstudio#makeuplesson#photoshoots#danessamyricks#makeupforwoc#makeupforblackwomen#makeuptips#dmvwedding#dcnights#engagementshoot#getbodied#nycmakeupartist#baltimoremakeupartist#headshots#weddingmakeup#womanentrepreneur#baltimorehair#fentybeauty#makeupart#patmcgrath#dcmakeupartist
1 note
·
View note
Video
Leg Day 🏋🏽♀️🔥💪 . Follow @graoficial for more inspiration ‼️ . #legday #gains #liftheavy #fitness #fitnessmotivation #leggains #fitspo #getbodied #bodybuildingmotivation #bodybuilding #bodygoals
#fitness#legday#fitspo#leggains#fitnessmotivation#liftheavy#bodybuildingmotivation#gains#bodygoals#bodybuilding#getbodied
1 note
·
View note
Photo
Only in FxxckinG Florida 🤦🏾♀️ I know he was hot 🥵🙄 Don’t sweat cause it’s a covid-19 pandemic, get BodyGarbage to keep your hygiene in order to keep all viruses at bay. We carry natural and artisan soaps for cleansing, whipped butters for hydration, bubbling bath salts, bath bombs and bubble crumble for fun and relaxation. #getbodied www.bodygarbagehandmade.com #bodygarbage #covid19 #coronavirus #cleanlinessisnexttogodliness #handmadesoap #bathbombs #bubblebars #bathsalts #naturalsoap #puresoap #soapstagram #soapshare #soapsposure #bathbombmaker #soapmakersofinstagram #bathbombmakersofinstagram #soapersgonnasoap #makersgonnamake #walmart #samsclub #onlyinflorida #blackownedbusiness #newarksmallbusiness #supporthandmade #shoponline #newarknj #nj #madeinusa #bodygarbagegotyoucovered (at BodyGarbage Handmade Soaps) https://www.instagram.com/p/B9shArWnIDo/?igshid=tuxdmoi04hqk
#getbodied#bodygarbage#covid19#coronavirus#cleanlinessisnexttogodliness#handmadesoap#bathbombs#bubblebars#bathsalts#naturalsoap#puresoap#soapstagram#soapshare#soapsposure#bathbombmaker#soapmakersofinstagram#bathbombmakersofinstagram#soapersgonnasoap#makersgonnamake#walmart#samsclub#onlyinflorida#blackownedbusiness#newarksmallbusiness#supporthandmade#shoponline#newarknj#nj#madeinusa#bodygarbagegotyoucovered
0 notes
Photo
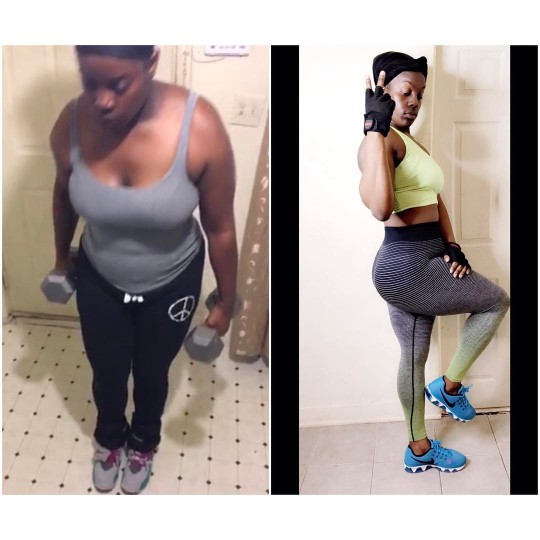
Excuses Where?! None Here! If you make excuses for the state and condition you're in, you will remain in the state and condition you are in. You need to change your mind set! On the left is me still big with a waist band on, on the right is me now. Start to finish I stopped making excuses of why I couldn't. I was still unhappy, still in pain and still no energy but I did it. No magical pills, no magical band, no magical powder, just a magical change in me! My stomach right now may not be completely flat, nor have a six pack, but I feel good, I have energy and I smash my workouts on a daily! That is where motivation, persistence and dedication will get you! 🙌🏽💪🏾🏋🏽♀️ ---------------------------------- #charisjoybeauty #liftheavy #beauty #charisjoybeautyfit #slimthick #getbodied #instafit #waistsnatcher #blackgirlsrock #squatbooty #wakeupandworkout #thickfit #fitdiva #eyelive4beauty #getriped #protein #slave2beauty #gymrats #fatburner #eattoperform #charisjoybeautyhair #workoutsupplements #fuel #nikewomen #fitchicksrock #fitnessmotivation #fitnessapparel
#eattoperform#fitnessmotivation#slimthick#getriped#eyelive4beauty#protein#blackgirlsrock#fatburner#getbodied#wakeupandworkout#fuel#charisjoybeautyfit#instafit#beauty#fitchicksrock#charisjoybeauty#workoutsupplements#squatbooty#charisjoybeautyhair#gymrats#fitnessapparel#waistsnatcher#liftheavy#fitdiva#nikewomen#thickfit#slave2beauty
1 note
·
View note
Video
#Repost @shefittho with @repostapp ・・・ Tricep tings with my love! #fitlife #shefittho #newyear #moregainz #underratedmuscle Outfit: @bodiedbycarla Song: Ambition by @xycloneredsq BodiedByCarla.com #bodiedbycarla #getbodied #bbcwear
2 notes
·
View notes
Video
Was able to rep 335lbs on this day. This is from 2 days ago Friday 14th, 2019 after my 1.7 mile run. Needed to feel the weight. Even failed to lift 370lbs. Lots of work needs to be done bc I will not be confident to compete in the condition I'm in. #powerbuilder #powerlifter #bodybuilding #powermoves #personaltrainer #mutantfitness #mutantphysique #motivation #functionalfitness #deadlift #strengthtraining #needtoworkharder #potential #lifestyle #work #grindharder #stronglittleman #getbodied #animalmentality #mutantfitness #mutantphysique #getyousome https://www.instagram.com/p/ByyADWnnt3g/?igshid=7xu15gwxoc9n
#powerbuilder#powerlifter#bodybuilding#powermoves#personaltrainer#mutantfitness#mutantphysique#motivation#functionalfitness#deadlift#strengthtraining#needtoworkharder#potential#lifestyle#work#grindharder#stronglittleman#getbodied#animalmentality#getyousome
0 notes
Video
Support the people trying to get on💪👏 . . Don't wait for someone to die, just to be seen and say how close you were, that's ALL THE WAY FAKE . . #realpeople #fakeasspeople #regrann #wethepits #merch #wshhafterdark #londonbridge #buildup #shakeback #louisiana #dirtysouth #getbodied #datnigga (at Houston, Texas) https://www.instagram.com/p/BryoTCVhsI7/?utm_source=ig_tumblr_share&igshid=ycxf33pbgvnn
#realpeople#fakeasspeople#regrann#wethepits#merch#wshhafterdark#londonbridge#buildup#shakeback#louisiana#dirtysouth#getbodied#datnigga
0 notes
Photo
Cats out of the bag, I play Fortnite! Lol #fortnite #mobile #dubs #winning #cubanruben42 #win #solo #getbodied (at Glendale, California)
0 notes
Photo

Just a lady with a passion for lipstick #single #af #dramafree #perolike #herro #byebitch #getbodied #prettyonfleek #blackmagic #anastasiabeverlyhills #doseofcolors #gucci #michaelkors #katvond #beatface #highlight #mua #ootdfashion #makeup #makeupaddict #starbucks
#highlight#katvond#doseofcolors#perolike#ootdfashion#makeupaddict#starbucks#beatface#dramafree#herro#single#af#gucci#blackmagic#mua#byebitch#makeup#michaelkors#getbodied#anastasiabeverlyhills#prettyonfleek
0 notes
Text
Laravel 9 PHP Guzzle Http Client Examples

What role may Guzzle HTTP Client play in your PHP Laravel GET and POST requests? We will attempt to respond to that in this tutorial. If you've been searching the internet for a Laravel Guzzle http client example, your search is over. If I think back to the early days of web development, we relied on cURL to perform tasks like this. However, a lot of advancements were made over time. Guzzle is one of such developments, and now I'd like to talk about the Guzzle HTTP client. We'll look at how to build the Guzzle HTTP Client in Laravel and learn how to submit HTTP requests in this tutorial.
Install Guzzle Http Package
Guzzle is a PHP HTTP client that makes it simple to interface with online services and submit HTTP queries. It offers a user-friendly interface that is both straightforward and effective for making POST requests, streaming huge uploads and downloads, using HTTP cookies, uploading JSON data, etc. Ideally, we need to install the guzzlehttp/guzzle package using Composer package manager in order to send HTTP queries. composer require guzzlehttp/guzzle Guzzle 6's best feature, and what draws my attention to it, is the ability to simultaneously submit synchronous and asynchronous queries from the same interface. Additionally, this provides countless settings for use with http requests.
Guzzle HTTP Client CRUD Requests
You may get a general concept about making GET, POST, PUT, and DELETE requests with Guzzle 6 HTTP Client library in Laravel from the information provided below. Guzzle GET Request public function guzzleGet() { $client = new GuzzleHttpClient(); $request = $client->get('http://testmyapi.com'); $response = $request->getBody(); dd($response); } Guzzle POST Request public function guzzlePost() { $client = new GuzzleHttpClient(); $url = "http://testmyapi.com/api/blog"; $myBody = "Demo"; $request = $client->post($url, ); $response = $request->send(); dd($response); } Guzzle PUT Request public function guzzlePut() { $client = new GuzzleHttpClient(); $url = "http://testmyapi.com/api/blog/1"; $myBody = "Demo"; $request = $client->put($url, ); $response = $request->send(); dd($response); } Guzzle DELETE Request public function guzzleDelete() { $client = new GuzzleHttpClient(); $url = "http://testmyapi.com/api/blog/1"; $request = $client->delete($url); $response = $request->send(); dd($response); } Read the full article
0 notes
Photo

Hey Bugs! The sale is over but BodyGarbage is always live on Etsy be sure to get your fix full of handmade excellence! #laborday #labordayweekend #labordaysale #handcrafted #supporthandmade #blackowned #buyblack #shoplocal #etsy #soap #bathbombs #bodybutter #lipbalm #lipscrub #sugarscrub #bodygarbagegotyoucovered #getbodied (at Newark, New Jersey) https://www.instagram.com/p/BnUI5IMniYX/?utm_source=ig_tumblr_share&igshid=1g8dfcp98y6bo
#laborday#labordayweekend#labordaysale#handcrafted#supporthandmade#blackowned#buyblack#shoplocal#etsy#soap#bathbombs#bodybutter#lipbalm#lipscrub#sugarscrub#bodygarbagegotyoucovered#getbodied
0 notes