#fluffy semolina recipe
Explore tagged Tumblr posts
Visit Tumblr Blog
Explore Tumblr blogs with no restrictions, modern design and the best experience.
Last Seen Tumblr Blogs


Fun Fact
Tumblr Inc. has $15.1M in annual revenue.
Text
Couscous Recipe 🥘✨ | Traditional & Flavorful
Introduction: The Essence of Moroccan Couscous 🇲🇦 Moroccan couscous is more than just a dish it symbolizes warmth, hospitality, and togetherness. Authentic Moroccan couscous is a staple in North African cuisine. It is a flavorful medley of fluffy semolina grains, tender vegetables, succulent meat, and aromatic spices. Whether you’re preparing a classic seven-vegetable couscous, a hearty lamb…
0 notes
Text
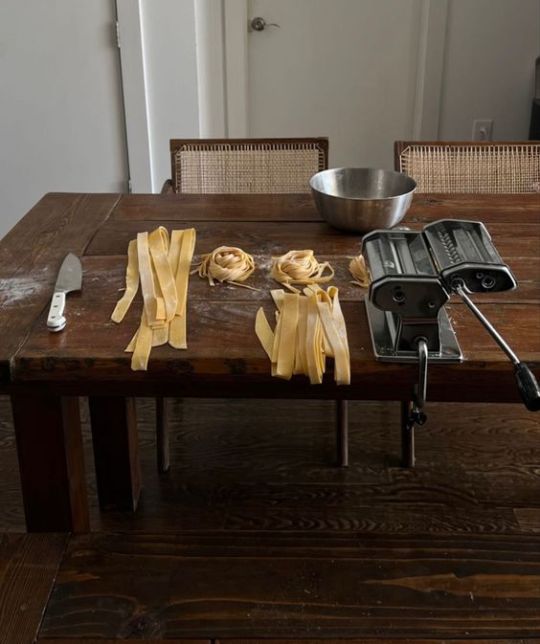
the milestones menu: nonna berzatto's homemade pasta


prompt: yours and carmen's first "i love you".
contains: fluff, general fluff. some mentions to dead relatives, carmen's self doubt, but very minimal bc it's very fluffy :)
2 cups of flour- Semolina.
4 Large Eggs
Pinch of Salt
Put flour into a mound. Make a center, and add the eggs to the middle. Whisk slowly with a fork, gradually working it in little at a time until nice and thick. Knead the mixture for about ten minutes. Let it rest in the fridge for thirty minutes. Put it in a ball, and roll it out very thin.
“Can’t believe you never had homemade pasta.” Carmen shook his head, blue eyes peeking out from under the mess of curls.
“Nope.” You shook your head, grinning over the crystal wine glass, sipping your riesling slowly. “Strictly a boxed pasta girl.”
“Fuckin’ criminal.” Carmen grinned, a playful, lopsided smirk that had you blushing.
The counter was covered in flour, stopping just where you rested, propped up on the granite while Carmen worked. Your eyes trained on his hands, hands that stirred the eggs into the flour, kneaded the dough until your thighs were clenching.
“My Nonna is rollin’ in her grave right now, you know that?” Carmen pulled you from your gaze, rolling out the dough.
“Noooo, don't say that.” You laughed, shaking your head. “You’re making me feel bad, Carmen. I swear I thought Olive Garden made fresh pasta.”
Carmen laughed, a little shy but louder now- more himself. He’d blossomed with you lately, unveiling new parts of himself every single day. “‘M just kiddin’, baby.” Carmen hummed, eyes cutting to you a little skeptical. “Sorry, I-I didn’t mean to sound like an asshole. That sounded douchey, right?”
You smiled, setting your glass behind you. “No, I was just messin’ with you, bear.” The nickname- his nickname. Hearing it more and more roll from your tongue, each time his heart skipped harder than the last.
“Is this her recipe?” You asked, picking up the faded recipe card, looped cursive on the aged paper. “Your Nonna’s?”
“Yeah,” Carmen nodded. “I, uh, so when I left to go to culinary school, right? She was sick, and… and I think she, like, knew that when I went to New York that would be the last time she saw me.” Carmen’s face dropped, slow and sad, it made your own heart sink.
“So she-she gave me all these recipe books and-and cards that were hers. We used to cook together a lot. She taught me how to cook, y’know? My mom and dad were always at the restaurant and didn’t want to cook when they got home. They didn’t want me in the restaurant either so I spent a lot of time with her.” Carmen muttered. You could see the memories playing behind his eyes.
You liked to picture that version of Carmen, a little boy with wild curls, helping his Nonna cook. Happy memories.
“That’s sweet.” You smiled, leaning against the cabinets. “She did a really good job. You know she’s so insanely proud of you.”
Carmen snorted, shaking his head lightly. “Yes, she is. Everyone’s proud of you, Carmen… I’m proud of you.” You hesitate, eyes scanning his features. It was true, of course, but handling Carmen sometimes was like handling a frightened animal. You were never sure what would make him scatter away in fear.
Carmen swallowed thickly, cheeks flushed red, lips in a tight line. “T-Thanks.” Carmen muttered, wiping his hands on his apron, tossing the flour back into his clammy hands.
“She, uh, she woulda loved you, y’know.” Carmen’s eyes met yours, intense and piercing. “I wish you coulda met her.”
“Yeah, me too.” You nod. “I would’ve loved to hear all the baby Carmen cooking stories. I bet she had some good ones.” You smiled, bright and wide- perfect. It made Carmen’s brain numb.
“Yeah, she would.” Carmen nodded, hands stilling, still buried in the dough.
He felt it in his bones, his heart, consuming his thoughts. The overwhelming need he’d felt for weeks, since the first time you kissed him really, that he’d been fighting- too scared to say. What he felt every time he looked at you, when he thought about you.
“Um, I-I wanna say something, and-and I don’t know if I should even fuckin’ say this or-or if it’s… fuck, if you-you feel the same or I just, I don’t wanna fuck this up because this is like the best thing that’s ever happened to me, and-and I’m workin’ on not ruinin’ good shit in my life and bein’ ok with it like-like my therapist says ya know, but-” Carmen rambled, words spilling out in fast, overwhelming bouts that took you by surprise.
Carmen flustered, reaching a dough covered hand to his face, the sticky batter catching on his brows and hair. He flushed deeply, hands shaking in embarrassment, cursing under his breath. “F-Fuck, I-I’m sorry. I-I, nevermind, it’s not… I don’t know why-why I would-” His hands trembled, body shaking with anger and embarrassment. Way to fuckin’ go, Berzatto, you fuckin’ ruin it. That’s all you ever do, Carmen thought bitterly, wiping his hands off on the cloth.
“Carm,” You said softly, your voice a beacon in the raging sea of his mind, pulling him out of his own harsh thoughts.
Carmen turned, a fury flush of pure embarrassment that burnt all down his cheeks to his chest. Eyes soft and wary, hesitant like he was doomed, destined for the worse.
You slide off the counter easily, grabbing the spare towel, bringing it to his eyebrows, wiping the dough off gently. The softness of your touch soothed Carmen, lulling his hammering heart- he didn’t see your own shaking hands, filled with your own adrenaline nerves.
You stood in front of him, eyes on the other, careful and watching- unsure. “I-I love you, too.” Your breath hitched, squeezing the words out in a nervous tumble. Carmen didn’t move, body going rigid, heart stopping entirely. The ringing was back in his ears, clouding his brain so loudly he was sure he heard you wrong.
“I’ve wanted to say it for a while, too, but didn’t…” You shook your head, heat in your own cheeks, eyes casting down to his dough covered hand. “I didn’t know if-if you felt that or if- I don’t know, I didn’t want to seem crazy or obsessive if it was too soon, and-and scare you.”
“No,” Carmen croaked, tongue thick in his own mouth. “No, I-I mean- fuck,” Carmen shook his head, looking to the wall. He needed a second, words jumbled in his mouth, heart racing, so high off the adrenaline he felt like he could combust at any moment.
“I-I was gonna say that too.” Carmen nodded, the quirk in your lips making his heart lurch. “That I love you. I was- yeah, I love you. I-I have for a while.”
“Really?” You whispered, voice tiny and excited, like it was a secret just for the two of you. Maybe it was.
“Yeah, fuck yeah.” Carmen let out a breathy, shaky laugh. “I love you, and-and I just love you so much it makes my brain hurt sometimes.”
“Me too.” You grin, a hand pressing to his cheek. “I love you.” The phrase you’d repressed for so long, deprived yourself of saying now spilled out of you like a mantra- like that was all you could say now.
Carmen grinned, brain bubbly and light. He let you pull him into a kiss, head tilting down, lips molding over yours so they fit perfectly.
Later over plates of Bologonese, you grinned across the table from Carmen. “If I didn’t tell you I loved you before, I definitely would now.” You moaned, pointing at the plate. “I really was missing out.”
Carmen beamed under your praise, gooey and love drunk off your words- off you. He knew Viola Berzatto, wherever she was, was boasting with pride.
And he knew his Nonna would have loved you too.
#thebearer#carmen berzatto#thebearerblurbs#carmen berzatto x reader#carmy berzatto x reader#the bear#carmy berzatto#carmen berzatto fluff#carmen 'carmy' berzatto#carmy berzatto fluff#the milestones menu#carmen berzatto x fem!reader#carmen berzatto x female!reader#carmen berzatto x you#carmen berzatto fic#carmen berzatto blurb#the bear fx#the bear hulu#the bear fic#the bear fanfiction#carmen berzatto fanfiction#carmy the bear
780 notes
·
View notes
Text
Upside down cakes are one of my favorite types of cakes to make, mostly because they are an easy way to impress. In an upside down cake, the fruit is layered on the bottom of the pan along with sugar, and a simple, fluffy cake batter is poured on top. Once it’s baked, the cake is inverted, and what was once the bottom of the cake becomes a gorgeously syrupy, fruity top. What could be simpler?
American upside down cakes are traditionally made with pineapple and cherries, but I gave that ’50s take on the cake a seasonal, Middle Eastern twist by using blood oranges, saffron and semolina flour in the batter. Blood oranges are typically in season from January until early spring, and they are some of my favorite citrus fruits to bake with: bright, not too sweet and seriously flavorful. Here, they add a vibrant pop of color to the cake.
As for the saffron, you might it already know it by its notoriously expensive reputation. Derived from the crocus flower, it’s the world’s most expensive spice, which makes sense considering the difficulty involved in harvesting it. But fear not: While Indian Kashmiri and Iranian saffron are definitely pricey, the more commonly available Spanish saffron is affordable, easily found at online spice retailers (even Trader Joe’s!) and thankfully, still delicious and flavorful.
In this cake, the sweet, floral and honey-like saffron threads are infused into sugar along with zest from the blood orange. The sugar turns extra fragrant and, when combined with orange blossom water and the semolina flour, yields a cake that’s intensely flavored, crumb-y and dense in the best way possible. The oranges on top are syrupy and candy-like (keeping the rind on, thinly sliced, adds even more flavor and fragrance to the cake) and best of all, it comes together in under an hour, just in time for an afternoon cup of tea.
Note: You may keep the rind of the orange on, as pictured, or remove it. Regular oranges can be substituted for the blood oranges.
14 notes
·
View notes
Text
Idli & Dosa recipe
Next week I'm going to post my long-promised Indian Film Fest 2024, complete with recommendation lists of my fave films. As an appetiser, here's one of the things I've been working on that was inspired by my love of Indian film.
Idli and dosa are Indian side dishes that I recently discovered and fell in love with. Idli are delicious savory steamed cakes meant to be eaten in place of bread or rice, and dosa are crispy pancakes. The same batter can be used to make either.
You can buy inexpensive idli steamers to fit into pots you already own, but there are also fancy all-in-one numbers. The trays are shown below.

Dosa are generally made very thin and crispy - basically a pancake - but can also be made a bit thicker and fluffier, depending on your preference.
The traditional Indian recipe for idli and dosa starts with uncooked rice and dried urad dal beans. They are soaked and then ground and mixed together. The batter is left overnight to develop natural yeast, which makes the idli and dosa fluffy when cooked. However, none of this is very practical. I figured there had to be another way to make them at home without buying a grinder, and did a bit of research. Sure enough, there are instant mixes on the market. I ordered one from a specialty shop and it was nice, and the ingredients were pretty much what I’d guessed they’d be – mainly rice and dal flour (although many instant mixes add semolina, so beware if you’re gluten free), and to make the batter you add in yoghurt to replace the natural yeast.
I’ve done some experiments and found a way to make something that’s close to the idlis I’ve eaten at restaurants. My dosas made with this batter aren’t as thin and crispy (still nice though). My recipe is made with ingredients that should be available locally at most supermarkets – I found these ingredients at both Woolworths and Coles in Australia.
Batter ingredients
White rice flour, not too finely ground (don’t use rice starch). Mckenzie's Rice Flour works well
Donna Hay* plain or self-raising flour OR equal parts sorghum flour mixed with brown rice flour
Besan flour** OR urad dal flour
Plain yoghurt (not lite). I use Greek yoghurt
A little xanthan gum or psyllium husks if you need to make the batter stickier
Salt
Baking powder
Water
* The Donna Hay flour is a mix of brown rice flour, glutinous rice flour and sorghum flour, and also has a high proportion of xanthan gum. Unfortunately, you can’t just use this as the only source of flour, or your batter will turn into glue when you attempt to cook it because of the xanthan. Ask me how I know. ☹
** Besan flour is not traditional, but urad dal flour is not available locally. Besan isn’t quite as neutral in flavour, but has a nice taste and works well as a substitute.
Making the batter
Measure out the ingredients in the following proportions:
2 white rice flour – 1 Donna Hay flour – 1 besan flour – 2 yoghurt
OR
1 white rice flour – 1 sorghum flour – 1 brown rice flour – 1 besan flour – 2 yoghurt
Put all the ingredients into a large bowl. Then add the following:
Salt – about ¼ tsp per cup of flour, or to taste.
Optional xanthan gum – this is not needed if you’ve used the Donna Hay flour. If you’ve made your own mix of flours a small amount of xanthan gum will help the batter stick together while cooking, especially if you make dosa. About ½ tsp per cup of flour. I prefer the taste and texture of psyllium husks which isn't quite as sticky but have a similar effect. About 1 tsp per cup of flour.
Water – enough to make a thick pancake batter, start with about the same quantity as the total number of cups of flour, but mix it in bit by bit.
Mix batter until smooth and set aside to rest for at least 10 minutes.
Right before cooking, add:
Baking powder – about 2 tsps per cup of flour.
If you have leftover batter, you can store it covered in the fridge. Before cooking, you may need to add a small amount of extra baking powder.
I tested both of the above proportional batter options, and they both worked, although the second option was a bit crumbly for making dosa without some xanthan gum or psyllium added. When I trialled the Donna Hay option, I used their self-raising flour, but the batter still needed baking powder – without it, the idli were solid, chewy lumps. They should be fluffy clouds!
If you use ½ cup white rice flour, ¼ cup Donna Hay flour, ¼ cup besan flour, ½ cup yoghurt, it will make about 12 to 15 idli.
My favourite combination is ¼ cup white rice flour, ¼ cup brown rice flour, ¼ cup sorghum flour, ¼ cup besan, ½ cup yoghurt, around 1 scant cup water, pinch salt.


Steaming idli
Prepare the steamer. Follow the instructions for the idli steamer you buy, but generally, you need to lightly oil the idli cups, and spoon in about 1 Tblspn batter to each.
Idlis take about 10 minutes to steam, and are ready when you can slide a knife in and it comes out clean. To remove from the idli pan, just slide the knife around each idli, and they will pop out. Serve on a plate that’s covered in a paper towel or cotton napkin or clean tea-towel.
Good with curries and soups, or anything you’d eat with rice, but also lovely as a breakfast dish in place of toast, with baked beans, omelette, or jam. They are nicest when fresh, but warm up well in the microwave the next day.
Frying dosa
Dosa are best cooked on either a cast iron pan or a non-stick pan. Warm the pan and spray or wipe on some oil. Spoon batter in a thin layer and shake the pan to even it out. Put a lid on the pan for about five to ten minutes, depending on the thickness of your dosa (I like my dosa slightly thicker than crepe-thin and find that the little bit of steam caused by putting the lid on makes it cook more evenly).
Once the bottom is brown, take the lid off and flip the dosa, and finish cooking without the lid. It’s done when cooked through and crispy on the outside.
Serve as you would a pancake, chapati or other flatbread.
If you end up trying these, I'd love to hear about it. :)
Enjoy!
2 notes
·
View notes
Text
Must-Have Indian Pantry Staples You Can Order Online Today
Indian cuisine is renowned for its rich flavors, vibrant spices, and diverse ingredients that can transform even a simple dish into a flavorful masterpiece. If you're a fan of Indian cooking or want to explore its culinary magic, stocking your pantry with the right staples is essential. Fortunately, you can now find these ingredients easily through Indian grocery delivery, ensuring you never run out of your favorite essentials.
Here’s a list of must-have Indian pantry staples that you can conveniently order online in the USA:
1. Spices: The Heart of Indian Cooking
Indian cooking is incomplete without its aromatic spices. From cumin and coriander to turmeric and garam masala, these spices are the backbone of almost every dish. They add depth, flavor, and warmth to your recipes. Don’t forget red chili powder and mustard seeds, which are equally essential for creating authentic Indian flavors.
Pro Tip: Opt for whole spices like cinnamon sticks, cardamom pods, and cloves for better flavor and a longer shelf life. Grind them fresh for that extra punch in your dishes.
2. Lentils and Pulses
Indian cuisine boasts an impressive variety of dals (lentils) and pulses, including toor dal, moong dal, masoor dal, and chana dal. These are not just protein-packed but also form the base of comforting Indian staples like dal tadka and sambhar. Pulses like chickpeas (chana) and kidney beans (rajma) are also essential for creating hearty dishes.
Quick Tip: Buying in bulk can save you money, especially if you cook these regularly. They are easy to store and have a long shelf life.
3. Rice and Grains
Rice is a staple in most Indian households, with basmati rice being the preferred choice for its aroma and fluffy texture. For more variety, stock up on parboiled rice, sona masoori, or brown rice. Additionally, grains like wheat flour (atta) are indispensable for making flatbreads like chapati and paratha.
Pro Tip: Consider keeping semolina (sooji) and millet flours for preparing South Indian dishes like idli, dosa, and ragi rotis.
4. Oils and Ghee
No Indian pantry is complete without cooking oils like mustard oil, coconut oil, or sesame oil. For those who prefer a neutral taste, sunflower or vegetable oils are great options. Ghee, or clarified butter, is another essential that adds a distinct aroma and richness to dishes like biryani, dal, and desserts.
Health Note: Ghee is a traditional Indian superfood with numerous health benefits, so don’t skip this golden ingredient!
5. Herbs and Aromatics
Fresh or dried herbs and aromatics are crucial for authentic Indian flavors. Curry leaves, dried fenugreek leaves (kasuri methi), and asafoetida (hing) are some of the unique ingredients you’ll frequently encounter. Additionally, garlic, ginger, and green chilies are indispensable in Indian cooking.
Storage Tip: Buy fresh when possible, but keep dried versions as backups for when you’re in a pinch.
6. Ready-to-Eat Indian Foods
For busy days, ready-to-eat Indian meals can be a lifesaver. From biryanis and curries to stuffed parathas, there are endless options to satisfy your cravings. These meals are easy to prepare and perfect for a quick lunch or dinner.
Convenience Tip: Check online stores offering a variety of ready-to-eat Indian food products to save time and effort.
7. Pickles and Chutneys
Pickles (achar) and chutneys are the quintessential condiments that elevate every Indian meal. Mango pickle, lime pickle, and garlic pickle are some classics that add a tangy, spicy kick. Chutneys like tamarind, mint, or coconut also make great accompaniments to snacks and meals.
Flavor Boost: A spoonful of pickle can transform even the simplest dal-rice combination into a delightful meal.
8. Snacks and Sweets
Indian snacks like samosas, namkeens, and bhujia are perfect for munching during tea time. Additionally, sweets like gulab jamun, laddoos, and barfis are must-haves for festive occasions or to satisfy a sweet tooth. Keeping a small stock of these ensures you’re always prepared for guests or celebrations.
Festive Tip: Many online stores offer traditional Indian sweets and snacks that can be delivered right to your door.
9. Dairy Products and Substitutes
Paneer (Indian cottage cheese) is a versatile ingredient used in numerous Indian dishes like palak paneer and shahi paneer. Yogurt or curd is another staple, often used in marinades, curries, or simply enjoyed as a side dish. If you prefer dairy alternatives, opt for coconut milk or almond-based yogurt.
Storage Advice: Look for shelf-stable options if you don’t have easy access to fresh dairy products.
10. Specialty Ingredients
Some Indian recipes call for unique ingredients like tamarind paste, jaggery (unrefined cane sugar), or rose water. These specialty items add authenticity and a traditional touch to your cooking. Keep them handy to experiment with a variety of Indian dishes.
Exploration Tip: Ordering these online is often easier than finding them at your local store, especially in the USA.
Why Ordering Online is a Game-Changer
Shopping for Indian groceries in USA can be daunting, especially when local stores don’t have the ingredients you need. With the rise of Indian grocery online in USA platforms, you can now access a wide range of authentic Indian products from the comfort of your home. Whether you need fresh spices, ready-to-cook meals, or pantry staples, these online stores make grocery shopping hassle-free. Plus, the convenience of Indian grocery delivery ensures that your items arrive fresh and on time, saving you trips to multiple stores.
Conclusion
Stocking your pantry with these Indian staples will ensure you’re always ready to whip up a delicious Indian meal, whether it's a simple dal or an elaborate biryani. With online grocery shopping, building the perfect Indian pantry has never been easier. Start exploring the vast variety of Indian ingredients today and bring the authentic taste of India to your kitchen!
0 notes
Text
Homemade Dhokla Recipe
Homemade Dhokla is a soft, fluffy, and savory steamed cake made from a fermented batter of gram flour (besan) and semolina. A staple in Gujarati cuisine, it's flavored with ginger, green chili, and a touch of lemon for tanginess. Steamed until spongy, it's tempered with mustard seeds, curry leaves, and green chilies, then garnished with fresh coriander and grated coconut. Perfect as a snack or breakfast!
#Homemade dhokla recipe#Gujarati snacks#healthy breakfast ideas#Indian steamed cakes#traditional recipes#vegetarian snacks#dhokla variations#easy Indian recipes#gluten-free snacks#Indian cuisine
0 notes
Text
Top Vegan Dishes With Millets: A Healthier Twist to Plant-Based Eating
Millets are rapidly gaining popularity among health enthusiasts and vegans for their exceptional nutritional benefits and versatility. These gluten-free grains are packed with fiber, protein, and essential vitamins, making them an excellent ingredient for vegan dishes. If you’re looking for inspiration, here’s a roundup of the best vegan dishes with millets to enhance your plant-based meals.
Why Choose Millets for Vegan Cooking?
Millets are not only healthy but also sustainable. They require minimal water and grow in arid conditions, making them environmentally friendly. Their mild flavor and versatility allow them to be incorporated into a variety of dishes, from savory to sweet.
1. Millet Buddha Bowl
A wholesome bowl of cooked millet topped with roasted vegetables, avocado slices, and a drizzle of tahini dressing. This dish is a perfect combination of nutrients and flavors.
2. Millet Pancakes
These gluten-free pancakes are made with millet flour and almond milk, sweetened with maple syrup. They’re a great option for a hearty vegan breakfast.
3. Millet Khichdi
A vegan twist on the traditional Indian khichdi, this dish combines foxtail millet with lentils, vegetables, and mild spices for a comforting meal.
4. Millet Salad
Combine cooked millets with chickpeas, cherry tomatoes, cucumber, and a zesty lemon-tahini dressing. This refreshing salad is perfect for lunch or as a side dish.
5. Millet Upma
Replace semolina with millets in this classic South Indian breakfast dish. Add vegetables like carrots, peas, and green beans for a fiber-packed start to your day.
How to Cook Millets Perfectly
Rinse thoroughly: Wash millets under running water to remove any impurities.
Soak if needed: Soaking for 4–6 hours can reduce cooking time and enhance digestibility.
Cook with a 2:1 water ratio: For fluffy millets, use two parts water to one part millet.
Nutritional Benefits of Millets
Millets are high in dietary fiber, aiding digestion and weight management. They are rich in plant-based protein, making them ideal for vegans. Additionally, millets are a great source of iron, magnesium, and antioxidants, supporting overall health and vitality.
Conclusion
Incorporating Vegan Dishes With Millets into your vegan meals is a great way to enhance both nutrition and flavor. Whether you’re cooking a savory khichdi or a sweet millet pancake, these gluten-free grains add a unique twist to your dishes. Try these vegan millet recipes and enjoy healthy, plant-based eating at its finest.
0 notes
Text
Dosa Delights: Exploring the Many Varieties of South India’s Favorite Crepe
Introduction:
Crispy, golden, and irresistibly delicious, the dosa is a beloved South Indian classic that has transcended regional borders to become a global sensation. Whether you enjoy it plain with chutney or stuffed with flavorful fillings, there’s no denying the versatility and sheer joy that dosa brings to the table. What makes dosa even more exciting is the sheer variety — each offering its own unique texture, flavor, and twist on the traditional recipe.
In this blog, we’ll explore the wonderful world of dosa, taking a closer look at some of the most popular and unique varieties!
1. Masala Dosa: The Classic Favorite
Masala Dosa is the king of all dosas! This traditional favorite features a thin, crispy dosa wrapped around a spiced potato filling, often served with sambar and coconut chutney. The combination of the crunchy dosa and the soft, flavorful potato masala creates a perfect balance of textures and flavors. Originally from Karnataka, masala dosa is now a popular dish across the world.
Pro Tip: Enjoy it with ghee or butter for an extra touch of richness.
2. Rava Dosa: The Instant Delight
For those who are short on time, Rava Dosa is a quick and easy option. Unlike the traditional dosa batter, which requires fermentation, rava dosa is made using semolina (rava), rice flour, and water, making it an instant recipe. It has a thin, lace-like appearance and a crispy texture, making it an absolute treat for those who love crunch!
Best With: Serve with spicy onion chutney or tomato chutney for an added kick.
3. Paper Dosa: The Giant and Crispy Marvel
True to its name, Paper Dosa is paper-thin, crispy, and often enormous in size! This dosa is rolled up into a large, thin cone or cylinder, making it a visually impressive dish. While it’s usually served plain, you can pair it with any chutney, sambar, or even a light masala filling. It’s the ultimate choice for dosa lovers who appreciate that extra crispy crunch.
Fun Fact: In some restaurants, paper dosas can be over a meter long!
4. Neer Dosa: The Soft and Delicate Delight
Neer Dosa is a popular variety from the coastal regions of Karnataka, especially Mangalore. Made with just rice and water (hence the name “neer,” which means water), this dosa is soft, white, and paper-thin. It has a delicate texture and is typically served with coconut chutney or fish curry. Neer dosa is light and easy to digest, making it a perfect breakfast or light meal option.
Pair With: Coconut-based curries or chutneys for an authentic coastal experience.
5. Pesarattu: The Protein-Packed Powerhouse
Originating from Andhra Pradesh, Pesarattu is made using green gram (moong dal) instead of rice, giving it a unique flavor and a high protein content. This healthy dosa is often served with upma (a savory semolina dish) stuffed inside, creating the famous Pesarattu Upma combo. It’s perfect for those looking for a nutritious yet delicious dosa alternative.
Healthy Twist: A great option for health-conscious eaters looking for a high-protein meal.
6. Set Dosa: The Soft and Fluffy Dosa Stack
Set Dosa is a softer, thicker version of the traditional dosa, typically served in a set of three smaller dosas. It’s fluffy and spongy, with a slightly tangy taste due to the fermentation process. Set dosas are usually served with vegetable saagu (a mildly spiced vegetable curry) or chutney, making it a filling and satisfying meal.
Perfect For: Those who love a softer texture with a side of creamy or curry-based accompaniments.
7. Onion Dosa: The Spicy, Flavor-Packed Treat
For a burst of flavor, Onion Dosa is a fantastic choice. This dosa variation involves finely chopped onions, green chilies, and sometimes cilantro sprinkled over the dosa as it cooks. The result is a spicy, savory twist that adds a delicious crunch and a punch of flavor to every bite.
Tip: Try it with a tangy tomato chutney to elevate the experience!
8. Cheese Dosa: The Ultimate Fusion
For those who love a cheesy twist on their traditional dosa, the Cheese Dosa is a modern fusion favorite! As the dosa cooks, generous amounts of grated cheese are added on top, melting into a gooey, delicious filling. This dosa is perfect for kids or anyone who enjoys a fusion of Indian and global flavors.
Best With: Serve with a side of ketchup or mint chutney for an extra zing.
9. Ghee Roast Dosa: Rich and Buttery Indulgence
Ghee Roast Dosa is a special variety made by spreading ghee (clarified butter) generously over the dosa as it cooks, creating an ultra-crispy, rich, and buttery experience. This dosa is especially popular in Tamil Nadu and is often served with a variety of chutneys and sambar. The crispy, golden edges and the fragrant aroma of ghee make it a mouthwatering treat.
Ideal For: Those who love indulgent, buttery flavors.
Pro Tip: Add a sprinkle of black pepper and cilantro for an extra punch of flavor!
Conclusion:
Whether you prefer it crispy, soft, spicy, or filled with delicious surprises, there’s a dosa for every palate and occasion. From the traditional Masala Dosa to the modern Cheese Dosa, each variety showcases the endless versatility of this beloved South Indian dish. So, next time you’re in the mood for dosa, why not explore one of these exciting varieties?
What’s your favorite dosa? Let me know in the comment
And also don’t forget check out our authentic and natural spices on Nischithdelicacies
And follow us on
📸 Instagram:
🐦 Twitter:
Youtube
Facebook
0 notes
Text
Buy Premium Sooji for Your Recipes
Sooji, also known as semolina, is a versatile ingredient that can elevate your cooking with its unique texture and nutritional benefits. Whether you’re preparing fluffy idlis, crispy dosas, or a comforting bowl of upma, using premium sooji ensures your recipes turn out perfect every time. Made from the finest quality wheat, our premium sooji offers a fine grain that cooks evenly, providing consistent results for both savory and sweet dishes.
For those seeking the best sooji on the market, look no further. Our product is finely milled to retain its natural goodness and flavor, making it a great choice for a variety of traditional and modern recipes. Rich in essential nutrients like fiber and protein, sooji is also a healthier option for your meals.
From breakfast to desserts, premium sooji is a must-have staple in any kitchen. So, why settle for ordinary when you can buy the best sooji and transform your culinary creations? Discover the difference in quality and taste by choosing premium sooji for your next recipe.
0 notes
Text
Greek Orange Syrupy Pie Aka Portokalopita (Without Phyllo Pastry)
🥧

Greek Orange Syrupy Pie aka Portokalopita (without Phyllo Pastry) - Portokalopita Siropiasti hwris Filo
BY: Greek Cooking Made Easy
SUBSCRIBE TO MY YOUTUBE CHANNEL: https://www.youtube.com/greekcookingmadeeasy
Check My YouTube Video: HERE
Κοιτάξτε Επίσης Την Συνταγή Μου Σε YouTube Βίντεο, Το Λίνκ Είναι: ΕΔΩ
youtube
SERVES 🍴⃒ PREP. TIME 🕔⃒
15 pers. 35 min.
COOK. TIME ♨ DIFFIC. LEVEL 👩🍳⃒
Syrup: 5 min. Easy
Pie: 45 min.
Portokalopita is one of those amazing Greek syrupy desserts, called "Siropiasta" that you simply have to taste. It is a juicy and sweet-flavored orange "pie" as we call it, although it could be called a syrupy cake, made with a filling of Greek yoghurt and fresh pulp from sweet oranges.
It is then bathed on top with a thick syrup that has been simmered with orange peel.
This particular recipe comes as a simplified method to the renowned Portokalopita made with phyllo pastry, but it's equally terrific!
And as with all my step-by-step recipes, just follow my instructions, if you want 100% success.
Suitable for lacto-ovo vegetarians.
INGREDIENTS
Ingredients for the Syrup:
· 375 ml / 1.5 cups Water
· 300 gr. / 10.5 oz / 1.35 cups Sugar
· 1 Cinnamon stick
· One Orange peel
· 1.5 tbsp. / 22 ml Greek Thyme Honey

Ingredients for the Pie:
· 3 Oranges
· Zest from 1 Orange
· 3 large Eggs @ room temp.
· 200 gr. / 7 oz / almost 1 cup Sugar
· 275 gr. / 9.75 oz / 2.2 cups Self-rising Flour (or fine semolina)
· 200 gr. / 7 oz / 0.85 cup Greek Strained Yoghurt 5% fat
· 8 gr. / 0.28 oz / 2 tsp. Vanilla sugar

METHOD:
A. Prepare the syrup earlier:
1. Turn on the heat to high. In a saucepan, combine sugar and water.
2. Add the cinnamon stick, orange peel and honey. Reduce heat, bring to a boil and regularly stir gently until syrup becomes translucent.
3. Then let syrup simmer for 5' extra, stirring it every minute.
4. Turn off the heat and let syrup cool down completely.
5. TIP: Syrup must be at room temperature when you pour it over the hot orange pie.
B. Prepare the pie batter:
6. Wash and peel the 3 oranges. Cut them into cubes.
7. Place them into a strong blender and beat them for 30"-1' or until they turn into a thick pulp. Reserve.
8. Break the 3 eggs in the bowl of a strong mixer with the flat beater attachment. Add also the sugar and vanilla sugar.
9. Start beating them in high speed for 5'-10' or until they turn into a thick, fluffy, off-white cream.
10. Reduce speed, adding the orange zest and yoghurt and continue beating until combined.
11. Next start gradually adding the flour (or fine semolina) spoon-by-spoon and continue beating until batter is homogenized.
12. FYI you could use either Flour or Semolina. If using semolina, Portokalopita will have a grainier texture that with flour; both wonderful, I must add.
13. Lastly, pour in the orange pulp and beat just enough to incorporate it.
14. Stop the mixer. Your batter is ready to be baked and looks a bit runny.
15. Spray or brush some oil to grease a Pyrex dish of 23 x 35 cm/ 9 x 14 in. You could also use a smaller dish, if you want a thicker pie.
16. Pour the batter in the tray using a soft spatula. Ready for baking.
C. Baking instructions:
17. Bake Portokalopita on the middle shelf of a preheated oven, both top and bottom heating elements on @180℃ / 350℉ for about 45' or until it becomes golden brown all around (depends on the oven).
18. After 45' check if pie is ready by inserting a knife in its center. It should come out clean. Remove it from the oven.
19. Place it on a rack to cool down just a bit and using a sharp knife, cut throughout to ensure that syrup will go everywhere.
20. While cake is still very hot, spoon half of the cooled syrup gradually and evenly over it.
21. Wait for 5' and pour the remaining syrup on top (*you may end up not using all syrup).
22. Let the cake sit for at least 1 hour @ room temp before consumption, to allow the syrup to penetrate it.

D. Serving instructions and suggestions:
When Portokalopita cools down completely, cover the tray with plastic wrap and store in the fridge.

Ideally, Portokalopita is consumed the next day or the day after, when syrup is fully absorbed and all the flavors have been integrated.

Portokalopita can be consumed either cold from the fridge or at room temp. all year round.

In the summer months, it is served with a generous portion of Vanilla or Kaimaki Ice cream, making it one of the most favorite desserts in Greece.

...or add some sour cherries preserve on top of Kaimaki ice cream!!

With golden crust on the surface and a juicy, spongy heart enhanced with the fragrance and aromas of the sweet Greek oranges, you can see why it is considered a supreme golden dessert & a Finger licking perfection.

E. Storage info:
Leftover pie can be stored in the fridge-covered-for up to 1 week.

F. More Info about Greek Oranges:
* Oranges in Greek mythology:
In Greek mythology, oranges are mentioned for the first time in one of the 10 labours of Hercules. According to the legend, the King of Tiryns, Eurystheus instructed Hercules to bring him the apples of Hesperides, which grew up in the garden of the Gods. After many adventures, Hercules managed to cut 3 golden fruits by confronting the guardians of the garden, the nymphs Hesperides and the elderly dragon Ladon, a terrible serpent with 100 heads, and bringing them to Eurystheus.

Modern day Greek scholars believe that these "apples" were most probably oranges.
You can find this myth as a detail in a Mosaic -Apples of the Hesperides, 3rd cent. AD, found in Valencia. It is hosted in the National Archaeological Museum of Spain, Madrid.

* Production of oranges in Greece:
Today, in Greece, oranges are mainly grown in Laconia, Argolida and Arta. The annual production of oranges is around 900,000 tons, of which 350,000 are exported. Due to the region's mild and warm weather, Lakonia oranges mature faster than other varieties in the country and their juice is particularly sweet. Laconia is not only one of the country's major orange manufacturers with many local factories, but it is also the area in which oranges have dominated the local cuisine.
Visit the historical Sparti and breathtaking Monemvasia in Laconia. Witness oranges hanging in abundance on the trees!

Oranges are a good source of fiber and a rich source of vitamin C and folate, among many other beneficial nutrients.
Check my YouTube Video: HERE
Πορτοκαλόπιτα Σιροπιαστή Χωρίς Φύλλο
BY: Greek Cooking Made Easy
SUBSCRIBE TO MY YOUTUBE CHANNEL: https://www.youtube.com/greekcookingmadeeasy
ΜΕΡΙΔΕΣ🍴⃒ ΠΡΟΕΤΟΙΜΑΣΙΑ 🕔⃒
15 35 min.
ΜΑΓΕΙΡΕΜΑ ♨ ΒΑΘΜ. ΔΥΣΚΟΛΙΑΣ 👩🍳⃒
Σιρόπι: 5 min. Εύκολη
Πίτα: 45 min.
Η Πορτοκαλόπιτα είναι ένα υπέροχο γλυκό ταψιού, από τα αγαπημένα "Σιροπιαστά" που απλά πρέπει να δοκιμάσετε. Είναι μια ζουμερή και με γλυκιά γεύση πίτα, όπως τη ονομάζουμε, αν και θα μπορούσαμε να την ονομάσουμε και σιροπιαστό κέικ, φτιαγμένη με γέμιση από γιαούρτι και φρέσκο πολτό από γλυκά πορτοκάλια.
Στη συνέχεια περιλούζεται με ένα παχύρρευστο σιρόπι που έχει σιγοβράσει με φλούδα πορτοκαλιού.
Η συγκεκριμένη συνταγή έρχεται σαν απλοποιημένη μέθοδος της φημισμένης Πορτοκαλόπιτας που φτιάχνεται με φύλλο, αλλά κι αυτή είναι εξίσου λαχταριστή!
Και όπως με όλες τις βήμα-βήμα συνταγές μου, απλώς ακολουθήστε τις οδηγίες μου, αν θέλετε 100% επιτυχία.
Κατάλληλη για χορτοφάγους.
ΥΛΙΚΑ
Υλικά για το σιρόπι:
• 375 ml / 1,5 φλ. Νερό
• 300 γρ. / 10,5 oz / 1,35 φλ. Ζάχαρη
• 1 ξυλάκι Κανέλας
• Μία φλούδα Πορτοκαλιού
• 1,5 κ.σ. / 22 ml Θυμαρίσιο Μέλι
Υλικά για την πίτα:
• 3 Πορτοκάλια
• Ξύσμα από 1 Πορτοκάλι
• 3 μεγάλα Αυγά @ θερμοκρασία δωματίου
• 200 γρ. / 7 oz / σχεδόν 1 φλ. Ζάχαρη
• 275 γρ. / 9,75 oz / 2,2 φλ. Αλεύρι που φουσκώνει μόνο του (ή σιμιγδάλι ψιλό)
• 200 γρ. / 7 oz / 0,85 φλ. στραγγιστό Γιαούρτι, πλήρες, 5% λιπαρά
• 8 γρ. / 0,28 oz / 2 κ.γ. Βανίλια σκόνη (βανιλίνη)
ΜΕΘΟΔΟΣ:
Α. Ετοιμάστε το σιρόπι νωρίτερα:
1. Ανάψτε τη φωτιά στο δυνατό. Σε ένα κατσαρόλι ανακατέψτε τη ζάχαρη και το νερό.
2. Προσθέστε το ξυλάκι κανέλας, τη φλούδα πορτοκαλιού και το μέλι. Χαμηλώστε τη φωτιά, αφήστε να πάρει μια βράση ανακατεύοντας τακτικά μέχρι το σιρόπι να γίνει διαυγές.
3. Στη συνέχεια αφήστε το σιρόπι να σιγοβράσει για 5' επιπλέον, ανακατεύοντας απαλά κάθε λεπτό.
4. Σβήστε τη φωτιά και αφήστε το σιρόπι να κρυώσει εντελώς.
5. ΣΥΜΒΟΥΛΗ: Το σιρόπι πρέπει να είναι σε θερμοκρασία δωματίου όταν το περιχύσετε πάνω στη πολύ ζεστή πορτοκαλόπιτα.
Β. Ετοιμάστε τη ζύμη για τη πίτα:
6. Πλύντε και ξεφλουδίστε τα 3 πορτοκάλια. Κόψτε τα σε κύβους.
7. Τοποθετήστε τα σε ένα δυνατό μπλέντερ και χτυπήστε τα για 30"-1' ή μέχρι να γίνουν ένας πηχτός πολτός.
8. Σπάστε τα 3 αυγά στο μπολ ενός δυνατού μίξερ με το εξάρτημα φτερό (κάπα). Προσθέστε επίσης τη ζάχαρη και τη βανίλια.
9. Αρχίστε να τα χτυπάτε σε δυνατή ταχύτητα για 5'-10' ή μέχρι να γίνουν μια πηχτή, ελαφρά κρεμ, αφράτη κρέμα.
10. Χαμηλώστε τη ταχύτητα προσθέτοντας το ξύσμα πορτοκαλιού και το γιαούρτι και συνεχίστε το χτύπημα μέχρι να ενωθούν.
11. Στη συνέχεια, αρχίστε να προσθέτετε σταδιακά κουταλιά-κουταλιά το αλεύρι (ή το ψιλό σιμιγδάλι) και συνεχίστε το χτύπημα μέχρι η ζύμη να ομογενοποιηθεί.
12. Πληροφοριακά μπορείτε να χρησιμοποιήσετε είτε αλεύρι ή σιμιγδάλι. Αν χρησιμοποιήσετε σιμιγδάλι, η Πορτοκαλόπιτα θα έχει πιο κοκκώδη υφή από αυτή με το αλεύρι. Και τα δύο πάντως είναι υπέροχα, πρέπει να προσθέσω.
13. Τέλος ρίξτε μέσα τον πολτό πορτοκαλιού και χτυπήστε μέχρι να ενσωματωθεί.
14. Σταματήστε το μίξερ. Η ζύμη σας είναι έτοιμη για ψήσιμο και φαίνεται κάπως ρευστή.
15. Ψεκάστε ή αλείψτε λίγο λάδι για να αλείψετε ένα ταψί Pyrex διαστάσεων 23 x 35 εκ. / 9 x 14 in. Μπορείτε επίσης να χρησιμοποιήσετε μικρότερο σκεύος, αν θέλετε πιο παχιά πίτα.
16. Χύστε τη ζύμη μέσα στο ταψί χρησιμοποιώντας μια μαλακή σπάτουλα (μαρίζα). Έτοιμη για ψήσιμο.
Γ. Οδηγίες ψησίματος:
17. Ψήστε την Πορτοκαλόπιτα στο μεσαίο ράφι ενός προθερμασμένου φούρνου, στις πάνω και κάτω αντιστάσεις στους @180℃ / 350℉ για περίπου 45' ή μέχρι να ροδίσει παντού (εξαρτάται από τον φούρνο).
18. Μετά από 45' τσεκάρετε αν η πίτα είναι έτοιμη μπήγοντας ένα μαχαίρι στο κέντρο της. Θα πρέπει να βγαίνει καθαρό. Βγάλτε τη από το φούρνο.
19. Τοποθετήστε τη στο πάγκο να κρυώσει λίγο και χρησιμοποιώντας ένα κοφτερό μαχαίρι, κόψτε τη μέχρι κάτω ώστε να βεβαιωθείτε ότι το σιρόπι θα τη ποτίσει παντού.
20. Όσο είναι ακόμα πολύ ζεστή, απλώστε το μισό από το κρύο σιρόπι σταδιακά και ομοιόμορφα.
21. Περιμένετε 5' και ρίξτε από πάνω το υπόλοιπο σιρόπι (*μπορεί να καταλήξετε να μην χρησιμοποιήσετε όλο το σιρόπι).
22. Αφήστε τη Πορτοκαλόπιτα να κάτσει για τουλάχιστον 1 ώρα σε θερμοκρασία δωματίου πριν τη καταναλώσετε, για να μπορέσει το σιρόπι να διαπεράσει μέχρι μέσα.
Δ. Οδηγίες και προτάσεις σερβιρίσματος:
Μόλις η Πορτοκαλόπιτα κρυώσει εντελώς, σκεπάστε το ταψί με πλαστική μεμβράνη και φυλάξτε τη στο ψυγείο.
Ιδανικά, η Πορτοκαλόπιτα καταναλώνεται την επόμενη ή την μεθεπόμενη μέρα, όταν το σιρόπι έχει απορροφηθεί πλήρως και έχουν ενσωματωθεί όλες οι γεύσεις.
Η Πορτοκαλόπιτα μπορεί να καταναλωθεί είτε κρύα από το ψυγείο ή σε θερμοκρασία δωματίου όλο το χρόνο.
Τους καλοκαιρινούς μήνες σερβίρεται με μια γενναιόδωρη μερίδα Παγωτό Βανίλια ή Καϊμάκι, καθιστώντας την ένα από τα πιο αγαπημένα γλυκά στην Ελλάδα.
...ή προσθέστε λίγο γλυκό κουταλιού βύσσινο πάνω από το παγωτό Καϊμάκι!!
Με χρυσή κρούστα στην επιφάνεια και ζουμερή, σπογγώδη καρδιά εμποτισμένη με τα αρώματα των γλυκών πορτοκαλιών, μπορείτε να καταλάβετε γιατί θεωρείται το υπέρτατο χρυσαφένιο γλύκισμα, που θα γλύφετε τα δάκτυλα σας!
Ε. Πληροφορίες φύλαξης:
Η πίτα που περίσσεψε μπορεί να φυλαχτεί στο ψυγείο σκεπασμένη-για έως και 1 εβδομάδα.
Ζ. Περισσότερες πληροφορίες για τα Ελληνικά πορτοκάλια:
* Τα πορτοκάλια στην ελληνική μυθολογία:
Στην ελληνική μυθολογία, τα πορτοκάλια αναφέρονται για πρώτη φορά σε έναν από τους 10 Άθλους του Ηρακλή. Σύμφωνα με το μύθο, ο βασιλιάς των Τιράνων, ο Ευρύσθεος έδωσε εντολή στον Ηρακλή να του φέρει τα μήλα των Εσπερίδων που μεγάλωναν στον κήπο των Θεών. Μετά από πολλές περιπέτειες, ο Ηρακλής κατάφερε να κόψει 3 χρυσά φρούτα αντιμετωπίζοντας τους κηδεμόνες του κήπου, τις νύμφες Εσπερίδες και τον δράκο Λάδωνα, ένα φοβερό φίδι με 100 κεφάλια και το έφερε στον Ευρυσθέα.
Οι σύγχρονοι Έλληνες μελετητές πιστεύουν ότι αυτά τα «μήλα» ήταν πιθανότατα πορτοκάλια.
Μπορείτε να βρείτε αυτόν τον μύθο ως λεπτομέρεια σε ένα Μωσαϊκό-Εσπερίδες, 3ος αι. AD, που βρέθηκε στη Βαλένθια. Φιλοξενείται στο Εθνικό Αρχαιολογικό Μουσείο της Ισπανίας, στη Μαδρίτη.
* Παραγωγή πορτοκαλιών στην Ελλάδα:
Σήμερα, στην Ελλάδα, τα πορτοκάλια καλλιεργούνται κυρίως στη Λακωνία, την Αργολίδα και την Άρτα. Η ετήσια παραγωγή πορτοκαλιών είναι περίπου 900.000 τόνοι, εκ των οποίων 350.000 εξάγονται. Λόγω των ήπιων και θερμών καιρικών συνθηκών της περιοχής, τα πορτοκάλια Λακωνίας ωριμάζουν γρηγορότερα από άλλες ποικιλίες της χώρας και ο χυμός τους είναι ιδιαίτερα γλυκός. Η Λακωνία δεν είναι μόνο ένας από τους μεγαλύτερους παραγωγούς πορτοκαλιών της χώρας με πολλά τοπικά εργοστάσια, αλλά είναι και η περιοχή στην οποία τα πορτοκάλια έχουν κυριαρχήσει στην τοπική κουζίνα.
Επισκεφθείτε την ιστορική Σπάρτη και την εκπληκτική Μονεμβασιά στη Λακωνία. Θα γίνετε οι ίδιοι μάρτυρες των αναρίθμητων πορτοκαλιών που κρέμονται σε αφθονία από τα δέντρα!
Τα πορτοκάλια είναι μια καλή πηγή φυτικών ινών και μια πλούσια πηγή βιταμίνης C και φυλλικού οξέος, μεταξύ πολλών άλλων ευεργετικών θρεπτικών συστατικών.
Κοιτάξτε επίσης την συνταγή μου σε YouTube βίντεο, το λίνκ είναι: ΕΔΩ
#Youtube#desserts#christmas#christmassweets#cake#pie#fruit#pastry#yoghurt#lowcost#vegetarian#children#orange#fall#winter#syrupy#fruitcake#Greek Orange Syrupy Pie aka Portokalopita (without Phyllo Pastry)#Greek Orange Syrupy Pie aka Portokalopita#Portokalopita#Πορτοκαλόπιτα Σιροπιαστή Χωρίς Φύλλο#Πορτοκαλόπιτα Σιροπιαστή#Πορτοκαλόπιτα
0 notes
Text
Unlock the Nutritional Benefits of Foxtail Millet Rava | Milletry
Welcome to Milletry, your trusted source for the finest millet-based products. Today, we're excited to spotlight one of our star offerings: Foxtail Millet Rava. Known for its impressive health benefits and culinary versatility, Foxtail Millet Rava is quickly becoming a favorite among health enthusiasts and food lovers alike. Let's dive into what makes this ingredient so special and how you can incorporate it into your diet.
What is Foxtail Millet Rava?
Foxtail Millet Rava is made from the tiny, yellow grains of the foxtail millet plant. It's finely ground to create a coarse, semolina-like texture, making it an excellent substitute for traditional rava (semolina) in various recipes. This guilt-free grain is packed with essential nutrients, making it a powerhouse of health benefits.
Health Benefits of Foxtail Millet Rava
Rich in Nutrients: Foxtail Millet Rava is a great source of protein, fiber, vitamins, and minerals. It provides a balanced mix of essential nutrients that support overall health.
Guilt-Free: For those seeking healthier alternatives, Foxtail Millet Rava is an excellent choice. It offers the same texture and versatility as traditional rava without the guilt of consuming refined grains.
Supports Heart Health: The high magnesium content in Foxtail Millet Rava helps maintain healthy heart function and reduces the risk of cardiovascular diseases.
Promotes Digestion: The dietary fiber in Foxtail Millet Rava aids in digestion and helps prevent constipation. It promotes a healthy gut by encouraging regular bowel movements.
Manages Blood Sugar Levels: Foxtail Millet Rava has a low glycemic index, making it an ideal choice for people with diabetes. It helps regulate blood sugar levels and provides sustained energy.
How to Use Foxtail Millet Rava in Your Cooking
Foxtail Millet Rava is incredibly versatile and can be used in a variety of dishes. Here are some popular ways to incorporate it into your meals:
Upma: A traditional South Indian breakfast dish, upma made with Foxtail Millet Rava is both nutritious and delicious. Simply sauté vegetables and spices, add Foxtail Millet Rava, and cook until it reaches a porridge-like consistency.
Idli: Swap out regular rava with Foxtail Millet Rava to make soft, fluffy idlis. These steamed cakes are perfect for a light breakfast or snack.
Halwa: For a sweet treat, try making halwa with Foxtail Millet Rava. Cook it with ghee, sugar, and water until it becomes a rich, aromatic dessert.
Dosas: Create crispy, golden dosas using a batter made from Foxtail Millet Rava. Pair them with chutney and sambar for a satisfying meal.
Porridge: Start your day with a warm bowl of Foxtail Millet Rava porridge. Add your favorite fruits, nuts, and a drizzle of honey for a wholesome breakfast.
Why Choose Milletry for Your Foxtail Millet Rava?
At Milletry, we are committed to providing the highest quality millet-based products. Our Foxtail Millet Rava is sourced from trusted farmers who practice sustainable farming methods. We ensure that each batch is carefully processed to retain its nutritional value and purity. When you choose Milletry, you are choosing a product that supports your health and the environment.
Conclusion
Foxtail Millet Rava is a versatile, nutritious ingredient that can elevate your meals while supporting your health. Whether you're making savory dishes or sweet treats, this guilt-free grain is a fantastic addition to your pantry. Explore our range of Foxtail Millet Rava products on the Milletry website and discover the difference that quality makes. Embrace the goodness of millets with Milletry!
0 notes
Text
Experience the Taste of Homemade: Try Subiksha’s Readymade Poori Madurai

Hey there, busy bees! We all love a delicious and satisfying breakfast, but who has the time to whip up poori from scratch every morning? Don’t worry, we’ve all been there — staring into the pantry with a grumbling stomach, wishing for a quick and tasty solution.
Well, fret no more! Today, we’re introducing you to a game-changer: Subiksha’s Readymade Poori Madurai. That’s right, the taste of homemade poori — crispy, fluffy, and bursting with flavor — can now be yours in minutes!
But what exactly is a poori?
For those new to South Indian cuisine, poori is a delightful deep-fried flatbread. Traditionally made with wheat flour and semolina (sooji), it puffs up like a golden balloon when cooked, creating a light and airy pocket perfect for scooping up your favorite curries and chutneys.
Why Subiksha’s Readymade Poori Madurai?
Now, you might be thinking, “Readymade poori? Can it really be that good?” We hear you! But trust us, Subiksha’s Readymade Poori Madurai is made with the same love and care you’d expect from a homemade recipe.
Here’s what makes Subiksha’s special:
We use high-quality ingredients and traditional methods to capture the true flavor of Madurai — a city renowned for its incredible street food scene.
Subiksha’s Readymade Poori Madurai is your shortcut to a delicious and authentic breakfast. Simply heat them up in oil for a few seconds, and voila! Perfect poori in a flash.
No more scrambling in the kitchen. Subiksha’s poori is your lifesaver on those mornings when you need a quick and satisfying breakfast.
Kids love poori, and Subiksha’s makes it easy to enjoy this delicious treat any time.
So, how do you enjoy Subiksha’s Readymade Poori Madurai?
The possibilities are endless! Here are a few ideas to get you started:
Serve them up with a potato masala for a classic South Indian breakfast.
Pair them with your favorite chutney for a flavorful and tangy experience.
Get creative! Use them to scoop up curries, dals, or even sweet fillings.
Subiksha Foods: Bringing You a Taste of Home
At Subiksha Foods, we’re passionate about bringing you authentic South Indian flavors made with love. We use only the finest ingredients and traditional recipes to create delicious and convenient foods that taste just like homemade.
So ditch the hassle and experience the taste of homemade with Subiksha’s Readymade Poori Madurai. Visit our website today to find a store near you and elevate your breakfast routine!
#ReadymadePoori#MaduraiPoori#Subhiksha Foods#SouthIndianBreakfast#QuickBreakfast#DeliciousPoori#AuthenticTaste#ConvenientCooking#CrispyPoori#FluffyPoori#EasyMeals#StreetFoodFavorites#BreakfastInMinutes#HomemadeTaste#IndianCuisine
0 notes
Text
Suji Appe Recipe in Hindi: Quick, Tasty, aur Healthy!
Suji Appe Recipe: Quick, Tasty, aur Healthy!
Suji Appe, jo Rava Appe ya Rava Paniyaram ke naam se bhi jaana jata hai, ek delicious South Indian snack hai jo bahar se crispy aur andar se soft hota hai. Yeh perfect hai breakfast, evening snacks, ya light dinner ke liye. Chaliye is mouth-watering recipe mein dive karte hain!

Introduction
Suji Appe ek versatile dish hai jo semolina (suji) se banta hai aur ismein aap vegetables bhi daal sakte hain, jo ise nutritious aur tasty banata hai. Yeh un logon ke liye ek excellent option hai jo quick aur healthy snack chahte hain bina taste compromise kiye. Chahe aap cooking novice ho ya seasoned chef, yeh recipe follow karna bahut easy hai.

Ingredients
Yeh cheezein chahiye aapko delicious Suji Appe banane ke liye:
1 cup suji (semolina)
1/2 cup dahi (curd)
1/4 cup pani (water)
1 small pyaaz (onion), finely chopped
1 small tamatar (tomato), finely chopped
1 small shimla mirch (capsicum), finely chopped
1/2 tsp rai (mustard seeds)
1/2 tsp jeera (cumin seeds)
1/2 tsp adrak (ginger), grated
1-2 hari mirch (green chilies), finely chopped
Namak swad anusar (salt to taste)
Thoda hara dhaniya (coriander leaves), chopped
1/2 tsp baking soda
Thoda sa tel (oil) for cooking

Read More Related Posts
Banane ka Tarika
Batter Taiyar Karna: Ek bowl mein suji aur dahi ko ache se mix karen. Ismein pani add karke thoda patla batter banayein. Isse 10-15 minutes ke liye side mein rakh dein taaki suji achi tarah se phool jaye.
Tadka Lagana: Ek small pan mein thoda sa tel garam karen aur ismein rai aur jeera daal kar crackle hone dein. Phir adrak aur hari mirch add karen aur halka sa bhun lein.
Sabziyan Add Karna: Tadka ko suji ke batter mein add karen aur ache se mix karen. Phir finely chopped pyaaz, tamatar, shimla mirch aur hara dhaniya add karke ache se mix karen. Baking soda aur namak bhi ismein mila dein.
Cooking: Appe pan ko garam karen aur thoda sa tel har cavity mein daal dein. Phir suji ka batter har cavity mein daal kar medium flame par cook karen. Jab ek side golden brown ho jaye, to appe ko flip karke dusri side bhi cook karen.
Serve Karna: Garma-garam suji appe ko chutney ya sauce ke saath serve karen.

Pros
Healthy aur nutritious snack.
Quick aur easy recipe.
Customizable with different vegetables.
Cons
Appe pan ki zarurat padti hai.
Thoda time consuming ho sakta hai agar aap bahut saari quantity bana rahe hain.
youtube
FAQs
Q: Kya main suji appe ko bina baking soda ke bana sakta hoon? A: Haan, lekin baking soda use karne se appe fluffy aur soft bante hain.
Q: Kya main ismein aur vegetables add kar sakta hoon? A: Bilkul, aap apni pasand ki vegetables add kar sakte hain jaise ki grated carrot, peas, aur corn.
Q: Kya main suji batter ko pehle se prepare kar sakta hoon? A: Haan, aap batter ko 1-2 ghante pehle bana kar fridge mein rakh sakte hain, lekin use karne se pehle use room temperature par le aayen.
Conclusion
Suji Appe ek perfect snack hai jo healthy aur tasty dono hai. Isse banana asaan hai aur yeh aapke aur aapke family ke liye ek nutritious option hai. Zaroor try karein aur apne experience ko share karen. Aur hamari dusri recipes aur posts ko bhi explore karna na bhulein. Happy cooking!
0 notes
Text
Start Your Day Right: South Indian Breakfast at Kongumess, Karur
Indulge in the rich flavors of South India with a delicious breakfast at Kongumess, conveniently located in Karur! Our restaurant offers a delightful selection of traditional breakfast dishes, perfect for starting your day off right.

Experience the Taste of Karur:
At Kongumess, we use only the freshest ingredients and age-old recipes passed down through generations to create authentic South Indian breakfasts. Our menu boasts a variety of dishes sure to tantalize your taste buds:
Idli & Sambar: The quintessential South Indian breakfast, our fluffy idlis are served piping hot with a flavorful lentil sambar for a comforting and wholesome meal.
Masala Dosa: A crispy dosa, a thin rice crepe, filled with a spiced potato masala. This classic dish is a crowd-pleaser and perfect with a dollop of chutney.
Pongal: A savory dish made with rice and lentils, pongal is a nutritious and delicious option. We offer different variations like Ven Pongal (made with ghee) and Seda Pongal (made with ghee and milk) to cater to your preference.
Vada: Fluffy lentil fritters, perfect for dipping in sambar or coconut chutney.
Upma: A savory semolina porridge cooked with vegetables and spices, upma is a light and flavorful breakfast option.
Filter Coffee: No South Indian breakfast is complete without a cup of our aromatic filter coffee, freshly brewed for a perfect ending to your meal.
Beyond the Classics:
Kongumess also offers a variety of unique breakfast dishes specific to the Karur region, allowing you to explore the local culinary heritage.
A Welcoming Ambiance:
Our restaurant provides a warm and inviting atmosphere, perfect for a relaxed breakfast with family and friends. Start your day in Karur the traditional way, with a satisfying and delicious South Indian breakfast experience at Kongumess!
1 note
·
View note
Text
:Exploring the Vibrant Flavors of an Indian Grocery Store: A Culinary Journey
Introduction:
Step into an Indian grocery store, and you'll find yourself immersed in a world of vibrant colors, exotic aromas, and an array of ingredients that will tantalize your taste buds. From fragrant spices to unique grains, pulses, and fresh produce, Indian grocery stores are treasure troves for food enthusiasts and home cooks alike. Let's take a closer look at what makes these stores so special and how you can embark on a culinary journey right in your own neighborhood.

Aromatic Spices:
The heart and soul of Indian cuisine lie in its spices. Walk down the spice aisle of an Indian grocery store, and you'll be greeted by a mesmerizing blend of aromas – from the earthy warmth of cumin and coriander to the fiery kick of chili powder and the sweet fragrance of cardamom and cinnamon. Learn about the essential spices used in Indian cooking and how they can transform your dishes with their depth of flavor.
Diverse Grains and Pulses:
Indian cuisine boasts a rich variety of grains and pulses, each offering its unique texture and taste. Explore shelves stocked with basmati rice, lentils, chickpeas, and more. Discover the versatility of ingredients like rice flour, semolina, and gram flour, which are used to make an array of traditional dishes and snacks, from fluffy idlis and crispy dosas to savory pakoras and mouthwatering sweets.
Fresh Produce and Herbs:
From vibrant vegetables like okra, eggplant, and bitter gourd to fragrant herbs like cilantro, mint, and curry leaves, Indian grocery stores offer a wide selection of fresh produce essential for creating authentic Indian flavors. Learn how to pick the freshest ingredients and incorporate them into your cooking to add freshness, color, and nutritional value to your meals.
Ready-to-Use Convenience:
In addition to raw ingredients, Indian grocery stores often stock a range of ready-to-use products that make cooking Indian cuisine at home more accessible than ever. Explore shelves filled with pre-made spice mixes, curry pastes, and frozen meals, perfect for busy weeknights when you're craving authentic Indian flavors but short on time.
Cultural Experience:
Visiting an Indian grocery store is not just about shopping for ingredients; it's also an opportunity to immerse yourself in Indian culture and heritage. Strike up a conversation with the store owner or fellow shoppers, and you may uncover valuable cooking tips, family recipes, and stories behind the foods you love. Embrace the sense of community and shared passion for good food that transcends cultural boundaries.
Conclusion:
Whether you're a seasoned cook or a culinary novice, a trip to an Indian grocery store is sure to ignite your senses and inspire your creativity in the kitchen. Explore the aisles, experiment with new ingredients, and savor the rich tapestry of flavors that Indian cuisine has to offer. With a world of spices, grains, and produce at your fingertips, the possibilities are endless. So why wait? Embark on your culinary journey today and let the flavors of India transport you to new culinary heights.
originally content published by,
:
1 note
·
View note
Text
Pops and drops (My childhood recipe)
“It’s my childhood recipe which my mother made for us when I was in prep school and during Ramadan. These are sweet, crunchy, soft, and fluffy. You just need a few ingredients to make this. To make these soft balls you need flour, semolina, egg, baking powder, vanilla essence, and milk.” Ingredients: Plain flour 1cup Semolina half-cup Sugar half cup Egg 1 Milk half cup Baking powder 2…

View On WordPress
0 notes