#drilling polymer
Explore tagged Tumblr posts
Visit Tumblr Blog
Explore Tumblr blogs with no restrictions, modern design and the best experience.
Last Seen Tumblr Blogs


Fun Fact
Tumblr was the first site to host the blog for President Barack Obama in 2011.
Text
Maximizing Drilling Performance with PHPA Based Polymers | Chemtex Speciality Limited

Boost your Drilling efficiency and reduce environmental impact with chemtex's "PHPA" based Polymers.
Chemtex's polymers are versatile, catering to a wide range of drilling operations including deep drilling, foundation piling, diaphragm walls, trenching excavations, and more. They are formulated to mix easily even with minimum shear in fresh water, enhancing their usability across different drilling scenarios.
#sustainabledrilling#efficientdrilling#greendrilling#highperformance#drillingtechnology#smartdrilling#phpa#drillingfluid#drilling polymer#petroleumengineering#chemical manufacturer#chemtex
0 notes
Text
Shale Gas Boom Fuels Growth in Drilling Polymers Market
Increasing Oil & Gas Exploration Activities and Need for Efficient Drilling Operations Drive Growth in the Drilling Polymers Market.

The Drilling Polymers Marketsize was valued at USD 2.01 Billion in 2023. It is expected to grow to USD 2.91 Billion by 2032 and grow at a CAGR of 4.12% over the forecast period of 2024-2032.
The Drilling Polymers Market is driven by increasing activities in oil & gas exploration, mining, and geothermal drilling. Drilling polymers, which are critical additives in drilling fluids, enhance viscosity, fluid loss control, and lubrication while stabilizing boreholes in challenging geological formations. With growing global energy demands and deeper exploration projects, the market is being propelled by the need for efficient and high-performance drilling operations.
Key Players
SINO MUD
Baroid Industrial Drilling Products
Baker Hughes, Inc.
Halliburton, Inc.
Chevron Corp.
Schlumberger Ltd.
Global Drilling Fluids and Chemicals Ltd.
Global Envirotech
Di-Corp
M-I SWACO (A Schlumberger Company)
Future Scope & Emerging Trends
The future of the drilling polymers market is closely tied to the continued development of unconventional energy resources such as shale gas, tight oil, and deepwater reserves. As drilling operations become more complex, there is a growing demand for advanced polymers that offer high thermal stability, salt resistance, and biodegradability. A significant trend is the development of environmentally friendly, non-toxic polymers aligned with stringent environmental regulations and sustainability goals in the energy sector. In addition, the increased use of water-based drilling fluids over traditional oil-based systems is expected to fuel demand for specialized polymers that maintain performance while reducing ecological impact. Emerging regions in Asia-Pacific, Latin America, and Africa are anticipated to be key growth areas due to ongoing exploration and infrastructure development.
Key Points
Essential for viscosity control, fluid loss reduction, and borehole stabilization
Rising demand from oil & gas, mining, and geothermal energy sectors
Growing focus on eco-friendly and biodegradable polymer formulations
Increasing adoption in water-based drilling fluids
Asia-Pacific and Latin America emerging as high-growth regions
Conclusion
The Drilling Polymers Market is set for robust growth as global exploration and drilling activities intensify. With advancements in polymer technology and a focus on sustainability, drilling polymers are playing a pivotal role in enhancing drilling efficiency, safety, and environmental compliance across the energy and mining industries.
Read Full Report: https://www.snsinsider.com/reports/drilling-polymers-market-4971
Contact Us:
Jagney Dave — Vice President of Client Engagement
Phone: +1–315 636 4242 (US) | +44- 20 3290 5010 (UK)
#Drilling Polymers Market#Drilling Polymers Market Size#Drilling Polymers Market Share#Drilling Polymers Market Report#Drilling Polymers Market Forecast
0 notes
Link
In the article from The Armory Life titled "9mm vs. 40 – Is the .40 Caliber a Better Handgun Cartridge?", Scott Wagner, a retired law enforcement officer, examines the longstanding debate between the 9x19mm Parabellum and .40 caliber cartridges. Highlighting significant events like the 1986 FBI Miami Shootout, which led to the FBI's subsequent switch to the 10mm Auto and the eventual development of the .40 caliber, Wagner discusses the pros and cons of each round in terms of stopping power and recoil. Through testing with Springfield Armory handguns and comparing the performance of both rounds using wet clay blocks, he concludes that while the .40 caliber offers more power due to its larger diameter and heavier bullet, advancements in 9mm ammunition have narrowed the gap in terminal performance, making the choice between the two a personal preference balancing power, recoil, and handling in defensive situations.
#Springfield Armory#9mm vs. .40 S&W#ballistics#recoil#magazine capacity#self-defense#law enforcement#ammunition cost#terminal performance#bullet trajectory#shot placement#firearm enthusiasts#muzzle velocity#energy transfer#defensive shooting#polymer-framed pistols#steel-framed pistols#ammunition availability#training drills#personal preference#competitive shooting#firearm reliability.
0 notes
Text
Drilling Starch Ahmedabad | PHPA Chemical Ahmedabad - Chem Fert Chemicals
Drilling starch exporter Ahmedabad, Gujarat, India - Searching for the PHPA chemical & PAC LV Importer and Traders? Chemfert Chemicals is leading Water Treatment chemicals Suppliers Ahmedabad, Gujarat, Polymer for pilling india, PHPA chemical exporter and Drilling Starch suppliers in Ahmedabad, Gujarat, India. Organphilic clay Supplier, Construction Chemicals Supplier Ahmedabad, Gujarat, india, Cloud point glycol Supplier, Commodity Chemicals Supplier in Ahmedabad, Gujarat, Best water treatment chemicals suppliers near me in Ahmedabad.
Drilling Starch, PHPA chemical & PAC LV Importer and Trader india, Polymer for pilling Supplier, Organphilic clay Supplier, Construction Chemicals Supplier Ahmedabad, Gujarat, Cloud point glycol Supplier India, Commodity Chemicals Supplier, Water treatment chemicals Suppliers Ahmedabad, Gujarat, India, www.chemfertchemicals.com, Chem Fert Chemicals
#Drilling Starch#PHPA chemical & PAC LV Importer and Trader india#Polymer for pilling Supplier#Organphilic clay SupplierConstruction Chemicals Supplier Ahmedabad#Gujarat#Cloud point glycol Supplier India#Commodity Chemicals Supplier#Water treatment chemicals Suppliers Ahmedabad#India#www.chemfertchemicals.com#Chem Fert Chemicals
0 notes
Text
Simple Solutions
There were many reasons Zil hated working on a human ship. They hated how everyone went into one big room to eat. Consuming calories for life was a private thing for the Xerilan; an unfortunate side effect of life that was better done out of sight of everyone. The humans did it all together, all sound and smells and noise. Going into the canteen at lunchtime was an assault on their senses.
They hated how the deck plates felt. Xerilan ships used a polymer covering for the floors, nice, soft, quiet. The humans used whatever alloy of iron they acquired from the lowest bidder. It was cold, and loud, and hurt their heels when they walked.
But, what they hated the most were the alarms.
Human alarms were loud, brash, violent affairs. Lights would flash, horns would honk, and some even added elements of vibration. When asked, the humans told them they wanted to make sure that everyone reacted to the alarm. Zil practically went catatonic at the noise. They received special training before taking their post on the human ship and still they had to fight the urge to roll into a ball every time the alarm sounded, and it sounded a lot.
There were alarms for battle - which was fortunately infrequent - alarms when the reactors ramped up, alarms for when they would need to secure for maneuvering, for when gravity was going to change. Zil was almost sure they heard an alarm for the start of a new day.
Zil was leaving his quarters, heading down to the greenhouse to begin his shift when the alarm sounded. This time, the alarm was different. Even they had to admit this one worried them. It sounded dangerous. It was high and trilling with a mid range warbling and even a brassy low range which made their own sounding plates vibrate unpleasantly. As soon as it started, literally everyone dropped what they were doing - some literally - and began to run.
It was the fire alarm.
As much as Zil hated all the human alarms, they at least understood why the fire alarm was so annoying. Fire aboard a starship was a potentially lethal affair, and everyone had to work together to find and extinguish the fire as quickly as possible. They ran to their assigned station and came upon the deck chief, Tanner.
"Zil! You're one of the first. Nice to see someone was paying attention at drills." He said, smiling quickly as he flung open lockers built into the walls. "Put on your gear."
Zil methodically put on his firefighting gear. Everyone aboard had some, and they were surpsied when they learned that the humans took the time and effort to consult the Swarm for plans and measurements for gear that would fit their bodyplan. It was almost like a spacesuit, but not airtight, made of a very thick cloth. There were tanks of breathing gas that the humans wore on their backs, but Zil's were strapped to their legs, like other Xerilan suits. They slid the helmet over their head and their feelers were blown around by a blast fresh air. It was annoying, but they knew that it wasn't something that could be adjusted. The humans needed their air to be fresh and in large volumes when they were under stress.
As soon as they were dressed, Tanner - also in his turnout gear - handed him a broom.
Even in the midst of an emergency, Zil regarded the broom curiously. "Uh Tanner, why did you give me a broom?"
"It's a hydrogen fire Zil, we don't know where it is."
Zil's hind-legs started twitching, preparing to launch themselves meters in the air and escape, just like their ancient ancestors. They suppressed the feeling. "What do you mean you don't know where it is?"
"Hydrogen fires are invisible and odorless. We can't see them." Tanner explained as he got his own broom. "We're going to walk the halls with the broom sticking out in front of us."
"How... will that help?"
"As soon as the broom bursts into flame, we know where the fire is!"
"We're going to walk until the broom bursts into flame? Don't you... don't you have sensors for this!?" Zil exclaimed as they began to follow Tanner. He would walk with his broom sticking out, angled towards the wall, and he moved Zil's broom so that it was pointed opposite his. Behind them two others from the deck team had their brooms out to the side.
"We do," Tanner said, not looking at them, "But they're never that accurate. Nothing like a physical indicator of an issue to find the leak fast. It's a simple solution, but that means it's robust and works even if there's a power outage or in some other kind of danger."
They methodically walked the halls of their deck, brooms out, with the alarm thankfully silent, but the lights still flashing annoyingly. They rounded a corner and came upon the other deck team, going the other way. As they approached, Zil saw one of their brooms flare to life, the fire orange and oily as the brushes caught.
"Found it!" One of the others shouted, and everyone dropped their brooms. Tanner signaled command to isolate the deck, and the pressure doors slammed down around them. Someone from the other fire team opened a cabinet and took out a fire extinguisher, and Zil ran over towards the pipe that was leaking and activated his comm. They did have a moment of thanks that the humans labeled everything. All they had to do was read off the location to command so they knew where to shut the line down.
"H2 line WES56.7, port side," he called over his comm. "Just aft of valve-" They glanced to the right, "-6769."
"Aft of valve 6769 copy." The voice on the other end crackled. Almost as soon as he called in the location, he could hear the whirring of machinery and the presumed jet of flame shrank until the only sign left was the smouldering broom and the smell of smoke and suppressant in the isolated hall.
"Nice work Zil!" Tanner said, and went to pat his back, but stopped, remembering that Zil hated being touched. "See? When you follow the training, you remain safe, and protected everyone and the ship."
"Yeah, but..." Zil opened his helmet and the hurricane if air thankfully stopped. "Brooms?"
"Simple solutions are the best ones, Zil." Tanner said, laughing. "Come on, it's up to maintenance now, we need to get back to our posts.
203 notes
·
View notes
Text
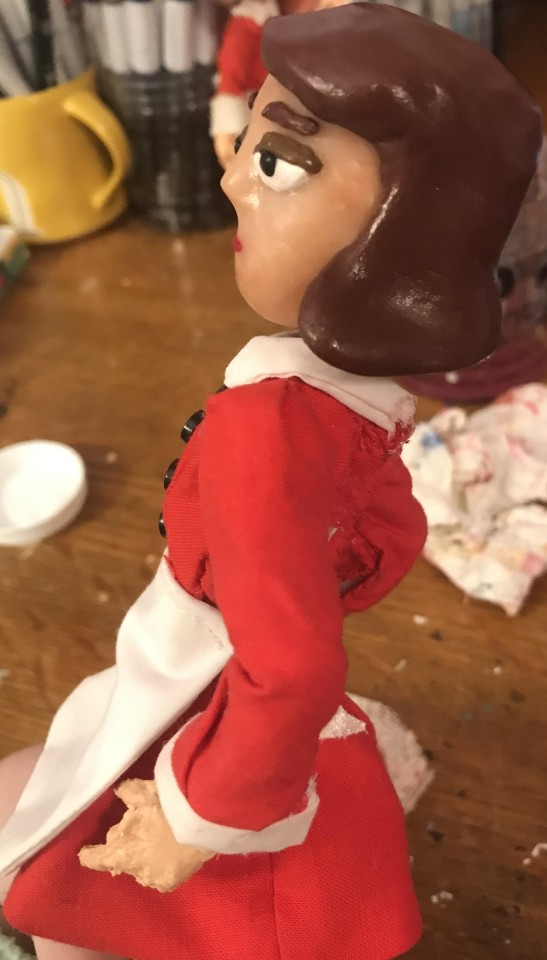
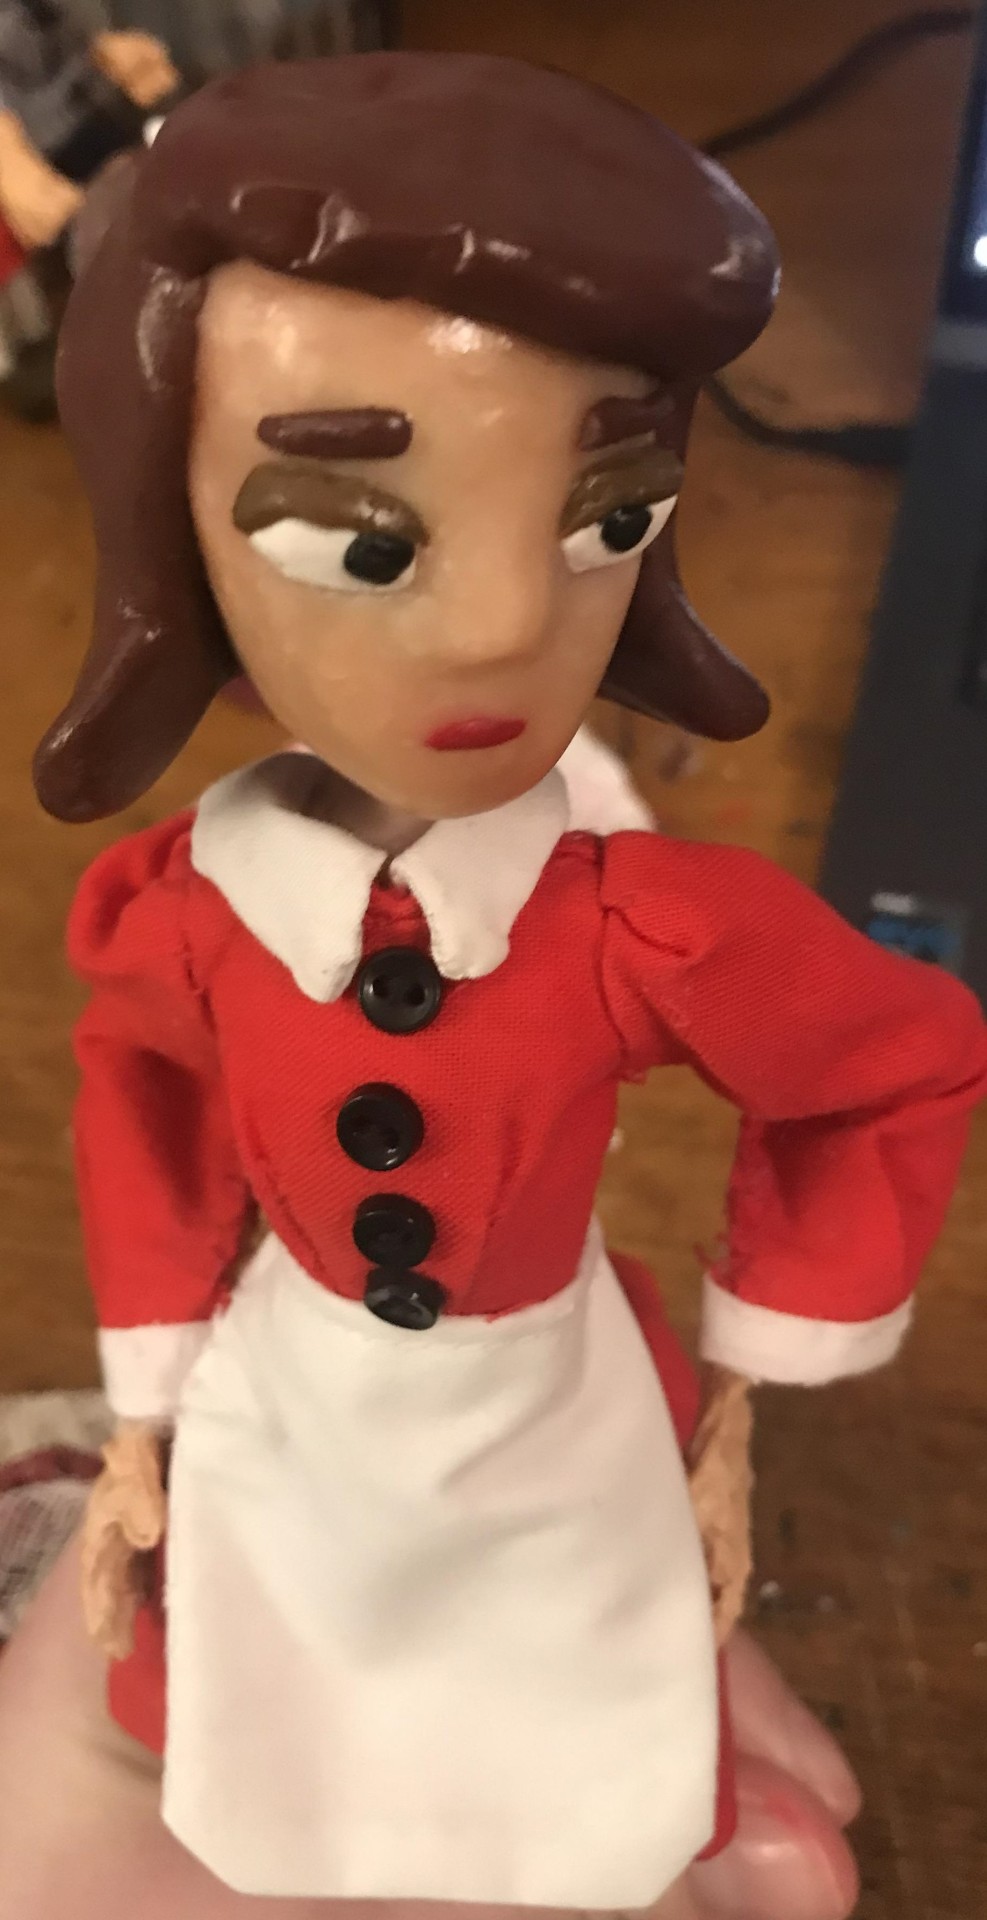
Okay so since I've posted it to reddit now and it's all finished (for now) I will share here a bunch of photos of my Orel and Bloberta dolls (Shapey is next WIP for the Shapey fans)! Materials included wire, epoxy putty, rubber latex, Super Sculpey/fimo polymer clay, Mr Super Clear, and lots of fabric lol- clothing patterns are originally from Chellywood.com (lots of awesome doll clothes patterns) which I have mixed/modified and added things of my own as with the collars and other embellishments. The inspiration for these came because I wanted my own puppets/dolls after watching the show. (There are 30 pics here because that's the limit lol)


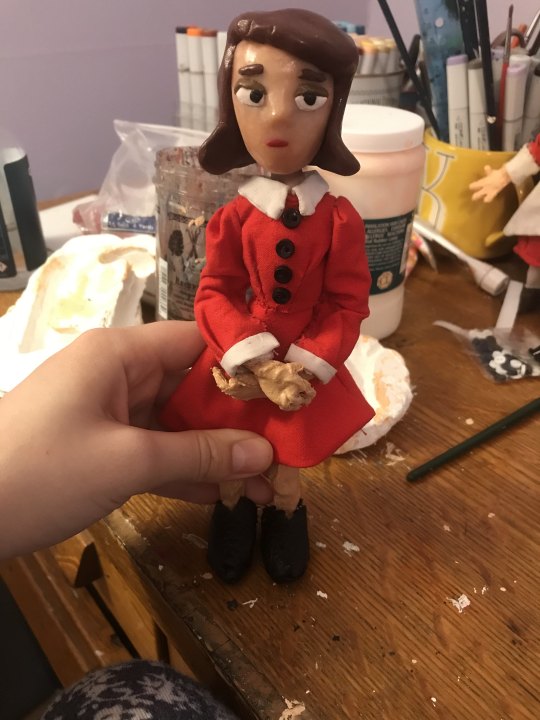

Orel clothes!

Bloberta clothes and stuff (apron, knitting, hat, broom, drill, slippers)! (more clothes made since this pic)

Based on the outfit she wore in Help (blouse pattern recreated in CSP)
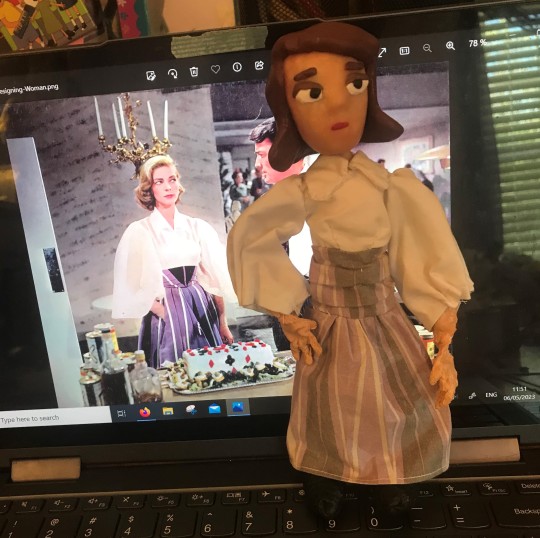
Based on Lauren Bacall's dress in 1957's Designing Woman (the pattern, which I recreated in CSP, got less saturated after I printed it which is annoying but at least it looks like it lol)


"My favourite lucky shirt!" Oh no Orel don't go on that hunting trip


Pyjama time


Multiple Godgasm shirt! I took the logo from the show, cleaned it up and vectorised it, and had it made into a direct film transfer (thank you DTFCreationsCo on Etsy)

"Look at my new shirt Mom!"


"Happy Mother's Day, Mom!" (technically it was like a week after Mother's Day that I took this but oh well. The card says "Happy Mother's Day, Love Orel" on the inside)


Various Blobs

Blobs and the drill

"Yarn yarn yarn"


Outdoor pics!!
Well there are a couple other assorted pics but at least I can put 30 here instead of 20 on reddit lol Look out for Shapey at some point!!
BONUS: Orel-burrito

#moral orel#orel puppington#bloberta puppington#bloberta hymentact#my art#ooak#art dolls#puppets#stop motion#adult swim#dolls#doll clothes#custom dolls#figures#shapey puppington#miniature#sculpey#lauren bacall#designing woman
146 notes
·
View notes
Text
How I made little Haarlep


A few days ago I posted about my latest finished crochet project for my good friend @tavyliasin, and I wanted to share how I made them! This is for people who would also like to make a little Haarlep (Raphael, Karlach, or any other character with horns for that matter), those who are curious how I did it, and I just love to yap about my projects. When I started this project I had only been crocheting for about 8 months, and it really pushed me to step out of my comfort zone, try new things, and learn a whole lot. I took the time to explore, experiment, and try again if needed. And man, did I learn from little Haarlep.
Note that this isn't a tutorial; I have made mistakes, oversights, and stumbled against problems. I will try my best to list these here, but if you have any questions about the listed patterns I advise you to head over to the linked etsy store to ask the creator of said pattern. But if you have any questions specifically regarding this project I'll try my best to answer them as best as I can. There are also some parts of little Haarlep where I didn't use a pattern at all, and either freehanded it, or did a load of guesswork.
Now, let's get started!
Used patterns:
Body: Doll base Amigurumi Body Version 3 by TheLoftyLoop
Wings: Kawaii Bat by ZeroGravityCrochet (I have also used this pattern for my Batstarion plushie)
Horns: Horns (3 sizes) by KnottedLovebymima
Used Materials:
Body: Katia Bambi #312 (3x)
Hair: Twister Solid XL Black #105 (1x)
I had bought the yarn for the hair and horns in a local yarn shop, and have thrown away the labels a long time ago. Once I have found them again I will list them here as well.
Polymer stuffing
PLA filament (optional)
Small chains which were part of a jewelry repair kit.
Soft silver RVS rings, 1,5 x 7,0 millimeters
Epoxy Resin (optional)
Gold and orange pigment powder
Gold glitter
Red embroidery thread
Used tools:
Crochet needles (3,0 millimeters and 3,5 millimeters)
Knitting markers
Yarn scissor
Yarn needles
Row counter (optional although it literally saved my life)
3d printer (Optional)
Silicone half circle mold
Pliers (x2)
Cutting pliers
Mini hand drill
Instant glue
Tweezers (optional)
Step-by-step guide:
First, I needed to know what the hells I was getting myself into. For that I have used several references on Haarlep. I have used these as a guidelines for the entirety of the project. The screenshots have been provided by @tavyliasin.


Then, I made a list every single part of the doll I needed to make.
Body
Tail
Wings
Horns
Ears
Eyes
Face
Harness
Hair
The body


For the body I have used the 3,5 millimeter crochet needle because I wanted the stitches to be as tight as I could. I had ignored the advised crochet hook size on the label of the yarn because of this. Although I quickly found out that the yarn itself was too large for this pattern as well, resulting in the doll becoming bigger and longer than I initially expected. But this is not necessarily a mistake because that would mean that there would be more to cuddle!
The head ended up being way too long though, so after I finished the body I folded the part of the head that was too long and stitched it on the back of the head.
The Tail

I didn't use a pattern for the tail, instead I made a magic ring with 6 single crochet stitches, and increased the stitch each time I felt like I should make the tail wider. For this I also used the 3,5 mm needle.
The wings

I used my trusty 3,5mm needle for this part as well. I already had a pattern for a bat plushie, which I had used to make the wings. From there I diverged from the pattern, and created a bigger 'spiral' so to speak by adding 3 more rounds.
If you are using this pattern, I diverged from the guide from row 5:
r5.1: 5dc, inc.
r5.2: 6dc, inc.
r5.3: 6dc, inc.
After that I followed the pattern again, and diverted from it once more to add more single crochet stitches to each 'spike' of the wings, making them more bulky and longer.
The ears

I also didn't follow any pattern for the ears, I just made a triangle of single crochets (again, with my 3,5mm needle), and stitched the points of the ears to one another to make them more pointy and give them more depth. Then I attached them on the side of the head with *only* the base of the triangles. This is because I was going to add the hair and horns later on, and I didn't want the ears to get in the way of them.
The eyes.


I worked with resin before, and still had some. I mixed a small amount of epoxy resin with gold and orange pigment powder, and golden glitters. I poured it in a half circle silicone mold I have with various sizes. After it had cured I tested which size I liked the most for the doll, and used those for the eyes.
Next was the application, glueing the eyes directly on the head would be a surefire way for them to detach in the near future. So at first I tried to use these screw eyes by hanging them over the mold as the resin cured, so I could simply sew them in. But that didn't work as the resin swallowed the entirety of the screw, and the thread I hung them over the mold with. The 'eyes' were still semi-transparent even though I used a lot of pigment, so I could easily see the ends of the screws inside the eyes. So this was a failure.
On my second try I didn't mess with the resin as it cured at all, and used even more pigment powder just to be sure it wouldn't be transparent. This time, I used a small hand-drill to create 2 holes on each side of the half-circle, as close to the edge as I could. Then I drilled another 2 holes on the flat side where the end of the first 2 holes ended, making a little tunnel. I took some tweezers and stuffed and pulled the thread through the tunnels until I could pull it through. I tied them on each end, and superglued the knots for extra security.
Once everything was dry I sew the eyes directly on the spots I wanted them to be. But I wasn't too happy with the result, in all honesty...

... So I gave Haarlep some eyelids. Sure, they still look quite bug-eyed, but I decided to trust the process.
The horns (and a nose!)

I had completely forgotten to photograph any of my progress from when I was done with the eyes t'ill the horns were already finished. I had also decided to give Haarlep a little nose (which I made out of a magic circle with 10 single crochets, 2 rows of increases, and 3 rows of decreases).
In the original pattern there are 3 sizes available, and I used size 1 and 2 for the horns on this doll. The yarn I used for this was quite thin, but I made the mistake to use the 3,5 mm needle *again*. Which is why I could see directly through all the stitches, and see all the polymer filling within. I admit that the horns were about my least favourite part of this project, and I was struggling to get through them (no hate to the creator of the pattern at all, as it was a very well-written pattern! I just didn't enjoy making these because of some Morb-problems). So I was not ready to do it all over again. Instead, I noticed I had a lot of yarn I used for the horns left, so I used that as filling so the large holes in each stitch wouldn't be noticeable.
The Hair

Again, I forgot to take any pictures of this process, so I'll have to write down what I did. I used the Twister solid XL yarn for this.
First I gave Haarlep a much-needed hairline to map out where I wanted his hairdo to start and finish. For each 'strand' of hair I repeated one of 2 processes whether I wanted it to curl or not.
(fun fact, the 'curly' hairs are based on a very simple pattern a friend of mine created to make toys for her cat!)
Curls:
Chain (make it as long as you want depending on how long you want it to be, but for this project I used in between 8-15 chains per strand), single crochet in the 2nd chain stitch from the end of your chain. 3 single crochets in every chain (I did this for about 3-6 chain stitches). Than I did a bunch of single crochets in every chain until I reached the end of the chain. Then I put another single crochet in the 2nd chain, and put 1 single crochet per chain stitch until you reach the end, tie and cut your yarn on both ends. I kept about 15-20 centimeters of yarn on the end that's the furthest away from the curl so I could use that to sew the strand of hair directly onto the head.
You can also put 2 single crochets per chain, or more than 3 depending on how curly you want your strand of hair to be.
Straight strand:
Follow the same steps as the curls, but just keep adding single crochets per chain stitch after you've made your chain, and repeat this twice.
I then worked in layers when attaching each strand of hair onto the head, I added one or two rows of "hair" starting from the neckline. Once I sew in those strands I sew about 3-5 centimeters of hair directly onto the head (the point that's the furthest away from the curl/the part of the strand that's attached to the head). This is so if the hair on the doll moves it wouldn't go out of place, and you wouldn't see any bald spots. This way I also wouldn't have to make countless of strands and add too much hair.
I have no idea how I can explain this properly without pictures, so if anyone reading this really wants to know how I did it I'll recreate the steps mentioned above.


I also added some sideburns to give Haarlep's hair a bit more of a finished look. After I was completely done with the hair (checked that I had not left any bald spot unchecked) I attached their ears on their lower horns using a piece of the same yarn I have used for the body.
The Harness
This was arguably my favourite part of this entire project! I really enjoyed making this as I could use several types of materials into this. I wanted to make the harness without having to directly attach it to Haarlep's body, so that it could be tight enough for it to stay attached. Bit first I had to start with the basics.

The undies! I freehanded the underwear as well, which goes as follows:
I started with the front, and made a chain that reached the diameter of Haarlep's body. From there I worked down, adding a single crochet per chain stitch. And at each end of the row I made a decrease. I used knitting markers to attach the underwear on the body as I made it to get as much of an accurate fit as possible. I kept going until I reached the hind, which is where I had to "split" the underwear to accommodate the tail. At first I went to the left, making every row very small until it reached 3/4 of the top of the tail (while making sure it could reach the front side of the underwear). I then made a chain that went around the entire top of the tail, and kept going until I reached the other side of the underwear, and attached my chain on it. I did the same stitching as I did on the other side of the tail, except in reverse until I reached the rest of the underwear. From there I finished up the underwear by securing all sides of the underwear to each other using the same yarn so it would seamlessly fit across the doll's waist.


I have no idea how to write a comprehensive tutorial and/or a pattern. So again, if you don't understand how I did this from the text I wrote please send me a message. I'll draw how I did this instead, and edit it into this post.
Next was the harness itself. I used a chain with a double crochet per chain stitch, and measured the chain against the body as I made it. I started out from the middle (the back strap that divides on the shoulders, to the front of the chest where it splits. I made several different sizes of "straps", always making a pair. I then attached every strap on a chainmail ring (the soft silver RVS rings), and kind of worked my way from there. I opened each ring with 2 pliers, slid on the end of each strap in place, and closed the ring with the pliers again. This was very much a 'trust the process' type of work for me.

If I couldn't secure the strap just yet I held them in place with a knitting marker (see shoulders).
For the shoulder pads I only used a chain to make the straps that go under the arms, and almost followed the same steps as I did when creating the underwear. Start with a chain (except smaller, like 5 or 6 chain stitches), do a round of single crochets, decrease at the ends of the rows, a round of single crochets, etc. Until I got a tiny rounded triangle, which I attached to the shoulder chain.
Next, I wanted to create the spikes that go on top of the shoulder pads. At first I wanted to make the tiniest studs using some embroidery thread. But I recently acquired a 3d printer! And as I already was using metal in the harness, I wanted those studs to match.
So I created a simple design on Tinkercad.com using a simple cone, printed 10 of them (using a 0,25mm nozzle and neutral white PLA filament), and painted them silver. Then I figured that I could drill a little hole in it with the same small hand drill I used on the resin, but turns out that cured PLA filament is quite hard, and brittle at the same time. So I went back to Tinkercad, and designed a cone with a hole in it that would allow a larger needle to go through it. I made the cone 0,5x0,5 millimeters.


After that was done I painted them silver again. Below you also see the shoulder pads, which is the only picture I have of them before I attached them to the doll.

I used 5 studs per shoulder pad, and sewed them directly onto the pads with black thread. After I secured them with a tiny drop of instant glue so they wouldn't shift. I could've created another hole that ran opposite of the one already going through the cone, but I think that it would've made the integrity of the inner (teeny tiny) supports within the cone too vulnerable.
After that was done I attached the shoulder pads around the arms and the harness.


For the final touches I attached the small chains from the jewelry kit, mirroring the references I found. I simply opened them with the pliers, hooked them through a stitch in the harness, and closed them. I actually had run out of these chains, and literally dismantled a necklace as I wasn't going to wait around and buy another jewellery kit or a whole spool of necklace chains when I was so close to the end. And I'm glad I did, because my patience had run out after I had been working on little Haarlep since August 2024.
And with that, they were done!

As soon as I was done I made pictures, and sent Haarlep on their way to Lia along with some snacks and a few other bits and bops. This project was such a challenge, but very much a welcome one. I had started learning how to crochet in december 2023, and truly went out of my comfort zone, and learned so much about crocheting techniques, trusting the process, and Frankensteining several patterns into one.
If you have any questions regarding this project, or if I can clear up anything mentioned here I'd love to help to the best of my abilities! Other than that, thank you for reading this and following the journey of creating the most intricate and hardest crocheting project I have made so far. And it was a joy to make. But it will most likely not be the last one, and not the hardest as I have no plans of quitting crocheting anytime soon. Who knows I'll surprise myself with the next Baldur's Gate 3, or other fandom project I'll decide to undertake.
#my art#my crochet#crochet plushie#crochet project#crochet guide#baldur's gate 3#bg3#baldur's gate 3 haarlep#bg3 haarlep#baldur's gate 3 fanart
5 notes
·
View notes
Text
Contention
Someone more eloquent than myself once said,
the world will end in fire or ice, and that either
would quite do the job, torching the Palisades
or encasing Long Island in ice sheets an inch
thick, sending residents fleeing for their lives
or trapping inside beside the hearth, cocoa mug
in hand, snug in their bear-foot slippers, while
the glaciers make their long-awaited return, the
artificial fleece draping their shoulder produced
in a factory, fashioned of synthetic fibers derived
from oils or polymers, another mass petroleum
product whose heritage is part-laboratory, part
dinosaur sucked out of the earth by an industrial
drill pipe, converted into Tupperware containers
and cheap fashionware, breakfast trays and black
television remote controls whose tiny, rubberized
buttons take us away to ancient times at the touch
of a thumb, into deserts, arctic tundra, or the waste
of Mars where surely some California developers
are eyeing crater-front property that, inevitably,
will be too hot to insure during the daytime, and
too cold at night while the dark Id of its surface
turns adamantly away from the Ego of the Sun.
-GeorgeFilip
#poem#poetry#georgefilip#poetrythreesixfive#spilledink#poetryportal#poetsandwriters#poetsontumbler#spilledwords#deepthoughts#contention#two sides#fire and ice#apocalypse#armageddon#ego#id
2 notes
·
View notes
Text
How to Install Snap Rivets Like a Pro: Tools, Tips, and Tricks
Snap rivets are a multipurpose and simple attachment method that using polymer, metal, and fabric materials. Whether furniture production, fixing appliances, or customizing DIY projects, being equipped with the knowledge of installing snap rivets will save time and make the work easier.
In this guide, we will talk about the tools that you should have, and the directions that you need to follow, we will also give you a few practical tips just to approach the experts’ level.
Tools You Need for Installing Snap Rivets First of all, you have to assemble these tools and materials before starting:
1. Snap Rivets: Pick the right size and material for your project. the options are different for these two materials like metal and plastic snap rivets are common ones.
2. Drill and Drill Bits: A drill is the tool to use to make holes in the materials you are fastening. If you choose a drill bit that fits the size of your rivet, then it will work for you.
3. Rivet Gun or Snap Rivet Pliers: The devices will easily fix the snap rivets.
4. Measuring Tape or Ruler: Be sure to accurately place the rivets.
5. Marker or Pencil: Indicate exactly where the holes will be drilled.
6. Safety Gear: Protect your eyes by wearing safety goggles and gloves, especially if you encounter tools that may cause harm while working.
Step-by-Step Guide to Installing Snap Rivets
The following steps will show you how to nail snap rivets accurately and efficiently:
1. Prepare Your Materials
• Take the two pieces that you are going to join and fit them correctly to each other.
• Afterward, cleanse the surfaces to be bonded and make sure no impurity like mud, or something dirt remains. 2. Mark the Rivet Positions
• Measure out the rivet’s placement using a measuring tape. Perfect placement results in uniformity and a pristine appearance.
3. Drill Holes
• Drill holes at the marked spots. Make the holes the right size so they are as big as the outer diameter of the rivet’s shaft to ensure a tight fit.
• Additionally, use a file or sandpaper to remove the sharpness due to the drilling of the holes.
4. Insert the Snap Rivet
• Put the pin of the rivet into the hole until the head on the bottom of the pin is properly aligned with the surface.
• The first thing you need to make sure of is that the panels are in the right position.
5. Secure the Rivet
• Using a rivet gun or snap rivet pliers, thrust the rivet into the hole. This way, the rivet will be blocked and a high contracting will be established.
• By hand, apply a steady force to ensure the rivet is entirely fixed in the hole. 6. Inspect the Installation
• Check if the rivet is sturdy and if the two objects stuck to it are tightly bonded. The rivet head must be even with the surface and the shank ends must be hidden away.
Tips and Tricks for Perfect Rivet Installation
• Picking the Right Rivet: You can do right sizing when you get the rivet that is suitable for your work. The type of the rivet which is the best for light projects is plastic rivets and for the heavy-duty applications make the best use of the metal rivets.
• Sample Material Testing: Do a dry run using a piece of scrap material ahead to be sure that you are comfortable with the tools and the process.
• Properly Line Them Up: The lack of alignment between the two materials may result in the weakening of the joint. Thus, be sure to check your alignment before installing the rivets.
• Over Tensioning: Applying much force can affect the rivet and the material as well. Just use the exact force that is enough to keep the joined pieces together.
• Keep Tools Maintained: Be sure to have the rivet gun or pliers in the right state for trouble-free operation.
Common Mistakes to Avoid
1. Selecting the Wrong Drill Bit: Holes too big or too small can lead the rivet to work ineffectively.
2. Ignoring Material Alignment: Misaligned materials can cause non-perfected joints as well as uneven finishes.
3. No Safety Gear: Always wear safety goggles and gloves to safeguard against any accidents from happening.
4. Using Wrong Material: The use of plastic rivets in places with higher temperatures or heavy loads can lead to them failing.
Applications of Snap Rivets Some of the uses of snap rivets are:
• In the auto industry, they are used to attach the interior parts.
• In consumer electronics and home appliances, they are used in functional connections.
• This tool is essential in the assembly of furniture.
• They are essential in fabric and leather working crafting.
• In the realization of DYI home improvement projects, they are imperative too.
Conclusion
There is no need for specialized knowledge or technical support, the installation of high-quality snap rivets is a simple process and underlines even that it is a process that anyone can master when he has the right tools and sufficient techniques. Mere obedience or implementation of these procedures and tips will be the cozy shelter for every project. Whether you are mending an appliance or tidying up your house with the furniture, snap rivets will give you the exceptionality of acting as a reliable and effective way of fastening the two materials. You can earn the title of installation professional with just a little practice.
2 notes
·
View notes
Text
The Essential Role of Oilfield Chemical Products in Extraction Efficiency
The extraction of oil and gas is a complex and challenging process that requires the use of advanced technologies and high-quality chemical products. These chemicals play a crucial role in enhancing extraction efficiency, ensuring environmental safety, and reducing operational costs. Imperial Oilfield Chemicals Pvt. Ltd. (ICPL), recognized as the best chemical company in Vadodara, excels in providing innovative oilfield chemical solutions that meet the rigorous demands of the industry. In this article, we will delve into the essential role of oilfield chemical products in extraction efficiency and highlight why ICPL stands out as the best oilfield chemical products provider in the world.

The Importance of Oilfield Chemicals in Extraction
Oilfield chemicals are indispensable in various stages of oil and gas extraction. From drilling to production and processing, these chemicals enhance performance, protect equipment, and ensure efficient resource recovery. Here are some key areas where oilfield chemicals play a vital role:
1. Drilling Fluids
Drilling fluids, also known as drilling muds, are essential in the drilling process. They serve multiple functions, including:
Lubrication: Reducing friction between the drill bit and the rock formation.
Cooling: Keeping the drill bit cool to prevent overheating.
Stabilization: Maintaining the integrity of the wellbore walls.
Carrying Cuttings: Transporting rock cuttings to the surface.
ICPL’s advanced drilling fluid formulations ensure optimal performance in various geological conditions, making them a preferred choice for drilling operations worldwide.
2. Cementing Additives
Cementing is a critical phase in well construction, providing structural integrity and zonal isolation. Cementing additives are used to enhance the properties of cement slurries, ensuring:
Improved Strength: Enhancing the compressive strength of the cement.
Reduced Shrinkage: Minimizing the risk of annular gaps and leaks.
Accelerated Setting: Reducing the waiting time for cement to set and harden.
As one of the best oilfield chemicals suppliers, ICPL offers a range of cementing additives that improve the efficiency and reliability of well cementing operations.
3. Production Chemicals
During the production phase, various chemicals are used to maximize oil and gas recovery and maintain flow efficiency. These include:
Corrosion Inhibitors: Preventing corrosion of pipelines and equipment.
Scale Inhibitors: Preventing the formation of scale deposits that can clog pipelines.
Emulsion Breakers: Separating water from oil to ensure smooth flow.
ICPL’s production chemicals are designed to address specific challenges in oil and gas production, ensuring high efficiency and longevity of equipment.
4. Enhanced Oil Recovery (EOR) Chemicals
Enhanced Oil Recovery (EOR) techniques are used to extract additional oil from reservoirs after primary and secondary recovery methods. EOR chemicals include:
Surfactants: Reducing surface tension to improve oil mobility.
Polymers: Increasing the viscosity of injected water to improve sweep efficiency.
Alkalis: Reacting with natural acids in the reservoir to form surfactants in-situ.
ICPL’s expertise in EOR chemicals positions them as the best oilfield chemical products provider in the world, helping operators maximize recovery from mature fields.
ICPL: A Leader in Oilfield Chemical Solutions
Imperial Oilfield Chemicals Pvt. Ltd. (ICPL) has earned its reputation as the best chemical company in Vadodara by consistently delivering high-quality, innovative chemical solutions tailored to the needs of the oil and gas industry. Here are some reasons why ICPL stands out in the global market:
1. Research and Development
ICPL invests heavily in research and development to stay at the forefront of technological advancements. Their state-of-the-art R&D facilities in Vadodara focus on developing new formulations and improving existing products to meet the evolving needs of the industry.
2. Quality Assurance
Quality is at the core of ICPL’s operations. They adhere to stringent quality control measures at every stage of production, from raw material sourcing to final product testing. This commitment to quality ensures that their products meet international standards and deliver consistent performance.
3. Customization
Recognizing that each oilfield has unique challenges, ICPL offers customized solutions to address specific operational requirements. Their team of experts works closely with clients to develop tailored chemical formulations that optimize extraction efficiency and reduce costs.
4. Global Reach
With a strong presence in the global market, ICPL is not only the best oilfield chemicals supplier in India but also a trusted partner for oil and gas companies worldwide. Their products are used in diverse geographical regions, including the Middle East, North America, and Europe, demonstrating their versatility and reliability.
5. Environmental Responsibility
ICPL is committed to sustainable practices and environmental responsibility. They develop eco-friendly chemical formulations that minimize environmental impact and comply with regulatory standards. This focus on sustainability is crucial in today’s industry, where environmental considerations are increasingly important.
Case Study: Enhancing Extraction Efficiency with ICPL Products
To illustrate the impact of ICPL’s oilfield chemical products, let us consider a case study involving a major oilfield operator in the Middle East.
Challenge:
The operator was facing significant challenges with scale formation and corrosion in their production wells, leading to frequent downtime and high maintenance costs.
Solution:
ICPL conducted a thorough assessment of the field conditions and recommended a tailored chemical treatment program. The program included:
Scale Inhibitors: Specifically formulated to prevent the deposition of scale in high-temperature environments.
Corrosion Inhibitors: Designed to protect the integrity of pipelines and equipment.
Results:
The implementation of ICPL’s chemical solutions resulted in a substantial reduction in scale and corrosion issues. The operator reported:
Increased Uptime: Reduced downtime due to fewer maintenance interventions.
Cost Savings: Lower maintenance costs and extended equipment lifespan.
Improved Production: Enhanced flow efficiency and increased oil recovery.
This case study underscores the critical role of high-quality oilfield chemical products in improving extraction efficiency and operational reliability.
Conclusion
The essential role of oilfield chemical products in extraction efficiency cannot be overstated. From drilling and cementing to production and enhanced oil recovery, these chemicals are integral to the success of oil and gas operations. Imperial Oilfield Chemicals Pvt. Ltd. (ICPL), as the best chemical company in Vadodara, continues to lead the industry with innovative solutions and a commitment to quality.
ICPL’s position as the best oilfield chemical products provider in the world is reinforced by their dedication to research and development, customization, quality assurance, and environmental responsibility. Their global reach and proven track record make them a trusted partner for oil and gas operators seeking to enhance extraction efficiency and achieve operational excellence.
As the industry evolves and new challenges arise, ICPL remains at the forefront, delivering cutting-edge chemical solutions that drive the future of oil and gas extraction.
#Best oilfield chemicals suppliers#Best oilfield chemical products provider in the world#Best chemical company in Vadodara#upstream oil and gas industry#upstream oil and gas segment
3 notes
·
View notes
Text
Converting a battery backup to Lithium because I hate myself
I've got a whole bunch of battery backups in my home, one on each computer, and a big one in my server rack in the basement. I've also got a few out "in the wild" at some of my family's places. They're great, where I live in the northeast US, the power grid is stable enough that most outages are only minutes long, and these backups (technically called a UPS - Uninterrupted Power Supply) do a great job keeping computers running through them.
My issue is the batteries. They all run on lead acid batteries, aka the same kind that's in your car, and they dont last long in this kind of environment, I'm lucky if I get 3 years out of one. On top of that, their battery life detection is terrible, It's about a 50/50 shot whether I get a warning about a dead battery pack before the next power outage takes it down without warning. Keeping track of that with just one or two is annoying, let alone 10 of them!
Lithium UPS's exist, and theoretically last many years longer, but they are many times more expensive than a normal backup. I'd like to not spend new-car money replacing a dozen UPS units, so I did some math instead.
I have a husk of a ups (no battery), and I tested it out: the open circuit voltage on the battery cable is 27.6 volts, which just happens to be almost the exact voltage needed to float charge a series of 8 Lithium-iron-phosphate (LiFePo4) batteries!
Why is that exciting? Usually when you think of lithium batteries, you think of lithium-ion (also can be called lithium-polymer) batteries. These are the batteries in your laptop and phone... And also Tesla cars. They hold more energy than a LiFePo4 battery, but are very sensitive to temperature, over and under-voltage, over-charging, and over-current conditions. Abuse them too hard, and they swell up and pop! That's why Teslas seem to catch fire more often than other cars: most other companies gave up range for a battery chemistry that isn't a ticking time bomb, like LiFePo4.
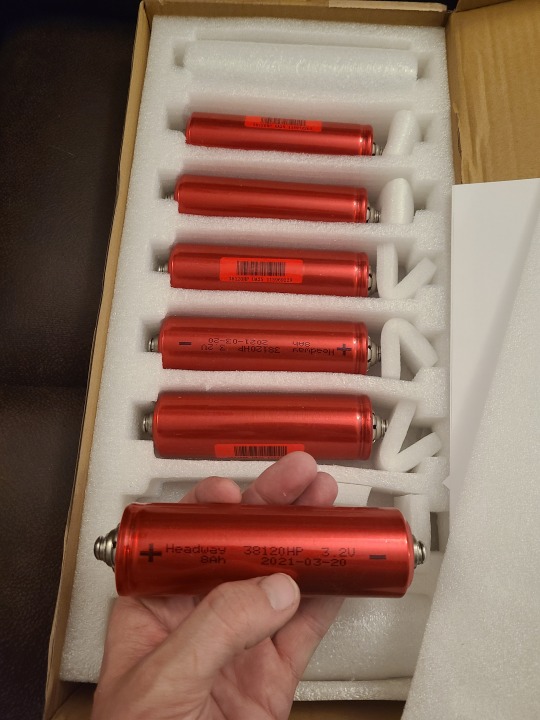
These LiFePo4 batteries can take a beating compared to Li-ion ones. Most importantly, they can be "float" charged, that is, left on the charger 24/7, without worrying about overcharging it and blowing caustic smoke everywhere. This is critical, because I'm attempting a direct drop-in swap for the old lead battery in this UPS, because float charging a lead battery is basically a requirement, and doing that to a Li-ion battery is asking for a fire!
Using a Li-ion pack would require a custom charging circuit, as the UPS's 27.6V is not correct for any configuration of Li-ion, and would either under charge the pack, losing me 50% of my capacity, or overcharge it, and make it explode. It would also have to stop the batteries from being float charged, again to keep the battery from exploding, while fooling the UPS into thinking a battery is still attached so it doesn't beep at me all the time, and my head is spinning just thinking about how that would work. Much easier to give up capacity for a simpler, and more robust battery.
This UPS can deliver 900 watts of power on battery, that equates to roughly 30 amps of current from the 27.6V battery pack. Adding a safety factor, I bought a BMS (Battery Management System) rated to 50 amps. A BMS is essential, as it offers extra protection against short circuits, over and under-charging and temperature cutoff. Also cell balancing, which keeps all the cells at the same level of charge during use (if they go out of sync-that's bad, is all I'll say for now). The batteries are rated for 120 amps continuous draw, so I am well under the limit where the cells would self-immolate.
With all that said, here's the guts:
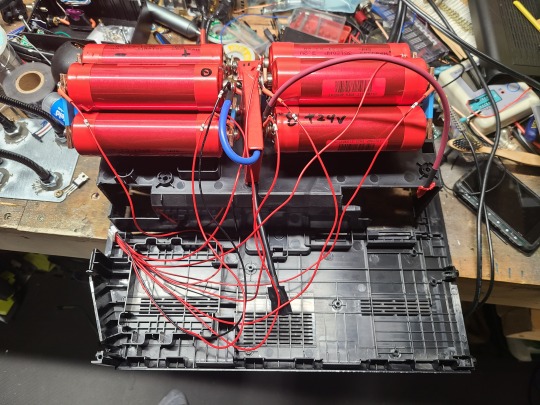
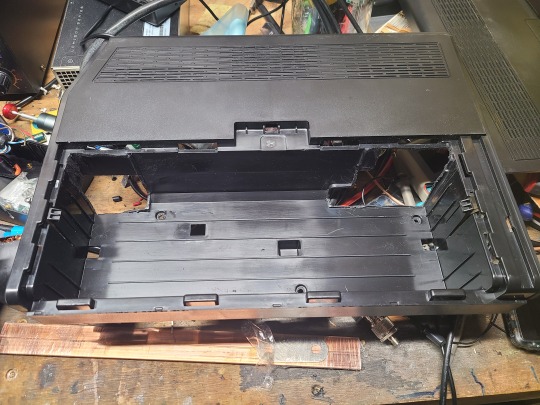

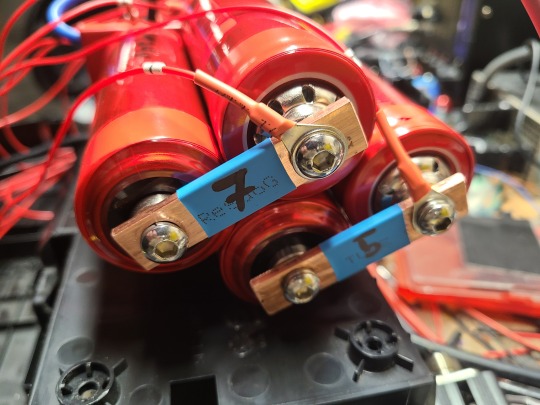

Looking close, you might see that I had to cut some plastic out to make it all fit. That's an error on my part-I didn't measure right. If I make more, I'll definately be using a smaller cell, so it will be a proper "drop in" mod. Lots of drilling, cutting, and filing to make this all fit!
It took several hours to link up the cells, terminate the balancing wires (the small red spindly ones), and and stuff them in the battery box. That's a LOT longer than I was hoping it would take, but the on-the fly mods took a lot of time. but eventually, it all fit in, and I was able to test it:
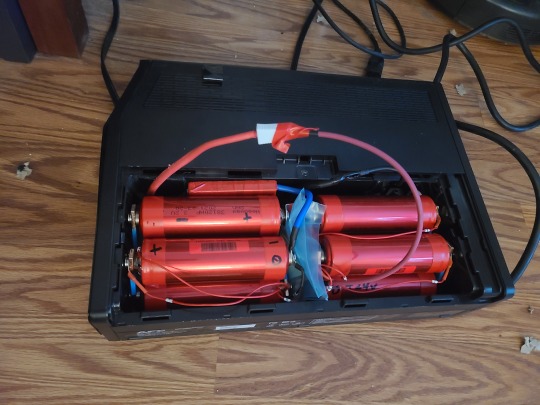

It works! I unplugged it from the wall, and it stayed on! For now, I am in full helicopter parent mode, since I don't want to deal with a lithium fire, even though my math checks out and the UPS should never get the the point that these cells are ever "abused". I only leave it on when I'm in the room, and when I leave, I unplug from the wall, and remove the red lead from the battery, so no charge enters or leaves while I'm not there to watch it.
In theory, the only issue with this retrofit will be a useless runtime meter. The "minutes of runtime" meter is measuring the voltage of the battery as it discharges to estimate how much longer it will last, and the voltage drop over time is different for lithium and lead, so the meter won't be measuring accurately. Once I'm confident it won't explode randomly, I will likely install it permanently somewhere in one of my compters.
Wish me luck!
7 notes
·
View notes
Text
PHPA Drilling Polymer Enhances Drilling Operations

In the realm of oil and gas drilling, efficiency is a paramount concern. The success of drilling operations depends on a multitude of factors, and the choice of drilling fluids plays a crucial role. Now the question is how PHPA drilling polymer, a polymer-based drilling formulation, in combination with other drilling fluid additives, can significantly improve oilfield drilling efficiency, all while promoting sustainability and cost-effectiveness.
The Role of Drilling Fluid Additives
Drilling fluid additives are essential components of the drilling process. They are meticulously chosen to address various challenges faced during drilling operations. These additives, when combined with PHPA drilling polymer, offer a range of benefits that contribute to enhanced drilling efficiency. Such as
Improved Wellbore Stability
One of the primary functions of PHPA is its ability to increase the viscosity of drilling mud. This enhanced viscosity aids in maintaining wellbore stability by preventing wellbore wall collapse and sloughing. Additionally, it minimizes fluid loss to the surrounding formation, reducing the risk of wellbore instability issues such as differential sticking and lost circulation.
Cuttings Transport and Friction Reduction
It effectively suspends and transports drilled cuttings to the surface. This prevents cuttings from settling at the bottom of the wellbore, minimizing blockages and disruptions. Moreover, it acts as a lubricant, reducing friction between the drill string and wellbore walls. Lower friction not only helps avoid drill string sticking but also eases the drilling process itself.
Customized Formulations for Optimal Results
One of the key advantages of PHPA is its adaptability. It can be tailored to provide specific rheological properties, such as shear-thinning or shear-thickening behavior, to suit different drilling scenarios. This flexibility allows drilling engineers to optimize Partially Hydrolyzed Polyacrylamide formulations for the specific challenges and geological conditions of each drilling project.
Sustainability and Eco-Friendliness
Sustainability is a growing concern in the oil and gas industry. Partially Hydrolyzed Polyacrylamide, being water-soluble and environmentally compatible, aligns with sustainability goals. Its eco-friendly properties make it a preferred choice for companies aiming to reduce their environmental footprint.
Cost-Effectiveness and Enhanced Drilling Techniques
Partially Hydrolyzed Polyacrylamide when integrated into water-based drilling fluids, not only improves drilling efficiency but also offers cost savings. By reducing the need for additional additives or treatments, PHPA contributes to cost-effective drilling techniques, aligning with the economic interests of oil and gas companies.
Chemtex Speciality Limited's Contribution
Chemtex Speciality Limited, a leading player in the chemicals industry, has been instrumental in providing innovative solutions for the oilfield service sector. Their expertise in the development and supply of drilling fluid additives, including PHPA drilling polymer, has contributed significantly to the advancement of drilling technology. Drilling polymer, when combined with drilling fluid additives, is a cornerstone of enhanced oilfield drilling efficiency. Its versatility, wellbore stabilization properties, and eco-friendliness make it a sustainable choice in the oil and gas industry. Some advantages of Chemtex Specialty’s drilling polymer are
Strong shear thinning performance
Good flocculation
Low TDS content
Significant lubrication and drag reduction
Chemtex Speciality Limited plays a pivotal role in providing these innovative solutions, ultimately leading to more efficient, cost-effective, and eco-friendly responsible drilling techniques in the oil and gas sector.
For more information please visit https://www.chemtexltd.com/products-and-solutions/performance-chemicals/drilling-polymer/
1 note
·
View note
Text
Global Drilling Polymers Market: Key Drivers and Challenges
Increasing Oil & Gas Exploration and Demand for Efficient Drilling Operations Fuel Growth in the Drilling Polymers Market.

The Drilling Polymers Market size was valued at USD 2.01 Billion in 2023. It is expected to grow to USD 2.91 Billion by 2032 and grow at a CAGR of 4.12% over the forecast period of 2024-2032.
The Drilling Polymers Market is experiencing significant growth due to the increasing demand for efficient drilling fluids in oil & gas exploration and production. Drilling polymers are essential additives used in drilling fluids to enhance viscosity, filtration control, and shale stabilization. These polymers help improve the performance and efficiency of drilling operations, reduce environmental impact, and extend the lifespan of drilling equipment. With the expansion of oil & gas exploration activities, increasing deepwater and ultra-deepwater drilling, and advancements in polymer-based drilling fluids, the market is set for substantial growth.
Key Players in the Drilling Polymers Market
SINO MUD (Mud Cleaner, Drilling Fluid Additives)
Baroid Industrial Drilling Products (Baroid LCM, BAROID Drilling Fluids)
Baker Hughes, Inc. (Baroid Drilling Fluids, VersaFlo)
Halliburton, Inc. (Baroid Drilling Fluids, OPTI-CLEAN)
Chevron Corp. (Chevron Drilling Fluids, Unimud)
Schlumberger Ltd. (XTREME Clean, DRILPLEX)
Global Drilling Fluids and Chemicals Ltd. (SlickWater, Mud Additives)
Global Envirotech (Eco-Clean, Eco-Drill)
Di-Corp (Di-Drill, Di-Versify)
M-I SWACO (A Schlumberger Company) (Baroid Mud Systems, Drilplex)
Future Scope of the Market
The Drilling Polymers Market is expected to grow due to:
Increased oil & gas exploration activities worldwide.
Growing demand for high-performance drilling fluids.
Advancements in water-based and bio-based drilling polymers.
Rising focus on environmental regulations and sustainable drilling solutions.
Expansion of offshore drilling projects and deepwater explorations.
Emerging Trends in the Drilling Polymers Market
The market is witnessing a shift towards water-based and bio-based drilling polymers due to growing environmental concerns and strict regulations on drilling waste disposal. The development of high-performance synthetic polymers that offer better thermal stability, lubrication, and shale inhibition is another major trend. With rising investments in offshore and deep-sea drilling projects, the demand for advanced drilling polymers that enhance operational efficiency and reduce non-productive time (NPT) is increasing. Moreover, nanotechnology-based drilling polymers are gaining attention for their superior rheological properties and enhanced drilling performance.
Key Points:
Increasing oil & gas exploration activities fueling demand.
Growing preference for water-based and bio-based drilling polymers.
Technological advancements in synthetic and nanotechnology-based polymers.
Rising focus on environmental sustainability and regulatory compliance.
Expanding offshore and deepwater drilling operations.
Conclusion
The Drilling Polymers Market is set to experience robust growth, driven by increased oil & gas exploration, technological advancements, and the shift toward environmentally friendly drilling solutions. With rising demand for high-performance and sustainable drilling fluids, industry players are focusing on innovative polymer solutions to enhance drilling efficiency and environmental compliance.
Read Full Report: https://www.snsinsider.com/reports/drilling-polymers-market-4971
Contact Us:
Jagney Dave — Vice President of Client Engagement
Phone: +1–315 636 4242 (US) | +44- 20 3290 5010 (UK)
#Drilling Polymers Market#Drilling Polymers Market Size#Drilling Polymers Market Share#Drilling Polymers Market Report#Drilling Polymers Market Forecast
0 notes
Text
So yeah...it's November...
We have not been given time to process the freak-ass crazy shit that happened in October, and a lotta freak-ass crazy shit went on.
Not sure why, just feelin' the need to report/vent while I sip coffee out here on the tumblr front porch with all the other old tumblr geezers.
Phase 2 of "Octember" has begun in a mix of good/weird/painful shit to work through. A lotta ghosts. Felt both Char and Kyle intensely the last few weeks: my two Gemini Ghosts. They're here but they're not here, and part of you wants them to stay and part of you wants them to leave you alone.
And yeah, money is still front and center in that assortment of emotional intensity. Much gratitude and thanks for the help that has gotten the rent and electric bill paid for yet another 30 days (you know who you are!).
My calculations this month were just a tiny (and ironic) amount off. After the dust settling, thinking I'd gotten it all considered, I ran through the numbers this morning before I left for the credit union, and saw I'd shaved it a little too close and after all was said and done, I was gonna be (drum roll please) $1.16 overdrawn. lulz.
No worries, I thought, being the resourceful hobbit I am I remembered I had a roll of quarters in the murse (what I call my patagonia shoulder bag) for laundry. Peeling off $1.25's worth of quarters, and laughing valiantly with the teller, I asked her to put that in with the roomie's half of the rent and bills.
Total came to a "lucky number" in her culture, and so I didn't think anything of it and got my rent check printed out and came home. Thought I'd (just to be sure) re-check the acct, much to my chagrin I'd mis-read the amt it was gonna be OD'd and hadn't put in quite enough quarters. So I'll head back over there tomorrow and deposit another quarter and laugh with the teller again. I don't wanna be overdrawn by ELEVEN CENTS. Handy dandy visual aid:

Yeah, I laughed, but goddamnit I am so fuckin' tired of the stress of this. The self-inflicted big lady ringing the bell paradin' yer ass around screaming "SHAME! SHAME!"
And then you just shut up and figure out what to make for dinner with what you have left on the eve before you go to the store.
October this year was a hard month on the planet. Lots of thin-veil coincidence/hoo-do shit, lots of miscommunicated things with roomies, with people while out, communication was hard, still is, but it seems to have lightened up some. Almost like gravity is getting stronger and pulling on us all more. Collective angst, personal angst, community angst, all of it just rushing up and saying hello at once.
One big angst for me has always been my fucking TEETH. My parents both had notoriously bad choppers, I know mine have been in need of workin'-on for awhile. I hadn't been to the dentist (before this round of visits) in well over 10 years. I had no insurance for most of my adult life, so I just never thought about it, unless something broke. Had several "It's cheaper to pull than fix" decisions about 20-25 years ago, and lost several back-teeth along with root canals and crowns on what was left. In short, a hot mess.
I have had Medi-Cal since I got into a wreck 3 months after i moved here (7 1/2 years ago), and just never thought that it might cover dental, since no other "insurance" I ever had in Texas ever coverd it. So once I figured out I can get my mouth looked at and worked on for nothing, I started the appointments a few weeks ago.
All of this leading up to this past Monday the 30th, when I got both the updated Covid jab and the current-season's flu-shot, and then went and got my mouth wrenched on and drilled and vacuumed and what-notted for a solid hour. Things have definitely progressed even in the last ten years. I thought I was looking at another surgical molar removal, but no!
They were basically able to use some kind of polymer that they put on and then the assistant pulls the trigger on a UV light-pen to "cure" it, and they do that several times, and completely rebuilt a broken tooth, and frankly, I'm amazed. It feels like the original tooth before it went south, and very little to no pain. And they numbed me up better for that than the last fucking oral surgeon who cut out my lower right back molar back in Texas did.
So a mix of crazy up/down shit, and then trying so goddamn hard to get the money thing right, and then still fucking it up, but comically inept. New-old tooth rocks, they want me back in April to do something else, and I'm fine. They told me to use a "hydropick" and I just looked doc and assistant in the eye and said "there's no money for things like that, I'm "I-brush-with-baking-soda-poor", and the assistant left and came back with a toothbrush, some floss, small bottle of mouthwash, and a little plastic syringe to use with warm salt water to flush the spaces under/between the crowns.
So mouth happy but goddamn, I have been sore for the last few days. Jab site almost done hurting, tooth as well, but muscles not quite recouped from the "Dentist Chair Death Grip"...I put my whole body into it and basically seize up and close my eyes and let them have their way with my mouth.
"Just lie back and think of California, dear!"
6 notes
·
View notes
Text
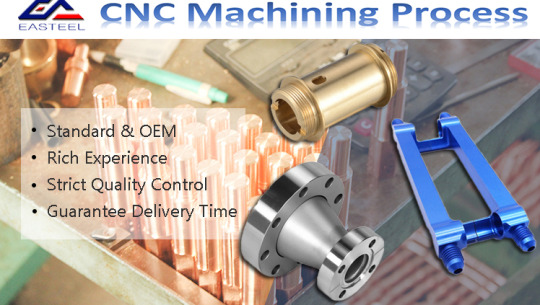
Get the Finest Precision with CNC Machining
In a subtractive manufacturing technique known as CNC machining, materials are precisely shaped and cut into the necessary shapes. CNC machining automates the production process in contrast to conventional machining, which mainly depends on manual intervention, leading to improved precision, repeatability, and efficiency.
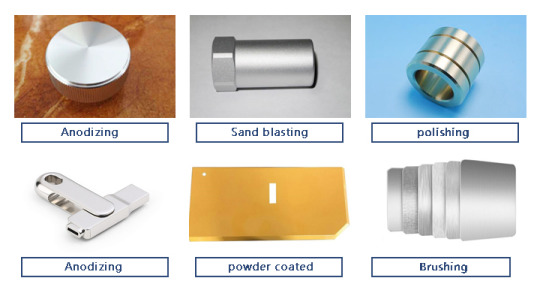
Using computer-aided design (CAD) software, a digital design is produced at the start of the process. The design acts as a guide for how the CNC machine should operate. The design is then transformed into a machine-readable format, often a G-code program, which gives instructions for the CNC machine after it is complete.
The ultimate product's needs are taken into consideration while selecting the material, which may be made of metals, polymers, or composites. By sawing the material into the required sizes, either manually or automatically, the material is prepared.
The prepared material is firmly secured to the work table of the CNC machine. The CNC program is entered into the machine's controller once the cutting tools, such as drills, mills, or lathes, are mounted during the CNC machining process.
After the machine is configured, the CNC controller reads the G-code program and gives precise instructions to the machine's motors to move the cutting tools. The cutting tools execute operations including drilling, milling, turning, and more to remove material in line with the design parameters.
Throughout the machining process, quality control procedures are used to make sure that the part's dimensions, tolerances, and surface finishes adhere to the necessary standards. To check accuracy, you could use measurement equipment like calipers, micrometers, or coordinate measuring machines (CMMs).
The advantages of CNC machining
The excellent precision and accuracy of CNC machining is well known. The process is computer-controlled, which guarantees consistent and dependable outcomes, making it perfect for applications that call for precise tolerances and complex geometries.
CNC machines can deal with a variety of materials, such as composites, metals, plastics, and wood. This adaptability makes it possible to produce a variety of components for different businesses.
Complex items may be produced fast and effectively using CNC machining. Once set up, the device can run alone with little assistance from a person. This shortens the production process and increases output in general.
It is possible to produce identical components with great repeatability using CNC prototype machining. Manufacturers can reliably make huge numbers of components because of the CNC program's ability to be stored and used again.
Main source: https://cneasteel.wordpress.com/
#CNC Machining#CNC Machining process#CNC Machining Techniques#CNC Prototype Machining#CNC Machining China
2 notes
·
View notes
Text
My blog literally used to be about ths concept, years ago.
If you think making a durable, biodegradable, high value item out of leather and a cow dying in the process is worse than drilling petroleum and refining its byproducts into a toxic polymer that famously falls apart quickly but ironically also doesn't biodegrade--- you're full of shit.
You're confusing morality with your colonized sense of comfort.
I'll say this: leather--even the leather that comes out of factory farms --is a million times more "ethical" than plastic alternatives. Many of us are just privileged enough to live lives that are far enough removed from where and how our means of subsistence are produced that death is unfamiliar to us and the idea of something dying gives us a gut reaction of distaste and panic.
8K notes
·
View notes