#decided to experiment with a black and white color palette for this!
Explore tagged Tumblr posts
Visit Tumblr Blog
Explore Tumblr blogs with no restrictions, modern design and the best experience.
Last Seen Tumblr Blogs


Fun Fact
Kazakhstan’s Minister of Communications and Informatics has blocked the Tumblr site because it contained 60 sites of terrorism, extremism, and pornography in 2015.
Text
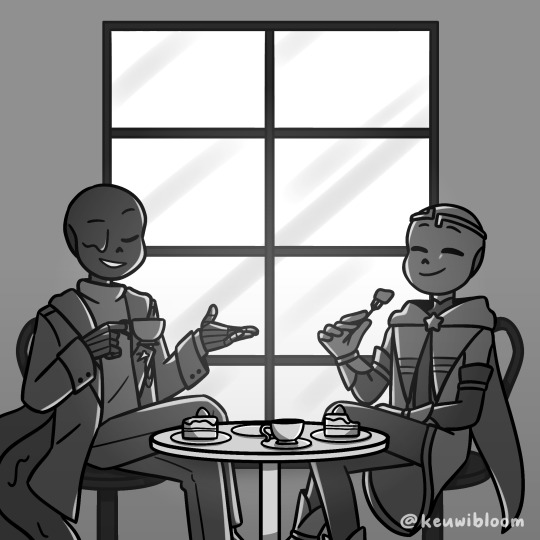
Happy birthday Dreamtale twins!
Here's Artemis and Apollo celebrating with tea and cake (and indulging both of their massive sweet tooths)
Dream and Nightmare belong to Jokublog
Parallel Synthesis (the AU where these guys are from) belongs to me
#undertale multiverse#utmv#dream sans#nightmare sans#dreamtale#dream!sans#nightmare!sans#parallel synthesis#parasynth#parasynth artemis#parasynth apollo#myart#decided to experiment with a black and white color palette for this!#i think it turned out okay
536 notes
·
View notes
Text
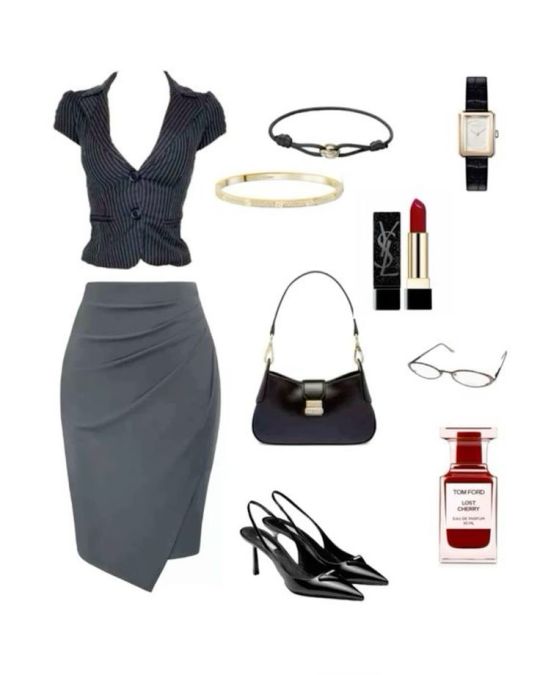
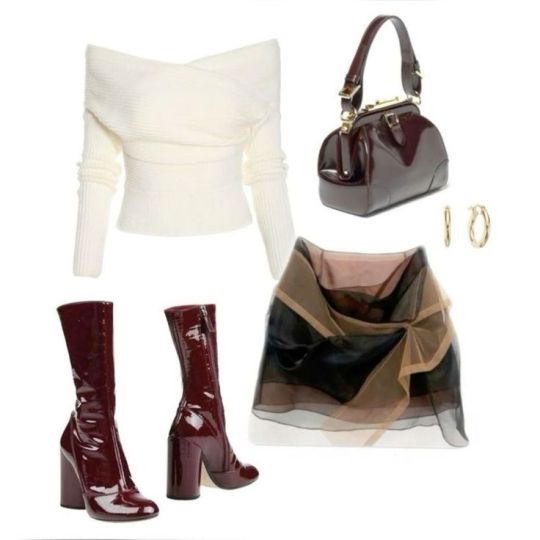
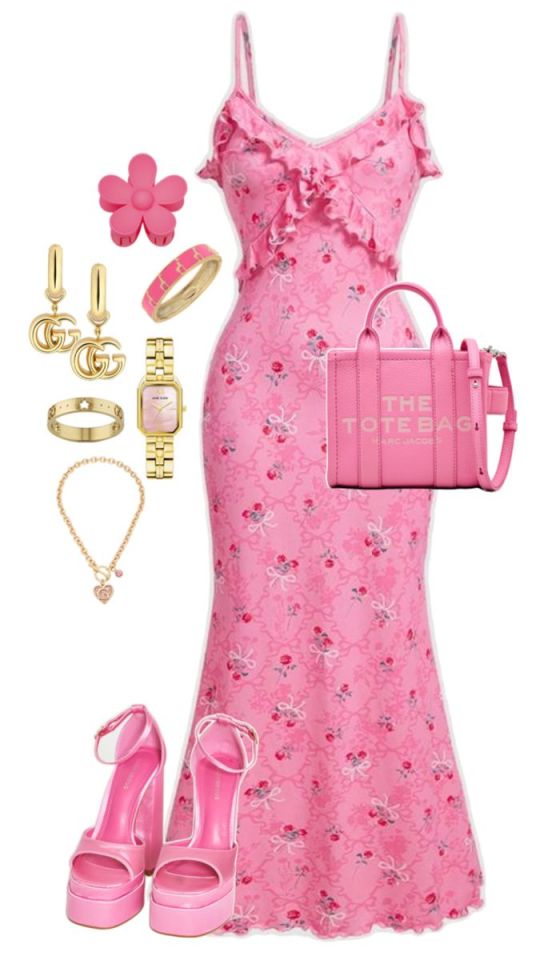
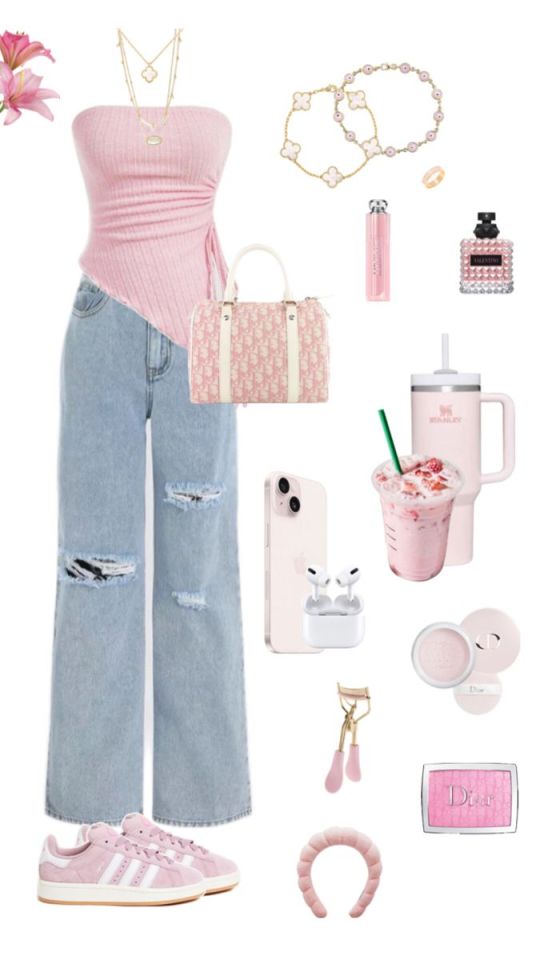
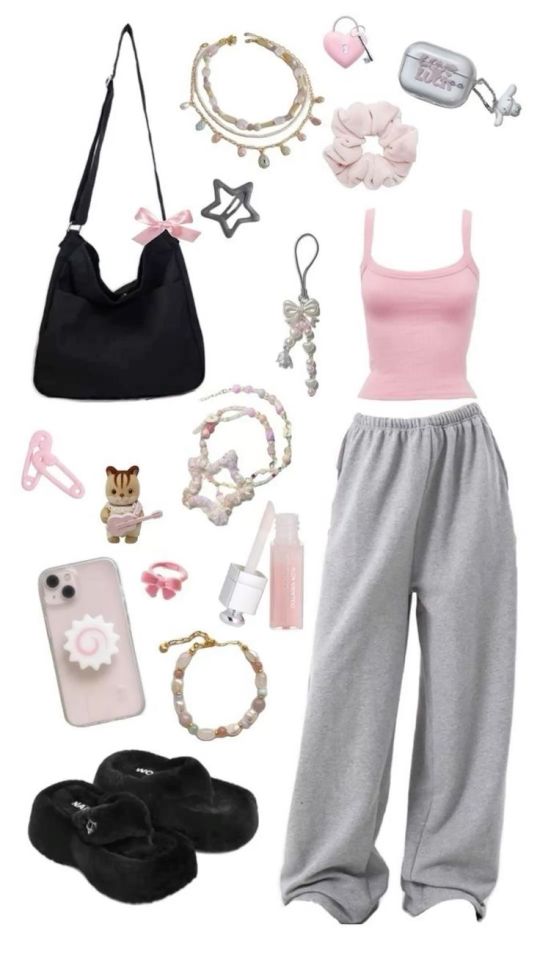
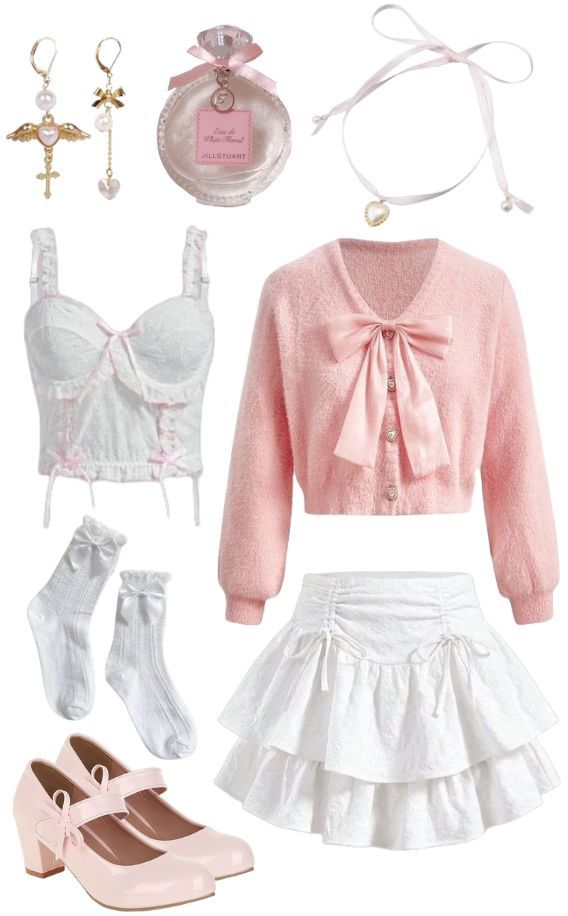
Pick a Pile: Your Future Fashion Choice +Love interest and Lifestyle. [Girls Edition]
Top Left to Right= Pile 1->Pile 2. Bottom Left to Right= Pile 3->Pile4.
Introduction
Pick one of the Images above and you will receive some outfits inspo that will suit you the best in the future. You will also receive a reading on your potential love interest and your lifestyle.
================================================
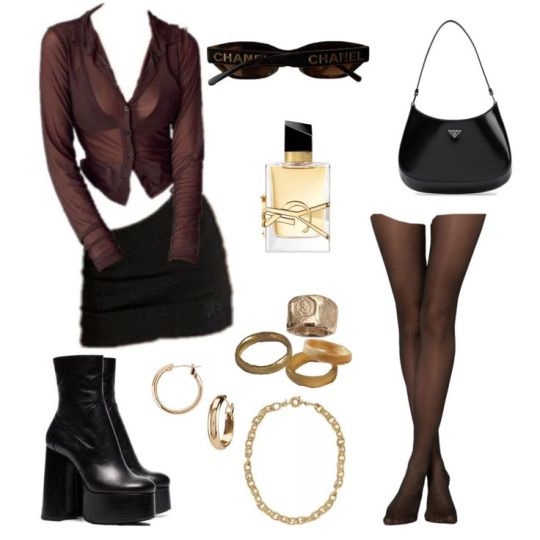
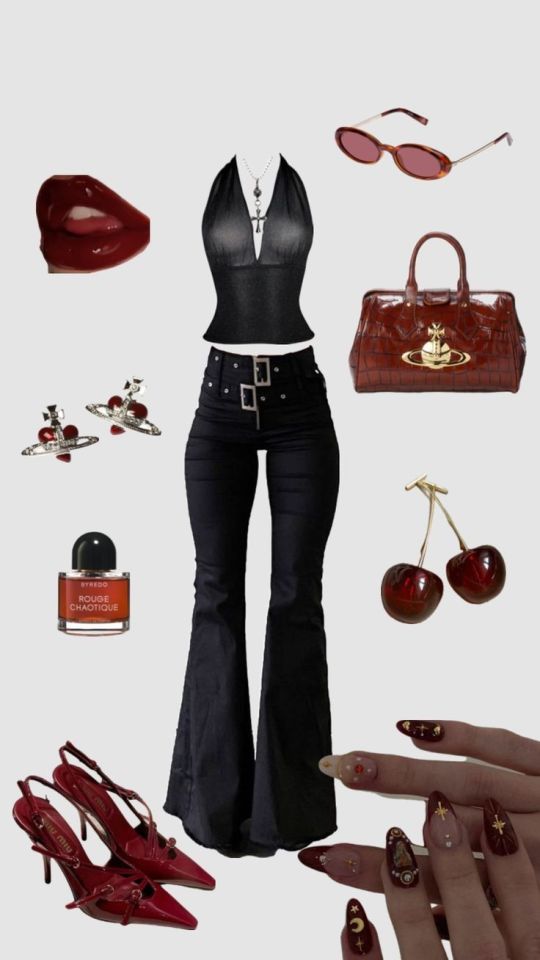
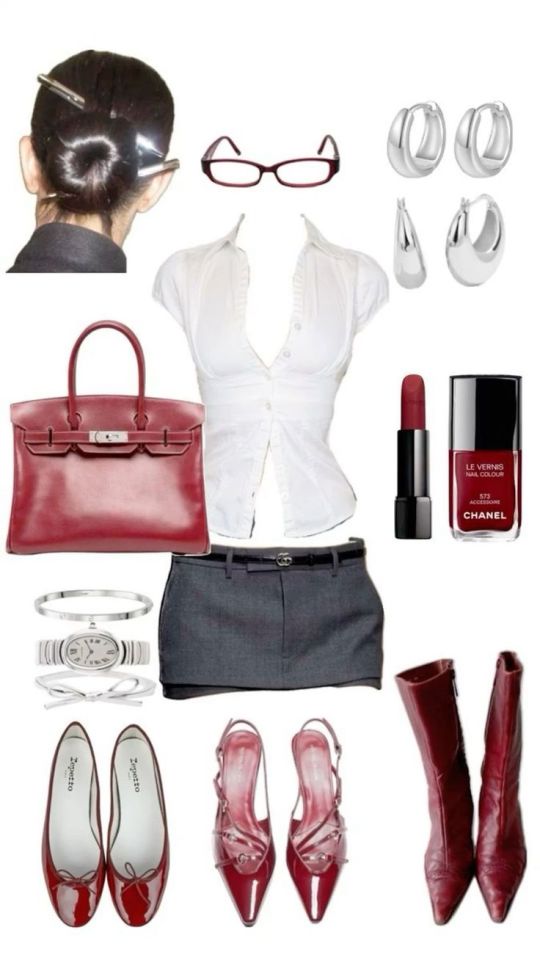
Pile 1
Your future style exudes an office siren and badass villain energy, with a preference for a dark, sophisticated color palette—think blacks, deep reds, maroons, greys, with accents of white and gold. You might accessorize in silver occasionally, and a bold red lip will likely be your go-to. Even on a minimal makeup day, a statement accessory could add that extra spark. This overall vibe will be strikingly sharp, almost vampire-esque, with a confident boss persona that draws attention the moment you walk in. Picture yourself in a high-powered corporate setting that requires formality, yet you’ll effortlessly exude that “high-value” look.
Interestingly, this era could open doors to a potential workplace romance. Picture a formal work event where you catch the eye of a charming individual—someone who wears glasses, has messy, dark curly or straight slick hair [Think of someone with a wolfcut or think of Prince Charmont from Ella Enchanted] , and a great personality with an introverted, brooding vibe. They might hold a senior role, like a project manager or supervisor, and have a naturally appealing charisma that others admire. Despite their introverted nature, they show a sweet nervousness around you that’s endearing. Your persona during this time might be a little sharper and more direct—focused on making moves and cutting distractions.
This phase may come after a breakup or a temporary break from a relationship that was overwhelming. This prior partner may attempt to re-enter your life, but by then, you’ll have met this new, more balanced person who feels refreshingly easy to be around. You’ll trust your instincts and follow your own path, even if it’s full of unexpected twists!
================================================================================================
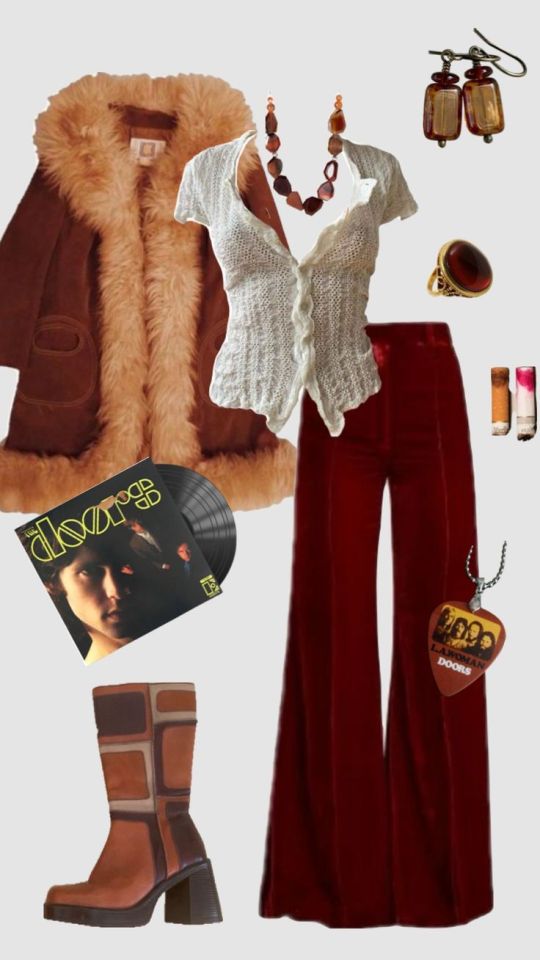
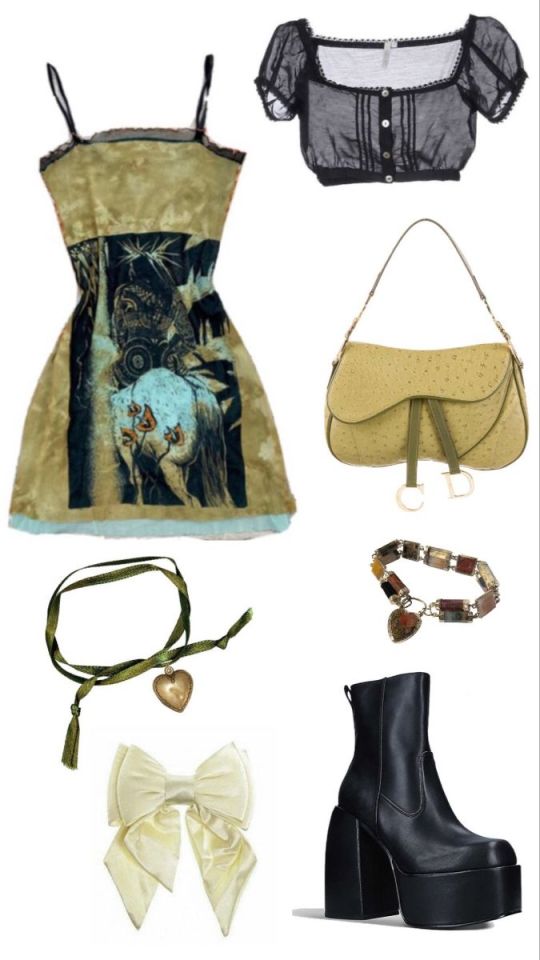
Pile 2
When you adopt the cozy, layered looks in the images below, it might signal a season where you crave more time at home. You'll likely prefer staying in but, on those occasions when you do go out, you'll look your absolute best, like you just stepped off the set of a fall-themed movie—very "Gilmore Girls." During this phase, your focus could be on a significant project, such as a college assignment, work project, or a challenging exam. This period is all about staying single, striving toward future goals, and building a clear vision of your success, even if it feels just out of reach for now.
In terms of romance, no specific person catches your attention, though a few people might find you quite charming. However, you’re discerning, weighing any potential connections against your ideal partner. One person, in particular, may be interested, but they don’t quite align with your ambition or vision for the future. Though they’re attractive, kind-hearted, and you share great chemistry, their lack of drive doesn’t fit with your goals.
Despite how well you get along, you ultimately decide to move on, seeking something bigger and better aligned with your vision. Though a tough, perhaps even cold choice, this person will understand, showing emotional maturity even if they’re briefly heartbroken. You might even give them a meaningful parting gift, ending things on good terms. For now, you’ll continue your journey as an “Autumnal Fairy,” focused on your dreams, knowing that in time, a more suitable match will come along.
================================================================================================
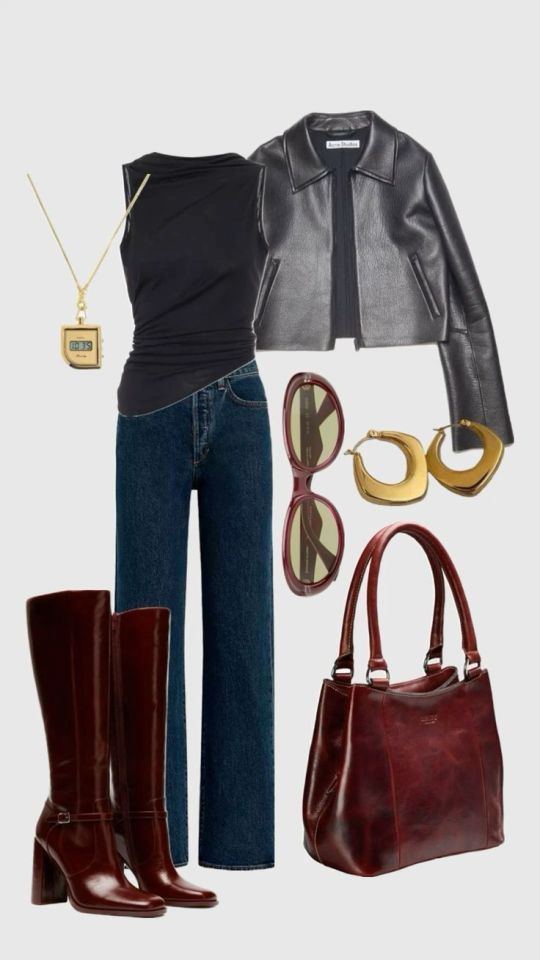
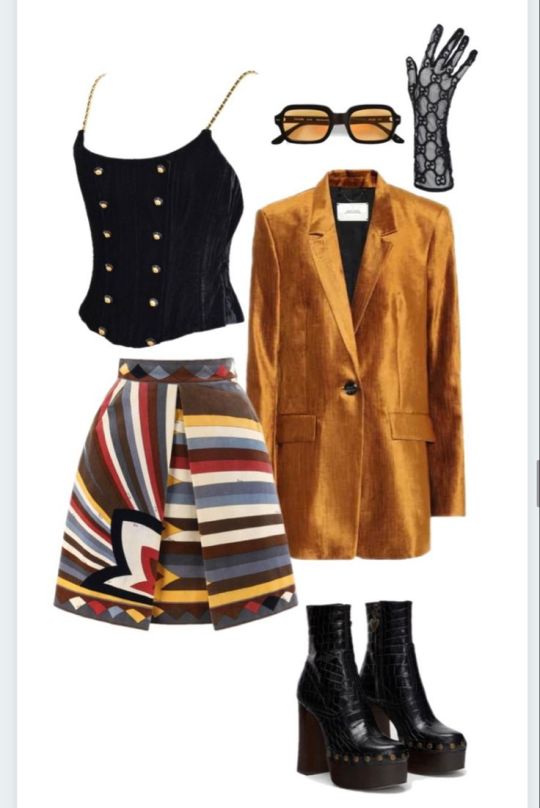
Pile 3
Unlike the other piles, you’re embracing an avant-garde style, experimenting with accessories and layering pieces that you feel harmonize creatively. You’re drawn to a wide range of colors, thinking, “What’s life without color?” This shift reflects your desire to create a more vibrant life, filled with happiness and lively connections. Expect to add graphic-print dresses and colorful, patterned skirts to your wardrobe.
Through this vibrant energy, you may serendipitously meet someone whose grounded style—favoring blacks and earthy tones—contrasts yet complements your own. This person, with tan skin and a captivating smile, is drawn to the radiance you bring. Your charm and lively conversations will leave a lasting impression, making you feel like their favorite book, a story they can’t put down. They’ll be smitten by your style and personality, enchanted by your unique way of navigating life.
Enjoy this exciting, colorful phase—cheers to what’s ahead!

================================================================================================
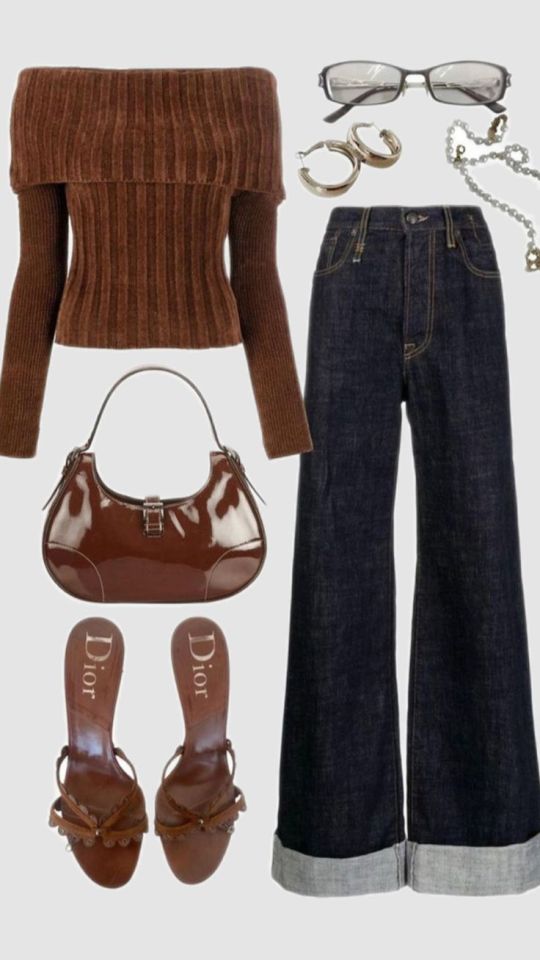
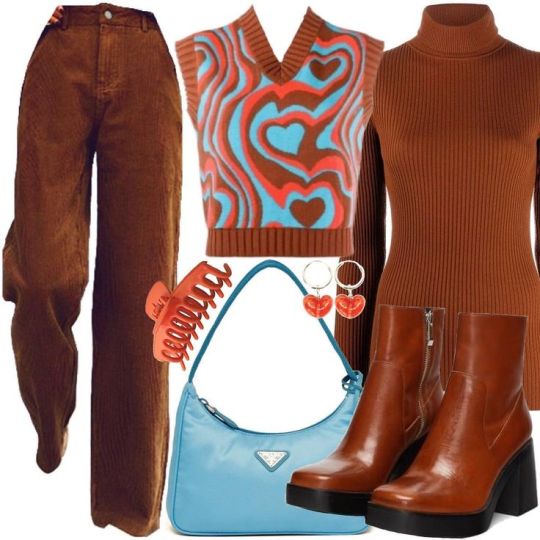
Pile 4
It seems you’re headed for an all-pink or mostly pastel tones typa phase in the future! You might have felt drawn to another style as well, so expect to mix up your aesthetics often, making this time especially fun. You’ll be leaning into a “doll” look, inspired by Bratz or Barbie, with a wardrobe full of pastel tones. Your vibe will likely be sweet and demure, with favorite spots to visit with friends, like cozy cafes, grocery store runs, late-night drives, and park picnics. Theme parks might also be on your list!
During this phase, there’s a significant person by your side—a taller, older partner who is strong, protective, and deeply loyal. With a cooler, steady personality, they’re both a provider and a devoted companion who treats you like royalty, always willing to support and spoil you. If you’ve manifested this connection, it’s clear your efforts have worked, as this person truly feels like a keeper.
You’ve got this—go get that bag, sis!
#pick a photo#pick a pile#pick a card#pick one#pick a picture#pick a card reading#psychic readings#tarot community#divination#fortune telling#pick an image
472 notes
·
View notes
Text


Some Eeveelution Shinies Reimagined
Notes down below and extras
I wanted to reimagine some of the eeveelution ones, since I think the shinies for the line can be hit or miss, and they straight up don’t change at all LMAO so I took it upon myself to reimagine them a bit
Flareon: I think a blue palette would work well, and white is nice too. It does look a bit icy, which kind of ruins what I was going for (blue and white fire) so lol
Jolteon: Straight up just swapped the eye and fur color. This was like my oldest edit, since I did it like 2 years ago with another flareon idea, which is scrapped rn. The purple looks nice with the Design imo and I’m sad they didn’t experiment with anything other than green for the actual shiny
Espeon: I took note of the very much daylight theme with it. And decided to model it after the sun. It looks very regal and very well, shiny and bright.
Leafeon: I think darkening Leafeon would be cool. I would’ve like actually gone for the usual autumn idea that a lot of people seem to like and use for their shiny recolors, but I didn’t want to do that personally skshsjd, I wanted to try something new. It’s dark oak Leafeon hsishs
Glaceon: I literally just, took the concept of black ice. I honestly have no idea if we have any black ice type like shinies. Someone has to tell me if they do
That’s basically it. I’m going to keep doing this series since it’s fun to experiment. Here’s some extra stuff I experimented with (only Flareon tho LMAO)


The brown flareon was one from years ago like Jolteon, I felt blue and white fit way much better l personally. I think I modeled the colors after a type of cat or dog breed? Idk I just call it poop flareon
My friend wanted to see a white body and blue fluff flareon so take the shitty edit
Anyway that’s it, feel free to suggest shinies again.
34 notes
·
View notes
Text

Day 20 !!!
Masquerade ... I couldn't think of much to do aside from turning my designs into masks :] I can't do lace for the life of me ? So I apologize if it doesn't look accurate!!! Did my best.... [Mind's the only one who has it, but still!] gosh where do I even start.......
Heart's is at the top!!! Silver, white, and purple colors [lil bit of black], Very stylistic choices- Main part of the mask would be white with a violet-y lavender color on the markings around the outside, while the moon would be silver! Same with the "strings" hanging down, those would be silver! Gems, feathers are all purple [any smaller feather is more black] and the spot around the moon is black :] I decided on the "No Eyes" Cover of a mask, aka the least practical ever. Each cover the part they're supposed to represent according to Mr. Jash's See no evil , Hear no evil, Speak no evil association for them all! Mind's is a full-face mask, one that clips around in the back- However I DO know from experience these kinds of masks push down on my ears at the very least and make it hard to hear :pensive: so that's why it's designed like that :] Color wise...... blues, gold, black, cyan-y teal [lil bit of white too!] :] clock hands on the top and bottom part of his mask are a bold gold color, very sparkly! deeep dark blue on the left side [cracked part, the cyber markings are a cyan color] majority of the mask is black, the spot around the visible eye being white! The gems below the eye are a bright sapphire, andd the markings around the eye are a bright bold blue too... Lace on the top is white, feathers being a golden-canary yellow type of gradient? supposed to resemble the sun I placed in his crown !! The mouth piece does disconnect and open up, Inspired off those cool monster masks that open up to show off more teeth.... Souls maskk!!!! His is a split one, 2 masks combined into one- one half around his eyes, the other side being a full face mask that covers the mouth! very impractical as well. color palette wise is mostly red-pink color, black, grey, white- just a little bit of Rhoad island chicken feathers on the side [thanks Darrell] right side of the mask is entirely grey, bold pink-red around the eye- left side is entirely black, with some white cracks toward the bottom! the fancy detailing above the opening on the left side are all the pink-red color, and well. Obviously red-brown feathers on the side. Feathers were given willingly no chicken was hurt in the making of this mask :smile: anyway..... phew. that was a lot of rambling. enjoy. the masks.?? feel free to make these yourself, I mighttt color them in at some point digitally? We'll see it depends on my motivation :sob:
#chonny jash#art#artwork#chonnys charming chaos compendium#cj hms#headcannon design#hms#0ne eyed ghost#cccc#cccc fanart#masquerade#masquerade mask#cccctober#cccctober 2024#jashtober#jashtober 2024#october prompts#october prompts 2024#day 20#implied heart#implied mind#implied soul#turned the freaks into masks.. oh no#i would wear all of these ngl#they would not be fun to wear but. still... pr..rprety....
25 notes
·
View notes
Text
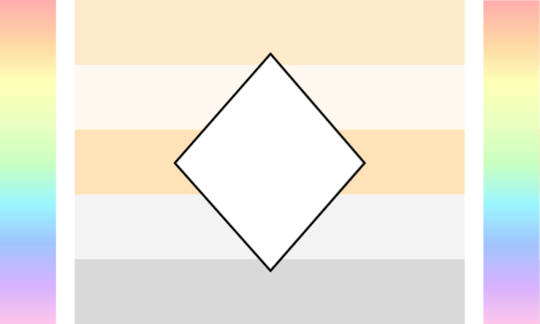
I wanted to challenge myself this week to put my own spin on existing flags. I decided to make them without using most colors from the originals while also using a different number of stripes. I'll make more another time but here are a few so far!
Maverique:

I wanted to try using some reds like what you'd find in the outherine flag, but softened. The minty green simply looked good, slightly borrowed from my nonbinary redesign below, and the white helps break it up in a unique way (being uncentered, which feels like it fits the maverique experience in a subtle way.) This flag feels like a piece of the outherine flag, which works well for an outherine identity.
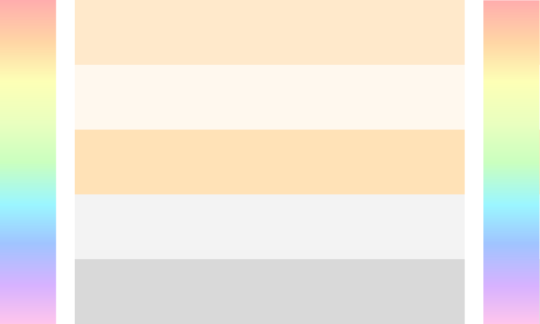
Nonbinary:

I remember coming across an anodiean flag and really liking how the colors worked together, so I borrowed the earthy tones and the green from that (slightly. The colors aren't exact.) I wanted to keep the yellow because it's iconic in nonbinary flags and the gray helps the flag look a bit softer (because I think black would have too much contrast.)
Neutrois:

I wanted to emphasize the green from the original flag while incorporating some yellow. When I think neutral, I think yellow and green. Plus, yellow is abinary. I can't not have it! The green can also represent genderlessness, rather than going with the obvious and overused black.
Lately I've been inspired to experiment with new color palettes I don't normally dabble in, like reds, browns, yellows, and desaturated colors. I'm liking the results!
- 💙💚
40 notes
·
View notes
Note
Hi! I really love the way you color, and I was wondering If you could make a tutorial about it, I of course completely understand if you Can't/don't want to do it thanks in advance If you decided to do it and have a good day/night.
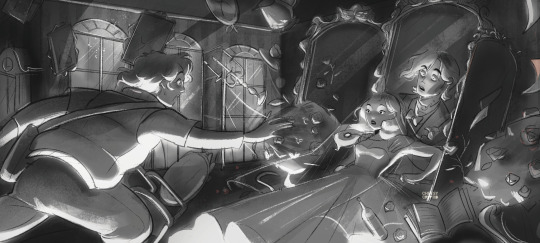
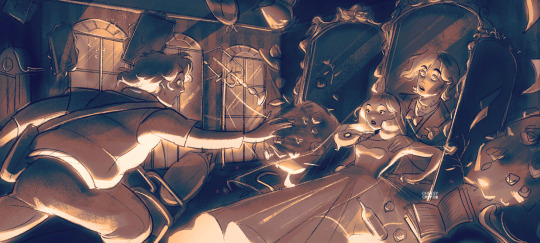
Hello hello! Ooooh, a color tutorial! I've never done one before so I'm not sure if I'll be any good at it haha. But I don't mind sharing my thinking process when it comes to coloring my works. So when it comes to color, I very much have a traditional painter's approach since that's how I learned color in art college. My painting professor never allowed us to use black or white paint, we could only use other colors to create darker colors or new colors altogether. And you're probably thinking, "What the hell? That's insane." And I wouldn't blame you haha. But this approach helped me a lot to not rely on tints (colors mixed with white) and shades (colors mixed with black) when I color. For the most part, I purely thinking about value and hues when I'm coloring.
Finding the right values:

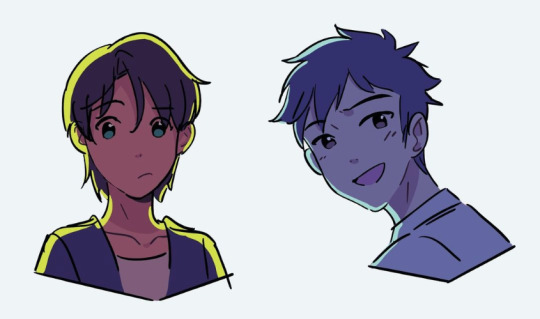
So for this drawing, I did two different takes (one with direct harsh lighting and one without). The reason why I'm showing this is because when it comes to color it's very important that your values aren't clashing with each other. When I started out, all my coloring felt flat because I was using colors with the same values so there was little to no depth. A lot of people don't realize this but color does have value!

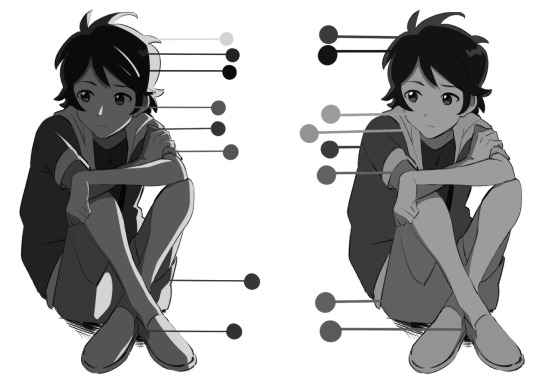
If we put the primary colors on greyscale, you notice how each color has its own value. Blue tends to be a dark value, red has a mid to dark value , and yellow is a much lighter value. This is why if you ever look at my work, the color I use for shadows lean into blue/purple tones. You can also have warm shadows since red does have a deeper value compared to yellow. But these values are when the primary colors are at the highest saturation. What would happen if we knocked down the saturation levels?
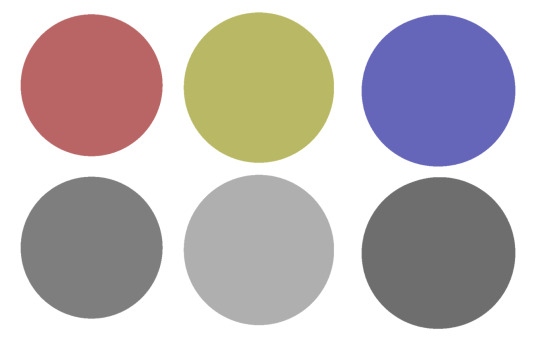
The values start to become more similar. Since we're not always using the most saturated colors, it's important to understand the values behind the colors you'll use. Once you unlock that, you can pretty much do whatever you want with color haha. That's why I hardly ever use black or white in my digital art when mixing (also I don't mix color with a brush, I just pick from the color wheel which might be insane).
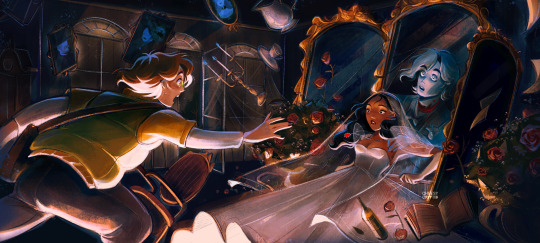
While it's not wrong to use white or black to create darker/lighter colors, color in real life doesn't always act that way. Shadows and highlights can have color. For myself, letting go of white and black has opened a world of color combinations that I didn't think of before taking my first ever traditional painting class. Now, I can freely pick colors and experiment with palettes since I've blocked out what values I need (like the image below).
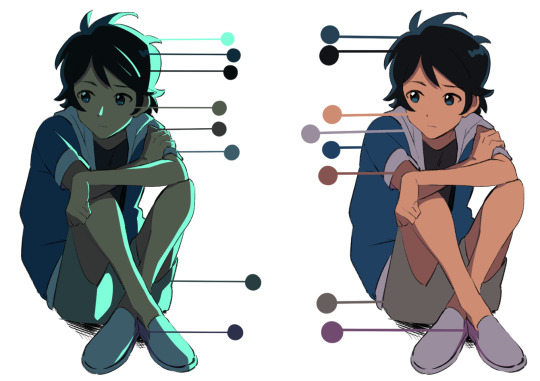
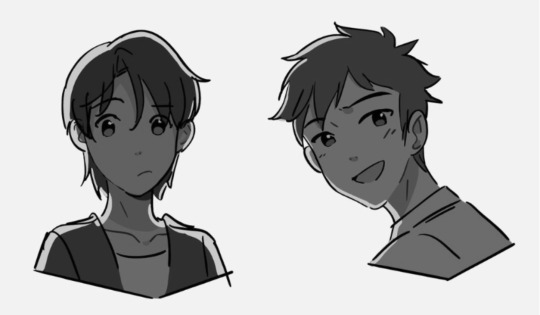
Even if I'm using blending modes like in the next image, I'm always thinking about making clear value separations. If I can't understand the image in black and white, then I'll have a hard time seeing it in color.

And when you get very comfortable, you can start placing characters in different color environments and match them (which essentially is the job of a color designer in TV animation).
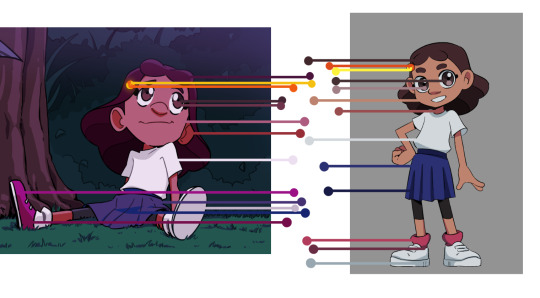
The right image is the official color palette for my character which already uses a lot of blue/purple for the shadows. But on the left side, she's in a night-time environment so I leaned even more into the cool colors to the point that the white T-shirt is actually a very very light purple/pink color haha.
Or like this example where the left drawing gives a more sunset/golden hour lighting while the right one is more blue hour/night time lighting. But you can read the colors clearly 'cause the values are clear to begin with. While that wasn't really a tutorial this is pretty much my thought process when I'm coloring my digital works. ^^; I very much do follow an academic approach to color theory but even then I think it's okay to break the rules. As long as you have understanding of colors' value, I think you'll be able to unlock any color style you want! I hope that answered your question and was helpful!
#digital art#digital illustartion#color#anon#ask#send me anon#send me asks#color theory#tone and value
237 notes
·
View notes
Note
I love the new "Play Date" pages! Question: is this chapter in color for aesthetic purposes unlike the first chapter to show the differences between people who are accustomed to Toyland vs Maria who just got here and wants to GET OUT?
About halfway through Welcome to Toyland, I entertained the possibility of switching to colour, but decided to wait until Play Date to do so.
My reasoning mostly was that I liked the feeling of dread that the black and white gave, which was a vibe I wanted for that chapter.
I wanted a vibrant 'Welcome Home'-like palette for Play Date to make it feel kinda like a nursery. Despite the heavy subject matter, it's a comedic light-hearted chapter, so I wanted palette to reflect that.
I'm not sure what sort of pallette to use yet for the Beach Episode, but it is gonna have beach summer vibes. Haunted Doll, I already have an idea for. If any of y'all have ever read Pepsiphobia, then you'll know what I mean. Reminiscent of the first chapter, but with a few spooky colours.
That's gonna be my little colour experiment, and hopefully, I can stick the landing on it.
23 notes
·
View notes
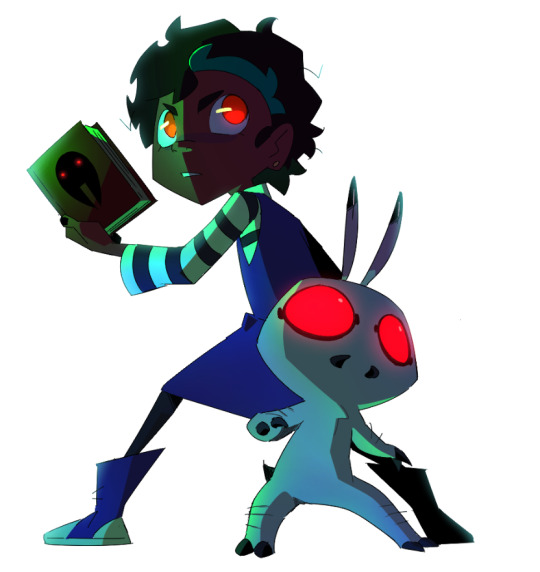
Text

Me when I men
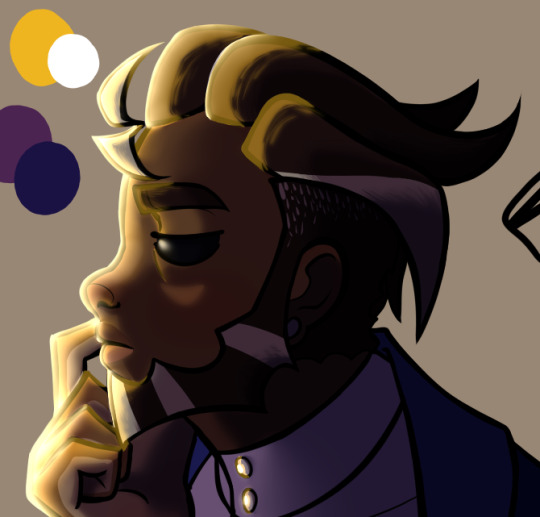
Dog Teeth AU Tom Character Reference Sheet
WARNING: Slight NSFW - Mild, Non-Explicit Nudity under the cut

My other husband I love him so much let me kiss you on the lips volatile ball of angst and anger

My poor boy was cursed with his father's hairline and sress he cannot carry,,, to be fair that last bit was his own doing
I sure hope he looks nautical enough,, I mean I want him to nautical INSPIRED, not a member of the marine court, y'know?
My lover said "very Garp of him" and I think that's that One Piece Marine DILF guy so that's a plus :)
I also wanted his outfit to be a direct contrast to Tord's - I mean red and blue are already contrasts on the color wheel but kinda so is green so I wanted a little more driving force: white against Tord's blacker color palette
While white is supposed to represent purity, I assure you, Tom is anything but
It's more a reflection of how the characters see themselves: Tord KNOWS he's a piece of shit and happily flaunts it because no one can do anything about, he holds it with pride even
But Tom doesn't believe he's being an ass, he thinks he's genuinely doing the right thing or at the very least the lesser of the two evils he was forced into, and than on it's own has some merit but this is just to say Tom isn't exactly the "savior" of the story despite what the white palette may suggest
It certainly is what he wants to portray to the public, however
Mmmmm mann
I'm apparently really into sharp contrasts or something cause I keep shading with very bright colors against very dark shadows,,,, it's really fun actually so whateva
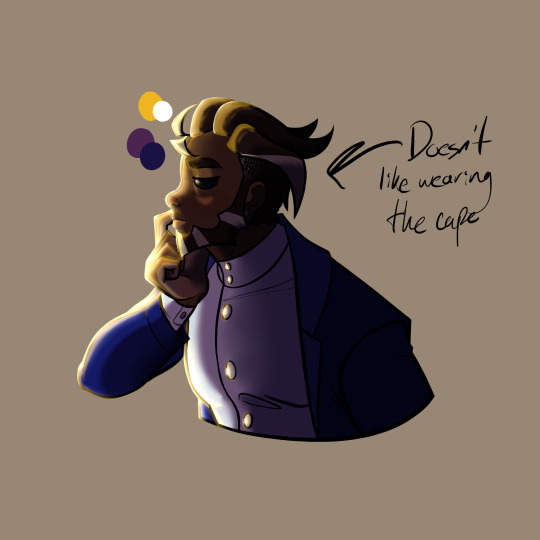
Also that cape thing Tom wears ? Worst thing ever, it's like a texture issues but instead of the texture bothering him it's the uneven amount of weight, like he's painfully aware it's on his left shoulder and not his right and it irks him so badly but "it carries his rebellion's symbol so he has to wear it in public" or whatever
He's really only seen wearing it during important or public matters, when it counts
Otherwise that thing's in the bin

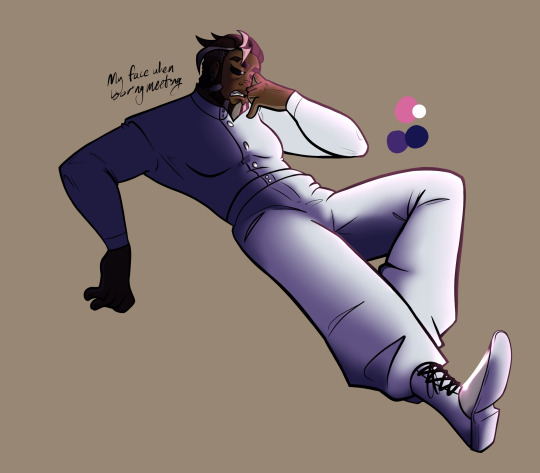
Back in his OG style but with the horrible hairline and salt in his hair
He got a day off
He snuck out of the lime light

"Ohh I drew him naked to show off his tattoos and to talk about them"
No I didn't
I'm a liar
I drew him naked cause I wanted to draw his tits so I did, simple
But I will talk about his tattoos some more :)
First of all: That scar on his left shoulder is from the house rubble, that cut we see on his arm at the end of The End pt. 2, yeah that's where that comes from
As for his tattoos,,
I know I've explained these somewhere but I'm explaining them again cause I dunno if I explained it someone's DMs or not lol
The Harpoon tattoos are pretty self explanatory, and I also just wanted to show off colored tattoos on darker skin complexions cause that's the stupidest argument I've ever heard and black/dark skinned people should be able to get colored tattoos
The rest are kind of important to Tom and the story line,,,ish?:
the Shark Teeth tattoo comes from the time he visited Hawaii to find out more about his father and his Father's side of the family and their customs, traditions, his heritage, etc. etc.
To make a long story short: there's a reason his father doesn't talk about his side of the family often, but it didn't ruin his experience while visiting some lesser hostile family members in Hawaii like his cousins, and he even got to surf with them - which was when they decided to convince him to get the Shark Teeth tattoo
On top of Tom just being really obsessed with sharks and having infinite knowledge on all things shark related, it's supposed to represent strength, guidance and protection which I think is very fitting for Tom
The "Wolf" tattoo kinda stands out because Tom's Irish, not Scottish or any sort of Norse. So why the Nordic rune?
Well :)
Back when Tom and Tord lived together, they weren't always at each other's throats
I think I mentioned this in my Strip Mafia AU reference sheet for Tord ignore how I forgot to flesh out Tom's,,, I have it I just haven't cleaned it up yet but I'm gonna rehash it here really quick:
Tord gave everyone in the house a tattoo he thought best represented them, including himself (which was the Ouroboros tattoo seen on his character sheet) and Tom's was the rune for "wolf" and I think there are very obvious reasons behind it
Tom stays around his friends a lot, he's got more bite than bark, very unfriendly to outsiders, the list goes on really
It's so odd seeing Tom in so much white if I'm being honest
I'm so used to him being in like angst blacks and greys and I don't think he's adjusting any better himself LOL
#love this big fella#man#eddworld#ew#fanart#art#digital art#reference sheet#character sheet#character reference#Dog Teeth#Dog Teeth AU#eddsworld au#ew au#ew Dog Teeth AU#Dog Teeth Tom#Dog Teeth Blue Leader#ew Tom#eddsworld Tom#ew blue leader#eddsworld Blue Leader#Tom#Blue Leader#jay draws#slight NFSW ?
96 notes
·
View notes
Text
Six of Crows Character Design Notes
As promised, here are my character design notes for this! These are all Six of Crows era and not Crooked Kingdom. The grayscale versions have four distinct values to have a comic feel, which may not match up with the color designs. Also, I’m certain I’ll continue to change up these designs, give them new outfits, etc as I draw them more, so think of these as works in progress.
So, without further ado... let’s get to the designs!
Kaz
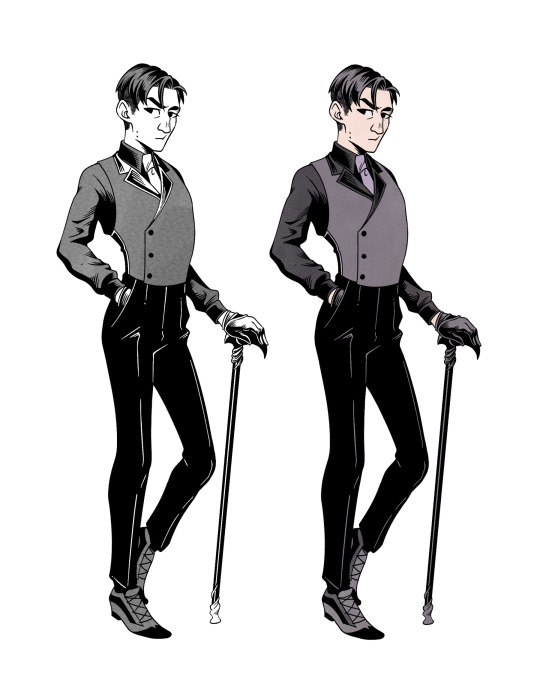
Monochrome color palette with hints of light purple, the color of kruge
Kaz never wears white, not even as a dress shirt. The merchants do wear white dress shirts, so this makes him distinct. Dark colors also make things easier to conceal.
They’re easier to see in this post, but he has two prominent facial scars and a few moles. A few other scars cut through the shortest part of his hair.
Each canon couple has an aspect that connects their designs. Kaz and Inej are connected through dark colors and vests
Inej

Black and blue-violet palette. I possibly see her theme color becoming a deep blue in CK (sea-related, symbol of trust, separates her identity and goals from Ketterdam purple)
Arm guards are double-layered to hold a knife each
Gold piercings contrast the blue-violet to show a difference between her old life and her life as The Wraith
Jesper
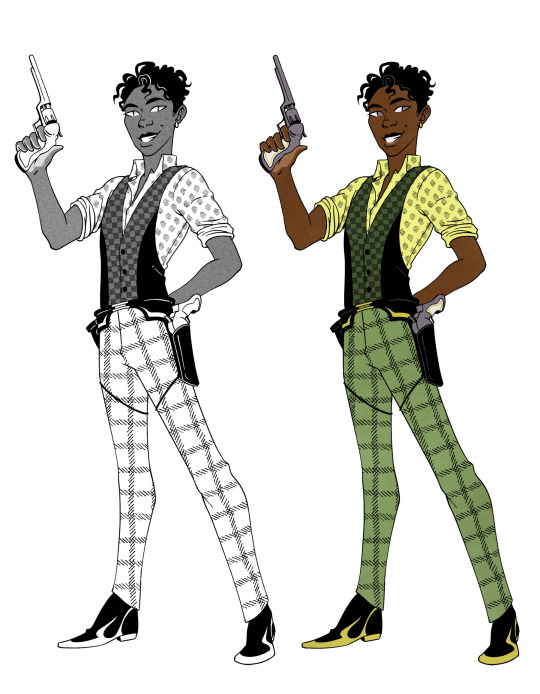
I imagine him wearing all sorts of colors, but I went with the yellow-green outfit described in a flashback. He wore more neutrals with hints of Jurda orange before joining the Dregs
Jesper’s concept was very cowboy-inspired to match his pistols. He wears boots instead of common dress shoes
Styled in Barrel Flash as seen from the three different patterns
Matching earrings with his family
Connected to Wylan through patterned pants
Nina
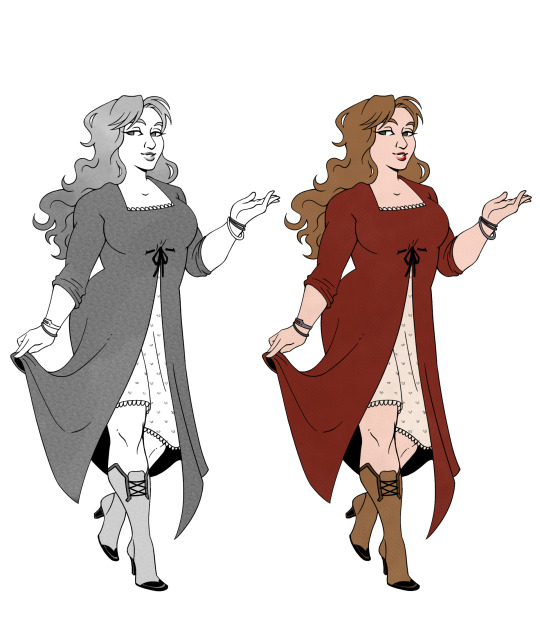
Red, cream, and brown palette to contrast the gray and black palettes of other characters
Heart motif seen through the pattern on her slip and the toes of her boots
Lots of Ravkan jewerly, especially bracelets to visually represent her powers
Connected to Matthias through brown boots
Matthias
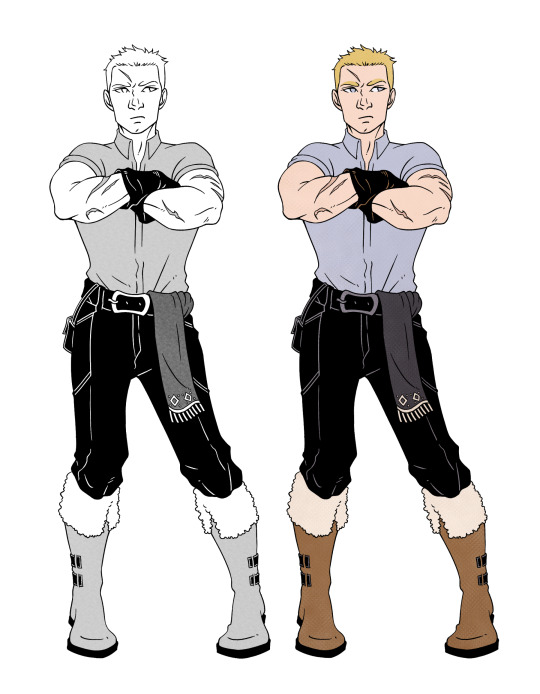
Cool blue and warm brown colors (contrasting colors, a character at odds with himself)
Prepared for anything with lots of pockets and an extra scarf
Scarring from prison and a bite mark from Trassel
Like Inej, he’s in a grounded pose to show his unwavering nature
Wylan

Red and gold palette like the Van Eck family but more neutral (disillusioned by his father’s true nature)
Boots from a second-hand store. Laces tied around ankles to fit better
Dirt smudges from experiments, unable to buy many new clothes
Bag carries supplies, with certain chemicals stored on the outside for easier use (no, they’re not pokéballs)
Kuwei
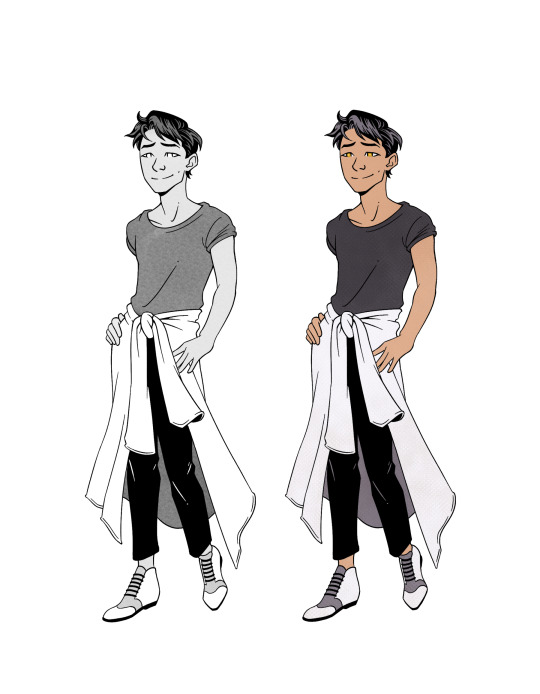
Theme color is gray or white from his lab coat. Maybe he wears more teal in CK? Haven’t decided on that yet...
His shirt may seem anachronistic, but apparently t-shirts were around in the late 1800s, so it can still fit the setting.
And... that’s it! Thanks for reading. If you have any questions about these, feel free to send an ask or put it in the comments.
#six of crows#six of crows fanart#soc#soc fanart#grishaverse#grishaverse fanart#leigh bargudo#six of crows duology#character design#kaz brekker#inej ghafa#jesper fahey#matthias helvar#nina zenik#wylan van eck#wylan hendriks#kuwei yul bo#art#fanart#kanej#helnik#wesper
366 notes
·
View notes
Note
Hi Nik! Okay, So I've seen you and a few artists go from black and white (to see values) to color. How do you guys do that? Do you paint with colors first and then filter the image in black and white to see the value or do you paint in black and white first and then somehow add color? I don't get it. Anonymously Yours, - An artist who clearly knows nothing (I just make lines on paper I haven't studied)
I start painting in black and white first after I cleaned up the sketch. And then i experiment by using different gradient scale palettes as sort of an underpainting. And then on a separate layer i establish flat colors using different blending modes (i dont usually stick to one type of blending mode because it all depends on the look that im trying to achieve). Its easier for me to do black and white first because it lessens the amount of time i spend on deciding colors.
Most of the time its all about adjusting and experimenting with different contrasts and blending modes. Heres some of my process from different layers. I couldnt give you the flat colors layer because i have a habit of immediately merging them together and coloring over my sketches
Hope this helps! 🌷🌷🌷
51 notes
·
View notes
Text

When the ambitious Miki and the conformist Gas cross paths, it's pretty much an "unstoppable force VS unmovable object" situation.
Last but not least, a couple of fan favorites! My redesign process was very different for each one: I did a quick sketch of Gas on day one, as soon as I was done with Raf and Sulfus, and I pretty much stuck to it. Meanwhile, I couldn't form a clear thought for Miki until my AFapril comic prompted me to do it! Now, about that creative process:
While Miki's canon designs are significantly different, Gas is pretty straightforward. Even then, I decided to work on unifying their respective color palettes first, and then focus on their redesigns proper.
I went with their Prisma Fly colors as their new main colors. To contrast the orange better, I switched Gas' purple for a washed-out blue, and included black and white for variety's sake. In Miki's case I went with three shades of forest green and included key lime green since it's closer to yellow and pops out nicely; I also included desaturated browns and off-whites to visually frame the key lime better.
Since Miki is characterized as somewhat non-conforming in the comics, I doubled down and updated her parka jacket to something more extreme-sports looking (thank you @haloheadhater for helping me figure that one out!), added thick denim jeans to the mix and the toughest pair of timber boots I could come up with.
Gas is the kind of character that tries to look tough (despite being the least intimidating devil ever), so I added a biker's denim vest to crank the Cool Factor™ to the max. There's little difference between his canon designs, so blending them together was easy enough. I tried to preserve his iconic Emo Frog shirt with a minimalist design, all derived from triangles to keep in line with the devil design philosophy I've been keeping so far.
I wanted to reflect Miki's dragonfly mascot in her overall design, so I gave her wings a peculiar shape. While adult angels may have multiple pairs, Miki's wings are a single pair: I took inspiration from pennant-winged nightjars for her wing design.
Officially, Gas has the smallest wing-to-body ratio of the entire cast. He can still fly just fine, no worries, but he took more naturally to phasing walls and floors around the school to get by. My biggest challenge was his horns and wings, specifically finding the right shade of orange so they would not blend with his ginger hair. I didn't want to use red for his hair, nor blue for his horns/wings like his original designs, so I had to put my eyes to the test there.
Mascot placement once again comes with meaning: Gas' tomato frog may have bright and intimidating colors, but it's actually cute, round and inoffensive; it rests right over his heart to represent his true nature. Miki's green darner dragonfly hangs at the end of her braid: braids are often associated with bravery, wisdom, patience or experience in character design, and dragonflies are renowned for their maneuverability; this way, Miki's core traits are in the end held together by her ability to adjust on the fly.
There it is! the entire main cast of Angel's Friends, redesigned :D I've also been working on the humans and teachers, but it'll be a while before I finish those. For now my attention is almost entirely on my AF rewrite fic. Shameless self-promotion aside, I'm really proud of my script and characters, and I really appreciate it when I get comments/kudos/hits. So far everyone's been really kind and excited and I definitely share on the enthusiasm!
I'll Fly With You (rewrite fic) Art masterpost
79 notes
·
View notes
Note
Please please share some coding/designing wisdom. Your game is so damn pretty 😭😭😭 Could you tell us what template you used and how hard it was to make it look like it is today? I imagine so much work must have gone into it
😭😭 I am no expert, but these are just my rationale/methods behind the visual choices I made!
For the template I used—I used Vahnya's Template! However, this post by @/manonamora-if has a whole section for templates that I wish I saw or checked out before making my IF! In another lifetime, I might've just used nyehilism's template to achieve the bottom sidebar instead of torturing myself learning how to do it... ;;
Below, I go into detail the timeline of designing Uroboros, as well as advice through the process I went!
Design Timeline
I started designing the UI late October 2022, and kept fixing, changing, editing it well into February and maybe a little bit of March 2023.
October 2022 - Early iterations of the design. Looked for stock images and began implementing it to add a background to the sidebar and the actual passages. Swatched some color palettes and began implementing them into the IF. Later decided to make the sidebar on the bottom instead of on the side. Also, added a title screen.
November - Testing different backgrounds for the IF's sidebar. Added a textbox to the passages, also worked on the black fade transitions.
December - Finished working on the sidebar background for both light and dark theme, began work on the background of the IF instead.
January 2023 - Finished working on the dark and light theme backgrounds! Started work on drawing the skill icons for light and dark theme, and finished!
February - Changed the title screen to look better on mobile, created a circle logo, added a border to the textbox. Also, made further edits for light theme.
March - Just remade the "Uroboros" logo.
If you're wondering why it took approximately 5 months to get to the final version—don't worry! I wasn't working only on the design for 5 months. My partner helped make the edits for the design, while I worked on coding them in and writing.
I spent a lot of time trying to get a grasp on Javascript, SugarCube, and HTML all throughout this time as well, to know how to fluidly add these things. Meaning, while I was working on these visual elements, I was also figuring out how to do the "looking" mechanic, black and white transitions, figuring out how Tweego worked, radio buttons, and so on.
Do note I've been busy the entire time throughout, so perhaps you can do this much quicker than I can!
The "Secrets"
1. Please—look at IFs you love! What are some visual aspects of other IFs that you love and want to include in your story? I started by analyzing parts of other IFs that I love. I liked Wayfarer's textbox; I liked how the choices looked in When Twilight Strikes. I liked the textboxes in the beginning of Zorlok. Find the things that amaze you about other IFs, and implement it your own way!
This seems like super basic advice—but trust me, once you think, "How can I put this in my game?" you will not only be able to have it, but most likely, you'll also learn a LOT.
While seeing how I could make the radio buttons, for example, I started researching. I googled "How to live change text?" and then I found out about jQuery, how to use the replace macro, etc. etc. JUST from researching how to do exactly one (1) feature.
2. What is missing in other IFs? Think about your own reading experience. I didn't like the clunkiness of some, how the sidebar is on the side when space on a mobile-screen is severely limited length-wise. So, I put the sidebar on the bottom.
I didn't like how other choices look in IFs, so I wanted a way to do mine that's nice and elegant(though it's still a little hard to read, admittedly).
Again, researching how to do the things you want opens many doors for you. I learned how to style <li> and change how bullets look, learned how to style links in Twine in general, etc. etc. again with just this ONE thing I wanted to change/add.
3. Don't do the work all by yourself. I struggled so hard because I hate asking for help. I was happy to Google other people's problems, but I never thought to open up my own thread or ask anybody in the community for help. Please, not only ask, but also—your work doesn't have to be completely original.
Use templates. Look at manon's amazing masterlist of things you can implement. I also have a few macro's that you can use, like multipronouns for MC, that does the work for you, for free.
Rip people's codes—respectfully. I'm not saying from other IFs, but online in other places. If they appear on help forums or are publicly available through places like CodePen, chances are that they're open-source or licensed in such a way that anyone can use it (e.g. MIT license).
Again, here is Manon's masterlist, which includes custom macros you can use in your game (Chapel, HiEv and Cycy are my high recommendations)! Additionally, here's my code for multipronouns here and my code for setting RO genders here.
4. MAKE IT READABLE!! Even if you want your game to look pretty... please, I'm begging you, make it easy to read. This is the most important thing ever.
I have a short attention span, and so does my partner. We reviewed the game to make sure we are NOT compromising the reading experience with our design. As much as we want fantastical backgrounds, we wanted to make sure it was at least not distracting. As much as we want gaudy styles, we want the actual passage to be suited for the long haul.
The most, most important part is to enhance the reading experience--not by adding things on, but by making it simple and intuitive. As someone in the computer science field, the user experience is CRITICAL. Put yourself in their shoes, think about them first and foremost.
Twine is amazingly customizable, and its powers can be wielded for good and evil. Plenty of amazing writers but inexperienced UI designers, especially from CoG, get into Twine. CoG almost completely takes away the design element, so Twine is a whole new ballpark.
Uroboros has a lot of pomp, but the actual textbox is uncharacteristically simple in comparison. The simplicity against an otherwise fantastical, but non-distracting background helps give it elegance. The sidebar, in contrast, is very eye-catching—but, it's also out of view most of the time, and isn't built for long reading.
To add on, make sure it's readable on mobile. I guarantee 80% of your readers are going to be reading your IF on their phone, and probably at 3 AM, so you will want the mobile to look as good as PC, or even better.
Closing Thoughts
Anyway, as basic as this advice is, this is really what guided my entire thought process behind my visual choices! -- Picking and choosing what you like from IFs, figuring out how to do them through research, and making sure your IF is built to be read for a while.
Thanks so much for asking, thinking that I have wisdom to impart!! 😭🫶💕
#uroboros-if#uroboros#asks#anon#writing reference#writing advice#if resources#twine resources#twine design#twine coding resources#gameplay design
95 notes
·
View notes
Text
Some Aldernic terms
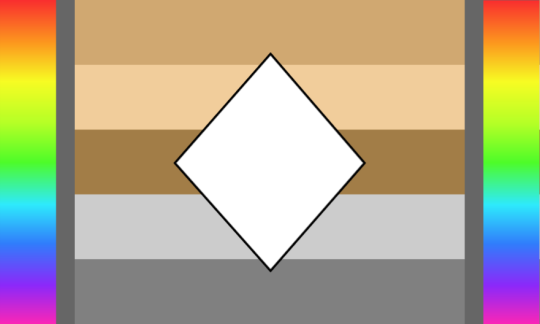
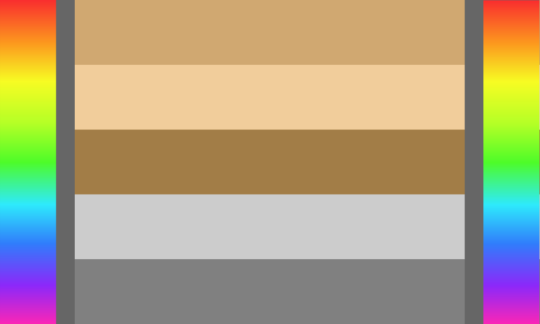
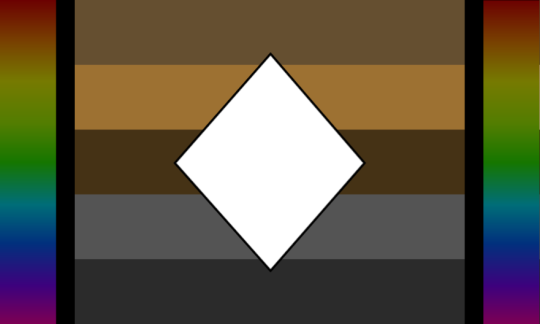
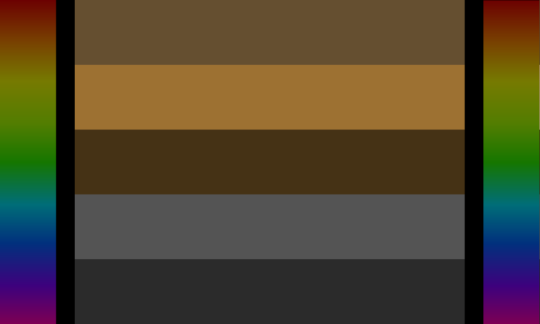
Row 1 (Pasentadernic): With symbol (left), symbol-less (right) Row 2 (Viventadernic): With symbol (left), symbol-less (right) Row 3 (Darentadernic): With symbol (left), symbol-less (right)
Pasentadernic: An aldernic term for when wants or has a body with a skin tone that can be described as pastel or light. Pasentadernic includes any color from white to light gray, and to any light non-vivid color.
Viventadernic: An aldernic term for when wants or has a body with a skin tone that can be described as neutral or vivid. Viventadernic includes any color from to any light gray to dark gray, and to any non-pastel and non-dark color.
Darentadernic: An aldernic term for when wants or has a body with a skin tone that can be described as dark or muted. Darentadernic includes any color from dark gray to black, and to any dark non-vivid color.
.
These terms do include colors already found naturally in human skin since human skin is naturally anywhere from very dark brown to pinkish (just as a generalization). One could choose to describe their current physical body with these terms if one wants, these terms were coined to be deliberately broad in their definitions.
These terms were mostly coined with alterhumans and system members in mind, provided one has skin or something that is basically the equivalent of skin. "Skin" here is a broad term. (Essentially anything that's not liquid, scales, feathers, fur, etc.)
There's no concrete line between what colors are defined as pastel, neutral or dark, so it really depends on one's own personal perception on what colors are what if one's trying to decide if the color is light or neutral.
.
I mostly coined these for myself since I'm a shapeshifter but two of my forms I can remember have pure white skin while the other has black skin. Well technically I don't have skin but it's the closest human word. One of my headmates also as brown skin and it'd be nice to have a term for her since her inner world body sure as hell doesn't match this flesh capsule.
I'll probably coin a term for being fluid between colors or these terms.
The flags include the gradients on the sides for nonhuman skin tones, the horizontal stripes are just colors I felt were important to note since these terms technically include human skin tones, and it's hard to blend brown and gray into a rainbow color palette, especially pastels. Hence why there's the small stripes for black and white as well for the light and dark versions. I just needed a good way to add a rainbow gradient without inducing eye strain due to the stripes being very similar tint/tone/shade-wise. This is just what I came up with. (The other alternatives would've just had way to many stripes and color variance for what I wanted to go for.)
.
Also! If you tag this as transx/transid I'm hard blocking you! Also if you try to argue with me saying these are basically trace or whatever because brown happens to be a human skin tone, I'm just going to ignore you.
These terms exist to describe a color one has or wants as the color of their skin or whatever equivalent of skin one has. Whether one is using the terms to describe their inner world body or outer world body or as a want/have is none of my business. I just coined these to fill a blank in my experience.
(Sorry for the long foot notes I just wanna cover the bases before posting, I just don't want to get back on after work to find like 20 people angry at me or something for not mentioning it and/or clarifying my intentions for these terms in the first place. /gen)
(I do not consent to these terms being used: to denote transition to another race, being used in diaracial/trace spaces, to fetishize BIPOC or anyone's physical meatspace forms. /srs)
#long post#chunk text#eye strain#coining#imoga#mogai#liom#aldernic coining#flag coining#aldernic#pasentadernic#viventadernic#darentadernic
27 notes
·
View notes
Note
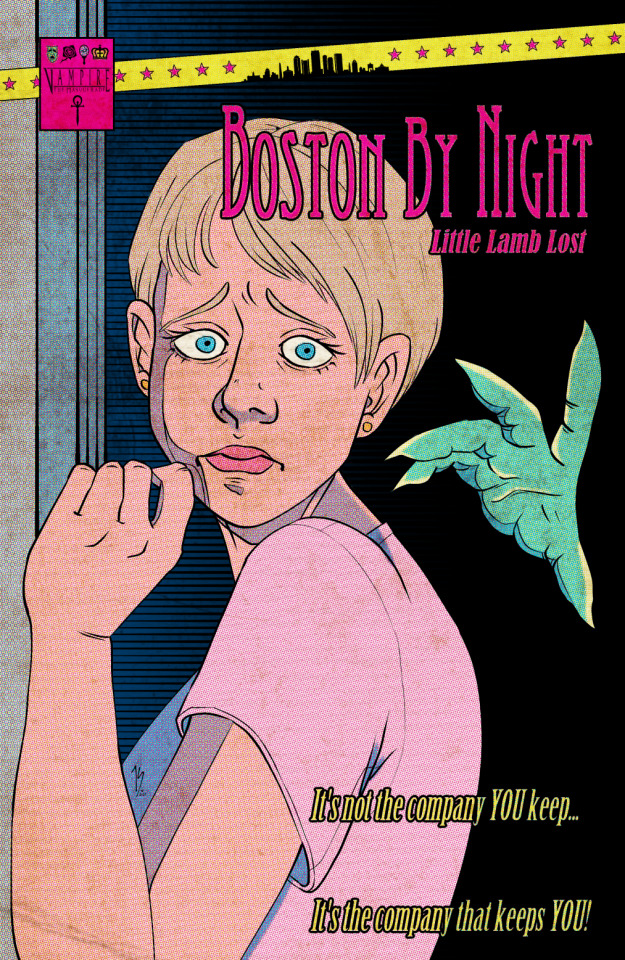
Your VTM comic book covers are simply GORGEOUS, I'm totally in awe! How did you get the super cool halftone/coloured dots effect? It looks super cool and realistic, I love it! Have a lovely day! :)
Thank you so much!
So to get the halftones, I use an old-ass tutorial I got off deviantArt literally....more than a decade ago? (Rosalarian's Golden Age Tutorial). The account appears to be deactivated, but I'll go through the steps here:
For reference, I bounce between Clip Studio Paint and a very old-ass copy of Photoshop, but if you're using other programs that have fun pixelate filters and you can change the color mode, you should be ok.
NOW...
Ink your drawing in straight black on its own layer
Block your colors on another layer (I hunted up some old comic color palettes thanks to madformidcentury dot com/2013/10/mid-century-color-palette-in-comics dot html)
Turn off any and all blackwork (this is INCREDIBLY important), and take your colorwork into Photoshop. (if there are any gaps in your color work, fill a separate layer with white and then merge the layers so it's all solid)
Set the mode to CMYK
Go to Artistic Filters >> Pixelate >> Color Halftone (the only thing I mess around with is the size of the dots; the default for my era of Photoshop is 8 and that's a lil big for my taste--all the VTM covers are between 4-6. It's up to your own best judgement, but I go by how "readable" things look--does the face still look like a face at a reasonable distance or is it just a smudge? If it's not readable, undo and change your dot size)
Add 3 new layers to your document and LABEL THEM: Cyan, Magenta, and Yellow
Then go to your channels panel and click on the Cyan layer to make a selection of it
Back to your Layers panel, make sure you're on your Cyan layer, and SELECT INVERSE
Then FILL the selection with the CMYK cyan that you've picked out
Deselect your selection, move to the next layer (and make sure you've got CMYK magenta in your bucket) and repeat steps 6-8 selecting Magenta and Yellow respectively
NOW you've got the beginnings of retro-feeling halftone. At this point, I import the halftone manipulation back into CSP and turn my blackwork back on.
For the ✨ grunge ✨ effect, I grab an old paper texture (after reducing its saturation and upping the contrast until it's mostly black and white splotchy) and set it to OVERLAY at anywhere from 50-20% (this is a 'let your soul decide' moment) over the whole thing
Then I grab another old paper texture and put underneath the Overlay Texture Layer, on MULTIPLY, at anywhere from 65-25% (again, let your soul decide). Both layers will give you a nice level of funk to go with your halftone shenanigans
A lot of the colorwork is going back and forth and back and forth because what looked ok in flats didn't translate after toning, but it works out eventually!
Some important things to remember:
Cool tones tend to fade back and warm tones tend to move forward if you're gonna use this method on any kind of scene
Keep your shapes SIMPLE; don't get bogged down in tones of gradients and fades and all of that because most of it WILL NOT come across once you start toning! Think of it this way: mass-production doesn't have time for fine detail, that's why comics are a lot of heavy black inks and flat color contrast
Experiment with the colors! You're working in a limited palette (if you're using any of the old Marvel/DC print books especially), and it doesn't have to be photorealistic/absolute. For instance, my Nos isn't actually green, but the tone suited the funky retro vibe so I went with it!
Let yourself fall down the research rabbit hole of pulp covers because they're both hilarious and informative. Same dot energy is an interesting collection website to go through, you can also go through your search engine (remember to add -pinterest -youtube to your search term to filter out that crapola)
HAVE FUN!
💖
25 notes
·
View notes
Text
The Role of Color in Evoking Emotion
Color is one of the most powerful tools in photography, capable of conveying mood, setting the tone, and evoking emotional responses

in viewers. Understanding how different colors influence feelings can elevate your work and help you create compelling images that resonate deeply with your audience.
The Psychology of Color
Each color evokes specific emotions and associations. Here’s a brief overview of how different colors can impact the viewer’s emotional response:
Red: Often associated with passion, love, and energy, red can create a sense of urgency or excitement. It draws the eye and can evoke strong feelings, making it a powerful choice for capturing intense moments.
Blue: Representing calmness and tranquility, blue can create a serene atmosphere. It’s often used in landscape photography to convey peacefulness or in portraits to evoke a sense of trust and reliability.
Yellow: This bright color signifies happiness and optimism. Yellow can instantly lift the mood of an image, making it an excellent choice for cheerful and vibrant compositions.
Green: Associated with nature, growth, and renewal, green evokes feelings of harmony and balance. It’s often used in environmental photography to symbolize life and freshness.
Purple: Traditionally linked to luxury, creativity, and spirituality, purple can add a sense of mystery and depth to an image. It works well in artistic or dreamlike compositions.
Black and White: While not colors in the traditional sense, monochromatic schemes can evoke feelings of nostalgia, elegance, and simplicity. They allow the viewer to focus on contrast and texture, often creating a more dramatic effect.
Using Color Intentionally in Photography
To harness the emotional power of color in your photography, consider the following techniques:
1. Choose a Color Palette: Decide on a color palette that aligns with the mood you want to convey. For instance, a warm color palette (reds, oranges, yellows) can create a cozy, inviting feel, while a cool palette (blues, greens) can evoke calmness.
2. Utilize Color Contrast: Contrast can make your subject stand out and evoke specific feelings. For example, placing a bright object against a dark background can create drama and focus. Experiment with complementary colors to enhance visual interest and emotional impact.
3. Pay Attention to Lighting: Lighting can drastically change how colors appear in your photos. Soft, diffused light can create gentle, romantic tones, while harsh light can create stark, bold contrasts. Adjust your lighting setup to achieve the desired emotional response.
4. Use Color in Composition: Incorporate color through your choice of backgrounds, props, and even clothing. These elements can influence the overall mood of the image. For example, a model dressed in warm tones can evoke feelings of warmth and happiness, while cool tones can create a more subdued atmosphere.
5. Post-Processing Adjustments: In post-production, you can further manipulate color to evoke specific emotions. Adjusting saturation, hue, and contrast can enhance the feelings you want to convey. However, ensure the final image remains true to the emotion you intend to express.
Conclusion
Understanding the role of color in photography allows you to create images that evoke strong emotional responses. By being intentional with your color choices and compositions, you can transform your work from simple visuals into powerful narratives that resonate with your audience.
Whether you're capturing a serene landscape or a vibrant event, the impact of color is undeniable. Remember, even the best wedding photographer in Dehradun knows how to use color effectively to capture the joy and emotion of special moments. So grab your camera and start experimenting with color to unlock new emotional depths in your photography!
#tiktok#landscape#paradise#nature#adventure#explore#travel#travelling#photography#forest#aesthetic#naturecore#cottagecore#light academia#fairycore#gardencore#flowers#flowercore
2 notes
·
View notes
Text
Divination deck adoption
Due to life reasons (lack of money, lack of time), I have decided to put my original divination decks up for adoption. I will try to make the entirety of the process clear and understandable.

★ Owning the deck
Adopting the deck means you will have full ownership of their designs. Meaning you can copyright them, change the designs, sell them, print them — the world will be your oyster.
After acquiring ownership I will take your deck out of all my stores, and they will be yours effectively, no longer being available for adoption.
☆ Receiving the deck
You’ll receive your deck through email, in zip file with all the cards, pdf file of printing sheet and a guidebook when the deck has it.
✧ Acquiring your original divination deck ✧
✦ Starting price is 5$ USD for a single deck, you might choose as many decks as you want to adopt.
✦ Will work similarly as a bid system, any updates will be posted in a reblog of this og post.
・Step 1. Choose the deck or decks you want to have full ownership of ・Step 2. Send me a DM telling me: which decks you want, for which symbolic amount and why they resonated with you ・Step 3. If accepted, payment can be made through paypal or ko-fi donation ・Step 4. After transaction confirmation, send me the email through which you can get your deck(s) ・Step 5. Enjoy! I hope the decks find a kind and valuable home in your hands.
★ Available decks
You can check the available decks in more detail here in the intro video, in my ko-fi shop page, linked in masterpost. If you wanna see a specific card from any deck, DM me and I’ll send it to you! The adoptable decks available are:
✧ Tarot decks
・Black is Art Tarot: 78 illustrated cards with The full Major and minor Arcana depicting Black excellence in Renaissance + a 46 pages PDF Booklet with details of the art and the inspiration and experience of making this deck.
・Soft as Clouds Tarot: 78 tarot cards with cute art and pastel palette.
・Sex & Love Tarot: 78 illustrated cards designed to represent matters of sex and relationship, based on the sexual and fiery meanings + a 44 page guidebook meaning of cards.
・The Dark Witch Tarot: 78 illustrated cards with the full arcana on black, white, red and gold to represent the elements of magick, the shadows and life force that sustain the shadows of witchcraft + 56 guidebook with cards meaning and correspondences.
✧ Lenormand decks
・Pride Lenormand: 36 illustrated cards – The full Lenormand with gender neutral and Pride aspects cause I am ace aro and needed to be included.
・Fairytale Lenormand: 36 illustrated cards – The full Lenormand with fairytale imagery inspired by classic illustrations on Aesop’s and Grimm’s books.
✧ Oracle decks
・Circular Tarotscope Oracle: 78 Circular and Illustrated cards that express the connection and correspondences between Astrology and Tarot, inspired by Joan Zodianz.
・Deep Dark Blue Oracle: 52 illustrated cards, colorful and inspired by the Ocean and infused with water energy + 22 page PDF Booklet explaining the meaning and correspondences of the cards, the energy of the deck and advice on getting to know your deck.
・Yes & No Oracle: 72 original cards varying on the Negative and Affirmative spectrum of answers.
・The Seed Oracle: 40 cards, borderless and illustrated with the cycle of a small seed in it’s progress, difficulties, challenges, growth and end, infused with earth energy + 7 page PDF guidebook containing the deck’s energy and the order of its cards.
・The Storyteller Oracle: 42 cards illustrated with the flow of a storyline is one present in our lives, a dance that mirrors and partakes in the flow of the Universe and one that is told by these cards + 10 page PDF guidebook explaining the Storyteller’s narrative.
・Daily Affirmations Oracle: 57 cards with a gente but direct Oracle deck with affirmations focused on manifestation of mindfulness, mental health, daily advice, love, Spirituality, Confidence and Success.
・The Erilaz Oracle: 30 cards inspired and based on the Elder Futhark alphabet and on the magick of the bindrunes for a rune divination through cards.
#artists on tumblr#witchblr#witchcraft#divination#tarot community#adoptable#adopt auction#oracle cards#clairvoyance#astrology#astroblr#lenormand#fortune telling#tarot cards
2 notes
·
View notes