#dark tone lightroom presets
Explore tagged Tumblr posts
Text
Unlock the Moody Charm: Masterful Dark Photo Presets for Stunning Visuals
Enhance your photography with our premium collection of dark photo presets. Achieve stunning and moody effects with just a few clicks. Explore our best-selling dark photo presets to add a touch of elegance and drama to your images. Elevate your photography to the next level with our selection of professional-grade dark photo presets.
#dark tone lightroom presets#dark preset lightroom#dark lightroom preset#dark lightroom presets#lightroom dark tone presets#dark photo presets
0 notes
Text


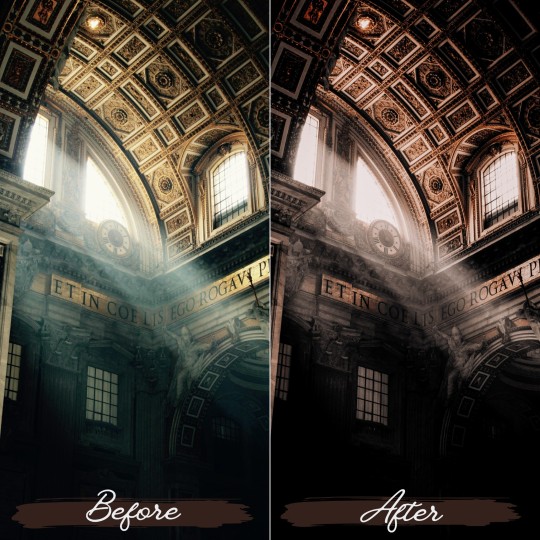
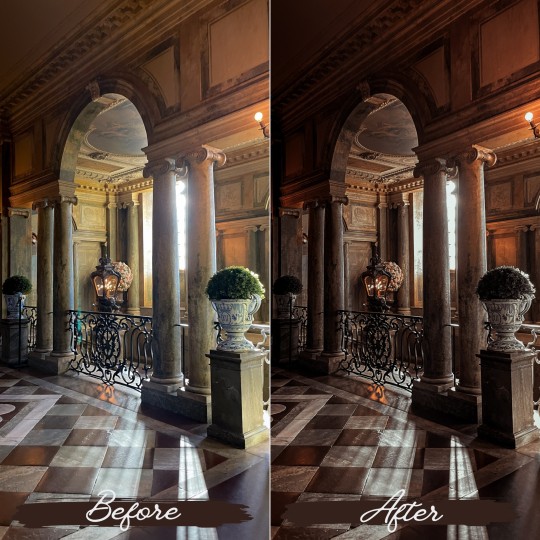

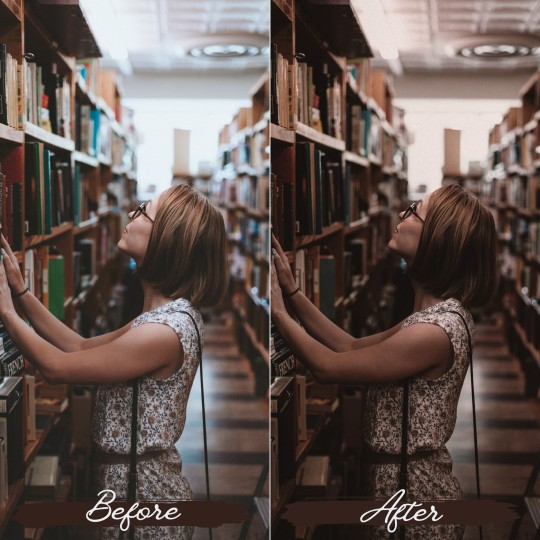
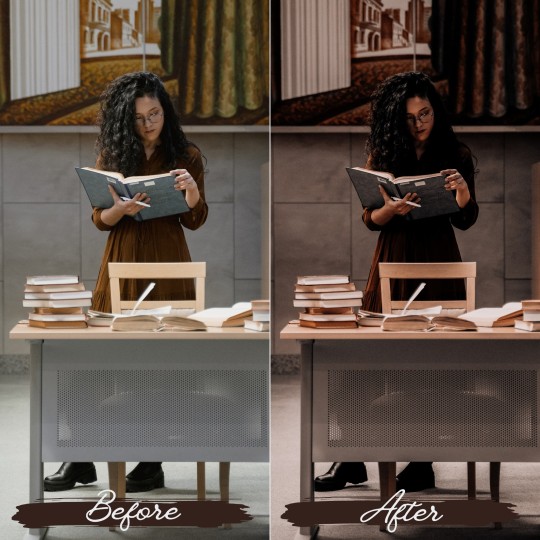
Dark Academia Lightroom Presets
Enhance your photos with a touch of literary charm using our Dark Academia Lightroom presets.These presets give your photo moody tones, vintage textures, and a dash of intellectual sophistication. Dark Academia Presets are perfect for academia photography,book library,outdoor photography and many more.
#dark academia#dark acadamia aesthetic#dark academism#old money aesthetic#aestehtic#aestheitcs#aestheticfilter#old money#adobe lightroom#lightroom presets#lightroom#blogger#influencers#instagrampresets
14 notes
·
View notes
Text
Mastering Dark Tone Editing in Lightroom: A Comprehensive Guide
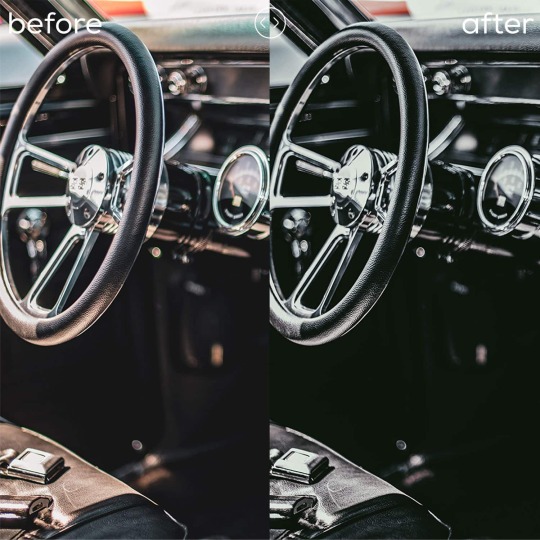
Photography is a powerful medium for storytelling, and editing plays a crucial role in shaping the narrative. Dark tone editing in Adobe Lightroom is a popular style that can create mood, depth, and atmosphere in your photos. In this comprehensive guide, we will delve into the art of dark tone editing, offering tips, techniques, and insights to help you master this evocative style using Adobe Lightroom.
Understanding Dark Tone Editing
Dark tone editing is a photographic style characterized by deep shadows, reduced highlights, and a rich, moody atmosphere. It is often used to convey emotions, drama, and intensity in photos. Here's how to achieve dark tone edits in Lightroom:
Start with Exposure:
Begin by reducing the overall exposure to darken the image.
Adjust the Exposure slider in the Develop module to your desired level. Be mindful not to overdo it, as you don't want to lose too much detail.
Tweak Contrast:
Increase the Contrast slider slightly to enhance the difference between shadows and highlights.
Experiment with the Contrast adjustment to find the right balance for your image.
Work on the Tone Curve:
The Tone Curve is a powerful tool for controlling tones in your image.
Create an S-curve by adding a point in the shadows to darken them and another in the highlights to brighten them slightly.
Fine-tune the curve to achieve the desired contrast and mood.
Adjust Blacks and Whites:
Dark tone edits often involve deep blacks and muted whites.
Reduce the Blacks slider to add depth to the shadows, and lower the Whites slider to avoid blown-out highlights.
Enhance Clarity and Texture:
Slightly increase Clarity and Texture to bring out detail and texture in your image.
These adjustments can add depth and character to dark tone photos.
Manage HSL (Hue, Saturation, and Luminance):
Use the HSL panel to fine-tune the colors in your image.
Reducing the luminance of certain colors can help achieve the desired mood.
Apply Graduated Filters and Radial Filters:
Graduated and Radial Filters can be used to selectively adjust areas of your image.
For dark tone edits, consider darkening the sky with a Graduated Filter or drawing attention to a specific subject with a Radial Filter.
Use the Vignette Tool:
Apply a subtle vignette to draw the viewer's eye toward the center of the image.
Adjust the Amount and Feather sliders to control the strength and softness of the vignette.
Finalize with Split Toning:
Split Toning allows you to add color tones to the shadows and highlights.
Experiment with different color combinations to achieve a unique look.
Save Your Preset: - Once you've crafted your dark tone edit, consider saving it as a preset. Presets can be applied to other photos with a single click, saving you time and ensuring consistency in your editing style.
Tips for Effective Dark Tone Editing
Maintain Detail: While dark tone editing often involves deep shadows, be cautious not to lose too much detail. Pay attention to the histogram to ensure a balanced tonal range.
Experiment with Colors: Dark tone edits can be more compelling when certain colors are allowed to pop. Consider selectively desaturating or enhancing specific colors to create visual interest.
Embrace Texture: Dark tone editing is an excellent opportunity to highlight texture in your photos. Experiment with Texture and Clarity adjustments to bring out detail.
Customize Your Workflow: Every photo is unique, so adapt your editing workflow to suit each image's characteristics and the mood you want to convey.
Study Inspiration: Look at the work of photographers known for their dark tone edits to gain inspiration and insights into the style.
For More Info:-
Presets Lightroom Wedding
Best Wedding Presets Lightroom
blue lightroom preset download
Lightroom New Presets Free Download
2 notes
·
View notes
Text

PORTRAIT is a MOBILE preset that will add rich, dark, and moody tones to your pictures.
INCLUDED:
• 20 MOBILE Lightroom Presets • A PDF installation guide with instructions on how to download and install these presets. • After Purchase, Customer Support
Check it out on my Etsy Shop! ♥
#lightroomcc#lightroompresets#lightroom#preset lightroom#photographer#photography#portrait#portraiture#presets
3 notes
·
View notes
Text
How to Edit Photos for Beginners: Simple Tips and Tools
In today’s visual-first world, photo editing is an essential skill. Whether you’re managing an e-commerce business, editing portraits, or simply improving personal photos, knowing how to enhance images can make a big difference. With this guide, beginners will learn simple tips and discover essential tools to transform ordinary photos into captivating visuals.

Why Does Photo Editing Matter?
Photo editing is more than just beautification—it tells a story and emphasizes details that grab attention. A well-edited photo can improve clarity, fix imperfections, and create a professional impression. For businesses, especially in e-commerce photo editing services, polished images are vital for building trust and increasing sales.
Imagine a stunning product photo for an online store. It needs to look perfect to convert visitors into buyers. This is where editing tools and techniques like clipping path service, background removal, and retouching make all the difference.
Must-Have Photo Editing Tools

Starting your editing journey requires the right tools. Here are beginner-friendly options:
Free Tools:
Canva: Great for quick edits and adding text overlays.
Snapseed: Offers professional-grade features like healing and selective adjustments.
GIMP: A powerful, free desktop tool with advanced features like clipping path services.
Paid Tools:
Adobe Photoshop: Perfect for precision editing, from portraits to product images.
Lightroom: Ideal for batch processing and fine-tuning colors.
Luminar AI: Simplifies complex edits using AI tools for beginners.
Key Editing Techniques for Beginners
1. Crop and Straighten
Fixing composition is the first step. Cropping removes distractions, while straightening aligns horizons or objects. For e-commerce, maintaining clean compositions, especially for product photography, ensures the subject stands out.
2. Adjust Brightness and Contrast
Brighten dark images and increase contrast to add depth. Balance is crucial; overdoing it can make images look unnatural.
3. Enhance Colors: Saturation, Hue, and Vibrance
Saturation: Increases color intensity.
Hue: Adjusts the tone of colors.
Vibrance: Boosts muted tones without oversaturating.
Color corrections are essential for jewelry retouching services, where the goal is to make gemstones sparkle naturally without appearing fake.
4. Use Filters and Presets
Filters provide instant enhancements. Apps like Lightroom and Snapseed offer presets tailored for moods or themes. Subtle filters work well for portraits, while dramatic ones can highlight products or landscapes.
5. Remove Unwanted Objects

Whether it’s blemishes in portraits or unwanted distractions in product images, tools like the healing brush in Photoshop can clean up imperfections. This step is essential for photo retouching services, ensuring flawless results.
6. Blur Backgrounds
Blurring the background creates a professional look and emphasizes the subject. Use tools like Snapseed’s Lens Blur on Photoshop's Gaussian Blur to achieve this effect. It’s a popular feature in ghost mannequin services for highlighting clothing details.
Editing for Specific Purposes
E-Commerce Photos
Product photos are the backbone of online stores. Editing techniques like clipping path service and background removal ensure a clean, distraction-free presentation. Consistency across product images builds brand trust and boosts conversions.
Portraits
For personal or business use, portraits benefit from photo retouching services. Softening skin, enhancing natural tones, and emphasizing details like eyes and hair make portraits look professional.
Jewelry Images
Jewelry is challenging to photograph due to reflections and intricate details. Jewelry retouching services refine images, enhance sparkle, and remove imperfections for a luxurious appeal.
Avoiding Common Mistakes
While editing, beginners often fall into traps like over-editing or starting with low-quality images. Always aim for subtlety, maintain original details, and use high-resolution images for better results. Poor-quality edits can damage a brand's reputation, especially for businesses relying on e-commerce photo editing services.
A Simple Editing Workflow for Beginners

Import Your Photo: Start with a high-resolution image.
Fix Composition: Crop and straighten for a clean frame.
Adjust Lighting: Balance brightness and contrast.
Enhance Colors: Fine-tune saturation and vibrance.
Apply Filters: Choose presets for consistency.
Export for Use: Save in the right format and size for platforms like social media or e-commerce.
When to Use Professional Photo Editing Services
For complex edits or time-sensitive projects, professional services are invaluable. Businesses rely on:
eCommerce Photo Editing Services: Ensures product images are consistent and optimized for sales.
Ghost Mannequin Services: Creates a polished look for clothing by removing mannequins.
Photo Retouching Services: Enhances portraits, products, and more with expert precision.
Jewelry Retouching Services: Adds the perfect sparkle and detail for high-end products.
Conclusion
Photo editing transforms ordinary images into captivating visuals that tell a story and make a lasting impression. Whether you're a beginner experimenting with free tools or a business seeking professional results, the right techniques can elevate your images. For e-commerce and branding, services like clipping path service, ghost mannequin services, and photo retouching services ensure perfection. Start your editing journey today, or let professionals handle it to achieve flawless results!
#photo editing service#photo retouching#photoediting#photo edit#clipping path service#image clipping service#ghost mannequin
0 notes
Text
20+ Artistic Effect Lightroom Presets for Creative Photographers – Speckyboy
New Post has been published on https://thedigitalinsider.com/20-artistic-effect-lightroom-presets-for-creative-photographers-speckyboy/
20+ Artistic Effect Lightroom Presets for Creative Photographers – Speckyboy
The right photo effect can transform an ordinary image into a work of art. Adjustments to lighting, color balance, and texture help you create the perfect mood for your project.
You can use Lightroom presets to achieve professional results in no time. They run the gamut from subtle touches to bold statements.
Each one is configured to change the look of your image. And much of the hard work has been done for you. However, they’re flexible and allow you to adjust them to match your needs.
If that sounds amazing, you’re in luck! This collection features more than twenty Lightroom presets that add artistic effects to any photo. They’re a great addition to your photography toolbox.
Check out our collection and find the presets that catch your eye. They’re so handy that you’ll want to use them again and again.
You might also like our collection of art effect Photoshop actions as well.
Inspired by Lomography, this suite of 19 presets provides a variety of interesting effects. They’re meant to mimic the non-technical joy of classic toy cameras. The effects aren’t meticulously crafted – but that’s the point.
Bring a rough industrial look to your photos using these grunge presets. They support the Lightroom adjustment slider to tweak the effect’s intensity. That makes it easy to go from subtle to dystopian in no time.
The look of a Polaroid instant photo is timeless. You can add this classic effect to your images via this set of five Lightroom presets. The washed-out aesthetic brings a retro quality to your portrait photography.
Artistic photo effects can be fun! The 20 presets in this collection add a memorable lo-fi look of a toy camera. They also support Lightroom Mobile, so you can take the party with you.
Fantasy fans will want to check out this suite of 50 surreal presets. Their style is reminiscent of popular period pieces like Game of Thrones. There’s plenty here to help you create a whole other world.
Use these presets to add a dreamlike haze to your photos. They feature soft tones and an airy ambiance that feels like a retro film camera. Give your images a past life with just a click.
Dark and moody, this collection offers muted colors and sharp lines. These versatile presets can be paired with portraits, fashion shots, and landscapes. They’ll make any photo stand out from the crowd.
The future is full of color according to this suite. Add a bright look to your nighttime landscape photos – especially those including neon signs. Rich hues and high contrast are the calling cards here.
Want to add some serious vibrance to your images? This collection of six Lightroom presets will boost even the dullest of photos. They make it easy to bring out the bold with a click.
These presets add a high-intensity effect to your lifestyle images. Your colors will be brighter and lines sharper. It’s a great choice for night photography or anywhere dark and light contrast.
This collection of 24 Lightroom presets includes a variety of luminous options. Whether you want to add a subtle light boost or something extreme, you’ll find it here. You can also adjust them to find just the right look.
Brighten and balance your photos using any of the 14 presets included here. They work well for outdoor shots or any image that could use a natural color enhancement. You’ll be surprised at how much life is hiding in your image.
Use these color-grading presets to add a moody vibe to images. Colors are boosted to bring out a dramatic look. There’s a lot of opportunity to experiment with the 20 included effects.
Embrace the darkness using this collection for Lightroom. Add a tint to photos while emphasizing earthy tones. The effect perfectly adds a cinematic feel to portraits and architectural images.
Here’s a way to bring a neon glow to your photos. These presets enhance light colors and bring them to the forefront. Your images will shine with a powerful visual statement.
Add a calm balance to any image with these matte effect presets. Inside, you’ll find ten options to achieve a classic film look. Use them to dress up portraits, landscapes, and lifestyle photography.
Your travel photos will benefit from this set of 50 Lightroom presets. They add a washed-out effect that makes them perfect for use as backgrounds. Website headers and hero areas are possibilities, as are print advertisements.
Bring a little heat to your fire images with presets built just for them. They aim to create a modern look while avoiding oversaturation. There are several options to choose from to achieve unique results.
Realistic sunshine effects are easy to implement with this collection of overlays. They brighten up any photo with bright rays of light. Add them as a separate layer and experiment with opacity and blends to make something special.
Vintage looks and warm colors make these presets a great option. Use them to turn a dull outdoor image into a dramatic scene. The 10 included effects make it easy to add some retro charm.
This collection of 20 presets will add the timeless beauty of sepia to your photos. The effect is subtle and still allows colors to come through. The result is an antiqued look that is sure to please.
Add Some Artistic Flair to Your Photos
Sometimes your photos need an extra boost. That’s where the Lightroom presets in this collection come in. They quickly add virtually any type of artistic effect imaginable.
What’s more, they’re great fun to experiment with. You can adjust them or even combine effects to create something unique. There are so many possibilities!
We hope you enjoy the options above and make them part of your photo editing workflow.
More Lightroom Preset Collections
Our curated Lightroom preset collections provide a comprehensive toolkit for both photography beginners and experts. We have a huge selection of presets, effects, and LUTs, including those suited for portraits, landscapes, cinematic effects, and much more.
More Lightroom Presets
Related Topics
#ADD#Adobe Lightroom#advertisements#amazing#Art#Beauty#Cameras#change#Collections#Color#colors#comprehensive#Dark#Design#easy#Editing#effects#eye#fashion#Features#Full#Future#game#headers#Heat#how#images#it#Landscape#life
0 notes
Text
Life and Pictures: Entry #8
Post-Processing and Editing: Enhancing Your Photos
Post-processing is an essential part of modern photography that can transform your raw images into stunning final pieces. This entry covers the basics of popular editing software, such as Adobe Lightroom and Photoshop, and provides guidance on how to use these tools to enhance your photos. Whether you're adjusting exposure, performing color correction, retouching blemishes, or adding creative effects, post-processing can bring your images to life.
Adobe Lightroom Basics
1. Importing Photos:
Start by importing your photos into Lightroom. Use the Library module to organize and sort your images.
2. Adjusting Exposure:
Use the Basic panel to adjust exposure, contrast, highlights, shadows, whites, and blacks. This helps to balance the light and dark areas in your photo.
3. Color Correction:
Adjust the white balance to correct any color casts. Use the temperature and tint sliders to achieve the desired look.
Use the HSL (Hue, Saturation, Luminance) panel to fine-tune individual colors in your photo.
4. Cropping and Straightening:
Use the Crop tool to improve the composition. Straighten horizons and remove any unwanted edges.
5. Retouching:
Use the Spot Removal tool to remove blemishes or unwanted objects.
The Adjustment Brush allows you to make localized adjustments to specific areas of your photo.
6. Adding Creative Effects:
Use the Effects panel to add vignettes or grain for a creative touch.
Experiment with presets to quickly apply a specific look to your photos.
Adobe Photoshop Basics
1. Layers and Masks:
Use layers to make non-destructive edits. Each layer can hold different elements of your photo.
Masks allow you to apply edits to specific areas of a layer, providing precise control over your adjustments.
2. Advanced Retouching:
Use the Healing Brush and Clone Stamp tools to remove more complex blemishes or objects.
The Liquify tool can help to subtly adjust shapes and features within your image.
3. Color Correction and Grading:
Use adjustment layers like Curves, Levels, and Color Balance to fine-tune the color and tone of your image.
Create mood and atmosphere by experimenting with color grading techniques.
4. Adding Text and Graphics:
Use the Text tool to add captions or watermarks to your photos.
Incorporate shapes and graphics to create composite images or design elements.
5. Creative Effects:
Use filters and blending modes to add unique effects to your photos.
The Smudge and Blur tools can help to create motion effects or soften parts of your image.
Alternative Editing Software
If you don’t have access to Adobe software, other editing programs offer similar features. Here are some alternatives you can use:
1. GIMP (GNU Image Manipulation Program):
A free, open-source image editor with a wide range of tools for photo retouching, composition, and authoring.
2. Affinity Photo:
A cost-effective alternative to Photoshop with professional-grade tools for editing, retouching, and color correction.
3. Darktable:
A free, open-source photography workflow application and raw developer, similar to Lightroom.
4. Pixlr:
A web-based photo editor that offers a variety of tools for basic and advanced photo editing.
5. Capture One:
A professional-grade photo editing software known for its excellent color grading tools and tethered shooting capabilities.
6. Snapseed:
A mobile photo editing app with a comprehensive set of tools for enhancing photos on the go.
7. Canva:
An easy-to-use online graphic design tool that also provides photo editing features, such as filters, adjustments, and text overlay options. Canva is great for quick edits and creating social media-ready images.
Workflow Tips
Consistency: Develop a consistent editing style to create a cohesive look across your photos.
Backup: Always back up your original photos before editing. Save edited versions as separate files to preserve the originals.
Practice: The more you experiment with editing, the more proficient you will become. Don’t be afraid to try new techniques and tools.
Post-processing can significantly enhance your photography, allowing you to express your creative vision fully. By mastering these basic techniques in Lightroom and Photoshop, or their alternatives, you can elevate the quality of your images and create truly stunning photographs.
1 note
·
View note
Text
Photo Editing for Beginners: A Comprehensive Guide

Introduction
Photo editing can seem daunting for beginners, but it's an essential skill for enhancing and perfecting your images. With the right techniques and tools, you can transform ordinary photos into stunning works of art. This comprehensive guide will walk you through the basics of photo editing, providing you with the knowledge to get started on your editing journey.
Understanding Photo Editing
Photo editing involves adjusting and enhancing images to improve their appearance. This can range from simple adjustments like cropping and color correction to more complex edits like retouching and compositing. The goal is to create visually appealing images that convey your desired message or aesthetic.
Essential Photo Editing Techniques
1. Cropping and Straightening
Cropping allows you to remove unwanted elements and improve the composition of your photo. Straightening helps align the horizon or other key elements, ensuring a balanced image.
2. Adjusting Exposure
Correcting exposure ensures your photo is neither too dark nor too light. Use tools like brightness, contrast, highlights, and shadows to balance the exposure.
3. Color Correction
Color correction adjusts the colors in your photo to make them look natural and vibrant. Tools like white balance, hue/saturation, and color balance can help achieve the desired color tone.
4. Sharpening
Sharpening enhances the fine details in your photo, making it appear crisper and more defined. Use sharpening tools sparingly to avoid creating an unnatural look.
5. Noise Reduction
Noise reduction minimizes graininess, especially in photos taken at high ISO settings. Balancing noise reduction with detail preservation is key to maintaining image quality.
Choosing the Right Photo Editing Software
Adobe Photoshop: A powerful and versatile tool for both basic and advanced photo editing.
Adobe Lightroom: Excellent for managing and editing large batches of photos with ease.
GIMP: A free, open-source alternative to Photoshop with many similar features.
Canva: A beginner-friendly tool with a focus on design and simple photo edits.
Tips for Effective Photo Editing
Start with a High-Quality Image: The better the original photo, the easier it will be to edit.
Work Non-Destructively: Use layers and masks to make edits without altering the original image.
Use Presets and Filters: Presets can save time and help you achieve a consistent look.
Zoom In and Out: Regularly zoom in to work on details and zoom out to see the overall effect.
Take Your Time: Rushing can lead to mistakes. Take your time to ensure each edit enhances the photo.
Common Photo Editing Pitfalls to Avoid
Over-Editing: Less is often more. Avoid making excessive adjustments that can make the photo look unnatural.
Ignoring the Histogram: The histogram is a valuable tool for understanding the exposure and tonal range of your photo. Use it to guide your adjustments.
Neglecting Backup: Always back up your original photos before making edits to ensure you can revert to the original if needed.
Conclusion
Photo editing is a valuable skill that can greatly enhance your photography. By mastering essential techniques like cropping, exposure adjustment, color correction, sharpening, and noise reduction, you can create stunning images that captivate viewers. With the right tools and a bit of practice, you'll be well on your way to becoming a proficient photo editor.
0 notes
Link
Refined Co - Refined II Presets for Lightroom & ACR Developed at the request of our REFINED Co Community, Refined II showcases an even cleaner and purer color palette than our beloved Refined I Collection. Perfect for a wide variety of genres and styles, Refined II can seamlessly go from light and airy to dark and moody while maintaining beautiful, rich colors and REFINED Co’s luminous skin tones. Clean colors, crisp whites, and pure blacks are at the foundation of this preset collection along with zero color shifts in the highlights and shadows to produce authentic, true-to-life edits that will instantly elevate your images. **Due to the digital nature of these files refunds are not offered. Learn more here. LIGHTROOM Desktop 4 versions of REFINED II presets & profiles ranging from soft and light and dark and moody 2 Black and White presets Workflow tools Desktop Supported Software: Adobe® Lightroom® 7.5 or later Adobe® Camera Raw 10.5 or later REFINED II REFINED II +2 . VIBRANCE REFINED II BW +2 SEE REFINED II PRESETS IN ACTION AS SEEN IN Marta Locklear Marta is a retired newborn, lifestyle and wedding photographer currently specializing in lifestyle, stock, commercial, and editorial work. Throughout the many stages of her photography career, she has found her deepest fulfillment in growing the worldwide community that REFINED has become and guiding photographers along their own creative journeys. BUY REFINED II
0 notes
Text
🌑✨ Looking to add a touch of mystery to your photos?
Our dark and moody Lightroom presets are here to work their magic! 😍🔮📷
🎨 Explore the realm of shadows and embrace your inner artist with our carefully crafted presets. Transform ordinary shots into captivating works of art that are bound to leave a lasting impression. 🖼️✨ 🎭📸 Go ahead, play with shadows and embrace the dramatic flair of darkness. Our dark and moody Lightroom presets are your key to creating jaw-dropping visuals that tell a mesmerizing story.🔥✨

#dark tone lightroom presets#dark lightroom presets#dark preset lightroom#dark and moody Lightroom presets
0 notes
Text
Editing Made Easy: Beginner-Friendly Photo Editing Tips and Software Recommendations
The first step in the realm of photography isn’t just taking a beautiful picture. The real magic happens when photographs are edited, when they may be improved, changed, and given a special touch. Photo editing may appear intimidating to novices, so don’t worry! The Zebra Institute is here to help you by offering software recommendations and some beginner-friendly photo editing advice.
Embrace the Basics
It’s crucial to comprehend the fundamental ideas before launching into the field of photo editing. The courses offered by the Zebra Institute give students a solid foundation in photography principles and composition.
Learn about principles like exposure, color balance, and contrast because they will have a big impact on your editing choices.
Choose the Right Software
There are many options available when it comes to photo editing software. It is advised for beginners to start with software that is user-friendly and provides a variety of editing options. Popular options include Corel PaintShop Pro, Adobe Lightroom, and Adobe Photoshop Elements.
Students are frequently introduced to these software programmes by Kolkata Photography Institute, which is renowned for its thorough training and assists them in gaining practical experience.
Adjusting Exposure and Color
The exposure and color balance of your images are two of the most crucial parts of editing. By altering the exposure sliders, an image can be made more or less bright or dark. Similar to that, color balance can be adjusted to get the desired effect.
The classes offered by Zebra Institute in Kolkata give detailed instructions on how to make use of these tweaks to improve your photos.
Enhancing Composition.
Editing photos gives you the chance to improve composition and produce a strong visual. By cropping your photos, you can enhance composition overall and get rid of unwanted elements. Additionally, playing with various aspect ratios can add a distinctive touch to your images.
The classes at Kolkata Photography Institute place a strong emphasis on composition, training students to create a sense of framing and narrative in their photographs.
The Power of Retouching
Retouching is another aspect of photo editing that can significantly enhance your images. Retouching enables you to enhance your photos, whether it’s by erasing flaws, lowering noise, or blending skin tones.
The courses offered by Zebra Institute Photography Institute in Kolkata give beginning photographers the knowledge and skills they need to produce faultless photos
Presets and filters
Presets and Filters can be a useful tool for novices who want to experiment with various looks and styles. The mood and ambience of your images can be easily changed by using these preset settings.
Explore presets and filters in programmes like Adobe Lightroom, where you may use them with a single click and make additional adjustments as necessary, suggests Kolkata Photography Institute.
Conclusion.
The realm of photo editing may initially seem intimidating to a beginning photographer. However, you may confidently navigate this creative space with the help and assistance of Zebra Institute.
To improve your talents, keep in mind to comprehend the fundamentals, select the appropriate programme, and practice numerous editing strategies. With perseverance and practice, you’ll soon experience the delight and satisfaction of using the art of photo editing to realize your vision.
1 note
·
View note
Photo

12 CARNELIAN Lightroom Preset Moblie Preset Photoshop Action Preset for Instagram Makeup Preset Portrait Preset Beauty Preset Photo Preset.
Download Link: https://www.etsy.com/uk/listing/1043922857/12-carnelian-lightroom-preset-moblie
12 Carnelian collections convert your photos into bright, fashion, clean, light red, and carnelian looks, which makes your photos seem more professional. This fashion package gives your photos trendy color effects and the main influence to red, white, and orange. This color grading is best for makeup, fashion, indoor, portraits, retouching, studio photography. This photo edit collection is perfect for makeup artist, fashion bloggers, Instagram influencers, Portraits, photographers, expert users, or beginners that have no experience in photo color grading. You can change your photo styles easily with a few clicks and save time.
#preset lightroom#instagram presets#preset#blogger preset#photo presets#skin tones#preset desktop#photography presets#presets mobile#photoshop actions#influencer presets#desktop presets#lifestyle presets#travel presets#baby skin#clear skin#preset bright#dark skin#portrait preset#wedding portrait#family portrait#skin preset#clean presets#gold tone#lightroom presets#mobile presets#photoshop action#acr presets
1 note
·
View note
Text
https://youtu.be/0SmF6oa2TEQ
youtube
New Preset Matte Black - Lightroom Mobile Tutorial
#editingphoto#editfoto#photography#lightroomtutorials#tutorial#lightroompresets#hrmwnart#youtube#lightroom#edit#lightroommobile#lightroomtutorial#adobelightroom#freepresets#presetlightroom#blacktone#darktone#dark tones#black preset#darkpreset
2 notes
·
View notes
Photo

Using Leading lines is a great technique to get outstanding photographs
#moody#photography tips#dark tones#cinematic#lightroom#lightroom presets#adobe#photoshop#portrait#social media#influencer#photographer#london
7 notes
·
View notes
Text


#earth tones#dark tones#a game of tones#cool tones#toneshifterz#original photographers#photographers on tumblr#photographer#photography#photos#lightroom#presets
1 note
·
View note
Text
20+ Best Color Grading LUTs for Lightroom – Speckyboy
New Post has been published on https://thedigitalinsider.com/20-best-color-grading-luts-for-lightroom-speckyboy/
20+ Best Color Grading LUTs for Lightroom – Speckyboy
You can use Lightroom Look-Up Tables (LUTs) to improve the look of any photo. They provide an easy way to add all manner of professional effects. They are a must-have addition to every designer’s toolbox.
Today, we’ll introduce you to some fantastic color-grading LUTs for Adobe’s Lightroom. These presets help you tell visual stories by adjusting aspects of your images, such as color, saturation, curves, and white balance. It’s a way to convey emotion, mood, and even time.
Our collection features a variety of color grading options. Use them to depict times of day, seasons, and color temperature, among other unique effects. The possibilities are nearly endless!
You might be surprised at what can be accomplished through these simple add-ons. Not to mention the time you’ll save by not having to edit your images manually.
Ready to get started? Keep reading to find the perfect fit for your visual storytelling project.
You may also like our free collection of Lightroom LUTs.
Add warmth to your photos with these Lightroom presets. They’re designed to bring out orange, red, and yellow tones. Use them to enhance landscapes and portraits with a sunny glowing effect.
Are you looking to add a cool touch to your shots? These LUTs accentuate cool color tones, making your image stand out to a whole new level. They’re perfect for making your subject pop.
Quickly add beautiful vintage film effects to your images with this collection. You can use these presets to bring out rich film tones and create a sense of magic. You’ll find everything you need to design a classic look.
This LUT collection offers a variety of cinematic styles. You’ll find presets for different color temperatures and moods. It’s an easy way to add a bit of Hollywood to your work.
Enhance your lifestyle photography with this set of muted tone presets. They’re great for setting a dark or serious mood. Even better, you can apply these eye-catching looks with a single click.
Create just the right mood with these LUTs. Inspired by a good cup of coffee, they bring rich, warm tones to photos. The large number of presets will help you find the perfect effect for your project.
These color-grading LUTs are designed to add cinematic tones to your photographs. Bring out a dramatic matte finish in an instant. You can also adjust these presets to fit your needs.
Soft pastel tones are great for portrait and landscape photography. They add a gentle touch and create a light mood. This LUT collection will help you add a look that will produce smiles.
Enhance your urban landscapes with this set of desaturated Lightroom LUTs. Use them to create a moody and contemporary look with just a click. You’ll find a variety of presets here to achieve your desired result.
Nothing stands out more than an image with rich color contrast. These presets will help you create high-end contrast effects with minimal effort. Add them to your collection and bring out the best in your photos.
The warm glow of the “golden hour” is a longtime staple of photography. The color-grading LUTs in this pack can help you enhance or even simulate the effect. Best of all, they work well with just about any photograph.
Use this collection of presets to add cool blue tones to your photos. They can bring a moody vibe to your landscapes and portraits. The effect is gentle on the eyes and easy to implement.
Bring your images to life with a bright, sun-kissed effect. The presets in this collection can enhance even the dullest low-light photos. The gorgeous glow of a sunset is within your reach.
Here’s a fun collection to make your images look otherworldly. Multiple styles are available, each with a unique spin on infrared film effects. Experiment with these presets to discover a whole world of possibilities.
Ensure your color stands out with this set of cross-processed LUTs. Choose your desired color, and the preset will do the rest. It’s a great way to add a dominant hue to your photos.
These LUTs will desaturate your image – resulting in an understated tone. They’re an excellent choice for fashion and landscape photos where a touch of nostalgia is needed. You’ll have professional effects in no time.
Add a vibrant touch with these color-popping presets. You can turn your images from dull to vivid with just one click. Use them to create attention-grabbing social media, web, or print photos.
#
Transform your photos with rich autumn tones that evoke the season’s spirit. Each LUT offers cinematic quality with an array of options to choose from. A simple way to decorate your images for fall!
Think of lush greens, pastel yellows, and bright whites. Bring out these springtime colors with a collection that’s blooming with potential. It’s perfect for outdoor nature shots and portraits.
Turn up the intensity with this collection of summer-themed LUTs. They’re designed to accentuate the rich, warm tones of your photos. Use them to beautify your summer shots without breaking a sweat.
These presets create a sharp and cool style reminiscent of winter. Each option focuses on a different shade, giving you multiple ways to make a statement. Use them on fashion, lifestyle, and outdoor images.
More Lightroom Preset Collections
Our curated Lightroom preset collections provide a comprehensive toolkit for both photography beginners and experts. We have a vast selection of presets, effects, and LUTs, including those suited for portraits, landscapes, cinematic effects, and much more.
More Lightroom Presets
Related Topics
#ADD#adobe#Adobe Lightroom#attention#Best Of#Blue#coffee#Collections#Color#colors#comprehensive#Dark#Design#easy#effects#emotion#eye#eyes#fashion#Features#Giving#hollywood#images#it#Landscape#life#lifestyle#Light#Lightroom Presets#LUTs
0 notes