#css tutorials
Explore tagged Tumblr posts
Visit Tumblr Blog
Explore Tumblr blogs with no restrictions, modern design and the best experience.
Last Seen Tumblr Blogs


Fun Fact
69% of Tumblr users are millennials.
Text
CSS Properties to Make Hyperlinks More Attractive – Speckyboy
New Post has been published on https://thedigitalinsider.com/css-properties-to-make-hyperlinks-more-attractive-speckyboy/
CSS Properties to Make Hyperlinks More Attractive – Speckyboy
Hyperlinks don’t always get the attention they deserve from web designers. Sure, we might make a few tweaks. However, we don’t always go the extra mile to make them stand out.
Perhaps that’s because the styling options used to be limited. Link color and underlining were the primary options. Hover and focus states seemed to be where most of the creativity occurred. Other enhancements tended to require add-ons like JavaScript.
CSS has changed the game in recent years. Several properties are available to customize the look of hyperlinks. They also provide a higher level of control regarding details like spacing and sizing.
It’s a whole new world of possibilities. Let’s check out some CSS properties that help make hyperlinks more attractive.
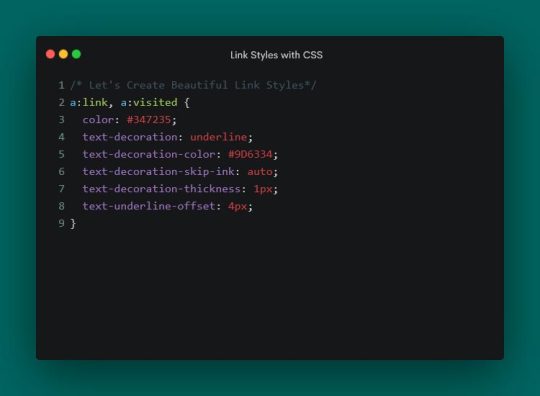
A Default Link
We’ll start with a default link configuration. A link color and CSS states were added – but that’s it. It will serve as a baseline as we explore the CSS properties below.
See the Pen Link Styling:Plain by Eric Karkovack
It used to be that a link’s underline had to be the same color as its text. The text-decoration-color property allows us to choose a separate hue. It also works with overlines, strikethroughs, and anything else set by the text-decoration property.
We’ve added a brown underline to compliment our green link text.
See the Pen Link Styling:text-decoration-color by Eric Karkovack
This niche property determines how the link’s text decoration interacts with glyphs. The default setting is auto, where the browser interrupts underlines and overlines so they don’t touch a glyph. You’ll notice this with lowercase letters that go below the baseline.
Setting the property to none means the underline or overline draws a straight line – regardless of where glyphs are located.
See the Pen Link Styling:text-decoration-skip-link by Eric Karkovack
The thickness of a link’s underline typically follows what’s defined in the font-weight property. That is, bold text will result in a thicker underline. This property lets us set a consistent value for every link in the cascade.
See the Pen Link Styling:text-decoration-thickness by Eric Karkovack
Text decorations don’t have to be a straight line. This property lets you change the style to dashed, dotted, double, or wavy lines.
See the Pen Link Styling:text-decoration-style by Eric Karkovack
Here’s a way to specify how closely (or not) an underline is to the text above. Adding a few pixels of space between them can improve legibility.
Note that this property doesn’t impact instances of the HTML underline tag (<u>). It only affects instances where the text-decoration property is set.
See the Pen Link Styling:text-underline-offset by Eric Karkovack
Another niche property, text-underline-position specifies the position of the underline relative to its text. Setting it to under is ideal for mathematical and scientific formulas. It makes subscript characters easy to read – even when underlined.
See the Pen Link Styling:text-underline-under by Eric Karkovack
Going Further with Link Styles
Hyperlinks don’t have to be bland. There are now plenty of ways to make them as much a part of your brand as other design elements.
The properties above are all worth considering when styling links. They’re relatively simple to implement and can make links more attractive and accessible. Best of all, they’re native CSS and won’t impact page load performance.
You can also use them beyond default styles. Style them for various states, such as changing the link’s underline color during a hover event. In addition, there’s an opportunity to add animation and transitions to create all sorts of fun micro-interactions.
Just beware – it’s possible to take things a little too far. Always keep best practices in mind to enhance the user experience. Anything that makes links harder to read or use isn’t worth doing.
It’s time to get creative! Experiment with these CSS properties and see how you can bring a little life to your links.
Related Topics
Top
#ADD#animation#attention#Best Of#browser#cascade#change#Color#creativity#CSS#CSS Snippets#CSS Tutorials#Design#designers#details#double#easy#event#focus#game#Giving#green#hover#how#HTML#impact#it#JavaScript#life#Link
2 notes
·
View notes
Text
CSS Tutorials, CSS Introductions - WebTutor
🚀 Elevate Your Web Development Skills! 🚀
🌐 Dive into the world of CSS with our latest tutorial on https://webtutor.dev/css/css-introduction. 💻✨
#WebDevelopment #CSSMagic #CodingJourney #TechSkills #LearnCoding
👉 Share if you're ready to embrace the world of CSS! 🌐💙
CSS Tutorials, CSS Introductions - WebTutor✨
1 note
·
View note
Text
Convert HTML to Image: A Step-by-Step Guide ✨

Do you want to turn some HTML code you've made that's on your website and have a way to convert it into an image for you to save?
Well, look no further! I too wanted to do the same thing but funny enough, there weren't any straightforward tutorials out there that could show you how! After hours of searching, I finally discovered the solution~!
This is an old tutorial I made 🐼

💛 Set your environment
Before we dive into the conversion process, I'll assume you already have your HTML code ready. What you want to learn is how to turn it into an image file. You should have a good grasp of HTML and JavaScript. For this tutorial, we'll use the following HTML code example:

We won't include the CSS code, as it doesn't affect this tutorial. The JavaScript file (script.js) at the bottom of the body element is where we'll add the functionality for the conversion.
Your page should resemble the following:

As you can see, the "Click me" button will handle the conversion. We aim to convert everything within the div.info-div into an image.
💛 Using the html2canvas JavaScript Library
The html2canvas library allows you to take screenshots of webpages and target specific elements on a screen. Here are the steps to include the library in your project:
The steps to put the library in your project:
Visit the html2canvas website for more information.
Copy the CDN link from here

and include it in a script tag in your project's head tag in the HTML file:

That's it for including the library on the HTML side. Now, let's move on to the JavaScript code.
💛 JavaScript Functionality
Here's the JavaScript code to handle the conversion:

In this code, I want to turn the whole div.info-div into an image, I put it into a variable in const div = document.querySelector(".info-div");.
I also put the button into a variable in const button = document.querySelector("button");
I added a click event listener to the button so when the user clicks the button, it will follow the code inside of the event listener!
You can find similar code like this in the documentation of the html2canvas library:

What is happening here is:
We add the div (or what the element we want to take an image of) into the html2canvas([element]).then((canvas)
Added the image file type url to a variable = const imageDataURL = canvas.toDataURL("image/png"); - You can replace the png to other image file types such as jpg, jpeg etc
Created an anchor/link tag, added the href attribute to imageDataURL
The download attribute is where we will give the default name to the image file, I added "dog.png"
Perform the click() function to the anchor tag so it starts to download the image we created
And that's it!
💛 The End
And that's it! You've successfully learned how to turn your HTML into an image. It's a great way to save and share your web content in a unique format.

If you have any questions or need further clarification, please comfortable to ask. Enjoy converting your HTML into images! 💖🐼
#my resources#coding#codeblr#programming#progblr#studying#studyblr#programmer#html#html css#javascript#neocities#coding tips#html5 tutorial#html tutorial
151 notes
·
View notes
Text
Hey you
all of you complaining about tumblr live

Seethe and cope 😎
Okay but seriously
Get yourself the Stylus extension For Firefox users: https://addons.mozilla.org/en-GB/firefox/addon/styl-us/ and for everyone else: https://chrome.google.com/webstore/detail/stylus/clngdbkpkpeebahjckkjfobafhncgmne
Get the Old Tumblr Dashboard Style: https://userstyles.world/style/11286/old-tumblr-dashboard-2023
You should get this stuff even if you don't plan to remove tumblr live :3 Now here is where the magic comes from:
Stylus allows you to add custom css styles to websites, and you can edit themes made by other people to fit your needs!

See that little fucker? How about we fuckin g kill it?
Press f12 to open the Developer Tools (or however it is called lmao)
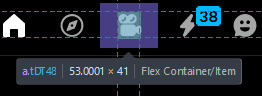
Click on this little guy

Now you can select an element on the website, and it will show where it is in the html!
3. Point
Click on it, and now we will see something like this in the inspector!

Collapse a bunch of this stuff, since here we only care about the list items, or <li>
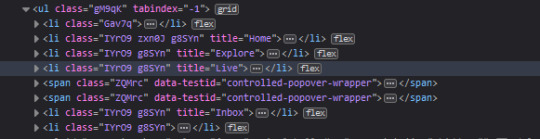
These are the different buttons in the banner
Now, how do we fucking kill that guy?
There are a number of ways to do this, so let's start with the simplest one
Delete
Just select the list item that has the title "Live" and press delete!

So it is gone now, right?
Well... not really. If you refresh the page, it is back. Which makes sense, since the only thing we did is remove that part of the "code" (if you can call html "code"), but when we refreshed it, the server gave us a version of the site that obviously had the button still there.
So what is a smarter way to get rid of it?
While you can't really delete a specific part of the site with just css, you can hide it! To do that, all you have to do is apply the style display: none;

Like that! While it doesn't fix the problem with the refresh, it brings us closer to the solution.
Remember when we got Stylus? yeah!
Go inside of it (😳), and inside the Old tumblr dashboard theme (😳😳), and now we just need to apply the css style of "remove that fucker" to the specific list item. How do we do that, since we can't add it directly into html? We use the attribute selector, and we look for title="Live"!
Where do I write this????
Well, css applies the styles from top to bottom of the style sheet (usually, this post is already too long), and you see how the list item has a few classes assigned to it? It so happens that they also modify the display property, so we have to override it by putting our selector after those in the css sheet... so basically you can just write the thingie at the end 😅
Here is how the attribute selector works!

the .IYr09 part is that specific class, so that if there is ever something on this page that has the title="Live" but isn't what we are looking for, it won't apply there (You don't need to do this, but whatever). The attribute selector is written in the square brackets, and you just... write the attribute that you are looking for there ;P
(I also did the same for the Explore button, but that can be an exercise for the interested ;P)
And now, BEHOLD

(How am I so popular that I got dms during the making of this >.<)
And it will stay like this, forever*
*except if something happens to the addon, theme, css of it or whatever, but you get the point!
#this post is too long#I could've just given the solution immediately#but this is funnier >:3#(am I on the autism spectrum? I kinda feel like it is the case tbh >.<)#Like this isn't how you write tutorials I think#whatever#css#tumblr live#fuck tumblr live#removing tumblr live#get stylus#get firefox too#idk at this point#196#pin
259 notes
·
View notes
Note
Hiii may i ask how you install fonts on bundlrs? I keep trying and it won’t work, I even looked at how you did it on your template but when I try to change the font it just doesn’t work?🥺 help please

yeah course i'll start from the very beginning
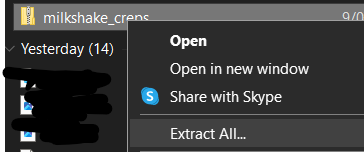
step 1
first i go to dafont and find a font i like and download it
step 2
i got to my files and extract all
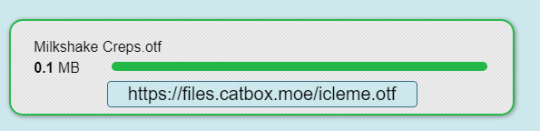
step 3
i head my way over to catbox and just drop the OTF or TTF file into the box
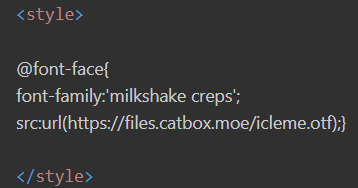
step 4
ok now it's coding time, make sure you've got your code inbetween <style> </style> or else it wont work
so what you're going to write is
@font-face{ font-family:'font name'; src:url(ur catbox url);}
step 5
to actually use this font you've got to assign it to something (go to this website if you need extra help)
if you want the font to be assigned to everything you do this
p, r { font-family:font name; }
and if you need it bigger or smaller you can add " font-size:15px; " (15 can be replaced with anything)

hope this helps


#☆ ◟ my resources !#lilay tutorial#tutorials#my resources#talking#noir 📷#bundlrs#css#html css#tutorial
88 notes
·
View notes
Note
Idk if anyone's ever asked you this but how do you go about animating? i.e. what program do you use and what's your process?
I really wanna start animating but it seems like such a daunting task lol
okay lots of words so. under the read more lmao
toon boom harmony is industry standard 2d animation software so thats what i use for freelance work and more finished things like that antibodies animation (though i did the bg painting in procreate) – but totally not the ideal software for just starting out with animation lmao not to mention the fact that its a subscription :/// small sketches like that gif of bones i posted i'll sometimes tackle in procreate or procreate dreams, which are wayy more affordable and user friendly, even if theye a bit less robust.
if youre looking for a combination of robust software with the best price, blender is free and has 2d capabilities that ive messed around with a few times – its super cool, but the interface can be confusing if you've never worked in blender before and it has a bit of a steep learning curve BUT theres also always always always good ol paper and pencil, and nowadays most people own a camera and can access video editing software to stitch things together the best things to start out with are the basics, like a ball bounce animation, different weight objects falling, walk cycles – once you get an understanding of how timing works with animation, then tackling how characters move is the next step. just going into complex characters right off the bat is an easy way to get frustrated FAST lmao starting simple is always the way to go also a lot of cartoons and stuff move A Lot Less than you would think, a 10 second animation at 12 frames per second is almost never going to be 120 different individual drawings – sometimes you can just get away with a few blinks and a bit of lip sync to really sell an animation, so while animation does take a lot of time and effort try not to be too intimidated!!
#also there are a lot of youtube tutorials out there if that helps#im not too experienced with rigging and im hoping to give myself a crash course in harmony rigging sometime soon#maybe after i finish learning html+css lmao i gotta finish that video first#ask#ghostfrog81
51 notes
·
View notes
Text
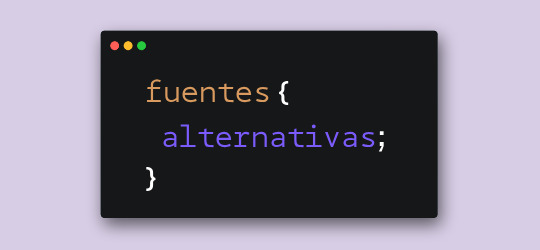
Hace unos días, cuando estaba compilando las fuentes para el pack que les subimos, me llegó una duda. Verán, algunas fuentes tienen versiones alternativas o caracteres alternativos. En Photoshop es fácil elegir la opción para usar esas variantes, pero me surgió la duda de cómo se lograría en CSS.
Bueno, al parecer la opción sí existe y se llama font-feature-settings. ¿Es infalible? Nope. ¿Podré usar todos los caracteres que tenga la fuente? No lo sé al cien por ciento. De todas maneras, quise hacerles este post para compartirles mi nuevo descubrimiento.
Tomemos de ejemplo la primera fuente de este pack, Balgon. Lo primero que vemos es el nombre de la fuente con caracteres que no están en los glifos principales, ¿cierto?
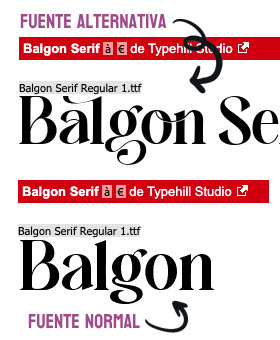
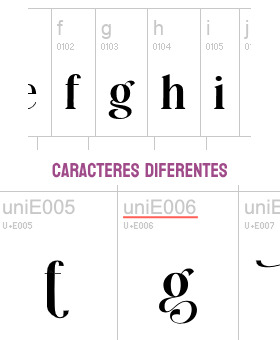
Pero si clickamos en "Ver todos los glifos", podremos darnos cuenta que sí están incluidos en la fuente, sólo que bajo un nombre diferente. En el caso de la fuente Balgon, tienen el nombre uniE000, de acuerdo al caracter. A veces, en otras fuentes, estos caracteres alternativos se llaman alt, aalt, salt, etcétera.*
Entonces, si queremos usar estas versiones, basta con agregar lo siguiente:
.tu-clase { font-feature-settings: "salt" 1; -webkit-font-feature-settings: "salt" 1; }
*Si no funciona con "salt", intenta alguno de los otros nombres como alt, aalt, etcétera.
¡Y voilà! Puedes ver el resultado dando click acá. ✨
¡Pero espera, hay más! Si hay más de un estilo alternativo, puedes sustituir el 1 por 2, o 3. Inténtalo y nos cuentas.
76 notes
·
View notes
Text
i think, if (when, actually, because i will be doing this in the future) i’m going to make a hangster x twisters au, then i need the prologue to be nothing but social media posts and comments. i need it to be 100% epistolary with news articles and twitter posts and YouTube comments and twitch livestreams
and then the actual story be in prose
and then the epilogue be a blog or article detailing the aftermath of the events
#and this is all because i want to read Ben’s article that they tease during the end credits#so yeah#i Heaven also been reading css work skin tutorials for this exact reason#when this fic happens#it will begin with an epistolary prologue that basically goes over the whole story but in an outsider’s perspective#like we are the ones getting the notifications and in the live streams and episode comments#hangster#hangster x twisters#twisters#tgm au#tgm x twisters
22 notes
·
View notes
Text

Web design is my passion
#shitpost#wobbledog#just 1#as you can see my programming class is going very well#html#i know a lot more than i did about html but i can barely do ANYTHING with what i know#fun fact i actually had to put in MORE effort to make it look like this m#quick image tutorial incoming#when you alter the image size in css you use the string img { width: 400px; } (or your desired pixel number or percentage)#and this scales your image accordingly. however.#you can also add a second value of height or width depending on what you started with and the image WILL stretch#so my code looked like this:#img { width: 100%; height: 400px; }#also ☝️ the colour of the title is dodgerblue and i think its the best blue. followed closely by aliceblue
7 notes
·
View notes
Note
Hiii this may seem silly to ask but how do you change the colors of your text to the specific colors you use rather the default palette.
Hi there! Not silly at allll.
The text color options can be limiting if you stick to the default palette. Here’s a simple way to use custom HEX codes for your text:
Highlight Your Text Select the text you want to color while editing your post.
Choose a Default Color Click the text color tool (the paint bucket icon) in the text editor and pick a color from the default palette. I recommend using red since it’s easy to spot.
Switch to HTML Mode Click the gear icon in the top-right corner of the post editor and go to the "Text Editor" section and select "HTML" from the dropdown.
Find Your Text and HEX Code Look for the line of code that corresponds to your highlighted text. It will look something like this: "<span style="color: #ff4930">Your Text Here</span>" The '#ff4930' part is the HEX code for red.
Replace the HEX Code Change the default HEX code (#ff4930 in this case) to your custom color. For example, if you want a jade color, you might use #5da271. Your updated code will look like this: "<span style="color: #5da271">Your Text Here</span>"
The website coolors is an excellent resource for color palates & hex codes
Preview and Save Go back to the visual editor to make sure the color looks right, then save or post!
7 notes
·
View notes
Text
Exploring 10 Sophisticated CSS Properties with Webtutor

In the ever-evolving landscape of web design, CSS (Cascading Style Sheets) stands as a cornerstone for creating stunning and visually captivating websites. As a web designer or developer, having a firm grasp of CSS properties is crucial to craft unique user experiences and bring your creative vision to life. In this blog post, we will delve into advanced CSS properties that can elevate your design game to new heights. Plus, we will introduce you to WebTutor, the ultimate online platform for mastering code and unleashing your web design potential.
Flexbox (display: flex)
Gone are the days of complex float-based layouts. With the 'display: flex' property, Flexbox simplifies the way you structure layouts, align content, and distribute space within a container. Designers can create responsive and dynamic designs, making it easier to build everything from navigation bars to complete page layouts.
Grid Layout (display: grid)
For those craving even more control over layouts, the 'display: grid' property offers a powerful solution. Grid Layout divides a web page into rows and columns, allowing designers to arrange content in a grid format. This approach grants unparalleled control over alignment, spacing, and responsiveness.
CSS Variables (custom properties)
CSS Variables, also known as custom properties, enable designers to define reusable values within stylesheets. This advancement allows for easier theming, dynamic theming, and quicker updates across an entire website. By centralizing key values, designers can swiftly adjust colors, fonts, and other design elements across the site.
Transitions and Animations (transition, animation)
Creating engaging user experiences often involves smooth transitions and animations. With the 'transition' and 'animation' properties, designers can add eye-catching effects to various elements, enhancing user engagement and guiding their attention to important content.
Box Shadow (box-shadow)
Box shadows add depth and dimension to design elements, making them stand out from the page. This property enables designers to create subtle or bold shadows that can make buttons, cards, and other elements pop, adding a touch of elegance to the overall design.
Background Blend Mode (background-blend-mode)
Background images can play a significant role in design aesthetics. The 'background-blend-mode' property lets designers blend background images with background colors in creative ways, resulting in captivating visual effects and unique design elements.
Transform (transform)
The 'transform' property opens up a world of possibilities for manipulating elements in 2D and 3D space. Designers can rotate, scale, skew, and translate elements to achieve striking visual effects that captivate users' attention and create a sense of interactivity.
Custom Fonts (font-face)
Typography is a cornerstone of web design, and the 'font-face' property allows designers to use custom fonts that might not be available on users' devices. This property ensures consistent typography across different platforms, enhancing the website's visual identity.
Gradients (linear-gradient, radial-gradient)
Gradients are versatile tools for adding depth and visual interest to backgrounds, buttons, and other design elements. With 'linear-gradient' and 'radial-gradient' properties, designers can experiment with color blends, creating stunning visual effects that catch the eye.
Scroll Snap (scroll-snap-type)
Enhancing user experience is paramount in modern web design. The 'scroll-snap-type' property assists in creating smoother scrolling experiences by snapping to predefined points on a page. This is particularly useful for websites with sections or galleries that need precise alignment during scrolling.
Introducing WebTutor: Your Pathway to Mastery
Now that you've discovered the power of these 10 advanced CSS properties, it's time to turn your knowledge into skills. Meet WebTutor, the ultimate online platform for learning code. With WebTutor, you'll embark on a transformative learning journey, guided by industry experts who are passionate about helping you master web design, development, and more.
Why Choose WebTutor?
Comprehensive Curriculum: WebTutor offers a curated curriculum that covers everything from the basics to advanced topics, ensuring you have a strong foundation for your journey into web design.
Interactive Learning
Dive into hands-on coding exercises and real-world projects that give you the practical experience needed to excel in the field.
Expert Instructors
Learn from experienced professionals who are dedicated to your success. WebTutor's instructors are there to answer your questions, provide guidance, and share industry insights.
Flexible Learning
Whether you're a full-time student or a working professional, WebTutor's flexible learning options allow you to study at your own pace, making it convenient to achieve your goals.
Community Support
Join a vibrant community of learners, collaborate on projects, share ideas, and celebrate your milestones together.
Conclusion
Mastering CSS properties opens the door to a world of creative possibilities in web design. As you explore these advanced properties, remember that practice makes perfect. And there is no better way to practice than through WebTutor, where you'll gain the skills and confidence to build beautiful, responsive, and user-friendly websites. Start your journey with WebTutor today and take your web design skills to new heights!
Learn more with WebTutor
Ultimate Guide to CSS Animations
Latest CSS Tricks and Features
Latest CSS Trends
Create Stunning Websites with CSS for Beginners
#Css Tutorials#Learn online CSS#learn the basics of CSS#Basics of CSS Syntax#learn CSS Selectors online#mastering the syntax of CSS#important aspect of CSS#learn CSS colors#online CSS colors#Learn Online CSS#Online CSS Tutorial#Introduction to CSS
0 notes
Text
Responsive Web Layout with Video Background
#responsive web design#responsive web layout#css3#html css#divinector#frontenddevelopment#webdesign#html#learn to code#css#html5 css3#html css tutorial#css tutorial#video background
8 notes
·
View notes
Text
pspsps'ing my own fucking brain into coding rn
cmon buddy, you dont get anything rn, but you Did once with a tiny thing. you can do it again. with more. you can pile up the info
you'll be able to create cool pages on neocities and here, cmonnnnn
#zach barks#i want to work on my neocities so bad#im reading tutorials on css and html. im learning abt programing languages#time will pass anyways. autism pls get on my side on this i'll be funnnn
8 notes
·
View notes
Text

CSS Animated Text Overlay
#css animated text overlay#css animation examples#html css animation#css animation tutorial#html css#codingflicks#frontend#css#html#css3#frontenddevelopment#learn to code#webdesign#animation#css image hover effects
9 notes
·
View notes
Note
do u need desktop to get fonts on bundlrs or is it also on mobile?

desktop helps a lot when turning fonts into a link using catbox, but you can also do it on mobile
in the edit section, you type:
<style> @font-face { src:url("font link .ttf / .otf"); font-family: 'font name'; } p, r { font-family: font name; } </style>
the "font-face" thing will import your font, and the "p, r" just stands for "everything in the pastebin" you can change "p, r" to "em, a, strong, code" etc
this sntry really helps explaining all the "p, r, em, a, strong, etc" thing
also, if the font is too big you can add
p, r { font-family: font name; font-size: 18px !important; }
you can change the number to anything you want
hope this helps! if you want links to fonts, i upload a few into the purrfect tale discord (invite here) :D feel free to ping me (@ lavgal) in "other help" if you want me to turn a font into a link for you
also if you don't know how to turn a font into a link, i made a tutorial here


50 notes
·
View notes
Text
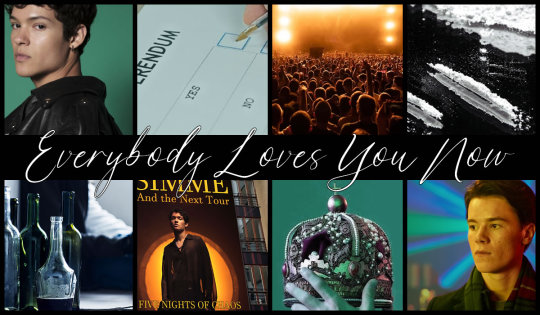
Everybody Loves You Now @AO3
International pop sensation Simme has announced on Instagram that he will be celebrating the end of his sold out world tour with five consecutive shows in Stockholm starting TONIGHT and running through the week. This will be his first extended stay in Sweden in four years, since he graduated from high school and flew to L.A. to sign a record deal.
And what is Wilhelm supposed to do with that.
Young Royals, Simon/Wilhelm, 74k words
This has been a wild adventure, thank you all for coming on the ride and fingers crossed there's more to come! <S <3
#young royals#young royals fic#everybody loves you now#elyn#elyn fic#lc2l#COMPLETE#No one has written a tutorial for instagram css so this took A LONG TIME to code
79 notes
·
View notes