#color efex
Explore tagged Tumblr posts
Video
Making a Splash into Today (Shenandoah National Park) by Mark Stevens Via Flickr: A setting looking to the southeast and downstream while taking in views of Mill Prong along the namesake trail. This is located in Shenandoah National Park. I decided to use the creek as the waters flowed by with the lichen covered rocks and tree stumps scattered about as a leading line into the image. The forest of trees and blue skies would be the backdrop for this setting. I did some initial post-processing work making adjustments to contrast, brightness and saturation in DxO PhotoLab 7. I then exported a TIFF image to Nik Color Efex Pro 7 where I added a Polarization, Foliage, and Pro Contrast filter for that last effect on the image captured.
#Appalachian Mountains#Azimuth 129#Blue Ridge Mountains#Blue Skies#Blues Skies with Clouds#Boulders#Color Efex Pro#Creek#Day 3#DxO PhotoLab 7 Edited#Forest#Forest Landscape#Landscape#Landscape - Scenery#Large Rocks in Stream#Looking SE#Mill Prong#Mill Prong Trail#Nature#Nikon Z8#No People#Northern Blue Ridge#Outside#Partly Sunny#Photoshop Edited#Portfolio#Project365#Rocks in Stream#Scenics - Nature#Shenandoah Blue Ridge Great Smoky Mountains
10 notes
·
View notes
Video
Wandergebiet Jenner (HDR). by Wim Jacobs Via Flickr: Zomervakantie Bergtesgaden. Tussenstop heenreis Hilpoltstein, terugreis via Aschaffenburg. Jennerbahn wandeling van Bergstation naar Mittelstation.
#Nikon D7200#Nikon#D7200#zomervakantie#Bergtesgaden#Beieren#Duitsland#Germany#AF-S DX 16-80mm f/2.8-4E ED VR#Jennerbahn#Jenner#Wandergebiet Jenner#wandergebiet#wandelen#hiking#HDR#high dynamic rage#NIK Color Efex Pro 4#FBpage#pint#500px#flickr
0 notes
Video
Spreepromenade by Pascal Volk
#Berlin#Berlin Mitte#Europe#Germany#Mitte#Spreepromenade#People#Menschen#Leute#Street Photography#Sommer#Summer#Verano#Canon EOS 5D Mark IV#5DMkIV#SIGMA 50mm F1.4 DG HSM | Art#50mm f1.4#50mmlens#unpointquatre#onepointfour#nifty fifty#50mm#DxO PhotoLab#Nik 7 Color Efex#Nik Collection#Fernsehturm#Telespargel#Television Tower#Torre de televisión#Árboles
0 notes
Text
My ON1 Photo Workflow for Landscape Photos
These are my step-by-step choices and reasoning behind making very realistic photos that make the viewer feel like they are looking at a real scene and actually there, not looking at a photo, using ON1 photo software. Continue reading My ON1 Photo Workflow for Landscape Photos

View On WordPress
1 note
·
View note
Note
what reshade preset are you using and how do you edit your photos? they’re so beautiful 🙏🙏
TYSM:3 I’m using Sumahama reshade preset. For editing i use photoshop( curves, shadows and highlights, blending modes if needed), and analog efex( dust and vignette)+ color efex sometimes. If you’re interested in something specific plz let me know cuz iʼm fickle in my preferences which makes the editing process chaotic and unstable. 🫠
7 notes
·
View notes
Text
Episode 36
Overmono feat. Ruthven – Gem Lingo (ovr now) (Matt P intro edit) [XL / CDR]
Serge Landar – Divination (Wellenrausch "Dark Matter" remix) [Vasilek]
Boris Brejcha – Bumblebee (Original mix) [Harthouse]
Jackie Hollander – All My Friends Are Hot (Weska remix) [Nervous]
Miss Monique & AVIRA feat. LUNA (D'arc) – Subterranean (Original mix) [Armada]
ALAT – Theurgia Page 110 (Original mix) [Coldharbour Black]
Marsh & Volen Sentir – Ascension (Original mix) [Anjunadeep]
Denes Toth – Endeavour (Yubik remix) [Moodyverse]
Nora En Pure – Life on Hold (Original mix) [Enormous Tunes]
Eelke Kleijn – Regenerator (Original mix) [DAYS like NIGHTS]
Avenue One & Jaren – My Way Home (Original mix) [Anjunabeats]
Andrew Bayer & Oliver Smith – Be Kind Rewind (Original mix) [Anjunabeats]
Genix – There Is No Fall In Love (Stephen Kirkwood remix) [Anjunabeats]
Myon feat. Nikol Apatini – Ghost Town (Rodrigo Deem remix / Matt P dub edit) [Ride / CDR]
Ferry Corsten – Yes Man (Original mix) [Flashover]
ReOrder – The Destroyer of Worlds (Original mix) [A State of Trance]
Amy Wiles & Nourey – Human (Original mix) [Anjunabeats]
James Hype – Wild (Original mix) [STEREOHYPE]
Mike EFEX – Hands on Me (Original mix) [Coldharbour]
deadmau5 – Strobe (Victor Ruiz remix) [mau5trap]
Armin van Buuren, Ferry Corsten, Rank 1 & Ruben de Ronde – Destination (Cubicore remix) [A State of Trance]
Dirty South & Ferry Corsten – Carte Blanche (Original mix) [Armada]
Durante – Ancora (Totally Enormous Extinct Dinosaurs remix) [Anjunadeep]
Gabriel & Dresden – Kinetic Cinema (Original mix) [Anjunabeats]
Khainz & KhoMha – Infinite Space (Original mix) [Spectrum]
Anyma & Rebūke – Syren (Original mix) [Afterlife]
Marsh feat. ALLKNIGHT – Rabbit Hole (Original mix) [Anjunadeep]
Edu Reimer – Suburbia (Original mix) [Droid9]
Eli & Fur – You're So High (10 Years On) (Sasha remix) [NYX Music]
Paul Oakenfold & Hernan Cattaneo – London to Buenos Aires (Original mix) [Perfecto]
Danny Avila, Sam WOLFE, HNTR feat. Rome Fortune – YES B!TCH (Original mix) [Experts Only]
CamelPhat & ARTBAT feat. Rhodes – For a Feeling (Layton Giordani remix) [RCA Records]
Wehbba – Awaken (Original mix) [Drumcode]
Sian, Bobby Nourmand & David LeSal – Control (Original mix) [Octopus]
Massano, Th;en, Carlo Whale – Touch Me (Original mix) [Tomorrowland Music]
Estiva – Sudden Moves (Original mix) [Colorize]
Denes Toth – Globus (Original mix) [MONO.NOISE]
Four Tet – Daydream Repeat (Original mix) [Text Records]
Cosmic Gate & Nathan Nicholson – Just the Beginning (Scorz remix) [Wake Your Mind]
[id: 1000687978424]
0 notes
Text
Books and Breaks and Butchers Postcards by The Learning Curve Photography on Zazzle. In a row of buildings constructed between 1889 and 1893, Nos 232 - 236 Queen St E in The Moss Park area of Toronto Canada are now home to a book store, a glass repair and a butchers. The row of buildings were designated a Heritage Property by The City of Toronto in 1973. Original photography using a Canon EOS 60D body with a Sigma 17-70mm f2.8 DC Macro OS lens. Processed using Silver EFEX Pro as a Lightroom plugin for the Black and White conversion. • Dimensions are 5.6" L x 4.25" H • High quality full color full bleed printing on both sides • 17.5 pt thickness 120 lb weight 324 GSM paper • Light white uncoated matte finish with an eggshell texture #postcards #zazzle #zazzlemade #toronto #blackandwhitephotography #photography #architecture #buildings
0 notes
Text
The Art of Jewelry Photo Retouching
Jewelry photo retouching is a meticulous art form that breathes life into jewelry images, transforming them from good to truly extraordinary. This process requires careful attention to detail, a deep understanding of aesthetics, and mastery over editing tools to bring out the brilliance, color, and beauty of each piece. Whether you're a jewelry photographer, retoucher, or business owner, understanding the art of jewelry photo retouching can elevate your visual content and engage your audience. Let's explore the essential elements of this specialized art form.
Understanding the Importance of Jewelry Photo Retouching
Jewelry retouching is essential to showcasing jewelry pieces at their best. Often, images straight from the camera don't fully capture the sparkle or intricate details due to various factors like lighting, reflections, and background distractions. Through retouching, you can highlight the essential elements of jewelry pieces, from diamonds to metals, making them visually appealing.
Boosting Brand Image and Sales
Quality images play a crucial role in online shopping, as buyers rely solely on visuals to make purchasing decisions. Retouched jewelry photos can significantly enhance a brand’s image, leading to increased trust and credibility among customers. When a product looks flawless, potential customers are more likely to make a purchase, directly impacting sales.
Essential Tools for Jewelry Photo Retouching
These two software are the industry standards for product photo retouching. Adobe Photoshop offers a wide range of tools, including the clone stamp, healing brush, and adjustment layers, to handle everything from background cleanup to intricate detailing. Adobe Lightroom, on the other hand, is excellent for basic adjustments like color correction, exposure, and contrast, making it a great starting point before moving on to Photoshop.

Specialized Plugins and Filters
To further enhance your jewelry images, consider using specialized plugins like PortraitPro and Color Efex Pro. These plugins add unique filters and adjustments, saving time and creating specific effects that can bring out the shine and sparkle in gemstones. With tools like Nik Collection or Topaz Labs, you can achieve professional-looking results with ease.
Techniques for Perfecting Jewelry Images
One of the first steps in jewelry retouching services background removal. A clean, solid-colored background enhances focus on the jewelry. After isolating the jewelry from the background, you can add subtle shadows or reflections to create a professional look. A neutral or white background is most commonly used to give the piece a high-end appearance.
Polishing Metal and Gemstones
Bringing out the natural shine in metals and gemstones is crucial in jewelry retouching. Techniques like the dodge and burn tool help highlight the metallic luster, while the clarity adjustment refines the sparkle of gemstones. This method can also correct imperfections or reduce unwanted reflections.
Enhancing Clarity and Sharpness
Jewelry pieces have small, intricate details that need to be sharp and clear. Focus stacking is a method that combines multiple images taken at different focal points to achieve maximum sharpness throughout the piece. This technique can be particularly effective in capturing fine details in macro jewelry photography.
Using the Sharpening Tool
Photoshop's sharpening tool, combined with high-pass filters, can accentuate the sharpness without introducing noise or grain. The goal is to strike a balance that keeps the jewelry image crisp while maintaining a natural look. Enhanced sharpness brings out details that draw viewers’ attention to the jewelry's craftsmanship.
Retouching Colors and Enhancing Gemstone Brilliance
Jewelry photography often requires color correction to make sure gemstones and metals look accurate and vibrant. Hue, saturation, and luminance (HSL) adjustments help in correcting color deviations and bringing out the authentic tones of each element. Color grading can also be applied to make images look polished and cohesive across a series.
Enhancing the Brilliance of Gemstones
To make gemstones look captivating, you can enhance their brightness and contrast. Using the dodge tool, gently lighten specific areas of the gemstone, creating the illusion of depth and luminosity. This technique helps in making gemstones look naturally brilliant and appealing to potential buyers.
Removing Imperfections and Unwanted Reflections
Dust, scratches, and minor imperfections on jewelry are common and can detract from the overall image quality. Using the spot healing brush and clone stamp in Photoshop, you can effectively remove these flaws. This step ensures that the jewelry looks flawless, increasing its appeal.
Eliminating Reflections and Fingerprints
Reflections, especially on polished metal surfaces, are inevitable in jewelry photography. Advanced retouching techniques, like frequency separation, help to smooth out unwanted reflections without losing texture. By eliminating distractions like fingerprints, the jewelry’s brilliance shines through.
Adding Shine and Gloss to Metal and Diamonds
Highlighting specific parts of the jewelry piece can add depth and make it look three-dimensional. Using Photoshop’s brush tool, you can create subtle highlights and shadows that give the piece a natural shine. This method can make metals look more polished and diamonds appear radiant.
Using the Blur and Glow Effects
For certain gemstones, adding a slight glow effect can enhance their natural sparkle. The blur tool can be applied subtly to areas around diamonds, creating an aura effect. This adds to the overall allure of the jewelry and makes it look more luxurious.
Adjusting Contrast and Brightness for Perfect Lighting
Proper exposure ensures that every part of the jewelry is visible. Underexposed areas may lose detail, while overexposed areas can appear flat. By adjusting brightness and exposure, you can bring out the true colors and textures of jewelry. This balance is essential for making images look professional and eye-catching.
Controlling Highlights and Shadows
Adjusting the highlights and shadows can help create a more balanced and appealing image. Too much brightness can make certain elements lose detail, while dark shadows can hide key features. By fine-tuning these aspects, jewelry pieces look both realistic and stunningly detailed.
Final Touches: Polishing the Overall Image
Once all the adjustments are complete, the final step is to crop and resize the image for different platforms, such as e-commerce websites or social media. Maintaining a consistent aspect ratio ensures that all images fit perfectly in various layouts, giving a cohesive look across digital platforms.
Applying a Subtle Vignette Effect
A soft vignette effect can be applied to draw the viewer’s eye to the center of the image, where the jewelry is positioned. By darkening the edges slightly, the focus remains on the jewelry, enhancing its visual impact without being overly distracting.
Optimizing for SEO: Making Jewelry Images Search-Friendly
To make jewelry photos SEO-friendly, add descriptive alt text and image titles. These should include relevant keywords that reflect the jewelry type, gemstone, or style. This not only helps search engines understand the content but also increases the chances of your images appearing in search results.
Compressing Images for Faster Load Time
Image size is an important factor for website performance. Compressing images without losing quality ensures faster load times, which improves user experience and can positively impact SEO. Tools like TinyPNG or ImageOptim can help achieve this balance.
Conclusion
Jewelry photo retouching combines technical skills with a keen eye for aesthetics to produce captivating images that attract customers and drive sales. Mastering these techniques, from enhancing clarity to creating realistic shine, can make a noticeable difference in how jewelry pieces are perceived. As you refine your skills, remember that patience and practice are essential. Each jewelry piece has its unique qualities, and with the right tools and techniques, you can bring out the best in every shot.
1 note
·
View note
Video
Maintenance Problems by Scott Gitlin Via Flickr: Color eFex Pro: nostalgic film. Fort Tilden, Riis Park, Rockaway Beach, New York
#Canon G9#New York#Riis Park#Rockaway#EssGee#emotive#Fort Tilden#Gateway National Recreation Area#tourist#travel#flickr
0 notes
Text

Need For Speed: Deluxe Edition (2015)
Nik Collection: Bildfilter auf Screenshots anwenden
Garage mit leeren Stellplätzen. Welche Wagen kommen neu hinzu? Im Test wurde Analog Efex 2 (Nik Collection) mit einem Vintage Stil auf ein Screenshot angewendet. Zugleich existieren hier auch im Filter Sortiment "Bokeh" oder "Bi-Color". Diese Modifikationen finden sich auch im Foto-Modus des Games unter den dortigen Effekten.
Aber bei Bedarf kann man hier ja selbst nachbessern und ein Motiv mit automatischen Effekten für Affinity Photo erzeugen. Zur Installation ist unter Einstellungen der Installationsordner des kostenfreien Google Filterpacks als Plugins anzuwählen.
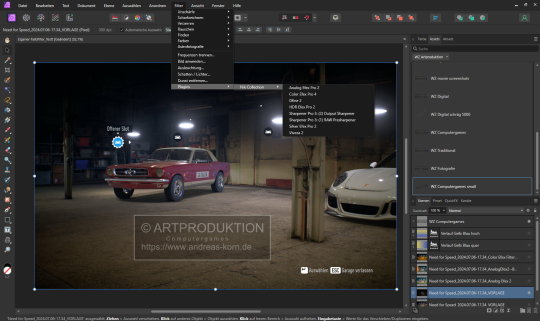

(Abb. Analog Efex 2: mit Vintage Effekt und Bokeh Schärfe/Unschärfelinse; der Mustang steht im Fokus)
Affinity Photo (2.5.3) scheint aber kleine Probleme mit diesem Nik Plugin zu besitzen. Zumindest ist es bei meinem PC so. Ist ein Bild geöffnet, sind die Filter ausgegraut und lässt sich nicht anwählen.
Abhilfe:
zuerst in Affinity Photo einen beliebigen Programm internen Standard-Filter (z.B. Ausleuchtung) anwenden. Diesen Schritt rückgängig machen. Danach konnte ich die Nik-Collection (und alle Varianten) im Test ordnungsgemäß unter Windows 11 verwenden.
Vgl. die Wikipedia Übersicht über alle bisherigen Teile.
Dr. Andreas Korn, 09.07.2024
+ + +
0 notes
Video
Fresh Ideas for Travel in Lassen Volcanic National Park by Mark Stevens Via Flickr: While at a roadside pullout along the main park road (and Volcanic Legacy Scenic Byway). The view is to the southwest with the road winding on the other side of the ridge. Kohm Yah-mah-nee Visitor Center is a little right of center in the image. This location is in Lassen Volcanic National Park.
#Asphalt Road#Azimuth 212#Blue Skies#California Cascades#Cascade Range#Color Efex Pro#Day 1#DxO PhotoLab 8 Edited#Evergreen Trees#Evergreens#Forest#Forest Landscape#Kohm Yah-mah-nee Visitor Center#Landscape#Landscape - Scenery#Lassen Peak Area#Lassen Volcanic National Park#Lassen Volcanic Shasta Napa#Looking SW#Mountain Peak#Mountains#Mountains in Distance#Mountains off in Distance#Mountainside#Nature#Nikon Z8#No People#Outside#Pacific Ranges#Project365
9 notes
·
View notes
Video
Almbachklamm, Theresienklause (HDR). by Wim Jacobs Via Flickr: Zomervakantie Berchtesgaden. Tussenstop heenreis Hilpoltstein, terugreis via Aschaffenburg. Almbachklamm - Ettenberg.
#Nikon D7200#Nikon#D7200#zomervakantie#Beieren#Duitsland#Germany#AF-S DX 16-80mm f/2.8-4E ED VR#Berchtesgaden#klamm#kloof#high dynamic rage#HDR#NIK Color Efex Pro 4#FBpage#pint#500px#flickr
0 notes
Photo

Nik Collection by DxO 6.9.0 Win - nikcollection (2024)
Nik Collection by DxO 6.9.0 Win
nikcollection
NIK COLLECTION by DxO — 8 премиальных плагинов для Photoshop и Lightroom Classic, которые сделают ваши фотографии еще лучше
Nik Color Efex
Бесчисленные яркие фильтры для цвета, тона, контраста и многого другого.
Nik Dfine
Удалите цифровой шум именно там, где это необходимо, не разрушая деталей.
Nik Silver Efex
Элементы управления, вдохновленные темной комнатой, для максимального...
Читать далее
Подробнее на https://eground.org/threads/nik-collection-by-dxo-6-9-0-win-nikcollection-2024.114105/?&utm_source=tumblr&utm_medium=autopost&utm_campaign=project_21975&utm_content=post_36619406
0 notes
Text
Nik Collection
Inspirational content and educational video resources for the Nik Collection have been created to illustrate some of the basic filter application and enhancement techniques possible with Nik Silver Efex, Nik Viveza, Nik Analog Efex, Nik HDR Efex, Nik Color Efex, Nik Perspective Efex, Nik Dfine, Nik Sharpener
0 notes
Text
drink up empty.
このページの Photograph はこちらをクリック (click here)
big sake barrel drink up empty after, cherry vase
Translated the Haiku made by MATSUO Basho.
呑み明けて花生にせん二升樽
松尾 芭蕉
------------------------
観桜会の一場面を切り取った風景です。この画から、松尾芭蕉が詠んだお祭り気分の句を連想しました。
美味しい酒が二升樽に入って届けられました。これを皆で飲み干して、空いた樽を花入れ(花瓶)にしましょう。弾んだ心持が伝わってきます。 松尾芭蕉が元禄4年、48歳のときに詠んだ句です。『蕉翁全伝』他によれば、尾張の門人から酒と木曽のウド、茶が送られてきましたので、門人一同に呼び掛けて句会を開いたとありますが、句会の記録は無いようです。 観桜会の楽しげな喧騒から連想された芭蕉の心持ちを僅かながらでも写し撮るべく 1 EV の差で 6 枚現像して、high dynamic range image として仕上げました。
☆ Shooting Data ------------------------ ○ camera : OLYMPUS TG-4 ○ focal length : 14.4 mm ( compared to 35mm format : 80 mm ) ○ shooting mode : Program AE ○ Tv ( Shutter Speed ) : 1/400 sec. ○ Av ( Aperture Value ) : F5.6 ○ ISO speed rate : 200
☆ Preprocess ( RAW ) ------------------------ ○ preprocessor : DxO PureRAW 2 ver. 2.6.1.18 ○ method : Deep PRIME ○ DxO optical correction : whole lens sharpness : on lens distortion correction : on ○ output format : DNG
☆ Developing Data ( RAW ) ------------------------ ○ development : RAW image developed by SILKYPIX Developer Studio Pro 11.0.5.0 ○ taste : fudeen's special ○ exposure compensation ( by camera ) : -1/3 EV ○ exposure compensation ( by developer ) : -1/3 EV ○ total exposure compensation : -2/3 EV ○ white balance : setting by shooting [ 5,617 K ] ○ tone adjustment : strong contrast ○ saturation : manual [ 1.09 / 8.0 ] ○ color profile : V4 compatible ○ color representation : film color Velvia ○ sharpness : pure detail edge emphasis [ 20 / 100 ] detail emphasis [ 75/ 100 ] black spotted outline control [ 25 / 100 ] ○ noise reduction : fine detail false color control : [ 30 / 100 ] fringe removal : [ 0 / 100 ] noise aligned : [ 0 / 100 ] noise removal : [ 0 / 100 ] dark side noise reduction [ a little strong ] ○ highlights controller : initial value color / brightness emphasis [ 25 / 100 ] saturation / hue emphasis [ 70 / 100 ] bright portion compensation [ 75 / 100 ] dynamic range extension [ +5.5 / 6.0 EV ] ○ development setting : type of file : TIFF pixel size : original match the long side direction : on develop result settings : for reprocessing with silkypix ( 16 bits) record exif information : on
☆ Exposure Blending Data ( HDRI ) ------------------------ ○ exposure blending by Nik Collectuin HDR Efex Pro 2 ver.5.70 ○ preset library : warm deep ○ tone conpuression : tone compression [ +30.0 / ±100.0 ] strength of method [ 50 / 100 % ] ○ HDR method : depth ( 1 ) strong detail ( 4 ) real dramatic ( 3 ) dim ○ tone balance : exposure balance [ ±0.0 / ±100.0 % ] shadow [ ±0.0 / ±100.0 % ] highlight [ ±0.0 / ±100.0 % ] contrast [ ±0.0 / ±100.0 % ] black point [ +69.0 / 100.0 % ] white point [ +53.0 / 100.0 % ] structure [ ±0.0 / 100.0 % ] ○ color control : saturation [ +15.0 / ±100.0 % ] color temperature [ +6.0 / ±100.0 % ] color cast [ ±0.0 / ±100.0 % ] ○ final adjustment : vignette ( off ) quantity [ -6.0 / 100.0 % ] circle [ -80.0 / 100.0 % ] rectangle size [ +60.0 / 100.0 % ] ○ gradation : upper gradation [ -0.4 / 100.0 level ] lower gradation [ ±0.0 / 100.0 level ] blending [ 50 / 100 % ] move vertically [ 0 / 100 % ] rotation [ 0 / 180 ° ] tone curve [ neutral ][ RGB ]
☆ Location & Target ------------------------ ○ location : 高輪界隈 ○ target : スーザフォン ------------------------
#bits & pieces#スーザフォン#sousaphone#HDRI#high dynamic range#楽器#musical instruments#高輪界隈#tokyo#撮影ノート#annotations#OLYMPUS#TG-4#photographers on tumblr#haiku
0 notes
Video
Jinx by Paul Cory Via Flickr: Cosplayer: Autumn Ford, LiberatingSeer Cosplay Taken at Animazement in downtown Raleigh, North Carolina. Lighting: Twin speed lights in a Apollo Medium soft box, turned way down low, at about 6 o'clock as fill. Single speed light with a Honl grid at between 8 and 9 o'clock spotlighting Jinx and her shark cannon. Post-processed in Color Efex Pro 4, because downtown Raleigh needed more grit.
0 notes


