#click or open in new tab for full quality
Explore tagged Tumblr posts
Text
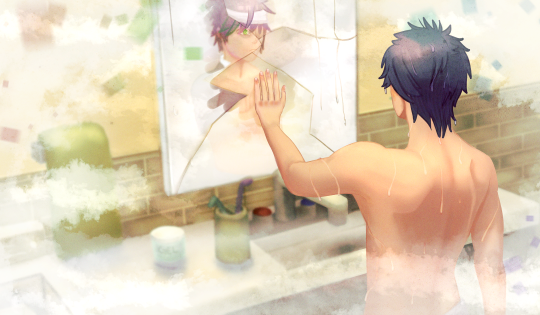
【fractured identity】
#toaru majutsu no index#toaru kagaku no railgun#toaru kagaku no accelerator#toaru#raildex#kamijou touma#a certain magical index#click or open in new tab for full quality#anyway happy early “birthday” to a certain boy#its an angsty bathroom scene#artists on tumblr#digital art
23 notes
·
View notes
Text
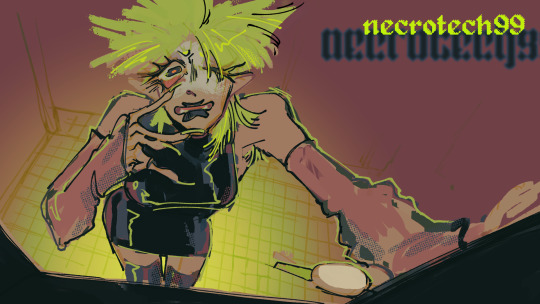
INITIALIZING..... OSSUARY RELAY ACTIVE......CLEAR SOUL TETHER KNITTING......ERROR. RETRYING..... USER: [GLAIVE] NOT FOUND. CURRENT TETHER POINT: UNIDENTIFIED USER ACCESSING OCULAR FEED.....CLEAR ACCESSING AURICULAR FEED.....CLEAR [UNIDENTIFIED USER] "Omigod. Did that actually work?" [UNIDENTIFIED USER] "Omigod. Omigod. Did I just put a bunch of dead people in my eyeball. Oh, shit. Ohhhh. Fuck!"
xxx
necrotech99, an interactive quest, is now live! exact content warnings pending, but necrotech99 is 18+ and will likely contain nsfw and gore/body horror.
FAQ/quest primer for new readers below cut!
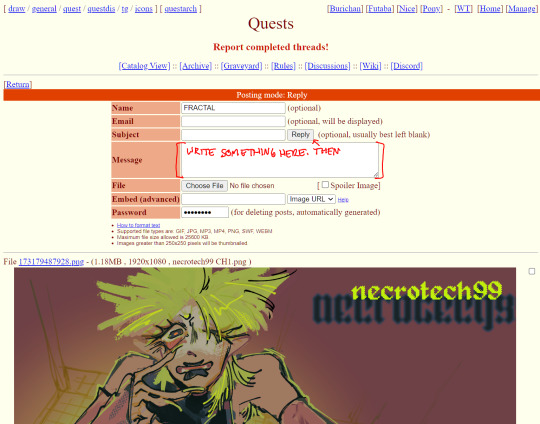
Q. ira this website fucking looks like 4chan A. yeah i know i'm sorry. it's not Q. okay so what is this A. it's a quest, which is kind of like an interactive webcomic, or like a forum game, or like a tabletop roleplay where everyone is controlling one character (at a time), or maybe like something completely different from that Q. how do i play? A. leave suggestions in the thread to help collectively guide the story with your fellow readers! suggestions are posted using this input field at the top of the thread page:
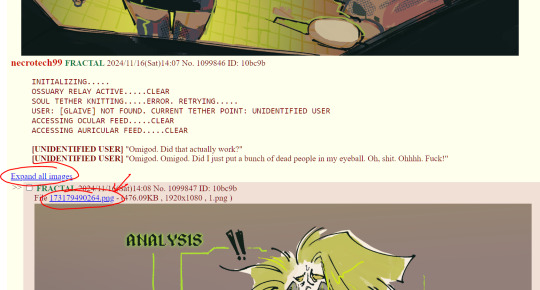
and, a final note on a quality of life thing that isn't very intuitive: all the quest's panels can be expanded to full size by either clicking "expand all images" at the top of the thread, or individually by clicking the blue .png hyperlink above each image, NOT clicking the images themselves (which just opens the images in a new tab for some reason)
636 notes
·
View notes
Note
Would you be able to share some of your gif making process/programs you use to make them? They look great! 💕
Omg thank you,,, 🥺💕💖💕 And yes ofc! I'm going to write down everything I can think of about my gif making process but if I forget anything/you have questions about something specific let me know! ✨
(Long post ahead)
Emulators & Recording
I use different emulators and recording programs, depending on the game I want to play/record:
DesMuMe: This is the one I use for DS games, and it comes with a neat “Record AVI” feature under the “File” tab. Just click it, choose a location for the file and click OK (make sure the Compressor is set to “Full frames (No compression)”). Recordings have a limit of 2 minutes/2GB, but when it reaches it, the program will automatically create a new file and keep recording until it reaches 2 minutes, and the process will repeat (the next recordings will have “part_X” in the name file). When you’re done recording, just lick on File > Stop AVI. Also! The recordings will always have the original resolution. My DesMuMe is set to be 2x its size with a gap between the screens, but all recordings are 256x384 pixels with no gap.
VisualBoyAdvance: Like DesMuMe but for GBA games. Also has a recording feature in Tools > Record > Start AVI recording. The resolution of the video will be that of the original game but I think there’s no limit on how long the recording can be. I’d still recommend stopping and restarting the recording every 5 minutes or so.
Other games & OBS Studio: For 3DS games I use Citra, and Dolphin for Wii ones. They both have Recording features but I don’t use them because they create weird files. Instead, I record them with OBS Studio. Open the program, click on "Start Recording" and then on "Stop Recording" when you’re done. Pretty simple, just remember OBS records your screen so obviously if your emulator window is minimized it won’t record it. You can change your OBS settings to only record the emulator window but I’m too lazy to tinker with OBS so I just record the whole screen lol. There’s always a slight loss of quality with OBS. If you’re recording games with 3DS models then it won’t be too noticeable, but I do not recommend using OBS for pixel/pixelated games like Nintendo DS and Game Boy ones.
Misc: Before OBS, I used to use Camtasia Studio 8. Also does the trick, but instead of saving a .mp4 file it creates its own type of file and it requires you to manually export it as a .mp4 (it's a hassle). It has some editing features too, which OBS does not as far as I can tell. Also, besides DesMuMe I have MelonDS. Highly recommend it if you need to use the multiplayer option (to trade pokemons between games for example) and most importantly for the better mic feature (you WON’T get past the Nintendogs tutorial on DesMuMe). Also the 3D model graphics are of higher quality, but it doesn’t have a recording feature so you will have to rely on OBS and as I said it lowers the quality.
As for video file types, both .avi and .mp4 are allowed in Photoshop. However, .mkv (mostly used for TV shows and movie files) is not, so if you want to edit, say, an anime episode in that format you’ll need to convert it to .mp4. I use Format Factory for that, although I think here’s a slight quality loss.
Here's a comparison of a pixel game recorded with OBS vs with DesMuMe. It's tiny but it will have you shaking the screen violently when you notice it.
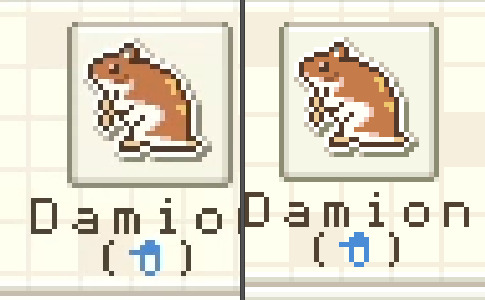
OBS recording vs. DesMuMe recording
Do not delete or move the video file until you’re done making gifs of it. Even if you save the file as a .psd, you will get an error message if the video file is gone from its original location and you'll have to start over again.
Editing (I)
I exclusively use Photoshop 2020. If you use CSP, GIMP or other editing program you’ll have to find the equivalent features or look at other tutorials, because I’m only familiar with Photoshop. Other PS versions should have either the same or similar features. Here are the steps I usually follow (names might be wrong because my PS is in Spanish “OTL):
Importing: Drag and drop your file into PS. You should have your Timeline window on the bottom part. If you import a .mp4 or .avi file you should get the Video Timeline, which is what we will work with. If you export a .gif you will get the Frame Animation Timeline; in that case you need to convert it to a single timeline. Click on “Convert to Timeline Video”, then select all the layers (click on Layer 1 and then hold Shift+Click on the last layer) and then right-click on the last layer > “Convert to Intelligent Object”. This is what your PS window should look like for both cases:
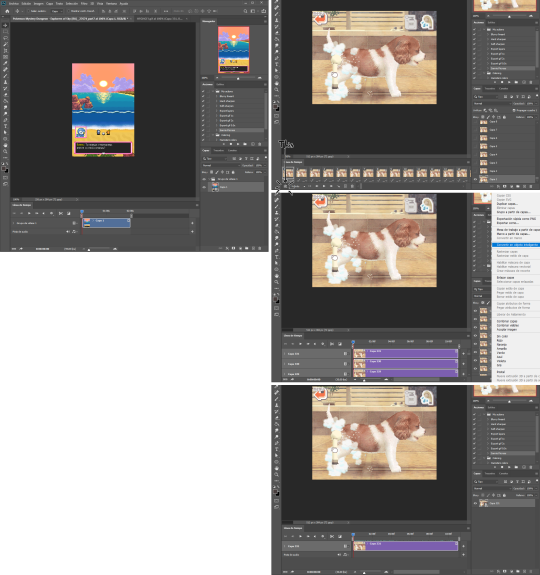
avi/mp4 file (has a Video Timeline) vs. gif file (has a Frame Animation Timeline)
Cutting and resizing: Often your file will either be the wrong size or have unnecessary parts. To resize your video, go to Image > Image Size (NOT Canvas size) and change the resolution. For good gif quality, the image resolution should always be 540 pixels wide (Tumblr’s image size), height doesn’t really matter. PS will change the height proportionally if you change the width. So, for example, a 1440x1080 video will be 540x405 after the conversion. Similarly, you can crop out parts with the Selection tool + Image > Crop. Making pixel games bigger requires a different method (more on this later).
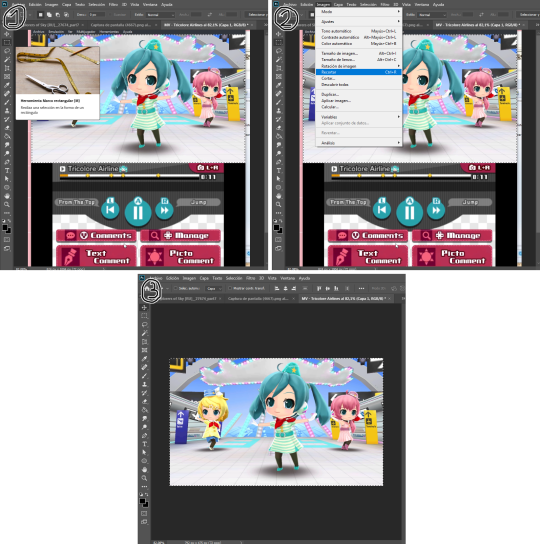
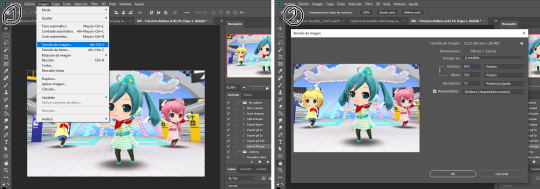
Cropping vs. Resizing
Cutting the timeline: Your gif will likely be too long, or you might need to stitch two parts together. In the Timeline window, move the vertical red line to the part where you want to make the cut. You can precisely move frame by frame with the arrows next to the play button. You can also zoom in and out the timeline with the slider at the bottom. Once you’ve placed the red line on the part where you want to make a cut, click on the scissors. You’ll get two layers – delete the one you don’t need and repeat until your gif is the right length. Similarly, you can click on either end of the timeline and drag it left and right to extend/reduce the length, but it’s less precise. I recommend moving the gif layer out of the video group in the Layer window, especially if you’re going to stitch parts together or add new layers that aren’t Color adjustment layers (like your watermark). If you do so, you’ll notice that each layer occupies a different line in the timeline, while if it’s in a group, it will all be in the same line (this means that all layers will be one after the other, you won’t be able to overlay them).
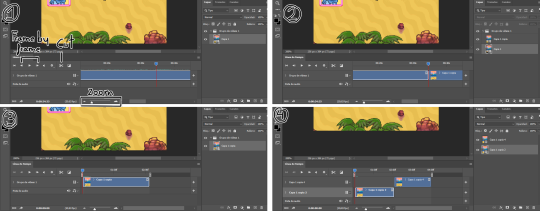
Cutting the timeline (1-3) + Moving the gif layer out of the video group (4)
Color adjustments: The fun part! You can get hella crazy with this one. If you want to go for really fancy stuff, I recommend checking out @/usergif, they have lots of tutorials and gifsets you can use as inspiration. I am however a simple man and will mostly use the same tools: Sharpen, Hue/Saturation, Gradient Map and Curves.
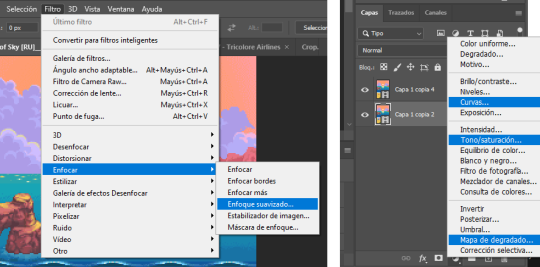
Soft sharpen in the Filters tab + Curves, Hue/Saturation and Gradient Map in the Layer window
Editing (II)
Can't make a bullet list of a bullet list so here's each adjustment layer explained. Note that this part is very personal so feel free to tinker with the settings for each tool until you get what you like:
Sharpen: Used only with non pixel media, aka for 3D models and series/movies. It makes the image look sharper. You'll notice that the video layer can have two icons: a movie film or a folded paper (in the "Import" section, the Pokémon gif has a movie film icon, while the converted Nintendogs gif has a folded paper icon). If your layer has the former, the sharpen tool will only be applied to one frame. To avoid that, right-click on the layer > Convert to intelligent object. Resizing the image will also do the trick. Filters are always applied to the layer, they don't create a new one (this is what the rest of the following adjustments will do). As for settings, this is what I usually have:
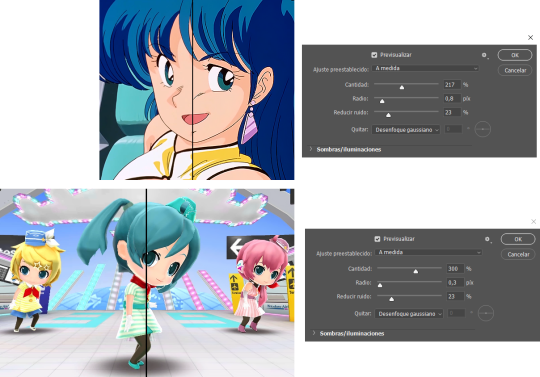
Two types of Sharpen settings (original on the left)
Hue/Saturation: Changes both the global colors and specific hues. To do the latter, open the menu right above all three sliders (by default it's set to "All") and then choose the color you want to change. Be careful! Sometimes you might accidentally edit the wrong hue, for ex a bluish green if you are editing blue hues. If you want to see what parts of the gif you're targeting, set the saturation to the max. Colors play a heavy role on gif size: the more diverse and brighter the color palette, the bigger the file. Gif size will be the ruin of your gif making process, so don't go too overboard with this. More on gif size later, but for now, I recommend "unifying" the color palette (aka making some hues similar).
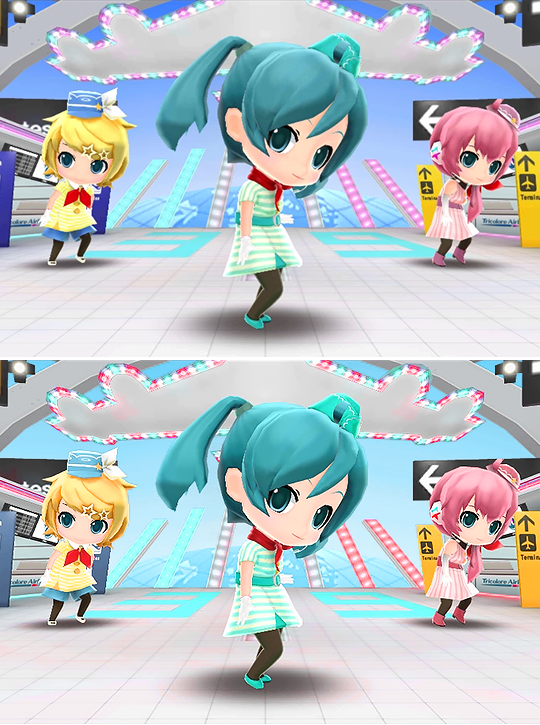
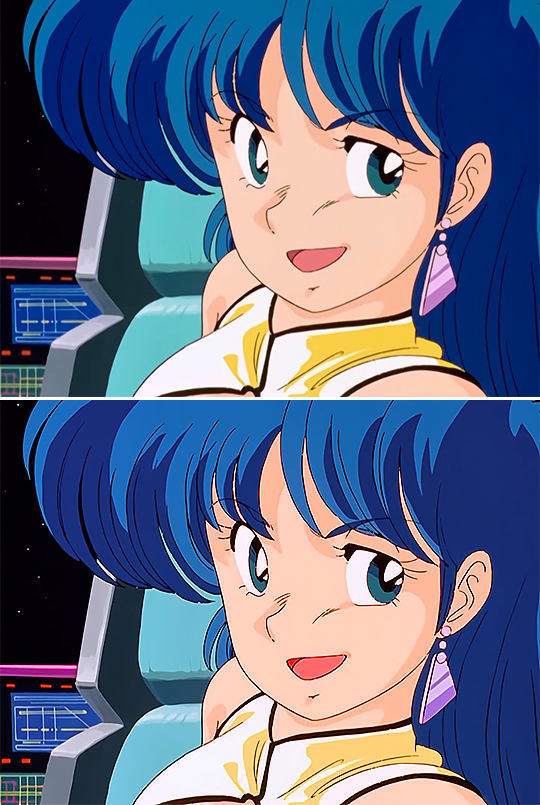
Two examples of Hue/Saturation adjustments (Original above)
Gradient map: Adds a gradient overlay to the image. When you open the Gradient Map window, click on the gradient and you'll be able to edit it or create a new one. To do so, click on the tiny boxes with colors (only the lower ones, the upper ones won't work), then on the slightly bigger box to change the hue. To add a color, click anywhere below the gradient; to move the colors around, drag the tiny boxes and move them, and to edit the limit between each hue, drag the tiny diamond. The way gradient maps work is by editing the colors from lighter (right) to darker (left). So if you have blue on the right of the gradient, light hues will be blue, and if you have pink on the left of the gradient, dark hues will be pink, with mid tones being a mix of pink and blue (either purple, or bluish purple or pinkish purple). The image will look weird when you add a gradient map, but don't mind that for now. Just create the gradient you want and click OK. Now, select the new layer that has been created and play with the blending modes and the opacity of the layer until you get something you like. For blending modes, I usually go for the ones in the second and third sections. To edit either the Hue/Saturation layer or the Gradient Map one, click on the black and white icons (left to the mask, aka the white box) in the Layer window.
Video showing how Gradient map works
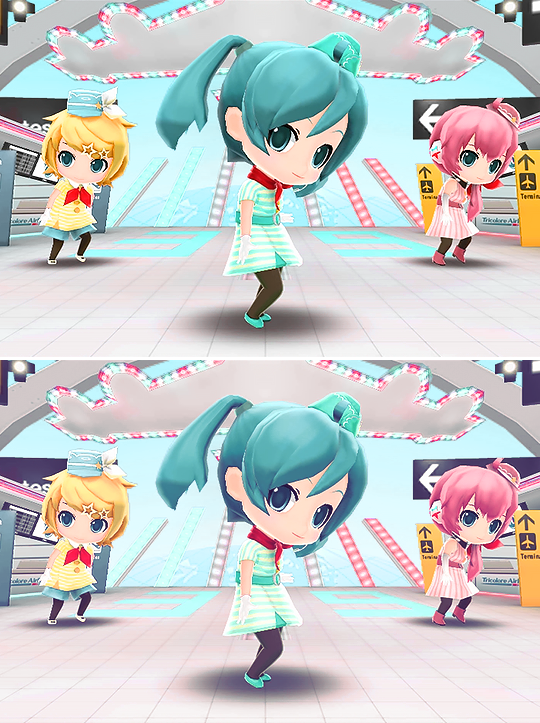

Two examples of Gradient maps, with a readjustment of the Hue/Saturation layer (Original above)
Curves: Edits the light, dark and mid tones. Click any point in the curve/line and then drag it around to see what it does. You can make more than one point in the curve. Afterwards, change the blending mode and the opacity.
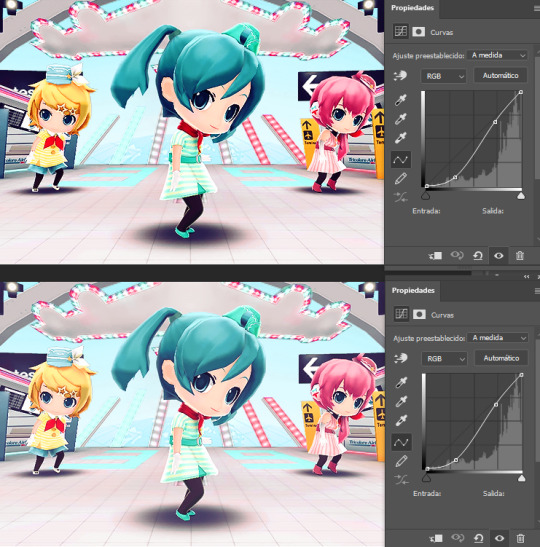
An example of a Curve and the same example with the Curves layer at 40%
Gaussian blur: Sometimes I add a blurry/fuzzy effect to certain gifs. To do so, duplicate the gif layer (right-click > Duplicate layer), then, while selecting the new layer, go to Filters > Gaussian blur and pick a small numer (0,4-1). Click OK, set the blending mode of the new layer to Darken and lower the opacity.
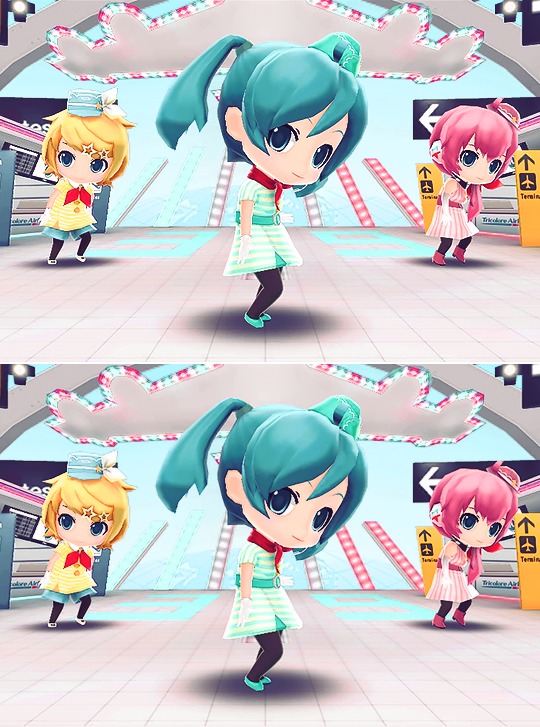
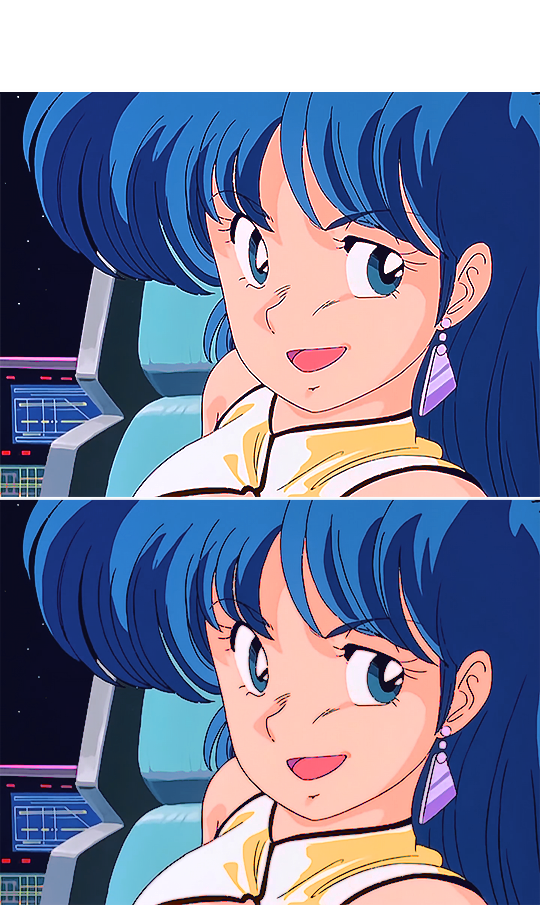
Two examples of images with Gaussian blur applied (Original above)
Watermark: Add a watermark to your image. Click on the Text tool, create a text box, pick the font, the size, the color and the placement, and then click the ✔ button. Change the blending mode and opacity of the text layer. Personally, I have a .png image of my watermark that I just import to the gif and then edit, instead of creating a text box everytime. Regarding watermarks, I get that they are annoying but it's going to be far more annoying when someone reposts your gif without credit or crops the watermark out. Tumblr sucks when it comes to reporting this kind of stuff and you deserve to have your work respected (you've spent time and effort on this!!), so I highly recommend putting a watermark on your gifs. If you want to avoid having someone crop it, put it towards the middle of the image and not in a place that can be edited easily. Also, I usually save gifs without a watermark and add it afterwards.
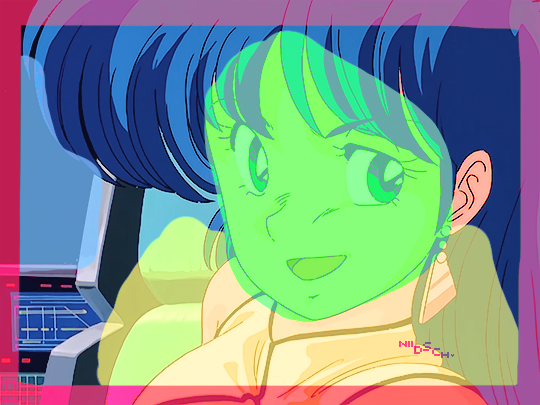
Red: Danger zone, can get cropped easily. Blue: Also Danger zone, can be edited out. Green: Too obtrusive. Yellow: Perfect place, can't be edited out and it's not on the main focus of the image
Exporting
This is the "hell on earth" part. To export a gif, go to File > Export > Save for Web (Legacy), then once it loads (may take some time), play the gif a couple of times to make sure it looks good and save it. These are my settings:
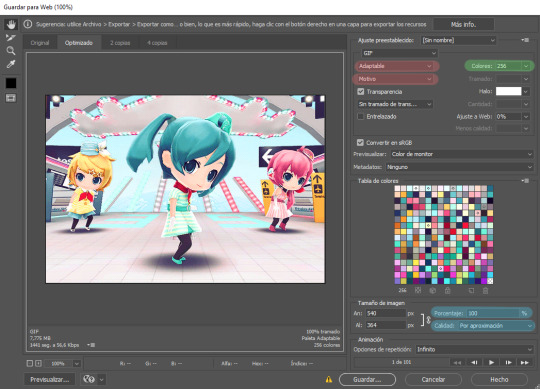
Settings for the Save for Web (Legacy). You'll only need to tinker with the settings on the right.
However, there's one thing to keep in mind: Tumblr has a size limit of 10MB per gif, meaning your gif won't be uploaded if it's larger than that, and you'll be surprised how easily you can surpass that limit. Also, gifs can't be longer than 500 frames, aka 8 seconds (to check the duration of your gif, zoom in in the Timeline Window, you can see the seconds at the top). Here are some pointers regarding gif size:
Pixel games and anime have a smaller size than life-action and 3D models: This is because the former have limited color palettes and the latter has way more colors. For example, Pokémon Mystery Dungeon or Sailor Moon will rarely pose problems, but Arcane, Breaking Bad, Nintendogs or Baldur's Gate 3 will.
The more complex the animation/motion, the bigger the size: This is because complex animations/motions, like a fight, have more unique frames than, say, someone moving their head up and down and nothing else, and that means there's more information to store.
The longer the gif/the bigger the resolution, the bigger the size: Kind of self-explanatory, longer gifs or gifs with big resolutions means more information stored in the file.
Bright and diverse color palettes increase the gif size: As explained in the first point, more colors means more information and thus a bigger file size.
The more it exceeds the limit, the bigger the changes you'll have to make: If it's 10.5MB you can get that number down easily. If it's like 20MB, you might need to cut the gif in half.
How do you solve this? There are a couple of methods:
Make the gif shorter: In the Timeline window, cut parts of your gif until it's short enough. If you don't want to delete certain parts, you can divide your gif in two separate ones.
Make the colors less bright/unify the color palette with an Hue/Saturation layer: If you haven't done this in the editing process and your gif exceeds 10MB, it's time to edit the gif colors.
Reduce the color palette: In the Save for Web (Legacy), you'll see that there's "Colors: 256" on the left (marked in green in the screenshot). 256 is the max amount of colors you can have, but you can reduce it. PS will automatically get rid of colors that have a smaller presence first (for example, in the anime gif above, if I reduced the colors it would get rid of the reds and magentas before the yellows or the blues).
Change the settings in the Save for Web (Legacy) window: Besides the color palette, there's a setting on the right side, marked in red in the screenshot above (the first one). I have it set to "Adaptable", which is the highest setting, but you can change it to "Perceptual", "Selective" or "Restrictive". This will lower the quality and thus the size, but sometimes it might mess up the gif. Similarly, you can change the setting below that one (set to "Motive" in the screenshot) to "Noise", "Difusion" or none at all to change the quality and size.
Optimize the gif: I use ezgif.com for this. Click on "Optimizer", upload your gif, make the Compression level smaller, click on "Optimize" and then save your gif. This will inevitably lower the quality, so I usually don't go lower than 35. Also, try to get your gif right below the 10MB limit, so if a compression level of 20 gets your gif to 9.5MB but a 15 gets it down to 9.9MB, choose 15. ezgif also has other cool features like one to slow down your gif's speed, so check it out!
Don't make gifs of media that causes problems: If you regularly find yourself being frustrated with gifs of X media exceeding the size limit, you might need to find something else. It sucks to think that you might not be able to make gifs of your favourite piece of media, but gif making should be fun, not ruin your day. Of course, it's up to you to decide how much effort you're willing to put on a gif, but don't overexert yourself either.
The Save for Web (Legacy) window is also where you can make your gif bigger in the case of pixel/pixelated games like Pokémon Mystery Dungeon or Nintendogs. In the "Image Size" section, set the quality to "Nearest Neighbor" and the percentage to 200% to double its size (it will be somewhat close to 540 pixels wide). You can make the gif three, four or even more times its size wih this method.
Closing thoughts and results
Managing a gif blog would require a whole new post with some advice so I'll leave that out for now. There are other things I've also left out like actions (highly recommend learning about them) but these are the basics methinks. Again, if you have any questions, my ask box is open ✨
And here are the gifs with a comparison to the original 🎉
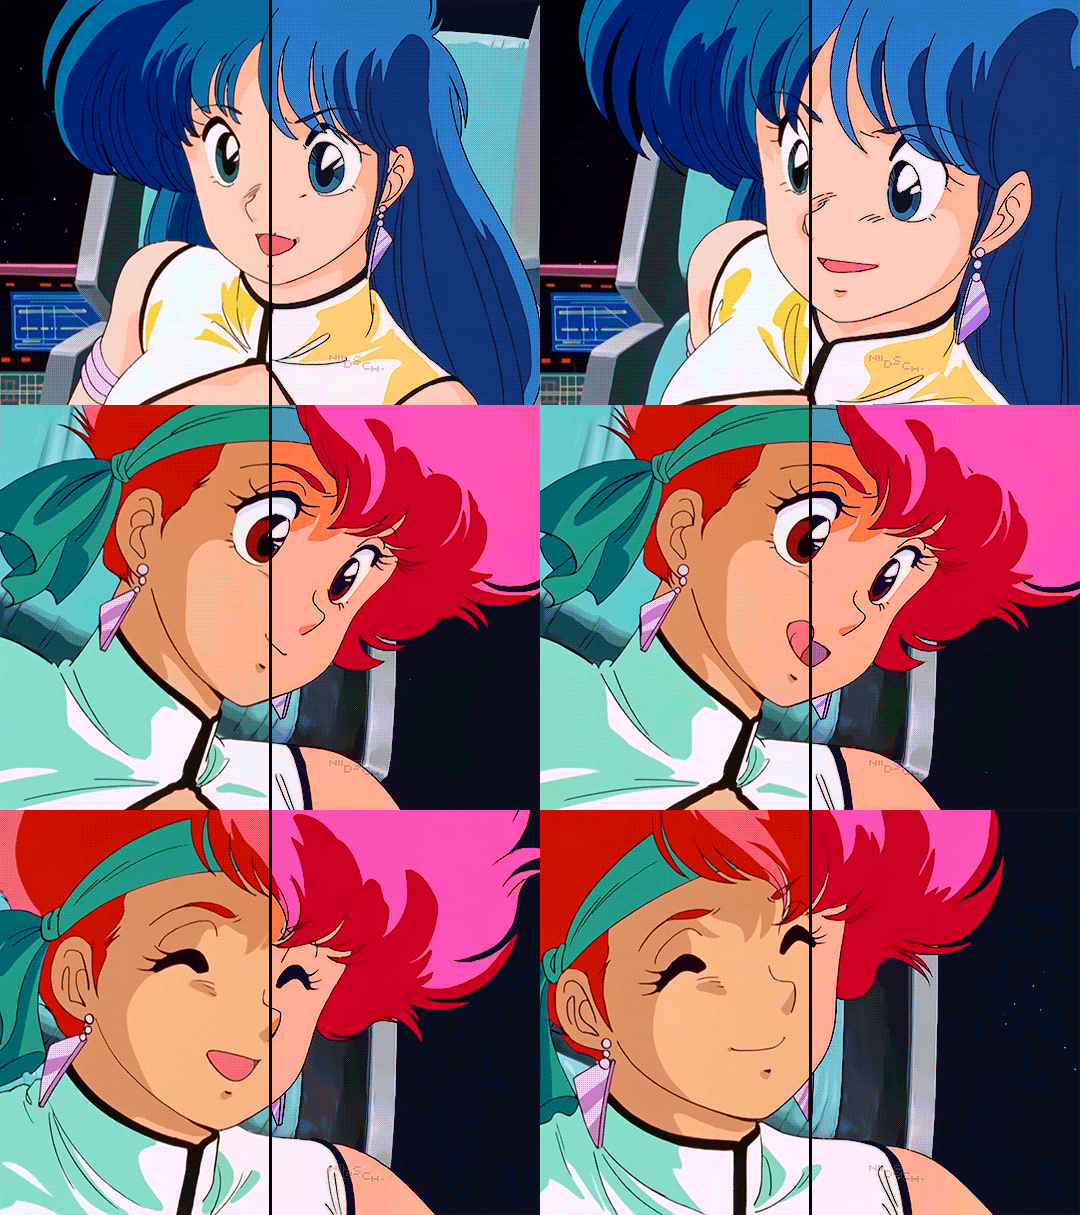
Sharpen, Hue/Saturation, Gradient map and Gaussian blur

Sharpen, Hue/Saturation, Gradient map, Curves and Gaussian blur
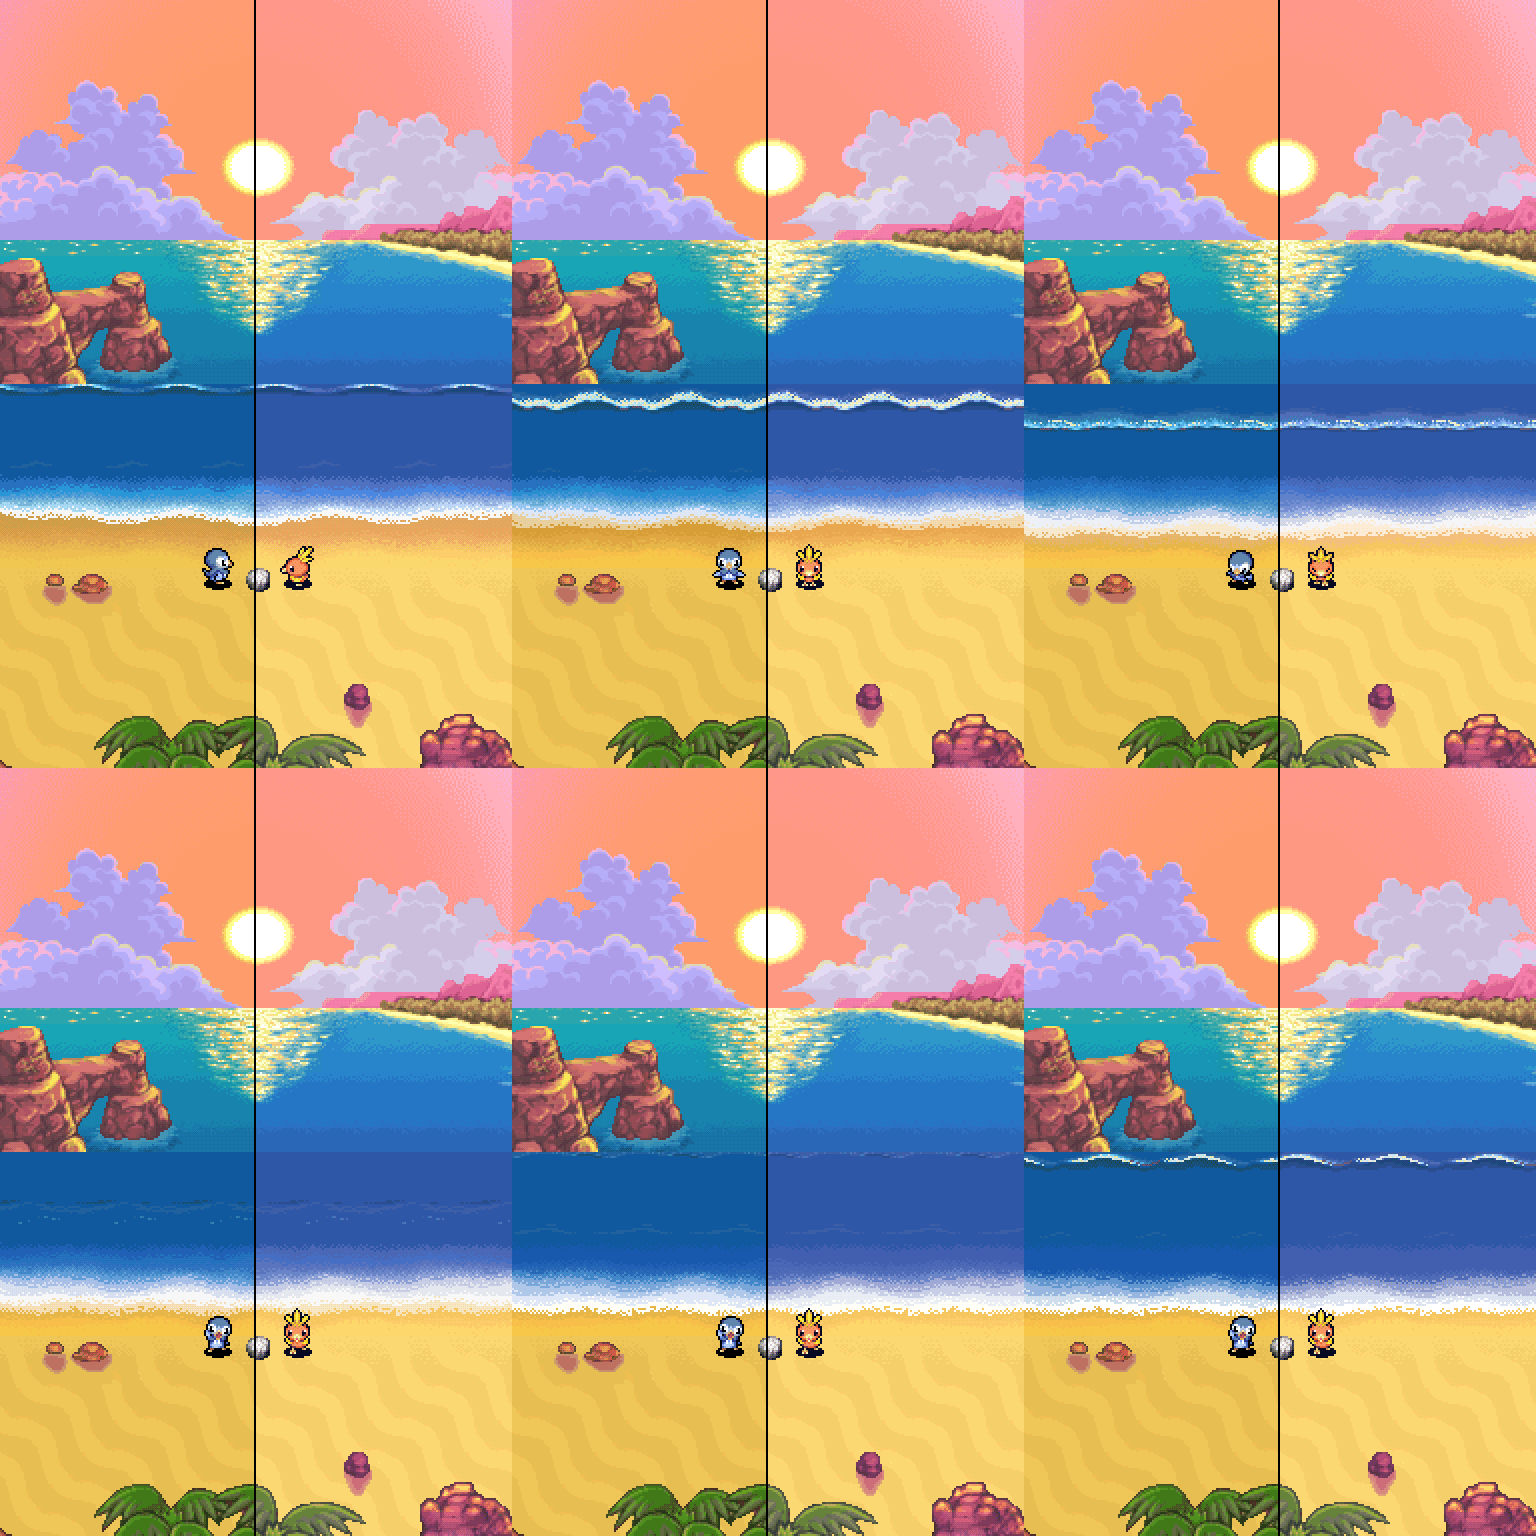
Hue/Saturation and Gradient Map
#ysiposting#whew this took a while#now if you'll excuse me I'm going back to studying for exams. regrettably
27 notes
·
View notes
Text


Comic panel redraw minus text cuz I couldn't think of anything for them to be saying. Dialogue is my weakness.
click/open in new tab to see in full & better quality!
original image:

#my art#phone art#spidersona#mysterio#quentin beck#redraw#comic redraw#eyestrain#eye strain#like.. extremely mild chromatic aberration. but just in case!!
92 notes
·
View notes
Note
just wondering, do you think you might be interested in posting graphic tutorials for like promos or headers or icon borders or whatever? all your graphics are so cool!!
hello! and thank you very much! 😊 currently, the only full tutorials i have are these if you find them helpful !
recoloring icons/graphics to add skintone if it's washed out by one color. how to fix fried colors/color match fried effect on psd colorings. simple icon borders. * this is the main formula to all my borders, including the ones in my commission examples; once you're able to get yourself an icon and (if you'd like) blockquotes, you can just slap some pngs around ur icon however you see fit and add your psd and you've got the idea to make your own !
as for a tutorial, i'd have to put some thought into whether or not i could make a full fledged tutorial, since making graphics can be a little more complex than a step-by-step walk through...at least, for me. a lot of it depends on the images i use, the placement of those images && recoloring/balancing colors. it depends on what you're trying to accomplish. however, here are some quick tips i'd personally recommend. i will be referencing photopea tools, as i use photopea.
PSD/COLORING. if you plan to use a psd on your graphic, add it first so you can see your progress as you go forward with your edit. // to add a psd (file>open) // when your psd is open, right click on the psd layer, layer>duplicate into and you'll see 'destination' with a dropdown. select the tab that your edit is taking place in.
even if you don't use a psd, there are several ways you can color match or adjust images if they look out of place. i personally use image>adjustments>selective color because i find it to be a major help; other helpful adjustments are image>adjustments>color balance // image>adjustments>channel mixer // image>adjustments>hue/saturation // image>adjustments>brightness/contrast // image>adjustments>levels // image>adjustment>curves // image>adjustment>exposure. really, just play around with it, psd or no psd—you can always come back to this step if you decide to add more imagery or balance something out later.
SHARPNESS/QUALITY/NOISE FILTERS. adding sharpness to an image can improve the quality of an image; though, it's best to stray from images with too poor of quality. ways to adjust sharpness are filter>sharpen // filter>smart sharpen // filter>unsharp mask. noise && grain filters can also add a sort of 'coverage' to any quality issues && you can do this in two ways. filter>noise>add noise // as is or monochromatic or filter gallery>film grain—lower the intensity or mess with the toggles as you please. you can either do this directly to your image if you're not worried about undoing it, or you can add a layer; if you're only trying to apply the grain layer to one object/png, you can turn that layer into a clipping mask. layer>new>layer, fill your new layer with white or black(or a chosen color, if you wanna experiment) && pick a blending option from the dropdown(it should say normal by default) i usually add a white layer && choose multiply or soft light. make sure to adjust your opacity toggle as you see fit && add noise/film grain as you see fit.
OVERLAY IMAGES/BLENDING. to blend overlay images (this can be texture overlays or simply adding another image), play with the blending options && opacity of your layer like you did with the noise/grain layers. this one you'll have to play with because it all depends on the lighting of your images && whatnot. you can also erase pieces that you don't want in frame if you need. to erase a corner or part in a way that doesn't look too harsh, i'd recommend lowering the hardness of your eraser brush.
TEXT. there are a variety of free fonts out there; here are some sites i use: one. two. three. // to make your text more dynamic, click the 'warp' button at top right, and you'll encounter a popup. you will go to where it says: style && choose from the dropdown (default is set to none). you can just play with the text until you're satisfied. you can also use the blending options on your text, if you so see fit.
additionally, you can duplicate your text layer; under the opacity of your text is a option that says 'fill'. switch the 'fill' to 0% && once you've done that, you can now right click blending options && check 'stroke'. adjust the color and size of your stroke and move the stroke layer around to add dimension(i usually move it back && downwards slightly). you can click your original text layer, right click it, go to blending options and check '3d'. you can change the color && distance && adjust the "darken" toggle to 0%.
PNGS. THESE STROKE && 3D EFFECTS LISTED IN TEXT ALSO WORK ON PNGS TO ADD DEPTH. png/cutout sites i use: one. two.
CLIPPING MASKS. if you want to put an image(lets say a image of a fc you have) inside of a shape(like a heart or circle), you can use clipping masks. you can refer to this tutorial i've made to see how clipping masks work for borders/icons. to get your desired image inside of a shape, right click your image>clipping mask && your image will be within the confines of the layer beneath it—the layer beneath it should be whatever shape/png you have in place.
that's all i can think of on the spot ? hope this helps !
#answered#anonymous#sorry if this is illiterate im very spacey today#* my tutorials.#these are more like tips but bgjhdgehw#free to rb //#btw..no idea if other people do the same exact methods?#since i had to like...figure (most) things out myself#so it may not be traditional methods in some areas ? i really don't know#either way these work for me
25 notes
·
View notes
Text


my piece for the 2024 @theterrorbigbang , painted for @asherephraim 's phenomenal fic: The company loves misery (click to redirect)!
digital painting + collage
fic summary + length: 22.6K
Charles has avoided the Franklins' Christmas party for five years running, but for the sake of his career, here he is this December, miserable, insufferable, and hoping beyond hope to avoid the host.
One by one, he encounters three men from his past, in chronological order (and of increasing import). How can his willpower and self-respect withstand this unjust onslaught?
my favorite detail: this little charles + shadow combo!!!

plus, some bonus doodles from the fic of Charles, Sol, Dundy, and Sir John Franklin (technically also the back of Ross's head....but I don't think it fully counts!!):


I was partnered with @asherephraim! Their fic is incredible, well written, gripping, painful, and funny all at once. Please check it out, so that I have someone else with to lose my entire mind with about it!! I was super honored to work with Ash on this project! check it out here (link)!
full image of the comic under cut; it's a big damn file so you're probably best off opening it in a new tab for decent image quality.
Please do not repost or remove captions. reblogs appreciated!! And go check out the fic!! it's really fantastically good!!

#pomodoriart#the terror#the terror amc#the terror big bang#charles des voeux#sir john franklin#solomon tozer#henry le vesconte
14 notes
·
View notes
Note
Btw, just saw one of your tags saying that you hate tumblr image quality, all you gotta do to see it in it's full glory (on pc) is to click the image, so it will be on the center of the screen, then right click it, and then "open in a new tab" and it's done Sorry if you already knew about this one!
ahh I knew about the click on it bit but not the open in a new tab!
mostly was just ranting about how the image quality dying after i upload it to tumblr lol
#it looks so nice on my clip studio tab#and so blurry on tumblr *cries*#thanks tho :] will def be using the new tab trick
10 notes
·
View notes
Text
Day 13 - while gaming
before i begin, please note! this is a catfish!Noel centric fic, so if that’s not your personal taste, please continue to scroll!
Noel’s current life was pretty much the perfect definition of a snowball lie. He hadn’t meant for any of this to happen, for such a simple action to spiral like this.
Using alternative accounts online with female usernames and profile pictures of beautiful women was just his stupid little guilty pleasure. It gave him that full-body feeling of joy that he craved, but rarely found. He had seen the name Talia somewhere, and decided it sounded pretty and slapped it onto a new Youtube account, using a random photo of a young woman as the profile picture. While browsing on that account, he happened to stumble upon a video by one Mischa Bachinski - his Ukrainian classmate whom he may or may not have caught a mild case of the hots for. It was a rap video with shitty quality, filmed in his basement, but Noel thought the rap was pretty good, and deserved a positive comment.
He had no idea that in a couple months’ time, his biggest regret would be sending that comment.
After seeing Mischa’s overjoyed response to the comment “Talia” left, it felt like there was simply no choice but to keep leaving such comments. It was only on the tenth comment he left that things went south - Mischa asked for her other socials. And just like that, suddenly Noel was creating more Talia accounts. Discord, Instagram, even a Roblox account was created. Suddenly he was researching how to do a Ukrainian accent, and keeping Google Translate open on a tab on his phone at all times. Suddenly he was installing a voice changer to use on Discord calls - giving the household computer a virus, which he was still too scared to mention to his mother.
Noel knew that this was all wrong. He was feeding lies to a vulnerable teen who had already been through so much. But he was too embarrassed, and too afraid of the consequences, to ever admit the truth to anyone.
“Top left!”
Noel flinched as he was suddenly pulled from his melancholic thoughts. He quickly clicked a key on his keyboard and shot down a zombie about to attack him. “Phew… дякую, dear.” he sighed in relief, reminding himself to speak in a more girly tone of voice, just in case the voice changer wasn’t convincing enough.
This whole mess wasn’t all bad - Noel finally had someone to play video games with, even if he did need to put on a fake accent and use a voice changer. Every Tuesday and Thursday, after choir practice, Mischa would call up Talia on Discord, and they would play any free multiplayer game they could find together.
So far, they had been at it for an hour, and neither boy was getting tired. Noel was more than content to stay here all night, and Mischa seemed like he was too.
At least, that was what Noel thought, until his headphones picked up a quiet shff of fabric, a shift. He thought nothing of it at first - Mischa was probably changing his position; he had been sitting for an hour straight. But then he heard him shift again, and again, in the space of just two minutes.
“Mischa, are you alright?” Noel gently asked. “You sound a little… fidgety. It’s okay if you’re getting tired, we can sign off—“
“Oh, no no no! I am just fine, my Talia.” Mischa insisted, his firm yet loving voice crackling straight into his ears. “Please, let us continue our battle against zombies. Ooh, shit, straight ahead!”
Noel made a frankly undignified noise, and quickly rapid-fired at the zombie in his face, using up all his bullets, which in turn sent him scrambling to reload. Come to think of it, there may have been a reason no one had ever leapt at the chance to play games with him. Mischa could be heard quietly chuckling as he saw his “girlfriend” fumble - but then that chuckle turned to a quiet hiss.
“Mischa?” Noel instantly questioned it, worry creeping into his tone. “Are you sure you’re alright? You just made a weird noise, you sound like you’re in pain…”
“M-my perfect Talia, your concern is so sweet,” Mischa began to brush him off, his voice sounding a little shaky all of the sudden. “But I am fine.”
“Really?” he challenged, his tone disbelieving. “I don’t think I’m buying it, my dear. You know you can talk to me if something is the matter…”
There was a tense silence. Before finally, Mischa sighed. “Okay… I am not completelyfine.”
Noel smiled sadly at the boy’s reluctant admission, glad that he had gotten through to him. “What’s wrong, my darling Mischa?”
“We-well… I…” he stammered, seeming unable to decide on the right words. “I have bottle of wine with me, yes? I have been drinking wine since we started game. And I drank wine super fast, the wine is gone now… a-and it passed through my body.”
It took Noel a good few seconds to figure out the problem, but when he did, his eyes went huge. Shit. He bit his lip behind his microphone to stop himself from laughing. “Mischa, do you, ah… need to pee?” he gently inquired for confirmation.
The soft and shy “mhm” that he received in response could’ve made his heart explode. In his wildest dreams, he never imagined Mischa could sound so meek. “Well, I don’t mind pausing the game for you while you take a bathroom break…”
“No,” Mischa instantly refused. “I don’t need break, I-I can hold it… We can keep playing.”
Noel sighed softly at his continued stubbornness. “Dear… you shouldn’t put it off, especially since you already seem pretty desperate… It’ll only get worse, and you’ll end up—“
“No, I won’t!” he snapped, before instantly regretting it and calming down. “S-sorry, my love. But honestly, we don’t need to stop game. I’m a strong man, I-I can hold a little pee-pee, no problem… Please, let’s- fuck!”
Noel’s eyes became the size of saucers, and a red hot blush crept across his face. For a few seconds, he thought that was meant to be a full sentence, and got more than a little flustered. However, the soft grumbling and frantic rustling that followed told him otherwise, and worry cut through his brief excitement. His computer screen showed the pause menu, suggesting that Mischa had paused the game. “Mischa?” Noel gently called out, dreading to think what might have just happened behind the boy’s microphone.
“Лайно, лайно, лайно-“ Mischa could be heard breathlessly cursing. “I’m so sorry, T-Talia, I have to—“
“Hey, hey- sweetheart, it’s okay,” he instantly comforted. “Go to the bathroom. I’ll be right here when you get back.”
Mischa made one last small noise of pain - before his mic picked up the sound of his headset slamming down onto the floor, as well as his footsteps faintly retreating.
With him gone, Noel took the time to take off his own headset and give his slightly sore ears a quick break. He gently rubbed his ears, quietly chuckling about what had just happened. He said a few random things in his normal voice, just so he wouldn’t somehow forget that he wasn’t naturally a Ukrainian girl. And he patiently sat and waited for Mischa’s return.
And waited. … And waited.
Finally, just as Noel was considering exiting out of the game in the interest of not burning the pause menu into the screen, he heard Mischa pick his headset up and put it back on. “Ah, welcome back!” Noel happily greeted him. “Feeling better now?”
“Y-yeah… better,” he replied in a very uncharacteristically quiet voice.
That gave the other boy a bad feeling. If he had successfully emptied his bladder, he should surely be back to normal - unless something had gone wrong. “… Did you make it?” he found himself asking.
Mischa’s response truly broke his heart. “I couldn’t,” he said simply, his voice breaking at the end of the sentence.
Noel softly gasped, empathy flooding into him from head to toe. He felt a knot appear in his throat. “Oh, Mischa, darling…”
A shaky exhale came through Mischa’s microphone. “I barely even got up stairs,” he began to rant. “I-I left basement, and I tried to run to toilet and suddenly it just wouldn’t stop, I…”
The boy took a slow and unsteady breath in, trying to keep his emotions in check. “… I’m sorry, Talia, f-for becoming so weak… you shouldn’t have to see that of me.”
Noel could’ve cried with sympathy. His heart absolutely ached for poor Mischa. “… Mischa,” he carefully began to speak - in this moment, he wasn’t playing a character, he was speaking entirely from his heart. “You know what I want you to do, darling? I want you to sign off, and get some dry, comfy pyjamas on. We can do a longer gaming session on Thursday.”
Thankfully, Mischa seemed too emotionally exhausted to put up too much fight. “Are you sure…?”
“I’m not about to let you sit at your computer in soaking wet pants on the verge of tears trying to fight zombies,” Noel insisted bluntly, which managed to get a very soft snort out of the other. “I’m positive.”
“Alright. I will… I will leave game and put on night clothes,” he reluctantly agreed.
They both exited out of the game, leaving them on call together without any distractions, which brought about a peaceful silence. Mischa breathed a heavy, despondent sigh. “… I-I’m sorry, Talia—“
Noel gently hushed him. “You don’t need to apologise for anything, kохана. Your bladder just couldn’t take it anymore, it’s not any kind of personal failure, it’s just biology… And I don’t think any less of you, okay? You’re perfect, Mischa, and I’m never not gonna think that.”
There was a short pause, before Mischa gave a small sniffle, evidently starting to fail at holding back tears. “I love you, Talia,” he managed to shudder out.
“I love you too,” Noel instantly repeated, the rehearsed feminine tone in his voice almost disappearing altogether. “I really do love you…”
“Will you message me goodnight on the Discord before you go to bed…?”
The soft smile on his face slowly fell, into a slightly sad resting face. “… Yeah, of course,” he assured him, returning to his usual Talia voice.
“Okay…” Mischa took a deep breath. “Thank you for playing with me. До побачення,Talia. Я люблю тебе.”
The little icon containing his profile picture disappeared from Noel’s phone screen, and he was alone. He let out a deep sigh, scrubbing a hand over his face as he tried to process what just happened.
Needless to say, it was very hard for Noel to keep a poker face when he heard Mischa the following day at school, muttering about how he had the “shittiest night”.
see you guys in two days for Day 15! :3
#fandomo#omorashi#omovember#omovember 2024#fuck it this is safe enough for fandom tags#ride the cyclone#nischa#catfish noel
5 notes
·
View notes
Note
do you pay for the pictures?
Hiya 👋🏻
No no. The only thing i spend money on is monthly photoshop subscription.
If i post edits, it's almost always either from m/otorsportimages, r/edbullcontentpool, official teams' or photographers' instagram accounts.
If you're wondering how to get the full size photos, on m/otorsportimages, i open the photo in full screen, click ctrl+print screen, then i paste it on paint and save from there 😅
On r/edbullcontentpool, you can open the image in a new tab (i use chrome), then right click the photo, inspect, type "liiift" into the search html bar and with clicking enter find the full size photo link and open it in a new tab and save from there 😌 (or have an account and then the photos can be downloaded, but i try to avoid making unnecessary accounts so this is a roundabout way of saving photos)
With social media accounts i always download the content too (i.e. snapinsta) so that they'll be in better quality than screenshots or screenrecords
8 notes
·
View notes
Text
TUTORIAL 2
Giphy Capture and Gifski
FULL TUTORIALS | EASY NON-RECOLORED GIFS
This tutorial is Mac only unfortunately, but is for the girlies who hate steep learning curves, don't want to recolor, and don't want to touch a command line with a 10-foot pole. It is wickedly easy and can produce great results for non-recolored sets.
Interface: Graphic User (GUI)
Needed software: Giphy Capture and Gifski (GUI version)
Operating systems: Mac
Time: 7 minutes for the 2 gif set (below)
Difficulty: Easy
Input: ANY video you can screencapture.


LIMITATIONS: 1 Mac only. 2) No recoloring. 3) Captions are limited in size, color, and font (but should generally be sufficient even for longer captions). 4) Since you are screen-capturing video, the quality of your recordings will be limited by the physical size and resolution of your computer screen. 5) You cannot crop after screen-capturing. You have to adjust your screencapture window to the aspect ratio you want your gifs to have.

1. Installation
You can get Gifski (GUI version) and Giphy Capture in the Apple App store.
2. Screen Capturing
When you first open Giphy Capture this screen capture screen should appear:

Open the video you want to screen capture, and make it as large as possible on your screen for the best quality!!!
If you want to make a square set, or a 3:2 set, adjust the size of the screencapturing box accordingly. You can't crop a capture to a different shape after recording.
In my example, since I only want a close up on Dean, and I want it to be square, I will reposition the box and drag the bottom right edge to resize this box as needed.
It's difficult to see in the above image, but there is a box in the bottom right of the green screen that tells me the exact pixel x pixel size of my capture screen so I can drag it until I get a precise screen ratio. In my case, the largest I can screencapture my square set (due to limitations of the physical size of my laptop's screen) is 850 x 850 px, so that's the dimensions I will adjust to.
Minimizing your screencapture screen will retain its shape. Minimize it then start the video you want to record a little before the point where you want to start recording, then press play, and quickly un-minimize your Giphy Capture window so it is on top of the window you want to record and hit the red button to start screen capturing.
You can record for only 30 seconds at a time, but Giphy Capture will save hundreds of 30-second successive screencaptures. You'll see them as thumbnails you can open in the bottom of your screen capture screen.
3. Cut into clips and caption
Once you have captured all of the sections of your video you want and are happy with the size and how the shots are framed, it's time cut your 30-second recording into clips representing each gif, and caption them one by one (you can make multiple gifs from the same capture).

Click on the thumbnail of your capture and a new box will open. Here, you can trim your recording and caption it.
Trim the recording by adjusting the ends of the purple bar.
Note: I recommend you not let the length of your gifs exceeding 4 seconds when possible, but I have gone to 5 or 6 seconds before.
You want to go ahead and caption each shot right after clipping it to length.
Click on the tab labeled "Captions" and a new box will open.

Click "Add Caption". A huge box will open on top of your gif.
Set the caption size to XS, change color as desired, and drag the caption box down and center it on the bottom of your screen and type in your dialogue in the top right.
If you have two people talking back and forth in the same gif, you can click "Add Caption" in the bottom left to add another caption, and set one caption on top of the other, or set one caption to end where another caption begins by adjusting the edges of the purple bar.
4. Exporting to MP4
When you're happy with your captions and the length of the clip that will become your first gif, go back to the "Options" tab and set the following options:
Loop style: Normal
Pixel Size: Original
Frame Rate: HD (we'll adjust the frame rate later in Gifski. It does something a little weird if you adjust it here—even to 23 FPS).
Click "Save As..." and then save the file as an .mp4.
Repeat this process for every clip intended to be a gif in your set, until you have them all saved.
5. Compressing and converting to .gif in Gifski
Now open Gifski and open your first .mp4 clip. It may give you a warning about the frame rate. Just ignore it.

In the bottom left corner, you can see the estimated size of your resulting gif. This estimate will auto-update as you adjust your compression settings. Remember: To upload your gif on Tumblr, it needs to be about 10MB or less. If it's already 10MB, just go ahead and click convert! If not (which is more than likely):
Adjust FPS to 18. I find this frame rate to be a good balance of compression and retained quality.
Decrease the dimensions of your gif as needed. Whether you use the drop down box or the dialogue boxes, Gifski will automatically scale to retain your gif's screen ratio rather than stretch it to fit, so you don't need to worry about keeping your gif proportional.
You can finely adjust the settings until your gif is exactly 10 MB if you want to keep the best quality, or just aim for a ballpark.
Cick "Covert" then save the resulting gif. Do this for all your .mp4 clips and then boom. You're done.
But what if I don't WANT to use the Gifski GUI??? Let me automate!!
Maybe you AREN'T scared of the command line and you're thinking, "I don't want to adjust the compression on these things one by one! Was captioning in Giphy Capture not enough for you???"
Well then you can easily automate the process by using the Gifski command line interface (CLI) instead. I already wrote the script for you here.
If you're already going to use the command line, you could also use FFmpeg Script 1 or FFmpeg Script 2 to batch convert and optimize your clips into gifs.
Wait... so why aren't we compressing straight to gif in Giphy Capture???"
Because the quality after compressing will not be as good (usually), and the compression options are much more limited in terms of rescaling and setting the frame rate of your set. Giphy Capture also produces strange motion results often when adjusting frame rates. You can see a comparison set here. Or check these out:


The left is exported to GIF straight from Giphy Capture. The right converted to .gif in Gifski.
If you want to try compressing straight to gif in Giphy though, my recommended settings are:
Pixel Size: 640 px or 480 px if needed (I wouldn’t go lower unless you're arranging in 2x or 3x orientation)
Frame Rate: HD (or High in a pinch, but don’t do Standard or lower).
#easy#giphy capture and gifski#GUI only#giphy capture#gifski#tutorial#if anyone has suggestions for a Windows and/or Linux version swapping out the work done in giphy capture let me know!
9 notes
·
View notes
Text


Beck: After all, I'm just some washed up old man parading around in this silly getup like some kind of clown, wearing a glorified fishbowl on my head! I look ridiculous! I just don't know what it is you see in me.
Acedia: And that's just one of the many reasons why I like you. You make me laugh with your jokes and acts, and you're very sincere with whatever you choose to do. I like that you're so confident enough to do all of this.
Beck: ..I don't deserve someone like you. If you keep talking like that you're gonna make me cry.
Acedia: Yes you do, and that'd be a good cry, though, yeah?
Beck, holding back: ..................Yeah.
(PLEASE CLICK TO VIEW AND OPEN IN NEW TAB TO SEE FULL SIZE AND QUALITY!! tumblr eats large posts)
Originals: [X] [X] comic source: [X] (1-3 only)
109 notes
·
View notes
Text
How to Use Chrome Extensions with GenQE.ai: A Step-by-Step Guide

In today’s fast-paced software development environment, efficiency and automation are key to delivering high-quality applications. GenQE.ai, the world’s leading AI-powered software testing tool, is designed to streamline your testing process and make it faster, smarter, and more reliable. One of the most powerful ways to enhance your experience with GenQE.ai is by integrating it with Chrome Extensions. Chrome Extensions can extend the functionality of your browser, enabling you to automate tasks, improve productivity, and seamlessly integrate GenQE.ai into your workflow. In this article, we’ll explore how to use Chrome Extensions with GenQE.ai, the benefits of doing so, and step-by-step instructions to get started.
Why Use Chrome Extensions with GenQE.ai? Chrome Extensions are small software programs that customize and enhance the functionality of the Google Chrome browser. When used with GenQE.ai, they can:
Automate Repetitive Tasks: Extensions can automate tasks like test case generation, data entry, and report generation, saving you time and effort.
Enhance Collaboration: Extensions can integrate with communication tools like Slack or Microsoft Teams, enabling seamless collaboration between team members.
Improve Productivity: Extensions can provide quick access to GenQE.ai’s features, allowing you to perform tasks directly from your browser.
Simplify Integration: Extensions can help you integrate GenQE.ai with other tools and platforms, such as CI/CD pipelines, project management tools, and version control systems. By leveraging Chrome Extensions, you can unlock the full potential of GenQE.ai and take your software testing process to the next level.
Step-by-Step Guide to Using Chrome Extensions with GenQE.ai Here’s a detailed guide to help you get started with using Chrome Extensions alongside GenQE.ai: Step 1: Install GenQE.ai Chrome Extension
Open the Google Chrome browser on your computer.
Visit the Chrome Web Store by typing chrome.google.com/webstore in the address bar.
Search for GenQE - AI-Assisted Quality Engineering or use this direct link: GenQE Chrome Extension.
Click on the Add to Chrome button to install the extension.
Confirm the installation by clicking Add Extension in the pop-up window. Step 2: Set Up GenQE.ai
Once the extension is installed, click on the GenQE.ai icon in the Chrome toolbar (top-right corner of the browser).
Log in to your GenQE.ai account or create a new one if you don’t have an account yet.
Follow the on-screen instructions to configure your testing environment, including selecting your project, defining test cases, and setting up integrations with other tools. Step 3: Explore Chrome Extensions for Enhanced Functionality To maximize the benefits of GenQE.ai, consider installing additional Chrome Extensions that complement its features. Here are some popular extensions you can use:
Postman Interceptor: o Use this extension to capture and test API requests directly from your browser. o Integrate with GenQE.ai to automate API testing and validate endpoints.
JSON Formatter: o Format JSON responses for better readability. o Use with GenQE.ai to analyze API responses and identify issues.
Screen Recorder: o Record your browser sessions to document test cases or capture bugs. o Share recordings with your team for better collaboration.
Session Buddy: o Save and manage browser sessions for quick access to frequently used tabs. o Use with GenQE.ai to organize your testing workflows.
Grammarly: o Improve the quality of your test case documentation and reports. o Ensure clear and concise communication with your team. Step 4: Automate Testing with GenQE.ai
Use the GenQE.ai Chrome Extension to generate test cases automatically. Simply navigate to your application in the browser, and the extension will analyze the page to create relevant test scenarios.
Execute tests directly from the browser using the extension’s one-click testing feature.
Monitor test results in real-time and access detailed reports through the GenQE.ai dashboard. Step 5: Integrate with Other Tools
Use Chrome Extensions like Zapier or Integromat to connect GenQE.ai with other tools in your workflow, such as Jira, Trello, or GitHub.
Automate notifications and updates by integrating GenQE.ai with communication tools like Slack or Microsoft Teams. Step 6: Analyze and Optimize
Use GenQE.ai’s real-time analytics to identify trends, anomalies, and potential bottlenecks in your application’s performance.
Leverage Chrome Extensions like Google Analytics or Hotjar to gather additional insights into user behavior and application usage.
Apply the insights gained to optimize your application and retest using GenQE.ai.
Benefits of Using Chrome Extensions with GenQE.ai By combining GenQE.ai with Chrome Extensions, you can: • Save Time: Automate repetitive tasks and streamline your testing process. • Improve Accuracy: Use AI-driven tools to generate precise test cases and identify issues. • Enhance Collaboration: Integrate with communication and project management tools for better teamwork. • Boost Productivity: Access GenQE.ai’s features directly from your browser for quick and efficient testing.
Real-World Use Cases Here are some examples of how teams are using Chrome Extensions with GenQE.ai to improve their testing processes:
E-Commerce Platforms: o Use GenQE.ai to test the checkout process and ensure it works seamlessly across different browsers and devices. o Integrate with Chrome Extensions like Session Buddy to manage multiple test scenarios efficiently.
Financial Services: o Automate API testing with GenQE.ai and Postman Interceptor to validate transaction endpoints. o Use JSON Formatter to analyze API responses and identify potential issues.
Healthcare Applications: o Test telemedicine platforms for performance and reliability using GenQE.ai. o Use screen recording extensions to document test cases and share them with stakeholders.
Gaming Companies: o Simulate thousands of concurrent users with GenQE.ai to test multiplayer servers. o Integrate with communication tools like Slack to notify the team of test results in real-time.
Conclusion Using Chrome Extensions with GenQE.ai is a powerful way to enhance your software testing process. By automating tasks, improving collaboration, and integrating with other tools, you can unlock the full potential of GenQE.ai and deliver high-quality applications faster and more efficiently. Ready to Get Started? Install the GenQE.ai Chrome Extension today and explore the possibilities: GenQE - AI-Assisted Quality Engineering. Transform your testing process and experience the future of quality assurance with GenQE.ai!
0 notes
Text
What is Kobold AI?
Kobold AI is an AI powered storytelling platform designed to generate captivating stories based on user-provided text prompts. This advanced version of AI Dungeon offers an interactive interface for content creation, allowing users to craft narratives that unfold like adventure games.
Overview of Kobold AI
Kobold AI is a versatile and powerful tool in the realm of artificial intelligence, specifically designed to enhance the writing process. It offers a range of functionalities that streamline content creation, making it faster and more efficient. Whether you need to speed up novel writing, create engaging product descriptions, or craft social media captions, Kobold AI is a robust solution.
The platform's intuitive interface simplifies the writing process, providing a seamless experience. Below is a comprehensive review of Kobold AI, exploring its capabilities and features.
Understanding Kobold AI
Kobold AI leverages advanced machine learning models to revolutionize traditional writing methods. This web-based platform offers an engaging interface that facilitates quick and efficient content generation.
Not limited to just writing, Kobold AI also supports interactive chats and gameplay, making it a versatile tool for various creative needs. Let's delve into its features to understand its full potential.
Key Features
Diverse Language Models Kobold AI generates text using sophisticated AI language models, customizable for various creative writing and storytelling needs.
Multiple Variants
KoboldAI Lite: A streamlined version for simpler tasks.
KoboldAI-Client: A more comprehensive client for advanced functionalities.
AI-Powered Storytelling The platform excels in creating captivating stories, allowing users to guide the narrative direction.
Open-Source Nature As an open-source platform, developers can contribute to and expand its features using its API.
Customization Users can adjust output settings and fine-tune language models to match their desired style and content.
User-Friendly Interface The interactive interface simplifies content generation.
Text Generation Kobold AI can generate text across various genres based on user preferences.
Pros and Cons of Kobold AI
Pros
High-level customization options.
Free and open-source, with community-driven improvements.
Offline mode available.
Active community support with resources and tutorials.
Cons
Initial learning curve for beginners.
Variable quality and consistency of generated text.
Potential for generating harmful content.
Noteworthy Features of Kobold AI
Human-Like Writing Kobold AI excels at producing content that reads like it was written by a human, making conversations feel natural and easy to understand.
Extended Conversations Users can engage in long, captivating conversations with Kobold AI, which remembers previous interactions for a seamless experience.
Multiple Language Support Kobold AI supports a wide range of languages, allowing users to write in their preferred language and choose from various language experts for enhanced content.
Customization Flexibility The platform offers extensive customization options, allowing users to adjust settings to meet their specific needs, thereby increasing content authenticity and efficiency.
Getting Started with Kobold AI
Step 1: Installing Kobold AI
Visit Kobold AI GitHub Page: Access the essential setup files.
Download Kobold AI: Click the green 'Code' button to copy the code.
Choose "Download ZIP": Select this option to download all necessary files.
Unzip the Downloaded File: Extract the files to a suitable location on your computer.
Alternatively, Kobold AI can be used for free on Google Colab, eliminating the need for local installation.
Step 2: Running Kobold AI
Launch Browser: Open a new internet tab.
Enter Web Address: Type http://localhost:5000/ to access Kobold AI's main interface.
Step 3: Loading or Importing a Story
Open Kobold AI in Your Browser: Click the 'Load Story' button.
Pick the Story: Choose the desired story file from your computer.
Step 4: Interacting with Kobold AI
See Your Story in the Editor: View and edit your story draft.
Make Edits or Add Content: Customize the draft as needed.
Click on the Submit Button: Save your changes.
Experiment with Inputs: Try different prompts and settings to refine your content.
Optimizing Your Kobold AI Experience
Tips for Better Results
Experiment with Different Prompts Explore various prompts to unlock new creative directions and ideas.
Edit and Refine Your Work Always review and refine generated content to ensure it meets your standards.
Provide Clear Instructions Clear and accurate prompts help the AI generate better quality content.
Kobold AI Pricing
Kobold AI is free to use, with no costs or subscription fees. However, using larger language models may require additional computational resources, which can be managed locally or through cloud services at a separate cost.
Ratings and Alternatives
While specific ratings for Kobold AI are scarce due to its open-source nature, AIChief has evaluated the platform based on various parameters.
Alternatives
AI Dungeon: Offers immersive storytelling with advanced machine learning.
Novel AI: A web-based platform with storytelling aids and image generation features.
Pricing for Alternatives
AI Dungeon: Free trial with paid subscriptions starting from $10/month.
Novel AI: Free access with monthly subscriptions starting from $9.99 USD.
Final Thoughts
Kobold AI offers an easy and convenient platform for content generation with a user-friendly interface. The AIChief team has thoroughly reviewed its features and provided tips for optimizing your experience. Start your journey with Kobold AI today to create high-quality content effortlessly.
FAQ
Can I Use Kobold AI Offline? Yes, you can use Kobold AI offline after downloading it to your device.
Is it free to use Kobold AI? Yes, Kobold AI is free to explore and use, including its API for integration into personalized programs.
0 notes
Text
How to Download Best Service – Chris Hein Guitars (KONTAKT)

Unlocking the full potential of your music production requires access to high-quality instrument libraries, and Best Service’s Chris Hein Guitars for KONTAKT is a stellar choice for any serious musician or producer. This comprehensive guide will walk you through the steps to download and install this exceptional library, ensuring you can start creating with these top-tier virtual guitars immediately.
Step 1: Ensure You Have KONTAKT PRO
Before diving into the Chris Hein Guitars library, it's crucial to have KONTAKT PRO installed on your system. This powerful sampler by Native Instruments is the engine that will drive the library. If you don't have it yet, visit our website to download KONTAKT PRO. Follow the installation instructions provided there to set it up on your computer.
Step 2: Navigate to the Download Page
Head over to Kala Plugins' official download page for the Chris Hein Guitars library. Here, you'll find all the information needed to understand what this library offers and why it's a must-have for your musical toolkit.
Step 3: Review the Library’s Features
The Chris Hein Guitars library boasts an impressive array of features:
Extensive Sample Collection: With approximately 40,000 samples, each instrument is meticulously detailed. Expect between 3,000 to 6,000 samples per instrument, captured in up to 13 velocity levels.
Versatile Styles: Over 30 styles per instrument allow you to capture the exact sound and feel you need for any genre or project.
Comprehensive MIDI Control: With 70 MIDI controllers, you have unprecedented control over every nuance of your performance.
Instruments Included
The library includes a rich variety of instruments:
Electric Guitar (Clean)
Jazz Guitar (Plectrum and Finger Picked)
Nylon String Guitar
Steel String Guitar
Mandolin
Banjo
These instruments are sampled with a level of precision and detail that ensures an authentic playing experience.
Step 4: Download the Library
Once you're on the download page, click the download link to start the process. Ensure you have a stable internet connection, as the library's size is substantial due to its high-quality samples.
Step 5: Install the Library
After downloading, follow these steps to install the Chris Hein Guitars library:
Unzip the Downloaded Files: Use a reliable unzipping tool to extract the files from the downloaded package.
Open KONTAKT PRO: Launch KONTAKT PRO on your computer.
Add the Library: In KONTAKT PRO, click on the 'Libraries' tab and then on the 'Add Library' button. Navigate to the folder where you unzipped the Chris Hein Guitars files and select it.
Activate the Library: Follow the on-screen instructions to activate the library. This may require an internet connection for verification.
Step 6: Start Creating
With the Chris Hein Guitars library installed and activated, you can now explore its vast range of sounds and styles. Whether you’re looking to add a clean electric guitar riff, a soulful jazz guitar solo, or a rustic banjo tune, this library provides all the tools you need.
Conclusion
The Best Service – Chris Hein Guitars library is an invaluable resource for any music producer or composer. Its extensive features, high-quality samples, and variety of instruments make it a top choice for creating realistic and expressive guitar performances. By following this guide, you’ll be able to seamlessly download, install, and start using this incredible library in your projects. Visit Kala Plugins today to elevate your music production to new heights.
0 notes
Text
Adsterra: A Deep Dive into the Advanced Advertising Network with a Unique Approach
In today's digital marketing landscape, navigating the complexities of online advertising networks can be a daunting task. But fear not! Here, we delve into Adsterra, an advanced advertising network that stands out with its unique partner care approach and a range of features designed to empower both advertisers and publishers.
Who Can Benefit from Adsterra?
Adsterra caters to a diverse audience within the digital marketing sphere.
Advertisers: If you're a brand, agency, or media buyer seeking high-quality traffic, Adsterra offers a powerful platform to reach your target audience. With over 20 targeting settings and access to premium traffic from 35,000+ direct publishers, you can deliver targeted ads that convert.
Publishers: Whether you're a website owner, blogger, or social media influencer, Adsterra provides a lucrative avenue to monetize your traffic. They boast of being the highest-paying ad network, with solutions for earning even without a website.
You’re Growth Area: Unparalleled Support and Performance
Established in 2013, Adsterra has become a hub for connecting brands and marketing professionals. Beyond just a platform, Adsterra positions itself as a "growth area" for its partners. This translates to industry-specific support, access to expert advice, and features designed to optimize your advertising or monetization efforts.
High-Converting Ad Formats to Captivate Your Audience
Adsterra understands that ad format selection plays a crucial role in campaign success. They offer a variety of options to suit your needs:
Popunders: These ads open in a new tab after a user clicks anywhere on a website. Ideal for delivering targeted offers directly to high-intent audiences, Adsterra boasts over 11.9 billion monthly popunder impressions. You can choose between CPM (cost per mille or 1,000 impressions) and CPA (cost per action) pricing models.
Social Bar: This user-friendly ad format integrates seamlessly across all operating systems and browsers. These non-intrusive ads garner an impressive 9.9 billion monthly impressions and offer out-of-the-box creative templates with significantly higher click-through rates compared to traditional web push notifications. Social bar ads are available with CPM, CPC, and CPA pricing options.
In-Page Push: This innovative format eliminates the need for opt-ins, sending notifications directly within a user's desktop or mobile browser. In-page push ads offer a powerful alternative to classic push notifications and work seamlessly across all operating systems and browsers. Similar to popunders and social bars, you can leverage CPM, CPC, and CPA pricing models.
Interstitials: Make a bold statement with full-screen ads that appear directly on top of website content. Guaranteed to grab attention, interstitials offer maximum visual impact and high click-through potential. Effective templates are available to suit your specific industry or niche. Adsterra offers CPM and CPA pricing models for interstitial ads.
Why Choose Adsterra: The Edge You Need
When it comes to selecting an advertising network, several factors differentiate Adsterra from the competition. Here's what sets them apart:
Unique Partner Care: Adsterra goes beyond simply answering questions. Their Partner Care philosophy emphasizes guidance and support. Expert account managers collaborate with you to optimize your campaigns, refine your monetization strategies, and ensure you're maximizing your return on investment.
Prioritizing Ad Safety and Traffic Quality: Adsterra safeguards both advertisers and publishers with a robust 3-level security system. This system diligently combats malware, ad fraud, and bot traffic, guaranteeing high-quality views and clicks. Furthermore, intelligent algorithms deliver targeted offers to the most relevant audiences based on over 20 customizable parameters.
Performance-Boosting Tools: Adsterra equips advertisers with a range of tools to streamline campaign management and optimize results. The Traffic Estimator and Smart CPM feature empower you to automate bidding strategies. Custom Bid allows for granular control over your budget allocation, directing higher payouts to the best-performing placements. CPA Goal enables you to prioritize conversions and optimize campaigns toward achieving your desired actions.
Effortless Self-Serve Platforms: Adsterra boasts user-friendly self-serve platforms that simplify the process of launching advertising campaigns or monetizing your traffic. The intuitive interfaces make it easy to navigate the platform, automate routine tasks, and ensure a seamless user experience.
Proprietary Ad Formats: Adsterra isn't afraid to push boundaries. They've developed exclusive ad formats like the Social Bar, which resonates with today's digital natives who are accustomed to interacting with social media platforms. These social bar ads mimic the look and feel of native social media notifications, offering a user-friendly and non-intrusive experience. This innovation is a testament to Adsterra's commitment to staying ahead of the curve and providing cutting-edge solutions for advertisers and publishers alike.
Conclusion
Adsterra stands out as a comprehensive advertising network that caters to the diverse needs of advertisers and publishers. Their commitment to partner care, robust security measures, performance-boosting tools, user-friendly platforms, and innovative ad formats solidify their position as a leader in the online advertising landscape. Whether you're aiming to reach a targeted audience or effectively monetize your traffic, Adsterra offers a powerful suite of features designed to empower you and propel your digital marketing endeavors forward.
0 notes
Text
1. “Tumblr is not easy to use” the rest of us got it, didn’t we? Also it got significantly harder and messier to use based on what changes were made since 2017!
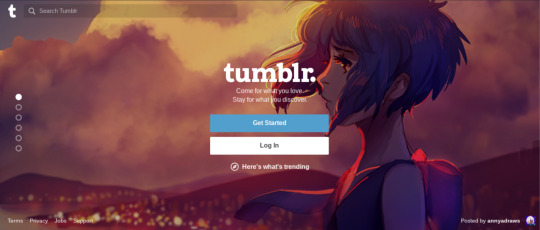
2. “Experiment with logged-out Tumblr” take it back to how it looked in 2017 where the signup page promoted a single, classy-looking work of art (left), instead of whatever this is (right):

3. "We must deliver great content each time the app is opened." Yes but No. Yes you want the content to be representative of what Tumblr is about and to be of high quality. But don't go searching for something forcefully. CREATING that content is NOT your job. That's OURS. You need to encourage Tumblr users to produce so much high quality content on their own (again) that it simply becomes the average view upon opening the app. That happens by making the users relaxed and worriless, by giving them ease and control. Right now, the very crashing use of this site seems a hotter topic than to make art and write poems. Why are we engaging in the Twitter war instead of baking elephant-shaped raisin bread? Because we're too worried we could lose this site. STAY AWAY FROM ALGORITHMS.
4. "Addressing the confusion within replies and reblogs." We tag each other. Problem solved. The only real problem that makes everyone very uncomfortable and sents them rightfully running from a post is this:
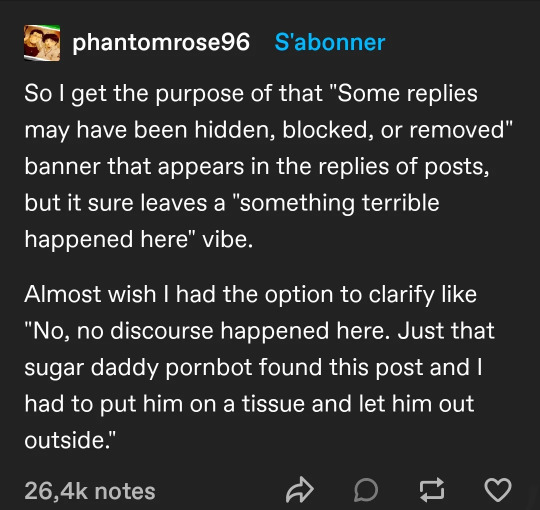
We'd rather see everything than wonder what happened. This creates too much insecurity and is the start of censorship. If there's an unwanted comment there, we can just block the person. Just get rid of the pornbot infestation.
5. "Lack of feedback stems from the outdated decision to only show content from followed blogs." No. Lack of feedback stems from the fact that I can't search for new blogs (also a feature from back in 2017). I haven't really followed a new person in years. Why? Because blogs aren't recommended in the search function. WHERE I SEARCH FOR THEM. Which I want to do. Which I don't anymore because unwanted stuff is shoved onto my dashboard. Now I just want to get rid of the annoyance. Let people search for what they want.
There's also the aspect where Tumblr has lost almost all its visual appeal due to the shitty blog view. It was a calm side drawer which allowed a quick overview, like this (left):


The central pop-up (right) is so messy and non-functional. Notice how the description and the first post are entirely cut off. You don't know where to look first, where to click, what to do.
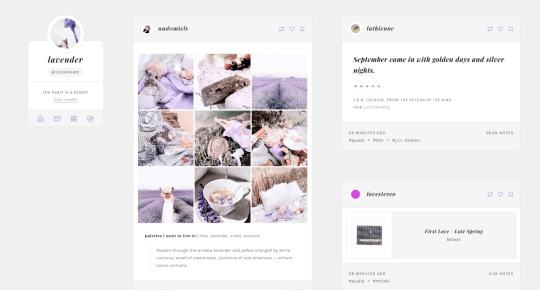
Alternatively, clicking on a blog was used to open a new tab. In 2017, people made use of their blog page filling the entire screen. They made elaborate and complex blog designs, bought templates and experimented with the HTML. Every blog was beautiful and showed the user's investment like a Carrd (left). They also counted on the entire internet reading their blog, not just Tumblr users. With the sign-up wall, this is no longer possible, so why bother? Now, everyone uses basic templates because nobody actually goes on people's full blog views anymore (right). The art of blog design has been lost. Gosh we had music players on there! Less artsy pages means cheaper memes and shitposts which means less quality art and less engagement with fanart, which makes Tumblr slowly become a text-only-based site that talks about nothing but its own function. It's as if Whatsapp users kept saying "Whatsapp is so shitty why are we still here" instead of messaging others, which is its use. A site's use must become an art or become invisible, but it can NEVER be the content of its own conversation.

6. "Build mechanisms to protect creators from being spammed by notifications when they go viral." Turn off notifications, done.
7. "Create patterns that encourage users to keep returning to Tumblr." I don't want to be spammed by e-mails. People will come when the site is amazing enough. It used to be (guess when. Guess). And it can be again. People need to be drawn to this site, not to be reminded that it exists. Tumblr has the potential to be fascinating.
8. "Improve performance, stability, and quality" Yes. But don't shove Tumblr Labs on us. We will come, attracted like mice, if something is good. THAT'S HOW TUMBLR WORKS.
Please think about what "letting the user control their experience" means.
Social media becomes an increasingly passive advertising game. The user has no control over their experience. The user must receive tools to create, not have their experience thrown at them by math. Users like to act intelligent, not to look at artificial intelligence.
TLDR: @staff If you went fully, 100% back to 2017 Tumblr, I would scream with joy. The crabs and frogs felt like that. That's why we liked them. Because it was harmless art. Fix the following things: Bot infestation, blog view should be sidebar not central, enable people to search for blogs again, don't hide replies, get rid of the sign-up wall and bring the more beautiful log-in page back. Additional: Get rid of Community Labels and Tumblr Live.
Tumblr’s Core Product Strategy
Here at Tumblr, we’ve been working hard on reorganizing how we work in a bid to gain more users. A larger user base means a more sustainable company, and means we get to stick around and do this thing with you all a bit longer. What follows is the strategy we're using to accomplish the goal of user growth. The @labs group has published a bit already, but this is bigger. We’re publishing it publicly for the first time, in an effort to work more transparently with all of you in the Tumblr community. This strategy provides guidance amid limited resources, allowing our teams to focus on specific key areas to ensure Tumblr’s future.
The Diagnosis
In order for Tumblr to grow, we need to fix the core experience that makes Tumblr a useful place for users. The underlying problem is that Tumblr is not easy to use. Historically, we have expected users to curate their feeds and lean into curating their experience. But this expectation introduces friction to the user experience and only serves a small portion of our audience.
Tumblr’s competitive advantage lies in its unique content and vibrant communities. As the forerunner of internet culture, Tumblr encompasses a wide range of interests, such as entertainment, art, gaming, fandom, fashion, and music. People come to Tumblr to immerse themselves in this culture, making it essential for us to ensure a seamless connection between people and content.
To guarantee Tumblr’s continued success, we’ve got to prioritize fostering that seamless connection between people and content. This involves attracting and retaining new users and creators, nurturing their growth, and encouraging frequent engagement with the platform.
Our Guiding Principles
To enhance Tumblr’s usability, we must address these core guiding principles.
Expand the ways new users can discover and sign up for Tumblr.
Provide high-quality content with every app launch.
Facilitate easier user participation in conversations.
Retain and grow our creator base.
Create patterns that encourage users to keep returning to Tumblr.
Improve the platform’s performance, stability, and quality.
Below is a deep dive into each of these principles.
Principle 1: Expand the ways new users can discover and sign up for Tumblr.
Tumblr has a “top of the funnel” issue in converting non-users into engaged logged-in users. We also have not invested in industry standard SEO practices to ensure a robust top of the funnel. The referral traffic that we do get from external sources is dispersed across different pages with inconsistent user experiences, which results in a missed opportunity to convert these users into regular Tumblr users. For example, users from search engines often land on pages within the blog network and blog view—where there isn’t much of a reason to sign up.
We need to experiment with logged-out tumblr.com to ensure we are capturing the highest potential conversion rate for visitors into sign-ups and log-ins. We might want to explore showing the potential future user the full breadth of content that Tumblr has to offer on our logged-out pages. We want people to be able to easily understand the potential behind Tumblr without having to navigate multiple tabs and pages to figure it out. Our current logged-out explore page does very little to help users understand “what is Tumblr.” which is a missed opportunity to get people excited about joining the site.
Actions & Next Steps
Improving Tumblr’s search engine optimization (SEO) practices to be in line with industry standards.
Experiment with logged out tumblr.com to achieve the highest conversion rate for sign-ups and log-ins, explore ways for visitors to “get” Tumblr and entice them to sign up.
Principle 2: Provide high-quality content with every app launch.
We need to ensure the highest quality user experience by presenting fresh and relevant content tailored to the user’s diverse interests during each session. If the user has a bad content experience, the fault lies with the product.
The default position should always be that the user does not know how to navigate the application. Additionally, we need to ensure that when people search for content related to their interests, it is easily accessible without any confusing limitations or unexpected roadblocks in their journey.
Being a 15-year-old brand is tough because the brand carries the baggage of a person’s preconceived impressions of Tumblr. On average, a user only sees 25 posts per session, so the first 25 posts have to convey the value of Tumblr: it is a vibrant community with lots of untapped potential. We never want to leave the user believing that Tumblr is a place that is stale and not relevant.
Actions & Next Steps
Deliver great content each time the app is opened.
Make it easier for users to understand where the vibrant communities on Tumblr are.
Improve our algorithmic ranking capabilities across all feeds.
Principle 3: Facilitate easier user participation in conversations.
Part of Tumblr’s charm lies in its capacity to showcase the evolution of conversations and the clever remarks found within reblog chains and replies. Engaging in these discussions should be enjoyable and effortless.
Unfortunately, the current way that conversations work on Tumblr across replies and reblogs is confusing for new users. The limitations around engaging with individual reblogs, replies only applying to the original post, and the inability to easily follow threaded conversations make it difficult for users to join the conversation.
Actions & Next Steps
Address the confusion within replies and reblogs.
Improve the conversational posting features around replies and reblogs.
Allow engagements on individual replies and reblogs.
Make it easier for users to follow the various conversation paths within a reblog thread.
Remove clutter in the conversation by collapsing reblog threads.
Explore the feasibility of removing duplicate reblogs within a user’s Following feed.
Principle 4: Retain and grow our creator base.
Creators are essential to the Tumblr community. However, we haven’t always had a consistent and coordinated effort around retaining, nurturing, and growing our creator base.
Being a new creator on Tumblr can be intimidating, with a high likelihood of leaving or disappointment upon sharing creations without receiving engagement or feedback. We need to ensure that we have the expected creator tools and foster the rewarding feedback loops that keep creators around and enable them to thrive.
The lack of feedback stems from the outdated decision to only show content from followed blogs on the main dashboard feed (“Following”), perpetuating a cycle where popular blogs continue to gain more visibility at the expense of helping new creators. To address this, we need to prioritize supporting and nurturing the growth of new creators on the platform.
It is also imperative that creators, like everyone on Tumblr, feel safe and in control of their experience. Whether it be an ask from the community or engagement on a post, being successful on Tumblr should never feel like a punishing experience.
Actions & Next Steps
Get creators’ new content in front of people who are interested in it.
Improve the feedback loop for creators, incentivizing them to continue posting.
Build mechanisms to protect creators from being spammed by notifications when they go viral.
Expand ways to co-create content, such as by adding the capability to embed Tumblr links in posts.
Principle 5: Create patterns that encourage users to keep returning to Tumblr.
Push notifications and emails are essential tools to increase user engagement, improve user retention, and facilitate content discovery. Our strategy of reaching out to you, the user, should be well-coordinated across product, commercial, and marketing teams.
Our messaging strategy needs to be personalized and adapt to a user’s shifting interests. Our messages should keep users in the know on the latest activity in their community, as well as keeping Tumblr top of mind as the place to go for witty takes and remixes of the latest shows and real-life events.
Most importantly, our messages should be thoughtful and should never come across as spammy.
Actions & Next Steps
Conduct an audit of our messaging strategy.
Address the issue of notifications getting too noisy; throttle, collapse or mute notifications where necessary.
Identify opportunities for personalization within our email messages.
Test what the right daily push notification limit is.
Send emails when a user has push notifications switched off.
Principle 6: Performance, stability and quality.
The stability and performance of our mobile apps have declined. There is a large backlog of production issues, with more bugs created than resolved over the last 300 days. If this continues, roughly one new unresolved production issue will be created every two days. Apps and backend systems that work well and don't crash are the foundation of a great Tumblr experience. Improving performance, stability, and quality will help us achieve sustainable operations for Tumblr.
Improve performance and stability: deliver crash-free, responsive, and fast-loading apps on Android, iOS, and web.
Improve quality: deliver the highest quality Tumblr experience to our users.
Move faster: provide APIs and services to unblock core product initiatives and launch new features coming out of Labs.
Conclusion
Our mission has always been to empower the world’s creators. We are wholly committed to ensuring Tumblr evolves in a way that supports our current users while improving areas that attract new creators, artists, and users. You deserve a digital home that works for you. You deserve the best tools and features to connect with your communities on a platform that prioritizes the easy discoverability of high-quality content. This is an invigorating time for Tumblr, and we couldn’t be more excited about our current strategy.
#tumblr#why did I write such a long comment why did I feel compelled to do that#because I freaking miss 2017 tumblr#I forgot how much this was a quality art site and not a shitty meme site#wherethekitethought#staff#tumblr staff#engineering#core product strategy
65K notes
·
View notes