#canva + poster effect
Explore tagged Tumblr posts
Text
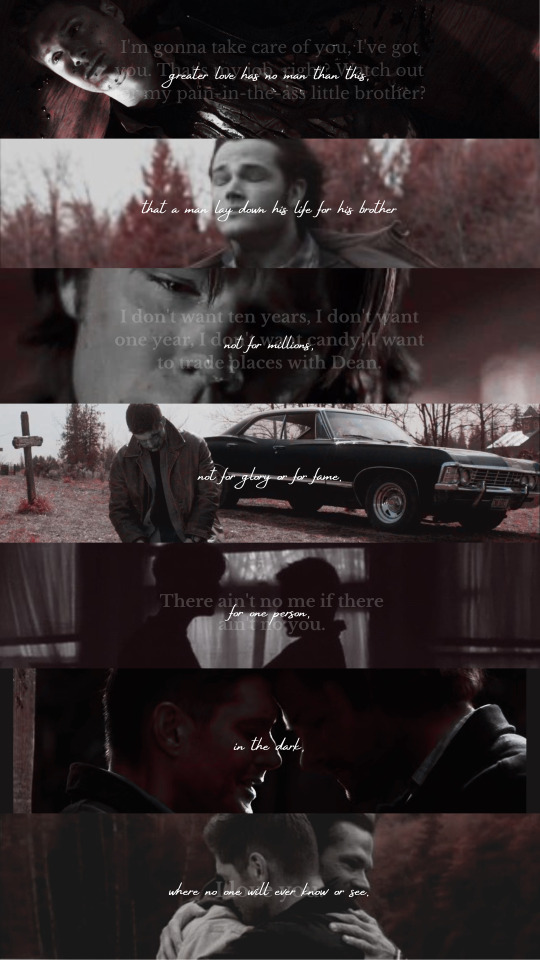
Jerk. Bitch.
Supernatural edit
| straczynski quote x supernatural quotes |
3x16 - No Rest For The Wicked 5x22 - Swan Song 1x1 - Pilot 15x20 - Carry On
#supernatural edit#supernatural#sam winchester#dean winchester#quotes#supernatural edit greater love#supernatural edit brothers#sam and dean#winchester boys#J. Michael Straczynski#quote#canva + poster effect#no rest for the wicked#swan song#pilot#carry on#spn 3x16#spn 5x22#spn 1x1#spn 15x20
47 notes
·
View notes
Note
Hello! I was wondering what company you use for your sticker sheets? I bough one from your Ko-Fi shop and really like the quality, and the pricing you were able to sell at is waaaaaay more reasonable compared to any of the companies I've seen and used myself. Is it a POD company, or a mass purchase of them to sell on your own?
Thank you for your time if you're able to respond!
I'm really glad you like the quality, because I actually make them by hand at home! (Please forgive the lighting, my bedroom is my office lmao.)
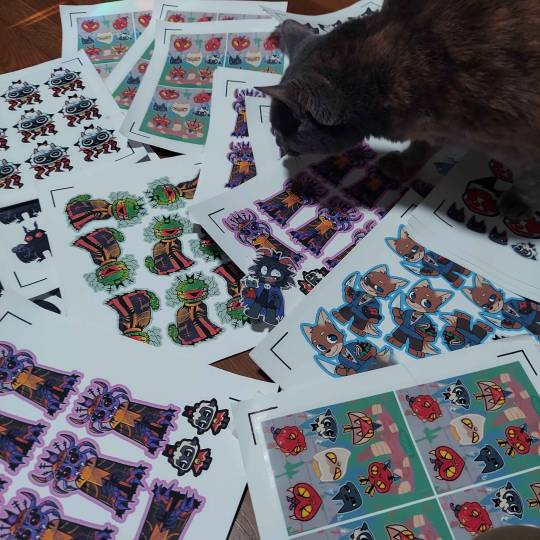
I don't use a company (and Idk what a POD company is sorry!) but making them at home gives a lot more freedom of stock, just be wary it can be very time consuming depending on how many you need to make.
I've had other people ask before, so here's a rundown of how I make my stickers at home: At most you'll need:
Printer
Sticker paper (this is the type that I use)
Laminator and lamination paper (the lamination paper that I use.) You can also use adhesive non-heat lamination paper if you don't have a laminator, gives you the same result, just be careful of bubbles. You will get double your worth out of a pack because we are splitting the pouches to cover two sticker sheets.
Your choice of a sticker cutting machine or just using scissors.
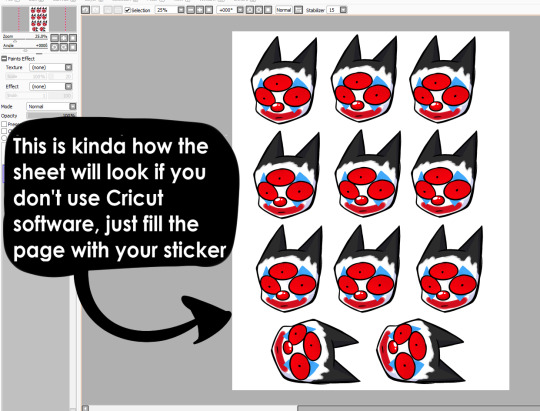
First, I use Cricut's software to print out the sticker sheet with the guidelines around the corners so the machine can read it. If you do NOT have a Cricut machine, open up your art program, make a canvas of 2550x3300 and fill it up with your sticker design with some cutting space between them. This the 8.5x11 size for the sticker page.
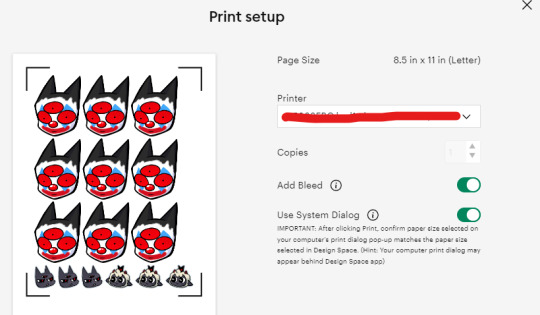
I usually have bleed selected so the cut comes out cleaner. Tip for non-Cricut users below: Increase the border around your sticker design to fake the 'bleed' effect for a cleaner cut.
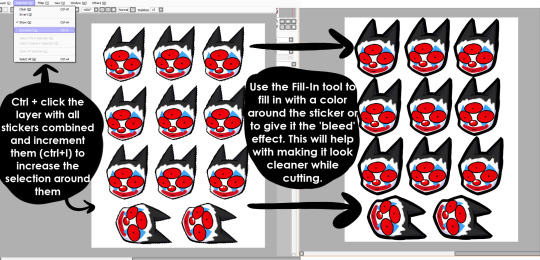
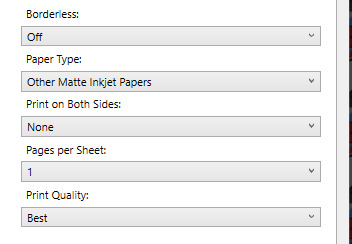
These are the print settings I use for my printer. I use the 'use system dialogue' to make sure I can adjust the settings otherwise it prints out low quality by default. Make sure if you're using the above paper that you have 'matte' selected, and 'best quality' selected, these aren't usually selected by default.
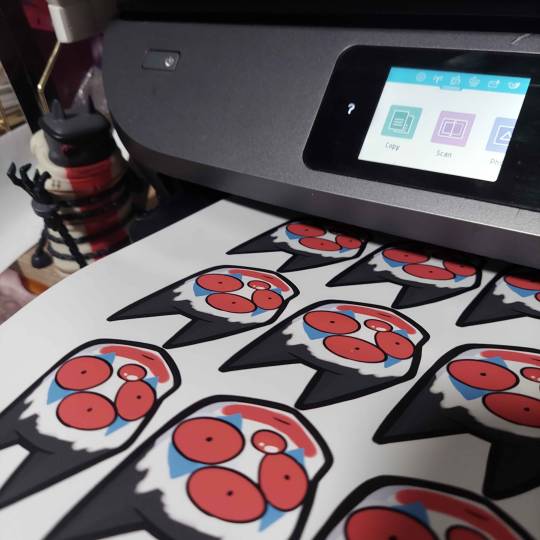
So you have your sticker sheet printed! Next is the lamination part. I use a hot laminator that was gifted to me, but there is no-heat types of lamination you can peel and stick on yourself if that's not an option.
(This is for protection and makes the colors pop, but if you prefer your stickers matte, you can skip to the cutting process.)
Important for Cricut users or those planning to get a Cricut: You're going to cut the lamination page to cover the stickers while also not covering the guidelines in the corners. First, take your lamination page and lay it over the sheet, take marker/pen and mark were the edges of your stickers are, and cut off the excess:
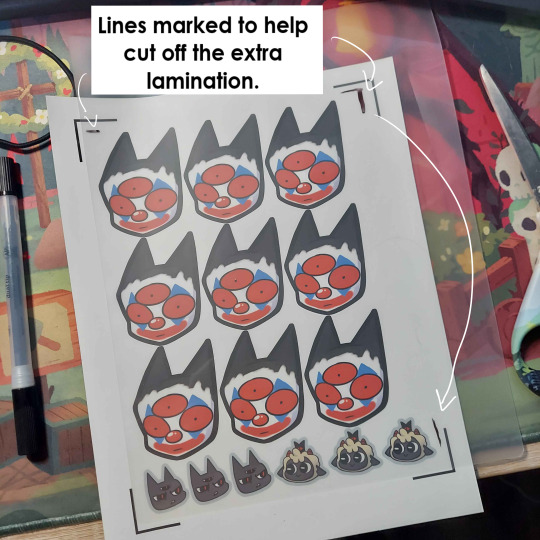
(I save the scrap to use for smaller stickers or bonuses later on)
After you've cut out your lamination rectangle, separate the two layers and lay one down on your sticker sheet over your stickers with matte side down, shiny side up. (Save the other sheet for another sticker page)
The gloss of the lamination will prevent the machine from reading the guidelines, so be careful not to lay it over them. It also helps to cut the corners afterwards to prevent accidentally interfering with the guidelines.
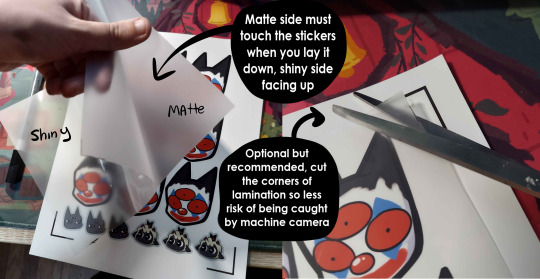
Now put that bad boy in the laminator! (Or self seal if you are using non-heat adhesive lamination)
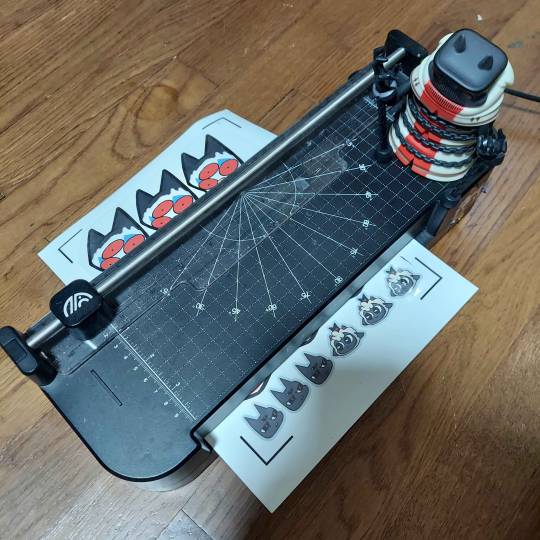
Congrats! You now have a laminated page full of stickers.
For non-cricut/folks cutting them out by hand: this is the part where you start going ham on the page with scisscors. Have fun~
Cutting machine: I put the page on a cutting mat and keep it aligned in the corner, and feed it into the machine. For laminated pages I go between 'cardstock' and 'poster board' so that it cuts all the way through without any issues, but for non-laminated pages or thinner pages, I stick for 'vinyl' and 'light card stock'. Kinda test around.
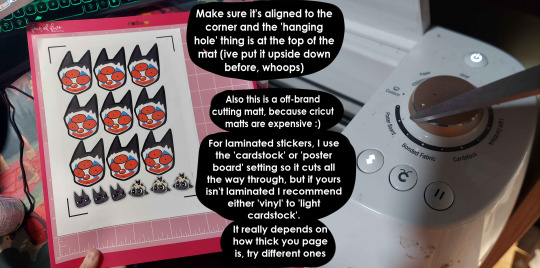
Now I smash that go button:

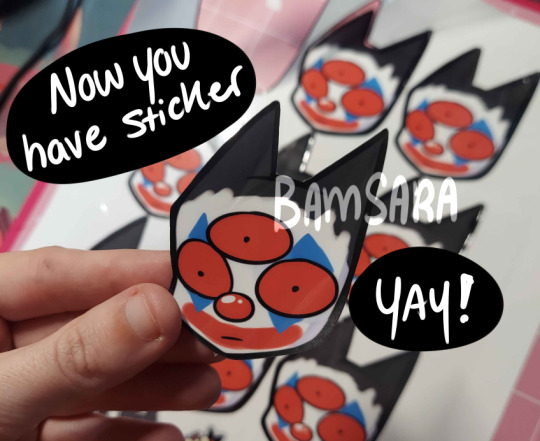
You have a sticker now!
The pros of making stickers at home is that you save some cost, and you have more control of your stock and how soon you can make new designs. (I can't really afford to factory produce my stickers anyway)
However, this can be a very time consuming, tedious process especially if you have to make a lot of them. There is also a LOT chance for some errors (misprints, miscuts, lamination bubbles, ect) that will leave you with B-grade or otherwise not-so-perfect or damaged stickers. (Little note, if you have page mess up in printing and can't be fed into the cricut machine, you can still laminate it and cut it out by hand too.)
I have to do a lot of sticker cutting by hand, so if you don't have a cricut don't stress too much about it. I have an entire drawer filled to the top of miscuts/misprints. I keep them because I don't want to be wasteful, so maybe one day they'll find another home. Sucks for my hand though.
But yeah! This is how I make my stickers at home! Hope this is helpful to anyone curious
1K notes
·
View notes
Text
Hey Look At This Comic: The Property of Hate
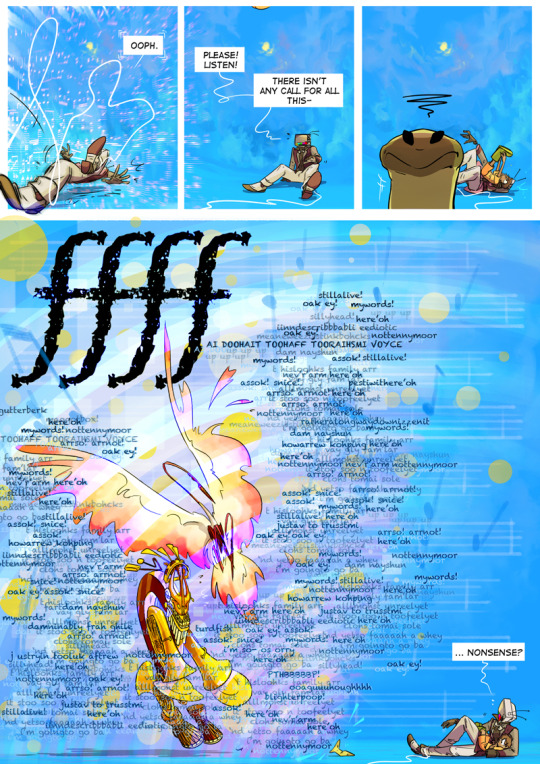
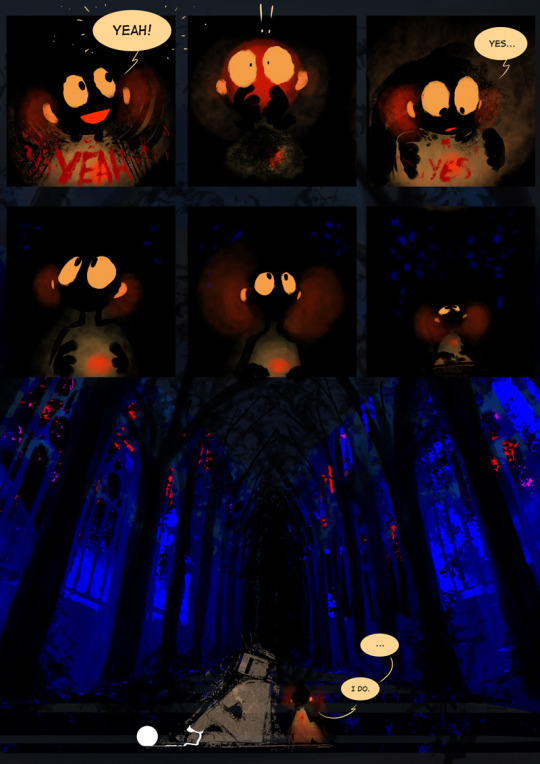
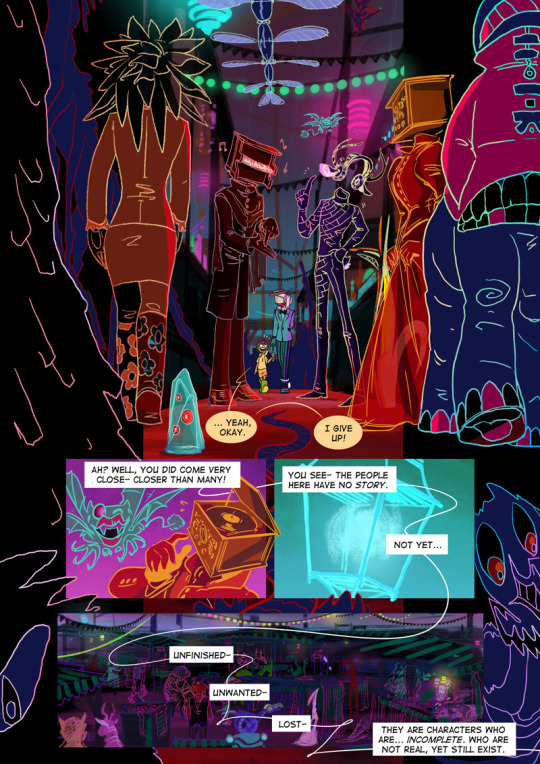
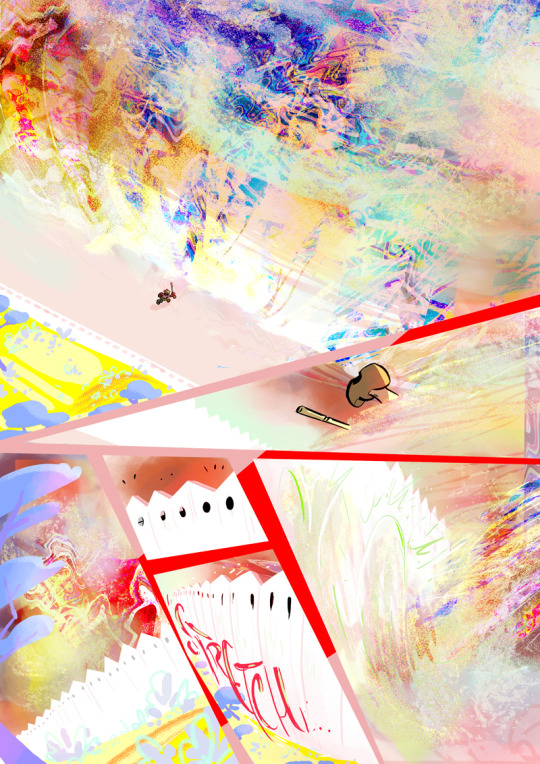
I don't know if any form of comics is as love with wild digital experimentation as webcomics. while even indie print comics often feel like they're opting for a more traditional and coherent look, webcomics feel like the place to be if you want people furiously twiddling the knobs and dials to see how far the machine can be pushed aesthetically. a lot of the boldest and most beautiful hypercomic experiments along these lines--stuff like NAWLZ and A Lesson Is Learned But The Damage Is Irreversible--probably aren't anything like household names anymore, but it feels like that spirit is alive and well in contemporary webcomics.
like just take a gander at the above pages from The Property of Hate. what an incredible, juicy abundance of style! this is a comic that's not afraid to get messy with layers of effects, even to the point of sometimes being kind of hard to visually parse. this is a digital comic writ large. actually, it feels like it's doing stuff that other comics these days eschew, stuff that was more a staple of--and probably is somewhat negatively associated with--early, rough, photoshop heavy webcomics. (the fact that the Property of Hate started, I guess, in 2012 probably has something to do with both this stylistic tendency, and its love of guys in suits with objects for heads.) like, look at that layering of semitransparent text elements in the first page above. look how hard it's going on the different layer styles all mashed over one another. it's full on reveling in this look, and the effect is a lot of fun, really conveying the idea of "this little sock puppet creature, Assok, just bellowed out a wall of prerecorded sounds".
of course, it helps that the actual cartooning and paneling here is a delight:
I love the touch of having RGB, the tv object head tumblr sexyman there, extend slightly out of frame in that first panel. it does a great job of establishing the "camera" and its exaggerated perspective for the sequence of three panels, setting up the gag of having the Hero fall on RGB in the background while in the foreground Assok's head pops up (and what a great expression lol). this sequence in turn acts as the setup to the big structural break that is the bottom of the page and its wall of noise, Assok comically small at the bottom. good stuff!
that second page, a sequence in which the Hero and RGB navigate the darkness under trees under sea by... sound essence I guess? is more painterly but also has some gorgeous digital art touches. I love the way RGB's body is a grey staticky cutout that looks like a uniform texture painted onto the canvas. the whole page is so lush, especially for something so defined by a very simplified set of brush strokes sitting on deep areas of black.
and then there's this third page, crowded with neon-outlined object head guys. this style does a great job of capturing the concept of a whole city of characters who haven't reached completeness and departed for their individual works of fiction or art--outlines waiting to be filled. the color palette of this location is delightful cause it feels like a black light poster or gel pen drawn on a black backpack. and it's got that mark, again, of digital production: scope out how those outlines have clearly been drawn first then covered in glowing gradients. this is the kind of technique that breaks with the vogue for digital inking and painting emulating physical media.
that's nothing compared to the incredible rushing storm on that last page and its bedlam of filters and blending styles. fitting for a storm that threatens to erase the main characters, the page is almost unintelligibly dense with effects and textures. it's almost a bit... too much? the comic can sometimes be a bit obscurationist in both style and narrative. after reading through it all recently, I wound up skimming back through in search of pages to talk about here and found that things were clicking a LOT better for me after getting some very necessary lore dumps later in the story. nevertheless, I can't help but look at a page like this and feel kinda thrilled! it really feels like Sarah Jolley is constantly looking ways to swing for the fences with the aesthetic of the story.
the cool thing about webcomics is, you can just do that and no one can tell you not to layer on as many filters as you want!
pages from:
this post originally ran on Cohost on June 3, 2024. you can read more reviews in the Hey Look At This Comic tag and support me on Patreon.
#Hey Look At This Comic#the property of hate#webcomics#comics#webcomic recommendations#comic recommendations#comic review
73 notes
·
View notes
Note
hello! I love your edits and I wanted to know, for the "Steve Robin and Nancy" Gif you posted.. How would I go about doing something like that? More specificly, the bottom two where it says "Height Difference" and where it labels them as "Princess, Jock and Loser"
Thank you! Sorry this took a while to answer. I finally had time to sit down and write this. Link to original post.
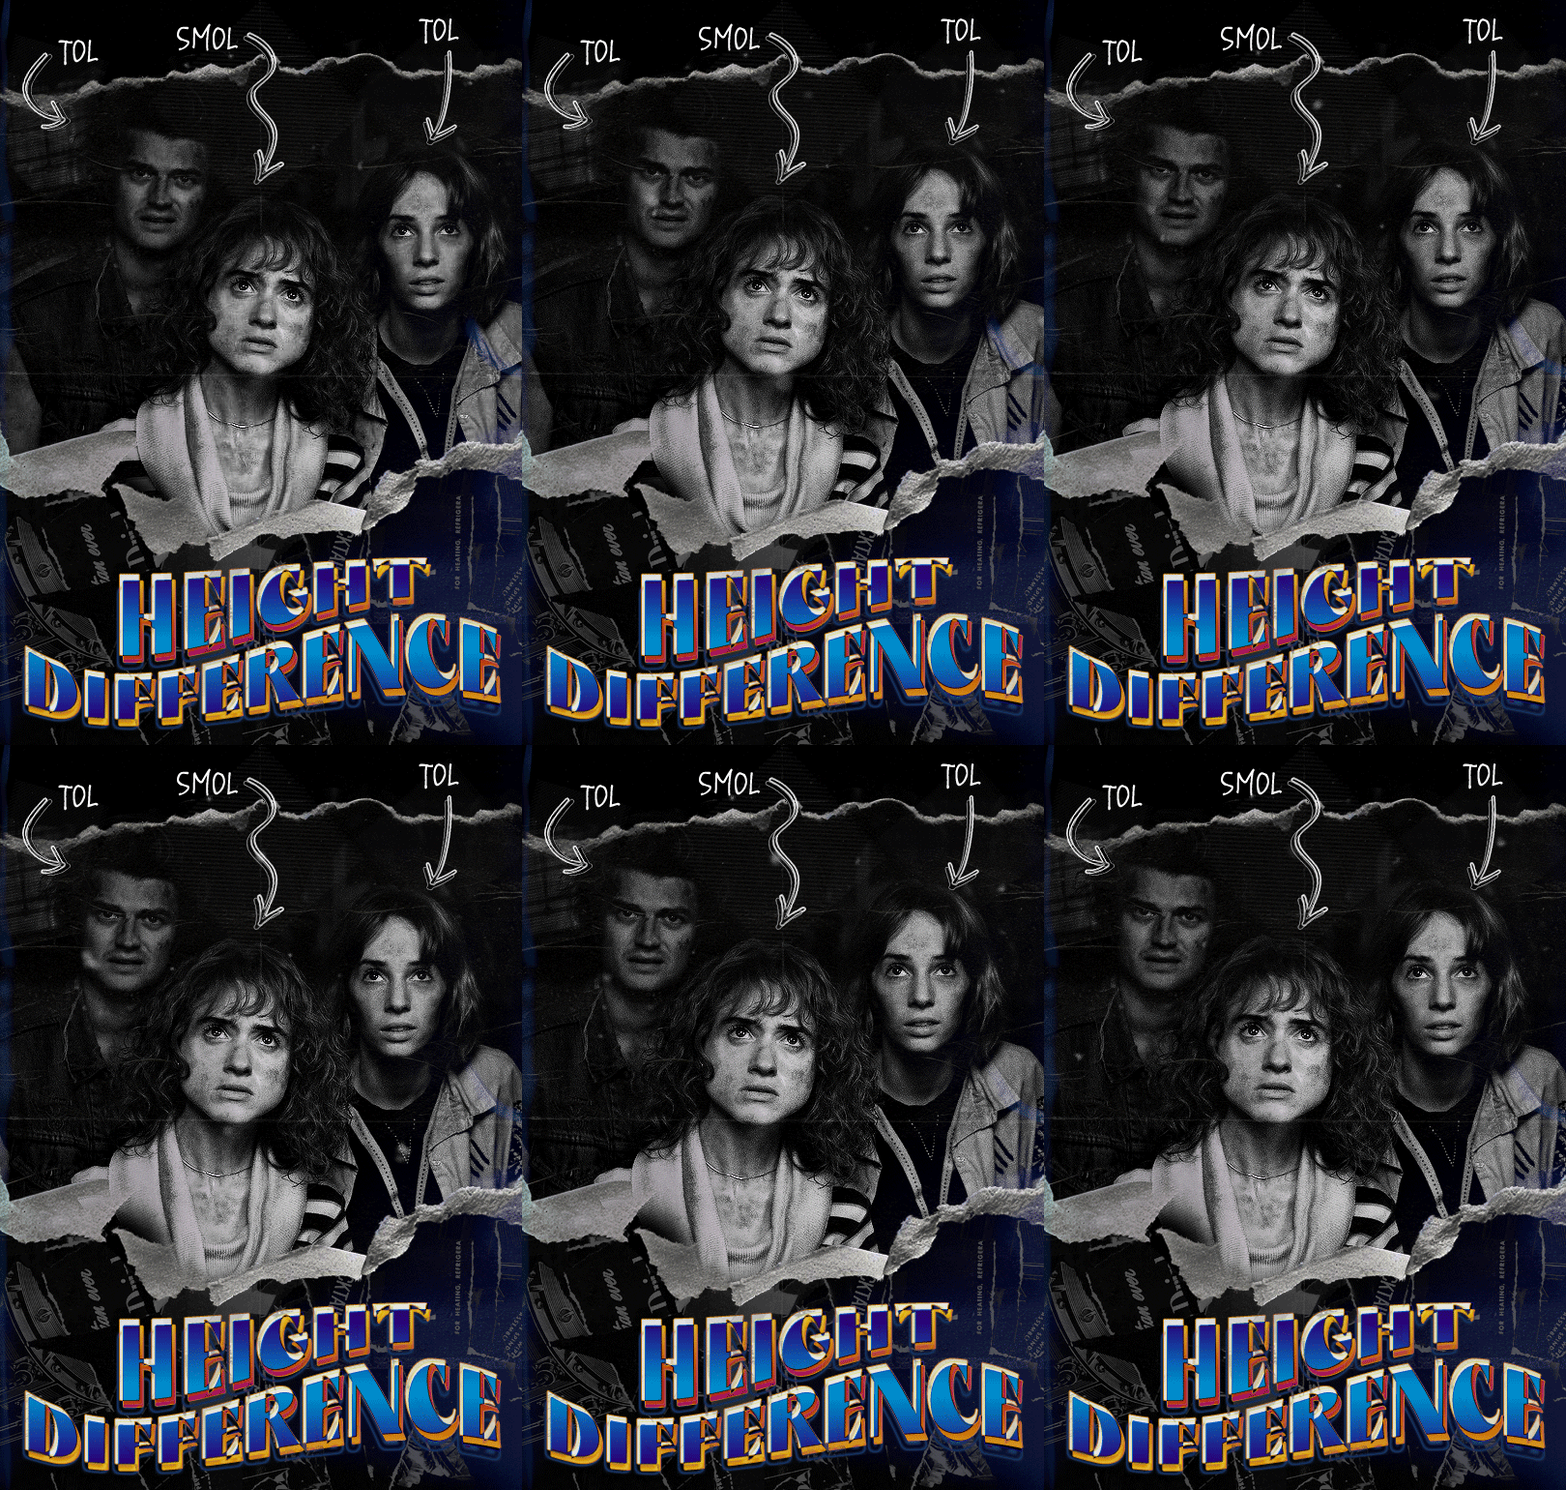

Quick notes: I'm using Photoshop 2021 on Mac and working in video timeline. Must have basic gifmaking skills and know how to use layer masks. This is primarily a gif layout and text tutorial.
Fonts used in first gif:
Pea Wolfe Tracks — link here
King & Queen — link here
Fonts used in second gif:
Kiera — link here
Post — link here
Ellianarelle's Path — link here
Heina's hurry — link here
I used a light leaks/film texture, ripped paper textures, folded paper textures, and transparent pngs (arrows + post-it notes + smiley face).
We'll start with this gif.

Make your gif! The gif here is 540x600px. I color and sharpen it to my liking. Go to image > canvas size > change height from 600 to 770px. I left the anchor in the middle, though it doesn't really matter.
I drag and drop my folded paper texture and change the layer order so it's under my gif. Then I change the blending mode on my gif to Screen so the texture shows through the gif, but I keep the texture at 100% Opacity and Fill.
Now I move my gif around and add my ripped paper textures. I wanted to give it a sort of poster-like feel to it, so I made more room on the bottom for my main text and ended up with something like this. Blending mode is set to Lighten for the ripped paper textures.
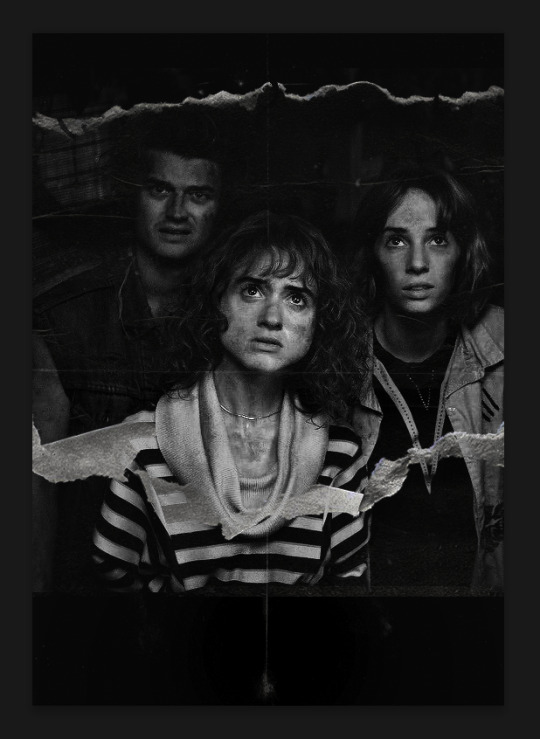
I then use layer masks to hide what I don't want shown and add my light leaks/film texture. Blending mode on light leaks/film texture set to Pin Light, Opacity: 50%, Fill: 70%.
I use Levels and Brightness/Contrast adjustment layers to darken the gif up a bit more, then I add a patterned paper texture. Blending mode for patterned paper texture set to Lighten, Opacity: 100%, Fill: 75%. Result:
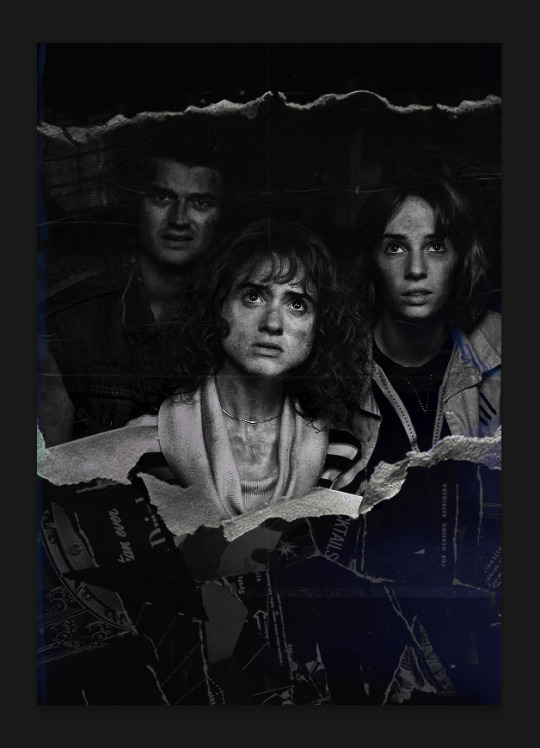
Now on to the text!
I'm going to be honest here, a lot of this was clicking around until I settled on something I liked. There's three layers to create this text effect. The font used here is King & Queen.
For the first text layer, the font color is set to black (#000000), font size: 87 pt, leading: 80 pt, tracking: 25.
Layer styles used here are stroke and drop shadow.
Text Layer 1
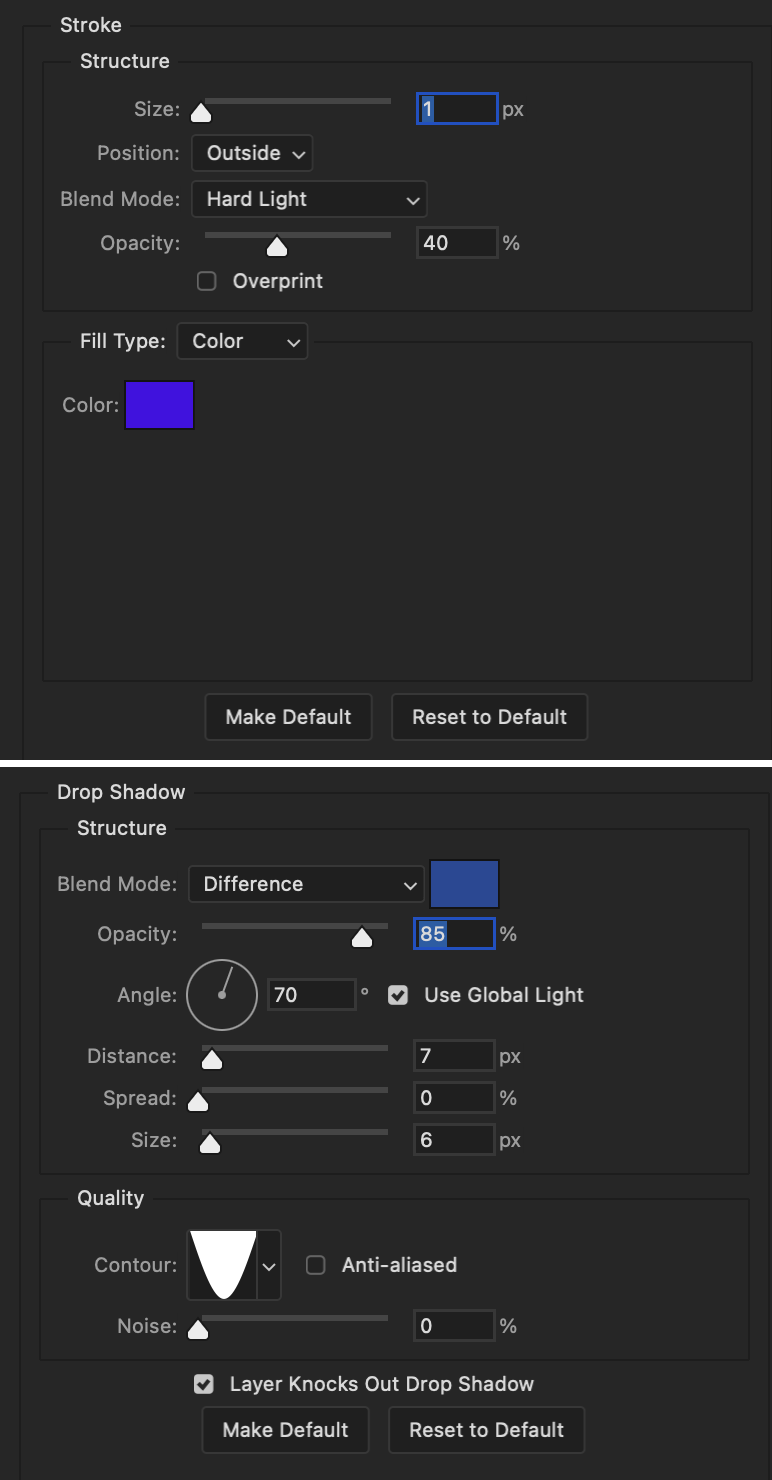
Stroke settings:
Size: 1px
Position: Outside
Blend Mode: Hard Light
Opacity: 40%
Overprint: unchecked
Fill Type: Color
Color: #5911ed
Drop Shadow settings:
Blend Mode: Difference
Color: #2d5ba8
Opacity: 85%
Angle: 70°
Use Global Light: checked
Distance: 7px
Spread: 0%
Size: 6px
Contour: Cone - Inverted
Anti-aliased: unchecked
Noise: 0%
Layer Knocks Out Drop Shadow: checked
Blending mode for text layer set to Overlay, Opacity: 100%, Fill: 85%.
Warp text settings:
Style: Wave
Horizontal: checked
Bend: +60%
Horizontal Distortion: +10%
Vertical Distortion: 0%
With all those settings applied, the first text layer looks like this:
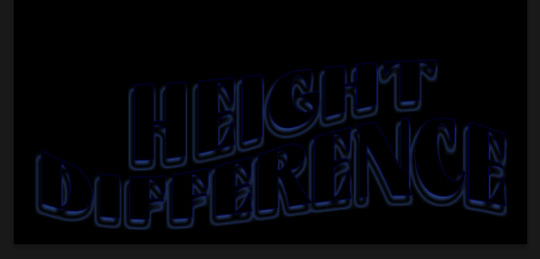
Duplicate the layer, clear all layer styles, and change the color for the second text layer to white (#ffffff). All other text settings (including warp settings) should stay the same. The only layer style then applied to this text layer is stroke.
Text Layer 2
Stroke settings:
Size: 1px
Position: Outside
Blend Mode: Difference
Opacity: 100%
Overprint: unchecked
Fill Type: Color
Color: #d48f16

Blending mode for the second text layer is set to Difference, Opacity: 90%, Fill: 100%. Nudge the second text layer a bit so the first text layer is a little more visible or move to your liking.
With both those layers active, it looks like this:
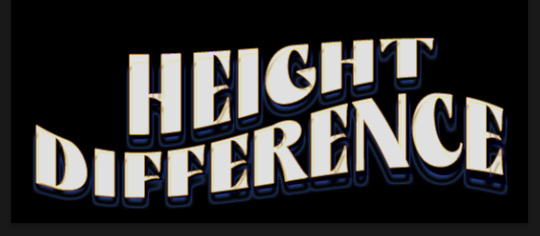
Duplicate the second text layer, clear layer styles, and change the color of this third text layer to a dark grey (#1a1919). Again, all other text (and warp) settings should stay the same.
Layer styles applied to this layer are stroke and gradient overlay.
Text Layer 3
Stroke settings:
Size: 1px
Position: Outside
Blend Mode: Difference
Opacity: 100%
Overprint: unchecked
Fill Type: Color
Color: #d48f16
Gradient Overlay settings:
Blend Mode: Difference
Dither: unchecked
Opacity: 100%
Gradient: #cd3f00 > #ffdb5d
Reverse: unchecked
Style: Reflected
Align with Layer: checked
Angle: 90°
Scale: 100%

Blending mode for the third text layer set to Exclusion, Opacity: 100%, Fill: 100%. I also moved the third text layer around, down and to the right a few pixels to give it that 3-D Word Art effect.
With all three text layers active:
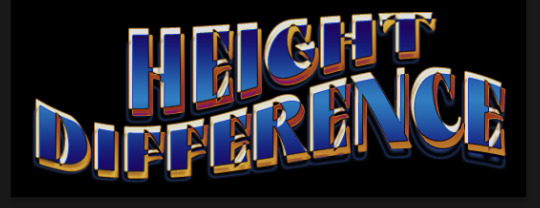
Next are the arrows.
Take your transparent pngs and place them to your liking. Blending mode for these is set to Difference, Opacity: 100%, Fill: 100%.
Command + click on an arrow thumbnail to select all the pixels in that layer. This is why the image must be transparent!
With that selection made and on a new blank layer, right click the selection and click on stroke. Settings for that are width: 2px, color: white, location: center. Move that a couple of pixels over.
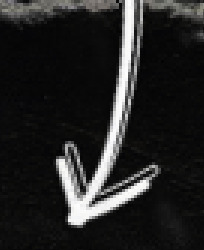
Do this for all arrows for a total of 6 layers for arrows. I group them together to keep my workspace clean, then I duplicate my arrows group with no further changes made to the second group to get what you see in the final gif.
Next is the smaller text. It's three separate text layers for each word, so I can move each of them around to my liking.
Font used is Pea Wolfe Tracks, font color: white (#ffffff), font size: 24 pt, leading: 6 pt, tracking: 25. Bold and italic options checked. I set the blending mode to Difference, Opacity: 100%, Fill: 100%.
And that's it! That concludes the tutorial for this gif!
Now on to this gif.

We'll start with the background gif. There are three separate gifs. You could make them one gif, but I wanted the option to order them differently if I needed to.
All gifs in the background are the size of the canvas: 540x770px. Color and sharpen to your liking, but keep them all black and white. To get the blurry effect go to filter > blur > guassian blur. Set radius to 7.0 pixels. Add this to all three gifs.
Then I add two folded paper textures. Blending mode for one set to Lighten, Opacity: 60%, Fill: 100%. The other set to Screen, Opacity: 70%, Fill: 90%.
I found this tutorial a while back for a halftone effect. They include links to the halftone pattern used here as well as textures and gradient maps not used here.
I'm only using the halftone pattern here.
Pattern fill settings:
Angle: 66°
Scale: 8%
Link with Layer: checked
I also added a gradient overlay layer style to the halftone pattern which gives the gifs the color you see above.
Gradient Overlay settings:
Blend Mode: Overlay
Dither: unchecked
Opacity: 100%
Gradient: #0059ac > #a33600 > #e6b801
Reverse: unchecked
Style: Linear
Align with Layer: checked
Angle: -100°
Scale: 100%
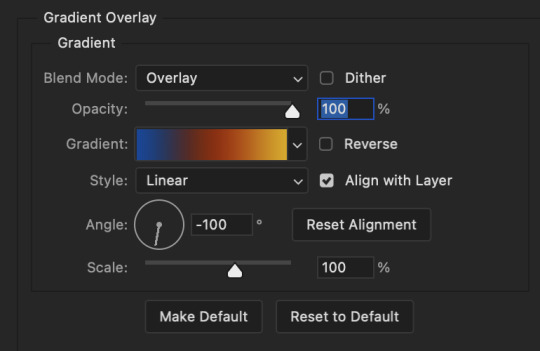
Now on to the square shapes with rounded corners. In the interest of keeping this tutorial short(er), I found this tutorial on youtube that explains how to make squares with rounded corners.
I set my stroke size to 6px, stroke color to white (#ffffff), and fill to no color. I don't use the stroke layer style to make the borders of the shape like in the video! I'm only linking the video to show how to curve corners with square shapes.
Note: Be sure you know how big or small you want these to be and how they're going to fit on your canvas in order to make all the shapes and edit them. It can be tedious to change the settings.
Duplicate and resize to your liking.
In this instance, I wanted to make three squares total, so I had to duplicate twice and resize until I had something I liked.
Settings for the shapes used here are:
Innermost shape: W: 200px, H: 280px, corners: 50px
Middle shape: W: 220px, H: 300px, corners: 60px
Outer shape: W: 240px, H: 320px, corners: 70px
Once I have the size I want for all three shapes, I group them together to make a set and duplicate that group twice, then adjust each set on the canvas for my layout.
What the sets look like all together:
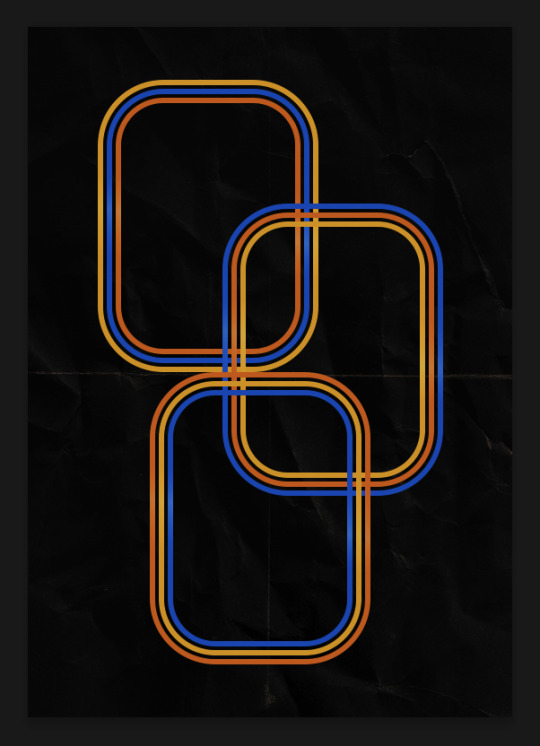
Colors used: orange #e47100, blue #0062d1, yellow #ecac00
To add color to the shapes, either change the color of the shape itself or use layer styles. I used layer styles.
Note: I didn't add the colors until the end after I knew what gifs went where and what color scheme I wanted, but I don't want to add more images than I need to here.
To keep this short, I found this tutorial on youtube that explains how to wrap text around a shape. However, I wanted the text to align on the outside where the white line is and not the green line (left image):
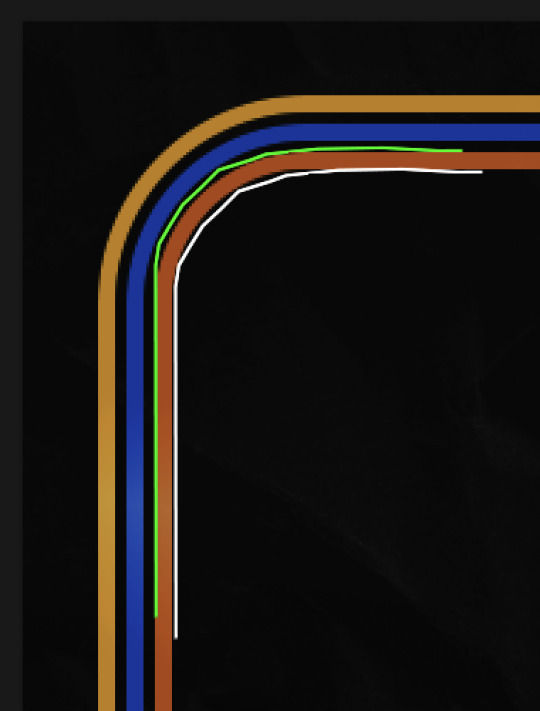
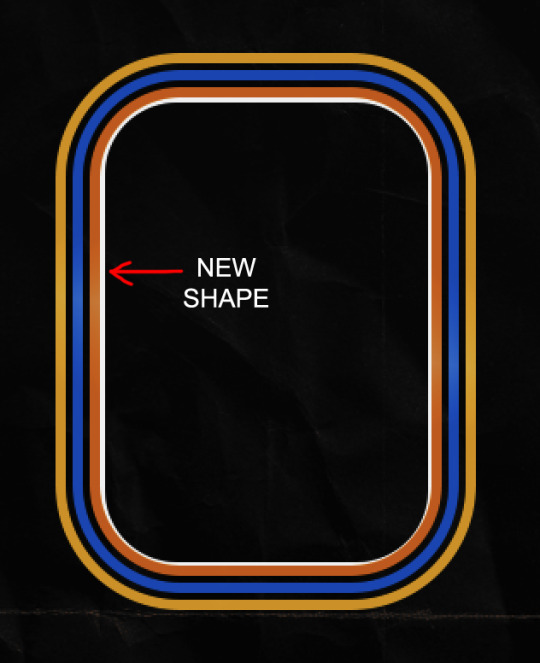
So I created another shape just inside the innermost square and used that as a path for my text (right image). Adjust the text to your liking until you have your text where you want it. Refer to the video tutorial if you need help moving the text along the path!
You don't need the shape path once you have your text where you want it, so use the layer visibility tool to hide it. You can hide your other shapes too so you can work with your text.
Do not delete your shape path!
I duplicate it once I start working with my "jock" text since all the sets are the same size. The "loser" text has to be worked a little differently, but we'll get to that later.
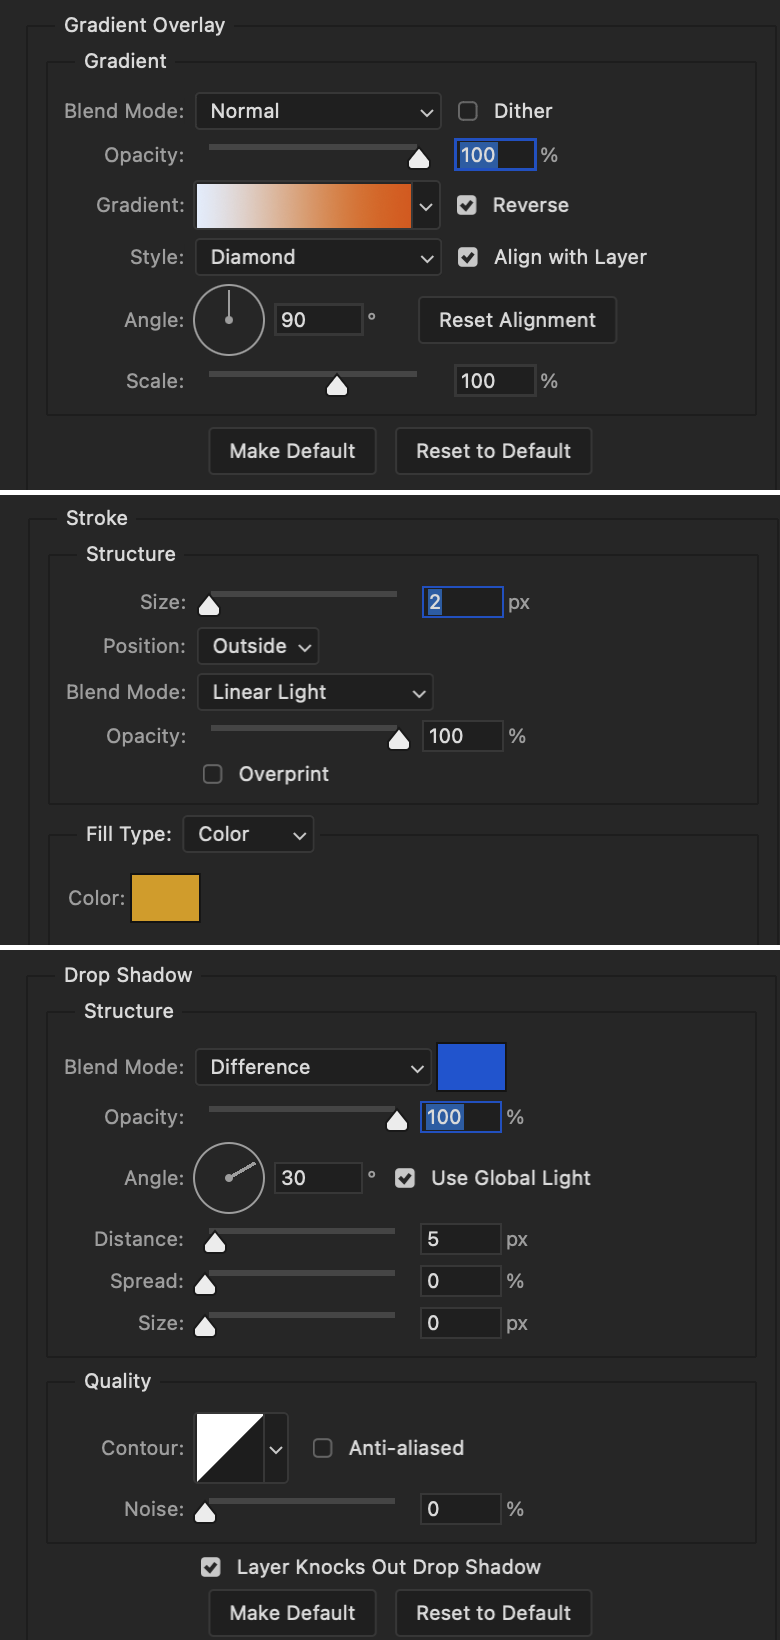
For the princess, jock, and loser text, there are two text layers to create the overall effect. For both layers, font used is Kiera, font color set to white (#ffffff), font size: 60 pt, blending mode set to Normal.
I added a gradient overlay layer style to the first text layer which I'll call the base layer. Opacity for this layer is 100%, Fill: 100%.
Base Layer
Gradient Overlay settings:
Blend Mode: Normal
Dither: unchecked
Opacity: 100%
Gradient: #f0b002 > #e7f0fd
Reverse: checked
Style: Diamond
Align with Layer: checked
Angle: 90°
Scale: 100%
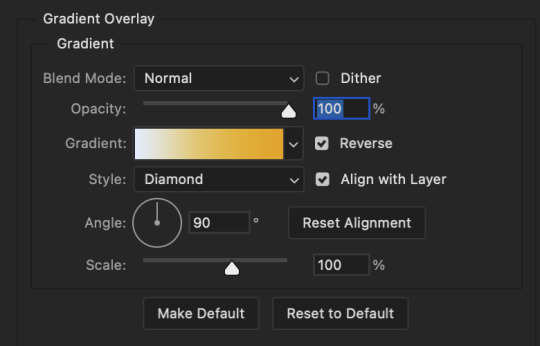
The second text layer is your stroke and drop shadow layer. For this layer, opacity is set to 100%, Fill: 0%.
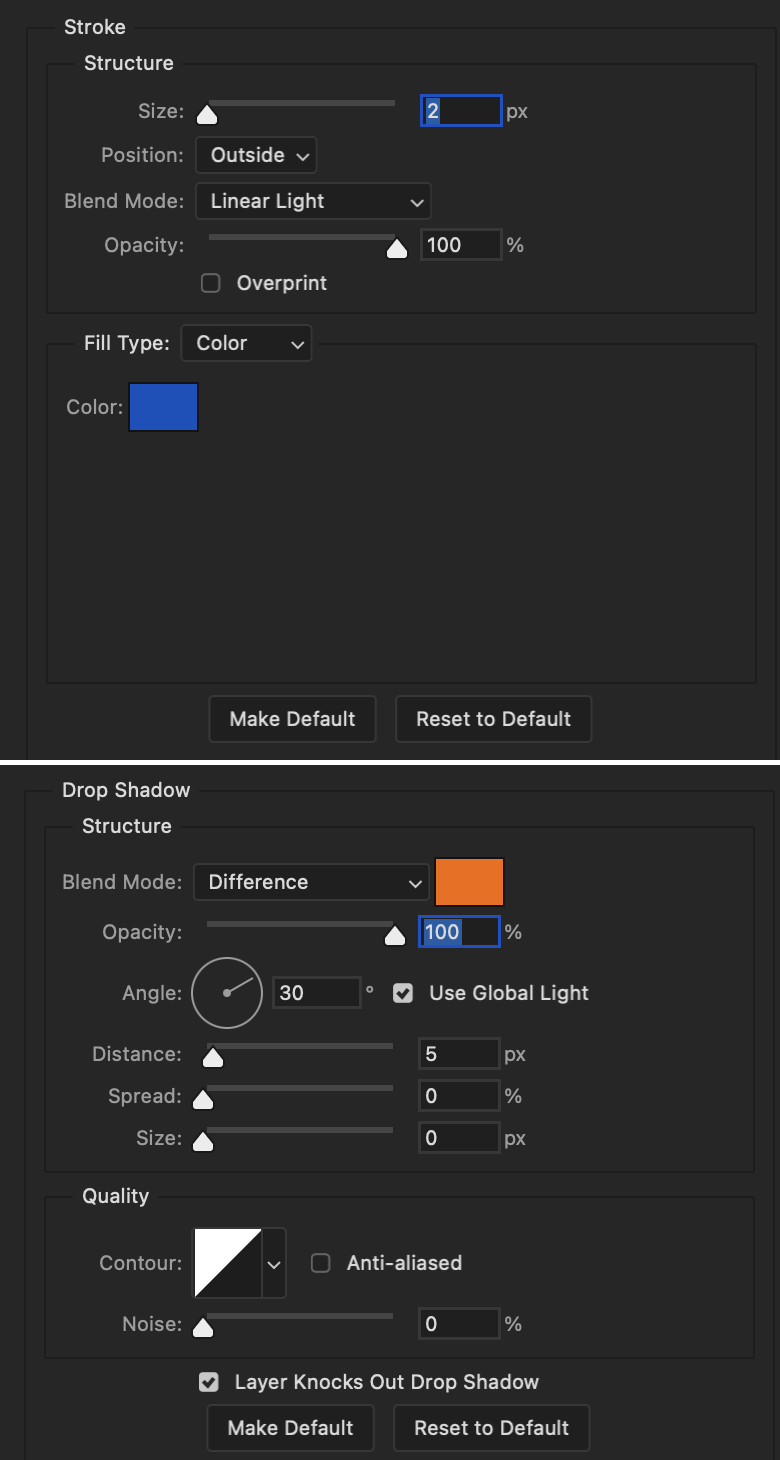
Stroke and Drop Shadow Layer
Stroke settings:
Size: 2px
Position: Outside
Blend Mode: Linear Light
Opacity: 100%
Overprint: unchecked
Fill Type: Color
Color: #0064cb
Drop Shadow settings:
Blend Mode: Difference
Color: #fb7c00
Opacity: 100%
Angle: 30°
Use Global Light: checked
Distance: 5px
Spread: 0%
Size: 0px
Contour: Linear
Anti-aliased: unchecked
Noise: 0%
Layer Knocks Out Drop Shadow: checked
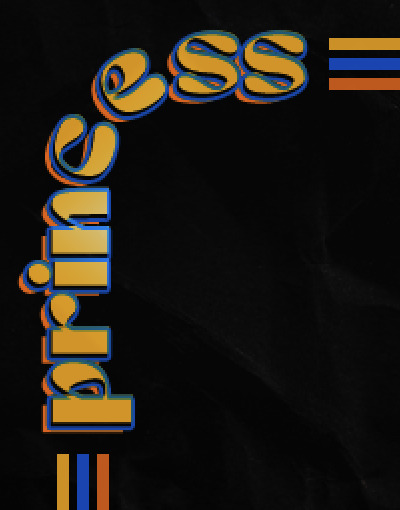
End result looks like this:

When I make my shapes visible again (minus the one I used as a path), I get this:
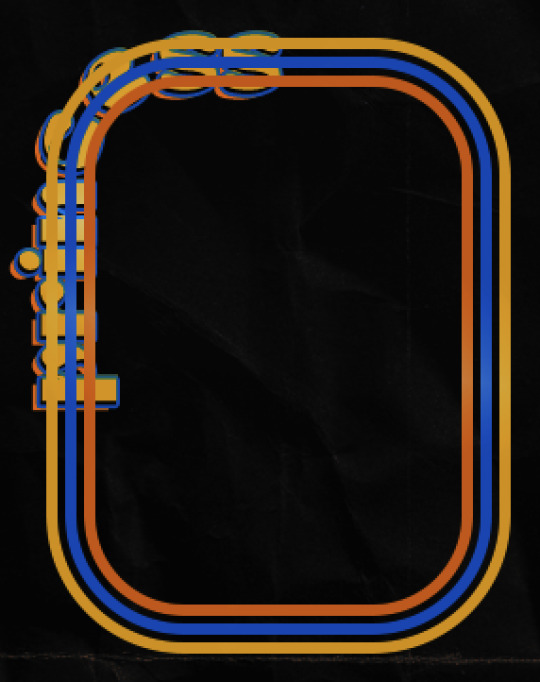
The shapes are clearly in the way of the text, whether they're above my shapes layer or under it. I use layer masks to hide what I want, so the text is legible. It looks cleaner this way and I wanted the text to be a part of the shape itself. I do that for each rounded square.
Now on to my smaller gifs. I like to crop, resize, sharpen, and color separately because my laptop and Photoshop would kill me if I tried to do it all on one canvas. I use the size of the middle shape for my gifs (220x300px), so I can have a little wiggle room when adjusting. I then use a layer mask to hide the parts of the gif that are outside of the shape.
A quick way to do this is to command + click on the thumbnail of the innermost square. With that selection made, I got to my gif layer and add a layer mask. Sometimes you need to invert it. Use command + i with the layer mask selected (not the gif) to invert the layer mask.
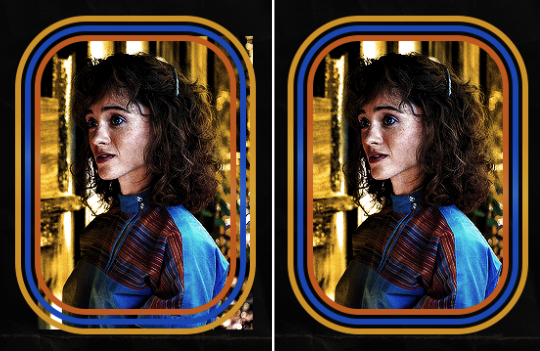
I repeat this process with my Steve and Robin gifs. I have to go back and forth with all the layer masks to hide parts of the gif/shapes I don't want for each set. It's kind of a long process, but not all that difficult. I label and group my layers together as I work to keep things clean and it helps me keep track of what I edited and what needs to be edited when it comes to things like this.
The picture below shows where I hid the bottom right corner of Nancy as well as the shapes that make up her set using layer masks. I also did this with the Steve and Robin sets, hiding the bottom left corner of Steve.
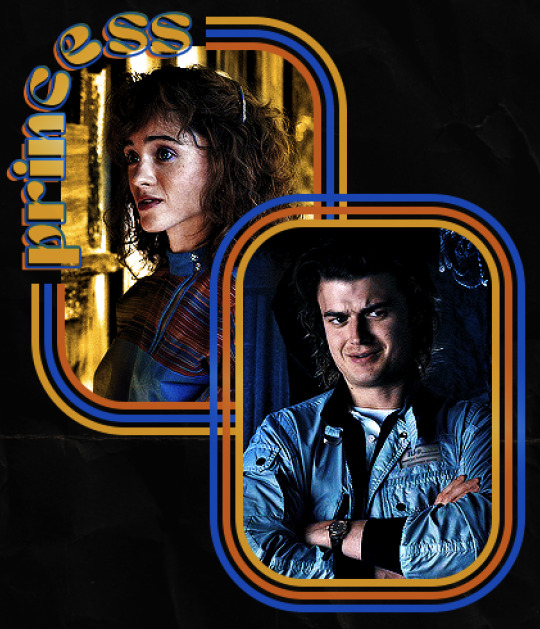

Similar text settings used for jock. The gradient overlay layer style for this base layer is different than that of princess because of the positioning of the text. Again, same as princess, two text layers are used here. Blending mode, opacity, and fill for both are the same as the princess text layers as mentioned before.
Base Layer
Gradient Overlay settings:
Blend Mode: Normal
Dither: unchecked
Opacity: 100%
Gradient: #007aec > move bottom middle dot to 80% > #e7f0fd
Reverse: checked
Style: Diamond
Align with Layer: checked
Angle: -140°
Scale: 100%
Stroke and Drop Shadow Layer
Stroke settings:
Size: 2px
Position: Outside
Blend Mode: Linear Light
Opacity: 100%
Overprint: unchecked
Fill Type: Color
Color: #a05700
Drop Shadow settings:
Blend Mode: Difference
Color: #ffba00
Opacity: 100%
Angle: 30°
Use Global Light: checked
Distance: 5px
Spread: 0%
Size: 0px
Contour: Linear
Anti-aliased: unchecked
Noise: 0%
Layer Knocks Out Drop Shadow: checked
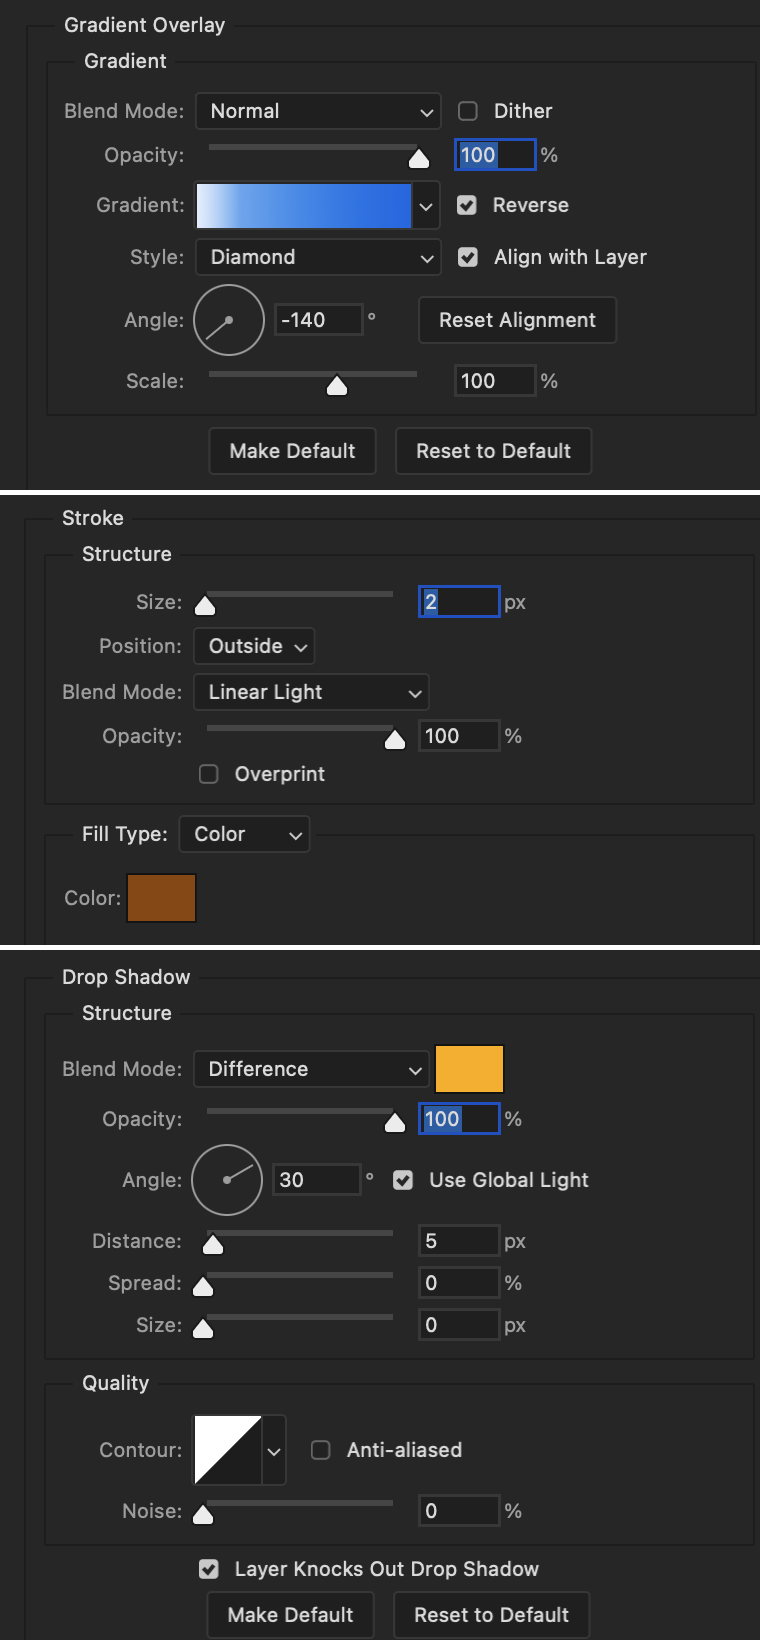
Image 1: We start with Robin.
Image 2: To make the loser text, I had to create a new path.
Image 3: I make it so the text is on the inside of the path instead of the outside. (Hint: Refer to video tutorial if you don't know how to do that.) I then adjusted the tracking between the letters in the word "loser" so they didn't look so squished together.
Image 4: Then I use layer masks to hide the parts of the shape I don't want shown.
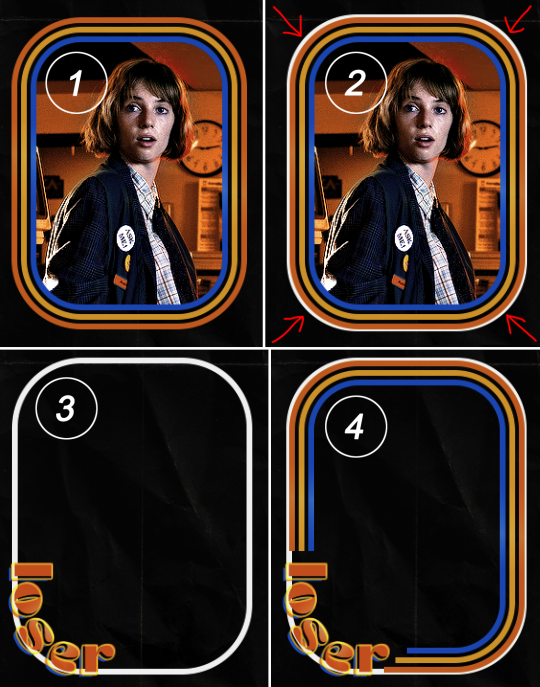
You can then hide the path or delete it. You only need it if you want to adjust the placement of the text. I keep it (hidden) just in case.
Text settings for loser are just like those for princess. Blending mode, opacity, and fill are also the same.
Base Layer
Gradient Overlay settings:
Blend Mode: Normal
Dither: unchecked
Opacity: 100%
Gradient: #eb6400 > #e7f0fd
Reverse: checked
Style: Diamond
Align with Layer: checked
Angle: 90°
Scale: 100%
Stroke and Drop Shadow Layer
Stroke settings:
Size: 2px
Position: Outside
Blend Mode: Linear Light
Opacity: 100%
Overprint: unchecked
Fill Type: Color
Color: #e1a900
Drop Shadow settings:
Blend Mode: Difference
Color: #0068de
Opacity: 100%
Angle: 30°
Use Global Light: checked
Distance: 5px
Spread: 0%
Size: 0px
Contour: Linear
Anti-aliased: unchecked
Noise: 0%
Layer Knocks Out Drop Shadow: checked
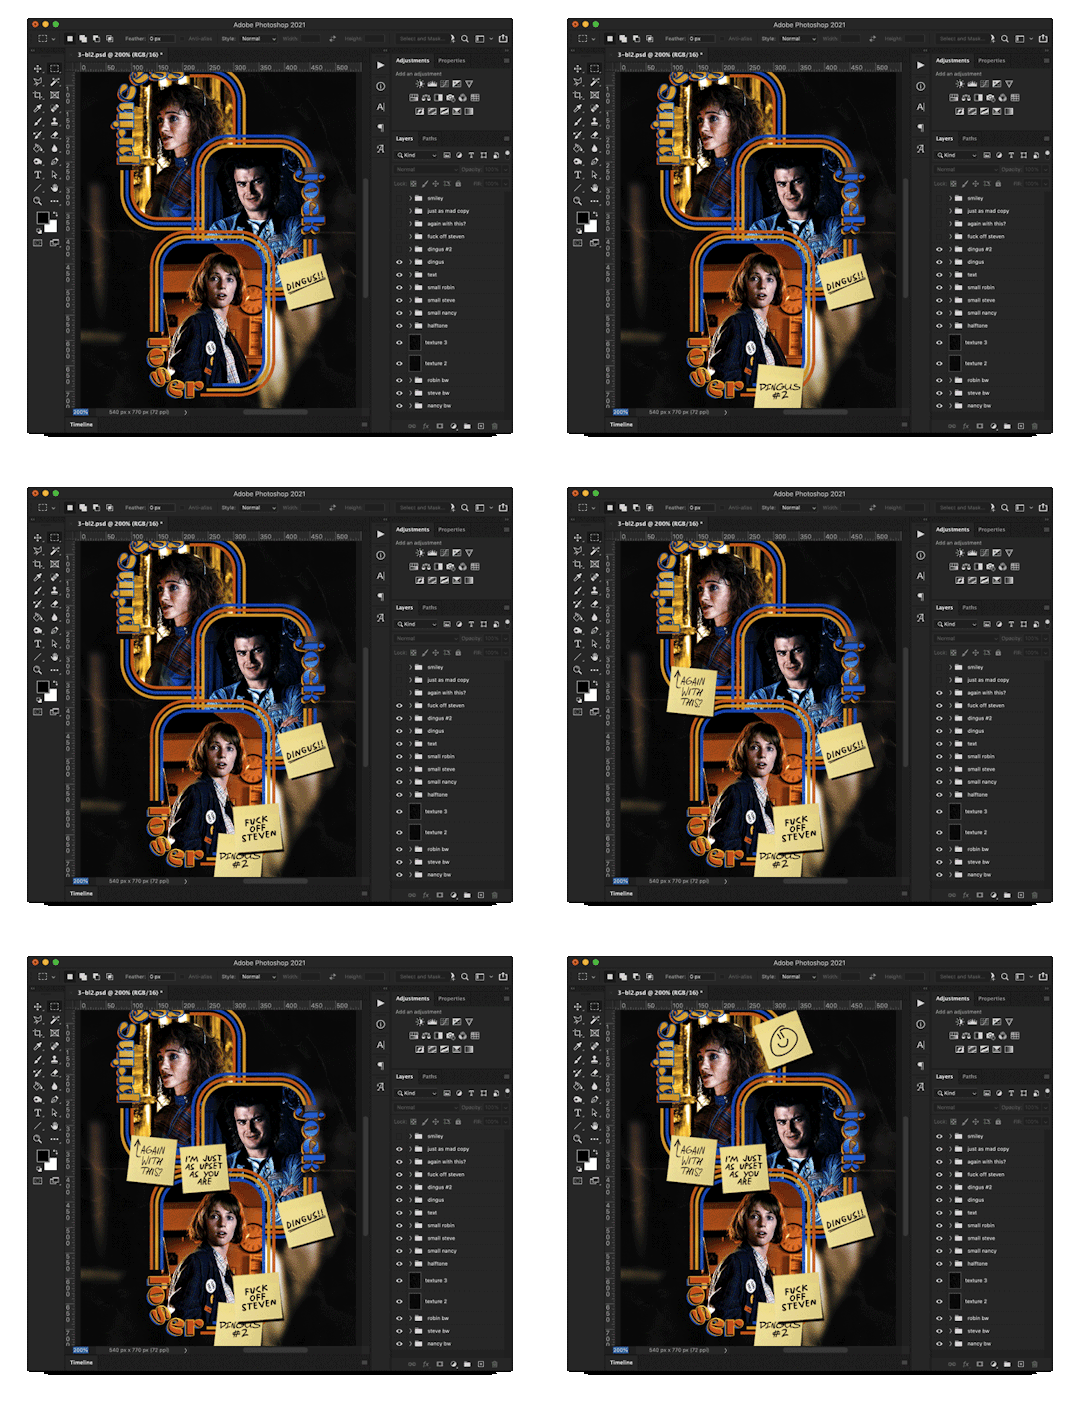
Next are the post-it notes! This is probably the easiest part of making this gif. You just have to repeat this process for however many post-it notes you're making.
Image 1: To start, place your transparent post-it note where you want it. You can also rotate it if you'd like.
Image 2: Then create a text layer and write what you want. Font used here is Post. I wanted this text underlined to give emphasis, so I click on the underline option. I also adjusted the leading because I wanted more space between the word and the line. Rotate the text so it looks like it's written on the post-it note. Note: It looks better if you choose a font that looks handwritten.
Image 3: I wanted another line to give emphasis to the "Dingus!!" text and make it seem more handwritten. I use the line tool to create another line.
Image 4: Then I adjust that line to my liking.

Fonts used for notes: Post, Ellianarelle's Path, and Heina's hurry
Repeat this process for all post-it notes!
That finishes the tutorial! (And I hit the 30 image limit lol.) I hope this helps. If you have any further questions, feel free to send an ask or IM and I'll try to answer to the best of my ability.
Happy photoshopping!
#ask#pcocana#photoshop#photoshop tutorial#tutorials#*tutorials#userchibi#userbunneis#uservivaldi#userriel#userabs#usertiny#useralien#useraljoscha#userfanni#userraffa#tusermona#userbess#userrobin#userroza#quicklings#janielook#usernaureen#userrlorelei#tsusermels#tusermimi#userelio#usertj#userbarrow#usernolan
287 notes
·
View notes
Text
East Palace, West Palace in ep5 of Blue Canvas of Youthful Days
I have been punched in the solar plexus by Blue Canvas of Youthful Days episode 5. So much happens in that episode that is overwhelming, from Qi Lu setting up a Netflix-and-chill date with the clear intention of making a move, to his putting on the famous film East Palace, West Palace (1996), to Qi Lu hiding Qin Xiao in the closet, to Qi Lu's panic at his father realizing he's been lied to, to the devastatingly practiced way Teacher Liu steps to Qi Lu being abused and handles his father, to the way Qi Lu shuts down, to the way QIn Xiao keeps sending mixed signals and Qi Lu calls him on it directly. And nobody else in this episode let me rest either; Tan Fan trying to ask Teacher Liu to wait for him and Liu brushing him off AGAIN, and Turtle trying to call out
@lurkingshan was already more coherent than I can be right now about what happened in the episode in her post.
So instead I want to focus on some queer cinema history that this episode evoked by using East Palace, West Palace as the film that Qi Lu shows to QIn Xiao.
For those who don't know, EPWP is considered to be the first realistic depiction of a gay man in film by a mainland Chinese production. It is to my knowledge the first time a gay man says "I love you" to another man on screen. It was made before being gay was decriminalized in China (1997), and it was filmed by an independent production company and smuggled out of China to France in order to be finished and distributed. It ended up at the Cannes festival in 1997, but the director's passport was seized and he was placed under house arrest to prevent him from attending. Despite pressure to pull the film, it still aired that year. In 1998, the Film Law was passed to prevent anyone from making films outside of the studio system (and therefore censorship review), effectively preventing anything like EPWP from being made in the future.
The film is about a gay man who cruises in the notorious bathrooms in the parks on either side of Tiananmen Square getting harassed by police officers (a situation extremely familiar to the historical queer experience in Canada [where I'm from] as well) and playing what I'd describe as a psychological game with one of them; A Lan kisses the cop, runs, and then gets caught a second time, and uses the second police confession as an excuse to tell his life's story in the public record, all while pushing the police officer a little further into deviance. As far as I'm aware, this film has been banned in China since being made and never shown (please correct me if I'm wrong about that!).
This is hitting me hard because of the much more recent history of Blue Canvas of Youthful Days itself. As most of you know, but I'll capture here for posterity, episodes 1-4 of this show aired on iQIYI (a China-based app) on August 6, and within 24 hours they were pulled from the app with no information about the future episodes being shown. When I watched episode 5 today, after waiting for it for 3 months, I was immediately hit with a wave of anger that this gorgeous, emotionally moving and powerful episode had been held back from public consumption for months, for the same reasons that the film being shown within the episode had been withheld from viewing in its own country.
Censorship is such an ugly thing, it's hard to articulate but the emotions around it are so strong because we know, when they pull or refuse to show media that depicts our lives, it's because they don't want our lives to be real; they don't want us to exist. It's a very real threat. And to have this episode--which is all about an abused boy who is in very real danger but so bravely insisting that he shoot his shot and take his best chance at love and happiness anyway, using the iconic confession scene from one of the most famous banned films in Chinese queer cinema history to do it--to have this episode be the one that was prevented from airing......I am overwhelmed.
In the scenes they watch in episode 5, A Lan tries to prevent the officer from uncuffing him, and then the officer lets him go, but A Lan doesn't go far and comes back. He declares his love to the officer's face, and demands that his love be acknowledged and not dismissed. And the officer does not know what to do with it and reacts with violence, which is partially what A Lan has been angling at all along. The show really played with this by having all three of the couples in the show stymied by having their overtures dismissed this episode, but we almost didn't get to see it.
I'm so grateful this got distribution now, and on multiple platforms. Blue Canvas of Youthful Days is airing Saturdays and Sundays on GagaOOLala and Youtube (note, as per @thisonelikesaliens's excellent language posts, the subs on Gaga are much better), and on Mondays on Viki. I know there is an avalanche of content right now, but this show is so good and worked so hard to make it to us, please give it some love!
#blue canvas of youthful days#east palace west palace (1996)#typed so that i can stop thinking it#queer history
97 notes
·
View notes
Text

Living Canvas
Lee: Minho Ler: Hyunjin, Chan Word Count: 2.7k
A/N: it's almost insane how much I love seeing Lino getting all the tickles his sweet heart deserves🥺💖hope you like it✨🤗
Tags: @itzsana-kiddingmenow, @lajanaa, @bbybumblelee, @hearted-anon, @lunalattae,
@reginald-stay09


Hyunjin was BORED. You may wonder, of what? Of painting, particularly on his usual canvases. He never thought a day would dawn when he’d feel that way, but here he was.
He lay draped over the carpet in their living room, mindlessly tracing patterns into the soft fibers, only to brush them away in frustration.
He was still there when Minho came over, stopping to stare at the moping puddle that was Hwang Hyunjin.
“Wow, a new rug,” he commented dryly, toeing at Hyunjin with one socked foot before heading over to Chan’s room. Hyunjin let out a long, drawn-out sigh, continuing his sad ministrations on the carpet.
Minho eventually did emerge from the leader’s room and flopped himself onto the couch. They stayed in a comfortable silence until the older’s voice cut through it.
“What’s wrong?” There was a tinge of worry and concern in Minho's voice that made Hyunjin roll over to face the kitten. “I don’t wanna paint anymore…” The older’s brows shot up at the confession.
“What? Like at all? Why not?”
“It’s not interesting anymore. I don’t feel as inspired to paint as I did before. Something about the canvas itself is throwing me off every time I so much as pick up a brush.”
The dam broke and Hyunjin rambled on until a finger was pressed onto his lips, effectively shutting him up.
“Did you try switching things up? Maybe try something other than a canvas to paint on?”
Minho’s suggestion was predictable. After all, that had been the first thing Hyunjin had tried. But maybe—maybe Hyunjin had been looking at this all wrong this whole time.
An unnerving smile crept slowly onto his face, his calculating gaze assessing Minho’s figure as an idea formulated.
“Hmm. You’re right hyung! Perhaps swapping out my usual for a more…interactive canvas would be a good idea.”
Minho did NOT like the emphasis the artist had put on the word ‘interactive’. His eyes narrowed and a chill ran down his spine.
Every instinct in his body screamed at him to run at the look Hyunjin was giving him. But the older remained seated, ever the poster child for a poker face.
But even as his face remained impassive, his body seemed to give him away. His feet drummed anxiously on the floor, his clasped hands writhing where they lay on his lap and sweat beaded his forehead.
“Hyungie, will you pleaseee help me out? Pretty please? I’ll take you out to eat afterwards!” Hyunjin’s voice was sugary sweet, eyes wide and innocent as he tried to convince the older to make a deal with the devil.
By now, Minho had a good idea of what was being expected of him. The kitten gulped, caught in a stare-off, until he folded—he really couldn’t say no to the kids.
“Fine, but you’re getting me ice cream too.” He hesitantly agreed, fully aware of what was coming his way.
“Deal!” Hyunjin’s smile was demonic. “Sit tight hyungie~ I’ll go fetch the supplies!”
Anxiety, nervousness and anticipation swirled like a soup in Minho’s stomach, his feet tapping more and more frequently on the carpet the longer Hyunjin took. Minho’s thoughts raced a million miles an hour as he mentally prepared himself.
After a good 10 minutes of this, the artist sauntered in, wearing a paint-streaked black apron and holding a big wooden box filled to the brim with paints and a collection of different brushes. He gave Minho a warm smile, setting the box down next to him on the floor.
“I’m just going to lay down some newspapers so we don’t ruin the floor,” he explained as he worked, covering the carpets with multiple layers of newspapers and finally with a paint-stained towel.
When Minho crouched to lay on it, a little dazed from the unexpected turn his day had taken, the artist stopped him, gesturing for him to lose the shirt.
“Your pants might get stained though…gimme a second hyungie!” Hyunjin raced to his room, reappearing with a pair of shorts, “Wear this, I don’t want your clothes to get messy.”
Then the ferret disappeared once more, this time into Chan’s room, allowing the older to change. By the time the kitten was done, Chan and Hyunjin emerged together.
"Channie hyung, help me hold him down, will you?” Chan was all too happy to lay Minho on the towel, cradling his head gently in his lap.
The leader clasped Minho’s hands in his own ones, gently rubbing circles into his palm to soothe his nerves.
“Okay! Time for prep!” The artist announced with a flourish, cracking his knuckles. Minho gulped at the action, biting his lower lip nervously. This wasn't in the script!
“W-what do you mean ‘prep’?”
“Hm?” Hyunjin sounded genuinely puzzled by the question. Then a twinkle of mischief appeared in his eyes.
“You’re too ticklish hyung. If I use my brushes on you right now, you’ll squirm around so much it’ll ruin my painting! So Channie hyung and I will get you ready so that you won’t be so sensitive.”
Minho didn’t buy that nonsense. He was all too familiar with this particular technique, being one he often used on the younger members (mostly Innie) whenever the youngest needed to put on makeup on his neck and ears.
Minho always volunteered, dragging their maknae away from their makeup noonas to wreck him, claiming it’ll let them do their job ‘easier’. Surprise surprise, it didn’t.
But now that the tables were turned, the kitten didn’t find it as funny. “That—that won’t be necessary. You can just get started. I’ll stay stiHIHILL!! HYUHUHUNJIHIN!”
The ferret had dragged one of his brushes over Minho’s lower belly, his eyes already flickering over to the next spot—Minho’s hips.
The kitten shook his head, blabbering in a panic,” No! Nohot there, JihiHIHInnie pleheheHEHEASE! Ihihi sAHAid noahAHAHAHA ah!!”
Hyunjin ditched the brush, carefully massaging the spot with his thumbs. The oldest grinned at the way their lee arched and squirmed. This was just the beginning.
“Chahahanihihie hyuhuhung!! Ahahahaha sahahave meee!!” He screeched at his only hyung. Chan just grinned at him, and wanting to get in on the fun, he grabbed a brush.
Holding Minho’s hands with one of his own, he moved them to the side of his face.
Then as the kitten watched with growing dread he lowered the brush to his ear, running the soft bristles over the shell of Minho’s reddened ears.
“Ah nohohoho not my eahahahahars!! Thahat's cheHEHEATING!”
It had the cute lee squeaking and shaking his head desperately…until Hyunjin’s hands cupped his jaw, fingers wiggling at his neck while Chan happily ran the brush all over his ears and the backs of them.
“Mhmhmhehe ahahahAHAHAHAA!! PLEHEASE!”
Minho’s face burned as he tried—and failed—to stifle his giggles, his attempts at self-control crumbling with every ticklish touch. He kicked his legs and tugged at his arms but Chan was stronger and he held firm.
For all his attempts to escape, they didn’t stop. Hyunjin’s hands moved from Minho’s hips to his belly to his sides and ribs, leaving hysterical laughter in its wake. Chan focused on rubbing Minho’s ears and scribbling under the younger’s arms.
“Nahahahaha lehehet me goHOHAHAHAHA! Ihihit tihihihickles!” He squealed out. “Yes baby, that’s what we’re tryna do~ Dohohon’t behehe ihimpatient,” Chan mocked the poor boy’s cries for mercy.
The two continued their playful torment on Minho’s torso, only stopping when Minho’s laughter grew breathy and his struggles started growing weaker.
After a short break and some words of praise, the artist grabbed a palette, squeezing a dozen or so different colors on the flat surface.
“Prep’s over! Now for the real fun~” He snickered meanly.
Hyunjin decided to start off with a smaller paintbrush, dipping it in some water, he hovered the brush over the older’s tummy.
Minho’s breathing was picking up, a smile already tugging at the corners of his lips as he watched a drop of cool water fall from the brush and onto his hot skin.
That ‘prep’ had done nothing. Not that any of them expected it to anyway.
“Hmm so much to cover! Where should I start?” Hyunjin pondered, staring dead into Minho’s eyes and the poor flustered boy averted his gaze, prompting a high-pitched cackle from Chan.
“Aw don’t be shy Linoya~” he cooed, simultaneously moving his eyes to tell Hyunjin to go for his stomach. Boy was Chan mean when he wanted to be.
Then, while Chan gently tickled his underarms, Hyunjin scooted back, leaning forward to plant a kiss on the center of his belly.
Now, ticklish kisses don't usually work on Minho but the way Hyunjin's and Chan's fingers scritch scratched at his waist and armpits made him feel that much more sensitive.
His body seemed suddenly receptive to the soft pressing of Hyunjin's plush lips on his belly and Minho couldn’t help jerked his body away. But there was nowhere to go.
“ohoHO MYHYHY GOHOHOD, IHIHITS SO BAHAHAHAHAD!!” He wailed, his body shimmying around helplessly. If he twisted away from one hand, he'd only be shoving his sensitive spots into the other hand. It was merciless.
“Lino hyung…how on earth are you so precious. Just look at you! I’m touching you so lightly and yet you look like we’ve tortured you for hours! What a mess we can make of you hyungie~”
Minho’s eyes flew open at that, his mouth falling open in shock. Hyunjin had murmured those words but it felt like he’d screamed them in Minho’s ear instead.
“I—you- Hyunjin I swear to god I will literally KILL YOU aft—nO shihiHIHIHIT SOHOHORRY, IHIHIM SOHOHORRY PLEAHEHEASE!!!”
At the threat, Chan’s fingers went crazy on his armpits, Hyunjin’s hands now starting to knead his sides as he kissed all over Minho’s belly before letting up.
The two waited patiently for the kitten’s breathing to calm down, and just when Minho least expected it, Hyunjin struck once more.
Hyunjin grinned and grabbed a paintbrush. Dipping it in water, he surged forward, swirling the wet tips along Minho’s upper arms, just above his armpits.
The poor kitten jolted, arms coming down only for them to be pulled back up by the leader. “Uh uh, you have to be still or Jinnie won’t be able to concentrate~”
But even as he said that, Chan showered a pokes Lino's torso with his free hand, giggling as he watched the kitten squirm. “Nohohoho whyhyhy ihis Chahahnihie hyuhung dohoing thihis tohoohoo?!”
“Yah! Can’t this old man have some fun too?” Chan scolded playfully, praying that Seungmin hadn’t heard him. He’d never hear the end of it otherwise.
“Sohoho youhuhu admihit youhu’re old?” Minho teased through his giggles, immediately regretting it when Chan’s thumbs drilled in between his ribs.
“So cute hyungie. You’re absolutely adorable.” Hyunjin’s reverent words cut through their playful banter.
The tips of Hyunjin's fingers drag along the soft expanse of skin along with the brush on the other side, observing with the kind of attention that he’d usually keep reserved exclusively for their dance practices.
The artist's gaze was trained on the way Minho squirmed, goosebumps raising on his bare skin as his eyes fluttered shut. Minho was so soft, so sensitive when it came to this little weakness of his.
“Hyuhuhunehehe plehease! Ihihit’s sohoho bahaHAHAD! ehehehEHEHEhehe~”
He was putty in Jinnie’s unforgiving hold. His pretty doe eyes sparkled with an innocent, child-like excitement that Minho himself didn’t seem to be aware of.
He’d strongly denied it when Chan had brought it up once, threatening to utterly obliterate the older if he wasn’t careful. But the blush on his cheeks and the way he couldn’t meet their eyes gave him away.
“I love you so much hyungie,” Hyunjin murmured softly, tears welling up when he suddenly recalled their past. Minho blinked up at him in confusion, bambi eyes wide and shining as they flickered over Jinnie’s features.
Then a small smile broke out, wiping away the previous sadness and Hyunjin pressed his fingers into Minho’s sides more firmly.
The lee squealed at the abrupt change, bucking and twisting as he tried to escape those mean fingers. “shihihiIHIT ! NOHOHOT THEHEHEHERE AH!”
“Do you feel how much I love you Lino hyung? No? That’s okay, I’ll tickle you until I convince you”
Minho's vision is a little blurry with tears of mirth, the two lers appearing as wobbly figures in his eyes. In contrast, the feeling of hands attacking his worst spots felt so much more intense than before.
“YEHEHEHES! YEHEHES IHI DOHOHO HYUHUHUNJIHIN NAHAHAHAHA!!”
“So handsome~ So sensitive~ You’re just perfect hyungie,” Hyunjin’s voice dripped with so much love and affection, it had even poor Chan feeling a little flustered, ducking his head to hide how the words affected him.
Minho was full on blushing, his eyes squeezed shut and giggles rising in pitch with how embarrassed he felt.
“Our shy little kitten,” Hyunjin breathed softly as he ran his fingertips lightly over Minho’s painted sides. The poor lee giggled some more, squirming around.
“NAHAHAHAA I CAHAN’T TAKE ANYMOHORE!! HYUNJIN PLEASE! I WANT TOHOHO DIE NATURALLYHYHY!!”
Chan and Hyunjin died at his dramatic proclamation, laughing almost as hard as Minho was.
Lino's body trembled and shook with the force of his laughter, words growing warbled and incoherent as it mixed with his sweet, bubbly cackles.
It wasn't often his laughter got the chance to spread through their dorm so the red lights duo were determined to milk that opportunity for all it was worth.
"ChaHAHAhanihie hyung plehehEASE lehehehet me gohOHO! Hehehehes gonna kiHIhill me lihhihihke thihis!! ArghAHAHAhaha NOHOhoho"
With a sly smile, Hyunjin leaned back, gripping onto Minho's thick thighs with his paint-stained hands and gave it a squeeze. The poor boy squealed, feet skidding on the floor and almost tearing the newspapers as he struggled.
“FUHUHUHUCK! ChahanNIHIHIE HYUHUNG PLEASEPLEASEPLEASE!!”
But of course, that didn't deter the artist, who pinched and squished the soft flesh between his fingers and watched with growing amusement at the way Lino threw his head back, loud bouts of laughter ringing through the wide space.
He was hysterical. Between Chan's fingers gently wiggling in his armpits and Hyunjin's skilled fingers at his thighs, he was a goner in seconds.
Minho yelped, dissolving into shrieks and giggles, his sounds bringing smiles to everyone who heard it. “N-nohoHO MOHOhore pleHEHEhease!!”
And much like the tune from the pied piper, summoning a couple of eager faces to the scene of the crime with his infectious laughter.
Minho strained against Chan's hold, desperately trying to fight back. But the leader was obviously stronger and the hands running along his body only served to weaken him further.
“Linoya is this really that ticklish,” Chan asked as he used his free hand to lazily scratch over each of Minho's ribs.
The poor lee nodded furiously, his hair whipping everywhere and tears getting yeeted in all directions from the sheer force of the movement.
It made the leader giggle, “Is our little tsundere kitten so sensitive he can't even form a single thought? Can't remember how to say yes hm?”
Minho had to get them back for this. He certainly would. He'd use his electric toothbrush right on Chan's belly button and his feathers on Hyunjin. But revenge would have to wait. He'd have to survive this sweet torture first.
The thought of revenge was what got him through their relentless taunts and jabs at his sensitivity. Despite the fact that he had turned a concerning shade of red, his struggles getting weaker, Minho held on.
“I cahAN'T tahaHAHAHAKE IT!! AHHAHAHAHAHAHA,” he wailed frantically, his feeble attempts at escape doing nothing to help him.
The two menaces went on till Minho's sweet hiccupy sounds cut off completely, replaced by little spray bottle noises that only brought with it more hysterical laughter from the rest.
Minho curled up on his side, rubbing over all the spots that were now pink from their playful assault as Chan stroked his hair in adoration.
As Hyunjin wiped away the paint, Minho’s giggles softened into quiet chuckles. “You-you’re evil Hyunjin,” he complained, voice still shaky from laughter.
Hyunjin grinned innocently, “Only for you hyungie~”
The leader himself massaged gently along his arms, soothing the hyper kitten from his giggly fit.
“Go take a shower, let’s cuddle after okay baby?” Chan cooed, pulling Minho up and pushing him towards the bathrooms.
Hyunjin has a lot of snacks prepared, humming contently as he placed them neatly on a table.
Minho’s idea had seemed to work it’s magic and Hyunjin already knew what he wanted to paint next. Maybe this was the right way out of his creative slumps.
And after a nice, warm shower, the three spend all evening cuddling and snacking together as they watched a random k-drama.
Later, a certain kitten received a rather embarrassing—and extremely flustering—painting that captured a moment from their...eventful evening.
His breath hitched as he unwrapped the painting, looking over the vibrant colors and playful lines that captured his every ticklish struggle.
Minho’s face was bright red in the canvas, little tears forming at the corners of his eyes as a wide, beautiful smile adorned his face.
The painting also included some rather unnecessary details like the hands that had put him in that state and he most certainly did NOT hang it on his bedroom wall. No, he definitely did not.

#kpop tickle#kpop tickling#stray kids tickle#skz tickle#skz#stray kids#minnielvrr™#stray kids fanfic#skz fanfic#lee minho#ler hyunjin#ler chan#sfw tk blog#sfw tk community#sfw twords#sfw tickling community#sfw tickle blog
92 notes
·
View notes
Text


RESOURCE DIRECTORY 2.0 + HOW TO NAVIGATE USERGIF
Hello! We hit 10k followers! I want to take this moment to thank all our wonderful followers and the talented members of usergif! We created this blog less than 2 years ago and are constantly blown away by your support and beautiful creations. As a thank-you, we're proud to announce our new and improved resource directory!!! Shout out to arithemes' custom page which allowed us to create a more streamlined and organized directory for everyone to use. Under the cut, you'll find a guide to help you find exactly the resource you're looking for on our blog. Happy gifmaking! :)

THE UPDATED DIRECTORY
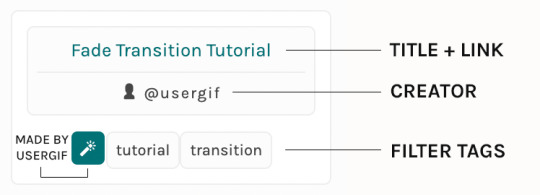
All resources are in alphabetical order first by the creator's URL (at the time of entry), then by the resource's title. Each title is a clickable link that'll redirect you to the original post. Beneath that, you'll find the creator's URL and the resource's relevant filter tags:
As always, whenever I add new entries to the directory, you'll see the last date listed on the right side of the blog here:
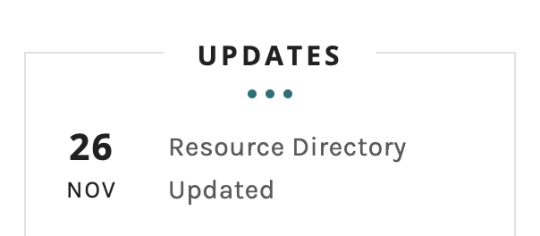
If you don't see one of your recent tutorials listed there, please be patient. I update the directory on a monthly basis, but only add resources that have already exited our queue.
THE FILTERS

Please note: the Source section has exclusive filters, meaning you can only select one at a time. In the Type and Effects sections, you can select as many filters as you want. However, if you select 2 filters in one section, like "animated" and "blending," it'll show results for any resource with either of those tags, not necessarily resources that include both of those tags.
Here's a breakdown of how we categorize our resources:
Source: ↳ all: posted by any creator ↳ usergif: posted by usergif
Type: ↳ all: click this to reset filter selections ↳ action: pre-recorded photoshop functions that can be replayed ↳ basics: non-effects-related resources to help new gifmakers get their feet off the ground (please remember usergif is not a resource for beginner-level gifs and focuses on intermediate to advanced gif effects. however, we thought it would be helpful to keep some basic resources available) ↳ brush: various brush shapes like ripped paper edges or intricate textures ↳ fonts: names and links to fonts or font packs ↳ template: pre-made, downloadable layouts and designs ↳ texture: overlays that add a different finish to a gif such as Ben Day dots (retro comic dots) or glitter ↳ tutorial: any post that provides an explanation for a gif effects process ↳ other
Effect: ↳ all: click this to reset filter selections ↳ animated: an effect that applies movement to an element such as rotating text or wiggling shapes ↳ blending: aka double exposure, this effect combines two or more gifs layered on top of each other ↳ color: specifically for color manipulation, an effect in which the original colors are completely different (e.g. a blue sky colored to look pink) ↳ glitch: an effect where color channels are toggled and layered over the original gif to give a flickering effect ↳ layout: multiple gifs on one canvas like a collage (e.g. hexagon layout) or poster-style templates ↳ overlay: an added element layered above a gif (excluding text) such as a shape, another gif confined to a shape, a texture, etc. ↳ transition: an effect that stylizes the passage from one scene/clip into another, such as a fade, glitch, linear wipe, or motion blur transition ↳ typography: any kind of stylized text added over a gif (does not include basic captions)
You can find examples of all these gif effects via their respective tags on our Nav!
THE SEARCH BAR

This search bar functions the same way as the search bar in the upper right corner of our main blog and the search function on Tumblr's mobile app.

Tumblr search allows you to generate results using keywords found in the body of the post or the tags. So, if you're looking for a post but can only remember it having the word "rotoscoping," you can type that in either in the directory's search or blog's search and find any post on our blog that mentions the exact keyword "rotoscoping."
THE NAV & TAGS
Tags function differently from search keywords as these relate to exact words and phrases found only in the tags, not the body of the post. Our members use tags to categorize original posts and reblogs. Some of our most frequently used tags are listed on our Navigation Page and saved in the mobile search function pictured below:
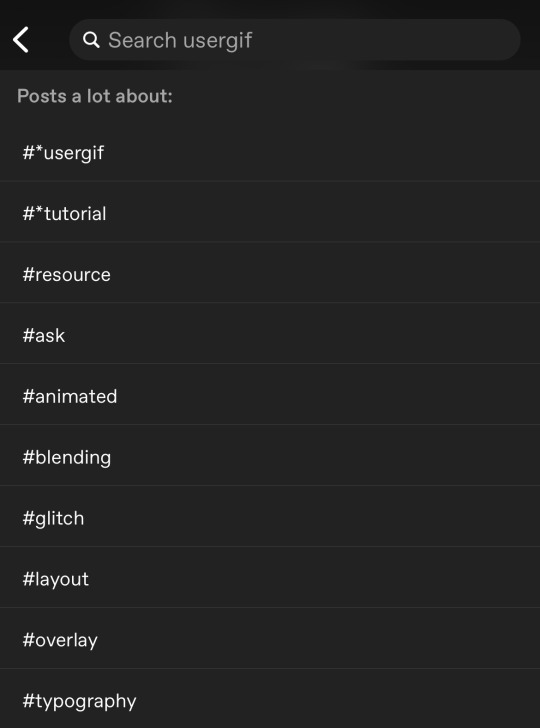
But if you ever want to quickly navigate a tag, simply add /tagged/word to the end of our url to find that tag! For example, if you want to see all the posts we've tagged as a #tutorial, just go to usergif.tumblr.com/tagged/tutorial.
BROKEN LINKS
Whether it's due to a creator frequently changing their url, the absence of an automatic blog redirect, or my own mistakes when coding the directory — you may stumble upon a broken link. Here's what to do:
If a creator has changed their username but their blog doesn't automatically redirect you to the new blog, check if they listed their new user name in the title of their old blog like I did:
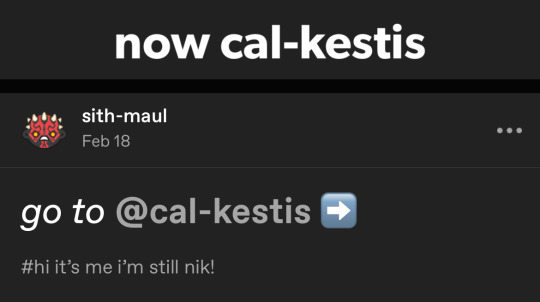
In this case, simply replace the url you landed on with this new url. For example, https://sith-maul.tumblr.com/post/692130400398704640/how-to-make-an-animated-google-search-overlay-a → would become → https://cal-kestis.tumblr.com/post/692130400398704640/how-to-make-an-animated-google-search-overlay-a
However, if you can't figure out the creator's new url or in the case that I messed up the link due to human error, feel free to send us a message so I can help find the source or correct the mistake!
WHERE TO FIND THIS INFO AGAIN
If you ever need to access this guide while using the directory, simply click the "i" button here:

And that's it! We hope this revamped directory is a lot more efficient and helpful. Thank you again for all your support and for helping us reach this follower milestone!
#*usergif#*usergifdirectory#completeresources#usershreyu#userace#uservivaldi#userbecca#usertreena#userzaynab#alielook#usernanda#userhella#userelio#useraish#userabs#tuserabbie#tusermona#usersmia#tuserlucie#usercats
360 notes
·
View notes
Text

Mine
<-Part 1 | Part 2 | Part 3 -> | Series Masterlist | Main Masterlist
Alpha!James Mace x f!omega!reader | Part of the Neighbourhood AU
Banner by me in canva, pics found on Canva and Pinterest (credit to OG posters!) | Dividers by @/cafekitsune
Not beta'd. I do not give permission for my work to be translated, reposted, copied or put through an AI machine.
Tags/Warnings: a/b/o dynamics, heats and suppressants mentioned, less angst and more fluff in this one!, allusions to past trauma/abuse,
Summary: Desperate to win your alpha over, you continue to try and get to know him.
Word count: 3.7k
As the end of your second week draws to a close, Jake shoots you a text about the omega group meet up at a café in the town about twenty minutes away. You curse your luck when you realise that there are no buses available yet since the neighbourhood is so new which means you're left to walk. Thankfully it's sunny out but your twenty minute commute had become an hour.
Telling Mace was easy enough; he just nodded and didn't question further when you said you were going although he did add that if you needed picking up to text him. You smile and lie that you'll text him, knowing full well you weren't going to disturb him.
You almost walk straight past the café, doubling back when you catch a glimpse of Jake sat near the window, waving his arms at you.
As you approach you see he's flanked by two other omegas - the woman who you'd briefly met ushering her kids into the car and Cookie's omega Ransom; who still looks as grumpy as ever in a ratty cream sweater.
"Hey!" He grins and jumps to his feet so quickly he almost knocks over the table. "You made it!"
You slip your bag off your shoulder and take the final empty seat and glance at the menu. The café was relatively quiet with only two baristas working the coffee machine.
"Uh yeah I-" you glance back to Jake and spot the purple bruise on his neck and raise an eyebrow. Jake's cheeks go bashfully pink, tactfully glancing at the menu in front of him.
"I'm sorry I didn't get to talk to you properly the other week," the woman says. She's pretty but visibly tired and her shirt has a myriad of colourful bright stains on it. "Everyone calls me Darling. My alpha is Ari."
"Nice to meet you." You smile at her and then cast a cautious glance at Ransom, who's blue eyes study you for a second before he sighs.
"My alpha is Cookie." He grumbles, slouching into his seat. "I'm sorry for how we met the other day but..." his expression shifts slightly to one of guilt. "Thank you for looking out for her."
"Ooh wow." Darling teases. "You got an apology from Ransom."
Ransom shoots her a glare but there's no malice in it; clearly as two of the oldest residents of the neighbourhood they'd been forced to become unlikely friends sooner than expected.
"So... you're alpha," Ransom asks picking at an olive with his fork. "What's he like?"
"I... erm..."
"Cookie said he's a grump?" Ransom offers and you can't tell if he's trying to be purposefully antagonistic or helpful.
"Aw hey now, he can't be that bad." Jake interjects before giving you a pointed look. "Is he?"
All eyes are on you and you feel a duty to defend your alpha, although you have to admit he can't dodge the grumpy allegations.
"He's grumpy but not in a bad way." You say quickly adding what you hope is a sweet smile for effect. "I think he's just not used to having company - I'm still a stranger too."
Ransom scoffs seemingly unconvinced but Jake offers a reassuring, albeit slightly worried, half smile. Darling only looks thoughtful.
"We've made some progress in the last two weeks." You add and then looks at your hands in your lap with a half hearted shrug. "I don't expect him to take to me quickly."
"While I don't disagree," Darling says slowly. "The whole point of the programme is so that you're matched to your true mate. Unless they somehow miraculously got it wrong - he's just being a stubborn asshole."
You look up to meet her eyes and she holds her hands up in surrender. "No offense."
"Wait, are you telling me you all just..." you geticulate wildly with your hands and all three omegas look sheepish. "Oh come on."
"I mean, I attempted being stubborn for all of two seconds." Darling chuckles. "Ari was just..."
She trails and shakes her head, blushing slightly. Ransom speaks up next.
"Cookie was patient with me. Too patient. But she took to me pretty quickly."
Everyone looks over to Jake, who swallows awkwardly, ironically drawing attention to the fresh bond mark on his neck. "I-I'm probably not the best person to ask about this."
You slump back into your chair, groaning into your hands. "Great."
After the initial awkwardness, conversation flows easily. You get to hear how all of the omegas met their alphas and, surprisingly, hear Ransom openly mention that he's acquired a second alpha. While he tries to act aloof, you and Darling exchange a knowing glance when his cheeks grow pink when he mentions how he'd been gifted a new sweater from Lloyd (who you recall to be the moustachioed alpha you'd seen with Cookie when Ransom made his exit). When the group disperses almost two hours later, Darling grabs you at the door.
"Hey, Sunshine." She grins at you. "Where are you parked? I'll walk ya."
"Oh - um - I walked." You say sheepishly and Darling looks taken aback.
"That's like, and hour's walk." She studies you carefully and her eyes narrow.
"It's a nice day." You counter. "I didn't have a job when I moved so other than pottering around I have nothing to do. May as well stretch my legs."
"Come on, I'll drive you home." Darling loops her arm in yours and half drags you to her people carrier, giving you no room to argue. The car has a lot of scents mingled into it (not all of them pleasant) and you have to move some stuffed toys from the front seat before you can buckle in.
"So," Darling begins pointedly once she's on the straight road leading back to the neighbourhood. "Now that the boys are gone we can talk properly."
You blink at her and find a smile tugging at your lips as she smirks at you in the rear-view.
"Listen, you don't have to join but since you already know Cookie you may as well know that us girls also have a group." Darling explains. "Not that an omega group isn't helpful but-"
"It's not the same." You finish for her.
"Exactly!" Darling exclaims. "Us gals need to stick together too."
You feel that there's a second meaning to her words and you appreciate her sentiment so much your chest feels a buzz with warmth.
"Thanks Darling," you say sincerely, twiddling your thumbs. "I really appreciate that."
"Ah, it's nothing." She shrugs. "We're meeting up next week; I'll add you to the group chat. But in the mean time if you need anything, you can come knock on my door."
You nod firmly. "I will. Don't worry."
"Oh!" Darling pulls across your driveway and puts the car in neutral before turning at you with an excited grin. "I forgot to say, next weekend we're having a barbecue if the weather's nice. You and your alpha are invited."
"Thanks." You beam. "I'll mention it to Mace."
You say your goodbyes to Darling and wave her down the few hundred yards of tarmac to her house before entering your own home, calling out to Mace that your home. When you recieve no reply, you know he's working in his office somewhere an deep in focus. You'd learned pretty quickly that when Mace was working, he had a one track mind and instead of disturbing him every so often, you'd silently ensure that water and snacks were left in his immediate work area (so long as they weren't in danger of combusting, melting or otherwise endangering him).
However, with him so distracted meant you could take this time to get to your stash. Creeping up the stairs, you get into your room and shut the door as quietly as you can. Under your fluffy rug, below a loose floorboard you'd managed to repurpose, was a stash of your belongings.
A grab bag will spare clothes, your passport and birth certificate, your suppressants and, most importantly, your budget book. It contained all of your monthly incomings and outgoings, savings and plans. You kept your collected coupons close at hand and checked your shopping list for this week. If you stuck to the list, you'd be able to save an extra twenty dollars; money that would go towards your future driving lessons if you were lucky.
You pull out your suppressants and pop a pill from the foil before pulling out the tablet cutter that you'd managed to order a while back before moving in with Mace. You needed to get more suppressants soon; halving them wasn't ideal. You were already beginning to feel the effects; headaches and nausea. Your next cycle would be brought on soon if you weren't careful, you needed to get to the doctors ASAP. You'd been signed up for the local practice when you'd taken a chance on the program you just needed to get around to making the appointment and asking Mace to take you to it...
That was a daunting thought.
You didn't know how he'd react to it and although he didn't seem like the type; your ex hadn't seemed like the type either. Mace seemed different - better - but you couldn't put your faith in a feeling since you'd been caught out before.
Swallowing the bitter pill-half you wonder for the umpteenth time how to win your alpha over knowing that sooner or later you'd have to deal with the unease of potentially being bonded to him. If you do become bonded to him it would make it harder to escape if the situation did become abusive. However, the flipside was that that if you weren't bonded, it would be easier for Mace to send you away and you'd have to start over again knowing your true alpha didn't want you.
You sigh placing the board back over your stash. You had taken a huge risk by signing up to this program and so far it had worked out for the better but only time would tell. The other omegas might think you're naïve however you're anything but.
You escaped once. You can do it again, if need be.

The next day you ask Mace to take you shopping. You're beginning to feel under the weather and know you need some extra snacks around for the inevitable grumpiness that was going to befall you.
"Can't you just take the car?" He quizzes and you shake your head offering an answer he can't argue with.
"I need help carrying the bags."
He sighs as he stands up. "Alright. Gimme five minutes to get my shoes."
The store is bigger than you expected and you're in awe of all of the shelves, goods and produce. You remind yourself several times to stick to your budget, not to be taken in by the temptation of chocolate or baked goods that smell like they fell from the heavens. Mace trails behind you with the trolley, reaching for the items on the list you can't reach but when you head to the dairy section to grab some milk, butter and yogurt you see something you cannot ignore.
Camembert.
You hadn't had it in so long and, as if by magic, the round is in your hands. Your mouth salivates at the thought of it. Honey. Caramelised onions. Bacon pieces. Maybe chopped walnuts. Dipping into a warm gooey centre with a slice of crusty bread.
But - it wasn't in this month's budget.
You go to place the round back when Mace appears, looking at you strangely.
"You okay?"
"Y-yeah." You say nervously, managing to place the cheese back precariously.
Mace follows your hands to the cheese and narrows his eyes. "That's not on the list you gave me."
"W-well, no, that's why-"
"Do you want it?"
"I've not - it's-" you shake your head frantically. "It's okay."
Mace frowns, then shrugs before unlocking his phone. "Alright. Whatever you say."
You feel flustered, you're not sure why, and check your list. You announce you'll grab some of the pantry ingredients like flour and sugar and won't be long.
By the time you find Mace again with armful ingredients, you notice that not only is there a round of camembert, but also bacon and a bag of walnuts. Your heart flutters and heat scorches your cheeks but when you glance at Mace you can tell he's purposefully not looking at you, finding the two-for-one sale of pudding pots extremely interesting. However, the pink dusting on his cheeks gives away his ploy.
"Thank you." You murmur as you place your items into the trolley. Mace coughs into his hand.
"I don't know if we have honey. I didn't want to disappear to far while you had your arms full."
"Right."
You wish could kiss him but you opt to sidle up next to your alpha as close as you could without touching him, offering him a small smile. You watch him take a deep breath as his lips twitch in a desperate attempt to not smile back at you and his grip on the trolley bar tightens.
"Come on. Let's get the rest of the stuff."

The journey back to the house is silent, with Mace raking a hand through his long hair every few minutes. You're too busy looking out of the window by thoughts bounce around Mace's head that make him feel dizzy.
He can't quite believe he'd Googled things that paired with camembert for you or how you'd beamed at him when he'd put it in the trolley for you. More worryingly, he couldn't understand why you'd created some sort of budget. Couponing was one thing but you seemed to be actively avoiding splurging on small things like cheese of all things and Mace was left wondering what else had you scrimped on and why. He had money, and of course there was the government stipend for the program, so why did you feel the need to budget and use coupons? Was the furniture you'd bought for yourself comfy? Sturdy? Or did you only get it because it was cheap?
Pulling into the driveway, he's already frowning again. You were still a mystery to him, however, you remained as sunny and personable as ever even if he hadn't solved you yet.
Once the shopping was put away, Mace slid his hands back through his hair. He was in desperate need of a shave. Beard and hair. It was too long now, bordering on ratty and unkempt.
"I'm going to shave." He huffs finally, walking to the stairs. "If you need me I'll be upstairs."
"Okay." Your sweet voice calls back to him and his brows knit together as he stomps up the stairs more loudly than he intends.
Shaving the beard was a quick task, it was the hair that was the problem. It was so long he wasn't sure where to start. Would it be better to cut it and then shave? Or just swipe the razor over it?
He hums thoughtfully looking at the electric appliance like it would be the key to all of his problems. He flicks it on and moves his hand up slowly, entirely focused on his reflection in the mirror.
"Are you shaving your head?"
Mace startles. You'd been so quiet he'd not even noticed your presence hovering in the bathroom's threshold, watching him with a wide eyed expression.
"Jesus." He grunts, flicking the razor off and looks over at you. He realises he's glaring when you look apologetic and mutter an apology and he shakes his head. "No - don't be sorry. You just... startled me."
His face softens and your shoulders relax - why were you like this? So sweet and apologetic all the time. You never ask him for much, if anything at all. Were you scared of him? He'd not been scary, at least, he thought he hadn't.
"But yes, I'm shaving my hair. It's annoying."
"Could I....?" You trail, your hand halting midair. You look bashful, blushing with a quiet smile as you draw your hand back towards you.
"Could you what?" Mace presses, his chest twisting uncomfortably as he looks at you.
"Could I - maybe... erm. Help?" You look like you're about to duck away behind your hands for even asking such a thing. "I-I like your long hair. I'll miss it but I want to help."
Mace can feel that twinge in his chest again - the same one he felt in the store over the damn cheese - as he huffs, rolls his eyes and mutters, "Fine."
You make a small, almost squeal of excitement before covering it with a cough. He knows you're happy he's allowing you to touch him, he doesn't need a bond to see that. It's written all over your face as you gingerly rake your fingers through his brunet locks, fingernails gently scraping at his scalp. He can't let you know how happy this makes him too. He sets his face into a frown, letting you untangle his hair with your fingers. You're unbelievably tender and it's so soothing; you stood before him in your comfy pants and tee co-ords just .... taking care of him. Mace never wanted it but God, did he need it. You run your fingers to the ends of his hair once, twice - and he sighs contentedly despite himself.
"Your hair is knot-free." You tell him sweetly. "Would you like me to use the razor?"
He looks at your face at the question and can see you're desperate to keep touching him, to keep helping him... to be useful. Mace grumbles a yes under his breath and patiently waits for you to plug his razor into the socket and give the switch a flick to test it's working. When the razor hums to life, Mace questions if he should shave. You liked his long hair but it was starting to get on his nerves. Would you still want to drag your delicate fingers through short hair?
Your thumb pad on his forehead, followed by fingers sliding into his hair, shakes him from his thoughts. No. He should shave. It's annoying him.
"Are you ready?"
Mace huffs another sigh. "Just get on with it."
Mace almost, almost, pulls you close. Your scent is overwhelmingly sugary sweet. His fingers dig into his jeans trying to hold himself back from wrapping his arms around you. He doesn't want to be one of those alphas. The ones who take for the sake of it. Just because you're his omega, didn't mean you chose him.
After ten painful minutes of wanting to wrap his arms around you as you clean him up, you announce that you're done.
"My alpha has such soft hair." You chirp, running both of your hands over his now buzzed head, brushing away stray wisps of hair that hadn't fallen to the bathroom tiles.
Mace stiffens. He doesn't know how to feel when you address him by his title. It feels wrong and right all at once.
"What do you think?" You ask stepping aside slightly to let him look in the mirror, a hand lingering on his crown. Mace swallows. He looks fine. He looks like himself. But you - you look so perfect. Made worse by how he can see you looking at him. Longingly.
Lovingly.
"'S fine." He hums, brushing sweaty palms against his jeans and makes to stand. "Thanks."
You nod and beam at him, clearly ecstatic at his recognition and appreciation. "I'll go get the sweeping brush and clear up."
"You don't-"
"I know." You interrupt and then drop your gaze to your feet. "I want to. I like helping you."
Mace sighs, anger bubbling at this feeling in his chest again. He shouldn't want to kiss you stupid. Or make you blush.
He hated this new program. He hadn't believed or really trusted it at first but being around you, your scent, your everything was driving him wild. He wanted to be your alpha. Wanted to claim you, selfishly have you for himself alone. But you should be your own person. Make your own choices. He shouldn't have a say in those things, even if you were his omega.
"I forgot to tell you yesterday." You say, as if you didn't have him by the heart strings. "Darling has invited us for a barbecue next weekend."
"Are you taking that cheese?"
You look aghast. "My good cheese? Never."
You snort and crack a smile that completely disarms him and he hates it. He hates how you managed to have in ruin so quickly, all of his steadfast morals and habits now somehow bendable for you. His heart aches for you but how the hell should he deal with that? Was it too late to ask you on a date since you'd been living with him for two weeks?
"What movies do you like?" Mace asks suddenly.
"Huh?"
He clears his throat awkwardly before he tries again. "I was thinking we could watch something tonight."
The way your face lights up should be a crime.
"So long as it has a happy ending, I'll be okay with anything!"
"Of course." Mace sighs trying to repress a grin. The embodiment of sunshine would want a happy ending. "What's your favourite movie?"
"Oh easy! Tangled." You look proud of that fact and Mace's heart does that strange constriction thing again. He may have to get that checked.
"Then we'll watch that."
"I don't know if you'll like it though." You say shyly.
Mace gets to his feet, brushing his clothes free of hair and attempts a half smile that looks more like a grimace.
"It doesn't matter. You like it." The distance between him, you and the sink is suddenly a lot smaller now that he's at full height. All he can think about is how kissable you look right now and how he needs to leave before he does something to ruin what could be the most nerve wracking night of his new life. "Wait here. I'll get the brush."
Part 2 End

A/N: I should really add him to my taglist form... 3's Company will be the next installment out because that story is sorta linear to this one. I'm slowly falling in love with these two but there is a follow up for Cookie's story coming soon too I hope! (Although, A Fault in the System won the next fic in the series after 3's Company!!)
Taglist - add yourself here
@stargazingfangirl18 @irishhappiness @awkwardgiraffe726 @jeremyrennermakesmesmile @cieraboobear @looking1016 @thezombieprostitute @krirebr @brandycranby @alicedopey @peaches1958
#gremlin girly writes#neighbourhood AU#neighbourhood au: mine#james mace x you#james mace sunshine#james mace#james mace x reader#james mace fanfiction#james mace x female reader#james mace x y/n#chris evans character x reader#chris evans character fanfiction
32 notes
·
View notes
Text
Visionboard 2025:
How to achieve everything without failing in the attempt.
The year is coming to an end and making a visionboard has become very popular again. So, today I will teach you and explain how to make a visionboard in a simple way, how to make it work and what it is. Get comfortable and read it.

ꔫ First of all, this is all based on my experience and that of some of my followers or people on the internet. Remember that there is no "wrong" way to make a vision board, but there are steps that you should definitely follow. Please let me know if I'm wrong about something or your way of doing them! Let's get started.
What is a vision board? ꔫ A vision board, also known as a "vision table", stands as a powerful tool in the context of the law of attraction. Its effectiveness lies in the combination of visualization and focusing positive thoughts towards specific objects or objectives.
This technique involves creating a board - physical or digital - that acts as a visual collage of dreams, goals and desires. Giving you motivation to fulfill them.

Part 2: How do I use a vision board?
ꔫ In a VB you can include images, keywords, phrases or any element that represents your goal, but here is a quick little guide:
Clarity of objectives: Identify your goals, they have to be clear and well defined. You can divide them into different parts such as economy, health, studies, etc. It is also important how clearly you visualize an image, what makes you feel or think. Since this is very important when manifesting, that is, if you want to have peace, put an image that gives you peace. If you want to manifest a cell phone, do not put any image, but the image of the cell phone you want.
Organization: It has to be an organized and understandable collage. I recommend organizing according to the relationships they have for better understanding.
Make the collage: You can do it anywhere, in canva, picsart, print the images and then paste them on a poster, board or notebook.
Visible location: The most important part! Even if it makes you feel embarrassed, you should see the vision board so that you know what your goals are, why you do what you do, and where you are heading. Place it in a place where it is always in sight on a daily basis.
Constant action: Don't leave everything to visualization, you can also take action to make those wishes come true. Instead of saying "I'm going to wait for that" change it to "you wait because I'm going to move forward to get that."
Images: They have to be images from your perspective, like you're already in that place or you already have that object. They have to inspire you or give you value, it's no use having an image that reminds you of bad things or makes you sad.
Affirmations: You can accompany it with affirmations that have to do with your images, you can put them behind the image (if you printed or cut it out) or write them anywhere, the important thing is to have it as an accompaniment to your Vision Board. I clarify that this part is not mandatory, it is only if you want to do it. Here is an example: "in this 2025 I will/must…", "in this 2025 I have/got…", "I am…", "I have…", etc…
Mistake: Overthinking your vision board. Avoid striving for perfection or feeling embarrassed by big goals. Instead, embrace the process, create without rules, and be honest about what you want. Every image and word should reflect a clear intention and inspire action. For example, rather than just adding a salad, pair it with images or words that evoke the energy and motivation to achieve your goals, like a fit version of yourself. A meaningful "why" will guide you to the "how" and turn your vision into reality.

Part 3: How do I see or have results?
ꔫ It is essential to remember that the process of manifestation requires patience and trust in the perfect timing of the universe. Results can manifest in different ways and at different times, depending on several factors, including intentions, level of belief, and actions you take on a daily basis.
You have to remember that consistency always pays off, and that results are not going to appear overnight. You have to take action to achieve those changes, claim them, and make them yours.
Manifesting doesn't mean just sitting back and waiting, it involves taking action in the direction of your goals.

Part 4: Arcana of the year and what your 2025 will be like.
ꔫIt has been very popular to see and hear people say that it is good to know what arcane awaits you in 2025. The arcana can offer you a symbolic guide to face the year. Each arcana reflects unique energies, challenges and opportunities that can help you focus on your personal growth, interpret key situations and make conscious decisions in alignment with what the year can bring you. In addition, it is an introspective tool that connects you with your deepest goals and desires.
To get your 2025 arcana, add the digits of your day and month of birth with those of the year 2025 (2+0+2+5=9). For example, if you were born on Aug 11, add 1+1 (day) + 0+8 (month) + 9 (year) = 19. If the result is greater than 22 (the major arcana of the tarot), reduce it by adding its digits again until you get a number between 1 and 22.
The 19th card corresponds to The Sun, which represents success, clarity, positive energy and achieving goals. It's a good year to pursue your dreams with confidence, but also to remember to enjoy the process and not let perfection cloud your joy.
If you need help with this part, feel free to leave a comment and I'll get back to you.


Some inspo before leaving:


I will be answering any questions you may have.
Post in Spanish: Coming soon.
.Mocha.
#affirmations#manifesation#subliminals#coquette#subliminal#affirmdaily#law of assumption#manifestation#visionboard#vision#board#beautiful#a#t#p#pink#pinterest#pink aesthetic#aesthetic#aestethic#pretty things#manifesting#2025#loa tumblr#loassumption#loa blog#master manifestor#loa success#loa#it girl
43 notes
·
View notes
Text
Its attack on titan the last attack cinema day for me! I’m so excited! I made this yesterday so this is a scheduled post :b
I’ve included the Timelapse and some photos to show how you can replicate this yourself too! All my posters up til now have been made in primarily procreate mobile with only the last two days being also with ibis paint x and sometimes ditherable
How I made this poster!


1. Get an image or images manipulate them into how you want them, I normally edit in procreate using colours and bloom but today I used ibispaintx I clicked filter then glow outer and changed the colour
2. Then I went to an app called ditherable, there you upload the image you just made and decide which design you like in the end, the app is really easy to use! Perfect for creating different effects
3. This is my procreate Timelapse for the poster, as you can see the red image just appears and that’s as I made it in ibispaintx and ditherable and then reloaded it back onto my canvas
I’m really bad at explaining things and have never shown how to do things like this to anyone so i apologise if it’s not explained enough, if you have any questions I can answer to the best I can! There are many other things and ways I’ve made the posters but if you want to make something like this one, this is how I do it :)
#attack on titan#tutorial#how to#art#fan art#aot#aot poster#eren aot#aot fanart#poster#graphic design portfolio#graphic design#procreate#procreate mobile#ibispaintx#anime#eren yeager#eren jaeger
21 notes
·
View notes
Text
art student Geto who gets paired with stem student Gojo. Their shared dorm is a disarray of mismatched interests. And Suguru’s poor attempt at recreating soft lighting hangs across their ceiling in the form of star shaped fairy lights that drape over Satoru’s pegboard that contains several articles related to biochemistry and radiology. Images of severed bodies and effects of radiation on human genome are pinned right next to the five foot canvas with gesso on it, awaiting the arrival of the oils. It get worse as the semester progresses. Large plastic models of subatomic structures and pictorial depictions of molecular structures of coordination compounds and their stereoisomers alongside a half finished sculpture with clay that has Suguru’s large handprints on them like a signature that marks his creation, little ceramic projects in shapes of vases, ashtrays and whatnot. Books related to colour and structure shoved in between advanced calculus and organic chemistry. Like a little library of their shared love.
Both of them pretend to hate it, Satoru grunts and nags Suguru when his penned diagrams disappear between the large stack of canvases with unfinished paintings. And Suguru who absolutely loses his mind when he sees Satoru use his insanely expensive hog hair brushes to dust his atomic structure models. They pretend to hate the mismatched chaos that surrounds their room, posters of artists and art, of bands and music adjacent to shelves so full of books that the wood creaks and cracks under it. Large blueprints of derivations and formulas. All held together by the starry golden lights.
At the end of the semester, Suguru saves up enough to finally have rented a small studio across the campus, similar to Satoru who finds vacant shelves in the isolated corners of the university’s physics lab. So when they come back after the winter break, they’re both equally surprised to see their shared dorm cleared out on each other’s end. Except for a few books and articles that occupy negligible space. They remain quiet about it, initially at least. But with their stuff moved both start spending ungodly hours at their respective spaces in the lab and in the studio. Suguru starts feeling the discomfort of the shared loneliness when he comes back at ten one night, having finished his painting, to find Satoru’s spot on the bunk bed empty. Satoru who works better at nights finds the room drowned in pearly sunlight at eight am when he makes his way back to get some sleep but Suguru’s side of the room is empty and so is his bed.
Then, one night, they start bringing back their stuff, one by one, until the room overflows with books and canvases and articles and disks again. When the top bunk remains untouched as the starry lights spill warmth on the shared lower bunk bed where two bodies coil into each other.
42 notes
·
View notes
Text


Dan Hays - Colorado Snow Effect (2008) - Oil on canvas
(Reposting this after the original poster [likeafieldmouse] of the original post has deactivated and the post itself got flagged as explicit, making it unlikely that Staff will reinstate the post, let alone be able to share it. Click the link and check the artist out. It's a whole series of paintings and there's more of them on the same concept!)
#Dan Hays#contemporary art#painting#snow#art#pointillism#image recreation#optical art#experimental#ok 2 rb if you need permission#I really do mean it when you should look thru them#the way he experiments and recreate the way pixels/dots are rendered#taking inspiration from printing to crt (the rbg lines)#feel like the webcore/cybercore folks would LOVE it
251 notes
·
View notes
Text
How to Master Color Theory in Graphic Design – Easy Tips for Students

Introduction
Color is perhaps the most influential graphic design element. It can evoke moods, express emotions, and enhance visual appeal. Whether you're a beginner or an aspiring designer, learning color theory is crucial to achieving professional and stunning designs. In this blog, we simplify color theory and provide easy tips to help students learn it effectively.
Knowing the Fundamentals of Color Theory
Before diving into advanced techniques, it is essential to understand the basics of color theory.
1. The Color Wheel
The color wheel is a diagram that shows colors arranged according to their relationships. It includes:
Primary Colors: Blue, yellow, and red – these cannot be created by mixing other colors.
Secondary Colors: Green, orange, and purple – formed by combining two primary colors.
Tertiary Colors: Created by mixing a primary color with a secondary color (e.g., red-orange or blue-green).
2. Color Harmony
Harmonious color combinations are essential in graphic design. Common color schemes include:
Complementary Colors: Opposite on the color wheel (e.g., blue and orange) and create strong contrast.
Analogous Colors: Placed side by side (e.g., blue, blue-green, and green), producing a calming effect.
Triadic Colors: Three colors evenly spaced on the wheel (e.g., red, yellow, and blue), offering a rich and balanced look.
Monochromatic Colors: Different shades and tints of a single color, creating a clean and simple appearance.
Easy Tips to Master Color Theory in Graphic Design
Now that you understand the basics, here are practical tips for effectively applying color in your designs.
1. Learn About the Psychology of Colors
Colors influence emotions and perceptions. Here are some examples:
Red: Urgency, energy, and passion – commonly used for sales pages and call-to-action buttons.
Blue: Calmness, professionalism, and trust – frequently used in corporate branding.
Green: Health, growth, and nature – ideal for eco-friendly and wellness-related designs.
Yellow: Warmth, happiness, and optimism – great for grabbing attention.
Purple: Mystery, luxury, and creativity – often used in beauty and fashion branding.
Select colors based on the industry and the message the brand wants to convey.
2. Utilize Contrast for Readability
Proper contrast ensures that text and design elements stand out. To enhance readability:
Use black text on a white background for maximum contrast.
White text on dark backgrounds (like navy or black) creates a sleek, professional look.
Avoid using analogous colors for text and background, as they can be hard to read.
3. Apply the 60-30-10 Rule
A well-balanced color scheme follows the 60-30-10 rule:
60% – Dominant color (background or major elements)
30% – Secondary color (complements the main color)
10% – Accent color (highlights key areas)
This technique is widely used in branding, web design, and UI/UX design.
4. Experiment with Different Color Schemes
If you’re unsure about color combinations, use online tools like:
Adobe Color
Coolors
Canva’s Color Palette Generator
These tools help generate visually appealing color schemes with ease.
5. Test Colors on Different Backgrounds
Colors appear differently depending on the background. Always test your design against both light and dark backgrounds to ensure consistency and readability.
6. Stay Updated with Design Trends
Color trends evolve over time. Stay current by exploring design platforms like:
Behance
Dribbble
Observing professional designers can help you stay inspired and refine your skills.
Why Learning Color Theory is Important for Graphic Designers
Mastering color theory is crucial for creating professional designs, whether you’re working on logos, websites, posters, or branding materials. If you’re serious about becoming a skilled graphic designer, consider enrolling in a structured course to enhance your skills.
If you’re looking for graphic designing classes in Yamuna Vihar or graphic designing training in Uttam Nagar, choose an institute that covers advanced design concepts, including:
Color Theory
Typography
Composition
Many reputed graphic designing training institutes in Yamuna Vihar and graphic designing coaching centers in Uttam Nagar offer hands-on learning with expert guidance.
For those interested in multimedia courses in Yamuna Vihar or multimedia training in Uttam Nagar, learning to apply color across multiple media, such as digital design, video editing, and animation, is essential. Mastering color theory allows you to create visually striking designs that capture the audience’s attention.
Final Thoughts
Color theory is a vital aspect of graphic design that every student must learn to create effective and visually appealing designs. By understanding color psychology, contrast, and harmony, you can elevate your design skills. Keep experimenting, practice regularly, and stay updated with design trends to enhance your expertise.
If you are searching for a graphic design course in Delhi or the best graphic design institute near you, opt for a course that provides hands-on experience and industry-specific knowledge. With proper training and guidance, you can build a successful career in graphic design. Visit us:
Suggested Links:
CorelDraw
After Effects
Canva Using AI Tools
#graphic designing#graphic design tips#graphic design tutorials#graphic art#graphic designers#graphic design#graphic designing tips#graphic designing institute#graphic designing course#Graphic designing course in yamuna vihar#Graphic designing course in uttam nagar
6 notes
·
View notes
Text
Free Tools Every Beginner Needs to Start Digital Marketing

Starting your journey in digital marketing? You don’t need to spend thousands to get going. With the right free tools and a bit of guidance, anyone can start building campaigns, analyzing results, and growing their online presence.
In fact, enrolling in the best digital marketing course can help you learn how to use these tools effectively. If you're looking for expert-led, practical training, the best digital marketing course in Hyderabad is a great place to start!
Let’s explore the top free tools every beginner should know.
Google Keyword Planner
One of the most recommended tools taught in every top digital marketing course, Google Keyword Planner helps beginners:
Find the right keywords
Understand search volume
Analyze keyword competition
This tool is often the starting point for anyone creating SEO or Google Ads strategies.
Google Analytics
Every digital marketer needs to track how users interact with their website. Google Analytics is a must-have tool to:
Monitor website traffic
Understand user behavior
Identify top-performing pages
The best digital marketing courses in Hyderabad include hands-on sessions on using Google Analytics to drive better results.
Google Search Console
This tool helps you:
Check how your site performs in Google Search
Fix indexing issues
Track keyword impressions and clicks
It’s covered in depth in the best digital marketing courses, especially in SEO and performance marketing modules.
Canva
Not a designer? No problem! Canva is a drag-and-drop tool for creating:
Social media graphics
Posters and presentations
YouTube thumbnails and more
Most instructors from the best digital marketing course in Hyderabad recommend Canva to beginners for quick and professional design.
Mailchimp (Free Plan)
Email marketing is powerful, and Mailchimp helps you get started for free:
Send automated emails
Build subscriber lists
Design email templates easily
Used widely in real-world projects, this tool is commonly included in digital marketing course curriculums.
Meta Business Suite
Running Facebook and Instagram campaigns? Meta Business Suite lets you:
Schedule and publish posts
Manage messages
Track ad performance
It’s one of the essential tools introduced in any best digital marketing course with a focus on social media marketing.
Ubersuggest
Created by marketing expert Neil Patel, this SEO tool helps with:
Keyword ideas
Competitor research
Site audits
Beginners love it for its simplicity — and it’s often mentioned in digital marketing training sessions.
Bitly
Bitly shortens long URLs and tracks how many clicks you get — simple but powerful for social media marketers. Many trainers from the best digital marketing course in Hyderabad recommend it for campaign tracking.
Conclusion:
Digital marketing doesn't have to be expensive when you're just starting out. With free tools like Google Keyword Planner, Canva, and Google Analytics, you can begin learning and applying marketing strategies right away.
But tools alone aren't enough. Learning how to use them the right way matters. That’s why enrolling in the best digital marketing course — especially if you're in a city like Hyderabad — can give you a huge edge. The best digital marketing course in Hyderabad blends hands-on training, real-time projects, and expert guidance to make you job-ready.
#best digital marketing course#best digital marketing course in Hyderabad#OnlineMarketing#digital marketing course curriculums.#MarketingTips#SEO
2 notes
·
View notes
Note
I love your art so much, the shapes are so neat and the style feels so visually interesting!!
I was wondering what software you used for the Spamton artwork? And what effect did you use for the Caine poster to create that old print effect? It looks amazing !!
Have a great day/night ^^
Edit: apologies if its weird im on mobile T_T
Hi! Thank you so much, i rwally appreaciate your kind words♡ they really help to keep me motivated it!
To answer your question however!
I use both illustrator and photoshop! Illustrator is used for all my drawings and photoshop for textures ☆
if you ever need the link for the free """"""version""""" *wink wonk* feel free to dm me!
For how to actually put textures!
1st! Open photoshop
2nd! Make your graphic or import your image, here i just made a quick smily face
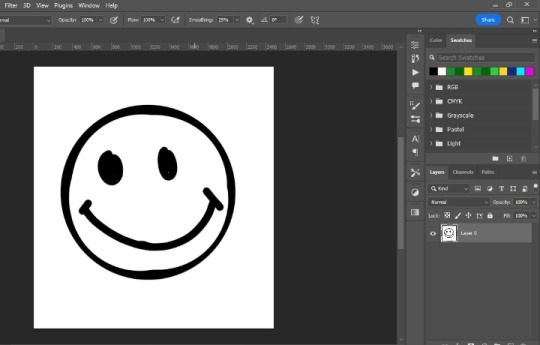
3rd! Import your texture! (You can easly find them by putting a word plus texture i.e. photocopy texture on google) and scale it to you preference, i normally just fit them as big as the canvas itself
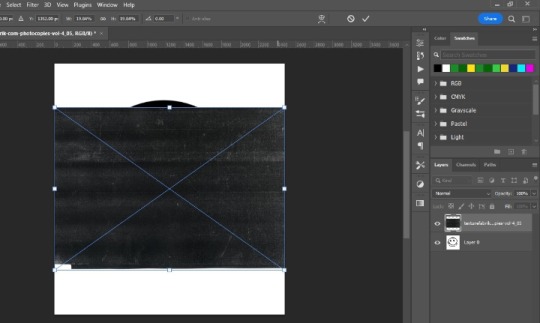
4rth! Blending modes! This is kinda experimental so feel free to browse all of them to see what fits better, in this case i use "lighter" so only the texture will be seen on the graphic, kinda like a layer mask
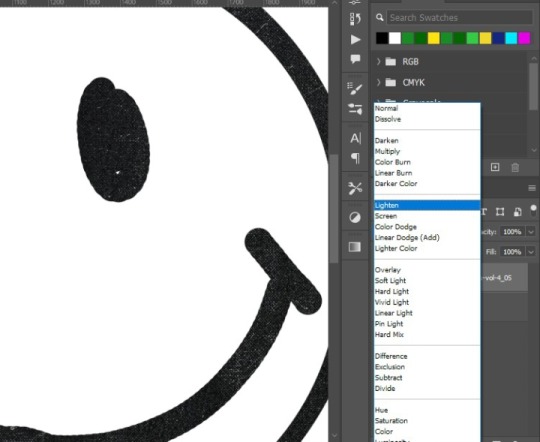
5th! Displace filter! Im not sure if other programs have this filter, but in photoshop basicly takes the texture of another photoshop file, and whatever things has on it, it applies it to the graphic (lets say that you have a photoshop file with a crumbled paper texture, the graphic will take the texture of this, giving it a more realistic look) akso i recommend converting the graphic to a smart object, so if youre not satisfied with it you can easily change the settings
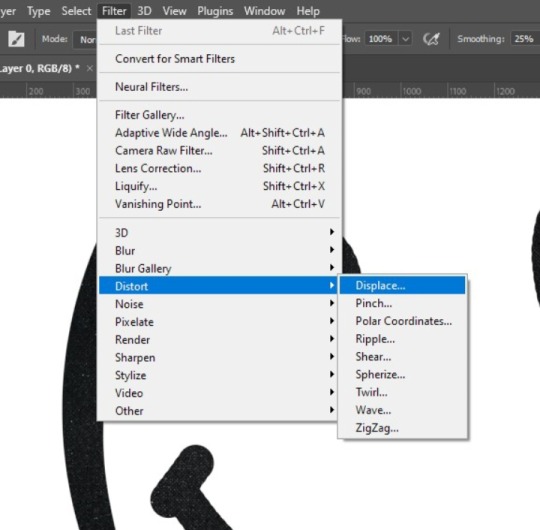
You will get this little square thing, im not going to lie i dont really know exactly what it is for LMAO but, the numbers the bigger they are, the more dramatic the texture result will be
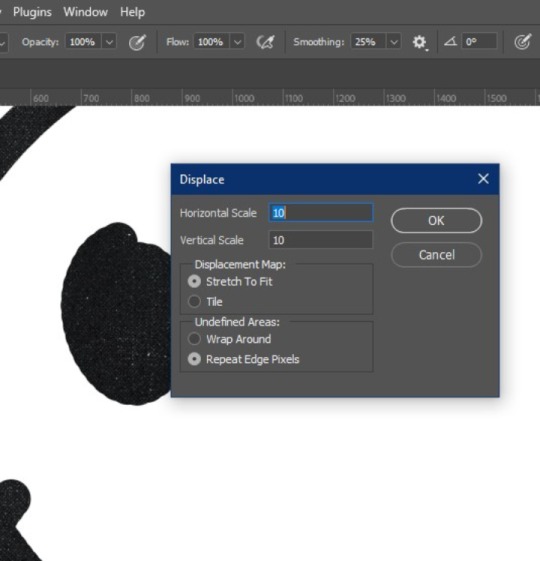
Then this window will pop up, it basicly tells you to choose the file you want, at the end i will tell you how you can make a displace file! And you click open:
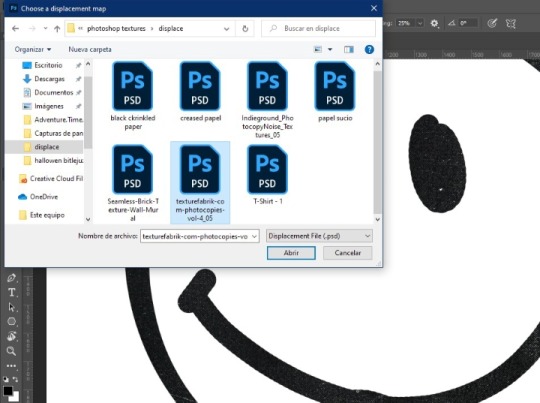
Results:
Then if the background looks a little flat you can copy the texture above your graphic, put it below it, inverte it and choose a blending mode, here i use multiply:
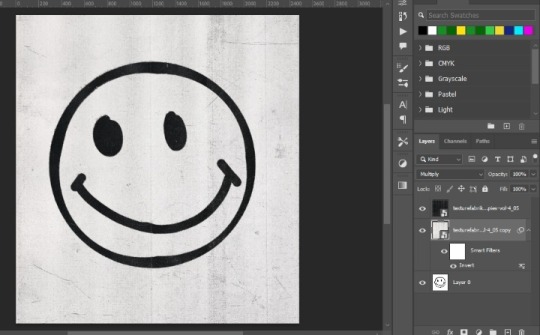
And thats how you get that sort of printed like texture!☆ you can use this method to get every variable of results, i hope you find it usefull hehe!☆ below the cut are the steps to make the displace file, just so this doesnt get too long haha
How to make a displace file:
1st! Choose your texture and open it on photoshop directly so the image is the background
2nd! Without doing anything youll just click on file>save as
3rd! Save it as a psd document
And there you go! You have a ready to go displace file so you can spice up your work☆
(I would put more pics but??? Appearently there is a 10 image maximum? Wtf?))
#mr k' s talk#thank you so much for the question! i hope you find this useful :D#texture#tutorial#graphic design
33 notes
·
View notes
Text
Lost in the Noise? The Secret to Making Your Brand Unforgettable in a Crowded Market using deluxe Backlit displays.
In today's competitive business landscape, the visibility of your brand is everything. In an office, retail store, or promotional area, the right branding elements can turn a lacklustre setting into an effective brand statement. From frosted stickers and window decals to wall branding and car graphics, every nuance helps make your business unforgettable.
Illuminate Your Space with Custom Branding Solutions
Window & Glass Branding
Create a lasting first impression with frosted stickers, vinyl lettering, and window decals. From a stylish reverse-cut frosted sticker for a contemporary appearance to a bold printed frosted sticker, your store and office windows can solidify your brand identity with ease.
Wall Branding & Décor
Convert bare walls into promotional materials with wall murals, stickers, and decals. With inspirational wall quotes to pillar brands and chic wallpapers, your interior space can both interest and align with your brand. Add the upscale feel by topping it with canvas, acrylic, wood, or metal framed prints.
POS & Promotional Displays
Engage customer interest where it is most impactful—point-of-sale (POS) locations. From shelf display and counter stand to mounted posters and repositionable static clings, these items augment promotions and marketing campaigns.
Floor Branding & Workplace Essentials
Direct customers efficiently with floor direction stickers, sale decals, and footprint graphics. Reinforce your store's brand with custom ceremonial ribbons and counter partitions to preserve a professional, unified appearance.
Vehicle Graphics & Outdoor Impact
Extend your branding outside of four walls with car door branding, bus wrapping, and golf cart signage. Turn company cars into mobile billboards and get the most exposure wherever you are.
Final Thoughts
Branding is not just about signage—it's an experience. With the proper combination of window decals, wall signage, promotional displays, and vehicle graphics, you can make a space that represents your brand's identity and engages customers.
Don't merely ornament—brand with intent. Spend on bespoke office and shop branding now and ensure all areas are a reflection of your company.#PrintServicesDubai #BusinessGrowth #HighQualityPrinting #MarketingEssentials #Branding #DubaiBusiness
2 notes
·
View notes