#and this goes for more than just gifmakers
Explore tagged Tumblr posts
Visit Tumblr Blog
Explore Tumblr blogs with no restrictions, modern design and the best experience.
Last Seen Tumblr Blogs


Fun Fact
In February 2021, Tumblr had 518.6 million blog accounts.
Note
sorry if this has been asked before but how do you make your gradients look so good?
Hi Anon! First of all thank you so much 🫶
I like to use gradient maps (which I've explained here) or gradient fills + gradient tool. I'll drop a little tutorial under the cut:
GRADIENT FILL
I'll be using this gif which I've already sharpened and coloured:

First of all let's make the background pop so I'm going to add a gradient fill (Layer -> New fill layer -> Gradient) with these settings (I'm using this colour #0099ff):

Now it's the time to play with the blending settings! Depending on your scene some will look better than others but I usually switch between Soft Light, Overlay, Color or Hue. 90% of the time I use soft light but this scene looked much better using overlay:

As you can see the background looks more blue and vibrant but it's not too much you know.
GRADIENT TOOL
Now it's time to use the gradient tool to give this gif a hazy look. I haven't seen many gifmakers talk about this tool but it's soooo useful and it takes gradients to a whole new level.
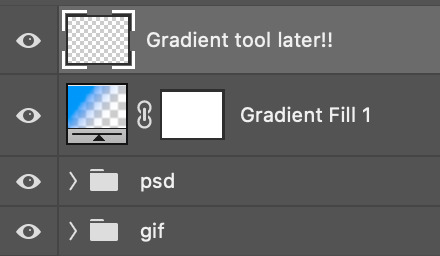
Before using this tool we'll need to add a new layer above the gradient fill, like this:
(HELP I just realised I typed “later” instead of “layer” 🤡 but let’s ignore that)
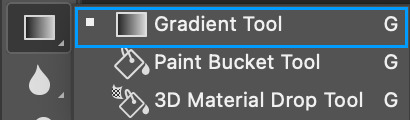
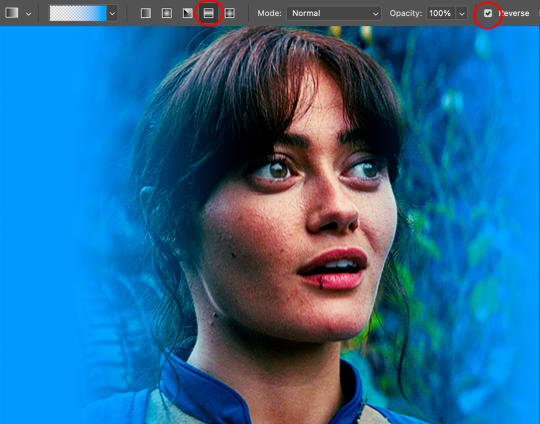
You can choose the gradient tool by pressing 'G' and then clicking here:
Make sure your gradient goes from any colour to a transparent background.

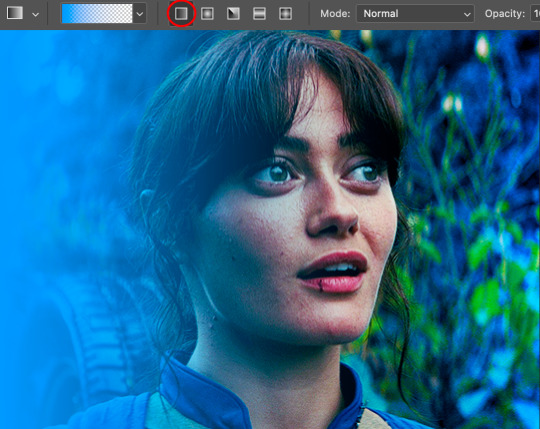
Okay so next to this gradient settings we have five different styles and each one will create a different shape. Depending on the scene I'll use the first, second or fourth one. Here are how they look:
1. Linear gradient
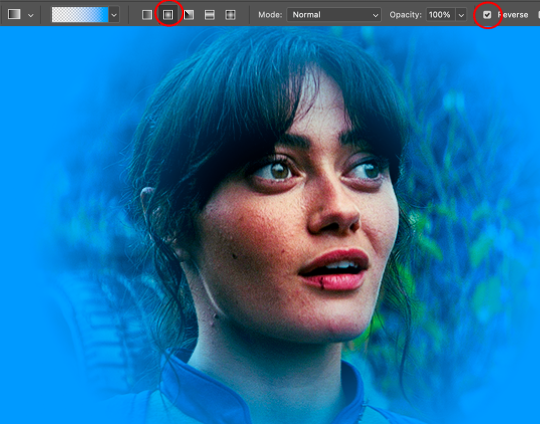
2. Radial gradient + Reverse (if you don't click this you'll end up with a blue circle above your gif)
3. Reflected gradient + Reverse
This time I'm going to use the radial gradient so to draw it start by clicking on the centre of the gif and drag the line (the farther you drag it the less intense the gradient looks):
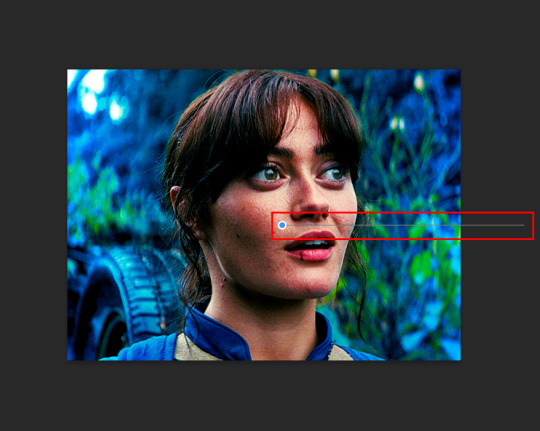
And this is the gradient:
And here comes the fun part again, playing with the blending setting and the opacity! Before doing anything I duplicate my gradient layer because I always use more than one so this is how your layers should look like:

Let's go to the first gradient tool layer and again try different blending modes: soft light, overlay, hue... Most of the time I'll use 'Soft layer' and I'll leave the opacity at 100%.
For the second layer choose 'Screen' and don't worry if your gif looks too bright because we're going to fix this by decreasing the opacity. Anything between 20-60% should look good but it depends if you want a more vibrant or more natural effect. I ended up using 40% and this is the result:

And we're done!!! As you can see the result looks much different from our first gif and it only takes a couple of layers!
Honestly the best advice I can give you is to play with the opacity and blending mode of the different gradient layers because depending on the scene some will look better than others!
#ask#Anonymous#ps tag#tutorial#usernolan#userrin#useraljoscha#uservalentina#userbunneis#userlockescoles#usernik
519 notes
·
View notes
Text
TILE TRANSITION TUTORIAL

a couple of people have asked me for a tutorial on how I did the penultimate gif in this set, so here goes! this is my first tutorial, so please feel free to reach out with further questions if anything's unclear.
note: this tutorial assumes you know the basics of gifmaking, can create the base gifs, and are familiar with timeline mode.
STEP ONE: create the base gifs! I'd recommend staying between 25-40 frames for each gif, since the transitions we'll use later tend to increase gif sizes. these are the ones I'll be using for this tutorial:


STEP TWO: create the guide layouts for both base gifs. for this panel, I chose a 4x4 grid — I would recommend keeping the number of "tiles" low because it can get tedious, but have a minimum of 9 (3x3 grid).


now your canvas should look like this:

STEP THREE: create the tiles. this is where the going gets rough; there might be easier ways to do this that I couldn't think of 😭 if there are any please send me an ask!
essentially, in this step we'll cut up the base gifs into smaller squares so that each tile can be manipulated separately when we put both gifs together. to do this, first create a square using the rectangle tool and the guides. then duplicate the base gif, move it above the square, apply a clipping mask, and then convert the clipped gif and square (selected in the image below) into one smart object.


ALTERNATELY: you could duplicate the original base gif and use layer masks to isolate tiles. create a layer mask for the duplicated gif layer and, with the layer mask selected, drag your mouse over a square (using the guide layout) and press delete. then press ctrl/cmd + i to invert the layer mask so that the gif only shows in the square of your choosing.
now repeat until you've got the entire gif in tiles, and do the same for the other gif!
since the transition effect is achieved by staggering the crossfades for each tile of the final gif, you can cheat by having multiple tiles "flip" at a time, ideally no more than four. this means you need to cut the base gif up into fewer pieces. to do this, simply draw multiple squares instead of one and then merge the shapes, before duplicating and clipping the gif onto them.


if you do this, it's essential to remember that you have to divide both gifs up in the exact same way. each piece of the b/w gif has to correspond to a piece of the purple gif!
this is what the layers look like for each gif once I'm done:


I have them lettered so that it'll be easier to match them up in the next step.
STEP FOUR: this is the complicated bit that took me two days to figure out. I'll do my best to explain but don't hesitate to reach out if something isn't clear!
to begin, open up a new psd and import both base gifs into it. (remember to click "create video timeline" and ensure that your gifs are all in order before proceeding.)
now, the trickiest part about this transition is ensuring that all the little tiles sync up so that the larger gif is coherent. so first we'll create some markers (just empty layers) to ensure that everything lines up as it should. — marker 1: at about halfway through the first gif (b/w in this case) — marker 2: at about a quarter of the gif length — marker 3: close to the end of the gifs

at this point we're ready to start bringing in the tiles. I'm going to delete the base gifs from this new psd just to keep things cleaner!
first thing to do is import my b/w tile. move the timeline slider over to marker 1 and split the first gif. (if it helps, rename the split gifs and add (start) and (end) to the two halves.) then, move the (end) half to the beginning of the timeline, and the (start) half to line up with marker 3.
the purple tile is easier to manage. simply import it into the psd and line it up with marker 2.
your timeline should now look like this:

notice the overlap between the gifs at their beginnings and ends ��� this is where you'll be able to cascade the tiles flipping, so it helps to have a significant amount of overlap.
crop the three gifs for this tile as you see fit! since this is the first tile I want to flip from b/w to purple, I'll crop gif 1a (end) all the way to the current position of the timeline slider (red line with blue tip) and leave the beginning of gif 2a uncropped. for the flip from purple to b/w, I'll crop both gifs a bit.
once that's done, drag all three gifs onto the same level in timeline so they form a video group. your timeline should look something like this:

now you just repeat the process for all the other tiles! as long as you made sure that all the tiles in one gif correspond with tiles in the other gif in step three, this should be a fairly painless process. make sure to crop the starts/ends of the gifs separately so that they don't all flip together.
this is what my layers look once I've done all the tiles:

and the gif!

STEP FIVE: transitions! click on the half-white square (top right of the left column in the timeline, beside the scissors) and select the crossfade transition, then drag it between two gifs in a video group. it should create a two-triangle symbol and shorten the overall length of the video group.


apply the transition to all the tile flips, ensuring that the duration of all transitions is constant. this can sometimes be tricky because ps likes to change the duration of each transition, so right click on the transition symbol and manually change all your transition durations to be the same.
your layers should now look something like this:

STEP SIX: draw the grid. bring back the guide layout from step two and using the line tool (I like 2px thickness), trace the grid. adjust opacity as you see fit (50-80% is usually a good idea), so that the canvas looks like this:

STEP SEVEN: export and celebrate! you're done!
I hope this tutorial made sense and was easy to follow, and happy giffing! my inbox is always open for any questions <3
#tutorial#ps help#ps tutorial#userace#alielook#userabs#usercats#userhella#userfaiths#tuserabbie#usershreyu#usertreena#tuserlucie#uservivaldi#usertj#usergiu#userroza
800 notes
·
View notes
Text
On Gifmaking:
So season 2's coming soon, and I wanna reflect on making gifs ever since I came back to Tumblr. I can't believe it's been 2 years of making gifs for this show!!!!! Look at how large my folder is lmao
And those are JUST gifs lol
Anyways, over time, my style has changed, especially how I color edit Arcane gifs. I kind of strayed away from a stylized filter color into just something that looks a lot more "natural" and works with the original scene.
Initially, I thought I'd save time, but I ended up not using my old arcane preset PSDs and resulted to coloring almost every scene manually. So in the end, it takes even longer to make them HAHAHA. It takes around an hour and a half for me to make a 10 gif set, basically. It also helps that I have a photography background, so coloring/editing is a lot simpler for me.
Here's a lil before and after of a dark scene (hiiiii viiiiiii <3)


Arcane is a REALLY dark show, but it goes for most of TV shows. Many of them are darker and harder to bring up the lights to make stuff look nice as gifs. Some people don't like to color their gifs, and that's okay. I personally just like color edited gifs more.
I've started learning how to upscale scenes myself, so that I have a better resolution and leeway to make things look "HD" more.
If you're wondering why my stuff look so "crisp", it's a combination of the scene's lighting, my sharpening settings on Photoshop and knowing how to upscale everything into 4k resolution. Of course, doing this needs an extremely beefy pc, which I am very lucky to own one.
Here's another before and after of a nicely lit scene. These are much, MUCH easier to do than all the darkly lit scenes because of shadows and lighting (caitlyn kiramman truly the rizzler <3)

I've been very lucky to be able to essentially take a nice, long break for like a month doing nothing after being so damn busy for the last year and a half, so it's nice that I was able to make a ton of gifs and be chronically online for a short while LMAO.
It's been so fun! But it's time to go back to reality lmao. I closed reqs for a bit because I was just so swamped with them the last few days, and I wanted to gif scenes that I like this time. I've done like 2 weeks worth of gifs. And you will see Vi a lot bc she's on my mind a lot heehee 🥰what can I say, she's such a babe <3
Here's a lil sneak peek, just look at herrrrrrr 🥰🥰🥰 and yeah, 4k upscaled resolution really helps making these tight crops, it's why i never went back to 1080p lol. It's how I’m able to make zoomed in gifs look decent (like the kirammountains gifset lol)

Thank you so much for all the support, likes, reblogs, and the nice tags you guys give. Yes, I can see and read all of them (both the nice and nasty ones lmao). If you have nothing good to say about the characters or my editing style, or anything related to the edit, please I beg you, just write a separate text post about it <3 If you have nothing nice to say, don't say it in my edits.
Lastly, thank you to the people who share my stuff outside the site and credit the blog and link them back here. I see you and appreciate you <3 You guys don't know how much I appreciate shoutouts and link backs, because people stealing my gifs is something that I've dealt with after making them for like a decade.
Tumblr is sadly not what it used to be in the 2013-2015 era. There’s definitely less activity as time goes by, so I appreciate all the people who credit and link back to this sideblog. Unfortunately, there’s more people who just repost them and it gets wayyy much more traction in other soc med sites. Yeah, ofc I get a lil jealous, but eh what can you do 😞 can’t really stop em.
I also don’t like putting watermarks because it personally looks tacky to me, but I understand why other people do it.
Anyways, if you reached at the end of this lil rambling of mine, thank you! I sadly might be busy during November because that's usually busy season, but I'll try to make time for making gifs of Season 2! Thank you and enjoy your stay on this lil sideblog :)
#personal tag#arcane#long post#nothing i just have free time rn and i wanna spend time on it rambling and yes im tagging the public tag lol#goodbye leave hello real life again
113 notes
·
View notes
Text
so as some of you may be aware, i managed to get a response from staff when i sent my feedback about the beta editor change and this was something that came up a lot when i called for screenshots. i thought i'd write a little summary of what i've found out because i think this is incredibly important in how we continue to raise the problems regarding the change to staff.
the number 1 biggest issue raised to me was the change disruption in quality via your blog's desktop theme. the biggest thing is the padding we notice on themes and the resizing of gifs, leading to their quality decrease:
in some cases, this also makes black (or even white) lines appear across the bottom of gifs:
now this is the response i received:
"The issue here is theme actually. It's applying padding to the entire Text post, rather than individual blocks. Because of this, the browser is scaling the proper 540px GIF down to 500px, and once the browser scales things, quality goes out the window. Under more modern themes, padding is applied only to Text blocks rather than the whole post, so Image blocks receive no padding and serve at their full 540px.
We're working on both a new post to explain this as well as looking into ways to improve this for older themes."
essentially, this is saying that it is an issue with how older themes process the gifs. now this changes things, this is not to do with gifmakers and our process, this is now to do with theme makers. if tumblr turn round, just make a post to explain it, and say 'just use our up to date themes!' this means that all older custom themes will still retain this issue. if you are a theme maker and you have old themes, they now become unusable. additionally from what i've heard (i'm not a coder, but from a brief chat with people who are) coding for this update is tricky. it is possible that this will majorly impact theme makers processes and limit our ability to use custom themes.
this means that we need to factor this into our feedback to staff. it's not enough to say 'we want to preserve our gifs', because the response is going to be 'absolutely fine, use one of our themes or a /blog view and it'll look great!'. we need to direct our feedback into also including that we love custom desktop themes and want to be able to use them to display our work, otherwise these will be sacrificed.
the second issue i received a few screenshots about is the shrinking of gifs on the app, as so:

this does not seem to be a beta post issue and in fact from the screenshots i've received, it affects posts both posted with beta and legacy.
i didn't receive a whole lot of insight on why it's occurring, but staff are aware of this and are working on fixing it. while incredibly frustrating it does not at least seem to be linked directly to beta and therefore shouldn't be something that sticks around!
#idk just thought i'd pass this on!!!#these were the two issues that i got sent in to me#it's positive they are actually discussing feedback and are 'working on it'#but it concerned me that the response i received was 'it'd all be fine if you just use one of our up to date themes!'#signal boost
546 notes
·
View notes
Text
hi everyone! I've gotten several requests to make a tutorial on how to make gifs for someone just starting out and I finally got around to slapping a tutorial together.
This tutorial will cover:
software recommendations
choosing what to gif
creating a gif step by step with probably a lot of unnecessary detail
some tips and tricks:)
(This particular tutorial will not cover how to find tv and movies to download and gif, or any specific instructions on coloring. only the basic gif making process.)
so for the purposes of this tutorial, we will be using Adobe Photoshop, which is the most common program for making gifs, and the one I recommend. the version you have doesn't make a major difference in terms of capabilities but the interface may be slightly different looking if you have an older version or a different type of device. you cannot make or edit gifs in any mobile version of the photoshop application. Optionally, we will also be using Adobe Premiere Rush/Pro or another video editing software of your choice. wherever you are downloading Photoshop, whether from Adobe or a third party, you should easily be able to acquire Premiere as well. I am aiming to be as detailed as possible in this tutorial, so it may sound more time consuming than it really is. once you get the hang of things, it goes fast. the most time consuming part by far is the editing and coloring. in my opinion, one thing that majorly saves time while giffing is knowing your keyboard shortcuts and using your mouse/trackpad as little as possible. I will be going over these in this tutorial as well.
before we begin, some general tips:
gifs of single shots that do not cut between angles or subjects generally will look the best, barring exceptions
for a single gif set, choosing scenes and shots with similar lighting will be easiest to get to look uniform when compiled together, since editing wildly different looking scenes to have similar coloring and lighting is hard and takes some practice!
avoid shots that will require you to majorly crop or zoom to properly frame the subject, as this will greatly diminish quality
speaking of quality, gifs will look best using 1080p video, but you can get away with 720p as well. I would not recommend giffing with anything lower resolution than that
Tumblr's upload capacity for image and gif files is 10mb. be sure when exporting your finished gif that it is under that size. if it is a bit over, you can try trimming a few frames off your gif in the video timeline.
if you get frustrated, don't give up! giffing is hard and complicated especially if you are new to photoshop. I tried to make this tutorial as detailed as possible so it's easy to understand (although im sure I still forgot some stuff)
ok onto the tutorial!!!
STEP ONE: choose what range of frames you want to gif, and how.
once you have decided what you want to gif, there are two main way to convert your episode into a range of frames to make into a gif. the first is by screencapping. this involves downloading a program like mplayer or vlc which can be used to convert video files into "stacks" of screencaps, which can then be separated into whatever range of frames you want and imported into photoshop. this is seemingly by far the most common method I have seen amongst gifmakers*, but personally I don't care for it and I think it's more confusing and time consuming overall, so I will be explaining the second method: importing video frames to layers.
now, normally what this would mean is opening the full episode in photoshop and using the pathetic little playheads on either end of the scrub bar to trim the file into a clip. this is where your video editing software comes into play.
open whatever episode or movie you want to gif in your program. if it is a large file like a long movie in 1080p, this may take a few seconds. like I said, I am using Premiere Rush. I will be using a random episode of 9-1-1 for my example gif.
in your media browser, hover over whichever episode you want (you can also just add the whole episode to your project and scrub through, but that can take longer unless you know what time stamp you're after). click the fullscreen button by the bottom righthand corner.
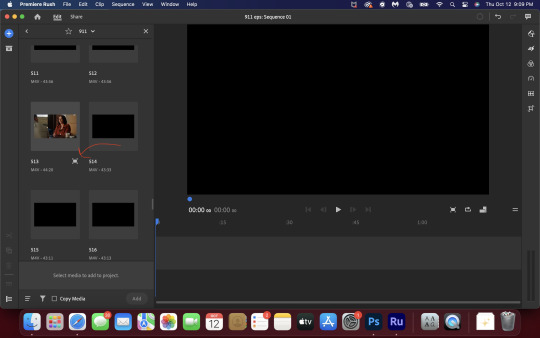
now you can scrub through and trim the episode before you even import it to premiere. this makes trimming your clip even easier.
use the trim bar (yellow outlines) to trim as close as you can around the scene you want to gif.
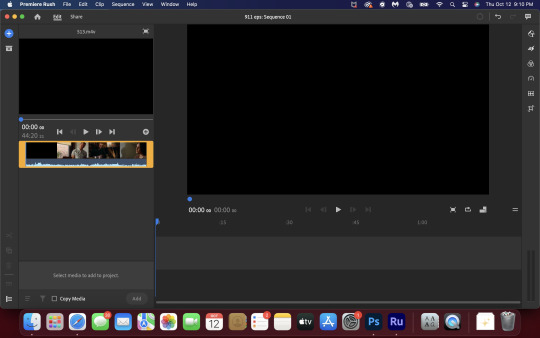
then click this plus, and then "add" below. this will add the clip to your project.
now, move the blue playhead up to the frame you want your gif to start on. then, use the scissors button off to the left to slice the clip. select the portion before the playhead, and delete it.
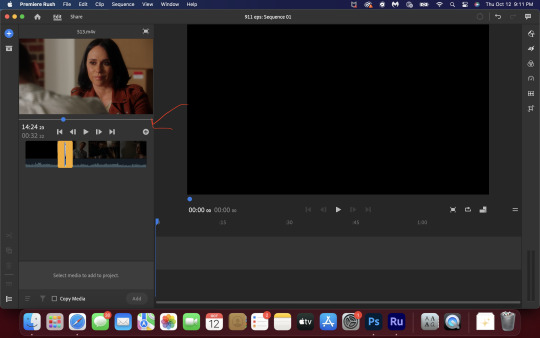
now move the playhead to where you want the gif to stop. a good length for most gifs is around 1.5-2 seconds in my opinion. some may be shorter depending on how long the shot is, or longer if you plan on making them smaller (remember, the uploading capacity on Tumblr is 10mb per file.) trim again, now delete the portion after the playhead. you can also use the left and right arrows beside the play button to move frame by frame, and you can adjust the side of the horizontal scroll bar below your clip to “zoom” in on it and make scrubbing easier.
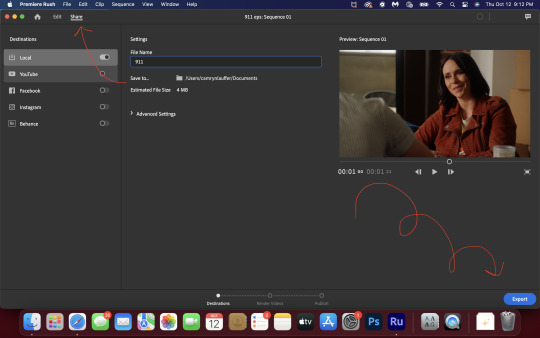
once you have your clip, go up to where it says "share". your clip will be rendered, and then you can click export to save it.
repeat step one as many times as you want for each gif. I know this may sound complicated, but like I said above once you get in the rhythm this step takes only a few seconds.
STEP TWO: create your gif!
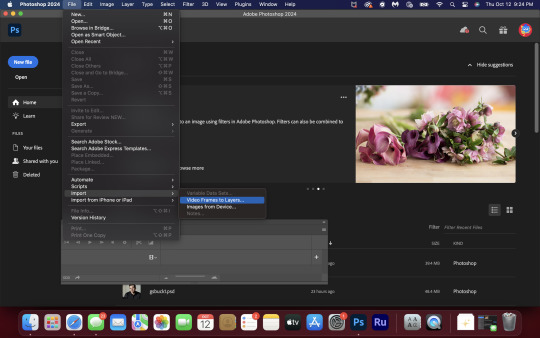
close premiere. open photoshop. head to the control bar at the top. select file > import > import video frames to layers.
navigate to whatever folder you exported your clip to. select it, and hit enter. a second popup will appear asking you to select your range of frames. since you have already trimmed your clip to your liking, simply hit enter a second time.
now your screen looks like this, and we are going to crop and resize our gif! (troubleshooting: if you do not see the timeline bar at the bottom, select window from the control bar, scroll down, and make sure timeline is selected as part of your workspace. Adjustments and layers should be there automatically but if not add them too).

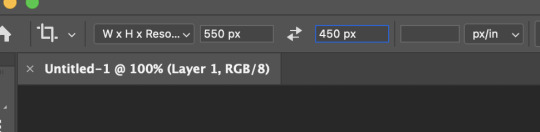
Tumblr posts are 540px wide, so in order to make my gifs as small as possible while maintaining quality, I typically crop my gifs to be around 550-600px wide, with varying heights depending on what shape I want the gif to be. experiment with this a little and decide what works for you. just don't make the width lower than 540px. once you have the portion of the frame you want inside the cropping grid, hit enter again. sometimes you have to hit it twice.
here are the measurements I am using for this gif
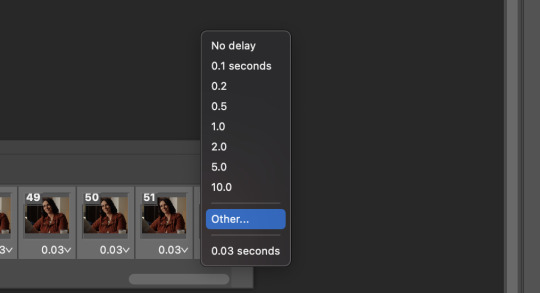
now in your timeline, select frame 1. hold down the shift key and scroll to the end to select the very last frame, thereby highlighting them all. from here we will edit our frame delay rate. photoshop will automatically set it to .03s, which will make your finished gif awkwardly fast. I typically use .05s, or .06s if I want a gif to be subtly slower (this comes in handy if the shot you are trying to gif is very short). anything longer than .06s will look weird though. choose "other" from this menu and type in your delay rate. make sure not to miss the zero after the decimal.
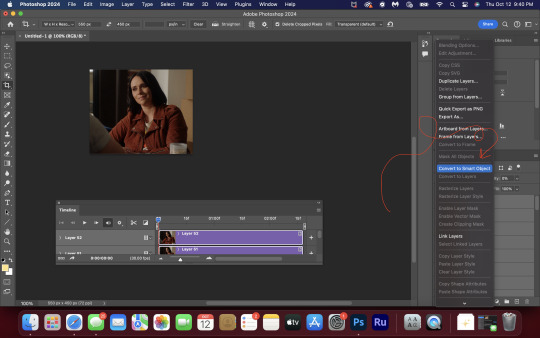
once you've set your frame rate, go to the other end of your timeline and click here to convert your frames into a video timeline.

then press option + command + A (on Mac) or windows + alt + A (on PC) to select all layers. then right click (control + click with a trackpad) on any one of the highlighted layers in your layers tab off to the right. scroll down in the popup menu and select Convert to Smart Object.
THAT'S IT!! CONGRATULATIONS!!!!! WE HAVE GIF!!!
from here comes the fun part!! you will begin adding action filters like sharpening as well as adjustment layers to color and edit your gif. experiment with different adjustments and styles until you find something you like. too many adjustment layers will up the size of the finished gif though, so I tend to keep mine to 3-4 layers max unless its a really hard to color scene. if anyone is interested in a separate coloring tutorial, please let me know!
once you are finished editing your gif, click file > export > save for web (legacy) OR hit shift + option + command + S. play your gif in the export window to make sure it looks okay, and then hit save!
I hope you guys find this helpful and informative! please hit up my in box if you have any questions or if anything doesn't make sense. happy giffing!!!
*one reason people seem to prefer screencapping to this method, is saving all the individual clips as video files does take up a lot of space on your scratch drive, which in turn can cause your computer to work slowly or crash programs. this can be rectified by making sure to delete the clips from your computer once you are done making the gifs. another space hoarder to look out for is the proxy files of your episodes that will be automatically saved to your hard drive whenever you add an episode to your project in Premiere. Periodically, go through your storage and delete all the .proxy video files. this will not delete the original episode files, only the proxy files created by Premiere.
tagging some mutuals to sb hehe: @shitouttabuck @lover-of-mine @honestlydarkprincess @eddiediaaz @compactdiscmp3 @eddiebabygirldiaz @bigfootsmom @callaplums @athenagranted @firemedicdiaz @sibylsleaves @loserdiaz @buck2eddie @diazass @eddiediaztho @giddyupbuck @monsterrae1 @icecreampotluck @sunflowerdiaiz @swiftfootedachilles @singlethread @aziraaphales @911onabc
140 notes
·
View notes
Note
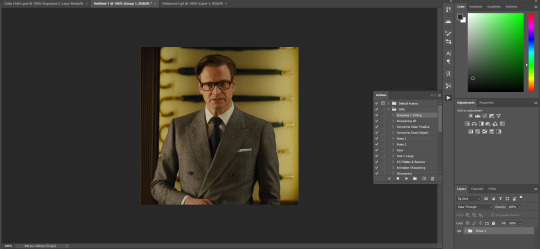
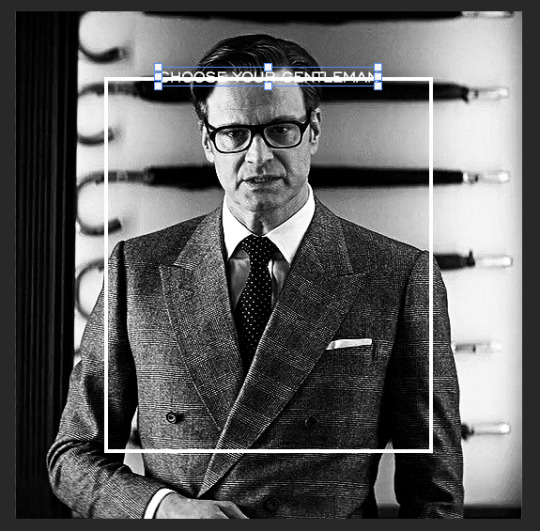
Hi, I love your blog and your edits. I was wondering if you could do a tutorial on how you combine multiple gifs into one in the first gif of yours MIKELOGAN’s 5K FOLLOWER CELEBRATION || GET TO KNOW ME MEMEFAVORITE ACTORS [2/10]Colin Firth (September 10, 1960) set? Thank you for reading this and helping me.
thank you so much, that's so kind!! this is the post in question (which was inspired by this gorgeous set) and i'll break down how to do it step by step below the cut!

i ended up saving this gif as a psd because i remember it taking me so long and being really frustrating, i just wasn't sure why. for reference, i posted that set back in september, just over four months ago. looking at the psd, i can see just how far i've grown as a gifmaker bc that thing is a hot mess. i made it about 3x more complicated than it needed to be, so let's do this the right way lol note: i was still using 0.07 frame rate at this point. i have since switched to 0.05 for smoother, quicker gifs.
what we're going to do is create all of these gifs separately and put them together at the end. in total, there are 6 individual gifs. let's start with harry.
i gif by importing video frames to layers, but if you prefer to screencap, load those in instead. because this ends up being a pretty large gif, both in size and length, i kept it to 20 frames per clip.
once you're satisfied with the frames you've chosen, crop your canvas to 540px x 540px. this is what i'm left with

this is when i sharpen my gifs. everyone's process is a little different. i created my own sharpening action, which converts my frames to video timeline and then sharpens.
the next step is to color your gif. if you're going for the overall look in mine, here were my layers:
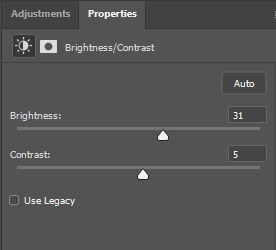
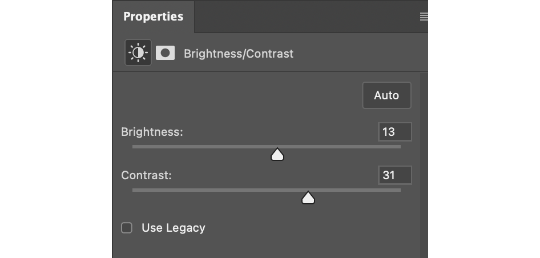
a brightness/contrast layer with brightness set to 31 and contrast to 5. this will depend on the scene you're working with

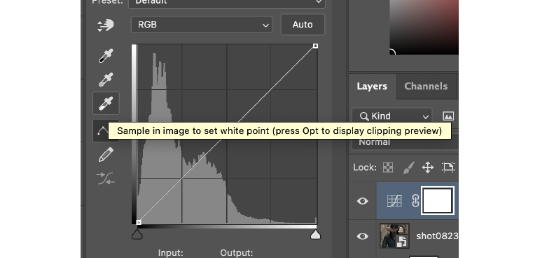
a levels layer using the black and white eyedroppers. the top one is your black eyedropper. to use it, click it and select the blackest part of your gif. do the same with the white eyedropper and select the lightest part of your gif. you may need to play around with selecting different points depending on your scene and the original coloring
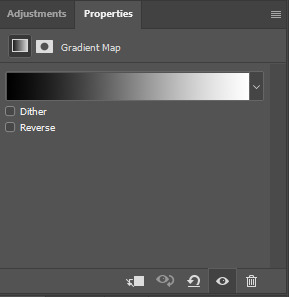
finally, a simple black & white gradient map layer on top
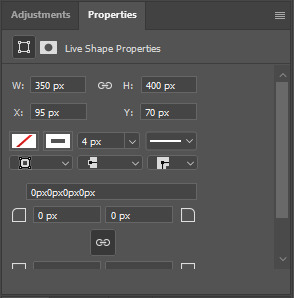
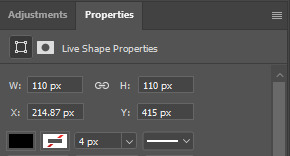
now we're going to add the thin rectangular border in the middle of the gif. i use the rectangle shape tool for this (press U on your keyboard) and these are my settings (x and y coordinates don't matter):

to center it perfectly, i use ctrl+T and drag it until it snaps into place with both the vertical and horizontal guides.
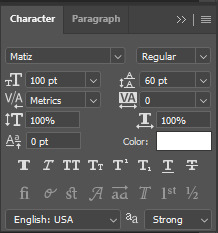
next, let's add the "choose your gentleman" text that goes at the top of the border. here is the font i chose and its settings:

once again, press ctrl+t and drag this to the vertical center of your gif and to the center of the top of the border. you should feel and see it snap into place. this is what we have now:
now, we're going to use a layer mask on the border so we can read the text. select the rectangle layer and click the layer mask button
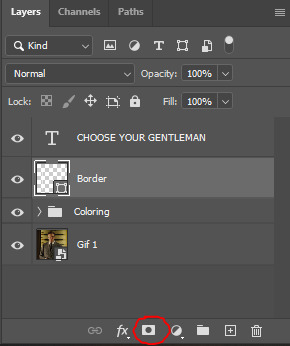
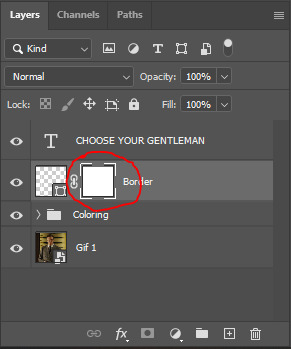
with the layer mask selected (as shown in the second image), use the rectangular marquee tool (M on your keyboard) to draw a rectangle around your text, taking care to keep it just a little larger
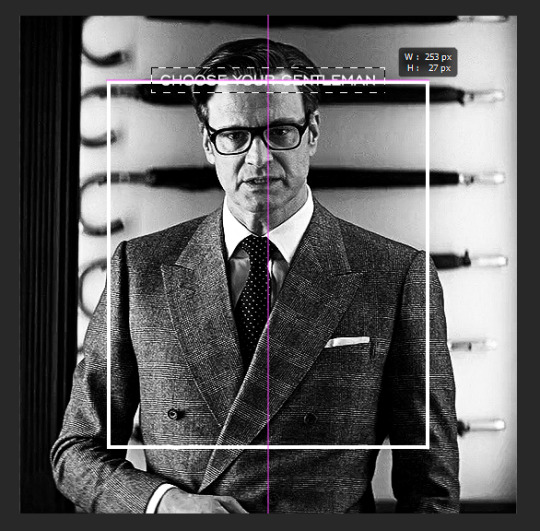
as you can see, you'll know when you're perfectly centered through your text layer and vertically on the entire canvas. select your brush tool without deselecting this rectangle (B on your keyboard) and paint the selection with a black brush. this masks that part of the border!


let's add the small square gif that goes at the bottom of the border now. i think the easiest way of doing this is to use the rectangular shape tool (U) again. the size of this gif is 110x110, so create a black square of that size with no stroke. Use ctrl+T to drag it to the center of the bottom of the border (the x and y coordinates don't matter):
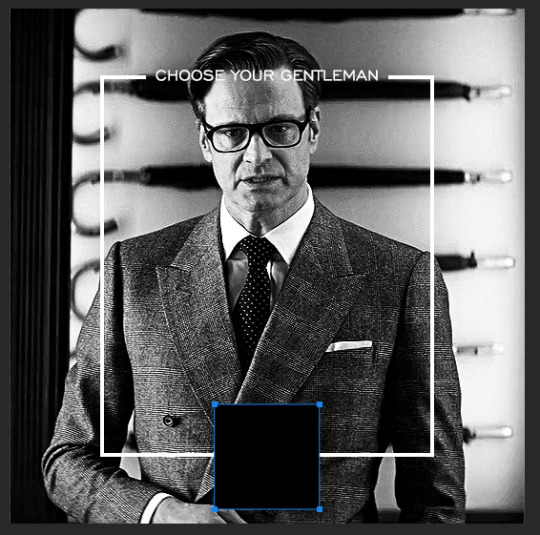
now duplicate your original gif layer (ctrl+J) and drag it to the top of the layer panel. right click on it and create clipping mask. this will make it so the gif only appears within the confines of the square we just created. resize your gif by using ctrl+T and, making sure the proportions are locked, drag the corners to the edges of the square.
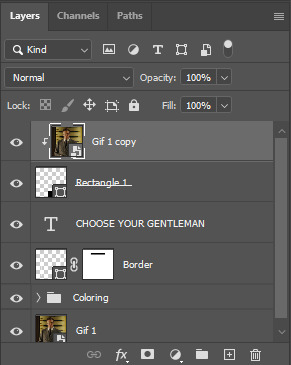
this gif is not colored at all as we only duplicated the gif itself and not the coloring layers. i duplicated those as well and dragged them on top of our small gif, but it's important to make sure those are using the clipping mask as well. you can click this on the properties layer of each adjustment layer to make sure they do.
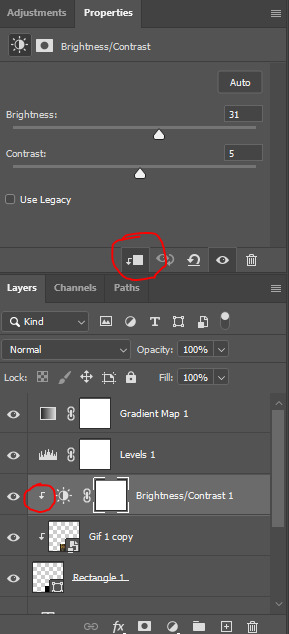
you'll know you've been successful when you see the small arrow next to each of your coloring layers. this keeps them from affecting the coloring of the larger, main gif.
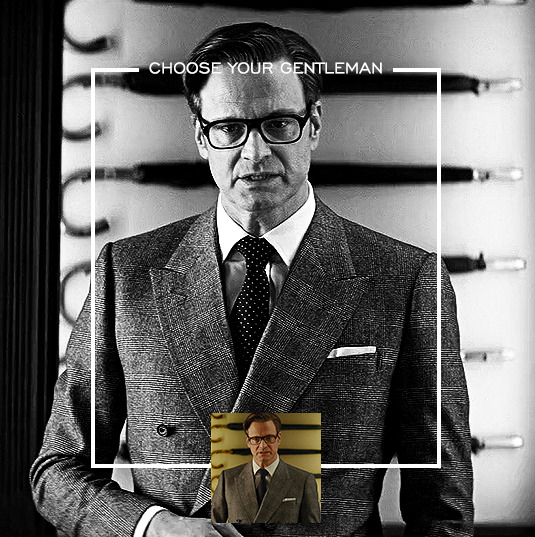
we're going to change the gradient map adjustment layer from black & white to black & lime green (or the color of your choosing). click on that layer and then on the map. this will bring up the gradient editor. click on the small white color stop at the far right end of the gradient and then on the color picker, choose a new color.

the hex code i used for the lime green is #00ff0c
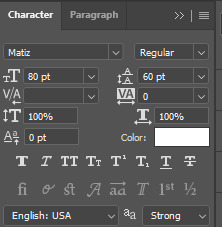
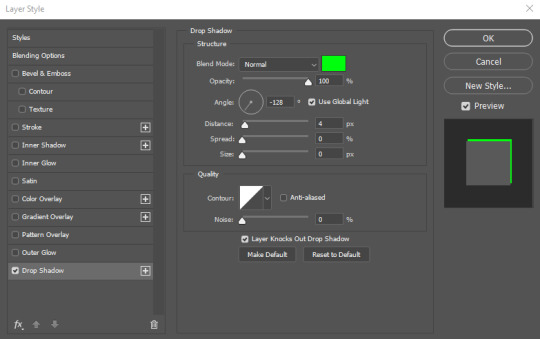
our last steps are the angle brackets on either side of the gif and harry's name in the center. here are the settings i used for those (angle brackets on the left and harry on the right):
the layer styles for harry's name (double click on the text layer to call up this menu OR right click > blending options):
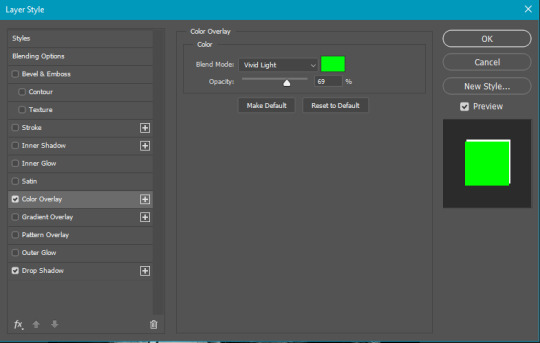
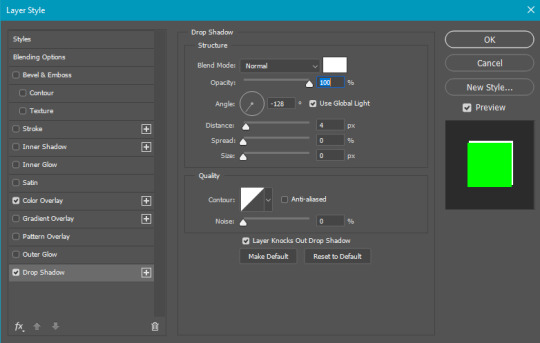
and for the angle brackets:
by now, you know how to utilize ctrl+T to move these layers where you'd like them. harry's name is centered horizontally and vertically and rotated at a bit of an angle and the angle brackets are centered horizontally and i just eyeballed where to put them in relation to the space between the border and the edge of the gif.
this is the complete first gif. what i would do for your own sanity since you have two more of these two create is 1) save it as a psd just in case something crashes and 2) don't convert it to a smart object until you have all 3 gifs completed and are ready to put them together.
the nice part about having the first one done is you've ultimately done the hard part. create your two other gifs, but you'll be using at least roughly the same coloring and all the same text, just with the colors adjusted, so you can drag those layers from your completed first gif to your others as you work on them.
once you have all 3 gifs completed and still on 3 separate canvases (and saved as psds bc this is adobe friggin photoshop and shit breaks all the time), convert all layers on all the gifs to smart objects. this will simplify the final gif and make things much easier.
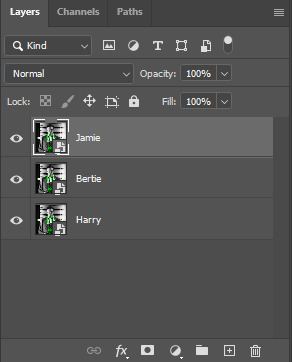
then, bring gif #2 and gif #3 both onto gif #1's canvas. this is what it will look like at first on the timeline and in your layer panel:

(full disclosure, i'm not making the other two lmao, i'm lazy and i already did it once in a way harder way 😂)
to get the gifs to play after one another rather than simultaneously, you just have to drag them after one another on the timeline!
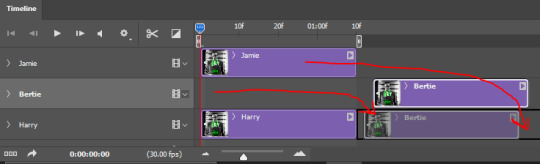
a little bit hard to show the actual process, but you're just clicking the bertie layer and dragging it down to harry's line after the harry layer. then do the same with the jamie layer, dragging it down to the harry layer after bertie. when you're done, it should look like this:
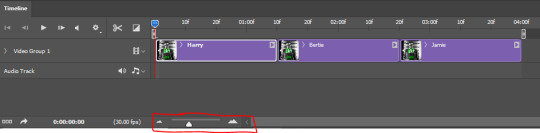
btw, the little slider i circled is what enlarges or shrinks the timeline view, so if you need to see something broken down a bit more/slower, drag it to the right. if you need to zoom out, drag it to the left.
and that's it! export and save your gif!
if you have any questions or anything is at all unclear about this, please let me know! i'm happy to help!
#answered#Anonymous#gif tutorial#my tutorials#gifmakerresource#completeresources#dailyresources#LISTEN. the way i did this 4 months ago was SO FUCKED#i made it SO SO much harder than it needed to be#you know what that is? growth.
96 notes
·
View notes
Text

Someone asked me for my gif colouring tutorial - this is a day I have been waiting for.
I’ll start by saying that there is no right or wrong way to colour gifs. It’s entirely dependent on the show, scene, character and the giffer. Over the years I’ve followed many gif tutorials (I’ll link my favourites at the end) and I think I’ve finally settled on a colouring routine (?) that works for any gif.
This tutorial presumes you have a basic understanding of how to make a gif and that you know how Photoshop works. I use Photoshop 2024 so things might differ depending on what version you have.
Shall we begin?
First thing I do once I’ve cropped, made my gif and sharpened it is to adjust the curves.
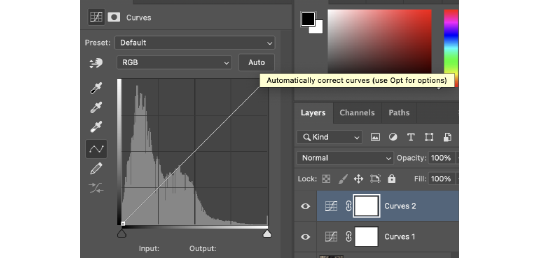
I always set the white point and the black point using the eyedropper tool. This adjusts both the brightness but also the RGB layers (red, green and blue) and begins colour-correcting the gif.
I then do another curves layer and I use the auto-correct curves button. This automatically adjusts the curves and brightens the entire gif.
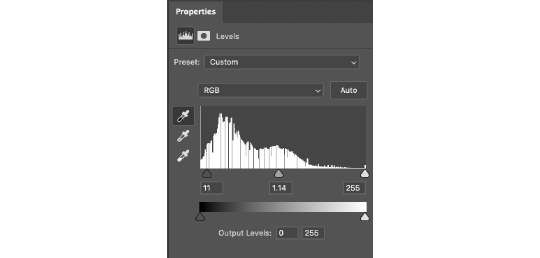
Once I’ve done my curves I move on to the levels. I increase the black point (the first little arrow as you look at it) and the grey point (the middle arrow). The black point deepens the darker areas of the gif. The grey point can either brighten the grey areas or darken them - I tend to brighten them.
Then I adjust the brightness and contrast to make the whole thing brighter and deepen the colours.
The channel mixer is a new discovery I made (I didn’t make it, I just found a tutorial that did). It helps to colour-correct the gif and make it less orange/blue etc. If you’ve seen Shadow and Bone (namely season one) you know how green and orange some of it is. This layer helps to combat that and make it a more natural colour.
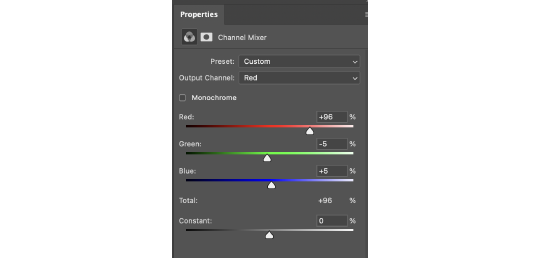
For this gif, because it was all a bit yellow/orange, I decreased the reds and greens and increased the blues. I only go up or down by one or two - if you go too much in one direction or the other it’ll begin to change the colour of the entire gif rather than subtly correct it.
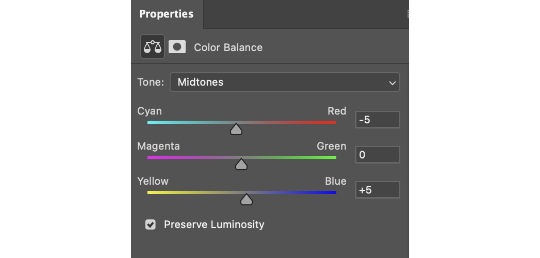
To colour-correct a bit more I use the colour balance layer. Again, I decrease the red and increase the blue. I tend to stick to going up in fives on this layer. +/- five tends to do what I need it to regarding colouring.
And finally I adjust the vibrance by five or ten just to make the entire gif pop that bit more.
Here's the gif before and after!

It's made a huge difference and made the entire gif seem a lot brighter and less yellow.
And just to prove it works no matter what - the left side has been coloured the right hasn't. The difference is noticeable, especially on Yennefer.

Tada, colouring tutorial! Whilst the numbers vary from gif to gif the order and layers used remain the same.
Here are some useful links to other tutorials. These are like my bible and I swear by them!
Gifmaking for beginners by @hayaosmiyazaki (the holy grail of tutorials for me)
Gif Making Guide for Beginners by @saw-x
And this tutorial by @aubrey-plaza goes into more detail about the channel mixer and how it actually works!
Any questions don’t be afraid to ask :)
50 notes
·
View notes
Text
Caryl Fanfiction Recs - Celebrating single-fic authors (part 1)
Happy Sunday, dear fellow carylers! Today I bring you the first part of a list that I have been preparing for some time.
Every fandom has its big stars: incredible gifmakers who everyone recognizes their work from a distance; amazing artists who draw fanart and edit fanvideos that deserve to be in a museum; and talented and prolific fanfic authors who are better storytellers than the actual canonical writers/creators. All of them deserve all the praise and love in the world, but, in reality, even the most popular ones don't get the feedback they truly deserve. Now, what about those fans who only create one thing for the fandom? Just one art, one video, one analysis, one fic? Where are the compliments for them?
So this list it's a way to rectify that for single-fic caryl authors. I hope a little bit of love reaches them wherever they are. Thank you for contributing to our fandom!
1. Wait by acaryler [ 9Lives ]
Summary: A new day only begins when the darkness goes away.
Rated: G
Word count: 814
Published: February 22, 2017 (one-shot, contains character death)
2. This is Who We Are by CarylLover [ 9Lives | AO3 | FF.net ]
Summary: Aaron is badly injured and, after the attack of The Wolves, the group at ASZ is left vulnerable. Daryl needs to go out to find more people, but he can't go alone. He chooses Carol to go with him. This time together will revive some painful memories for Carol and confessions will be made. But will they only come from Carol? Does Daryl have a dark secret too?
Rated: M
Word count: 10.490 (05 chapters)
Published: May 31, 2015 (complete)
3. Weeping Statue by Evilangel [ 9Lives ]
Summary: She watched silently from the shadows.
Rated: T
Word count: 151
Published: January 22, 2016 (one-shot)
4. Contently Broken by FloraDora [ 9Lives ]
Summary: Following the deaths of Beth and Tyreese, Carol's concern for Daryl grows as he continues to distance himself from the group, clearly struggling with his grief. Carol attempts to reach out to him which results in a very emotional encounter.
Rated: T
Word count: 1.410
Published: March 17, 2015 (one-shot)
5. We belong by Ithil [ 9Lives ]
Summary: Daryl helps Carol to start healing after the events of 5.16. Inspired by Ryan Adams' song I love you but I don't know what to say.
Rated: T
Word count: 1.622
Published: June 24, 2015 (one-shot)
6. Doors by @jtsbar [ 9Lives | AO3 ]
Summary: Daryl before he opens the door.
Rated: T
Word count: 513
Published: August 16, 2014 (one-shot)
7. Felicity by Lesoni [ 9Lives ]
Summary: He hoped that she would understand him like she always seemed to do. That she was his woman-his Carol. The woman that he'd learned to love more than he loved anyone else-especially himself-because it had been her that had shown him how much he was actually worth. He was trying to give her that back. He damn near worshipped her, and she needed to know that.
Rated: E
Word count: 2.787
Published: April 23, 2016 (one-shot)
8. New Habits by LouWho88 [ 9Lives ]
Summary: Daryl and Carol have stuck with their usual habits while becoming roomates in Alexandria even as their relationship has been growing. However, on this particular morning it seems as though Daryl has developed a new habit and Carol hope it sticks.
Rated: T
Word count: 1.238
Published: May 02, 2016 (one-shot)
#caryl#caryl fic recs#caryl positivity#caryl fanfiction#caryl fandom#caryl fic recs - single-fic authors
18 notes
·
View notes
Note
as someone who has been in tumblr fandom a long time (like since tumblr started having gifsets), I want you to know that the way you were called out was 1. really rude and 2. goes beyond what I have understood as typical fandom etiquette
like, everyone's allowed to have their own boundaries -- including gifmakers, who put a lot of hard work into their creations -- but it was honestly mean to imply your analysis post with one gif by someone else was the same as someone reposting a gifset as their own, then put on a callout post and blocklist
+ you were very kind toward the gifmakers who called you out
wanted to let you know that you have been seen and appreciated
Thank you. I can’t express how refreshing it is to see a positive message in my inbox today.
To be honest, I genuinely didn’t know crediting regular gifs was fandom etiquette. As someone who used to make gifs myself, I understand it’s a lot of work. None of the fandoms I’m a part of ever cared about it unless they’re super personalised with art and sfx and quotes and stuff like that.
But if that is how this fandom works, I’m more than okay with following along. It just would’ve been nice (which I seemingly didn’t deserve) if I wasn’t bunched together with other people who are indeed stealing gifs despite warnings to not do so. Especially the title ‘known gif stealers’ makes me wonder how many people have been talking about me and perceiving me as a rude person while I just didn’t have the information.
Anyway, sorry for the rambling. Thank you so much for your kind words. I’ll always remember you.
3 notes
·
View notes
Note
Sorry if I bother you, but I really love your gif sets! Do you know some tutorials or, app, or anything, to learn how to make good gif? I am learning and I feel very stupid because all my gifs are shit. (if my ask is inappropriate or anything, please ignore me)
you're not bothering and none of this is inappropriate, you're more than welcome in my inbox! as for your questions, let's see what i can do.
1) tutorials — i've been doing this for long enough that i don't really have much to recommend here, the only tutorials i use nowadays are all about specific things and not how to make gifs as a whole. that being said i've linked this one before, i personally do some things differently but it's a very good tutorial, well-received by gifmakers who are just starting and well written, from what i've skimmed through.
another good post to look through is this one, not a gifmaking tutorial per se but it goes into sizes, sharpening, and how to get neat & clear gifs. two of the main points are A) while you can get away with making gifs out of a 720p quality video, 1080p is what is usually recommended. you could use 4k as well, but a 1080p video is usually easier to find, will take less space in your storage, and will give you really good results already. no need for overkill <3 as for B) size matters here on tumblr dot com, mostly width. the op of the post linked in this paragraph has included a nice graphic for the size limits for gifs, you can refer to it as you make your gifs so that whatever you make won't turn out pixelated once you upload it to tumblr.
if you're curious, i've been asked about my sharpening settings here and i spoke before on tumblr sizing here
2) software — you mentioned app, if by app you mean mobile stuff then i'm sorry, i can't help you! i've never made gifs through mobile and i wouldn't even know which direction to point towards for you to find more information. as for computers, if you mean programs then these are what i use to make my gifs: potplayer (for taking screencaps) and photoshop cc 2020 (for making the actual gifs, this is the post i used but here's one with more links)
now i'd like to mention something my grandma always used to say: no one is born learned. you're not stupid just because it's taking you a while to do something, learning is a process and everyone has their own pace. i've been making gifs for a decade now and i know there are things i could do better! i'm also still learning, i make plenty of "shit" gifs before stumbling my way to something i am okay with posting, and sometimes i'm really proud of what i've made and other times i think it's just "good enough". i understand feeling disheartened but please do not feel stupid about any of this!
no use in putting yourself down, now hold my hand and let's add the finishing touches on this long ass reply <3
3) tips — we've mentioned video quality, sharpening, and sizing. what else, what else. personally i would start simple (and i did, way back when, and still do!! most of my gifs are quite simple). so: cropping/resizing + coloring + sharpening. it'll help get the basics down and then you'll have a good foundation for everything else you might want to learn. i mentioned in another ask, almost two years ago now lmao, that i used to download other people's free psds (that is, pre-made settings and layers to color your gifs) and instead of using them i would open them up and pick them apart to see how people were coloring things, which layers they used, in which order, stuff like that.
remember: there is no right or wrong to do this! you could ask ten different people how they make their gifs, and their preferences for any specific part of the process, and you'd get ten different answers. if you find a tutorial and don't vibe with it, throw that aside and look for another. pick and choose, find what works for you and what doesn't! and that means do not be afraid to experiment and try things out.
also, don't like photoshop? no problem! i started with gimp, now personally i wouldn't recommend it over ps but it's a good program, it taught me a lot, and there's really nothing to hate about it. it might have less functions than ps though, and already a decade ago there weren't that many tutorials/resources for it.
don't like photoshop AND don't want to download a program? try photopea, i haven't used it but it works directly from your browser and it should do everything photoshop does!
let me know if there's anything else i can help with <3
17 notes
·
View notes
Note
not to sound like an ungrateful ass because i'm really grateful somebody took the event over rather than it getting abandoned completely but oh boy, i really wish there was more consideration put into thinking about us poor lil gif makers lmao. i saw the prompt list & my heart sank because wow, what the flip am i supposed to do with some of these prompts? i was up late last night trying to come up with a plan & yh, it's going to be difficult that's for sure! anyway best of luck to you my love! x
Nonny I am really glad you sent this message because I am feeling the EXACT same way.
I am so grateful to the new mods that whumptober is continuing and I recognize how massive this event is, how much time goes into planning and running something on this scale. I have a massive amount of appreciation for themcause I certainly couldnt handle it. And I love them for doing it. I do.
But it feels like they only thought of this event as a writing event and that irks me. This prompt list is so hard for gifmakers. It's great for writing and I'm glad a lot of writers are feeling inspired but as gifmaker my heart sunk further and further with each days prompt I read. How on earth am I supposed to come with enough scenes for a compilation gifset for these prompts? Hell, I can't even come up with a single scene for a lot of these. Even the alternates are a challenge so I can't even use those to help me.
I don't know. I'm not giving up though!! I'm gonna figure something out for each day even if it's only vaguely related to the prompt! Still, it's a little discouraging reading these prompts. Feels like sometimes people forget that the whump community is fandom community and not just a writing community. There is so much more to this community than writing and I wish that was acknowledged more sometimes. Not to diss writers! I'm a writer! I love whump writers! Y'all are amazing! But being a gifmaker it can make me sad sometimes that people think of the community as strictly a writing community when it's more than that.
Ugh sorry for being a downer. I'm struggling here. I don't want to repeat scenes I've giffed before but it's not looking good. I know I'm gonna have to repeat scenes cause I just don't have any other examples. I was really hoping for specific tropes instead of vague ideas this year.
But its gonna be okay, yeah? Us gifmakers can do this! We got this! And we can help each other. I already know of a few days I'm going to ask for help with so if I can help anyone with a prompt please ask! We can do this!
#mod replies#im feeling down about things today i guess#i love this community so much#i love whumptober#just feeling a little discouraged today#ill be fine#itll be fine
16 notes
·
View notes
Text

Hi everyone! As I had said in this post, I would be talking about my favorite creator each month and this way, I can introduce everyone to people I like and get introduced to people I haven't interacted yet with too! This is the first time that I'm doing this and thus, choosing someone to debut this with was actually an easy choice, it's the creator who actually inspired me to make something like this to appreciate every creator's efforts (and trust me, we must appreciate them, because the amount of work that goes into it, is mind boggling). ### Creator shoutout of October 2024 is none other than @finnickodaiir ( @mrperfectlyfinetv ) for me! Here are a few things Jake created that I absolutely adore: 1. A gifset celebrating 10 years of 1989 2. The heartstopper gifset that i absolutely love (the coloring is simply amazing) 3. The "some things never change" gifset that absolutely had my heart when he posted it
Why Jake? No, the question should be why not. Every creator has their own niche thing- enabling them to stay unique. Jake has the ability to provide simplicity while maintaining complexity. And the way he colorizes the gifsets and the fonts he uses are just soooo.... I mean why arent gifmakers working as part of the movie industry is something I will not understand. I do know him (no we haven' met irl, but we have been friends for more than a year- i think 2 years), which is why it was easy for me- I have seen him balance everything and more, while still making time to release his creative juices. Biased? Who cares.
-----
-> if you'd like me to see your edits (be it gifsets or drawings or anything), use the tag #tusercleo
2 notes
·
View notes
Note
No bc a gifset I posted after that one from a 1990s movie that took a lot less time to make already has 300 notes I think people just hated the watchers of haven’t seen it yet and also don’t care. But it takes forever to make gifs with 4k footage my computer wants to blow up so seeing it gain less reblogs than hours that have passed since posting is so disheartening 😭
I feel you so much!! the struggle of gif making is real, and working with 4k caps omg. and then it just not getting appreciated??? I posted something yesterday and it has 20 reblogs rn, I almost thought about not giffing anymore with that (I’m dramatic.) but honestly if people knew how much work goes into gifmaking I think there would possibly be a lot more reblogs
#hiii beck <3#ask#sorry I went on a little rant here 😭❤️#just noticing my friends not getting rbs hurts me and them :(
3 notes
·
View notes
Note
Hi queen!!!
Thank you for all these gifs you'vemade! Just wondering, have you ever thought of putting a watermark on your work? I worry you're not gonna get the credit you deserve!
oh my darling you must be (somewhat) new to my blog hahahh :') anyway, hi love!! you're so welcome, i'm happy you enjoy them! <3 now, for the long part that i'll spare my usuals on here cause i sound like a broken record at times:
i used to have a watermark on them! they got reposted into oblivion. i asked people not to, i got a lot of hate, been called a bully etc. people don't understand why 'i make gifs if i don't want people to use them' because they fail to understand gifs can be similar to art, rather than just plain reaction gifs to repost 'omg hot' above. i enjoy making things pretty, but apparently it's wrong to not want to have them reposted. with my art, no one has that issue though. funny how that goes :) had a short period where i would even add the whole 'freckledjoes do not repost' on a gif, and people still claimed to not see it. like you don't stare at a gif over and over when you take the time to steal it, lol. i've posted with and without, and the amount of reposts is the same. it's just extra work for me. like, i prefer people enjoy my gifs on my page, giving it the love it deserves on my posts, but instead they prefer to get likes with a gif they put zero effort in. often they don't even bother to interact with my content (especially not the twitter folks!) so yeah, i could get 'credit' if i put my name on there, but all it does is cause more reposts, which i generally did not want :) maybe at some point i'll put it on them again, if i ever consider it fun to see it blasted everywhere, but currently i prefer to pretend people did not know i don't appreciate reposts. fun fact: had a person follow me on twitter recently. i posted 1 gif there (cause due to the reposts instead of retweets, it didn't feel as fun to post a lot there anymore so i only RARELY do it). they didn't interact with it whatsoever, just reposted it (which is more effort than a retweet i would say). that's the fun of being a gifmaker. people will not repost fiction or art, but gifs? S U R E. it's only a filter, right? they say the same about edits (which i do watermark most of the time). it's funny how it's so hard to understand why people make gifs if they don't want them used by others (it's fun, it's a creative outlet, it's pretty) but have no problem understand why people make art (it's fun, it's a creative outlet, it's pretty), and understand that reposting of art isn't cool. i'm so sorry for the suuuuuuper long answer, but this is the story :D it has its ups and downs. sometimes i wanna watermark again, sometimes i don't. you're so sweet for saying i deserve the credit, sounds like you value this stuff and that means i appreciate you as a person :) much love to you! hope you have an awesome day.
2 notes
·
View notes
Text
bad buddy fandom getting-to-know-you meme ):)
template by @fiercynn, tagged by @hereforlou! this is exciting, thank you so much for tagging me <3
name and whatever you want to share about yourself
i'm (na)tasha, a freelance artist from eastern europe, i really love mountains, lemons, teal colour and when it's hot as hell outside. you might know me from c-drama/novel fandoms - that's what i mostly draw on my main blog (which i'm being weirdly secretive about, but if you want to know the url you can message me about it off anon)
when did you watch bad buddy/join the fandom?
episode 5 was trending on here and a mutual who abandoned tumblr almost completely suddenly came back to reblog like 15 rooftop kiss gifsets in a row, scream in tags and then disappear again which made me go huh. what's all this then. lemme check out the first episode. and then by the time episode 6 aired a few days later i'd been already all caught up (can't remember exactly but since i have a tendency towards binge-watching i have a suspicion i watched all five episodes nearly in one sitting). for some personal reasons i'd rather not get into i never got a chance to create anything back then when it was airing and after, and so here i am finally joining the fandom more than a year later!
favorite ship(s)
(apart from the obvious) 📢📢📢TONGYOD📢📢📢 !!! also i was never big on crossover ships but then our skyy 2 happened and altered my brain chemistry
favorite character(s)
sometimes it's pran, sometimes it's pat. i don't control the part of my brain that decides which one of them to hyperfixate on out of the blue
favorite episode(s)
(again, apart from the obvious) i really love episodes 2-4 where they get to reunite and just hang out with each other. i love you bus stop shenanigans. also episode 11 because i'm a sucker for beach episodes, especially when they are mellow and bittersweet
favorite scene(s)
episode 8 balcony scene my beloved. inkpa darkroom confession scene and the way love's voice was trembling as she was on the verge of crying. also that bit in episode 11 where pat wakes up alone, goes out and sees pran playing the guitar outside and pran turns to greet him and SMILES SO SO BIG ugh my heart is doing somersaults as i'm typing this
one thing you would change about the show if you could
put pat in crop tops. cmon
what are your some of your favorite fanworks made by other people?
any of the artworks by @thatgothsamurai, but especially this one
any of the artworks by @shikanji, but especially this one
any of the artworks by @hereforlou, but especially this one
any of the artworks by @kornswasianguyswag, but especially this one
this fanvid, the best fanvid ever that i've accidentally stumbled upon when searching up "bad buddy same page" (i think i was looking for the mock trailer lol)
this fic by @oldlace
this fic by @aroceu
and a special shoutout to all the wonderful gifmakers and meta writers, you guys are the real mvps <3
(if you create fanworks) what are your favorite fanworks that you’ve made?
well, i haven't drawn much bbs fanart yet, but from the ones i've done so far i especially love this inkpa
also pls look at this korn i drew in the bbs discord server
a song that makes you think of bbs (the ones in the show don’t count lol)
does same page count if it technically wasn't in the show ah no wait pat sang it in episode 12 damn it ok this one i guess
youtube
idk anything else you want us to know?
this show's name in my native language is a pun that i can't explain
unfortunately i don't really know anyone in this fandom yet (unless.. @aroceu have you done this thing?), so i'm not tagging anyone, but if you're reading this and you really want to do this, you can say i tagged you!
9 notes
·
View notes
Note
18, 38, 42! 🤍
18. For the aesthetic, for the laughs, or for the feels what your preference it depends a lot on my mood and what it is. i have a whole list of shots i wanna gif purely because the actor looks good in it. but if i'm doing like a scene, it's usually for the feels or the laughs. if i'm doing a more artsy set or something that's more involved, it's most likely gonna be for the feels, although sometimes it's also the aesthetic. so... all three?
38. What are you really excited to gif that isn’t out yet okay i've been thinking about this and i genuinely don't think there is anything? like, i've never been excited to gif something that isn't out, outside of a new season of a tv show that i already watch and make gifs for. but even then it's like... i don't get excited about something that hasn't been released because i want to gif it. i'm usually excited just to see it. i don't usually go into something new knowing i'm gonna gif it unless it's only new to me and i know enough about it/have heard enough about it to know i'm gonna end up wanting to gif it (for example, i knew i'd wanna gif dracula before i started it because i knew enough about the show to know i'd be obsessed). i end up giffing things because i love it so much i just kind of have to. does that make any sense? like i just don't think i've ever seen the trailer for something and thought, "man, i can't wait to gif this thing."
42. How is your gif folder organized? Is it organized at all? okay so i keep my gif folder decently organized. the main folder is called GIFs, and then from there i have folders that are generally named by the main edit tag for the set, ie. karadanversedit, supergirledit, sadiemccarthyedit, etc. if it's just one character, it goes into that character's edit folder. if it's more than one character or more just about the show/movie in general, it goes into the show's or movie's edit folder. if it's a ship, it goes into the ship's folder. the only time i deviate from this is if i have an ongoing series of sets like i have a folder named with the tag i used for a series of sets i did featuring my favorite outfits for a specific character. i have one with the tag i used for a specific gif event, etc. so basically, inside my gif folder is just a bunch of folders named by tags i use (with the exception of a select few i named before i started organizing them this way). and then INSIDE those folders it gets messy. if it's a scene sometimes i'll pick out a short phrase from the scene and title each gif phrase01, phrase02, etc. sometimes if it's a more artsy set i just kind of pick a word and use that. but most of the time i just use the episode number and then number them, so if it's a pilot they'll be 10101, 10102, etc. and THEN if i have more than one version of a certain gif bc i can't decide which version i like, the next version becomes 101002 instead. so really it's just a jumble of words and insane numbers that only make sense to me. this is what it ends up looking like:

as you can see, i'm insane
gifmaker asks!
#katie answers#i was secretly hoping someone would ask about my gif folder can you tell#couldn't tell you why but#ask: morgana-pendragon
2 notes
·
View notes