#and now loading the screencaps into ps is taking forever
Explore tagged Tumblr posts
Text
i’m trying to learn the screencapping method for giffing instead of video frames to layers which I’ve done for years, because I’m tired of having to wait hours while my videos convert to mp4 but how do y’all live like this
#it seems like screencapping is what the majority of this site uses#but first of all i can't use kmplayer bc i have mac#so i've had to try 10 different programs to find one that can take batch screencaps#(are some of y'all manually capturing each frame? i'm concerned)#and then i had to do a whole editing of the app to set it up for batch screencapping#and now loading the screencaps into ps is taking forever#and i still haven't gotten to the making it into video timeline step yet#if i could just find an alternative to handbrake that doesn't take literally 8 hours to convert a movie into mp4#this wouldn't be happening#i've never understood screencapping#julia.txt
1 note
·
View note
Photo
i finally decided to take the time & do a heavily requested gif tutorial! this will be very detailed & is how i make every single one of my gifs from start to finish! i’ll also include resources for ps downloads, actions, etc. if you have any questions, don’t be afraid to ask! & if this helps you, pls rb!!
TUTORIAL UNDER THE CUT!
i’m going to break it down into sections to hopefully make it easier to understand!
1. software i use
2. hq movie/tv show/video downloads
3. screencaps
4. importing screencaps into photoshop
5. cropping
6. actions/sharpening/gaussian blur
7. image sizing
8. time delay
9. coloring
10. saving
1. software i use
photoshop - i use photoshop cc 2020 on my macbook air but any version of photoshop with video timeline/frame timeline will work for creating gifs! i pay for my photoshop but i know there are ways to get it for free. if you don’t want to/can’t pay for photoshop, here (x, x, x, x) are some links to download it without paying!
mplayer osx extended - this is the software i use for my screencaps. there are a lot of software’s out there & i think it truly comes down to preference. i’m just more familiar with mplayer & the screencaps come out really smooth in my opinion. it’s free as well & here is a link to download it!
2. hq movie/tv show/video downloads
ok so i’ll be real, i never used t*rrents until recently & i’ve personally noticed a huge difference when it comes to quality. before using them, i was using files from MEGA & if you’re not comfortable with t*rrents, i would definitely recommend MEGA links! when it comes to downloading any videos, try to make sure they are 1080p or 2160p if available! 720p is also ok but always try to get 1080p. also i’ve found that with movies, 1080p Blu-ray versions look better but again, it’s all about preference!
t*rrents - i only use one t*rrent site which is r*rbg. they have a huge variety of tv shows & movies from what i can tell.
MEGA - MEGA is really nice for people that aren’t comfortable with t*rrents. the way i used to use MEGA was, i followed accounts on twitter that would upload MEGA links to tv shows. here (x, x, x, x, x, x) are some of the accounts that post a wide variety of links to MEGA downloads! i will say, the only downside to MEGA links is that they seem to take longer to download & you can cap out at a certain amount of GB each day.
folx - i use this to download stuff from r*rbg! download this before you try to download anything from r*rbg. its free to use & there are multiple sites you can download this software from but i’ll link a few right here (x, x, x this one is a link directly from the apple store but it costs $15.00). if you don’t want to download from any of those links, you can just simply look up ‘folx mac/windows download’ in google!
4k video downloader - i use this to download videos from youtube! it’s free as well & you can download it here!
3. screencaps
once you’ve downloaded a movie or tv show or whatever you want to gif, open whichever screencap software you’re using & start playing the video. for mplayer osx extended, to screencap you just go to the scene you want to gif, pause the video, & hold down shift + command + S on mac (i think it’s the same for windows i’m not sure).
4. importing screenshots into photoshop
now that you’ve got the screencaps of the scene you want to gif, it’s time to open photoshop! to upload the screencaps, in photoshop go up in the lefthand corner to file > scripts > load files into stack. once you click on that, you’ll click ‘browse’ over to the right & the files on your computer will pop up. go to wherever you saved your screenshots & select all of them! once you’re done selecting them, hit ‘open’ in the bottom right corner.
5. cropping
now all of your screencaps are imported!!! now it’s time to crop the screencaps. go to the crop icon over to the left.

for this gif, i want dimensions to be 540 x 350, so i go up top & type it in

great! now the gif will look like this:
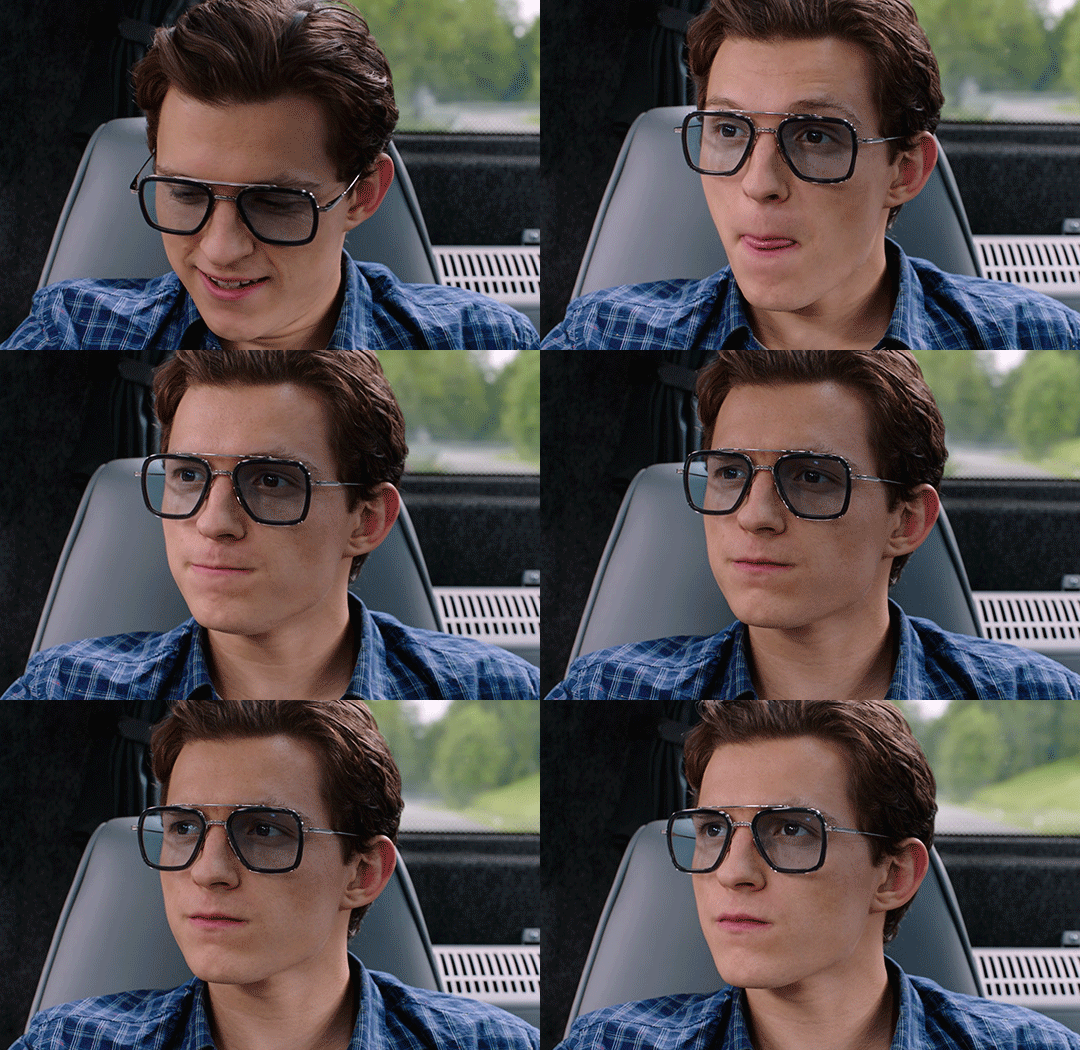
6. actions/sharpening/gaussian blur
now that the gif is cropped, we’re going to sharpen it. i use actions because they are so much faster & easier. i use the action that kylos uses in her giffing tutorial & the direct link to download the action is right here! to access actions, you can either go to window > actions or go over to the play button to the right that looks like this:
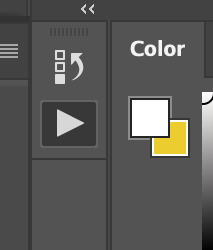
when you hit that play button, you will see the actions that you have downloaded pop up! select where it says ‘select here!’ & then go down to the play button at the bottom to play the action. i circled both steps down below

the default radius in this action is 0.3 & i normally change it to 0.4 (it’ll normally pop up & ask you like shown below & just change it to 0.4!)

now the action has been played!! i add an extra step but it’s optional! what i do next is i add a layer of gaussian blur on top of the action. to do that, go to filter > blur > gaussian blur. once you select that, it’ll have a pop up that looks like the one below & you’ll just select ok or hit the enter button

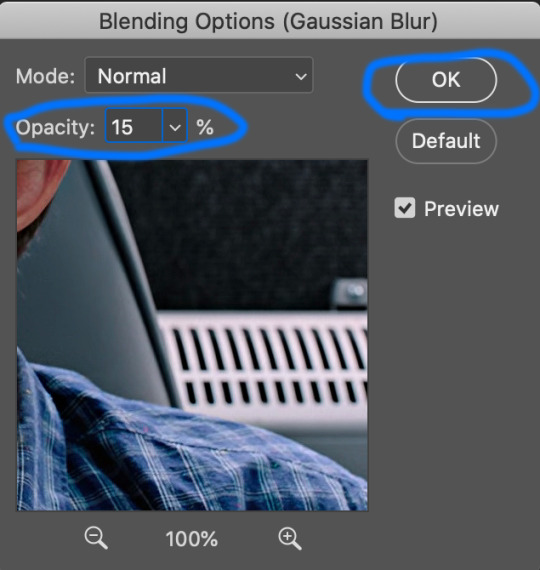
once you do that, you’ll notice your gif looks soft or not sharpened so the next step is to change the percentage of the gaussian blur layer you just applied. to do this, you go to the bottom right corner & hold down option by clicking on the gaussian blur layer. there will be options that pop up & you’ll select ‘edit smart filter blending options’ like shown below (my handwriting looks like a five-year-olds ik)

another pop up will show up in the middle of the screen & you’ll be able to select which percentage you want to place on your gif. the opacity really depends on the gif but i normally do 10%-30%. for a lot of my gifs recently i’ve applied 15% which is what i did on this gif! once you change the opacity to whatever you want, hit ok!
after that you want to change the image size to the same size you cropped the gif to. to do this, you’ll go to image > image size > & change it to 540 x 350 (or whatever the size of your gif is! also make sure it’s switched to pixels instead of inches! once you’ve done that hit ‘ok’ or press enter.
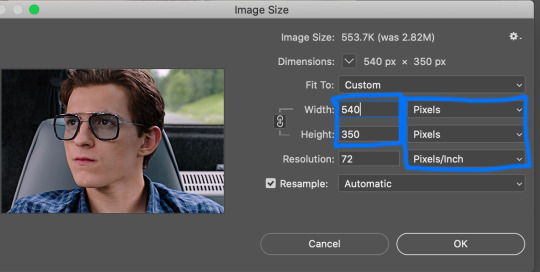
once that’s done, go ahead & save the gif! to do this, go to file > export > save for web (legacy). it’ll show you the size of the gif down in the bottom left & as long as it’s under 10mb you’ll be fine!!! down below i circled my save settings as well! also its SUPER IMPORTANT THAT YOU SET LOOPING OPTIONS TO FOREVER! once you’ve done all that, save your gif by hitting the ‘save...’ button down below that’s circled. you can name your gif however you like just make sure you keep the .gif after it!

now my gif looks sharper than before:

now for time delay & coloring!!!
7. time delay
open the gif you just saved in photoshop by going to file > open. once it’s opened, you’ll see a timeline of all the frames towards the bottom. it’ll likely say 0.07 sec with a small little downward arrow next to it. select the downward arrow & select other. change the speed from ‘0.07′ to ‘0.05′! gifs look much better & more natural at this speed. (also yes i did delete a few frames because i felt it was too long so to delete frames you just select the ones you want to delete & click the trash button down by the scroller!)

8. coloring
coloring can be so much fun but so tricky! i personally use a base psd that i made for all of my gifs & then adjust it according to the gif i’m coloring but for this gif i colored it from scratch! so for most of my gifs i only color/edit them using levels, selective color, brightness/contrast, curves, color balance, & vibrance (in that order) to access these, go to layer > new adjustment layer > & then select whichever one you want to start with.
1. levels

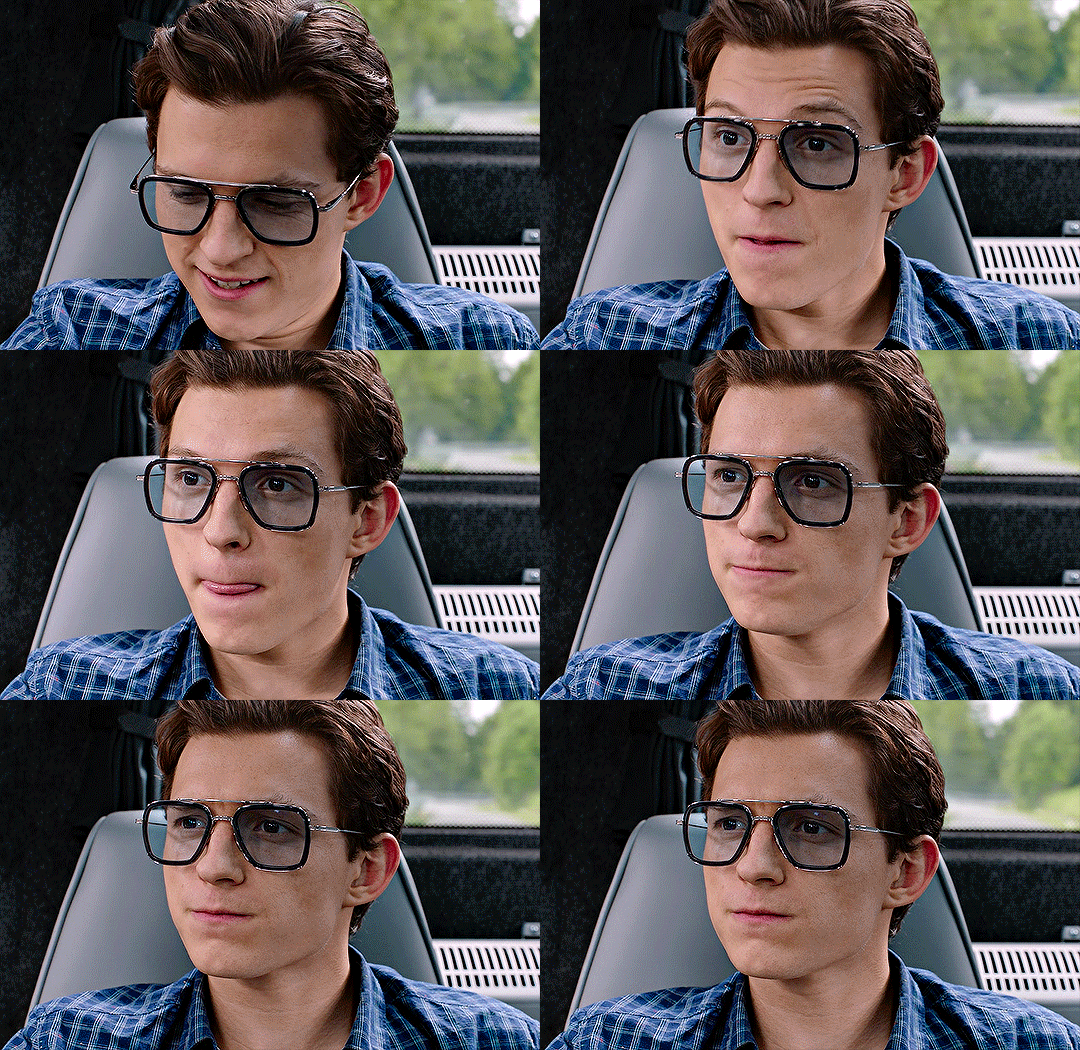
2. selective color
blacks: black +2
reds: cyan -9, magenta +1, yellow -3
cyan: cyan +100
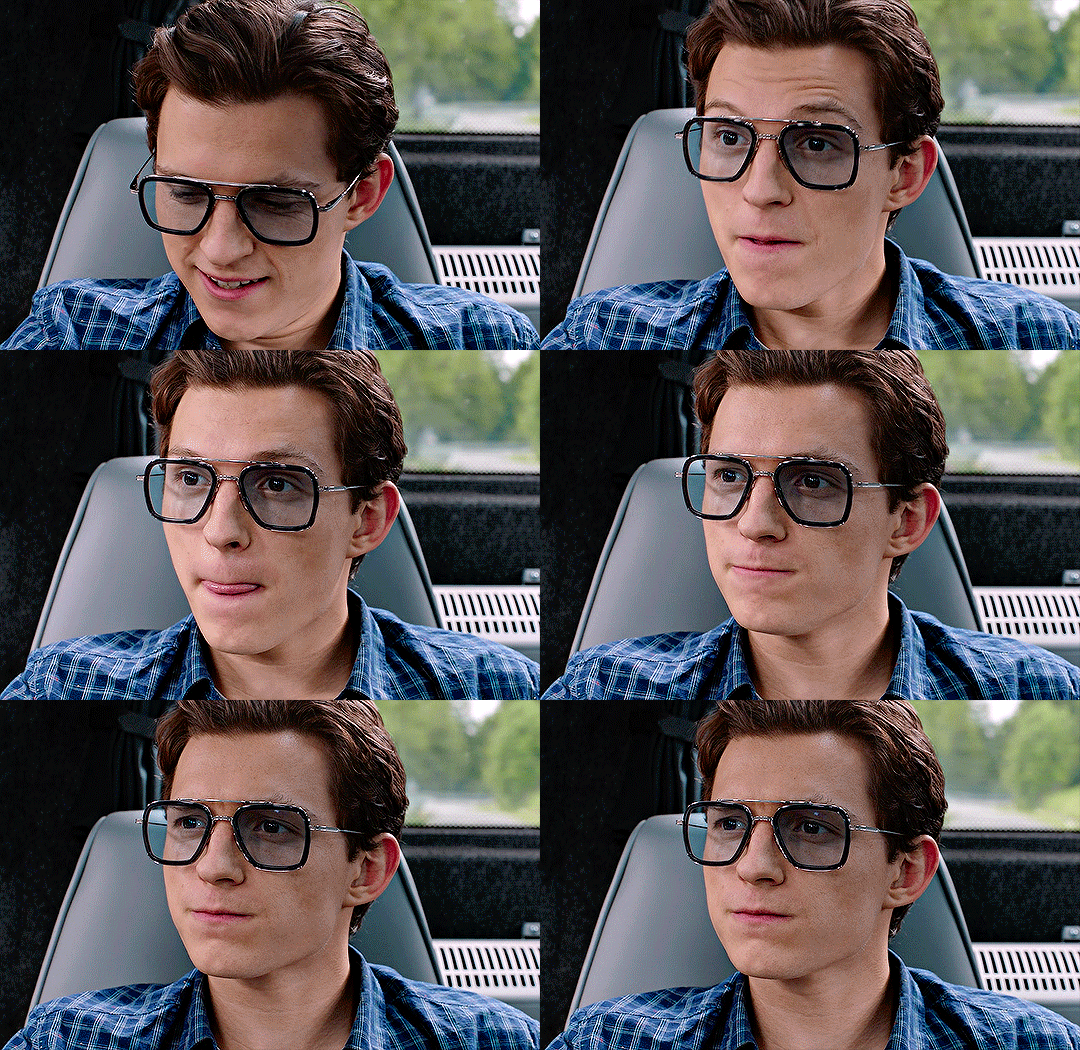
3. brightness/contrast
brightness: 5
contrast: 6

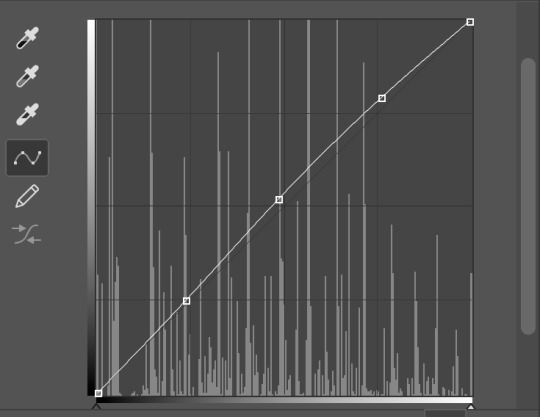
4. curves

5. vibrance
vibrance: +16
saturation: 0

then you save it just like earlier by going to file > export > save for web (legacy) & you’re all set!!!! i hope this helps anyone who is trying to get into gif making & if you have any questions, don’t be afraid to reach out!!!!
#this is so long i apologize#gif tutorial#allresources#resources#completeresources#quirkyresources#my tutorial#photoshop
640 notes
·
View notes
Text
gif tutorial ✨🎥
I got a few requests to make a gif tutorial so here it is. hope it helps :) It’s quite long so I’ll put it all under a read more. If you have any questions, feel free to ask or PM me directly for help!
Alright....sooo, I don’t remember the last time I made a gif tutorial on this site, but I figured I would even though I use the same method a lot of gif makers have been using for years. I have never strayed from this process and I’ve been making gifs on this site for a decade.
There are a couple methods to making gifs. You can import your video directly into photoshop and cut your gif there. OR you can use a separate video player that has a screencapping tool, then import all your frames into photoshop; this is the method I use and it’s how I’ve adapted and perfected my giffing skills over time.
This post will be long, but I want to be as detailed as I can and explain it step by step. It’s really NOT difficult once you get the hang of it, which is probably why I’ve always done it this way.
Disclaimer: There are three programs I use and I highly suggest you look for reliable links yourself if I’m not able to provide one. I use pretty old versions of KMPlayer and Photoshop (I’ll explain why later), so be careful where you go looking for downloads. There are some photoshop downloads here, but I can’t vouch for them.
Let’s start :)
DOWNLOADING VIDEOS
I use a program called 4k Video Downloader to rip HD videos from Youtube. 1080p is the way to go, but obviously that’s not always possible. It’s ridiculously easy, all you do is click the “Paste Link” button and it’ll download your video. Clicking the “Smart Mode” button will let you set the default quality and the folder you want all your videos to be saved to.
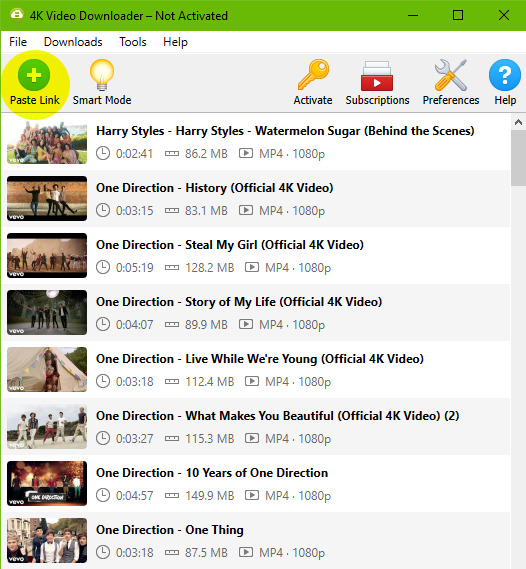
As you can see, here are all the videos I’ve downloaded recently for my gif posts. You can clear this download history list at any time.
SCREENCAPPING
After your video is done downloading, I open the video in KMPlayer. Now, I use an OLD version of this program because this was exactly how I learned to do this back in the day. You can find old versions online, I don’t really know exactly which version mine is because I’ve had it forever, but it’s the old school one that looks like this.
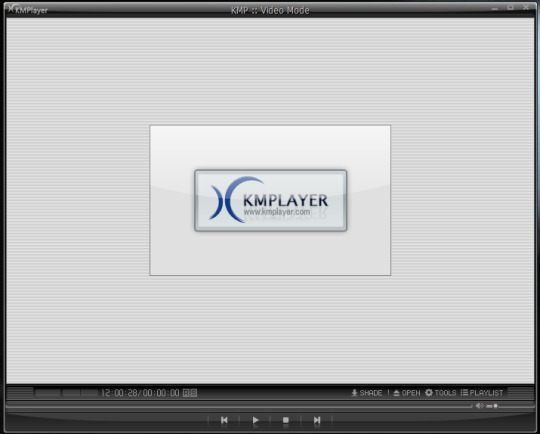
When you open the video, it might stretch the player to full screen so I always adjust it by dragging the corner of the player inward so it shrinks to a more medium size. This will also make your screencaps not so GIANT, which will take longer to load into photoshop.
Anyways, you’re gonna open your video and right click anywhere on the video to select Capture > Frame Extract... (or Ctrl+G on Windows). This window will come up. Make sure all your settings look like this to ensure a really smooth gif.
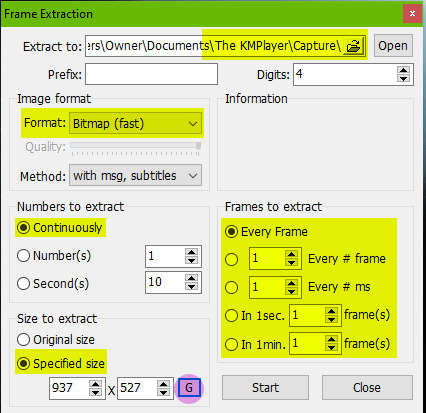
The first thing you should do is click that little “G” button next to the window size at the bottom. That’ll lock in the dimensions of however big you’ve made your video window, and if you stretch it you’ll see these numbers change. If you start capping without remembering to push that and you make your window smaller/bigger, your caps might be a wacky size or look stretched and you’ll have to go back and do it again. Also note the extracting location at the top. All your caps will go directly to a default folder titled “Capture”.
Once all the settings are ready, go to your desired section of the video, pause it, and hit “Start”. Play the video, pause the video when you’ve got all your caps, then hit “Stop”.
Locate your “Capture” folder and doublecheck you got all the caps you want. This is where I take a moment to delete any caps I don’t want in my gif, that way you don’t bother loading them into photoshop and making it take longer than it needs to.
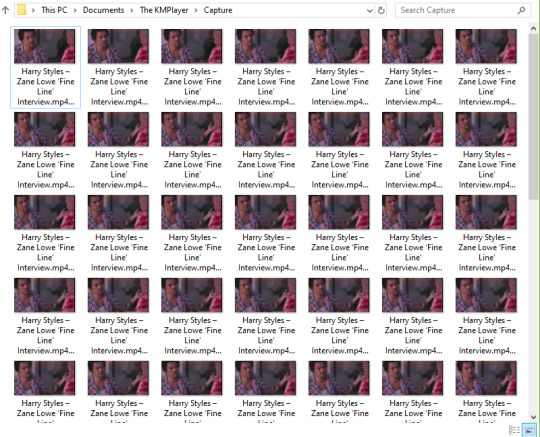
MAKING THE GIF
You’re gonna open whatever version of Photoshop you’re using. I hilariously still use CS3 to make gifs because the next script I’m gonna run doesn’t work in the free download that I have of CS5, but that’s what you get sometimes when you don’t pay for stuff. Hopefully whatever more recent version of PS you use, you have no problems.
Go to File > Scripts > Load Files Into Stack...
This window will come up.
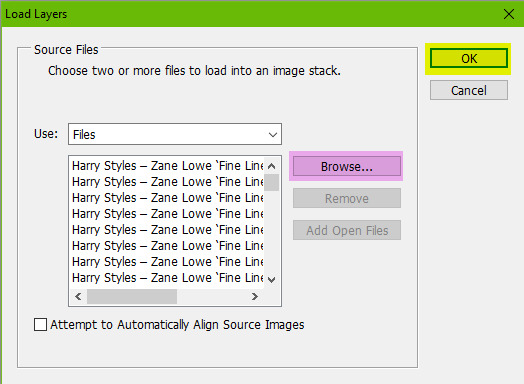
Hit “Browse” and locate your capture folder. Highlight all your caps and press OK. You’ll see them all come up in a list as shown above. Press OK again. Your caps will start to load into one big stack of layers. This will take a minute or so.
When it’s all loaded in, you’ll see them all stacked in your Layers window (Windows > Layers). You’re gonna open your animations timeline (Windows > Animation) and click the little drop down button in the top right corner of the window and select “Make Frames From Layers”.
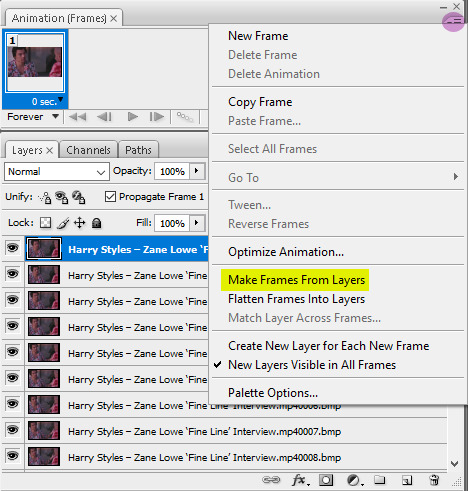
Click that drop down menu again and hit “Reverse Frames”. Click that drop down menu again and hit “Flatten Frames Into Layers” (this is so our sharpening action will work later). Click the drop down menu again and select “Select All Frames”. All your frames will be highlighted. This is where you’ll set your animation speed. Under each frame you’ll see “0 sec.” Click on that and select “Other”. Type in your desired speed. I usually go for 0.04 if it has a lot of frames. For less frames, 0.05 or 0.06. This is honestly entirely up to your preference. I actually made myself a photoshop action doing all these repetitive steps so it saves me a few precious long seconds of clicking around over and over. I just run the action after my caps are loaded. If you make gifs a lot, I recommend it.
Next it cropping. The reason I don’t crop right away after the files are loaded into a stack is because I like to see where the subject in the gif moves before I decide where I need to crop. I don’t want to accidentally cut anything off. The subject might sway in and out of frame or be off center if I crop it blindly before seeing exactly where the object moves around. So I’ll play the gif first to see exactly where to crop.
Anyways, you’re gonna set your desired width x height of your gif. I’m making this a big gif so you can see the details better. 540 px is Tumblr’s width for big horizontal gifs. If you’re making a photoset with two gifs side by side the width for Tumblr is 268 px.
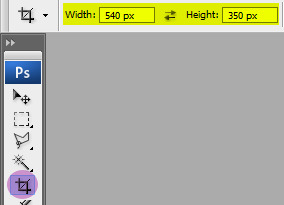
Go ahead and crop your gif. It’ll resize itself as well. Play the gif back so you can see if anything gets cut off or it’s not where you want it. You can undo the crop and do it again until you’re satisfied.
Here is what my gif looks like animated and cropped.

As you can see, it plays nice and smoothly due to our screencap settings from before in KMPlayer and with our set gif speed (I used 0.05 here).
Next is sharpening the gif. I use a sharpening action that can quickly sharpen up to 120 frames. You can download it here. Open the action by going to File > Open and locating the file. It’ll be added to your Actions window. (Window > Actions if you can’t see it.) In order for it to run correctly, you have to have the first frame selected on your animation window, as well as “Frame 1″ in the layers window. Just like this:
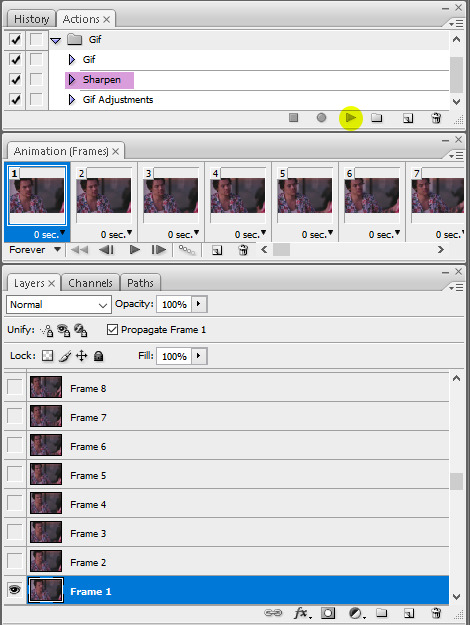
Click the play button on the action and wait a few seconds for all the gifs to finish being sharpened. For any gif with less than 120 frames (which I hope is always, good God) a pop-up will come up when it reaches the end of the frames asking you if you want to stop. Click “Stop”.
Tip: If you think you want to delete more frames, run the sharpening action before you do it. Otherwise you’ll have to flatten your frames into layers again. The first frame and the “Frame 1″ layer should always be the same (the little eye will appear to the left of the layer to let you know it’s visible when you have that specific frame selected) otherwise the action won’t work.
Here is what my gif looks like now that it’s sharpened.

COLORING THE GIF
This is where all the fun (or pain) comes in. All your coloring will be done by using Adjustment Layers (Layers > New Adjustment Layer). I usually go in the same order of adjustments, but this is where personal style comes in and you do no have to do it in the same order I do. You can practice with this part all you want and see how you like to do it.
I start with brightening the gif first and fixing the white balance if a scene needs it. I chose this video specifically so you could see this next handy trick that a lot of people don’t even know about. It’s a dark scene and the white balance makes the subject look quite blue.
I can fix this by starting with a Curves layer. By clicking the third eyedropper tool, you can go and click on a white point in your gif (in this case, I clicked on a white square on his shirt) and bumped up the input number a bit for a little contrast (optional). My curves look like this. Click OK.
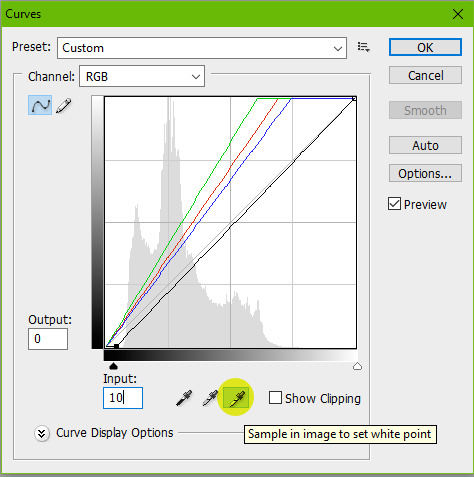
My gif now looks like this.

It’s much better, right? The white eyedropper tool will become a lifesaver sometimes, but it’s not always needed.
Next, I go in with a Levels adjustment to do some more brightening. This is all up to preference, but you can play around with this. I typically like to add more contrast with this layer. I just adjust the sliders until I’m satisfied.
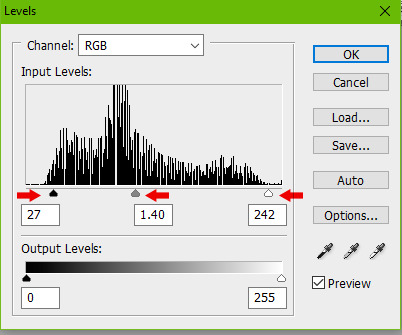
Here is my gif now.

Onto yet another brightening layer. Brightness/Contrast. A couple teeny tiny more positive numbers and I now have this.

Next is Selective Color. I wish I could explain this in a way that makes sense, but this is the layer that takes a bit of practice getting down and boils down to how you like the colors in your gif to look. I personally don’t like a lot of yellow in mine, so I focus a lot on the Yellow and Black sliders in each specific tab. I start in the Reds, then Yellows, Whites, Neutrals, then bump up the Blacks a tiny bit.
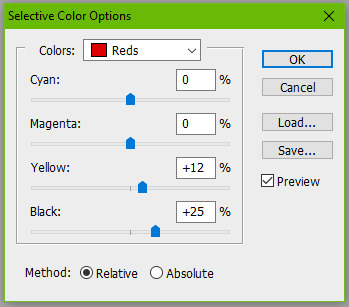
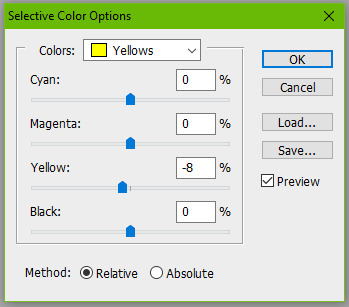
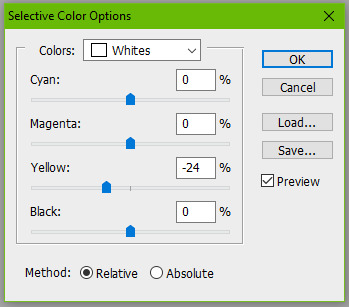
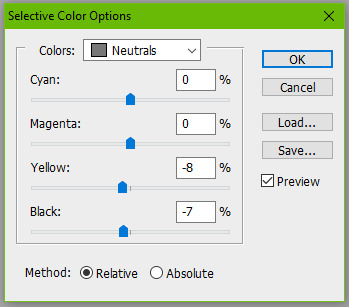
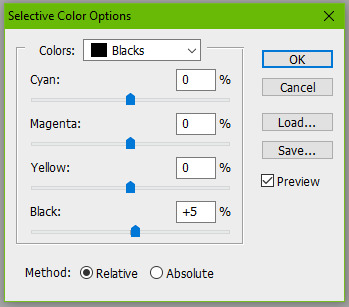
Here is my gif now. It’s a bit more cool toned, which is what I like.

Next I’ll go in with a Color Balance layer and play with the Midtones and Shadows.
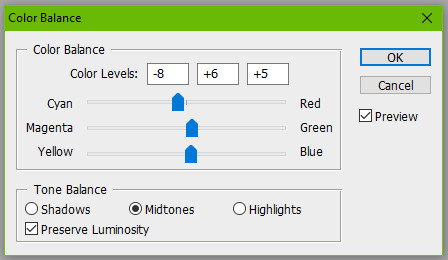
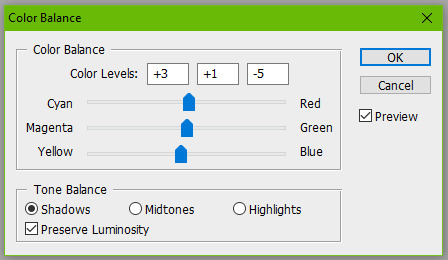
Here it is now.

This is usually my last step unless I want to adjust the brightness again (which I do), so I might go back into my Curves and Levels layers to bump it up.

And you can totally stop there, but I would like to mention a few more optional layers to add depending on your gif. If I wanted more saturation, I would add a Hue/Saturation layer at this point, but I think it’s colorful enough so I’m not going to.
Another layer you can use is Gradient Maps.
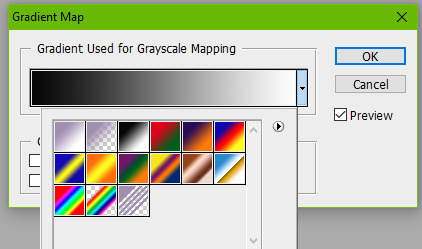
Setting a black and white gradient map overtop your gif and setting the layer to Soft Light and lowering the opacity to your heart’s desire (you might need to go to the little drop down menu in your animation timeline and hit “Match Layers Across Frames”) can give your gif a very contrast-y look like this.

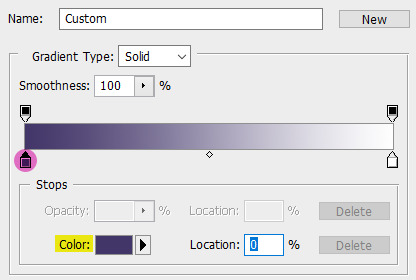
Or you can change the black color to something else for a different tone, like a dark blue.
Here is my final gif.

If you want to add a caption to your gif, you can do so with your font of choice (Arial and Calibri are good) and add Stroke or a Drop Shadow to it by going to Layer > Layer Style. You can make sure the text is perfectly centered by clicking on your top frame layer under all your coloring adjustments, hitting Select > All, then clicking your text layer again and going to Layer > Align Layers To Selection > Horizontal Centers. Then hit Select > Deselect and go to your little drop down menu in your animation timeline and click “Match Layers Across Frames”.
Here is what it looks like with a caption.

SAVING YOUR GIF
Go to File > Save for Web & Devices...
A big window will come up where you can preview your finished gif by pressing the play button on the right hand side. In the bottom left corner will tell you what size your gif is. Tumblr’s gif limit is a whopping 10 MB, so we’re good.

Your gif settings should look something like this.
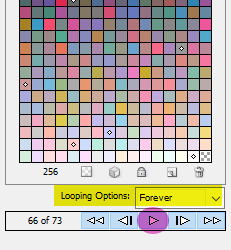
We always want to keep all colors at 256 (the highest). Lowering this number will make our gif file size smaller, but also decrease the quality of the gif itself. If your file size is more than 10 MB, I recommend going back and deleting some frames or making some more curve adjustments. Some users also like to set their gif to “Adaptive” instead of “Selective”. This is up to you.
Click Save and you’re done!
#this took me all day and half the gifs dont even move when you view this post on my desktop theme#LOVE THAT#please view this on the mobile view
220 notes
·
View notes
Text
part II: creating gifs in photoshop
how to make critical role gifs (a tutorial)
masterpost || part I
The method I use for giffing is the > Load files into Stack method. What this means is that you take screencaps of videos and load them into Photoshop to convert them into frames. In this part I'll teach you how to make gifs in Photoshop using screencaps.
NOTE: my Photoshop is set to Dutch but I explain everything in English in text (also because of context clues I’m sure most of it will be self-explanatory anyway).
what you’ll need:
Photoshop (I use an old CS5 version).
Screencaps to make gifs from.
(if you don’t have photoshop maybe take a look at this list)
loading files into stack
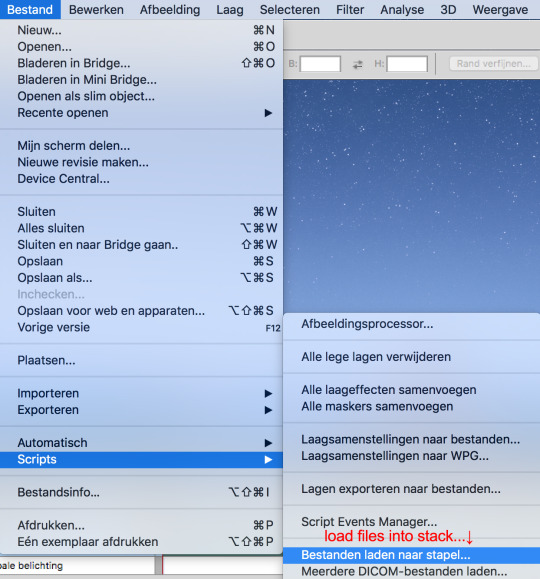
The first thing you need to do is open the screencaps in Photoshop but because we want them all in one file we don’t just go to File > Open and select them. Instead we do this:
Go to File > Scripts > Load files into Stack
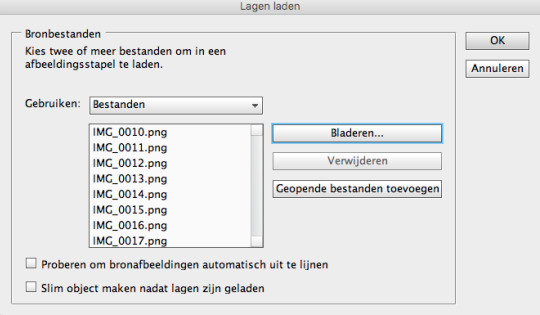
Click Browse
Select all the screencaps you want to use for your gif
Click Open (I typically use anywhere between 50 and 150 screencaps in one gif)
Click OK and wait for them to load (each screencap will load as its own layer which will make it a lot easier to make small adjustments)
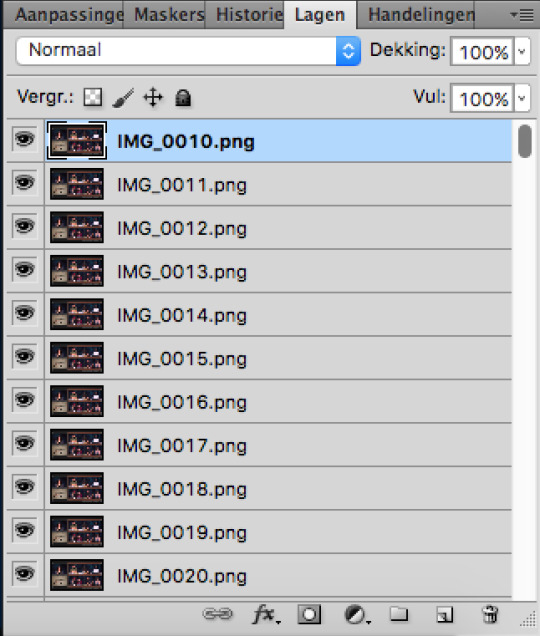
Once it has finished loading your layers should look something like this
making frames from layers
Go to Window > Animation (or Window > Timeline depending on what ps you use) and make sure it’s checked
Your Photoshop should look like something like this
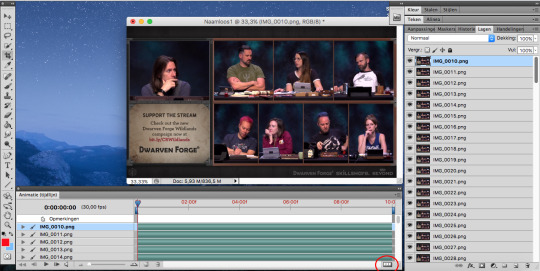
Click on the three white boxes on the bottom circled on the image above (Create Frame Animation or Create Video Timeline)
Your animation window should now look like this

In the top right corner of the animation window you will find an arrow pointing down with lines next to it (circled in the image above)
Clicking on it will reveal a list
Click Make Frames from Layers
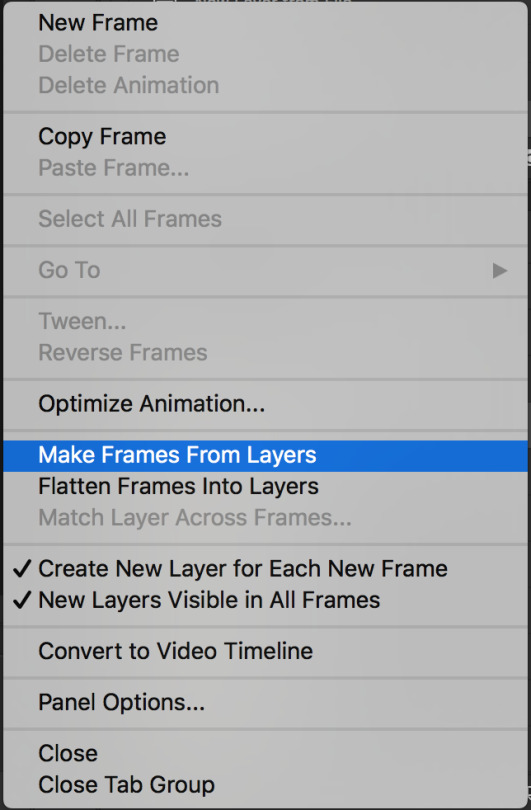
Your layers will appear as frames in the animation window but they will be arranged backwards
Click on the same icon again (arrow pointing down next to the lines)
Click Reverse Frames
Your gif will now play correctly if you press the play button in the animation window (bottom left)
cropping
We have our base but it’s obviously way too big to properly work with and I want to focus only on Travis’ face. To know what size to crop to you have to understand Tumblr dimensions; this image is a clear and easy reminder of what they are.
Note: height is less important and can be messed around with more than width. If you upload a gif that doesn’t follow the width dimensions tumblr will resize it and you will lose some of your quality.
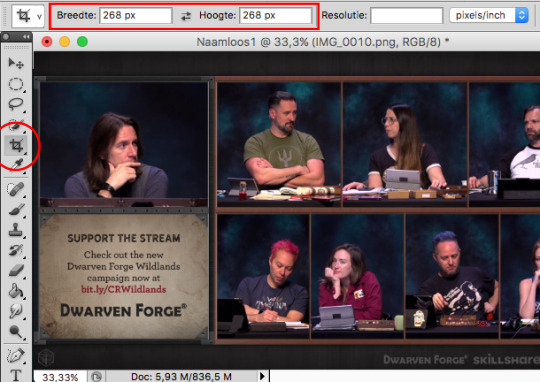
Most of the time the gifs I make are 268px by 268px though I would recommend you play around and find your own preferred sizing after you get a bit more comfortable.
Select the cropping tool on your tool bar
Enter the dimensions you want where it says Width and Height
Crop the image
timing/looping
The timing of your gifs helps control how fast or slow your gif moves.
Click on the arrow pointing down next to the lines again (top right corner of the animation window)
Click Select all Frames
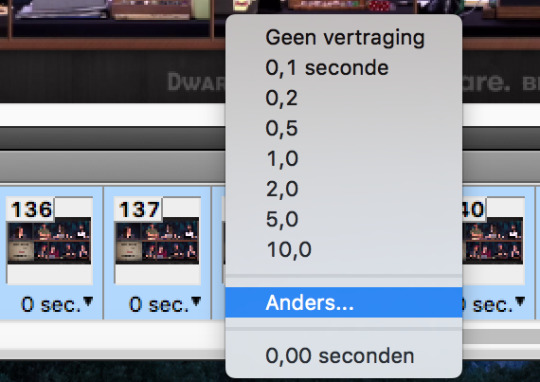
Click where it says 0 sec. on any of the frames
Click Other...
Set Delay 0,05 seconds
(0,05 or 0,06 is what I have found works the best for my screencaps; if you use a different method for getting screencaps or want to speed up or slow down your gif you could change this to whatever you prefer)
Click OK

Next we’re going to change the looping setting to make sure your gif doesn’t stop after playing one time.
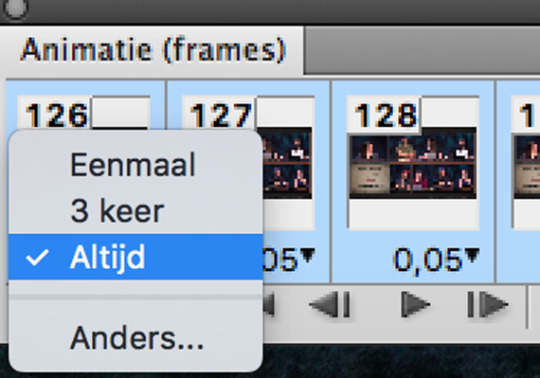
Click on where it says Once in the bottom left corner
Select Always
My gif now looks like this:
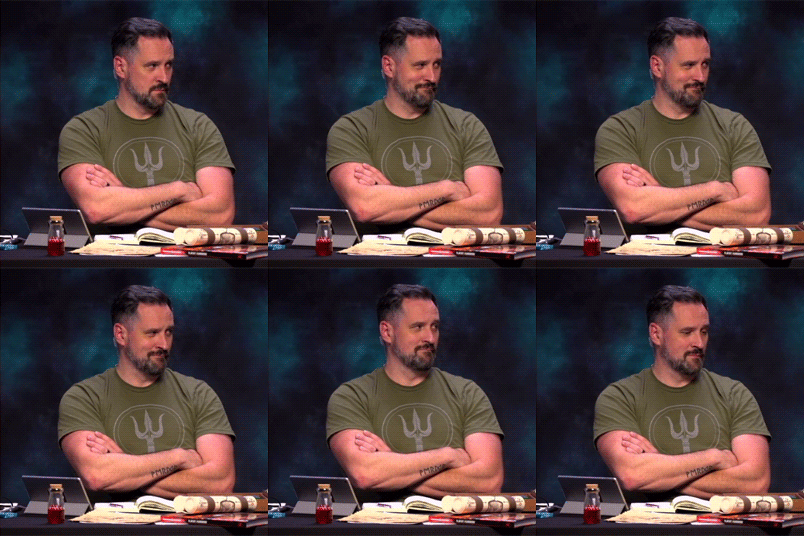
At this point you should delete any of the frames you don’t want to keep in your gif (select a frame you wish to delete and click the little trash icon on the bottom of the animation window). I have a tendency to use a few more screencaps than I actually need to because I want to make sure I get the exact moment I wanted and now is the time to get rid of any excess ones.
Go through your gif, let it play a few times and figure out if you want to delete a few frames here and there (I only ever delete frames from the beginning or the end so as not to mess up the flow/smoothness of the gif). This is the last chance you’ll have for this.
convert for smart filters
Congrats you have made a basic gif! If you’re like me you maybe want it to look a little bit prettier and a little more polished though. The main ways to accomplish this is to sharpen and to mess around with the colouring a bit.
Now there’s a lot of different ways you can go about this but I like to do it with my frames/layers converted for Smart Filters so that I don’t have to go through every frame one by one.
Go to Select > Select all Layers
Select all Frames (arrow pointing down next to the lines > Select all Frames)
Click on the rectangle in the bottom right of the animation window
Go to Filter > Convert for Smart Filters
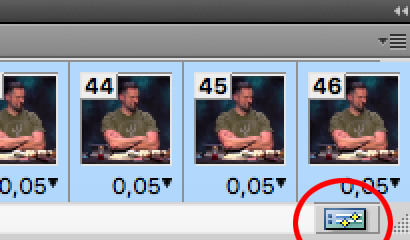

Your animation window and layer panel should look something like this

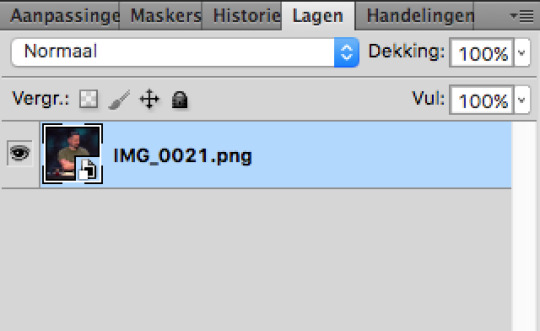
Check if your gif still plays when you press the play button in the animation window just to make sure nothing went wrong. If it is not playing go back (Edit > Step backward) until you can see all your frames and layers once more and try again
sharpen
Now we can sharpen the entire gif in one go. You can use an action if you have one but if you don’t this is the easiest way to easily sharpen your gif.
Go to Filter > Sharpen > Smart Sharpen
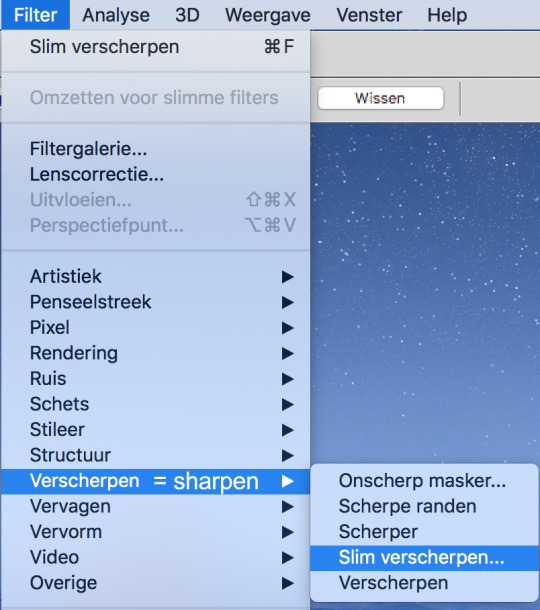
Copy the settings on the image below (you can play around with the radius if you’d like; 0,3px also works)
Click OK
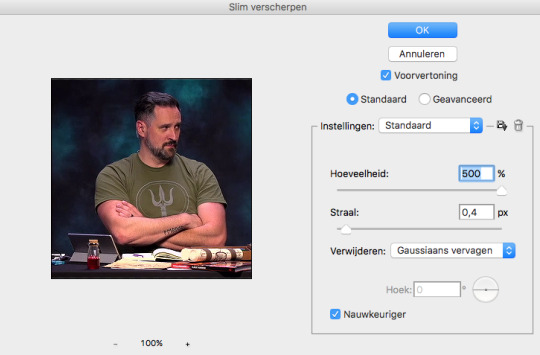
My gif now looks like this:
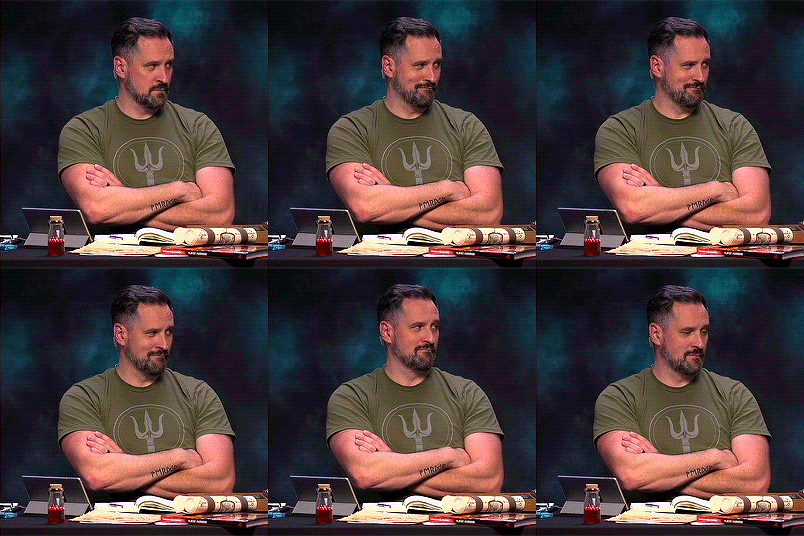
colouring + resources
This is where you can play with the colouring a little bit if you wish to. Either you can use a PSD (a pre-existing colouring) or create your own colouring. When using a PSD created for another show please keep in mind you will probably have to do a lot of adjusting because of the way cr is filmed.
Here are a few tutorials on basic colouring in Photoshop: one, two, three.
And here is a list of places that offer some great PSD’s to download:
drunkandcoloring
flawless-psds
itsphotoshop
psdsfaves
For my own colouring I usually play around with Curves, Levels, Selective Colouring, Vibrance and Color Balance.
If I get to it I will clean up my own critical role PSD’s and upload them for public use and insert a link here.
text
Though not needed for this specific gif a lot of Critical Role gifs do depend on subtitles. Here there is a quick and easy tutorial on subtitles for anyone who needs help using the Text tool.
save for web and devices
Your gif is smooth, the colouring looks great and now it’s time to share your labor with the rest of the world. Saving gifs is a little different than saving other files because we want them to move when uploading. If you were to simply click save right now you would have a nice PSD file that doesn’t move and you can’t upload anywhere. That’s where saving for web and devices comes in.
Go to File > Save for Web and Devices
A window should pop-up, again there is a lot of room for messing about and finding what works for you; but these are the settings I always use with a quick explanation

I use Selective and Pattern from the dropdown menus highlighted. From what I gather Adaptive and Perceptual are good options for the first one as well (all the others are less so). I like the look of Pattern better because it arranges the pixels in a pattern which I personally prefer but both Diffusion and Noise are fine too. Always pick the highest number of Colours (256) for the best quality gif.
Make sure the box next to Convert to sRGB is checked to keep the vibrance intact.
Looping options: Forever. To keep your gif looping endlessly instead of stopping after one time.
Gif size! Who even knows what the Tumblr gif size limit is anymore; it’s 5MB after compression but then sometimes people are fine uploading 7MB gifs and others struggle with 6MB gifs. Personally I hardly ever go over 4MB but hey, let me know if you understand it.
To save click Save... (rather than Done)
And you’re done!
This is the end result:
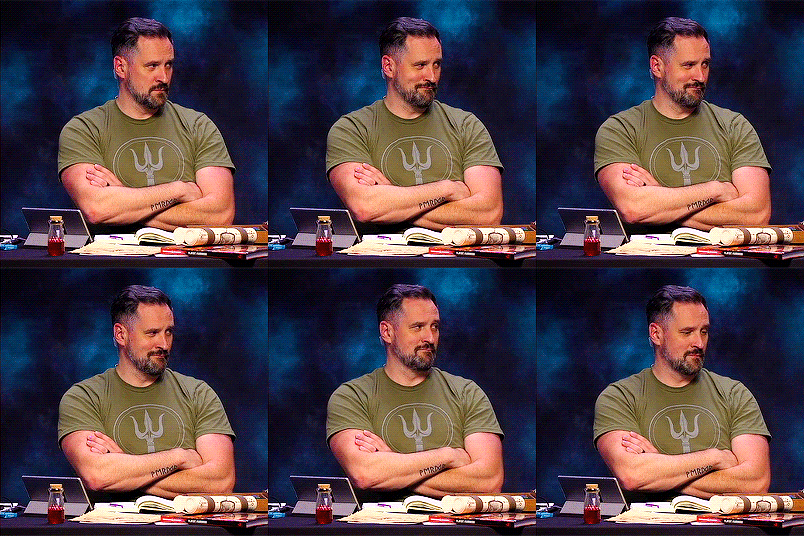
If you have any questions or comments or remarks please feel free to contact me. Hopefully this was somewhat helpful! :))
11 notes
·
View notes
Note
koo! this might be a dumb question but how do u make ur gif icons?? they're so cute
ah ! hihiii , angel ! ♡ it’s not a dumb question at all n thanku soso much for the compliment n for likin’ my gif icons !!! it makes me veryvery happy 2 know that are well loved heh !!! i’ve included a lil tutorial for u under the cut , but i’m a bit bad at explainin things n am never sure which visuals 2 rly provide , so if anythin is unclear , feel free 2 jus lmk n will try to help u thru it !!! i’m sorry it’s so messy , i kinda .. rambled my way thru this , but yea !!! these r my basic steps heh !!! ^♡^

okie so !!! the way i do my gif icons is a bit lengthy n unconventional probably , but it’s the way i like the best bc the steps are rly easy for me .. so !!!
ur gna need: photoshop ( i use cc2017 ) , free video to jpg converter , topaz denoise & clean , & 4k video downloader ( optional , but that’s how i pull vids off of yt ) , n this action by mintrps !!!
i’m not gna walk u thru the steps of downloading ur vids , bc i’ll assume u already got that down !!! our first step is to turn the video into screencaps . so , once u hav ur video that u wanna gif downloaded , open up free video to jpg converter !!! mayb i shld add a visual here , but i think it’s simple enough ! jus hit add files , open up ur video , check the lil bubble that says every frame , select ur preferred output location , n hit convert ! this’ll turn ur video into screencaps for u ! it might take a minute , but it’ll make a cute lil sound when it’s finished !!!
ur screencaps will all be in ur desired folder !!! u don’t hav 2 do this part , but i go thru my caps n sort them into gifs !!! jus selectin the caps i want for gifs n movin them into different folders n such , as so !!! so my folder will end up lookin like this — u get the gist ! this jus makes the actual giffing part quicker for me !!!

now !!! we’re at the actual giffing part !!! so , ur gna open up photoshop !!! go file › all the way down to scripts › n then load files into stack !!!

n then a cute lil window like the one below shld pop up !!! hit browse , n then ( if u sorted ur gifs like i do ) u can jus go to ur gif 1 file n select all of the screencaps in that folder !!! or , if u didn’t sort em , still jus select all the caps u want for ur first gif n open em up in this lil window . they shld take a second to load , but once they do — go ahead n hit OK !!!

it’ll take a sec for ur layers to all load here too , but once they do , here’s where that action i mentioned above comes in !!! if u hav the action loaded into ps , jus go ahead n play the frames from layers action bc that’ll save n a whole bunch of steps !!!

n now ur gif shld be a frame animation !!!! yay !!! so , here’s where my steps stray from most gif tutorials bc most ppl don’t do this , but it jus helps the quality for me . :( so !!! now that it’s a frame animation , i crop it down to 380 x 400px ? i jus focus the crop on the person i’m giffing ( see here ) , jus bc i need it to be a reasonable size for our next step !
after cropping it , i’ll convert it to timeline & a smart object , which is what the little convert action will do for u in our lil set there !!! once u do that , it’s time for topaz !!! i hav a lil action here , which is the settings i almost always use ! so , u can jus load that into ps n hit play on the denoise action first n then the clean action ! DO NOT play ur animation , bc ur gna regret it sm if u do ..
now , u need to turn it back into a frame animation , which i’ve explained how to do here ! i’ve made myself a lil action for this step , n i suggest u do too bc it’ll save u sm time !!!
now that our big gif is all prettie n topaz-ed , it’s time 2 gif icon it ! now i jus crop it down to whatever size i please , my default is 70px , with a focus on my fc’s face !!! so , now she’s cropped , n we hav this lil guy !!!

but :((( she’s not very prettie huh ! so , ur gna convert it to timeline & a smart object once again !!! we’re gna sharpen it now ! u can sharpen it however u like , i use this action , but i’ve edited it to my liking a bit , but there are a lot of other sharpening actions floating around !!! either way , make sure ur timeline is at the very start of the animation when u play the action , otherwise it won’t work right ( with the one that i use , anyway ) !
once u’ve done that n it’s all sharpened , u’ll need to convert it back to a frame animation again using the same steps as before — delete any excess frames / layers n such !!! so , now , we’re left w this !!!

a lil bit prettier , but now quite what we want ! so now , ur gna take ur psd n jus drag n drop !!! make sure ur psd layer is at the top of ur layer stack , otherwise it won’t be on all the frames , n if ur gna edit ur psd at all , make sure the first frame of ur animation is selected !!!
n then we’re jus gna set the frame delay using the timeline 0.04 action in that same set — but there are other frame delay actions in there too , so play around as u please !!! n now !!! we hav this !!!

n i luv her n am happy w her , so i’m gna go file › export › save for web legacy › set looping options to forever › save !!! n now ur done !!! ^-^
#rpt#rpc#rph#╰ ♡ › ❪ 🍓 ❫ ↝ answered 。#messiest tutoral ever ??? yes !!!#i pinky promise there are better tutorials out thereskjdhjs#i'm don't know how 2 explain my process w anythin ever . :<#i jus . do thingsskjhdk#╰ ♡ › ❪ 🍓 ❫ ↝ mine * / resources 。#tutorials.#╰ ♡ › ❪ 🍓 ❫ ↝ anonymous 。
36 notes
·
View notes
Text
Updated gif tutorial
This is an updated tutorial on how I make and colour my gifs. You can find all of my previous tutorials here.
What I use:
Windows 10 laptop
Potplayer (to screencap)
Photoshop CC
I’ll be making this:

Note: This tutorial won’t be as in-depth as my previous tutorials since this is geared more towards people that have basic understanding of how to gif and use Photoshop. You can find my gif making tutorial for beginners here and colouring tutorial for beginners here.
This tutorial will be divided into two parts - Part 1: Making the gif and Part 2: Colouring the gif.
PART 1: MAKING THE GIF
1. Screen capping
The first step to making gifs is taking screen caps of what you want to gif. I do this using Potplayer, which you can download for free here.
Note: A lot of gif makers use KM Player to screen cap, but I found that it constantly crashed on my laptop and wasn’t very functional so I switched to Potplayer which suits me much better. You can download both programs for free along with others such as VLC and others, so it’s all about finding one that works best for the laptop/computer you’re using.
Open Potplayer (or whatever program you’re using) and open the video source you’re going to be giffing from. I’m giffing from a downloaded episode of Game of Thrones so I go to Open File(s) > Videos and open the correct file.
Top tip: To ensure your gifs are of the highest quality always aim to use videos that are 1080p or at least 720p (HD).
Go to the scene you want to gif, pause just before it and hit CTRL + G, which will bring up the Consecutive Image Capturer (below).
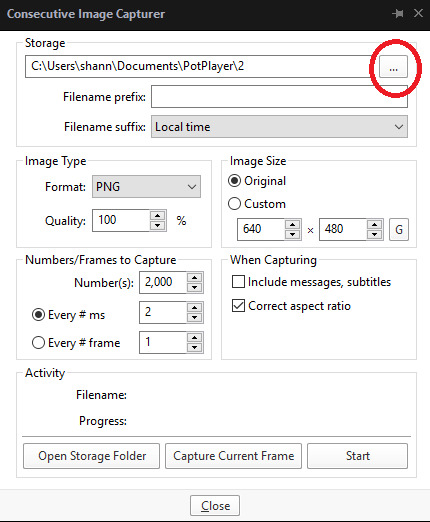
These are the settings I use. You can use the same or adjust them to suit you best.
Note: You can choose where you’d like to save your screen caps by clicking on the square with three dots which is been circled red (above).

I always minimise the screen and drag the Consecutive Image Capturer box alongside the video so I can see what I’m giffing.
To start screen capping the scene hit start and press stop when the scene has ended.
Where it says Progress beneath Activity, it will tell you how many screen caps you’ve taken. I took 54.
2. Cutting screen caps down
Go to the folder where you’ve saved your screen caps and check to see if there are any unnecessary caps that need deleting. In my scene, I accidentally captured Tyrion so deleted those caps and I now have 41 left.
Note: Thankfully the increased 3mb limit means that we don’t have to be as stingy with the size of our gifs anymore, but I still try to stick to no more than 60-80 screen caps for one gif just to cut down on the amount of time it takes to make it.
3. Open in Photoshop
Once you’re happy with the screen caps you have open Photoshop > File > Scripts > Load into stack
Note: I used to use Photoshop C5 which a friend sent me via Dropbox, but having since paid for the full version of PS, I wouldn’t recommend using any free version of PS you’ve found online. There is a risk of viruses, but free versions are also rarely fully functional (mine actually stopped working completely without warning) and a lot slower. It’s worth paying the £9.98 per month (if you’re a student) to have the full use of the program.
The following box will appear:
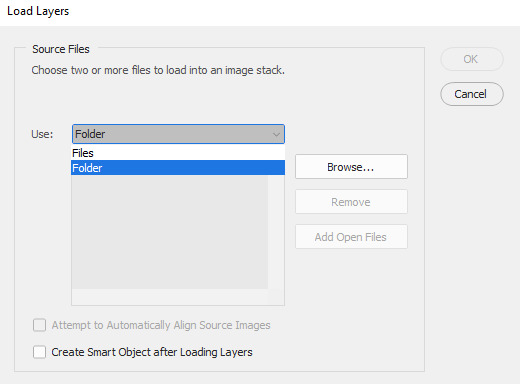
Where it says File click the drop down menu and select Folder. Once Folder has been selected, click on Browse to the right, locate the folder where you saved your screen caps to and click OK. The screen caps will begin to load in the window and when they’re done the OK button to the right (above cancel) will be available for you to click on, so click on it and they will load into PS.
Depending on how many screen caps you have, you may have to wait a few minutes for them all to finish loading.
4. Making the gif
Now that all of my screen caps have finished loading my PS looks like this:

Everyone’s PS will have a slightly different layout because on the right sidebar you can order the different tabs however you choose.
The important thing is to make sure you have the essential tabs open. To do this go to Window (on the top bar) and ensure you have the following ticked: Timeline, Layers, Tools and Options.
It’s also essential to have Adjustments (this is how we colour the gif), Actions (if you’re using actions to sharpen like I do) and Character (this is how we make subtitles) open. You can see that I have all of these tabs open in a cluster together at the top of my right toolbar, but as I said you can drag them to wherever you prefer.
In this step the Timeline is the most important part. Go ahead and click Create Video Timeline, now your Timeline will look like this:

Click on the three small squares to the left of the Timeline (circled red below) that say ‘Convert to frame animation’ when you hover over it.

Now your Timeline will look like this:

Click on the menu symbol with four horizontal lines to the top right of the Timeline (circled below) and ‘Make Frames From Layers’

Now you’ll notice that your caps have appeared along the timeline. Click again on the four horizontal lines menu symbol you just clicked on and click Select All Frames (when they’re all selected they’ll turn a darker shade of grey) > Reverse Frames. Note: We do this because the caps have been loaded into PS backwards and by reversing them, they’re now in the right order.
Keep all of the Frames selected (if you’ve already clicked off them, simply repeat the above step go to the menu and Select All Frames) and now we’re going to set the timing of the gif.
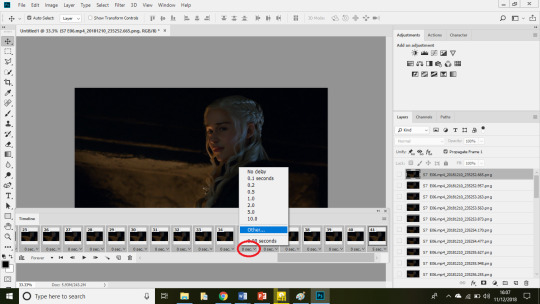
Underneath any of the frames click the time stamp where it says ‘0 secs’ (circled above) until the above options come up and then click Other...
When the Set Frame Delay Box pops up, simply type 0.05 and OK.
Note: You can now hit play on the gif if you want to see how fast it is and can readjust the speed to your liking.
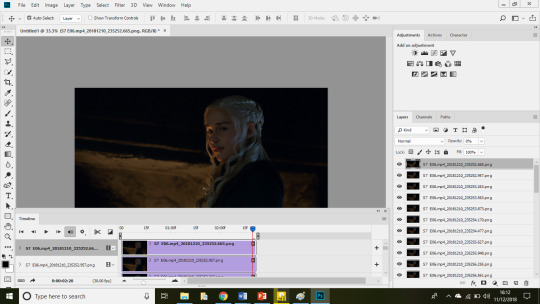
Now click on the symbol in the bottom left hand corner of the Timeline to the left of the word ‘Forever’. You’ll know it’s the right one, because when you hover on it, it should say ‘Convert to video timeline’.
Your Timeline will now look like this:
5. Resizing and cropping
Here are the Tumblr dimensions as of 2018:
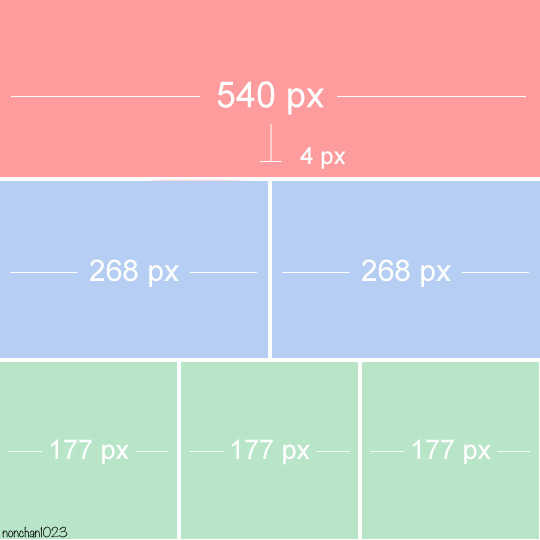
Since most people tend to make 268px gifs, those are the dimensions I’m going to go use for this tutorial.
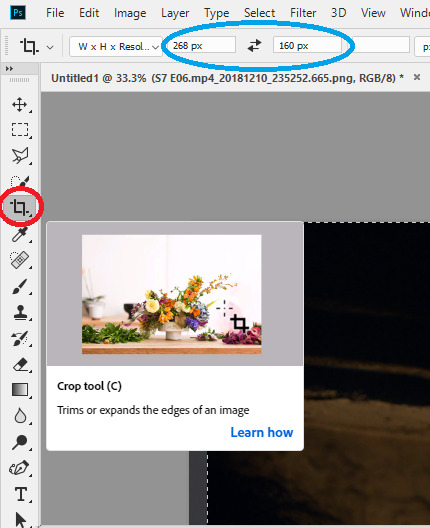
Select Crop from the left tool bar (circled red below) and adjust the size you want your gif to be in the boxes circled in blue.
As you can see my crop tool is currently set to a width of 268px which is correct, but I want to change the height to be a little bigger so I’m going to type 170px instead.
Now click on the gif until it looks like this:

And press Enter to crop it. Since Daenerys is slightly to the right of my gif, I dragged the crop to the right so she’d be more central and this is what my gif now looks like:
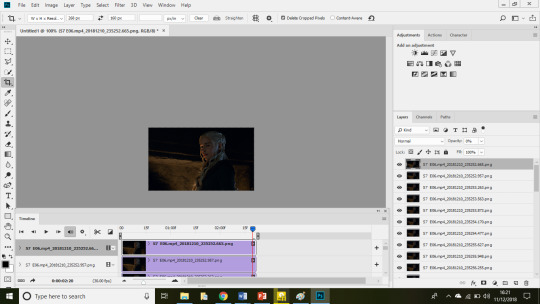
Note: When changing the size of your gif, you may need to change your zoom. After I cropped my gif it was tiny because my zoom was set to 50%. To adjust your zoom simply click on View and you then have the option to Zoom in, out or go to 100%.
6. Sharpening the gif.
I use actions to sharpen my gifs, just because that’s the way I’ve always done it. You can download the action I use here or find another that you like at yeahps.
Note: If you don’t already have an action or don’t know how to use them, simply download it, go to the actions tab, the four horizontal lines at the edge of the tab to bring up the menu, load actions and locate it.
First we need to convert the layers to a Smart Object. To do this click on the timeline at the start of your gif so that the red line with the blue shape on top is at the beginning (below, if you compare it to the image above, you can see the red line has moved from near the end of the timeline on the last image to the beginning now).
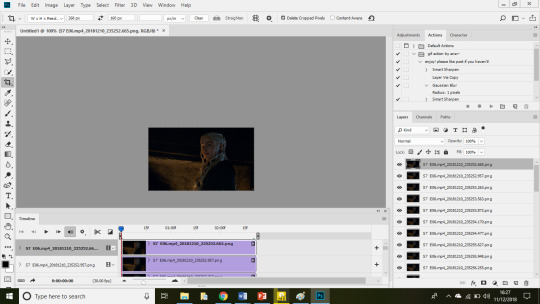
Next go to the Layers tab (in my case it’s located to the left of the Timeline), select the top layer (it’ll be dark grey when it’s selected, like mine above), hold SHIFT, scroll down to the bottom and select the last layer until everything is highlighted (below).

Click on the menu button to the right (circled red below) > Convert to Smart Object
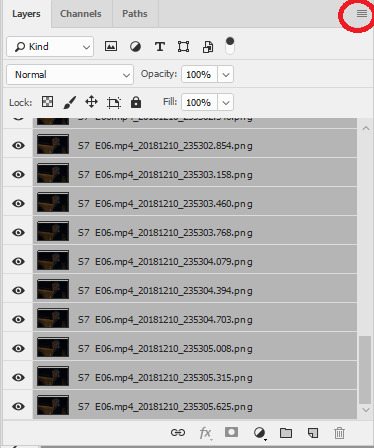
Once it has converted to smart object it will look like this:

Go to the Actions tab, find the action you’ve loaded into PS and hit the play button (circled below) so that the action is applied to your gif.
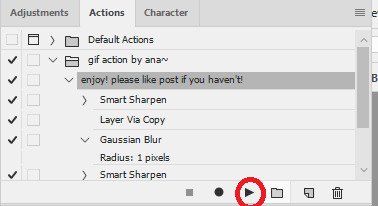
Once it has been applied you’ll see under Layers the smart object will have lots of little sections saying ‘Smart Sharpen’ have appeared below it.
For reference this is how my gif looked before sharpening:

And after:
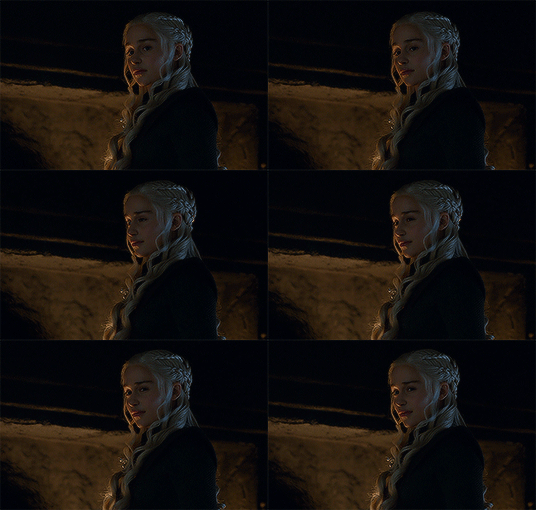
PART 2: COLOURING THE GIF
Now for the hardest, but most fun part - colouring the gif.
You can see my previous colouring tutorials here. I generally follow the same process for colouring, but I have better understanding of colour balance and selective colours now (thank goodness lmao). If you’re a beginner, it’s worth referring to my beginners colouring tutorial alongside this, because it’ll be more detailed than this tutorial is.
For this part, the Adjustments tab is essential, so make sure you have it checked (if not go to Window > Adjustments).
Step 1: Curves
Select curves and drag the line until you’re happy with how bright your gif is (remember, we’ll also be brightening the gif later with levels and brightness, so don’t go overboard.)
I adjusted mine to this:

Step 2: Levels
Next click levels, the levels box looks like this:

The three boxes just below the little line graph thingy (where it says, 0, 1.00 and 255) are the settings you need to change. You don’t need to change of the far right box (where it says 255) and the first two boxes (where it says 15 and 1.1).
By increasing the number in the left box, the gif darkens and increasing the number in the middle box brightens it.
Generally in the left box I’ll choose anything ranging from 10-30, but my go to is 20. The middle box generally ranges from 1-1.6 depending on how dark the scene is.
For this gif I went with 20 and 1.5.
Step 3: Brightness and Contrast
I chose the following settings.

My gif now looks like this:

4. Colour Balance
This is the setting I’ve learned to use better since I first started colouring and I’ve earned how much of a difference it can make to a gifs appearance.
The box looks like this:
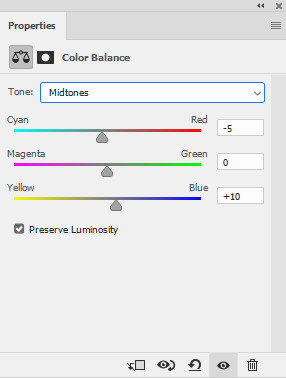
Since my gif is yellow/red in colour due to the fire I changed the Midtones settings to the above.
An important element of Colour Balance which I didn’t use before is Shadows and Highlights. By clicking on the dropdown menu where it says Midtones, you can also select Shadows and Highlights.
When you change the colour balance on Shadows, it changes the undertones of the gif, the background, whilst midtones changes the middle layer of the gif and highlights the top surface of the colour (sorry, I suck at explaining this, but play around with the settings to see what I mean about how the different settings change the colours in different ways).
I changed Shadows to +10 Blue and -5 Red.
Before colour balance:

After:

Step 4: Selective Colours
Selective colours can completely change the appearance of a gif and it’s important to play around with them as often as you can and to get an eye for colours.
For example, when I look at my gif as it is now I can see that the colour balance has helped diminish the yellow/red tones, but not quite enough, so I’m going to adjust yellows to -20.

I can also see that the colour balance has brought out some cyan/blue tones in Dany’s hair, which I want to get rid of so I’m going to change cyans to -100 on every option and blue on blues to -100.

The difference is subtle, but it’s there. Now that I’m happy with the colour of the gif, it’s time to go back and readjust any of the previous layers I’ve added such as brightness, levels etc. to add any final touches.
My final result is this:

Thanks for reading. I hope this was useful to you. Please share if it was and feel free to ask if you have any questions, I’d be happy to help.
I’ll also be creating a ‘Gif Colouring Tips’ post for people that are new to colouring there gifs or are currently using other’s PSDs and would like to learn. I’ll link it here when it has been posted.
416 notes
·
View notes
Note
okay i tried to figure this out on my own to no avail and i’m a little bit at my wit’s end with it so now i’m afraid i’m gonna trouble you by asking: how do you get a good frame rate for your gifs in photoshop~?
i always use vapoursynth’s preprocessor but then i end up with a lot more frames so i can only include like 25% of what i could get away with by using photoshop alone. but then if i skip vs the gifs always turn out too fast or too slow, no matter what i set the frame delay or timeline frame rate to. is it something to do with the video you pull frames from or do you use another program after all…? idk what else i can try at this point.
mighty gif maestro, please teach me your ways 🥲🙏
Mighty gif maestro iAKAKAK please don’t!!!! 🥹🥹🥹 baby I don’t use Vapoursynth at all when giffing, I take screencaps of the scene I want to gif in mpv player and then load the screens into photoshop and proceed to crop resize etc! I haven’t used vs for a while now! I think sv slows down the giffing process a lot it took me forever to make a gif , and my laptop froze all the time. And most of all I didn’t like the quality of my gifs at all so i switched back to only use ps like in the past! If you need any help let me know, I would really happy to help you!
0 notes
Photo


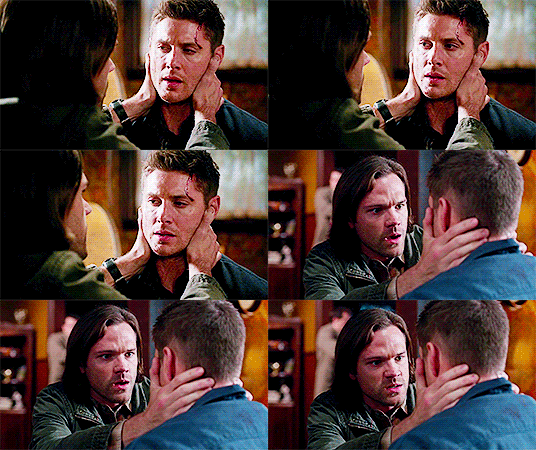





- ̗̀ How to Make Gifs with Photoshop and KMPlayer (Very Detailed) by quirkyresources © ̖́-
♡ All my tutorials ♡
Hi! I'm no expert, but I've been making gifs for at least like four or five years, and over that time I've learned a lot, so I want to share that stuff :) Also, someone requested that I teach them how to gif. I hope this helps!
This tutorial will teach you how to create simple but quality gifs, like the ones in the gifset above! Those gifs are all from TV shows, but it should apply to giffing almost anything. I’ll be using KMPlayer and Photoshop.
This is the gif I’ll be showing how to create, as an example:
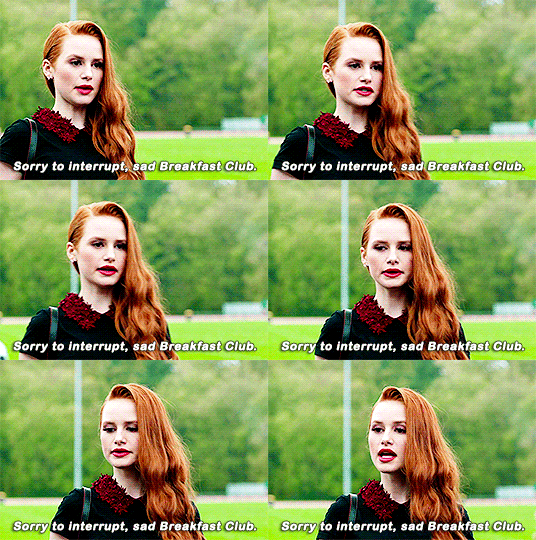
If you have any questions at all, please feel free to message me here :) And I’m somewhat new to writing tutorials, so if you notice that I got something wrong, please let me know. Thanks!
Please like/reblog if this is at all useful to you. Thank you so much if you do!
You need:
KMPlayer (link below)
Photoshop (I'm using CC 2017, but I think any version with the timeline should work)
A video to gif (recommended source below)
A sharpening action (recommendations below)
A PSD / or to know how to color gifs (recommendations & tips below)
I'll go over:
How to buy/download PS, download KMPlayer, and download a video!
Taking screencaps in KMPlayer
Importing the screencaps into Photoshop
Cropping and timing the gif, organizing layers, etc.
Adding a PSD or tips for coloring it yourself
Adding subtitles & learning font settings
Saving for web
Posting to Tumblr
Various tips along the way!
The tutorial is under the cut. Have fun and good luck! ♥
[Note: If a photo looks too small, right click it and choose "open in new tab"]
Step 1: getting Photoshop, KMPlayer, and quality videos
Get Photoshop: I was able to buy my Photoshop, so I don’t have any free downloads to recommend, I’m sorry! But there are plenty of other Photoshop blogs on tumblr that can help with this stuff :) And there are some deals from adobe that might help you afford it if you want to buy it instead. They had a great one for college students that totally helped me. Anyways, if you can get it somewhere/somehow, here are the next steps...
Download KMPlayer: Here's the link (it's free!): kmplayer.com You can use it to watch videos, but in this case we use it to take screencaps of them to use for gifs.
Get your video: If you’re going to download a movie or show, I recommend getting torrents from thepiratebay.org and using μTorrent to download them. (Here's a tutorial for how to download stuff with it.) Be careful with viruses and stuff, though! When you look for a video, try to get one that's as HD as you can find, meaning one that is 720p or 1080p! That tells you what the height of the frames will be, in pixels. They are usually big files, but should be much better quality than others. Also, try to find videos that do NOT have network logos or ads on them!! They can make gifs look pretty bad, and it takes some serious cropping to get rid of them, which then makes it look even less quality.
Step 2: taking your screencaps Open your video in KMPlayer. (Open KMPlayer and press CTRL O.) Get to the exact scene/clip you want to gif. (Tip: it's hard to find the exact place you're looking for, so I recommend using your right/left arrow keys to skip through a little at a time.)
Once you're at the part of the video you want to gif, press CTRL G. This brings up the "frame extraction" window. This is where, as you can probably guess, you extract the frames for your gifs! Here are the settings I use:

I use these exact settings almost every time, except for the image format section. I go between JPEG and PNG. I use JPEG if I'm making a smaller gif (like 268px width or less) and I use a PNG if I'm making a larger gif (like 540px width.) This is because (or at least I've heard) PNGs are the highest quality option, JPEGs are the middle, and bitmaps are the lowest (don't use them!!) The only downside is that the higher the quality, the higher the screencap's file size. So use PNGs sparingly if that matters to you.
You can also change the "prefix" of the screencap filenames.
After figuring out all of these settings, click "start"! Then press play on the video, play until the end of what you're giffing, and press "stop" and pause it.
Then, in the frame extraction window, click the "open" button that’s to the far right of the "extract to" bar. This will open up the folder location of your new screencaps.
Step 2.5: organizing your screencaps What you'll want to do now is organize the screencaps into separate folders for each individual gif. This is something that's good to do whether it's all from one scene or you're doing a compilation of different clips. This is because, when you upload the screencaps into PS, it's best to have them in their own little folders!
(Tip: Personally I use 75 frames or less in each gif. This is because that’s the limit on the sharpening action I use, but I also think it's a good amount to stop at.)
Step 3: importing your screencaps into Photoshop
Next, we're finally going to move the screencaps you took into Photoshop. Yay!
Open file > scripts > load files into stacks. (Tip: Sometimes this function doesn't work on certain Photoshop downloads. If this is the case for you, here's a tutorial on how to get around that!) This brings up this window:

Click "browse" and find the folder with the screencaps you want for your gif. Select all of them and click "open". Then click "ok" and wait for them to load. Each screencap will load as its own layer in the layers panel, which is what you want to start with.
Step 4: changing the screencaps from layers into frames in the timeline
Once they're all loaded as layers, go to window > timeline. This brings up the timeline!
At this point, things should look something like this:

Now we can start using the timeline! In this method we convert the layers into frames that live inside the timeline, which we’ll use to make the gif move.
First click on the button in the middle of the timeline panel that says "create frame animation" right here:

Then click on the little three bars icon on the top right corner of the timeline. Click "make frames from layers" on the thing that pops up .
It depends, but you might need to reverse the frames (if it imports them in backwards). So just click on that three bars icon again and click "reverse frames".
Step 5: cropping the gif
It's really important to know the Tumblr dimensions! If you have a gif that doesn't fit the dimensions most Tumblr users view it at it can get distorted.
So the width dimensions you should use are:
A row of just one: 540px wide
A row of two: 268px wide each
A row of three: 177px & 178px & 177px
A super helpful explanation of good dimensions to use is this one made by karazorel. It's very close to the way I do it.
So to crop it, go to the crop tool (duh, sorry) and enter in the dimensions you want into the area I highlighted here:
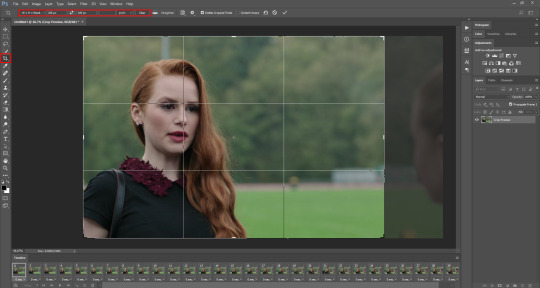
Here's what the gif looks like so far:
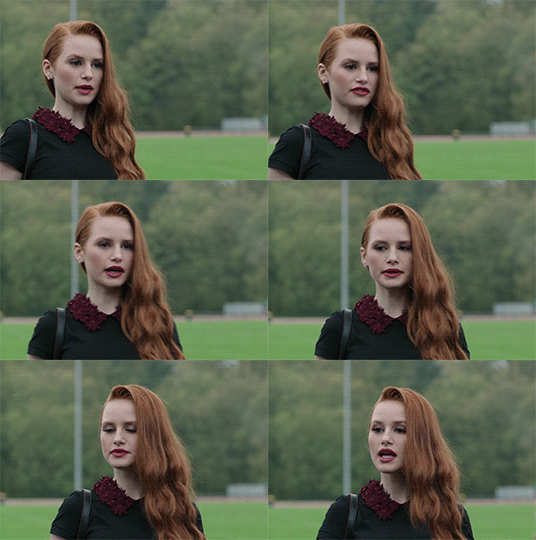
You'll probably notice it moves really fast and stops moving after playing once. That's because we haven't gotten to the step to fix that yet. But that's next!
Step 6: timing, looping, etc.
Timing: Select all of the frames. You can do this by selecting the first frame, holding shift, and clicking on the last frame. Now click the little arrow next to where it says "0 secs." under any of the frame previews right here:

Click on "Other..." and type "0.14" into the text field. That represents the number of seconds, or usually the fraction of a second, that each frame will play for. (It's "0.14" in this case because of the way we entered the settings in KMPlayer in the "Frames to Extract" section. The number depends on what you enter there.) Press enter/okay.
Looping: Next change the looping setting from "once" to "forever". Here's where I'm talking about:

Step 7: sharpening the gif frames
This step can either be done at this point (before coloring it) or later (right after coloring it.) I go back and forth on which is better, and different people say different things. So just play around with it!
I use this sharpening action. It can sharpen up to 75 frames, which is a really good amount in my opinion.
Once you have a sharpening action downloaded, go back to Photoshop and go to window > actions. Click this little menu button, then click "Load Actions...".
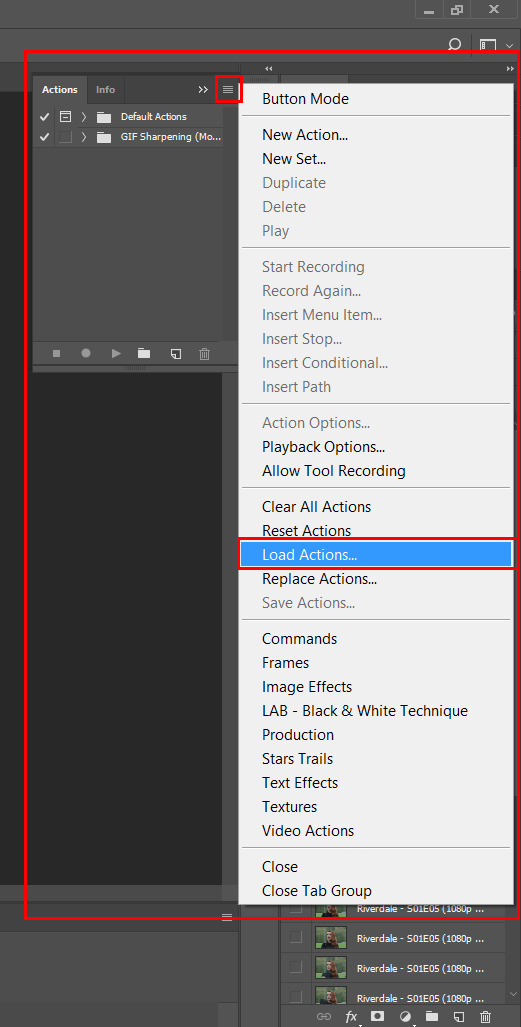
In the window that pops up, choose whatever sharpening action you downloaded and open it. This will load it into your actions panel!
Next, click the menu button on the upper right corner of the timeline panel and click "Flatten Frames Into Layers". Now there will be a new set of layers that are labeled Frame 1, Frame 2, Frame 3, etc. Keep those, and then you can delete the OLD set of layers. (That can significantly lower the file size, and it doesn’t mess anything up if you do it right!)
Now select the very first frame in the timeline, labeled "1", and select the corresponding layer, labeled "Frame 1".
Then open the sharpening action's folder within the actions panel and select the folder labeled with the number of frames you have in your gif. For example, I have 18 frames in my gif, so I selected the folder labeled "18 frames". Or at least that's the way they labeled things in the action I'm using. You may have to explore yours to figure it out.
Then click the play button on the actions panel:

Now that should have sharpened all of your frames/layers! Woohoo! Here's what the gif should look like by now, all cropped, timed, looped, and sharpened:

If this way of sharpening doesn't work for you, here are some other gif sharpening tutorials:
How to use sharpening actions in Photoshop CC by peacelovegifs
Gif sharpening tutorial by manofsteel.co.vu
Sharpening for Photoshop CC by completeresources
Sharpening all gif frames at once by thosetutorials
Sharpening masterpost by itsphotoshop
Gif sharpening action tutorial + download by themazerunnrs
Step 7.5: grouping your layers (a baby step!) A bonus step that I recommend you do is to put all your layers into a group to keep things neat. Just select all of them and press CTRL G.
Step 8: adding a PSD and/or coloring it yourself!!
Here's the fun part! Now you can let out your creativeness with the coloring. It takes a LOT of practice to get good at this, trust me. I've been doing this for YEARS and I still hate my results sometimes. But if that happens to you, too, don't let that stop you from trying again! (God, I sound like a motivational speaker or something, sorry!)
Here’s some background on PSDs for beginners, but you can totally skip this bit...
"PSD" stands for "Photoshop document", meaning a file you make or edit in Photoshop (sorry, kind of self explanatory). On Tumblr, when people talk about PSDs, they're usually referring to a document with layers that add effects (mostly adjustment layers) to a gif/photo/graphic, etc. Also referred to as a "coloring". They usually include things like brightness/contrast, vibrance, curves, selective color, etc. People post these so you can download them and use them for your own work! (Just don't repost and claim as your own. Not cool, man.)
All you have to do is download the file, open it in Photoshop, make sure you have the layers panel open (windows > layers), and drag the PSD file's window on top of your file's window, but keep them separate so you see both at once. Then drag the PSD file's group of layers (but not the background!) over to your file.

(Then you can close the PSD window.) Then on YOUR file, mess around with the adjustment layers and stuff to change it to whatever you want it to look like. I usually edit mine like crazy!
Anyways, here are what your options are.
Finding a PSD (and then I recommend editing it to however you like it)
Here are places to find some great PSDs on Tumblr! (FYI, some are tag pages with sections for PSDs, with different types to choose from. So look around.)
QuirkyResources (Navigation) (Yup, shameless self-promo!)
QuirkyResources (My PSDs)
CompleteResources
ItsPhotoshop
ChaoticResources
YeahPS
DrunkandColoring
AresColoring
That's just a few of my favorite sources, so message me if you want more recs! :)
Coloring it yourself
I'm not going to do a full-on coloring tutorial right now, but here is my tag for those made by other people!
Basically you should learn how to use the most important adjustment layers: curves, brightness/contrast, selective color, color balance, hue/saturation, vibrance, levels, exposure, and gradient maps. At least those are the ones that I use the most and find super useful. Many of the tutorials in that coloring tutorial tag I just linked go over how to use those. So check them out!
In this case, I used my current fave PSD by dracoharry. (I’ve noticed it works on most shows I gif, so it’s super useful! I actually used it for all of the gifs in the gifset I made for this post.)
Here are the layers I kept hidden/showing:

FYI, I changed the layers' settings and whatnot a bunch.
And here’s what my result was:

Step 9: adding text & learning font settings (optional)
This is usually when I add text to the gif, if relevant.
There are various fonts and settings you can use for this, but to make things easier, here's a font PSD by adorkablelena. It’s for subtitles/quotes. I recently started using it. It's really cute! If you're not into it though, here's my tag for other font PSDs you can check out.
When you find a font PSD you like, open it and drag it into your document the same way you would with a regular PSD.
Select the text tool and replace the text with your quote. (Tip: Try not to misquote or misspell things if you can help it! I've done it and it sucks when that happens. Ugh.)
As far as colors go... For the primary quote I make the text white, and the secondary quote I usually make it yellow (#ffde00). And if there is a third I'll use some shade of orange, and anything after that I just use whatever I can make look the best. The stroke color I use varies sometimes, but I usually use black (#000000).
Finally, select the move tool (V) and make sure "smart guides" are turned on. To check this, go to view > show > smart guides, and make sure it's checked. Now when you drag around the text (select its layer first), you can see little purple vertical/horizontal guides pop up when you drag the text to the center of either direction. For the subtitle we're making, we want it to be centered horizontally and close to the bottom of the gif, but not too close. Also, if you have more than one line of text, just press enter somewhere in the text that splits it into similar-sized lines. Here's an example of all of this stuff put together:

Step 10: saving for web
There are a lot of settings to remember and play around with when saving for web, and specifically for Tumblr.
First, go to file > export > save for web (legacy).
Here you'll see a lot of settings to choose from, but they're not as intimidating as they may look!
Here are my usual settings:

Red highlight: There are multiple options in the top drop down list in the area I highlighted that are good to use. I usually use “Adaptive”, but “Perceptual” and “Selective” are good options too. In my experience, the rest make your gif look pretty gross. For the drop down list under that I choose "Pattern". This arranges the pixels in a pattern, and I like the look of that more than the two other viable options, ”Diffusion” and “Noise”.
Orange highlight: This is where you choose the number of color shades that are in the gif. I use the top amount allowed, 256, because this achieves the highest quality possible! If you need to make the gif's file size smaller, you can lower this amount, but I don't recommend it. If it's a B&W gif you can sometimes get away with using less and have it still look just as quality.
Yellow highlight: Looping options: Forever. Very important! Like I showed earlier, you can also set this setting before you get to the "save for web" option. Either way, this makes it so the gif loops forever.
Green highlight: Gif size! As I mentioned earlier, there is a limit for Tumblr. This example is a pretty small gif (592.9K) and the current file size limit on Tumblr is 3MB. Tumblr seems to change this limit a lot though, so you may want to look that up once in awhile to stay up to date.
Turquoise highlight: Always check the box next to “Convert to sRGB”. I just learned that this setting is important. It basically keeps the vibrance intact when you take it from Photoshop to Tumblr. Read a much better explanation here! :)
Then just click "Save...", choose the file location, and press "Save" again.
Step 11: uploading/posting to Tumblr
Now, last but not least, it's time to upload it to Tumblr! I probably don’t need to explain this, but I’m going to anyways. It's super-duper easy. Just go to your dashboard and click on this button:

Then the post creation window pops up, and just go on from there. Upload your images/gifs, drag them around to arrange them however you like, and add a caption if you want.
(Tip: Don't forget to add tags! It's super important to add tags if you want people to actually find your post. Only the first 5 tags show up in the main Tumblr tag-search results (ugh wtf, right?) but sometimes the other ones you add will show up on the general search page. I don't really get how to explain it or how it works tbh, sorry! But I do know that many fandoms have developed their own tagging-language to find people's posts more easily (and avoid spam) which is very useful once you figure it out. For example, if I was posting a gifset of Cheryl Blossom from Riverdale, I'd tag it with things like "riverdaleedit" and "cherylblossomedit" and maybe "madelainepetschedit". So basically the name of the show/character/actor/ship plus "edit", no spaces. Or an abbreviation of any of those, like "spnedit" or "dwinchesteredit". I hope that at least makes a little sense? As far as the amount of tags that will show up on individual blogs, I'm not positive, but I believe you can use up to 30. After that the post won't appear on the tag's page. Grrr.)
Then, of course, just post it! I recommend saving it as a draft and then posting it at a time when a lot of people are likely to be on Tumblr. (There's research done on this timing!)
THE END! :D
I really hope that was at least somewhat helpful. Sorry if it was annoying that I went into sooo much detail, I just thought I should explain everything so it would make sense to most people, especially total beginners. Again, if anyone has any questions at all, you can absolutely ask me here! Or let me know if you think I got anything wrong, I would definitely want to fix it! Thanks for reading, and please like/reblog ♥ I’d really appretiate it!
#photoshop tutorial#completeresources#itsphotoshop#chaoticresources#yeahps#tutorials#gif tutorials#gif making#how to make gifs#gif making tutorial#mine#mine: tutorials#peachresources#riverdale#riverdaleedit#coloring tutorial#sharpening tutorial#photoshop tips#ps tips#photoshop 101#ps 101#500
632 notes
·
View notes
Text
gif tutorial
an anon asked me how i make my gifs, and tbh i just do it in the traditional way. buuut since i have some free time, i’m up for explaining things! this tutorial is long and detailed as well as image heavy. i’ll also provide links as to where to start with everything, so let’s get started!
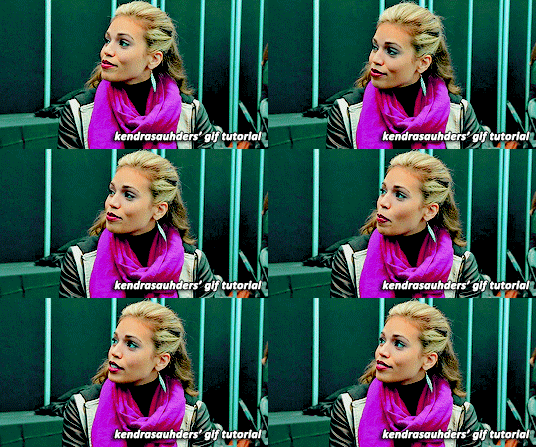
so you want to make a gif? the first step would be to download photoshop. i use ps cc 2017 which can be downloaded here for windows and here for mac. you’ll need winrar or 7-zip to unzip the file for windows after downloading, and then just follow the steps to open and use it! the second step is download kmplayer, which works best for getting screencaps from your video. you can download videos from hdpopcorns, get the url of a youtube video and download it using 4kvideo, or use a torrenter to use a torrenting site to find movies. be sure to only use either 720p or 1080p movies / videos, never any less. the gif will be harder to work with if you use anything lower, and it will likely come out extremely grainy, which is generally regarded as “ugly”.
so, now that we have ps, kmplayer, and a video, we can go ahead and open up our video in kmplayer. once your video is open, find the scene you want to gif and right before the scene starts, pause the video and press ctrl + g to bring up the frame extraction panel, which will look like this.
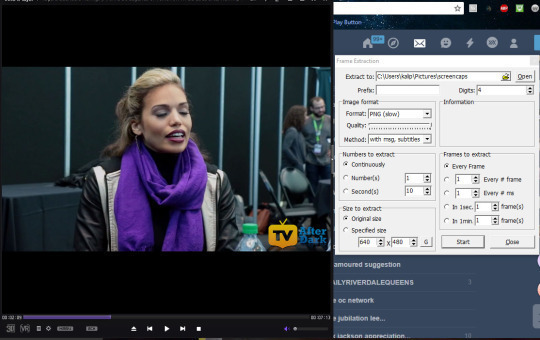
you can change the “extract to” to an area where you want your screencaps to go. since i’m me, i tend to keep things organized, so i made a folder specifically for screencaps. for image format, i use png, however others may use jpeg. png is the highest quality, though, so that’s what i prefer. for method, you can select “only video image” if you’d like, but since this video doesn’t have subtitles, it doesn’t make much of a difference for me. the numbers to extract should be marked with continuously, as well as selecting every frame. some may say it’s okay to select every other frame, but the gif looks smoother selecting every frame, but it’s all up to you.
so, now we just press “start” and press play on our video, and the screencaps will be captured. once the scene ends, press “STOP” on the frame extraction panel and you can open up the folder where your screen caps are and see if there are any images you need to delete (which would typically be from starting too early or ending too late). delete the unnecessary scenes.
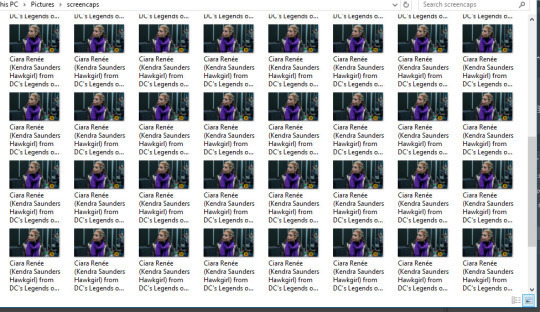
i have all of my screencaps, so i’m just going to go ahead and now open up photoshop.
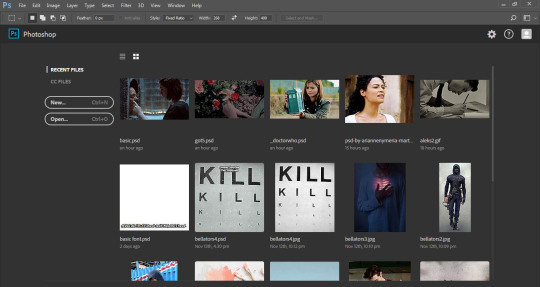
this is generally how it’ll look upon being opened (minus the recent files part bc…we’re all different people and these are just my recent files).
the first thing we’re going to do is press FILES, scroll down to SCRIPTS, and click LOAD FILES INTO STACK. then we’ll get a little pop up like this:
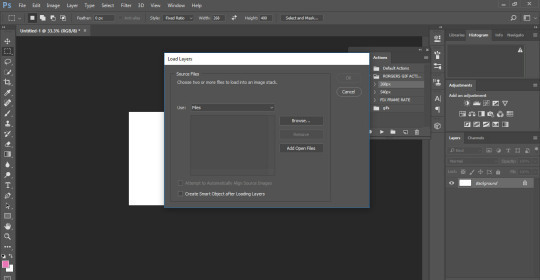
click Browse and select your screencaps folder. select all of your screencaps from the folder.
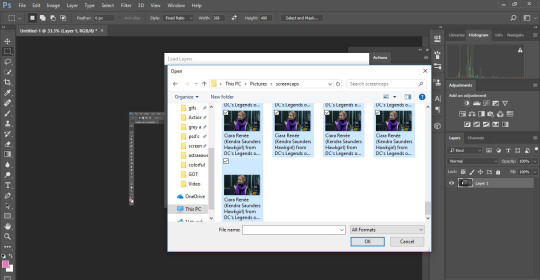
and select ok.
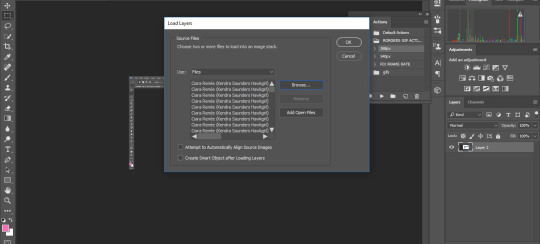
the pop up will show up again. select ok and wait for all of your screencaps to show up in a new tab.
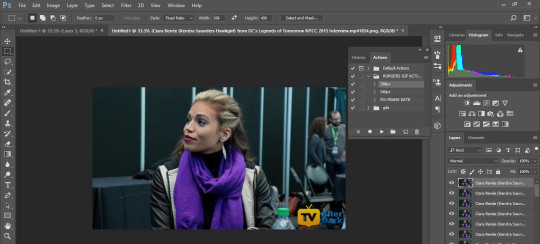
now it will look something like this. the first thing youre going to do is click on “windows” at the top bar, and press animation so that you can bring up the timeline.
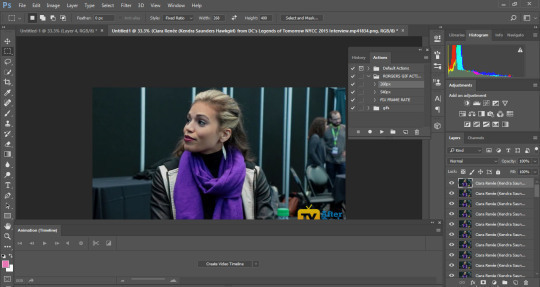
now it looks like this. press “create video timeline”.
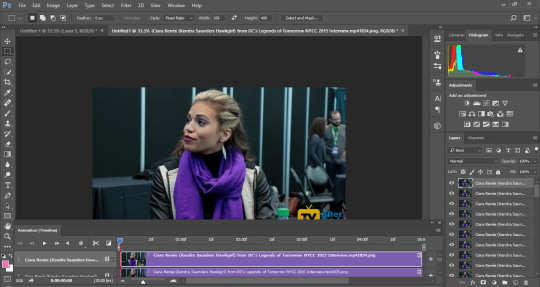
it now looks like this. the first thing you’re going to do is select the little stack button in the right corner of the animation tab, which looks like this.

from there, you’ll press the button that says CONVERT FRAMES, and then select MAKE FRAMES FROM LAYERS.
now it’ll look like this.
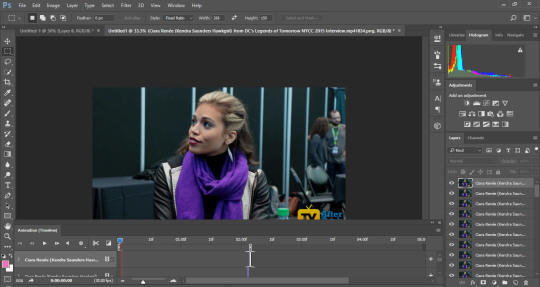
now. you’re going to press the three squares in the bottom left corner that looks like this:

and then your workspace should look like this:
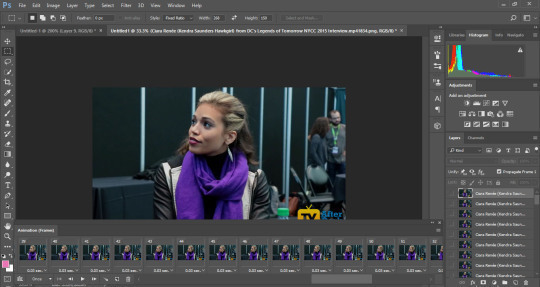
click the little three stack in the top right of the animations tab and select “reverse frames” (because ps puts them in backwards).
and now this is essentially your “gif”. you can play it to see how it looks (also be sure to change the “once” to “forever”!) you can change the delay as well; depending on the video and the gif, my time varies. be sure not to make it too fast or too slow.
so technically, this is our gif and we can be done, but to make a nice gif, we need to do two more steps: sharpening and coloring.
to sharpen, we click the little boxes by the bottom left area of the animations tab, which looks like this:

this will take us back to the original looking panel.
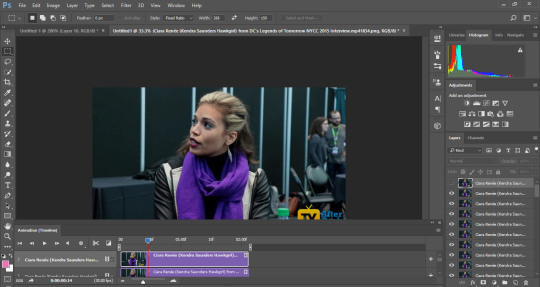
what we’re going to do from here is press the select tab at the top and press select all layers. (this can also be done by pressing ctrl + alt + a). and then press ctrl + g to make all the layers into one group, so we don’t have to sharpen each layer separately.
the workspace should now look like this.
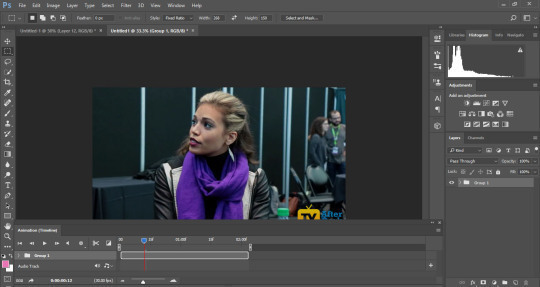
so, now that all our layers are together, we’re going to press filter and then convert for smart filters. it should now look like this:
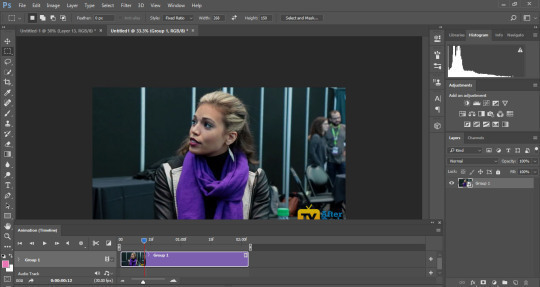
select filter again and click on smart sharpen. enter these settings:
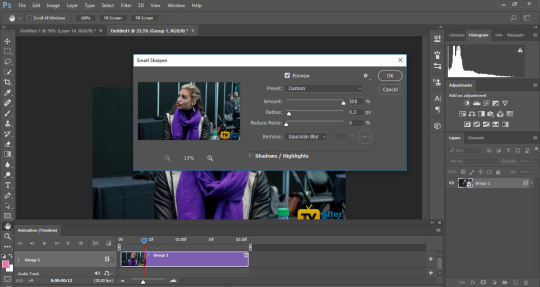
and press ok. our gif is now sharpened!
now we’re going to resize our gif and crop out unwanted parts. you can do this step in the beginning, before making our gif, when we just have our screencaps, or you can do it after, before coloring. either works.
so, first we’re going to select the rectangular marquee tool.
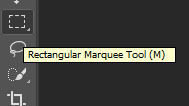
and input the measurements for our gif. i’m using 268x150, which is what i usually do for gifs that are side by side.

and then i drag the rectangular marquee over where i want it to be.
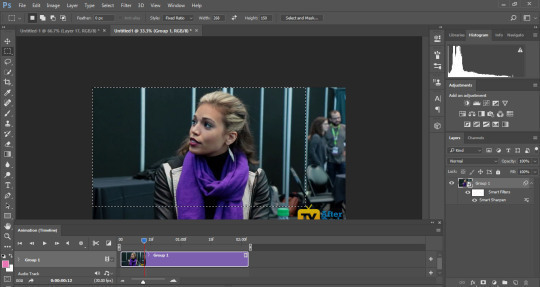
then, i get the cropping tool, which is three below the rectangular marquee tool, and the dotted line becomes like so:
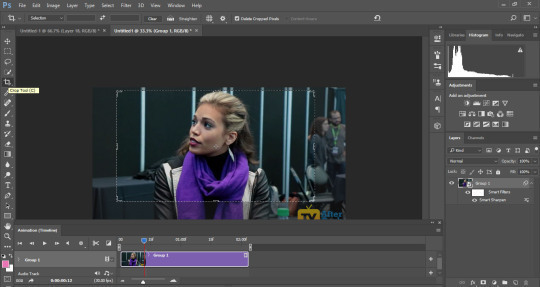
i then go ahead and press enter once, and then twice (to which it looks like this):
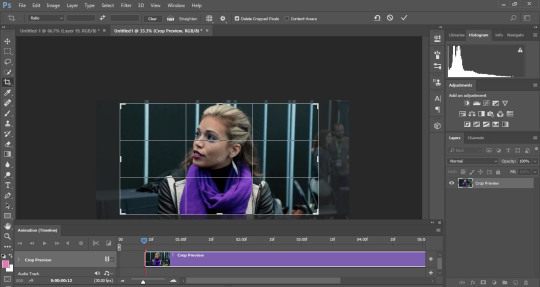
and then press enter again. my gif is now cropped and looks like so:
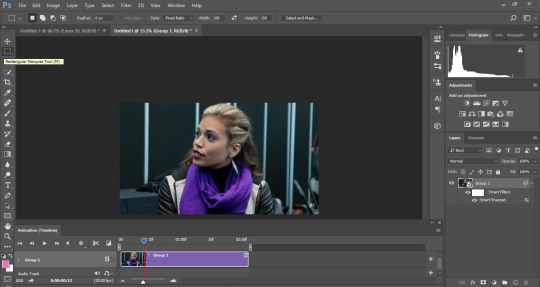
next, select image from the top and click on image size. type in the width you selected from the rectangular marquee and it will adjust.
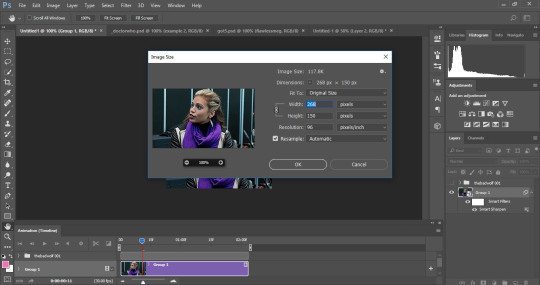
press ok and then your gif is now resized! you can zoom in to get your gif to a comfortable size for viewing.
now, we can get to the fun part: coloring!
if you have a psd, feel free to apply it by opening up your psd and dragging the group onto your gif. this can be trial and error depending on what you’re giffing, as well as what scene it is and how bright the scene is. different psd’s work on different things, and brightness / selective color may need to be added to get a desired effect.
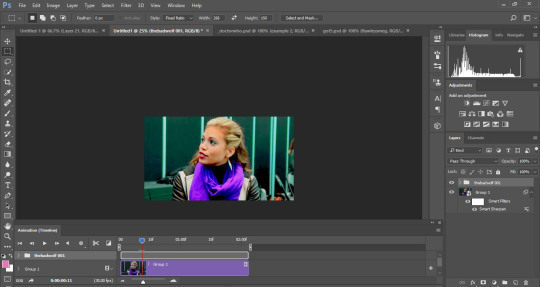
this is my gif with my desired coloring; i dropped on a psd and added adjustments to get it to look like this.
now that our psd is colored and sharpened and down to the size we want, we can save! select FILE, and scroll down to export. then click save for web.
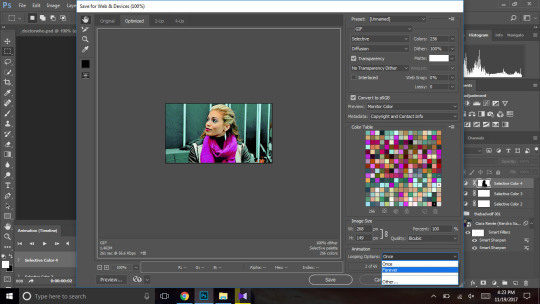
be sure to change the looping option to forever, and use the above settings. click save and you’re good to go!
here’s my final product (vibrant coloring):

and a b&w version:

compared to this, with no coloring, just sharpening:

if you found this useful, please like / reblog! and if you need any more help, feel free to message me.
43 notes
·
View notes
Text
Andy’s Gif Tutorial
Hello, everyone!
Since a few people have been interested in my gif making process, I have decided to compile a detailed tutorial with some tips that I find useful, screenshots and links to other posts that have helped me along the way.
What you need:
a version of Photoshop (I use CC 2017);
HQ clips/movies (720p or 1080p for best results);
a screencapping tool (I use KMPlayer, but I hear there are some other programs that work just fine);
patience and perseverance.
I will try to make this as comprehensive as possible, but please feel free to ask me any questions if you have to and, of course, please like/reblog if you find this helpful.
STEP 1 - Frame extraction
As I previously said, I use KMPlayer for screencapping, it’s free to download on the official website for Windows and also has a beta version for Mac. I hope that by now you have decided on what scene you want to gif, so now all you have to do is open your video in KMPlayer and go to said scene TIP: I usually pause the video just before the scene starts to make sure that when I start extracting, I’ll have all the frames I need.
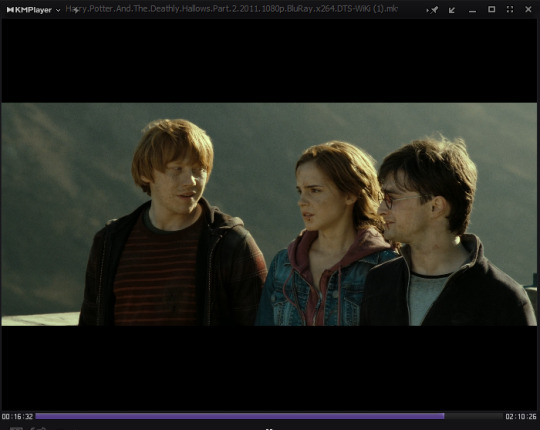
Now hit CTRL + G in the player and a new window called ‘Frame Extraction’ will open up. These are the settings I use 99% of the time:

As you might notice I prefer using a smaller image size from the beginning because my laptop is slow enough as it is and also because it’ll be easier later on when I load the caps into PS. I always choose the size as if I’d make 540px gifs and I adjust the width accordingly, but I always take into account the video’s ratio and the fact that I need some extra pixels in there in case I need to crop my image. Once you’ve settled on your settings and your scene, you just have to click the ‘Start’ button in the ‘Frame Extraction’ window and you’re good to go, then click ‘Stop’ when you’re done. Alternative: If you need to make longer gifs, but also be able to stay withing the 3MB limit, in the ‘Frames to extract’ tab you can choose the second option, that will extract every second frame of the video, but I must warn you, the quality of your gif might decrease a bit.
STEP TWO - Loading frames
First of all, make sure your PS version has a timeline. If I am not mistaken (that would be embarassing) for older versions you can find the Timeline option directly in the dropdown Window menu, but for CC 2017 you have to click Window > Workspace > Motion.
Your workspace should now look like this:
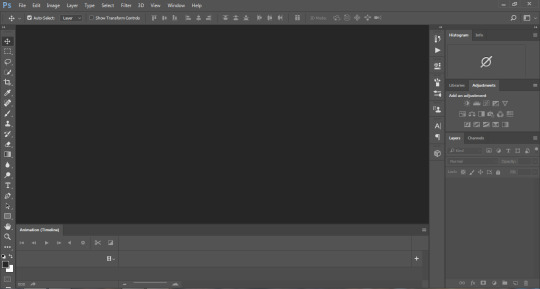
See the space called Animation (Timeline) on the lower part of the window? Well, this is your new best friend.
What you need to do next is load the frames you’ve previously extracted into Photoshop and this is how you do it:

This will open up the ‘Load Layers’ window where you will hit ‘Browse’ and open up your screencaps folder, choose the frames you want to use wait a few seconds for them to load and then click ‘OK’.
STEP THREE - Making your gif
Once the all the frames have been loaded into layers (again, there’s a bit of waiting, depending on how fast your computer is), your timeline will look like this:

Click one ‘Create Video Timeline’ and then you will have this:

Now click on the button on the bottom left of the image (the one that looks like three tiny squares), that’s called ‘Convert to Frame Animation’. On the top right of the timeline click on the dropdown menu and choose ‘Make Frames from Layers’. This will transform all the layers you’ve loaded into frames that you can use in your gif.
If you hit the ‘Play’ button now, you might notice your gif is moving backwards. There’s an easy fix for that. Go again to the timeline dropdown menu and click ‘Reverse Frames’.
This is when you are going to pick how many and which of the frames you loaded will be in the final version of your gif. Delete all the ones you don’t use.
STEP FOUR - Resizing
One of the most important steps in gif making in my opinion, because if it’s not done well, then the quality of the gif is affected. If you need to crop your image, this is the time to do it.
To resize your image, go to the ‘Image’ menu and pick ‘Image Size…’.
WHAT I USE: For two column gifs, I use 268px width with 150px or 170px height and for big 540px gifs in width I use 250px or 270px height. I pick the height depending on the initial ratio of the image or how wide is the scene I want to gif. Also, again, when I crop, I use 5px extra that I take care of later.
You probably noticed that your image isn’t exactly the right size now. You might think cropping it again is the best way to go, but there’s a better way, in my opinion, and that’s Image > Canvas Size.

You might’ve noticed when you opened gifs on tumblr, that some of them have a very thin, although inaesthetic for my taste, transparent area between the edge of the image and the gif area. Using ‘Canvas Size’ and playing those 5px extra is how I get rid of that and make my gif look neat all, even at the edges.
In this window you just have to set the exact dimensions you want your gif to have (mine is 268x150), and you’re all set.
STEP FIVE - Sharpening
Most tutorials will now tell you to set your frame delay, sharpen, colour and save. What I am going to do next, I learned from this tutorial and it honestly saved my life. Now I will sharpen my gif in a few easy steps and by the end I will have all of my frames sharpened and open in the timeline.
Click on the ‘Convert to Timeline Animation’ button on the lower left of your timeline, the one just under the first frame.

Select all your layers, the ones that are in use in your timeline will have a small eye symbol next to them, those are the ones you need (I usually delete all the layers I don’t use), right click on them and choose ‘Convert to Smart Object’.
The smart object you have now is the one you will apply your sharpening settings or action to.
There are a few sharpening actions here, but you can always look up more on resources blogs, there are a lot of them around.
Go into the timeline menu again and pick Convert Frames > Flatten Frames into Layers. Now you have all your layers again, but they are also sharpened. Now convert back to frame animation like you did on the first step (I delete the smart object because I don’t need it anymore, I have layers now) and make frames from your layers again.
STEP SIX - Frame Delay
To set a frame delay aka how fast or slow your gif will move, you have to select all your frames and click on the tiny arrow button under the image.
I prefer using 0.05 seconds between my frames, but honestly, ultimately it depends on what you want your gif to look like so I reccommend playing around with different values and see how the gif moves before settling on one.
You will have to make sure that your gif will be playing on a continuous loop.
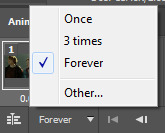
By default you will have the ‘Once’ option ticked, you have to make sure it’s set on ‘Forever’ before you save your gif.
My gif now looks like this:

Now all you need to do is apply a PSD, or if you’re me, make your own colouring and then you’re all set. (I will maybe discuss colouring another time, maybe, depending on time and how useful people find this one.)
STEP SEVEN - Saving your gif
In CC 2017 you have to go to File > Export > Save for Web, but in older versions you will find ‘Save for Web’ in the ‘File’ dropdown menu. These are my saving settings:

And congratulations you’ve just made your own gif!
LINKS: gif tutorials | gif colouring | ps basics
Please message me for feedback and also if you have any questions regarding this tuorial or like…in general.
210 notes
·
View notes
Text
gif tutorial
for @1230-1004 😊
disclaimer: it’s a long process so this tutorial is also long i’m sorry;;;;
today we’ll be giffing the beautiful jun:

but first, here are the things you’ll need:
high quality videos (i get my svt vids from the_rosebay)
kmplayer (download here; i’m using version 3.9.1.134)
photoshop (i’m using cs6; here are some dl links)
time and patience?? lol
ok let’s start
screencapture
1.) first make a folder where you’ll be putting your screencaps in. i’ve named my folder “gif tutorial” (yea im obviously very creative lmao)

2.) open kmplayer & click the gear button at the bottom left:

a small window will pop up, and click:


3.) another window will open, and apply these settings:

4.) now click the folder button (NOT ���open”) to open the folder you made for the screencaps


5.) double click on kmplayer’s screen, it will allow you to open/select the video you’ll be giffing the scene from

6.) look for the scene you want to gif, and click “start”

let the whole scene play, then click “stop” once you’re satisfied
TIP: i like to capture a little bit before the scene starts, and stop it a bit after the scene ends. that way, i’m sure i’ve captured the entiiiire scene.
7.) open the folder where the screencaps are stored & delete the screencaps that you don’t need

obviously i only want the ones with jun in it, so i delete the bits before and after it
the average length of a gif is 30-40 screencaps, but this scene happens to be 71 screencaps lmaooo so i just cut out some of the first and last caps, and eventually ended up with 41 caps
well i mean you can opt to retain the 71 caps but it’ll take you more time to make the gif lol
ok moving on:
making the gif
1.) load the caps into one document: file > scripts > load files into stack
2.) this small window will pop up. click “browse” and look for your caps, select all of them, and click ok

after clicking ok, wait for the caps to load
3.) crop your caps, though it’s up to you just how much you want to crop it

TIP: if you don’t really want to leave anything out, at least crop out the edges
most videos have a very subtle black border, which will be very visible when you upload it
this is what it looks like uncropped:

as you can see, there’s are some black lines at the sides which are v distracting
4.) then we adjust the image size: image > image size (ctrl + alt + i)
one of the methods to making your gif look “crisp” is to follow tumblr’s post dimensions
you just gotta input the width, then the height will proportionally adjust to it

NOTE: if your gif size is anything but these sizes, it’ll come out as blurry/stretched when you post it
5.) another way to make it look “crisp”: filter > noise > reduce noise
the values depend on your taste, but here mine:

(if it’s not clear, it’s: 8, 14, 6, 44)
what it does is it makes your layers look less grainy AND sharpens it
apply this to your first layer, then do the same thing to the rest of the layers one by one (yea i know)
to help, press ctrl + f (apply the most recently used filter) to each layer after the first one, it will speed up the process
so like:

6.) now open the timeline window: window > timeline (it’s also called “animation” in other ps versions)
7.) click “create frame animation” (some ps versions don’t have this tho; u can skip to the next step)

8.) you see this little button at the top right? we’ll be clicking that a few times, so let’s name it billy

click billy > make frames from layers

9.) but it starts from the last layer, so click billy again > reverse frames

10.) adjust the time delay. select all of the frames and click the arrow (you can click from any of the frames)

it will show you a list of suggested time delays, but you don’t prefer any of these times, you can click “other”

usually my range is from 0.06-0.08, but i think 0.04 is best for this gif, so i click “other” and input the time
11.) set the time loop to “forever” by clicking:


to check the flow of your gif, click the play button

and adjust the time delay if necessary
12.) edit the colors. you can either:
find downloadable psds online (you can check out @kpop-colorings)
make your own from scratch (this is a whole other tutorial on its own lmao lmk if u want to know more~)
reuse one of your own psds
i’ll do the 3rd option
if you want to know how to apply a previously made psd into your document, go HERE
and this is my result:
before:

after:

side note jun looks good in blue lol
13.) when you’re sure that it looks ~ready to go~ save it: file > save for web (shift + ctrl + alt + s) (”save as” is different)
this will pop up, and make sure you have these settings:


you can find the file size at the bottom left:

tumblr’s size limit is 3 MB (to my knowledge). if your gif is beyond 3 MB, it won’t move when you upload it
click “save” then you’re done!!!!!!!!!
recap
download your hd video
make a folder for your screencaps
take screencaps through kmplayer
“load files into stack” on photoshop
crop
adjust image size
reduce noise
make frames into layers
reverse frames
adjust time delay
set loop to “forever”
edit the coloring
save!!!
more tips
if you want to post it on tumblr, SAVE IT IN YOUR DRAFTS FIRST!!!!!!! come back to it 10+ mins later, and you’ll be pinpoint possible errors & identify how you can improve the gif further (is it too red? too fast?)
don’t forget to save it once in a while just in case lol. during the process, save it as .psd
ofc you can opt to find/use actions online (here), it will save you some time and effort, but so far i haven’t found the right action that suites my gifs so 🤔
if you want to learn other things about gif-making (applying text, making a border around text, centering text, coloring, blurring out logos, etc.) i’d be happy to help~~
#text#gif tutorial#when i first started making gifs in 2011 the size limit was like 500 KB and it was an Absolute Nightmare lol
65 notes
·
View notes
Photo

as an anon kindly requested, here’s yet another gif icon tutorial for the tags ! the things you’ll need for this are a playable video file ( .mp4, . mov, etc. ), photoshop and its timeline, this action along with a psd and a pattern fill ( both optional ).
note: since i won’t cover how to make gifs out of movies/shows that ps isn’t able to open due to its file type, i recommend checking out this tutorial to see how you can load screencaps into ps and turn them into gifs.
001. open up your photoshop. i’ll be using cs5. in case it’s not yet visible, click on window → animation to have the bar pop up. click to enlarge

002. to open your video, click on file → import → video frames to layers..., next click on your video. click to enlarge

003. make sure to select selected range only and do as it says. for short videos you can also select from beginning to end but i highly prefer the second option. also make sure not to skip any frames. click to enlarge

004. as soon as the frames and layers are loaded, click on actions ( next to layers on the right ), → create new set. click to enlarge note: you can skip to step 011, if you don’t want to create an action with a different time delay than 0.06 and just use the one linked above.

005. name it whatever you want and click ok. click to enlarge

006. the new set should be selected as of now, next make sure to click on create new action. click to enlarge

007. once again name it whatever you want and click ok. click to enlarge

008. the action just started recording, so make sure to avoid mistakes. go back to layers, click on its first one ( the one that belongs to frame one, aka the one below every other layer ), right-click on it and select select similar layers. click to enlarge

009. back on the animation bar, click on the little thingy with the down arrow and a few lines, then hit select all frames. click to enlarge

010. next click on any of the down arrows on the frame bar and type in a time delay. as you can see i usually go for 0.06 and hit stop recording. click to enlarge ( two, three )


011. to crop your image, click on the crop tool after setting up a size ( mine is 80x80px ), then select the area you want to be visible, right-click and hit crop. click to enlarge

012. hit the marked convert to timeline animation. click to enlarge

013. click on filter → convert to smart filters. click to enlarge

014. afterwards, if you wish, sharpen your gif icon by clicking filter → sharpen → smart sharpen... click to enlarge

015. this is basically just to show you my settings, but obviously there are a ton of variations to sharpen gifs. click to enlarge

016. to apply a psd and/or a pattern fill, open up your file with them and drag them over to your gif. click to enlarge ( two ) note: for the pattern fill, click here.


017. click on file → save for web & devices... and make sure the looping options are set to forever. click to enlarge ( two )


and voilà ! it’s donezo. ik this might look a bit overwhelming, but with practice one gif icon usually takes about two mins, so best of luck !

187 notes
·
View notes
Note
heya! I know you've probably been asked this before, but how do you make your gifs? :D They're super duper cool and I was thinking about making some gifs myself. Thank you and have a lovely day!
Hey!! I’ve been asked this before, but I don’t think I’ve ever really made a tutorial about it, so I suppose this would be a good time to do it, huh? And thank you sO much ahhHH!!! I really appreciate it :”)) I hope you have a wonderful day as well! xx
Okay so there are two different ways I make gifs, depending on what I’m giffing. I will go through both processes under the cut.
Programs I use:MacPhotoshop CC 2017UMPlayeruTorrentMiro Video Converter
Alright, let’s get started!
Gif Process 1: DVDs
For this process, I use UMPlayer to take screencaps from DVDs. UMPlayer is basically the Mac version of KMPlayer for PC. You can find a tutorial on how to use UMPlayer here. Make sure you understand how to take screencaps before continuing. From this point on, I’m gonna put everything into steps :)
Step 1: Load screencaps into photoshop by going to File > Scripts > Load Files into Stack

this window will pop up:

Step 2: Click browse, go into the folder you saved your screencaps in, select the ones you want to use for your gif, and they will load into the box like this:
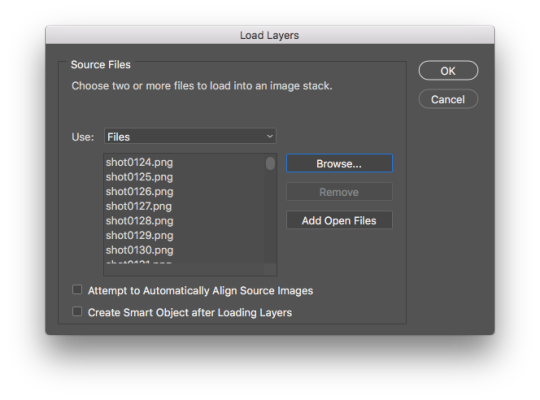
Press OK and wait for the layers to load. This may take a while, depending on how many screenshots you’re uploading. I try to never exceed more than 120 layers at a time at the very most.
Step 3: Once your layers have finished loading, make sure your timeline is showing so you can work with your frames. Go to Window > Timeline (or Animation, depending on your version of ps) to open it up
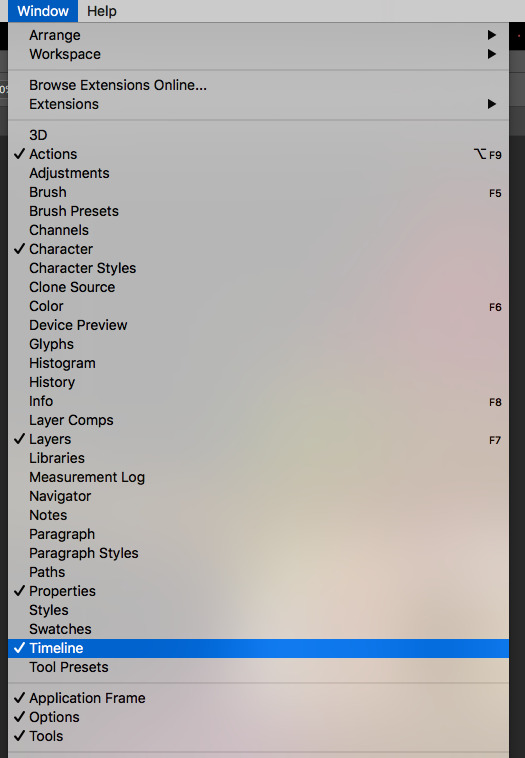
now your window should look something like this:
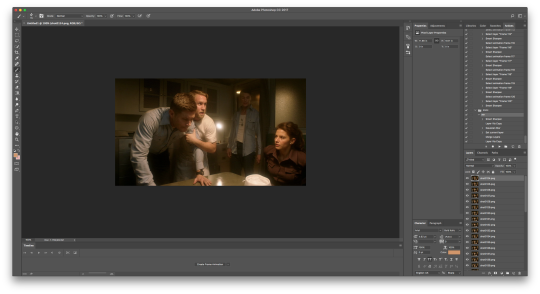
Step 4: Click Create Frame Animation in your timeline, and one frame will appear. Then click that little paragraph-looking button to the right of your timeline and select Make Frames From Layers
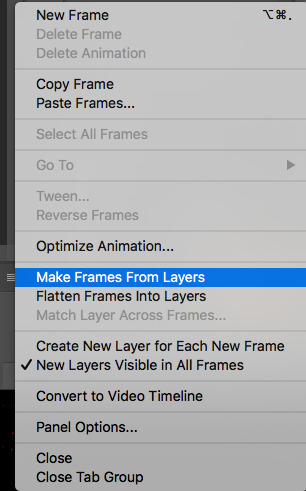
now your timeline should look like this:
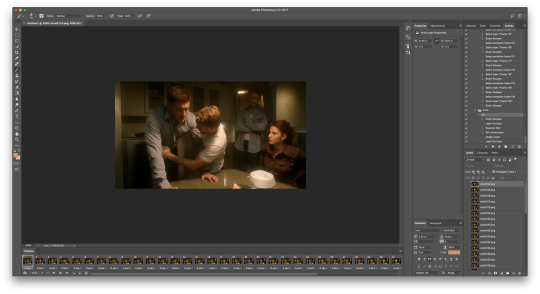
Step 5: *THIS STEP IS IMPORTANT* Your screenshots upload in reverse order. So you need to select that little paragraph-looking button again and click Select All Frames then Reverse Frames.
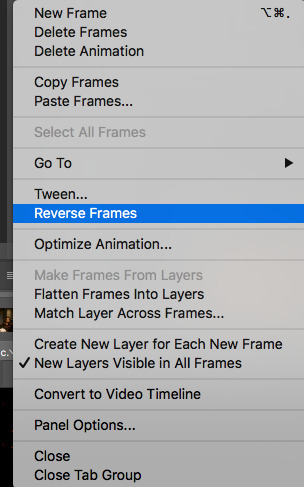
Step 6: This is when I move my frames to a new canvas. So you’ll want to make sure all your frames are selected, then click Copy Frames in that same dialogue box as before.
Step 7: Create a new file and enter the dimensions you want to use. For gifsets with two columns, I use 268px x 168px. For single column gifsets, I vary in height but be sure to keep your width at either 500px or 540px. That’s what matters.
Step 8: Paste your frames into your new canvas. They will load at the same size they were before, so you’ll need to adjust that by selecting all your layers on the righthand side of your photoshop window, press cmd (or ctrl) + T to transform the layers, hold down the Shift button to keep the proportions in place, then scale your layers to your new canvas.
This is similar to how it should look now:

Step 9: Set your timing for each frame and duration of the gif while you have all your frames selected. On the bottom left of your timeline is where you can adjust all these things.
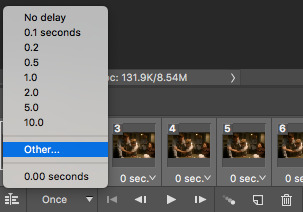
Change Once to Forever so that your gif loops continuously. For the timing of each frame, I usually keep it around 0.06 seconds. You can select Other to type in your preferred timing.
Step 10: Now is when I make sure my gif is looking the way I want. You can click the play button on the bottom left there to preview your gif. Watch for any glitches or anything in case the video paused or skipped while you were taking screencaps. You also want to keep the number of frames in mind, because the more frames you have, the larger your file size will be.
Step 11: Okay so next is when I do my sharpening. I know there are several ways you can do this, but I usually use a sharpening action for my gifs. To do that, click Flatten Frames Into Layers in that dialogue box on the upper right of your timeline. You’ll notice that in your layers window on the right, you will have a duplicate of your layers on top of one another, only now they’re called frames. I delete the old layers when I do this to keep it organized, but you don’t have to.
NOTE: You can find sharpening tutorials here for other ways to do it, and you can find sharpening actions here.
When using a sharpening action, make sure you flatten your frames into layers as I just mentioned. Then make sure your first frame in your timeline and your first frame layer on the righthand side are both selected. Then select the action you want to use in your actions window and click play.
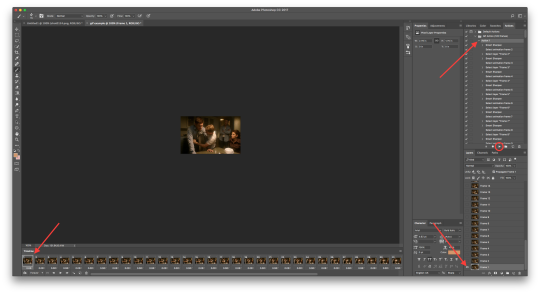
Gif sharpening actions will vary in length as far as how many frames it will sharpen. Mine sharpens 120 frames at a time, so once it reaches that 120 frame limit, the action will stop. If there are less than 120 frames, a dialogue box like this will pop up:
click Stop.
Step 12: Coloring! From here, it’s all up to you how you color your gifs. You can find all sorts of PSDs all over the place, like here. Look through resource blogs to find and collect PSDs you like. Remember that the same coloring won’t be compatible for everything, so you’ll have to do some tweaking here and there. Or, if you’re good at coloring, you can make your own! I’m horrible at coloring from scratch omfg so PSDs are super helpful lmao :)
Step 13: Once you’ve finished coloring the gif to your liking, save it by going to File > Export > Save for Web
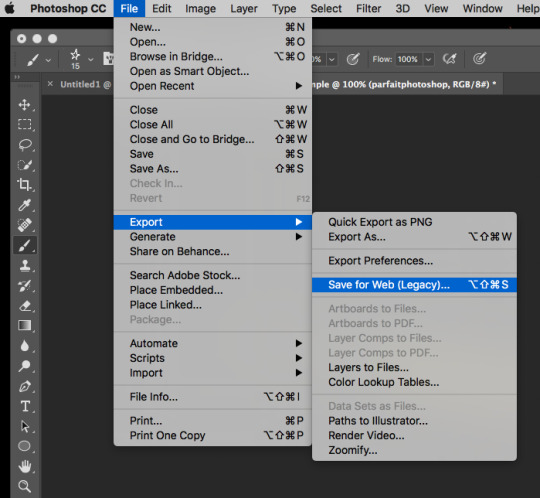
this box will pop up:
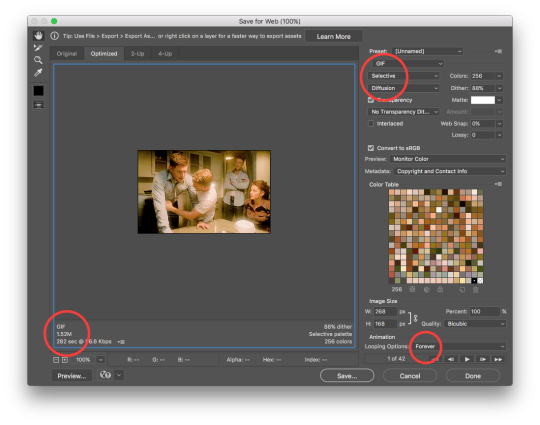
The things circled in red are the things you want to pay special attention to in order to make sure your gif works and saves properly. I always preview my gif and make tweaks as needed. The tumblr file size limit for gifs is 3M now (hECK YEAH) so be sure your gif is under that limit, otherwise it won’t work.
Step 14: Upload your gif to tumblr and BAM, look at that! All done! Great job, fam :)
Gif Process 2: Importing Videos
I use this gif process for anything I don’t own on DVD (so new episodes that have just recently aired, youtube/twitter/instagram videos, etc).
Step 1: For new episodes, I find torrents on sites like thepiratebay, extratorrent, or wherever I can find one with good dimensions (always pay attention to that, 720p is usually your best bet for quality). I click the magnet link, which opens uTorrent, and the episode downloads to my computer in mkv format.
Step 2: Then I convert the video from mkv to mp4 format using Miro Video Converter, because mkv is not compatible with photoshop. mp4 is pretty much compatible with anything, so it’s helpful to have it in this format anyway. The conversion will take quite a while, so now’s a good time for a break! Go pee, pet ur cat, grab some cereal. Stretch it out, you’ve probably been sitting a while, right?
Step 3: Once the video is converted, now you can upload it to photoshop to gif it! Go to File > Import > Video Frames to Layers

Find your converted video and open that. Then this box will pop up:
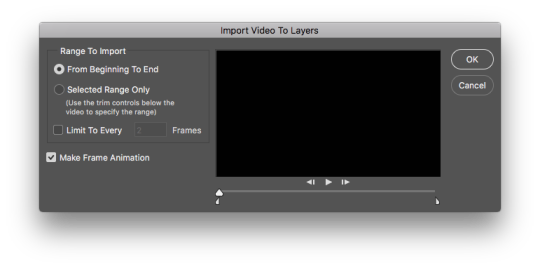
Step 4: Move the arrows below the timeline to select the scene you want to gif and click OK. (You’ll want to keep the arrows really close together for long videos like episodes.) It may take a while for the frames to upload, so be patient.
Step 5: The frames upload in order, so no need to reverse them this time. Go through your frames and cut out the ones you don’t want/need to keep your gif at a reasonable file size.
Step 6: Everything is the same from here on out, so refer to steps 6-13 in the previous process :) And then you’re done! BOOM, nailed it.
At the end of it all, you can show off a pretty gif like this:

So that’s what I’ve got for ya! The biggest thing with gifmaking, in my opinion, is patience. It takes a lot of patience to sit through and find ~just the right~ scenes and screencap it all, wait for things to load, color things ~just right~, etc. It can be a huge pain in the butt, but once you get the hang of it, it’s not so bad. I hope this has been helpful! If you have any further questions, feel free to ask :)) Best of luck in all your gif endeavors!
#completeresources#itsphotoshop#chaoticresources#yeahps#gif tutorial#thespngraphicmakersnet#visualresourcesnet#multifandomgraphicmakersnet#spneditsnet#my tutorial#anonymous#answered
19 notes
·
View notes