#also i learned how to use the gradient and found some new brushes
Explore tagged Tumblr posts
Note
Hello hi I just found out you're the artist of my favorite pic of Jamil from all time 🥹 I absolutely LOVE LOVE LOVE LOVE LOVE LOVE LOVE LOVE LOVE LOVEEEEEEEEEEEEE SO MUUUUCH his bday art from 2020!! It's my favorite one from every art and he looks so pretty and hot and cool and like he's in a music clip and about to drop a fire verse!! I LOVE your painting style so much, as a baby artist, would you one day show us how you color? I'm sure you put so much blood, sweat and tears into your hard work and it would great to get a little bit of that wisdom. Please keep drawing, keep doing what you love because it makes the world a better place to live!
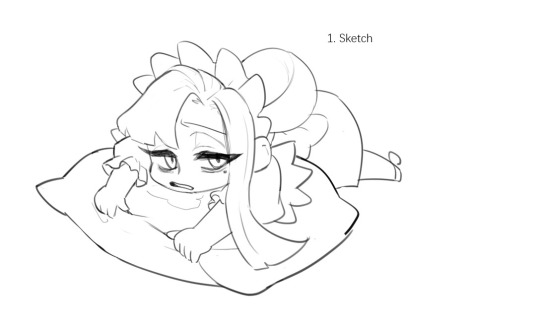
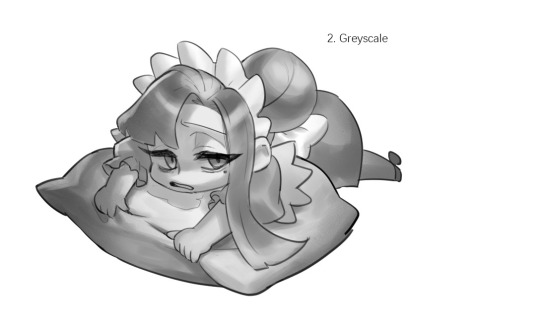
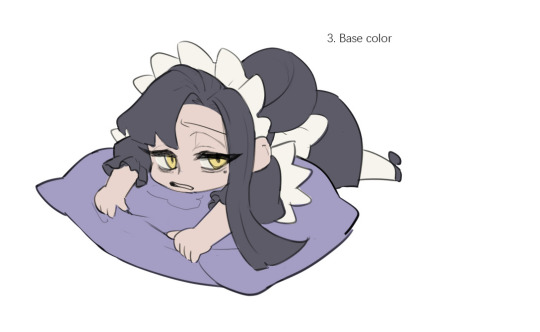
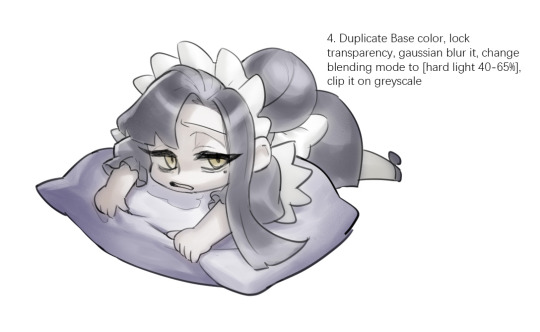
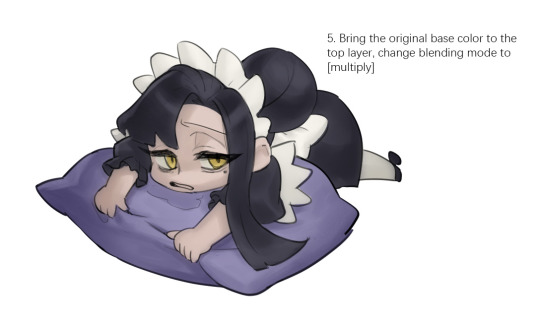
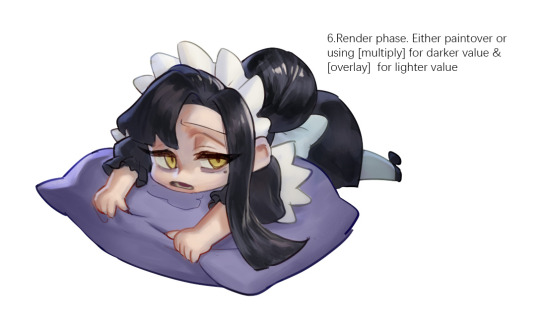
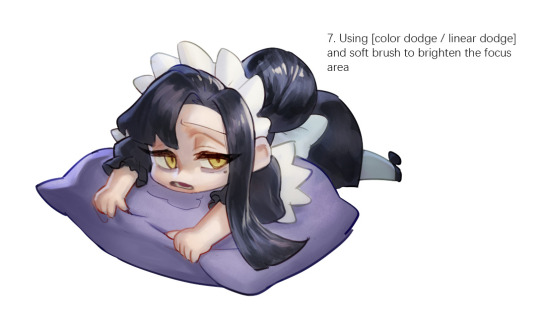
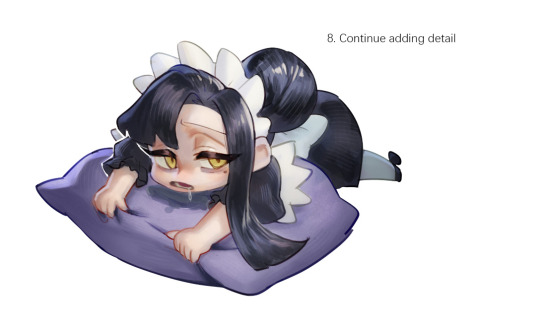
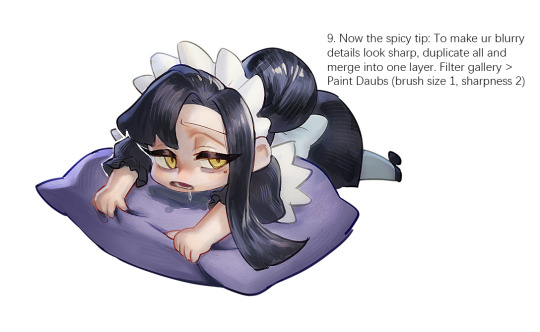
Sketched my sleepy and tired oc to do a very quick demonstration but it covers how I color when i render things:
Start with rough greyscale first, it's a good start to roughly decide light direction and value of your overall work. Especially if you have no idea on your shading.
Next, apply base color to greyscale. I'll use gradient map if I want to keep the details of my greyscale. But if not, I'll just start with a flat base color, and try whatever I can to apply color.
Rendering phase. Add layers and just paint on top to refine it. Merge all layers if it's too messy. Then add layers again. My rendering really depends on how much time taken because it's just a loop of paint over and refining. Thats why i do more simple fanart cuz I sometimes get bored of rendering Also at this stage when doing lineless style, I merge lineart with layers and cover up the lines.
Final touch. Merge all layers and use [filter gallery > paint daubs (brush size 1, sharpness 2)]. It will sharpen your work and look detailed. Or add some very fine noise texture, it will look detailed too.
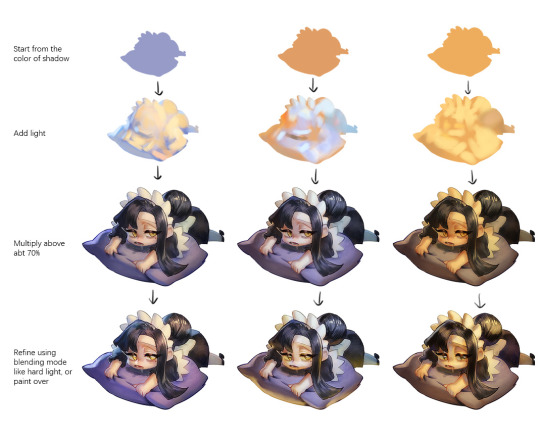
Another very rough demonstration on how i apply color mood. This will be after step 2. And same will be more refining and even paint over to ensure the colors look ok.
Other tips:
Add warm and cool colors especially on skin.
Use pinterest. Always find more than one reference for a subject if you want to draw better than yesterday. Pure ref is a nice tool to gather reference on your pc. When i draw a single hand I had a lot of ref. (pose, color temperature, lighting, photos, artwork, all diff ref)
Color theory is so important I still struggle a lot. I highly recommend beginners start from practicing Marco Bucci's ball practice. After that slowly change to adding character into movie scene and photographs, the purpose is to adapt different color moods and learn the lighting from the image. Learn more from famous movie and cinematic. They did their best to nail the colors.
Anyway,
this is a long answer about how I color. My previous job influenced me so much on coloring so there's a lot of thinking and struggle on my colors.
So, I suggest you be more experimental and try new ways, at the end what remains is what fits you.
139 notes
·
View notes
Note
sorry if this was has been asked b4 but how did you do your Raika Hojo pixels/blinkies? I wanna learn how to do ‘em :D

og post: https://www.tumblr.com/chichirid/767910269177528320/raika-hojo-pixels-and-blinkies-20x20-and-30x30
this is a tutorial on photopea, and its kind of vague so feel free to lmk if you need specific steps rather than a general process / if you dont understand anything :3

hiii so for the blinkies i used this dotted border, and this rectangle border i made (dont credit me, i traced it from blinkie cafe 😳)


i forgot which font i used.. sorry!! but i found a sampler online and typed "special for princess" and "raika hojo" then screenshotted it like the image below. then i removed the bg and was only left with the black text. then in photopea i selected the pixels of the layer so it only selected the text, and then i very carefully traced over the letters using the brush tool. (btw i colour-picked the colours from their logo image). i used the screen layer setting & a stroke setting of one pixel.
i just used a cursive font and tried to imitate a ribbon myself through colouring ><
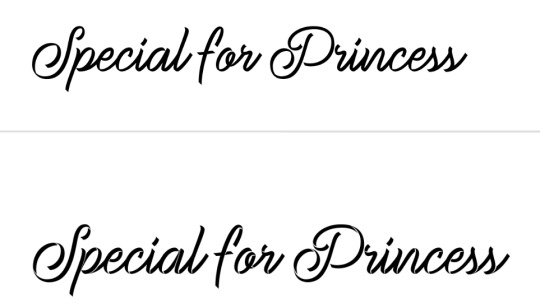
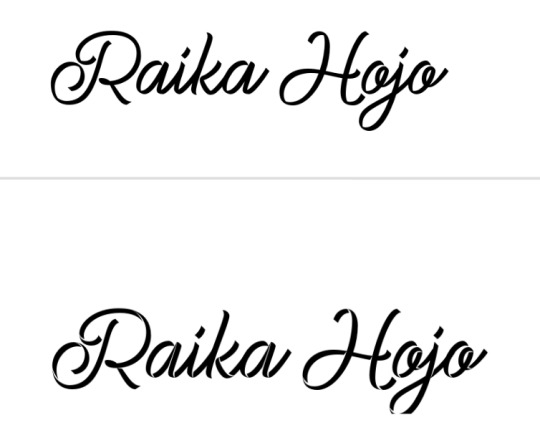

for the raika pngs i screenshotted some sprites then copied them in. idk how to use symmetry so i placed one png at one side of the blinkie, and found what X coordinate it was at. (ie 205px) and then subtracted that from my blinkie template's total X width (730px). then manually typed the X coordinate of the other png based off that formula (so to get a png symmetrical to an image at 205px, the X coordinate of the png would be 730 - 205px.)

for the flashing dots i made two frames:


then i combined these in ezgif "gif maker". the lower the delay time the faster the gif will go.
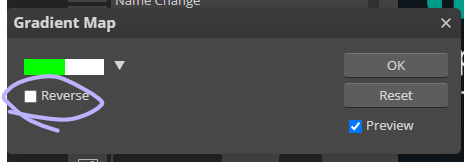
to make these two frames i used that earlier dotted border. essentially i used a gradient map on the dotted border's layer where the black was the red colour used and then the white. (like this image below as an example, both colours are set at 50% and 50% to get an even split). this makes one frame. to get the other i just clicked "reverse gradient".


to make the pixels, i saved some raika pngs using the enstars wiki, and then opened a new canvas in photopea with the dimensions of 30x30. (30 width, 30 height). then i opened the pngs and sized them how i wanted. important for this step: CLICK ENTER ON YOUR KEYBOARD ONCE FINISHED SIZING! this will make the pngs go blurry rather than pixelated, which will result in a more legible image when viewed from far away. its really up to you but i like making my images blurry. example:

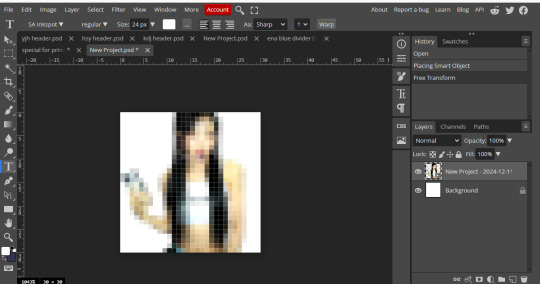
on the left i havent hit enter on my keyboard, on the right i have. save this basic png without the background layer
then just "ctrl + alt + t" again and either tilt the image, size it up, or use the arrow keys to move it sideways or up. save this moved image and once again i used ezgif gif maker to combine the two frames and make a pixel. oh also click "dont stack frames" when making the gif. here i moved the basic image 7 degrees to the left and used a delay of 30. hope this helped ^_^


4 notes
·
View notes
Photo
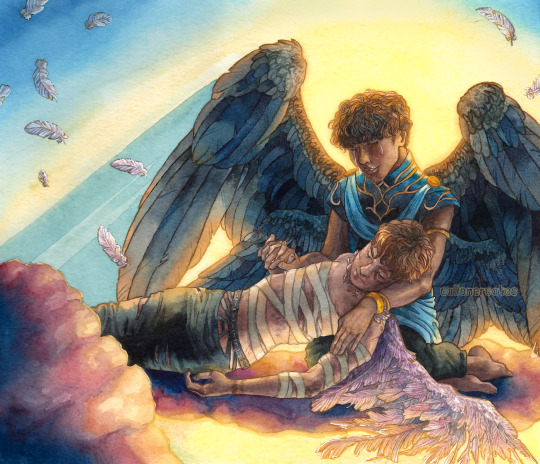
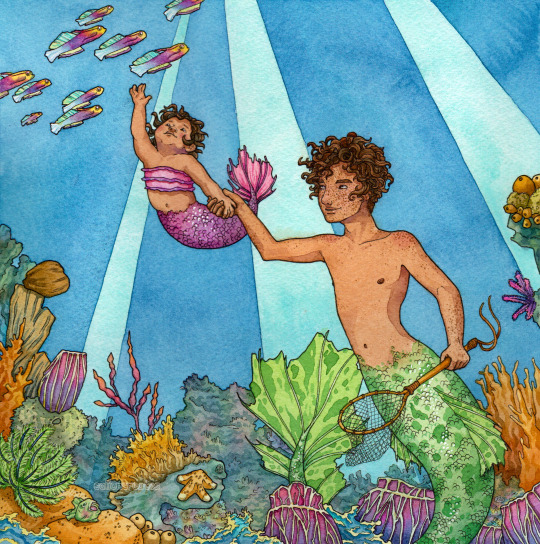
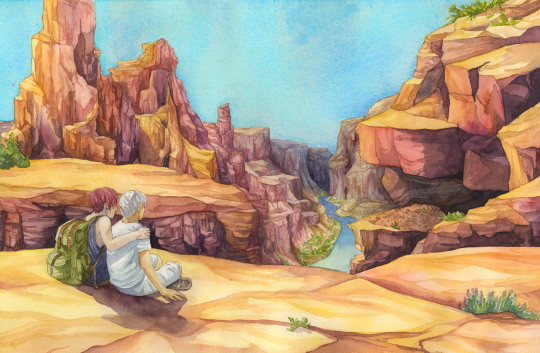
A Bunch of Watercolor Tips!
I love working in watercolor, especially with lots of details, dramatic lighting, and vibrant colors. So, I get a lot of folks who ask me for tips and tricks...and here’s a big compilation of them!
P.S. Find my watercolors on Instagram and Twitter too :)
Understanding how the paint works:
The more watery the paint, the lighter it will dry
If you add a more watery color into a partially dry color, it will bloom (those spidery effects) outwards from the wet paint (the wet pain pushes the pigment of the semi-dry paint away
Some paints are “granulated” which means you can see the pigment in little spots (reds and blues do this a lot). This is okay, just roll with it! It’s a beautiful part of the medium.
More water means less control, but it’ll give you more of those unique watercolor effects like “blooms”
Brush tips:
Get one with a good point, as that will allow for clean lines (I use this in my art ALL the time!)
Lean towards using a bigger brush than you think you need. It’ll be more precise than you expect and that way you can paint a larger area before it dries. This allows for smoother gradients.
Synthetic and natural brushes both work well, but I find synthetic to hold more pigment and water, and to be more precise
Turn your paper as you work, so the brush tip is going along the edge of where you want to paint. Never paint with the middle/back of the brush as it won’t make a clean line.
For detailed spots, use a small pointed/round brush and not very watery paint. This’ll give you the most control.
Supplies tips:
Paper matters! So much! If there’s one thing to invest it, it’s good paper. I love Arches, but I’ve heard Baohong is great and cheaper too.
Hot press paper will dry quick and doesn’t allow for a lot of blending, and leaves crisp lines. It’s smooth, so good for lines.
Cold press paper allows for blending and dries at a moderate speed, but has some texture to it
Rough press paper has a lot of texture, but will allow for a lot of smooth blending
Student grade watercolors are totally fine, they just have a little less pigment to binder ratio--so you might need to use more paint to get a vibrant color. I found Cotman watercolors to be a good starting set (some people prefer pans rather than tubes, though)
Have a big broad palette, so you can mix lots of colors without them running into each other. I use a flat pan, and then have a smaller palette with separated spots for mixing larger color batches
The thicker the paper, the less it will warp (I love 300-400lb). Optionally, you can learn to stretch watercolor paper before painting to prevent warping!
Masking fluid can be SO helpful if you want to protect spots from getting paint on them (you can also use masking tape to cover larger areas). But fyi, these both almost always contain latex--so watch out if you have an allergy!
To use masking fluid, buy a “ruling pen” that you can dip in the fluid. It’s a weird metal contraption that can tighten and loosen to make lines. This way, you avoid ruining your brushes with the liquid.
Color tips:
You’ll keep your colors vibrant by using few layers. In the pieces I shared above, I used basically three layers max (besides a few deep shadows or tiny details)!
Don’t be afraid to blend while it’s still wet, by adding in a new pigment--just keep in mind it will bloom out if your new pigment is wetter than the color on the paper already
All layers are transparent, so keep color theory in mind. If you have golden skin and paint purple over it, you’ll get a more brown tone, since they are complementary colors.
Try not to use brown paints directly for skin colors (unless they are exact color you’re looking for). They tend to look too muddy, especially on darker skin. It’s more realistic to use a mixture of yellows (like yellow orchre or naples yellow), reds (like a nice magenta or rose) and blues to mix purple to darken the skin. This combo allows for more realistic highlights, shadows, and blushing/warmth!
Never use grays or blacks to shade darker skin (unless it’s a very intentional and careful stylistic choice), it almost always makes the skin look ashy and unrealistic
Use a spare piece of watercolor paper to test the colors you mixed first, to see if it’s what you want
Keep this in mind when having a light source: if the light (and things lit by it) is warm in tone, the shadows will be cool. If the light is cool, the shadows will be warm. So, anytime you make a gradient, think of how it’s lit and go from warm to cool (or vice versus) depending on your lighting!
It is actually okay to use colors straight from the tube/pan sometimes! Go for vibrancy. :)
Lighting tips:
Work from light to dark, as you can’t lighten watercolor well once it’s put down
...but if you do need to lighten/remove a color, try wetting it with clean water and then lifting it up with a tissue! I’ve also heard a magic eraser works (wild)
Keep a dry tissue nearby for the above reason
Think of watercolor like working in multiply layers. They are transparent coatings of paint over each other!
Want dramatic lighting? Check out this other tutorial I made!
Think through your lighting before you paint. Once you put watercolor down, it’s hard to go back...so mentally plan where you need to shade before you put your brush down.
For deep shadows, sometimes you will need to use a lot of layers, especially if you’re avoiding black (which can work, but it can also create a blah visual pit). Layers here are really helpful!
Misc tips:
Try sketching with a colored pencil, so it isn’t as see through! (I like Prismacolor ColErase)
Or...draw your sketch and then roll a kneaded eraser over it to lighten it, so the pencil isn’t visible through the paint
Explore mixed media! I’ve done pen line art (microns) and then painted, and I’ve mixed acrylic and gouache for highlights and effects after the watercolor is done too.
Let your work bloom sometimes! Roll with that unique beauty of watercolor.
It can look really cool if you mix totally different colors alongside each other. Play with what it looks like to have an orange bloom in a blue spot, etc! :D
Play with fun effects! Drop alcohol, salt, or add plastic wrap that you leave to dry. These (and more) can all look really cool.
You can paint in whatever style you want! It doesn’t have to be that typical watercolor look. Mine is really graphic and different, but it vibes with me!
Have a question? Feel free to send me an ask, or reach out on Instagram or Twitter! If you use these tips, tag me and I’ll totally check out your work too!
#art tutorial#watercolor tutorial#watercolor tips#art tips#watercolor#painting help#watercolor help#painting tips#color theory#color tips
1K notes
·
View notes
Note
Howdy! I’ve been following you for 2 or 3 years (started on Instagram then moved here) and your art is always so crisp and clean. Have any secrets to share on how to post pieces at such high quality? I use procreate too but you’ve seemed to mastered it.
THATS SO LONG OMG HIIII ty ty for all the support 😭🙏💕💕 you must be one of the OGs!
and oh boy what a compliment haha, I’ve definitely learned a thing of two over the years but I swear I am still learning new tricks everyday 😵💫😵💫😵💫
happy to help 😤💪✨first and foremost, I think the most important part of getting your art to look less pixelated boils down to what canvas size you’re using! I do my best to finish my canvases off at 1400x1400 at the very minimum! The larger it is, the more smooth the piece looks—but as of course the larger it is, the less layers you’re able to add :/ I do wish procreate allowed for a greater range but oh well, do your best to keep those layers organized so you can mash em down later✨
I almost always start off each piece using the built-in Screen Size canvas option when starting a new piece (I don’t even toggle with the DPI, which if I remember correctly, is just set to 150 for that canvas) and then I adjust the sizing as needed
here’s a few finishing touches I like to give my pieces to make them look more crisp!

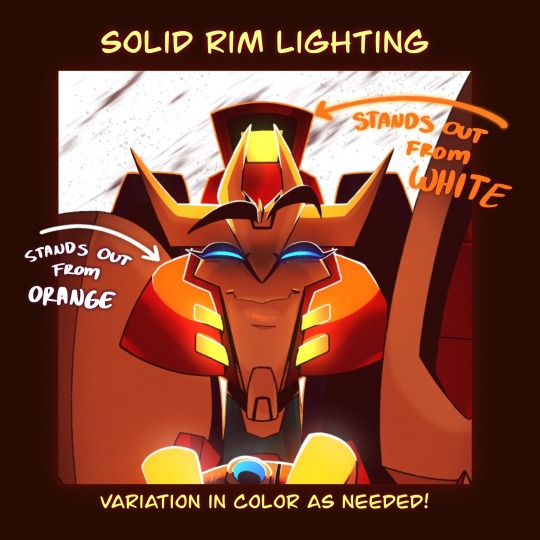
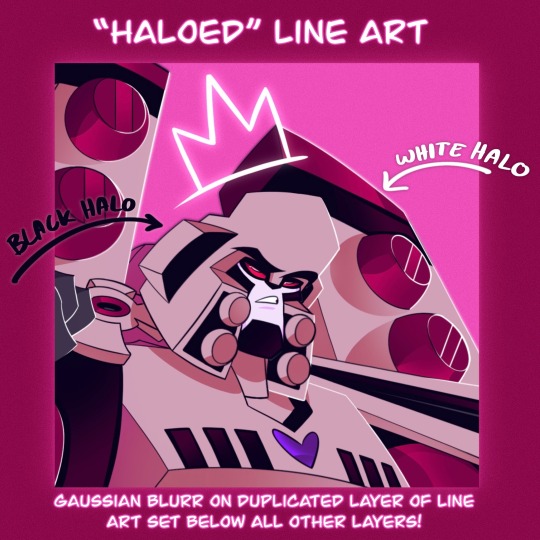
Another thing to note! Take advantage of the noise brush and the noise effect Procreate has! (Noise effect is found under the Magic Wand tool and I believe that the brush lives originally in the pre-set Materials brush pack) Just a bit of noise added to your background can often help the characters stand out from it as well 👍✨
Also! I’ve recently started shading things like the soft curves of muscle or rounded parts of metal using the noise brush to erase to make things look more blended/add some variation to my cel shading
There’s still tons of things I want to try out on procreate as well! I think that for as cheap of an app as it is, there’s a lot of potential to be unlocked and it’s just a matter of finding the right people to show you some tricks
I’ll link a few tiktoks as well that could help out or just add some fun tricks to the art process oml they’re sm better at explaining/showing than I ever could!!
Double Compliments coloring
Art Window Effect
Procreate Gradient Maps in Action
Procreate Perspective Grids
#I’m still working on collecting tons of tutorials from tiktok and one day I wanna make a big ol link post#SPREAD THE KNOWLEDGE 😤💪✨✨#I hope some of this helps!! haha noise effects/brush are my best friends I swear#asks#tutorial#helpful
148 notes
·
View notes
Text

hi anon thank you for the ask! i’m gonna start with links to some blending tutorials that i have found really helpful (especially when first starting): tutorial by @yenvengerberg, tutorial by @jackarthurdavenport, tutorial by @sith-maul, tutorial by @nelsonnicks
also there is a high change this might not make sense, writing and like making sense in general are ummm not my best skills sdfjsdlfkj so if anything really doesn’t make sense or is confusing just let me know and i will do my best to clarify!
I. PICKING SCENE
so i think one of the most important parts of blending (at least for me) is not actually the making of the gif but picking scenes. there are a few things i keep in my when i’m starting to pick scenes to gif:
first is the overall brightness of the scene. it can be really hard to blend a bright scene such as an outdoor scene with a dark scene like a nighttime scene (it’s not always impossible but take a lot more work with the coloring)
and it helps if each scene has i guess the best way to put it is little contrast?? like if it’s a dark scene that does have any little part it’s just not gonna show and the same with a light scene that has little to no darker spots

you can see this with this blending. you only really see the green gif and the other gif is really hard to see

here is another example that could work better. you can’t really see the overlay gif of lito and hernando at first but does show up really well when the other gif is darker
II. CROPPING AND PLACEMENT
once you have the scene you can go through your typical process to load your gif and then crop. sometimes i won’t crop right away and will just change the gif size to the height i want so i can place around with the placement of each gif a little more
but whatever you decided to do once you have finished you will copy and paste one of the scenes onto the other one. i usually do with frames because that’s how learning but some of the tutorials i listed show how to do this on timeline
if you are using frames, you will select all of your frames and then go to the menu on the top right of the timeline and choose copy frames

once you have it copied go to the other scene, select all frames and go to the same menu then hit paste and choose the option below
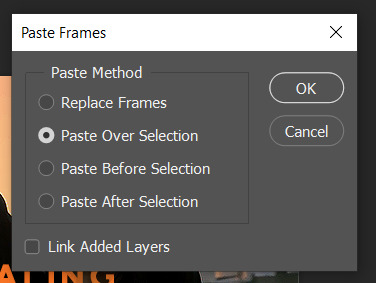
then change one of the groups to screen (you can also try lighten but i normally use screen)
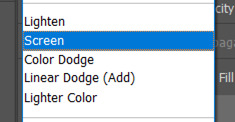
this is normally where I place around with placement if i’m not sure. to do this you select one of the gif groups and hit ctrl + t to be able to move the gif around. Once i’m happy with the placement i will crop and go on to coloring.
III. COLORING
i normally make only one scene visible when coloring and check how it looks with the other gif throughout my coloring process.
and for some gif instead of doing my normally coloring i will use a black and white gradient map and then a color fill set to color


you can an example of this in the gif below
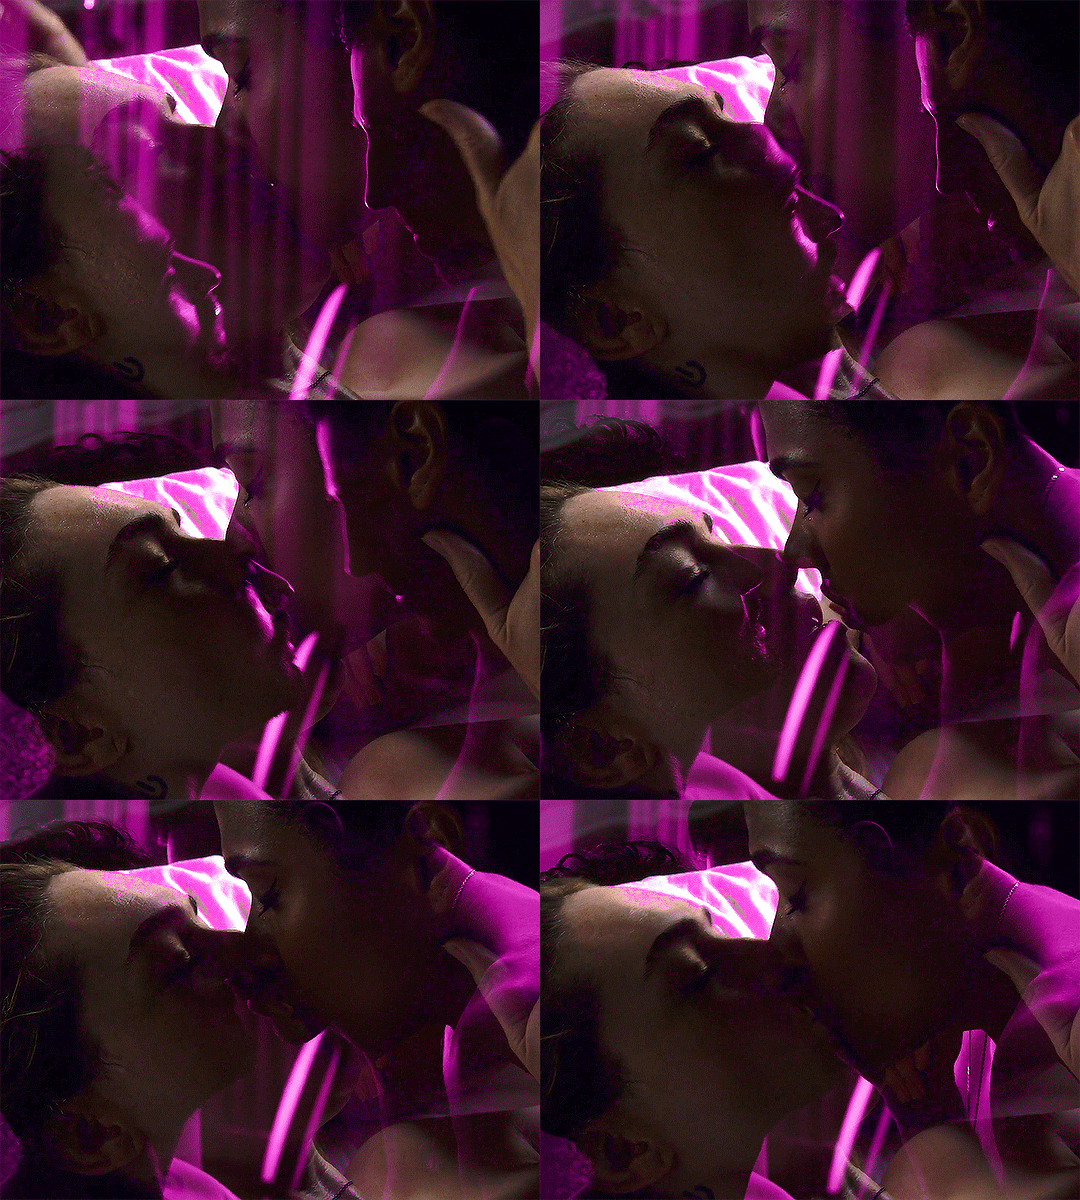
when i am done with coloring both gifs i will do a final check to see if i need to change anything. if i’m okay with how everything looks i will just add a final brightness/contrast layer over both gifs
if i’m not happy i have a few thing that i will do:
sometimes if one gif is showing more than the other, i will reduce the opacity of the brighter on
you could also place around with the coloring of each gif to help the blending by increasing brightness or contrast. i would be careful with this (especially brightness) because it could affect skin tone
if there are certain spot that needs to be dark, i will make a new layer set it to soft light, and paint with black until you are happy. when doing this i normally use a soft brush set to 25% opacity. you can also change the opacity of this layer as well!
without layer
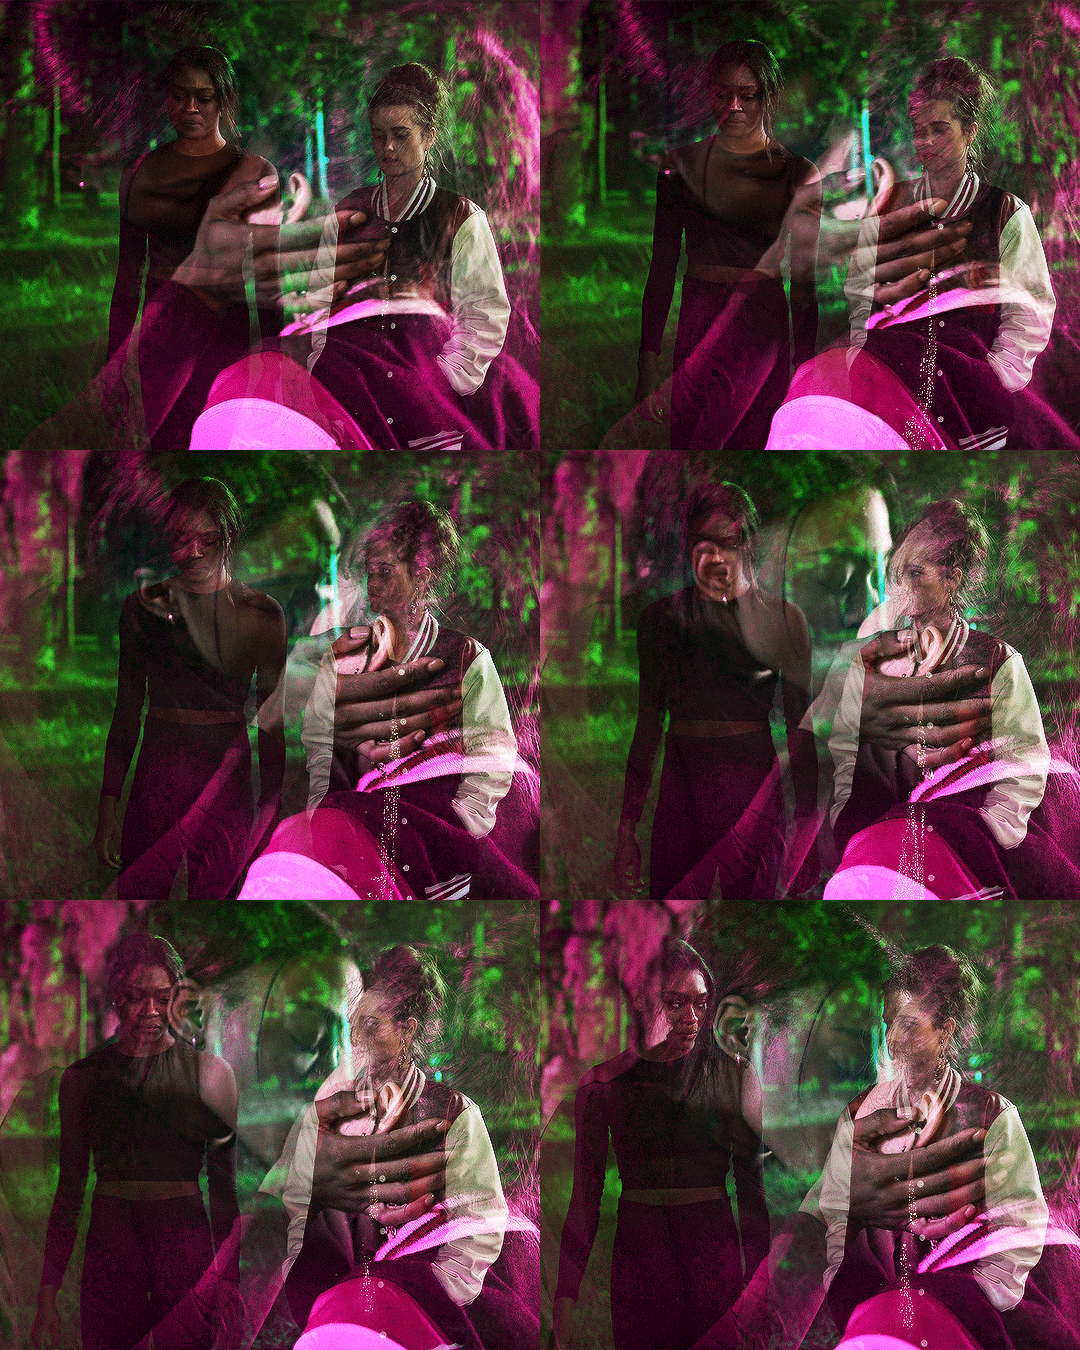
with layer

once you are done playing you can add any final touches (like typography and whatnot) and then save as you normally would.
if you get discouraged or frustrated know that it definitely gets easier! the more gifs the better idea you get a scene of what will and won’t work. also, i have definitely had times where i’ve scraped the scenes i’m working with because they just aren’t working. a lot of blending if it is trial and error. it helps once you find your favorite types of blending and whatnot. like i really like to have at least one of the gifs i’m working with have some movement. i don’t know why exactly, but i just know those gifs end up being some of my favorites!
here is example and some of my favorite blending! (also i didn’t psds save for the calliette love trope set which is why it still has the text)

if you want some additional resources on blending or gifing in general you can check out my resource blog @oblivionresource i would recommend looking at the resources on @usergif they have a lot of good resources and tutorials!
#ps asks#*tutorial#uservivaldi#uservalentina#userrobin#usernanda#useremi#tuserabbie#userelio#tuserlucie#usershreyu#usersalty#tuserrex#tuserbea#userrsun#tuserheidi#usermarsy#userrainbow#userkosmos#userk8
253 notes
·
View notes
Text
I'm here with you honestly! Fellow traditional artist of way too many years to count, only got a tablet last year and did some art sporadically. Here's some of the stuff I've learned.
Set up
For the start, configure your tablet in your tablet installer's settings. First, check your program of choice's key shortcuts. I use FireAlpaca and it serves me well, though it of course depends on your preferences. Most digital art programmed will have keyboard shortcuts for specific tools (E for eraser, M to select, p for pen, etc) and if your tablet and/or pen has buttons, you can map specific key combinations into it. My pen has 2, so i have switch colours (X) on one button and the eyedropper (i) for the second one.
While you're in the settings, make sure to configure your tablet's sensitivity. it's that little line you can curve. idk the science of it, just fiddle with it up or down if you find it's not responding well.
Line work
For steady line work, remember to turn up the stabiliser. Most digital artists use it and on a high setting to get those nice cohesive lines. it's a useful crutch.
A good starting point for line art, if you're not used to drawing it in digital, is to do it on paper, take a photo, then trace it in the digital program. Alternatively you grab a picture and trace the pose over. It's a way of training!
Remember to watch out layers so you don't end up doing clean line art on the same level as the sketch. Remember you can lock layers to prevent editing them. In FireAlpaca, the locked layer gets a little lock icon.
Also, if you don't like that your lines look a little blurred on the edges, you can go into your brush's settings and turn off anti-aliasing (both on the brushes and erasers).
Clipping
Clipping is amazing. It saves so much time. How I and a lot of artists tend to work is that we begin with line art, then we make another layer and colour it in white within the line art. This white layer, I'll call it the cutout for a lack of a better word, will be what we clip all others onto.
Clipped layers show only on what they are being clipped onto, aka our cutout. So the solution in my case is to clip a folder onto the cutout and start filling it with layers (the layers inside that folder don't need to be clipped, but you can create dimensions of clipping if, say, you want the irises to clip onto the eyeballs but not the entire head).
Clipping is also useful with...
Shading and Effects
This is the part that's the most fun about digital.
Layer settings allow you to do some crazy stuff once you learn them, and I'm only a fledgeling at their use. My best advice is to just fiddle with them as much as you can and experiment. I've discovered that Multiply or Overlay layers are great at creating shadows, while an Add layer is great for light. Use coloured shadows (these layers don't like pure black and white), and adjust the opacity to match your needs. Also remember you can do more than one layer of shadows if you want that gradual darkness, and that gradients set to Add/Multiply layers make for great sources of light and shadow.
Effects a a bit funkier. I mostly use Gausian Blur, which causes the select to go all fuzzy and soft, making it great for shading, especially for adding light (you can copy a layer, use gausian blur on the copy, put it under the original, and set it to Add t o make it somewhat glow!)
Checking your colour values
Something I learned from digital is how much your colours can uninentionally blur despite being distinct. You can learn to use values to guide the eye to what's important, or to make stuff pop! This is where the values layer comes in.
Make a new layer overtop everything else, colour it in wholly black, then set it to Saturation/Colour/Hue (personally i haven't found the difference between these two). Let's use my sona for an example.


Now that the form is in black and white, you can see what stands out, what's darker or lighter, and it can make it easy to notice how, for example, the crown doesn't stand out as much as it could, or the freckles are a point of interest, because they're the darkest spot among a lot of light tones. They draw attention to the face.
From there, you can tweak these, and suddenly you can make stuff stand out! Or blend in, if that's the effect you seek!
Lastly... community
I cannot understate this - find an art community. A discord server, some other group, whatever. Find digital artists you can speak with and ask for precise advice, because you'll get way more out of a few talented friends than from youtube's repository of tutorials (though those are also helpful as heck).
genuinely don't think there's anything more humbling then trying to learn how to do digital art
i respect digital artists SO MUCH, i have for years, it's so impressive -> i'm saying this as a traditional artist trying to learn
tips would be appreciated 😓
39 notes
·
View notes
Text
so a friend asked me if I could give some tips on how I blend gifs like these:
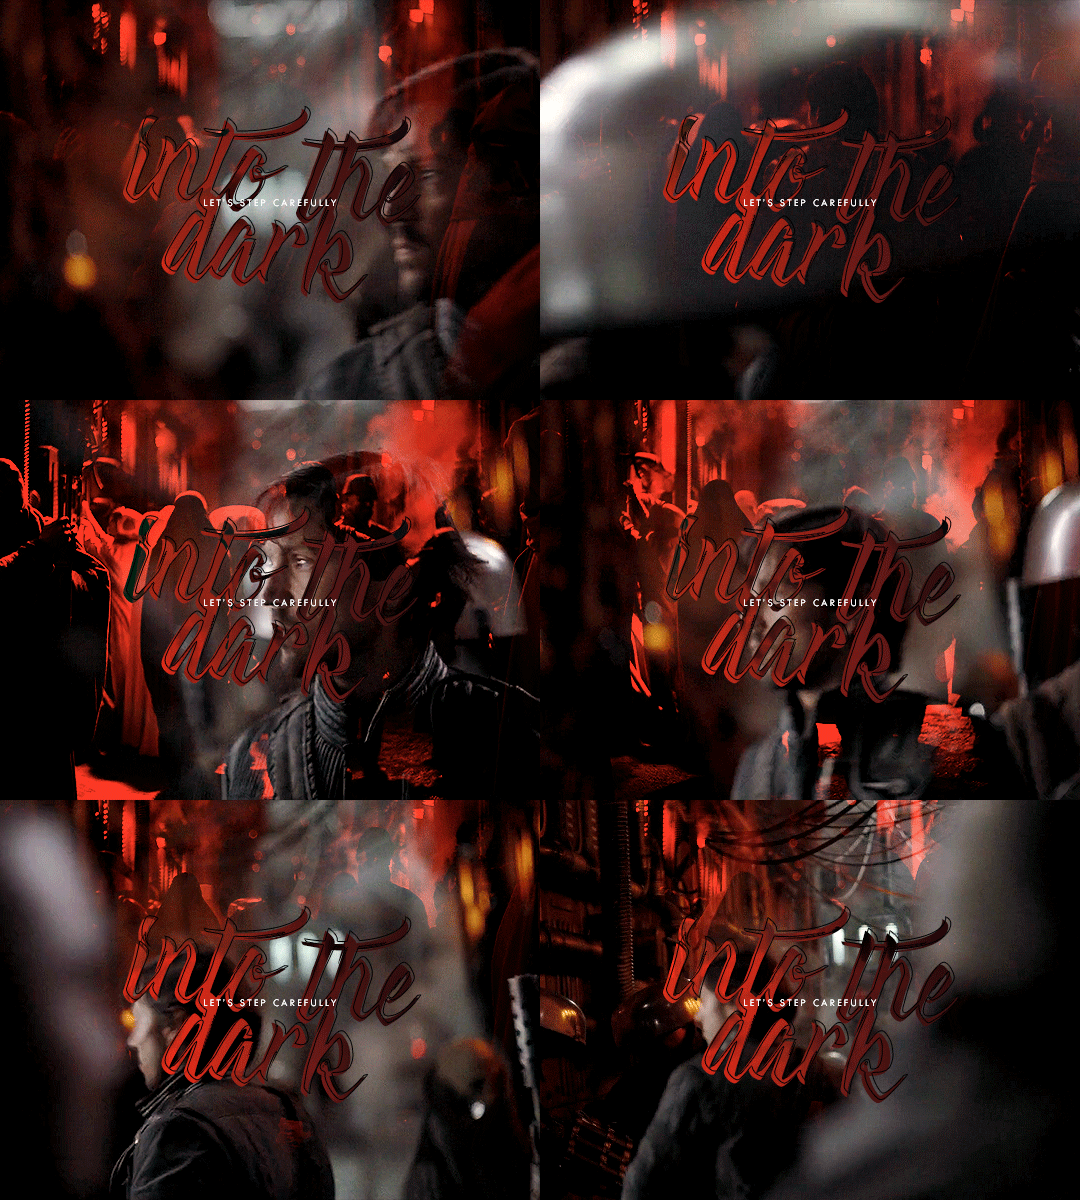
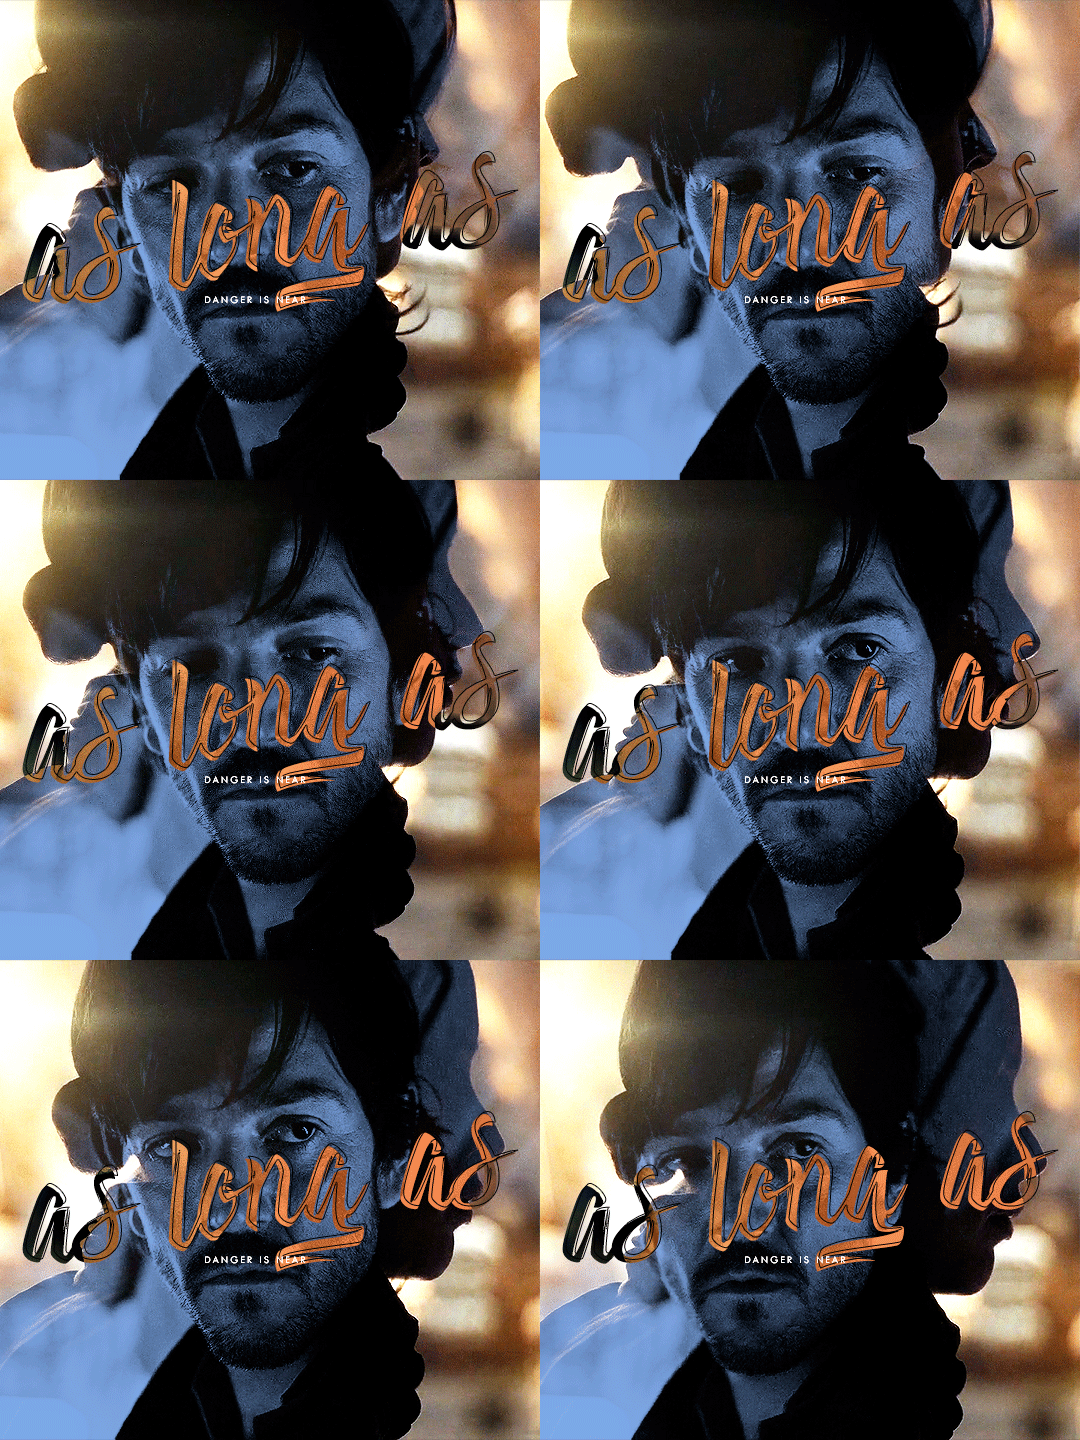
and LOL let me tell you I mainly recommend following tutorials like these (one, two, three) and honestly I owe so much of what little I know to @anya-chalotra especially the text lol I learned how to do that text line thingy from her. but I just wanted to give some pointers and maybe help explain why some scenes work and some don’t. it’s all trial and error.
setting a layer to screen in photoshop makes dark spots in the layer see through so I try to line up the parts of a scene that I want to highlight with those darker spots. I found a scene that had jyn backlit so that I could just turn up the contrast and make her silhouette darker (after I had finished the basic coloring I do for gifs). then I took the scene with cassian and put a gradient map over it, but I made sure to brighten the shit out of the scene so that it wasn’t just a dark blue blob, that there was a decent amount of contrast in his face.
now if you imagine the gif as having four quadrants, and I’m sorry I’m lazy so you’ll just have to imagine it for yourself, look at the top right quadrant. what I could have done was put a clipping mask on a new layer above the scene with cassian and drawn a bit of black with a big, diffuse brush (set to normal) in order to erase the bit of blue from cassian’s scene that is near jyn’s nose (I actually did that underneath but idk I guess I liked the look of it lol) and that is a good way to hide parts of a scene that you don’t want showing through the other scene. why black? because with a clipping mask layer it will only show up for the layer that is it is clipped to, and since black/dark shades are more transparent with a screen layer, it will allow the other scene to show more clearly.
this works best with scenes like these where the subjects aren’t moving too much.

but with this gif, the movement is the point:

it was completely unintentional, I just lined up the two scenes are noticed when the people with the helmets walked past cassian, you could see the other scene of him walking away more clearly - and the theme of the gifset was spy, so it just ~~fit the theme to me. that his face would be hidden and you’d see him in the background, walking away, in flashes.
in this case I think I literally just put the two scenes on top of each other, set the scene with the gradient map to screen, brightened that layer up significantly and called it a day. it helps that they are both from the same scene in the film, so there is a uniformity to the mess of these individual scenes that are cohesive. but usually all this movement can obscure the subjects and that’s generally not what people are looking for when making gifs. in this case, it works because of the theme.
it also helps that there is a contrast between the lighting of these scenes - the background scene has cassian silhouetted and backlit. so there are more dark spots to show the foreground scene, which has cassian’s face highlighted and bright.
conversely, when using two light scenes like in this gif
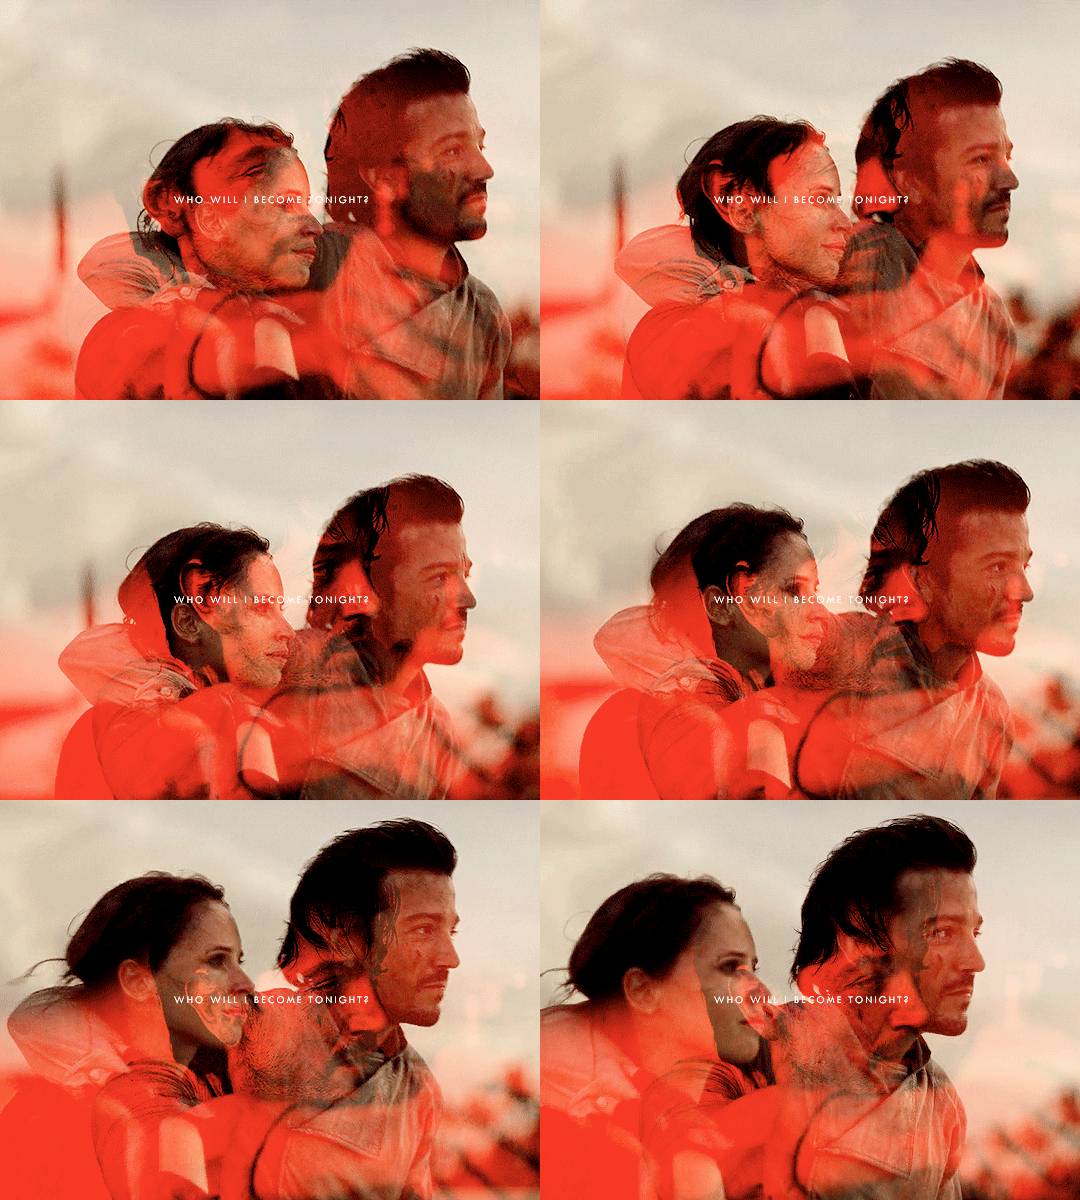
I actually darkened/added more contrast to the scene with jyn and cassian and sloppily did that clipping mask with the black brush onto the scene with the gradient map (and you can actually see it a bit lolll it was late I was very tired) in order to create more contrast between the overlapping subjects. if I felt like redoing this, which I don’t, I would make that black brush a bit more diffuse in order to blend more nicely.
I hope this helped and sorry for the laziness.
79 notes
·
View notes
Text
!! These are older ficlets as I’m spending time with my bf soon <3 !!
Secret Soulmates Ficlets !!
can also be found here
writing as much as i can in 15 minutes minimum based on a writing prompt !! <3
1.) 7/29/22 1:00 - 1:15 a.m.
He wasn’t sure when he had fell in love with Grian. It could have been during EVO, Grian and his adorable laugh, bright blonde hair, and silly Link costume. Or maybe in between their time as Watchers, Grian being a force to be reckoned with, more powerful than anyone he had ever met. It felt like lifetimes had passed since then..
Big B wasn’t sure when, but looking at him, he knew he wanted to spend forever with wing. He wanted to spend every waking and resting moment for the rest of his life with them. Grian was.. amazing. In so many ways he didn’t even know. Or maybe wing did.
He knew it was wrong. Loving someone else when the one he was destined to be with, his soulmate, was there, but.. Big B couldn’t find himself caring. Ren had Martyn. A man he had loved before and still loved today. He could have Grian. Smart and sweet Grian.
His. His darling. His and his alone.
It was them against the world. Even if the world didn’t want them to be.
Secret Soulmates, bound only by their love for eachother. Not a red string of fate or anything of the likes. Just them. Always.
2.) 7/29/22 4:12 - 4:48 a.m.
Grian sighed in content as wing watched Big B try to make a flower crown made of bluestars and aster. Wings lover.. He made him so happy in a world intent on damaging and corrupting everyone.
He absentmindedly picked flowers from near him and weaved the familiar form of a ring. He looked at it and smiled before turning back towards their lover. Big B looked up from his flower crown and waved at Grian, making butterflies flutter in his stomach.
Grian stood up and walked over to Big B, holding the flower ring close to wings heart.
“Love, I made you something.” He grinned at the other. Big B’s eyes scrunched as he smiled back.
“I made you something too darling.” Grian sat on his knees next to the taller.
“Mm, I know you know a lot about flowers so I spent some time learning about them to make this special..” Big B handed the flower crown he had made over to Grian, blushing deeply. Grian took the crown and felt their heart melt. Wing set it on his head and grabbed his lovers hands in his own.
“I love it, thank you dear,” Grian moved towards the other and brushed up against Big B’s face, “you don’t know how much this means to me.”
“But, uh, i have this for you..” Grian took a deep breathe before moving onto one knee. “Big B, darling. You mean the absolute world to me, we may not be bound by a string but you are my true soulmate. I would and will chose to be with you in every single one of my lives. So, Big B Statz, will you marry me?”
Big B’s eyes widened and felt tears well up in his eyes. “Oh my god. Yes, yes, a million times yes!!” He threw his arms around Grians neck and kissed wing passionately. They parted and Big B watched as Grian slipped the flower ring onto his finger.
“It’s made of Gardenia, which is usually used to reveval someones feelings for another but, us being secret soulmates, it felt right. The other flower is red salvia meaning “forever mine”, fitting for my fiancé, yes?” Grian explained the flowers meanings and Big B felt himself fall in love all over again.
“It’s perfect.. I- I love you so so much Grian. I can’t wait to spend the rest if my life with you.” Big B chuckled and pulled them both down, now lying on the ground facing each other.
They laid there for hours, just talking and exchanging kisses until the sky had turned into a gradient of dark blue, orange, and pink.
Oh how they wished they could have stayed there forever. Sighing and getting up they said soft goodbyes and parted ways, making their ways back to soulmates who could never have what they had.
3.) 7/29/22 5:23 - 5:43 a.m.
Big B didn’t know how long he had sat there, on that new, uncomfortable couch. He knew he should wake Grian up but he couldn’t bring himself to when this was the first time the other had been fully at peace in weeks.
He sighed and moved Grian’s head onto his shoulder, making himself more comfortable. The brunette shifted in wings sleep, making Big B still. When he was sure he hadn’t woken his lover he let out his breathe and smiled.
Big B planted small kisses on Grians head and preened their wings, content to let them sleep as long as they needed. He continued to do so until he felt himself slip into the comfort of unconsciousnesses. He hummed to himself and finally closed his eyes with the sught of Grian safe in his arms on the tiny couch.
— - — - —
Big B groaned lowly as he felt the harsh sun on his eyelids. He slowly tried opening his eyes, and winced at the light invading the room from the small window across from him.
He blearily looked around the tiny cabin tucked away in a far corner of the SMP’s lands, just for Grian and him. Slowly he realized he no longer felt Grian on him, nor saw him. Big B sat up straight and finally noticed the blancket on him as it fell off his shoulders from the sudden movement.
“Grian..?” He called out for his lover. His ears twitched as he heard something moving around in the room next to the one he was in.
“Big B? You’re awake?” Grian peeked wings head into the room and Big B sighed then relaxed. Grian chuckled at the other and walked over to him.
“Good morning sleepyhead. I woke up a couple hours earlier and i didn’t want to wake you. I’m sorry if I scared you by leaving.”
“Mm.. no no.. it’s fine. What-,” Big B coverd his mouth with his hand as he yawned, “what time is it.?”
Grian giggled and hugged Big B from behind. “It’s around 10 in the morning. Scar and Ren should be expecting us back, but i think they can wait a couple more hours.”
Big B nodded and pulled Grian around and pulled him into his lap. “Can we sleep some more darling..” Grian hummed and nuzzled his face into their partners neck
“We can.. but i think it would be more comfortable in the bedroom.”
“Mmm.. alright..”
#trafficblr#double life smp#trafficshipping#dlshipping#bigbst4tz2#grian#biggri#my favorite cheaters <3#/lh ofc
22 notes
·
View notes
Note
hi ana! Sorry if I'm bothering you, but I'd like to ask you something. so I'm a big fan of your work. I'm still new to tumblr, but your creations inspire me so muxh!! so i was wondering if you could give me some tips to start creating content. For gif and editing stuff, do I need to pay for photoshop right? Or are the free versions safe? thank you <3
heya sweet anon! you're not bothering me at all so don't worry ^^ thank you for being < fan of my works, it makes me super duper happy hon ^^ *hugs* as for tips darling i know a blog that has lots of tutorials and resources where you can start learning and see how things are done ^^ you can go to @fyeahtutorial there you have tips on how to make gifs, editing, fonts, etc! ^^ I also have a gif tutorial and a manga coloring I’ve made myself, i will put the links here and here ^^ hope they can help you sweetheart! On my about page you have also some resources links of the websites i use to find textures, vectors, brushes and such!! As for photoshop, you can download it for free, you don’t have to pay for it ^^ unfortunately i don’t have the link of the one i’ve downloaded, but i remember that i got it from a video i found on youtube ^^”” sorry darling for not being so useful on the photoshop part!! I only know more about photoshop since it’s the one i use it more but you also have other editing/animation/coloring softwares like, adobe illustrator, after effects, pain tool sai, which they are free too! If you’re gonna start darling, I suggest you start it simple and easy, like on that blog i’ve sent it to you, it will show you the ropes of how to start working on photoshop and htorugh there you will know how to work with it and start making gifs :D For my colors for gifs, we use psds which means is a batch of settings of colors we add on the gifs like selective color, gradients, contrast and brightness, etc! On that blog you will learn how to do psds too, i think they share psds and teach how to do some! Ok i think it’s everything that i can rememeber now but if you need anything, any help, please feel free to come to me and ask, no worries at all ^^ *hugs* hope this is helpful hon!! you’re welcome and good luck on editing, it’s very fun, you’ll love it ^^
9 notes
·
View notes
Photo
Welcome to soonhoonsol’s gif tutorial!
As a nice anon asked me how I make my gifs, I thought it’d be cool to create an in-depth tutorial :) Perhaps this can help some others enter the gif-ing world too!
What we’ll be using for this tutorial:
Software: Bandicam, Avisynth, Photoshop CC 2018, Topaz Labs
File Format: .mp4
Operating System: Windows
Disclaimer: This is just my method. Every gif maker works differently and has different preferences. What works for me may not work for you, and that’s completely okay!
Let’s get into it!
1. Find the best quality video you can find
This really depends on the content you want to gif. For variety shows, music videos or photoshoots, any video of [1080p] should be sufficient. Try not to use anything below 720p.
For stage performances, fancams tend to have higher resolutions [1440p, 4k]. Use these if your computer can handle it. If not, usually 1080p works fine. The best option would be to download .ts files, which provide clearer and less grainy videos.
For Seventeen, you can get .ts files from The Rosebay on Twitter :)
2. Screen recording
As a Windows user, I don’t have a built-in screen recorder on my laptop. So, I use Bandicam, which is a free screen recording software. The only con to it is that it has a watermark.
To combat the watermark, I always have the boundary box a little bigger than the video itself so that I can crop it out of the gif.
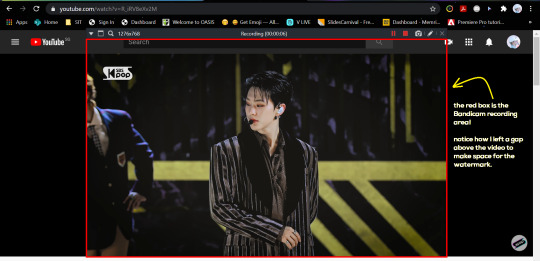
This is what the recording would look like:
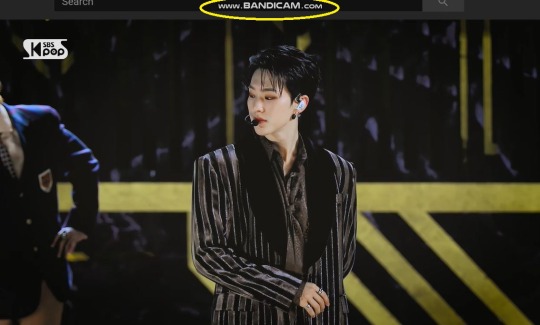
Just record the scene(s) that you want to gif so your video file doesn’t end up too large! Your recording should be in .mp4 format.
(You may use pure .ts files in Avisynth but it never worked well for me so I usually screen record the .ts video and move on)
You can find your recorded videos in Documents > Bandicam.
3. Avisynth
I followed THIS tutorial to download Avisynth. This software is really helpful if you want sharp and clear gifs! I recommend to follow the steps in the tutorial as the below method stems from it.
- Once you have downloaded it, open up your recorded video from Step 2 and watch it. Take note of the duration you want to gif. (e.g. from 00:01 to 00:05)
- Drag your video file into normalwebrange.bat. On Windows, you can find this in File Explorer > Local Disk (C:) > video. For other .bat files, you may check out THIS tutorial.
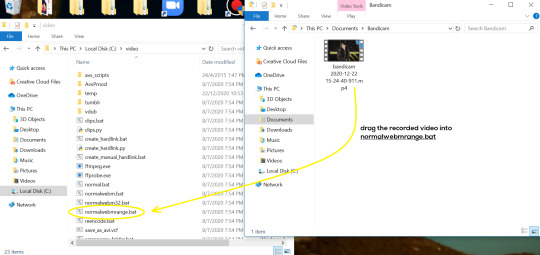
- In the pop-up box, key in the start time for your gif (e.g. 00:00:01). It has to be in hh:mm:ss format. Press “enter”.
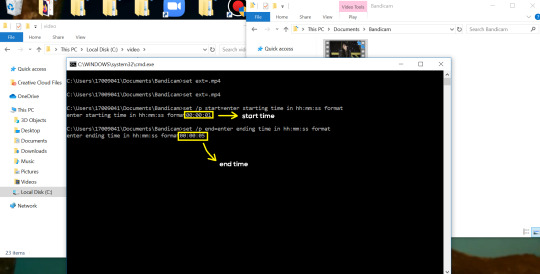
- Key in the end timing and press “enter” again. A resizer should pop up in an Internet Browser. I found that Firefox works best for me.
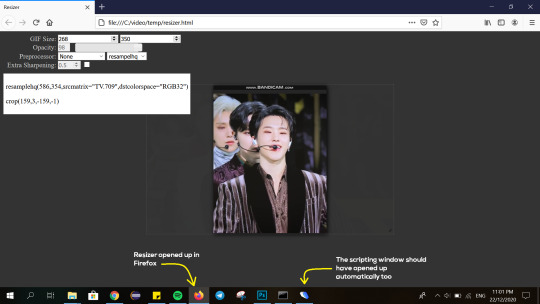
- In the resizer, you may indicate the size of the gif you’d like to make. You can also click and drag the video to resize and frame it to your liking. You may refer to THIS post for Tumblr dashboard sizing.
(These are some common gif sizes for stage performances):
1 gif - 540px by 540px (square)
2 gifs - 268px by 350px
3 gifs - 177/178px by 250px
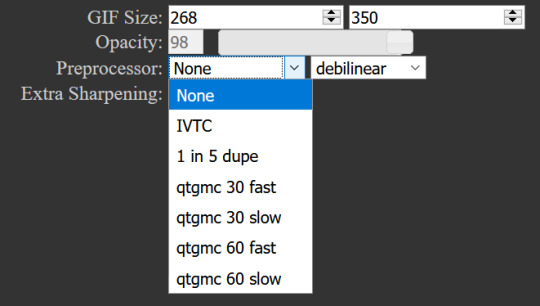
- Under “Preprocessor”, select “debilinear” for the second box. For the first box, you may pick between qtgmc 30 (same frame rate as video) or qtgmc 60 (doubles the frame rate; smoother).
- You will also see “fast” or “slow” options. These are just how long the video will take to render. “Fast” will give you slightly lower quality as compared to “slow”, but usually is good enough.
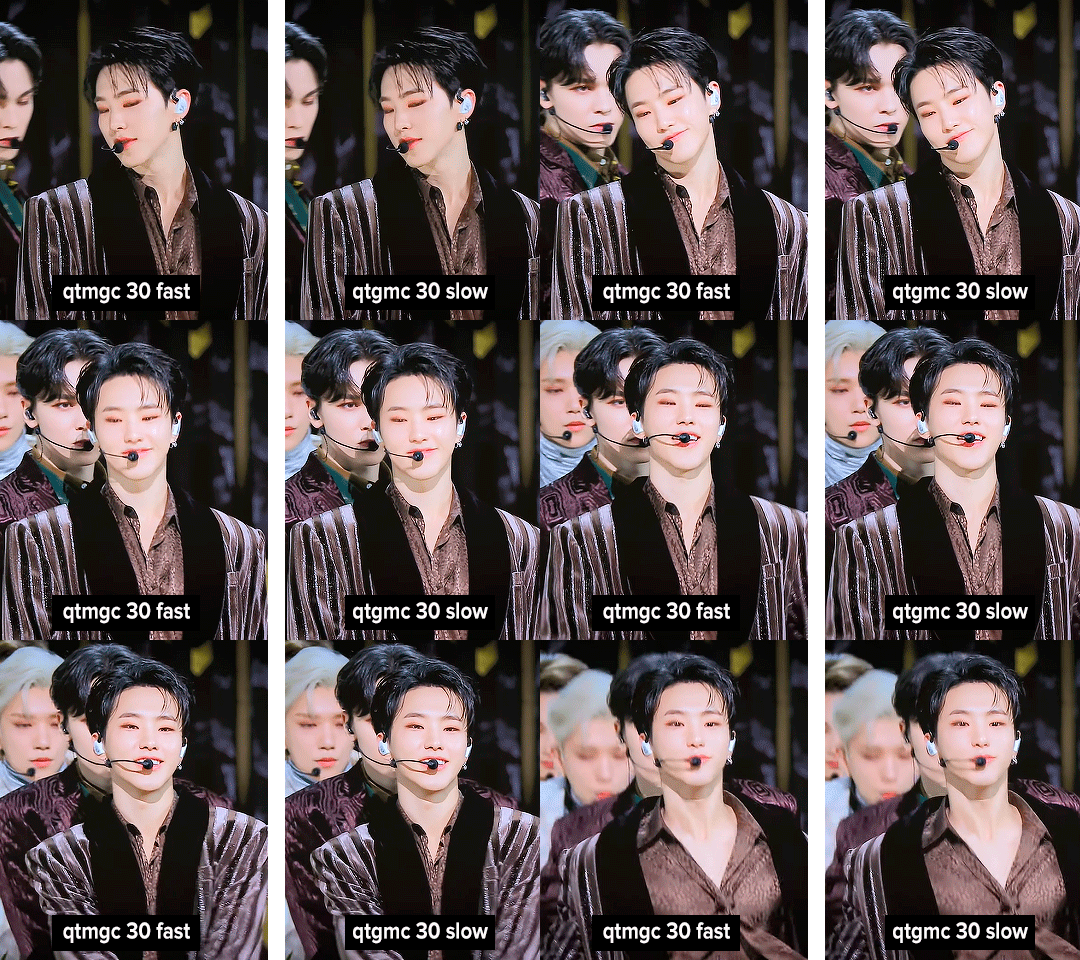
(You can see that his features are sharper and more defined in the “slow” gif as compared to the “fast” one.)
- Copy the code in the white box. Navigate to the scripting window (it should have popped up with the resizer) and paste the code at line 17. Type a “#” before qtgmc on the same line. This will prevent the software from lagging.
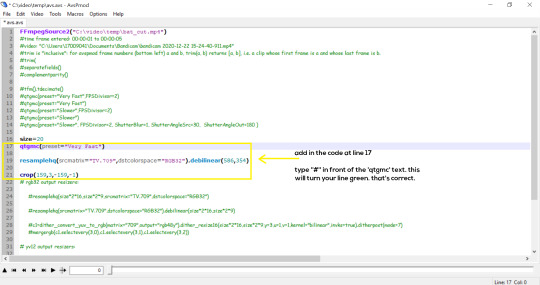
- Click on the inverted triangle at the bottom of the screen. Your video will now appear in the scripting window. Drag the slider to the intended starting point of your gif and press the “home” key on your keyboard.
- Drag the slider again to the intended ending point of your gif and press the “end” key on your keyboard. This blue area you see is the duration of your gif.
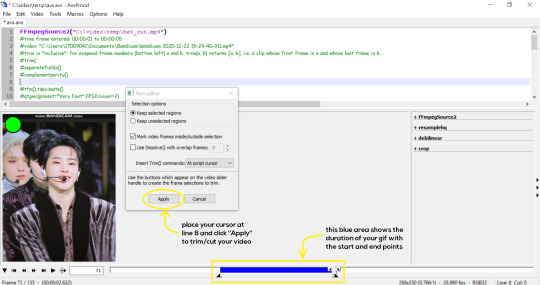
- On an empty line (I usually go to line 8), place your cursor there and click “Apply” in the mini pop-up window. Afterwards, remove the “#” from line 17.
- Go to File > Save or press Ctrl + S to save the code. Close the scripting window. The video renderer will pop up. When it’s done, it will automatically close by itself.
4. Using Photoshop and Topaz
I’m using my school license for Photoshop 2018, but if you don’t have that, there are plenty of cracked versions for free. I don’t have any to recommend though so I’m sorry about that :(
I followed THIS video tutorial to download Topaz plug-ins for free. I use Topaz DeNoise (the most helpful) and Clean, but you may use others if you’d like :)
Alright, let’s dive in to the steps!
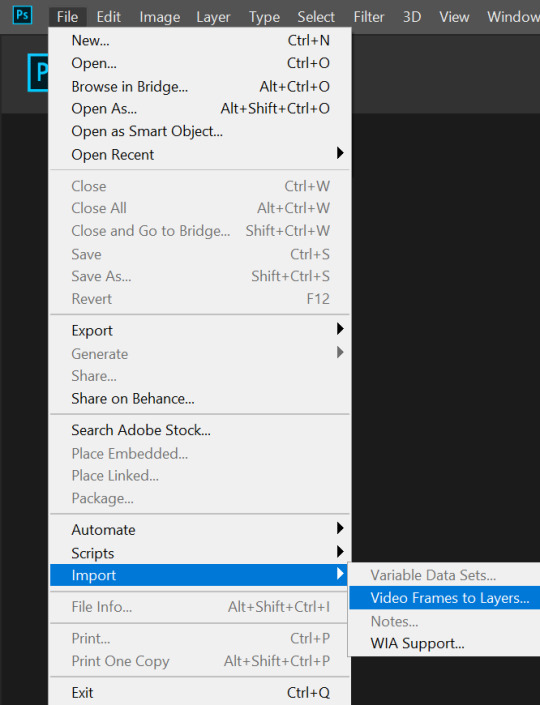
- Open up Photoshop and go to File > Import > Video Frames to Layers.
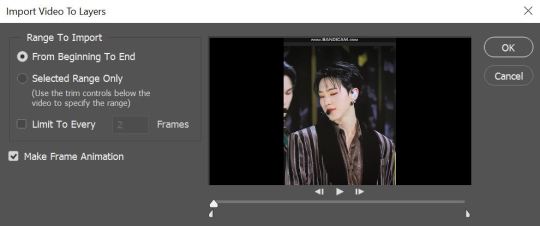
- A pop-up will appear. You can find your deinterlaced Avisynth video in File Explorer > Local Disk (C:) > video > temp > video.avi. Follow the settings in the picture and click “OK”.
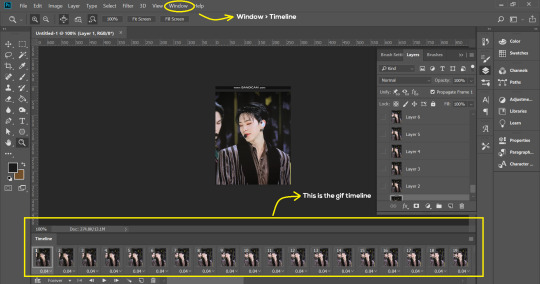
- Go to Window > Timeline to open up the timeline. You should be able to see your gif spread out in frames. If you press the play button, it should play like a video.
- (Quick optional step I learned from THIS tutorial) Go to Image > Canvas and set the Resample option to “Bicubic (smooth gradients)”.)
- Select the first frame of your gif in the timeline. Shift select the last frame. Go to Window > Layers. Shift select these layers as well.
- With everything selected, click the 3 lines at the top right corner of the timeline. Select “Convert to Video Timeline”.
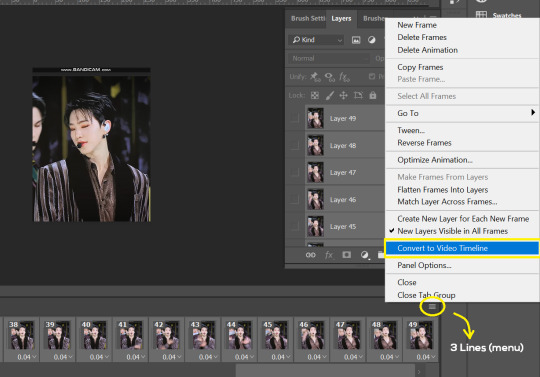
- At the top of the screen, select Filter > Convert for Smart Filters. Your layers will condense into one layer. Don’t worry, your gif is fine.
- Now it’s time to sharpen the gifs. Go to Filter > Sharpen > Smart Sharpen. Play around with the settings to your liking!
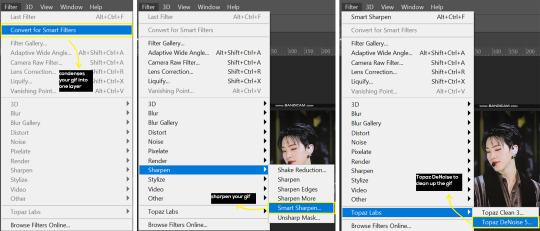
- If you’ve downloaded Topaz correctly, it should appear under Filter > Topaz Labs. If a pop-up asks you for an activation key, you may use THESE to activate it for free.
- Go to Filter > Topaz Labs > DeNoise and/or Clean and play with the settings until you’re satisfied.
5. Blurring
If your gifs have captions/logos that are distracting, you’d want to blur them out. Don’t be like 2018 me that blurred out the logo frame by frame; it’s very tiring. Instead, using this method from @scoupsy‘s tutorial, you’ll save lots of time.
- In the Layers tab (Windows > Layers), select the “New Layer” icon. It should be blank.
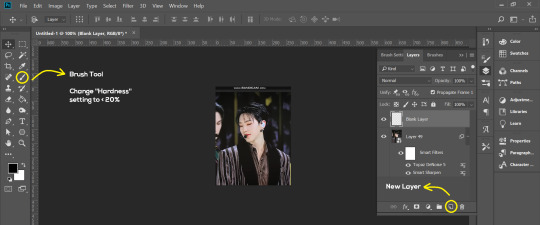
- Select the Brush tool. Make sure the “Hardness” setting is below 20%. This will blend the blurring nicely into the gif.
(For the sake of this tutorial, I will be blurring out the Bandicam logo to show you.)
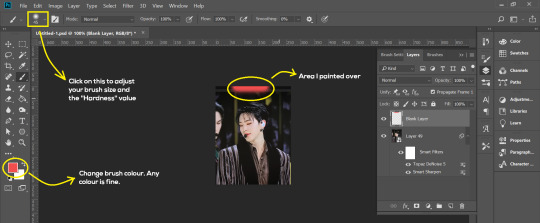
- Paint over the captions/logos. Make sure this is on the blank layer!
- Duplicate (Right Click > Duplicate) the gif layer and drag it so that it’s on top of the blank layer.
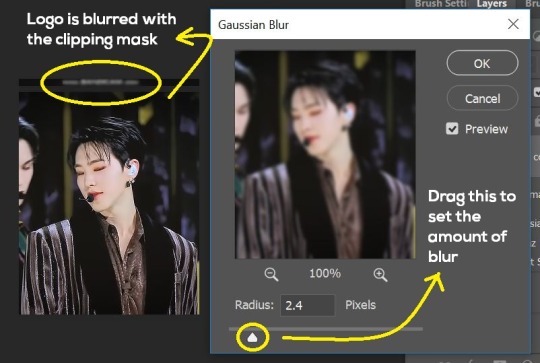
- Right click on the duplicate layer and select “Create Clipping Mask”.
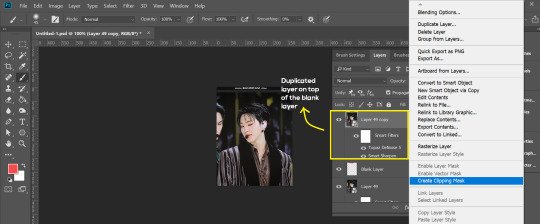
- Go to Filter > Blur > Gaussian Blur and play around with the settings until you’re satisfied with the level of blurring. Click “OK”.
6. Flattening & Colouring
- Once you’re done with sharpening and/or blurring, click on the 3 lines on at the right corner of the video timeline and go to Convert Frames > Flatten Frames Into Clips.
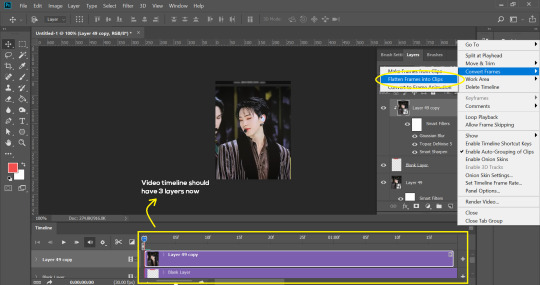
- Topaz layers and blurring will take some time to render so you can just chill for now~
- When it’s done rendering, click again on the 3 lines and go to Convert Frames > Make Frames From Clips.
- Convert it back to the gif timeline by clicking on the 3-box icon at the bottom left of the timeline.
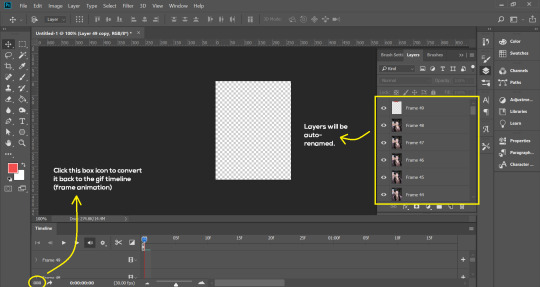
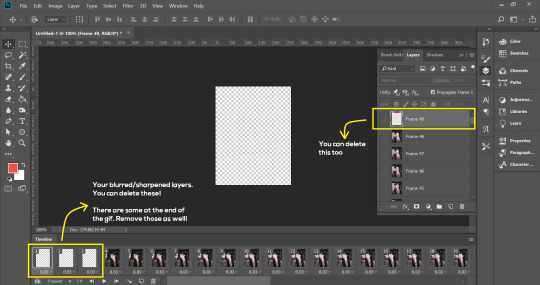
- Select the first frame of your gif. It must be the FIRST.
- Scroll to the top of the layers and select the layer at the top. Any other layers you add should be on top of this layer. VERY IMPORTANT!!
- In the Adjustments Tab (Window > Adjustments), there are many different things to play with. There’s a high chance you won’t use everything, but here’s a few of my favourites.
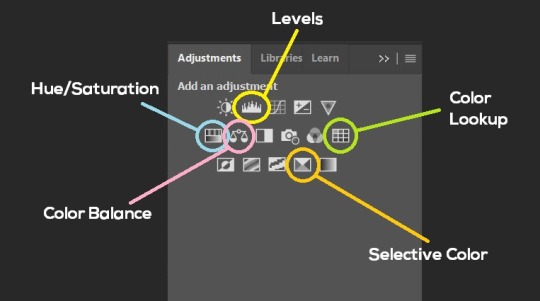
Levels - Adjust the brightness and contrast of your gif in depth.
Hue/Saturation - Useful for changing colours, or switching it to black and white.
Color Balance - Tweak the colours to your liking.
Colour Lookup - Comes with built-in LUTs that you can use as a preset. Great starting point for colouring. Saves time too. You can even download plug-ins for this. 11/10 tool.
Selective Colour - Adjust the vibrancy of specific colours.
- Colouring is completely up to the gifmaker. Go crazy go stupid :D
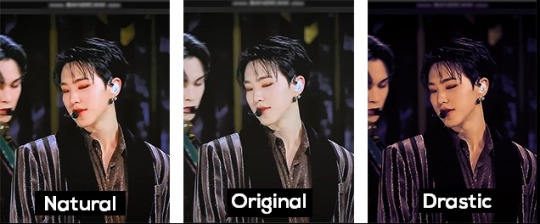
7. Exporting
We’re almost to the end!
- Set the timing for your gif.
If you used qtgmc30, the best timing would be 0.04s / 0.05s / 0.06s.
If you used qtgmc60, the best timing would be 0.02s / 0.03s / 0.04s.
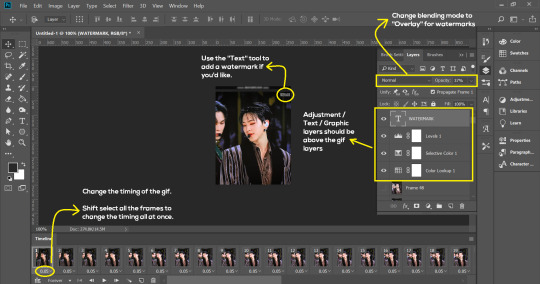
- Once you’re satisfied with everything, go to File > Export > Save for Web (Legacy).
- Follow the settings in the picture below:
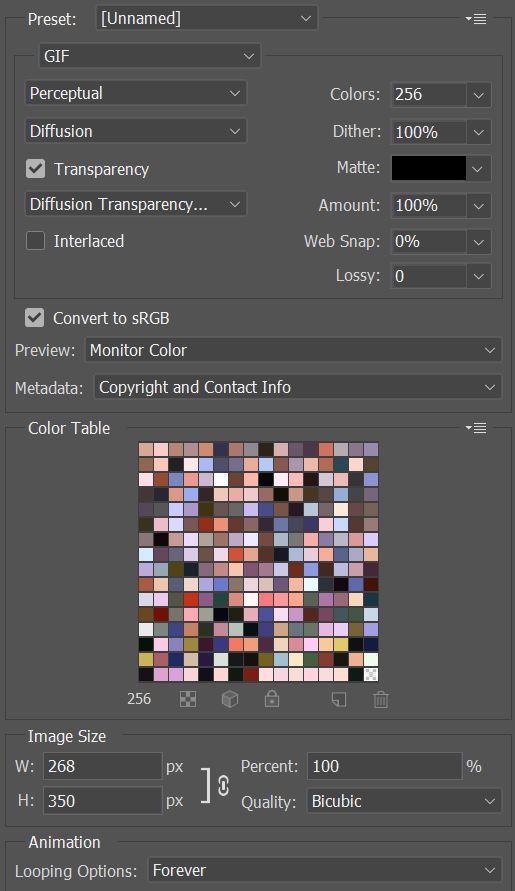
- Tumblr’s gif limit is 10mb per gif. Check the gif size at the bottom left of the pop-up window. Make sure it’s below 10mb; the smaller the better.
- Click “Save”. Choose where you’d like to save the gif.
- Done!
~~~~~~~~~~~~~~~~
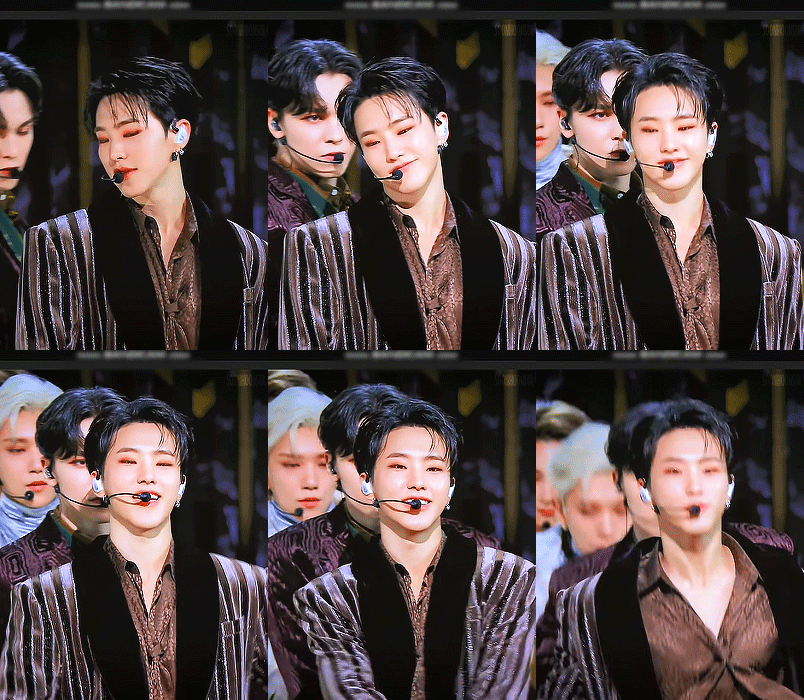
And that’s it! You’ve successfully made a gif! Good job you :D
I hope this tutorial was helpful! Please leave some feedback if it helped, or if you have other methods you’d like to share :)
Lastly, if you have any questions, feel free to send in an ask or DM me!! :)
Good luck and happy gif-ing :’D
#gif tutorial#kpop gifs#avisynth tutorial#topaz tutorial#gifs#chey.resource#kpop#idk what else to tag so...#i finally posted the tutorial yay!!#please spare a reblog if you find this even remotely helpful thank you <3#also to spread it hehe i spent a lot of time on this#if anyone has any questions please feel free to DM me!!#i apologize if there are any spelling errors
230 notes
·
View notes
Text
Time for a random nail art thread because if I spend too long thinking about other things I'm going to lose it. (6/24/22)
Let's talk about Stamping.
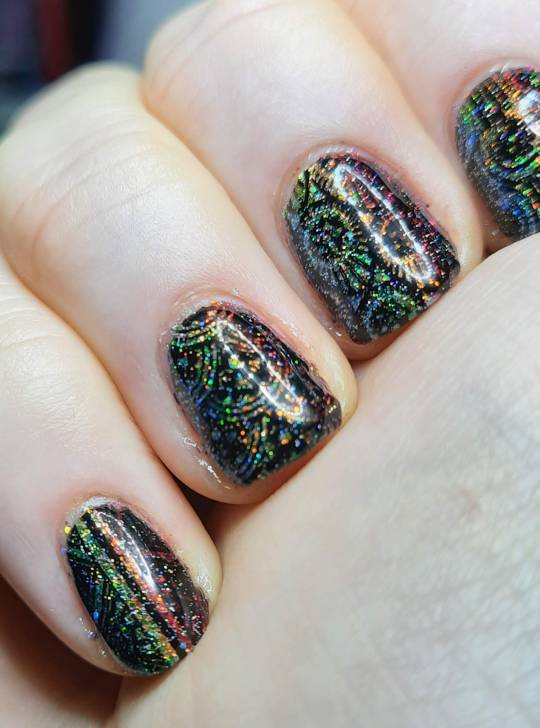
SO... I have a new favorite tool. The Creative Shop stamper. If you've ever tried to do stamping on your nails and it hasn't worked very well, join the club. Clear stampers are easy to see placement on but often don't pick up well, especially at first. Moyou London's XL clear stamper is all right and does okay with a lot of polishes, but it's still nowhere near the Creative Shop for stickiness and pick-up-iness. The free ice cube stamper you get from Maniology works okay if you prep it with a quick swipe of acetone the first time, but can be difficult otherwise. The Born Pretty stamper I have will be reserved for french tips, it's garbage for stamping.
The Creative Shop's swiper card is also excellent, very flexible but not too flexible. By contrast, Maniology's card is okay, and Moyou London's is too stiff. The flexible card from TCS cleans the surface perfectly without taking polish out of the grooves.
I've thus far tried Maniology, MoYou London and Born Pretty stamping polishes. Of those, I prefer the Born Pretty polishes, with Maniology in second place and MoYou London a distant third. Some of their polishes are fine. A couple just don't work at all.
For stamping plates, if you have a good stamper, it doesn't matter so much where you get them. I have plates from Moyou London, Born Pretty, Maniology and the Creative Shop. I wouldn't use The Creative Shop plates with any other stamper because the lines are very very fine, but if you're doing an order, you might as well get both, because the lines are very detailed and they have some unique designs.
I find myself returning to my Moyou London plates the most, with Maniology a close second, mostly because they have highly specific plates for things like Pride manicures and gorgeous geometrics, but basically get stamping plates when you get other stamping supplies, and get them on sale. I spend up to about $4 per plate on them, only more if I need a very specific plate at a specific time. (they usually retail for about $8-10 per plate.) My exception is The Creative Shop, which is a Ukrainian company, and I pay full price there (don't use the coupon code) because they donate their profits to the cause in Ukraine.
As for learning to stamp, I learned everything I know about it from two sources: My Simple Little Pleasures (Colette) and KelliMarissa on Youtube. With Colette, if there's a technique you want to learn, look for her long videos from her livestreams, where you can see the entire process in real time. Her tutorials skim through a lot of stuff, which is fine once you have the hang of it, but watching the real time tutorials can help when you're first starting out. This one, for example, shows stamping with a Moyou London stamper, polish and plate. The quick version is here. The advantage of the long version is that you get to see cleanup in real time, which is a vital thing to learn. Kelli also has a tutorial or two on cleanup.
I found it incredibly reassuring to know how much cleanup people do. I generally use Colette's method, latex on the tops of the fingers and scotch tape on the sides. My favorite latex for this is from Nailhoot because it isn't perfumed and is cheap. They also have a glitter-safe nail polish thinner that can fix clumpy/old polishes completely. (Like, bring them back from almost solid.)
But even with the best prep and the best technique, some cleanup is always needed. I've tried Holo Taco's cleanup brush, Born Pretty's cleanup brush and E.L.F.'s concealer brush and mostly I prefer the ELF brush because they all last about the same amount of time and it's cheap. The HT and BP brushes are slightly more precise when new. They all get a little fuzzy over time.
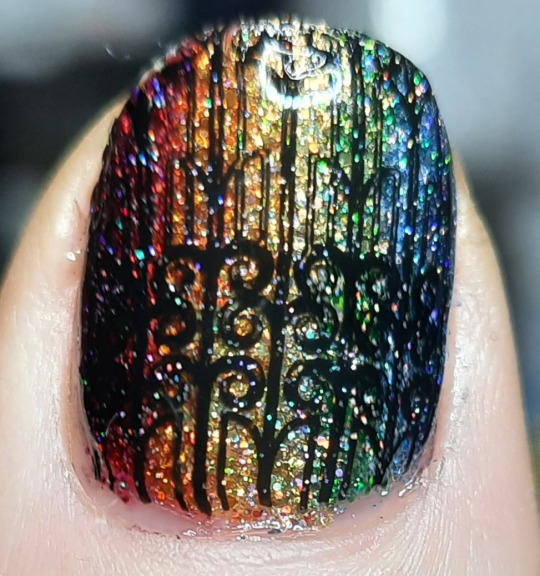
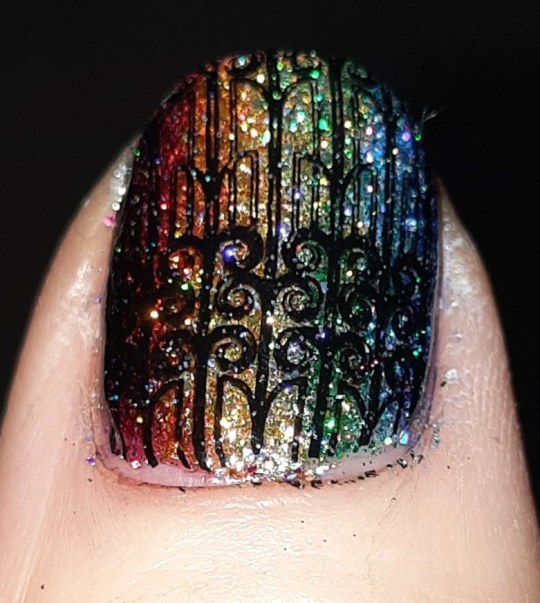
The left image shows the cuticle difference when cleanup is done. (two close-up images of the same thumb, rainbow glitter vertical gradient polish with a stamped art deco black design that looks like a wrought iron gate. The left image has cleaner cuticles than the right image.)
If you look closely, you can see where the lines of the stamping are a little incomplete. This was done with the Moyou stamper and Born Pretty polish. I'd see if I can do this exact stamp again at some point with the stamper from The Creative Store.
3 notes
·
View notes
Photo

✧ TEXTURES – A TUTORIAL BY EVANSYHELP.
In this (long and image-heavy) tutorial, I’ll be showing you how I make textures, as requested by a very kind anon. I use Photoshop CC 2019 but you should be able to replicate my methods on most editing software. Please like or reblog this post if you find this helpful!
Index.
Ethically Sourcing Your Images.
Finding The Right Image.
Making Your Texture.
Other Tricks I Use.
Quick Recap.
Making Textures Without Images: Speedrun.
Outro.
Ethically Sourcing Your Images.
I will be explaining a couple quick ways to make textures without any images at the end of the tutorial, but since my personal favourite way involves images and that’s specifically what the anon requested, that’s what the majority of the tutorial will be focused on.
The first step, naturally, is finding an image to use. My personal favourite site is Unsplash, but there are plenty of options out there.
What you need to keep in mind is what kind of license the images have. Unsplash is free for personal and commercial use with no attribution required, which makes it perfect for things like this. There are more sites like this in my free for commercial use masterlist (linked at the end of the post), but unless you’re using them in products you’re selling (like graphic commissions), the commercial aspect isn’t something you need to worry about. Just check the site/photographer’s rules to make sure you’re allowed to edit the images for personal use, and whether attribution (credit) is required.
Another important thing to keep in mind is that these sites typically never allow you to redistribute the images as they are. That means you can’t just go to Unsplash’s texture category, save the images without any changes, and reupload them in a texture pack on Tumblr. That’s stealing. We don’t do that.
Finding The Right Image.
Knowing what kinds of images will make good textures is a learning curve. My first couple texture packs are rough compared to what I make now, because I basically taught myself with no guidance and learned through trial and error. But with practice, I learned what worked and what didn’t.
You want your images to be HQ, either with no ‘subject’ (ie. a person) or with a large background. Higher contrast is better but not super necessary. You should hopefully be able to envision what kind of texture you want to make before you even touch the image.
Making Your Texture.
For the majority of the tutorial, this is the image I’ll be working with. Credits can be found in the link at the end of the post.

Open your canvas. You can make specialised textures, like 100px for icons or 540px for Tumblr graphics, but I personally prefer to make them large for versatility. I’m using 800px in this tutorial. Once you’ve chosen your size, upload your full-size image into the canvas. This is where the fun begins!
Drag the image around into a nice position. Or use Edit > Transform to rotate, flip, and warp the image in different ways. Or use Edit > Free Transform (Ctrl+T) to change the size or the angle more precisely. Or probably some combination of all three! With Free Transform, make sure this aspect ratio anchor is selected so you don’t butcher the quality of the image, unless you’re warping it intentionally:

This is all very individual to each image you use. You might want to flip one, shrink another, put another at a 30 degree angle. Just experiment until you end up with something you think would look awesome as a texture. For the sake of providing a good example, I flipped this image vertically, shrunk it to 80% its original size, and rotated it until it looked like the smoke/cloud was coming from the bottom right corner. This is what we have:
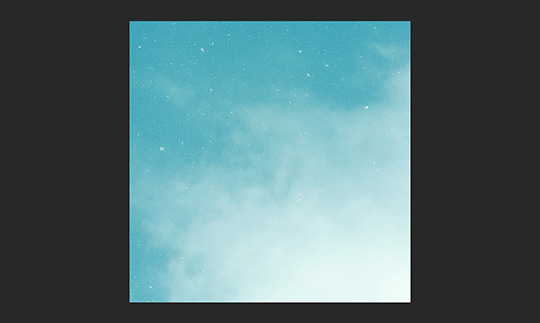
Then we move onto enhancing. Textures work best when there’s a lot of contrast because it’s easier to manipulate the blending modes. So if your image isn’t already high contrast, these adjustment layers (Brightness/Contrast, Levels, and Selective Colour) are your new best friends:

If you don’t see this on your Photoshop, go to Window > Adjustments and it should pop up. Again, just experiment, because different images will require different things. Essentially, you want to make the darks darker and the lights lighter. Something I like to do is add a Selective Colour layer and use the Black slider. Pick out the primary colour of the image, and then Whites, in the drop-down menu, and move the bottom slider (left to lighten, right to darken) until you’re satisfied. Like so:
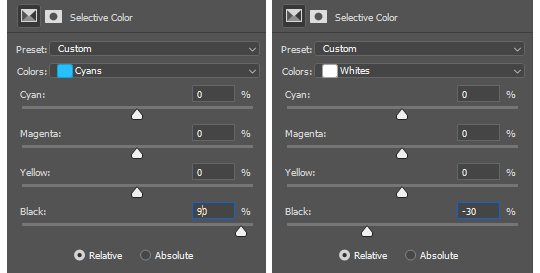
So with those Selective Colour settings and the following Levels settings, here’s the before and after of my image.


Much better contrast! If you want to end here, you can, but I personally prefer grayscale textures a lot of the time because it makes it more versatile. Instead of being forced to make a blue graphic because this image is blue, I can make any colour graphic I want with one simple black and white Gradient layer. Photoshop does have a default Black & White adjustment feature, but I prefer using Gradients.
Pro tip: if your image doesn’t have a pure black, you can keep the darkest parts of your image dark by using the left slider, shown below.


A lot of the time, I’ll also decrease the opacity of that Gradient layer, to somewhere between 80% and 95%, so just a hint of the original colour comes through. This gives it more dimension in my opinion, while still keeping it mostly neutral. Here’s 100% vs. 85%:
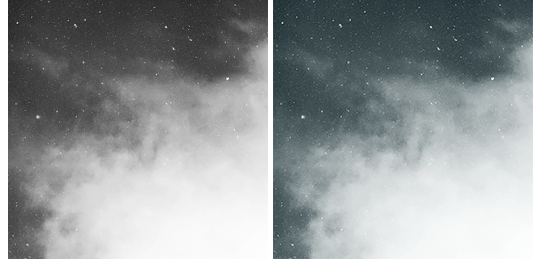
You may find that you want to add a little more contrast after. With this texture, I decided to grab another Selective Colour layer, pick ‘Black’ in the drop-down menu, and pull the Black slider up to +40. I also settled on 95% opacity for the Gradient. And here’s the final product!

Other Tricks I Use.
That covers how I make a lot of my easier textures, but here’s a quick run-through of other, slightly more complex tricks. I’ll be working with this image (again, credit at the end of the post):
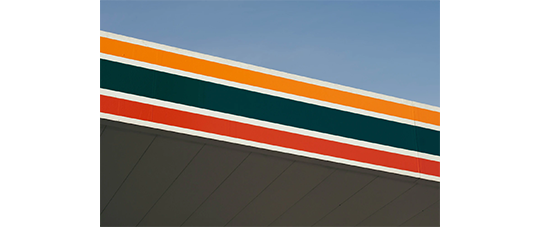
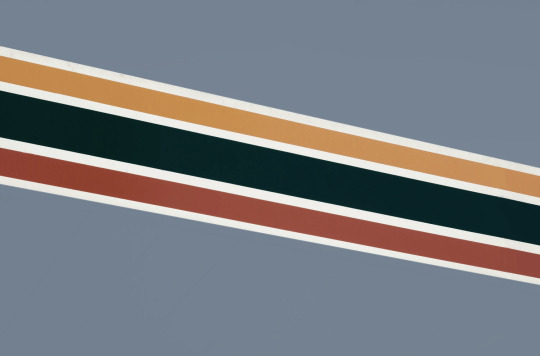
This, of course, is not as obviously texture-worthy as the previous example, but I love textures with strong lines, so here’s how the magic happens! I wanted to get rid of the detail on the bottom half, so I used the Polygonal Lasso tool to select it:

Then I used the eyedropper tool (the 4th symbol under the polygonal lasso in the image above) to select the blue of the sky and, on a new layer, painted that selection completely blue. I decreased the opacity to 90% just so it wasn’t a total block colour, but not enough that you can really see the lines. I repeated this process for the sky, so it looked more consistent with the bottom half.
Then, using the eyedropper tool again and making a new layer for every colour, I went in with a small soft paintbrush and painted out the harsh vertical lines on each segment of the stripes. I didn’t want to make them totally perfect, but I painted over the bulkiest interruptions.
I added a black and white Gradient layer, using the slider tool I showed you before to darken the darks and lighten the lights, and decreased it to 50% so that it wasn’t totally black and white but still more neutral than the original. Here’s the result:
Another fun way to shake things up, which unfortunately will require Photoshop (CS6 should be fine, not sure about earlier versions), is the Filter Gallery. Go to Filter > Filter Gallery, and you’ll find a TON of effects that change your image drastically. Most of the default settings are nightmarish, but you can play around with the settings panel on the right.

Here’s just a few results that are possible with the Filter Gallery, labelled for convenience. You can view the HQ versions in the link at the end of the post.

Quick Recap.
So you don’t have to reread this obnoxiously large tutorial every time you want to reference it in the future:
Choose a HQ image.
Resize, rotate, flip, and/or warp.
Enhance the contrast.
Black and white!
Paint over problem areas!
Filter > Filter Gallery.
Making Textures Without Images: Speedrun.
We’re almost done! There are some tools built directly into Photoshop that can allow you to make textures completely from scratch, and I’ll briefly cover my favourites here.
The first is pattern fill layers. I spent too many years not appreciating the patterns feature in Photoshop, but they’re great. Go to Layer > New Fill Layer > Pattern, click ‘OK’ on the box that pops up, and another box will pop up to let you choose your pattern.
By themselves, they are UGLY. It can take a while to figure out how to use them. But if you change the scale, change the blending mode, and change the opacity, you have thousands of textures at your fingertips. And if you add two or three together? Billions of possibilities. I can do a more in-depth tutorial on patterns if y’all are interested, but here’s two examples I just whipped up in a matter of minutes, using two patterns on each:

The next feature is gradient fill layers, and the gradient tool. Go to Layer > New Fill Layer > Gradient… to select a gradient (or make your own!) and an angle, OR use the gradient tool (featured below) to drag the gradient across your canvas manually. On its own, boom, that’s a gradient texture. Paired with a pattern or put through the Filter Gallery? Even better!


The last is brushes. Brushes can be great for textures because there are so many kinds. You want to make a paint splatter texture? Paint splatter brush sets are everywhere! You want to make a smoky texture? You can get brushes that look like smoke! Smudged? Scratchy? Grunge? Halftone? Light leaks? Torn paper? Brushes have your back.

With all of these features (and things like actions, too!), your saving grace is going to be this little cog wheel shown below, and the list you’ll find under the Reset/Save/Load section. There are SO many more options built directly into Photoshop that you don’t even see right away, because you have to add them manually from this little cog wheel.

And you can download countless more patterns, gradients, and brushes from sites like Brusheezy and DeviantART. A couple tutorials on downloading and installing them can be found in the link at the end of the post, but remember, download these things ethically. If you want to sell products that use a custom brush, it’s your responsibility to find brushes that are free for commercial use. If you don’t want to credit the creator, it’s your responsibility to find resources that don’t require attribution.
Outro.
I think that’s everything, guys! If you found this tutorial helpful or otherwise enjoy my content, please consider supporting me on Ko-fi! I offer exclusive rewards, like custom graphics, to everyone who donates.
Due to Tumblr’s latest rules about links, you can find the credits list, the promised bonus tutorials, other important links, and the full-size HQ versions of the textures made in this tutorial over here.
Thanks for reading!
#rph#allresources#completeresources#itsphotoshop#chaoticresources#photoshop tutorial#photoshop resources#photoshop help#ps resources#ps tutorial#eh#eh: tutorial#tutorial#ps help#texture#*100#*250
371 notes
·
View notes
Text
HAHA Hey suckers I lied Star Sanses Extended chapter 1 done NOW (link to it on AO3)
It was quite the normal day.
Unfortunately. The Great Papyrus was bored. He had already recalibrated his puzzles twice, made pasta 3 times, scolded his brother 4 times, and was trying to figure out what to do 5 and 6 times (because threes are overused) when something happened. Well, not really. Sans took one of his shortcuts to appear right behind Papyrus, something he did often to try and surprise him. Have no fear, Papyrus can’t be surprised, so his brother never succeeded.
Papyrus turned around, ready to scold his brother for not simply walking. Really, his sentry station wasn’t that far from Papyrus’s. Except… that wasn’t Sans. It was! But, well, he looked different.
“SANS? BROTHER, YOU DON’T HAVE TO DRESS UP AS ME TO FEEL AS GREAT. I KNOW YOU’RE TRYING YOUR BEST.” Sans was wearing a chest plate with a light gray t-shirt peeking out. There was a bright blue scarf wrapped around his neck, tied back rather effectively into a bow. It fit him, but Papyrus felt that scarves look better when they can flow dramatically in the wind. He had on gloves that looked identical to Papyrus’s but in the same blue as his scarf. And, interestingly enough, his eyes were not his regular white but light blue. “THAT IS BETTER THAN YOUR USUAL ATTIRE THOUGH, SO I THANK YOU FOR TRYING.”
“AH,” the smaller skeleton said. He looked a bit uncomfortable. Sans was never uncomfortable around Papyrus unless he was hiding something.
“SANS? IS THERE SOMETHING YOU NEED TO TELL ME? IF YOU WANT INTO THE ROYAL GUARD, I WOULD BE HAPPY TO TELL UNDYNE!!” Papyrus gave his brother a toothy grin (what else can he give him? Skeletons can’t hide their teeth, silly) in the hopes of comforting him. But still, Sans shook his head. Ah well, if his brother wanted to keep another secret-
“I’M ACTUALLY NOT YOUR BROTHER,” Sans (not Sans? Stary Sans? Blue Sans?) looked down before straightening himself. Now that this skeleton mentioned that he wasn’t Papyrus’s brother, the bigger skeleton noticed how much different he sounded. For one, those definitely sounded like all caps. Sans hated speaking in all caps, though he’d told Papyrus that it made him sound much more commanding. Next, his posture was much better. Sans had a terrible habit of slouching. His eyelights were also a cyan color, like a lighter shade of Sans’s magic.
“IF YOU’RE NOT MY BROTHER…” Papyrus scrunched up his face. This, was a puzzle. A puzzle he intended to solve all on his own. He stared down at the skeleton, who appeared to be bracing himself.
“WOWZERS, IT’S A LOT HARDER THAN I THOUGHT TO TALK TO AN ALTERNATE VERSION OF MY BROTHER,” Not Sans smiled awkwardly and looked away before quickly forcing himself to look back at Papyrus. Papyrus paused, trying to fit in what Blue Sans just called him.
“AN… ALTERNATE VERSION OF YOUR BROTHER?” Papyrus felt ridiculous repeating back what not Sans said, but he couldn’t help it. What did he mean by alternate version? Papyrus vaguely recalled a training session with Undyne. They liked to chat while they were sparring, and this particular time Undyne mentioned something Alphys was studying in her free time. “AUs.” She said. After a bit of questioning, Undyne revealed that AU was an abbreviation of Alternate Universe, but she hadn’t really been listening beyond that. Papyrus despised abbreviations, and found it so frustrating that Undyne and Sans were so intent on using them, that the words had stuck with him despite their vagueness. “ARE YOU TALKING ABOUT ALTERNATE UNIVERSES?”
Not Sans perked up, his eye lights popping into stars. His smile went from awkward to excited as he began to talk.
“YES, I AM! HOW MUCH DO YOU KNOW ABOUT THEM? USUALLY PAPYRUSES AREN’T AWARE OF THEM, BUT IF YOU ALREADY KNOW OF THEM THAT WILL MAKE THIS MUCH EASIER!”
“I’M AFRAID MY KNOWLEDGE IS LACKING. IT WAS MENTIONED BRIEFLY BY MY FANTASTIC FRIEND UNDYNE, BUT SHE DIDN’T KNOW MUCH EITHER.” Papyrus announced, slightly embarrassed. The blue Sans faltered, but quickly regained his energy.
“ALTERNATE UNIVERSES ARE EXACTLY WHAT THEY SOUND LIKE! THEY ARE ALTERNATE VERSIONS OF THIS WORLD. MINE IS CALLED ‘UNDERSWAP,’ YOU AND I HAVE SWITCHED PERSONALITIES THERE, SO REALLY, WE’RE THE SAME.” Not Sans concluded, looking adequately proud of himself for such a well worded explanation.
“…I SEE. WHAT ARE YOU DOING HERE THEN, NOT SANS?” Papyrus inquired. There was also the question of how Not Sans got here, but Papyrus was certain he would learn in due time.
“BLUEBERRY IS FINE! I’M A PART OF A GROUP OF SANSES CALLED THE ‘STAR SANSES’ SO MY FRIENDS AND I ALL HAVE NICKNAMES.” Nicknames, Papyrus’s worst enemy. Blueberry didn’t seem to mind though, despite him supposedly being an alternate version of Papyrus. “BUT TO GET TO THE POINT- I AM HERE BECAUSE I NEED TO ASK A FAVOR OF YOU, CLASSIC PAPYRUS.”
“IF YOU WOULD LIKE TO ADD A TITLE TO MY NAME, THE GREAT WOULD BE BETTER, THANK YOU.” Papyrus announced, not sure what Blueberry meant by “classic.”
“NO, NO. CLASSIC IS A REFERENCE TO YOUR TIMELINE. YOUR TIMELINE IS THE ORIGINAL, SO IT’S LABELED ‘CLASSIC.’ I’M AFRAID MULTIPLE PAPYRUS USE ‘THE GREAT’ SO IT’S NOT AS DEFINING. IF YOU HAVE A DIFFERENT SUGGESTION, I’D BE OPEN FOR HEARING IT?” Blueberry sounded apologetic. Papyrus, meanwhile, was thinking hard. What other title would he like? Classic just didn’t suit him. He had to admit, Blueberry’s reasoning was sound. It might be better than coming up with his own. Still, if he could figure out a better one…
“THEN YOU CAN CALL ME COOL GUY INSTEAD!” Papyrus announced proudly. Blueberry hesitated then smiled.
“A NAME TO MATCH YOUR PERSONALITY? FANTASTIC! IGNORING THE FACT THAT I’M COOLER THAN YOU, IT’S PERFECT!” Blueberry concluded. Papyrus was tempted to correct him, but he could guess that it wouldn’t go so well. They were alternate versions of each other after all, so it would be difficult to discover who was cooler (it was obviously Papyrus though).
“ANYWAYS,” Papyrus said. “YOU MENTIONED A FAVOR? I’M FANTASTIC AT DOING FAVORS, AND I’D LOVE TO HELP YOU. WHAT DO YOU NEED?”
“MY FRIENDS AND I HAVE A VERY IMPORTANT JOB. WE PROTECT THE MULTIVERSE FROM AN EVIL GROUP CALLED THE ‘BAD SANSES.’ THEY’VE BEEN SUPER ACTIVE LATELY, AND DREAM THINKS THEY’LL ATTACK TODAY. UNFORTUNATELY, I’M BUSY ALL OF TODAY. I’M WORRIED ALPHYS WON’T THINK I’M FIT FOR THE GAUD OF I MISS A TRAINING SESSION, AND TODAY’S IS PLANNED TO LAST UNTIL LATE TONIGHT.” Papyrus had to hold back laughs picturing the short scientist holding one of Undyne’s spears with an eyepatch stuck on. He couldn’t seem to make it look anything short of ridiculous.
“BUT! BACK TO THE FAVOR, I WAS WONDERING IF YOU COULD TAKE MY PLACE TODAY. IF YOU’RE BUSY TOO, I UNDERSTAND.” Blueberry concluded.
“IT SOUNDS LIKE YOU HAVE A VERY IMPORTANT JOB. WHY DO YOU STILL WANT TO BE A MEMBER OF THE ROYAL GUARD? DOESN’T BEING A STAR SANS GIVE YOU ALL THE LOVE AND AFFECTION YOU COULD DESIRE?” Papyrus said haltingly. Star Sanses protected the whole multiverse, the Royal Guard just protects the underground. If that didn’t give Blueberry enough love… What hope did Papyrus have?
“WELL, IT DOES, BUT…” Blueberry took a deep breath. “I HAVEN’T SHARED WHAT I DO WITH MY TIMELINE YET. IT’S KIND OF A HUGE SECRET. I’M THE ONLY MULTIVERSAL BEING WHO ISN’T AN OUTCODE. IT’S NOT SOMETHING INCODES ARE SUPPOSED TO KNOW ABOUT. THERE AREN’T REALLY RULES BUT…” Blueberry trailed off, looking a bit upset.
“I’M SORRY I PUSHED. DOES THAT MEAN I’M NOT ALLOWED TO TELL ANYONE? MY BROTHER IS REALLY GOOD AT KEEPING SECRETS, MAY I TELL HIM?” Both brothers kept secrets from each other. Papyrus had his share, and he knew Sans had a pile. They had recently talked about trying to be more open with each other, and Papyrus wasn’t sure how he could keep his brother’s trust if he made a new secret. It was important to prevent new secrets from forming.
“LIKE I SAID, THERE ARE NO SPECIFIC RULES. IT’S JUST WHAT YOU FEEL COMFORTABLE WITH. BUT I WILL ASK THAT YOU COMMIT TO BEING ONE OF US BEFORE YOU TELL HIM,” Blueberry said firmly.
“OF COURSE! I WON’T LET YOU DOWN! HOW DO I HELP THOUGH? I’M NOT EVEN SURE HOW TO LEAVE MY TIMELINE.” Papyrus admitted. Blueberry looked relieved, and he stuck out his hand.
“I’M AFRAID I CAN’T OPEN MULTIVERSAL SHORT CUTS MYSELF, BUT IF YOU’D TAKE MY HAND MY FRIEND CAN BRING US OUT!” Blueberry widened his grin, and Papyrus reached out to grab his hand. There was a moment of stillness, where it was just the two of them in a snow covered forest. Some snow flurries falling from branches above. Papyrus shifted, the pause was uncomfortable. Just as Blueberry began to frown, a warm, distinctly yellow feeling began to spread through Papyrus’s bones. Blueberry even seemed to be glowing with the magic. Then pop, and he was somewhere new. It felt like a small jerk on his SOUL, more abrupt than his brother’s short cuts around the underground.
Speaking of, this wasn’t like anything Papyrus had seen in the underground. It was a large space with an orange gradient. It looked… undefinable, in the sense that it didn’t end. There were papers with small dancing images, and a number of them looked like Papyrus and his friends. Some were held up by strings while others hovered around the islands that floated about. It was a very dream-like place, like something Papyrus had imagined. It has been a long time since he dreamt something so serene, which was the only reason he could believe what he was seeing.
“Sorry about that Blue-” a new voice spoke, sounding a bit out of breath. Papyrus turned to find a golden Sans, laced with the same magic that brought him and Blueberry here. He had his hand wrapped tightly around another Sans. This one was incredibly short, he looked like a child compared to Papyrus (Not to fear! The Great Papyrus was fantastic with children!). He had a brush taller than him strapped to his back, and his outfit was all kinds of decorated- like a superhero! Both Sanses were.
“IT’S FINE. IS… IS EVERYTHING ALRIGHT HERE?” Blueberry regarded the Golden Sans’s grip on the Sans with a brush. Oh dear, so many Sanses. Someone who wasn’t as brilliant as Papyrus might not be able to follow!
“Uh, yep!” The golden Sans smiled, but he looked a bit too stressed. The brush Sans, however, snapped his full attention to Papyrus. His eyelights bounced between color and shapes before finally landing on a bright sky-blue shaped as a triangle and a Royal purple as a star.
“HELLO!!!!! I’m Ink!!!!” Ink struggled out of the gold Sans’s gasp and bounced overs to Papyrus. It was disturbing how little he resembled Papyrus’s brother. “I’m the protector of the Multiverse!! You’re Classic Paps, right?!” Ink grinned wildly as Papyrus avoided cringing.
“HELLO, INK. PLEASE DON’T CALL ME PAPS, OR CLASSIC FOR THAT MATTER. BUT WOWIE, PROTECTOR OF THE MULTIVERSE SOUNDS LIKE SUCH A BIG JOB!” Papyrus couldn’t help but be in awe of Ink’s title. It sounded more important than Head of the Royal Guard. Ink’s grin grew and his purple eyelight turned yellow. He looked like he was about to respond, but the gold Sans cut him off.
“Yep, super big job, which is why he has us to keep him on track. Anyways, hello, my name is Dream. I’m the guardian of positivity. If you don’t want us calling you Classic, what should we call you?” Dream kept his smile up, but he looked exhausted.
“HE WANTS TO BE CALLED COOL GUY.” Blueberry announced. Dream managed to look more worn out before responding.
“That’s… a fun nickname. But this needs to be like a substitute for your real name? Just, please pick something different.” Dream sounded incredibly firm, and Papyrus didn’t want to wear him out anymore. So he listened.
“WHAT ABOUT COOL BONES?” Papyrus’s smile faltered as Dream’s eyelights flickered out.
“Papyrus, please, be serious.” Papyrus had been serious, but he decided not to mention it. “Just- here, think about our names for a moment? Ink, Blue, Dream,” Dream pause, looking up at Papyrus hopefully. Papyrus did his best to reconsider. He could find an alternate version of his name? Translate it into another language perhaps. There was also the history of the word itself, which he and Sans had searched up late one brotherly bonding night. While the word papyrus is a plant, it’s also a form of paper in Ancient Egypt. Paper has simply so many uses, and it’s so incredibly important (and obnoxiously underrated). The Great Papyrus wouldn’t mind being called Paper.
“I CAN BE PAPER!” He offered, and Dream relaxed into a more genuine smile.
“Oooh!!! Like the paper to my ink!!!” Ink grinned, absolutely delighted.
“No, actually-“ Papyrus (Paper?) tried to correct him. With all the meaning behind his choice, he wanted to give it the proper glory.
“WELCOME TO THE STAR SANSES, PAPER!!!” Blueberry said, cutting Papyrus off. He tried to place his hand on Papyrus’s shoulder, but after discovering he couldn’t reach Blueberry settled for patting Papyrus’s back.
“THANK YOU NEW FRIEND!!” Papyrus widened his smile, reveling in the fact that he had made not one, not two, but THREE new friends in less than an hour. He couldn’t wait to tell his brother.
“NOW THAT WE’VE GOT THAT OUT OF THE WAY,” Blueberry said, “I HAVE TO HEAD HOME, ALPHYS IS EXPECTING ME. GOOD LUCK PAPER!” Blueberry threw a glance at Dream, then he lit up with the same golden hue as last time and disappeared. Ink’s eyelights flashed to a different color as he focused again on Papyrus, who had noticed by now that Ink’s attention was short and his focus quickly shifted.
“So, buddy, what do you wanna do now?” Ink leaned forward, almost as if bowing, and he bounced a little on his heels before performing some kind of trick jump and landing on an island floating a few feet up. He was now roughly at Papyrus’s socket-level.
“We tell Papyrus how this is going to go.” Dream said, cutting Ink off. Ink frowned, one eyelight flipping to a purple question mark while the other changed to a dim reddish-orange square.
“WHAT DO YOU MEAN?” Papyrus wiggled his fingers, the fabric of his gloves rubbing. Dream sounded awfully serious, a stark contrast to Ink’s carefree nature.
“Blue’s already learned how to deal with… the Bad Sanses. Since we already know what does and doesn’t work, I’d rather skip the hard-learned lessons.” Dream gave a weak smile at the end, while Ink stuck out a rainbow colored tongue, nearly pouting.
“...WHAT MIGHT THOSE BE?” Papyrus began to worry for the first time since he accepted Blueberry’s offer.
“First of all, Blue’s already tried speeches.”
“MAYBE THEY JUST NEED MORE, OR HE HASN’T FOUND THE RIGHT ONE!” Papyrus said. Dream winced.
“Maybe, but we don’t have the time to give the speeches, and more often than not the Bad Sanses don’t even listen, they murder while you talk.” Dream said, the spot where his eyebrows would be tilting up.
“MURDER?” Papyrus faltered.
“Did Blue forget to tell you?” Ink asked. He had plopped down and was lying on his back with his skull dangling off his island, looking far too relaxed.
“TELL ME WHAT.” Papyrus didn’t want to guess this time. Dust isn’t a puzzle he ever wanted to solve.
“Our role as Guardians of the Multiverse is to protect timelines from being destroyed. The way that happens is the Bad Sanses wipe through the entire Underground, killing anyone and everyone they meet. Once they’ve killed enough, the timeline is unstable enough for them to destroy it directly.” Dream sighed, his shoulders slumping.
“Or so we think. Timelines are weird, and there could be a whole slew of reasons for how things work!! It’s really interesting. I’ve been wanting to study it all but- OOH A BUTTERFLY!!!” Ink said, jumping up to chase the shiny indigo insect. Even though Ink didn’t finish his sentence, Papyrus could get a sense of why he wasn’t learning anything. Ignoring the eccentric skeleton, Dream just looked sad. He was staring down at the ground, one hand wrapped tightly around the fabric above his SOUL.
“WHAT HAPPENS IF WE DON’T GET THERE IN TIME?” Papyrus tried to say it softly, but he could never figure out how to speak in lowercase. At least it still sounded caring.
“The entire timeline dies.” Dream sighed. He looked up, finally seeing Papyrus’s expression. “Ah! Don’t worry though!! We win a lot!! I’m just trying to explain why I need you to listen to me!!” Dream waved his hands about, trying to dispel the dark mood that had settled.
“THAT’S ALRIGHT. YOU WERE BEING HONEST. IT’S IMPORTANT TO UNDERSTAND ALL OF THE PIECES OF OUR JOB. I’M GLAD YOU TOLD ME.” Papyrus crouched so as to come eye to eye with Dream. He used this tactic with his brother whenever Sans was upset. Papyrus had found that it’s easier to talk to someone who’s right there with you. Papyrus reached out his gloved hands, and wrapped the bright, cheery red around Dream’s hands. Papyrus realized for the first time that Dream wore gloves too. Maybe he was a swapped version of Papyrus like Blueberry. Papyrus made a note to ask him later, when he was feeling better.
“Thank you, Paper.” Dream took a deep breath before continuing. “We pride ourselves in not killing anyone, ever. Not even the Bad Sanses. A tactic we like to use is trapping them. Blueberry does that the most, because he has the most magic to spare, so you’ll be using a lot of blue magic. Is that ok?”
“ABSOLUTELY!! I HAVE FANTASTIC CONTROL OF MY MAGIC, YOU DON’T NEED TO WORRY.”
“The butterfly flew away.” Ink said, butting in. He had a pout again. Papyrus leaned toward Dream a little and whispered to him.
“DOES… DOES HE PAY ATTENTION ENOUGH TO NOT GET HURT?” Papyrus was genuinely worried, but Dream burst out laughing. His grin widened as he turned toward Ink, who had begun to… eat… grass..?
“Most of the time.” Dream said, not particularly reassuring.
#writblr#fanfic#star sanses extended#classic papyrus#papyrus undertale#owl's writing#YE#I don't feel like tagging this properly so just like. take it
13 notes
·
View notes
Text
Chance
Chapter One: Dancing in Silence
3631 words
Original Idea:
::You are here::Part 2::Ao3::
The cacophony of night that most coastal cities had was entirely lost on the quiet, lonely streets of Gotham. It wasn't a silent city by any means, but its citizens had learned a long time ago that nighttime was not their domain, and as fantastic as some of those night-liers were, Gotham knew it was best to leave the night to its own, and let the bats do their hunting.
Most of Gotham knew that, anyway.
Marinette Dupain-Cheng, President of the class in the French foreign exchange program, fashion genius, and proud owner of at least 3 brain cells, was lying wide awake at 2:30am in a bed in a luxury hotel room at the heart of Gotham City, desperately trying to figure out if cereal was a soup and feeling remarkably as though she had been lied to her whole life.
The hotel room, which she was finding she disliked more and more the longer her brain went without sleep, was a mess of creams and browns and golds when the lights were on, but in the dark, with only the faint street light filtering through the balcony doors' curtains, everything was the same vague gradient of grey to black. She much preferred it like that.
Marinette lay on her back, sheets tangled at the corners of her bed after hours of tossing and turning, her arms and legs splayed out in a manner not unlike a starfish that had been asked for a high-five, and her black hair flopped out of the two now virtually-useless buns perched atop her head, loose strands sticking uncomfortably to her wide-eyed face.
She had half a mind to wake up her roommate, Chloe Bourgeois, who had been asleep for the last hour and a half, and ask her opinion on the matter. Even considering what 'the wasp', as Alya had taken to calling her, was going through physically at the moment, and that she'd put Sabrina in a choke-hold for almost a full minute last time she was disturbed--with precise details of how she would personally destroy anyone who dared bother her nap again--and only let go after she'd given Sabrina and everyone who saw the incident one (1) more chance to live.
It probably wasn't worth it.
Unfortunately, Marinette was about to die from over-internalization, and she was genuinely considering putting her life on the line for answers.
Mari shifted to her side and stared at the gap in the curtains, one of the narrow slices of light that leaked through them leaving a stripe of color down her face and abdomen, illuminating her plain black sports-bra and green basketball shorts she'd stolen from Adrien after accidentally ruining her own fuzzy Pj bottoms mere hours before. If anyone else had been awake, they would have also seen the light glinting off the peculiar, vein-like markings that spiraled around her torso, their lines intertwining with themselves and leading up to two small marks just above her shoulder blades.
Marinette openly scowled at the double doors to the hotel balcony.
'I'm going to go insane.'
With a sigh as quiet as she could manage, Mari sat up, climbed to the foot of her bed, rifled under her dresser for her suitcase, and fished out her specially altered red-and-black hoodie, the matching pair of black leggings with red spots, and a pair of sneakers. Sliding into them in almost total silence--she doesn't count the muttered French that may or may not have been cursing when she stubbed her pinkie toe on the end table--she opened the glass doors at the end of the room and slid outside for some fresh air.
Stepping out onto the small balcony, Mari inhaled deeply and stared at the city. The lights were loud, even though the noises weren't, but the colors outside felt better, and she found she could think more clearly without the suffocating blackness of the room surrounding her, glaring at her with thinly veiled chartreuse and belly-hair-brown.
Mari looked up, the waning crescent moon sending a crooked smile her way as she did so, and she smiled right back.
The sky looked different in America.
She turned, mouth twisting into a knot, and stared at the 'french' doors that led back to her room, having half a mind to just go back inside… but her designer's heart craved a better view, and the stifling heat of her bed was exactly the kind of thing that would keep her awake longer.
Nodding resolutely, Marinette marched toward the doors, and leapt up precisely as high as she needed, fingers gripping the ledge above it with a strength that belied her small stature. Hooking her foot over the top of the door frame, she hauled herself up and began scaling the building, using every ledge and window she could. Her seemingly delicate hands were covered in calluses after years of sewing accidents and other... extracurricular activities, so the rough concrete and brick was nothing she hadn't dealt with before.
Chloe liked to 'joke' that she probably didn't have fingerprints anymore, and could definitely get away with murder. Marinette snorted, smiling to herself as she pulled herself over another window ledge, her brain temporarily distracted from cereal soup by that particular conversation that had kept the three of them awake far past curfew.
Chloe scoffed from her perch on the largest bed, tossing her head to flip her white-blonde braid over her shoulder as she dipped the little brush back into the fingernail polish container.
"Oh course I'm not talking about actually murdering anyone, Bumble-Bug." She said, delicately coating her pinky fingernail in pearlescent midnight-blue polish. "All I'm saying is that if, hypothetically of course, somebody, nobody in particular, at say… the school, happened to end up dead in a ditch somewhere," she dipped the brush again. "And there happened to not be any fingerprints, the police couldn't pin a thing on you. Ask Sabrina, she's doing an internship at her Daddy's place."
Shaking her head, and biting her lip to keep herself from laughing, Mari turned her attention back to applying her own rose-gold polish.
A few specks of Gotham's finest hotel were unintentionally scraped off the border of a window and tumbled to the pavement below. Mari grunted, adjusting her grip on a gargoyle-like figure near the edge of the roof to better secure herself so she could find another foothold, unintentionally scraping her palms in the process. She grinned.
"Y'know Ladynette," said Adrien, his mop of sunshine-blond hair coming into view as he sat up from where he had been lounging on the floor, still waving his hands in an attempt to dry the sloppy black and green nail polish he had insisted he do himself. 'We just have to take it off before I go home! Father won't know if we don’t tell him!' "Bee's got a point. I'm not saying I would appear as Chat to give you the best alibi in history, but I'm also not saying I wouldn't." He tapped the side of his nose, effectively smearing the nail polish on his index finger all over the inside of his eyelid. "You're the star student, after all."
Marinette couldn't take anymore, and collapsing into a giggle-fit, accidentally spilling the rose-gold nail polish all over her fuzzy pajama pants in the process. It took far too long to calm down, but when she did, Chloe and Adrien had already found replacement pants for her.
Mari returned to the present as she, with a final shove, found herself on the roof of the very prestigious hotel her class was staying at during their 3 month exchange program. Her entire class.
'No one in particular my foot.'
Mari stood near the opposite edge of the roof from where she'd climbed up, letting the cool, damp midnight breeze play with her hair, as she breathed a deep sigh.
Cereal was soup.
…
Kwamiis, she'd been hanging out with Adrien too much.
Her thoughts stilled for a moment, though her mind continued at breakneck speed as memories of her loved ones filled her up to bursting. She closed her eyes and let the images chase themselves in circles for a little, drinking in the feeling of the night and the faint smell of coastal rain that sank into her bones.
Gotham was officially her second favorite city.
The mood was briefly soured as her brain, still dutifully chugging along as the speed of light now that she had nothing else to think about, began turning to darker subjects. Mari sighed, her whole body sagged in exhaustion and her fingers twisting around the ponytail that was wrapped around her wrist as said darker thoughts began playing on repeat in her head, the face of at least two thirds of her misery laughing at her misery, though she wasn't on the roof to laugh at her.
‘Lila.’
Marinette's fiddling with the ponytail ceased as she began bouncing her leg, her hands moving up to readjust her buns in a vague hope of making them slightly less disastrous.
‘Oh boy, Lila…’
Liar and life-ruiner extraordinaire.
The reason her only friends were suddenly transferred to new classes even though she herself had tried a dozen times over to do just the same.
Mari sighed, tugging at a nasty tangle the ponytail-holder had somehow created with her bun.
At least she still had Alix and Kim. As much as she loved Chloe and Adrien, Adrien couldn’t do anything to rock the boat without his father forcing him to quit public school, and since Chloe’s father had finally been replaced as Mayor, she didn’t have nearly as much power as she used to. Besides, the class was against her to begin with, and it had only gotten worse as Lila began to spin her web.
Alix and Kim on the other hand, while they couldn't convince many people of Lila's schemes, they could punch people in the face. Mari actually cried when they told her they both got suspended for a week after doing just that the day they found out Lila was nothing but a liar, (Alix did the punching and Kim cheered her on) and while she insisted they never do that again, she brought them 'thank you' goodies every day for six months after that.
Her thoughts cheered up significantly after a few forceful topic-changes and as they continued to wander, a tune bumbled its way to the surface and, having nothing better to do at the moment, she began humming it. What the song itself was called she didn't remember, maybe it never existed to begin with, but the melody was quiet enough to be soothing, and it was calming, if a little haunting.
A few measures into her strange melody, Mari found herself half dancing-half fidgeting to the beat of her imaginary song, incomprehensible words playing through her mind as the night dragged on and Gotham continued on in semi-silence.
Mari was midway through one of the ballet moves Chloe had dragged her to classes to learn, when the hairs on the back of her neck stood on end. Mari cut her movement off mid-flow and stood stock still.
Someone was on the roof with her.
Years of constantly living life on the edge of both a mental breakdown and a life-or-death battle was the only thing keeping her from blindly round-house-kicking whoever it was in the face and running off into the night. Fight and flight instincts could fudge a delicate situation, and whoever was up here could simply be getting some air, like her.
Maybe she should have let her instincts run the show.
She barely had time to register she was still humming--being forced to communicate in the most dire of circumstances had made the moments where she couldn’t shut herself up more often than she’d care to admit--when an arm that felt as though it was made of steel and iron was pinning her left arm to her back as a knee, which she assumed belonged to the owner of the steel and iron arm, slammed into the middle of her back and began forcing her to the ground.
In the split second before her face made contact with the gravel on the rooftop, Mari had one single thought racing through her head.
She knew this hold.
She’d done it a thousand times in the back alleys of Paris on odd nights.
This was the hold that would break your arm if you struggled.
The hold designed to keep the victim still and in pain.
The hold to intimidate and contain.
The hold made for criminals.
Hah.
No.
Faster than even she expected, Mari twisted her body completely around and successfully out of his hold, eyes narrowed in determination.
C R A C K
‘Well.’ Mari rolled away from her attacker, clutching her broken arm to her chest. ‘That’s going to be hard to explain to Mlle. Bustier in the morning.’ Mari recovered quickly--She'd felt more pain than a broken arm and won a fight before: and a non-functioning arm wasn't going to stop her now.--and regained her footing just in time to see a young man, probably about her age, in a truly shocking outfit with the most bizarre color coordination she had ever seen-- Okay not the most bizarre. She'd fought Akuma after all, and some of those deserved to be taken down on their fashion sense alone--pull out a katana from seemingly nowhere.
‘Wait…’ She thought as she dodged the katana swipe and dropped to the ground in attempt to swipe his feet out from underneath him. ‘Him and his traffic-light costume look familia--’
“Robin!”
Marinette froze as none other than Batman--The Actual Honest To Goodness Batman--swung onto the roof just behind her attacker.
Mari would’ve fangirled if she wasn’t so high on caution juice.
“Father,” apparently-Robin said, not breaking eye-contact with her, the blade of his katana less than an inch from her throat now that she wasn’t fighting back.
‘Wait… wait, isn’t that called adrenaline?’
“Robin, why were you attacking a civilian.”
‘Oh glory Batman is speaking to Robin, he’s speaking with Robin and they’re talking right in front of me--’ Mari blinked. ‘Civilian?’
“Tch,” Robin’s lip curled slightly, though otherwise he didn’t move. ‘Oh. Right. I’m not wearing my mask. “Father this isn’t another civilian.”
‘I mean he’s right, but I’m right here--’
“She’s clearly a villain.”
‘Okay WHAT?!’
“And what makes you say that?” Mari’s mouth moved in her own defense before she’d formed a proper argument.
‘FrICK.’
Silence.
Silence punctuated by Batman’s stare.
Which of them he was looking at was a mystery, but he punctuated the lack of noise nevertheless.
‘I’m sorry Batman: One of us is going to die tonight and it’s probably going to be me if your son doesn’t say something soon.’
“Tch.” Robin’s head rolled slightly to the side; an exaggerated eye-roll if she’d ever seen one. “You’re up here, alone, ballet dancing, and humming a stupid creepy tune.” Mari blinked at him incredulously. “It’s highly unusual in Gotham for anyone to preform their own... musical theater routine, at 4 in the morning mind you, unless they’re extremely unbalanced and have a bomb planted sixty feet below the mayor’s office.”
“You…” She took a deep breath in, moving her broken arm as carefully--and casually--as she could. “You tried to knock me unconscious, fight me, and potentially take me to a police station for questioning... because I was awake at 4am.” Well, if Batman’s stare wasn’t burning holes into Robin’s head before, it sure was now. Robin, to his credit, relaxed his defensive stance slightly, even as a scowl darker than any she’d expect on his face dragged whatever hope she had of reasoning down with his mood.
“Robin?”
Batman had said 9 words since his first appearance, and somehow Mari knew he was on her side.
She and her motor-mouth could learn from him.
Robin snorted softly and stuck his nose in the air, though any fool could see it was over a sense of wounded pride rather than genuine haughtiness. Or, anyone who’d been friends with Chloe for more than a week, anyway. He finally relaxed his fighting stance, however, and stood with his back ram-rod straight and his arms crossed over his chest.
“It isn’t my fault she was being stupid.”
“And it isn’t my fault you couldn’t just use basic human communication to inquire as to my true intentions.” Being starstruck is overrated.
“If you were really a villain you’d take advantage of that.” He snapped, glaring at her.
“If I were really a villain,” Mari retorted with a scoff. “I wouldn’t be stupid enough to dance out in the open in celebration of my latest unfinished scheme.” Mari crossed her arms. ‘Owowowowow no that’s bad don’t move broken arm that hurts--’ “Especially not when it’s nighttime and the Batman Squad are out and about. Besides, you can be physically prepared for an attack while still brokering a deal. It’s how being a superhero is supposed to work, isn’t it? Get the villain talking so you can assess the situation and the threat without potentially risking any civilians in the way?” ‘I just back-talked Robin. And by extension, Batman.’
Mari could feel her blush burning her skin to ash.
‘Batman please take your son and leave so I can die in peace I’m--’
“You’re very correct, Miss.”
‘S a y f r e a k i n g w h a t n o w.’
Mari whipped around, her loose hair smacking her in the eyes as she did so, to see The Actual Freaking Nightwing standing on one of the rooftop gargoyles and grinning at her.
Her heart had stopped functioning a long time ago, and it appeared her lungs were now bent on doing the same.
“Being a superhero is about more than just punching crime in the face. Though I gotta admit that’s the fun part.”
“Until crime punches ya’ back,” the ghost of Marinette’s soul replied through her somehow still-living body. “Then you just have a black eye, injustice, and a whole lotta paperwork.” Nightwing burst out laughing, and slid off his gargoyle to walk over and give her a clap on the back.
“It’s official,” he said, his grin wide and friendly. “You’re my second-favorite civilian.” Mari’s soul transcended to the next dimension. “What’s your name, kid?”
“I-I’m Marinette Dupain-Cheng, monsieur.” ‘I’m Freaking Nightwing’s Second Favorite Civilian. How in the ever-loving hECC, did I end up here? How has my life come to this? Is this where I die?’
“A pleasure to meet you Marinette,” Nightwing said with yet another grin, as he stuck out his hand to shake. “I’m sure you already know who we are, but based off your French accent you probably aren’t from ‘round here: I’m Nightwing.” He gestured to Batman’s looming figure. “The silent Night is Batman, and--”
“I suppose Traffic-Light boy is Robin, then?”
‘MOUTH WHAT THE HECK YOU CAN’T OPERATE WITHOUT EXPLICIT PERMISSION FROM THE BRAIN WHAT ARE YOU DOING GOING ROGUE LIKE THAT YOU’RE OFFICIALLY ON PROBATION--’
“No-- wait I'm sorry I didn’t mean it like that I swear--”
It was too late.
Robin had frozen in place, his face a mixture of shock and an emotion she couldn’t place.
Nightwing was doubled over with laughter.
Batman’s face seemed to always be an emotionless, impenetrable mask in the short time she’d known him, but Mari could’ve sworn she saw the faintest of smiles. It was gone in a moment, but it was there.
Marinette Dupain-Cheng had made Batman, actual honest to goodness Batman, smile.
Well, if she wasn’t dead before, she was now.
“We’re sorry for the trouble Miss Dupain-Cheng,” said Batman when it seemed like Nightwing wasn’t going to recover anytime soon. “I hope Robin didn’t hurt you too badly.” Marinette welcomed the distraction, though she was still redder than her hoodie. She waved her non-broken arm dismissively.
“He didn’t, Monsieur Batman. Je--err, I, am perfectly fine. I’m sorry to have disturbed your patrol.” Batman gave her the tiniest of nods. “Now, if you don’t mind, I think I'll get back to my room. It’s very late after all.”
“Enjoy your evening, Miss Dupain-Cheng.”
“You too, mon--err, Sir.” Marinette started walking toward the side of the building to climb back down, when a door in the center of the roof caught her attention.
Oh.
She paused halfway to the entrance, gnawing at her lip.
Mari turned around sharply.
“Robin?” The three caped crusaders paused. The boy in question gave her a sidelong glance, shooting her a quizzical look that may or may not have been laced with faint distaste. Not that she blamed him. “I’m sorry for any trouble I may have caused.”
He stared at her for a moment, his face expressionless for a moment.
“I’m sorry too. I hope I didn’t hurt your arm too badly.” he nodded to her curtly. “Have a good night, miss.”
And then they were gone.
A wave of exhaustion hit her like a truck, and she had the sudden realization she was supposed to be asleep at 4:30 in the morning.
She turned and opened the rooftop door, thanking anything and everything that the door was unlocked, and closed it softly behind her, leaning heavily against it and biting back her groan of pain.
Hiding a broken arm was painful.
Mari stared at the ceiling for a few seconds, absorbing everything that had happened.
Her face split into a joyous beam.
Adrien and Chloe were going to go berserk tomorrow.
~~~~~~~~~~~~~~~~
BONUS:
Nightwing: “Hey, B-man. Bat-guy. Bro-man. Bat-dad. Can we please keep her? Please?”
Batman: “Not that it’s up to me, but we can’t. At the very least not unless she can fight.”
Robin: “Father, she broke her arm getting out of my hold and didn’t bat an eye at it.”
Nightwing: “The bean did what now.”

(also have a sketch i did. i’m sorry it’s not great but i just... i lov her okay?)
::You are here::Part 2::Ao3::
#Ayyyy another Maribat/Daminette Thing Lookit that#daminette#ml/dc#miraculous / DC crossover#maribat#Chance!Au#yoooooo#damien is sooooooo screwed lmboooo#also#what am i doing with my life#i'm writing crossover fanfic#(my first ever fanfic mind you)#with one show i'm super salty about#and the other is one i've never seen#what's wrong with me#Miraculous Bat Bugs#I don't really have a name for this au#other than Chance#so name suggestions are v helpful#idk man#it's also rough#because it's 1:32am#and i said i'd post it on sunday#but if i don't post it now i'll forget#bc i'm a fool#and also babey#ALSOALSO#THERE IS NO WAY DICK DOESN'T PROTECT MARI UNTIL HIS DYING DAY#OVERPROTECTIVE OLDER BROTHER DICK GRAYSON IS A HILL I WILL DIE ON#JASON WILL BE THE SAME
1K notes
·
View notes
Text
Illusion - Evaluation
The “Illusion” project was about creating photo-manipulation with use of two still life images and combining them in Photoshop by using layer masks.
At first I really struggled with an idea for this project, I couldn’t find anything that would create something interesting, but once I “unlocked” my imagination I found a lot of different ideas.
I sketched all my ideas, then choose the one I liked most. during the selection, I was also guided by the fact that my design was not too complicated and the shapes were similar. What mattered to me was to do the best possible result but also not to make my work difficult because due to the restrictions that now exist, I couldn't spend a lot of time on this project because I have other responsibilities.
I chose to combine chocolate box with scrabble - instead of chocolate bar coming out of box I wanted to swap it with scrabbles.
Before I started to take photos I made sure I have everything I need to make it succesfull. I prepared and checked all the equipment like: camera, lens, tripod, lights, backgrounds, reflectors, flags, diffuser and props. As a place for setting up my mini photo studio I chose my bedroom. I had to make sure I have easy access to the power socket to plug in lights and most importantly that it is safe to walk around for my daughter - safety first.
I did three photo shoots for this projects, the main things I wanted to achieve:
- light/ shadows coming from the same side for more realistic look
- soft lighting, I used diffusers made of white tissue paper
- the objects needed to be cut in post production that’s why I photographed them on the background that was different color than objects - white for chocolate and black scrabble
- I wanted the object to be sharp and clear that’s why I chose to set up camera on the tripod and settings to f/5.6 and ISO 100
- I wanted to keep nice shape of both objects and separate it slightly from the background so I putted a box underneath
- I used silver sided reflector situated above the object to pop out golden lines/sign on the box
It took me some time but I enjoyed the process of creating those images and learned a lot from it.
Meanwhile, in class, I was learning how to connect these images, how to use layer masks, selecting tools and blending modes. I was able to find a lot of very useful resources and step by step tutorials on MyCity.
While working on the final image in the Photoshop I was gaining my knowledge and confidence with working with layer masks.
Tools I used in Photoshop:
- layer masks
- selection tools
- gradient/ solid color for background
- blending modes
- brush tool to reveals/conceals pixels
- marquee tool to create shadow
Summing up the whole project I learned a lot new things from taking photos of still live in home studio to putting together two images in Photoshop. I feel more confident with Photoshop software then I was before and I started to like using it :)
4 notes
·
View notes
Note
Hey! I really love your edits and the way you make the colours pop! I've messed around with gif making but never quite got how to make something so bright and colourful (much like your recent Pride ST upload). Is it honestly just playing with selective colour a buncha times or is there more to it? I don't know the right term so I can't look up a how-to. Unless you can point me in a direction? Sorry to bother you but I very much appreciate the help! 🙏��
honestly its a lot more than just messing with selective colors but its also hard to explain. ive been giffing for about 8 years now and its all trial and error. here is a tutorial i did a while back on how i color gifs and here is a base psd i use a lot. from there here are some tips:
when you mess with selective colors, make sure to make a different selective color layer for each color ie mess with yellow on one selective color layer and red on a different one. that way if you need to go back and change something you can easily know which layer has which adjustment
color balance is also your friend! i use color balance a lot to get a yellow scene more neutral (and tua has a lot of yellow-based scenes) but also to get whatever color i want to highlight to pop more. mess around with it and see what you like!
try to mess with gradient masks or brush layers. start a new layer and either using a brush with a soft edge or low opacity or the gradient tool with transparency to add some color to the gif. i use this a lot. the next step is important though! you want to set the layer settings (like where it says normal next to it’s opacity) to a different setting. i usually use overlay, soft light, hard light, screen, or color most often but see what works for you!
the most important step is to try new things! i’ve used the word “mess” a lot in this because that’s exactly what you’re doing, messing around. nothing has to look amazing on the first try (believe me my gifs have improved a ton over the past years) so just have faith that everything you learn is one step toward becoming better!
i’ll link some more tutorials that i have found that have helped me in the past:
x x x x x
and as always my ask box is always open for more detailed advice, tips, tricks, or resources !!
#yeahps#photoshop#psds#photoshop help#gif tutorial#im thinking about starting a resource blog because i just have so many things bookmarked askghlgd#tamsly#mine:resources
32 notes
·
View notes