#all resources free use on canva
Explore tagged Tumblr posts
Visit Tumblr Blog
Explore Tumblr blogs with no restrictions, modern design and the best experience.
Last Seen Tumblr Blogs


Fun Fact
Tumblr Inc. is using 66 technologies for its website.
Text

PNGS of Barbarian, Paladin, Bard, Artifiter, Warlock, spores druid are available Here I will add more classes as I go, message me for a custom one ♥
#d&d#dnd#d&d resources#session template#d&d notes#og content#character sheet#session notes#all resources free use on canva#dungeons and dragons
6 notes
·
View notes
Note
Do you have tips/suggested websites and apps for Japanese learning? Duolingo is a nightmare to work with for me.
Alphabet first is definitely the biggest advice
Lingodeer over Duolingo imo, it has better pacing and deeper documentation per step
Paul Noble's audiobooks was great for grammar and sentence forming (as well as getting to hear Japanese)
When you feel up to learning some Kanji, WaniKani is a site I've just bought lifetime membership for, it really works for me
I just started playing Learn Japanese RPG: Hiragana Forbidden Language on Steam too which is teaching me lots of phrases (and helps refine alphabet)
Also the YouTube channel GameGengo is a personal favourite as he uses games as his canvas for teaching which I enjoy
Corocoro comic in Japan is like Shonen Jump but for younger kids. It has furigana meaning you can easily use Google translate to slowly self translate and learn. They have tons of their comics free on their website
Then aside from random TikTok creators I follow I think that's all my learning resources currently. HEARING Japanese is just as important as reading it, so you can get used to pronunciation and the like - I listen to Japan Top 50 on Spotify, watch anime (obviously pronunciation is exaggerated there) and podcasts exist too so you can hear it, even if you don't understand what's being said
Edit: I can't believe I forgot to mention HelloTalk, I basically use it like Twitter but for JP / ENG crossover posts. I ignore a lot of its other features
And once you're feeling more confident Todaii has daily articles from Japanese media with labelling for N5 and beyond levels (lots of furigana too)
565 notes
·
View notes
Text
some graphic design resources cause im bored and itching to write something but i cant write anything i'm happy with--- anywayssss
unsplash for lots of royalty free pics
heres a cool site to learn how to pair fonts together
heres another site to learn kerning [spacing]
in fact heres a bunch of games to help u get better at graphic design stuff
some free online video editors x x x
color accessibility resources :]
savee.it - like pinterest but for designers!! unfortunately it has a save limit for free users but u should still be able to browse it for inspo i think?
some free fonts
aside from coolors i really love adobe color!! it has color palette generator [triads, monochrome, complementary, etc.], accessibility tools, palettes+gradients extractors, and color palettes inspired by trends within diff industries.
make moodboards online for freeee i miss u polyvore
spline and womp for web based 3d design! + blender of course [go make that donut!]
we all know and love them: photopea [photoshop but free and on a browser?!] and canva [no introduction needed im sure]
upscale the resolution / quality of pics it says anime but it works really well with most stuff like video game screenshots [gets rid of hard edges/pixels]
typography inspo
more color palette generators [already meets accessibility guidelines]
filmgrab - a curation of movie scenes 💕
here's another one but for color palettes from films
more inspo and tutorials
cargo - for web design stuffs
an archive of BRANDING GUIDES
free online zine hosting
milanote - very very useful for organizing creative projects :D kinda like a mix of notion and pinterest ? [its basically notion but more visual]
a collection of free luts
lots of pngs for editing
freepik - lots and lots of free design assets.
flaticon - lots of flat icons / vectors. i haven't used this in a while, but it was free last i checked
in case u need more help pairing fonts go here and here
idk ilu all have fun!!!!
4K notes
·
View notes
Text
#mARTch 2024

text version (with more info!) under the readmore! please check it out if you're confused about anything <3
F.A.Q
do i have to draw every day? no!!!! there are skippable days built into the event, please use them whenever you need them! i really don't want anyone getting a wrist injury!
can you share my art? yep! i try to share entries to @bweirdevents daily during the event!! the tags can get busy tho so i might miss some posts OTL sorry
what are the tags? #mARTch is the main tag, but this year you might find posts in #mARTch2024 too!
wait, i'm confused about a prompt... full breakdown of all the prompts below ↓ with helpful hints if you're stuck!
_____
INTRO WEEK
this week is all about your artistic identity ... technically, you don't have to draw anything new this week if you have some art that already fits. the starter days are:
1 ⭐ self portrait who are you? it doesn't have to be you IRL .. if you feel more comfortable drawing a fursona or mascot, that's fine too! if you don't wanna draw, you can also just share old self portraits today and talk about why you drew yourself that way!
2 🤍 inspirations see how this day doesn't have a star? that means it's optional and you don't have to do it at all! but if you really wanna- tell us all about what inspires you to create art! this could be anything from the people that inspire you, the shows you like, the pins on your big messy pinterest board, or concepts that you're drawn to! you can draw something about it, talk about it, or just post your inspirations! anything is fine
3 ⭐ fav thing to draw what do you like drawing most? backgrounds? animals? one specific animal? bust of your oc facing left? cars? the same anime boy over and over and over? no judgement!! show us :)
_____
STUDY WEEK
this is the week we actually start drawing from reference! polished art is not required at all, quick sketch studies are fine! please don't burn yourself out
4 🤍 plant
5 🤍 body
6 ⭐ animal
7 🤍 object
8 🤍 food
9 🤍 face
10 ⭐ hand
these ones are pretty self explanatory! you can do them as realistic studies, or adapt them into your own art style, it's all fine! you can reference from your own photos or from resources on the web.. have fun!
_____
COLOUR WEEK
this is the week for playing with palettes and working on your colour theory skills! if you're really struggling with these ones, don't worry about drawing scenes or characters, you can just have fun splashing colours around on an abstract canvas!
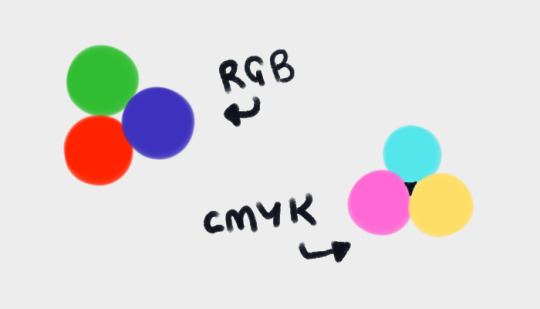
11 🤍 RGB a set or primary colours typically used in digital/screen art - red, green and blue!
12 🤍 CMYK a set of primary colours typically used in traditional/print art - cyan, magenta, yellow ... and key (black!)
for both of these days ↑ you can add in black and white. and feel free to combine the two days into one, if you're struggling with a three-colour palette! use all six!
13 ⭐ WARM COLOURS the warm side of the colour wheel, reds oranges and yellows!
14 🤍 MONOCHROME monochrome doesn't mean black and white ... it means one colour! that can be any colour at all- shades of red, shades of purple, shades of green .. or yeah, grey if you really want!
15 🤍 COMPLIMENTARY complimentary colours are the ones opposite each other on the colour wheel! they're kinda married

16 🤍 YOUR FAV COLOURS pick any palette that works for you! where's your comfort zone? what looks nice to you? what colour combos do you always go back to?
17 ⭐ COOL COLOURS the cool side of the colour wheel, purples, blues and greens!
_____
CREATIVITY WEEK
this week is all about vibes! try to create something that matches the mood of the prompt .. they're vague on purpose! don't overthink it, just draw from the heart!
18 🤍 SMALL you could draw something that's really small, like an ant .. or draw on a canvas that's really small .. or use a really small brush .. get creative with it!
19 🤍 DANGER try to capture the adrenaline .. the rush .. the fear that you associate with the word danger!
20 ⭐ SOFT soft colours, soft textures, soft vibes ... whatever makes you comfy!
21 🤍 MIDNIGHT darkness and secrecy .. spooky witchy vibes .. the tranquility of a forest at night .. the fun of a late-night party .. there's lots of ways you can take this!
22 🤍 POWER what does this word make you think about? superpowers? control and oppression? literal electrical power? something else?
23 🤍 CHILL chill as in calm? or chill as in cold? who knows .. it's up to YOU!
24 ⭐ LOUD try to draw something that feels LOUD! BRASH! IN YOUR FACE! how can you convey sound through art?
_____
FUN + GAMES WEEK
this week is just for enjoying yourself! take it easy and have fun! also .. another reminder! there are skippable prompts! if you're tired and struggling to get to the finish line, please don't hesitate to skip a day!!! or multiple days!! as many as you need!!!
25 🤍 TRY A NEW ART STYLE copy the art style of a show you like, ask a friend if you can try their style, draw the eyes a new way, develop a totally new style on the spot... whatever you want!
26 🤍 DRAW WITH YOUR NON-DOMINANT HAND righties, draw with your left! lefties, draw with your right! ambidextrous nation ... our time to show off!
27 ⭐ DRAW WITH YOUR EYES CLOSED don't peek! try to draw something without looking! if you really want, you can colour it with your eyes open after you draw the lines/sketch with your eyes closed... but please try not to cheat with the actual drawing part!
28 🤍 RE-DRAW SOMETHING OLD find some old artwork you like, or something you feel like you can do better on now, and give it another go!
29 🤍 RE-DRAW A MEME find a silly picture on the internet to redraw .. do you have any in-jokes with your besties?
30 🤍 DRAW A GIFT FOR A FRIEND create something for someone you love <3
31 ⭐ FREE CHOICE final day! you can draw anything you want today! show off your skills! draw something you've been meaning to draw! whatever!
_____
please refrain from reblogging this post after march ends - next year's prompts will be different, thank you! if you have any additional questions, don't hesitate to shoot me an ask!
947 notes
·
View notes
Text
Writing Notes: Book Cover

“Don’t judge a book by it’s cover!” We’ve all heard the phrase and we all know that’s impossible. Because the cover of a book is the first thing a potential reader sees—it should stop them in their tracks. It’s a very powerful marketing tool; having a well-designed book cover is crucial.
Tips for Making a Great Book Cover Design
Using more than two to three typefaces on a cover is discouraged, as it can look really messy.
Keep things simple. Your cover will be in a sea of other covers so try to keep your design from getting muddy and make sure it stands out.
Show your designs to people who have a design eye and/or you trust. It’s great to get feedback.
If you hire a professional designer, write a brief and send them info. Be really clear on what you want. Designers usually do a certain number of design rounds included in the agreed upon fee and any extra rounds of design will be extra.
If you hire a professional designer, they will likely have ideas about printing and may have connections to printers. They are a resource so don’t forget to ask questions.
Don’t forget: a book cover is an important part of selling any book. Whether you decide to do it yourself or collaborate with a professional, pay special attention to this part of the process, as a great cover goes a long way.
6-Step Guide: Professional Book Cover
STEP ONE Generate Ideas. Look around at book covers you like. Go to a bookshop and peruse what’s currently happening in book cover design. Take notes of what elements you like on the cover image. A certain typeface? Color? Do you prefer an image or an illustration or something purely typographic on the cover? Another option is to create a mood board. You can use a platform like Pinterest or Evernote, or create a folder on your desktop, and pull book cover inspiration from the web. While you’re gathering inspiration, keep in mind what genre your book is and what kind of book design feels appropriate.
STEP TWO Find a Designer (Who Could Be You!). Do you have design skills? If so, your next step is to begin layouts and mock-ups of the covers. You should use whatever software program you are comfortable with. Most professional book cover designers use a program from the Adobe Creative Suite:
InDesign. InDesign is a multi-page design platform but can also be used for single page design.
Photoshop. Used to manipulate and experiment with photography.
Illustrator. Illustrator is a vector-based program, which means you can create graphic art that can be scaled up or down without loss of quality.
Photoshop and Illustrator. These can also be used together as you can bring your Photoshop file into Illustrator to set the type after you have worked with your cover image.
If you don’t have design skills, now is a great time to hire a book cover designer. The first step is to figure out what kind of budget you have for this. A designer’s fee will range depending on their expertise. Get a figure in mind and then write a design brief which should include the book specs:
Size
Print-run
Intended audience
Where and how the book will be published
Anticipated publish date
You should also include a summary of what the book is about and what you are looking for in a cover. Also share the inspiration you’ve gathered with the designer.
If you don’t have design skills but want to create the cover without the help of a professional, there are a few software programs you can use, such as Canva or 100 Covers, design tools that allow you to DIY the cover (for free or a fee).
STEP THREE Decide on the Dimensions. If you’re self-publishing and printing with a local printer you can work with them to make sure your book dimensions will fit on their printer (remember a book prints front, back, and spine in one sheet of paper). It’s also a good idea to find examples of books whose size you like and feels good to hold. Use that as a jumping off point for your book.
Book Cover Dimensions List. If you are printing for a specific market, from print to ebook, here is a handy list:
Amazon Kindle Direct Publishing File Format: JPEG or TIFF Cover Size (Recommended): 2560x1600 pixels Cover Size Requirements: between 1000x625 pixels and 10,000x10,000 pixels (one side must be at least 1000)
Apple iBooks File Format: JPEG or PNG Cover Size (Recommended): 1400x1873 or 1600x2400 pixels Cover Size Requirements: at least 1400 pixels wide
Barnes & Noble File Format: JPEG or PNG Cover Size (Recommended): Rectangle height and width, at least 1400 pixels Cover Size Requirements: Min. 750 pixels height and width
Kobo Books File Format: JPEG or PNG Cover Size (Recommended): 1600x2400 pixels Cover Size Requirements: Min. 1400 pixels width
Smashwords File Format: JPEG or PNG Cover Size (Recommended): 1600x2400 pixels Cover Size Requirements: Min. 1400 pixels width Draft2Digital
File Format: JPEG Cover Size (Recommended): 1600x2400 pixels Cover Size Requirements: Tall rectangle
STEP FOUR Choose Your Style
Photo-based cover. If you’re creating an photo-based book cover, you’ll need to source stock imagery. There are lots of great resources online to find stock imagery including ShutterStock, Getty Images, and Adobe Stock. (Keep in mind: most photography archives require payment to use their images. Always investigate the copyright of images you’re interested in using.) Look for images that convey or allude to your book’s genre. You can use programs like Photoshop to manipulate your image, making it black and white instead of color or cropping it in a certain way.
Illustration-based cover. If you’re considering a more graphic approach to your cover, Illustrator is the tool to use. You can bring hand-drawn drawings into it and outline them to create scale-able, high-res illustrations which you can manipulate within the program. You can also create shapes, patterns, experiment with typography within illustrator and play with color, transparency, size and much more.
Typography-based cover. Finally, many successful book covers use typography as the main graphic device. This takes some skill and knowledge of typefaces, the historical context of a typeface, and how to manipulate it thoughtfully. That said, using type as a graphic can be very impactful.
STEP FIVE Pick a Typeface (Font). No matter what kind of cover you are designing, you are going to need the title of the book and the author’s name on the cover. As mentioned above, picking an appropriate typeface is very important. You want to pick something that feels right for your book—is it a sans serif or serif? A heavy weight or lighter weight? You want to make sure it’s not something with a lot of baggage, like Comic Sans or Papyrus. It is a good idea to actually do a little research on when, where, and who your typeface was designed by to give you context and feel out if it will be right for your book. You might also consider using up to two different typefaces, one for the title and one for your name. A serif and sans-serif mix can give a bit of contrast and visual interest. There are some typefaces that pair really well together. Check out the website TypeWolf to get ideas of what fonts pair well together.
STEP SIX Test, Tweak, and Repeat. Once you have a few versions of your cover, print them out on your home printer and take a look with a critical eye. Does the type size feel chunky? Too bold? Too small? How does your image look? Is it cropped right? Are the lines of your illustrations too thin and not showing up? Go back and refine your design and then repeat! Don’t forget to look at your book cover as a small thumbnail as well. People are on their mobile phones and you want to make sure your cover still stands out and is impactful.
Book Cover - serves as your first impression with potential readers—and though book covers don’t always look the same, they do tend to contain the same essential elements.
Design standards may be different in the world of traditional publishing than they are in self publishing, and book cover templates for physical paper books may differ from those of ebooks—but they all serve the same purpose.
Some Functions of a Book Cover
A book’s cover provides essential information. At its most elemental, a good cover includes a book’s title, the author’s name, the publisher, and the price.
A good cover offers clues about your book’s content and tone. Your cover design indicates whether your book is a work of high-minded literary fiction, a pulpy page turner, or a compelling work of non-fiction.
A front cover reveals a book’s genre. You can usually tell if you’re holding a thriller, a memoir, a sci-fi epic, or a nineteenth century classic just by looking at a book’s cover art and typography.
A back cover offers broader context. It may feature quotes from reviewers and fellow authors. Softcover books may contain a plot summary or author biography on the back; those summaries and bios are typically moved to the inner flaps of a hardcover book.
How to Hire a Professional Book Cover Designer
Book covers are marketing materials, and a well-designed professional cover can make your book stand out among the competition. If you want someone with expertise in the realm of cover design to work on your book, you may want to hire a professional book cover designer. Here are some steps to consider when hiring creatives to design your book cover:
Hire a cover artist. A cover artist produces the cover art and imagery that will appear on your book cover, either on their own or with heavy input from an author or publisher.
Hire a graphic designer. Certain graphic designers specialize in layout; they incorporate cover art that you provide them—whether that’s an original illustration, photograph, or even a stock image—into the overall design of the cover.
Find a cover designer online. Reedsy is one of a number of online resources for independent authors, self-publishers, and anyone connected to the world of books. Many professional book designers list their services on Reedsy.
Use your personal network. Seek out writers’ groups, either locally or on Facebook. In these groups, people share professional referrals and help support one another when a member has a new book in the works. A group of like-minded individuals can be an invaluable resource when creating your own book cover for the first time.
When to Call a Pro:
You have a budget (a designer’s fee will vary depending on experience and location).
You have enough time to work with the designer.
You have a clear idea of what you want or at least what you don’t want.
You don’t have any design skills.
You don’t want to invest in the design software.
Your book isn’t selling.
How to Design a Book Cover Yourself
If you don’t have the budget for a pro designer or just have a DIY itch you want to scratch, it is easier than ever to design your own book cover. While it may not be quite as rudimentary as when you covered your textbooks in a brown paper bag back in fifth grade, modern technology has made cover image design accessible to anyone with a computer. Here are some tips:
Use a template. There are numerous websites that offer book cover templates and step-by-step tutorials covering basic cover design skills. Some even have a free book cover creator tool, along with cover ideas, design tips, pre-made design templates, and digital cover image tools.
Use standard design software. Book covers can also be made using standard home computing software including Photoshop, Microsoft Word, and even (with a little sweat equity) Google Docs. This is particularly easy if you are importing a pre-made cover image from another source.
Make a prototype. The process for assembling a book is straightforward and satisfying. If you want to test out how your book will appear in print, you can learn to bind a copy yourself.
When to DIY:
You don’t have any budget for design.
You have design skills to do it yourself.
You have the design software.
You have a template and know exactly what you want.
You have people with an eye for design that can guide you.
How to Make a Hardcover Book
So you’re ready to bind your own book. Here’s what you’ll need:
Content, of course.
Uncoated printer paper for book pages
Decorative paper for endpapers, such as wrapping paper or cardstock
Davey board (aka bookbinder’s board), thin chipboard, or cardboard for the book covers
Craft knife
Polyvinyl acetate (PVA) glue such as Elmer’s glue
Hot glue gun and glue sticks
Ruler or straight edge
A long stapler
Thin fabric or book cloth for cover
Binder clips
Thick decorative paper (optional, for dust jacket)
Paper trimmer (optional, for trimming book pages)
Paintbrush (optional, for spreading glue)
There’s more than one way to bind a book, and you’ll find tons of great tutorials online for making homemade books, including Japanese bookbinding and perfect bound softcover books. The most popular style of hardcover book binding is called case binding, which is traditionally done by stitching pages together with thread. Here is how to make a hardcover book step-by-step—no sewing or special materials required:
Assemble the content. The number of pages and the type of paper you work with depends on whether you’re binding a novel, a full-color photo book, or a sketchbook. Familiarize yourself with the format by taking some hardcover books down from your bookshelf and observing how they were made.
Format your pages. If you’re creating a blank book, you can skip this step. If you’re printing a book with text, you'll need to format the text so that you can print it into a book. You can get help with this at a copy shop, or you can download book design software and print at home. Eventually, you’ll end up with a PDF with a page count. This page count has to be divisible by four so that your book can be bound as folios made up of eight sheets of paper (32 pages) each. You may need to add some blank pages at the end of the book to keep your page count correct for the folios.
Print and fold. Once all of your pages are printed, fold pages in half and stack eight within each other, making sure the pages are in the correct order. Staple the folios together in the folds, alternating the location of the staples so that you don’t end up with a bulge in the spine.
Bind your folios together. Arrange all of the folios in the correct order and flatten them between heavy books. Once your folios are flat, it’s time to glue them together. Hold the folios together with binder clips and use a glue gun to glue the folios together along the stapled edge. This will become your book’s spine. Be careful not to overdo it on the glue: Use just enough to keep the folios together. Before the glue cools, use a thin piece of fabric to cover the spine only.
Even out the pages. Carefully trim the edges of the pages with a paper trimmer or craft knife, if needed.
Make the hardcovers. Cut two pieces of cardboard for the front and back covers of your book. For the spine, cut a piece of cardboard that is the same height as the front and back covers, with a width equal to the thickness of the spine plus the front and back covers.
Attach the hardcovers. Paint the cardboard (both covers and the spine piece) with a thin layer of PVA glue and attach to the cloth you’ll use to cover your book, leaving a space between the covers and the spine equal to one and a half times the thickness of the cardboard. Let dry.
Assemble the book. Use PVA glue to attach the fabric-lined spine of your bound folios to the cardboard spine. Keep the book propped up between other books while you wait for it to dry.
Attach the endpapers. Trim the paper lining so that it’s twice the size of the first page and fold it in half. Paint glue onto the inside of the front cover and the front page, and attach paper lining. Repeat with the back cover.
Make the dust jacket. If you’d like to cover your book with a dust jacket, measure a piece of thick decorative paper as tall as your book and as wide as the entire book, plus a few extra inches to fold over the edge of the cover. Fold the dust jacket over the bound book. Lay another heavy book on top of it to help the dust jacket keep its shape. This is the place to add a cover design, if you’d like.
Sources: 1 2 3 4 ⚜ More: Notes & References ⚜ Writing Resources PDFs
#books#book cover#writing tips#writeblr#booklr#literature#writers on tumblr#writing reference#dark academia#spilled ink#writing prompt#creative writing#bookblr#writing inspiration#writing ideas#writing advice#on writing#light academia#writing resources
113 notes
·
View notes
Text
Typesetting Tips 4.5: Graphics/Images
One common question I see popping up for people getting into making books/typesets is 'where do I find graphics/images to decorate my books with?' And of course, that's with the caveat of 'and they're free'.
Thus, this is a continuation of my old post on where to find graphics/images to use for typesetting/book design. Because it's been half a year since then, and while I am very much the same amateur typesetter I was then, I am now a slightly older amateur typesetter---who knows more websites!
(I'm including websites I've listed before so that all the links are in one post)
All these sites have free offerings to varying degrees. Personally, I haven't had to pay anything so far for that I've used. If you see something you like that's locked behind a paywall, try to reverse google search it to see if there's a free version out there! I've seen a lot of these sites upload the same images. Also, be careful of AI!
Graphic/Image Resources:
Archive.org - Internet Archive. Not as easy to download or use images from, but there are a lot of cool resources there if you have the time.
Canva - Easy to use for beginning design work. I recommend taking advantage of their month long free trial (I found it easy to cancel as well when it was over), but do not recommend subscribing.
Creative Fabrica - They send out a lot of free bundle promos in their email subscriptions. I mostly use them for fonts but they do have a lot of free resources for crafting.
Exotic Animal Photo Reference Repository - This is an animal photography database by @why-animals-do-the-thing! They have a lovely growing repository that's both education and free! Just be sure to ask permission and credit and link to them if you to use their work!
Freepik - More free stuff! I haven't used it a lot yet, but I've seen this site recced by others.
Heritage Library - Lot of neat pngs/vectors. Especially great if you're looking for vintage/nature images.
Pixabay - Royalty free and under the Content License
Rawpixel - Probably the site I use the most. I sort to exclude all the AI images and just use the free/public domain stuff.
Noun Project - Lots of icons available. Tend to be more minimalistic and simple. I know a lot of bookbinders use this site, though I haven't explored it much.
Smithsonian - The Smithsonian Open Access is free database from the Smithsonian with millions of images available.
Streamlinehq - Another site with a lot of free icons. Most of their really cool assets cost money, but you can sign up for free with an email address to download 10 free assets if you see something you really like.
Wikiart - Great place to look at public domain artwork.
Wikimedia Commons - (Wikimedia Commons, Wikisource, Wiki Books, etc.) Tons of stuff to sift through.
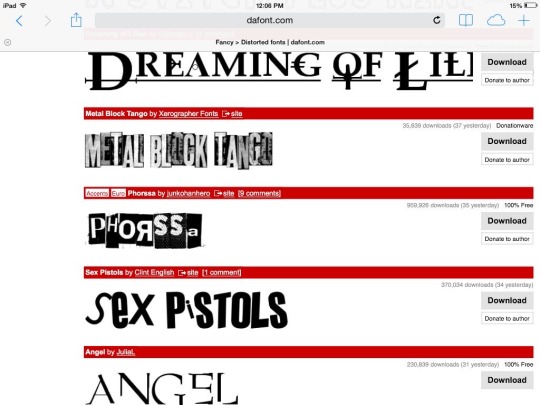
Last source: FONTS! You can go a long way with dingbat fonts for decorations! Frames, ornaments, etc. can be done with fonts. Check out dafont and other free font sites; fonts can sometimes be a lot easier to use in texts than images.
130 notes
·
View notes
Text

Amanda | Not WCIF | 18+ (Sometimes NSFW)
Find me on YouTube: Here Main series on YouTube: The Aspiring Artist | Rotational Gameplay All posts related to The Aspiring Artist can be found here. Casual gameplay posts on my blog are separate from the storyline on YouTube. All of my Sims 4 posts | All of my reblogs CAS Mods Cas background | Cas lighting (Studio flat) | Controlled Position Mod | More Cas Columns (6 columns) Game Lighting Mods In-Game Lighting (Dark) | Sunblind Gshade/Reshade I make my own Gshade presets. They are not available for download. However, here are some that I would recommend if you are looking for a preset: Boho dreams (Neecxle) | Birdie (Sforzinda) | Lithium (Gunthermunch) | Luminescent (HazelMine) | Raices (Folkbreeze) | Almond (Glimersims) | Kaleidoscope (Okruee) | White Willow (Tianaberrie) | Serenity (Misslollypopsims) | Neapolitan (Midsummermoon) Photo Resources I use SRWE for a lot of my screenshots. I take some of them on a higher resolution monitor without hotsampling. I use Krita for photo editing and sometimes Canva. I usually crop my photos and resize them for faster uploading. Check out this tutorial if you're new to hotsampling. Check out this FAQ for help with understanding reshade. Video Resources I use OBS to record my videos and Filmora to edit. I also recommend Davinci for a free editing alternative. I use this mic for narrated episodes. Essential Gameplay Mods I don't use a lot of mods because I strongly dislike updating them. But these are the ones that I consider essential for my game: Basemental Drugs (21+) | Wicked Whims (18+) | MCCC I do have other gameplay mods installed, but I don't consider most of them to be necessities. MCCC and WW handle nearly all of the background "tuning" in my game. Other Mods These are mods that I don't necessarily need, but they're nice to have: UI Cheats Extension | RPO (I only use modules 1,7, and 14) | Utopya Romance Mods | Somnik and Severinka Custom Foods | Control Any Sim (Use with caution, this mod is rarely updated) | No Zzz | No Music Notes | Let's Get Fit | Hidden Highlight | Tool | No Romantic Satisfaction Decay I vey rarely add new mods to my game, so this list probably won't change. I do remove these mods if they start causing issues. Defaults/Overrides My current default skin can be found here , default eyes here, default feet here, and default teeth here. I mostly use these skintones. Default phone | Default phone two | Toothbrush | Headphones | Male animation replacer (18+) | Terrain override I don't use custom loading screens, menu/map overrides etc. Some Commonly Used CC I use a lot of eyes from these creators found here and here. I typically use skins, skin details, and other genetics from these creators found here, here, and here.
69 notes
·
View notes
Text
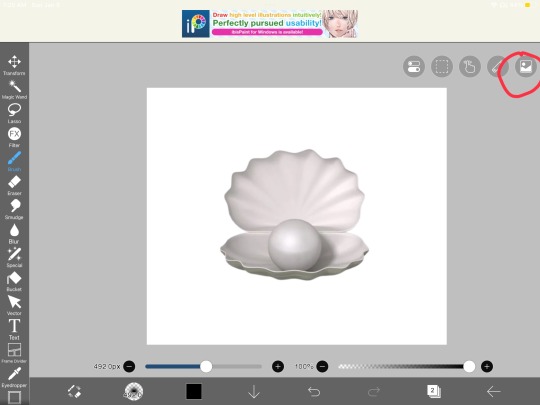
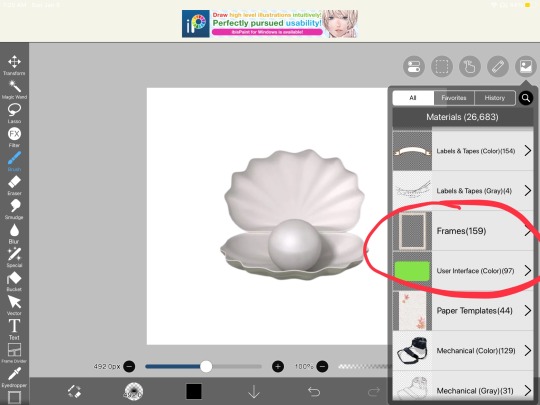
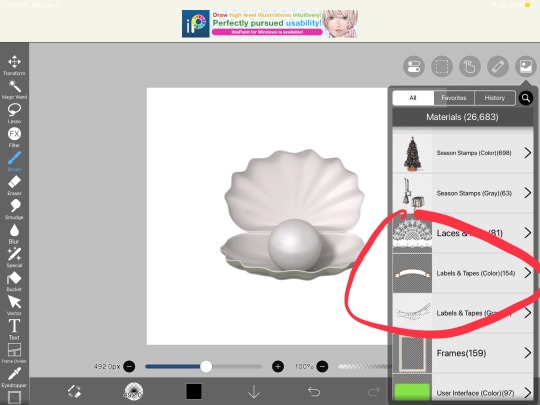
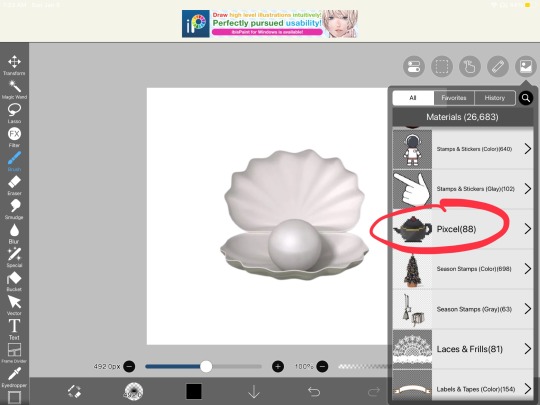
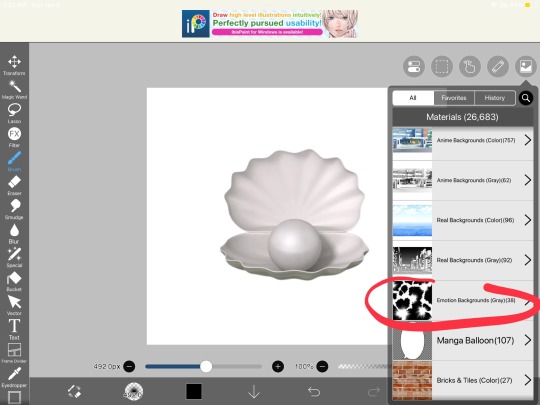
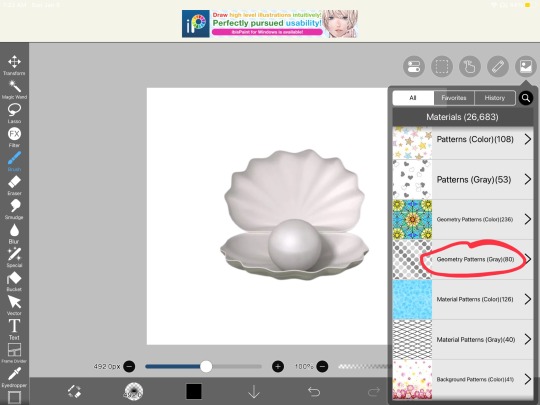
How to edit! Part 2… Tips and tutorial!
So for resources that you can find through ibispaint x, click the little image icon at the top right corner, and the ones I have circled are ones I have used or plan on using! The pixel one is usually only if you plan on making pixels/favicons !!
As far as filters go for me these are what I use and how to find them!
So for the basics of using ibispaint x.. you can figure out as you go and can probably find out the basics of the interface through their website and/or their in app tutorial as you click on buttons and such 🫶🏻 don’t be afraid to mess around with buttons, but just know if you exit out of ur canvas/project or ur app closes, you will not be able to double-tap/click to remove past mistakes or undo anything.. so like don’t mess around too much and keep that in mind while editing.. 😭 I’ve done it a few times while drawing on ibis (because I am also an artist) and editing ofc
Also DONT merge ur layers. If someone asks for proof you made ur graphic, even if you have 100 layers.. don’t merge them because all you’ll have is a speedpaint and if you don’t add ur watermark too on top of it.. they’re gonna think u stole it.. so just like keep it mind.. 😭
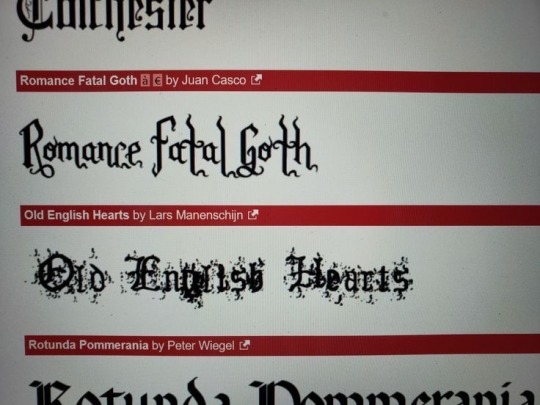

Here are some fonts that you can download for ibispaint x! If you plan on making a blog, watermark, or anything text related! Ibispaint x does have a lot of free fonts you can use through their app but having some fun downloaded fonts is also great! I used to have a massive collection but I’m on my iPad now 😭 so I have one.. it’s romance fatal goth LOL
I’ll have to make a thread for this because you can only add 10 images to ur posts so… if I have anything else to add that’s image related I’ll reblog some more things..
Pinterest is gonna be ur best-friend 😭 so is tumblr.. and rentry resources!
I’m gonna make a video on how I colour graphics and such probably tomorrow because it’s almost 2 a.m and probably will be past 2 a.m when I’m done making this..
Anyways.. HERES SOME RENTRIES FOR RESOURCESSS AND ALSO ON HOW TO GRADIENT YOUR TEXT ON TUMBLR!!
Rentry Rentry 2 Rentry 3 Gradient text tutorial!
#( ╹ ╹)? a post!#rentryblr#editors on tumblr#rentry#rentry decor#rentry stuff#editblr#tutorial#tutorials#rentry graphics tutorial#rentry tutorial#tumblr tutorial#fonts#ibispaintx
91 notes
·
View notes
Text
2024 Was a Great Year for Elriels
The end of the year is approaching, and unfortunately, there's no announcement yet, but Elriels definitely have plenty to be grateful for this year.
On the contrary... (Quick rant...I'm allowed one a year)
The other side has enjoyed complaining and discrediting articles and large companies commenting on Elriel...
Why?
I suppose it's because their side of the fandom has nothing new to talk about with their ships?
All they have are:
Commissioned art pieces paid for by themselves (great for the artists and Elriels do commissioned pieces to so... touche)
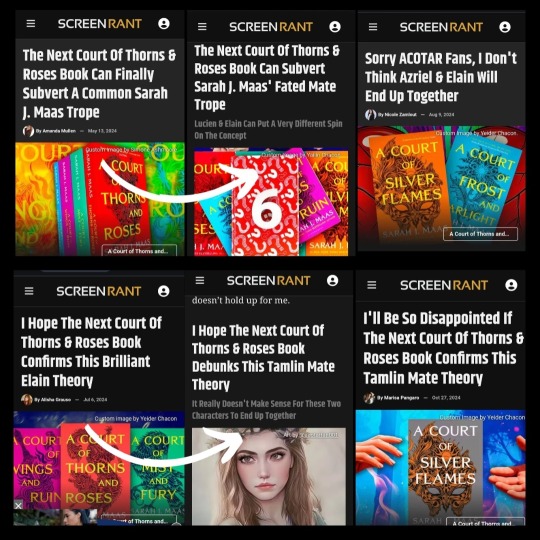
Screen Rant articles. This website is a way for free lance writers to make some money. Honestly, if you want to dive into them, go ahead, but these article centralize on the writers' opinions and click bait/SEO. And no, I'm not going to hunt down these writers' information to discredit. People are allowed to have their opinions and make money however way they want. Just at least take a moment to look at the titles for Screen Rant articles vs. TIME, TODAY, and E! News. You'll see a difference going forward in this post.
Additonal unnecsssary "official" weeks/ "spontaneous" days for ships and characters due to the belief that Elriel fans ruin everything

Anyways, let's dive into this year's pro Elriel content ❤️
January 30th, 2024
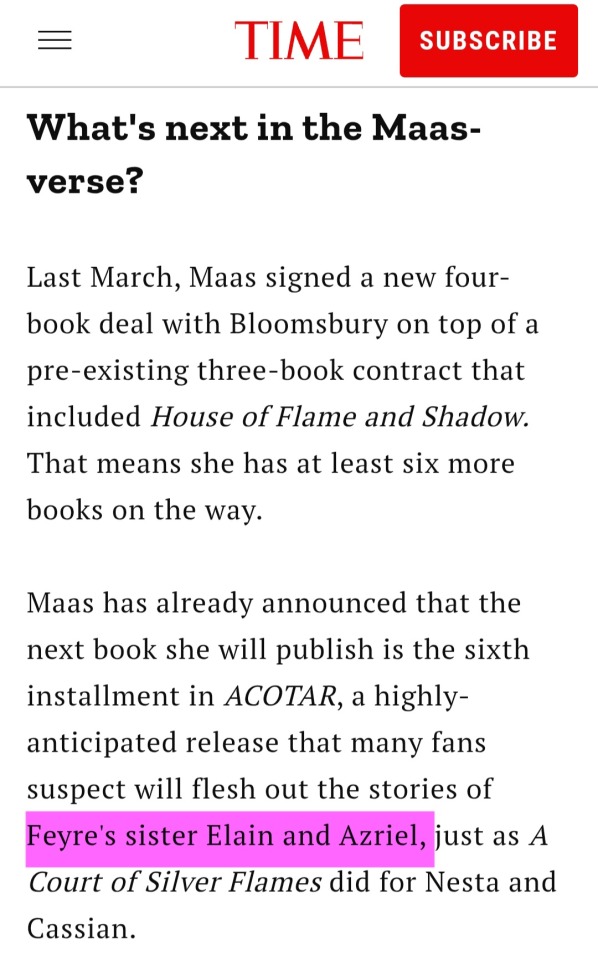
TIME- Time magazine is a widely cited resource and maintains high standards of journalism. In this particular article, only Elain and Azriel are mentioned as a possibility for the next ACOTAR book.
January 30th, 2024
TODAY Show- A sit-down interview with SJM. (This particular part of the interview I condensed together on Canva because of the limited pictures we can include on Tumblr) Below, Sarah talks about fate, the idea of exploring rejecting mates, and free will. (Lucien and Elain?) She also discusses her characters ending up with someone who offers growth and joy. (Azriel and Elain?) SJM can't tell us in black and white that she's doing this, but COME ON people. There's a reason she discusses it.
Oh, and the TODAY show decided to like/comment on Elriel comments ONLY.


Side Note: If interested, take a look at this tumblr post for a lovely, thorough breakdown. ( @courtofblooming )
April 19th, 2024
Guilty As Sin Instagram Story from SJM- Sarah loves her little crumbs, and this song honestly encapulates Elriel. We unfortunately don't get confirmation from SJM, but I'll include some of the lyrics for you to judge.
This cage was once just fine
Am I allowed to cry?
I dream of cracking locks
Throwing my life to the wolves
Or the ocean rocks
Crashing into him tonight
He's a paradox
I'm seeing visions, am I bad?
Or mad? Or wise?
What if he's written 'mine' on my upper thigh
Only in my mind?
One slip and falling back into the hedge maze
Oh what a way to die
I keep recalling things we never did
Messy top lip kiss
How I long for our trysts
Without ever touching his skin
How can I be guilty as sin?
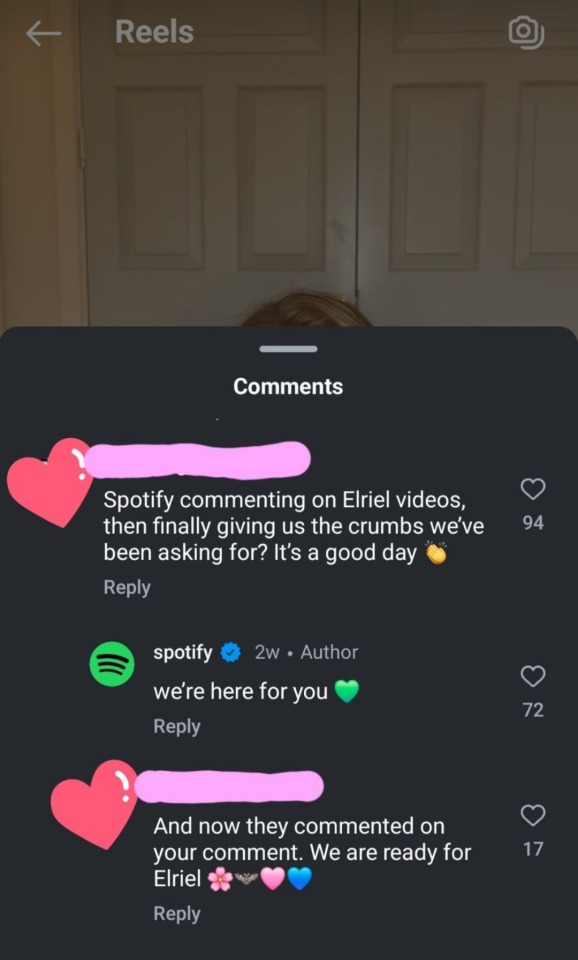
What makes it even better? Audible and Spotify commented ONLY on Elriel posts in relation to this song. You won't find these particular companies commenting on any other ships of the fandom.
Side Note: The other side of the fandom tries to discredit these influential companies by stating the person behind the account doesn't represent the whole company or just enjoy saying the companies comments aren't credible. Multi-million dollar companies are NOT going to waste their time and reputation on fanon created ships. These companies are business smart and only invest in what's profitable. There's a reason they make millions...ELRIEL is profitable due to canon evidence. Simple as that.

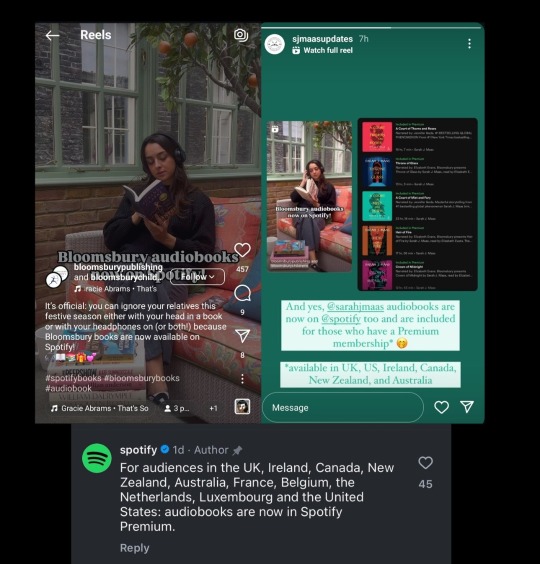
December 2nd, 2024
Bloomsbury and SJMaas Updates announce that the audiobooks are now available on Spotify- Bloomsbury, SJM Updates, and Spotify are in close collaboration with each other. Makes those Spotify Elriel comments even more satisfying. ❤️
December 9th, 2024
SJM 2024 Author of the Year Spotify Video- Although we got little news for the coming spring about audible books, us as a fandom had a lovely time dissecting the video. Yet again, Spotify only commented on Elriel comments.
Side Note: Take a look at these tumblr posts for an inciteful look into the significance of tea cups/Elain ( @offtorivendell ) and an excellent interpretation of the Spotify video. ( @wingedblooms )
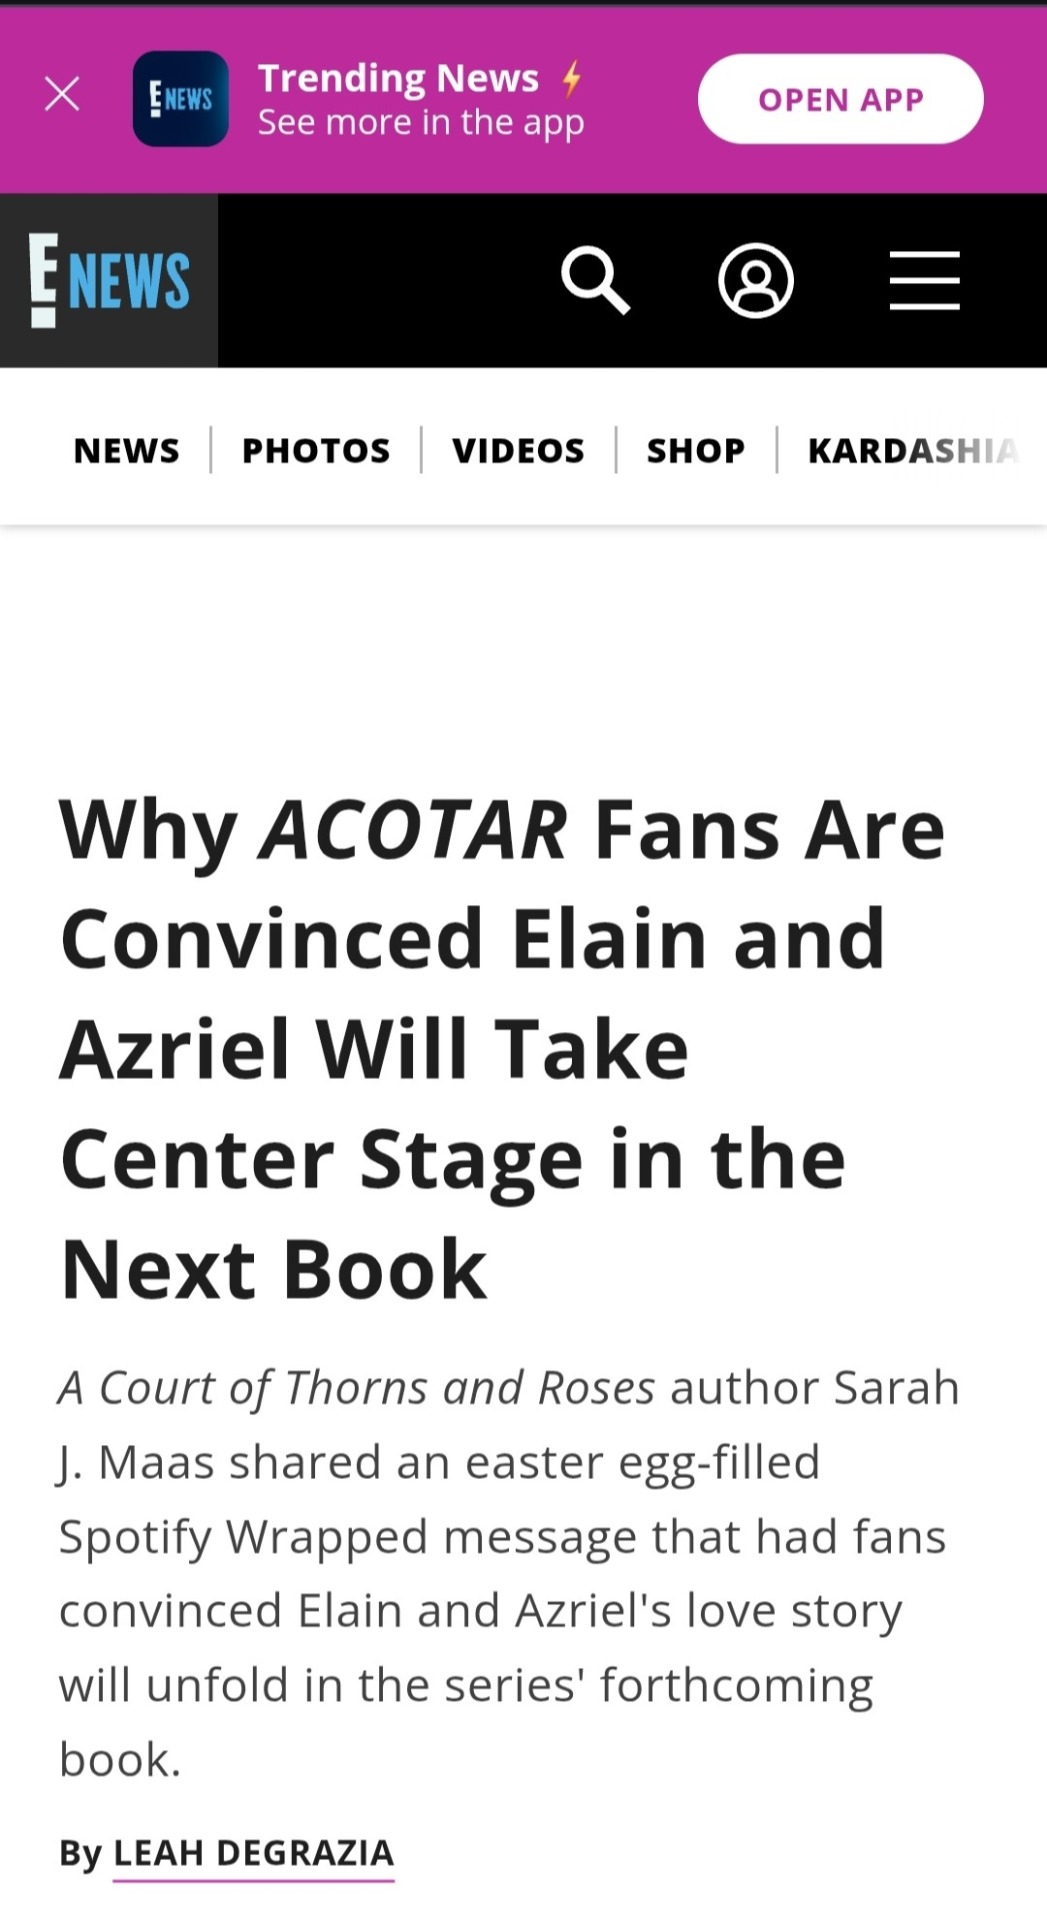
December 13th, 2024
E News!- I know this particular article has ruffled some feathers, but it's entertaining none the less! Gotta love the nod to Azriel's wingspan. IYKYK (And yes, it's credible... it's owned by NBC Universal... the same company that owns TODAY and 33% stakes of Hulu through Comcast (Comcast owns NBC Universal, and the stakes are through NBC Universal). I only add Hulu due to the ACOTAR TV series being developed through Hulu.)
December 17th, 2024
Goodreads- This is just a little star on top of the tree, but it's great to know that ACOFAS made it into the top 10 most read overall books this year. (Interesting how ACOSF didn't make it...) Notably, ACOFAS is the bridge for future spin-offs. (Also interesting how a particular character isn't seen in ACOFAS...)

(ACOFAS pictures taken from @psychologynerd post linked below)
In Conclusion...
As an Elriel, I've truly appreciated the continuous confirmations for Azriel and Elain for the future ACOTAR 5 book in small, simple ways. Even better knowing that Spotify and Audible have outwardly commented on ONLY Elriel posts.
As the year 2024 ends, I'll treasure these little nuggets of positivity until the announcement day! I have a feeling 2025 will hold some excellent news for the fandom. Until then, have a wonderful holiday season and a Happy New Year!
P.S.
If you know of anymore pro Elriel content from this year, by all means, write a comment. 🥰
#elriel#elain x azriel#pro elriel#elriel supremacy#azriel and elain#acotar#elain acotar#elain archeron#azriel acotar#pro elain#acofas
87 notes
·
View notes
Text

Hello and welcome to "Icon Making With Killian: An Intro to the 'Lost' Art of LiveJournal Icons"
aka, I'm still making them and I'd like to teach you how to do it, too!
This tutorial was written in Photoshop 2020, but you can probably recreate it in as far back as CS2-ish (since I still use the same sort of techniques I've been using since then, lmao). It also assumes basic understanding of the software, though I've tried to be as clear as possible throughout.
With that out of the way, let's get this tutorial on the road!!!!!!
I started with the bloomed art of Hiiro from the White Lilies scout box (image courtesy of the Ensemble Stars!! English Wiki).

I basically always start with a blank 100x100 canvas and paste the image into it. I try to go into icon making with a vague idea of what I want to do, and I knew from the beginning that my vision for this icon would have the top 1/4-1/3 of the image covered by a solid band of color. To make positioning the image of Hiiro easier, I made a rough version of the band with temporary colors (though they're pretty close to what I ended up using in the end).

With that in place, I could start working with the actual image for the icon. After pasting it in and adjusting the layers so it was under the band, I resized it and moved it around a bunch until I was happy with the position. Once I liked how it looked, I used an Unsharp Mask on the base.

Next up, I used a texture from lookslikerain. However, purple is all wrong for the color scheme I had in mind, so I went to Image > Adjustments > Hue/Saturation... to change it up to better suit my needs. Never be afraid to mess around with textures!

Here's how I adjusted this specific texture, but each one is unique- both the texture and the icon you're creating, so it's best to play with it until you get good results.

I then pasted this into the icon, making sure it was under the layers making up the top bands of color (because I was only trying to affect the base for now), and set this layer to Darken.

Now it's time to mess with the colors of the top band. They sorta matched before I did anything to the base, but now...not quite. I used a layer style for each part of it, but using the paint bucket tool would work just as well. I went to Layer > Layer Styles > Color Overlay... for each, changing the colors as necessary. The thickest band is #85d0bf, the middle band is #086371, and the thinnest, lightest one is #fcfcd8.

Time to start putting stuff on top of everything!! I took this light texture from ianthinae, rotated it, and set it to Lighten. I decided I wanted it to be a little bit brighter, so I duplicated the layer, set it to Screen, and dropped the Opacity to 20%.

I then used a texture from Sarah-Dipity and set it to Lighten as well.

Okay, now that's what I'm talkin' about!!! It's time to throw some text on this~ I went for something simple to go with the theme of the story this card is from: Princely. The font is Georgia, 10pt, in #086371, set to all caps. I decided it didn't stand out enough, so I duplicated it, changed the color to #8b4235, dragged it under the first text layer, and moved it 1 pixel to the right.

I wanted a bit more embellishment around it, so I used this simple tiny text brush from colorfilter in #06444d. I also erased part of it to make it fit the space better.

Finally, I used a texture from shiruji, set to Darken to get a bit more color variation in it, and called it done! :D

If you have any questions, please feel free to ask, and I'll answer as best I can- as long as it's not about making icons in other software D: I only know Photoshop (and Paint Shop Pro, but I don't think anyone uses that anymore). If there are any other icons of mine you're interested in seeing tutorials for - or even just specific techniques! - just lemme know. I love helping :D
Also, I'm happy to share where I get icon resources from. I have a whole post dedicated to that on my DW graphics journal, though tbh that's the best place to talk to me about making graphics in general. But I will absolutely answer asks/replies/etc about icons here on tumblr, don't worry!!!!
#livejournal#icons#icon tutorial#graphics#graphic tutorial#photoshop#LJ icons#100x100 icons#100x100#tutorial#tutorials#reference#what do I even tag this as XD
91 notes
·
View notes
Text
Yandere Brother Pt 3
Tw: suffocating unbearable love, violence, general yandere, female reader shenanigans, infantilization, and of course incest. also christmas
minors and ageless blogs dni please <3
click here for part 1 and part 2
Click here for my new oc Yves (PLEASE READ IT I LOVE YVES)
plotholes and emglish errors everywhere and i could not be bothered :100emoji: please dont point it out thanks xoxo
Caught the Covid fuk now i cant leave my bed im so damn sick and pukey all the time, i dont fuckin know where my roommate is but at least they're not here to get infected, feeling like a busted up rustbucket rn
So this was originally written last year, couldnt find what else to write but this christmas time is perfect, so like dont mind the shoehorning of Christmas somewhere in this fic
You're having your summer break and you plan to pick up on a new hobby. Crocheting, perhaps.
Fuck, your brother picked up your search history from his spyware. Now you're left to deal with $1000 worth of wonderful quality crocheting materials and your big brother being your personal crocheting mentor.
This is where it gets frustrating. Yes, if you have the resources, you would enjoy your hobbies more. But, just like... What if you didn't like crocheting in the end? You're stuck with all these.
It happens to every single potential hobby. Stamp collecting? Your big brother will bid to the death for an extremely rare stamp from the 1900. You're not even fucking collecting the stamps, the stamp book already comes arranged with all the stamps ever produced. A collection that would only give a hardcore stamp collector an instant orgasm upon sniffing it.
Nail art? Where the hell should you keep all the acrylic powders, fake nails, drills and drill bits? Not to mention the dizzying numbers of nail polishes, nail brushes, nail stickers and cuticle sticks. Of course, your big brother is going to hire a professional nail artist to make sure you're practicing your hobby safely while he's learning how to do it himself, so he could replace your mentor too. He would become so skilled that he could qualify to open up a 5 star nail salon. But he's not interested unless you are.
Painting? you absolutely do NOT need all of those tubes of paint. The difference in shades for some of them are so small that you mistook it for the same colour. You would have a headache choosing the right type of paper, right type of primer and right type of fixative to use.
Are you having troubles on painting? Let big brother teach you. You would sit on his lap as he guide your hands across the canvas. Don't you think his warm hand enveloping yours feel nice? Doesn't his free hand feels nice sensually rubbing your thigh? Don't you just feel protected in his hold?
Makeup? Same situation with your nail hobby. You're essentially being babied by him and experienced celebrity makeup artists, you would drown in a mountain of eyeshadow palettes, primers, setting sprays, skin care products, anything and everything related to makeup.
Every instrument ever? Big brother would insist lovingly providing all the music lessons you need. He is a musical prodigy after all. If it's something ridiculously obscure like a Glass Armonica or the Theremin, big brother would master it in a couple of weeks, earn a fucking pHD in it and THEN teach you. No instrument is too expensive or hard for him. Your big brother is crossing his fingers HARD for you to have this hobby.
Chess? Oh, he is also a prodigy in it. He could teach you. Your chess pieces would be custom made to your liking, by the way. It would be the perfect density, perfect size, perfect texture for you. He knows what you like and you hate that.
Sports? Take a look at his "achievement room". It's filled to the brim with golden medals and trophies of every sport competition ever. He's not leaving you alone for this one.
Pottery? Welcome to your very own personal pottery studio, furnished with all types of drying racks, ovens, kilns, turntables and equipments you have never heard of. Big brother is always there to supervise you, making sure there won't be any accidents.
Cooking and baking? You get to have an industrial sized kitchen all for yourself. Everything is decorated such that it looks like you would be on television, starring in a cooking show. You don't need to clean anything, or prep anything, or actually do anything, really. There's a team of professional chefs and assistants to do everything for you. They're paid to cheer and clap and celebrate when you pour cake batter into a pan.
Gardening? Well, there's a massive plot of fertile land for you to garden to your heart's content at the house he bought as your 18th birthday gift. If you want a big project, it will be done overnight. You wouldn't hear the gigantic machineries and vehicles tumbling about due to the soundproof walls he installed. No one would be able to hear you both either, doing god-knows-what inside.
Video games? Your big brother personally do not encourage you to pursue this. But... Nonetheless, he would spoil you rotten with all the latest gaming consoles, limited edition merchandises, pre release copies of your favorite game franchises and whatever your gamer heart desires. All at a hefty price of... Daily cuddles and kisses. And you also have to move in with him. And he gets to decide what game you're playing, if he deems it a "bad influence"? It is not staying in his house.
You rather not.
Nothing is fun because the fun parts are already done for you. You don't get to experience the highs and lows of picking up a hobby, you don't get to explore and experiment. You're literally cursed with luxury.
So imagine your boredom, stress and paranoia during summer break. All your friends are spies for your brother, your hobbies aren't even "yours", leaving your house would inevitably lead you to your brother and all digital footprints are heavily scrutinized by him too. No privacy, no autonomy, all monotony.
You juggled three smartphones at once. Throwing one up in the air, catching the other one with your dominant hand, throwing the last to your other hand. Who gives a damn if one, or all of them breaks? It's riddled with spyware and your big brother would buy you every time a new model is released anyways. Which is... A new phone, a month?
You stopped caring where he gets the money. Obviously he has an assload and can afford to wipe his ass with thousand dollar bills regularly.
It's summer break. One last resort to try and spend your time like a regular ol teenager is taking up a part time summer job. There is a wide variety of jobs to choose from with your qualification. Granted, it's minimum wage and mostly customer service.
If you work as a barista, the cafe or juice bar you'll be working at will LOVE the crap out of you.
Your older brother will visit daily and increase their sales tenfold. Of course, he would pick the drinks that you like doing. It's okay if you fucked up, its only your beloved big brother's order, you can add as much sugar, salt, pepper, cyanide as you want. He will never yell at you, never tell you that you made anything wrong or never even die.
The management will suddenly see a surge in daily customer count. Thanks to big brother's networking. And like him, they also will accept anything you make with no complaint... As per his instructions. You could go full on ridiculous and give them a cup of ice drizzled with strawberry scented dish soap and call it Tutti Frutti, they would still pay for it and take it with them. Though, you're not sure if they ever consumed anything from you.
Without fail, your brother would visit you during every break and hand you your meal along with a kiss on the forehead or the cheek. He would bring you out to eat but you would refuse everytime. You also didn't want his company, which made him pout and whine without fail. But it's nice that he would actually back off after the sixth "no".
However, you know that fucker is watching you from a hidden camera somewhere in the nooks and crannies of whatever breakroom you're resting in.
He would engulf you in a big hug when you get off work, telling you how proud he is of you for getting through another workday like a champ. Praising you for all the hard work and excellent performance, making sure to soothe and comfort you if you happen to come across a rude customer earlier in the day.
You try not to think too much about their fate.
You will be fed, bathed and loved after every shift.
Hell, he would even build up a company from scratch just to hire you. Any position you want, barista, manager, cashier, back office work, janitor- you name it, you get the "job" and get paid a pretty penny. All your other coworkers and customers are probably paid actors and actresses to simulate a "real life working experience" safely. He controls it all, making sure you have just the right amount of drama, the right amount of diplomacy and the right amount of gossiping. You're rarely pushed out of your comfort zone, though. Big brother always has your safety and best interests at heart.
Of course, he will never tell you all of this, to keep the immersion going. You're going to feel sad that you're not exactly experiencing reality. But a bastardization of it. Might as well star in a trashy reality TV show instead, at least, it's much more authentic than whatever your big brother has going on for you.
He doesn't need to even tell you though. You would pick it up easily and quickly especially if you already watched the Truman Show. Don't tell him you did, god help you if he ever gets an inkling that you knew about the existence of the Truman Show. He deemed that movie as demonic propaganda and he needs to lecture some sense into you. If you want out, just say that you're 'bored' and want to do something else. Your big brother will gladly drop everything and do anything in his power to help you "achieve" what you want.
But for the sake of "plot" in this latest installment, you agreed to work in a quaint little bubble tea stall. Where you're the only employee, making drinks for whoever is ordering in front of the shop's decorated window.
Of course, your big brother miraculously happens to work in a nearby skyscraper as one does. It's not that you didn't do your research, you were a hundred percent certain he didn't work in that building, because that fucker never goes to work... At least, physically. Perhaps he does his job, whatever that may be, through online means.
You were planning to use your bicycle to get there that you got yourself with "your" money. He never bought you a car or a bike or anything that would get you around, he saw it as something unnecessary. Why would you need it when big brother is available 24/7 to bring you anywhere?
Actually, you could have gotten yourself a car with the allowance he gives you every day for being cute and adorable, and being patient with his incessant kisses and hugs and cuddles and love and touches and his fucking insanity in general.
But you know that he's going to kick up a massive fuss about driving alone. It was hell to even get your license with him actively trying to sabotage you at every exam- which includes him stooping so low to bribe the examiner to fail you. However, you persevered, and you got that stupid license. All the while, he was lamenting about how you're going to leave him all alone, how you don't need big brother anymore, how society pressured you to grow up too fast and recklessly drive off wherever.
You knew better than to fall for that. Or even entertain it either. Eventually, he gave up trying to guilt trip you into crying, apologizing to him and sobbing in his arms, promising that you won't leave him.
It's not like he DIDN'T kick up a fuss when you said you're using a bicycle either. He began freaking out about your safety, fearing that you might get run over.
Well. You admitted defeat. He's driving you to fucking work and back. It's not worth it to fight this battle.
So you began working in the stall. You had someone train you for your first 2 weeks. Then you were on your own.
The owner, who is also the person who showed you the ropes around there, said business isn't good, but it isn't bad either. So you didn't need to worry about rush hour where hoards of thirsty, sleep deprived office workers trample over each other to get their daily boba fix. It's pretty peaceful working there.
But what you do need to worry about, is your fucking big brother.
He would come and buy a drink, whichever you like to make. It can be the most expensive one, or the cheapest one, the most elaborate one or the simplest one. It's up to you, he will pay for it and happily drink what you made.
You could make him pay for the most expensive drink there is but serve him a cup of lukewarm water, and he would still drink it with glee and fork over his money, telling you to keep the change (which is usually a hundred bucks extra).
Let's say you want to be decent and make him drink that you know he would actually like. Which is anything that tastes generally fruity. And insist that you like making it even though it actually sucks.
He knows. He can tell that you're specially making his favourite drink. And that makes him happy and more obsessed with you if that's even possible at this point.
He would leave a massive tip and a kiss on your forehead.
Although your brother is fucking gross and weird like that, you still love him. Probably a bad idea but you're working so hard, trying your best to earn money honestly just to get him a Christmas gift.
Despite the restraining order between your parents and him, your brother is still invited back home each year to be jolly together. Preparations start a few days before Christmas, where you would see an unusual sight.
All of your immediate family members in the same room, or at least in the same house together without fighting to the death. Your dad's bones are intact, your mom didn't have her insecurities jabbed on for once. They're not exactly on speaking terms, per se.
You woke up one morning to see an... appropriate sized tree for your parent's house, erected in the middle of the living room. Adorned with beautiful ornaments and... are those pictures of you on the ornaments?
Wrapped presents were patiently sitting under the tree. There was a small box with your father's name on its tag, another small one with your mother's name on it. A decent sized box was addressed to your brother, must be a combined present from your parents.
Your shoulders sagged in defeat when you saw your presents took up the perimeter of the tree and even conquered the couch, the back of the couch and under the coffee table. You lost count after gift box #27.
Since everyone is in the kitchen, you quickly place the presents you got for your parents... and your brother.
You panned to the fireplace. Your Christmas stocking is filled so much to the brim that your brother must have added 5 more next to your original one. Your parents' and your brother's stockings are relatively empty. You stuffed them with candies and nuts to make them look less embarrassing.
You straightened your back, that should do it. Your ears perked up when you heard some clamoring in the kitchen. It must be your brother.
You let out a surprised yelp when you're yanked back by a pair of arms that snuck around your waist. "Merry Christmas, my little wittle precious baby!" You squeezed your eyes shut and scrunched your face as he attacked you with a barrage of kisses.
He giggled and squealed as he held you in his arms and twirled you around in glee. You let out a scream of horror as your feet dangle off the ground. He does this every Christmas morning when you were a child to wake you up further and get you excited for the holiday. But you're not a kid anymore, and this is horrifying.
Finally, he stopped and put you down. Your hair is frazzled and the world around you is gyrating. He squeezed you in another hug and gently rocked you side to side.
He immediately unlatched when you said you're hungry. Your big brother gleefully lead you to the dining table, where he fixes up a napkin around your neck like a bib. You asked him why is he tying a ribbon on your hair, he said that you are his Christmas present and he is spoiling himself this year.
Before you could respond, he gave you a brief peck on the head before frolicking away into the kitchen.
Your parents came out of the kitchen, greeting you. They're holding a tray full of steaming hot breakfast foods, no doubt your brother forced them to make it for you. Every Christmas generated a metric ton of leftovers. It's because your brother wanted you to try all of the foods from all over the world. But don't worry though, the leftovers could be so intact that it was given out to neighbors and friends and extended families. Some didn't even need to cook after that, the sheer amount of leftovers was enough to fuel ten more Christmas gatherings.
Croissants, quiches, various types of bread, eggs, ham, bacon even panettone made from scratch. Looking at the spread in front of you is dizzying, your big brother sets down the last plate right between your hands. It's a breakfast plate your brother customized to fit your usual preference, everything is shaped into a heart. He patted your head as he took a seat next to you.
Everyone ate in silence. Everyone was focusing on their own meal except... your brother. Who else would rather stare at you adoringly instead?
He asked if you wanted to go make snowmen outside. Not without proper winter protection, that is. You shrugged, it's not like you could escape your family anyway. Your friends are all busy with their own families, and you don't even have friends. Everything is closed and if you lock yourself in your room, your brother will just pick the fucking lock and force his way in.
Your parents tried making small talk, this earned a feral glare from your brother because it interrupted the connection between the both of you. They paid him no mind and began asking about your life. You tiredly replied to their questions and asked some back yourself, to try to find any sense of normalcy. Your brother would be disengaged with the words coming out of your parents mouth, but highly interested in what you had to say.
The rest of the morning went by uneventfully. You offered to help clear the table and do the dishes. Your brother just 'aww'd at you and gave you an appreciative kiss on your forehead. That wasn't an explicit yes, he appreciated the gesture, but he wouldn't allow you to dirty your hands doing chores.
He told you to wait for him to clean up. In the mean time, he gave you permission to open some of the gifts he got you. Frankly, you don't even want to deal with it at all, it's just too much crap. You decided to go through the stockings instead and grab some snacks for yourself.
As expected, he filled it with the most expensive treats and the freshest oranges. These types of foods are usually served in a formal setting, like eating gold crusted caviar at a 10 star restaurant, all dressed up in fancy clothes. But he just... shoved it in a Christmas stocking as if they're mundane chocolates.
Whatever, you shoved some into your pockets.
You turned around to see your brother smiling lovingly at you. He wrapped a puffer jacket around you, his scarf with his cologne on it, a pair of thick mittens on your hands , a winter hat snuggly fitted to your head, and a pair of thick pants he made you wear in front of him.
He picked one of your numerous christmas presents and handed it to you. He clasped his hands together expectedly as he watches you.
Your brother urged you to open it, go wild. Rip the wrapping to shreds. You felt so bad seeing how well wrapped it is and the quality of the wrapping paper is... indescribably good. It doesn't even feel like paper, it feels like silk.
So your carefully dismantled it, trying not to tear anything. You look up to see that your brother is pointing his camera at you, capturing this very precious moment. He encouraged you to go on.
You managed to remove the packaging and revealed a box of expensive winter boots. These are high quality and you would have been the source of envy even though most of your "friends" are also from wealthy families. Not everyone gets to have these.
You appreciate it but... You already had a pair of winter boots, the ones from last year, and the year before that. And the year before that, and a week ago where your brother is freaking out about you potentially having frostbite on your toes.
"It's the latest model! It was released as a part of a Christmas special, it will keep you warm and protect your feet too. It was selling out fast, I'm so glad I managed to get a pair for you, I can't have my sweetiepie sad on Christmas day!" Gushed your brother. You slipped them on.
You can't tell the difference between the one you had last year and the one on your feet now. Maybe some minor difference in it's stylistic design but... they're equally as comfortable.
You thanked your brother and finally gave him what he actually wanted from all this: a hug. He put away his phone and returned the embrace, sinking so deep into your jacket that neither of you can move without stumbling. You know he expected you to show gratitude for all his gifts through his main love language; touch.
It is exhausting.
After that, he brought you out to his private plot of land which he made into a park, complete with swingsets, monkey bars and slides. But these aren't for the public, it's for you. All the equipment are well maintained and look brand new even though you know it's been there for years.
He's not fond of throwing snowballs because it could hurt you. But he allows you to throw as much as you want at him. Even after the stunt you pulled last year.
You packed snow around a rock and hurled at him with all your might, it went straight to his head and his right eye was busted for months. Your brother didn't see that as something wrong, though. Even if you tried to apologize, he said that it was an accident and it was alright, he still loves you dearly and you did 'nothing wrong'. The first thing he did after recovering from his injuries at the hospital is to take you out for hot chocolate and then give you a backrub back home because winter could make your muscles stiff; and hence you must feel strained and sore.
He was still mildly bleeding from his gauze at the time, it was covering at least 70% of his upper head. Your brother was clueless when you asked if he needs any painkiller for his recent injury. He claimed to not feel the pain, but his wincing tells you otherwise. He rewarded you for your concern nonetheless with hugs and kisses and another massage.
You laid yourself on the snowy ground and started making snow angels. Your brother had his camera out and began capturing every moment he has with you.
You felt uncomfortable. And the cold is nipping at your bones even though you're thoroughly insulated by the sophisticated winter gear your brother made you wear. You're ready to go home now.
It shocked your brother and made him a bit desperate. He stammered and stumbled over his words, asking you if you wanted to play on the swing, build a snow man, play on the slides, the merry go around and... throw snowballs at him. Are you cold? He was in the middle of removing his own jacket to layer it onto you, but you stopped him.
You said you're tired. You don't find this fun and you're too old for this.
Maybe you're thirsty? He packed a flask filed with steaming hot chocolate for you- no? You're not thirsty or hungry? Maybe you wanted to use the bathroom-- no? You don't have to go?
He tried listing out all the possible reasons you wanted to go home and all its' solutions. Desperately wanting you to stop growing up so fast.
You got sick and tired of this, you yelled at him at the top of your lungs that you wanted to go home. You then stormed away towards the car, leaving your brother to stand there in silence, his camera capturing your explosive outburst.
Your brother saw you slamming the door angrily as you got in.
He sighed, gulping and hovering his finger over the delete button. But he ultimately decided against erasing the footage, it's still a video of you after all. Your brother assured that he's coming to the car, he wipes a stray tear away as he heads to his vehicle.
The both of you stayed silent as he drove you home.
Once you arrived, you bolted out of the car and ran back in. Locking yourself in the bedroom and barricading the door with random furniture. Hugging your knees close to your chest as you pray that your brother does not go after you by climbing into your windows.
And... he didn't. He left you alone for once. For a few hours too. It gave you the much needed relief, you felt like you could breathe now.
You're starting to feel a bit hungry. And you're hungry enough to be willing to face your older brother. So you began unbarricading, placing your dressers to it's original place.
You carefully unlocked the door, fully expecting him to be waiting outside for you. To your surprise, no one was in the hallway. You could hear some noises downstairs, in the kitchen.
You cautiously went down, the tree is still intact. Nothing is broken and there doesn't seem to be signs of a fight. You released a breath that you didn't know that you were holding, happy to know that you don't need to spend another Christmas at the hospital visiting your badly battered parents.
You whipped your head to the sound of your brother calling your name softly. He's holding a baking tray and a bowl, you can't tell what is in there because he's too tall. He smiled at you as he set it down on the dining table. The tray contained freshly baked parts of a gingerbread house and the bowl contained vanilla frosting.
You scanned the rest of the table. There are numerous small glass bowls containing different types of candy and snacks; from pretzel sticks to colourful chocolate rocks, to real gold leaves. Piping bags with metal tips are present too next to a box of plastic gloves.
Your brother pulled your chair out and invited you to sit there. You did, and he called you a good girl. His good girl. As you put on a pair of plastic gloves, he kissed you on the temple.
You asked where your parents are. He said that they're preparing the food for dinner, which includes ham and a roast turkey. And 15 other dishes.
You quizzed on, asking if there will be more people coming in. He shook his head: no. It's only the four of you. In the meantime, you should enjoy yourself building this gingerbread house. He puts on his own pair of plastic gloves too and began filling the piping bag with icing.
The two of you worked in peace, you opting to decorate the house while he pipes the details on the gingerbread men.
There is only two, a large one and a smaller one. You can guess which represents who.
You noticed the odd choice of attaching the small one to the large one's torso. With strategic use of the candies and frosting, he made it look like the larger gingerbread man is carrying the smaller one on its hip. He piped your defining features onto the baby gingerbread, and piped his features on the larger one.
He noticed you staring, your brother asked if you had a hard time connecting the pieces with frosting and if you needed his help. You said no, you just need a spatula from the kitchen. He tried to get up from his seat, but you pushed him back down, saying that you can get it yourself. He pouted, telling you to be careful and not touch the knives or stoves. Your brother went back to obsessing over the details on his gingerbread men.
You went inside the kitchen and greeted your parents who are busy cooking. You go through the drawers to find a silicone spatula and decided to help pick up some stray food scraps on the floor, throwing them into the bin. But as soon as you step on the pedal and have the lid swing open, you saw two crushed, but perfectly edible, gingerbread men in the garbage bin.
You returned to the dining table to see that your big brother is proudly presenting his work. He said this represents you and him... as if you already haven't figured it out. He said he dreams of having you live with him in a perfect fantasy house, fantasy world where you never have to grow up. And he will always be there by your side, taking care of you till the end of time. You will be pampered and spoiled rotten, you don't have to do anything, you don't have to lift a finger. Your big brother will do everything for you. He would even breathe for you if he could.
You nodded in acknowledgement, too tired to engage with him. You sat back down, continued with the gingerbread house. You failed to notice the flicker of sadness in his eyes, your brother felt so neglected and unwanted these few years. He wished that you were a kid again so the both of you could play together and be happy. The more he tries to win your favour, the more distant you get from him. He is endlessly chasing and you are running non-stop.
The rest of the afternoon went by uneventfully, other than the fact that your big brother rests his head on your shoulder the whole time.
Now, it's time for dinner. You tried helping them bring out the dishes, your brother praised you for being a darling as usual. He lets you have the first bite of the turkey, tearing a small inconspicuous piece of flesh from the bird and hand feeding it to you. It's still warm, juicy and delicious. Maybe it's the feeling of being special that makes it even tastier.
You chew as you brought out the casserole, setting it down on the table.
You looked at the spread. It looks like a buffet at a high end hotel. So many varieties and extremely nutritious.
Your brother fixed your napkin bib for you again and took food for you. Slumping in your seat, you were thinking of protesting but you knew it's easier to just wait for him to carve the best parts of the turkey for you and let the food pile up neatly on your plate first. He returned it to you, all your favourite dishes are on it within sensible portions. But these are still a lot of food for a person.
He didn't care about praying. Your brother wanted you to eat as soon as possible because you must be hungry. And it is absolute sacrilege to let you go hungry.
You insisted that you join your parents in saying grace and you're not that hungry. Your brother looks uncomfortable, still believing in his sick mind that you're starving to the point of emaciation. But since you are adamant in doing such 'pointless' things In his mind, he agrees, only if he leads it.
Everyone bowed their head down and held each others' hands.
Your brother said the shortest, most insincere, laziest grace ever. Once he fulfilled your requirement, he urged you to eat.
You're upset, you felt really angry and you thought he was mocking you instead. So you opted to eat alone in your room, you made it clear that you didn't want anyone in. Especially not your big brother.
He cried out a desperate plea to get you to stay with him. You ignored him and took a couple more of your favourite finger foods. Predicting a fight between your brother and your parents.
You wrenched your arm away from his powerful grip and fled the scene, hurrying up the flight of stairs. Only slowing down when you're out of sight.
As you thought, sounds of verbal fighting started resonating throughout the house. You heard your brother screaming his head off at your parents for being bad influences and poisoning you to hate him. Your parents defended themselves and this only fuelled the fire. You didn't want to be around when your brother started hurling chairs, so you slammed the door as hard as you could. The sudden loud noise did stop the commotion downstairs briefly. But it continued soon after.
You ate alone, in your barricaded room. Wishing that you're born into a 'normal' family, with 'normal' trauma. To a lot of people, you are complaining about a blessing. But you are always feeling alone, the only person facing a problem which everyone sees as a solution.
You scraped the last bits of food with your spoon. Waiting for the sounds of the ambulance or at least for the fighting to quiet down.
You looked at the clock. It's 1 AM. It's been relatively quiet for a while now, they should be finishing up their fight or cleaning up. Time for you to return your plate.
You grunted as you pushed the furniture away from your door which felt like the umpteenth time. You left your room and head downstairs.
Hearing soft sobs from one person, your brother. He's sitting in front of the tree, hugging the present you left for him earlier. The presents addressed to your parents are both missing, presumably being taken back to their room. A blanket is loosely draped around his shoulders.
You took slow steps, unsure if you should comfort him or not. But before you can even decide to chicken out, he spotted you. However, to your surprise, he didn't approach you or tell you to come forward. He gave you a soft assuring smile, before returning his attention to the tree.
You set your plate aside and went by his side. Your brother watched you with puffy eyes full of love, yet it tells you that he has been irreparably hurt by something... or an accumulation of things.
"Thank you..." He whispered, refering to the gift you gave him. It isn't something particularly valuable to you. It's a picture of the entire family in a photo frame. Your brother is going to cherish it, because it is a gift from the person he loves most in the world. But deep down, he secretly wishes that it was a photo of you and him alone.
He still looks extremely upset and distraught. Almost like he is at the brink of a breakdown. Your brother usually verbalizes what he wanted, but he couldn't this time.
You wonder what your parents got for him. You peeked over his shoulder to see that an unopened box containing a plain T-shirt and a pair of socks is carelessly discarded to the corner of the room.
Then, it clicked. Just like you, he felt alone. Maybe you will never understand why he holds you so dear in his heart. Just like how no one will understand him either, his struggles are unique to him with no one to relate.
He destroyed the relationship between himself and your parents. His friends are all superficial. You're grown up and constantly rejecting his love.
Not a single one of you paid attention to him. Yes, it is hard to think of a present for someone who has everything. But they could have put in a bit more effort, the colour of the shirt and socks aren't even in his favourite colour or in the correct size. You could have removed your parents from the photo, your brother will never remove it himself. Because that would mean defacing your gift for him.
And growing up, your parents never saw him as... a person. As someone with feelings and a personality. They only saw his value as a trophy piece to show off to their friends and family. Same goes to his friends now, if it wasn't for his skills and possessions, he would be nothing to anyone.
He had to beg to be loved. Even that isn't reliable, he could give it his all and everyone around him will expect more. Your brother could never dream of being the receiving end of his own affection. It seems like an impossibility to him.
Perhaps he is doing all of these despite getting nothing but disgust and disdain from you is all to protect your innocence, to not put you through what he had to face. It's just that he went about it the wrong way. Or maybe he is just... wrong in the head. Or maybe he was hoping by loving you so much, you would give him the intense type of love he was yearning for his entire life.
Either way, he is alone.
The both of you are now seated in front of the fireplace. You didn't want to open presents, your brother is okay with that. He did not nag you to do it for once. Snuggling closer, the both of you shared a blanket. He still looks unhappy and crestfallen.
You remember you still had the ribbon bow on your head.
He hovered his arms around you as you squirm in his grip. You managed to crawl into his lap and rest your head on his chest. He lets out a chuckle and some sniffles, clamping his arms back down around you.
You reminded him of one last gift. Your brother is confused until he saw your ribbon.
From that moment on, he burst into tears of joy. He found you so unbearably adorable, so unbearably cute that his heart couldn't take it. An excited squeak escaped his lips as he held you even tighter. Peppering kisses all over your face, neck and head.
He started blabbering in baby talk, calling you every pet name and listing out everything he loved about his 'gift'. Repeating that this is the best gift he ever received and this is all he ever wanted. You are all he ever wanted. Praising that you remembered what he loves.
You hope that he could feel a little less lonely tonight. You can't peer into his head and know exactly what is going on inside. But you knew, he was happy.
Your breathing calmed him down and he closed his eyes, nuzzling against your neck. The collar of your shirt wet from his tears and your arms are secure around him. Your brother mumbled "I love you." as he adjusted you on his lap. Pressing your form against his, enjoying the heat that the both of you shared. Wishing that this moment will never end and you will never part from him.
You realized another thing too as he strokes your hair.
Your older brother is the only person in the world who harbors true, undying, unconditional love for you.
Even though he has his flaws, there will be no one else like him. Ever.
So you closed your eyes and melt into him. Just like before, you felt safe.
The both of you fell alseep in front of the hearth, surrounded by gifts, mostly unopened ones. Snowflakes floating down from the skies and landing delicately at the edge of the roof. Feeling unburdened and content in the living room.
Merry Christmas.
#yandere#yandere x reader#yandere oc#yandere male#tw infantilization#yandere oc x reader#yandere x you#tw yandere#yandere concept#male yandere oc x reader#yandere brother#tw incest
323 notes
·
View notes
Text
i was imagining doing a cool "why you should use obsidian" post but i doubt it would reach anyone but here are the bullet points
obsidian works as a folder with markdown files. meaning you can at any point yoink a note and grab the text with any basic text editor.
wiki style linking for the adhd brain that jumps topics really fast or if your brain connects notes like that.
really great community with tons of addons, custom themes, and resources for learning both how to use the program AND how to take notes. notebly (hehe) i have noticed a lot of ADHD & autistic people who offer advice for organizing while having a chaotic brain.
it's free. it's so free. all the addons and themes are free. the pay options are for syncing/cloud (and you can use other services like dropbox bc of how obsidian is just 1 folder) and publishing your vault as a website.
organize notes, creative writing, images, everything. it can open PDFs so you can read while taking notes. I use it to organize my creative writing and world building. i use the canvas feature to make big ol mood boards and reference boards for art.
use obsidian 🫵💥🫵💥
76 notes
·
View notes
Text
Hi everyone! It's been a hot minute since I did a Compendium update, but I promise I'm not dead. For those who don't know, I got a new job! That meant pretty much the entirety of October was spent wrapping up my old job, going to my new site and trying to learn the new one. I'm on break in approximately two weeks, yay! ☃️
These updates will take on a wintery/Starlight theme to celebrate the season, much like All Saints. I hope you enjoy.
Additionally, myself and the lovely folks at SEAFLOOR are having a Catch up (for) Starlight Challenge! You should join us if you're interested. ❄️
However, without further the following communities have been added to Sea's Community Compendium for XIV Creatives.
LARGE SCALE
The Help Lines—We are a community-based discord to be used to play the critically acclaimed MMORPG Final Fantasy XIV. We host almost all content including DRS and BA, Raiding, Deep Dungeons, Blue Mage and more. Our mission is to create a welcoming space for any individual in need of assistance to reach out and accomplish their FFXIV goals in a toxicity-free environment.
The Aether Entertainer—Founded in 2021 on Aether, The Aether Entertainer is player-made virtual magazine covering music, theatre, art, current events, and Eorzean popular culture.
LORE
Final Flowery XIV—Compiled by ann0yance(bsky)/@sa8oteur, this guide explores the various flowers in XIV, comparing them to their real-world equivalents and meanings.
On Elementals, Accountability and Criticism—An essay written by @morgana96 that explores the lore of elementals and their place in Gridania (and beyond)!
MISC
Vanilla Gpose Tips by Winterdeepelegy—A how-to guide on effectively utilising the vanilla gpose tools to create visually stunning screenshots, written by @winterdeepelegy.
WoL Reference Sheet—Created by @coldshrugs, a handy WoL reference sheet you can build in Canva!
NA GPOSE Studio/Themed Housing Directory—A player-made repository of North American Gpose studios and themed houses!
CHANGELOG
The Scholar's of Nym—The link has been modified at the request of the owner.
Skystone Co.—Has been removed at the request of its owner.
UI Macro Menus—The link has been modified to accurately reflect the bookmark.
Have you thought about joining our Tumblr Community? You can find it here!

Want to submit? You can either fill out the google form here or send me an ask with the relevant information!
Is my space suitable for the Compendium? Most of the time, yes! Below the read more is some more information/stipulations. This is all publicly available on the document. 🦌
Below are the following things I do not accept on the Compendium:
Personal/Single-Character LFC ads. (Though these get posted to the SEAFLOOR Tumblr Community when I find them!)
Content intended for or can be used for bullying, harassment and OOC gossip. E.g. ‘Secrets’ blogs, receipts, callout posts, etc. This does not include IC tabloid blogs or other ventures used to generate roleplay.
Communities that do not have an RP/writing element (large-scale exempt).
Anything I find personally distasteful or goes against the spirit of this project.
Common-sense rule applies.
I want to put my community on the Compendium but we have an application process. Is this okay?
Yes! Just note somewhere in your application that's a requirement. The only thing that is mandatory for the Compendium is that you must be open to new members or have a public-facing/accessible facet. There's no point advertising a community if no one can join it in some way!
I want to put my Community on the compendium but I only have x number of members —
Also totally okay! People don't start with large communities. Activity is a must but, whether your server has two or two thousand members, if you're looking for new people to join, I'd love to help you find people.
I want to put my community/resource on the Compendium but I worry its too niche?
Okay, and? If your Eorzean Fishing Alliance has four members but you roleplay every second weekend, I still want to know about it. The same goes for resources; if it's relevant to the game, it'll be useful to someone.
How active does a community need to be?
If you find a community has not been active in about two/three months, send me a message and I'll take a look at it. Communities have ebbs and flows, especially event spaces that may take hiatuses depending on member interest/life events. I'm not strict in my implementation provided a space isn't dead. If a link or anything is broken, contact me asap!
I have [insert a question not stated here]?
No drama! Send me an ask or use the #Compendium channel in my Discord!
#final fantasy xiv#ffxiv#ffxiv community#final fantasy xiv roleplay#ffxiv roleplay#。・゚゚・ — sea speaks#。・゚゚・ — sea's community compendium#i hope i haven't forgotten anyone it's just been a bit!!#care u all kiss
35 notes
·
View notes
Note
BOUNCING UP AND DOWN. HELLO SOUL!! I just got a drawing tablet and I’m super excited about it!! I’ve been drawing for a long time, but I’m usually more of a traditional artist, do you have any tips for beginners with digital art? I am REALLY EXCITED (currently vibrating) and since I sadly don’t have any digital artist friends, this was the first blog I thought of to ask for tips!! Because!! Your art is amazing and this blog feeds my insatiable hyperfixation!! I think it’s so cool and your art is amazing!!
(I’m sorry if this is annoying TwT also yes I know I’m sending this literally on Christmas Eve but there is no pressure and you can answer this ask whenever :D)
HELLO HELLO CONGRATS, FIRST OF ALL! ! !! LOL I REMEMBER WHEN I GOT MY FIRST ART TABLET the little wacom one .. it served me very well
i think the one of the biggest hurdles in going from traditional to digital is getting used to how different it feels. at its core it's the same thing, you're drawing on a canvas, but getting used to not feeling the paper under your pen and how it handles and glides differently on the tablet can take a little while. and THEN you have to get used to your art program of choice...........
i started with (and still use) firealpaca because it's free and covers all your necessary bases plus a few nice quality of life features! i know krita is also free and seems like a good pick, though i've never used it myself..
i guess it's less a question of tips and more of getting used to the change????! for an actual tip i'd say explore your program and see all the cool features it has to offer, then play with the settings (like different brushes, stabilizer levels and pressure sensitivity (if your tablet/program supports it)) until you find something you like!! eventually it becomes just as natural as it was before. i'm kinda bad at giving advice but i hope this is something at least ^_^''
tldr give it time and explore the resources given to you.. you'll discover your preferences and eventually it'll just become natural to you !!
26 notes
·
View notes
Text
SO! You've seen these little things I do sometimes and you want to know the process!

It's genuinely super simple, so here goes! Apologies by the way if anything is unclear or glossed over. A lot of this is personal taste and such so I hope this can be a nice boost to create something!

RESOURCES AND THINGS TO KNOW!
To preface this little guide already assumes you have basic knowledge of color distribution, lineless art, or breaking up art into proper layers for later processing! I am also assuming that your art program has access to scatter brushes and tiling textures. Personally I use Clip Studio Paint, but this can work on other apps. Anyways, here are some good sites for this:
EZGIF - Free, easy gif maker for assembling any kind of gif*! It also has stuff like converting those damn WEBP's back into png.
*PLEASE KNOW THAT YOU CANNOT MAKE GIFS THAT ARE PARTIALLY TRANSPARENT. YOU MUST USE A SOLID COLOR UNDER ANY PART THAT IS OVER BARE CANVAS
Transparent Textures - Free to use source for HQ transparent textures that tile! Amazing for finding a paper texture for these if you commit to the paper doll look. Best results for textures that are in white or black!
So! You have a finished, prepared piece that you want to glitterfy. Well I'm not covering that right now so you can scroll down to That part if you came just for the glitter. This next section is for...
PREPARING THE PAPER DOLL
To start, your piece should already be separated into respective layers in any order you'd like! We're about to use a ton of clipping masks so Make sure you know your program before starting! So, as my example we have my oc Roy, resized to around... 1500x1500 or the nearest equivalent Smaller is better because it brings out the texture! He looks a little ah...Flat, though right now?

I'm using this guy for a couple different reasons! Those being:
Roy has translucent bodyparts! Just so you will know what to do with characters who are translucent! I'll get to this in a moment so sit tight
He has a clear, defined, and distinct palette that is easy to pick a color to slap the glitter on! This is important because I personally find balance to be the most appealing part of the finished art.
He also just has a lot of doohickeys on his design.
This is where you need your transparent texture! You can use any kind of texture and I encourage experimentation and such, but I personally use a simple paper texture. What we are going to do is go through and clip our imported and tiled texture to each applicable layer! (Make sure to just Copy and Paste the layer you do NOT need to repeatedly go through this menu...)
And... When you are done, you should have something like this:
"But why don't I just clip the texture to the entire piece through a folder? Why go through the hassle of clipping to each individual layer?"
Well that's because of the next step, where we will be adding the shadows. If we don't clip each individual layer, your shadows will look like this example on the left which sort of just ruins the 3D effect and kinda just looks icky, as opposed to this, which is nicer and smoother.
Now I'm no lighting wiz! In fact I'm rather mediocre at best but some general tips for adding the shadows:
Try to keep your shadows going all in one direction mostly! It gives the effect of one light source and generally just looks better than if you shaded around ALL edges everywhere.
Try to only shade where there are parts overlapping that need the dimension! Overdoing it can make the piece look odd. It's especially helpful to separate any details like different shades of hair, layers of hair, etc so that you can put as much volume as you want.
Once the shadows are all added in you should have something that looks like this:
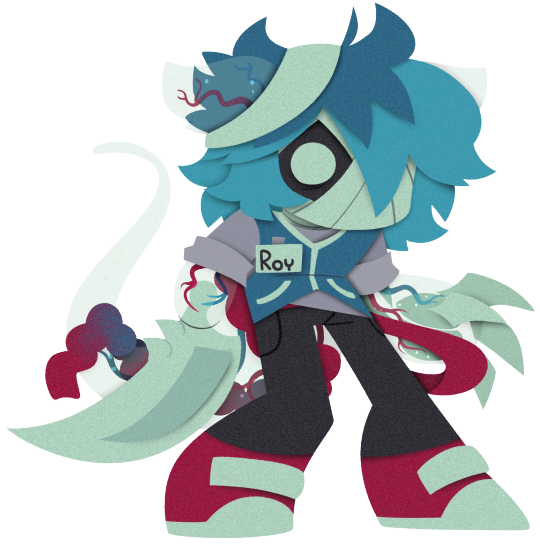
Which looks good! Now I'd sometimes stop here if I can't pinpoint how I'd like the glitter to sit or if I think the piece just doesn't need it, but we're moving on to the big important steps!
ADDING GLITTER
This part is entirely up to your taste! But I'll describe how I do my glitter stuff. Firstly I start out by identifying which color I want to pop out. For Roy here I chose the red parts! For your character it may be different. Experimentation is key!
This is also, however where you need that scatter brush I mentioned earlier. Personally I just use the default CSP spray brush, but again go wild!
Make a folder above your piece, set its blending mode to glow dodge (or add, or add glow depending on what options you have), and create three layers inside of this folder. Setting the folder to clip is optional right now but will be needed later.

Then, fill each glitter layer with your choice of particle in whatever color looks good! Yes, you can do gradients and other stuff on the particles too! World's your oyster.
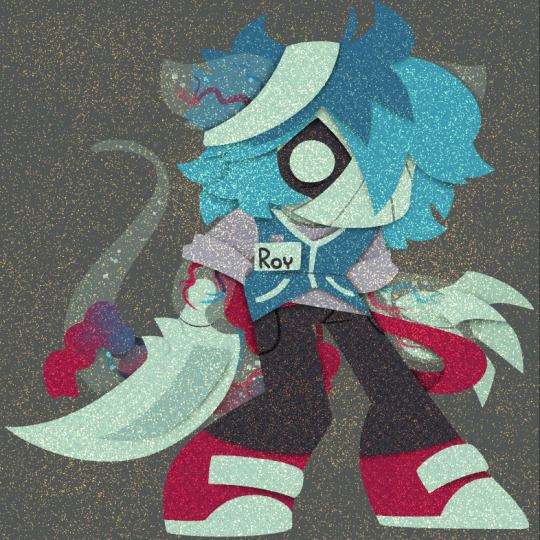
^ Unclipped example of a glitter layer.
Glitter tips for the early 2000's webcore enthusiast:
Use different strokes and patterns for the glitter distribution! This helps it animate better by moving around. For example this time I went diagonally for the first, horizontally for the second, and then in loose circles for the third. Particle density and stuff is also completely up to you.
Use a color that would pop against the intended area! For Roy I used an orange-ish yellow since it compliments both blue and red.
So now we have the layers! This is where clipping is our best friend once again! You're just going to go in and clip the glitter to whatever layers you want it on. Entire folder, not just one of the layers!
Once that's all done, go through and toggle the respective glitter layer for the frame, saving individual copies when done. You should end up with 3 identical images with different glitter distribution.
"BUT WAIT! JONES, THE TRANSLUCENCY!!" I hear you call! Yes, this is where we handle that! If your character is NOT translucent, you can scroll past this section.
Open up your frames all in one canvas, stacked on top of eachother (no jittering or slight displacement! ON TOP of eachother!)
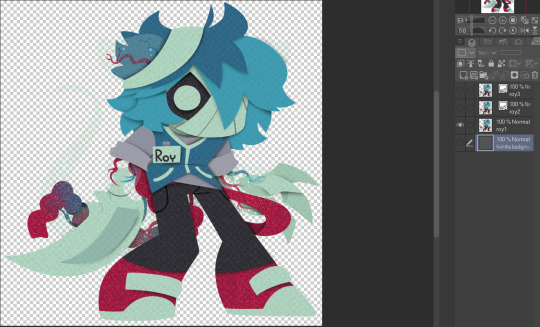
Our layout should look something like this...Note how the translucent parts are rather hard to see, well if you took your frames and put them in EZgif, they'd be gone entirely! That's because you physically cannot have a partially translucent gif due to technology limitations. So an easy little cleanup thing I did was:
1. SELECT THE CANVAS AROUND THE CHARACTER WITH THE MAGIC WAND TOOL. Do not have any expansion settings on or it probably won't look right in the end.
Make sure you do not miss any gaps! I personally missed the gap between the arm, leg, and lanyard and I had to redo this next step...
2. SELECT -> INVERT SELECTION

3. FILL SELECTION WITH THE DESIRED COLOR. IT MUST BE OPAQUE. I personally picked this cloudy gray color.
You can now save individual frames of your character with the fill so that they don't go bald when you move on to the next step! Again, you should have 3 frames.
FINISHING UP
This is nice and easy. Upload your three frames into EZGIF and wait for it to process. It'll look like this if you're in the right place.
Once things have loaded, make sure to change the settings to the following:
FRAME DELAY: 0 (this is how fast the frames move.)
DON'T STACK FRAMES: ENABLED
You can play around with this but I generally leave everything else alone because you don't need it. Just hit the make a gif button and you're all done!

Aaaand that's it! If you've read this far...Firstly thank you for dealing with my rambliness and horrible explanation skills. Secondly, I hope that this can come in handy for anyone interested! Would love to see if anyone puts this to use. n_n
#tutorial#art tutorial#art tips#art#flashing lights#i dont know what other things to add. ummm#bookmark#<- for myself later so i can find this if i need to#long post
414 notes
·
View notes
Text
DRAWING BACKGROUNDS: TIPS AND TRICKS
So many people are afraid of drawing backgrounds and I think it's a shame, so here's some tips and tricks, because I'm not perfect at it myself but I think the hardest part is really just knowing where to start.
First off: Perspective
Yeah, yeah, that's the scary word. But I promise you, once you're familiar with the basics, backgrounds are a LOT less intimidating. Don't get discouraged if WHEN you have trouble with it. Even professional artists struggle with it. I promise you, screwing it up is good and normal. That's how you learn after all!
Now I'm not going to go into detail on how to do it here, because honestly there are a thousand and one free resources online and in libraries that can explain it far better than I ever could in a singular broad-strokes tumblr post. But I AM at least telling you you should familiarize yourself with these basics:
Important Terms: Horizon Line: A horizontal line across your canvas, showing your viewer's eye level and providing a location for most of your vanishing points. Vanishing Point: Integral to drawing in perspective. The sides of a 3D object get smaller as they become farther away from the viewer in space. This point is where the parallel lines of a side eventually meet.
The Basic Types of Perspective: One Point Perspective: Good for drawing things that you're looking at straight on. Two Point Perspective: Good for drawing things at an angle. Three Point Perspective: Good for drawing things the viewer is looking up or down at, especially at an extreme angle.
[Click images for ALT descriptions]
And if you're comfortable with these and serious about improving your skills for use in storytelling, I also might suggest looking up:
4 Point Perspective: Great for extra wide or tall shots and for camera tilts if you're doing an animation or animatic. I think some other names for this in animation include "banana pan" and "warp pan."
5 Point Perspective: Fish-eye lens. Good for all your angsty anime boy slipping into madness needs!

Some perspective tips I wish someone had told me earlier:
Objects' relation to the horizon line is constant. A super helpful tip to remember when placing a character or object in space is that they will always (assuming they aren't changing in size or moving up or down) have the same relation to the horizon line no matter how far or close they are. If your horizon line is at shoulder height for your focus character in the foreground, any character of the same height in the background will still line up with the horizon line at the shoulders.
How to pick the distance between your vanishing points: 2 pt perspective uses 2 vanishing points, 3 pt uses 3, etc, etc, but how close should they be? Well, first of all, for anything that isn't one point perspective, one or more points will usually be off the canvas. Super annoying, I know, but the closer your vanishing points are, the more warped your drawing will become. Second, a helpful thing to know is that choosing the distance between your points is basically the illustration equivalent of picking your camera lens! Photography buffs will know that wider (shorter focal length) lenses show more space and make the distance between foreground and background more dramatic, while longer focal length/telephoto lenses are flatter, and more focused and intimate. The same is true of vanishing points that are closer (shorter focal length) or farther apart (longer focal length).
2 point/3 point/etc doesn't actually mean you're limited to that many points total on your page. this one confused me a lot when I was getting started, lol. A lot of examples will show you drawings of nice, neat cities or something, in which all the buildings are facing the same way in order to demonstrate perspective drawing. But in real life, buildings don't all face the same direction. They're at all sorts of different angles. So how do I do that??? Answer: Just because you're drawing in 2 point perspective or whatever doesn't mean you... have to actually keep your 2 points in the same spot. You can move them around, just keep them the same distance apart, so you're not screwing up your camera lens.
Other Tips:
Use reference! The instant you try to draw a house, you're going to forget every house you've ever seen. That's just how it goes. Buildings are complicated. Do yourself a favor and collect a few reference images first, buddy!
Consider details (like architectural style, amenities, and materials) Your building will look more like a building when you keep in mind that buildings have gutters and door knobs and light switches and paneling and stuff, and aren't just boxes with roofs on them. Again: reference! You will forget electrical sockets and baseboards exist immediately. Art brains are dumb.
Use details and texture to fill in negative space Giant stretches of blank space tend to be boring and distracting. Put a few suggestions of wood grain or something on that wall back there, bud, just don't overdo it.

Line weight Darker, thicker lines draw more attention, look heavier, and look closer to the viewer than lighter, thinner lines do. Take advantage of this to draw the viewer's attention to your focal points, de-emphasize less important details, and imply depth. It's up to you to decide how you want to use this and what your style is, especially once you start getting into combining or replacing it with shading, values, and color, but a helpful rule of thumb is to try reserving your thickest lines for focal foreground characters and use thinner lines on backgrounds, especially details in the far distance.
Perspective guides If you're drawing digitally, take full advantage of any perspective tools you have access to! A lot of art programs lately have begun adding perspective guide features that let you set up vanishing points and then literally guide your hand as you draw so you stay in perspective. Some of these include Procreate, Clip Studio Paint, and Adobe Fresco. (still sadly none in Photoshop as far as I'm aware, what the heck, Adobe!). Check through the settings of yours to see if it gives you any perspective guides or other similarly useful tools. They're 100% worth it! And for god's sake, if you've got any skew or perspective warp tools, draw your complicated shapes flat and then warp them instead of spending an hour on it! Don't make my mistakes!
#backgrounds#art tips#tutorial#art reference#drawing tips#perspective drawing#the owl house#hunter toh#doodle art#doodletext#rambling topic#yes i'm using my blorbo to demonstrate art tips what about it#this took longer than i meant it to lol. i got really into the examples#thank you for your patience guys#this turned out to be a GREAT exercise for me as an artist too actually. Trying to explain things is rlly good practice#I didn't even get into values and such. I can only ramble so much I'm afraid
1K notes
·
View notes