#Transplanting And Potting Rooted Cuttings
Explore tagged Tumblr posts
Text
Caring For Black Pepper Plants In Winter
Protecting Tropical Plants From Harsh Weather Tropical plants such as cardamon, noni, and black pepper are frost-sensitive, which may cause leaf drop or death. They need to be placed in a sheltered location. Consider employing fencing, netting, or neighbouring vegetation to protect them from cold winds. Applying mulch and composted manure just before the temperature declines can furnish warmth…

View On WordPress
0 notes
Text
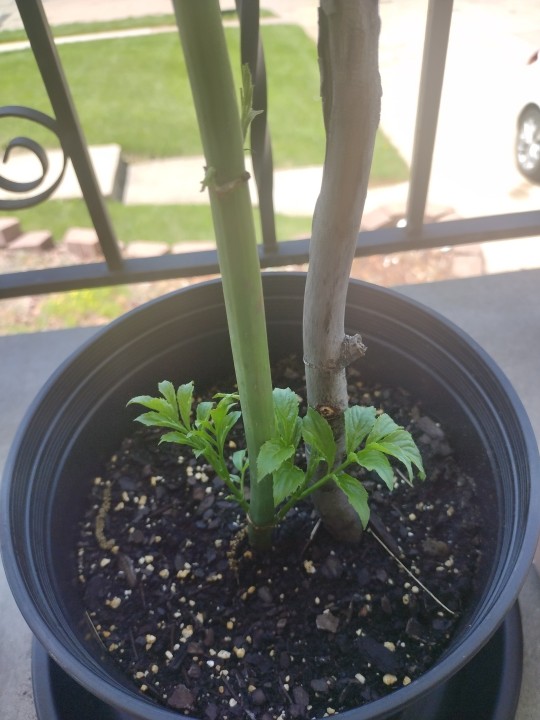
In the back yard of the duplex I rent, there's an elder tree shrub. I loved her very much and her presence in the yard felt like a good omen to choose this place to live. Well last year she was mowed down one day by the landlord's landscaper and I was devastated. She came back this year tho! So I decided to try to propagate a cutting from her to grow in a pot in case she was mowed down again. I'd never taken a cutting of a plant before but I watched videos, made the propitiatory offerings and rhyme, and then took a cutting of her roots including a green branch with leaves, and planted her in a pot on my front porch.
She immediately displayed transplant shock, her leaves all died and she droopped all the way to the concrete. But I knew she was still alive. I read that it can take months to recover from the shock, so I removed all her dead leaves and used a stick from the yard to help her stand up straight. Then I patiently watered her and braced myself to wait months to see if she'd bounce back.
To my utter surprise, she's recovering much faster than anticipated! Look at her leaves!! And she's standing on her own now despite the intense wind we're having. I'm so happy!
I'm looking forward to tending this emissary of the Elder Mother.
39 notes
·
View notes
Text





(光与夜之恋 Light and Night) Melody of Return Letter Translation
*Light and Night Masterlist *Join the Light & Night Discord (^▽^)~ ♪ *This will go under everyone’s personal tag *Spoiler free: Translations will remain under cut
❖ Osborn:

My Little Naughty (Y/n),
Finally willing to come back, huh? The long-term contract we signed has yet to be fulfilled, so I'm not letting you escape all so easily. ‘Sides, I don't believe that you don't miss me at all, seeing how I'm always at your disposal, all day, any day. Milkie has become friends with the others at home, and Xiaoragon loves it. But I know that Xiaoragon loves you best. Ye Chuan asked about your recent situation, saying how he wouldn't be able to have peace of mind until he saw you for himself again. Let's go visit him when we have time.
—Osborn
❖ Evan:

My Little Rabbit, (Y/n),
That spider plant is flourishing. It helps put me at ease whenever I place it in its daily spot of sunlight. However, I do think sometimes that it shouldn’t be trapped in a small flower pot indoors, relying on regular and controlled amounts of watering to sustain its own life. Perhaps the life it wants is being able to take root in the soil and grow freely. Let’s transplant it to the yard together once we’re free, and we can watch the ending of the movie we first watched together after.
—Evan
❖ Sariel:

My dumb bird, (Y/n),
Qi She said that I wasn’t smiling as much during the time you were gone. I thought about it, and maybe I do smile around you a lot. Maybe that was what gave Qi She that misconception. But you’ve always done well; your growth as a designer is steadily improving, and you’ve never been a dumb bird. In short, you don’t have to go away for such a long period to further your studies next time. You can just come to me. I’ve brought back a couple of trinkets that I think you’d like. I’ll deliver it all to you later.
—Sariel
❖ Charlie:

My Dear Fiancée (Y/n),
The joy of publishing ten papers cannot even come close to the joy of seeing you. So, if you want to come see me more often, I can reciprocate as well by coming to visit you instead. However, I am not like the golden bachelor you read about in novels, who wants to confine their Fiancée like a canary in a cage. I fully support your decision to go further outland to further your studies, but don’t forget to contact me more no matter where you are. Texting would be good, phone calls are better, and of course, bringing me along would be the best.
—Your ever-waiting Fiancé, Charlie
❖ Jesse:

My Dear Lady, (Y/n),
You’ve finally returned! I’ve lost weight waiting for you, and the costume you [personally designed and made before you left doesn’t fit as well anymore. So, when are you gonna come by and help me make some alterations, Milady? Also, you once pinky swore with me that you’d always stand by me and that you’d never leave. I won’t let you go back on that promise, so you’d best be prepared~
—Milady’s One & Only Knight, Jesse
#光与夜之恋#Light and Night#Otome#Translations#Tencent#萧逸#Osborn#齐司礼#Sariel#陆沉#Evan#查理苏#Charlie#夏鸣星#Jesse#For Night For Freedom#For Night For Causation#For Night For Revolution#For Night For Paradox#For Night For Belief#Melody of Return
40 notes
·
View notes
Text
garden update // september 24th
phew! today was busy! rain is supposed to fly right on thru our area very quickly because of Helene so i have been busy shifting gears into prep mode for that.


the biggest deal was getting these basil seeds inside. i would rather have them sit on the plant for another 3 or 4 days... but i also would rather not have them drenched in downpours and end up rotted. so i cut a majority of the basil heads and will let them dry inside in a paper bag before processing. it's spicy globe basil - my absolute favorite basil variety ever - and since it's so tight and compact the bees love sleeping there at night, like this little guy. so i did leave some for them, especially the not-too-developed seed heads. hopefully it'll all be ok.


a lot of the no longer baby plants in the greenhouse are now in their semi-final home. transplanted like crazy the past two days! the cilantro doesn't have true leaves uet, but they were stretching like cray cray in the greenhouse since i have shade cloth on it, so i went ahead and put them in their pot. i say semi-final home because it's their final home in my garden before they are sold at the market. typically i transplant, let them grow in their new pot for 2 weeks, then consider them for market inventory. those 2 weeks allow for root growth and for them to get used to their new surroundings outside the greenhouse. kinda like hardening off, but not really.

went from 8 trays down to 4 in the greenhouse. the heating pads are NOT on, just don't have anywhere to store them so they just stay put. next week this will be back to full after i start more seeds. these were the only babies left without any true leaves. kohlrabi, cabbage, lettuce, collards, and celery.

so early this spring hubs and i pruned a pomegranate tree that's at the farmers market. not the best time to prune tbh but that's ok. i took 50ish cuttings and tried to root them. only these two did so. admittedly i'm a novice at rooting cuttings so honestly surprised i got these two. now i need to find a final home for them by next fall... for this winter they'll go in the greenhouse.
pro tip (like, the only tip i know about cuttings): the best way to tell if your cutting is still alive or transformed into a stick is to take your thumbnail and scrape a tiny dent into the bark. if the layer underneath is green, it's still alive and would prefer to not be knicked again plz thank you. if brown, then it's now a stick and you can toss it in the compost pile or to your dog. they are still babies so they don't like to be knicked so do this test as tiny as possible. its like checking to see if the chicken is raw after cooking... if you have to squint and hold it up to your face to try and tell, then its cooked dont worry. if you have to hold the cutting up and squint at it to find the green layer then its cooked, too.

peas are happy. the daikon totally wasabi *wink wonk* radishes have transplanted well. the cantalope from the compost pile is photobombing the peas and daikons.


last but not least, cascading over the raised bed edge appreciation photos. although deer have been coming by to eat the sweet potato leaves. but that's ok. and the creeping rosemary is absolutely loving its spot under the blueberry bush. i have had horrible luck trying to grow normal rosemary, but this creeping variety is more visually fun.
hopefully next week we will get a break from freak pop up tropical systems and i can finally get my two new metal raised beds in place! yippee!!
#food not lawns#gardening#home garden#homegrown#food#gardenblr#grow food#garden blog#raised garden beds#garden beds#garden beauty#garden update#suburban farm#suburban agriculture
14 notes
·
View notes
Note
so when roots are overgrown in the pot to the point that the whole thing pops out because it's ALL ROOTS and there's hardly any actual dirt left, are you supposed to tease the roots out a bit or leave them? grandmother taught me the latter, but I feel like it's additionally traumatic to the plant on top of being replanted
Most of the time, it's a good idea to tease those roots! You don't have to be overly aggressive about it if it makes you nervous or the plant is otherwise in ill health. But it won't hurt the plant and will actually encourage new outward growth into the surrounding soil/media. It is going to have to focus on growing new roots out and down anyway.
You don't have to spend a whole lot of time getting it all perfectly untangled either or worry that much about breaking roots. When I transplant hydrangeas for spring, to help them grow their roots out and break dormancy, I score their roots with a soil knife with four cuts on each side of the root ball. Otherwise they keep growing in circles even when given the chance to spread out.
If the potting media the plant is growing in is significantly different than the soil it will be planted in (like a nursery potting mix to a heavy clay soil) some people even recommend wholly bare rooting the plant, spraying off all soil, and teasing the roots fully loose. Then filling in with native topsoil, making sure to fill every gap. I've done this method a few times if the nursery mix really really sucked (cough cough Monrovia cough)
23 notes
·
View notes
Note
I've been lurking for a while and I gotta ask:
are you familiar with basil and hacks to properly transplant it? I followed the turtorials I found but my [store-bought] basil plants always struggle to take hold of new earth and pots :-(
Despite the much bigger space they always struggle to survive.
Ngl basil is a plant I have historically had problems with, so I don't have hacks specifically for it. If anyone has specific basil tips, get in the comments.
I do have some general transplanting tips though.
- Handle the roots as gently as possible, especially if you need to seperate tangled plants. Additionally, keep them moist while transplanting
- Water the plant right away after transplanting and keep a close eye on moisture, since transferring can cause root damage which makes it harder for plants to stay hydrated. A little bit of wilting is expected because of this
- If moving them outside / to a new location, check that temperatures are warm enough and harden off the plants as needed (help them gradually adjust to new temps)
- Thin the seedlings as needed, since cutting out some of the weakest / smallest plants can allow the others get more nutrients and space to grow stronger
- Be cautious of wind, if moving them outside
Side note: grocery and hardware store plants are unfortunately not always well cared for before you buy them (looking at you Home Depot). They have a higher risk of carrying common diseases and pests, as well as an increased risk of nutrient deficiencies, dehydration, and rootbound issues. Sadly, sometimes these plants are very hard to keep alive even with your best interventions. I would recommend you:
- Check for signs of disease / pests / deficiencies before buying. Yellowing, spotty, or crispy leaves can indicate unhealthy plants
- Transplant immediately after purchasing, so your plant has access to good soil and adequate space right away
Hope this helps! Happy gardening 🌱
11 notes
·
View notes
Text


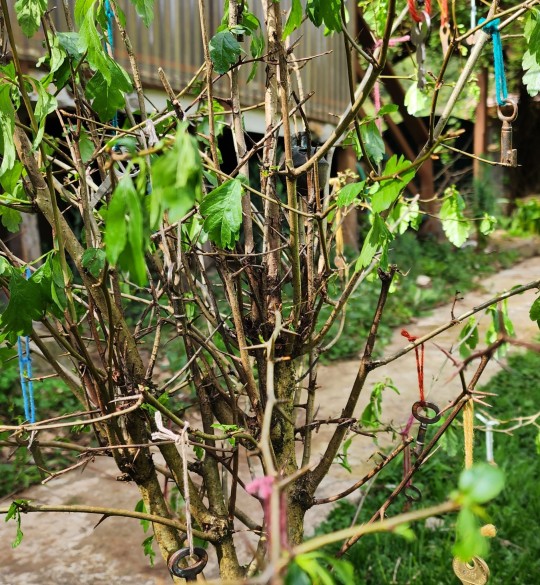

Dressing the Wishing Bush
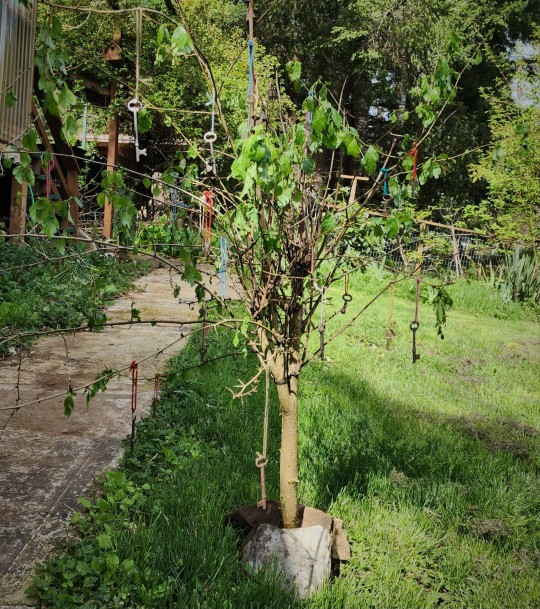
An important Walpurgis custom of ours has long been the traditional Dressing of the May Bush. This year, though, things have gone a bit differently.
In the past, we would harvest a small branch of blooming Hawthorn on April 30, which we would set before the home and decorate with Clooties. We would ideally ornament the living Matron Whitethorn by our front gate, but we have been discouraged from drawing attention to her unnecessarily, lest we risk attracting the unwelcome. As such, we've used a small switch from the Matron tree each year.
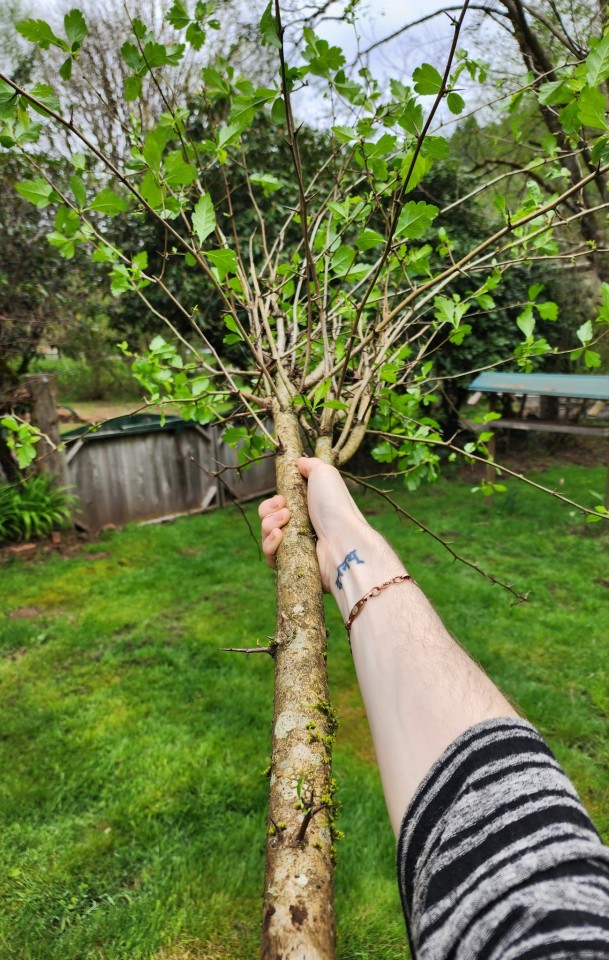
This year, however, we were given leave to harvest a special thorn-broom from her central bole that we've admired for years. We will dry this specimen, following today's celebration, and reuse it every year. What's more, we have been guided in establishing a different form of the May Bush, and so was born the Wishing Bush.
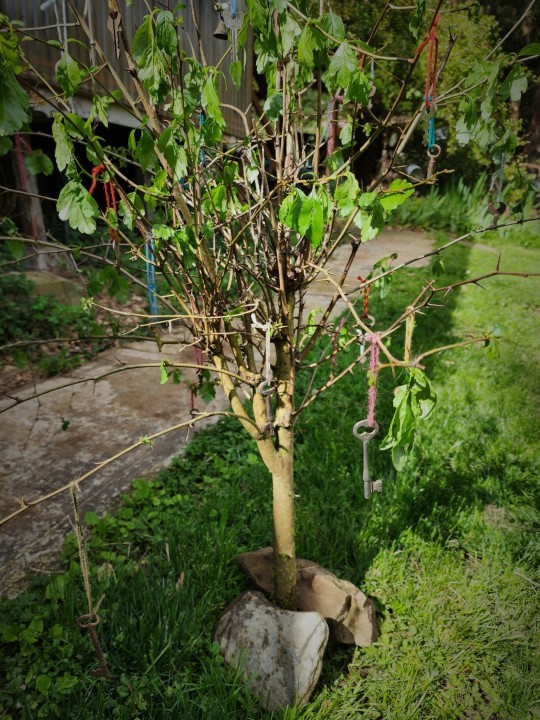
We used keys to represent an array of wishes for the coming year—however small��which we consecrated and tied with colorful loops of charm-knotted cord. These keys were then hung from the Hawthorn and earnest entreaty was given to the Whitethorn Mother, that She might help bring these wishes to fruition. On the next day, the cords will be cut and burned in the smoldering remnants of the Hexennacht Fire—that the Hawhthorn-blessed wishes might be carried on the wind to the powers that be. The keys, in turn, will be cleansed in hallowed waters, for future use.
EDIT: Multiple powerful omens ended up making it clear that this harvested "thorn-broom" was not meant to be dried, but was instead meant to be rooted and transplanted—most potent amongst which was the segment beginning to put out new growth after 9 days of being in a warm greenhouse with no water or soil. Despite initial fear that we heeded these omens too late to save the segment of Hawthorn (which was doing very poorly everywhere but that single branch of new growth) we managed to rescue and rehabilitate it with weeks of vigilant care. I think it should be ready to re-pot by the coming Walpurgis.
#may bush#wishing bush#hawthorn#whitethorn#whitethorn mother#walpurgis#hexennacht#wending way#folk magic#traditional witchcraft
77 notes
·
View notes
Text
So, some of you might remember, how I found an abandoned 'banished settlement' where people used to live 20 years ago, and they left plenty of cultivated and edible plants behind, including one huge rose plant. It was spread more than 10 meters in both directions, made thousands of roses, I used to decorate my entire place with them, dry them, they didn't have a scent so I didn't make food from them. However, the city has decided to build some ugly buildings in that place, so they flattened half of the area to the ground, made it into nothing but empty dirt. Needless to say I was devastated when I went foraging and found most of my plants, including the rose, gone.
However, the rose wasn't just a plant you can run over and destroy; in the spring I found new shoots, it's starting up again from the roots, and it's not going to get exterminated so easily. I do believe they're intending to destroy it completely, so I'm going to try and rescue it by taking some cuttings and propagating it.
Here's what it used to be vs what it is now.
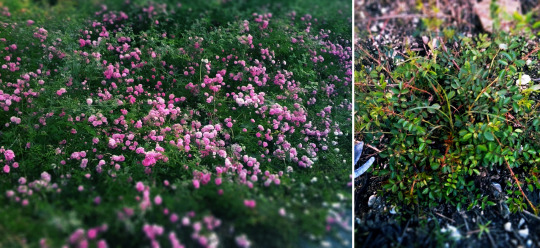
:(
I took a few of the most sturdy stems I could find, I had to get plant cutters in order to do it, they will not break easily. Here's me propagating them at home:

All of the leaves and growth is stripped down, because a plant without roots cannot support foliage. For roses, I think stems of 12-15cm in lenght are reccomended for propagation, that way they have enough stem to try and grow roots from, and not too much to support. I stabbed them in a pot of soil, and then covered with this big glass thing, because cuttings will usually only grow in high humidity, they need to be supplied with water from air, because they don't have roots yet. I had to cut them down a bit more to fit them in, but I think that will be okay. I watered them excessively, and sprayed the cover with water too, so it would create super humid conditions.
I left this on the kitchen window, so it doesn't have to deal with a lot of sun or heat, it's best for cuttings to be put in mild conditions so they can focus on development of roots. If they start growing new foliage, that's the sign that the propagation is successful!
Here they are 10 days later:
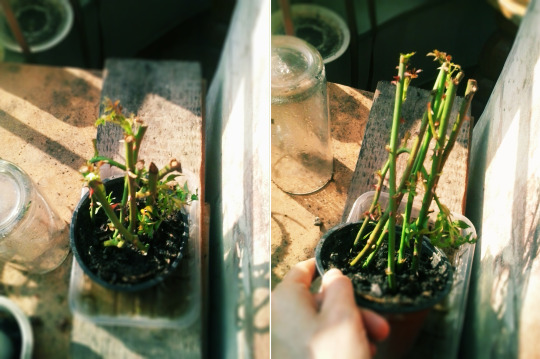
To me it looks like all of them are already growing new foliage, but, it's suspicious, I don't think they would have managed to grow new roots so soon, in my mind it should take a ~while~. Maybe they're just using the plant power they had stored in the stem, and haven't figured out they've been turned into cuttings yet. The only way to really check would be to pluck them out and check for roots, but I won't do it yet, I'll leave them in here for at least 2 more weeks before trying to transplant them somewhere else. But for now it looks hopeful! I might have roses on my balcony!
Here's the first post I ever made about this rose, if you wanna see more pictures of how it looked.
(edit: I later looked into how long do rose cuttings take, and it said 2 months, but it also said that in late spring, you're supposed to only take young, flexible, and not-woody cuttings, and they'll grow faster. So I have messed up a little, sturdy cuttings are to be taken in the fall and winter and they're the most difficult ones to root. It also said you need 25cm and to bury them 70% in the ground. But it seems that it's still going well so do not follow the rules! I did have one that was young and flexible and that one is showing the strongest signs of growth.)
#propagating roses#roses#cuttings#gardenings#propagating plants#rescuing roses#male parasitism#i cant believe someone would destroy that plant#that plant was like a sister to me#its ok i will make sure it gets to wild again#but still its a big loss#my rosee
57 notes
·
View notes
Text
Real pleased with the progress in the yard so far, and fine-tuning the next steps as I go
Projects I noticed while working on the reseeding today:
Need to build and hang some bee boxes and then scrub down the deck with a citronella seal to hopefully convince the carpenter bees to relocate - also need to redo the deck frankly but that's a long-term thing and I'd really like to have access to a woodlot first and plane our own boards rather than buying them. Even in bulk from a lumbermill that's more money than I'd like to spend for proper hardwoods like oak and cherry
Need to buy a sythe/machete for the tall invasives by the creek - once the ground is cleared, going to turn our old olive oil tins into lizard houses, and reseed with strawberry corn, sunflowers, cardoons, witch hazel, and ground cherries
Need to call the city and find out who is legally allowed to bring down the willow across the creek that got uprooted during Helene and has been threatening to fall onto our fence ever since. Happy to do it myself if I'm allowed, but would rather the other land owner handle it, unfortunately it's not a person, it's a company so I have no idea how to talk to them about this except through the city.
Need to smash a pumpkin and throw some budding sweet potatoes into the compost and really hill up the hay on top so I can have a pumpkin and sweet potato patch for my leetle ladies tasty treat times
I need to sprout the red plum seeds and prep the temporary pots for when they're ready to transplant outdoors, might consider planting them directly in their own loosened hale bales, esp if I can let the chickens have at the bales over winter first.
Speaking of which, we need more hay. I need to call my hay guy and ask how much another 50 bales of clover hay will cost me
Need to bury the logs under hay and compost to start byilding raised beds and improving the topsoil quality, ideally I'll seed the swales with wetland/riparian plants so that as the swales smother the lingering invasives, the plants can sprout up on top with all that yummy organic matter
Need to buy/make root veggie sacks to bury in the compost and new topsoil so I can grow even while I'm still making new topsoil
I need to make sure to include wildflowerd in the spring compost and reseed, because we're starting to get some volunteering which means the soil is recovered enough to play good host and I want to speed that up
Gotta make some starter plots around the chicken run and the dog run to regularly re-establish groundcover in them given how much the chickens and dogs tear up the grass
Need to build a chicken tractor to use in future years to control overgrowth and compost growing beds after harvest
Need to build a water table for lettuces and greens, ideally linked up to the rainbarrel water storage system
Need to keep expanding the chicken run now they're all enjoying it so Elvira is less of an asshole, and reinforce under the coop so no one gets stuck under the foundation
Reinforcing the creek bank (witch hazel and red plum tree and creeping thyme) behind the dog run so we don't lose integrity of the fence.
Paint the house some goddamn colors holy FUCK
Keep making braids for cat and chicken toys
Maybe enclose the upper deck for a four season cat porch
Set up some 7-10 gallon pots on the deck for growing ginger and lemongrass and other culinary/medicinal plants we need to keep out of the topsoil
Make a plant ID booklet for use during harvesting
Make a recipe book to guide cut and come again use
Set out a shaded table at the top of the drive with places to set out eggs, produce, preserves, etc that we're not going to be able to use up for give away - should make sure to put a sign up to officially let folks know they can take what they like.
Start passionflower vines by the creek and back fence
Fill the front yard with flax
Plant a broomsedge, scouring rush, water cress, plaintain, American Trout Lily, alumroot, phlox, chickweed, creeping blueberries,culinary sumac, and primrose propogation bed by the creek to crowd out the last invasive ground covers (apparently the native ground covers have done a GREAT job smothering most of the invasives in the yard, and there are only a few invasive vines and crabgrass left actually. Everything else is native wetland grasses and galax. Just....so much galax lmao
I might look into canebrrak bamboo as well, that would be extremely useful for fiber production holy shit
I definitely want a stand of Indigo for dyes and inks
I still want my pawpaws and wild olive and wild black rum cherry trees so they'll probably go in the front where the crabapples are now. I could probably make a lil lumber out of the bigger crabapple and a nice cat toy out of the smaller one.
It would be great to get a Broom Hickory or a chinquapin, too, but I'm prioritizing the pecans
A sugar berry would be lovely, they're kind of nothing on their own, but if you use them in preserves of other fruits, they come out AMAZING
Coreopsis my beloved <3
I need to flesh out my medicinal garden too, and I'm thinking about waterleaf. It would be AMAZING for my skin condition, particularly for my feet, but I'm not sure I can harvest and use it fast enough given its growth habit the leaves and shoots are ostensibly edible, so maybe if we a consistent about cutting them back for the greens that will keep the rhizomes focused on growing rather than spreading.
Bayberry would be extremely useful for making plant waxes and butters, but I'm in the same position as the waterleaf, esp since they're even less readily edible lol
I think that's everything so far, which is good because it's already a year's worth of work lmao
3 notes
·
View notes
Text


Repotted my Hoya and Leopard Lilly today. Really hoping my hoya flourishes. Just never got around to repotting either of them but I know they could both benefit from the change in substrate. I also transplanted the Chinese money plant cutting a friend gave me. I didn't realize it had grown it's secondary roots already. I wonder if that's why it was beginning to yellow, just still being in solely water and rooting hormone. Fingers crossed she thrives! Not the best pot but it is what I had available. Worst case it doesn't make it and they give me another one (theirs is absolutely huge and they already offered more).
Side note: For the time being I am no longer responding to private messages. I have a lot going on in my personal life, mental health, etc., and I would like to focus on just sharing and talking about plants. I appreciate your support and understanding.
#plants#indoor plants#grow life#grower#indoor garden#tropical plants#repot#chinese money plant#leopard lilly#dumb cane#hoya pubiclyx#hoya#plant update#plant journal#plant journey
2 notes
·
View notes
Text
Cloning cannabis is a horticultural technique used to create genetically identical copies (clones) of a cannabis plant. This process allows growers to replicate a desirable parent plant without the need for seeds, ensuring that the new plants will have the same genetic characteristics as the original.
Here are the basic steps involved in cloning cannabis:
Select a Healthy Mother Plant: Start by choosing a healthy, robust cannabis plant with the desired characteristics you want to replicate. This plant is referred to as the "mother plant."
Gather Supplies: You'll need a few supplies, including a clean and sharp razor or scalpel, rooting hormone, small pots or rooting cubes, a cloning gel or solution, and a propagation tray or a humidity dome.
Prepare the Mother Plant: Take a cutting (clone) from the mother plant. This is typically done by cutting a branch or stem tip that has healthy growth and at least a few sets of leaves. Make the cut just below a leaf node. Remove any large fan leaves, leaving only a few smaller leaves at the top.
Treat the Clone: Dip the cut end of the clone in rooting hormone to encourage root development. This helps the clone establish itself when planted.
Plant the Clone: Place the treated clone in a small pot or rooting cube filled with a growing medium, such as soil, coco coir, or a specialized cloning mix. Make a small hole in the medium with a pencil or similar tool, insert the clone, and gently pack the medium around it.
Create a Suitable Environment: To ensure successful root development, maintain a high humidity environment. You can achieve this by placing the clones in a propagation tray with a humidity dome or using a plastic bag to cover them. Keep the clones under fluorescent or LED lights for optimal growth conditions.
Monitor and Maintain: Check the clones regularly to ensure they stay adequately hydrated and maintain the right temperature and humidity levels. Mist the clones with water to keep the humidity high, and make sure they receive gentle light to stimulate growth.
Transplanting: Once the clones have developed roots (usually in 2-4 weeks), they can be transplanted into larger pots or into the garden if you prefer outdoor cultivation.
Cloning is a popular technique among cannabis growers because it allows them to maintain genetic consistency and ensure that they are growing plants with known characteristics. It can also save time compared to growing from seeds, as clones skip the germination phase and start with a head start in growth.
#kush strains#growing marijuana#growing weed#420culture#420buds#cloning cannabis#weed love#weed life#smokeweed
21 notes
·
View notes
Text

Poinsettias adorn the Zocalo, the main square in modern Mexico City. Indigenous to Mexico and Central America, the plant became a symbol of Christmas with a little help from European missionaries and an American diplomat named Joel Poinsett. Photograph By Carrie Thompson, Alamy Stock Photo
How The Rugged Poinsettia became Our Favorite Holiday Flower
Long before a clever marketer turned it into a Christmas staple, the Aztec and Maya celebrated the colorful shrub for its medicinal value.
— By Bill Newcott | Published: December 22, 2022
Think “Poinsettia” and you think “Christmas,” right? Well, think again. At the time of the first Christmas, the closest poinsettia to the little town of Bethlehem was 8,000 miles away, clinging to life in a rocky canyon in what’s now southwestern Mexico.
“The Aztec called the plant cuetlaxochitl (brilliant flower), and the Maya referred to it as k’alul wits (ember flower),” says Mark Hoddle of the University of California Riverside’s department of entomology. He became fascinated with the poinsettia while working on his doctoral dissertation in the 1990s, exploring ways to control whiteflies, a common scourge of the holiday plants.
There’s evidence the indigenous peoples of Central America appreciated the plant for its seasonal red leaves, he says, but mostly they saw medicinal value.
“When you break a leaf or branch of a poinsettia, it leaks a milky white sap,” Hoddle says. “The cultures believed that sap had healing properties.” Aztecs applied the sap to the breasts of nursing mothers to increase milk production. They also used the sap as a depilatory.
Even today, Hoddle says, descendants of the ancient Maya in Mexico boil the leaves to create a remedy for obstetrical or gynecological hemorrhaging. And if you happen to be bitten by a snake, the locals say, there’s nothing better than boiled root of k’alul wits.

The poinsettia is named in honor of Joel Roberts Poinsett, an American diplomat and avid amateur botanist who introduced the plant to the United States in the 1820s. Library of Congress
The First Christmas Poinsettias
Franciscan missionaries arrived in Mexico in the 16th century and eventually began setting up elaborate manger scenes at Christmastime. Holly, Europe’s holiday flora of choice, was nowhere to be found for the dioramas, but when the missionaries saw the red and green colors of this local plant—that happened to burst into color every December—they knew they had the perfect stand-in.
By the time an American diplomat named Joel Poinsett arrived in Mexico in the 1820s, those bright leaves were a common sight in local churches at Christmastime. A swashbuckling U.S. congressman from Charleston, South Carolina, Poinsett spoke six languages, dined with Russia’s czar, served President James Madison as a covert agent to protect U.S. business interests in South America, and somewhere along the way became, for a short time, a general in the Chilean army.
Yet despite all his exploits, Poinsett is remembered primarily as the amateur botanist who became fascinated with those red and green plants from Mexico. He sent some home to Charleston, where people began growing them in their gardens. Their notoriety grew under a variation of Poinsett’s name.
Poinsettias Become A Christmas Star
For the first 100 years or so after those first transplants arrived in Charleston, fragile poinsettias were nearly impossible to keep alive in a pot. They were sold primarily as cut flowers.
“That all changed with these guys,” says Fred Clarke, keeper of what’s likely the world’s only poinsettia library. He’s leading me toward a large, translucent white shed tucked into a corner of the Flower Fields at Carlsbad Ranch, a bit north of San Diego, California.
Each spring Carlsbad’s famous Flower Fields become a fantasia of red, yellow, and white ranunculus flowers. Clarke is the horticulturalist in charge of making sure those 80 million flowers grow and get to market, but it’s clear his passion plant grows inside this shed.
“Here we are!” he enthuses as we step inside. Sitting on a series of low, tiered risers are scores of potted poinsettias arranged chronologically in order of their historical development.
Clarke doesn’t have a sample of Joel Poinsett’s iteration, but his chronology does include a close relative: the legendary St. Louis Red. The first mass-produced poinsettia, it was introduced in 1924 by Louis Bordet of Missouri.
Long-stemmed and fragile, the St. Louis Red was still primarily a cut flower. But a self-taught Southern California agriculturalist named Paul Ecke started toying with the Red’s genetics, breeding varieties that exploded with multiple colored leaves, didn’t mind growing in a greenhouse, and, most importantly, could be shipped in pots.
Following the lead of those long-ago missionaries, Ecke began marketing poinsettias as “The Christmas Flower.” He convinced Hollywood to use them as decorations on seasonal TV specials. (Ecke’s son personally saw to it that Johnny Carson had an extravagant display behind his Tonight Show desk each year.)
For decades, the Ecke family grew nearly all their poinsettias on what’s now Carlsbad’s Flower Fields. Today, poinsettias are grown primarily outside the U.S., so the Ecke family focuses on developing and patenting new varieties. The results are on proud display in Clarke’s poinsettia library.
Ushering me through the collection, Clarke—who started working with the Ecke family 42 years ago—ticks off the subsequent varieties. They include the Flaming Sphere (1950), a floppy version that never caught on. The C-1 (1968) was the first poinsettia that could withstand the rigors of transport. The Limo (1988) introduced the deep red of present-day poinsettias. Freedom Family (1991) was the first with rounded, elephant-ear-shaped bracts rather than long, pointy ones. And the Prestige (2002), known for its rich color and stamina, is now the most popular poinsettia on the planet.
After touring the poinsettia library, Clarke invites me to enjoy one of the Flower Fields’ famous strawberry milkshakes. As we head for a small stand, he suddenly stops and turns back toward the shed and his red-leafed congregation. He smiles.
“These guys have come a long way,” he says.
3 notes
·
View notes
Text
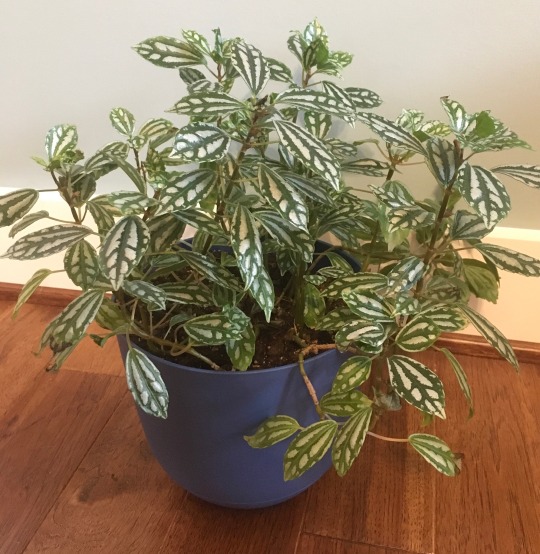
This week for Houseplant Spotlight, I wanted to feature my lovely and easygoing aluminum plant (Pilea cadierei). I actually got this plant a few years before the Great Houseplant Hyperfixation of 2023...I'm not sure when, but I'm pretty sure it was before the pandemic. It started out as a little 4" cup that I got from the grocery store, and it survived a lot of very spotty care before growing into this beauty. (I realize there's nothing here for scale, but that's an 8" pot). The leaves really do have a silvery sheen to them that is quite attractive.
I'm pretty sure I picked it because the tag said "low light". That's not exactly true-- it likes at least 4 hours of indirect light per day. Indirect light is pretty much all I've got in my house (not counting my grow lights). This guy currently lives on the bottom rack of my bathroom plant stand, where it has really been enjoying the extra humidity. I've also had luck growing them in pots with water reservoirs.
Another nice thing about the aluminum plant is that it grows from cuttings super-easily. It can get a little leggy, and pruning it helps it to grow nice and dense. I like put my cuttings in water (I use mason jars because I have a lot of them) until they grow significant roots, and then I plant them up. I took a few cuttings of this recently and they've all been growing beautifully. One of my current favorite things to do is to grow plants from cuttings, transplant them into throwaway cups, and put them out on a "free plants" table.
Anyway, it's just a nice plant that's very pretty and hard to kill. It's also non-toxic to pets. If someone offers you one, I highly recommend it!
24 notes
·
View notes
Text
ENTRY 190
Here are 20 vegetables and herbs you can start growing indoors using parts of the produce you would throw away and this can save you a pretty penny the next time you go grocery shopping.
Romaine Lettuce - Similar to celery, keep the base of your romaine lettuce in a bowl with a ½ inch of warm water. Leave it to sit in direct sunlight, and in a week or two, your lettuce stem will produce fresh, new lettuce leaves for all your great salads. Transplant your lettuce to soil to continue growing. They should be full grown in three to four weeks. This process works for Bok Choy as well.
Garlic Sprouts - Are those tentacles?! Nope, those long green things growing out your garlic are green shoots. You can put them in a little water, under a lot of sunlight and grow a bunch of garlic sprouts. They are milder in taste than garlic cloves and are great in salads, pasta and as a garnish.
Carrots - Place chopped off carrot tops in a container filled with a bit of water. Pretty soon, they will begin to sprout delicious greens from the top that are a nice addition to meals.
Turnip - Like carrots, cut off turnip tops and leave them in a shallow container with water until they begin growing roots. This can take a couple of weeks. Once they’ve sprouted, plant them outside.
Sweet potato - Unlike most vegetables, sweet potatoes aren’t started by seed but by slips (or shoots). Clean and cut a sweet potato in half, then place it half in/half out of a jar full of water using toothpicks. Over a few days, your sweet potato will begin to sprout slips at which point you remove them and place them in water to grow roots. You should have rooted slips with the week. Next, plant them in loose, well-drained soil and water every day in the first week, and then every other day (or as needed) the following weeks.
Ginger - With ginger you already have, look for pieces that already have little things growing out of them. With that piece, cut off the parts that look like they’re about to start what’s called a “rhizome” because they’re the key to growing new ginger plants. Growing this food takes minimal effort but does require the right conditions. Warm, slightly humid places like kitchens are perfect. Plant the piece of ginger about 3-5 inches in the soil with its rhizome pointing upwards. Water it regularly. It’s a labor of love and can take up to ten months before you get a sufficient amount of ginger, but its health benefits are more than worth it.
Pineapple - This will definitely take a few years but if you’ve got the time and right climate, why not try? Take a pineapple and cut the flowery “crown” off about an inch below the leaves. Trim around the bottom until you see little brownish bumps (these are the root buds). Before planting, dehydrate the pineapple crown to prevent rotting too soon. Now, with your prepped pineapple cutting, place it in a shallow container of warm water. When the cutting begins to root, replant it into a container with soil and be sure to water once a week. If possible, keep it in a bright, warm place with as much direct sunlight as possible.
Rosemary - Like other herbs, you can regrow rosemary from 5-6 inch cuttings. Place them in water and within a few weeks, there should be enough that have rooted and not rotted. In a 4″ pot filled with damp potting soil, make a 3″ hole with a pen or pencil and place the rosemary cutting gently into it. Because this herb is so delicate, only water it when the soil starts feeling dry. Keep it direct sunlight for 6-8 hours per day because it needs light to flourish. If the soil isn’t dry yet, giving them a quick mist is also okay.
Potatoes - When growing potatoes, you need ones with ‘eyes’ (or slips) growing on it. When you’ve got a potato with a lot of eyes, cut it into 2 inch squares with each piece having a couple of eyes. Leave them out in room temperature for a couple of days to let them dry out to help prevent rotting. In a deep pot, place the cubes 8��� deep with the eyes facing upwards and cover it with another 4″ of soil. As more roots begin to grow, continuously add more soil and keep modestly watered. In as little as 70 days, you should have quite a few potatoes!
Tomatoes - You can regrow new tomato plants that can reach up to 8” feet. Ease the tomato plant out of its pot, trim the low leaves, and place it in a hole, fill it with soil, and do not compress it much.
Celery - To grow this healthy snack at home, cut off the base of the celery and leave it in a bowl with a little bit of warm water. Keep the bowl in direct sunlight, and in a week, your celery base will start to grow leaves. Transplant the celery in soil and watch it grow!
Cabbage - Don’t throw away the bottom of your cabbage head just yet. Just like celery, leave it in a container with an inch or two of water in a well-lit area and wait. Over time, it will start to regrow with no planting required.
Avocado - You can successfully grow an avocado tree from just one avocado pit.
Mint - To grow mint, get a clipping and plant it 3″ deep in a 5-8″ pot of damp soil. Make sure your mint plant is in a slightly humid, sun-exposed room (the kitchen is ideal). Every few days, to allow for the plant to grow evenly, rotate the pot. Within a few weeks, your mint plant should begin to flourish and be ready to be plucked for delicious dishes and drinks.
Lemon - To grow a lemon tree at home, you will need an organic lemon with non-germinating seeds, nutrient-rich potting soil, a planting pot that’s 6″ wide and 6″ deep, a seedling pot that’s 24″ wide and 12″ deep, and a sunny growing location (possibly with a grow lamp).
Mushrooms - Mushrooms can be regrown from spores in the comfort of our home.
Peppers - You can grow a number of hot peppers from the seeds that are leftover. Just collect the seeds from your habaneros, jalapenos or any other peppers that you have on hand. Plant them in potting soil and keep in direct sunlight unless it is warm outside and then you can just plant them in your garden area. Peppers grow relatively fast and don’t require a lot of care. Once you get a new crop, just save some of the seeds for replanting again.
Spring Onions - You can regrow spring onions in as little as five days. Simply leave at least an inch attached to the roots of your left over spring onions, put them in a small glass of water, topping up the water if it evaporates.
Basil - Got some basil clippings lying around? If they have at least four-inch stems, gather them up and put them in a glass of water under direct sunlight. When the stems grow two inches long, you can put them in some soil in a pot and grow your very own basil plant. No more basil shopping for you!
Onions - Unlike the other foods on this list, onions have to go directly in the soil to grow. Take the bottom end of the onion and plant it in a pot or directly in the soil outside. If it’s potted, water it when needed. The more of a bottom you leave on the onion, the better. At three weeks, the onion will develop roots. By the fourth week. It will sprout leaves.
More thoughts later.

3 notes
·
View notes
Text
youtube
Jerry rescues plants from a redevelopment site and shares tips on how to relocate them.
What to Avoid:
Established gardens often have environmental weed species that were planted unknowingly. In Brisbane these include cocos palm, tradescantia zebrina, coral vine, morning glory and the creeping inch plant which are very hard to eradicate and are weeds you'd rather leave behind. Transporting weeds to a new location can also worsen their environmental impact, so check your local authority’s website to identify each plant’s weed status before taking it with you. Invasive pests, like fire ants, or pathogens and diseases can also be spread with the movement of garden materials. Check the roots to make sure they look clean, and if you live in a containment area contact your local bio–security agency for advice.
Sadly, some plants are simply not worth the effort. Australian native, Lomandra hystrix, while useful is easy to find and very cheap to buy. And a bird of paradise might be tempting but they’re notorious for having incredibly strong deep roots and dense tough growth. You’d need a bobcat to shift it, so save your back and look elsewhere.
Save Seeds:
Seeds are a perfect way for plants to move; they’re already a whole plant packed and ready to travel. Jerry finds a bottlebrush and the Queensland classic, bushmans poison. As the name indicates, all parts of this plant are toxic to ingest, but it's a favourite in gardens for its pretty, sweet-smelling spring flowers which bees adore. This survivor is growing on shale soil and can weather harsh conditions. They’re readily propagated from seed when ripe, just make sure to wear gloves to protect yourself.
Lift Bulbs:
Another group of plants that travel well are bulbs. Hippeastrum can be expensive to buy and slow to establish which makes them valuable to save. To transport, dig them up and let the soil fall away, then trim back the leaves and roots to conserve moisture, and it’s ready to go. The important part to conserve is the bulb itself because that is the energy storage, carrying flowers for next year.
Take Cuttings:
Dracaenas aren’t exactly uncommon; however, they offer instant size through maturity. To propagate a super-sized cutting, use a sharp saw to cut the trunks cleanly at the base. You can tie this against a fence with its base touching soil, and over summer it will take root and can be replanted where you want it. Alternatively, each branch tip will root in the same way offering you a whole garden bed worth of plants. Succulents and cacti can also easily be propagated by cuttings, such as the spineless, night-flowering orchid cactus, Epiphyllum hookeri.
An iconic Queensland combination is a clump of elkhorn ferns growing on the side of a frangipani. In winter, the frangipani loses its leaves, and the winter sunshine benefits the fern. In summer when the leaves return, they shade the fern from the hot summer sun. In return, the elkhorn fern gathers leaves, storing nutrients and moisture to drip feed the frangipani. It's a blissful marriage. To transplant an elkhorn, use a sharp pruning saw to remove individual plants and then pot them up with ordinary potting mix or mount them onto a new tree. Frangipani is best propagated in winter to help the long stems seal over seal before planting. In the summer, there's a risk they may rot before establishing.
Re-potting:
The cast iron plant, Aspidistra, are tough as nails and are often found growing happily in the shadiest of spots. They’re permanently lush and green and can be dug up whole or broken into smaller clumps before re-potting. Ferns such as the native kangaroo fern, exotic rabbit foot fern and Boston fern can be repurposed in the same way but need some extra care. To transplant a fern, line an old hanging basket with a plastic bag with holes in it to conserve moisture during transit. You can disguise the bag with coconut fibre, then plant the fern in with potting mix. Keep it damp and in the shade so that it doesn’t drop any fronds, and eventually it will grow into a living sphere of foliage.
#gardening australia#solarpunk#australia#garden#gardening#moving a garden#how to#how to move a garden#established gardens#Brisbane#weeds#invasive species#invasive plants#invasive insects#seed saving#bulbs#plant cuttings#potted plants#Youtube
2 notes
·
View notes
Text
Maple
This morning I asked my daughter to help me with the second of the sitting-in-pots-for-too-long maples. Having an extra set of hands expedited the process amazingly, but it was still hard to dig up the roots that had escaped the pot and grown into the flower bed. And under rocks. And into other pots you slut!!
When we finally had dug it fully up and disentangled all the opportunistic roots, we took it to the bank between the yard and the creek. I’m hopeful that by planting it well before it comes out of dormancy it will survive. The darned thing is about 8 feet tall, now (it was shoulder height this time last year). If it behaves like I expect, it will hardly grow at all this year, because of transplant shock, but spend the time getting its roots re-rooted. Then, the year after, it will start growing like crazy.
Instead of working on the last maple, we took some time to remove excess honeysuckle vines and thorn bushes from the bank, along with cleaning up numerous dead branches. There are several trees in that area standing dead, and they’re too entwined with vines to cut down safely. They’ll just have to decay slowly while standing there. The woodpeckers will be happy, at least. It was good to work together!
23 notes
·
View notes