#Kitchen hacks
Explore tagged Tumblr posts
Text

I replaced my old tablet with a new one before going to Europe, because I didn't want to take a full laptop but I knew my elderly tablet wouldn't handle the travel well. I'm using the new one for reading and such, but I didn't want the old one just languishing in a drawer forever, so I bought a pair of wall mounts for it and installed it on one of my kitchen cupboards. It's now my jukebox, podcast player, and recipe book whenever I'm in the kitchen. (I'm waiting on some moldable utility putty to arrive and I'll fix the cord a little more elegantly.)
[ID: A kitchen cabinet over a counter, very 80s style with wood grain trim. Attached to the cabinet door are a pair of plastic "mounting" corners; sitting in the corners is a tablet with the screen lit up, showing a handful of icons including links to my recipe files and an audio player. The tablet's charging cord is plugged into it and currently taped to the surface of the cabinet door inelegantly.]
373 notes
·
View notes
Text


Get more ideas: www.pinchofdecoration.com
#home decor#home design#home & lifestyle#interior design#interiors#home decoartion#kitchen decor#kitchen design#kitchen cabinets#kitchen appliances#kitchen makeover#kitchen renovation#kitchen inspiration#kitchen interior design#kitchen organization#kitchen style#kitchen ideas#decorations#decoration#decor#kitchen aesthetic#kitchen#kitchen fun#kitchen goals#kitchen hacks#kitchen remodel#kitchen redesign#kitchen trends#kitchen tips#kitchen upgrades
28 notes
·
View notes
Text

Post from "America's Decline into Idiocy."
121 notes
·
View notes
Text
Reducing food waste: 1

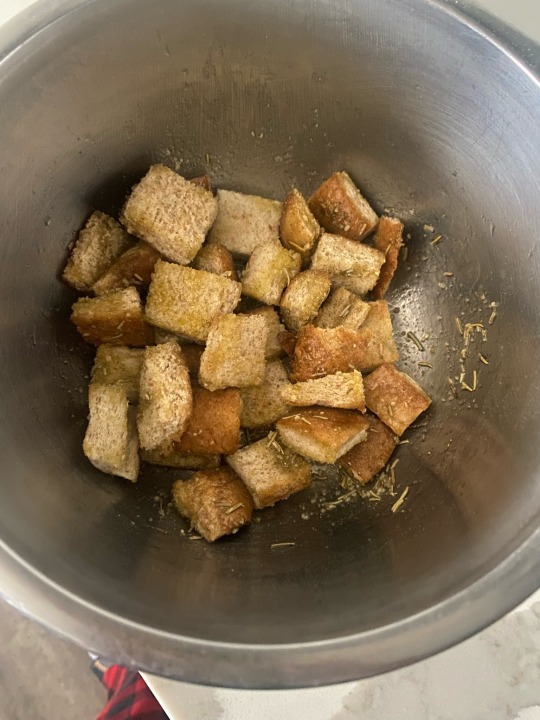

If you dont like end pieces, make croutons! Simply cut them up into uniform pieces., season to your liking and add butter or oil and bake at 300f/150c until they are your desired crispy. I baked mine for 9 minutes, and yes, you can use an air fryer.
Any pieces that are too small for a crouton can be made into breadcrumbs or be given to birds.
Allow them to cool before closing in an air tight container, or just eat them immediately!
16 notes
·
View notes
Text
A kitchen hack that actually works. 🤔
#pay attention#educate yourself#educate yourselves#knowledge is power#reeducate yourself#reeducate yourselves#think for yourself#think for yourselves#think about it#kitchen hacks
118 notes
·
View notes
Note
I like your vibe, you seem real friendly.
You got any advice for making boxed pasta a lil better? I normally just grab some canned or microwavable veggies tbh
Hey! As someone who eats a lot of easy food I have some good answers here!
One thing that is great is adding products like “Better than Bouillon” a little extra touch of a flavour bomb helps boost it up, also experiment with adding condiments and spices, fresh or dried herbs etc. Like whenever I eat Mac and Cheese I add a little mustard and chicken broth. There’s also the old truck of adding precooked meats like a pre roast chicken that’s been shredded to your meal. Cooking a bit of onion and garlic in butter before you add your box mix goes a far way aswell to make your meal a little tastier. Hopefully these little tips can help some!
Ask again anytime
Cheers!
Tay
23 notes
·
View notes
Text
( -25% ) KitchenAid All Purpose Kitchen Shears with Protective Sheath for Everyday use, Dishwasher Safe Stainless Steel Scissors with Comfort Grip, 8.72-Inch, Black
These all-purpose shears from KitchenAid are a valuable addition to your kitchen utensils set and ideal for a variety of tasks throughout the home, from slicing poultry and pizza to clipping coupons. The blade edges feature micro-serrations to provide a superior cutting experience. Durable and strong, these kitchen scissors are made from heavy-duty stainless steel that withstands daily use, with soft-grip handles that provide comfort and control while using. The shears come with a blade guard to protect blades when stored. Dishwasher safe; hand washing is recommended.
more info: Click Here
2 notes
·
View notes
Text
How do you clean and maintain a frying pan to extend its lifespan?
A frying pan is a steadfast companion in the kitchen, witnessing the sizzles and aromas of countless meals. To ensure it remains a reliable culinary ally, proper cleaning and maintenance are essential. In this comprehensive guide, we'll explore the steps and tips for cleaning and maintaining a frying pan, unveiling the secrets to extending its lifespan and preserving its performance.
Cleaning Your Frying Pan
Immediate Post-Cooking Care: Strike While It's HotThe key to easy cleaning is addressing the frying pan immediately after use. Allow it to cool slightly, but not completely, before cleaning. This is especially crucial for cast iron pans, as cleaning them while warm facilitates the removal of food residues.
Avoid Cold Water Shocks: Gradual Temperature ChangesRapid temperature changes can damage your frying pan, especially if it's made of materials like cast iron. Avoid shocking the pan with cold water immediately after cooking, as this can lead to warping. Instead, let it cool gradually to room temperature before beginning the cleaning process.
Hand Wash with Mild Soap: Gentle CleansingFor most frying pans, hand washing is recommended to preserve their integrity. Use a mild dish soap and a soft sponge or brush to clean the pan. Avoid harsh scrubbers or abrasive pads, as they can damage non-stick coatings and remove the seasoning from cast iron pans.
Hot Water Soak for Stubborn Residues: Loosening Stuck-On FoodIf there are stubborn residues clinging to the pan, a hot water soak can work wonders. Fill the pan with hot water and let it sit for 15-30 minutes. The heat will help loosen food particles, making them easier to scrub off. After soaking, use a gentle brush or sponge to clean the pan.
Baking Soda and Vinegar for Tough Stains: Natural Cleaning AgentsFor particularly stubborn stains or burnt-on food, create a paste using baking soda and water. Apply the paste to the affected areas and let it sit for about 15 minutes. The baking soda helps to lift stains and residues. Afterward, use a soft brush or sponge to scrub the pan. Alternatively, vinegar can be used to tackle stains and add shine. Remember to rinse thoroughly after using baking soda or vinegar.
Avoid Dishwashers for Non-Stick Pans: Gentle TreatmentWhile some frying pans may be labeled as dishwasher-safe, it's generally advisable to hand wash non-stick pans. The harsh detergents and high heat in dishwashers can degrade the non-stick coating over time. Follow the manufacturer's recommendations for the best care.
Removing Rust from Cast Iron: Restoring SeasoningIf you're dealing with a cast iron pan and notice signs of rust, don't panic. Rust can be removed, and the seasoning restored. Scrub the rusted areas with steel wool or a stiff brush until the rust is gone. Afterward, re-season the pan by applying a thin layer of oil and baking it in the oven. This process helps protect the pan and enhances its non-stick properties.
Dry Immediately: Warding Off RustAfter cleaning, ensure the frying pan is thoroughly dried to prevent rust. Use a kitchen towel to remove excess moisture, and if needed, place the pan on low heat on the stove for a few minutes to evaporate any remaining water. Proper drying is especially crucial for cast iron and carbon steel pans.
Maintaining Your Frying Pan
Season Cast Iron Pans Regularly: A Protective LayerCast iron pans develop a natural non-stick surface through a process called seasoning. To maintain this protective layer, season your cast iron pan regularly. After cleaning, apply a thin layer of oil to the pan and bake it in the oven according to the manufacturer's instructions.
Avoid Metal Utensils: Preserving CoatingsWhen cooking with non-stick pans, use wooden, silicone, or plastic utensils to avoid scratching the coating. Metal utensils can compromise the integrity of the non-stick surface, reducing its effectiveness over time.
Store Pans Properly: Preventing DamageHow you store your frying pans can impact their longevity. Avoid stacking pans directly on top of each other, especially if they have non-stick coatings. Place a protective layer, such as a soft cloth or paper towel, between stacked pans to prevent scratches and damage.
Re-Season Cast Iron as Needed: Monitoring PerformanceOver time, the seasoning on cast iron pans may wear off with regular use. If you notice a decline in the non-stick properties or see signs of rust, it's time to re-season the pan. This process helps maintain the pan's performance and protects it from corrosion.
Check and Tighten Handles: Ensuring StabilityPeriodically check the handles of your frying pans for any wobbling or looseness. If handles become loose, tighten the screws or bolts as needed. This simple maintenance step helps ensure the stability and safety of your pans.
Use the Right Cooking Utensils: Preventing ScratchesBe mindful of the utensils you use while cooking. Using metal utensils on non-stick surfaces can cause scratches and reduce the effectiveness of the coating. Opt for softer utensils to preserve the integrity of the pan.
Avoid High Heat for Non-Stick Pans: Prolonging Coating LifeNon-stick pans have temperature limits, and exposing them to high heat can lead to the breakdown of the coating. Avoid using non-stick pans on high heat settings, and opt for medium to low heat for best results.
Regularly Check for Wear and Tear: Proactive MaintenanceKeep a watchful eye on your frying pans for any signs of wear and tear. If you notice chips, scratches, or a decline in performance, address the issues promptly. Proactive maintenance ensures that small problems don't escalate into more significant concerns.
Conclusion
A well-maintained frying pan is the cornerstone of a functional and enjoyable kitchen. By following these cleaning and maintenance tips, you can extend the lifespan of your frying pan, preserving its performance and ensuring it continues to be a reliable partner in your culinary adventures. Whether you're dealing with cast iron, stainless steel, or non-stick pans, the key is to treat them with care, address issues promptly, and appreciate the longevity they bring to your kitchen. With proper care and attention, your frying pan can withstand the test of time, contributing to countless delicious meals and memories.
2 notes
·
View notes
Text
Give your cooking game a lift - Kitchen Hacks
10 notes
·
View notes
Text
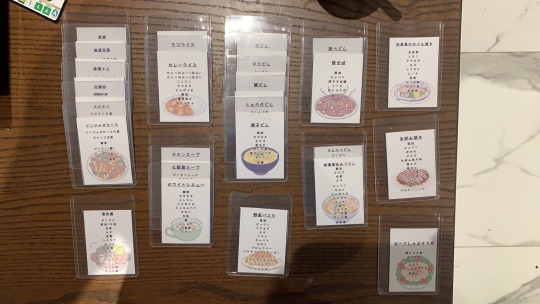

Grocery shopping card.
An idea that I came up with my mother.
Instead of writing the recipes we wrote down the ingredients we will need for each dish. When we decide which dish to make we pick up the card and check the fridge and pantry what we have and cross it off the list with permeant marker. Anything that is not crossed off is what we need to restock.
I’m currently caring my father at home, and unable to leave him alone. I give the card to my mother so she can get the groceries on the way home after work.
When she passes the groceries to me , she goes and spends some time with father and I get dinner going.
When I’m done with the card I take some isopropyl alcohol and wipe the maker off so I can reuse it again for next time.
#kitchen hacks#grocery shopping#idea#grocery list#ingredients#illustration#list#cards#chores#cooking#dish
2 notes
·
View notes
Text
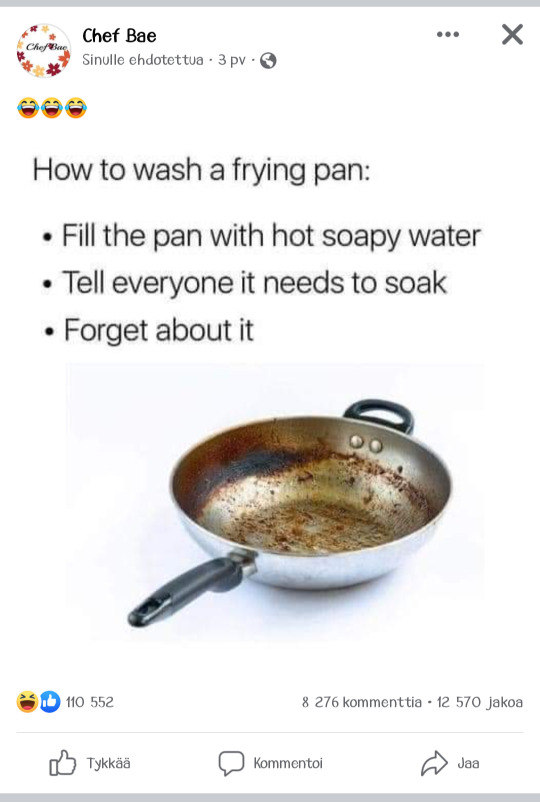
Saw this on Facebook, and I just wanted to seriously tell everyone who doesn't know. Don't fill it with water. Rub soap on it with a wet paper towel and leave it upside down for a few minutes. Then wash it normally. There's no need to soak.
9 notes
·
View notes
Text
Say Goodbye to Struggling - Everybody likes One Touch Can Opening! Get those sweet beans
Are you tired of struggling to open your cans? Look no further than one touch can opening! In this video, we'll show you how to use the latest can opener technology to effortlessly open your cans with just one touch. Say goodbye to struggling with traditional can openers and hello to the convenience of one touch can opening. Whether you're cooking in the kitchen or enjoying a picnic outdoors, this technique is a game-changer. So sit back and watch as we demonstrate the easiest way to open your cans!
can opener, kitchen hacks, easy cooking, convenience, effortless, kitchen tips, cooking tips, life hacks, kitchen gadgets, one touch can opener, food prep, time-saving tips, kitchen tools, cooking appliances, meal prep, kitchen organization, kitchen equipment, kitchen supplies
#can opener#kitchen hacks#easy cooking#convenience#effortless#kitchen tips#cooking tips#life hacks#kitchen gadgets#one touch can opener#food prep#time-saving tips#kitchen tools#cooking appliances#meal prep#kitchen organization#kitchen equipment#kitchen supplies
5 notes
·
View notes
Text
Just a heads up to you youngins getting your own places soon: mixing ammonia and bleach creates Chloramine gas. Chloramine gas causes severe eye, throat and lung irritation. Thirty minutes of exposure to it can cause lung collapse.
Also note that urine contains ammonia! So be mindful of products containing bleach when you clean up pet stains or toilets.
If you do accidentally create Chloramine gas in your home, quickly open the nearest window and remove yourself, other people, and your pets from the area and - if possible - close the door to that area to prevent it from spreading. You can aim a box fan at the bottom of the door (if there is a gap) to help with ventilation.
Wash your eyes with cool water and take some deep breaths outside or in a well-ventilated area. If you continue have eye or lung irritation for an hour after exposure, you should really consider going to the hospital.
I hope this helps someone. This is such an easy mistake to make and not everyone knows about it.
#life#lifestyle#reality#real life#life hacks#life tips#cleaning#chemical#chemicals#health#mental health#homedesign#work#bleach#ammonia#Chloramine#kitchen hacks#home & lifestyle#homemade#cheap home#house#housekeeping#kids#protection#petslover#pets#cats#cute cats#dogs#good dogs
2 notes
·
View notes
Text
5 notes
·
View notes
