#I need to learn how to use photo editing apps now
Explore tagged Tumblr posts
Visit Tumblr Blog
Explore Tumblr blogs with no restrictions, modern design and the best experience.
Last Seen Tumblr Blogs


Fun Fact
25% of US internet users with an annual income of $80-100K use Tumblr.
Text
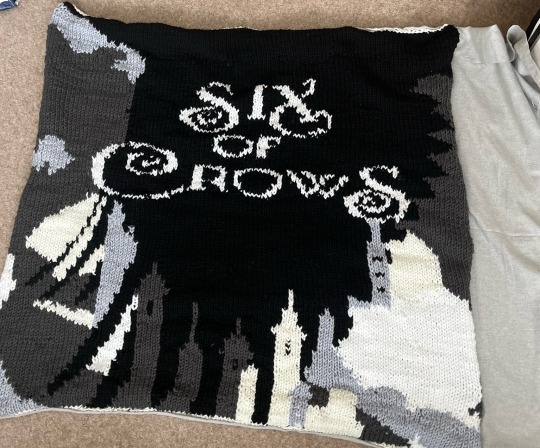
How to knit a Six of Crows blanket!
Hi my darlings, after posting quite a bit about my Grishaverse knitting projects I’ve had a few people ask if I have any kind of pattern or instructions for the Six of Crows blanket I made. I completely drew it myself and (as someone who has never designed a real pattern) figured it out as I went but I thought I’d do my best to put together a step-by-step guide of what I did for my one so you can try it if you’d like to! If you do this and share it anywhere then if you could please credit me for the design that would awesome <3
My finished blanket is approximately 117x120 cm, or 46x47 inches, and it looks like this:
Yarn I used: so sorry I can’t remember and I don’t have the information right now but if anyone wants me to I can update this when I find it; I know that it was bulky weight though
Needle size I used: 9mm
Stitches you need to know how to do: Knit and Purl
Other techniques you’ll need to know: the fair isle method for colourwork, and possibly how to back a blanket but I will explain that in more detail because I had to learn how to do it for this project
Tags: @marielaure @spike-is-not-a-dogs-name @scenemime @worth-this-and-more @wisegirl29 @atac-agent @uttermywish @feralipadkid @fairytalesofforever
Guide below the cut!!
Step 1: the first thing you need is a chart, because this is knit in fair isle. I’m sure there are proper softwares for designing fair isle charts but I uploaded a photo of the six of crows book cover onto a free drawing app called Ibis Paint X, went over it in flat colours to create a more 2D design, superimposed a grid over the top, and then went round every individual square of that grid and edited the image so that there was one colour in each square (ie, pixelated it). The fun thing about doing it like this is that you can easily change it to be whatever size you want by changing the size of your grid (each square represents one stitch). As I mentioned before, if you use the same yarn as I did and the exact same chart as I did it comes out to be around 117x120 cm or 46x47 inches; it’s pretty square and smaller than your average blanket, which is perfect for what I wanted but might not be perfect for what you want so you might want to adapt that if you’d rather a different size. This is what my chart looked like:
Step 2: casting on and knitting! This is the most fun bit, in my opinion. My grid is 103 stitches wide so and I wanted to have a border all around the edges so the first thing I did was cast on a full row in the cream yarn that I wanted to make that border from, with two more stitches
1) Cast on 105 of cream yarn. This should be the number of stitches across the x-axis of your pattern plus 2, to create a border either side. This cast on row will then create a one row border at the bottom of your work.
2) K1 in cream, knit first row of pattern, K1 in cream
3) P1 in cream, purl second row of pattern, P1 in cream
4) repeat steps 2) and 3) until the pattern is complete
5) complete an entire row in cream yarn
6) cast off - this is always so exciting!!! This is when you get the first real sense of accomplishment, in my opinion
I don’t have loads of progress photos, I’m afraid, but this is what mine looked like when I first cast off:
(The edges are curled here so you can’t see the border on the sides, but it is there, also the lighting is rubbish sorry)
Step 3: Weave in all the ends. Gonna be super honest this step is deeply boring but incredibly important; there are a lot of ends to deal with here. Sorry I don’t have a photo of the wrong side of my work but if you imagine at least one loose end for every section of colour change you can gather that it’s a lot haha
Step 4: Backing!! Now there can be different methods of backing depending on what kind of fabric you choose, I can’t actually tell you what kind of fabric I used other than that the colour was called ‘luna grey’ because the label didn’t actually say what it was so I just decided to go for it. I could only buy it in metres or half metres so I had to get 150cm and then trim the excess. Remember to cut your backing fabric larger than your knitting!! - you need lenience to sew it in. I chose a soft fabric that wasn’t very stretchy. If you get a stretchier fabric you might want to use something to band the knitting first so that you avoid pulling it out of shape.
Lay the right sides of your two pieces (fabric & knitting) together and securely pin three sides.
Once your right sides are pinned together you can go all around your three pinned edges and sew together. Sewing is not my forte so if it isn’t yours either don’t worry, what’s good about this is that your stitches won’t actually be seen once the project’s done so don’t worry too much if they aren’t super neat. I used a running stitch and caught the underside of the knitting without going all the way through so that I knew my stitches wouldn’t be visible. If you want to add extra security, you can go round this sewing section twice. I personally hand sewed this, I think you could use a machine if you wanted to but be careful that the knitting doesn’t catch.
This is an exciting bit because you can really start to see the finished project
Once you’ve sewn your first three sides what you essentially have is a giant inside out pocket, and you can turn it right side out so it looks something like this:
Sorry it’s not a great photo.
After this I trimmed off the excess fabric and just sat and stretched everything out to make sure it was sitting properly and I was happy with it. If you’re also trimming off excess fabric, remember to leave the same amount of lenience (I did about five centimetres/two inches) as you did for the original edges!!
Then fold your lenience fabric inside the pocket and pin it nice and securely. I used a YouTube video to learn an invisible stitch to close this edge and it worked really well once I’d gotten the trick of it, I was really pleased. I practiced it on the excess fabric is cut off first and I definitely recommend that, it was really helpful
And then that’s it!!!
Here is my finished project again:
I am so overjoyed with how this came out!
I hope that this guide was somewhat helpful, though I realise it’s clear that I don’t write patterns and am probably not very good at describing what I did so I’m sorry if anything was unclear. If you try this let me know, and if you share it anywhere please credit me! 🖤🖤
#six of crows#crooked kingdom#grishaverse#leigh bardugo#kaz brekker#inej ghafa#wylan van eck#jesper fahey#nina zenik#matthias helvar#kanej#helnik#wesper#fandom knitting#fair isle knitting#hand knitted#knitting#knitblr#knitters of tumblr#knit blanket
124 notes
·
View notes
Text
Photo, motto!
Yuuji, Nobara and Megumi are shocked to learn you have no social media accounts, and decide to change that. However, things don't go as planned.
wc: 1.6K
tags: jujutsu kaisen, just crack honestly, slow-burn Nanami x OC/Reader, some fluff if you squint, the chaotic trio being chaotic (I love them).
This is part of my "Jujutsu Partners Canon Divergence AU". A sequence of short stories and one-shots related to Nanami x Reader x Higuruma. To see the ever-growing list of one-shots and short stories, please visit my masterlist :)
Disclaimer: these stories are NOT written and posted in chronological order of events. To see where this story fits in the timeline, please check the masterlist mentioned above.

You were lazily flipping your finger on your phone's screen while you read an article on hydrangea's colors. Every time you flicked your finger, the phone took quite a few seconds to respond, rendering it a nearly daunting task. The thing was ancient by this point, but since you weren't much tech-savvy at all, you never bothered to get a new phone in these last 6 years.
The class was finished, and the first years were blabbering on about something. More specifically, Yuuji and Nobara were having a pretty heated debate about the best 'filter' — whatever the hell that was — to use on a photo before posting it, and Megumi sighed, refusing to break the tie between the two of them.
"Sensei!" Nobara exclaimed, pulling your attention.
"Hm, what?" You asked, having your eyes still glued to the screen of your phone, annoyed at how slow it was.
"We want to know if you find that a feed with no-filter photos is better than a feed with heavily edited photos!" Yuuji chirped in. "No filter is clearly better, real and all!"
"Are you two really going to harass sensei with that nonsense?" Megumi asked, annoyed.
"Of course! And just so you know, I want my pictures to look pretty, not realistic, duh." Nobara answered, not realizing Megumi had used the word nonsense.
"Oh, I can definitely tell that from your feed!" Yuuji replied jokingly, prompting Nobara to pull him by his collar, ready to sucker punch his face.
"What are you guys on about?" You finally asked, looking up. "Filter? Feed? What?"
They stopped for a second and the trio looked at you, perplex.
"You don't have a Picgram* account?" To your surprise, the one to ask that was Megumi. Even with the nonchalant facade, he was still a teenager, after all.
*Yes, I'm avoiding saying other social network names in this, sorry about the cringe.
"The what now?" You asked, earnestly, having Yuuji and Nobara look shell shocked.
"What do you mean you don't know what it is?" Nobara inquired, incredulous. "It's just the most famous social network in all of Japan!"
"Oh, I don't care much about those. I just use my phone for texts, calls, taking pictures, read, listen to music, and that's about it."
"Ah, sensei, you must create an account, then!" Yuuji said, spirited, releasing himself from Nobara's death grip and frolicking towards you.
"Hm, okay, I guess. Good luck trying to do anything on that phone, though" you said, having him sit beside you. After Yuuji took your phone on his hands — cracked screen, unkempt as hell, and clearly in overtime duty, his face contorted in horror.
Nobara came and stepped towards you both, taking in the decrepit state of your smartphone with her eyes.
"Sensei, maybe you should get a new phone?" Yuuji inquired, gently.
"Not maybe. Surely. This is just about to crumble to pieces" Nobara noted.
Megumi crept up behind the other two students.
"Oh, come on, it's not that bad" you replied, scratching your head.
"It definitely is" Megumi stated, unprompted. "Jujutsu sorcerers are well paid, sensei. You can afford one."
"It's not that I can't afford one, Fushiguro, I just don't need a new phone" you replied, lifting an eyebrow in annoyance. "Just get on with it and do the thing."
"Eh, fine, fine!" Yuuji replied, opening your browser app. He basically set up your account, followed his own and Gojo's accounts, and then motioned himself by your side to show you how it worked.
"So, here are your messages" he pointed to the corner of the screen.
Obviously those were the text messages, that was a worldwide used icon since the nineties.
"I figured out that much, Itadori" you answered, asking yourself when did these teens begin thinking you were so technologically inept.
He cleared his throat and said, "sorry".
You saw a message coming in from Gojo. Upon clicking, you and Yuuji waited for a few seconds until it opened. It was a greeting dog sticker. Of course.
"Well, and how does this work?"
"Down here, you can pick a photo to post, and you basically follow people on the app to see the photos they post, comment on them, give them a like and things like that!" Yuuji answered.
"Hey, Yuuji, did you have sensei follow me?" Nobara asked.
"Let me show her how to post a picture first" he lied, pressing on the plus icon.
When he pressed it, multiple images of flowers and plants appeared, having some landscapes sprinkled across your photo library.
"Oh, these are beautiful!" Yuuji said, delighted.
"Let me see!" Nobara exclaimed, butting her head beside Yuuji, and gasping. "Oh, the flowers, they're pretty!"
"Oh" you huffed out, smiling, slightly embarrassed. "Thank you, I guess."
Then, Yuuji and Nobara went silent for a moment, something very uncharacteristic for them.
"Hm?" You hummed.
They both seemed to be slightly blushing and said nothing.
"What is it?" Megumi asked, butting himself on Yuuji's other side and widening his eyes a little. "Oh. Uh..." He began, "I-I've been to that bakery, it's very good."
What the hell?
You got up and stood beside them, realizing that they had caught you red-handed.
On the screen, was a picture you had taken of Nanami in one of your missions, clearly without him seeing it or noticing you did so. He just seemed so satisfied and happy munching on his ciabatta sandwich that you just had to take a picture of that.
"H-hey, just-" you stuttered, blushing violently. "Students, stop messing on my photo library!"
"I'm sorry!" Yuuji said, fumbling your phone back at you. It fell on the table, and when you got a hold of it again, your blood ran cold.
The photo had accidentally been posted.
"Uh?! Posted?! What?!"
The trio paled in an instant.
"I- I'm so so so sorry, oh my-" Yuuji was stuttering, completely mortified, hands covering his mouth.
"God..." Megumi said, sighing deeply. "I'll be outside waiting for you guys to finish this."
"Itadori, stop. Stop talking" you stated, inhaling deeply. "Nobara, please delete this" you said, handing her the phone.
She tapped on the screen, first delicately, then stronger, following a sequence of angry, nervous taps.
"W-what? What is going on?" You inquired, also mortified.
"It's frozen" she answered.
Oh, for fuck's sake.
***
Gojo was reveling on a matcha ice cream while he roamed the streets of Tokyo.
As the sorcerer walked, he got a notification on his phone. Upon checking, he realized you had followed him on Picgram, and promptly followed you back, sending his classic dog greeter on your DM's.
Given that he wasn't doing much, Gojo decided to doomscroll for a while, checking out the feed for some minutes, and realized there wasn't anything particularly interesting.
After refreshing, however, a photo of Nanami, that had clearly been taken without him noticing, appeared on his feed.
Checking the profile, Gojo realized you were the one to post the picture, and took a print-screen of it as he laughed mischievously to himself.
Oh, this is going to be fun, he thought as he opened his text messages with Nanami.
GS: Hey, Nanamin!
NK: Don't call me that.
GS: I have something for you.
NK: ... What?
***
You and Nanami were at the usual bar for yet another drinking session after work. He had just told you about his mission for the day, and you were about to tell him about the students' debacle, just before stopping in your tracks.
You were both silent for a few moments.
"So, do you remember that bakery? The one that has a great ciabatta with pesto that we went a few weeks ago?" He inquired, lifting his glass of whiskey to take a sip.
You looked at him suspiciously. "Yes, I remember."
"I think we should go there tomorrow. I wanted to try the newer options from the menu, their bread is exquisite" Nanami answered, still holding his glass up.
"Uh, sure, I guess." This is very sus.
"Maybe..." the ratio sorcerer said, gravely lowering his glass on the bar counter, "we should also take a picture, their food is very well presented, after all."
Oh, no.
"Nanami, I'm so so so sorry! I just thought you looked so happy with your sandwich, it was an accident, the first years are relentless, I didn't mean to-"
Nanami was clearly amused hearing your apologies as he nonchalantly took another sip from his drink, unwavering.
When you were done blabbering, Nanami held the urge to smile, as he resumed speaking.
“What was that you used to call me back at Odate?” The sorcerer asked, filled with satisfaction, ready to deal the killing blow with no mercy at all.
"Oh, come on, Nanami! Please don't."
Your pleads fell on deaf ears.
"Oh, I think I remember” Nanami said, vindication from ten years of teasing stewing under the monotone of his voice.
“Don’t you dare, Nanami...” you warned, vermilion face pulsing with embarrassment.
“You used to call me ‘stalker’" he stated, highlighting the last word, before he proceeded. "So, how does it feel to actually be one?”
“Nanami, come on, I'm not a stalker! Ugh” you sighed, covering your face in shame.
This time, he couldn't hold the amusement grin.
You grunted before proceeding. “Guess I’ve earned this one, but come on, that was ten years ago! How did you hold on to that grudge for so long?”
Except it wasn’t a grudge. Well, maybe just a little bit.
I need a new phone.
--
End notes:
This one was so fun to write. About the "stalker" thing, it's referring to my mid-long fic, Sand and Snow (you can check it out here), given that reader is based off of my OC from S&S :) Hope you had fun! xoxo
#jujutsu kaisen#jjk#nanami kento#jjk fanfic#jjk nanami#jujutsu nanami#jjk imagines#kento nanami#yuuji fluff#yuuji itadori#jjk yuuji#kugisaki nobara#jjk nobara#nobara kugisaki#megumi fushiguro#jjk megumi#gojo satoru#jujutsu gojo#jjk gojo#satoru gojo
69 notes
·
View notes
Text
adobe products I know how to use from easiest to hardest to learn. really interesting stuff I know
acrobat pro - easy, intuitive, helpful. -1 point for being very hard to download illegally.. something about the software makes it only stay cracked for a few days so I download/crack it once a year when I really need to edit a pdf
lightroom - haven't used for anything very complicated but used it to compile high def photos of flies from a microscope for a whole summer. straightforward
dreamweaver - had to use it for website design in college once.. totally useless application, but not too difficult. could figure it out in a few hrs
audition - ive used this to edit podcasts for a school project... not too bad, but have never used it for actual music purposes, so hard to judge
indesign - I love you adobe indesign, so good for poster design, definitely easier to use if you come in with prev. experience from other adobe applications. kind of a learning curve if you haven't though. started using it middle school for a journalism class and now use it for making figures and posters— blends super well with illustrator
premiere pro - starting to get into the ones that have driven me to tears. I came into it with 0 experience from any other video editing software. I still don’t understand how to truly use keyframes. that said I have successfully edited and captioned videos multiple times with it, useful app
photoshop - by far the most experience with photoshop. I love you adobe photoshop but definitely takes practice. spent weeks watching tutorials when I was 11 just so I could make some horse edits and use it to this day all the time
illustrator - what’s a vector, really, and why does the pen tool never work like I think it should. what do you mean that didn’t form a path. extremely powerful software that is truly top of the line for figure making but requires more study than I ever have time to give it since i’m always using it super rushed
after effects - homer simpson am I disabled meme. like all the difficulties of photoshop combined with all the difficulties of premiere pro and then you also have to check every frame. total nightmare that I spent a solid week trying to learn one summer
7 notes
·
View notes
Note
i love your art style! any tips for beginner artists?
thank you so much!! here're a few that popped into my head:
always use references! if you don't know how to draw something - look it up on the internet or (even better!) take a picture of yourself and draw it. drawing things from photos and nature will help you improve much faster than trying to draw everything from imagination and memory. ps. try not to use references drawn by someone else in the beginning because then you'll most definitely duplicate someone else's possible mistakes and we don't want that.
don't focus too much on finding your own art style. learn the rules first so you can break them later and apply them to your drawings. I can't count how many times I was angry that each of my drawings looked different until I realized that this is also a part of the whole "finding my own art style" process, so look for interesting styles and be inspired by artists you like.
and I don't know if this is a tip but I feel like I need to say this - it's okay to be inspired by someone else's art style. my art for a very long time was inspired by burdgebug (raise your hand if she was your art style goddess too) and many times I even copied her drawings too, and that is fine HOWEVER I never posted them anywhere and signed them as my own. and my point is - study art styles that you want your own style to be based on but never copy or trace someone else's drawings and post them as your own. AND if you draw something inspired by your favorite artist - tag them! I'm sure they'll be thrilled to see that their work has inspired someone. :)
digital art and tablets are great but don't forget about sketchbooks! using different types of media, from pencils to paints, give you freedom that no screen can. and if you're posting your art on social media - don't feel pressure to post every sketch online, not everything you draw has to be content.
also not everything you draw has to be perfect, let yourself experiment and learn from it!
if you're drawing digitally remember to flip your canvas! and if you're drawing traditionally you can look at your drawing in the mirror or take photo of it and flip it in the photo editing app.
don't shade with black! it will make your drawing look mudy.
I really like to draw studies from my favorite movies or tv shows because they allow me to learn how the light and shadow work in different setups so I recommend you doing that too!
I know it sounds scary but try to draw full bodies and backgrounds too and not only portraits (but they're so fun to draw right?!) so you'll improve all of these three things at the same rate. I was teriffied of drawing feet for a very long time and look where I am now - still can't draw them, why do people even need feet...
and what is most important - have fun! draw what you want, experiment, use defferent medias and art styles and find what suits you best. it's a very long road, a lifelong even, so don't be upset at first if something doesn't look the way you wanted it to (it hardly ever does even if you're on the higher level in being an artist). someday you'll be able to draw something that you've imagined for years and it's the greatest feeling in the whole world! just be patient and try to enjoy the road you're on instead of looking at the final destination.
bonus tip or more of a uplift for begginer artist that post their drawings on social media: YOU ARE AWESOME AND YOU DESERVE EVERY RECOGNISION, try not to pay attention to engagement and numbers on your posts because they can ruin your motivation like nobody's business, and remember that you are what you create and not how your art performs on the internet. <3
that's a long ass post, but I hope it's somehow helpful! I could make a post with useful resources (mostly for digital art) so let me know if you'd be interesed in that~!
79 notes
·
View notes
Note
if it's okay, would you mind sharing your art process? your style is SO gorgeous dude. keep it up spardacest nation!!!
Thank you so much anon, and of course! I kinda posted about it on twitter a while ago, but for anyone not also on there, here's a paraphrasing of what I said there! (under a cut bc it's gonna get a bit long)
(speedpaint video from procreate mostly bc like I also said in that post, it's one of the few pieces I've done entirely on procreate and thus entirely recorded kdfjhdk I usually don't do the sketching + painting parts on there but every now and then I get lazy and want to get it all done quick in one program lol! It's not as good as it would look if I were using krita to render (which is what I normally use) but it gets the idea across decently of what it is that I do)
The short version of my process is: sketch, clean up sketch for lineart, then flat colors, then paint over the flats (i make the flats my shadows and paint on the light), then a multiply layer for skin details (like lips, eyebags, etc), then an overlay layer for skin transparency details (red over the ears/nose/fingertips etc), then i do hair over the lineart, then a multiply layer with the contact shadows in a light beige/grey/neutral tone on top of everything else, and then i unify layers, paint over the details, and color correct the HELL out of it The longer version is: SO, first of all, I will say, my entire process for a finished/fully redered piece is pretty scattered and uses a lot of different apps, because after many years of trying out different drawing apps I found that I just worked better when I could incorporate the parts I liked best from each individual one rather than having to adapt to another app entirely! In total, what I use is: autodesk sketchbook and procreate for the first half I do on my ipad, then krita and photoshop on my computer when I'm actually rendering (but any photo editing app instead of ps will do, I'm just used to photoshop bc that's what I learned as my first drawing app WAAAY back in the day lol), and then meitu on my phone for color filters (also any phone editing app with filters in it will do), AND also optional just for references: blender and daz3d on computer + magicposer on my phone The actual step by step of what I do: First of all, if I want to do a detailed, well rendered piece I will start by getting my references ready. That means either just grabbing a screenshot from the game if it's like, a simple portrait, or a photo reference, taking a picture of myself in the right pose/lighting, and if it's something more complex I will recreate the scene in Daz3D to simulate a realistic lighting, OR even just blender (i have the game models for the dmc characters downloaded, so I can just pop them in, pose them and change the lighting to get a realistic idea of what shadows their faces will cast in that specific angle/lighting.) Note: references are pretty essential to me, and there's nothing to be ashamed about for using them! Personally I don't struggle a lot with the drawing/sketching part of art, but my tiny little pea brain cannot fathom how to make an object 3D in my mind, and how to visualize shadows realistically... thus the reliance on 3D programs to do that for me, and then all I have to do is draw what I'm seeing lol. My art improved significantly ever since I started making 3D refs so I could get /exactly/ what I needed - there's still a lot of leeway you need to learn though, because as realistic as the lighting will be in a rendering program, you'll never really get a fully natural looking image, as far as stuff like the body stretching/squishing/pulling when it's in movement, facial expressions, folds in clothing/fabric, etc... so really it's more a guide than something meant to be followed 1:1.
Then, once I'm confident I know exactly what I'm gonna draw/have the idea in my head, I start sketching it in sketchbook. Not really getting very in depth, just blocking out rough shapes - I like sketchbook and to be on my ipad for that because it feels very reminiscent of traditional sketching on paper to me, which while I'm not super confident on my traditional art abilities, I do get the most natural/fluid/non-stiff figures out that way. Then when I think I have the general idea ready, I export the sketch layer as a png and import it into procreate - which is where I kinda start picking at the sketch and polishing it like i'm carving it out haha. Lots of liquify tool, flipping the canvas to check if it's even, blending out some of the lineart to help out with the rendering later, and then polishing up what was once the sketch into serviceable lineart. I usually reimport it back into sketchbook at this stage - while I like procreate for drawing I don't love the brushes I can use for lineart there, and so I usually only draw the "base" naked figure in there - when I'm in sketchbook I use a hard pencil to refine the details, then on a separate layer add all the things "on top" like hair, clothing, etc - usually I can get it pretty easily in one go, and once I'm satisfied I erase the naked body under the clothes and unify the lineart layers. Then I will just do the flats with a hard brush, turning the lineart layer into an overlay layer and coloring things in with the shadow colors. At this point, I export the file as a psd and import it on my computer - I give it a once over in photoshop first to see if there needs to be any adjusting (like whether any layer that has an effect needs to have a different effect, if all the colors look right since the ipad screen isn't the most faithful, if i wanna change the background color, etc), and once I think it's ready enough, I open it up in krita, where I do the actual bulk of the painting/rendering (as to why specifically krita: it's because I've gotten very comfortable with the brush/painting brush dynamics there and cannot seem to get as good results anywhere else, it's just the goldilocks spot of a brush for me haha.) If anyone's curious, here's the brushes I usually use for painting:
The one in the middle is my go to painting brush, left one for tinier/more refined details, right one for blending out soft shadows (though I learned the hard way to not overuse it, or it will look like I went ham with an airbrush tool lol). (I don't change any of the settings on these brushes, so if you wanna try out the exact ones I use! Just fresh off how they come out the app haha) I paint on the lights on top of the shadows, and just focus on that for the time being - once I'm done with the basic painting, I'll make a separate multiply layer for details like lip color, eye waterlines, makeup if there is any, eyebags, etc, and then adjust the opacity until it feels right - then I'll make an overlay layer with skin translucency details (like, when you hold your hands in front of a light and see the tips of your fingers become bright orange - many parts of your body are always a bit translucent to the blood underneath, specifically parts where the skin is thin like noses, cheeks, joints, knuckles, etc, and I found it makes the character look a lot more alive to add that subtle coloring in) - then usually I do hair on a separate layer on top of the lineart (because that way I can add small flyaways, more details, etc, and just use the lineart as a guide) After that, I'll usually make a multiply layer on top of everything where I'll add contact shadows in a neutral color (usually pretty pale, it'll be darker anyway since it's multiply), and once I feel like I've rendered everything out properly, I save the psd and re-open it on photoshop.
In photoshop, I'll mess around with the layers a little bit more (changing hue/saturation, opacity, etc), fuck around with the background to make it look pleasing, and once I'm happy with it, I'll unify the layers and start color correcting - usually by duplicating the unified layer and messing with the curve/hsl of the image and then changing the opacity of that edited layer until it's as strong or muted as I want it to be - then I also edit the RGB curves individually and adjust the opacity of that also (because I just really like how it ends up looking if I give a bit of a red/warm tint to the shadows lol), and at that point often I will reimport the finished image into procreate for some finalizing touches! Like, blending out shadows that came out too harshly, painting over anything that came out not the way I wanted it, redefining the lineart if it got messy during painting, and adding any extra small detail that might have gotten lost like catchlights, hair shines, hair flyaways, tears, etc. I also do one last round of flipping the canvas and liquify if needed! At this point, I export the finished image both to my computer and my phone - on my phone I open it up on the photo editing app, and add a bunch of different color filters - I don't hesitate from going completely balls to the walls here, and just kinda applying as many filters as will make an image look pleasing to my eye. Once I think it looks good, I'll export the edited image to my computer - and then open both the version without filters and the one with them on photoshop, and use the filtered version as an opacity layer, and adjust it until it doesn't look as crazy anymore lol. One last step I recently started incorporating was also changing the image to grayscale after I'm done, and doing one last round of curves in greyscale to make sure the values look right, and nothing is getting too lost because the values are too similar (because i know i get a bit swept up in getting repulsed by harsh contrasting lighting and can end up washing out all of rendering if I don't check myself kjdfgk) AND that's it! Yes it's a pretty long and chaotic process, but it's coming from years of trial and error and realizing I can just let myself fo whatever makes me happier with the results, and I don't have to stay constrained to one program if I don't like every tool it has to offer/don't have to accept the final image fresh off the painting app as the "finished" image with no adjustments allowed after, lol. I don't find it takes a lot more time than if I didn't do it this way, but YMMV. Hope this was helpful and sorry for taking so long to explain! I just wanted to give a thorough explanation dfhdkhkx
#asks#sorry i know its a bit chaos hfdgd#but i hope its helpful anon! thanks for asking#also for anyone wondering#no i am not paying for ps lmao#fuck adobe#it is always morally correct to pirate adobe products people#if you have an alternative photo editing app you like best youre welcome to use it#but if youre too used to photoshop. everything is free on the internet if you know where to look#i also wouldnt recommend meitu bc it feels like a pretty sketchy app all things considered#im just too lazy to care to change my go to app but i would look for a different phone app#p sure theres billions that let you add funky color filters instead#actually i think you could use photoshop camera raw filters for that too#its just way too intensive of a process for my tiny potato computer and it feels a lot faster + seamless on phone
13 notes
·
View notes
Note
Would you hang or would you sink? Flutter like butterfly or moth? Freeze over or return to ash?
These questions were asked at the tail end of September. I was planning to answer them. But then I started to see the same questions cropping up, with beautiful answers, from handfuls of poets. What did you do with all those lovely answers?
Who are you, dear stranger? Is it time now to unmask?
Have you found the answers you were looking for?
And because I have far too much caffeine in my system & I have another cup, I'll be answering other messages that have stagnated in my inbox & I'm sorry it took this long & I don't know how this will go...

All good, dear Anon! I have too many sideblogs for my own good.
I don't use anything fancy. I'm the least "tech"-y person ever. I literally just use any default notes app, or my outdated, but trusty, MS Word app, then take screenshots & use whichever editing app is currently available to me to copy/paste, and move around my screenshots & photos. (Sometimes I edit the colours and all that, but even that gets too complicated for me.)
It quite literally feels like the virtual equivalent of making scrapbooks. Like when you paste/glue/tape down magazine cutouts, cropped newspaper articles, torn pages from your favourite books, and your own personal photos & journal entries on the pages of a notebook your best friend from catholic school gave you a lifetime ago, and you scribble poetry excerpts on the margins for good measure. (Okay, maybe this is too specific but, I hope this answered your question. And PLEASE share with me your art blog, if you're okay with that. And also, don't apologise for the confusion & the slow brain, because—same here.)
SHORT ANSWER: Default notes & editing apps.


I believe these were from the same Anon. This as well.
All I know of you, dear Anon, are these words. And to me, you seem far too kind for this world. I have told you previously that I wanted to keep your first message in my inbox forever. Like it was a precious commodity, like it wasn't meant for me—a love letter that was sent to the wrong address by mistake.
And it feels the same with your recent messages. I, once again, didn't want the world to get its greedy hands on them. I have lost far too many treasured things & people in this way. One way or another, we learn about the opposite of kindness, and of loss, from the world's touch. Perhaps it is loss that teaches people to become selfish and greedy themselves. It seems, to me, dear Anon, that your kindness is streaked with wisdom. And it seems to me that your wisdom is rooted in some kind of pain (but what do I know of kindness or wisdom?). And yet, with mere words, you turn this pain into a blanket of sorts that wards off the cold.
There is warmth here. And it thaws my heart when you say you have gifted these words to others too. They deserve your light. Keep sharing it with them, please. Because your kindness (particularly in that final paragraph) is wasted on someone like me. Because it's far too late for me. But more importantly, I hope you turn all this warmth & light & kindness inward, too.

Anons like these... You take my heart && you throw it into the deep end. Sometimes it floats & the sun feels nice on my face. Most times, my heart sinks. & underneath it all, I could feel the fish's eyes on me.
(But you are far too kind, dear Anons. Just getting lovely messages like these make my account way overrated. Only 2 people were meant to see this. & god, maybe. No one was meant to read my words for this long—for years. My mind is having a hard time fully grasping that. But definitely no offense taken, dear Anon. Your question is very sweet & appreciated. I know the things I post here can be quite dark. Sometimes I need to take the nameless heaviness inside me & turn it into words & nauseating experimental scrapbook-esque edits I concoct thoughtlessly & haphazardly in between trying to live what's left of my life. Because sometimes that's how the light filters in through the waves & reaches me. Maybe we have different definitions of love, dear Anon. But what I'm trying to say is—I hope it's not as dark wherever you are. I hope the sun feels nice on your face. I hope the fishes don't bother you too much. I hope you find a new favourite tumblr account, because this one's a mess & always will be, and unfortunately, there's far too much gravity here.)
I feel drained & deflated. I'll answer other questions/messages again soon. In the meantime, tell me more, dear stranger. Ask your perplexing questions, write me untitled poetry, send your letters to the wrong address, scream into the void.
6 notes
·
View notes
Note
Hey I have a question? How do you produce such high-quality gifs. It's so cool and I've been trying but it usually just doesn't come out well
Thanks! I’ve been making gifs for about 2 years, so I’m by no means a pro. Sometimes it feels like I’m just throwing things at the video until it looks the way I want it to look.
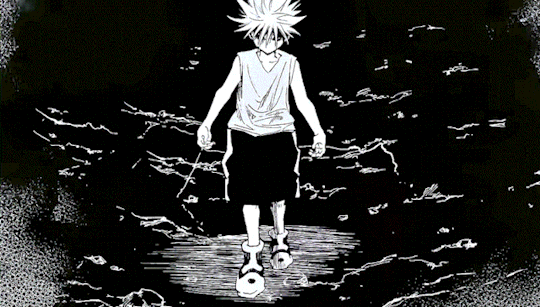
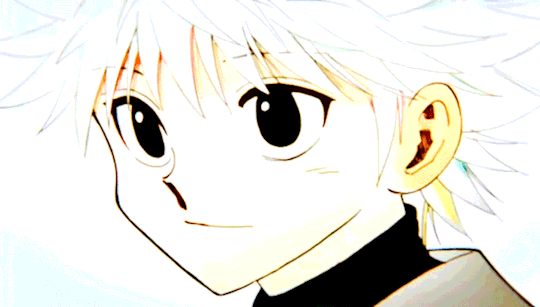
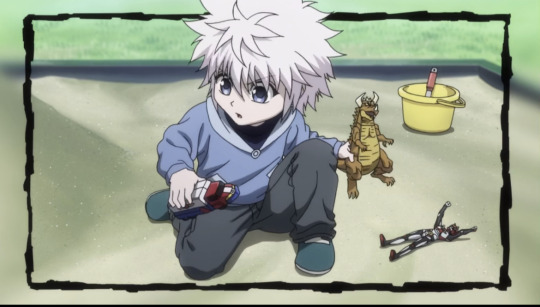
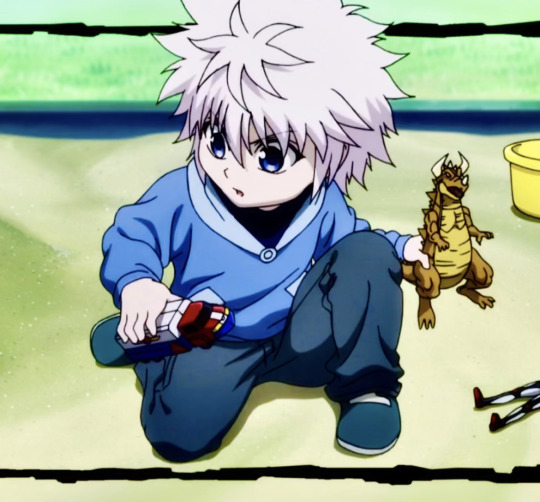
I didn’t use any guides, so it took a lot of trial and error to learn. Just to compare, here’s the first gif I ever made!
My advice for starting to get into gif-making is, you gotta really choose a media or character you love because the process is time consuming and it can be frustrating if it doesn't end up the way you wanted right away. Plus, you’re gonna stare at the same picture for like a loooong time. Over time, I’ve gotten a lot faster at making sets. Like that killua x start over gifset only took me an hour to make, but I barely edited that one. I normally spend a few days on each set.
I still don’t completely get photoshop, so I don’t feel like I can give a tutorial for it. But I do make a lot of gifs on my phone so here’s a more in depth look at that.
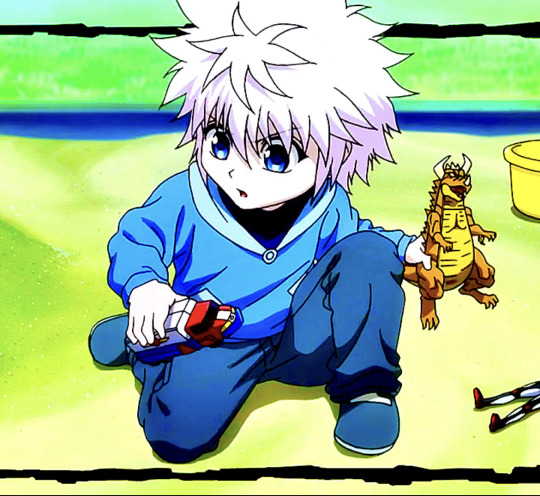
For starters, I always get video footage in 1080P. Either download or record the footage you want to turn into gifs. I’m gonna use Killua as an example. Here’s a picture of what the clip looks like before I’ve done anything.
I find that the shorter the clip, the easier it is to make it smooth and crisp. This clip is only 5 seconds long. I try to keep my clips 5 seconds or shorter. I can do longer clips, but then I’d have to shorten the frames used and the speed of the gif (frames per second), which I don’t like doing. Next, I crop it. You want to crop before you start editing.

After that, I can start recoloring. There’s a couple good apps I like using for this. VideoDay and InShot are pretty good, but they’re pay to use. The free one Apple provides in the photos app is good, too. I’ve got a different coloring style for most of my sets. But I mainly focus on making dark colors darker, making colors more saturated so they pop, and brightening the video. On VideoDay & Inshot you can find this setting under Filter. Then go to Adjust. This is what it looks like after boosting up the contrast, saturation, brightness, shadows, and definition. Mess around with different settings until you come up with something you like.
Now, I recolor it a second time with filters. Sometimes I use Inshot or VideoDay, but I mostly use the app ImgPlay. ImgPlay is what I’ll be using to actually turn this video into a gif. I use different filters depending on what colors I want to stand out. CL2 and HW3 are a couple favorites. For this set I use HW3. Then I added more contrast, saturation, and sharpened it as high as it could go.
Now that it looks pretty, time to make it move smoothly. Through a lot of trial and error, I’ve found that these settings work okay. I have it set to 90 frames for this clip. For frames, I usually try to keep it within 80-90 frames (or 30-80 if it’s a shorter clip). If I push it past that, like say 100 frames, it’ll start to look blurry once I condense it.
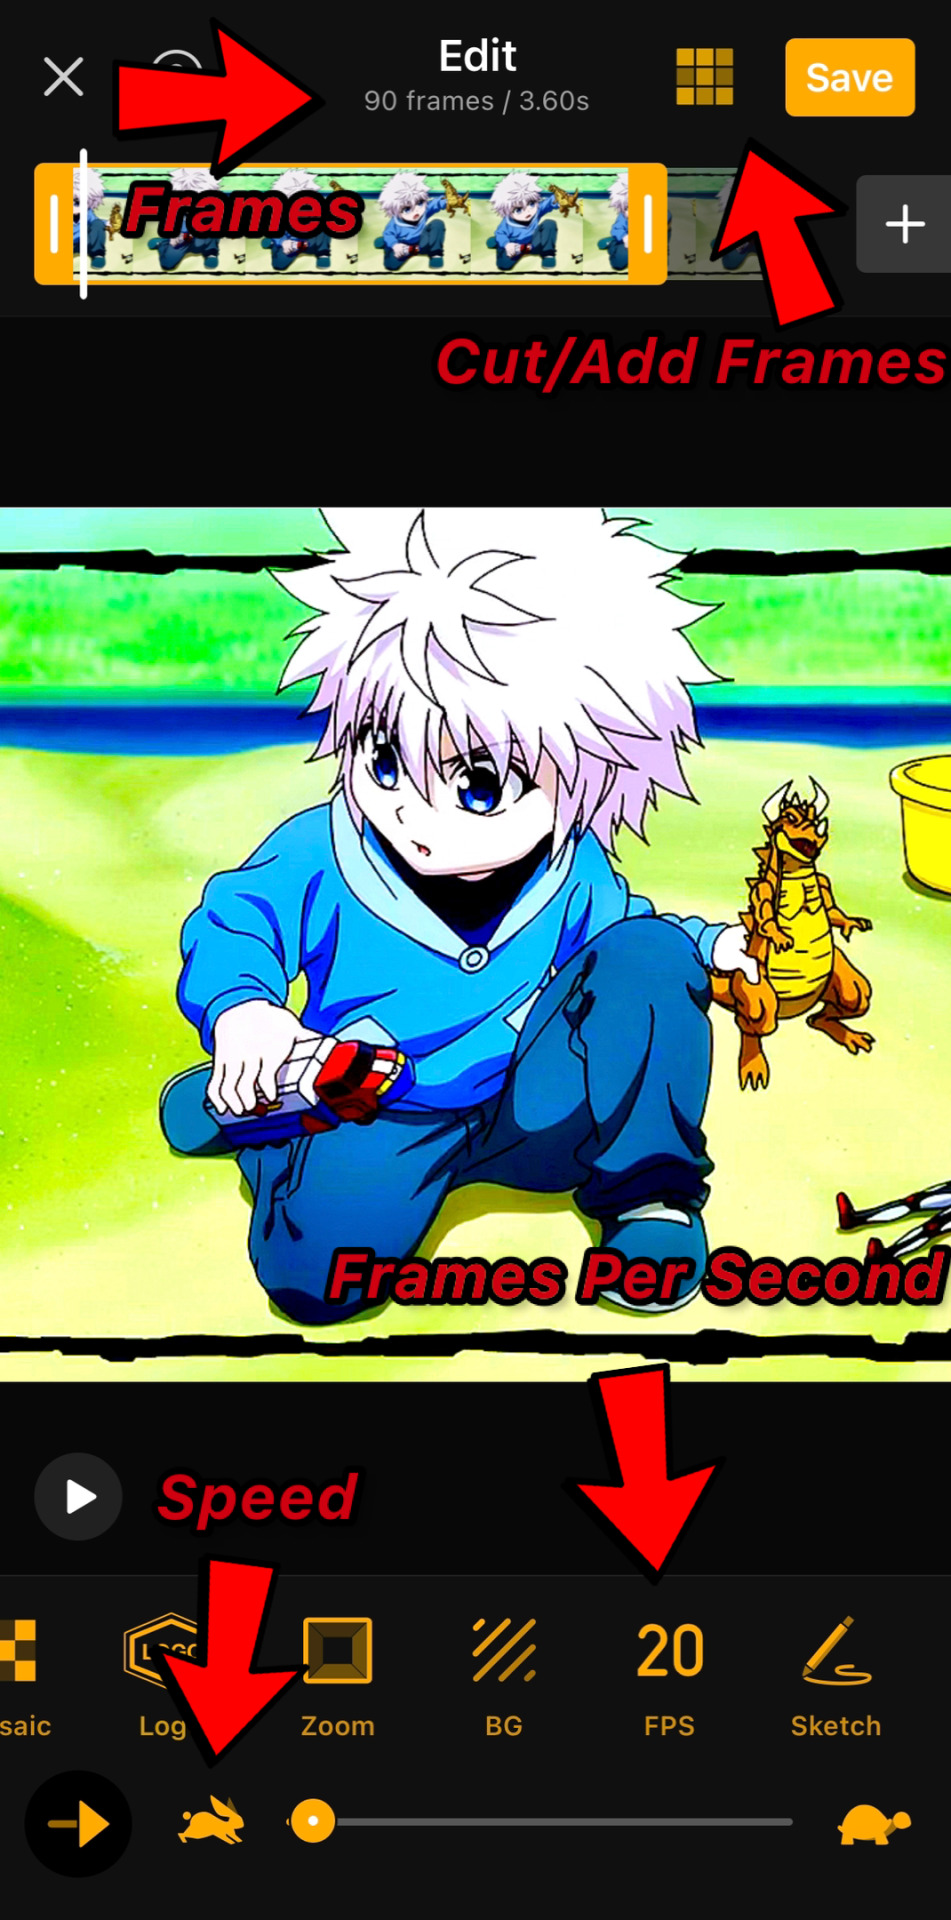
For speed, I either use .04 seconds or .05 seconds. For frames per second, I always go with 20 FPS at least. This will push up the frame count, so you’ll need to make the clip shorter. You can do that by using the slide bar or that little area with 9 squares in the top right corner.
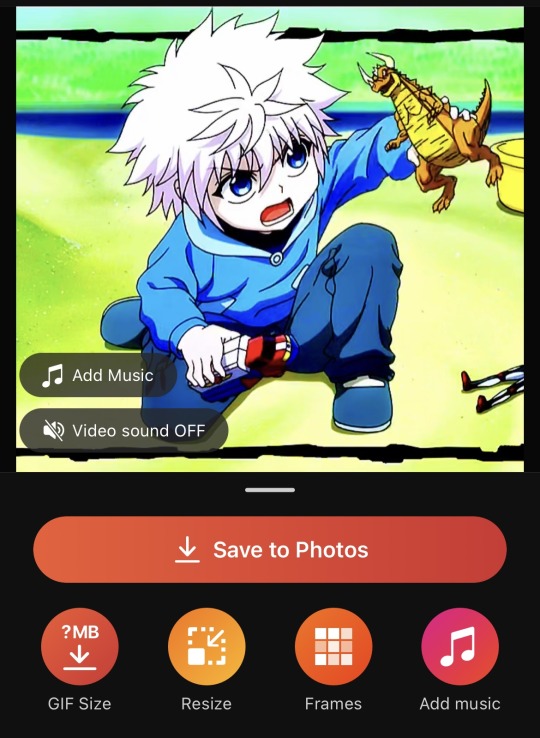
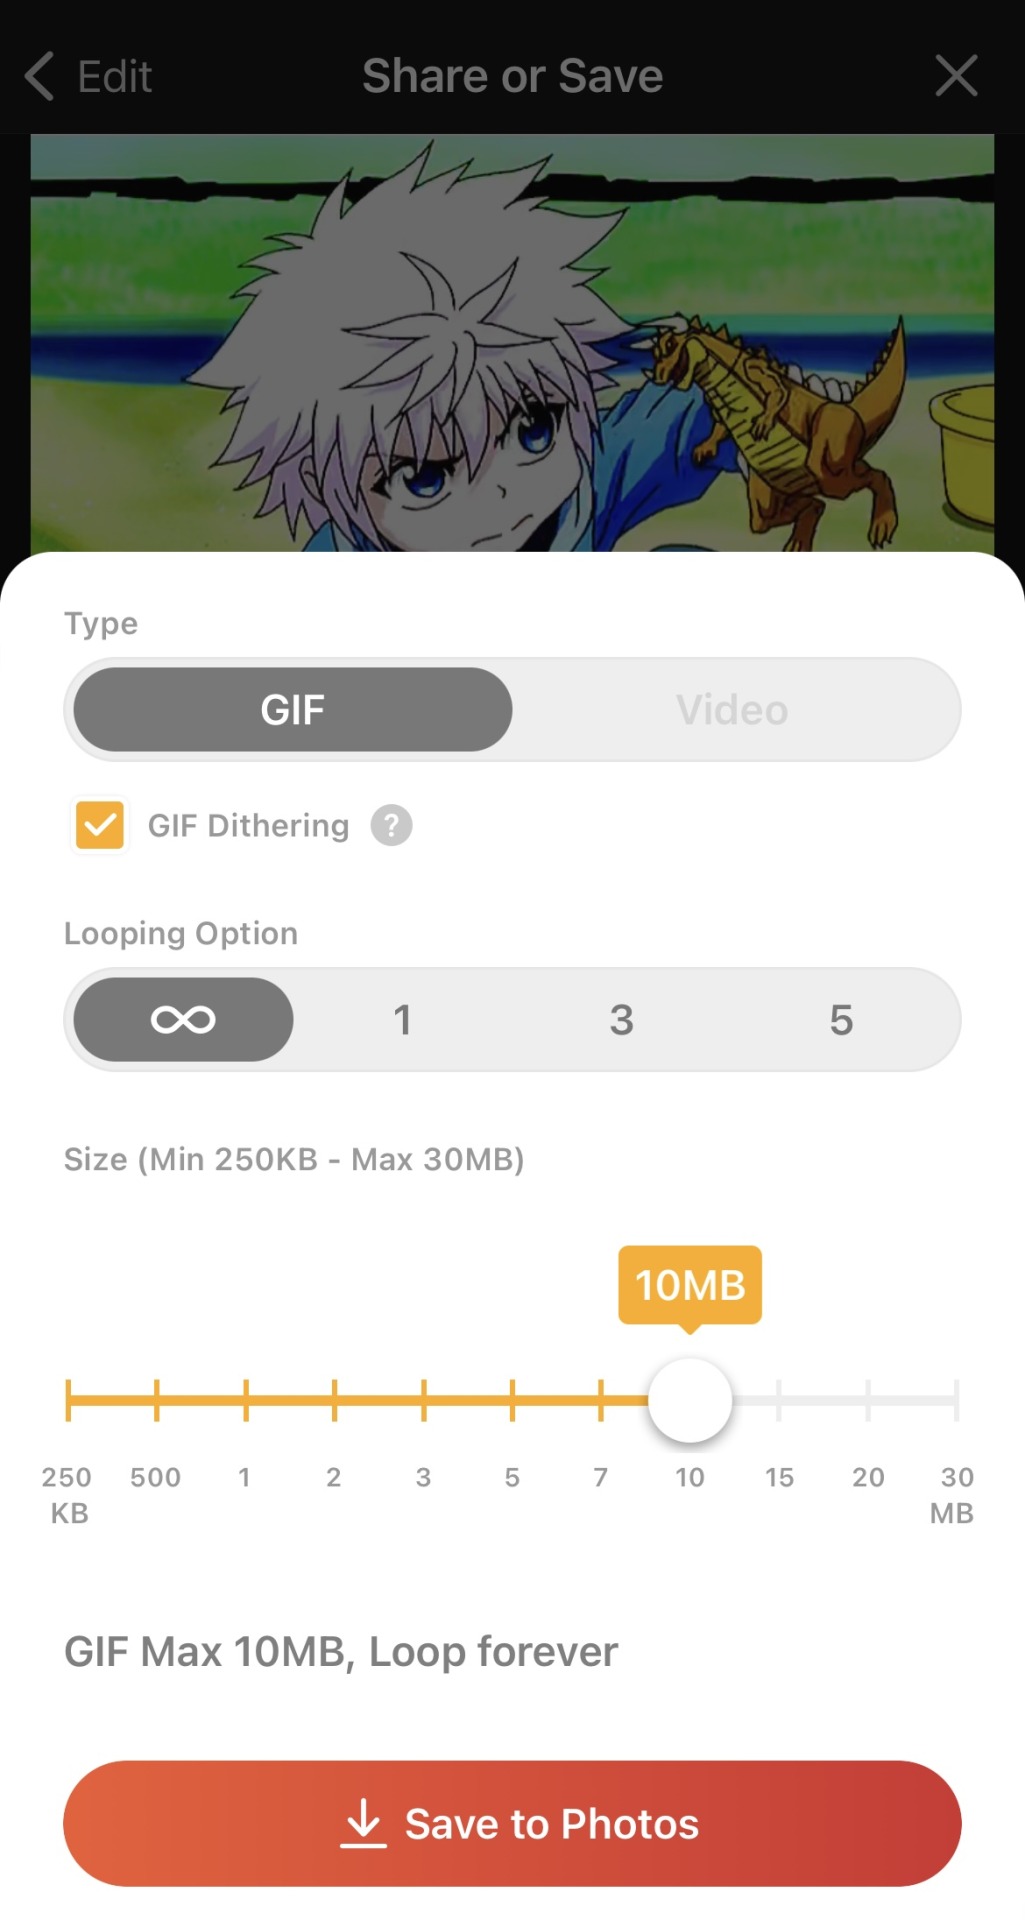
Now it’s time to export! Just click on save and GIF size. Set the loop to infinity and size to 10 MB. Tumblr has a limit on GIF size, so it needs to be 10MB or under. You can also click on GIF dithering to make the colors blend a bit more.
And we’re done! Hope it wasn’t too confusing and that I explained myself clearly! There’s a lot more cool effects you can do once you get the hang of video editing. This is by no means a strict guide or anything! Heck, even I don’t follow this exactly and I try changing things around, seeing what works and what doesn’t. Gif-making can be super fun, so I hope you keep at it! 😊💖
#asks#lucy answers#hope this made sense!#i tried to explain myself as best as i could 😅#now you all know how long my process is (and why i get so angry when someone reposts my stuff acting like they made it)#i don’t follow these rules exactly like i have a whole different setup for live action gifs#plus i try different settings all the time#but this is the gist of it 😊#flashing tw#flashing
11 notes
·
View notes
Note
hii!! do u have any tips on starting a blog? i've recently discovered that i like writing but i'm not sure how to set up a blog or anything like that.. like for example, making banners, putting links and just anything like that 😭
ahhh anonnie i’m honoured you came here for advice 🥹 i’m happy to help the most i can <33
ahh there’s so many things i can say so if you want to come back for more tips anytime, just hmu but hmmm to start,, i’d say making a navigation post is rlly helpful to just store all your important content you want ppl to easily find such as an about me or carrd, a masterlist, rules, etc. and then also making all those posts as well so you can include them as links in your navigation. you can always look at my navi (my pinned post) or other blogs that you like for inspiration <3 mine is pretty basic and not v special tho, i suggest going to others for inspo T-T hahhahsj
in terms of banners, you can use any photo editing app to make them if you want to add text and stuff to your banner. i tend to just stay simple cuz i’m lazy skdjdj and go for the classic three picture moodboard type thing haha ,,,, oooh and then you can have your header picture, and stuff in your bio as well. again, i’d suggest looking around at different blogs to find inspiration and gather things you like about each to come up w ideas for yours and come up w your own aesthetic :>
this might already be a lot, so you don’t have to bother with this one if you don’t want to, but i made a survey (a little over a year ago now apparently?? a little outdated now then ig T-T sjsjsj) for our fellow engene readers to give input to writers on things they like. if you want to take a look at those results, it might help in the,, success?? of your blog? idk if i wanna call it that, but yk what i mean 😭
most importantly tho, at the end of the day, your blog belongs to you and so you can do whatever you want with it. just have fun, experiment, and you learn what works for you along the way :>
lmk if this helps and if you ever need more advice on anything or if you have any specific questions! i’m always happy to help :>
#best of luck to you and your blog !! <3#if you ever wanna lmk your @ i’d love to support ^_^ <3#only if you’re comfortable ofc <3#em answers#lovely anon
5 notes
·
View notes
Text
When Life Hands You Lemons
The semester is starting to wind down these days, especially for my grad students, whose term lasts only 13 weeks. It may seem like it is long at times, but it really is fast. And like many other semesters before, we have been treated to some very newsworthy, sometimes amusing, other times anger-inspiring, events that cause us to stand up and pay attention.
Like the ongoing worries over TikTok and whether it should be banished not just in individual states and on their government-owned devices, but nationwide. Australia just announced its complete ban on government-owned devices. In the US, in a rather odd come-together moment for the Right and Left, there is momentum to ban it here as well.
It’s just that TikTok’s parent company, ByteDance, has more ammo in its case. The top apps right now for lifestyle and video editing are owned by them: Lemon8 and CapCut. Take that, you pompous lawmakers. We’re not just going to roll over and die.
CapCut is a handy tool for creating the reels that users post to TikTok or elsewhere. I only learned about it this last weekend from my oldest daughter, who said that “everyone’s using it” at the digital marketing agency she calls her professional home. Me, I use Mojo, which, for all I know, could be owned by ByteDance as well. She says it is much better than Mojo. I messaged Oldest Daughter yesterday about CapCut’s owner, and I could almost hear her gulp all the way from Dallas.
And then there’s Lemon8, the new social media app that is designed to take on both Instagram and Pinterest. But in the case of Lemon8, it’s only new to the US. Launched in 2020 to little fanfare, ByteDance kept it in limited circulation until now.
And now we know why.
Lemon8 is not an exact Instagram clone, however, focusing—at least for now—on fashion, food, wellness, and travel, among other general interest topics. Like BeReal, it shuns pretense, and urges users not to stage photos like many we see on Insta. The site also encourages users to include direct links to where viewers can buy featured products.
My question now is whether a ban on TikTok would also include a ban on Lemon8 and CapCut. And even if it does, what’s to stop ByteDance from continuing to roll out new apps to dodge federal bullets? Will it boil down to banishing all Chinese-owned apps, like Pinduoduo and Shein? This could lead to war, you know.
Which makes me begin to wonder if all this pomp and circumstance, this drum-beating, is an exercise in futility. Short of erecting a massive firewall around us, like the Chinese do to keep out western media, there’s little that can be done. Worse yet, it leads to frustrations among the people, especially when we live in a place that espouses First Amendment rights and freedoms. Fire up the VPN, as I have said before, and hope you don’t get caught. I hear that Chinese citizens can be in serious trouble if they do so. The last thing we need is a similar clamp down.
The other part of me wonders how people can continue to absorb so many social media sites. I am not opposed to the development of new ones at all. It’s just that there are still only 24 hours in the day, and I have a hard enough time just attending to Meta’s Facebook and Instagram. I have work to do, you know. Heck, my LinkedIn looks like a ghost page. I guess if I were looking for a job, I’d hop on it.
All of which means we are continuing to slice the market into ever smaller pieces, and as long as it can be done profitably, new sites will continue to roll out. Stir on the controversy of Chinese ownership, and Ima gonna have things to write about for a long, long time.
Let the user beware. There may be someone in Beijing looking over your shoulder.
Dr “But Still I Must Check It Out“ Gerlich
Audio Blog
2 notes
·
View notes
Text
[ID: a series of 18 photographs with text on them. photos are not described in this ID (I will add it as an edit when I can). A block of text is between images, this is added here for context:
I am mad about cellphone cameras hiding the processing they do, and I am glad about software that lets me control it and opt in and out, and I dictated this rant on insta so I am resharing the images here and will attempt to turn this into a useful text post on my blog in future, when my hand is working better [rock on hand-sign emoji][thumbs-up emoji]
end explanatory text. text on images (minorly edited for clarity) reads:
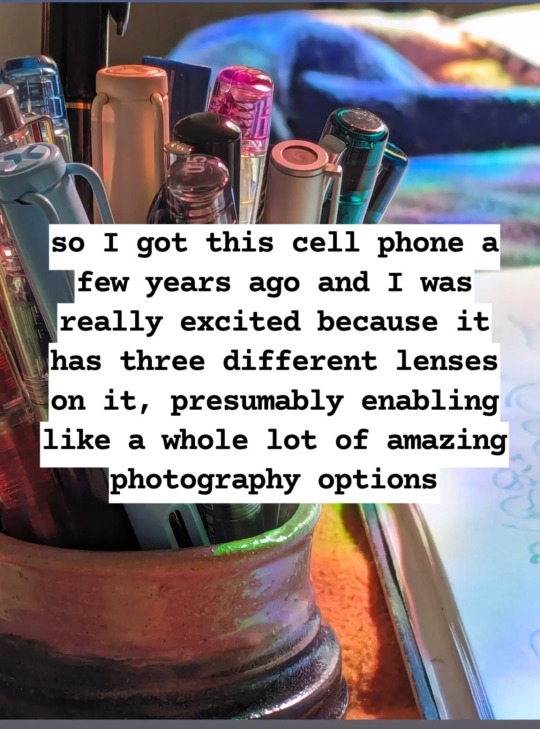
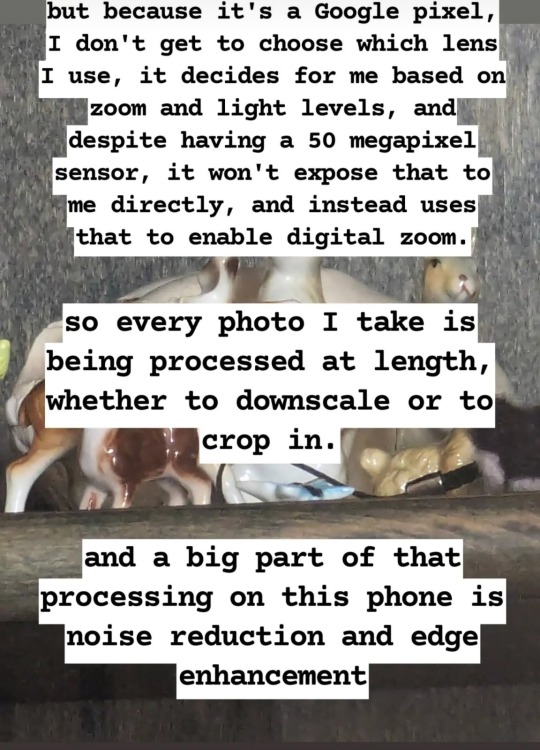
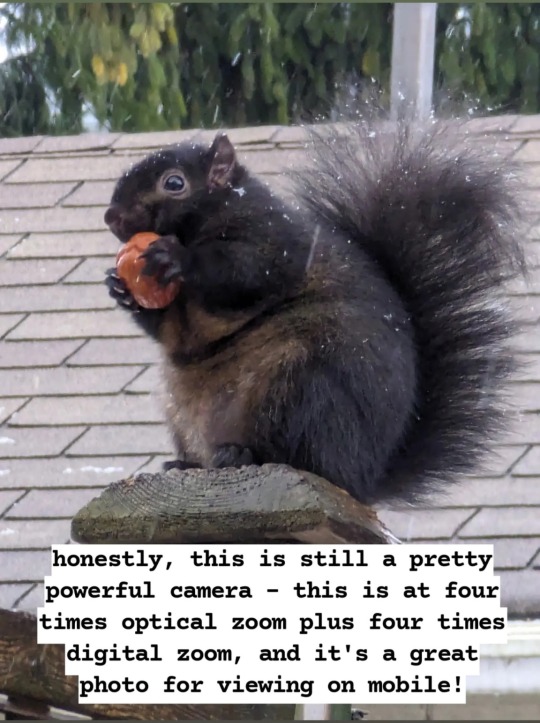
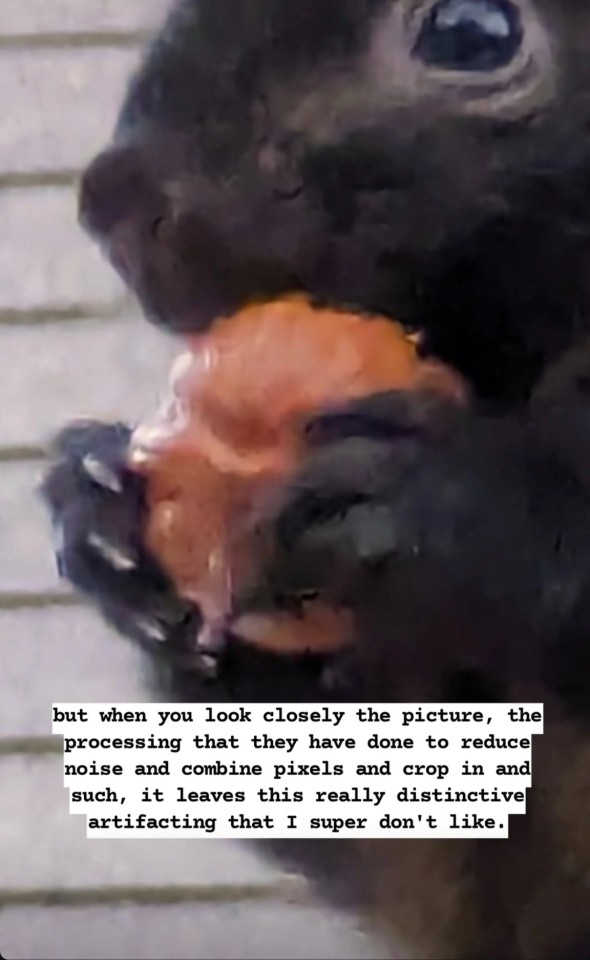
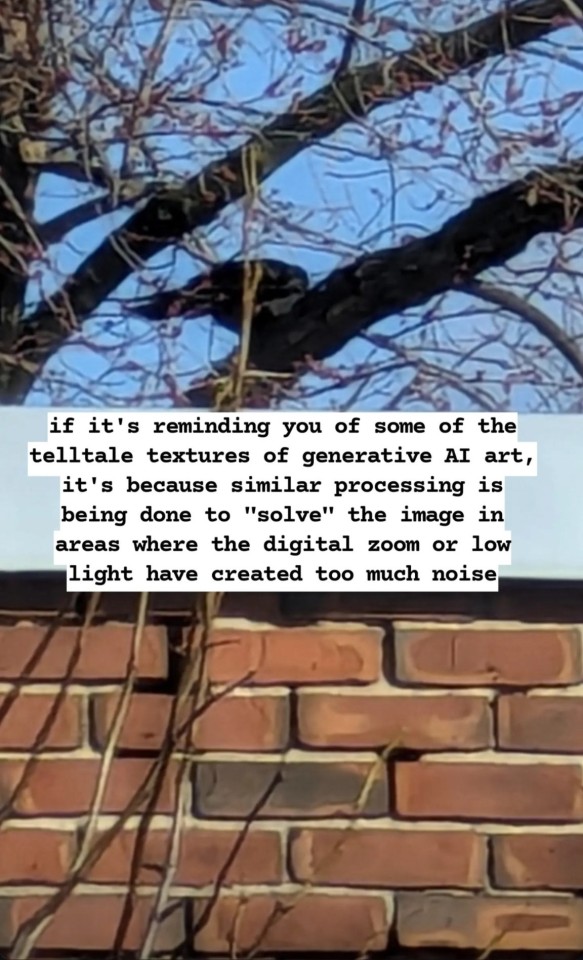
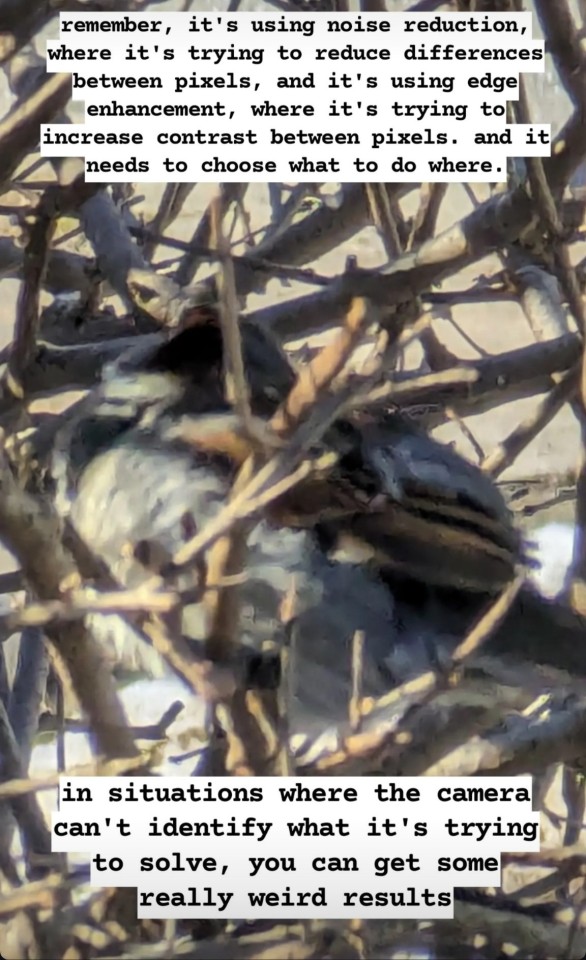
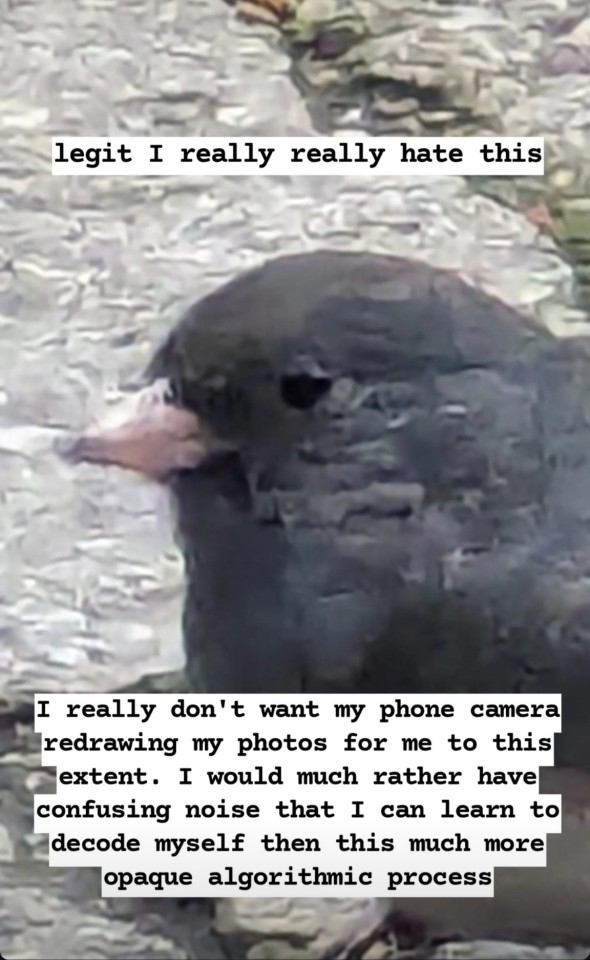
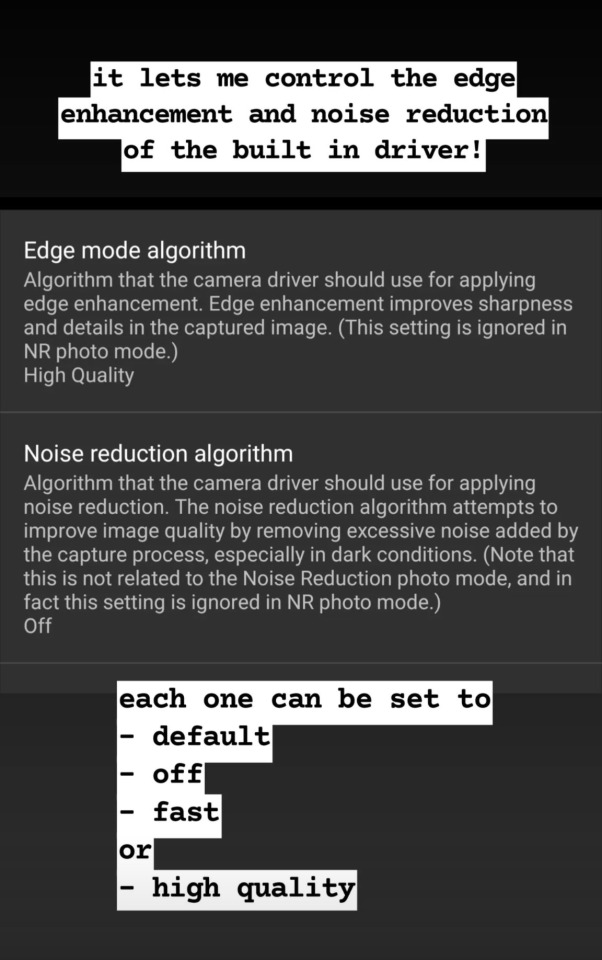
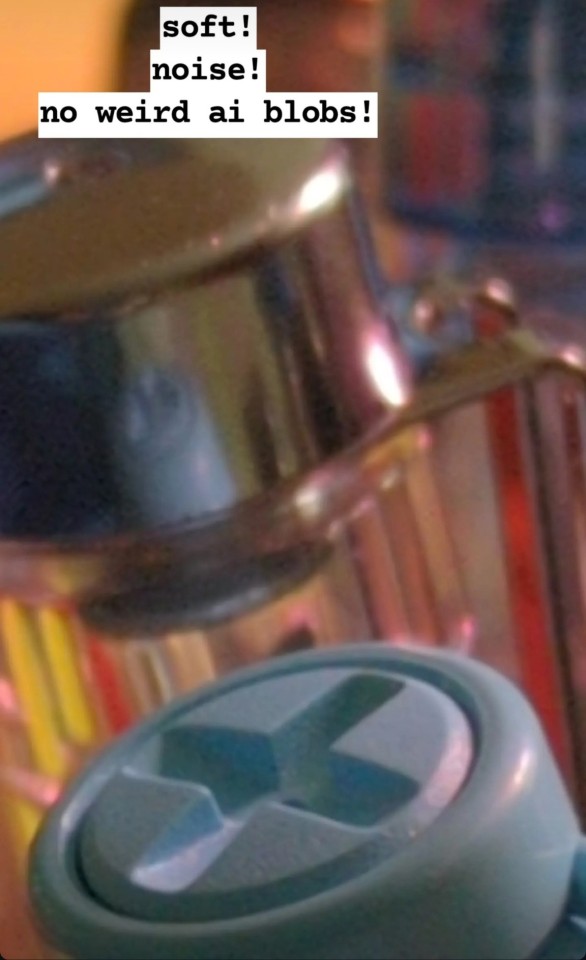
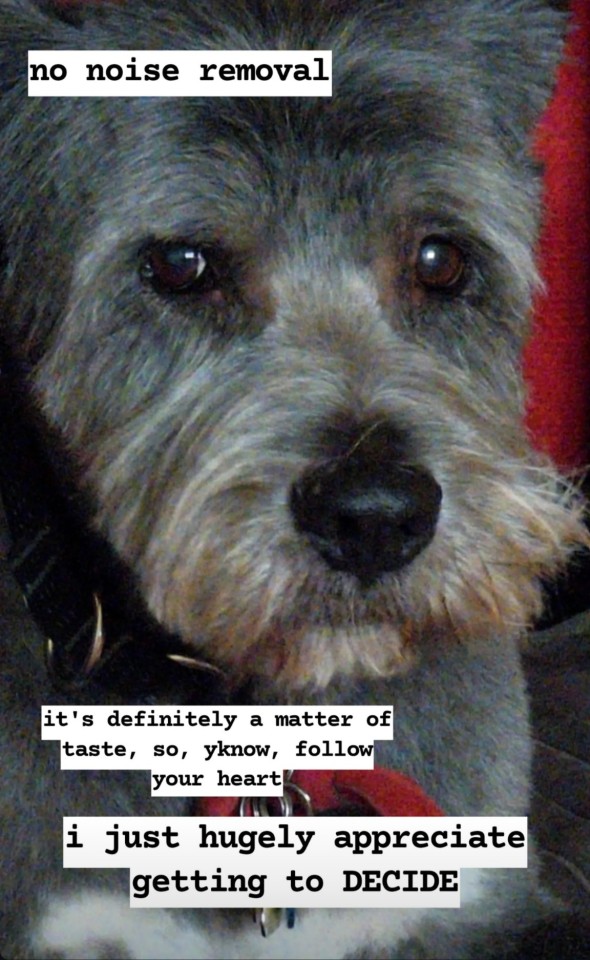
So I got this cell phone a couple of years ago, and I was really excited because it has three different lenses on it, which presumably enables like a whole lot of amazing photography options. But because it's a Google Pixel, I don't get to choose which lens I use, it decides for me based on zoom and light levels, and even though it has a 50-megapixel sensor, it won't expose that to me directly, instead using it to enable digital zoom. So every photo I take is going to be processed at length, whether to downscale or to crop. And a big part of the processing on this phone is noise reduction and edge enhancement.
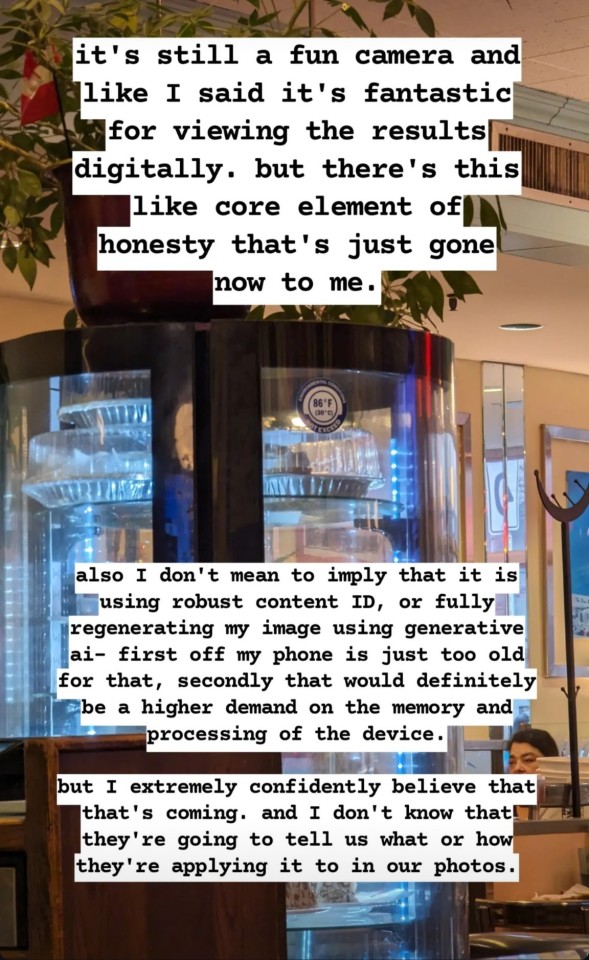
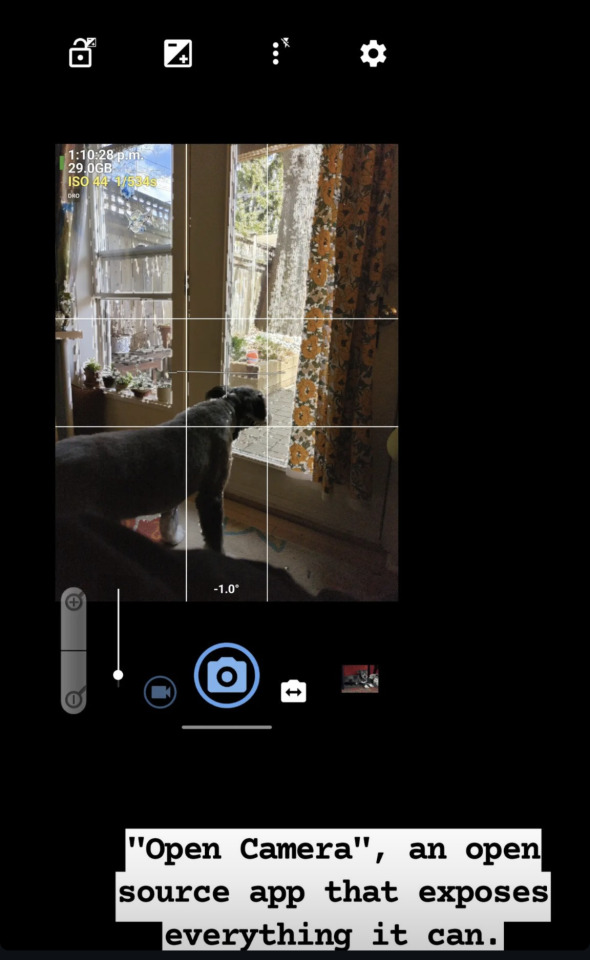
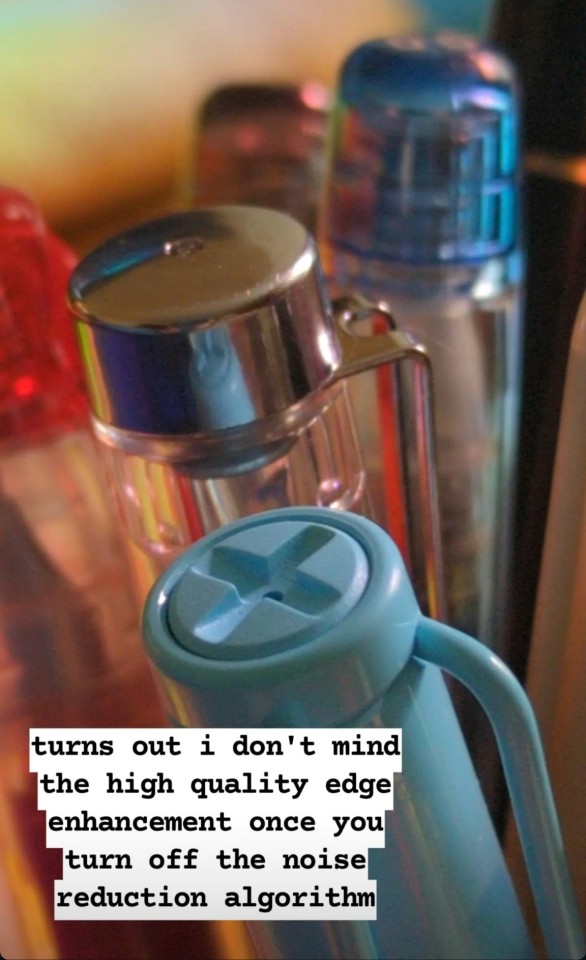
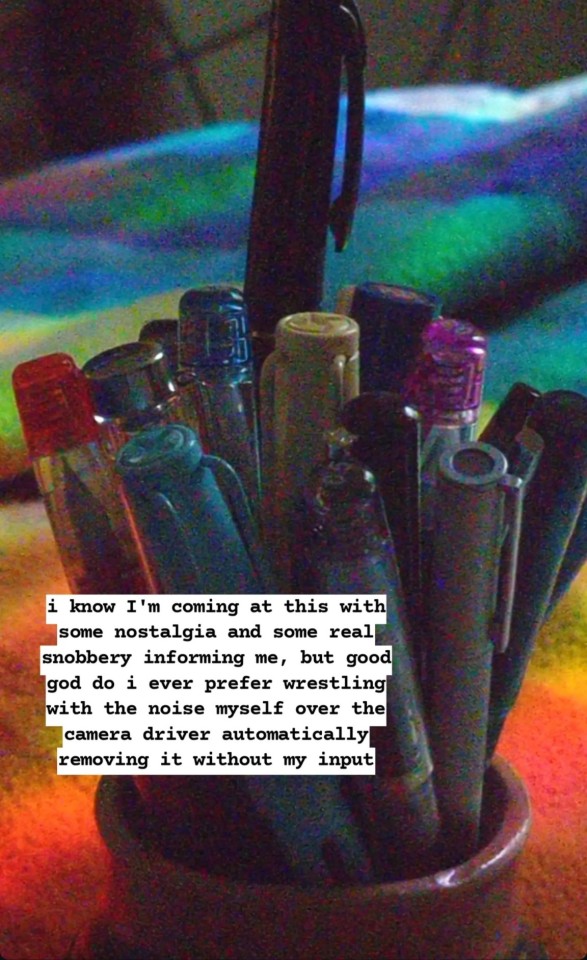
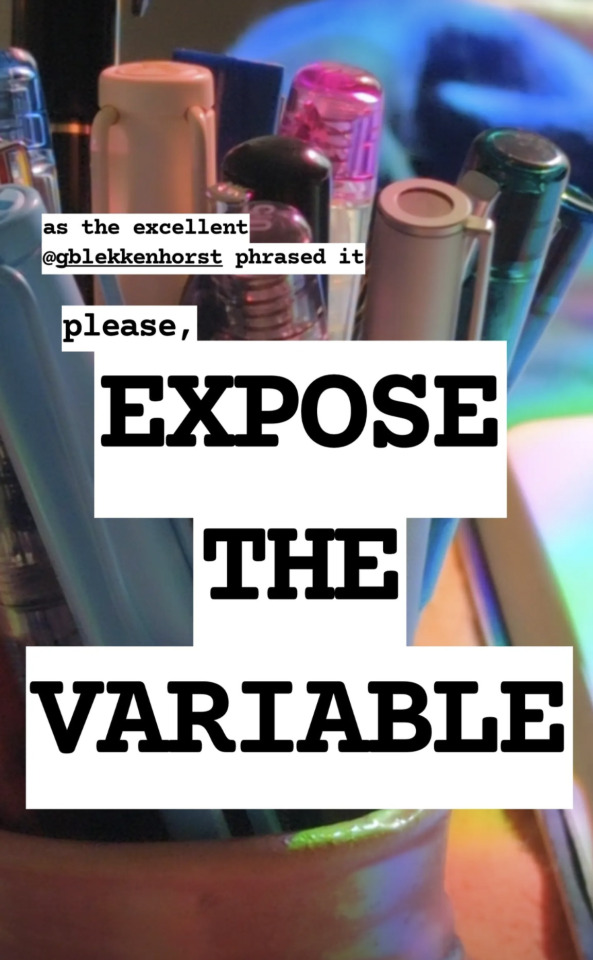
Honestly, this is still a pretty powerful camera. [referring to Image] This is at four times optical zoom plus four times digital zoom, and its great for viewing on the mobile! But when you look closely at the picture, the processing they have done to reduce noise and combine pixels and crop and such, it leaves this really distinctive artifacting that I super dont like. If it reminds you of some of the telltale textures of generative AI art, it's because similar processing is being done to "solve" the image in areas where the digital zoom or low light has created too much noise. Remember, its using noise reduction, where its trying to reduce differences between pixels, and its using edge enhancement, where its trying to increase contrast between pixels. and it needs to choose what to do where. In situations where the camera can't identify what it's trying to solve, you can get some really weird results. [referring to image] Legit I really, really hate this. I really don't want my phone's camera redrawing my photos for me to this extent. I would much rather have confusing noise that I can learn to decode myself than this much more opaque algorithmic process. It's still a fun camera and, like I said, it's fantastic for viewing the results digitally. but there's this like core element of honesty that's just gone to me now. Also, I dont mean to imply that it is using robust content ID, or fully regenerating my image using generative AI - first off, my phone is just too old for that, and secondly, that would definitely be a much higher demand on the memory and processing of the device. But I am extremely confident that this is what is coming. And I do not know if they will tell us what or how they will apply it to our photos. However, I have found a camera app that lets you turn off some of this built-in processing! "Open Camera", an open source app that exposes everything it can. It can't force my phone to use a particular lens, nor can it expose all 50 megapixels, BUT [screenshot of Open Camera interface] It lets me control the edge enhancement and noise reduction of the built-in driver! [screenshot of Open Camera settings] Each one can be set to default/off/fast/high quality [referring to image] Smooth! Noise! No weird AI blobs! [referring to image] Turns out I don't mind the high quality edge enhancement once you turn off the noise reduction algorithm. I know I come at this with some nostalgia and some real snobbery informing me, but good God, I would always prefer to wrestle with the noise myself than have the camera driver automatically remove it without my input. [Image with noise reduction][Same image with no noise reduction] No noise removal It is definitely a matter of taste, so y'know, follow your heart. I just hugely appreciate being able to DECIDE. As the excellent @/gblekkenhorst put it Please EXPOSE THE VARIABLE!
end text transcription.
Additional tumblr tags, taken from @/irradiatedsnakes: #for iphones, check out yamera. its what i use when i need manual lens selection and focusing
end ID.]
I am mad about cellphone cameras hiding the processing they do, and I am glad about software that lets me control it and opt in and out, and I dictated this rant on insta so I am resharing the images here and will attempt to turn this into a useful text post on my blog in future, when my hand is working better 🤘👍

#photography#phone camera#cellphone camera#digital photography#please tell me if i've messed up anything in the ID or if you would like smth changed#will try to describe the images (or at least some) but rn i can't#if anyone else describes the images(especially the ones referred to in the ID) i will gladly add it here & give credit
29K notes
·
View notes
Text
For almost three years straight I was operating on a nightly cooking regiment that both fed us dinner and proved lunch for the next day.
While this provided us with lots of variety in our day-to-day dinners and lunches (something my ADHD demands), it was, quite frankly, extremely exhausting. I would have to push through my executive dysfunction just to make a meal list for the week so I could then make the grocery list and then I'd also have to force myself to go shopping, and all of that before the cooking even began.
It's especially been a problem in winter when my SAD kicks in and steals all my energy away.
So, among many other life changes in spring of 2024, I decided to completely change the whole method.
No more spreadsheets or calendars or miscellaneous recipes scattered between paper, Dropbox or notes- and no needing to cook a whole proper meal every. Dang. Night.
First off, I decided it would be easier to cook one large batch of a well-rounded meal to cover lunches for the whole week, for two people. With that decided, the amount of decisions I would need to make plummeted. It also meant the times meals were repeated each month was also drastically reduced, which balances out the need for lots of variety.
Then, I did some research on meal planning tools to find something that would work better for me, and found something perfect.
It's an app called Paprika 3 that costs $4.99 (a one-time purchase) which I was happy to pay as opposed to a subscription.
My favorite features of Paprika 3: (there's a lot, feel free to skip ahead)
- You can import recipes and store them all
- Your saved recipes can generate a shopping list, which you can edit before adding to make sure only items you need are put on the list
- Recipes photos are displayed next the the item on the recipe list, something great for a visual person like me! I eat and plan with my eyes.
- There is a built in browser to search recipes
- There is a built in calendar where you can plan which meals are happening on any given day
- You can organize saved recipes by making folders for easier searching- pasta, soup, rice, just to name a few of mine.
- When following a recipe you can turn your device sideways and it will display ingredients alongside the directions (I HATE having to scroll back and forth between these two on websites)
- You can cross off ingredients as you go, and you can highlight the step you're on in the directions
- Your phone screen will stay on while using the app (super annoying when it turns off repeatedly IMO)
- The grocery list is so great. I would have bought this app just for this. (I don't think there is any built-in pricing feature which is the only thing I want added, it would be so helpful for seeing how much you're about to spend)
- There's also menu and pantry features. I haven't used these but I bet they're great for those who want these features.
Anyway, ramble over- back to meal planning and stuff.
Nowadays I have been making one big meal and picking up several assorted easy meals- microwave dinners, frozen veggies, box and canned foods, etc. stuff that either of us can make without much effort, meaning I can take a break from cooking if needed (HUGE).
The key has been learning what kinds of easy foods are worth having on hand, and trying to have a few frozen or fresh veggies on hand to add for more nutrients (and flavor!).
It's a simple solution and it makes each dinner feel fun. It baffles me that it took me so long to figure this whole thing out.
I have more energy for other things now, and I have less decision fatigue. I give Paprika 3 a 5/5 star rating.
#meal prep#meal planning#anecdote#delectable diaries#neurospicy#meal accessibility for ADHD and autism#cooking#Paprika 3#ADHD#Autism
0 notes
Text
Digital Alchemy: Can PTool Really Make Me a Face-Swap Wizard?
Digital technology has a peculiar power—it can turn the simplest ideas into something magical. Case in point: have you ever played with the notion of swapping faces in photos? It's like having a superpower from a comic book. You know, the kind of power where you can seamlessly swap your mug with someone else's, and it looks so real that even your mom would be fooled for a second. This digital sorcery isn't just for the pros anymore. Enter Deepswap and PTool AI Face Swap, the tools that have democratized this once elusive craft. But let's delve into into this with a critical hat on—can PTool really make me, an everyday Joe, into a face-swap wizard?

First off, you have to give credit where it's due. The technology behind Deepswap and PTool is nothing short of impressive. These aren't just any old apps; they're sophisticated pieces of software that use machine learning to do their thing. But here's the real question: Does the output match the hype? Can someone with zero editing skills jump in and start swapping faces like a seasoned expert?
Let's put the brakes on the enthusiasts for a moment. Face swapping sounds like a breeze, right? Just upload a pic, pick another face, hit a button, and voila! However, if you've ever tried it, you know it's not quite as simple as it sounds. There's an art to getting it just right—the angles, the lighting, the expressions; all these factors need to arrange for the swap to look believable.
Now, PTool claims to make face swapping accessible to everyone, but does it deliver on that promise? I decided to test the waters myself. It's user-friendly, that's for sure. You don't need a degree in computer science to direct the interface, and that's a big plus. But as I played with it, I couldn't help but wonder—is this just a fun party trick, or could it have some real-world applications?
Imagine you're a filmmaker or a game developer. Suddenly, face swapping becomes more than a novelty; it's a tool. It's a way to bring characters to life, to create more immersive and personalized experiences. But is PTool up to such tasks? In my experiments, I found that while it's great for casual use, professional projects might still require a more nuanced touch. Could PTool evolve to meet those standards? Only time will tell.
Let's talk about the NSFW mode. It's there, and yes, it allows for some edgy creativity. But should we be opening that Pandora's box? The ethical considerations around using such tools forInappropriate content are valid and worth discussing. When does the fun of swapping faces cross into territory that's not so funny?
I'm curious, do you think PTool could ever replace the human touch in editing? There's something to be said for the personal flair that a human editor brings to the table. Can an AI algorithm truly replicate that? Or are we just fooling ourselves into thinking that technology can replace real skill and intuition?
Sure, PTool can make swapping faces look easy, but it's also a reminder that with great power comes great responsibility. As the technology gets better, we need to ask ourselves: Are we using these tools wisely? Are we considering the implications of making face swapping so accessible?
So, is PTool the magic wand it claims to be? It's a start. It's fun, it's accessible, and it's a glimpse into what's possible when technology meets creativity. But let's not kid ourselves into thinking it's a substitute for the real thing—not yet, anyway. The true test of any tool is not just in what it can do, but how we choose to use it. And that, my friends, is something only we can control.
0 notes
Text
social media
Social media is a platform that can be used in multiple ways, both positive and negative. It is a resource that can be used to stay in touch with friends and family or to share your thoughts and feelings on subjects. Social media is a hard term to define as there are so many different ways to use it or define it. You can create, share, and interact with others whether you know them or not. It is great to meet new people and engage with them without meeting face to face. But with the new access and freedom that comes with social media, there is also a sense of danger that both younger and older users should be aware of. Social media opens doors for people to connect and share information in a positive regard, it can also spread disinformation and enhance privacy concerns for children on social media apps. The spread of fake news is a big concern when it comes to social media with headlines speaking to users that are both false and misleading. While social media can help you stay in touch with your friends it is also a big concern with cyberbullying, a term that has become very popular in the past few years and a leading worry with younger users. Social media is a great platform for people to create and express themselves however it also comes with many troubles that should have people be cautious while using social media.
As a social media user, I am on social media to share my life and update my family and friends while also staying in touch with them. I am on apps such as Instagram, TikTok, and Snapchat which all give you the ability to post and create content that updates your followers. I post a lot on Snapchat specifically mostly because I’m able to edit who can see it and make private stories for my close friends who I want to know what I’m doing and to stay in contact with them. On Instagram, I post bigger moments in my life such as prom and homecoming however I don’t post as much on Instagram due to it being a bigger pressure I found. As a teenage girl today I can see how Instagram can come with a negative side when looking at it in a social media aspect with cyberbullying and pressure to be perfect. With this, I tend to stay away from Instagram more often. TikTok is a more fun app that I truly enjoy being on and have no problem posting videos with my friends and family. Saying this I don’t have many posts up due to me just not making that many videos however I find no problem filming and posting them and have never looked at likes and followers on TikTok.
When it comes to understanding social media in this age it can be difficult especially when you join social media as a child. I joined Instagram and Snapchat when I was twelve and have made many mistakes on the app since. I believe that when joining social media as a young user you're bound to make mistakes however it can also be used to stay in touch with your friends as obviously when you're young you don't have the freedom to just hang out whenever you want or a driver’s license. However, as I’ve gotten older I found that I’ve definitely gone through periods where I’ve not posted on social media at all and even strayed away from Snapchat. I always see myself critiquing photos of myself on Instagram or straying away from updating my friends with the thought that no one cares. In these times I can say the challenge has been self-love or comparing myself to others as any other teenage girl probably has done. I think finding a healthy medium when it comes to social media is important and a standard you need to be on the app.
As a teenager I do use social media a lot and have for a long time stayed in contact with friends or family or posting about my life. I believe learning about social media and its origin to now or simply learning about the other possibilities with social media would be very interesting. I'm looking forward to leaving this class with a new sense of insight into social media and a deeper understanding of the platform.
1 note
·
View note
Text
AI Improves Pixel In 6 Ways Include Pixel Circle To Search
AI powers a few of the well-known and beloved Pixel features. Google covered seven instances last year, ranging from Magic Eraser to Real Tone include Gemini, Audio Magic Eraser, Pixel Circle to Search, Gboard and Google have come a long way since then. Here are six additional ways that your Pixel is made even more useful by Google artificial intelligence efforts.
Use your personal AI helper, Gemini, to swiftly summarise a webpage
Gemini can save you time browsing and skimming through webpages if all you need is the main content. Gemini can quickly provide a concise synopsis of the key talking points for you to read after scanning a full page of text.
How to use it: Gemini may be used as your mobile assistant on Android devices. Once your Pixel 8, Pixel 8a, or Pixel 8 Pro is configured, open a webpage in Google Chrome and press and hold the power button to launch Gemini. When the overlay shows on your screen, ask Gemini to summarise the article. Saying “Hey Google” will also activate Gemini by voice.
Record a video and use Audio Magic Eraser to edit the noises afterwards
Your favourite take of yourself wishing your best friend a happy birthday gets ruined by a dog barking in the background as you’re recording. You can send a video of yourself in the best possible light by using Audio Magic Eraser to muffle the dog and any other background noise.
How to apply it: Using your Pixel 8, Pixel 8a, or Pixel 8 Pro, record a video. After that, navigate to your Google Photos, pick the video, and press “Edit.” At the bottom of your screen, there is a row of options that include “Video,” “Crop,” “Audio,” “Adjust,” and more. To activate the Audio Magic Eraser function, tap “Audio.” It will recognise the many types of sound in your movie, such as wind, nature sounds, and human speech. Select “Auto” to let Pixel enhance the audio for you, or choose a sound and reduce it to suit your preferences. Once you’re satisfied, select “Done.”
Use Pixel Circle to Search to learn more about what’s on your screen
Suppose you’re using your phone to view a YouTube Shorts video, read an article, or study something on your screen and you’d like to know more about it. With the Pixel 6 and above, you can now get more information without switching apps by tapping, highlighting, circling, or scribbling anywhere on the screen.
Use it by holding down the navigation bar and then highlighting the text, image, or video that you want more information about, either by circling it or in another way. To get the best results, you can also add more context to the search bar at the bottom of your screen by asking questions like “where can I get a similar shirt?”
Use Gboard’s Proofread to ensure that your messages are error-free
If, like me, you type messages quickly and push send before realising a humiliating typo, Gboard, driven by artificial intelligence, can be of assistance. Before you send, proofread using Gboard to eliminate typos and punctuation or grammar mistakes with a single tap.
How to apply it: Draft your texts after installing Gboard on your Pixel 8, Pixel 8a, or Pixel 8 Pro. The “Fix it” chip will immediately show up on the suggestion bar if the feature detects any mistakes. You can make changes to your text by tapping the chip, and you won’t need to send a second text message asking for clarity. By selecting the checkmark-adorned icon located beneath the letter A on Gboard, you can also initiate Proofread on your own.
Use Document Scanner to scan and produce PDFs from documents with your camera
Simple digital document creation is possible from paper copies of contracts, receipts, or anything else you wish to distribute, share, or keep on file. This comes in rather useful when it comes to retaining a digital record of your receipts for tax season or even filing your travel costs.
How to apply it: First, on a Pixel 6 or higher, open Google Drive. You can now proceed by tapping +New, selecting “Scan,” or by just tapping the scan document icon. Use manual mode to adjust the distance between you and the paper to take a picture if you want greater control over how the document is framed as you scan.
Auto capture can swiftly recognise and scan the edges of your paper if all you want to do is fast snap a picture of that receipt. In addition, you can preview, remove, or add additional pages to a scan. You can even clean up your document if it has, instance, a coffee ring on it. After selecting “Done,” edit the file’s title and store it on your drive. You can then download, share, or send your scan from that point on.
Monitor your noises during the night with snore and cough alerts
Have you ever wondered if you snore and cough when you sleep? You can find out using your Pixel 8, Pixel 8a, or Pixel 8 Pro.
How to apply it: Locate and select Bedtime mode from the Digital Wellbeing and parental controls section of your Pixel Settings. Once there, information about cough and snore will appear beneath your weekly report. Select “Allow access” and turn on the snore and cough detection. Instead of storing the unprocessed audio, this feature processes the frequencies in advance and converts them into numbers that AI can understand. To get a complete picture of your sleeping patterns and habits and to find out how well you actually sleep each night, pair this with your FitBit.
Read more on Govindhtech.com
#PixelCircletoSearch#pixelfeatures#artificialintelligence#googlepixel#androiddevices#gemini#pixel8pro#GoogleChrome#GooglePhotos#youtubeshorts#GoogleDrive#Pixel6Pro#Pixel6#news#technews#Technology#technologynews#technologytrends#govindhtech
0 notes
Text
Looking for the Best Photo Retouch App for iPhone? Here are our Top 5 Picks!
Before posting on social media or sharing with our friends, we often retouch our photos to make them look better. If you also have the same requirements or would like to remove an object from a photo on iPhone, then you have come to the right place. In this post, I will help you pick the best photo retouch app for your iOS device by listing 5 different options. Let’s begin and learn how we can make ordinary photos look way better in seconds with your iPhone.
Does iPhone have an inbuilt retouch tool?
If you are already using an iOS device, then you must be familiar with its inbuilt editing features. Once you go to the Photos app, you can just open any picture, and click on the edit icon. This will provide multiple options that you can leverage to edit your photo, including: - Adjusting its light, color, exposure, contrast, and so on. - You can also crop, rotate, and flip your photos in horizontal or vertical directions. - There are tools to straighten and adjust perspective as well. - You can find all kinds of filters on the app that you can apply to your photos. - Users can also write anything on pictures and make doodles.
Note: The inbuilt iOS editing tool only provides basic editing and photo enhancement features. You can’t remove an object from a photo on iPhone using its inbuilt tool as of now. To do this, you need to use a dedicated photo retouch app instead.
App 1: iFoto Cleanup: The Best iPhone Photo Retouch App
iFoto Cleanup is the best remove object from photo app that you can use on your iOS or Android devices. It can be accessed via its web interface or dedicated iOS and Android apps, helping you clean up your photos in seconds. - iFoto Cleanup uses a highly advanced AI algorithm that can instantly remove any object from your photos. - With iFoto, you can get rid of objects, individuals, logos, watermarks, texts, and almost anything in your photos. - There is no need to have any prior designing or technical knowledge to use the iFoto Cleanup tool. - iFoto’s results are extremely fast and it is known to produce highly precise and effective results. - There is also a provision to get precise results by customizing the size of the brush on iFoto as well.

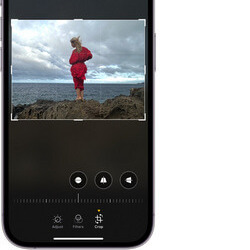
It is a part of the iFoto Suite that offers a wide range of editing options. Apart from cleanup, you can also use the iFoto Suite to remove backgrounds from images, generate AI fashion models, swap faces in photos, change the color of clothing, and more. To use the iFoto Cleanup photo retouch app to remove any object from your photos, just follow these steps: Step 1: Open the iFoto app and upload your photo To use the iFoto Cleanup feature, you can just launch the iFoto app on your iOS device. Now, from its home, tap on the “Cleanup Picture” feature and choose to upload a photo and browse it from your device storage.
Step 2: Clean the uploaded photo on iFoto After loading the photos on iFoto Cleanup, you can simply select the object that you want to get rid of. As you select the object, it will be highlighted in a different color.

To get precise results, you can adjust the size of the brush from the side and make final adjustments. Once you are done, just click on the “Remover” button to remove the selected object from your photo.

Step 3: Save the edited image In no time, iFoto Cleanup will do its magic and remove the selected object from your photos while providing a flawless finish. If you want, you can fine-tune the image by making other selections as well. Once you are satisfied with the results, you can save the edited image on your iOS device by tapping on the download icon.
App #2: TouchRetouch App
TouchRetouch is another popular photo retouch app for iPhone that can help you enhance your images. While the user interface is a bit complicated, it can yield effective results after mastering the tools. - You can get rid of any object from your photos like trash cans, stoplights, pillars, etc. - There are dedicated features to remove power lines and linear objects as well. - The tool also lets us remove pimples and other skin blemishes instantly. - There are also other solutions to restore your old photos and make them look modern. - With the TouchRetouch app, you can also remove text from your photos. To make the most of this remove object from photo app on your iPhone, you can follow this drill: Step 1: Load the photo to edit on TouchRetouch Firstly, you can install the TouchRetouch app on your iPhone and launch it. Now, tap on the “Albums” feature and manually browse and load the photo to edit.

Step 2: Remove any object from your photo Once the photo is loaded on the TouchRetouch app, you can go to its toolbar and select the “Object Removal” feature.

Now, you can manually use the brush tool to highlight any object that you wish to remove. For instance, here you can see that I have highlighted an electric pole that I want to remove from the photo.

If you want, you can also zoom in to get precise results on the photo retouch app. After making the final selections, you can just click on the “Erase” button from the toolbar.
Step 3: Review the edited image and save it The TouchRetouch app will instantly remove the selected object from your photo, letting you review the changes. You can now just save the edited image on your iPhone.
App #3: Retouch: AI Remove Objects
If you are looking for an AI-powered, multipurpose cleanup app for your iPhone, then you can also try Retouch. From removing people to fixing skin blemishing and blending photos to removing background, you can do it all with Retouch. - With Retouch, you can instantly remove any object or individual from photos. - There are dedicated features to make your photos look better with its AI enhancements. - You can make any picture a portrait shot by blurring its background. - Retouch also lets us remove backgrounds from photos and replace them with new ones. Here’s how you can use this photo retouch app on your iPhone to remove any object: Step 1: Select the object remover feature You can start by launching this remove object from photo app on your iPhone and tapping on the feature to remove objects from its home.

Step 2: Select the object to remove Afterward, you can just load the image of your choice on the Retouch app. Now, using its inbuilt brush, you can manually select the object or induvial that you want to remove from your photos. Tap on the “Erase” button from the toolbar after selecting the object.

Step 3: Review results and save your photo Once the object is removed from the picture, the Retouch app will let you review the results. That’s it! You can now just save the edited photo and download it on your iPhone’s storage.

App #4: PhotoDirector: AI Photo Editor
As the name suggests, this is an AI-powered photo retouch app that comes with tons of features. Using PhotDirector, you can instantly edit your images and apply multiple effects on the go. - You can just select the object, individual, or text to remove and let PhotoDirector get rid of from your photo. - The end results of PhotoDirector are quite precise and after removing the object, it blends flawlessly with the image. - You can use the PhotoDirector app to instantly enhance the visual appeal of your photos and add filters. - Furthermore, you can even change the background of your images and turn normal portraits into anime styles. To remove an object from a photo on iPhone with PhotoDirector, simply follow these steps: Step 1: Launch PhotoDirector and load your image You can start by simply launching the PhotoDirector app on your iPhone and then loading the photo on the app that you wish to edit. Step 2: Select the object to remove Once the image is loaded, tap on the “Brush” feature from the toolbar and manually select an object to remove. You can also adjust the brush size from here to get the desired results.
Step 3: Remove the object and preview the results After highlighting the object, just tap on the “Eraser” button at the bottom panel. In no time, the object would be removed from your photo. You can now just check the end results, fine-tune the image, and download it on your iPhone.

App #5: AirBrush: AI Photo Editor
If you are looking for a more professional photo retouch app, then you can consider using AirBrush. The iPhone app is powered by AI and can help you enhance your photos, modify their backgrounds, and do so much more. - AirBursh offers an inbuilt “eraser” tool that can instantly remove any object, text, individual, etc. from your photos. - The eraser tool can let you precisely select the object to remove by adjusting the size of the brush. - AirBrush features a wide range of AI filters that you can apply to your images and change their overall appeal. - There are dedicated features in AirBrush that can help you remove skin blemishes and spots too. You can follow these basic steps to remove an object from your photo on iPhone using AirBrush: Step 1: Install AirBrush and load the image to edit To start with, you can simply install the AirBrush app on your iPhone, launch it, and load the photo you want to edit. Step 2: Select and erase any object from your photo After the photo is loaded on AirBrush, you can go to its editing features and tap on the “Eraser” option. Now, you can simply select any object in your photo that you want to remove. You can adjust the size of the brush and even zoom in or out the image to make precise highlights.
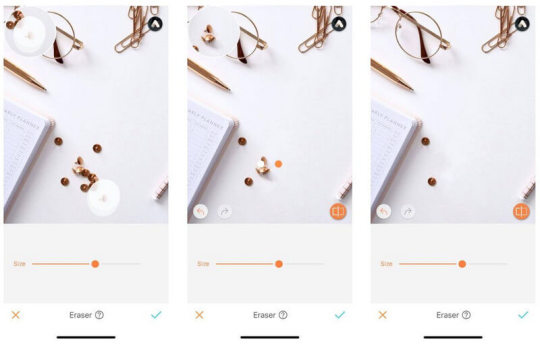
Step 3: Review results and save your photo Once you have highlighted the object, let AirBrush remove it from your photo and blend it with the background. You can make multiple edits and download the edited image on your iPhone.
Conclusion
There you go! Now when you know how to remove an object from a photo on iPhone, you can easily give your everyday pictures a brand-new look. For your convenience, I have listed not one, but five different iOS apps that can retouch and clean up your photos. Out of them, iFoto Cleanup has to be the best photo retouch app, which is used by beginners and pros alike. iFoto produces fast and precise results by leveraging its advanced AI model and offers a wide range of visual editing and generative AI tools as well. Read the full article
0 notes
Text
Cosmo AI Review – Create Profitable AI Video Content in Minutes
Welcome to my Cosmo AI Review Post. This is a real user-based Cosmo AI Review where I will focus on the features, upgrades, demo, pricing and bonus how Cosmo AI can help you, and my opinion. This is a world’s first App Fully Powered By Google’s Latest AI Tech Gemini Turns Your Text, Ideas, PPT, Blogs, Tweets & URLs Into Stunning In Less Than Few Minutes.

<< Get Cosmo AI with my Special Bonus Bundle to Get More Traffic, Leads & Commissions >>
Cosmo AI Review: What Is It?

Cosmo AI Review: Overview
Creator: Uddhab Pramanik
Product: Cosmo AI
Date Of Launch: 2024-Jan-15
Time Of Launch: 11:00 EST
Front-End Price: $17
Official Website: Click Here
Product Type: Software (Online)
Support: Effective Response
Discount : Get The Best Discount Right Now! (Use “COSMO3” for $3 off)
Recommended: Highly Recommended
Skill Level Required: All Levels
Refund: YES, 30 Days Money-Back Guarantee
Cosmo AI Review: Key Features
World’s First Google AI “Gemini” Powered App.
Turn Your Text, Ideas, PPT, Blogs, Tweets & URLs Into Stunning 4k AI Video Contents.
Covert Text To AI Videos — Create videos for YouTube, Instagram, and TikTok by entering a single keyword.
Turn Ideas Into Videos — Make Your Ideas A Reality By Entering Your Prompt & Let AI Turn It Into Stunning Videos With AI Voices.
Transform Your Text Into Lifelike Speech — Choose from over 2000 ultra-realistic voices in 75+ languages, saving time & cost on voiceover artists.
Generate Lifelike AI Avatar Videos For Your Company & Marketing Needs…
AI Voice Cloning: Produce a Realistic clone of your voice by recording a 2-min sample.
Create engaging videos from blog articles with CosmoAI’s Blog to Video feature.
PPT to Video: Convert PowerPoint to Video Just By uploading your PPT, Cosmo AI auto-generates scripts and adds AI avatars, lifelike voiceovers, and music in seconds.
Tweet To Video: Instantly create viral tweet videos for TikTok, Reels, and Shorts! Just paste your tweet URL and it automatically adds rich visuals and lifelike voiceovers.
Create Videos From Photos and add lifelike voiceovers, sound effects, music, animations, and more.
Product Video Maker: Make videos from your product pages, just paste the product URL & cosmo Ai does the job.
Fire All Your Expensive Tools & Services. Say Goodbye To Monthly Fees.
Commercial License Included — Create & Sell as Many Assets As You Like To Your Clients.
Iron-clad 30-Day Money-Back Guarantee.
Newbie Friendly, Easy-To-Use Dashboard.
<< Get Cosmo AI with my Special Bonus Bundle to Get More Traffic, Leads & Commissions >>
Cosmo AI Review: How Does It Work?

Cosmo AI Review: Amazing Benefits
Create Stunning AI Video Contents In Any Niche & Language In Just 3 Clicks.
Instantly Create & Sell Attention Grabbing AI Video For Social Media Marketing, eCommerce, and Businesses.
No Video Editing or Learning Curves Required.
Effortlessly Convert Any PDF, Text, Image, Or Other Content Into Mind Blowing Video Content.
Effortlessly Generate, Customize, And Share Compelling Video Content On YouTube Channel.
Instantly Create AI Videos For Education & Elearning.
Turn Any Keyword Into a Video Such As Idea To Video, Blog To Video, PPT To Video, Tweet To Video, Avatar To Video, Product To Video & Much More.
Create & Post Product review videos on Social Media & Amazon For Maximum Profits.
Use AI To Create Eye-Catching Realistic Looking Product Explainer Videos In a Few Clicks.
Get Everything Done With Your Voices Or Text-To-Video Feature.
Cosmo AI Review: Can Do For You
Convert Text To AI Videos: Create videos for YouTube, Instagram, and TikTok just by entering your text script or single keyword.
Turn Ideas To Videos: Easily craft mind-boggling realistic Ai videos for Prepare to be captivated as your imagination comes to life, pushing the boundaries of what’s possible. Get ready to leave your audience speechless.
Transform Your Text Into Likelike Speech: Choose from over 2000 ultra-realistic voices in 75+ languages, saving time and cost on voiceover artists.
Create Ultra-Realistic AI Avatar Videos: Generate Lifelike AI Avatar Videos For Your Company & Marketing Needs.
AI Voice Cloning: Get a realistic clone of your voice by recording a 2-min sample. Save time on manual recordings with Fliki’s AI-based Voice Cloning.
Turn Blog Into Stunning AI Video: Create engaging videos from blog articles with Cosmo AI’s Blog to Video feature. Enhance SEO and drive engagement by converting blog posts into videos with a few clicks.
Transform PPT Into 4K AI Videos: Convert PowerPoint to Video Just By uploading your PPT, and Cosmo AI auto-generates scripts and adds AI avatars, lifelike voiceovers, and music in seconds.
Convert Tweet To Video: Instantly create viral tweet videos for TikTok, Reels, and Shorts! Just paste your tweet URL and it automatically add rich visuals and lifelike voiceovers.
Photo To Video: Create Video From Images: Create videos from your photos and add lifelike voiceovers, sound effects, music, animations, and more. No video skills are required!
Product Video Maker: Create Videos From Product Pages Make videos from your product pages with lifelike voiceovers, rich visuals, music, animations, and more. No video skills are required!
Translate Videos to 75+ Languages: Experience the power of our cutting-edge Video Translator feature designed to improve your reach by translating content into 75+ languages.
Comes With Commercial License: Sell unlimited ai generated contents with no restrictions at all You’re backed with out commercial license.
Built-in Audience To Sell Your Creations In No-Time: Now, sell anything you want to our built-in audience. This is the real deal breaker.
Cosmo AI Review: Who Should Use It?
Affiliate Marketers
YouTube
Social Media Marketers
Bloggers & Website owners
Local Businesses
Coaches & Course Creators
eCom, Shopify, and Amazon Sellers
Freelancers & Solopreneurs
Small Businesses owners
<< Get Cosmo AI with my Special Bonus Bundle to Get More Traffic, Leads & Commissions >>
Cosmo AI Review: OTO And Pricing
Front End Price: Cosmo AI ($17)
OTO 1: Cosmo AI Pro ($67)
OTO 2: Cosmo AI Unlimited ($67)
OTO 3: Cosmo AI DFY ($197)
OTO 4: Cosmo AI Automation ($37)
OTO 5: Cosmo AI Plug ’n’ Play ($97)
OTO 6: Cosmo AI Marketing Kit ($97)
OTO 7: Cosmo AI Agency ($67)
OTO 8: Cosmo AI Reseller ($97)
Conclusion
Cosmo AI shines as a multifaceted AI tool, illuminating opportunities for creators, businesses, and productivity enthusiasts. Its diverse toolbox, intuitive interface, and user-friendly approach make it a compelling choice for streamlined workflows and creative exploration. However, like any celestial body, it’s not without its shadows. Managing expectations regarding output quality and acknowledging the learning curve for advanced features are key. Ultimately, Cosmo AI’s true power lies in its potential to evolve. With continued development and community feedback, it can refine its strengths, address limitations, and truly become a master of its many domains. So, whether you choose to embrace Cosmo AI as it is or watch it blossom into an even brighter star, remember — the magic lies in the journey, not just the destination.
Frequently Asked Questions (FAQ)
Q. What exactly can Cosmo AI do?
Cosmo AI offers tools for Content Creation (text, video, audio, images), Business Automation (chatbots, social media, email, data analysis), and Personal Productivity & Entertainment. Imagine a digital Swiss army knife for creativity and practicality.
Q. Is it easy to use for someone like me with no technical experience?
Cosmo AI is known for its seamless interface and processes. Pre-built templates, tutorials, and instructions simplify most functions, which need little technical understanding. Advanced features may need some training.
Q. How good is the quality of the AI-generated content?
While Cosmo AI creates a variety of information, but expectations should be managed. Writing may be excellent but lacks subtlety and humanity. Consider it an inspiration for your own creative effort.
Q. What are the different pricing options?
Cosmo AI has tiered programs for individuals and teams. Paid subscriptions unlock more features and greater use restrictions than the free tier. The ideal plan depends on your demands and use.
Q. Is Cosmo AI right for me?
Cosmo AI helps content producers, small enterprises, freelancers, and others automate and enhance productivity. Cosmo AI may boost creativity, optimize operations, and explore digital possibilities. However, technical consumers or big companies with complicated demands may need more specialist solutions.
<< Get Cosmo AI with my Special Bonus Bundle to Get More Traffic, Leads & Commissions >>
Thank for reading my Cosmo AI Review till the end. Hope it will help you to make purchase decision perfectly.
#CosmoAI#CosmoAIOverview#CosmoAIReview#CosmoAIFeatures#CosmoAIWorks#WhatIsCosmoAI#BuyCosmoAI#AIScreenSnapBonus#CosmoAIDemo#CosmoAIDiscount#CosmoAIOTO#CosmoAIPreview#CosmoAIScam#GetCosmoAI#CosmoAIReviews#ArtificialIntelligence#AI
0 notes