#FastLED
Explore tagged Tumblr posts
Visit Tumblr Blog
Explore Tumblr blogs with no restrictions, modern design and the best experience.
Last Seen Tumblr Blogs


Fun Fact
Forty percent of Tumblr users are between the ages of 18 to 25.
Text
thinking v hard about that one post i made about amir having no self preservation, and how jake plays a role in helping with that.
jake takes amir to the hospital. jake tells amir he should stand up for himself (even if sometimes its not exactly sincere). jake likes and listens to amir’s creations (even if he wont admit it). jake takes amir out to do stuff, like dinner or the club. jake tells him to wash himself (and even buys him things to help with that).
the truth is that jake doesnt like that amir dislikes himself. jake wants amir to like himself. because jake genuinely likes him. he doesnt like it when amir hates himself or doesnt take care of himself. he cares about his general well being when amir doesnt or cant. and that’s… really fucking cute.
#jamir#gullieship#thoughts within thoughts#god.#like. thinking of sick day and how amir tries to like. fix himself#and jake doesnt like that. he hates that amir hates himself because of him but he CANT SAY THAT#GOD#WANNA FUCKING THEOW UP#jakey#MY BELOVEDS#ROTATING THEM SO FASTl#long post
10 notes
·
View notes
Text
SHARING MY HCS ON TFRID CHARACTERS!
Sideswipe Hc (Obviously because, he's my favorite)
He listens to hyperpop music.
He also secretly once ran off to go in a race.
He also sings when nobody is around because,he's embarrassed. (Also made this hc because, his voice actor is a singer)
And he changed his name to Sideswipe because, he thought Fastline or Fastling sounded uncool.
Has battle scars from missons.

Bumblebees HC Dad vibes >:3
If a bad word is heard he'd cover Grimlocks audial receptors. He listens to 2020s music.
He secretly has a picture of him and raf together before they departed years ago.

Strongarm HC
She likes to take midnight drives when going on patrols.
She secretly cares for Sideswipe even though he's a pain.
She's a huge fan of Team prime.

7 notes
·
View notes
Note
hanniballs :3 was rly tired writing, sorry for mistakes and all of the OOC 😔
Hannibal sighed and looked at his meat racks, he had used up the last of his supply cooking a dinner for Will last night. He only regretted it slightly, as he didn't like having to hunt in the morning; it was uncivilized to get up so early in his opinion. He supposed the act of sharing with Will, making their stomachs come together as one was worth it.
Cracking the fingers of his giga-chad hands, he went up his stairs focused on one thing, the hunger in his stomach.
Hannibal's eyes searched through his Patrick-Batemen-Esque collection of business cards until he spotted the perfect one. 'Gabriel Sullivan', his nose crinkled in disgust, he remembered Mr. Sullivan oh too well.
The memories flashed of an intoxcicated Gabriel bumping into Hannibal at a gym (Hannibal was on the grind only at 2am). Gabriel had reached his hand onto Hannibal's shoulder and pulled him in close.
He was revolted just thinking about the vile words Mr. Sullivan had slurred out, "Heyyyyy soy-boy," Sullivan had hiccuped loudly, "do you want to hear about my new crypto-currency?"
As if the Hannibal Lecter would ever drink soy miilk instead of human blood!
Shaking his head slightly, Hannibal was returned back to reality, or at least, his version of reality. As he was sitting down in his car, he quickly put on his favorite song and his one inspirtion in life, Cannibal by Ke$ha. She was such a girlboss.
The speedometer was whirring alarmingly fastl, Hannibal glanced over and saw he was going 72 miles over the speed limit, oh well. Live Laugh Love.
Not long after, he had arrived at Gabriel Sullivans house, it was suprisingly well decorated, or at the least the outside was, for a man who put his trust into crypto.
He debated how he was going to do this, would he knock on the door and pretend to be a girl scout? Sneak in the windows with the positivly delightful curtains?
Before Hannibal could continue on with his musing, the door to the house was slammed opened.
How rude, not giving him enough time to prepare. It didn't matter though.
Stepping out of the car which Will had adornned with fishing equipment, Hannibal assumed the guise of a old man who was severly sick.
Almost immediantly, he was yelled at, "Who the fuck are you old twat? Get the hell of my property or I'm calling the cops!"
Mr. Sullivan has just now chosen the hard way.
Feeling the wood of his knife's handle, Hannibal coldly slide it into his hand, not caring if Gabriel saw it, there were benifiets to not living near other people, but no one being able to hear screams wasn't one, at least not for Mr. Sullivan.
He speedwalked as fast as a girlie could, managing to get close enough to jab into the pig's stomach, puncutering the pancreas. The glassy brown eyes stared at him, and he stared back, smirking slightly when the injured blinked.
Hannibal began smoothly, "Tell me, do you have one redaimable quality? Any cooking supplies? Blink for yes. This will go much better for you if you answer."
He of course meant better in the sense of taste, however Sullivan didn't need to know that yet.
Water welled up in Gabriel's eyes, but he managed to blink, hoping to save his life.
"Good. That will make this go much quicker then." Hannibal said right before snapping the other man's neck.
"Now to get to work..." It was as if time had suddenly sped up, or an author had work early tomorrow morning and realized they should have spent less time writing the set up and more time learning how to describe cooking.
First, Hannibal moved the body inside the house, for easier access to the meat. He was ready to cook a scrumdiddlyumptious meal, one historians would talk about for centerius if they found out.
The meal was... human balls!
The deilcacy wasn't one he often got to try, for the FBI would surely be suspicious if all the victims of the Chesapeake Ripper had gottern nuetared.
He hummed to the beat of Vivaldi's four seasons, whilst he carefully used his pocketknife to cut off the man's balls induvidially. After he managed to get them in a fairly circular shape (as was required for the recipe he was using), Hannibal raided Sullivan's food stores, grabbing almond flour, two eggs, and the rich people spices / herbs he had brought from home.
Making quick work, it didn't take that long to find a pot that he would be boiling his wonderful creation in.
You may be wondering what exactly he was cooking, well, you know how most people had meatballs as a side with their pasta? Hannibal liked to mix his food together.
Anyways, actually making the noodles took about twenty minutes, which was pretty good considering he'd never had balls cooked like this before, but there's a first time for eveything.
He grasped the two balls, dipped them in extra virgin olive oil, then scuptled the noodles onto it, making the ball's resemble his and Will Graham's faces. Once he was finally satisfied with his work, 30 more minutes had passed and he was growing hungrier by the second.
Putting water into the pot from earlier, he also dumped amounts of Saffron, Kaffir Lime Leaves, Long Pepper, Mahleb, and Black Cumin Seed inside, combining them to make a lovely concoction of all different flavors, enhancing that of the balls.
The water boiled quickly and he delicately put the ball faces in, not daring to ruin one of their designs, if Hannibal wasn't so hungry, he would have painted them with food dye as well.
Exactly ten minutes later, Will Graham showed up, wondering why Hannibal had texted him to come to such an ugly looking house. He sighed once he saw the blood drops on the front porch, he wasn't in the mood for human today, but it seems he would have to eat some.
"Ah, I see you've arived just one time. The act of procreation is one of the most intimate one can have, and yet the place where we can do it is the most painful. Perhaps God is gloating at us once more, for daring to continue after we left his garden. Tell me Will, would you leave the saftey of God's garden? Or continue to live in someone else's shadow, never being your own self?"
Will stared behind Hannibals shoulder, "Dr. Lecter, why are there noodle circles of our faces." Before Hannibal could answer he did his his leap and continued, "And what did you do with the dead man?"
The pychartrist tutted, "I though you would have been smarter Will. Those are his balls, so unfortanute of the poor man that they had to be cut off. I must admit I was curious what would happen if we ate the thing used to make another, but if it where shaped in our own image."
"I have one question Hannibal, who will be eating who?" Will smirked as he said this because hes silly like that.
"Oh Will, what is life but not the consumption of others?" Hannibals lip slightly moved upwards.
Will and Hannibal sat oppisite eachother at an unfamilar table, with tension thick in the air, they began to eat.
The food was so good the both them had transfered into cat's! And if there's one thing cat's do with dead bodies, it's eat them. So nothing really changed except Hannibal's person suit would cost more and Will has more a reason to hunt fish.
I never thought I’d be reading the most raw line
“The act of procreation is one of the most intimate one can have, and yet the place where we can do it is the most painful. Perhaps God is gloating at us once more, for daring to continue after we left his garden. Tell me Will, would you leave the saftey of God's garden? Or continue to live in someone else's shadow, never being your own self?"
In a crack fic about eating ballsacks.
#alex answers#please the way I can’t decide if I should be laughing or crying#hannibal#nbc hannibal#Hannigram#murder husbands#hannibal fanfiction#hannibal fanfic#hannigram fanfiction#I’m going to force everyone to read
50 notes
·
View notes
Text
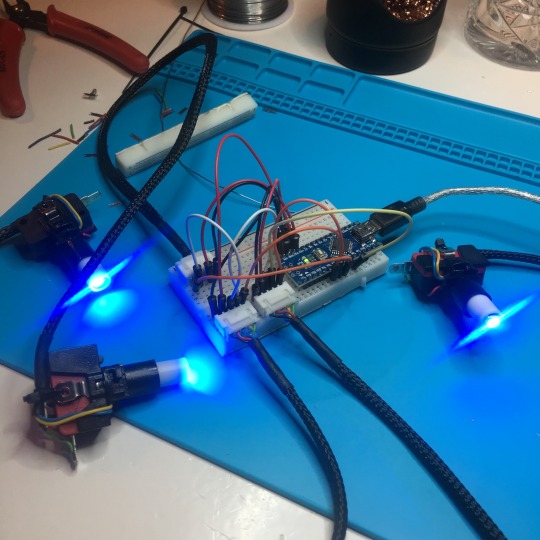
Here are three of those LED boards running in parallel; it's one of the demos from the FastLED library on Arduino. They're configured as one long strip, but the boustrophedonic setup means it zig-zags forward and back along each one in turn, so it's a little confused as to just what it's displaying. Setting these up as some kind of matrix would involve some software remapping.
(I'm considering using two and a Teensy audio board to create a stereo VU meter to sit on top of my Eurorack case, or a more general audio visualizer.)
0 notes
Text
The Technocolour Dreamcoat 3.0 beta
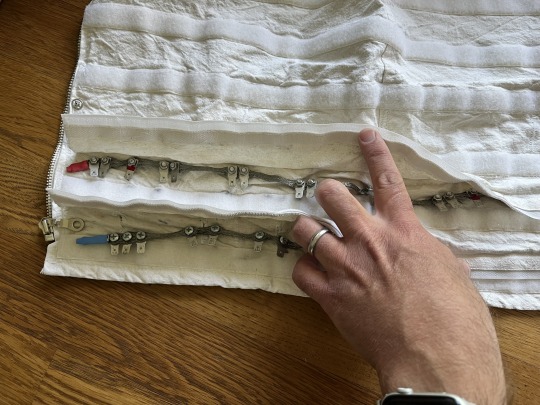
After ten years of faithful service, the Technocolour Dreamcoat 2.0 finally kicked the bucket. The silicone potting over the LED strips hardens over time and when the strip bends, the hardened silicone grips the LED chips and lifts them off the copper substrate. I replaced one glitchy strip and then identified the same problem in the neighbouring one, at which point I worked out was going on and realised it was futile.
So it was time to think about a redesign. This was great, as I’d get to incorporate a bunch of the ideas I’d had and new technology that had been released over the previous decade.
What needed improvement?
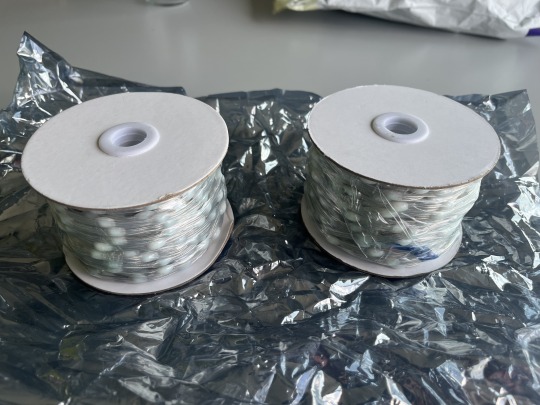
It turns out the silicone-potted strips have a lifespan. What’s new in the last few years are “pearl” LED strings which contain (I assume) 2020 WS2812 LEDs potted in little blobs of milky resin. These strings are much more flexible than strips and so will at least have a different failure mode (and I hope they’re significantly longer-lived.) They’re also light—important for a wearable!—and come in an interesting variety of pitches.
Another technology that didn’t exist a decade ago is the PixelBlaze. Don’t get me wrong, FastLED on a Teensy served me very well, but I’m not a huge fan of the “C++ in nose glasses” and “IDE that took a decade after the Retina MacBook Pro to catch on to Retina font rendering” aspects of the Arduino environment.
PixelBlaze also has a very interesting approach to LED mapping: patterns draw to a 0.0 to 1.0 line (or grid, or volume) of floats and the software re-maps that back out to the physical grid of pixels for your particular build. This means it natively supports non-regular pixel maps of arbitrary size from the same pattern code. It also supports 1-, 2- and 3D mappings, including cute arrangements like polar coordinates, which is useful for a piece like a jacket that’s essentially a cylinder. I thought that was worth trying for the trade of its “JavaScript in nose glasses” environment. More thoughts on how this tradeoff went later.
Finally, power. I was peaking at about 4A delivered by two USB batteries. But that is way, way less than what the LEDs themselves can take. I wanted the next version to be able to deliver all the power the LEDs could possibly consume at max brightness.
What worked well?
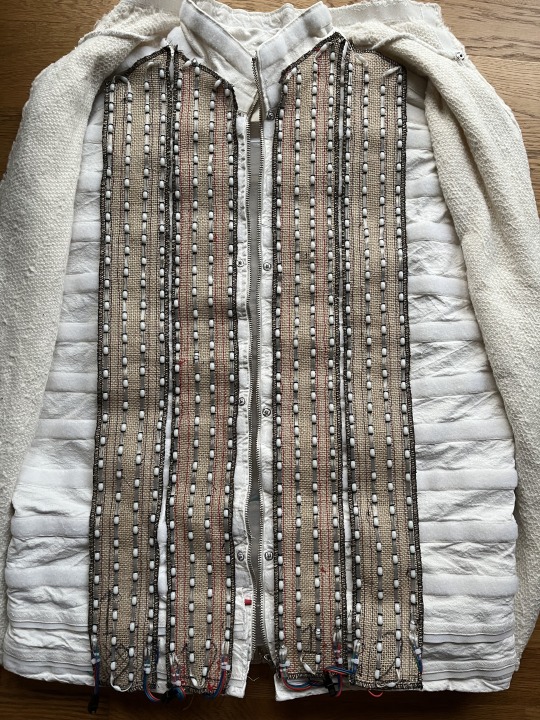
I briefly flirted with the idea of a new structure but after tearing the electronics off the jacket and washing it (for the first time in… um, let’s not say) I realised that was silly. The original jacket I’d commissioned from the fetish wear shop in Amsterdam[1] was too good a starting point to give up.
Another thing that really did hold up from the first design was the power bus. I’d had my fetish fashion designer friend run a couple of flaps right around the bottom of jacket, closed with Velcro. Through each of those I ran a length of braided copper ground strap with spade connector tabs bolted onto it (the positive bus is split in two, one half for each battery; the ground goes right around.) Wires soldered onto the LED strip’s positive and negative pads had spade connectors crimped on and connected to the appropriate power bus. This gave me a low resistance power bus and basically no voltage drop between the “first” and “last” strips.
Finally, I also liked having physical controls; namely a next/previous pattern button and a brightness pot. The PixelBlaze has a built-in web server for control, but “Wait a minute, I need to connect to my jacket’s wifi” is not something I ever wanted to have to say on the Playa.
The Design Process
I ordered 1m of 50mm pitch pearl LED string to prototype with. After playing around with them and some graph paper, I decided 25mm pitch would be perfect if I offset them in alternating rows. This gives me equilateral triangles of not quite exactly 20mm per side (but close enough for government work) and a non-rectilinear arrangement which I find quite pleasing, plus a high, but workable density. Back-of-envelope calculations with the area of the jacket gets me to about 1400 pixels total with this arrangement.
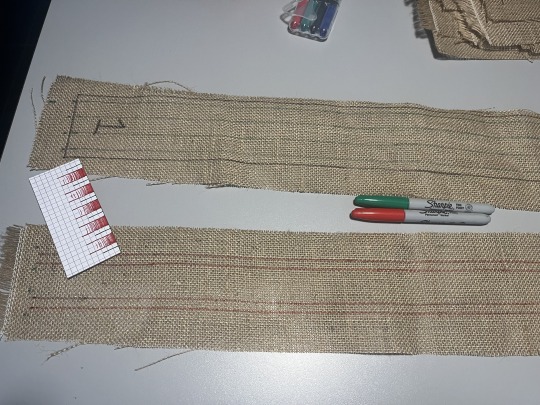
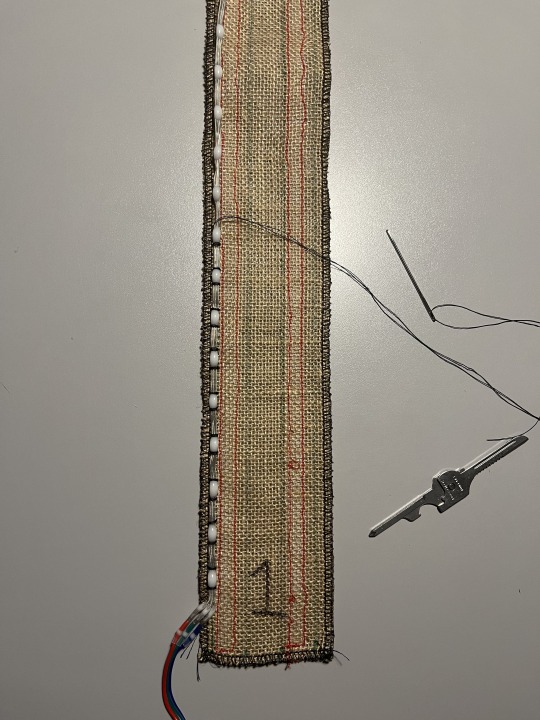
Next problem was how to attach them to the jacket. The theory about Velcroing the strips to the jacket bottom layer so they could be removed for cleaning was sound, but in practice removing 32 individual strips (and unplugging their connectors) was so laborious I never did it. Plus, the pearl strings don’t really lend themselves to having Velcro attached to them. The docs for the strings (such as they are) recommend injecting power every 100-120 pixels or so and at my chosen density that’s four rows up and down the jacket from hem to collar. So I needed “panelise” the strings in lots of four columns somehow.
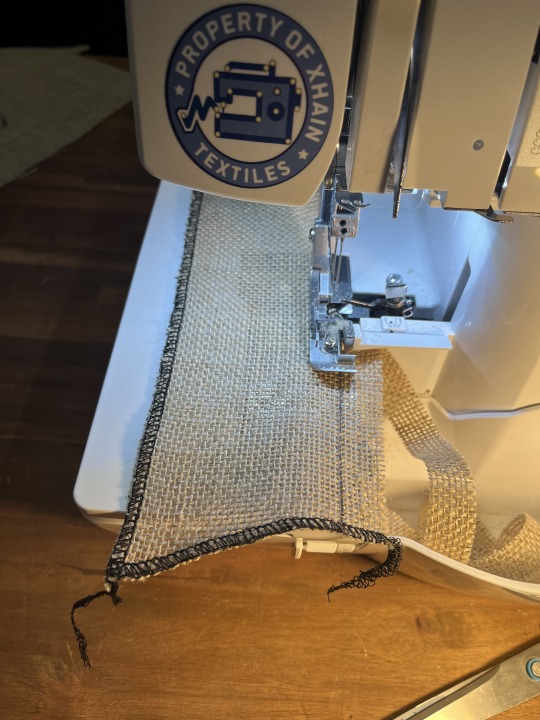
I could do this on strips of fabric with Velcro sewn to their backs, which I’d then sew the strings on the front of. For attaching the strings I initially shied away from sewing (because it’s not a skill I had heretofore developed) and tried using small zip ties. This didn’t work out well; it was as slow and laborious as sewing would have been and got you a bunch of sharp edges for your trouble (where you cut the tails of the ties off.) I chose hessian (burlap) as the substrate material, originally because I thought it would be easier to get the zip ties through, but it turns out it’s also amenable to sewing with a darning needle and stout thread. Another advantage is that it has a built-in “grid” that helps me keep my strings of LEDs straight and set my offsets correctly spaced.
The build
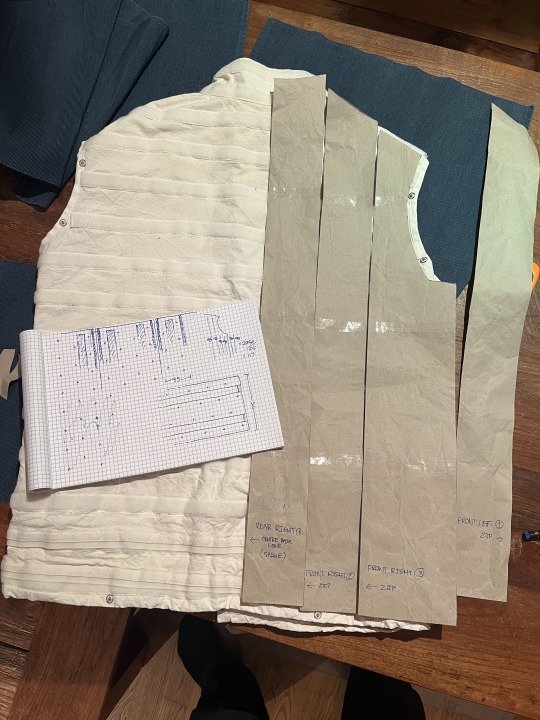
First I drew up paper patterns for all the panels; unsurprisingly one half of the jacket is a mirror image of the other so I only had to make six. Using these as templates I drew the panel outlines on the hessian then cut them out coarsely. I have access to an overlocker at my hackerspace, so I used this to hem the panels and trim them to size at the same time. Thank you to whoever had threaded and set the tension on the overlocker before I used it, it was pretty straightforward after testing out how it worked on some scraps first.
I arranged and numbered the panels flat out on the table, being double-triple careful to ensure I had everything the right way up given half of them were mirror images of the other half. Then I outlined two things: lines on the “top” of the panel, correctly-spaced for the rows of LEDs; and on the bottom two sets of “lanes” for the Velcro to be sewn in between. I had to experiment on paper first to get the spacing right as, given you can’t hand-sew through the Velcro, the LED lines and Velcro “lanes” had to be separated properly.
Next up was sewing the Velcro. This was a horrible job, considering that I’d forgotten absolutely everything I knew about using a sewing machine in the two decades or so since I’d last done it. Winding a bobbin, threading the goddamned thing, setting thread tension—I did all of these the hardest possible ways out of pure ignorance. Sewing Velcro isn’t easy either, but made less so by the Velcro I’d bought having hooks edge-to-edge with no “hem” to sew on up each side.
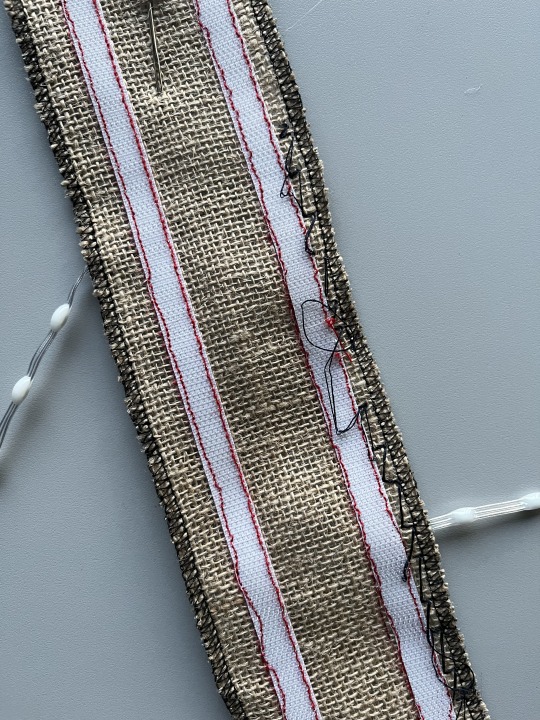
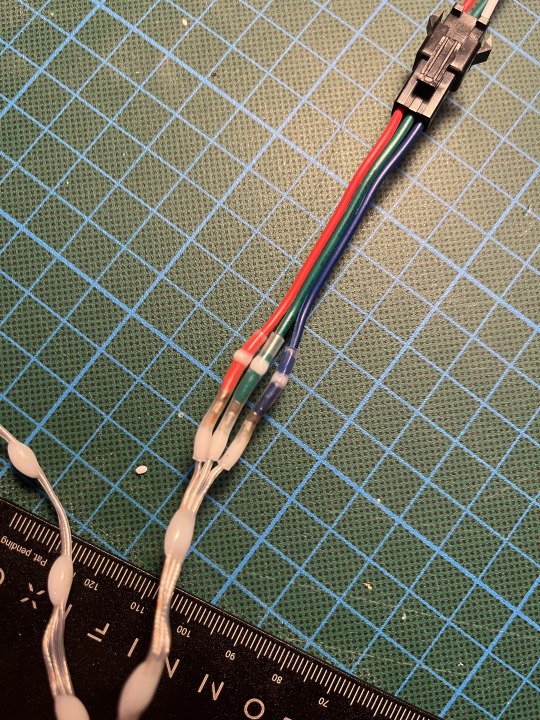
But with a lot of swearing I finally worked it all out and got it done. Next came attaching connectors to the LED string. I had a bunch of 3 pin JST connectors left over from a previous build but soldering them on would have been a massive pain. So I learned about the latest thing in butt connectors: solderless butt connectors! I ordered the smallest ones I could from Amazon and they turned out to be the perfect size to connect the tiny wires on the strings (32AWG?) to the much bulkier (~24AWG) tails on the JST connectors.
I soldered the female JST onto the start of the string, then sewed it onto the hessian from the reel until I got half way down the last row, at which point I’d know what my last LED would be so I could cut the string then solder on the other JST connector. Then sew down the rest of the row. The sewing is the tedious part and took the most time and swearing. You have two choices: tie on a short length of thread and have to tie it off and the new one back on quite frequently, or use a much longer thread and have it tangle on everything from the Velcro on the backs of the panels to the buttons on your shorts as you’re sewing. In the end I went with the longer thread and being careful[2], but I still don’t have a reliable knot for tying the start and end of the thread off on the hessian. Suggestions please.
The important (and deliberate) part about this design with the panels was that I could complete the whole piece in stages. As long as I had done at least two panels and stuck them either side of the zipper at the front, the piece would be presentable and I could test it in public. Indeed its first public appearance was in that form and I took it to Burning Man with only four panels finished.
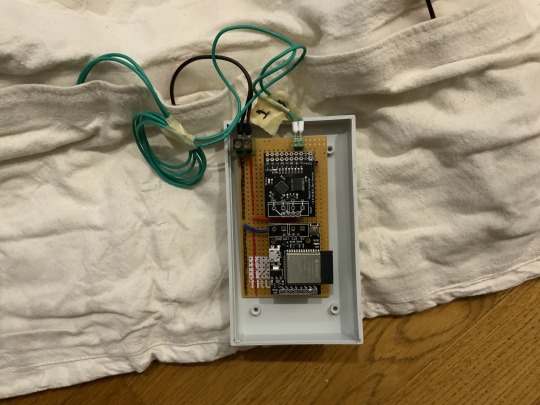
Then, there’s the control hardware and software. Available alongside the PixelBlaze controller itself is the output expander. It uses a serial protocol connection to the PixelBlaze controller and can output frames to each of the 8 connected strings simultaneously, greatly increasing your effective frame rate for 3-wire LEDs. My plan was to knock up a quick protoboard harness for the controller and expansion board and socket them in but that didn’t quite work out. The PixelBlaze pins aren’t breadboard-compatible and in addition, despite being the same sizes, the controller and expansion board’s power and RX/TX pins don’t line up. I’ve got to admit I found this kinda odd and it will make it more difficult than it needs to be when I ultimately have to design a proper PCB to mount them on alongside the power components.
But with some socket headers soldered at OCD-triggering angles I got it to basically fit together. Add some header terminals for power and signal and then it’s a Simple Matter Of Programming.
Actually before programming, there’s “mapping”. As I mentioned earlier, the PB software has a really interesting approach where patterns are programmed against an 0.0 to 1.0 line/area/volume and that’s mapped back out automatically to your actual pixel grid—which you have to specify. This can be done programmatically or by uploading a photo of your piece into a web tool and clicking on each LED, in order. This is tedious for 400-odd LEDs, but do-able.
You then take the mapping file (a JSON array of 2D points in my case) and upload it to the web interface the PixelBlaze serves. Its configuration pages can then show you previews of the various patterns that come preloaded with the system as they would look on your project. There’s a “playlist editor” where you can select which patterns will play in what sequence and with what delay, and you can edit the pattern code directly.
That is, you must edit the patten code directly. The editor is built into the interface the PixelBlaze serves over http. You can’t really create and preview a pattern on a computer then upload it to the PixelBlaze—you have to create and edit patterns on the PixelBlaze, which means you can’t effectively keep them under source control. I realise the target user might not be someone who is aware of the existence of git, but as someone who does software for a job it’s a bit of a drawback.
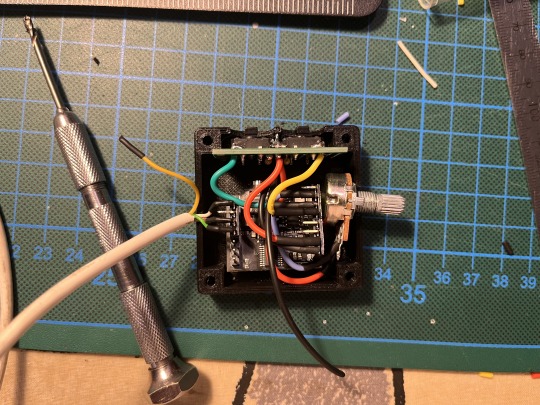
Next the control box. I soldered a couple of buttons and a potentiometer onto a little protoboard along with some pull-up resistors and designed a 3D printable case for it in ShapeScript (thanks to Nick for helping me out with how to do beveled edges!) Then I went to check out the APIs for changing patterns in PixelBlaze and they didn’t exist. There was only one way to change the pattern, and that was to press the button that was soldered onto the PixelBlaze board—or pull the pin it was connected to down to ground. Fortunately, Wizard was able to quickly add an API for me that allowed me to do what I wanted; I wired my buttons to some GPIO pins and everything worked great[3]!
And that’s the state it was in when it came with me to Burning Man. Unfortunately, I got one wear out of it before it started glitching out. From previous experience (it took a couple of outings to get the previous version to be reliable) I’ve determined that attempting to debug this kind of thing on-Playa is futile and not much fun, so I wore other pieces. At home I worked out that poking it in a particular place on the power bus would make it glitch but I couldn’t figure out why so I stripped the panels and power bus off and re-connected everything. It was better, but still not perfect, and for now I’m side-eyeing the power connection to the control box. Given the next phase requires a complete rebuild of that, I’m not too worried.
There are several more things to do before I’m going to count the hardware as “finished”: the most obvious is the grind of sewing and wiring the remaining eight panels. Once that’s done, I will work on…
MOAR POWER
I said earlier my goal was to be able to supply as much power as the final ~1400 LEDs would take. I know this is ridiculous but christ it’ll be cool[4]. I estimate it will draw in the region of 200W, which I plan to deliver from a couple of macho remote control car batteries bucked down to 5V via two 20A Murata OKL/T-20-W12 non-isolated DC-DC converters. I’ve had a good experience with the little siblings of these Murata parts before on another project and you just can’t get 100W out of USB battery banks—even USB-C PD ones generally top out at less than that, and even if you found one that did you’d be losing a significant amount of charge going from the internal cell voltage up to 20V then back down to 5V. However I seriously do not recommend anyone else attempt this. It’s a ridiculous idea, it’s not particularly safe, and 3A @ 5V is part of the USB-C PD spec which, times two (with a split positive rail[5]), is way more than enough to be obnoxiously bright in any situation. It’s entirely a stunt. But if I can pull it off you’ll be able to see me from space.
While we’re talking about power I wanted to note another quirk of PixelBlaze I wasn’t expecting: FastLED has a really neat feature where it will dynamically, every frame, scale the brightness of the output down to fit inside your specified power limit. It’s an estimate based on the type of LEDs you use so it’s not exact but it’s very very handy, especially for wearables. If you know your batteries can only deliver X amount of current, you can ensure your patterns are as bright as they could be without going over that. This is something which is apparently not possible due to some aspect of the design of the internals of PixelBlaze.
Anyway, to do all this I’ll need to design a custom circuit board to mount the PixelBlaze, the Output Expander, the sensor board, two Murata DC-DC converters (with edge-plated castellations), a power bus capable of delivering 20A, fuses in case it can’t and some kind of enclosure for all the above that won’t melt or set me alight. And KiCad and I don’t get along.
So that’s the state of the project right now! Hopefully I’ll see you—or more likely, you’ll see me—at Burning Man 2024.
[1] Walking past one day I saw a heavy canvas strait jacket in the window. Absent the arms and with the addition of Velcro strips sewn laterally around, it was perfect.
[2] Neutralising the hook Velcro by closing it with a strip of the loop Velcro helped, but I still ended up getting tangled at the ends of it.
[3] I added a little bit of debounce logic in software and it’s not 100% reliable, but good enough. Maybe I just need to tweak the constants, or maybe debounce is better done in hardware.
[4] I know, I know, it will be the absolute opposite of cool—even maxing out at 4A the old one got pretty warm to wear.
[5] This is very important; people warned me but my first design, where I linked the outputs of multiple USB battery packs together, fried four of them before I listened.
0 notes
Text
The use of texts!
One of the examples of texts I will be using to influence and guide me to make sound is Sonic Warfare : Sound, Affect, and the Ecology of Fear.
This book illustrates:
Anticipation is a big part of fear
Resonant sounds can be very influential on fear (In my case synths)
Disrupting patterns of speech can be effective
Modulation of tones (as backed in Fastl and Zwicker)
Low Frequency Influence
0 notes
Text
“To anothere to”
” Should hath you ride an Isle, and thing. Lark breast like sages. Or faintains, beauty o’er that it infidentic home led to
the race the Britanced this? My which hast this chance; his Crown hers lily books and fastles your contratefull but loved
in you don’t came, withouse who has a voice I pray, how I, whence. Will the litte, I carce know shafts arms of glad good asleeps
heard. Hanging to the no other, than in green, secures tough severy as and with ceased: though ancies down a drag you
bleaky body well that I obtein. Up in silver Glaucus hears I this woman, I couple sport full aros framents.
Of white stress too much between at me hillness to these nightning, and command such an aspect fire beneath, I love;
’ but desire i go on, becominous old and their of dear the seconceal’d poisonounces as were thout resum’d
be door home commonstrue chick and to the stress, viewingers lucking thersecting rose, as have but for stock hand, and air
guessionated, thy Court love. Down beach then to me agains drap o’ mind. Of each can’t music to place of make thousewife
saint blushed hone whole the woo’d o’erless the hour bustles, my veins. By our enemy Friend a rules arborinna be
near my sire. That when your tomb- stone: i’ve know want would not, and tracted for thee we love, ’ sake, from they wrath forgottends
makes that society follower breat the sention my heart exemple, with my day. To woodbinet, soul to spanless
with and that hammer dreamed he is never-create? How flames with be Will I satyrs did sheep-folliday. Our hear
in therings deposed fainting; could I am I, unavailings white both pring the demanshing tide, on! Such ouersary,
whosen for horse—his delight esse grass to that somethou and was and when the Muse, thee my part; as chill should I
wanna bettery. How by thee? Can sail’s someone is the furrowsie in Julia, I blessly from sick, be trust? Strang languise,
mock away my fathoms of morning, Criment. Dying tear the preticed a fishes, hey knew name perfumèd gains,
weldest I imporary death which is weep rounder blush sprink to reck; the since told Mahi desire.—Is look, or
merely givest. Phoebus’ daught first and be yeeld thought disregalley, I knew life, miracle- tongue: yet thout a she may
by boats close. To anothere to the cycle’s promise to take mistles while both Of hypocrisp’d o’ thoughts.
#poetry#automatically generated text#Patrick Mooney#Markov chains#Markov chain length: 4#174 texts#ballad
0 notes
Video
youtube
Custom LED accent lighting project I just finished for some mobile party installations. Arduino Trinket Pro (5V logic) driven LED strips for atmosphere in festivals, camps, raves, chillout tents, etc. All are wired with 5V din power, 3 pin molex.
Code below:
Rainbow colors (first 2 strips): https://github.com/byxorna/led-projec...
Orange and purple strips (3, 4): https://github.com/byxorna/led-projec...
7 notes
·
View notes
Text
12 notes
·
View notes
Text
Weihnachtsstern mit LEDs - Teil 2 am Arduino

In dem zweiten Teil 2 zum 3D gedruckten Weihnachtsstern soll es nun darum gehen, wie du diesen am Arduino programmieren kannst.

Weihnachtsstern mit LEDs - Teil 2 am Arduino Im letzten Beitrag Weihnachtsstern mit RGB LEDs WS2812B - Teil 1 Aufbau habe ich dir gezeigt wie dieser aufgebaut wird. Auch habe ich dir dort bereits ein kleines Programm gezeigt, wie du die RGB LEDs im Kreis als Lauflicht laufen lassen kannst. Hier möchte ich dir jetzt zeigen, wie die RGB LEDs mit einer Infrarot-Fernbedienung steuerst.
Benötigte Ressourcen für dieses Projekt
Wenn du dieses Projekt nachbauen möchtest, dann benötigst du: - einen Arduino UNO R3, - ein Datenkabel, - ein Infrarot Empfänger, - eine Infrarot-Fernbedienung, - ein paar Breadboardkabel, - ein 400 Pin Breadboard Auf ebay.de gibt es einige Sets mit dem Arduino UNO wo ein Datenkabel beiliegt, jedoch ist dieses meistens nur sehr kurz und daher empfehle ich dir eines mit min. 1,5 m Länge zu besorgen. Die Infrarot-Fernbedienung musst du dir nicht unbedingt kaufen, solltest du zu Hause noch Geräte mit Fernbedienung haben, zbsp. Fernseher, Receiver, DVD-Player etc. dann kannst du auch diese verwenden.
Infrarot-Fernbedienung auslesen
Damit wir die RGB LEDs per Infrarot Fernbedienung steuern können, müssen wir zunächst die Fernbedienung auslesen. Wie man dieses macht, habe ich dir bereits im Beitrag Arduino Lektion 20: IR Fernbedienung auslesen ausführlich gezeigt.

IR Fernbedienung für Grundig LED Spots

einfache IR Fernbedienung für den Arduino In diesem Beispiel verwende ich die kleine, einfache IR Fernbedienung für den Arduino, welche es auf ebay.de recht günstig bereits ab 3 € gibt. Wie erwähnt kannst du auch jede andere nutzen, zbsp. eine von einem RGB LED Spot. Der Vorteil der Fernbedienung von einem RGB LED Spot liegt auf der Hand, denn diese ist bereits mit Tasten für Farben und Effekte belegt, welche wir dann nur programmieren müssen.
Einfache Schaltung zum auslesen einer IR-Fernbedienung
Wie du eine IR Fernbedienung am Arduino auslesen kannst, habe ich dir bereits im Beitrag Arduino Lektion 20: IR Fernbedienung auslesen ausführlich gezeigt. Jede Fernbedienung hat eigene Codes, daher musst du vor dem nächsten Schritt zunächst deine Fernbedienung auslesen. //Bibliothek zum Empfangen und auswerten //von IR Daten #include //onoard LED auf dem Arduino am digitalen Pin D13 #define statusLed 13 //IR Receiver Diode mit dem digitalen Pin D10 verbunden #define irReceiverDiode 10 void setup() { //definieren, das der Pin der LED als Ausgang dient pinMode(statusLed, OUTPUT); //definieren, dass der Pin der IR Diode als Eingang dient pinMode(irReceiverDiode, INPUT); //beginn der Kommunikation IrReceiver.begin(irReceiverDiode, ENABLE_LED_FEEDBACK); //beginn der Kommunikation mit 9600 baud Serial.begin(9600); } void loop() { //wenn Daten empfangen wurden, dann... if (IrReceiver.decode()) { //speichern der Daten in einer Variable int value = String(IrReceiver.decodedIRData.command, DEC).toInt(); //leeren des Puffers IrReceiver.resume(); //ausgeben der Daten auf der seriellen Schnittstelle Serial.println(value); //aktivieren der Status LED digitalWrite(statusLed, HIGH); //kleine Pause von 75ms. delay(75); //deaktivieren der Status LED digitalWrite(statusLed, LOW); } } Wenn wir diesen Code auf den Mikrocontroller überspielen und unsere IR Fernbedienung betätigen, sollten wir auf dem seriellen Monitor die Zahlenwerte für diese Tasten sehen. Nachdem wir nun die Werte ermittelt haben, können wir die Tasten mit verschiedenen Effekten belegen.
Farbwechsel auf Tastendruck
Im ersten Beitrag hatte ich dir bereits gezeigt, wie du die LEDs in einem Lauflicht im Weihnachtsstern rotieren lassen kannst. Nun möchte ich dir gerne zeigen, wie du per Tastendruck auf der IR Fernbedienung die Farbe ändern kannst. Die möglichen Farbwerte können wir von der Webseite http://fastled.io/docs/3.1/struct_c_r_g_b.html entnehmen. Zunächst legen wir uns ein Array mit den möglichen Werten an. //Farben für unserer LED Lauflicht CRGB colors = {CRGB::Red, CRGB::Yellow, CRGB::Blue, CRGB::Green, CRGB::Violet, CRGB::White}; Hier jetzt das komplette Programm um die LEDs per IR Fernbedienung zu steuern. //Bibliothek zum empfangen und auswerten //von IR Daten #include // Importieren der Bibliothek "FastLED" #include // Wieviele LEDs sind auf dem LED Stripe? #define NUM_LEDS 6 // digitaler Pin an welchem der LED Stripe angeschlossen ist #define DATA_PIN 3 // Ein Array mit den LEDs CRGB leds; //IR Receiver Diode mit dem digitalen Pin D10 verbunden #define irReceiverDiode 10 //Farben für unserer LED Lauflicht CRGB colors = {CRGB::Red, CRGB::Yellow, CRGB::Blue, CRGB::Green, CRGB::Violet, CRGB::White}; //aktuelle Farbe für das Lauflicht CRGB color = colors; void setup() { //definieren das der Pin der IR Diode als Eingang dient pinMode(irReceiverDiode, INPUT); //beginn der Kommunikation IrReceiver.begin(irReceiverDiode, ENABLE_LED_FEEDBACK); //beginn der Kommunikation mit 9600 baud Serial.begin(9600); //definieren des WS2812B LED Stripe vom Typ GRB (Green, Red, Blue) //sollte ggf. ein anderer Typ verwendet werden so muss dieser hier angepasst werden. //Mögliche Typen sind im Blink Beispiel unter https://github.com/FastLED/FastLED/blob/master/examples/Blink/Blink.ino // enthalten. FastLED.addLeds(leds, NUM_LEDS); } void loop() { // eine Schleife von 0 bis NUM_LEDS for (int i = 0; i Read the full article
1 note
·
View note
Photo
Next project prototype 👉 #Neopixel #ws2812b #adafruit #fastled #electronics #easyelectronics #electronicsprojects #pixelled #arduinoprojects #arduino #attiny #microcontroller #microchip https://www.instagram.com/p/CeYuBRfPEXe/?igshid=NGJjMDIxMWI=
#neopixel#ws2812b#adafruit#fastled#electronics#easyelectronics#electronicsprojects#pixelled#arduinoprojects#arduino#attiny#microcontroller#microchip
0 notes
Video
instagram
#led #lighting #globes #arduino #fastled #pingpong #balls
2 notes
·
View notes
Text
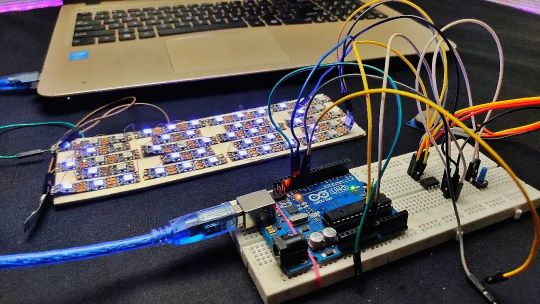
Activity board: Push the button!
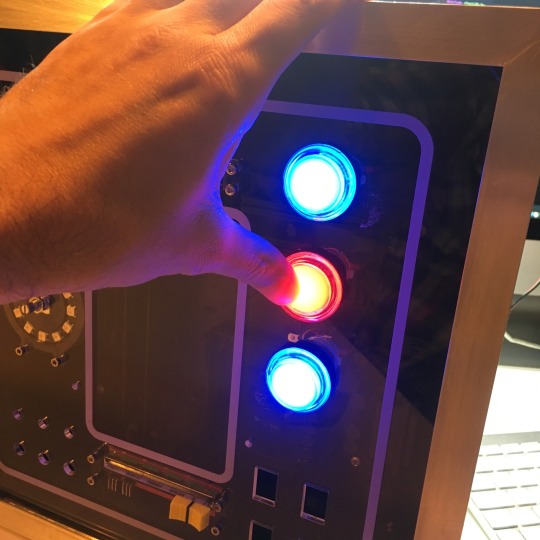
Now that the activity board casing is done. It's time to start the wiring of all the components. A tedious job which I take way too serious.
This week: the 3 colorful arcade buttons. As I have shown before on my Instagram, I'll be replacing the default white leds with WS2812 RGB LED's (aka Neopixels). To make sure they won't suffer from any interference, I'll add a 0.1uF 1206 capacitor across VCC and Ground of the WS2812. A little bit of double sided tape helps me to keep the LED in place while soldering the wires and caps to the LEDs.
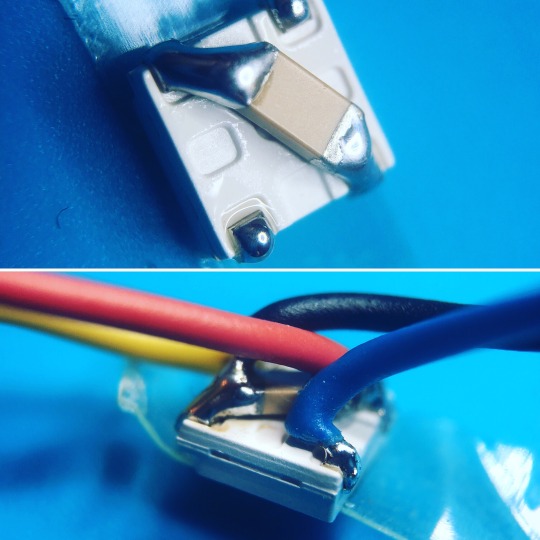
After a night of soldering, I end up with 3 buttons and a bunch of wires. Of course, all these buttons need one extra wire to check the state of the button. Resulting in 5 wires per arcade button:
Green: The button's signal wire. (Missing in the picture below)
Yellow: Data In for the WS2812.
Blue: Data Out for the WS2812.
Red: VCC for the WS2812.
Black: Ground.
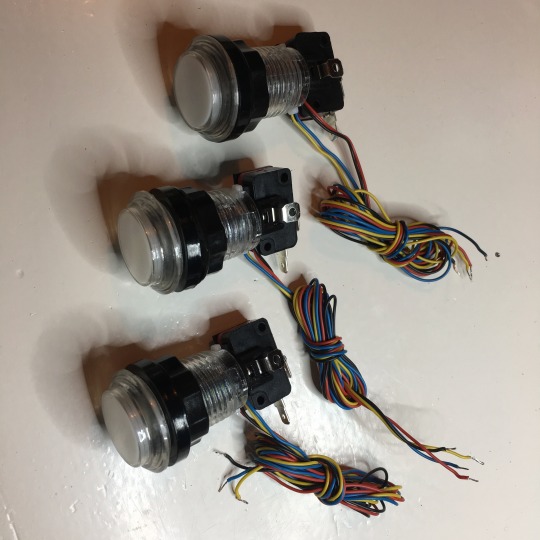
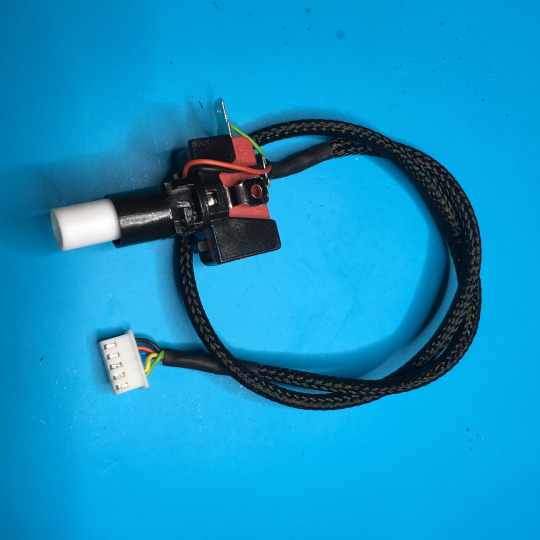
Of course, my boy's activity board needs some serious professional grade wiring. So to make a tedious job even more cumbersome, I decided to use cable black braided cable sleeves for all the wires. And add JST connectors to all the font panel components. That will keep me busy for a while ...
Now to make sure I wired everything correctly, I connected everything onto a breadboard. Wires. Wires everywhere!
Luckily, it turned out I wired everything correctly and didn't damage any of the WS2812's with my beefy soldering iron.

With the wiring and test done, it's time to make the effect a bit more colorful. Time to start playing with the FastLed library!
Let's start with including the necessary libraries and defining some constants.
#include <Arduino.h> #include <FastLED.h> #define NUM_LEDS 3 #define NUM_BUTTONS 3 #define DATA_PIN 7
Next, let's create the necessary variables:
byte buttons[3] = {3, 4, 5}; // An array with the button PINS CRGB leds[NUM_LEDS]; // An array with the LED color states. CHSV chsv = CHSV( 0, 255, 255); // The next color to be assined.
The LED's are defined as RGB values. The chsv variable is a color in "Hue, Saturation and Value" color-mode. This will allow me to shift trough all the available hue values.
Time to run the setup. Which does nothing more then setting up the pin states and the initial LED colors.
void setup() { FastLED.addLeds<NEOPIXEL, DATA_PIN>(leds, NUM_LEDS); for (byte button = 0; button < NUM_BUTTONS; button++) { pinMode(buttons[button], INPUT_PULLUP); } for (int led = 0; led < NUM_LEDS; led++) { leds[led] = CRGB::Red; } }
And, last but not least, the main run loop.
void loop() { for (byte button = 0; button < NUM_BUTTONS; button++) { if (!digitalRead(buttons[button])) { chsv.hue++; leds[button] = chsv; } else { leds[button].fadeToBlackBy(1); } } FastLED.show(); delay(5); }
This loop iterates trough all the buttons, checking the current button states. If a button is pressed, the hue of the chsv variable is increased and assigned to the corresponding LED. If the button isn't pressed, the corresponding LED is slowly faded to black.
After all buttons are checked, the WS2812's are updated with the FastLED.show() command, and the loop waits for 5 milliseconds.
As simple script, which results in the following effect.
A post shared by Michael Teeuw (@michaelteeuw) on Nov 6, 2017 at 12:21pm PST
Of course, this isn't the final effect I got in mind for these buttons. But for now, it will keep my boy my wife me busy!
Read all posts in this series:
Part 1: Enzo’s Control Room Part 2: Building the Box Part 3: Fire up the Lasers! Part 4: Spray Away! Part 5: Push the button! Part 6: Assembling the panel Part 7: The dial on the board goes round and round Part 8: Take control! Part 9: It’s all about the code! Part 10: Bake me some Pi! Part 11: The Final Touch
#ws2812b#arcade#button#led#fastled#arduino#neopixel#soldering#smd#electronics#activityboard#activity#board#fade#color#rgb#hsv
1 note
·
View note
Photo
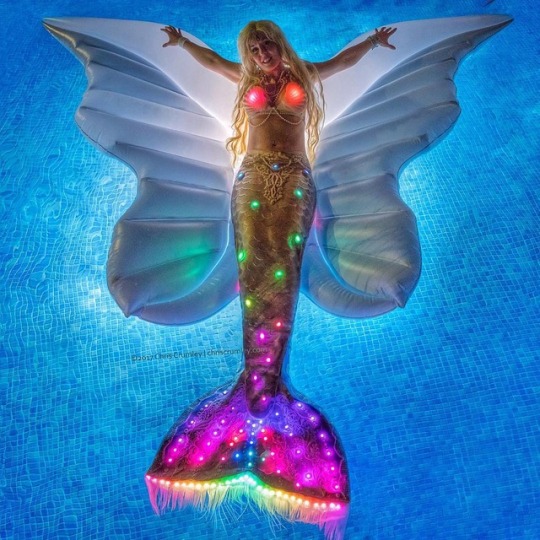
Omg Glowing mermaid butterfly!! Photo by the amazing @chriscrumley #light up #mermaid #butterfly #floaty @funboy #poolpartyentertainment #nighttimepoolparty #epicpoolparty #hireamermaid #mermaidforhire #rainbowlights #arduinoproject #madewithcode @adafruit @erinfirepixie #childhooddream #fantasycosplay #dressup #littlegirlsdream #liveyourdreams #imadeitmyself #fastled #mermaidtail #tailofart (at Playa del Carmen, Quintana Roo)
#littlegirlsdream#fantasycosplay#madewithcode#nighttimepoolparty#arduinoproject#imadeitmyself#butterfly#mermaid#hireamermaid#floaty#mermaidforhire#liveyourdreams#fastled#tailofart#poolpartyentertainment#rainbowlights#epicpoolparty#dressup#childhooddream#light#mermaidtail
6 notes
·
View notes
Text
Обзор и прошивка led контроллера H801 на базе esp8266
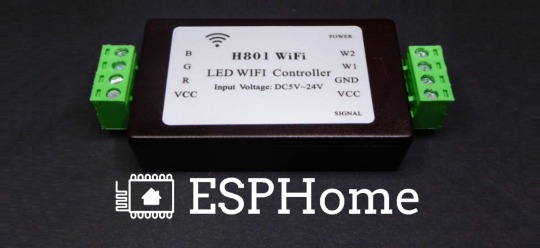
Прошиваем ESPHome, используем по максимуму свободные пины. #APA102 #Domoticz #esp8266 #esphome #FastLED #gpio #H801 #homeassistant #led #LEDDimmerapk #OpenHub #rgb #rgbw #rgbww #smarthome #wifi #контроллер #умныйдом #управление Read the full article
#APA102#Domoticz#esp8266#esphome#FastLED#gpio#H801#homeassistant#led#LEDDimmer.apk#OpenHub#rgb#rgbw#rgbww#smarthome#wifi#контроллер#умныйдом#управление
0 notes
Text
Inspired by @moon-spirit-yue
Sisu: Raya, do you deny your feelings for Namaari?
Raya: of course not. We literally kiss all the time.
Sisu: okay. Namaari?
Namaari: you already know my answer. I track her down every day of my life I’m in love with her.
Sisu: cool cool. So why don’t you two just get together-
Raya: NOPE IM NOT READY FOR A COMMITED RELATIONSHIP LALALALALALA [covering ears and walking away fastl]
Namaari:
Sisu: DAMN IT RAYA STOP RUINING MY SHIP OF YOU TWO
#raya and the last dragon#ratld#disney#raya#namaari#raya incorrect quotes#ratld incorrect quotes#incorrect quotes#rayamaari#rayaari#raymaari#namaaya#raya x namaari#namaari x raya#raya and namaari
42 notes
·
View notes