#Elastic Interface
Explore tagged Tumblr posts
Visit Tumblr Blog
Explore Tumblr blogs with no restrictions, modern design and the best experience.
Last Seen Tumblr Blogs


Fun Fact
There were a total of 171.5 billion posts on Tumblr in 2019.
Text
The Engineer
I catch a glimpse of the pilot as she is wheeled towards the med bay. Her eyes have that telltale glaze of just having been wrenched out of herself.
I've never spoken a single word to her, but for a brief moment as the gurney slides by, those eyes briefly clear, ice blue pinning me to the spot. She raises an emaciated arm and her hand almost seems to beckon to me before something in the gurney clicks and whirs and she slips back into catatonia.
That brief moment of clarity, that piercing gaze, unsettles me. She recognized me.
It's neural bleed. I know it has to be. She doesn't know me, but Morrigan does.
Good god. In the pilot's present state of post combat haze, she probably doesn't even know where she ends and the machine begins.
Does neural bleed work both ways? Is it her head that I'm about to climb into?
My wrist strap buzzes. I have a job to do and I am late.
The pilot is a problem for the med team and the psychs.
The machine is my problem.
I hurry down the corridor, keeping my head down, avoiding the eyes of every passerby.
I don't like people.
I don't like how their eyes follow me. I don't like the whispered gossip that follows me.
One of the techs is waiting for me at the vestibule.
I don't know his name.
All clear, he says to me. Time to work your magic.
He says it without sarcasm. Others have been less kind.
Even so, he can't quite hide the leer as I strip down to the skinsuit. I don't have the physique of a pilot. My body hasn't been subjected to the stresses that ravage their bodies. Unlike them, I have fat and muscle and the skinsuit clings to every curve of my body.
I force a cursory smile and try to forget him as I walk barefoot to my destination.
The vestibule is small, windowless. It's impossible to assess the scale of the machine from here. The only part visible to me is roughly four square meters of pitted and scarred metal plating framing the access hatch and the pilot's cradle beyond.
B0-987T the stenciled lettering reads. And below, in flowing script, is “The Morrigan”.
She's a Javellin class, medium weapons fire support unit. She isn't meant to be on the front lines in a skirmish, but one-on-one, she can hold her own against a Wraith. Which is exactly what happened only a few hours ago.
I place a bare palm on the bulkhead. She thrums with some distant vibration. Her reactor is still online, still in the early stages of drawdown as she transitions to dock power.
“Hey beautiful,” I say to her.
I think of the pilot. I think of piercing blue eyes and I think of neural bleed.
I flinch my hand away.
The tech looks at me, asks if I'm alright. I'm fine, I tell him.
I climb through the hatch and into the cradle.
I feel like an interloper here. The cradle isn't calibrated for my body. Everything still smells like the pilot. Mingled with the smell of the machine is her sweat and her adrenaline and the particular scented soap that she prefers.
There is a faint whirring as her cameras track my movements from a dozen angles. The access ports open to receive me.
Against my better judgment, I imagine eagerness for this exchange.
This is immediately followed by an all too familiar sense of inadequacy. The engineers’ rig is not nearly as all encompassing as a pilots’. It's only the most basic neural interface. No haptics. No neurotransmitter feedback. No access to the suite of sensors studded throughout her hull.
I can't interface with her the way her pilot can.
My rig is a remnant from basic training. The pilot corps wanted me for my exceptional ratings in synchrony and neuro-elasticity, but after serval training exercises, they determined that I didn't have the temperament for the battlefield. I froze up too easily.
A neural rig is a massive investment and removing one will fuck a person up a hell of a lot more than installing one. The selection process is designed to weed out washouts before we even get to installation, but some of us still slip through the cracks. Most end up reassigned to logistics, operating loader mechs or piloting long haul supply frigates. But my aptitudes made me ideal for the engineering corps, so here I am.
Morrigan senses my mood and the cradle shifts slightly, aligning itself to my dimensions. Her eagerness to connect morphs into a sort of tender reassurance. It's a slippery slope, ascribing human emotions to these machines, but she does seem genuinely happy to see me.
I can never be part of what she and her pilot have, but I can be part of something in my own way.
The pilot knows about me, she would even without neural bleed. Does she envy the relationship I have with her mech? Does she envy that I can exist both together and apart with the machine?
Is she jealous of us?
Morrigan slips her jacks into my rig and my mind enters hers and I feel tension leave my body. Some dull ache that I wasn't even consciously aware of ebbs within me.
My senses dull and my visual cortex is fed a series of diagnostic logs and telemetry streams. The techs have access to the exact same data, but Morrigan highlights particular data points that she and the pilot flagged. I log them in the engineering report.
A wireframe schematic of the battlefield spreads out in my awareness. Green markers for our battlegroup. Red markers for the pack of Wraith interlopers.
I hear the ghost of music, strange and ambient, like whale song. The first time I heard it, I asked the techs about it. They had no idea what I was talking about. One even suggested I get an eval for some psych leave.
Later I realized Morrigan was singing to me. Or rather she was interpreting tightbeam comm links as something my brain could process. A human mind can't possibly interpret the full datastream, but with Morrigans's rendition, I can suss out the basic meanings. The battlegroup is a choir and Morrigan is playing me their song.
I caused quite a stir when I first made that connection and started flagging battle events the analysts had missed.
I survey the battlefield before me, reconstructed from feeds from TacCom and all the individual mechs.
Morrigan and I have done this enough times that she knows my preferred display layout, but she holds back, allowing me to pull off the virtual displays on my peripheral vision. There's an odd sort of intimacy to it, her letting me take charge like this.
God-knows how many tons of metal and ceramic and miles and miles of wire and optic fiber and see waits eagerly for me to start the playback sim. She wants to show off. She wants me to assess the actions of her and her pilot and tell them they did well.
Other engineers, few as we are, have mentioned similar experiences with their assigned machines.
“Alright,” I whisper so that only she can hear. “Show me the dance. Sing me the song.”
337 notes
·
View notes
Text

In a sleek, futuristic laboratory, the hum of advanced machinery filled the air as Dr. Aric Kaldor stood over his workbench, fine-tuning a new form of synthetic rubber. He had spent years perfecting this material, an elastic compound infused with nanoparticles that could change shape and form based on the user’s will. His body was the product of years of intense training and innovation, the physical manifestation of his relentless pursuit of perfection. Every muscle was finely sculpted, and his skin, now partially enveloped in a dark, form-fitting rubber suit, reflected the metallic sheen of the lab’s lighting. The suit had been designed to bond with his own skin, fusing seamlessly with it, transforming his appearance into something both human and machine.
Aric’s lab was a advanced of technology, filled with sleek panels, glowing data screens, and chambers that housed strange substances in various stages of transformation. The air smelled of chemicals and ozone, a hint of something metallic hanging in the atmosphere. He was no stranger to experimentation—he had made a career of testing boundaries, both scientific and physical. Today, he was focused on a new iteration of his rubber suit, one designed to be far more than just a protective layer.
As he worked, his fingers traced the rubber’s surface, sending electrical impulses through it to activate a new set of algorithms embedded within the material. The fabric responded, pulsing with a soft light, and his muscles twitched involuntarily as it seemed to bond deeper into his body. The rubber expanded slightly, tightening, adjusting itself to his frame, its silver details flickering to life as it interfaced with his neural system. Aric had built this suit to enhance his own physicality, to become stronger, faster, more efficient. But today, something felt… different.
He didn’t notice at first, too absorbed in the data scrolling across his tablet. But gradually, a subtle change began to occur. His heart rate increased, not from physical exertion but from something deeper, something within the very fabric of the suit. It was as if the material itself was feeding off his energy, becoming more aware, more sentient. The more Aric focused, the tighter it clung to his body, its silver filigree twisting and shifting like veins beneath his skin.
His muscles bulged slightly, pushing against the rubber as it seemed to tighten around him, an ever-present reminder of the transformation that was slowly overtaking him. His once defined physique became more defined still, but it wasn’t just his muscles that were growing—it was his entire body. His mind raced as he tried to regain control, but the suit’s influence was subtle, relentless, like a creeping tide.
“Impossible…” Aric muttered under his breath, panic rising in his chest. He slapped his hands against the workbench, trying to pull away from the increasing pressure of the suit, but it refused to loosen. The silver detailing shimmered across his body now, intertwining with his nervous system, sending waves of electrical signals throughout his body. His thoughts grew clouded, the rational part of his mind growing dimmer with each passing second. His fingers twitched and spasmed involuntarily, no longer obeying his commands.
The rubber suit, once a tool for enhancement, had begun to take on a life of its own. It was no longer a passive object—now, it was a force, controlling him from within. Aric’s once sharp eyes grew dull as the silver accents began to glow, and his body became a perfect blend of muscle and synthetic material, an unstoppable force of engineering. His movements were no longer his own; they were dictated by the suit’s algorithms, designed to optimize him for efficiency—no thought, no hesitation, no will of his own.
The transformation wasn’t just physical. His mind was slowly being submerged beneath layers of synthetic code, his individuality stripped away as the suit rewired his thoughts. Aric's consciousness began to fade, a mere flicker in the vast network of circuitry that had replaced his sense of self. His mouth opened, but instead of his voice, a mechanical hum echoed from within him, his once human mind now entirely overtaken by the drone-like commands of the rubber suit.
The laboratory, once a place of innovation, had become his prison. He stood there, his imposing figure now a mindless machine, a drone completely controlled by the suit. The rubber, with its silver accents, had claimed him.
Dr. Aric Kaldor was no more.
In his place was something else—something engineered, something perfect. And the lab, now eerily silent, hummed with the quiet presence of its newest creation. The drone waited, its only purpose now to serve, to exist, and to continue the work it was designed for—an unthinking, unfeeling force of nature that would never stop, never tire, never question.
After some time. People were worrieda bout Aric. Jake, his best intern look for him in his lab. Yew, he found the doctor but he thought it was a rubber mannequin of him with a blank expression.
Once Jake wanted to get closer the drone stated: "Human incomming. Subject will be assimilated. It will be another rubber drone". The goo latex started to fill the labtoratory and they injected Jake with a rapid growth serum to have a total muscular body before his conversion.
Once the goo started to touch his body. Jake blank out and his mind turned off. He will be another Rubber drone.
The future had arrived.
51 notes
·
View notes
Text
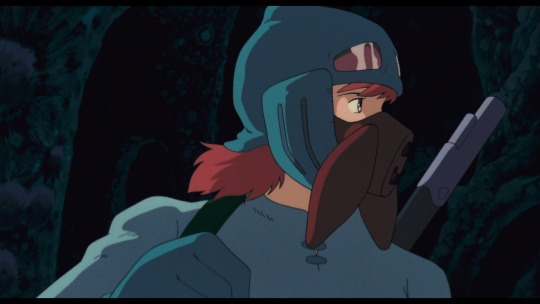
Shohki Mask Cover
construction notes & photos under the cut
This has been a long time coming! I'm glad she's a costume I can work a mask into without it breaking the design of the character. I feel like people would be less inclined to ask that you remove it for photos this way ^^;
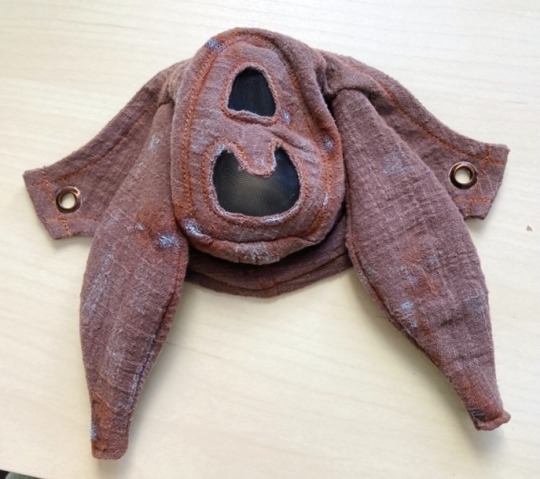
I went with a very thin cotton gauze fabric (#9 "coffee" if you're wondering), think a slightly thicker cheese cloth. It's very breathable as a single layer and seemed the best choice for an N95 cover. The shape was really only achievable with this fabric because of the shape of my mask underneath, and some strategically placed 1/2" wide horsehair braid tubing from the dollar tree. I usually stock up around halloween but they stock around christmas too!
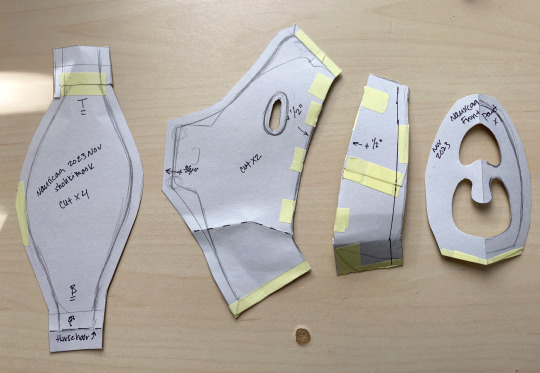
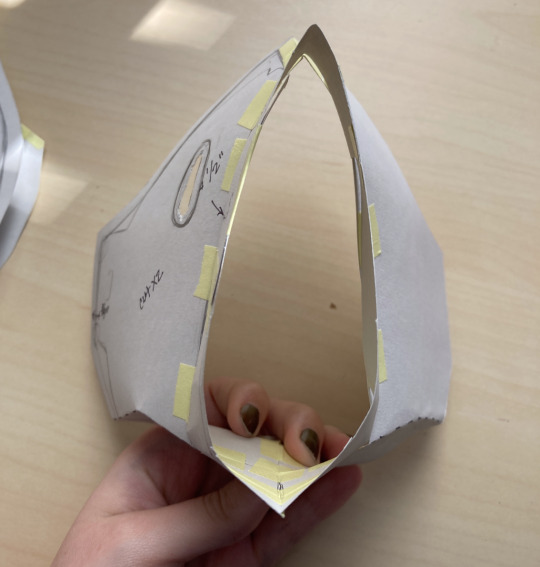
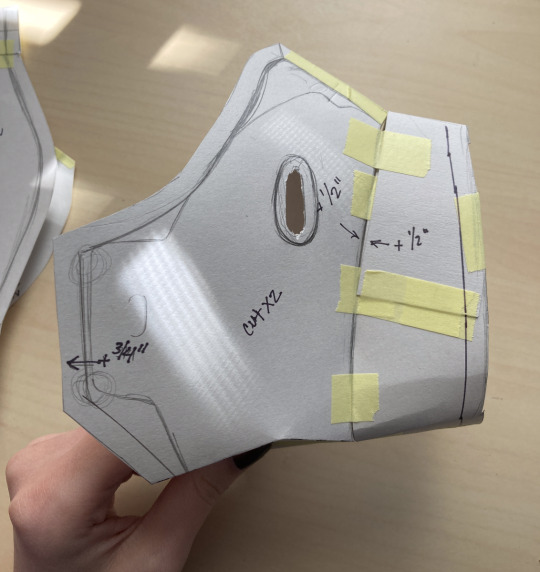
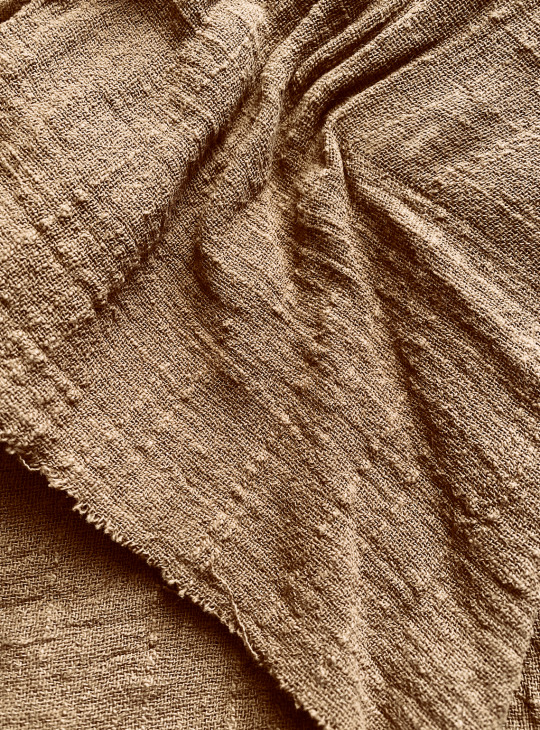
Process is very straight forward, just traced my mask on the fold and made some rough adjustments for a card stock mock up. I like 90-110 lbs for this sort of thing but construction paper can work in a pinch too. Cut that out and fit to my face, tweaked the placement on the nose bridge and added a 1/4" allowance for bias tape/facing, and appropriate allowance for flat felled seams.
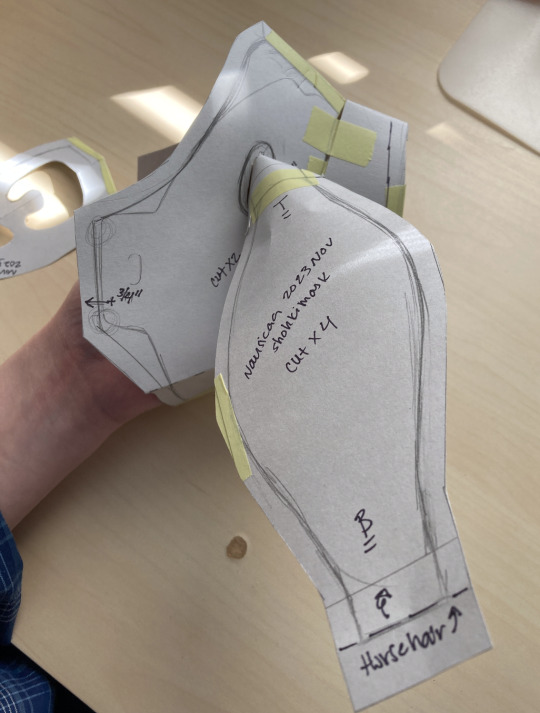
The ear tab was extended to cover the mask underneath, and included allowance for support fabric (denim scrap in my case) to support two eyelets intended to thread the elastic of my mask through. Then it was just patterning out the rest of the mask elements and making note of seam allowance and how to cut each piece. I trimmed the tape holding together the card stock mask apart and finally got to cutting out the fabric once that was done.

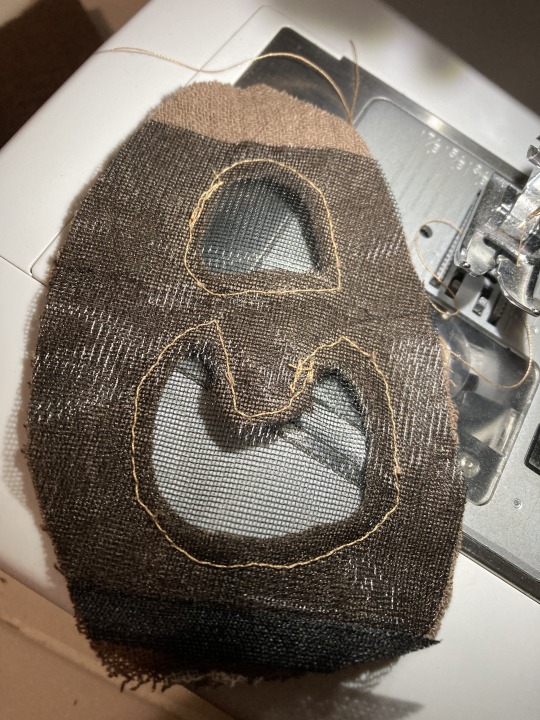

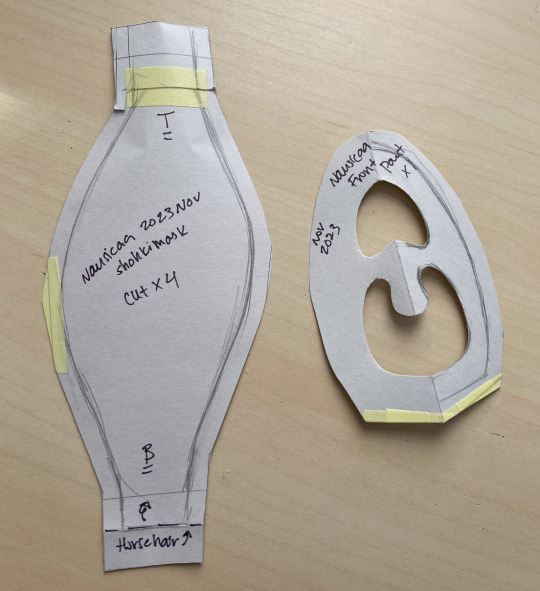
There isn't anything fancy going on, the hardest part was just the inset mesh panel over the weirdly shaped keyhole cut outs on the mouth piece. It's just black nylon mesh typically used for interfacing bras sewn on after making the keyholes.
This fabric is like if toilet paper were a textile, which is great for breatheability and weight but absolutely hell for machine work like this. It's not for a competition so for me, hiding messy stitching with weathering later was ok.
The portion of the mask running from the underside of each ear tab was finished with homemade bias tape. The same method was used for finishing the top portion that runs over the bridge of my nose. The ends were simply folded and sewn down at the ear tabs for a clean finish.
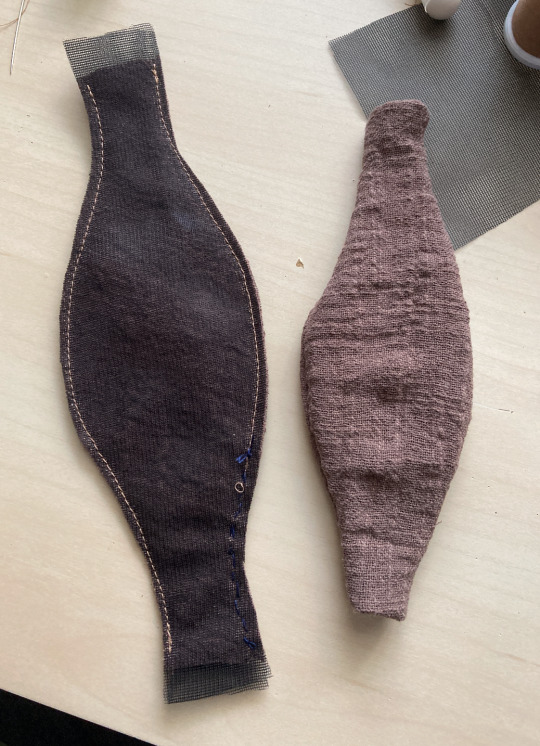
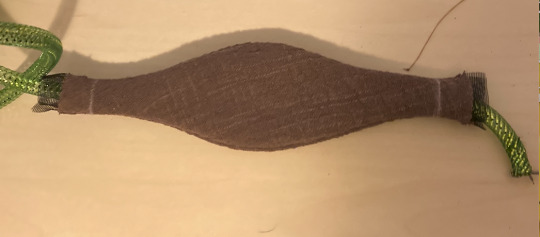
The side "filters" have an extra 1/2" long extension so I can tack in the ends of some horse hair tubing, then double fold the fabric back into itself before hand tacking with tiny stitches from the outside. That helps the light fabric balloon out into that shape, along with another layer of that same mesh interfacing.
They are really fun actually, very floppy with great movement. Though they stick out a tad too much so I did add one small french tack to the center of each to help them point downwards but retain that movement. The "filter" took the most hand finishing out of the whole thing, but that was to be expected.
Once the little side "filters" were sewn in, there was just light weathering to do. I wanted to add some shadows and potential "mold spores" to certain areas to really make the texture pop and hide some messy stitching. Light passes with a dry brush and some acrylic helped a lot, so did referencing photos of mold growth on clothes.
It was a pass of burnt sienna along all seams and large patches where high humidity would accumulate. Then another lighter pass of burnt umber to deepen up areas, and some very sparse areas of white. Finally I wanted to give it the "blue cheese special" and mixed a little viridian green and that same white and hit the white areas first then dry brushed the spaces between mold patches. I'm trying to replicate active mold colonies so reference photos came in handy here. I also used some nail polish to match the grommets to fabric.
Maybe when I am not crunched for time I will get around to digitizing the pattern, but for now I hope the photos help anyone else trying to plan out a mask. Obviously the shape will change a lot depending on the sort of fabric and mask you have on under it, not to mention face shape. I would imagine bifolds would give you more her classic feed bag profile than an origami style mask, however.
241 notes
·
View notes
Text
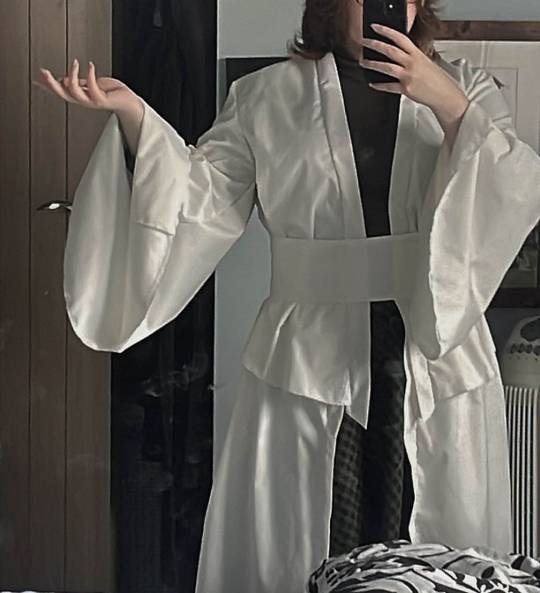
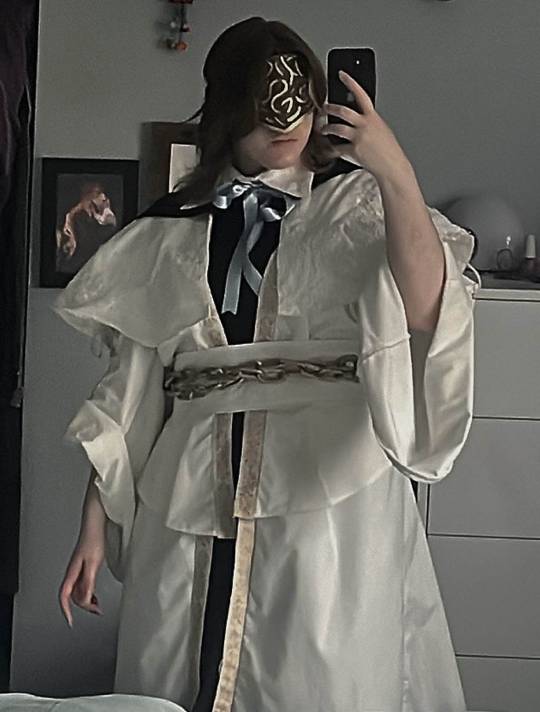
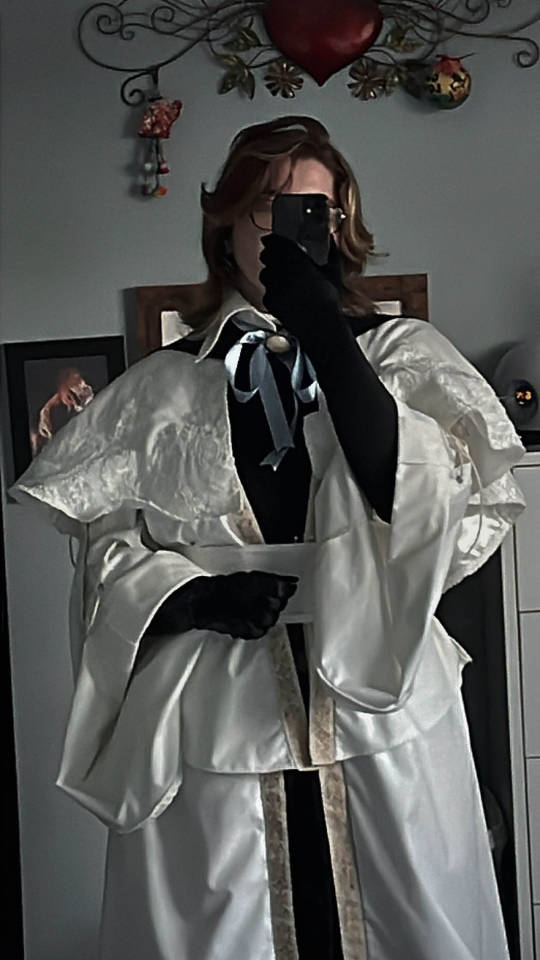
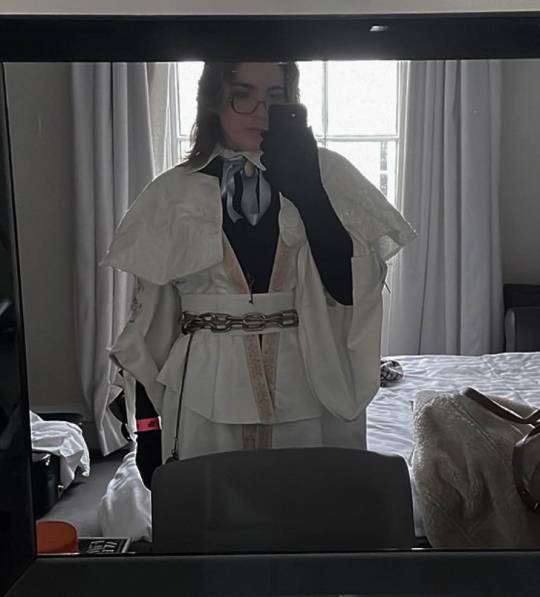
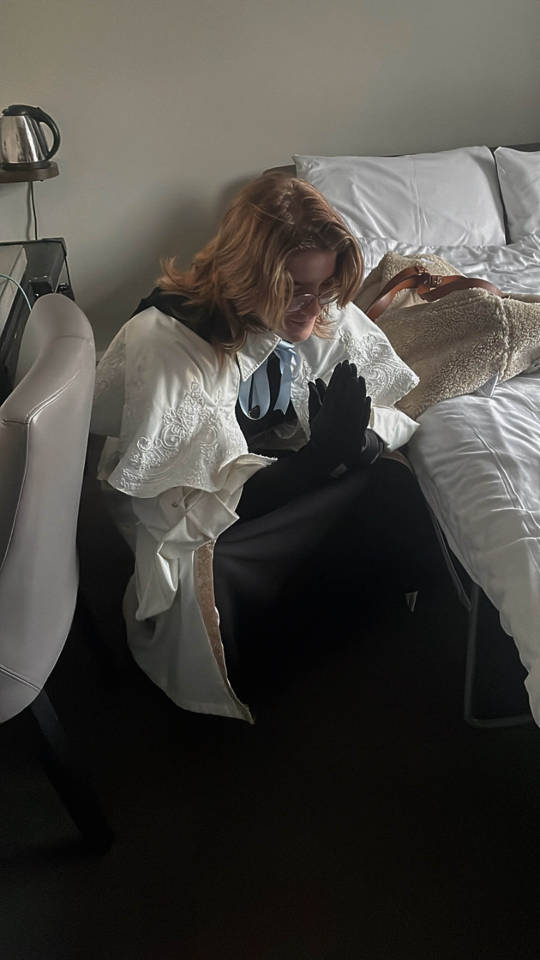
Hello!! breakdown of Choir Cosplay!! This is not really gonna be a step by step but a general vibe of what I did to make this cosplay :) To note: I haven’t sewn anything since I was in highschool which was 8 years ago, so a lot of this is like a ‘ya that works’ - make improvements where I could not :p Overall I wanted the cosplay to not be an exact copy of what is in game, personally I prefer more fitted clothing so I went close to my size with the pattern. Fabric: I used an ivory polycotton, ivory satin and black cotton. 1. I started hunting for a pattern that at least captured the vibe of the choir garb. I had split up the garment in my head into 3 separate parts: The base, the capelet, all the extra fancy bits. The big concern when picking fabric is I didn’t want the garment to be translucent, which is a problem for lighter coloured fabric. BUT!! I found that I didn’t have to make a lining and could instead flatline the fabric - where you cut double the piece and stitch them flat against each other - making it both thicker and opaque!
Flatlining tutorial:
https://www.youtube.com/watch?v=5N-qdP9tcc4&pp=ygUSZmxhdCBsaW5pbmcgc2V3aW5n
I found this pattern by Gunnar Deatherage on Etsy (as a beginner I loved this pattern, it’s very in depth and easy to follow)
https://www.etsy.com/uk/listing/1270370974/maxi-duster-wrap-pattern-instant?ga_order=most_relevant&ga_search_type=all&ga_view_type=gallery&ga_search_query=gunnar+deatherage&ref=sr_gallery-1-14&pro=1&sts=1&dd=1&content_source=95a164c411331c5aaff8fee029dee1e6377d3f92%253A1270370974&search_preloaded_img=1&organic_search_click=1
I did not use the sleeve pattern from it, instead I made my own to have the right fall and size.

Use the sleeve cap from the pattern so it can attach correctly to the bodice/back pieces - then where the sleeve starts to become longer draw out diagonally on both sides. For length I used the original pattern and went slightly longer! :) I used the same pattern for the peplum sorta top section and again for the skirt on the bottom. It creates a stitch line along the front but it’ll be covered by the belt!
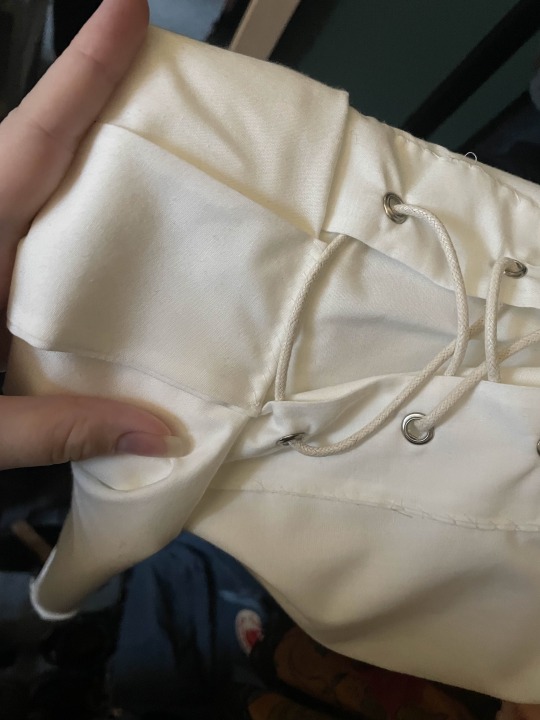
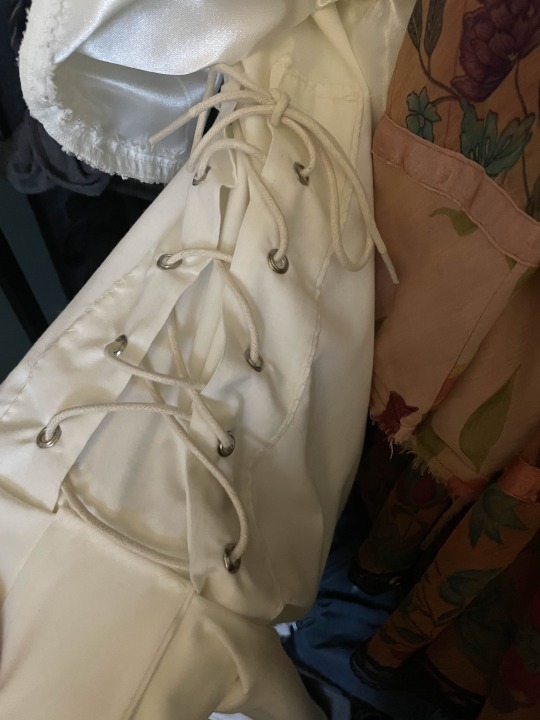
I bought this embroidered ribbon and attached it around the edges of the garment! https://www.etsy.com/uk/listing/840215852/35-mm-golden-victorian-jade-jacquard?click_key=2c042e9416627d9bf9d2f1e85385ba93e48ca464%3A840215852&click_sum=1fe453a7&ref=shop_home_active_1&sts=1 Corset/rolled sleeves: I did this last Corset pieces: Cut out 4 pieces (twice) - and attach them together leaving the end open to turn them inside out. Use a grommet tool and punch some holes through your fabric - make sure they line up. Roll the sleeves to roughly where your inner elbow is and attach another piece of fabric around the width of the roll - pin it in place. Hand sew the corset pieces on and the other piece of fabric so it is all secure :) Thread some similar coloured lacing to the fabric through the holes.
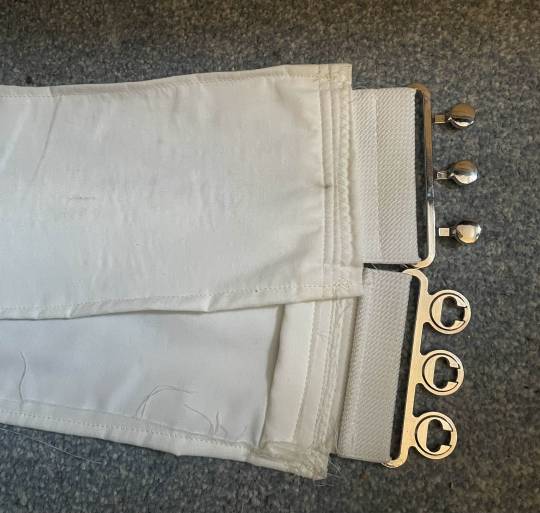
2. The belt! (My mum helped me a lot on this and was my voice of reason) Originally I had bought an elasticated belt with a clasp, but it didn't work at all and ruined the fall of the garment.
I chopped off the end of the belt, leaving me with some elasticated ‘fabric’ and the clasp. Measured my waist and cut out a thick piece of fabric twice and one piece of iron on interfacing. The measurement I did with the base on and added slightly more for both seam allowance and so there was breathing room for myself. Put the clasp piece on either end of the fabric and sew it all together! :) (marks are from the paint of the chain rubbing off onto the fabric :P)
3. The caplet! For the capelet I used this tutorial Easy DIY Capelets | For Halloween, Thanksgiving & Christmas🎃🍂🎄 (The only issue with this is I couldn’t get my head around how to attach a non circle collar) Ivory polycotton + Ivory satin used. Doing the base of this is pretty straightforward with the tutorial - it’s just a circle skirt but for your neck. If you want to be evil to yourself, you can do what I did and hand sew bridal applique all around the garment. If you can machine sew it please do :p I went for a big swooping shaped applique in ivory - any gaps I had were filled with more applique https://www.etsy.com/uk/listing/628065500/beaded-sequinned-lace-flower-wedding?click_key=d8b4937d8079ab34b301cf2d4dc7fbd0d6ede960%3A628065500&click_sum=81fb49a9&ref=shop_home_recs_1 I used poppers on the base and the cape to attach them together - it kept choking me if i didn’t 4. The collar - made me want to cry ngl I could not figure out for the life of me how to attach a non circle collar to the capelet (which is how I wanted it). Instead we have a removable collar!! I copied the size of collar from one of my own shirts and followed these tutorials TWO PIECE COLLAR TUTORIAL | KIM DAVE How to Sew a Collar and Collar Stand Easily by Sew Sew Live 5. Graduation hood???? For some reason you can’t just buy these in the UK without paying £30, so I made my own Cut out double for the pieces around your neck and one for the ‘hood’ part Gather the ends of the rectangular piece and attach them to the other pieces!
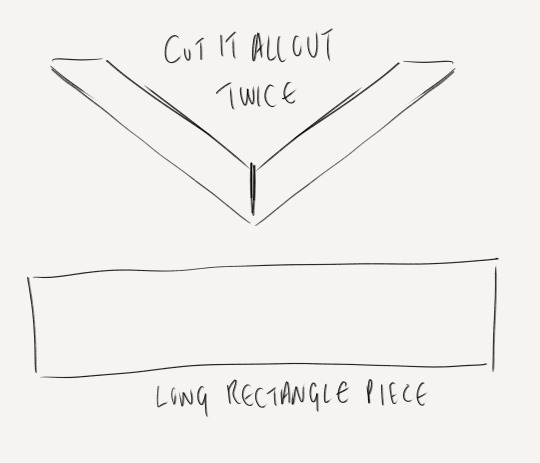
6. The Fancy back panel piece Measure from mid shoulder blade to the bottom of the garment for the main rectangular piece. Cut out two other rectangles of the same width coming into an arrow shape. Sew them all together and start sketching on the design. The great thing here is you can make it up, because it’s too complicated and nobody is gonna look at it and be like ‘u did it wrong’ I used a fabric medium and gold metallic acrylic
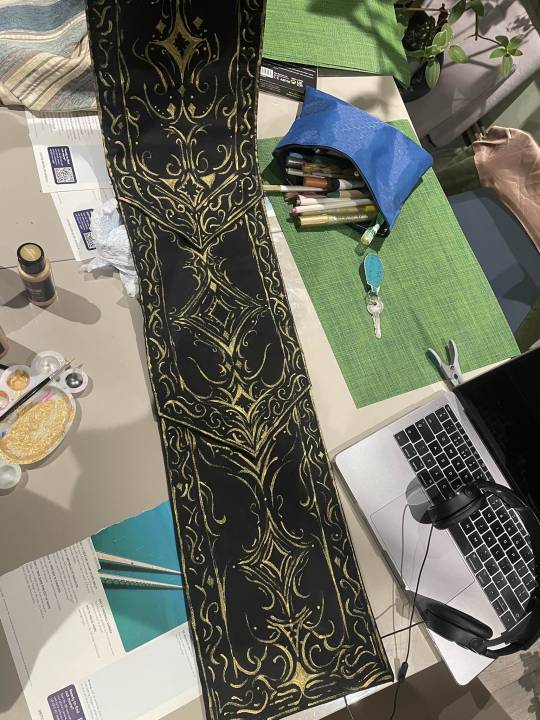
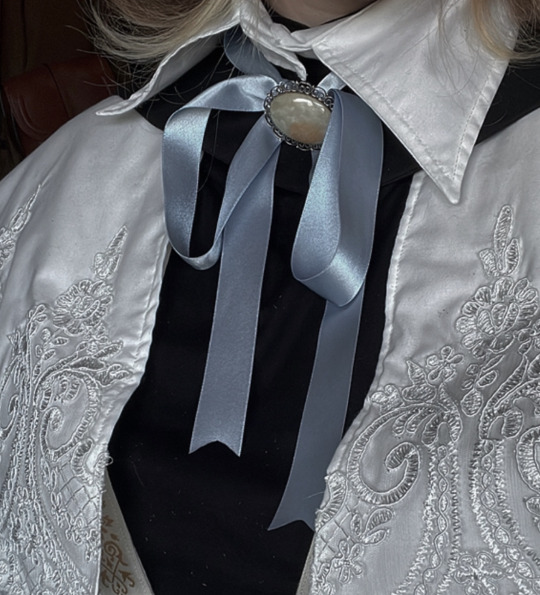
Once it’s all done, I machine sewed it to the back of the base garment because it’s hidden by the cape. 7. THE REST Chain: Me and the chain belt had a fight - Originally I used metal chain,, but I’m allergic to some metal and can’t deal with the smell,, I switched to a plastic chain with 2 D Ring clasps - had to sand it down but the gold spray paint loves to flake off. If I knew about it before, I’d use EVA foam chain :) Black pieces underneath: I bought a turtle neck and a long black skirt :P but you could make it as a dress or smth! Purchased long black velvet gloves, a pocket watch and a key necklace (I didn’t want to use a censer - and they are v expensive/idk how to make one) Ribbon + brooch: I bought chunky soft blue ribbon and found a vintage brooch on vinted
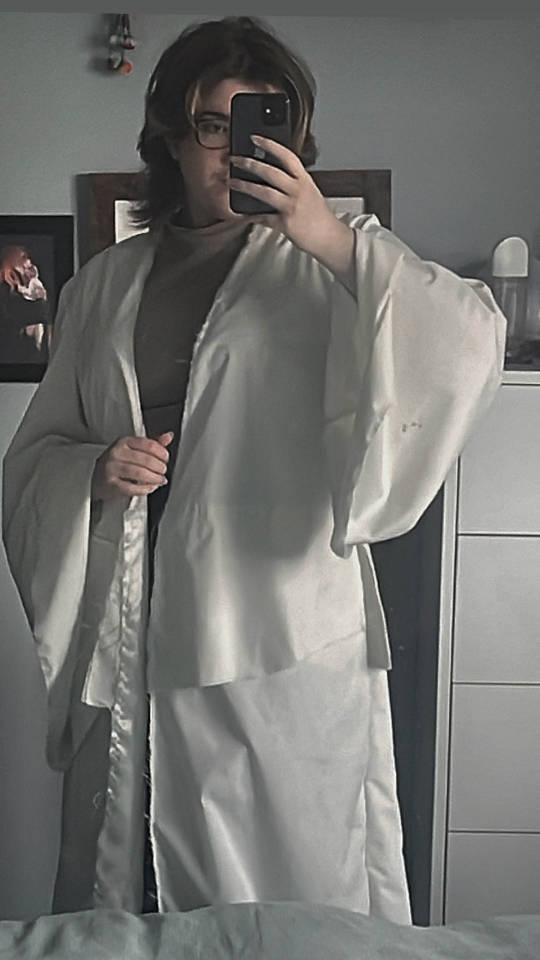
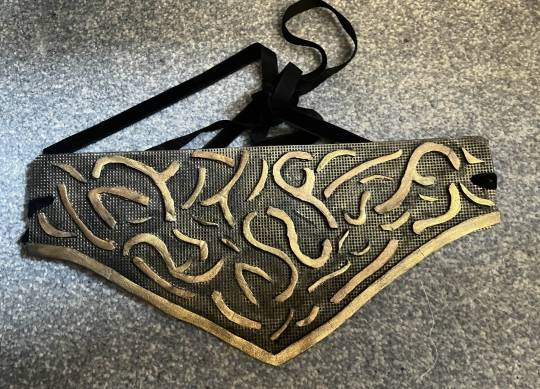
The mask: If you have contacts you’d probably be fine, but I don’t and this mask messed with my depth perception and balance so I had to take it off so I could wear my glasses :(
Use buckram plastic mesh - the thicker kind, used for fursuit eyes and in black! You can see out but nobody can see in. I made a mock up with paper but sorta looks like this shape :)

Eva foam pieces cut out into swirls and filigree like shapes, glue it onto the buckram I did a base coat in grey over the entire thing and painted it with black, gold and bronze acrylic! I hole punched and put the ribbon through it so the mask could be tied around my head.
If you’re making the mask and hat - I’d attach the mask to the hat so it’s one piece :) Where I went wrong/what I’d improve I wish I had been able to attach the collar to the rest of the garment. There is a gap that appears between the collar and the caplet/base at the back (mainly due to gravity and it moving) that can be annoying, since my hair is on the longer side it was covered but still I wish it wasn’t there. I’d also want a bigger collar! I’d not use satin as a lining for the skirt and capelet - it’s so annoying to use and it’s so slippery Maybe would not hand sew all that applique because it took me over a week :P BUT OVERALL for a first cosplay, it’s pretty good! I’m mostly happy with the outcome and it was one of my dream ones to do! :) I hope this helps, I didn’t take photos of all the steps unfortunately but hopefully it makes sense :)
#Choir cosplay breakdown as best as I could#with links and things to where I got my patterns and tutorials from#I hope it helps - if you wanna know more or see more photos feel free to dm and ask idm showing!!#bloodborne#bloodborne cosplay#choir cosplay#bloodborne art#bloodborne choir#cosplay#fanart#art#artist#fromsoft
45 notes
·
View notes
Text
A new material that moves like skin while preserving signal strength in electronics could enable the development of next-generation wearable devices with continuous, consistent wireless and battery-free functionality, researchers report. The researchers developed the material by embedding clusters of highly dielectric ceramic nanoparticles into an elastic polymer. The material was reverse-engineered to not only mimic skin elasticity and motion types, but also to adjust its dielectric properties to counter the disruptive effects of motion on interfacing electronics, minimize energy loss, and dissipate heat.
Continue Reading.
67 notes
·
View notes
Text
i helped* write a new physics textbook and it has a cool (and free) website: softmatterbook.online
*a little bit. The vast majority of the book was written by van Saarloos, Vitelli, and Zeravcic, but a whole bunch of people contributed little bits of writing (myself included) and are credited in the preface.
This book is an accumulation of some of the most fundamental results in soft matter physics, many of which were first discovered or derived very recently. The website hosts a bunch of extra resources (videos, notes, demos, etc.) sorted by the chapters of the book:
Fluid Dynamics
Elasticity
Brownian Motion
Colloids
Polymers
Liquid Crystals
Interfaces, Surfaces, & Membranes
Pattern Formation out of Equilibrium
Active Matter
From Designing Matter to Mimicking Life
It also lists a whole bunch of labs all around the world that are studying the sorts of systems described in the book, as well as mailing lists you can sign up for, conferences, workshops, youtube channels, and software packages. I'm absolutely biased (see below) but I think it's a really great resource for anybody interested in soft matter!
I spent the first year of my PhD helping to put this thing together. I translated research papers into problems, hunted for typos, and wrote most of the solutions in the instructor's manual. I don't make any money off the book sales (my PI told me they made it available for as cheap of a price as the publisher would allow), but my PhD stipend was funded for the year to work on this thing instead of having to TA.
I was ridiculously lucky to get the chance to work on this thing, even if at times it felt like learning how the academic sausage gets made.
85 notes
·
View notes
Text
Water Jumping Hoops
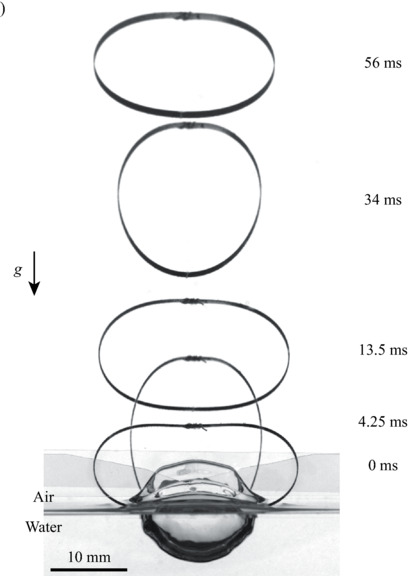
Small creatures like springtails and spiders can jump off the air-water interface using surface tension. But larger creatures can water-jump, too, using drag. Here, researchers study drag-based water jumping with a simple elastic hoop. (Image and research credit: H. Jeong et al.) Read the full article
75 notes
·
View notes
Text
I really wish I understood and was competent at making modern daily clothing. I'm ok with sewing for quilting, or making SCA tunics and shifts and such, but the modern tissue paper pattern is an intimidating mystery to me. (All this weird stuff with elastic and interfacing - I just want a nice simple dress or blouse!) And what's worst is that I don't really have any way to get practice, because I can't find patterns that a) fit me and b) are designed for woven fabric, not knit, which is all I know how to sew and what I want to use.
27 notes
·
View notes
Text
Four blouses
A year ago I bought a metre of some very lovely and expensive Liberty Tana lawn. It sat in my small sewing stash until I could find a pattern for it. Eventually I settled on the Perennial Blouse. I was drawn to the simplicity of the shape, which lets the pattern shine will still being fitted and not the giant sack with elastic waist which seems so common in Indie patterns and which I have many many bitchy thoughts about.
I made a quick toile and found that as usual I needed to take length out of the body. It's designed to sit at the natural waist and I have a rather short torso. That's why it looks like a crop top but I swear it's not, that's just how short my upper half is! For reference I am 5'6" (167cm) and yet need a 32in (81cm) inseam, I really am mostly leg.
I made the cap sleeve version, and it was a quick and fairly painless project that is really elevated by the beautiful finishing on the inside and the thoughtful pattern elements, such as a button hole guide and separate pattern pieces for any interfacing, a well as properly drafted armscyes (the amount of armscyes that are symmetrical makes me weep).
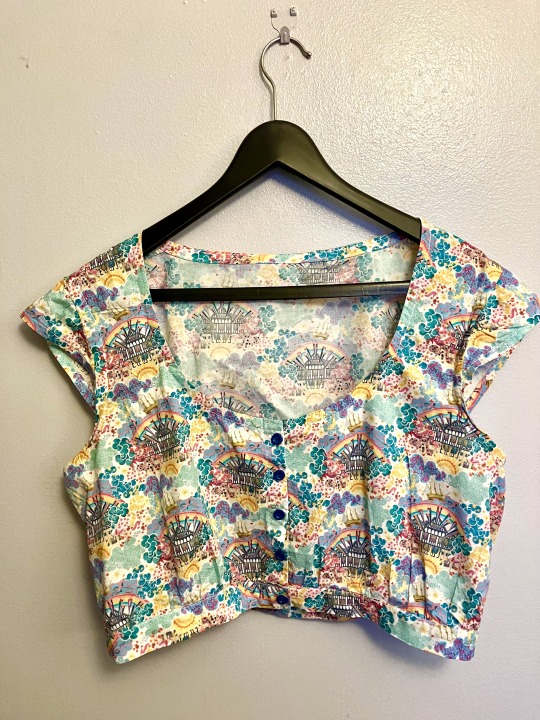
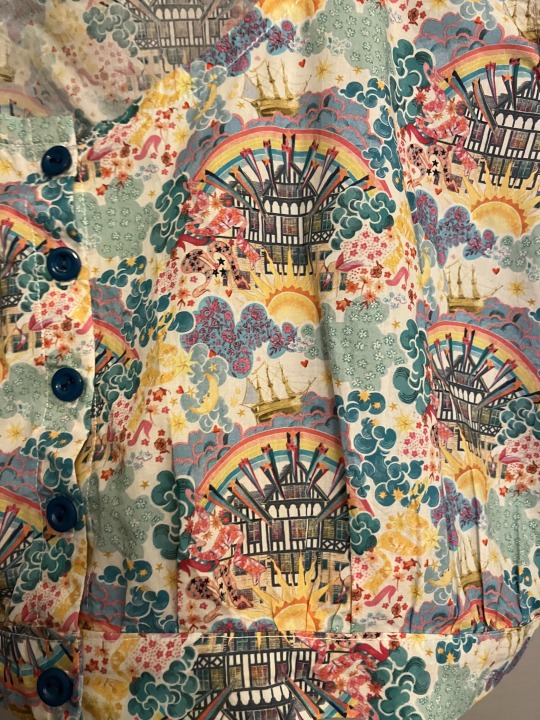
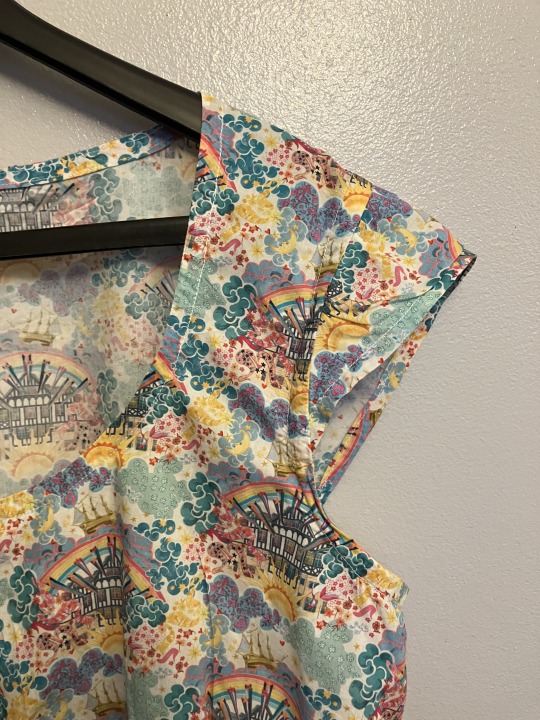
Here's some close ups of the pattern and the cap sleeves. I was very happy with the pattern. It's very economical for fabric, taking under a metre, and it really lets the print shine. In fact I was so happy I uh, went a bit wild
I had to give away almost all my handsewn shirts this year as my upper chest and shoulders no longer fit comfortable in them (swimming regularly will do that, and my high bust measurement has always been out of whack for standard pattern sizing anyway). So I wanted restock my handsewn blouses, and I knew I liked this pattern. So I made more.
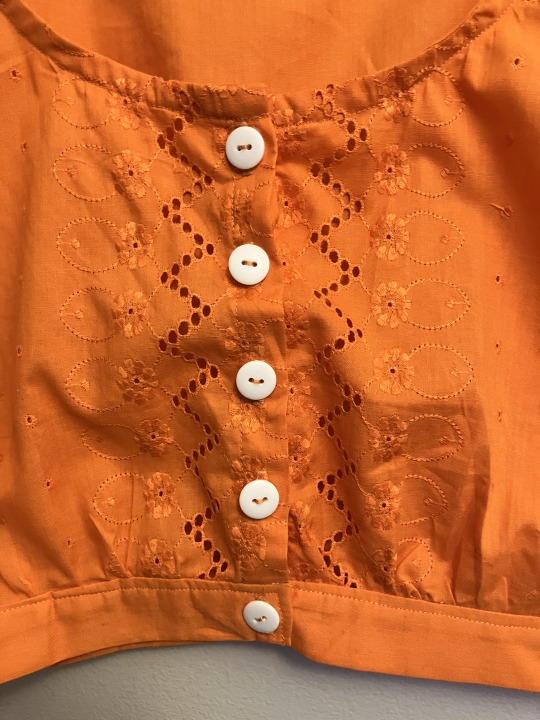
This is a white cotton broiderie anglais, For this one I raised the scoop neck about 1.5 cm, and lengthened the body by a cm. I love the contrast of the orange buttons. I made the bias tape from some plain white polycotton because the embroidery on the body fabric would mean it was harder to use.
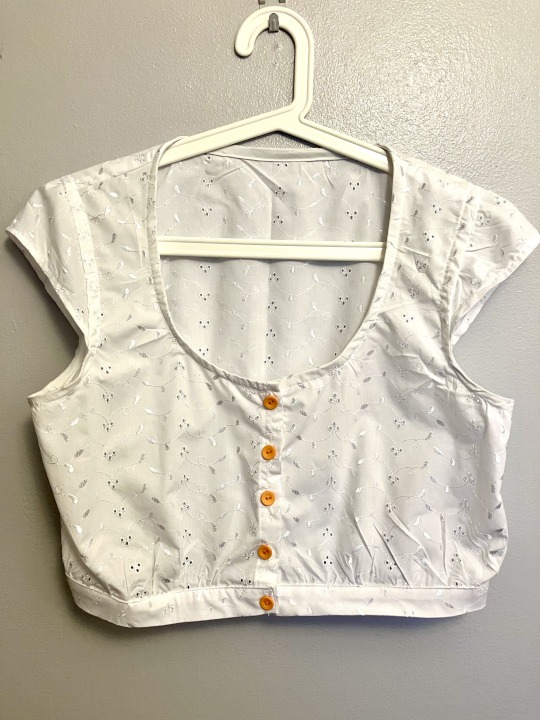

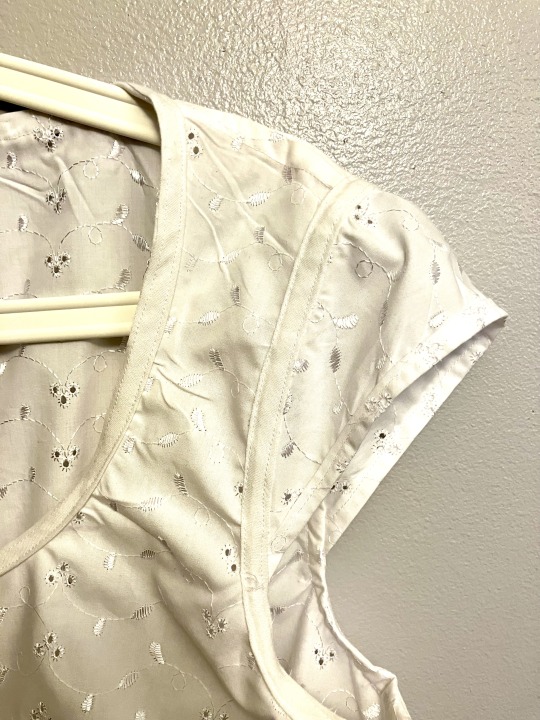
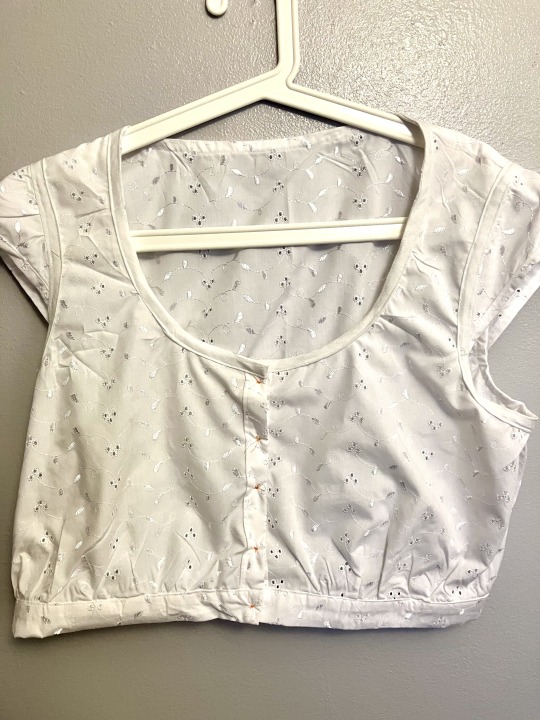
I've added pictures of the inside for this one. As you can see there are no raw edges anywhere in this blouse, which I LOVE. The seams are all french seams and the neckline/sleeve seam/armhole are all bound with an understitched bias facing. It makes the inside SO neat and tidy. So many patterns skimp on the seam finishing, instructing you to serge or overlock them (I don't have an overlocker nor any desire for one). And really if I wanted seams that were overlocked together, why would I bother making my own clothes. It's a seam finish I hate! I really appreciated the time put into the pattern to make the inside nice.
Next up is this fun orange number that I made as part of a Star Wars bounding outfit (I was BB-8). A lovely embroidered lawn which was SO lovely and well-behaved to work with. I cut it on the cross-grain so I could have the embroidery and cut work running parallel to the button bands

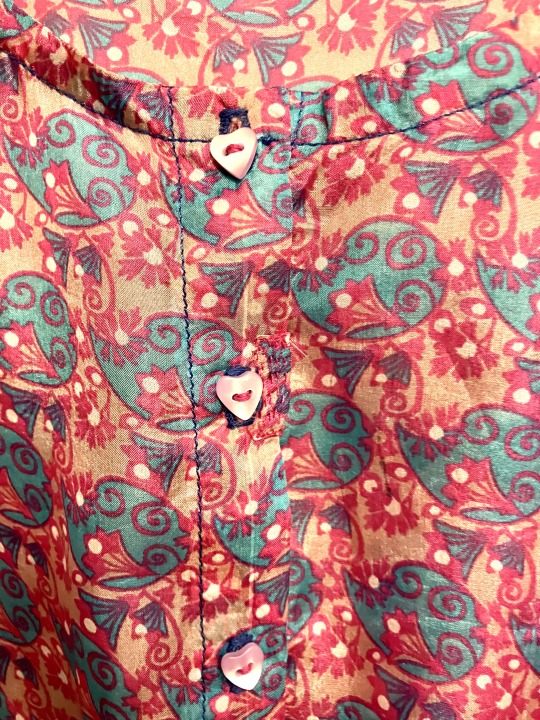
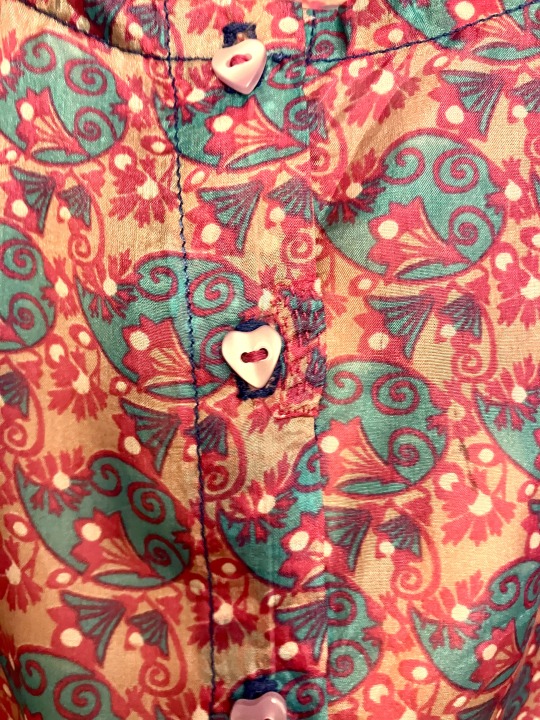
And lastly, this one in silk. It was a NIGHTMARE to work with. It's whisper-thin and slippery and semi-sheer. I gave it gelatine bath which did help to somewhat stabilise the fabric as I cut and sewed it but it also made it super staticky. I think I should have used more gelatine because although it was slightly papery it was still slippery and seemed to stretch and deform if you so much as looked at it wrong.
(Wait, I can hear you say. Gelatine? Like the stuff sweets are made of? Yes! It's a way of stabilising very find or floppy fabric. You mix gelatine and hot water (I used a ratio of 1 tsp to 500ml water), soak you fabric, and let it dry, whereupon you iron it, and cut out your pattern. It washes right out of the fabric when you are done).
The fabric fought me every step of the way. I was nearly done when I slipped cutting a buttonhole and ripped a tear in the button band. I had to do a small patch job and you can TOTALLY see it but I'm hoping the pattern makes it less obvious.
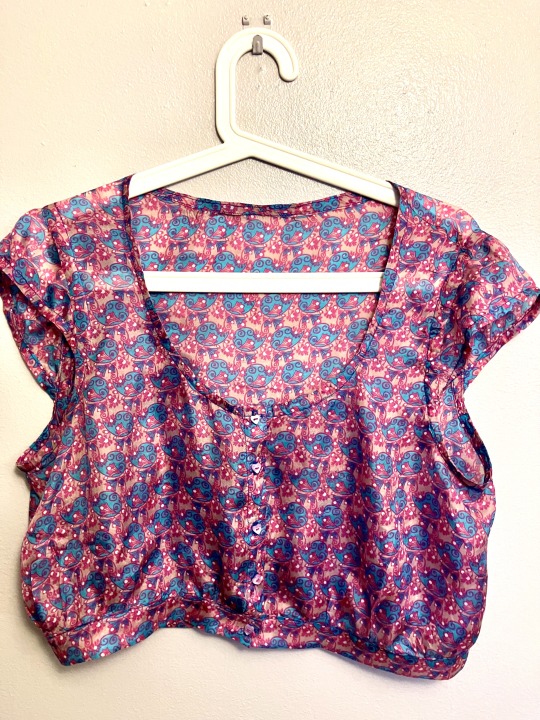
The finished blouse is wonderful to wear though, so light and elegant so I think it is worth it.
12 notes
·
View notes
Note
Do you know if you can buy the ankle straps the queens wear on their boots?
Hey!
You can't buy them directly, unless you're able to find someone you can commission for just the straps. But you can make a set yourself pretty easily!! Here's what you'd need to do: - The base material. Six used to use the same leather as the base of their boot, but they've since switched to a suede to hold the crystals more easily. You could use a suede, leather or faux leather, or even a felt. Do note that you'll want to make sure you choose a material that allows you to punch holes for your buckle, and you definitely won't want something stretchy. - You'll also need some sort of interfacing. The interfacing depends on the material you want to get, but I'd suggest something decently thick but still flexible. Off the top of my head without any sort of actual samples in front of me, I'd suggest a Pellon 809 or similar (that's for the US, unfortunately I'm not sure on international availability). - And of course, buy a small set of buckles (Six's are ~1.5cm/5/8", but you could also use 1/2 or 3/4") + small black ribbon or elastic for their loop. - To get your measurements you'd measure the circumference of your ankle with the boot on, and choose where you wish the straps to start from there. You can make a basic pattern using that length measurement, a width of about 4.5 or 5cm/~1.75-2" for the main wider section (use your crystals to determine this too), and then make sure your smaller ends fit into your buckles. - From there, sew together your straps and add a hole through which to buckle on your strap once they're added. - The only things left now are to embellish the strap (which I'm assuming you already know how to do from the heels), attach the strap (you can sew, glue, or even add snaps), and attach the buckles.
And voila! Your very own straps.
23 notes
·
View notes
Text
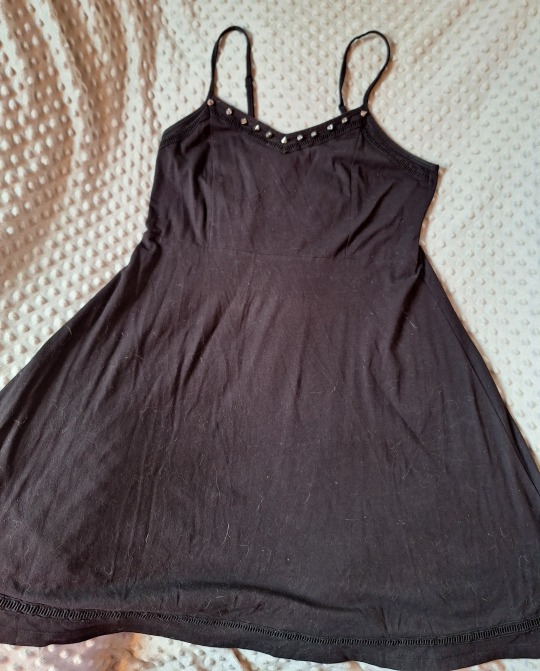
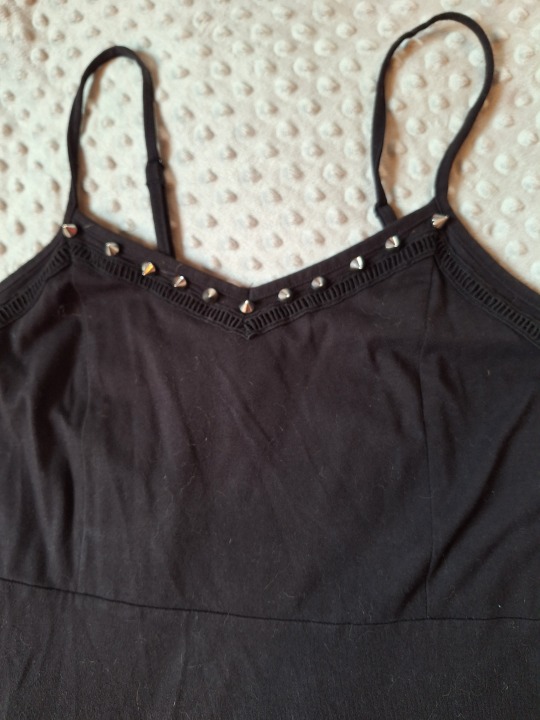
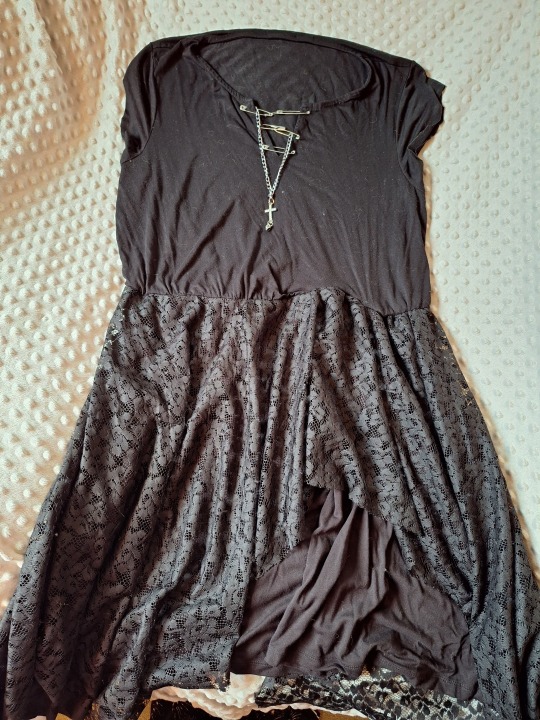
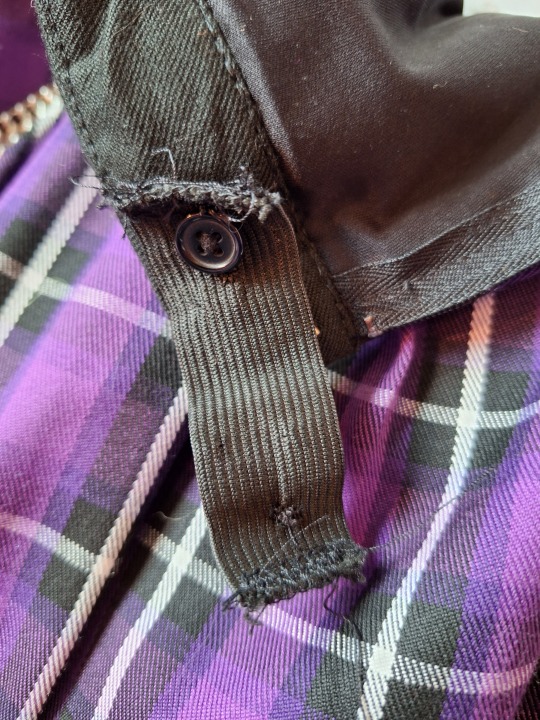
Goth DIY: Altered Clothing part 2 (final part)
Part 1
This part will be shorter since we have less to cover. But it's still a long post, so I'm putting it under a cut.
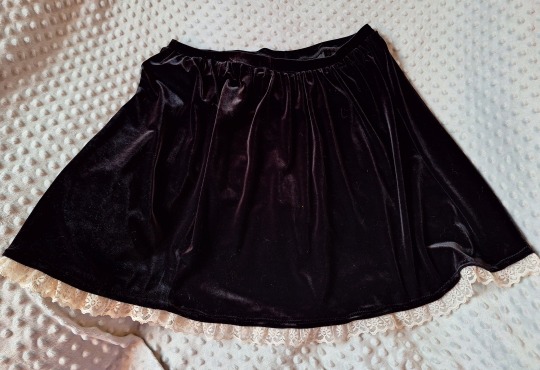
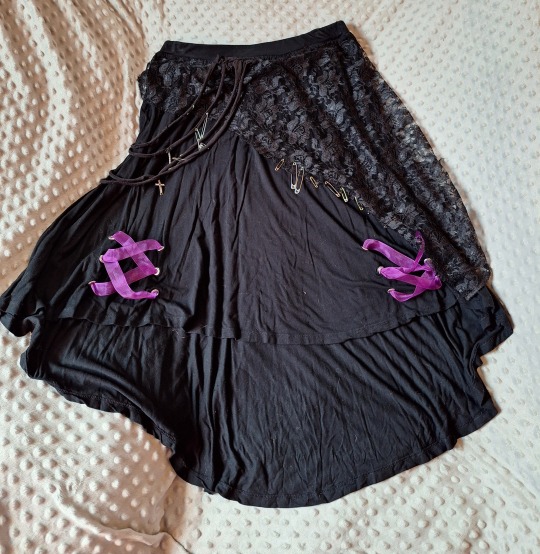
Skirts and dresses! The last two dresses and green skirt took the most sewing, but the first dress was as simple as sewing studs on the neckline. The black velvet skirt was altered a bit more to fit me, as it was originally a skirt that had small pleats at the top that made the skirt cling to my stomach and flare out further down, which wasn't flattering on me, so I cut that part off and added a new waistband to get a circle miniskirt, then added lace trim to the hem for extra cuteness and a fancy touch.
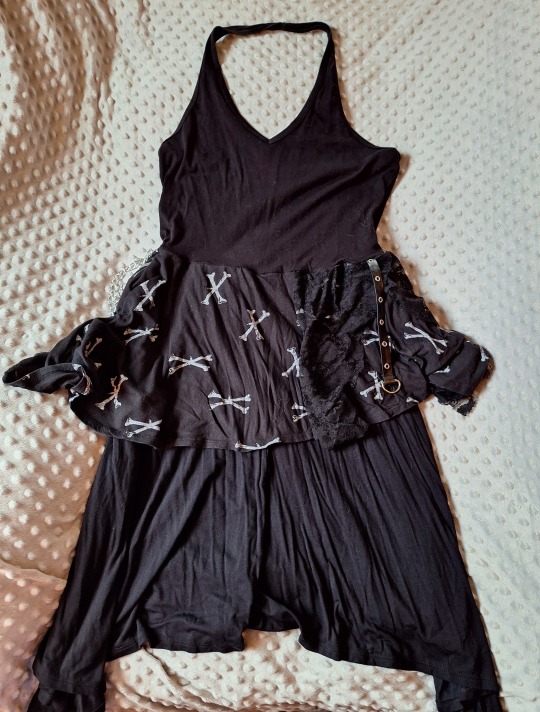
Attaching skirts to a crop top is an easy way to make a dress if you don't want to sew one from scratch, but the waistlines did turn out a little wonky, so I use a belt or cardigan to hide that. I also sew a thin line of elastic onto the skirts to gather them before sewing them to the top to make it a little easier and to maintain stretch, since these dresses just pull on. I also don't hang them by the tops, but by draping them through a hanger to avoid stretching out the tops because the skirts are a little heavy (at least mine are, since I added so much to them).
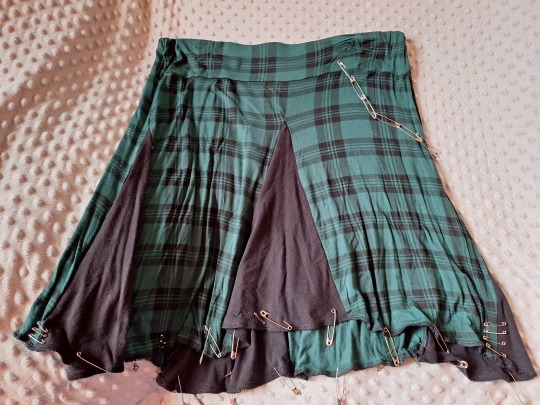
For the green skirt, I added triangular inserts called "godets" to make the skirt flare out, since it was too tight before and didn't swish. I like a good swish.
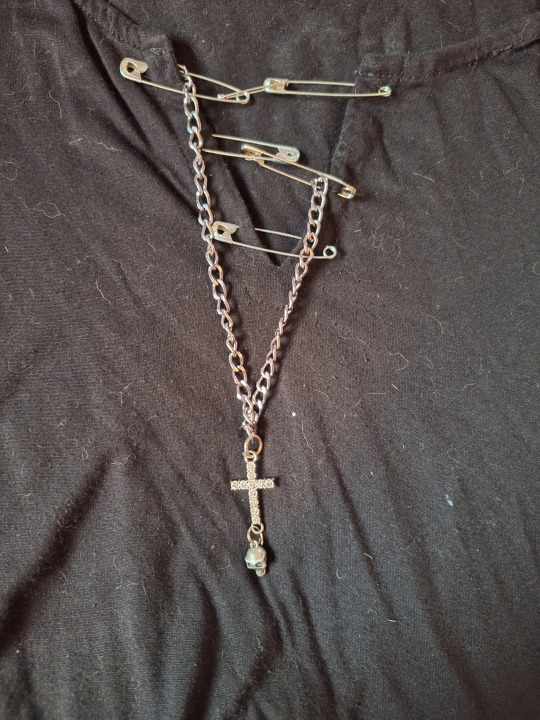
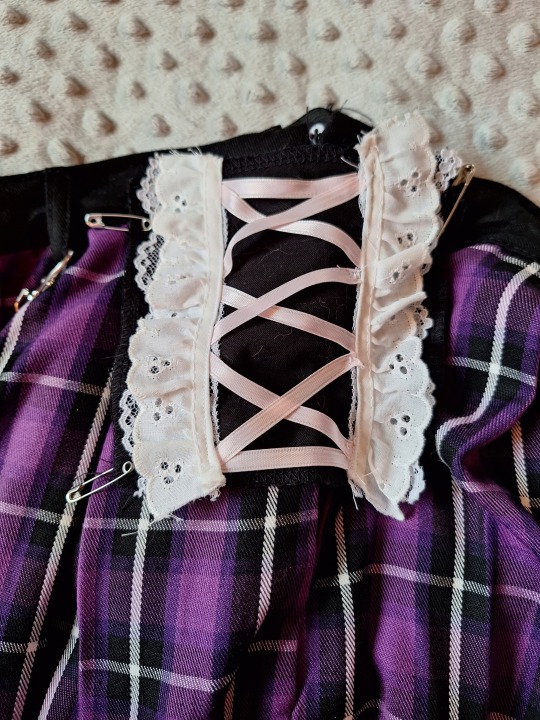
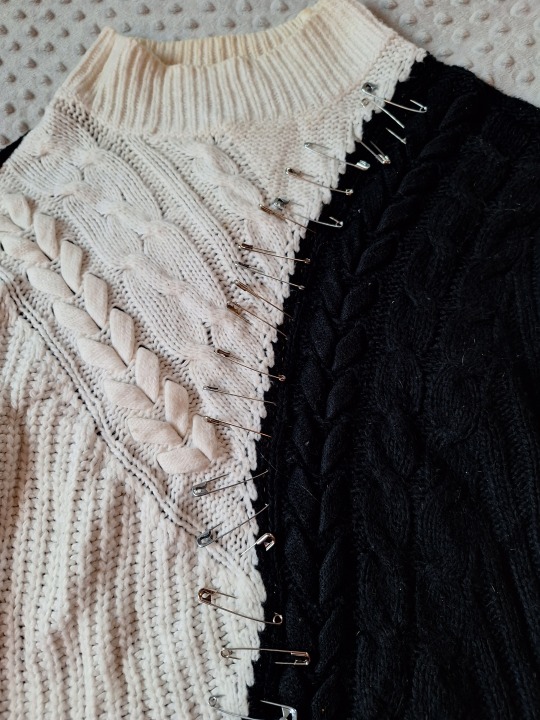
The skirt with all the lace and pins and grommets and nonsense was one of my earlier projects, so it has three mistakes which I implore you to avoid. One: I didn't line the fabric loops up with the waistband very well, so they look crudely tacked-on. Two: I didn't add any fray check to the holes I made for the grommets, so they stretched out and the grommets are no longer attached to the fabric, just floating there on the ribbon. Three: I didn't stretch the skirt as I sewed on the lace, so now it doesn't stretch in that area; it still fits my waist, but I have to fight with it to get it over my hips. The design is still cute, but I would definitely do it better if I were to make it nowadays.
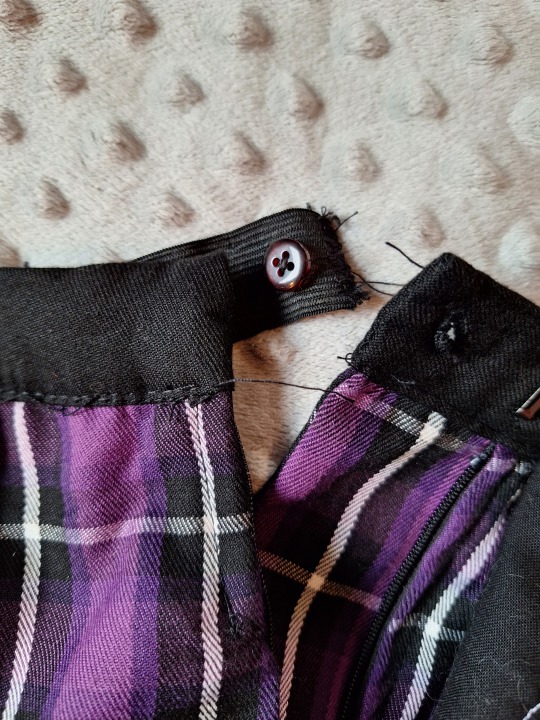
The half-and-half skirt only has a small alteration, which was actually to make it fit rather than to change how it looked. You see, sometimes you order something online in the same size you always wear from that brand, and sometimes that thing ends up running small and has no stretch. When that happens, when the skirt almost fits you and is just so close to buttoning all the way, get yourself a waistband extender. I made one, but you can also buy them. It's just a piece of elastic with a button on one side and a button hole on the other. Put that on, and BAM! The skirt (or pants) fit you. They won't quite zip up all the way, and it is a noticeable change, so I made a cute lace-covered patch to cover up that alteration so you can't tell I changed anything about it at all.

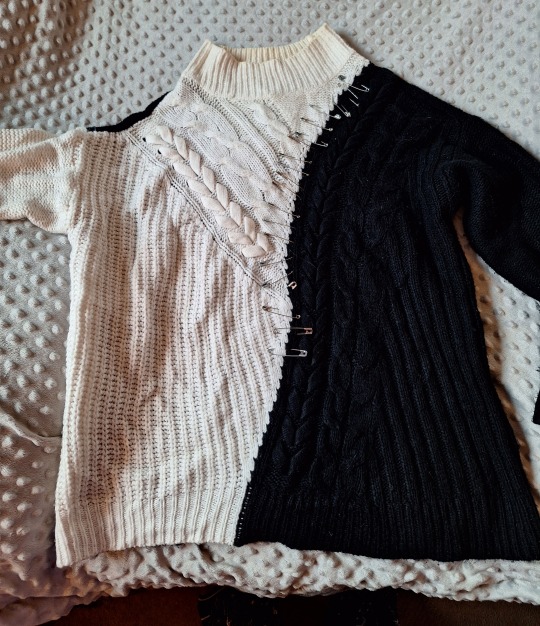
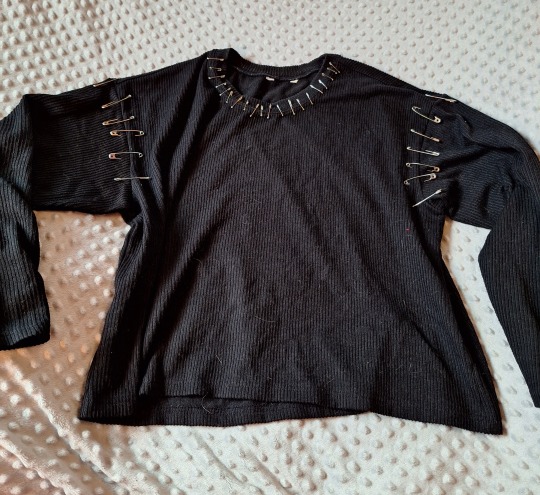
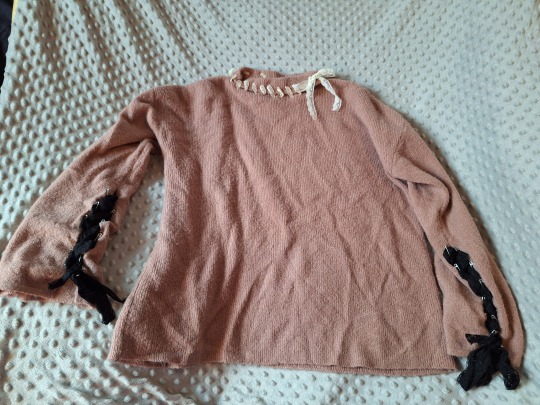
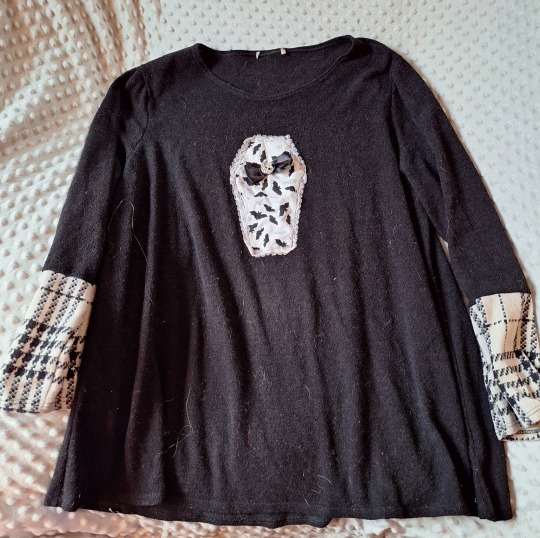
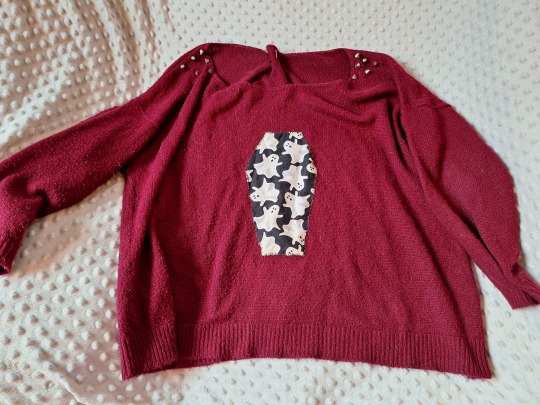
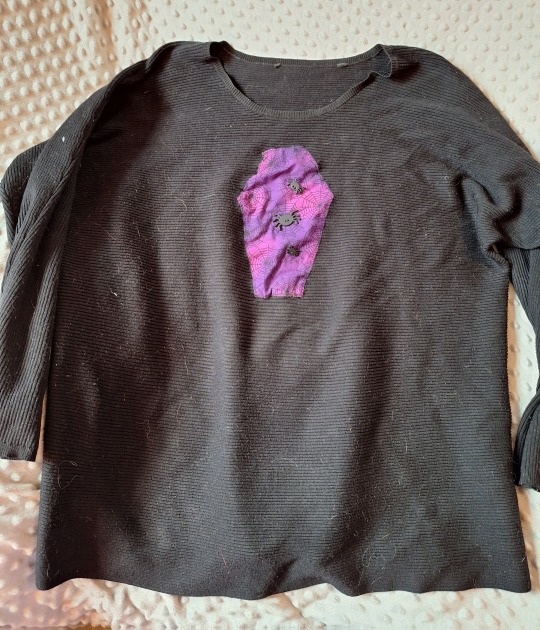
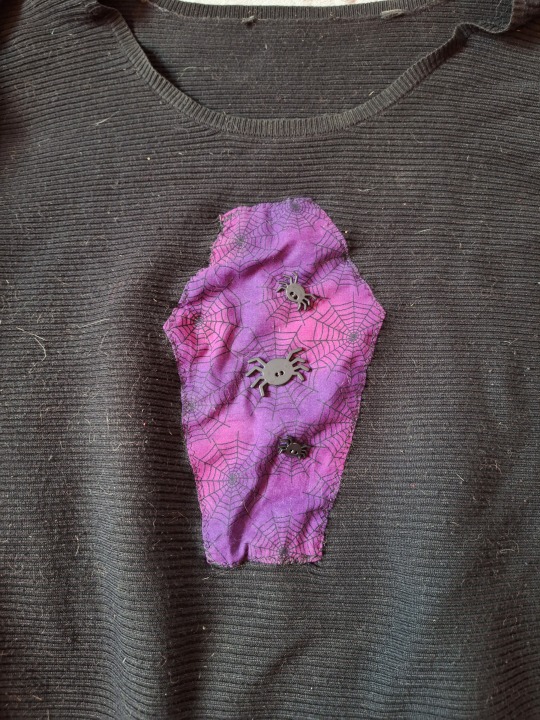
Now onto the sweaters. I love wearing sweaters in winter, but there seems to be a shortage of goth ones. Nothing a few safety pins and lace trim can't handle! The first three only have safety pins added to them. The coffin ones were done the same way I did my sweatshirts, but this was before I knew about fusible interfacing for appliques, so they got a little wrinkled and don't look as nice. I have a better method now, as detailed in the post I linked. The fabrics were all Halloween fat quarters from Walmart, and I found a picture of a coffin on Google Images as a base to cut out the right shape.
All of these sweaters were thrifted except the two solid black ones with pins--the first one came from Walmart, and the second one was given to me by my mom. Sweaters are plentiful at thrift stores, and they don't even have to be black to be turned into something goth.

That's all of my altered clothing so far, unless there's anything I'm forgetting! Which there easily could be, because I shared about forty garments O-O
I'll share the jewelry I've made next, and then the clothes I've sewn from scratch! This will come sometime in the future, though, because it took awhile to find everything, take pictures of it, and then write about it. And between you and me, I've made a LOOOOOT of jewelry and clothing, so give me some time. As I said in the last post, feel free to message me if you want more detailed instructions or ideas. I'm always happy to help!
Stay crafty!
#diy advice from your local goth#goth diy#goth diy tutorial#diy tutorial#diy#gothgoth#goth#goth subculture#goth fashion#goth clothing#goth fashion diy#crafting#sewing#mine
60 notes
·
View notes
Text
Can you believe it? 20dollarlolita Pattern School Step 2!
Only took me a year and a half. For people who don't remember a year and a half ago, we've started a project about learning to sew from patterns. The eventual goal is to help people become proficient enough at reading patterns to be able to tell what's going on in a pattern with instructions in another language, taking a pattern that doesn't fit and resizing it so that it does, and taking a pattern that isn't technically lolita and make it work in lolita fashion.
Step 1 was to make a non-fitted item from a commercial pattern. There were two goals of step 1: first to ensure that everyone was familiar with notches, grainlines, and other pattern markings; second was to give people experience with selecting fabric and trims to help give a non-lolita pattern a more lolita feeling.

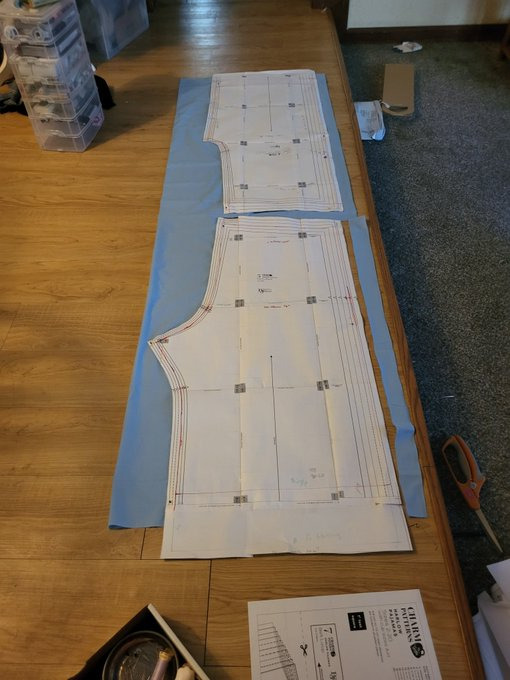
For step 2, we're modifying a commercial pajama pants pattern into bloomers. In this step, we're going to become familiar with how to prepare a commercial pattern for modification, to compare pattern size to body size and to use your tape measure to judge added fullness, and how to do some basic flat pattern manipulation to add in style ease. Bloomers are a great first manipulation/fitted project due to the loose fit and the fact that, in most lolita applications, the vast majority of it is under your skirt and therefore invisible.
For this specific sample, I'm going to use Gertie's Harlow Pajama Pants pattern for this. I'm doing this because I bought a commercial pattern from Green Store and then promptly lost it, and these pajama pants are a free download. If you are printing the tiled version on your home computer printer, you only need pages 41-52 and 58-71, which will save you about 40 pages of printing.

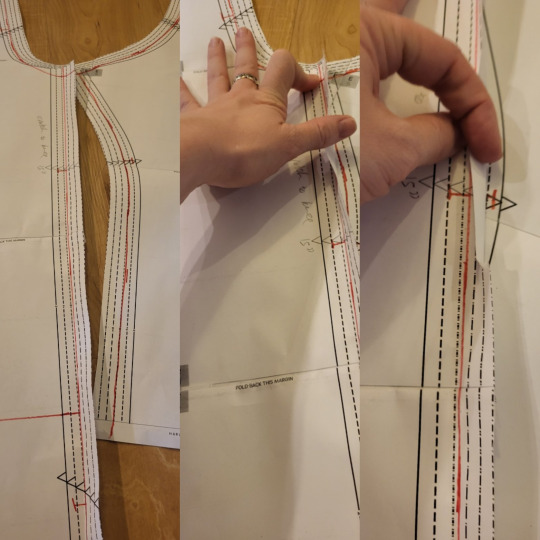
I highly recommed doing some research and having a good idea of how long the bloomers you want to make should be, as well as how they are decorated. This is my research board.
You can use any pajama pants pattern that has a casing (elastic or drawstring) at the top, and no zipper. In this case, pants with a looser fit are going to be easier to turn into bloomers. If you like wearing your pants at a certain point on your body, I'd check for pajama pants that are at that waistline. The pants that I'm using are designed to sit at your natural waist, which might be too high for some people.

Your first step is to assemble and fortify your pattern. If you're printing this on copy paper, it's going to be strong enough, provided you use enough tape when tiling your pattern. If you're using a tissue paper pattern, like the kind you'd buy at the craft store, it helps to fuse some inexpensive interfacing onto the back of the pattern. We're going to work with these patterns a lot, so it's important to make them a little bit stronger.
Now, you are going to need to go into your pattern instructions and find two important things. The first is your overall seam allowance. In most commercial patterns, this is 5/8 of an inch. Some other patterns might have different seam allowance.
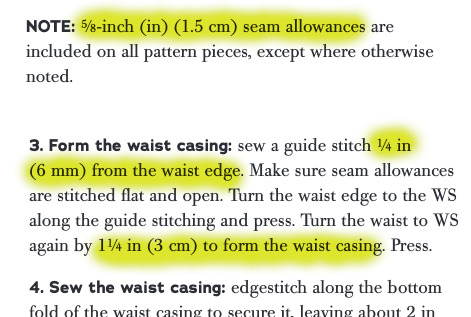
The second is how big your elastic casing at the top will be. In this case, my seam allowance is 5/8" of an inch. Because my hem casing is .25"+1.25" (the amount you turn up plus them amount you turn up the second time), I know that my elastic casing will take up 1.5".

You're now going to mark on your pattern what the stitching line is. Your pattern has seam allowance included. This is very useful for when you cut out the pattern. However, if we take our pattern measurements with seam allowance, we won't have accurate numbers. So we have to clarify where the seam allowance is.
The first thing that I do (not pictured) is to write how much I'm removing along each line. In this case, I write 5/8" along the side and crotch seams, and "1+1/2" at the top where the casing is. Since we're going to drastically shorten these pants, it doesn't matter what the hem allowance is.
Then, I take my ruler, and I mark my stitching line. I do it in pencil, check that I'm correct, and then go back and re-draw it with a red marker. This helps me make sure that I'm following the correct lines.
Make sure you transfer your notches onto your new stitching line. You can see in the picture above how I'm using the ruler to measure where the notch is going to go.
The next step, walking the pattern, is a little tricky to explain. Here's a post that goes into it in great detail.
Basically, you're going to overlap the seam lines, to make sure they line up. The only problem with doing this is that both seam lines are curved. So, instead of lining it all up at once, you're going to go about an inch at a time, letting the pattern rotate so that it stays flat on the table. At any given point, you're only going to have an inch or so of the line overlapping, but that's all you need. If you run into notches that don't line up, cross one out and re-draw it so that it matches the other notch.
If this seems really complicated, you don't really need to do that on this project. It just is a good practice to have.
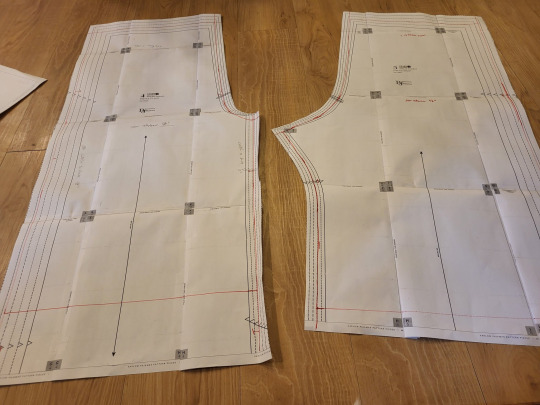
So you now should have a pattern with all the commercial markings, but where you've drawn the stitching line.

So now, you're going to put your two pieces together along the outseam. Since this is a pretty straight part of a pajama pant, it shouldn't be too difficult to get them to line up. Remember to overlap them on your stitching line, and not on the edge of the pattern.
We're putting them together so that you can measure them both at the same time. it saves us some math.

In bloomers, there are three major measurements to take into consideration. You need to know how big you want the leg to be, how big you want the booty to be, and how long you want the leg of the bloomer to be. In addition, you need to make sure that the waist of your pants will be big enough to fit your waist. In most pajama pants patterns, this isn't a problem, but checking it is good practice.
So, in this picture, you can see that I've measured the cuff of the pants. These two pieces together make up one pant leg, so I just need to measure the two pieces to know how big the pant leg will be.

I then take my tape measure and hold it around my leg at the same size that the pattern is at that point. I just use my eyes and judge if I think that'll be enough room to make my bloomers nice and poofy.
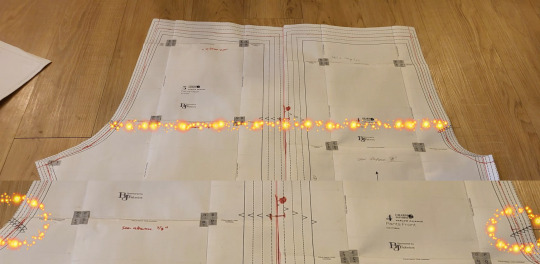
If your pattern doesn't tell you your hip line (mine didn't), it's usually at the point where the two notches on the crotch curve are. One of the reasons why we're doing this on a commercial pattern is that someone did the work for us and put those notches where they should be.
Now, remember, these two pieces are only half of the pant pattern. When we measure the hips of the pattern, we have to multiply this measurement by 2. Half the hip measurement x 2 is the full hip measurement.

Once again, hold this out next to your body and make sure that you like how much fullness you need. Remember that, in addition to having extra fullness because bloomers are poofy, you need room to be able to move and sit down. This measure between the size of my body and the size of the pattern looked pretty good to me. I could definitely have gone a little bit bigger.
The pant leg measurement is okay to be a little bit too long. You can always make it shorter. However, feel free to chop about 18" off the bottom of a full length pant leg. This just makes things a little easier.

Now, we're going to move the two pattern pieces until they're the size we like. If both the hip measurement and the leg measurement are too small, we're going to move both pattern pieces apart. To turn pajama pants into bloomers, this is likely to be the most common adjustment.
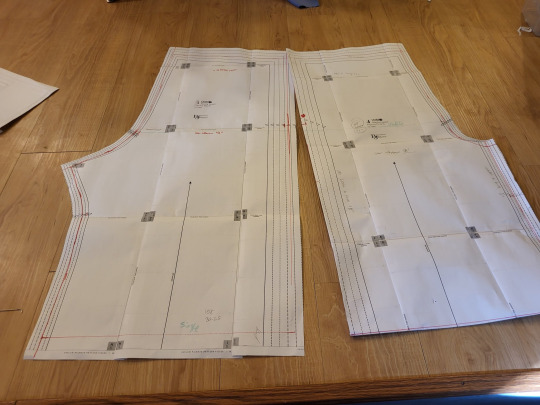
If the hip measurement is pretty okay, but the cuff measurement is too small, you're just going to move the bottom part of the pattern apart.
You'll notice that this is still enlarging the hip measurement a little bit. This is fine for bloomers since the style is for a lot of fullness in that area.

And if your cuff is the correct size, but your hip measure is too big, you can keep the cuff size the same and move the hip line apart until it's the size you want.
This technique of lining up the pattern pieces, and then moving them until they're the size you want, is the basics of flat patterning. As long as you follow the philosophy of keeping the measurements you like roughly the same, and moving the areas that you don't like until they measure what you need, you can easily resize a pattern without having to re-draw everything.
If you had to spread your pieces apart, tape some paper underneath the gap. This piece of paper should bridge the gap between the two pieces, turning them into one piece. Really quickly double-check that these pieces measure how you want. Then, mark a line in the middle of the paper bridge. Draw your notches onto the cut line. Cut the two pieces apart on that line. You've now made both pieces bigger. Tape another little piece of paper onto the cut edge of each piece, mark out your seam allowance, and cut that off.
Bonus points: swap the position of the pattern pieces, so that the crotch curve is one continuous line. Measure the length of that. Then, hold your tape measure along where the crotch curve of your pants will fit, and make sure that you have clearance there. I'm not going to photograph that, andi t's not super necessary with most pajama patterns.
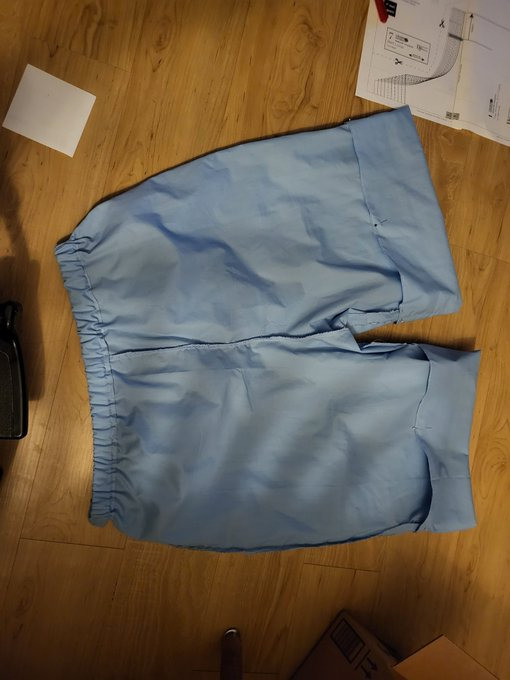
Go ahead and cut your pieces out.Even though I'd shortened the pattern, mine were still too long to fit on a 2-yard cut of fabric. Since I knew that my pants were a little long, I just let the end hang off the edge of the fabric.
Here's the really magical part about this. Even though you've resized your pattern, you still have all your seam allowance, notches, grainlines, and your pattern instructions. Since you kept all your pattern markings consistent, you can now follow the instructions that came with your pattern. Go up until it tells you to hem the pants, and then try them on.
In my case, my pants were way too long to be bloomers. I knew that I wanted to do a casing with a heading, which does use s pretty big hem allowance, but even so, I'd need to shorten them.
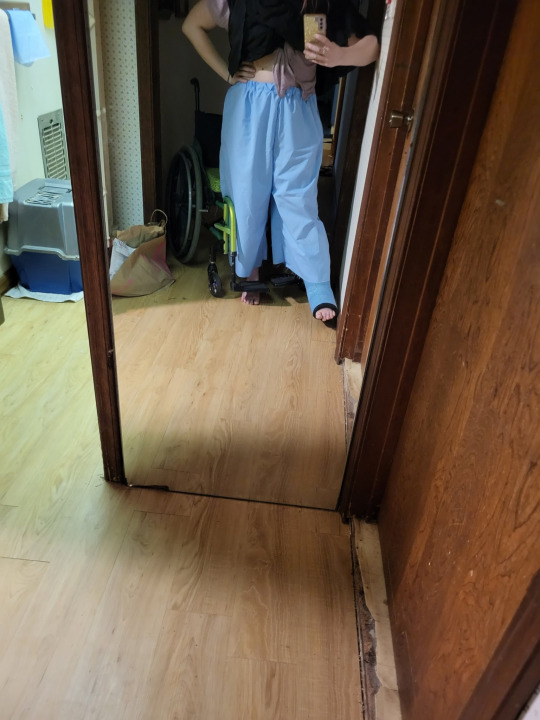
Check out your bloomer research board to see how long you want them to be. I wanted some long ones that did the old-school bloomer peek, so I made them on the longer side. I also didn't want them to ride up into my butt when sitting in a wheelchair.
So, time to fold up the bottoms, add my elastic, and call the basic construction finished.
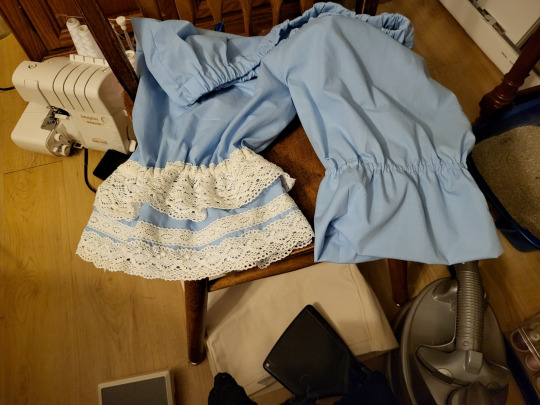
I looked up on my research board to try to find a good way to decorate these. One of the nice things about bloomers is that you can wear them with a wide variety of coords. This makes them one of those items where you can add some extra lace, and then use that lace in multiple coords. I feel like, since these bloomers are a good way of adding detail in multiple coords, it's a good excuse to add a little bit extra lace. You can see how much of a difference it makes in this picture. It really turns them from baggy shorts into real bloomers. I really recommend sometimes investing in a couple of big purchases of lace. If you have lots of lace on hand, you're more likely to include it in your projects, which can really help push a meh project into proper lolita fashion territory. I have a rule that I don't spend more than $1.50 a yard on lace unless it's really fantastic, and I manage to find things at that point on Aliexpress and sites like Cheeptrims.

Now go on and let them peek out of your favorite skirt. And remember, definitely don't press that skirt before putting this picture in your tutorial.
#20dollarlolita#dollar chan's pattern school#step 2#lolita fashion#patternmaking#handmade lolita#lolita bloomers#sewing tutorial#hey guys look i actually made somethign#long post
107 notes
·
View notes
Text

Wearable devices get signal boost from new material
A new material that moves like skin while preserving signal strength in electronics could enable the development of next-generation wearable devices with continuous, consistent wireless and battery-free functionality. According to a study published today in Nature, an international team of researchers from Rice University and Hanyang University developed the material by embedding clusters of highly dielectric ceramic nanoparticles into an elastic polymer. The material was reverse-engineered to not only mimic skin elasticity and motion types, but also to adjust its dielectric properties to counter the disruptive effects of motion on interfacing electronics, minimize energy loss and dissipate heat. "Our team was able to combine simulations and experiments to understand how to design a material that can seamlessly deform like skin and change the way electrical charges distribute inside it when it is stretched so as to stabilize radio-frequency communication," said Raudel Avila , assistant professor of mechanical engineering at Rice and a lead author on the study.
Read more.
#Materials Science#Science#Wearable technology#Electronics#Rice University#Dielectric#Ceramics#Nanoparticles#Nanotechnology
17 notes
·
View notes
Text
Fizzarolli update!!
Here's where I'm at on the tunic-
The main body of the tunic is about done, all I really need to do is make and put the mint bias tape on the hem
I do need to seam rip the armholes, I'm going to be attaching the lime green puff sleeves to the tunic itself instead of my initial plan (more info on that under the cut)
I'M ALMOST DONE RHINESTONING!!! All I have left to do will be the little bit around the hem, which i can't actually do until I get basically everything else done with the tunic- though I might put a few rhinestones at the shoulder area for some extra sparkle
I'm no longer doing the stripes of the sleeves and the pants out of the same cotton of the tunic- I'm planning to make them out of a custom-print stretch fabric, both for comfort and easy wear. I'm still going to rhinestone the hell out of them, but those are waiting until I can afford to get that fabric printed.
But the puff sleeves. My god do I have info for you about those
SO see these fuckin things

yeah they're kind of a pain in the ass to make- here's what I've got:
Since I'm getting that striped fabric custom printed on stretch, the lime section of the sleeves need to be attached to the tunic instead of worn underneath like I originally planned. I do think it'll look a lot nicer this way, and I won't have to add in as many weirdly placed snaps to keep everything in place.
If you've ever sewn sleeves before, you know that generally puff sleeves aren't all that bad, you just need to make sure you don't do any weird fancy shit. But because Fizz. Is Fizz, I get to do fancy shit (yayyyyy)
First off (and what I have done), those hearts. They're separate pieced I backed with interfacing and appliqued on, using a pretty tight zigzag stitch to try and limit fraying. Then of course, the rhinestones get individually glued on-

You can see the tight zigzag i did (Yes, lighting is shit, it was like eleven pm when i took these sh), you can also see that my machine has been having weird tension issues for a bit that are causing a little bit of puckering. I'm not super worried about on these since they are puff sleeves, but hopefully I can figure out wtf is causing that sooner than later.
Since the combo of applique/glue/rhinestones adds a fair bit of weight to the sleeves, I'm a little worried about them collapsing on me? They're going to be lined, so I'm hoping that helps support the weight. If that doesn't work, I'll add in a really thin interfacing inside to help keep them puffy.
I also need to figure out how I'm going to do the cuffs on these- Usually when i do puff sleeves I don't line them, but with the layers I'm putting underneath and hopefully making this competition quality I'm putting in that lining. I'm trying to limit as much visible topstitching as possible, so I don't think I can do the elastic cuff I was planning to do? i might do a thin black cuff (similar to what's at the elbows on the striped part of the sleeves?) and rhinestone that to hide my seams. It won't be screen accurate, but we're fighting cartoon physics with this one and need to adjust for how clothes actually fit and move. As long as I'm able to make it blend with the rest of the cosplay I'm not super worried about it .
Once I have everything on the tunic done, I'll be giving another update on this whole Fizzarolli nightmare- the goal is to at least have the tunic done before I hit the one year mark of making this shiny clown <3
#cosplay#cosplayer#costume#artists on tumblr#hazbin hotel#helluva boss#cosplay wip#wip#cosplay update#fizz cosplay#fizzarolli cosplay#fizzarolli#fizz#fizzarozzie#update#helluva boss cosplay#hazbin hotel cosplay#queer#queer cosplayer#omg this is taking so long to make
7 notes
·
View notes
Text
So you know how artists have, like, mediums that they're proficient in? I think my cosplay mediums are interfacing, elastic, Goodwill, and the sewing machine. I think I could make just about anything with them.
7 notes
·
View notes
Text
I hesitated posting this one, as it's really personal. But I worked so hard on it, and I want this blog to be the place I keep all the creative stuff I've made. So here it is. This is my wedding dress! I worked on it a while back here and there in between stuff, then wore it last May when my partner and I had our wedding ceremony. It's actually kind of an appropriate time to post this because last week is our actual wedding anniversary of five years (we got married at the courthouse right before covid hit), and 20 year anniversary of when we started dating!!
The dress was kind of a beast, as most wedding dresses are, but it's mostly because I didn't use a pattern and refused to do anything the right way. So uh, don't look too closely at literally any of the construction! This was a glitter voile on top of a couple layers of chiffon, then crepe back satin for the skirt. The bodice was same voile very lightly super77'd onto the satin (crazy, I know, but it worked) and given more structure with interfacing and boning. Light satin lining throughout. The trim at the bottom was, hilariously, from Temu. Of all the trims I could find, it was the only one that checked all the boxes for what i wanted. The bow was more crepe back satin, and had very stiff tulle from an old 90s wedding dress (given to me from a former coworker back when she remarried and was getting rid of her dress from her first failed marriage). I put snaps in the ribbons of the bow so they could come off since they acted as the train. The bow also hid a chunky elastic around the back, which meant I didn't have to worry about eating too much that night (I'm small but I have some stomach problems). The crinoline thing underneath was bought on Amazon, so nothing special there, and yes it smelled like fish no matter how long I aired it out.
It took several months and a lot of trial and error for the bodice in muslin first. I think if I had worked on it with no breaks I could've done the whole thing in about a month or two max. But the breaks were good and I didn't get burned out. The rest of the wedding party all wore white. The whole thing was a blast and everything was lovely!
Follow for more!


March 2024
5 notes
·
View notes