#Adobe Photoshop CS6
Explore tagged Tumblr posts
Note
Hi! Do you mind my asking what device/programs you use to draw? I love croissant the wizard and all his adventures
Thank you! I exclusively use an ipad and procreate. I wish I had something more exciting to share but I have a very basic setup, haha
#one of these days I'll learn clip studio#but today is not that day#I used to run Photoshop with a Yiyinova tablet but then I had to get a new computer and lost my activation code for my CS6 programs so#:^) ty for that adobe#but yeah I really like using procreate - it's not the BEST program but for its cost it's fantastic! (don't think about the cost of the ipad#asks
21 notes
·
View notes
Text
WHY DID ADOBE BUST MY ASS AGAIN
#I DESERVE TO PIRATE PHOTOSHOP UNTIL THE DAY I DIE#smh why does adobe hate me#for the first time in my 24 years of life i have to pay for ps? i will cri#curse you dinkleberg#and they don't even let you buy one time and be done with it either !!!#like no !!! i don't want to subscribe monthly i don't even need photoshop cc !!!#you could give me photoshop cs6 and i'd be happy with it for the rest of my life !!!#damn you#jen rambles
9 notes
·
View notes
Text
How To Make Sticker Panel For A Printable Machine By Adobe Photoshop
THERE HAVE SEVERAL TYPES OF STICKER MEDIA FOR PRINTING AND ALSO PRINTING MACHINE HAVE PRINT SIZE WHAT SIZE THE MACHINE CAN PRINT. ALWAYS LARGE SIZE STICKER NEED TO MAKE PANEL FOR PRINTING MACHINE WITH 2CM OVERLOCK.
#photoshop#adobe p#adobe psd#free photoshop software#photoshop cs6#photoshop for pc#photoshop free#ps photoshop#photo shop tutorial
0 notes
Text
technically, the newest page could have just been a gif, but i preferred the idea of letting readers view the light-speed lines for as long as they wanted

i also didn't know that, in AS2 at least, you could export gifs with movie clips and it would just. work kinda?
there's some very obvious visual glitches due to actionscript not running (gif exports in flash ignore any and all AS) but the fact that movie clips play at all is insane to me. i love working in animate 2020 for 6 months until i get fed up with it because it's ANIMATE UGHH
#adobe animate#adobe flash#flash#flash animation#mspadventures#web adventure#psfla#13337#adobe photoshop#for you. you there reading these thousands and thousands of tags...#i use cs6 to develop! and focus on playback of swfs in ruffle#gifs load so much faster than ruffle's embed though#whoops i forgot the plain photoshop tag#photoshop#PLEASE GOD SOMEONE READ MY MSPA
1 note
·
View note
Note
omg this is so important. I just went through hell about Adobe when I signed up for a couple months for school even though I hate Adobe and their Blackrock monopoly bullshit, but I had no choice. So I had to drop out because of chronic stomach problems and I go to cancel my subscription. Oh no, you can’t without spending $100. Which was certainly not advertised. I’m pretty sure there’s now a class-action lawsuit about exactly what happened to me, I’d have to look into it.
I also have been looking for graphic design opportunities, and I’m locked out of all of them because I use Affinity instead of Adobe. Adobe is awful, price gougy, AI ridden, ran by Black Rock, a Million apps that do similar shit, can’t own it, etc. Affinity is a pricey-ish one time payment that’s often on sale for less than $50 per program (there are 3). Then I use Procreate for Illustration (one time $12 iirc)
Please let’s get away from Adobe. If we all collectively do so maybe people can get into art jobs or college without having to use it. (Luckily Affinity can convert Adobe’s file types so you can import it that way, but I’m not sure about exporting which would be needed to lie to work about what program you’re using. Not that it would be feasible anyway). Also please someone on Skillshare make an Affinity course cuz currently there’s little learning tools that aren’t the books, further forcing people back towards Adobe.
Wait new hbomb video??? When???
From his most recent Patreon post:
"...my next main-channel video, tentatively titled Adobe Must Die, should be out before the end of the year, but don't hold me to that."
I'm reeeeeeally looking forward to that one, I hate Adobe so much and I wanna see it burn 😤
#Alex’s shit#Alex’s rambles#Adobe#Sorry for the ramble but I’m passionate about hating Adobe#I used to use illustrator and photoshop cs6 pirated#Because of course the pricing made talented people without much money locked out of learning#Affinity is so accessible and so much better#The only complaint is that there’s no how-tos#Because everything’s always Adobe#So your only option is to figure it out or buy their books which are kinda pricey#I wouldn’t mind because I wanna support them#I just haven’t had the money#This also isn’t to say there aren’t other options that aren’t Affinity#That’s just the one I’ve been using and I like it a lot
298 notes
·
View notes
Video
Adobe Photoshop CS6 Lite Download Katılımsız (5 Dakikada Kurulum)
0 notes
Text
Adobe Photoshop CS6 ফ্রি ডাউনলোড করুন।সম্পূর্ণ বিনামূল্যে ডাউনলোড করন
Adobe Photoshop CS6 ওভারভিউ Adobe Photoshop CS6 Extended হল একটি জনপ্রিয় ইমেজ এডিটিং সফ্টওয়্যার যা 2012 সালে পূর্ববর্তী সংস্করণ, Photoshop CS5-এর উত্তরসূরি হিসেবে প্রকাশিত হয়েছিল। এটি একটি শক্তিশালী টুল যা ব্যবহারকারীদের সহজে ডিজিটাল ছবি এবং গ্রাফিক্স তৈরি, সম্পাদনা এবং ম্যানিপুলেট করতে দেয়। CS6 এক্সটেন্ডেডের সাথে, Adobe নতুন বৈশিষ্ট্য এবং সরঞ্জাম প্রবর্তন করেছে যা এটিকে আরও বহুমুখী এবং…
View On WordPress
0 notes
Text



1 note
·
View note
Text

Never give up
long story short, I have a new pc, so far so good, was very lucky to get it. Bad news, a program I've had since 2014, ten years, and still own but cannot have is my adobe photoshop cs6. Adobe won't let me have it because I guess it's on two dead pc's (one being my laptop) and even though they know this, they said they can't reset it, they can't give me access to it, and just said, "here is six free months of this program, go suck lemons" and I refuse to accept any offer but what I bought. It's not the fault of the employees they are doing the best they can, but if I can help it, I will never use Adobe ever again and I recommend anyone of you who wishes to do so to be careful, and those who have yet to try it, don't bother, there are better programs out there it just has a learning curve, industry standard or not its time they understood that they can't own you. You deserve better. That being said some files were saved, and these two were the last I had worked on before the crash. I managed to recover both by the skin of my teeth and most of the rest. The moon aka Philip had gotten corrupted, and I believed it was a lost cause, that I would have to redraw him, start over from scratch as his whole face was cut up to glitchy pieces. However, in an ironic twist of fate, if you can call it that, the sun card Caleb saved it, it had managed to reconstruct it from nothing, lurking on the file, as I had drawn Philip first and Caleb over him for the sun.
So in lieu of that, I decided to add the Gravesfield portal to their backgrounds, I was going to make them center stage like the star/collector, but this... this is good for them... Never give up.
sincerely Dove
#my art#magic#philip wittebane#the owl house#toh#wittober#caleb wittebane#emperor belos#halloween#moon#sun#tarot#tarot cards#tarotblr#tarot deck#tarot reading#tarot witch#tarotcommunity#eda the owl lady#eda clawthorne#toh eda#edalyn clawthorne#toh edalyn#toh raine#raine whispers#raeda#luz noceda#toh luz#toh fanart#amity
126 notes
·
View notes
Note
How do you make your gifs?
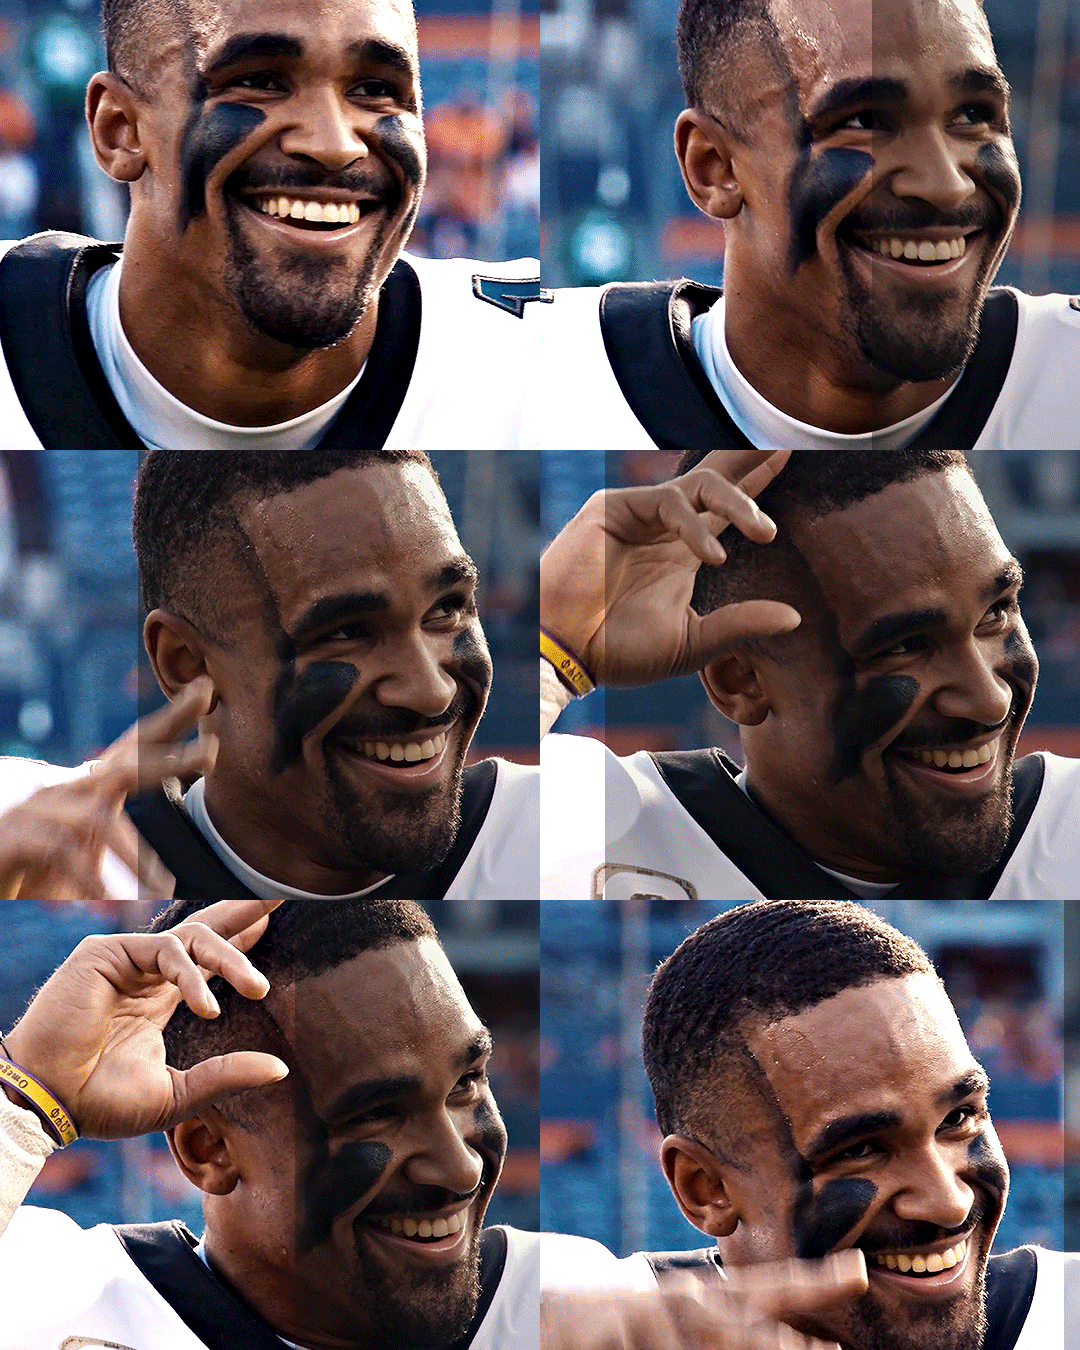
Hello hello! I love talking about gifmaking, so thank you for giving me the chance to ramble.
Instead of a detailed step-by-step walkthrough, I will link tutorials and resources written by the wonderful Tumblr creators on here along the way. Everyone has their method and preferences, and there’s no right or wrong way to make gifs. I’m going to share techniques and resources I picked up along the way that work best for me—they may or may not be suited to your preferences, but I hope you’ll find some helpful things here.
(Warning: screenshot/image heavy)
USEFUL TUTORIALS AND RESOURCES
Here are some tutorials and resources that I found very useful when I got back into gifmaking:
Gifmaking tutorial using video timeline by @hope-mikaelson is identical to my own process
Gifmaking and coloring tutorial by @kitty-forman, whose process is very similar to my own
Giffing 101 by @cillianmurphy, an incredibly detailed tutorial that covers everything you need, including a step-by-step guide to using HandBrake
Gifmaking and coloring tutorial with 4K HDR footage by @sith-maul, another incredibly detailed tutorial with many useful tips
Gifmaking tutorial by @jeonwonwoo, incredibly comprehensive and covers so many aspects of gifmaking from basics, sharpening, captioning, and text effects
Gifmaking/PS tips and tricks by @payidaresque
Action pack by @anyataylorjoy, the Save action is especially a true life-saver
@usergif and @clubgif are amazing source blogs with many tutorials on gifmaking, color grading, and gif effects, can’t be thankful enough for the members for their work curating and creating for these blog!
TOOLS
Adobe Photoshop CS6 or higher, any version that supports video timeline. @completeresources has many links to download Photoshop, have a look!
Photopea is a free alternative to Photoshop, but it has a slightly different UI, check out these tutorials for gifmaking with Photopea
HandBrake or any other video encoder, especially if you’re working with .MKV formats
4Kvideodownloader for downloading from YouTube, Vimeo, Instagram, etc.
OBS Studio or any other similar screen capturing software. To prevent duplicate frames in gifs that prevents your gifs from looking smooth, try to match the recording frame rate (FPS) with the source.
IMPORTING FOOTAGE AND WORKING IN VIDEO TIMELINE
I work exclusively in video timeline instead of importing video frames to layers or loading files into stack. For videos that don’t require converting/encoding using HandBrake, especially ones that are already in .MP4 format, I tend to open the video directly on Photoshop, and trim the videos around directly.
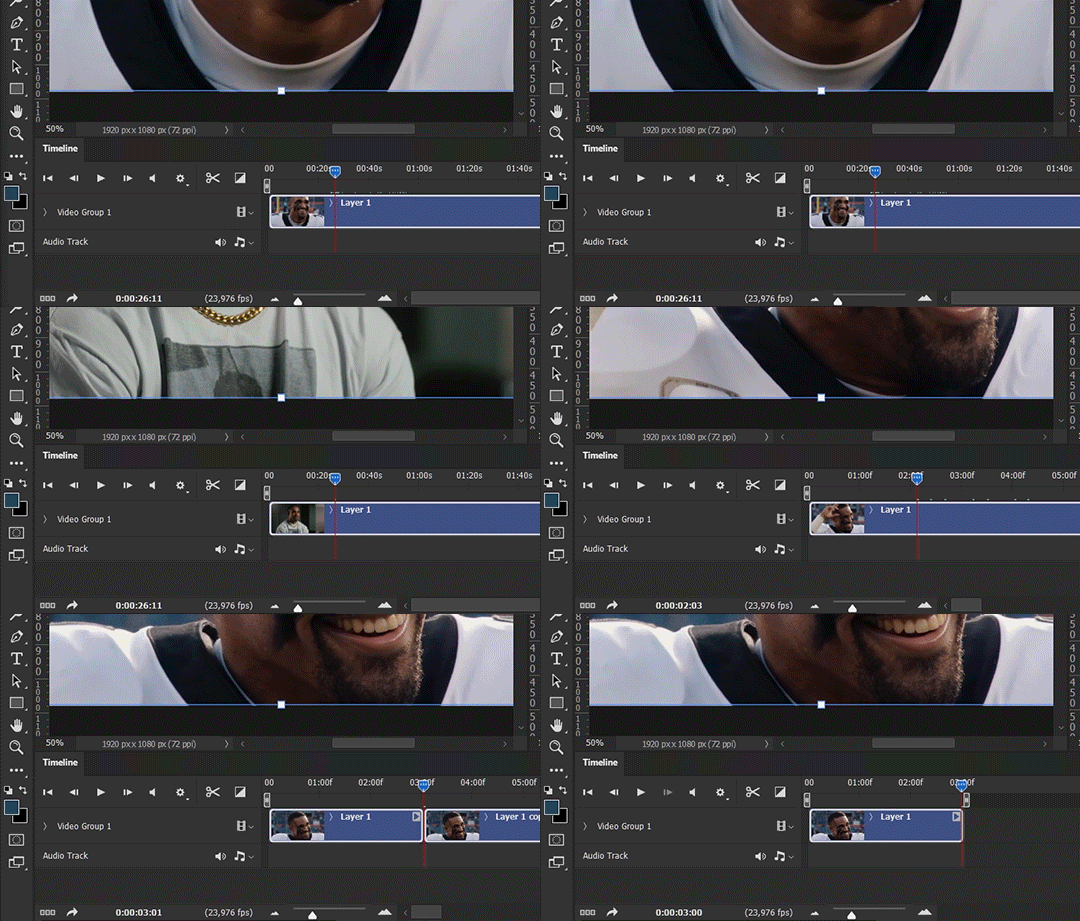
As mentioned above, this gifmaking tutorial using video timeline is exactly how I make gifs. I find it more efficient, especially if you’re making multiple gifs from the same video/the same scene with little to no change in lighting conditions You can simply slide around sections of gifs you want to save, and they will all be the same length.
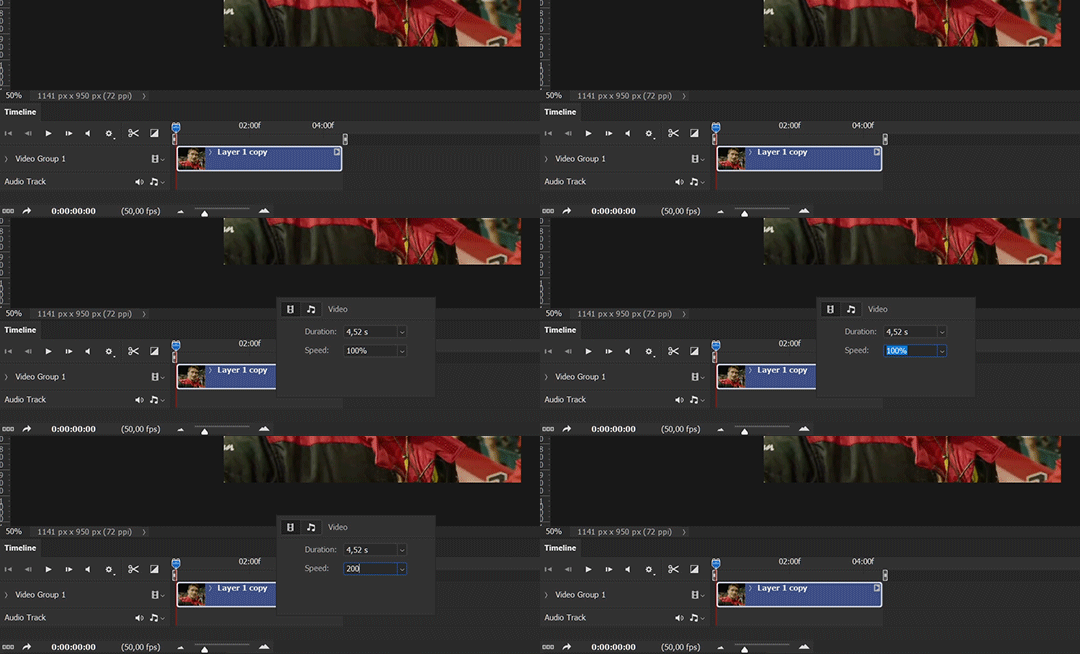
Another thing also covered in the tutorial linked is the ability to change video speed in video timeline mode. Right click on the video and set the speed before proceeding with cropping/resizing. This is also very useful when you’re making blended gifs where you need the footage to have the same length.
Slowing footage down.
As mentioned in this post, changing the FPS before slowing down the gif results in smoother gifs. Doubling the frame rate before slowing down your gifs usually yields the best result.
Speeding footage up.
I love using this to speed up slow motion B-rolls to make the speed slightly more natural. It will result in nice, smooth gifs:

(B-roll footage, normal broadcast speed)

(200% speed)
Subject won’t stay in frame?
Another feature of the video timeline mode. Keyframes are your best friend. This tutorial by @kangyeosaang covers everything you need to know about panning gifs. I use this technique regularly, it’s a life-saver.
COLORING
Here are some coloring tutorials I found very useful:
Coloring tutorial by @brawn-gp beloved, their coloring style is second to none
Mega coloring tutorial by @yenvengerberg, for stylized /vibrant coloring
Understanding Channel Mixer by @zoyanazyalensky
Coloring rainbow gifs by @steveroger, which delves deep into Channel Mixer
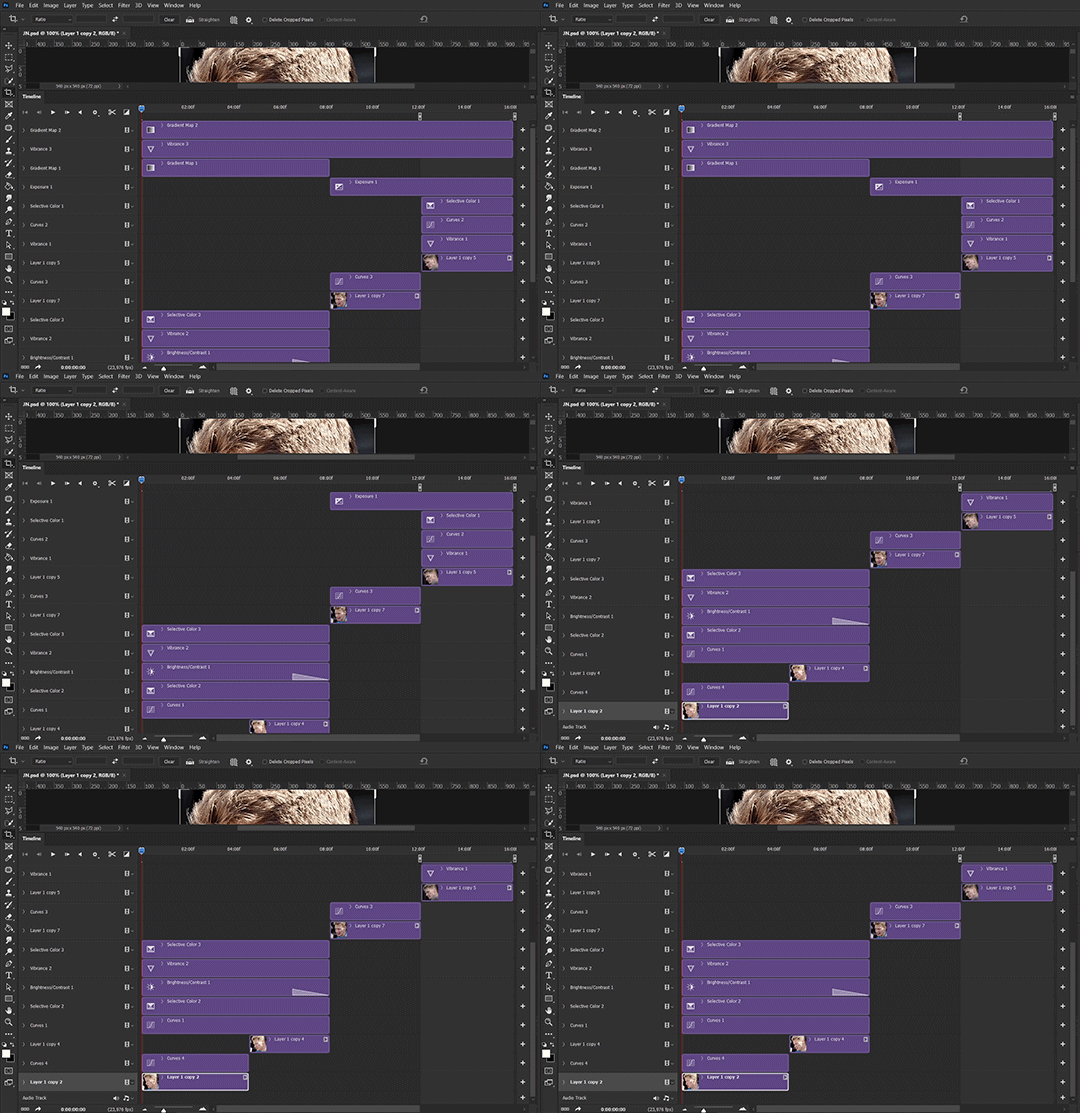
I tend to go for neutral-saturated coloring in general, especially for minimalist gifsets with no effects (blending/isolated coloring/overlays etc.), but the possibility is endless for stylized coloring. Here’s what my adjustment layers look like for the example gifs above.
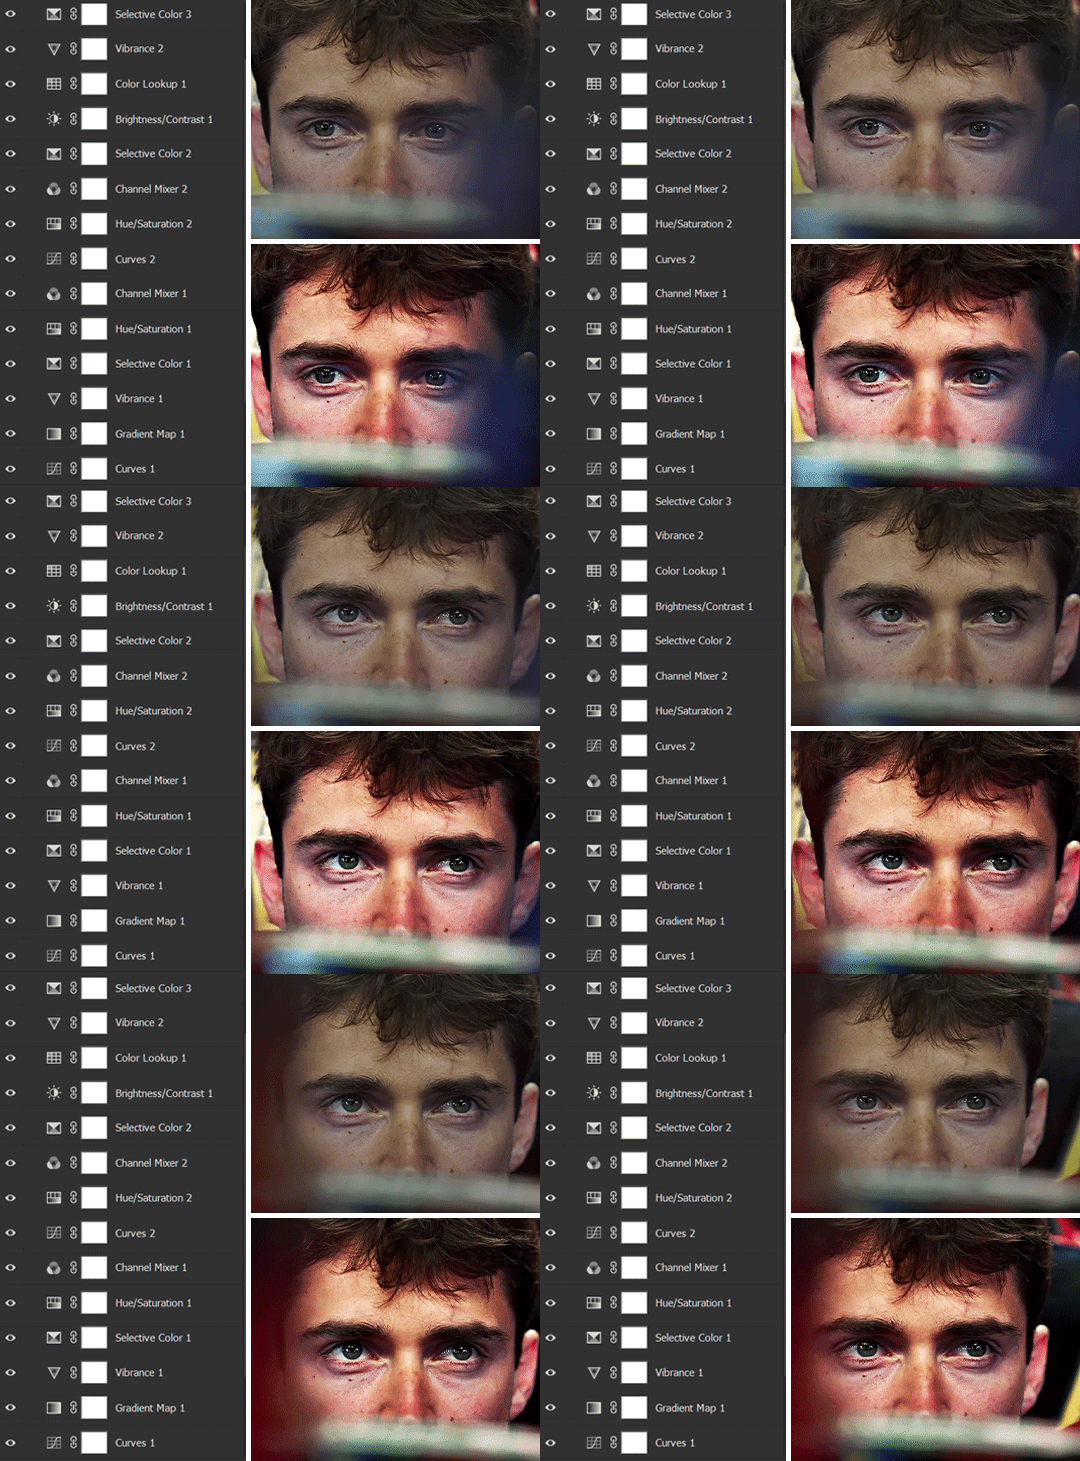
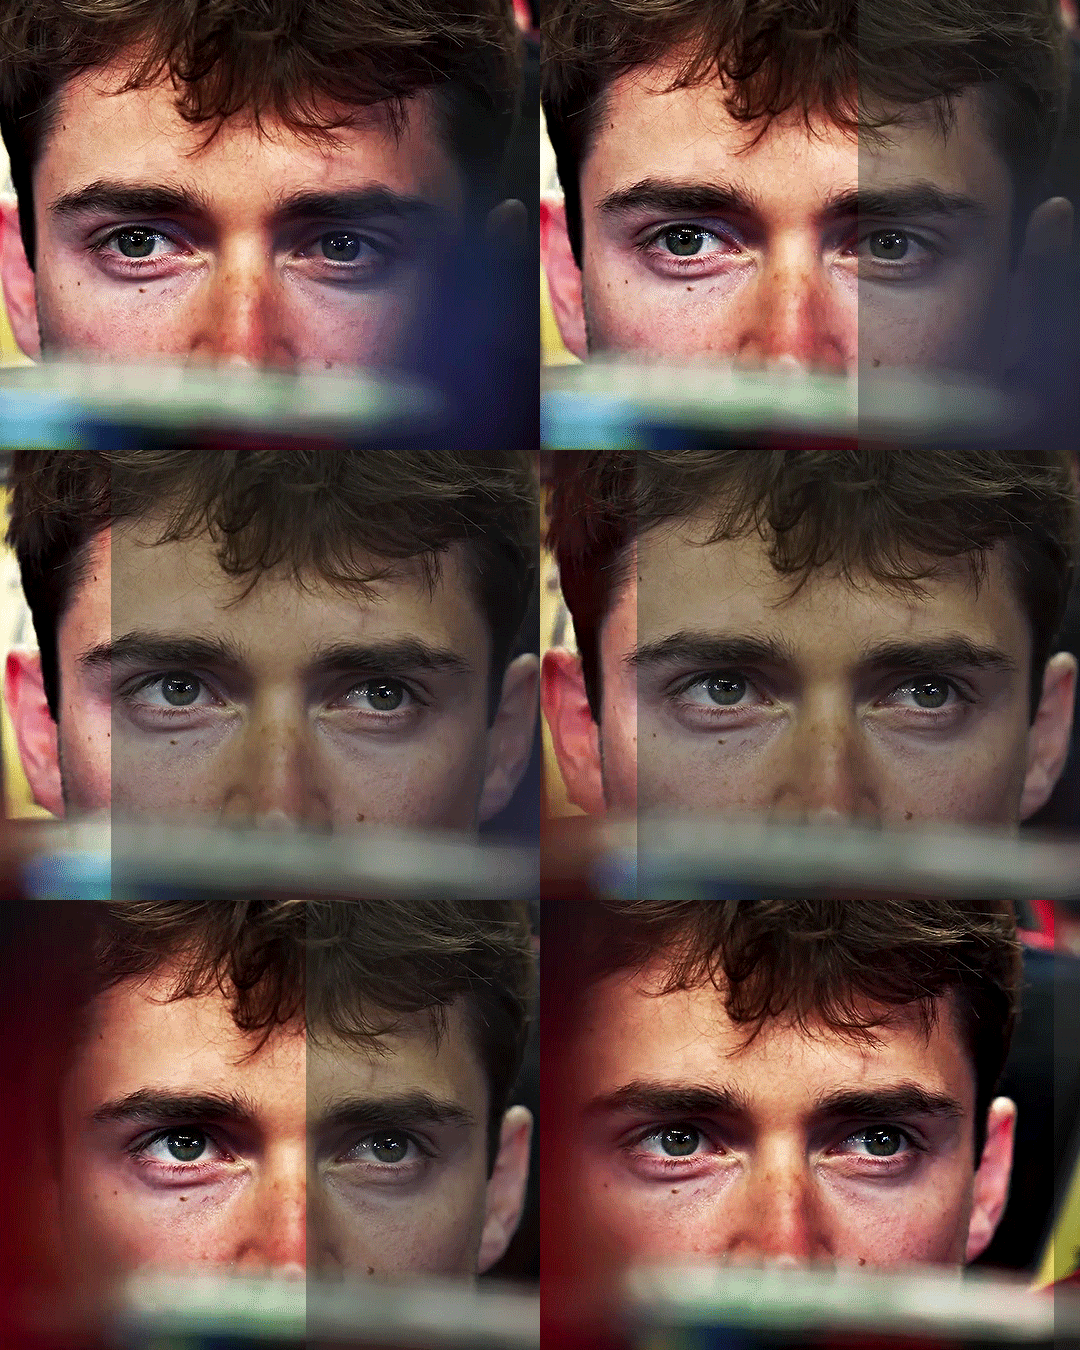
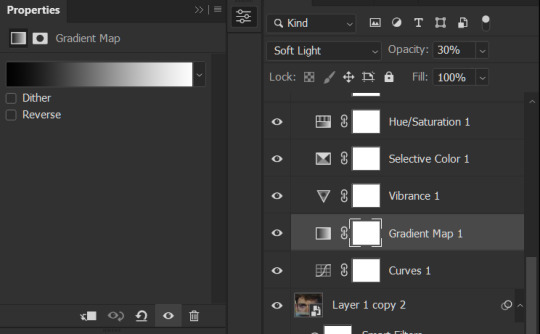
The base footage for this Charles gifset is incredibly desaturated. I started with a Curves layer to bring contrast to the gif, as well as do some color-correcting to bring the base footage to a more neutral tone. To bump contrast, I also like to add a black and white Gradient Map layer with a Soft Light blending mode at 10%-30% opacity:
The Vibrance layer is then used to lift the saturation of the base footage, with the Selective Color, Hue/Saturation, and Channel Mixer layers to help remove the green/yellow tint to his skintone.
An underrated adjustment layer/preset in my opinion is the Color Lookup. You can layer in pre-loaded .LUT color grading presets to help speed up your process. For this gif, it’s simply a base preset Soft Warming Look to achieve a warm, pink-tinted tone.
In hindsight I feel like this gifset is too saturated, his skintone is skewing very red/pink, I could’ve bumped down the lightness of the reds with a Selective Color layer or a Hue/Saturation layer. Try to err on the side of neutral for skintones. Experiment with layer orders—there’s no right or wrong! Remember that each layer build up on the one before it.
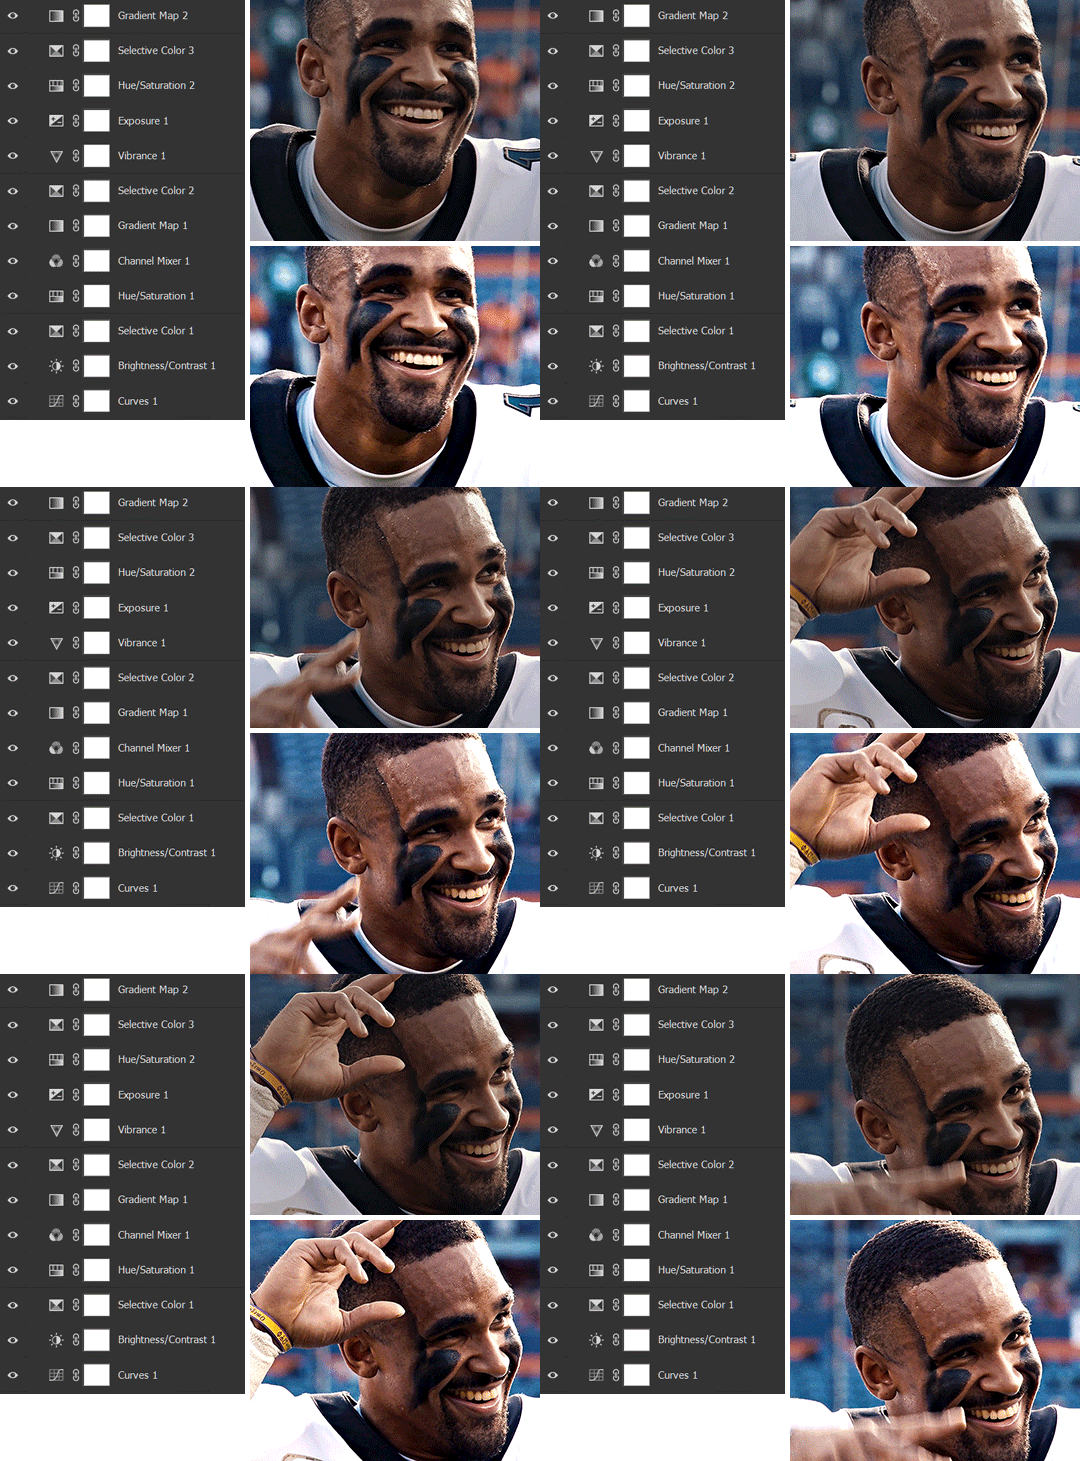
The base footage of the Jalen gif is already quite nicely color-graded, but it’s still muddy and underexposed. As with the Charles gif, I started with a Curves layer to bring the gif to a better baseline contrast. Then I focus on brightening the gif with the Brightness/Contrast and Exposure layers.
The Hue/Saturation and Selective Color layers are to color-correct Jalen’s skin tone—it’s something I spend most of my time coloring gifs and focus a lot on, especially when color grading BIPOC skintones. Putting a Vibrance layer, upping the Vibrance and Saturation, and calling it a day would make his skintone skew very, very yellow/orange.
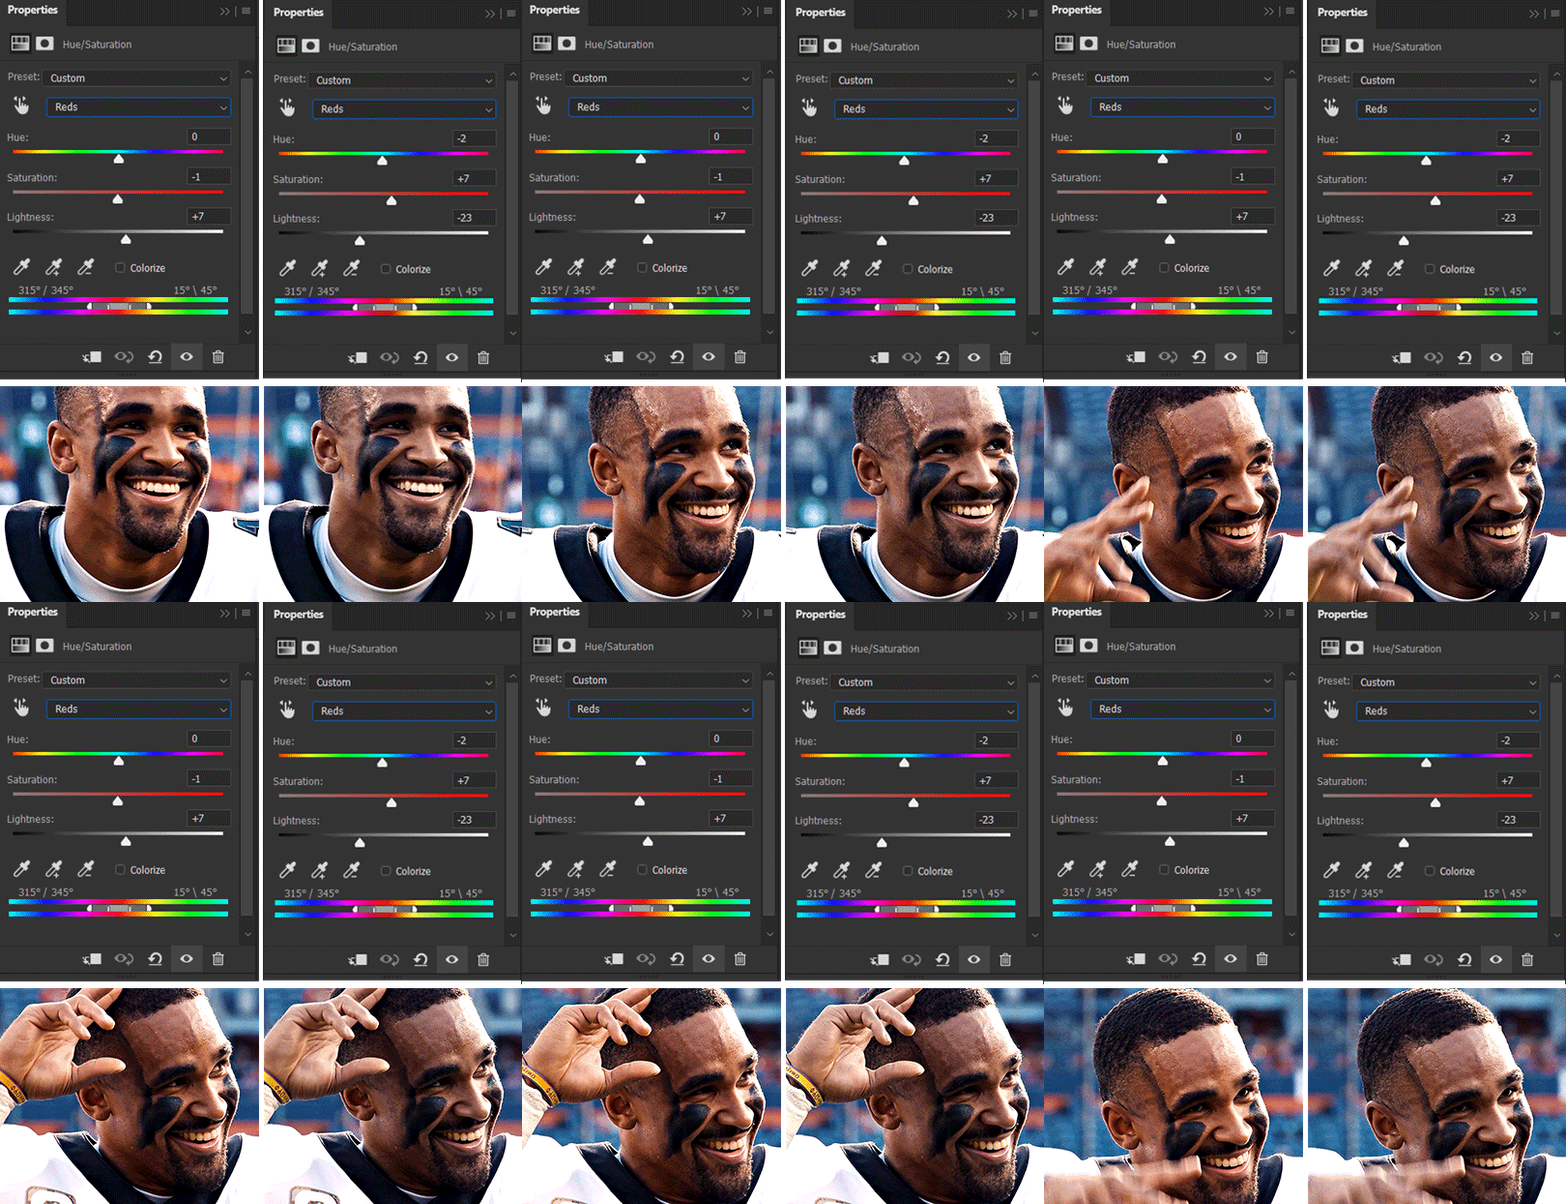
Focus on the reds and yellow for skintone, play around with the Saturation and Lightness sliders, use the Hue slider with caution.
It can be tricky to achieve the right skin tone when working with sports footage vs the higher quality, higher dynamic range footage of films or TV shows, but I try to keep it as close to the subject’s natural skintone as possible.
Here are some of tutorials with tips and tricks on coloring BIPOC:
How to fix orange-washed characters by @zoyanazyalensky
How to prevent pink-washing and yellow-washing by @jeonwonwoo
Coloring tutorial by @captain-hen
Changing lighting conditions?
Fret not—this is why I love working in video timeline. I’ll take this gifset as an example: it’s a deceptively difficult one to color. The footage is 720p and the sunlight shifts throughout the video, so matching across gifs was tricky.
My solution was to split the clips in sections with consistent lighting, and apply adjustment layers to the individual sections before applying general color grading layers on top of everything.
We can make use of the Fade Transition effect for sections where the lighting changes within the gif section we want to color.
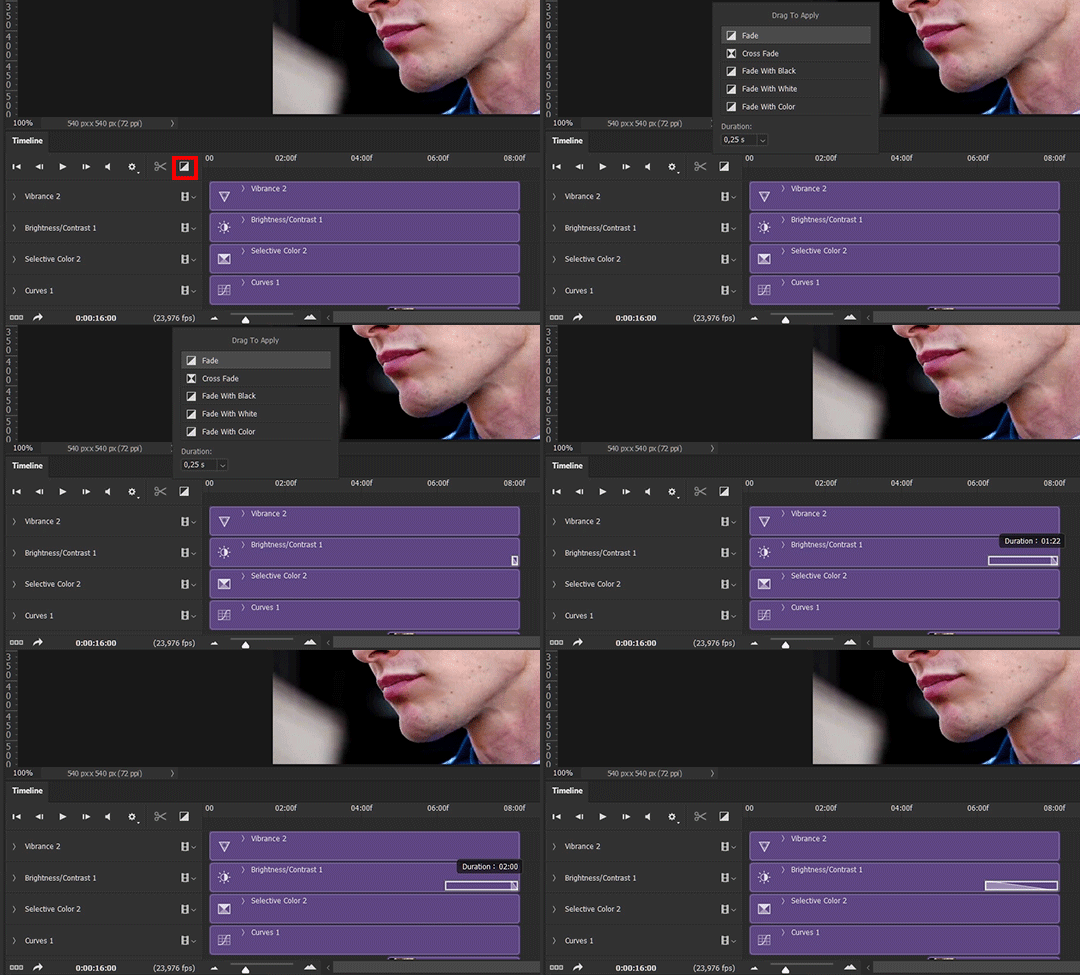

(without vs with Fade on the Brightness/Contrast layer)
The difference is subtle in this example, but the brightness in the right gif is noticeably more consistent throughout. You can also add the Fade Transition effect to the beginning for a fade in, of course.
SHARPENING AND OPTIMIZING GIF QUALITY
This tutorial by @anya-chalotra covers everything you need to know about optimizing gifs for Tumblr.
Sharpening.
Sharpening is essential to making crisp gif images. Here’s another ask I answered re: my own sharpening settings and maximizing gif quality.
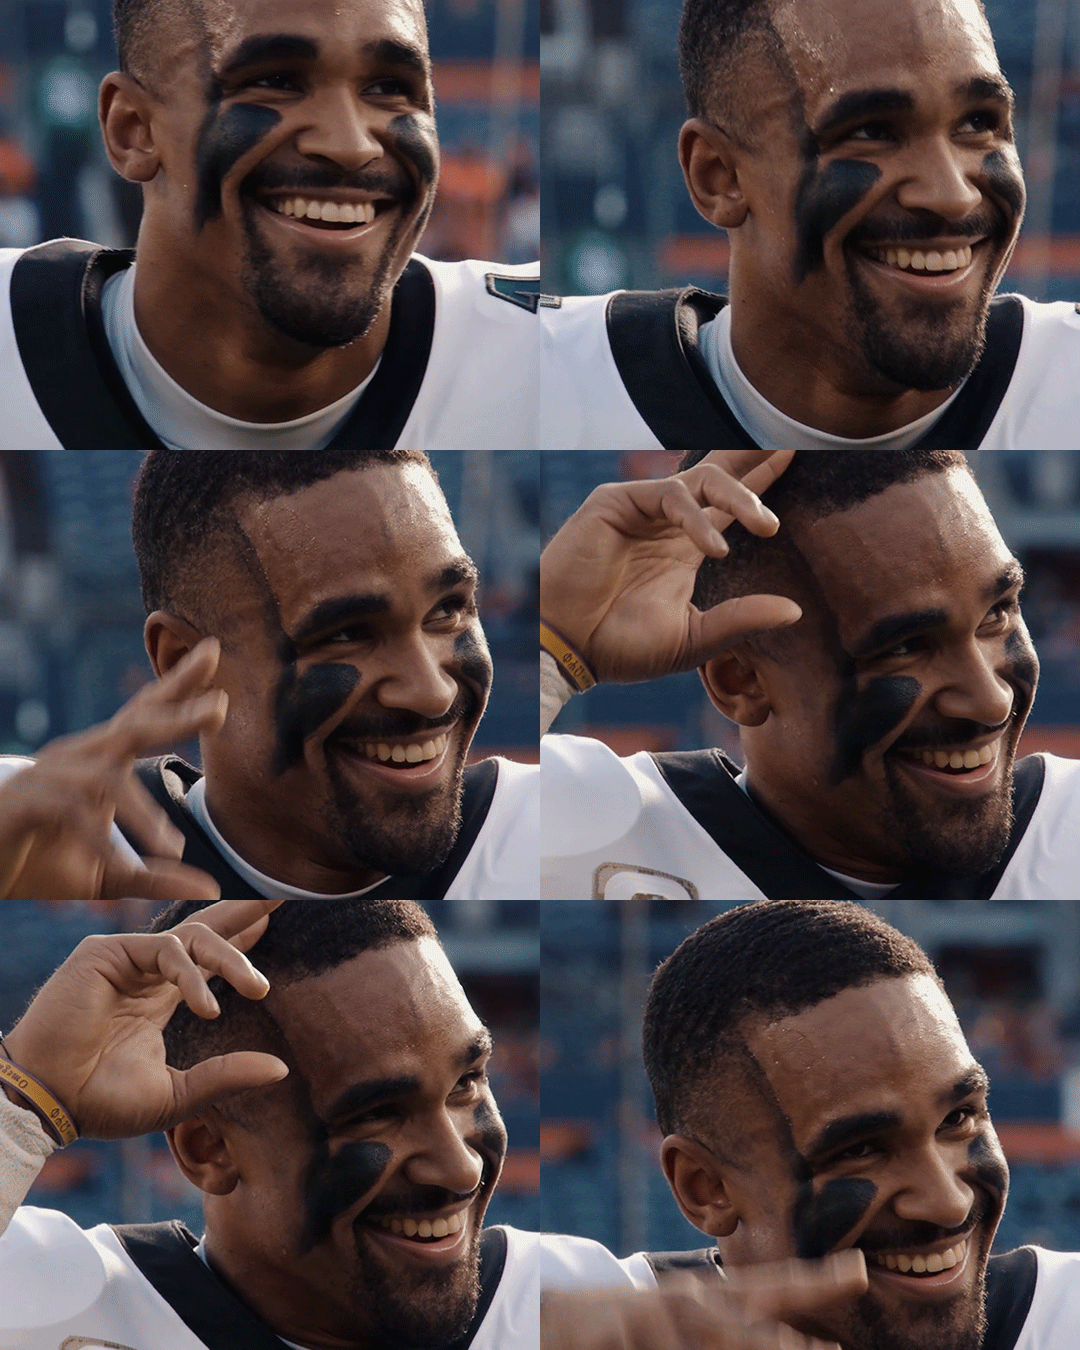
(base footage, unsharpened)
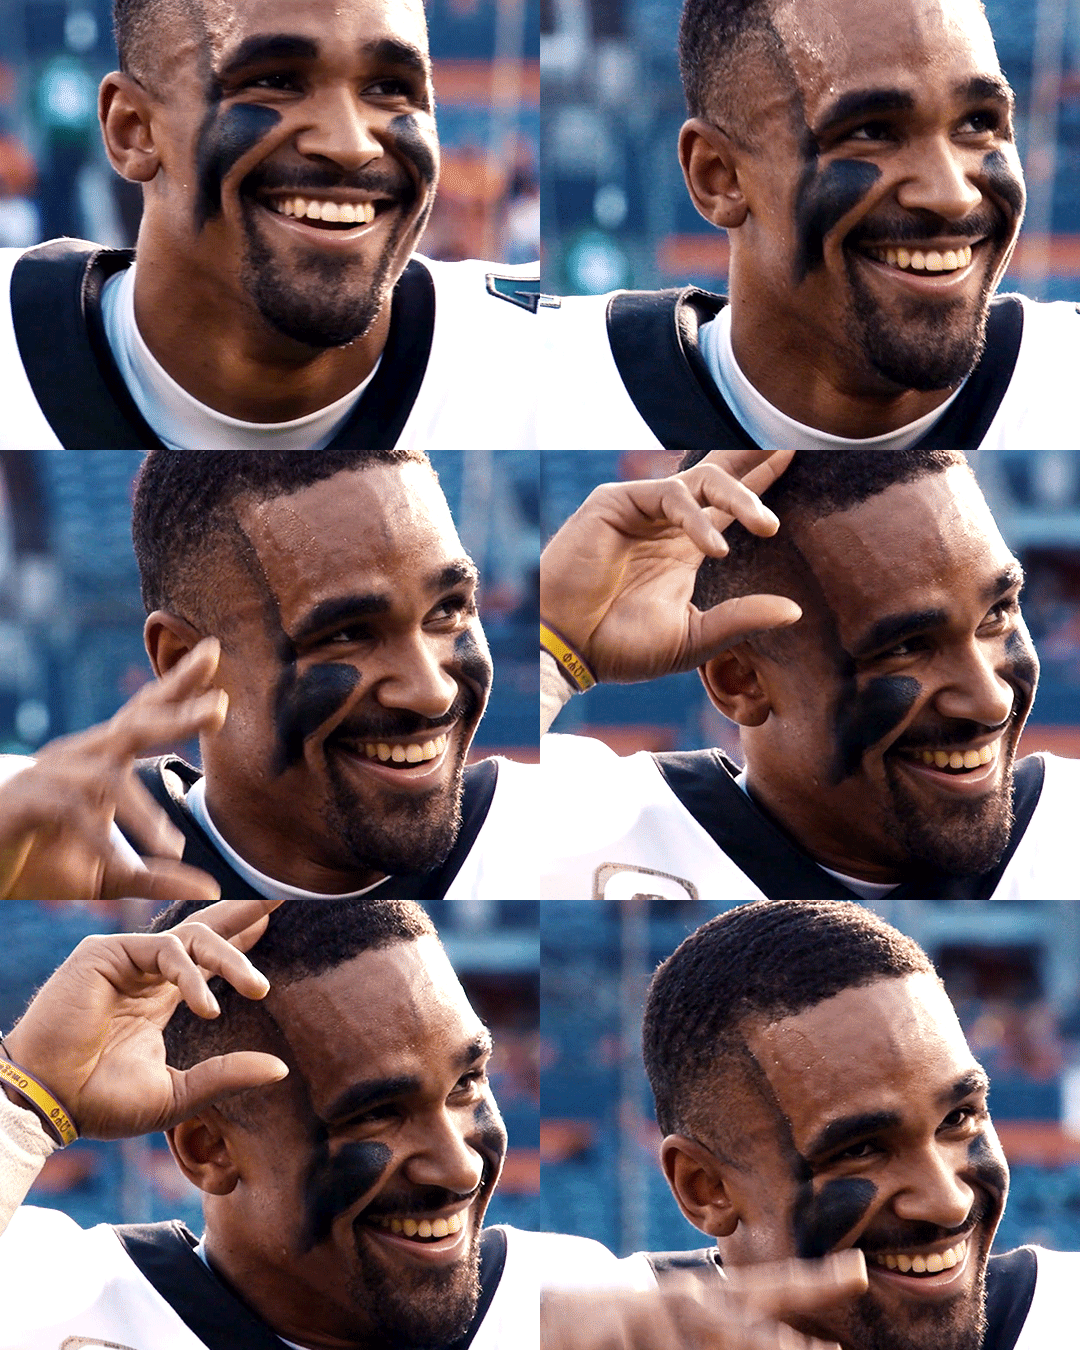
(color graded, unsharpened)
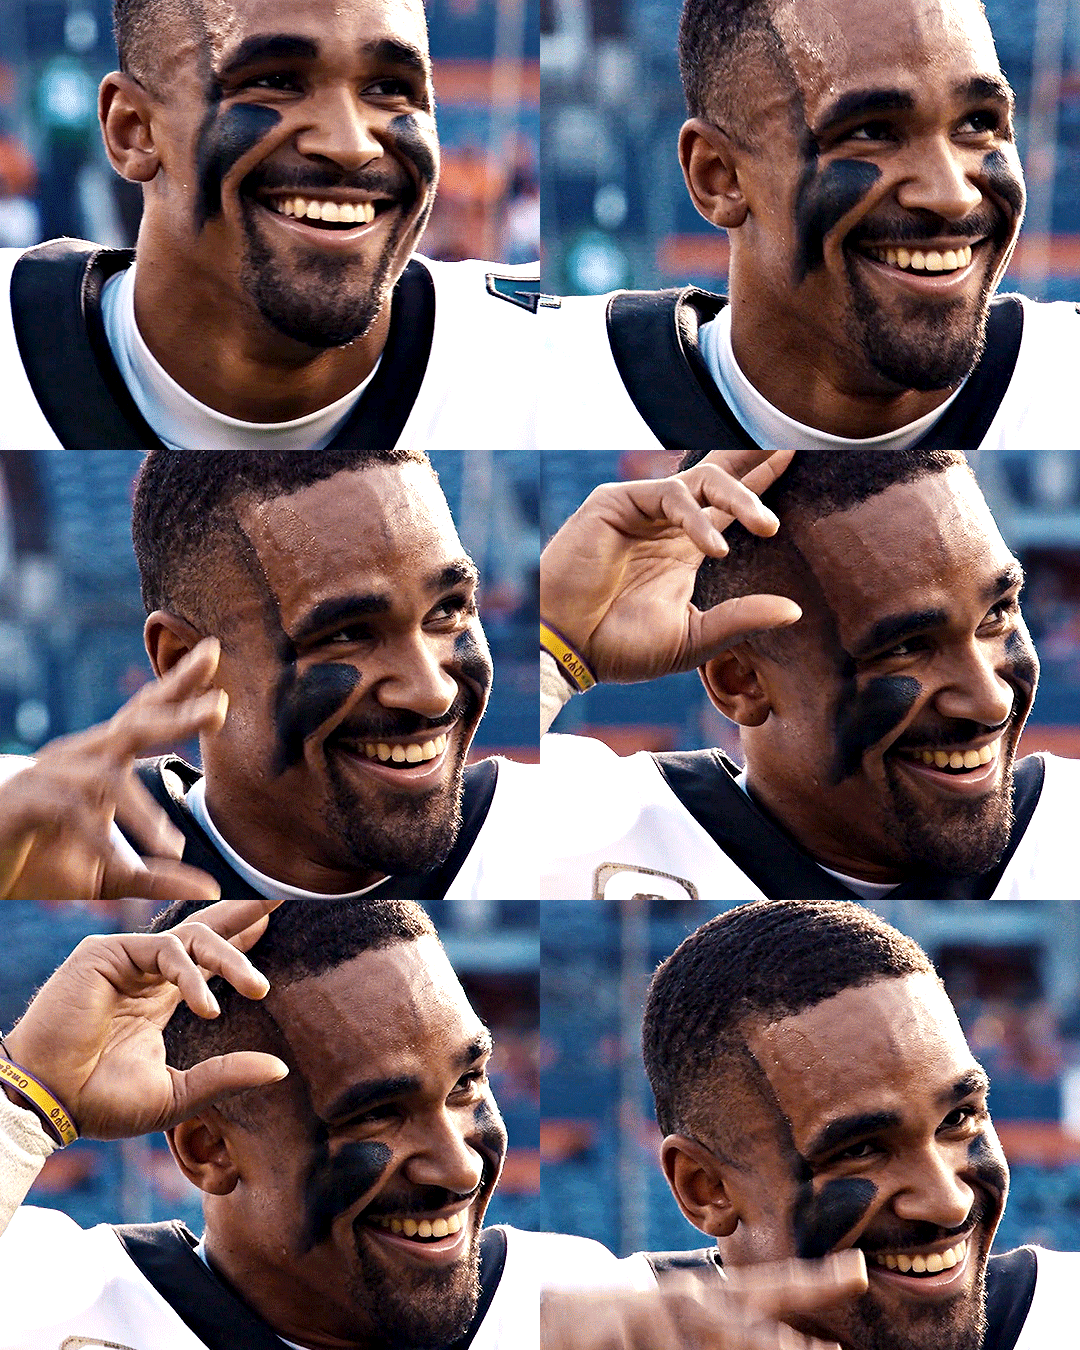
(color graded, sharpened)
The final gif is sharpened with Smart Sharpen, 500% at 0.3px and 10% at 10px (my standard sharpening settings).
Here are some tutorials and resources on sharpening:
Sharpening process by @anya-chalotra
Sharpening tutorial with added gaussian blur by @haleths
Sharpening action by @daenerys-stormborn
Size your gifs for Tumblr correctly.
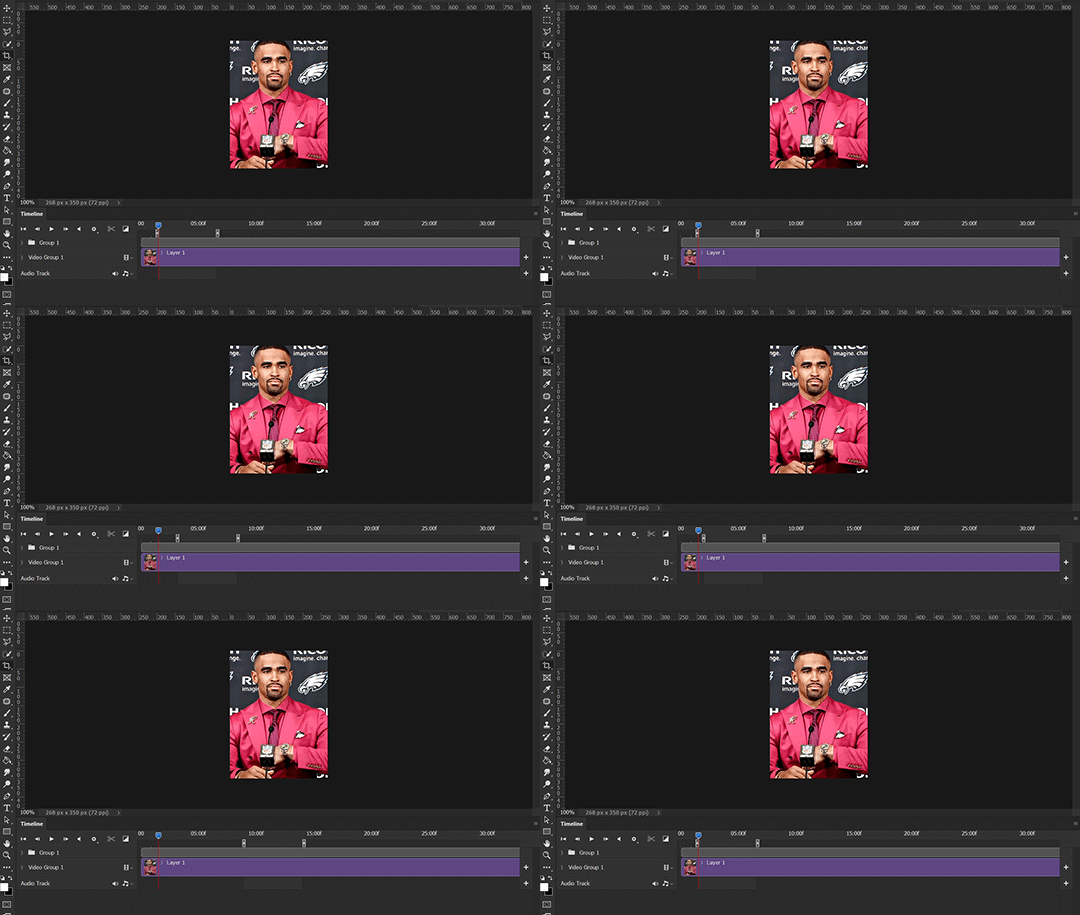
This is essential: full width gifs are 540px wide.Two side-by-side gifs should be 268px wide. Here’s a handy post on gif size guide for Tumblr.
Incorrectly sizing your gifs will take away the quality of your gifs: undersizing your gifs will especially make them grainy, blurry, and /or pixelated, and won’t display correctly on many people’s desktop theme. Oversizing usually isn't as dramatic as undersizing, but it will make the gifset glitch when displayed, and the file size will be unnecessarily bloated.
Work with HD footage if possible.
Media fandoms (films/TV shows) are luckier than us in the sports trenches—we have to work with what we have. Broadcast footage is usually subpar: lacks contrast, pixelated, very desaturated, the list goes on. But it’s possible to still make high quality gifs from subpar footage. Here are a couple of tutorials to mask low source footage quality:
low quality video ➜ “HD” gifs tutorial by @nickoffermen
Sharpening low quality footage by @everglow-ing
(This gifset I made is from a 480p footage with horrendous lighting conditions and colors, and the end result is decent I’d say)
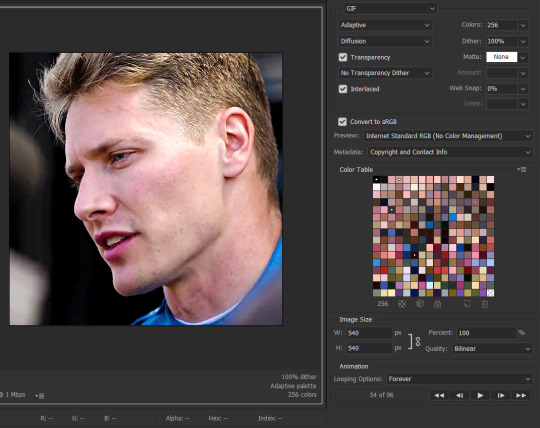
Save for Web (File > Export > Save for Web (Legacy) or Ctrl + Alt + Shift + S) settings.
I default to Adaptive + Diffusion but also use Adaptive + Pattern from time to time. Any combination of Adaptive or Selective + Diffusion or Pattern will give you a good result. In my experience some gifs will need the Selective color table for the colors to display correctly.
Here are my default settings:
SAVING AND EXPORTING FOR TUMBLR
Converting to frames and adjusting the gif speed.
If possible, avoid exporting your gif and reopening it to adjust the frame speed. I used to do this sometimes when I’m lazy, I have to admit, but this is where this Action as mentioned at the beginning comes in very handy. It converts all visible layer into smart object, then converts it back to frame animation.
Step-by-step:
1. Select all layers
2. Right click > Convert to Smart Object
3. Go to the Timeline menu (≡) > Convert Frames > Flatten Frames into Clips
4. Go to the Timeline menu again (≡) > Convert Frames > Convert to Frame Animation
5. In the same menu (≡), select Make Frames from Layers
6. Delete the first frame (it’s a duplicate) then set your frame speed

Now you can adjust the frame speed before exporting it (Save for Web).

Pay attention to the source framerate.
The frame delay of 0.05 s is usually the default to make gifs for TV shows and films, and it is preferred by most gifmakers. This stems from the fact that most movies and TV shows are 24 or 25 FPS. This may not be the case for all source videos: you might get 30 FPS footage, and sports or gaming footage can be 50 or 60 FPS. Gif speed also depends on the FPS of your original file. Play around with gif speed and see what feels most natural to you.
My rule of thumb is the frame delay Photoshop gives you + 0.01 s. For example, 50 FPS footage will give you 0.02 s frame delay (25 FPS gives you 0.04, 30 FPS gives you 0.03, etc.), so set it to 0.03 s. I usually err on the side of a faster frame delay for smoothness in in-game sports footage, anything else (interviews, press conferences, B-rolls) can get away with being slowed down. Again, experiment and see what you think looks best!
Keep gifs under the Tumblr file size limit (10 MB).
Cut down the number of frames. My gifs are usually around 60-70 frames for 540px full-width gifs, but depending on the coloring, sometimes you can get away with more. 268px gifs can go up to 200+ frames.
Crop your gifs. Remember to keep full-width gifs at 540px wide, but if necessary, you can crop the height. My go-to sizes are 540x540, 540x500, 540x450, and 540x400.
Amp up the contrast of your gifs. Flat colors like black cut down gif size.
The Grain filter or Noise filter, though beautiful for aesthetics or simply necessary sometimes to mask low source footage quality/pixelating, may bloat your gif size.
Play your gifs back before exporting.
Pay attention to duplicate frames or glitches, you might need to get rid of them!
Hope this is helpful! Don’t hesitate to send an Ask or DM if you need any help, I will happily answer all your questions and send over PSDs. (I’m also on Discord—just shoot me a message if you need my tag!) Happy creating :]

#tutorial#PS asks#gif tutorial#Photoshop tutorial#I guess this is more of a resource link dump than tutorial but. Hey. Why reinvent the wheel...#Sorry for the late answer I hope you see this Anon :]#completeresources#allresources#userxoames#userbarbi#usernrzr
1K notes
·
View notes
Note
The fact that about 90% of the comments and tags defending GIMP or recommending other open source alternatives talk about these programs exclusively in their use for digital drawing really kind of says it all. Just not a single thought that some people might need Photoshop for photos.
i think there are also a lot of people under the impression that Adobe software is the industry standard in a lot of fields because something something capitalism something monopoly, which, sure, that's kind of a factor, but it's also important to note that their software is really fucking good. the main downsides to Adobe are 1. their predatory pricing models (SaaS can die in a hole) and 2. technical support teams that try to gaslight you into thinking software glitches are either your fault or straight up aren't happening, but that's why you 1. pirate + crack CS5/CS6 and 2. go to reddit for support.
63 notes
·
View notes
Text
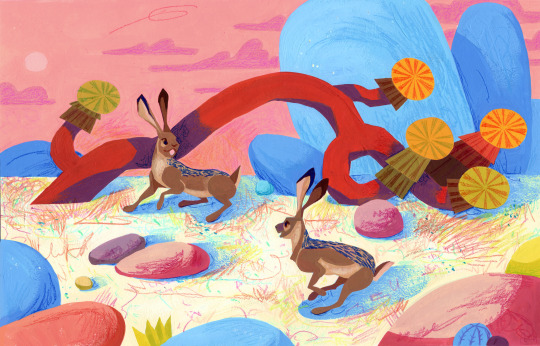
Jackrabbits, gouache and colored pencil on Bristol. 11x7in.
Digital art has been my beloved for so long - Photoshop CS6 had been both my deeply hated nemesis and beloved companion for nearly a decade, but this past year has seen an update in my technology (negating my license, boo) and negative advances in services of Adobe and, my more current system, CSP. This year I'm choosing to take a step away from digital art and focus my efforts on traditional art instead. So here's to seeing more gouache, pastel, and acrylic work in 2023!
834 notes
·
View notes
Text
Because everyone is reacting to Dark being short, here's something that I did on February 28th.
Hollow Heads and their Posture plus Character Analogy [An Analysis]
I never posted it here, but I did this intense research thingy where I became obsessed with properly getting the Hollow Head's posture.
This was my last project before I moved from Adobe Photoshop CS6 to Krita. I completely forgot about it, to be honest.

From left to right: Dark, Chosen, Second, victim, and H I added my tall boy H (Hangman) in there too, 'cause why not.
So what were my conclusions?
Second is the tallest one. His legs are longer and he's more slouched than the rest of them. He notably has a wide leg stance, but his shoulders are the most relaxed. Having a weak stance like this implies that he's mostly in a peaceful or at least safest environment compared to the rest of them.
Chosen has the most tensed posture. His arms look as if he's always ready to block any attack, and his legs look as if he's always ready to run at anytime. What does this mean? He's never relaxed. There's always this fear at the back of his mind, that someone is out there to get him.
victim is the most fragile out of all of them. He moves as if he has this plan in his mind that he's replaying over and over again, like anticipating every variable. His stance is very narrow, with his limbs barely leaving his main body. Not a fighter at all. He knows he's weak so he makes up for it with the smarts and resourcefulness.
Dark is the most confident. His legs look as if he has strong stance, yet his arms look very relaxed. He knows he's strong and isn't afraid of what his opponent might do. The way his head moves while in combat, imply that he's also very observant, and can likely anticipate the moves of his opponent. And yes, he's the shortest one (because victim is slightly slouched while Dark is standing straight).
H is mostly an OC at this point. He evolved so much that you can't even recognize that he's the Hangman.
Main inspiration came from:
Second - AvPhysics Also had some help with Nova on getting the head just right.
victim - The Box
Chosen - Wanted
Dark - Showdown I drew Dark's head thinner, unlike the Showdown which has thicker strokes. Although someone pointed out that I should've used the King Orange vs. The Dark Lord - An Actual Short as reference for the body.
The heads were manually redrawn and was not traced at all. The reason for this was I had to make them the same thickness.
50 notes
·
View notes
Text
PSA for anyone that uses Photoshop Elements for CC-making and was thinking of upgrading— from Elements 2025 onwards, licenses are no longer perpetual, being replaced by three-year licenses instead.
For a paid alternative, I highly recommend Affinity Photo (currently 50% off for Black Friday– £33.99 in the UK).
Affinity was acquired earlier this year by Canva, so there's every chance it will move to a subscription itself in the future, but I always cursed myself for never getting CS6 back in the day (hence why I'm making this post! xD).
Of course, there's also the free, open-source alternatives Krita and GIMP- the latter of which is currently testing what may become version 3.0.
(Whilst I'm on the subject I might as well also mention 3D Coat Textura– Pilgway usually has a Black Friday sale too, but it's a bit pricier and more of a niche program than the ones listed above.)
#Kinda non-sims?#CC-making#Texturing#Executables on executables xD#My other software licensing warning- check how many installs you're allowed and/or whether you can revoke activations from devices!#I lost my Corel Painter license this way; thankfully they had a Humble Bundle sale so I could rescue my files for ~£15#As a hobbyist I don't feel like subscriptions allow me to fully create#Instead it puts a time limit on my enjoyment and thus only leads to me thinking about money whilst using it#wondering if my time and money could be better spent elsewhere etc.#vs. a perpetual license that removes that overhanging feeling entirely and lets me fully enjoy creating
10 notes
·
View notes
Note
Hey! I don't know if you've posted about this or not but I thought maybe you and your followers would like to know! Clip Studio Paint is on sale with 60% discount until tomorrow!!
Because of all the bullshit Adobe has been pulling with wanting to have access to people's work while they use their programs and labeling everything that comes out of Photoshop as AI generated in the metadata, they decided to capitalize on it lol
heyyyy thank you!! I'm actually debating cuz i'm still using v1.11. It serves me well but v3.0 has some cool updates I lowkey wanna have. But I don't need it asap so I probably can wait until v4.0 and hope they upgrade their garbage text tool aksjdhalsd
Anw yeh for anyone that is thinking of getting v 3.0 it's on sale rn go get it chat! (or if you need PS just torrent CS6, it's always morally correct)
#yapping in hyperspace#rebeljyn#my ps license is under my school so until it expire i can still use it#even tho i don't use it as much anymore#proud to say i've never gave Adobe a single cent hah!
13 notes
·
View notes
Note
I don't know how to edit images... Is there any tutorial around for Topaz Clean?
I assume you're the Animal Crossing anon :D
Topaz Clean is a lot simpler to use than you'd think. Mastering it probably takes some time and effort, but give it ago.
I can't remember where I downloaded topaz plug-ins but try this:
After installing, open Photoshop (I use CS6 :D) and you will find it here:

Clicking "Topaz Clean 3" or any others (go ahead and try them out :)) will open a pop-up with currently selected layer and you can edit it separately.
You can save presets by clicking the gear icon in the bottom left corner of the pop-up window. I created the preset I use for Animal Crossing images to make them a little softer (edges especially) without losing details. These are the settings:

You can use these settings like this but I'd recommend playing with the sliders.
My settings do this (left unedited), not a huge change but enough for me:

I actually use these same settings for my Sims pictures currently :)
Hopefully, this not-a-tutorial helps you get started, anon ☺
11 notes
·
View notes