#3-D printer
Explore tagged Tumblr posts
Visit Tumblr Blog
Explore Tumblr blogs with no restrictions, modern design and the best experience.
Last Seen Tumblr Blogs


Fun Fact
Tumblr has a 66 index score for customer satisfaction in the US.
Text
:D I love Nicky so much
I'll be making these into (handmade) stickers and will be giving them out for FREE at both the upcoming Elfia event and at Heroes Dutch Comic Con (summer edition)
I actually don't think anyone from the Netherlands follows me on here but uuuhh if you do plan on going to one/both events, keep an eye out for someone in a badly made Taylor cosplay and you will be granted with one of these bad bois >:)
#the last (and first time) I did this it took me like 3 HOURS to make only 30 ish stickers lol#and it was at like 1 am at the night before the event#but this time I'm more prepared#and I just tested out a new way to make them which is SO MUCH MORE EFFICIENT#and IT. WORKS. TOO.#I'll also be remaking a few from last year#also; yes I did look into just ordering them online but I'm not going to spend 100+ euros on stickers that I'm going to give away for free#and investing into a printer and sticker paper and laminate stuff is a bit too expensive right now as well#so I'd rather make these by hand with all my blood sweat and tears and spend that money on the artist alley instead :D#dndads#here we go with all versions of spelling Nicky's name again#dndads nicky#nicky close#nicky foster#nicholas close#nicholas foster#nicky close foster#nick#trans nicky#trans#my favorite trans guy#dungeons and daddies#my art#elfia#HDCC#teen nicky#demon nicky#so mannyy tagss
238 notes
·
View notes
Text
i thought it would be nice to share two projects i made in art class this semester!
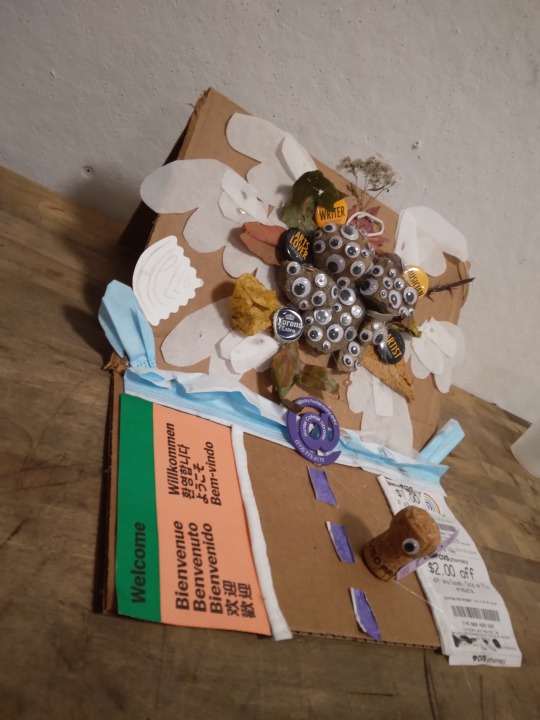
title: angel of change
this one's a fun collage/sculpture about the positive and negative changes one can go through when starting college! featuring a nervous little peg person on the road, a surge of waves, and a biblically accurate pet rock angel smoking a cigarette
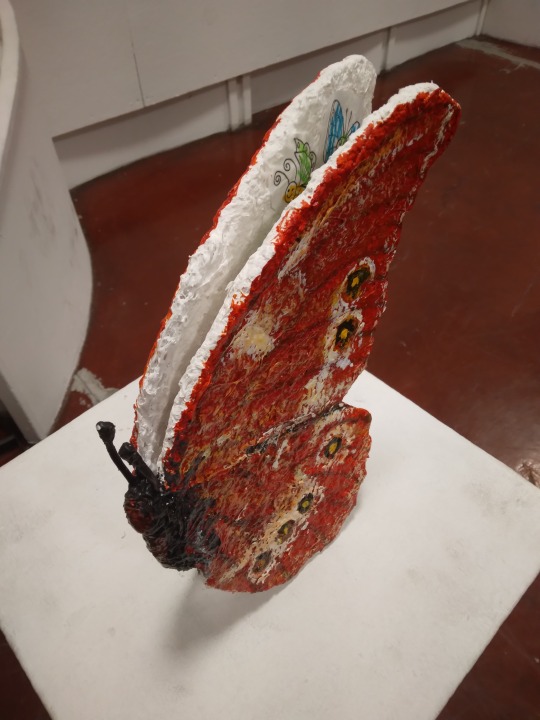
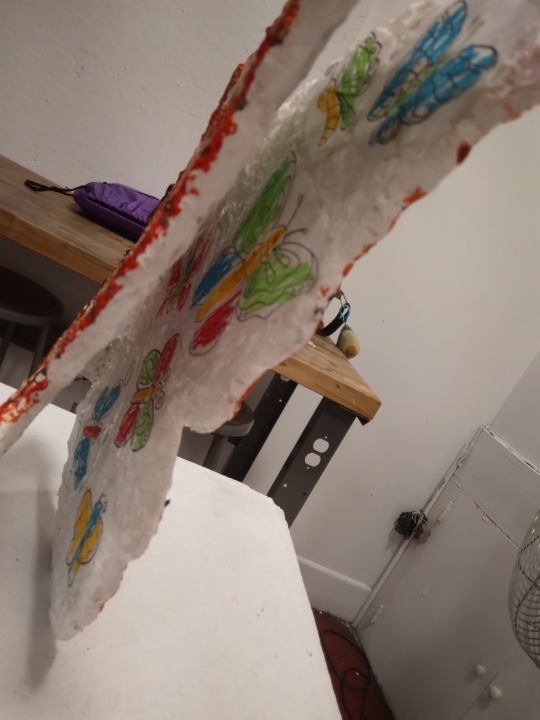
title: wing surfaces of morpho didius
and this is a sculpture of a morpho butterfly! with its ventral wing surfaces (the visible side of the wings) painted realistically, and with its dorsal wing surfaces (the hidden side of the wings) covered with messily-colored butterfly coloring book pages. the idea here is that my fascination with butterflies, despite being very scientific now, is still one imbued with naïveté, playfulness, and childlike wonder :)
#dandy's doodles#<- i keep changing my art tag. i might want to change it again. because not all of my art is drawings :'D#sculpture#collage#butterfly#i guess those are all the tags i need?? i don't really care. this is really for my followers/mutuals anyway <3#the butterfly sculpture was so annoying to make...#it's cardboard + wire + hot glue + paper mache + tempera paint + tacky glue + printer paper + oil pastels. augh#the worst part was that the paper mache (cuz it was wet) was disintegrating the cardboard base as i was putting it on#which meant one of the wings fell off and i had to reattach it#but then it dried with the wings too closed#i ended up working with it but ideally the inside of the wings would be more easily visible. oh well#i really like how both of these turned out :) though i have no clue what i'll do with them#they're still in the art room right now. but i'm dorming (no space) and my house is a cluttered mess (no space)#i honestly wouldn't mind leaving them there if i'm allowed to but ideally i'd take them... hm.......
18 notes
·
View notes
Text

just some sillies i made into stickers for myself :D
#trigun#trigun stampede#vash the stampede#nicholas d wolfwood#myart#theyre black and white bc i dont have a color printer btw :3#i also made a couch sticker and a cat nai one too#i messed up the hand for the trimax vash but shhhhh
56 notes
·
View notes
Text
Wild experience of today: Sending photos of my fursona to my father
#light's spot#it's only because he has a 3-d printer now and boy do I love trying to#build a fursuit someday#he was like 'you want anything?' and I hit him with the 'actually....'#sigh#anyways. back to my projects...
3 notes
·
View notes
Text
The cosplay-making scene is kind of funny to me sometimes because a lot of times people will ask me questions like how I make props like weapons, hats or shoes or finish my seams and why I don't do them x established way and it's like. I would love to know where in my tiny apartment I have to share with two other people and a parrot you think I am going to keep a steamer and a serger and a heat gun and a 3-D printer and a stock of worbla and stuff to cobble shoes with idk and a fume hood (since it's not like I have an outside space to use toxic fumey glues, which is basically all of them other than hot glue) and so on and so forth when I'm already fortunate just to have enough space a sewing machine and a small stash of fabric. Oh, and I guess an iron as long as I keep the iron on a shelf and the ironing board folded against the wall.
#soliloqyu#also learned that you can't really keep 3-D printers in apartments#because of the fumes and particulate matter#those would almost definitely kill my bird
3 notes
·
View notes
Text
Finding a sweet spot between radical and relevant
New Post has been published on https://thedigitalinsider.com/finding-a-sweet-spot-between-radical-and-relevant/
Finding a sweet spot between radical and relevant
While working as a lecturer in MIT’s Department of Architecture, Skylar Tibbits SM ’10 was also building art installations in galleries all over the world. Most of these installations featured complex structures created from algorithmically designed and computationally fabricated parts, building off Tibbits’ graduate work at the Institute.
Late one night in 2011 he was working with his team for hours — painstakingly riveting and bolting together thousands of tiny parts — to install a corridor-spanning work called VoltaDom at MIT for the Institute’s 150th anniversary celebration.
“There was a moment during the assembly when I realized this was the opposite of what I was interested in. We have elegant code for design and fabrication, but we didn’t have elegant code for construction. How can we promote things to build themselves? That is where the research agenda for my lab really came into being,” he says.
Tibbits, now a tenured associate professor of design research, co-directs the Self-Assembly Lab in the Department of Architecture, where he and his collaborators study self-organizing systems, programmable materials, and transformable structures that respond to their environments.
Play video
His research covers a diverse range of projects, including furniture that autonomously assembles from parts dropped into a water tank, rapid 3D printing with molten aluminum, and programmable textiles that sense temperature and automatically adjust to cool the body.
“If you were to ask someone on the street about self-assembly, they probably think of IKEA. But that is not what we mean. I am not the ‘self’ that is going to assemble something. Instead, the parts should build themselves,” he says.
Creative foundations
As a child growing up near Philadelphia, the hands-on Tibbits did like to build things manually. He took a keen interest in art and design, inspired by his aunt and uncle who were both professional artists, and his grandfather, who worked as an architect.
Tibbits decided to study architecture at Philadelphia University (now called Thomas Jefferson University) and chose the institution based on his grandfather’s advice to pick a college that was strong in design.
“At that time, I didn’t really know what that meant,” he recalls, but it was good advice. Being able to think like a designer helped form his career trajectory and continues to fuel the work he and his collaborators do in the Self-Assembly Lab.
While he was studying architecture, the digitization boom was changing many aspects of the field. Initially he and his classmates were drafting by hand, but software and digital fabrication equipment soon overtook traditional methods.
Wanting to get ahead of the curve, Tibbits taught himself to code. He used equipment in a sign shop owned by the father of classmate Jared Laucks (who is now a research scientist and co-director of the Self-Assembly Lab) to digitally fabricate objects before their school had the necessary machines.
Looking to further his education, Tibbits decided to pursue graduate studies at MIT because he wanted to learn computation from full-time computer scientists rather than architects teaching digital tools.
“I wanted to learn a different discipline and really enter a different world. That is what brought me to MIT, and I never left,” he says.
Tibbits earned dual master’s degrees in computer science and design and computation, delving deeper the theory of computation and the question of what it means to compute. He became interested in the challenge of embedding information into our everyday world.
One of his most influential experiences as a graduate student was a series of projects he worked on in the Center for Bits and Atoms that involved building reconfigurable robots.
“I wanted to figure out how to program materials to change shape, change properties, or assemble themselves,” he says.
He was pondering these questions as he graduated from MIT and joined the Institute as a lecturer, teaching studios and labs in the Department of Architecture. Eventually, he decided to become a research scientist so he could run a lab of his own.
“I had some prior experience in architectural practice, but I was really fascinated by what I was doing at MIT. It seemed like there were a million things I wanted to work on, so staying here to teach and do research was the perfect opportunity,” he says.
Launching a lab
As he was forming the Self-Assembly Lab, Tibbits had a chance meeting with someone wearing a Stratasys t-shirt at Flour Bakery and Café, near campus. (Stratasys is a manufacturer of 3D printers.)
A lightbulb went off in his head.
“I asked them, why can’t I print a material that behaves like a robot and just walks off the machine? Why can’t I print robots without adding electronics or motors or wires or mechanisms?” he says.
That idea gave rise to one of his lab’s earliest projects: 4D printing. The process involves using a multimaterial 3D printer to print objects designed to sense, actuate, and transform themselves over time.
To accomplish this, Tibbits and his team link material properties with a certain activation energy. For instance, moisture will transform cellulose, and temperature will activate polymers. The researchers fabricate materials into certain geometries so they can leverage these activation energies to transform the material in predictable and precise ways.
“It is almost like making everything a ‘smart’ material,” he says.
The lab’s initial 4D printing work has evolved to include different materials, such as textiles, and has led the team to invent new printing processes, such as rapid liquid printing and liquid metal printing.
They have used 4D printing in many applications, often working with industry partners. For instance, they collaborated with Airbus to develop thin blades that can fold and curl themselves to control the airflow to an airplane’s engine.
On an even greater scale, the team also embarked on a multiyear project in 2015 with the organization Invena in the Maldives to leverage self-assembly to “grow” small islands and rebuild beaches, which could help protect this archipelago from rising seas.
To do this, they fabricate submersible devices that, based on their geometry and the natural forces of the ocean like wave energy and tides, promote the accumulation of sand in specific areas to become sand bars.
They have now created nine field installations in the Maldives, the largest of which measures approximately 60 square meters. The end goal is to promote the self-organization of sand into protective barriers against sea level rise, rebuild beaches to fight erosion, and eliminate the need to dredge for land reclamation.
They are now working on similar projects in Iceland with J. Jih, associate professor of the practice in architectural design at MIT, looking at mountain erosion and volcanic lava flows, and Tibbits foresees many potential applications for self-assembly in natural environments.
“There are almost an unlimited number of places, and an unlimited number of forces that we could harness to tackle big, important problems, whether it is beach erosion or protecting communities from volcanoes,” he says.
Blending the radical and the relevant
Self-organizing sand bars are a prime example of a project that combines a radical idea with a relevant application, Tibbits says. He strives to find projects that strike such a balance and don’t only push boundaries without solving a real-world problem.
Working with brilliant and passionate researchers in the Self-Assembly Lab helps Tibbits stay inspired and creative as they launch new projects aimed at tackling big problems.
He feels especially passionate about his role as a teacher and mentor. In addition to teaching three or four courses each year, he directs the undergraduate design program at MIT.
Any MIT student can choose to major or minor in design, and the program focuses on many aspects and types of design to give students a broad foundation they can apply in their future careers.
“I am passionate about creating polymath designers at MIT who can apply design to any other discipline, and vice-versa. I think my lab is the ethos of that, where we take creative approaches and apply them to research, and where we apply new principles from different disciplines to create new forms of design,” he says.
Outside the lab and classroom, Tibbits often finds inspiration by spending time on the water. He lives at the beach on the North Shore of Massachusetts and is a surfer, a hobby he had dabbled in during his youth, but which really took hold after he moved to the Bay State for graduate school.
“It is such an amazing sport to keep you in tune with the forces of the ocean. You can’t control the environment, so to ride a wave you have to find a way to harness it,” he says.
#3-D printing#3d#3D printers#3D printing#Advice#aluminum#amazing#anniversary#applications#architecture#Art#artists#atoms#Building#career#Careers#cellulose#Center for Bits and Atoms#challenge#change#code#college#computation#computer#Computer Science#Computer science and technology#construction#courses#curl#Design
0 notes
Text
how to make your own beanie buddy!!
first: sacrifice a beanie D: this was a damaged and worn zip the cat. farewell sweet prince. thanks for your service. anyway take that beanie to bits
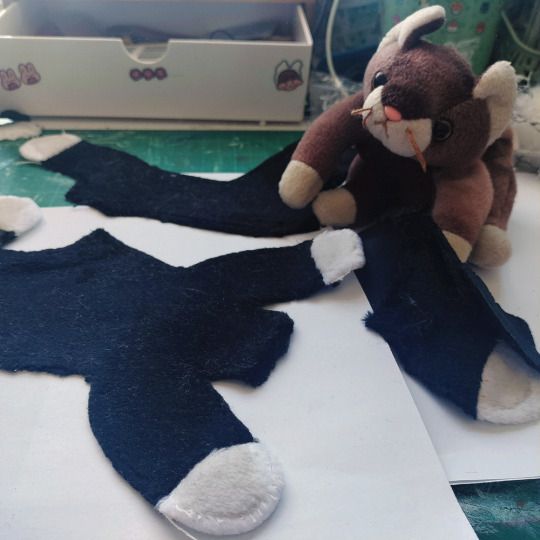
iron the pieces and trace them to make a pattern (make notes about how to reassemble NOW before you forget!)
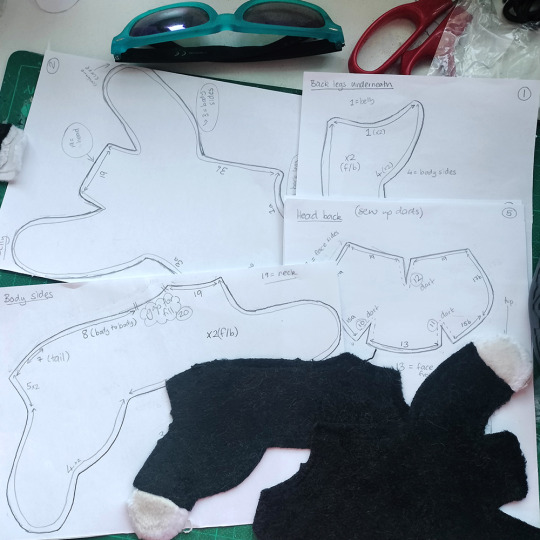
Ask your sister to use her work printer to blow up the pattern from A5 to A3! thats four times bigger!!
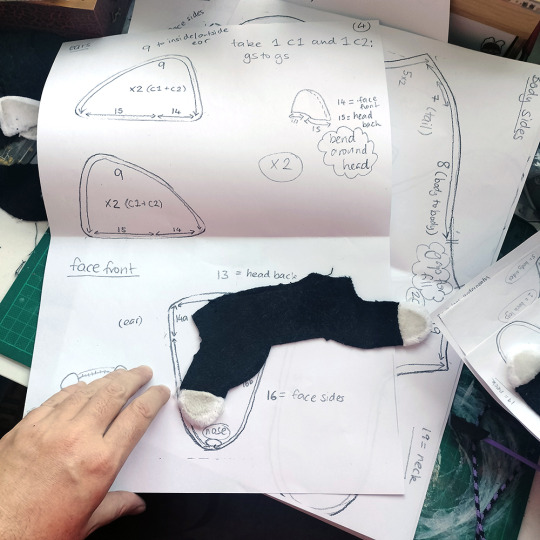
get some plushy fabric from the craft store and get tracing and cutting (using medical scissors from that surgery you had four years ago)

SEW THAT BABY TOGETHER and then pick apart the head because you messed up AND THEN SEW IT BACK TOGETHER PROPERLY!!
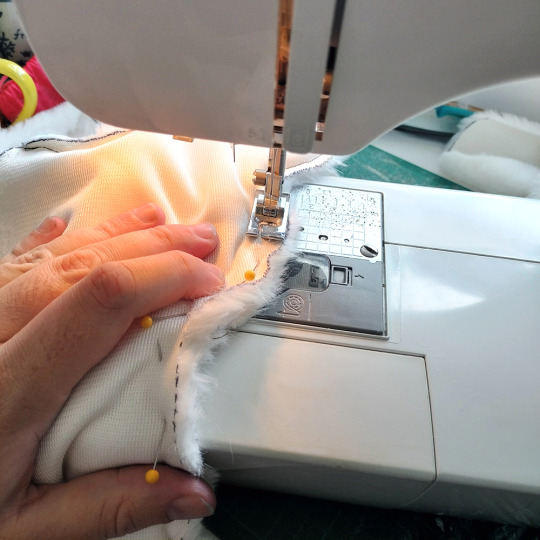
make a little face :3 eyes, nose and whiskers!!
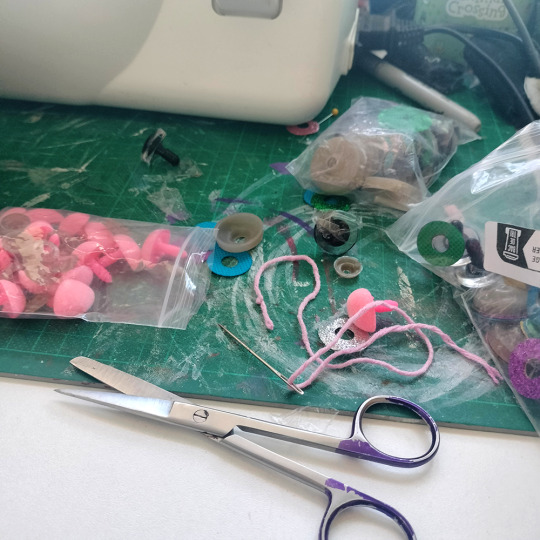
fill that beast with BEANS using your sister's hamilton shotglass (and some fluff for the head and body)

sew her up.... and take some photos!!
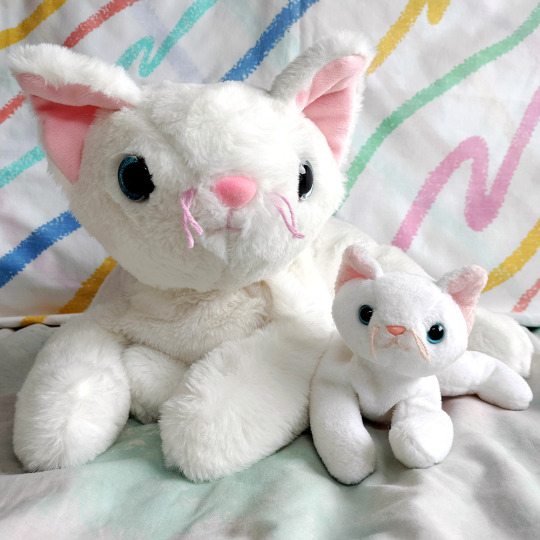
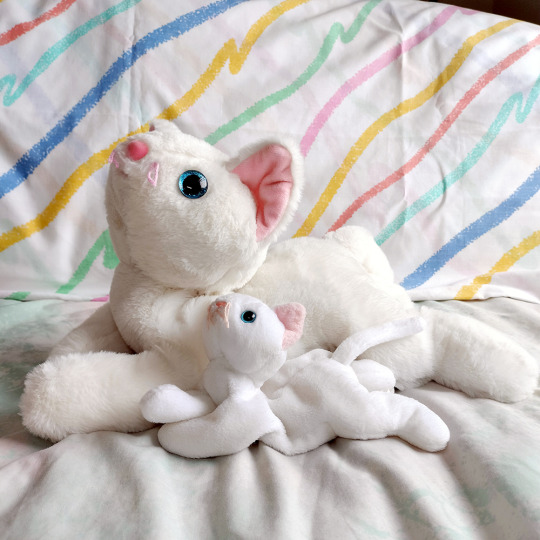
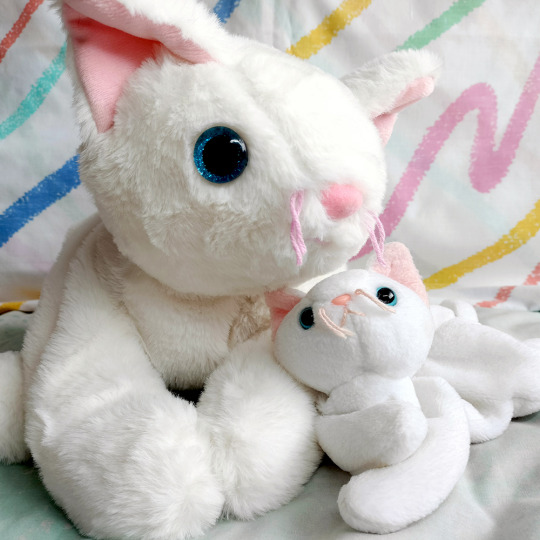
optional step: repeat the process to make some siblings!
#custom beanies#my art#(well sort of)#my beanies#beanie babies#flip#kidcore#plushie#plushie mod#plushie craft
6K notes
·
View notes
Text


"The Howling Howff is a support group run by werewolves, for werewolves: specifically, new, potentially emotionally (and physically) scarred werewolves. This book is a 101 on what it means to be a werewolf and how to navigate a sometimes confusing existence. Other ‘bitten’ werewolves who have reviewed this material have mentioned words like “tone deaf” and “drastically out of touch”, but we here at The Howling Howff understand denial and anger are an intrinsic part of their human side and we do not hold it against them – or you!" ~*~*~*~*~*~*~*~*~*~*~*~*~*~*~*~*~*~*~*~*~*~ If you like satirical folk horror and werewolves, then this is the book for you!
The book itself is 60 pages (including covers) and is currently available to pre-order once more in my Ko-fi shop - THE HOWLING HOWFF PRE-ORDER . I have to hit around 30 orders to be able to bulk buy, at which point it'll take around 2-2.5 weeks for the printer to sort (the covers have metallic ink inlaid :D) and then I'll happily ship them out!

My ko-fi shop also has a separate upgrade option for tracked shipping and I've shipped all over the world with little issue. You can purchase it here - TRACKED SHIPPING UPGRADE


You'll also find a bunch of other goodies in my shop like Art Cards, Prints, Patch and Stickers :) - OTHER GOODIES ~*~*~*~*~*~*~*~*~*~*~*~*~*~*~*~*~*~*~*~*~*~ Any support is much appreciated! I'm currently working towards a second book which will be available as a Kickstarter project hopefully around June! ~*~*~*~*~*~*~*~*~*~*~*~*~*~*~*~*~*~*~*~*~*~
I'll be closing pre-orders on Monday 21st of April as I'll be putting the bulk order in :). Book sales will resume in 2-3 weeks time after the pre-orders are packed and shipped.} Huge thank you for everyone who purchased a copy so far! You've made the second re-print possible
#wolfhidewinter#myart#werewolf#thehowlinghowff#werewolves#support group#illustration#satirical#folk horror#scotland#sticker sheet#art print#ko fi shop#ko fi artist#world building#folklore#transformation#skin ripping#scottish artist#scottish#book#guide#scottish folklore
793 notes
·
View notes
Text


printed the lineart of this piece and coloured it traditionally. fun !
how it started:

how its going:
#ive lowkey wanted to do this for so long with literally any of my digital drawings but I don't have a printer </3#so i would like to thank an unnamed friend for letting me take advantage of his generosity and printer like that. much appreciated.#my art :D#art#traditional art#oc art#ouagh i would be ao insufferable if i had a printer tbh...i would be printing my digital art constantly just so that i could Hold It.
45 notes
·
View notes
Text
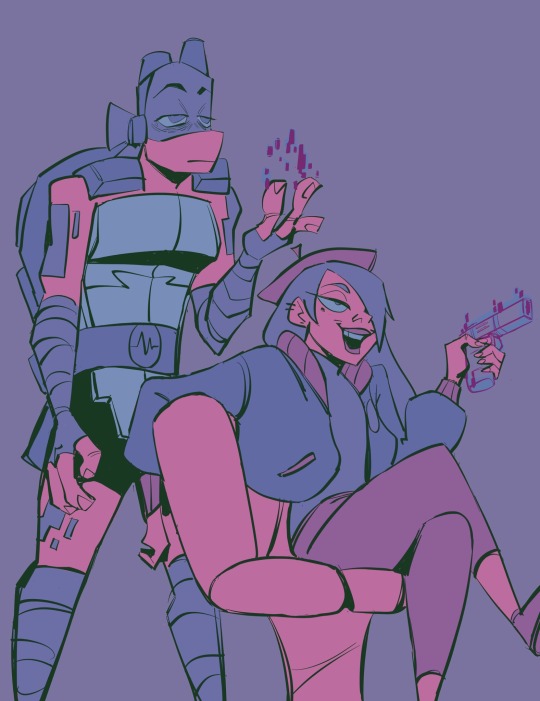
Febuwhump Day 9: Bees “Human” Weapon
“Weapon? I have a whole arsenal now!”
I figured I would continue this prompt! Next
Poor Jace is off camera peeing his pants. Like Kendra wasn’t scary enough before she brainwashed a 3-D printer for any weapon imaginable.
#rottmnt#rottmnt fanart#tmnt#tmnt fanart#rise of the tmnt#kendratello au#rise donnie#rise kendra#rise of the teenage mutant ninja turtles#febuwhump#febuwhump2024#febuwhumpday9#my art
3K notes
·
View notes
Text
The Wayhaven Chronicles—Update 23/May/2025
I don’t know what it is about Wednesdays, but apparently they are the days when I absolute hammer it, lol!
I did really well all week again, but Wednesday was just full-on and intense!
Today though, I’ve been working on the scenes for asking the BFF vampire to the dance class with your MC! They have some very fun responses to that, hehe! :D
This week, I also finally sat down, printed out the rest of my plan (when the printer decided to play ball. Jeez, two hours later, and I finally managed to get it to work. N’s tech phobia really comes from personal experience, lol!), and divided it into chapters.
I hadn’t been doing that so far, working with scenes instead and cutting it off when it seemed appropriate for the chapter, but I wanted to get on top of that and see where I’m at with it all.
The chapters may not stay as I have them planned, but it was good to get an idea! Though blimey, the chapters this book are intense, hehe! I usually have some chapters where I get a bit of a breather—they’re simpler, not much branching or variation, and only one or two characters in the chapter—but oh boy! Not in this book! Every chapter has some major branching/variation/character interactions going on.
But then that’s what I want for Wayhaven. I want it to really react to the reader and how they’ve played so far or how they are playing it now! It just means that is more in the background to have it smoothly flow that way :D
And I have to say, I’m so proud of what Book Four is becoming!
Rest of this week and next week is continuing on with writing. I really want to slam into this chapter as, again, there’s a ton of variations to it!
Though next week on Patreon there's going to be a very exciting poll! The end of this chapter has the decision of which kind of ‘gem’ you choose as your MC’s theme for the upcoming ball, and as usual, I couldn’t decide which ones to choose as it’s waaay too many to have them all. So, I thought I’d let the patrons decide the final list! :D
I’ll let you know the results so you can all start thinking about the ball scene as much as I am…hehehe! ;D
Hope you all have the most fabulous weekend! We’ll be offline as usual, so I’ll update you all again next week! <3
#the wayhaven chronicles#interactive fiction#unit bravo#twc detective#romance#update#choice of games#hosted games#if wip#creative writing#twc book 4#the wayhaven chronicels book 4
243 notes
·
View notes
Text
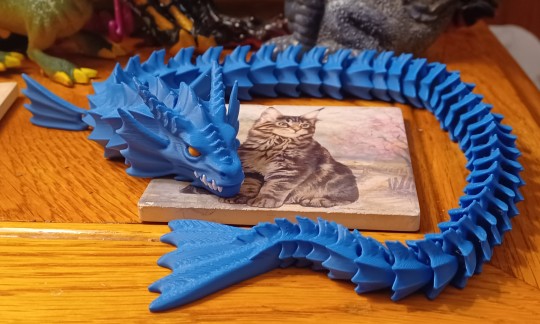
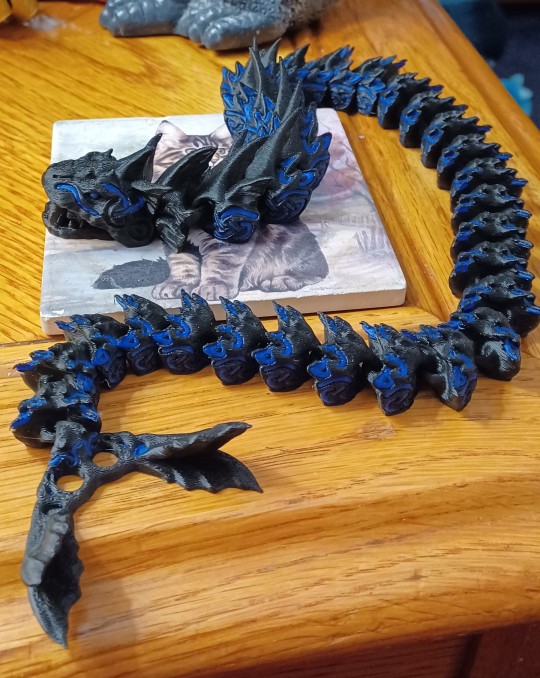
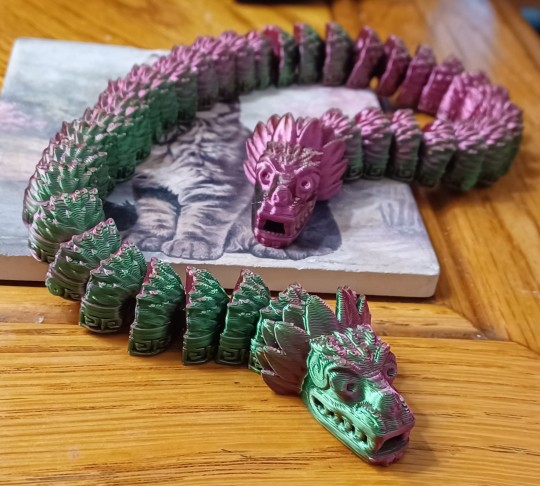
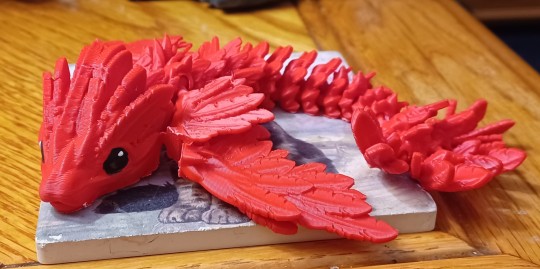
A Flight of Dragons, I Command It! A FLIGHT! OF! DRAGONS!
doom DOOM DOOM
Hey fuckers, it's February and my Seasonal Affective Disorder is at its fucking PEAK, so it's gonna get REAL weird around here for a while. Luckily, my old ass has spent the last thirty-some years figuring out how to deal with this particular recurring problem, and one of the many tools and tricks I've learned is an age old classic:
I gotta treat myself.
So, ok, I work at a daycare, and one of the things that's very popular with the kids these days are 3-D printed dragons. They're inexpensive, customizable, and pretty easy to transport and store, so it's no wonder kids like them. But, you know, I'm something of a child at heart myself, and I love dragons, so when I saw my kids bringing all these 3-D printed dragons to the center... well, I got a bit envious. And, well... when you're an adult with disposable income... there's no one STOPPING you from buying a 3-D printed dragon for yourself.
Or two.
Or three.
Or... lots. Lots and lots. Because you're an adult and they don't cost much money and you've always loved having swarms/herds/big families of creatures ever since you were a kid, and because it was January when this idea struck you and looking at the estimated time of arrival on etsy for these things you realized most of them would arrive by February, when you might NEED the serotonin provided by having a big ol' flight of dragons.
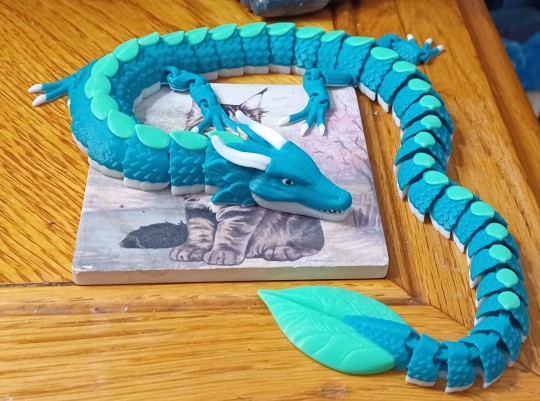
So let's go on a journey, fuckers. A journey of excess, a journey into imagination, a journey through the marvelous world of people with 3-D printers making a quick buck on etsy. Let's look at some fucking dragons.
I'm going to go ahead and link the store pages for each dragon I purchased, in case you too are deranged and need some dragons in your life, and because I want to give some form of credit to the artists who made these. Granted, that won't always be possible - while a few of these seemed to be unique to the shops I bought them from, many of them could be found from NUMEROUS sellers, which makes it difficult if not impossible to figure out who originally programmed the project files for them to be 3-D printed from.
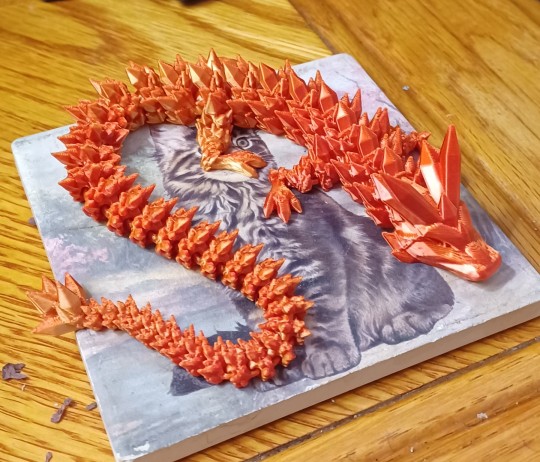
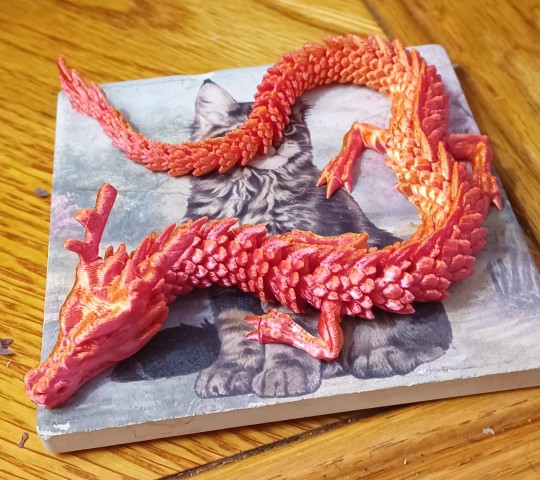
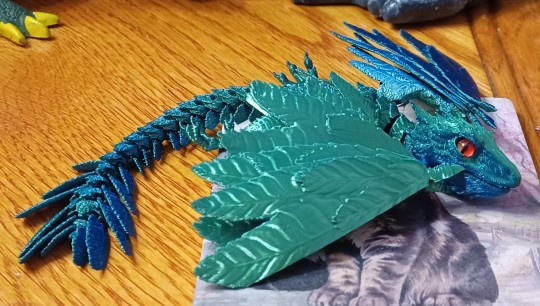
Case in point is The Crystal Dragon here, which can be found in SO MANY etsy stores. Most of the 3-D printed dragons my students at the daycare had were of this variety, in fact, so it seems to be a very popular pattern for 3-D printing. It's definitely a cute and pretty little thing, and sort of sets the standard bar for a 3-D printed dragon. I wish the face was a bit more detailed, but the rough, angular nature of it does help convey the idea that this thing is made of crystals.
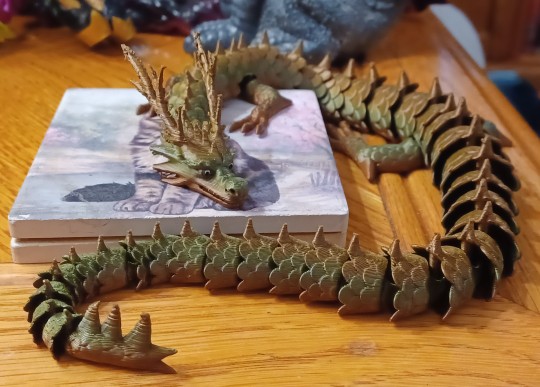
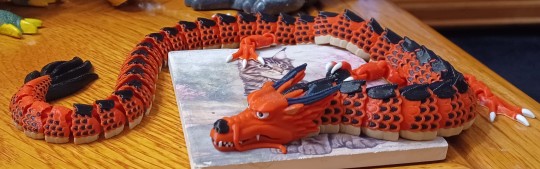
The second most common design, as far as I can tell anyway, is this Chinese Dragon/Loong (oh hey, they used my favorite English spelling!). I really like the face of this guy, and it seems like an excellent rendition of the standard East Asian dragon design - there's even tiny holes under its nostrils where you could insert a wire or thread to serve as its barbells, though most sellers (including the one I bought from) don't make use of it.
While most of the dragons I bought are "realistic," there were some cartoony/more stylized ones for sale that I decided to partake in. This little guy is one such dragon, and I think he's probably the best one to get if you're buying for a kid - the smoother body and smaller, nubbier horns makes it less likely to break, and just a bit more fun to play with in your hands. These things are often marketed as fidgets, after all, so the tactile feel of them is something to take into account.
While on the surface just a variation of the fidgets we've seen so far, this dragon has one particularly clever feat of engineering: because of the way the spikes on its neck are set up, you can get its head in a nice "snake rearing up to strike" position, which, combined with its distinctive short-snouted face, goes a long way to giving it an extra bit of character among the 3-D printed dragons.
While most of the dragons I found seemed to have the same simple color options to choose from, a few sellers seemed to have their own custom ones that were unique to their shop. This mix of bronze and olive greens was unique to this particular dragon, which, along with its painted eyes, really helps its stand out! I will note that the joints of this dragon tend to stick a bit more than my other dragons - perhaps a result of using different plastic colors than is standard? - but if you let gravity do its work they'll sort themselves out, and it's worth it to have such a striking little fellow.
Since this particular style of toy really suits serpentine creatures better than all else, I decided to look for some explicitly marine dragons to add to the group. I really like this sea serpent I found, which comes is very basic crayola-ish plain colors, but has just enough personality in its sculpt (and eyes and teeth in different colors) to stand out.
If you're looking for sea dragons on etsy, though, you're much more likely to encounter this fellow, which almost every store selling it calls Jormungandr and/or the Midgard Serpent. It's got these vaguely Nordic runes carved into it, as well as grooves in its tail designed to fit its prominent fangs so it can make an ouroboros, which makes the Jormungandr connection feel pretty intentional. It's a really distinct design, but I do think it's a little funny that it's far from the beefiest of my dragons. I wonder if there's a shop that sells an upsized model...
While not notable in terms of engineering, paint work, or plastic color options, this dragon IS notable in having heads based on a statue of Quetzalcoatl, who is in turn one of my favorite mythological figures, so I had to get it.
Of course, I also wanted a Quetzalcoatl-style feathered serpent that had the classic "winged snake" look, and this one fit the bill well enough. It originally came with little hair clips attached to its underside, allowing it to cling to your head and/or clothes, which I thought was really clever... but I also didn't like the clips sticking out from under the little thing so I took them off. A lovely little dragon either way, though.
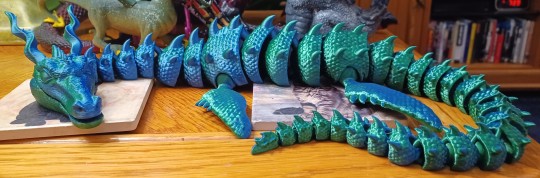
So, ok, I'd been going relatively cheap at this point, but as I shopped I was struck with a sort of passing fancy, an idle thought... what was the most elaborate, fanciest 3-D printed dragon I could get? It's not this one, mind you, but this was very much the start of that rabbit hole. While mechanically it's not significantly different than the dragons we've seen till now, the amount of colors it's printed in immediately make it stand out as a higher quality dragon.
The same store that sold the dragon above also sold this fellow, which may well be my favorite of the many East Asian dragons I found on this little quest. Just look at that wonderfully monstrous face! And he's got a pearl, the little devil!
While the color of the plastic and the engineering of this sea dragon may not seem particularly notable, what has to be taken into account here is the sheer SIZE of this lass. This is one of the biggest dragons of my lot, not only in length but in sheer girth and weight of its joints. The Midgar Serpent needs to move over, this is the REAL leviathan of my 3-D printed dragon collection.
Of course, if you know me, you know I'm a basic bitch who loves the European "four legs and two wings" style of dragon the most of all, so my search for fancy 3-D printed dragons started to focus on finding some that fit this description. I can't actually find the store page for this guy anymore (it's not in my past purchases on etsy for some reason), but it's a pretty solid low budget take on the concept. But we can do better - and we will...
But first, a detour to some wyverns! This little guy is really cute, with a head based on the Peter Jackson Herbit movie's design for Smaug, and a feathery little body that makes it looks like a fantastical archeopteryx.
The same shop makes a more reptile-ish dragon, with leathery wings and scaly skin, which I got in a larger size because, well, you know my preferences. It's like the perfect size to perch on your shoulder, though I'd want something to hold it in place because I'm pretty sure falling off from that height onto a hardwood floor would be the end of it.
There's no shop link for this one or the next because it was a freebie - which is to say I didn't actually order this dragon, but found it in one of my packages as a free gift from the seller. That's the nice thing about shopping on places like etsy and ebay - sometimes the people on the other side of the screen are really solid and decide to give you an extra little treat. This is clearly a Games of Throne-style wyvern specifically, based on the proportions and the shape of the head, and that's pretty cool. The dragons are one of the only things that made it out of that show still looking cool.
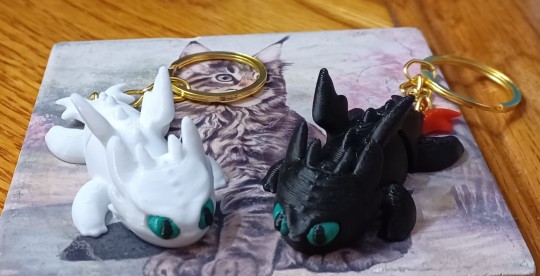
The second freebie dragons I got were these little toys of Toothless and Girl Toothless from How to Train Your Dragon. Look at them, they're so cute!
But now... now it's time for the answer to the question:
What
Is the most Deluxe 3-D Printed Dragon
I can get?
The Bronze Medal goes to this marvelous dragon here, which feels like it flew right off of some medieval coat of arms and into my own flesh and blood ones. It's solid, beautifully sculpted, and full of articulation points. However, the method in which it's articulated makes it a bit frustrating to pose, as some of these joints end up bending and twisting in ways you don't want them too. Still an excellent dragon, mind you, but outdone by the next two...
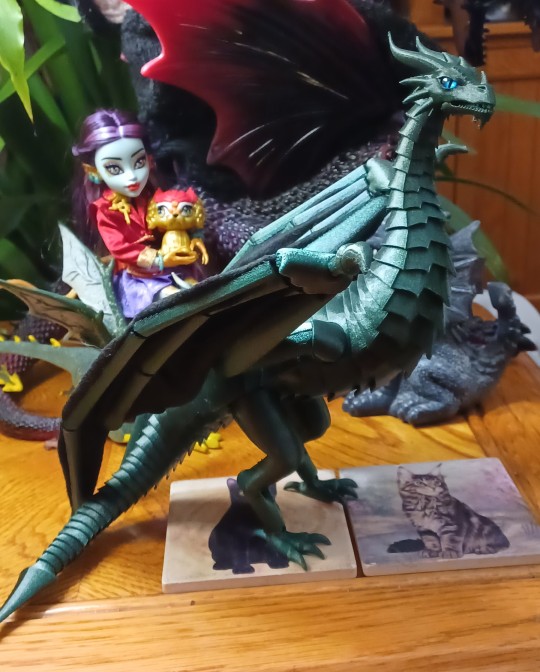
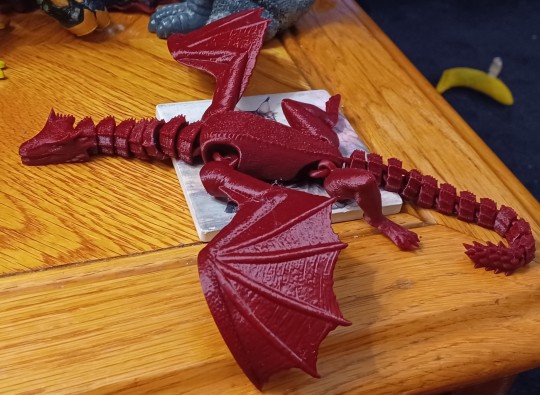
The Silver Medal goes to this marvelous wyvern, which has much tighter joints that are a lot less frustrating to pose. Its wings are a mixture of cloth and plastic, allowing them to flex and bend into a variety of poses (though admittedly the weight of the wings keeps them from holding most of those poses very well). Also, look at that regal face, that sleek sculpt, and those elegant proportions! It's almost a perfect dragon for me. Almost.
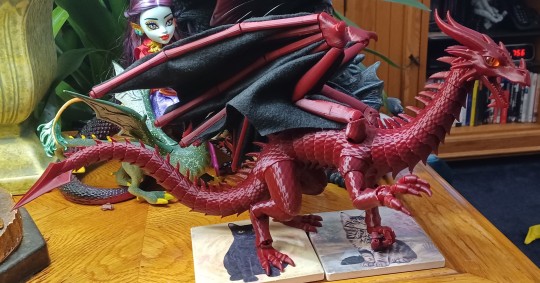
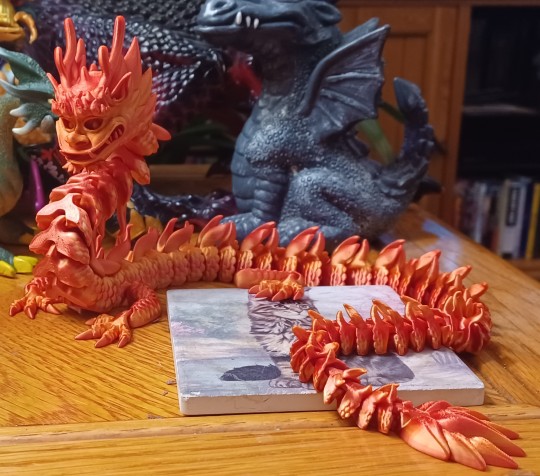
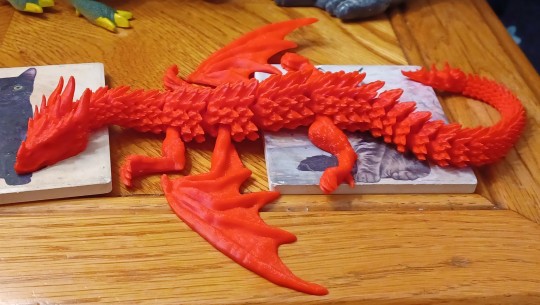
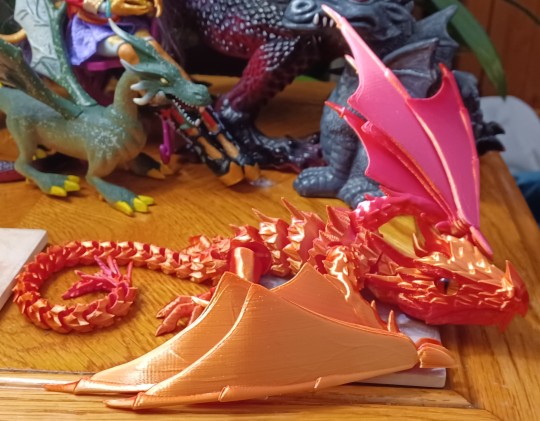
My one and only gripe with the previous dragon is that, well, I'm a basic bitch who likes dragons with four legs and two wings the best! And what do you know, they made one of those too! And god, does this dragon look magnificent in person, sporting all of the elegance of the dragon above but with magnificent grasping hands! HANDS! Hands that you'll have to be careful with because the joints are a little loose and like to pop off when you play with them, but still, HANDS!
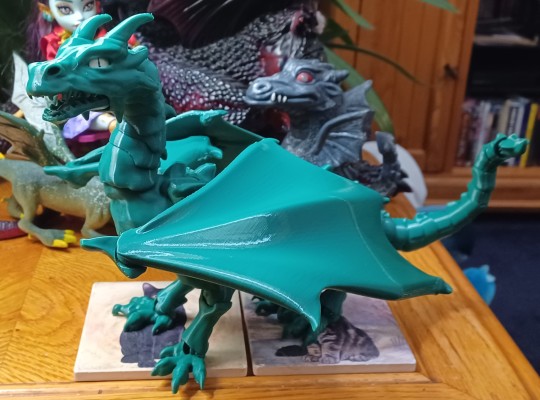
This is a high enough point to end off on, but there's one more 3-D printed gift I'd like to cover here. My favorite one.
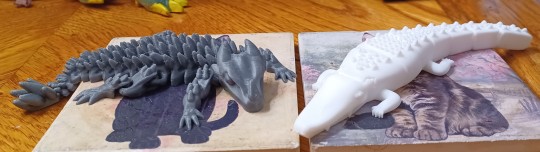
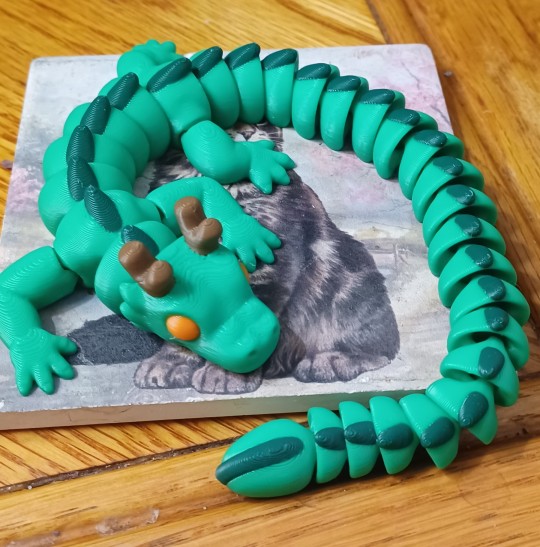
Well, ones I guess. This all started with my students, and well, some of them noted my interest in the 3-D printed dragons they were bringing to school. And a couple of them actually ended up getting 3-D printers of their own (well, their parents' own, ayway) and decided to print off a dragon and a crocodile for me - smaller than all the other dragons here (except the Toothless keycains), but no less dear for it. I guess one of the pros about taking an active interest in the things your students like and letting them gush about it is that they might give you a 3-D printed dragon or crocodile out of the kindness in their little hearts.
253 notes
·
View notes
Note
Hi can I please a platonic dream bbq ena x reader from the human world but when they wake up in that strange digital world they find themselves in a different body. Perhaps they are now a wyvern hybrid somehow, like their head and torso are the same but everything else was changed. Anyway they somehow end up working with ena to help take down the boss and she tries to help them adjust to their new life. Thanks!
One moment, things seemed perfectly normal for you. It was just another mundane afternoon.
And the next...you passed out and woke up somewhere completely foreign. Nowhere near your home, workplace, or anywhere familiar.
It seems you were on some island, with unusual structures, a patterned ceramic floor, and mysterious arches in front of blue entities. And tiny people in paper lanterns strung over your head.
Even the sky looked most unnerving as you flinched at the sight of a massive hazelnut brown eye peering down upon you, like it was some god.
When you tried getting up, you're quick to realize that your arms aren't exactly, well, arms anymore.
Instead they've somehow become dragon wings. They were made of cloth, as though cut from a flag of Wessex, but the claws on them were made of the hardest stone.
Yet as you flapped them, they generated an unusually strong gust of wind that not only propelled you upright, but made you hover at least three feet in the air.
You were startled as you dropped back down to the ground, discovering your legs were also dragonlike, too. They appeared as though they came fresh out of a 3-D printer, but the claws on your feet were also made of stone.
How strange...
And of course, you had a barbed tail that was disconnected from the rest of your body, but it floated behind you. It was covered in scales, resembling that one dragon from that one fantasy video game you recently played with the highest graphic settings applied.
Or....was it the dragon from that one dark fantasy movie you saw in 4K?
You couldn't remember.
The only normal parts about your body were the head and torso, and you still retained the same articles of clothing as before.
Despite all of this, you're not as freaked out as you definitely should have been.
You distinctly remember having arms and legs, but your head was still fuzzy and you couldn't quite make sense of where you were or how you even got here-
"My, my...what big claws you have! Tell me, newcomer, what's your profession? Do your wings help you climb the ladder and attain a well-deserved promotion?"
You see somebody approach you. She definitely wasn't human, but looked humanoid enough to be a familiar sight. Her body was split down the middle, her smile trapped to the red side.
"Um...actually I am-"
"STOP RIGHT THERE!!! I KNOW WHAT YOU'RE GONNA SAY!!!" Suddenly her jagged paler side dominates the conversation, frowning deeply. "You're not the Boss!! So let's cut the crap!!"
"Boss? What?" You frown. "I was gonna say I'm not....erm...from around here..."
".....oh--well isn't this a treat? You've arrived from somewhere beyond our business scope! I smell great potential!" Her red half returns to lighten the mood, clasping her mitten hand against her geometric one. "Ena's the name. What do I owe the pleasure?"
"I don't...think you could help me. But I'm not from this world. Like at all." You try to explain. "I was somebody else one moment, and the next I woke up here as this...weird, wyvern thing."
She's quiet, taking in all this information, before she chuckles. "Ah. Wyvern! Such a charming name! I concur that your visage may intimidate future clients, but worry not! I can teach you excellent strategies for coping with the ups and downs and works of the trade!! Of course, though, I don't offer my services for free." Her smile falls flat for a moment, her triangular eyes piercing through you. "...you have to agree to the following terms and conditions...."
There's a long pause, and you realize she's waiting for your response.
Even though you had a feeling your name wasn't "Wyvern", you couldn't exactly tell Ena that now---as she's 101% convinced that's your name and wouldn't accept anything else.
"Okay, so what do you need from me? Money?"
"Oh nononononono! No, no, no!! I am not one of those sleazy contractors who entangle poor souls in sign-up fees and cancellation fees!" She huffs, almost sounding insulted. "YOU, my dear draconic associate, are gonna help me find the Boss. You see, he's our next target, and I just know you can put those claws and teeth to work!! So let's shake on it."
Extending her clawed hand, she waits in anticipation, but you were rightfully hesitant.
"That's a kind offer, but...why help me? We just met not even-"
"So what?" Her meaner side grunts, fingers twitching with impatience. "My job sucks, so I might as well have someone else to share in my misery. Besides, I'm the best you got. So what's it gonna be??"
"Yes. Yes..I'll go with you." Sighing, you awkwardly stretch your wing out, your stone claw coming to rest in her palm, and that seemed to suffice for a handshake, as the salesperson half of her smiled. Just a little softer.
"Bless you for your business, Wyvern. I promise you won't regret this. Now let's review the job description."
#the moment i saw 'wyvern' i locked in#clanask#anonymous#ena x reader#ena joel g x reader#ena dream bbq x reader#dream bbq x reader#dragon reader#wyvern reader#hybrid reader#headcanons#platonic
211 notes
·
View notes
Note
I always wanted to ask but got nervous
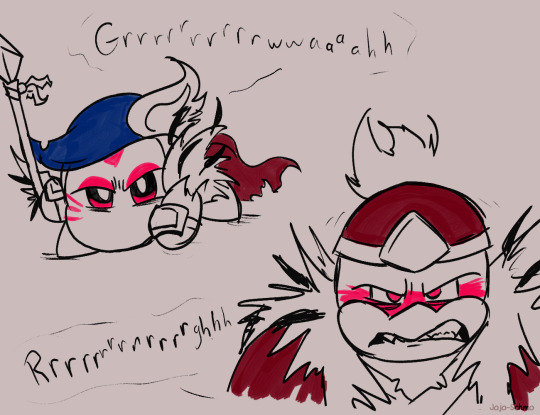
Between Forgo Masked Dedede vs. Awoofy Prince Bandee
Who'd win? Like I love the role swap between them but the idea of who's more powerful between the two while brainwashed got me thinking 🤔
Also I am getting a 3d printer soon and learning sculpting and I love the forgotten world roleswap and you're making tempted to actually buy the game so watch out I am gonna attempt to print and paint that awoofy boi!
(I just realized you specifically asked about the masked versions of these characters- but my imagination went wild and I explored their first boss fight form first-! I am so sorry about that and I’ll try to explore their masked versions sometime soon <3 )
SO Primal Dedede vs Primal Bandee was a wild idea to explore (pun intended). They’re both very powerful in their own right- Dedede’s larger size and strength makes him a tank. But Bandee’s smaller size and speed make him nimble! So I couldn’t come up with a winner yet. :’D
But the battle itself is pretty tragic and emotional on principle-!! A King vs his most loyal subject, but neither of them are really in fully control of their actions…. And in the Forgotten Land Light Novels, when Bandee fights Primal Dedede, he’s so filled with despair and shock that he can barely move, and the guilt of fighting Dedede, even if it was necessary, stayed with him for almost the entire rest of the story!
But under Fecto Forgo’s control? Dreamland’s stubborn King, and most loyal guardian…? This is something neither of them would back down from. And since they’re not themselves, I think they would resort to more vicious and under-handed maneuvers that would deeply shock both of them when they’re back to normal.
Here’s some of my brainstorming while considering this!
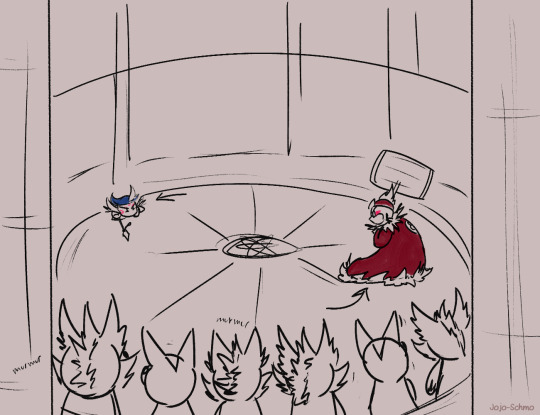
Two Beasts meet in that fated arena in Winter Horns…. Circling each other to gauge each other’s strengths and weaknesses…

The battle begins with their powerful battle cries!!
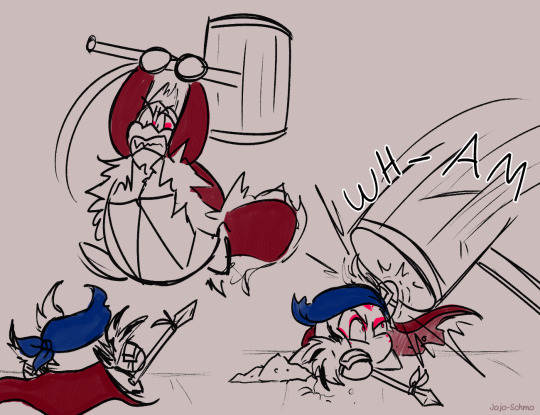
Dedede goes straight in with his hammer, but I love the idea that Bandee has some great strength hidden in him… Remember Megaton Punch? <3
Bandee tries his claws-
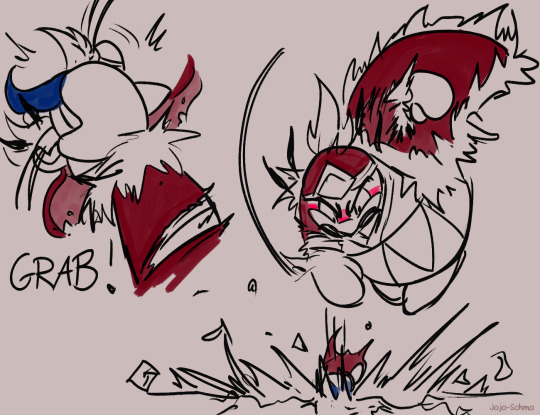
But Dedede’s larger size makes close combat more risky. (Side note, Primal Dedede picks up Bandee and throws him to the ground in the Light Novels too!) I think it’s a pretty brutal move that regular Dedede would never try- his pride in his battle skills is too great to resort to this.
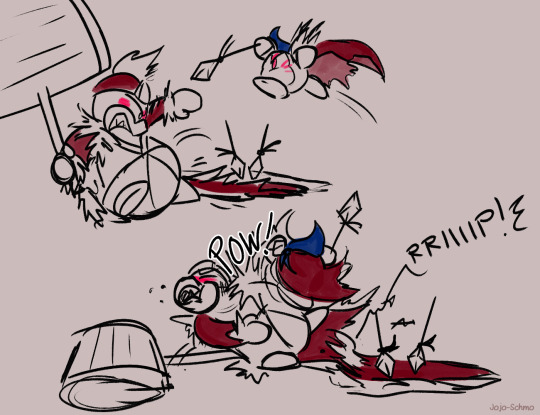
Spearing the Great King’s robes?! A callous action Primal Bandee doesn’t think twice about. Humiliated and enraged by being punted into the ground, he punches the King with all his might.

The King is PISSED. His pride is intact even through Fecto’s influence. Let’s see how you like it, you puny pup….
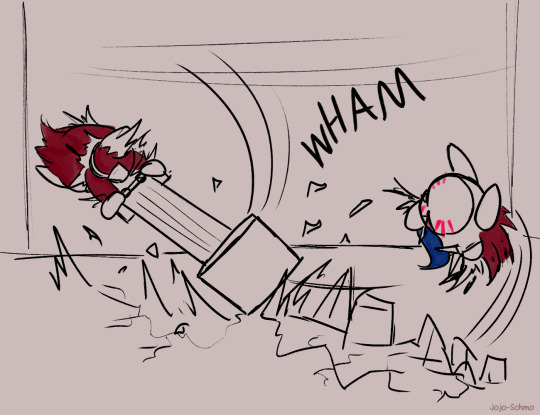
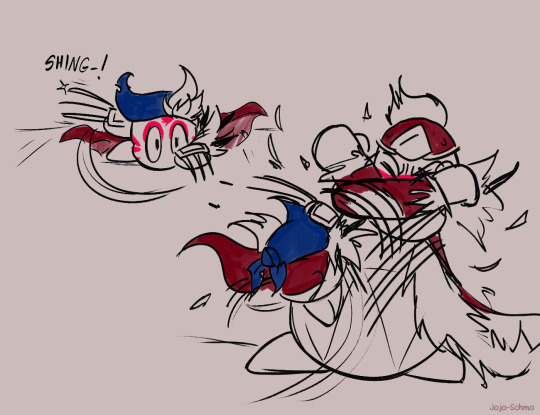
The second phase of the fight begins at some point and Dedede wields the pillar from the arena-
\
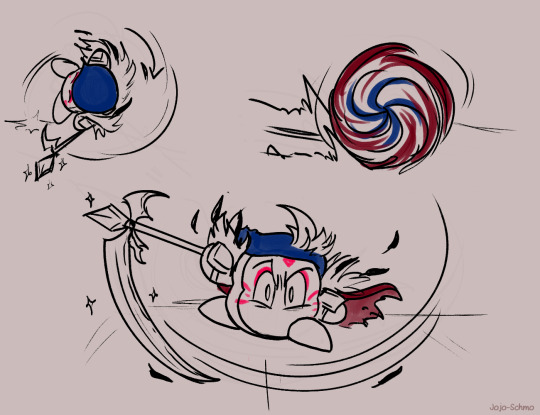
But The Awoofy Prince upgrades his weapon too….!
So yeah! I had to stop brainstorming since I have other projects to finish but I hope you enjoy my short exploration of, “What if these two were both brainwashed into a primal state, were not on the same side, and had to fight?”
And thank you for the kind words, dear Anon! I hope everyone knows they can ask me whatever they’d like! I just may not be able to answer everything but asks do bring me a lot of joy!
AND OMG- if you ever DO make a Primal Bandee figure…. It would fill me with indescribable joy if you could share some pictures of him! Thanks for the ask <3
#roleswap bonus features#forgotten land roleswap#art#king dedede#bandana waddle dee#beast pack#kirby and the forgotten land#kirby au#kirby#kirby series#kirby comic#ask
112 notes
·
View notes
Text
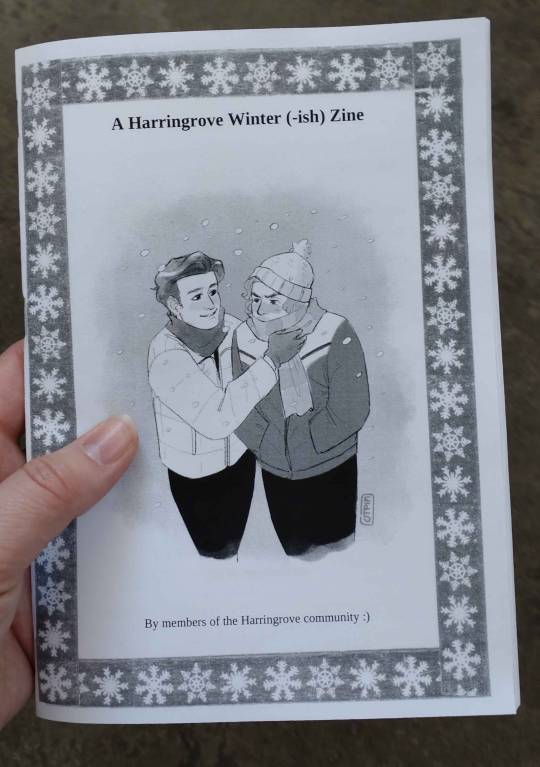
THE ZINE IS DONE (yay!)
An old-school Harringrove zine, free to download and print and enjoy, by fans for fans :)
Making a zine doesn't have to be so complicated! It can just be for fun! This particular one was put together in Microsoft Word (yes, I'm old), and decorated with washi tape and decorative borders I had lying around at home.
Artists: @deathbyotpin123 @maybetorbie @thatgirlwithasquid @bubblegumflavor @alicetallula and yours truly
Writers: @shieldofiron @dragonflylady77 @spaceofentropy @lorifragolina @sarkkunautti and again, yours truly
(Please note that one of the fics is a NSFW one with possibly disturbing themes. The fic has been marked as such, and is read at your own discretion.)
Download the zine here
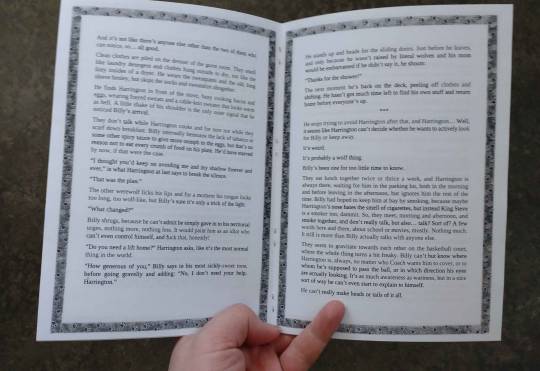
For instructions on how to print it, and pictures of the finished product, see below:
Instructions on how to print the zine (A5 format):
Step 1: Download the zine via the link above and open it (duh)
Step 2: Print it - as a BOOKLET, on BOTH SIDES of the paper (see the printer settings below)
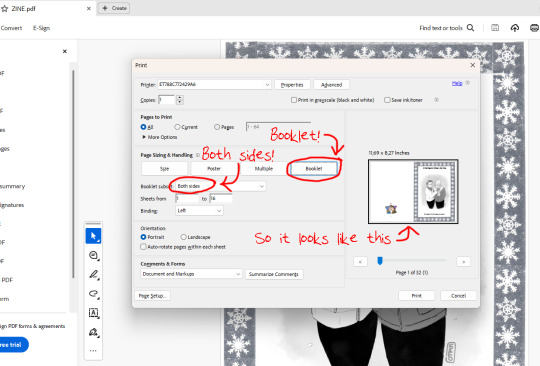
Step 3: Once printed, fold the papers in half and order them, and then either staple them or sew them together in the middle.
Step 4: Ta-daa! You have a zine! :D
(I don't have a color printer, but it works for black and white too!)
128 notes
·
View notes
Text
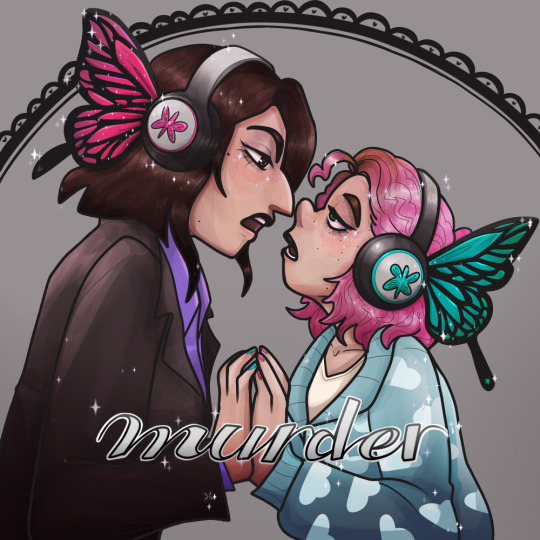
diversity win! the worms are gay!!
happy pride month!! :D
(CLICK FOR BETTER QUALITY, THEY GOT SQUASHED </3)


"I'm gonna make a bunch of stickers and nobody can stop me"
the nefarious printer cartridge running out of ink during a small test:

#I'm making the stickers real just you wait 🫵#that was basically the whole reason I drew these#anyways!#murder drones#murder worms au#uzi doorman#serial designation n#serial designation v#digital art#peanut's doodles
67 notes
·
View notes