#178px
Explore tagged Tumblr posts
Visit Tumblr Blog
Explore Tumblr blogs with no restrictions, modern design and the best experience.
Last Seen Tumblr Blogs


Fun Fact
In 2020, Tumblr had 29.4 million users in the US.
Text


Crispy salmon onigiri (<3)
302 notes
·
View notes
Text
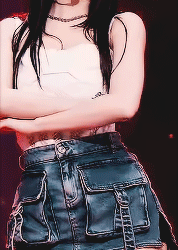


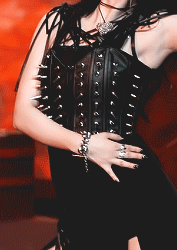

Karina & 'Drama' outfits ♥
#karina#aespa#femaleidolsedit#femaleidols#by seuhgi#flashing tw#sad i couldn't get a nice shot of the 1theK all black outfit#also middle gifs look bad in 178px but even worse on 177px so idk what to do lol#1k
2K notes
·
View notes
Text
top tip for new gif people because i've seen a few recently (which is really cool) - tumblr will compress your gif to a width of 540px when you upload it. this compression won't retain as much quality as if you just resize it to 540px across in photoshop/whatever program you use. tumblr will suck the life out of your beautiful crisp 1080px gif whereas photoshop will do its best not to (resizing in vapoursynth or similar is ideal but that's not necessary and often too much effort for adults with real lives)
#i learnt all of this during covid as a teen with a sunday job so that's why i could afford to care#also 540px is if you've got one gif per row#2 gifs per row should be resized to a width of 268px each#and 3 per row is 177px - 178px - 177px#height doesn't matter#you can google tumblr gif dimensions for a diagram but there are a few from before they increased the width in photo posts so lots of#conflicting info there#these are the correct ones#it's personal preference whether to resize ofc but the vast majority of people do#also whilst i'm yapping here#photoshop can do stuff that other software or online platforms can't#obviously use whichever one you prefer or have access to - it really doesn't matter#the more gifs the better#yay#but if there's something you've seen other people do that you can't figure out#and you're not using photoshop#chances are the other person is.#there are good alternatives like photopea but that still doesn't quite match ps#saying this bc i had a small phase of being quite discouraged as a 17yo md/zs fan from looking at all the online options and realising that#none of them had the capabilities to create the kind of gfx that i saw other people making and wanted to try out myself#ofc there's a learning curve too and LOTS to get wrong then try again but there is also the insurmountable difference between ps and#online alternatives. i hope it doesn't put people off from trying#keep at it with whatever program you've got your hands on#and if you really want photoshop. well. cough 🏴☠️🏴☠️🏴☠️🏴☠️ cough#excuse me what was i saying#i cant remember bye have fun
58 notes
·
View notes
Text
utterly fascinating to me that to this day there are gifmakers who stubbornly cling to the 500px post format. i admire your dedication but also it has been a literal decade since they changed it i think it might be time to move on
#additionally theres a sudden influx of people who dont care about the aspect ratio?#like more and more new gifmakers i see just make their gifs whatever size#and like if you see them on mobile it doesnt even matter cause they'll look like shit anyway#but it still feels so wrong to me. like why don't you want your gifs to look as good as they possibly can#540px 268px 177/178px its not hard
8 notes
·
View notes
Note
Hi! I haven’t made gift sets or photo sets on this website in forever - can you please tell me what the standard dimensions are these days? Thank you in advance - love your blog!!
sure!

the middle gif of the 3 gifs is no longer 178px, it’s now 177px! (template example source)
and you can now add up to 30 gifs and the gif size limit is 10mb!
hope this helps and thank you for loving my blog 🤗💖
44 notes
·
View notes
Text
Gif/Coloring Tutorial

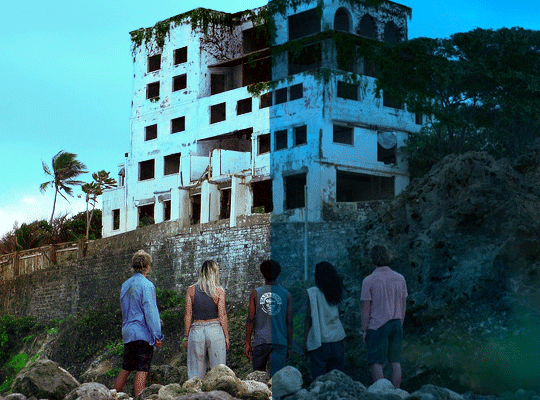
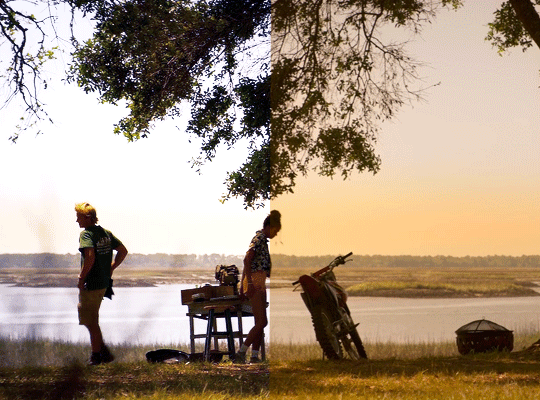
I was asked by @just-lost-inbetween-worlds how I make, specifically, my Titans gifs so I figured I’d just make a tutorial on the gif making and coloring since the show is SO blue and the process is the same for all of my gifs.
I did try and go into every step so it’s hopefully beginner friendly lol It did get a little long but I hope it helps!!
What you’ll need:
Clip of what you’re giffing (try using footage that’s 1080p or 4k, nothing below 720p)
Adobe Photoshop (I’m using 2022)
Step 1:
Open photoshop, click file > import video frames to layers

Use the cursors to trim the part you want to gif, make sure you have “make frame animation” selected

Step 2:
Group all of the frames you want to be a part of your gif. Click your first layer then crtl+shift+click your last layer

Step 3:
Delete the frames and layers you don’t want to be a part of your gif. Select the layers and click the little trash can at the very bottom of your layer panel. Do the same in your timeline
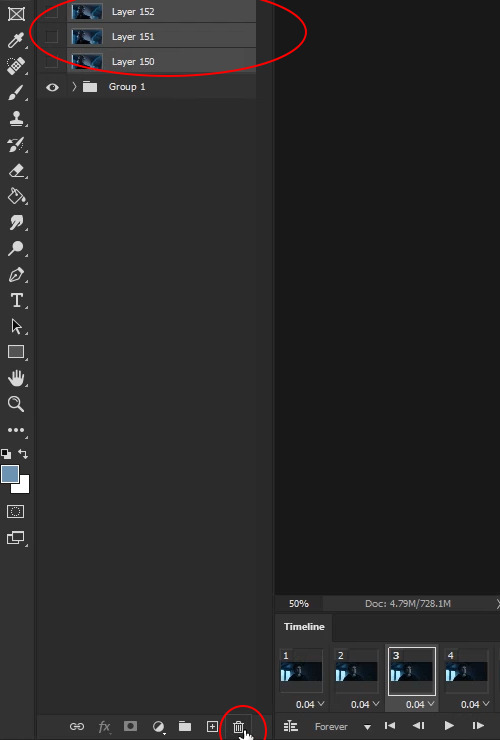
Step 4:
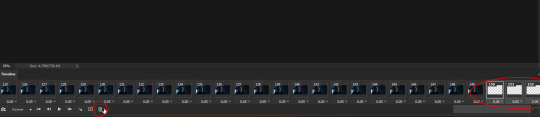
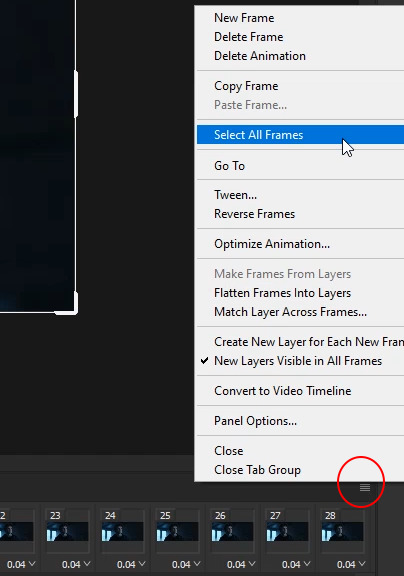
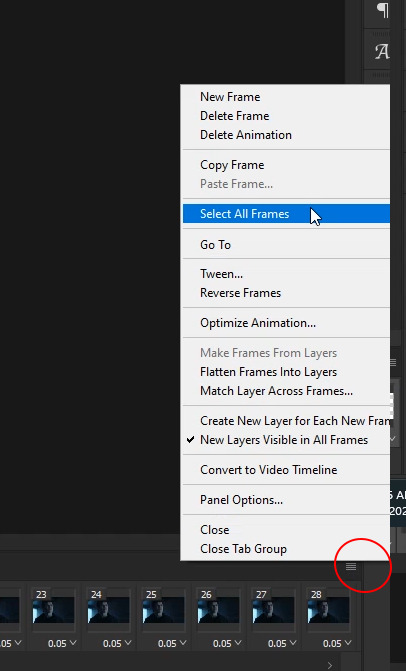
Click the hamburger stack at the right hand side of your timeline then click “select all frames”
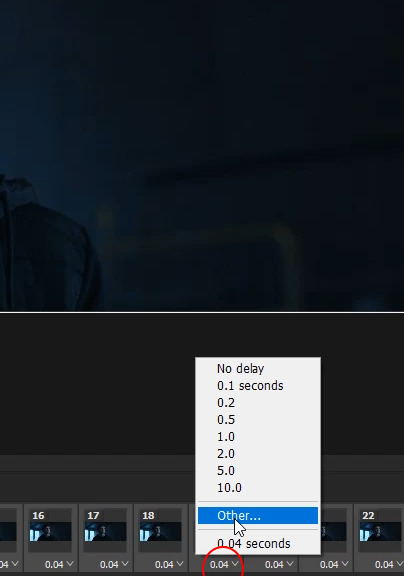
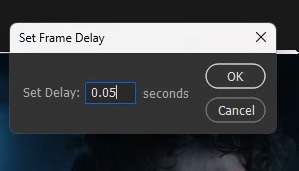
Click one of the little arrows on one of your frames and change the speed to 0.05
Step 5:
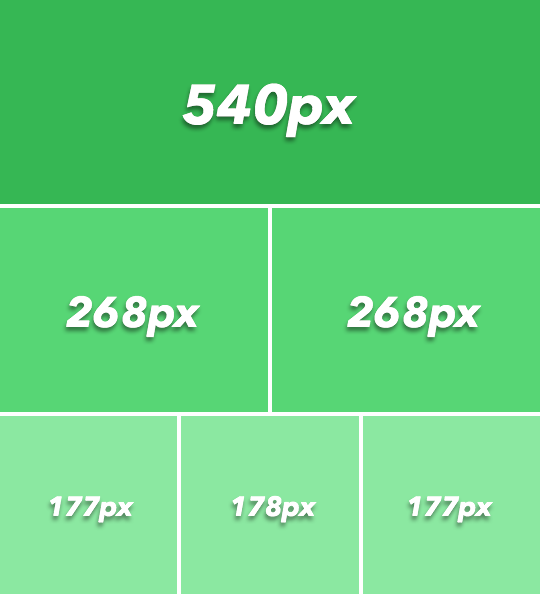
Change the size of your canvas. Tumblr has specific dimensions for gifs. For 1 column gifs, the width should be 540px, for 2 column gifs the width should be 268px, and for three column gifs the width should be 177px on the outside gifs and 178px for the middle gifs.
My favorite dimensions are 540px by 340px but you can mess around with the height. The height of the gif does not matter


Step 6:
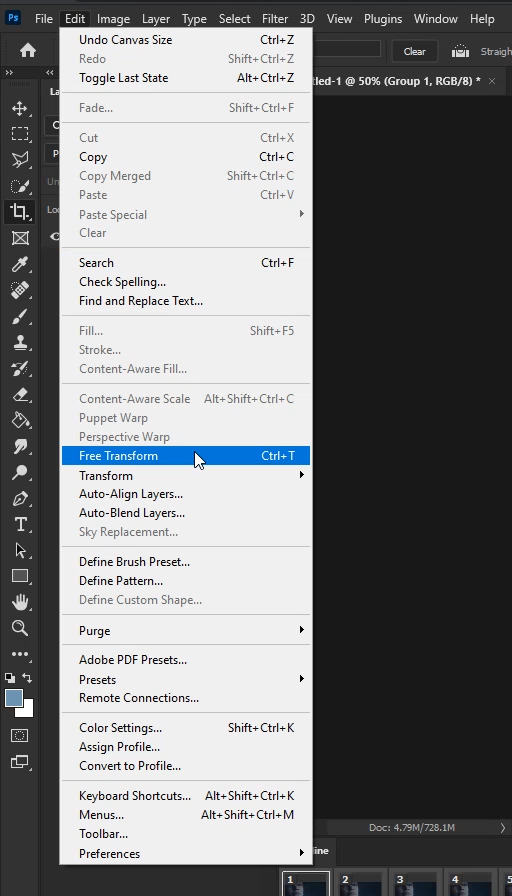
Select your group then go to edit > free transform. Use free transform to adjust your frames to fit your new canvas size

Step 7:
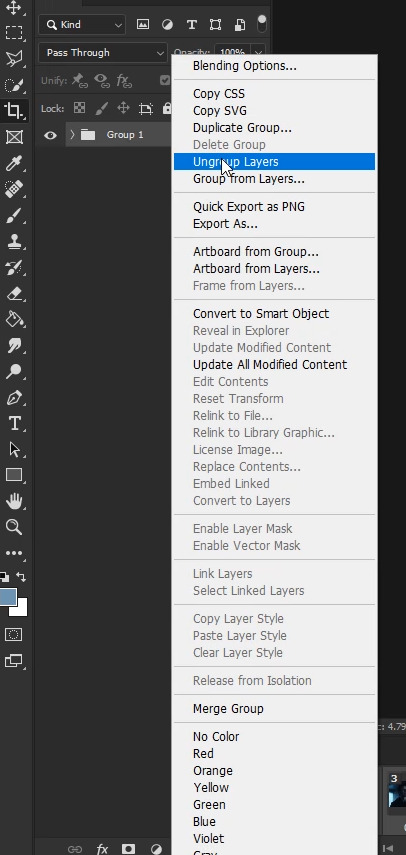
Click the hamburger stack and select all frames. Ungroup your layers by right clicking your group then “ungroup layers”. On the bottom left side of your timeline, click the little hamburger stack with a line through it to covert your timeline to frame animation. Just make sure all of your frames and layers are selected when you turn your timeline into frame animation


Step 8:
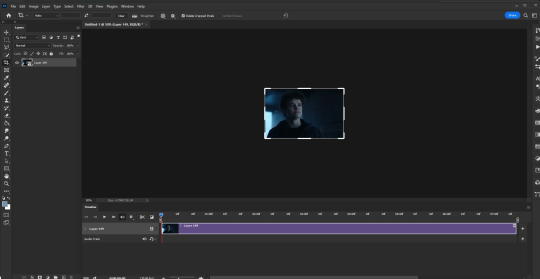
Select all of your layers and right click > “covert to smart object”
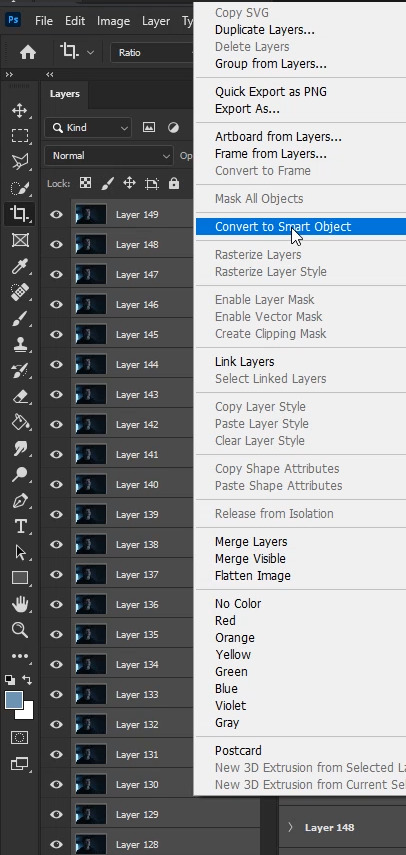
Your work space should look like this
Step 9:
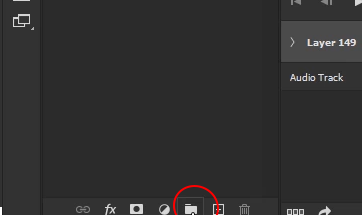
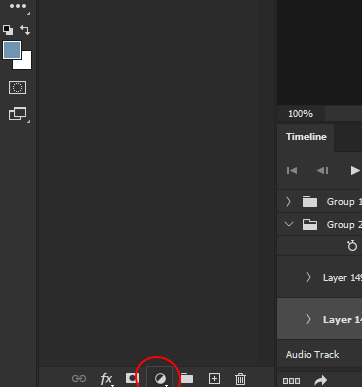
The coloring! Click the little folder at the very bottom of your layers panel
Step 10:
Click the adjustment layers option and select “Channel mixer”.
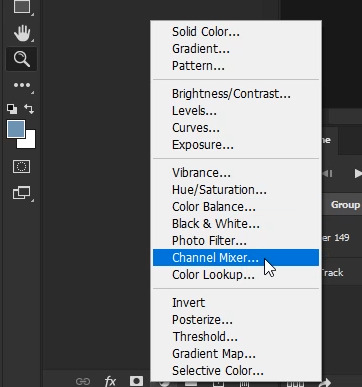
I really like channel mixer for scenes that are really blue and really yellow. It’s a quick way to reverse those filters. Channel Mixer works with contrasting colors. So, your blues go yellow, your greens go purple and your reds go blue. I highly recommend this tutorial by @zoyanazyalensky . It is amazing and they explain channel mixer worlds better than I ever could lol
For my gif, it’s really blue, so I go to the blue channel and bring the blue blues down a little
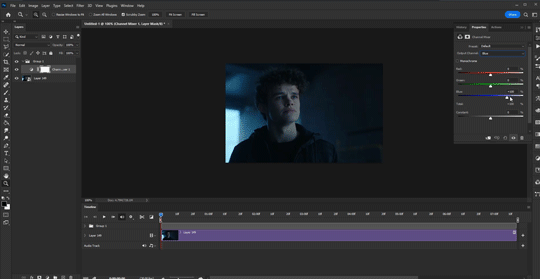
My gif starts going a little bit green so I open the green channel and bring the green greens down a little bit

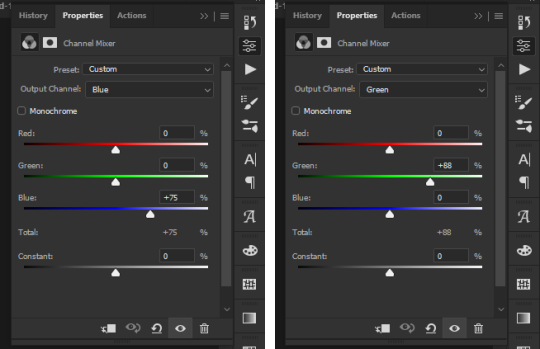
I just messed with the blue and green mixer until I was happy with it. My channel mixer settings ended up looking like this
Step 11:
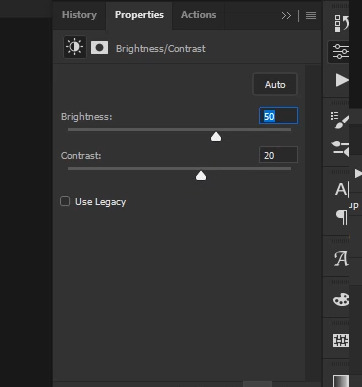
Click the adjustments layer option and select "Brightness/Contrast”
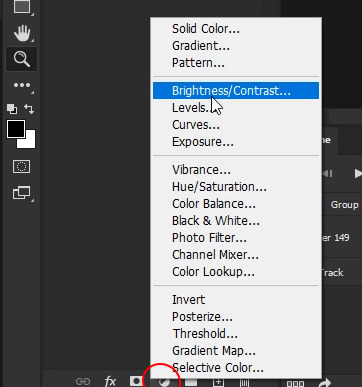
These are my brightness and contrast settings. Set these to whatever works best for your gif. Be careful not to brighten too much because your gif can go a bit grainy if you do
Step 12:
Click the adjustments layer option and select “Color Balance”
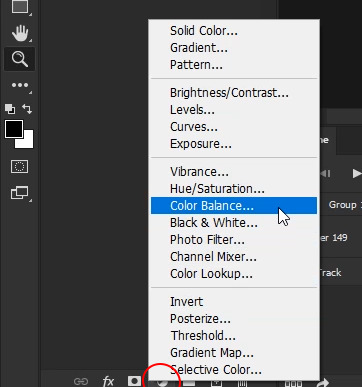
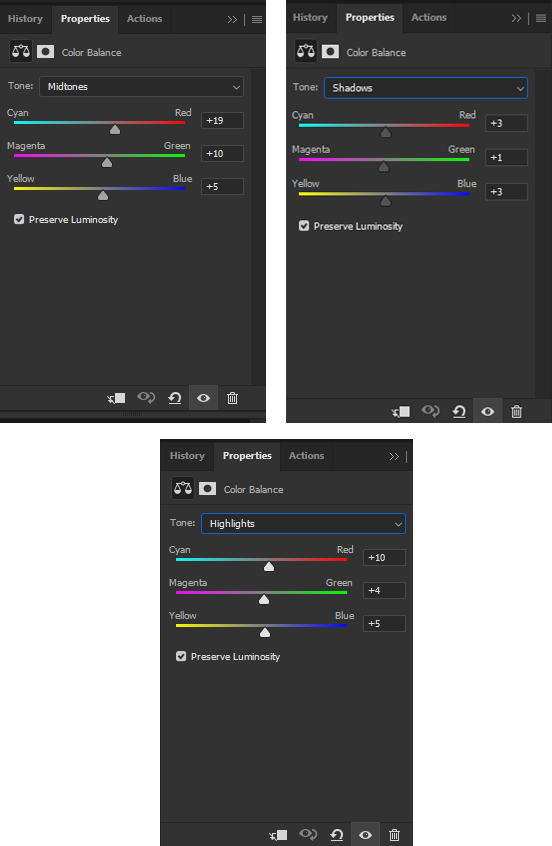
I love color balance. You can adjust a lot with it and it’s a great adjustment layer. For every gif, I start with midtones. For blue gifs like this one, I slide all of the sliders to the right and staircase them. There isn’t a specific number I set them to since every gif is different so I just slide them until I’m happy with them.
Next, click the drop down menu that says “midtones” and select “shadows”. For shadows, I also slide them just a little bit to the right.
Next, click the drop down menu and click “highlights”. Again, just move those a little bit to the right.
This is what mine looks like
For gifs that are more yellow, you’ll likely slide your sliders to the left instead of the right!!
This is what my gif looks like with Channel Mixer, Brightness/Contrast, and Color Balance

Step 13:
Click the adjustments layer option and select “Selective Color”
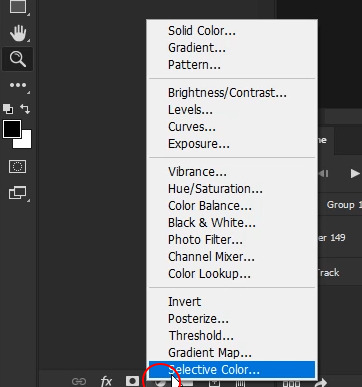
Selective color is great because it allows you to fine tune individual colors within your gif rather than changing the entire color of it. Selective color is really helpful when it comes to skin tones as well. There isn’t a specific way I do this lol I just slide the sliders left and right until I like what it looks like lol
This is what mine looks like
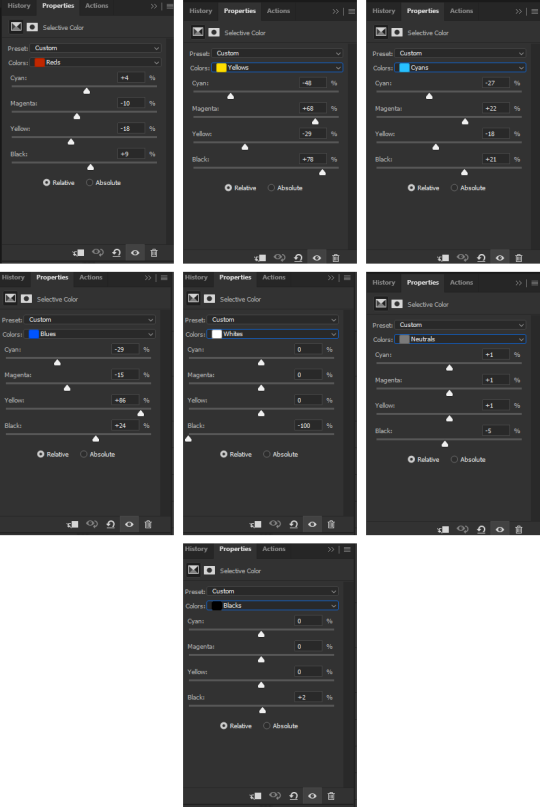
I almost allows brings the white blacks all the way to -100 and have the black blacks set to +1 to +3
Step 14:
Click the adjustments layer option and select "Vibrance”. I just upped the vibrance and saturation a bit since Jason’s skin was looking a little washed out.
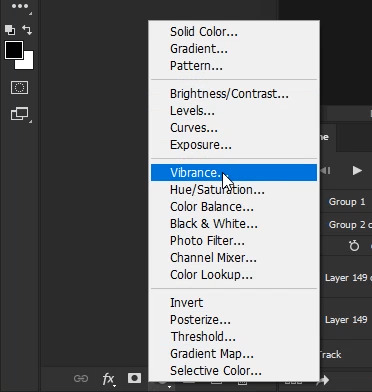
This is what mine look like

Step 15:
Add your sharpening!! Click your smart object then go to filter > sharpen > smart sharpen. I’m using sharpening by @anya-chalotra but I usually set the reduce noise to 7

Step 16:
Export!! Go to file > export > save for web


Make sure your gif is under 10mb (red circle) because if it’s over 10, it won’t play on Tumblr.
Make sure your colors are set to 256 and your dither is 100% (green circle), the quality is set to “bicubic” (blue circle), and the looping is set to forever (pink circle). The yellow circle are my other settings. You can play around with those but I find adaptive and diffusion work best in most cases!!
Step 17:
Photoshop will export your gif with a speed of 0.07 so now you need to fix that. Once your gif is saved, open your gif in Photoshop again. Select all of your frames and change the speed to 0.05. Then export it like above and save!!
And that’s it!! I hope this was at least somewhat helpful!! If you have any questions, feel free to send me an ask!!
Here are some other gifs I’ve done following these same steps


#tutorials#tutorial#gif tutorial#coloring tutorial#photoshop#adobe photoshop#photoshop tutorial#giffing tutorial#chaoticresources#completeresources#allresources#dailyresources#userautie#userzesty#userriel#userfaiths#tusernoor#my tutorials
205 notes
·
View notes
Text
unhelpful tips and resources for gifs&gfxs
Hi everyone, I don’t know how useful this post will be but I wanted to share some of the things I learned through the years of creating content for tumblr and also new information I find every now and then. I see lot of new people who start creating content here and I want to help with what I know.
Note: I won’t upload any tutorial of mine or anything because I believe the resources I will link here will be more useful than just a tutorial that I won’t be able to explain well because English is not my first language. Let’s start!
First of all, few words about tumblr and how it works. Tumblr is a site with many communities. Every user has its own blog that can post many kinds of content, including a text,photo,video,audio,art etc. When you first join the site it might be overwhelming but in reality, it is not (*whispers* I personally find instagram harder to understand how it works).
Like every site tumblr has its own search bar, tags, likes, reblogs(share on fb,rt on twitter),and follows. When you search a blog to follow and you see their posts you can like their post by tapping on the heart and share(reblog) by clicking on the two arrows button that looks like the recycle icon.
What does reblog mean and do?
Reblog is as we said the “share the post” of facebook, with reblog you don’t repost someone’s content but you share it with your followers and help it to be seen bymore people that way you actually help the creator to promote their creations.
Likes
Unlike, instagram,twitter and facebook, when you like something the website doesn’t recommend the post to your followers unless they go to your blog via their phone and go to your likes page, if you have it unlocked, so basically, likes don’t help with supporting creators as much as reblog does.
Tags
Tagging system on tumblr, in my opinion, is pretty fun both for the op of a post and for the reblogger. With tagging you can organize all the posts on your blog by anything you like. For example, if you tag artworks as #art and you want to find a certain artwork you reblogged a time ago you can just go to the tag and find it.
For op you can use tags the same way as other sites to promote your work, as I remember the first 5 tags will be shown on the general tag like if you search on tumblr #artwork and you have the tag #artwork on the first 5 it will be shown there.. but I am not sure if this changed.
Creating a post
As you can see from your dashboard(timeline on twitter) you have the option to create a text form post, a photo form post.. etc. You can experiment with all of these, don’t be afraid. I will focus on photo form posts because we will talk about gifs and gfxs.
The photo form(with the camera icon) post, is what most content creators use to post their creations like designs/graphics,art/fanart/photography, and gifs.
The site allows you to post 10 photos(if you want to post more I think Text form allows more).
The size of your photos and gifs must be under 20mb for photos and under 10mb for gifs.
As for dimension, tumblr has its own dimension but you can always post whichever you want, the bad thing is that the quality will be reduced on the dashboard and the viewer will have to click on every single photo in order to see the original quality. Here are the dimensions:
For a single photo/gif per columna it is 540px horizonatally
For 2 photos/gifs per columna it is 268px x 268px
For 3 photos/gifs per columna it is 177px x 178px x 177px (be careful the middle one always has to be 178px)
Themes
When you feel comfortable with using tumblr, you can customize your blog with beautiful themes that talented people have shared here!
You can find and learn about themes here: @/theme-hunter
Gifs/gfxs
In this part, I will provide links and tutorials for gifs and graphics, But first of all you need a program for content creation. The most common one is Photoshop, you can buy a subscription from Adobe(it is expensive) or you can find crack version on the internet.
Chaoticresource has a whole tag for photoshop and many more programs for you to start with photoshop. Not only that they have a whole list of resources for both giffing and graphic making. You can find their tag list with everything you need to here.
Here are some tutorials on how to make a gif
Tutorial by: misty-quigley
Tutorial by: kylos
Tutorial by: hayaosmiyazaki
Tutorial by: cal-kestis
Tutorial by: gr-ogu
Tutorial by: misfitsexual
Tutorial by: unbrokencolorings
Tutorial by: josefnewgayden (also has many resources)
Tutorial by: dunkzilladaddy
Tutorial by: theedorksinlove
Tutorial by: ashleysolsen (with more resources)
As you can see there are many different ways to gif, experiment with as many as you like and choose one you feel more comfortable with.
Usergif and deenafier and cillianmurphy have collected many tutorials in their page/posts so I recommend reading them.
Some random yet helpful tutorials I have and I find myself going back here and there are:
The coloring tutorial by @/ daisylouisejohnson
The coloring tutorial by @/magnusedom
The color table tutorial by @/ggroupsdaily
The coloring tutorial by @/lee-haechan here and here
Coloring tutorial by @/binariesuns
Layer mask tutorial by @/daisylouisejohnson
Transition tutorial by @/fionagallaqher (and coloring tutorial)
Blending tutorial by @/linda-darnell
Blending tutorial by: @/morningstr
Channel Mixer tutorial (REALLY IMPORTANT IMO) by @/zoyanazyalensky
Glitch effect tutorial by @/nobodynocrime
Glitch tutorial by @/sarah-snook
How to fix orange-washed characters by @/zoyanazyalensky
Colored background tutorial by @/rafael-silva
Sharpenning gifs by @/joelmillrr
Coloring tutorial by @/yelenafbelova
Coloring tutorial by @/yenvengerberg
Don’t be afraid to experiment with gifs, try different styles and most important have fun!! I know thereis a lot to learn but trust me, it can be pretty fun! Good luck!
Now for graphics.. all I have to say is just have fun and experiment, experiment and experiment more! Here is a list ofresources I have collected that helped me improve my skills and find resources.
Where to find fonts/textures/vectors/mockups.
deviantart (everything)
unsplash (photos)
pixeden (mockups,photos)
graphicburger (mostly mockups)
freedesignresources (everything)
spoongraphics (mock ups)
graphicgoogle
rawpixel (photos)
digitalbrushes (brushes)
zippypixels (mockups)
dafont (fonts)
fonts by google
behance( under the tag freebie)
pinterest
fonts.ilovetypography (fonts)
gvfxarmy on twitter did an amazing job collecting resources.. you can find them here
List of youtube channels that will help you with tutorials and educational information on graphic design
Envato Tuts
Madia Designer
elliotisacoolguy
Brad Colbow
LearningScreen
PiXimperfect
The Futur
The Futur Academy
Jeremy Mura
Blue Lightning TV Photoshop
Nemanja Sekulic
Digital Art Creation
Will Paterson
Nobu Design
Satori Graphics
Logo Design Ideas
Adobe Creative Cloud (recommend to watch some of the livestreams they are interesting)
Gareth David Studio
Spoon Graphics
PSD Box Official
creatnprocess
Jamie Windsor
Dansky
Daily Photoshop Tutorials
How to Graphic Design
Photoshop Tutorials - PSt
Yes I'm a Designer
Photoshop Tutorials
PHLEARN
Some other sites and links that i find interesting:
designbolts
thefutur free resources
The most important compositional principles in graphic design(article but check the site too)
The power of color (article, check the site too)
bezier.method (site to practice the pen tool)
aiga
httpster.net (site for inspiration)
access.mymind (color inspiration)
How to design a logo (article)
How to design a logo (article 2)
The Importance of Branding in 21st Century (article)
Color combinations
Lastly here you will find books and more resources for graphic deisgn! Thanks to @/isaaczara_ on twitter
That’s it! Hope you find this post helpful! I tried my best to not forget anything!
Have fun on tumblr and on creating your content! Don’t give up and have fun creating!
#masterpost#a rushed masterpost#long post#hope it helps#resources#its not the masterpost i said i ll make its a similar one
256 notes
·
View notes
Note
a while ago I saw someone say that we didn’t have to make the middle gif in sets of three gifs in a row 178px anymore (because tumblr had fixed that, according to them). and today I saw a tutorial mentioning a different width for big gifs (bigger than 540px). thanks for answering!!
ah okay! i haven't heard anything about sets of three changing, but i haven't made one recently, so i can't speak to that. however, i can confirm for you that 540px is still the recommended width, per tumblr:

you can absolutely make wider gifs, but the larger dimensions will only be displayed correctly when the individual gifs are clicked on. i've never posted anything wider than 540px so i can't say for sure, but you might run into quality/loading issues. i'd actually say that's pretty likely, given that tumblr is a) held together with duct tape and b) actively warning against going beyond 540px
UPDATE: some other gifmakers chimed in down in the replies (thank you @madeline-kahn and @withered-rose-with-thorns!) and while it appears tumblr will add a 1px column of padding to the right side of your post if you upload three 177px gifs in a single row, it will also make one of the gifs blurry. i'd recommend sticking with 177 x 178 x 177 to make sure everything is as crisp and clear as possible
good luck with your giffing ✨
6 notes
·
View notes
Note
WOW! Your Shogun costume design gif set is immaculate. May I ask what the size of each gif is to achieve such a cohesive look? I always like to learn from the best! :) Have a great day/night! Marlene x
thank you so much!! each middle gif is 178px, the gifs on the sides are 177px, and then the height is 250px <3 you can read more about gif sizes here !!
4 notes
·
View notes
Note
hi! i LOVE the way you made the comic strip in this post and was wondering if you'd mind explaining how you made it?: post/720743054291746816/elios-25k-party-kate-bishop-for-chikoriita
hiya!! sure, i can definitely explain! :)
for the layout, it's the classic 177px, 178px, 177px! you can find an explanation on how that's done here.
i chose scenes that didn't have too much movement so that it would be easy to colour them. i'm currently working on a colouring tutorial, so i won't go into detail about this part of the process here, but there are tons of other great colouring tutorials floating around on this site if you're curious to know more!!
at this point, i just went to google images, typed in "kate bishop comics" (any wording similar to this will get you good results). when i found the comic page/strip/image that i liked, i saved it to my computer and opened it on photoshop.
i used the polygonal lasso tool to cut out the speech bubble, then dragged it onto my canvas that had 3 gifs. i sharpened the speech bubble a bit so it wasn't as blurry, then placed it accordingly after sizing it down. (you can also play around with the brightness/contrast and levels adjustment layers if you want your speech bubble to be brighter!)
that's essentially the process i had for the comic strip -- i hope this was helpful! sorry that this wasn't not a full tutorial, i just don't have the capacity to make one right now but i know i'll never get to actually explain if i don't do it this way >:0 so, feel free to ask more questions at any time and i'll do my best to clarify!! :)
2 notes
·
View notes
Text


Cowboy butter steak bites (<3)
#*mine#178px#food#foodie#foodblr#food gif#stim#stimblr#steak bites#mashed potatoes#cooking#steak#savory#dinner
105 notes
·
View notes
Text
Dark Mode Work Skin for the fic To Be a Dragon Among Men

This is the code and urls for the custom dark mode work skin I made for my fic To Be a Dragon. Feel free to use it for your own works or for site skins, just remember to credit my user if you do.
Additional Resources
A Step-by-Step Guide to Work Skins from AO3 News - A great basic guide to what work skins are and how to make one.
How to Apply Work Skins to Others' Works by classygreydove - This is a guide I made on how to make a work skin into a site skin. You'll need to know this if you want to apply the work skin to any fic you want to read.
How to Change Work Skin Font by classygreydove - Don't like the font I use for the work skin? Don't worry, I'll show you how to change it.
Light Mode CSS - You can find the code for the Light Mode work skin here.
Light and Dark Mode Backgrounds - You can find the background images for the Light and Dark Mode work skins here.
Other Background Options - Here are a few mid-tone backgrounds that will have a lower contrast to the text.
Line Breaks (for Phone) - Do you like the custom dragon line breaks? Here's the phone-sized ones.
Line Breaks (for Wide Screens) - Do you like the custom dragon line breaks? Here's the laptop-sized ones.
[Code begins under Keep reading break]
#workskin .userstuff .hr, #workskin .hr, #workskin hr { height: 36px; width: 178px; background: url(https://64.media.tumblr.com/f19653c8c877dbe7a14e78434f1d0df6/d0f8688c32033f2d-b3/s250x400/6edcdac1e5614693d10491cff0725fd3633de77e.png); background-repeat: no-repeat; background-position: center; border: 0; }
#workskin { background: url(https://64.media.tumblr.com/f20ef324c5117a56d7dd2c8aa7e45151/4dcdf7c3c32cb0d1-68/s2048x3072/10c1120c78cd66a99c1067e6ed8b1addcd52ef57.png); background-repeat: repeat-y repeat-x; background-position: top; color: rgba(255, 255, 248, 0.85) !important; font-family: 'Georgia', 'Lucida Grande', 'Verdana'; }
#workskin a { background: linear-gradient(135deg, #b4853f 0%, #edc967 40%, #b4853f 80%, #705103 100%) !important; -webkit-background-clip: text !important; -webkit-text-fill-color: transparent !important; border-bottom: 0px; }
#workskin a:hover, #workskin a:active { background: linear-gradient(135deg, #b4853f 10%, #edc967 60%, #b4853f 80%, #705103 100%) !important; -webkit-background-clip: text !important; -webkit-text-fill-color: transparent !important; }
#workskin h2, #workskin h3 { line-height: 1.25; font-variant: small-caps; }
#workskin .userstuff blockquote { display: block; border: 2px solid #b4853f; border-image: linear-gradient(135deg, #b4853f 0%, #edc967 40%, #b4853f 80%, #705103 100%); border-image-slice: 1; padding: 15px 15px 15px 15px; margin-left: 1.5em; margin-right: 1.5em; }
#workskin .goldborder { display: block; border: 2px solid #b4853f; border-image: linear-gradient(135deg, #b4853f 0%, #edc967 40%, #b4853f 80%, #705103 100%); border-image-slice: 1; padding: 15px 15px 15px 15px; }
#workskin .frameborder { border: 2px solid #b4853f; border-image: linear-gradient(135deg, #b4853f 0%, #edc967 40%, #b4853f 80%, #705103 100%); border-image-slice: 1; }
#workskin .mobilebreak { width: 178px; max-width: 100%; max-height: 100%; display: block; margin-left: auto; margin-right: auto; }
#workskin .textlink { font-variant: small-caps; }
#workskin .notesheading { font-size: 120%; font-variant: small-caps; font-family: 'Georgia', 'Lucida Grande', 'Verdana'; line-height: 2; }
#workskin .triggerwarning { color: rgba(240, 240, 240, 0.9); border-radius: 5px; background: rgba(128, 0, 0, 0.8); padding-left: 2px; padding-right: 2px; font-weight: bold; font-variant: small-caps; }
#ao3 skins#ao3 writer#ao3 fanfic#ao3 work skin#dark mode#the untamed#mo dao zu shi#To Be a Dragon Among Men
4 notes
·
View notes
Note
what aspect ratio do you tend to use for your graphic posters? what’s the best option for posting multiple photos at once on tumblr so it’s not ugly 😭 love ur art and ur blog and style i’m struggling with the basics over here
everything i post to look good i make w 540px width (if it is two, one beside each other it is 268px, and three 178px) bc that is tumblr’s way! especially gifs! and also thank uuu 🥰
0 notes
Note
what are the ideal gif dimensions?
just put myself through making this guide using the exact dimensions and then being like. well i could've just done a quick doodle this wasn't necessary. but here you go
the annoying one is that middle 178px one if you do three gifs next to each other lol. it really does make a difference though. the height isn't that important, if you make them suuuuper tall they wont display right but generally anything you go with will be fine
68 notes
·
View notes
Note
Hi, Allie! I declare myself such a fan of your gifs! I wanted to know if you have any tricks to make smaller gifs (like square 177x177 or rectangular ones with a width of 268px). I always lose quality on them and they look so pixelated and wrong :(
hiiii thank you so much! sorry this is a bit late!
i'm not sure i have particular tricks for smaller gifs to be honest, except that it's important to adjust sharpen settings? in my experience my usual sharpen settings for 540px gifs are usually too strong for smaller gifs.
also for square 177px gifs, make sure in your row of three gifs that the middle one is actually 178px. (177 + 4 [gutter] + 178 + 4 + 177 = 540px)
i hope this helps a little?
1 note
·
View note