#.tuto
Explore tagged Tumblr posts
Visit Tumblr Blog
Explore Tumblr blogs with no restrictions, modern design and the best experience.
Last Seen Tumblr Blogs


Fun Fact
If you dial 1-866-584-6757, you can leave an audio post for your followers.
Note
I love your art style and how you draw hands! Mind showing us how you draw said hands? ✋🤌✌🤟
Hey there, thank you so much for your kind words! ✨
I really if I'll ever be able to explain how I draw hands with pedagogy, but I'll give out some tips that were always useful to me and I'll break down some sketches with notes explaining the creation process!
👌 ||| t i p s
• Draw the hands. Keep drawing it. Sketch it several times on the side if you're unsure and need to practice with the pose - but draw it. No one's gonna think less of you if it looks clumsy. But draw the damn hands! Just like everything else in art, practice is key and you won't get it anywhere else.
• Look at hands. Look at your own hands, at other people's hands. At the way hands are drawn in your favourite manga/comic/cartoon/anime, how artists render their hands - try to look for their personal tricks. Is it obvious that they use references? Do they simplify the process by stylising hands? How do they deal with foreshortening?
• Give your hands some character. I know it's hard to get the hang of it in the first place, but a big part of learning how to draw human figures is all about diversification. Learn to draw all kinds of hands, and when you draw them, ask yourself - who do they belong to? Height, weight, age, body shape, fashion, hobbies and work - these are parameters that will shape your hands. And to an extent, that will also determine the position you want them in.
• Struggling with the position? Go for an alternative. Sketch out the overall rudimentary shape of what you might have in mind. Use a bigger brush or a marker and determine the silhouette of the hands with no outline. Go for something simpler. Practice on another canvas; if you're struggling with a position, try drawing it from another angle or with another shape of hand; if you're struggling with a shape of hand, try drawing it from another position or another angle until you get the hang of it more naturally; if you're struggling with the angle, try drawing it with a simpler shape of hand and adjust it until you're satisfied.
🌟 ||| b r e a k d o w n

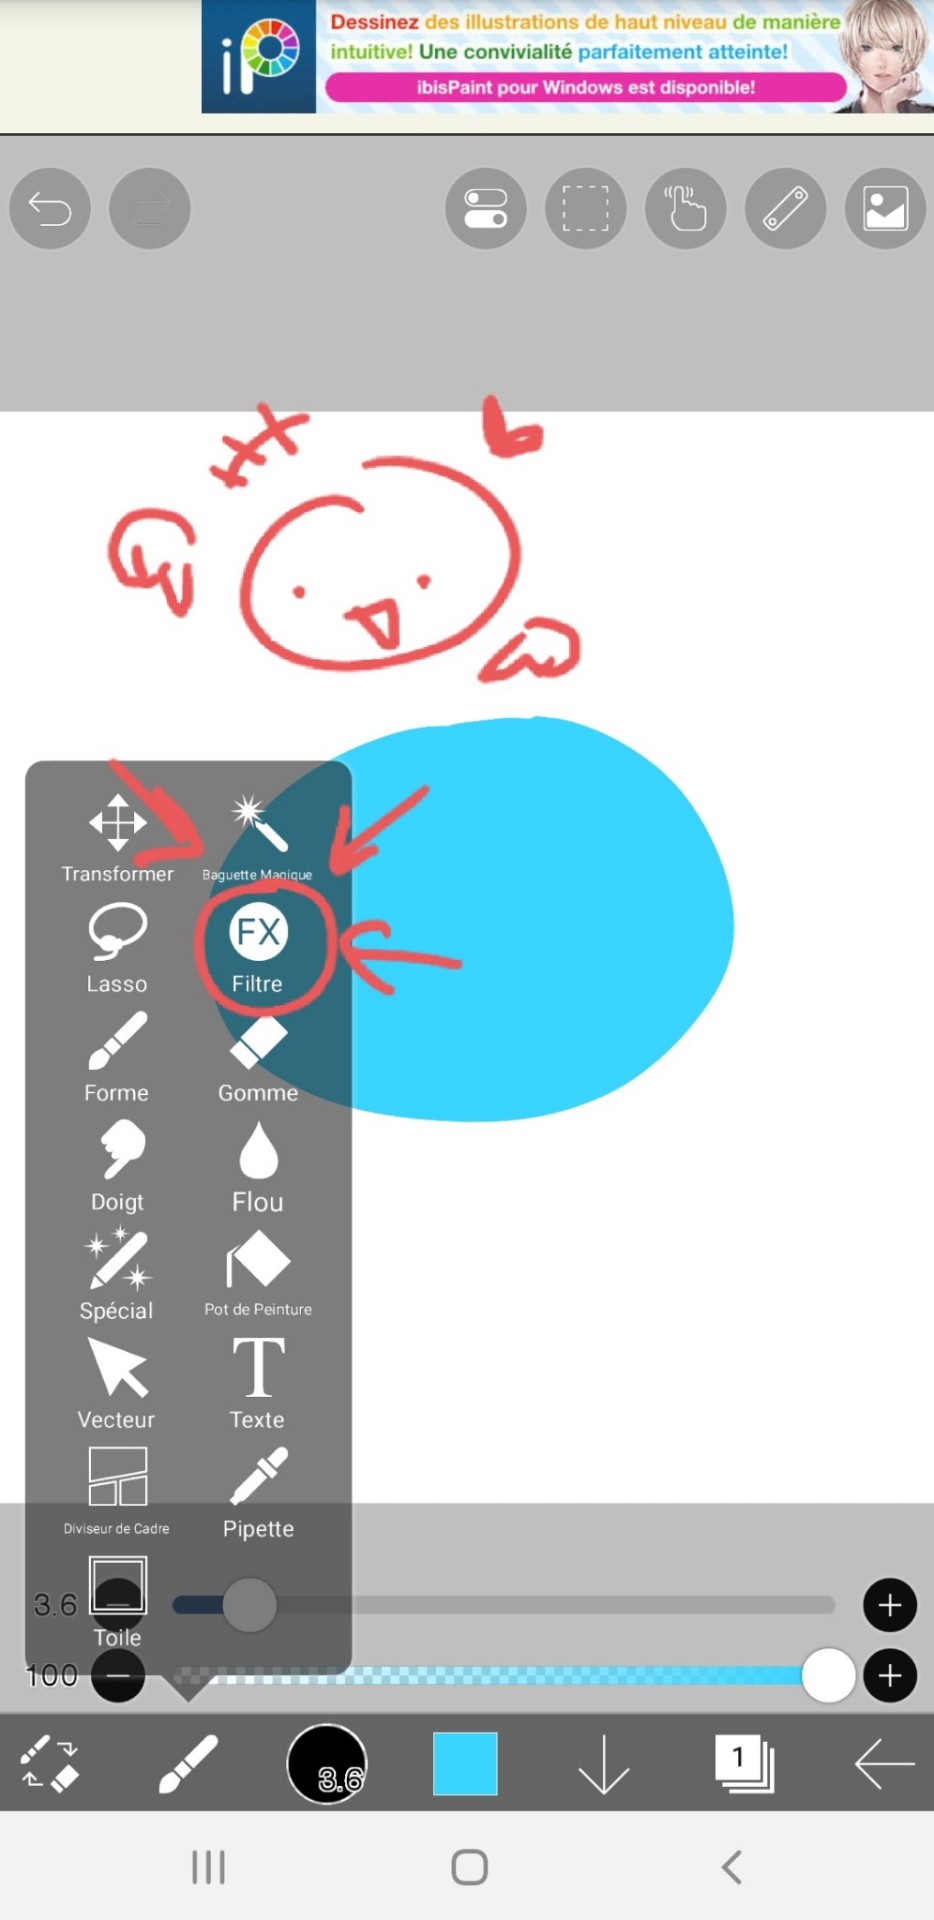
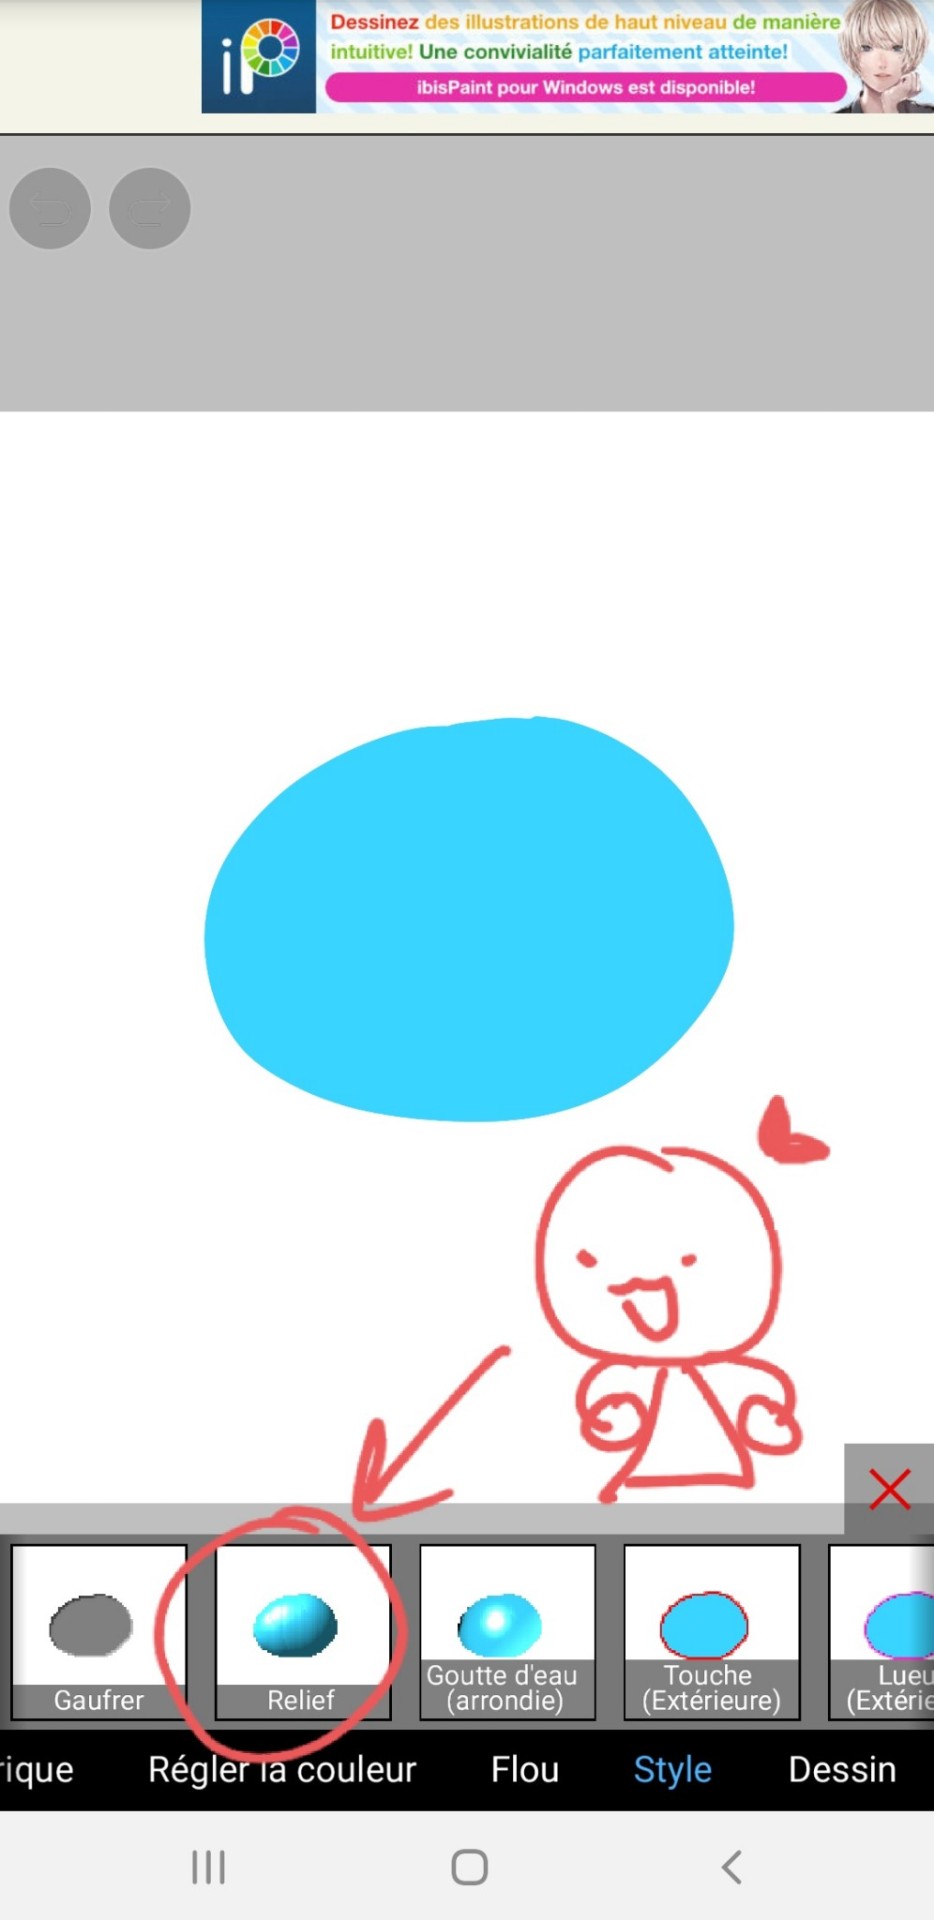
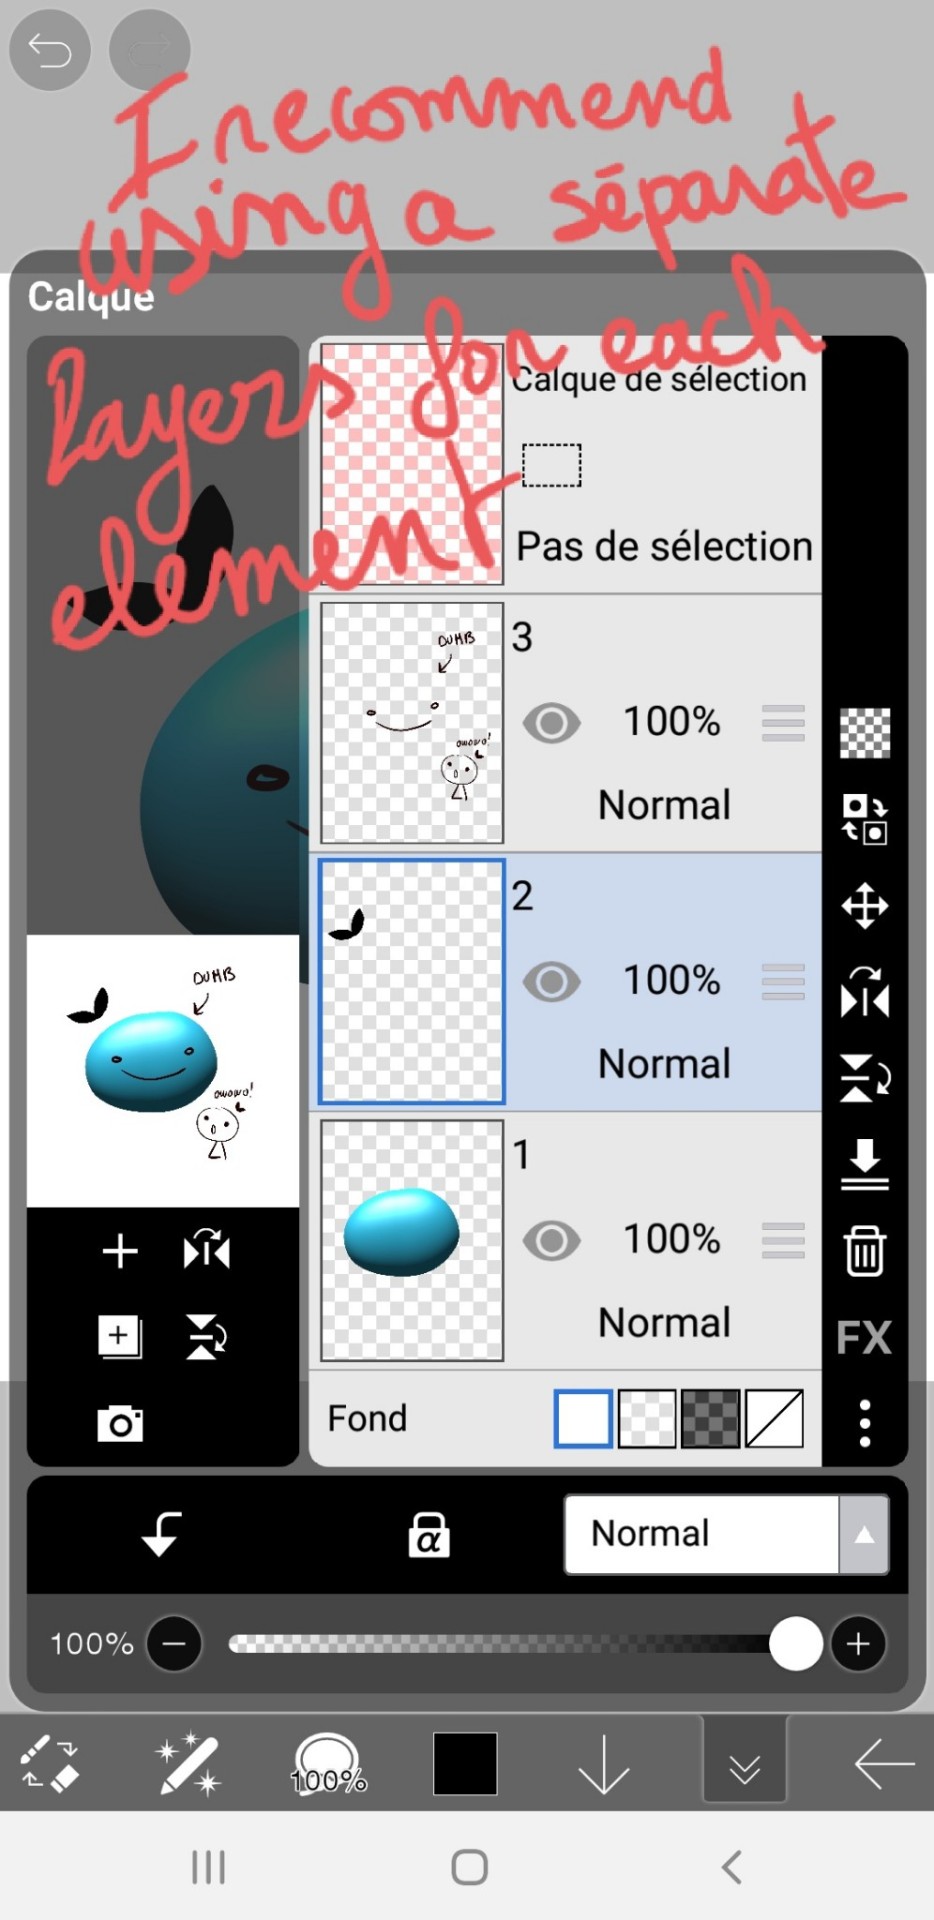
I gathered some old sketches of Bella Yaga that I lined and finished. I put the creation process with notes under the readmore! Fair warning, my sketches are horrendous and barely readable.

When I start constructing a character's base, I want to determine the position's dynamism right away - I find my balance with a few strokes, and I by the time I'm satisfied with the rough base, I know what the hands are supposed to be like, even if my sketch indicates nothing. Here's my thought process:

You'll see that being comfortable plays a huge part in how you construct your sketches. I used a character that I know by heart, so the shape and position of her hands came to me naturally - if it was someone I wasn't familiar with, the sketch would have been a lot more detailed and hesitant.
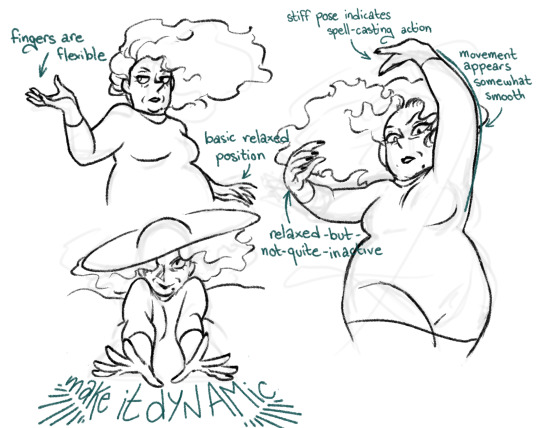
I tend to determine the details when I draw the lineart because it's a lot more efficient and time-saving - but you're free to draw an additional sketch to detail your hands before you line them.
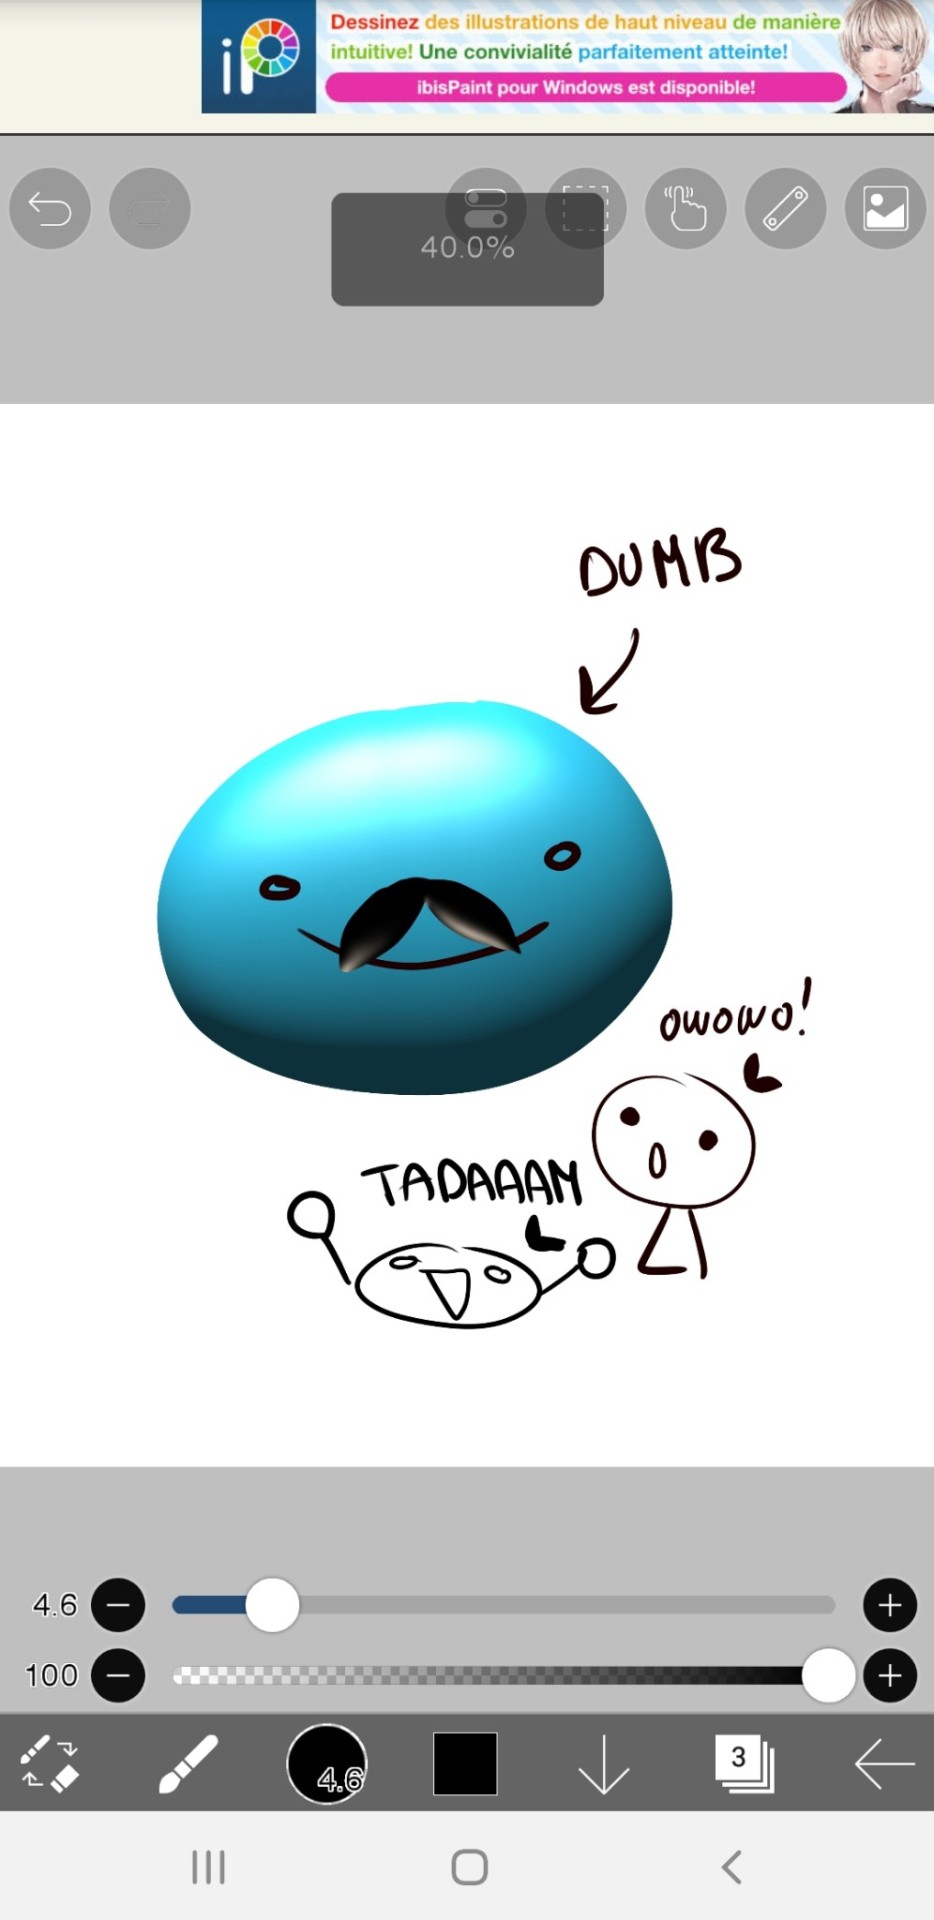
Here's the finished look!
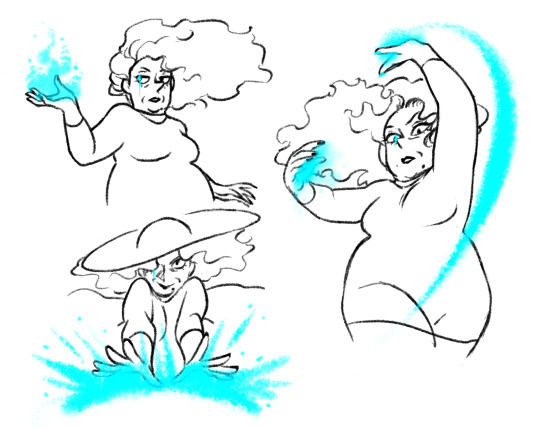
Thank you so much for your ask, I really appreciate your kind words 💕 I hope I made sense here and my tips will be useful to you!
#.ask#.tuto#.art#earwig and the witch#.bella#im unable to be normal about hands and i actively enjoy drawing them fr#thanks a lot tho i really appreciate the validation <3
20 notes
·
View notes
Text


ve škole probíhala soutěž o nejlépe ozdobené dveře a myslím si, že toto si zaslouží sdílet
(nebyla to moje třída tho)
#všimněte si prosím že je to učebna 314 a vedle je tam hned vedle mánička s pi#tohle byla poslední tři roky naše třída a teď tam dali prváky a nás šoupli jinam#díky tomuhle jim ale tuto krádež třídy musím odpustit#česky#čumblr#pelíšky
264 notes
·
View notes
Text
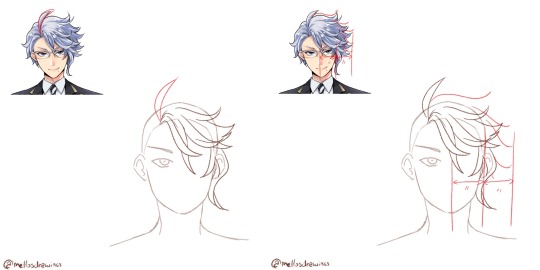
Alrighty, let's tackle the second part of this request!
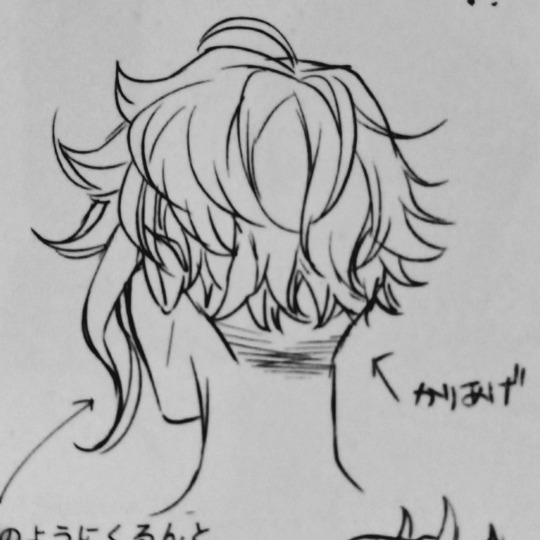
Here's a tuto on how to draw the nightmare that is Azul's hair!
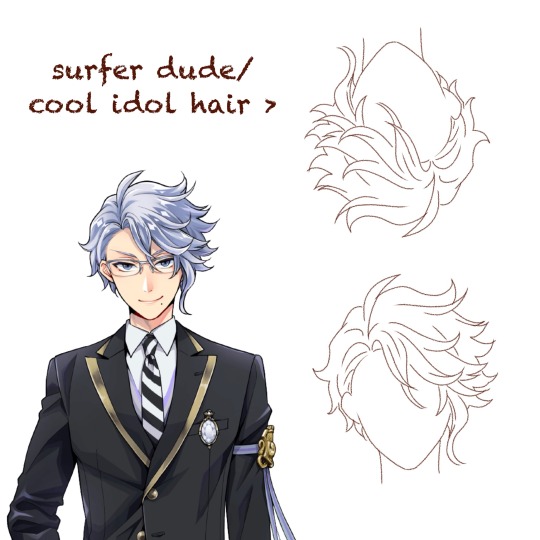
First, a few observations.
Contrary to other characters like Jamil, Riddle, or Sebek, Azul's hair doesn't immediately tell you everything about his personality. For someone as calculating and (trying to be) mature as Azul, you'd expect his hair to be slick and and each strand to be at it's proper place.
It's the contrary here. Azul has wavy, almost curly hair that is completely all over the place.
It's because that's his own struggle that is shown here. Azul has always fought against himself, being his octopus nature, his weight, or even his hair that won't stick down. That boy is just cursed to forever have something about himself that doesn't fit his aesthetic.
(Personally whenever I look at Azul upside down, I really feel like it'd be the kind of hair for a cool extroverted guy in an Idol gacha game)
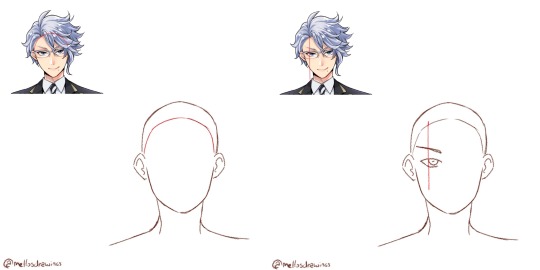
Step 1. Hairline
Azul has a simple round hairline so simply draw an arch.
Step 2. Hair root
Azul's hair all comes from a point right above the left side of his left iris, so I would suggest you draw Azul's face (and even glasses) first.
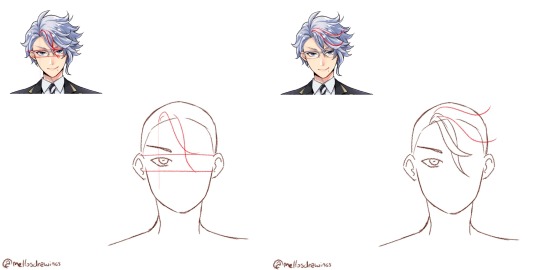
Step 3. Bangs
Azul has two strands that fall between his eyes, just a bit to the right. Start from the root point you placed earlier, and draw two wavy lines intersecting. The first will stop at the upper rim of his glasses, above his right iris area. The second will stop at the lower rim of his glasses, below his right iris area.
All of Azul's hair will be made with soft waves that fork back up, so train yourself to do that move flowingly. You're not done using it.
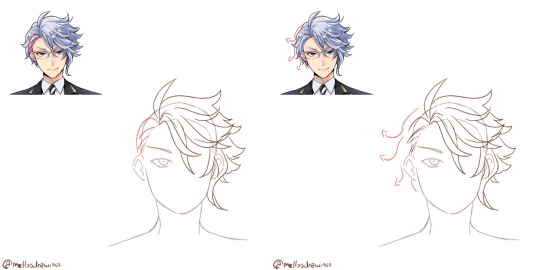
Step 4. Front hair 1
There are two strands that seem closer to us and frame the other bangs, so let's draw them first. In my example I drew the lower strand a bit too high, it should come right above Azul's right eye. The upper one thought will almost be horizontal. Both of those will reach the area above the right ear.
Once more, waves.
Step 5. Front hair 2
Now the two strands between the last two. They will go further than the ear.
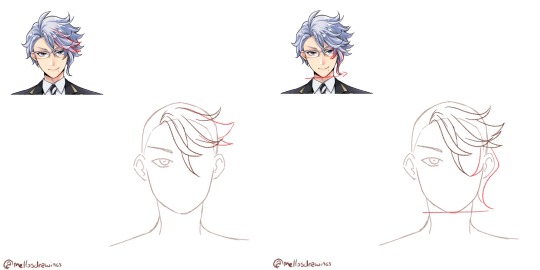
Step 6. Side strand
Azul's tentacle-like strand. It is composed by the only strand of hair that forks towards his face, instead of outward. It goes around the eye and reaches lower than the middle strand.
The second part is the actual tentacle. It hides the ear entirely and reaches down to Azul's chin level.
Still, always a wave that forks outward.
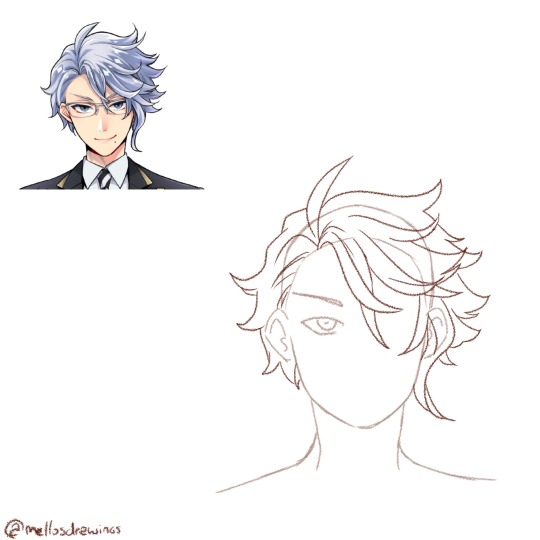
Step 7. Ahoge
Yup. "Mature" and calculating Azul has an ahoge. That might be the only part of his hair that does indeed reflect his personality. Azul can be quite immature and stupid at times. (For those who don't know, "ahoge" literally means "stupid hair" and it's usually used on stupid or immature characters)
Simply make it start at the root point. It's about the size of Azul's hairline to eyes, but globally just make it go up above where the rest of his hair would go.
Step 8. Right side
That is the part that people (even Yana if we trust the notes she made) struggle with. There is a volume here that can't be too fluffy or not big enough. It's actually just the size of half his face. Put your mark and do your best to fill it without going further.
From there, draw about 4 or 5 waves. Connecting each tip should make an arch, with the further point being the strands at Azul's eye level.
Step 9. Behind the ear
The only part of Azul's hair that is well groomed is those few strands of hair, that look like they were pushed behind his ear. This is also the only part (alongside the ahoge) that isn't made using a wave.
Step 10. Left side
And we're back to drawing waves, this time forking left. There is about 3 waves to do. These strands won't be as fluffy as the right side, sticking closer to the skull, but still add some volume. Wavy/curly hair just can't stick to the skull (I'd know it *sigh*)
Step 11. Details
Time to check your proportions, add a few lines within the strands, add more lines at the roots to show that his hair go from here.
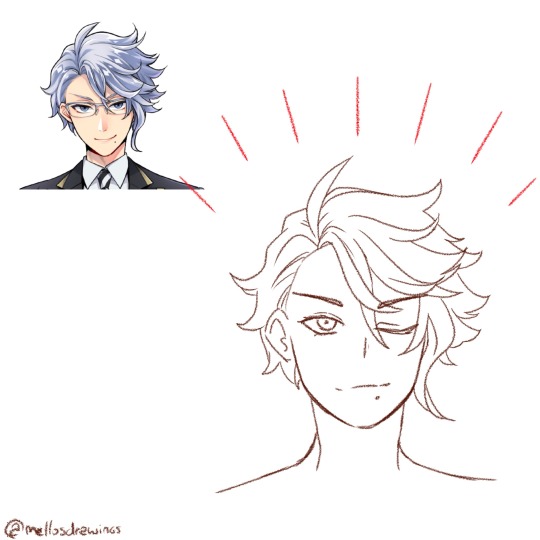
Finished!
So. Idol!Azul when? (One day. One day I'll do that Housewarden Idol AU)
(Last note: he does have an undercut. I'll forever go crazy about Azul of all people having a fuckboi (/affectionate) haircut)
(Official pic from the Magical Archives)
#this one got long#but I spent so much time dissecting Azul's chara design#have I told you dissecting and analyzing character designs wa my fav pasttime?#mello's drawings#twisted wonderland#twst#azul ashengrotto#my art#ask me anything#analysis#art tips#step by step#tutorial#tuto#drawing tutorial
361 notes
·
View notes
Text
Tuto : effet "poussière"
Version requise : Photoshop, pas besoin d'une version récente.
Durée de la video : 8.21min (effet poussière d'étoile + effet "grain texture/brûlé")
Infos : français et sous-titré. Ne pas hésiter à mettre en grand écran pour mieux voir, j'aurais dû zoomer dès le début.
Si vous avez des questions ou si ça manque de clarté, n'hésitez pas ! Ce tuto est sponsorisé par les "hop" et les "zoup" et les "euh".
Exemples de rendu (les effets de poussière d'étoile/ textures grains comme si brûlé) :

335 notes
·
View notes
Text


Recent Meanderer drawings. Monk girl and Tuto.
307 notes
·
View notes
Text
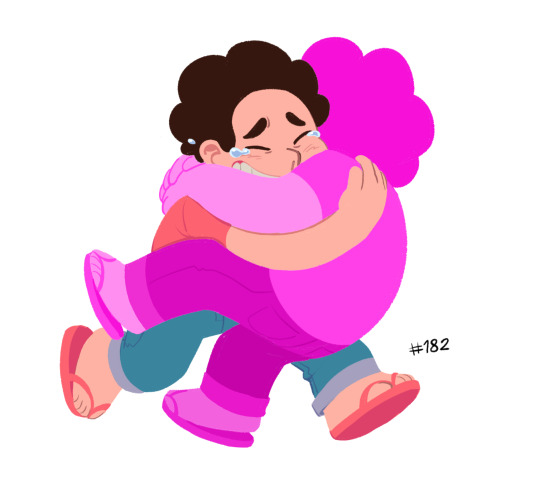
#steven universe#pink steven#su fanart#my art#kappart#if anyone has a good tuto for rendering plz send em to me im struggling over here🙏🙏
2K notes
·
View notes
Text
Americké novodobé pohádky: ne nemůžeme naznačit že to co dospělý pijí je alkohol to by mohlo pohoršit mladé diváky
České novodobé pohádky:

#vážně jsem nečekala že v dětské pohádce někdy přečtu větu “Ale pane profesore vždyť to je přece fetovací nádobíčko Kudly Dederona”#czech#česky#český tumblr#hezky česky#čumblr#původně jsem chtěla editovat jeho filmovou podobu jak si dává jointa ale pak jsem si vzpomněla na tuto ilustraci z knih#lichožrouti
145 notes
·
View notes
Text
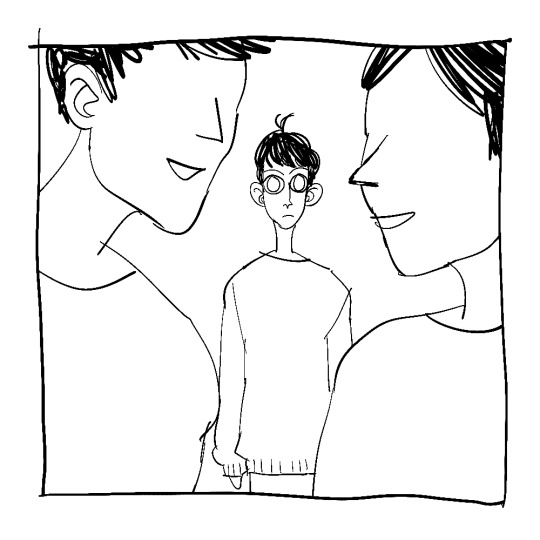
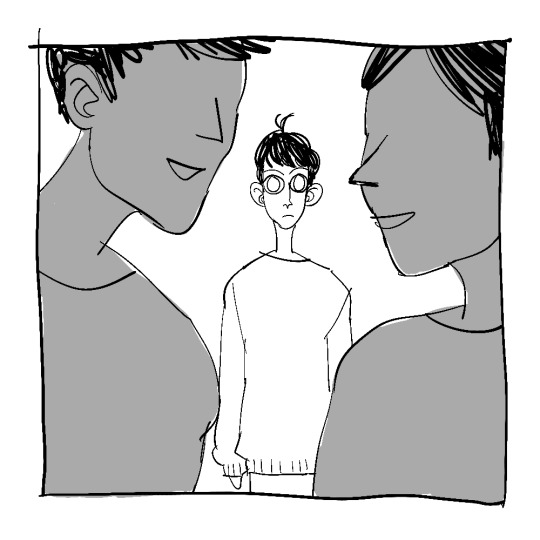
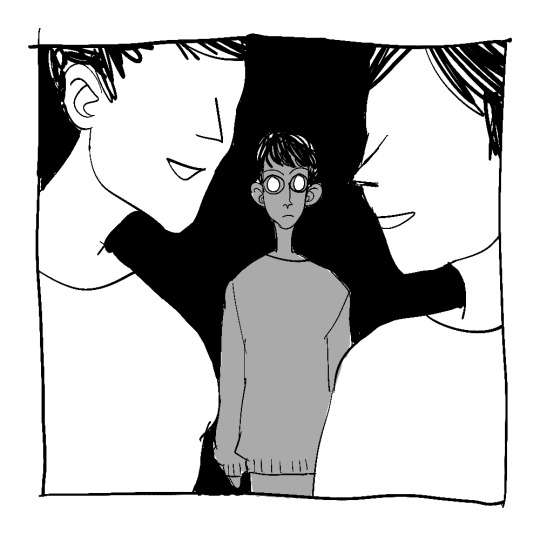
value speriments for comics !
control image (no values): we've got two foreground characters and one background character. basic
foreground shadows, varying levels of drama: feels like we are Bullying the background character in some way. talking about them, Laughing at them

blacked out foreground: maximum drama. dream sequence-y? nightmare? who knows. feels a bit more unreal than the others

background shadows: a bit ominous... what are we planning... feels like jealousy or envy... the Creature is watching...
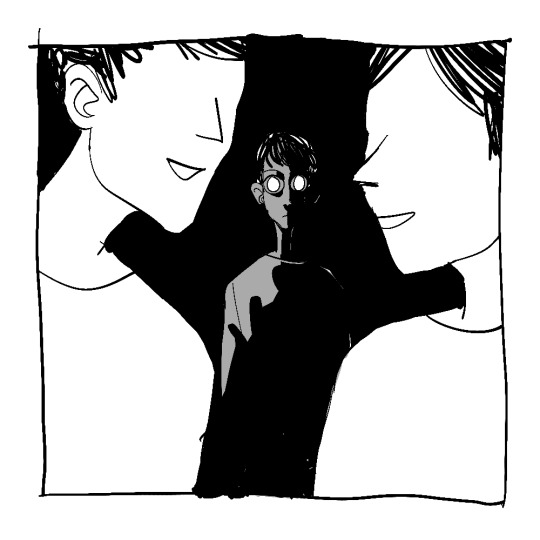
thank you for coming to my ted talk
#couldn't find any of my references so i had to make this#reference#art#art reference#my art#comics#p sure insertdisc5 has a good tuto on this
219 notes
·
View notes
Text
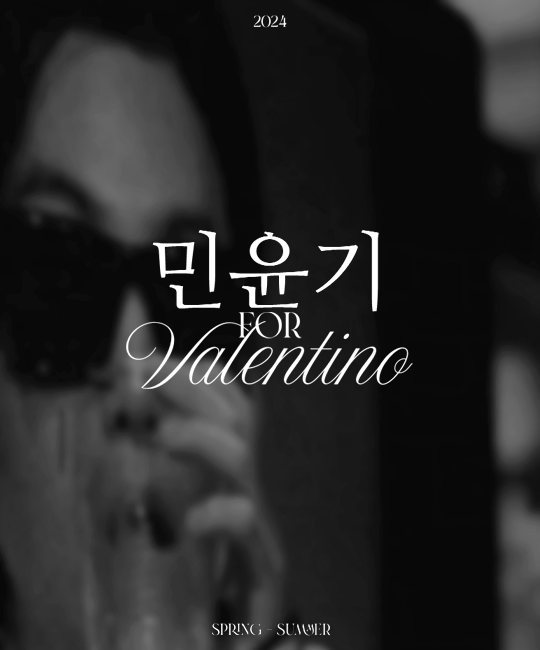

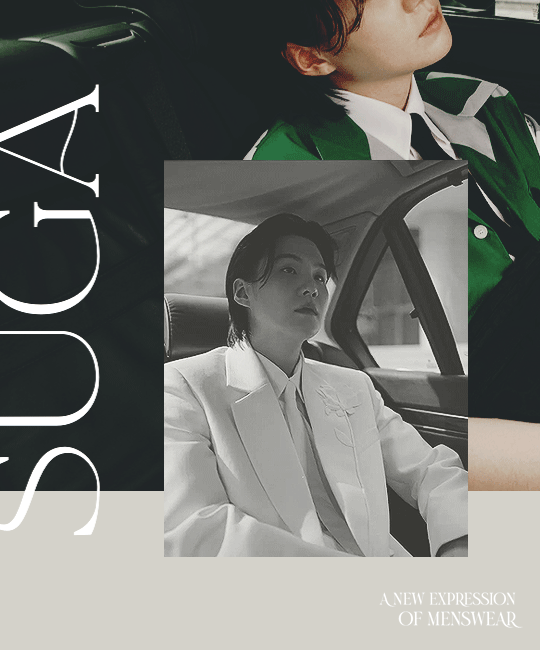

Ambassador Suga of BTS for Valentino
#bts#min yoongi#suga#btsedit#userpat#btsgif#bangtan#bangtanedit#I didn't amke gif in years!!! YEARS!!! I had to actually look at tuto to remember how to do it lmao#it will flop but to be honest it was nice to be happy to create something and to open PS#thank you Yoongi for the inspiration#and damn that's my 1st bts creation#mine#mygifs#sugaedit#yoongiedit#mygraphics
240 notes
·
View notes
Note
May I ask what brush you use to draw in 3d?
Hehe no problem it's really easy :D 💯


I hope my explanation was clear :D🎀
41 notes
·
View notes
Note
two questions.
one, HOW DOES ONE COMIC/STORY BOARD??
IM OBSESSED WITH HOW YOU DO IT ITS SO BEAUTIFUL
two, HOW DO YOU SO IT SO FAST( that’s question is more just me being super impressed oh my goodness)
you’re very good😳
Aw, sweet, a board question *puts on serious glasses*
Ok, bring it on anon.
So, the first thing to ask yourself when starting a comic, as I see it, is what type of board are you dealing with. Webtoon? A4 pages? 4 panels? There are many ways to go about it, and each involves different processes. For example, pages will allow for more superfluous scenes, whereas the webtoon format has to be super succinct because of the reading direction. I personally think that's the main reason I do pages, among other advantages: •narrative density •variety •Tumblr-friendly format
There are quite a few disadvantages too but you have to go through the process of trials and errors to really find out what suits you best!
Then there's the ambition of the sequence you're boarding for. And it goes from 1. how used I am to boarding this kind of sequence/drawing these characters/setting and backgrounds, to 2. is it an emotional sequence? Dialogue-heavy? Or more contemplative?
It changes the way you work and how you should approach your board! For example, in TMS, the very wordy chapters (4 and 5 for ex) generally called for simple and narrow framing. Of course, you don't want to bore the reader so you can spice things up to match the characters mood and reactions once in a while, but you have to bear in mind that the sequence aims to provide dialogue and information = the text bubbles are key and WILL take a lot of place. So let them.
( then again, it's all about pacing and balance. A page full of dialogue and one with too much happening are equally hard to read and boring to do)
Only dialogue, simple squares, no compostion, the focus is on Mel's reaction
On the other hand, parts 7 and 8 are all about action and atmosphere! This makes for wider and more varied shots!
They're fighting, things are going fast so why not use a single line to show many actions! They're still basically squares and rectangles but the pacing is totally different!
Or why not give the action a full page to really show its sheer impact
You can also split things, with a zoom or small time gap, depending on if it's a gag or if you want to put the focus on a reaction. Here, the asymmetry helps reinforce the unstable, jerky aspect of the scene. The situation is getting out of hand, and visually, the pages are affected too.
Now, these are case-by-case examples. And I never work on my pages separately.
For context, this-

-is the "first" board I did for part 8.
The drawings are very small and frankly difficult to make out, but the intention is what matters at this point lol I have the script (very important) next to my canvas, and I scribble the pages one after the ither. This allows me to see if the actions flow well, if the compositions are varied and also whether certain passages are too long or too short in regard to their importance. Which scenes can be merged? Removed? Toned down or if they deserve more bite?
This is a really fun and creative part but, I'll say it again, made a lot easier with a solid scipt. And I'm talking about a text document with clearly defined dialogues (or at least outlines) and actions.
I can't really explain how to write a script, it really depends on your work flow and how confortable you are with writing, but it's too important to just rush through it. No matter how much it changes before, during or after your finish boarding (cuz you gotta break your own rules sometimes and you'll often realize some things don't work as well once you put them on paper/sometimes art block can be resolved by writing the scene and just taking the time to imagine) but it's still your one guideline.
Aaaand, that's about it.
Other than that, I can only highly recommend reading lots of comics, Webtoon, books, watching movies, paintings, illustrations, animatics or listening to music, to inspire you and expand your own "personal library of references". Professional or not, anything your find inspiring and well executed. Boarding is at its core, telling stories. No art skill involved, just pure subjectivity. At the end of the day, it's all about squares, rectangles and bubbles so you gotta work on your creativity. The rest is gut feeling!
Constantly ask yourself how to tell this story, and how you want to tell it. How this sequence should be perceived? What do you need to show to make pages and pages of words appealing and interesting.
Be patient, be bold. Start with easy stuff to get some confidence if you need to. Accept that "boring" pages are smt necessary and that it's up to you to build up tension for a scene to really pop. Try new ideas and be ready to scrap many of them, the result will be worth all the work!
Now, concerning the "fast" part, I'm flattered but I personally think I'm super slow xD You prbly get that impression bc I finish the whole chapter before posting it, but behind the scene, I'm just working at a very regular pace.
Thank youuu anon ♡( ◡‿◡ )
#ask#ask me#forgot the tag I use for those errr#tuto#boarding is so much fun *sigh* unlike this *looking at the pile of pages waiting for lineart*#I personnaly prefer boarding for animatic but comics are fun cuz I know I'll get to actually see the final result haha#I know some artists love to do intricate shots with lots of details and pers (big flex here) but I'm more about the vibe really xD
59 notes
·
View notes
Text
pokud je anděl páně vskutku české good omens tak prosím třetí díl kde se tento archanděl Gabriel zamiluje do typicky česky čertovského páně pekel jejich veličenstva Belzebuba

#vůbec netuším kdo by je měl hrát ale určitě máme v herectvu někoho kdo by tuto růžovokřídlou mrchu dokonale doplnil#kdo by zosobnil pekelnou prací otráveného nechuťáka. votrhané stvořeníčko pekla. s neočekávanou láskou pro andělské milfky#každopádně chápete jak moc je to dokonalé a paralelní?? tenhle gabriel taky bytostně nesnáší Petronela#“just shut up and die already” a “ty? VEN!” má stejné pocítěníčko. ta nechuť je silná#kdyby Gabriel mohl vidět Petronela hořet v plamenech pekelných tak by to ráda udělala a všichni to víme#takže kdyby se museli z nějakého důvodu usmířit a pracovat spolu. a přitom bychom se dozvěděli o pekelno-nebeském románku.#jasně strach by do toho nešel. ale jak vtipné by to bylo#česky#obrození#good omens#archangel gabriel#anděl páně
164 notes
·
View notes
Text
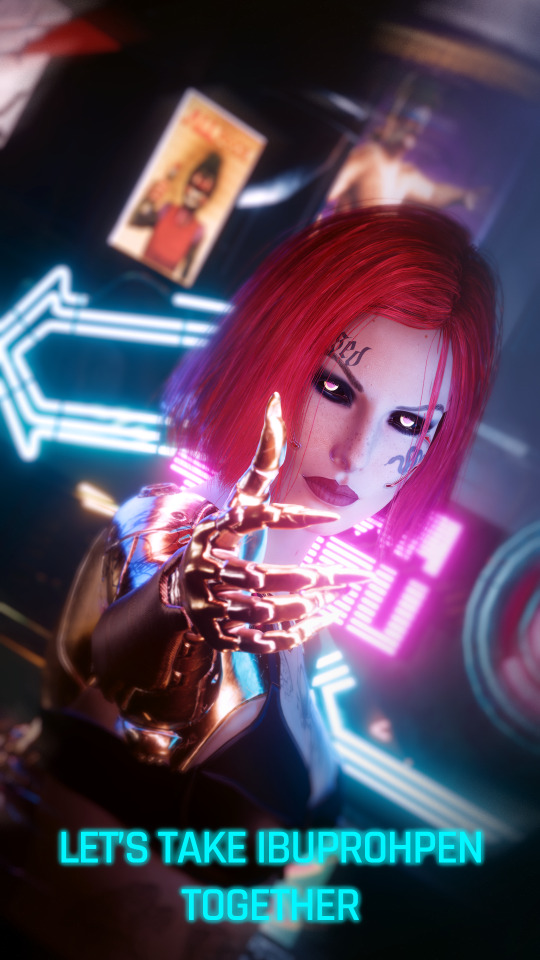
dont trust her lies
#cyberpunk 2077#oc: illyana volkova#cyberpunk photomode#i wasnt going to do anything with this pic but i edited it for a lil tuto and it made me laugh
108 notes
·
View notes
Note
Not sure if it can be done but a tutorial on glasses (like with Azul) would be fantastic. Also one on the nightmare that is Azul's hair. Please and thank you in advance.
One tuto for glasses!
I will do Azul's hair in another post :3
Warning: I don't have the vocabulary for glasses at all. I did my best to make it understandable but don't hesitate to ask for clarifications if you need TwT

Here's our two glass boys. I looked for mostly similar glasses online to use as reference.
Azul has thin frames, rectangle glasses. Trey has heavy frames, square glasses with rounded edges.
Glasses have a LOT of different shapes. Don't hesitate to look online for references on round/oval/etc glasses to help yourself. Website that sell them tend to have pics of the glasses under several angles, which is very practical when you draw anything that isn't front facing.

Step 1: drawing zone
The most important thing to figure is where to place your glasses. Anything else can be yolo-ed and still work, but badly placed glasses will make everything look weird (though it can be used for comedic effect).
Simply put: the higher part of your glasses should reach right below your eyebrows (on realistic proportions). Otherwise, use your eyelids as ref. Place your frames a bit above your eyelids. The sides of the glasses will (usually) reach the sides of the face. That's the case for both Azul and Trey.
The bottom part is where you get to choose the size of your glasses. That's where you decide to elongate them to get square/round glasses instead of rectangle ones.

Step 2: Tracing the glasses
Within the drawing zone, simply draw the general shape of the glasses. A rectangle, a square, a circle. Keep about a finger-width size gap between your two glasses.

Step 3: Details
Draw your main shape first (rectangle, square, oval). Then remove space for your nose. The glasses will tend to leave a triangular zone free in most shapes to make space for the nose (except on round glasses). Here you can add the bridge and where the arms of your glasses connect with the actual glasses.

Step 4: Frames width
Now that you have your elements placed, you only need to draw the actual frames. In most glasses the upper side will be slightly wider than the rest. Don't hesitate to only draw one side and simply copy paste and flip it to get the other side. Glasses are symmetrical so it can be a hassle.
Once there you can decide to add the thingies that keep the glasses secured on the bridge of the nose. This step can be optional if you don't go for hyper realistic glasses.

3/4 and side view
3/4: The same steps from before can be used here. Put your drawing zone first, upper frames right under the eyebrows. The side farthest from us should reach the bridge of the eyebrow (for realistic proportions). Otherwise, leave about a finger-wide space between the face and the glasses. The side closest to us will depend on how much the character looks to the side. On regular 3/4 views you can place it right on the side of the eye. For the center part, follow your nose and place the triangular hole on top of it. Part of your glasses will be hidden by the nose.
You can decide to draw your glasses in front view on another layer first to get the symmetry right, and then to move and stretch your layer until it fit in front of the eyes. It's a perfectly valid strategy!
Side view: Here the only thing you need to draw is the side of the frames and the arm reaching to the ear. You can place the arm first, mostly parallel to the ground. The frames should be put right in front of the eyebrow bridge and at least cover the whole size of the eye. For bigger glasses, add volume on the bottom.
And that is mostly that? Glasses are mostly about where you put them and giving the illusion of symmetry.
After that you can have fun with the shapes (personally I love drawing round glasses), the size, you can decide to draw the thingies that hug the nosebridge or not, you can decide to draw the arms or not, you can add accessories, etc.
You can even decide not to draw parts of the glasses to keep a clear view on your eyes. Yana has a note for Azul and Trey that the glasses should always be full even if they hide the eyes. For me it depends on my mood and what is most important in the current art.

As you might see here, I tend to add a white edge to give actual presence to the lenses and separate the eyes (or hair) from the frames. It's your choice whether you want to erase anything to make things clearer or to keep it all as is to make it realistic.
And I guess the last thing I have to say is... look at refs online. I think that's how I finish most of my tutos lol
#hopefully that's not too messy#I haven't done tutos in a while I forgot how hard it was to explain things properly in another language#mello's drawings#twisted wonderland#twst#azul ashengrotto#trey clover#original characters#glasses#tuto#step by step#tutorial#art tips#drawing tutorial#ask me anything
301 notes
·
View notes
Text
youtube
TUTO ACTIONS PHOTOSHOP (version avatars rpg)
J'ai réalisé une (longue oops) vidéo tuto pour expliquer comment exploiter la fenêtre "actions" sur Photochop CC et pouvoir aller plus vite dans la création de vos avatars. Les actions ça sert à ce qu'en un seul clique et bouton, vous pouvez redimensionner, recadrer, copier coller votre coloring ou tout ce que vous voulez. Disclaimer, c'est un peu long je mets le petit sommaire en dessous, je bafouille beaucoup et mon micro n'est pas du tout de qualité, désolée d'avance ! J'espère que c'est compréhensible et que ça pouvoir aider quelques personnes !
Pensez bien à mettre en 720p !
de 0 à 2,18 minutes : introduction, je montre ce qui est possible de faire rapidement.
de 2,18 à 7,20 minutes : tuto basique pour recadrer et redimensionner en un clic.
de 7,20 à 9,50 minutes : tuto action pour ouvrir tous ses fichiers en un clic.
de 9,50 à 11,50 minutes : tuto pour recadrer, redimensionner et rajouter son coloring en un clic.
de 11,50 à 12,50 minutes : tuto pour enregistrer en .atn et ne pas perdre ses paramètres. C'est fini !
#ressources avatars#rpg ressources#tuto graphisme#tuto avatars#rpg#avatars#tutoriel photoshop#Youtube
38 notes
·
View notes
Text
Appliquer le dark mode à une bannière
Il est d'utilité commune désormais d'utiliser un dark mode sur nos forums afin de rendre l'accessibilité la plus complète possible au maximum d'utilisateurices. Cependant un souci se pose souvent; c'est celui de la bannière. Une fois installé dans le panneau d'administration, il est difficile de savoir comment faire en sorte qu'elle change lorsqu'on clique sur le bouton de dark mode. Les couleurs; c'est souvent très bien expliqué mais la bannière, je n'ai personnellement pas trouvé de tuto' explicatif de comment faire. C'est pour ça que nous sommes là aujourd'hui ! Avec quelques petites modifications de template et de rajout de CSS, nous allons apprendre à mettre en place une bannière en deux "couches" afin qu'elle change au click du dark mode.
Il va falloir tout d'abord comprendre comment nous allons procéder. Nous allons tout simplement supprimer la balise dans notre template principal qui correspond à la bannière et en "recréer" une toute nouvelle. Ça semble compliqué de premier abord, mais pas du tout !
Dans votre template "overall_header" (Panneau d'administration > Affichage > Template > Général), vous avez cette ligne là :
<a href="{U_INDEX}" id="logo"><img loading="lazy" src="{LOGO}" alt="{L_INDEX}"/></a>
Cette ligne correspond à la bannière que vous allez entrer dans votre panneau d'administration au niveau des images, et qui est cliquable en renvoyant à l'accueil. Donc si on la supprime, allez-vous me dire, comment avoir une bannière qui s'affiche correctement et qui est ensuite cliquable ? Et bien, on va tout simplement simuler cet effet avec deux couches; un peu comme les calques sur Photoshop. Le premier calque correspondra à notre bannière qui va changer au dark mode et la seconde couche sera une bannière "invisible" à la même taille que l'on va poser par dessus, et qui sera elle, cliquable. C'est donc en décortiquant cet effet pour le reproduire en deux étapes simples que l'on va pouvoir avoir une bannière qui change avec le dark mode.
Alors avant de continuer, il faut que vous ayez d'ores et déjà installé un dark mode (celui de @code-lab, EDISON, est très bien, très bien expliqué et très pratique !) afin d'avoir dans notre CSS le root correspondant au mode de base de notre forum et le "data:root", correspondant aux valeurs du dark mode.
Commençons donc par installer les deux couches de bannière. À la place de votre valeur supprimée qui correspond à la bannière de base de Forumactif, vous allez rajouter ceci à la place :
<div class="dark_bann"></div> <div class="dark_bann_sup"><a href="/"><img src="https://2img.net/i.ibb.co/BTqHhnX/prdbirthday3.png"/></a></div>
Ici, vous pouvez voir que la première div est vide et que la seconde contient une bannière invisible. Votre affichage de forum après avoir enregistré le template sera tout vide en haut de la page d'accueil et c'est parfaitement normal ! On ne panique pas, et on va installer le CSS pour rendre tout ça un peu plus joli.
La première étape est d'aller créer une nouvelle valeur dans le root correspondant à l'image de la bannière de base que vous voulez afficher; comme celle que vous aviez installé dans votre panneau d'admin. Exemple :
:root { --imgbann:url(VOTREURLD'IMAGEICI); }
Une fois ceci fait, vous allez copier coller cette même valeur dans le dark:root (qui correspond à ce que le dark mode va aller remplacer), mais en changeant l'URL par la bannière en dark mode. Exemple :
[data-color-scheme="dark"]:root { --imgbann:url(VOTREURLDELABANNDARK); }
D'accord, c'est bien mignon mais rien ne change quand on clique sur le dark mode, oskour ! Pas de panique, c'est parfaitement normal. On vient simplement de configurer le changement d'image au click du bouton de dark mode. Maintenant, il va falloir appliquer cette même image par le CSS dans la bannière dont la div était vide. Et oui, elle servait à ça ! Retournez donc dans votre CSS, et rajouter ceci :
.dark_bann { width: 800px; height: 500px; overflow: hidden; background-image: var(--imgbann); background-size: 100%; background-position: 50% 50%; }
Ici, nous avons donné une largeur de 800px à notre bannière, une hauteur de 500; on a imprimé en image de fond notre bannière de base; on lui a appliqué une taille de 100% pour que ça prenne bien toute la place disponible et on l'a centré totalement. Et là, magie, notre bannière s'affiche bien et change au click du dark mode !
Cependant il reste un souci, notre bannière invisible cliquable apparaît en-dessous de notre "vraie" bannière qui elle n'est pas cliquable. Nous allons donc ajouter à notre CSS :
.dark_bann_sup { overflow: hidden; width: 1005px; height: 500px; margin-top: -500px; } .dark_bann_sup img { width:100%; }
Ici, on a donné la même taille à la bannière invisible (vous pouvez essayer de lui mettre un background d'une couleur bien voyante comme le rouge pour bien la voir) et on l'a "remonté" pour qu'elle se superpose à notre vraie bannière. Et là, tout est parfait ! On peut bien la cliquer comme une bannière "normale", et la couche inférieure est notre bannière qui change au dark mode.
Voilà voilà, j'espère que ce tuto pourra aider qui que ça intéressera et que ça ne sera pas trop difficile à utiliser !

#forumactif#tuto code#tutoriel#forum rpg#rpg forum#french rpg#ressources#forumrpg#forum#code#rpg francophone#partage de ressources
35 notes
·
View notes