#tutoriel
Explore tagged Tumblr posts
Text
Undertale lore is hilarious because there'll be impossibly deep secrets about certain characters you can more or less only learn by datamining, but also the first major character is called "Toriel" because she gives you the tutorial.
6K notes
·
View notes
Note
Hello :D
I have been following you for the last year or so (a few days after I got my Tumblr lmao) and I absolutely love your art!
I have been wanting to study your art style for a while but don't really know where to start,,,
Could you please show me a small portion of your art process, if it isn't too much trouble of course. Thank you and have a nice day!
hello. oh my god. this took forever to find.
im sorry it took 2 WHOLE FUCKING MONTHS for me to respond to this but i wanted to put it off until i felt happy with my art process again, so here it is
my fall 2024 rendering tutorial!
(this will be very very long)

FLATS AND WHATEVER YOU WANNA DO WITH LINES GIRL. then make sure to recolor the lineart to better match your base. trust me it helps, bold dark lines are Not your best friend when rendering. wait for that post-rendering
i start off with a doodle or a sketch, and then filling it in with flats and other details such as blush

FIGURE OUT YOUR LIGHT SOURCE. FIGURE IT OUT GIRL YOU CAN DO IT you can make it as simple as possible, make it as big as possible, dont even THINK about the details.........just make it really fucking big so you at least know where the shadows and the light goes THEN add smaller shading details LISTEN TO ME. LISTEN TO ME OKAY!!!!!!!!
my key point with this is for you to learn lighting fundamentals.
it's SOOO ANNOYING but alas......they are all correct. it helps a lot.
one thing i also really want to point out is that i like creating a big shadow shape first before fixing up the little details (such as folds and whatever) because it helps me focus on the way the lighting actually works instead of tunnel vision-ing into making the shading make sense on the clothing.

contact shadows (i dont remember if thats what theyre called okay) theyre fucking ugly because im not actually thinking sorry 💔
okay so basically:
contact shadows (if that's what they're called) are the spots in shading and lighting where light will NEVER hit.
shadows are still influenced by the colors and lights around it (it's why a blue shadow and a yellow shadow feel completely different, despite both being shadows) so it's not always COMPLETELY dark.
BUT! there are small points in shadows where light never hits, and they're almost always super dark or pitch black.
it's hard to explain shadow and light so briefly for a tutorial, but you'll notice it when watching fundamental studies and when trying it out for yourself


YES i unclipped the multiply layer YES its ugly and terrifying but it makes coloring the multiply layer easier okay the colors merged w multiply so now it looks cool and has depth overlaying colors that actually make sense
so basically what i did was color the multiply layer that i used to shade the overall drawing
adding a band of red/orange/yellow around where the light hits, and blue where the shadows get big and wide, gives it a fake ambient occlusion effect in the way that a person would get if they stood under the sun with a clear blue sky
the colors don't have to make sense, especially because i never draw backgrounds, but coloring the shadows really help it give a sense of depth and extra subtle detail and effect that just helps make the painting look nicer
around the end, i also put in colors (in an overlay layer with a low opacity brush) that actually make sense in context of the drawing, which is the lit cigarette and the yellow eyelights
mostly because none of the colors were making sense and i needed to actually make use of the lighting that DOES exist in the drawing lol

adding a muddy golden yellow pin light layer (opacity turned down to like 40-50%) to make the light colors less ugly lol
i SWEAR by the fucking pin light layer style. it's so useful and so so underrated.
i used an almost brown-ish gold color on stop of all the layers, and with the pin light layer, it helped make the bright (almost blue-ish) white colors more warm and more yellow. it just helps make things more warm (something i prefer)
i could probably show what it looks like without adjusting the layer opacity to truly show off what i mean (like in the coming section) but i sadly forgot to do that lol


make a layer on top of your drawing with this color in these ranges YES the drawing is fully merged NO don't be afraid, the base was fucking ugly anyway 💔 make this layer into an exclude/exclusion layer style TRUST turn down your exclusion layer opacity from a range of 10% to 40% literally until you're happy with the contrast and the way the color over the drawing. use your eyeballs. i know you can do it im so proud of you
this is pretty self-explanatory instruction-wise, so i'll go into why i do this instead
i really like art that seems like it has low contrast, with almost mid-gray shading and lines. i don't personally use dark and bold lines and shading, unless i find it necessary for the tone of the piece, so using this method helps lower the contrast of the art and make it look "pleasantly muddy" in the way that it's easier and softer on the eyes.
the inverted blue color also helps makes things warmer!
the exclusion layer style is still a bit of a mystery to me but i really like the effect it gives, even if i don't completely get how it works lol
if you want an alternative method to this, and if you have access to it (because i primarily use sai and sai only),
i absolutely encourage you to play around and experiment with gradient maps.
there are so many out there you can make yourself or even get from others that just give the painting an extra amount of depth and color variation. they're SO fun.
personally, if sai2 gets a gradient map update, it's over for y'all it will literally be so over no one will be able to stop me


then i merged everything and actually adjusted the contrast back up because it was looking too muddy for me 💔 but the color adjustments are still there so all hope is not lost here's a comparison of the adjusted contrast in black and white (adjusted on the left) (newly merged layer without adjusting the contrast on the right)
as you can see, i actually turned the contrast back up (despite talking all about how i liked things with less contrast lol)
i wanted to demonstrate that doing adjustments should be done in moderation, and is why i adjust layer opacity often when making color effects
you are free to play around with colors to help your style, but don't lose your initial idea and colors along the way.
you still need to trust your own colors and intuition!
along with that, i just want to say that it's completely okay to change your mind mid-painting, and it's okay to make somewhat drastic changes.
don't be afraid to change things you don't like or change your mind about certain aspects way later on
that's basically the whole thing of this!!! don't be scared!!!

now im gonna hold your hand when i say this..........but you need to learn how to render by yourself. it seems like i can teach you but i literally can't, because rendering is different on every piece and depending on how clean your base is. i have to render A LOT because of how fucking ugly my sketches are LMAO to simplify it, think of it as obsessively cleaning up every detail you can see, but with a color picker and a clean, hard edged brush. if you have shit lineart, you don't have to redraw it cleanly over and over, just paint over it. that's basically what rendering is
THIS especially is where you need to be brave and stop being scared.
like i said, i can't teach you how to render, and it's something you have to discover yourself because rendering is something that will always be personal to every single piece you make. the way you render on every piece is different.
on one piece, you will barely need to render, and on another, rendering is more than half of your ENTIRE process.
don't be afraid to paint over your old art.
rendering is a process that's both very perfectionist yet also very careless.
find your balance and just go for it.

and then that's it……..u did it………..now yuo know how to paint and render. it's literally just layering shading and lighting knowledge until you think it makes sense and looks okay lol additional note: since i render in only one layer (you don't HAVE to do this, but it'll be harder for you…), i also made slight adjustments with the transform (and liquify, if you have it) tool to make things more proportionate. (i drew the head too big lol)

if you compare the finished piece to the final unrendered base, you can see that a LOT changed, including a bit of subtle proportion adjustment.
particularly, the sleeves changed A LOT (because i really didn't like them)
but it's also over all cleaner and more coherent, instead of having haphazard colors and shading just thrown about.
rendering is when you finally use all 100% of your brain to finalize and figure out where the shading should go, where to clean up your lines, where to ERASE or ADD BACK in lines, and make sure all your colors look coherent.
it's not as intimidating as it seems, i only use a hard edged brush with a little bit of color mixing and my color picker.
it's like dragging and dropping colors to cover up mistakes, it's really quite fun when you get used to it
i wish i could explain it clearer but it's hard to describe without visuals!
i hope this helped, and i hope all my yapping isn't annoying (art as a special interest beloved)
have fun studying and trying to render in my art style!
#long post#art tutorial#rendering tutorial#art help#art tips#tutorial#kia doodles shit#artxstic-scr1bbles#tutoriel
197 notes
·
View notes
Note
Hi Zuuuu! I love your art a lot, and I'm having some troubles! I cannot draw a mouth to save my life! They all come out as sad lines, and I don't know how to improve that without drawing lips, and since your drawings usually don't have them (kinda hard with skeletons lol) I was wondering if you had any tips :3
Hii!╰(*´︶`*)╯
You don't need to draw lips in order to show a mouth ☆ Use curves and forms, add dimples on the cheeks, choose teeth or fangs, — feel free to experiment ♡
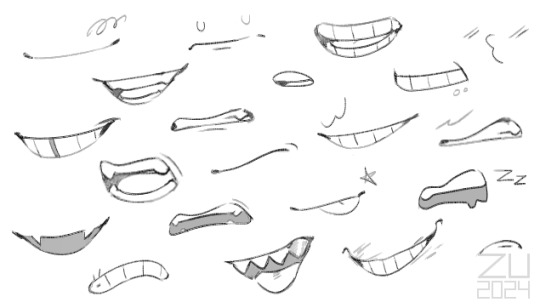
#thank youuu! <3#zu is happy#zu art#ask#tip#tutorial#zutorial#tutoriel#<– I'll never get over with these tags heh
282 notes
·
View notes
Text
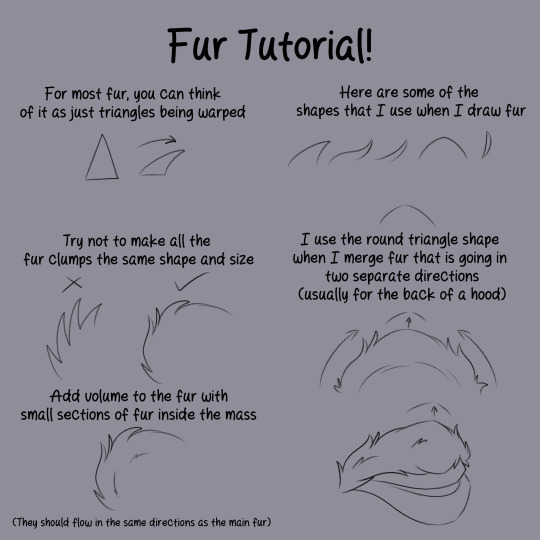
I made a short tutorial for how I draw fur. It's not much, but maybe it can help a little ❤️
212 notes
·
View notes
Note
Your art is so good and I really like your style! I was wondering, how do you draw backgrounds so well?
You probably mean that one background in the most recent part of the 3 months au comic which the making of was quite of a journey so im gonna explain it step by step
step 1. Pretend that you know what you're doing and practice (for example this background that I drew over a year ago for RinRee's comic "Broken Bonds" (the characters were drawn by her)), gain some experience
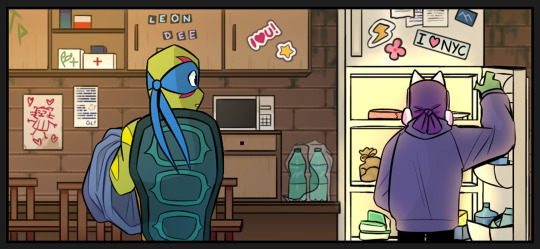
step 2. Get a minecraft reference (if you suck at perspective like me)
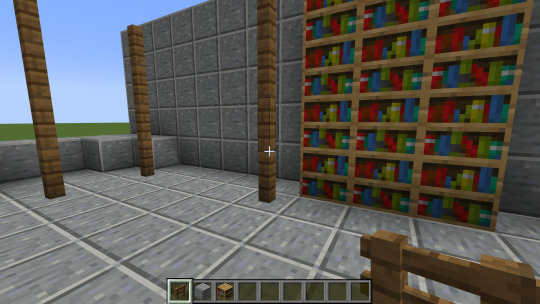
step 3. fail miserably
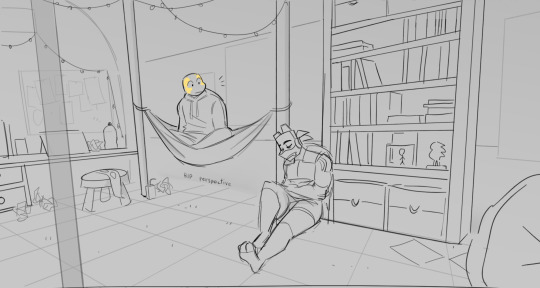
step 4. get more references
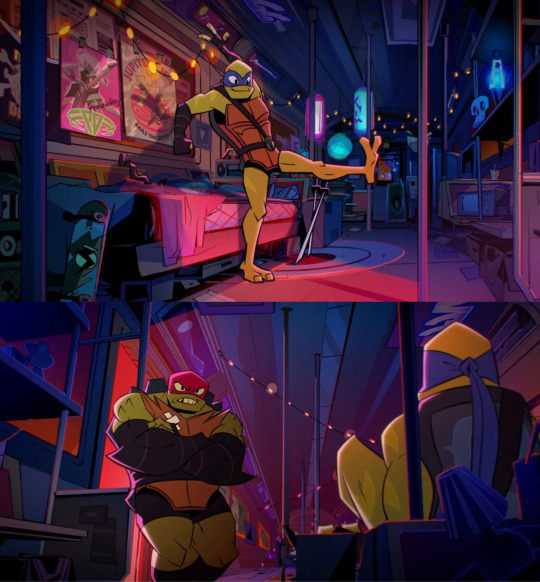
step 5. figure out what you did wrong, study (for ex. your references), practice some more (i cant show because my practice were other backgrounds for the 3 months au comic)
in my case what i did wrong was lack of warm up (the last time i drew an actual background was few months ago which is WAY TOO LONG), making it not look like an actual train and in general making the room look too organized and empty. Mikey is a chaotic and artistic soul so it's obvious that he'd have a mess in his room (it's important to think about what a character would have in their room, ex. art supplies, sticky notes/stickers, junk, posters etc)
step 6. try again
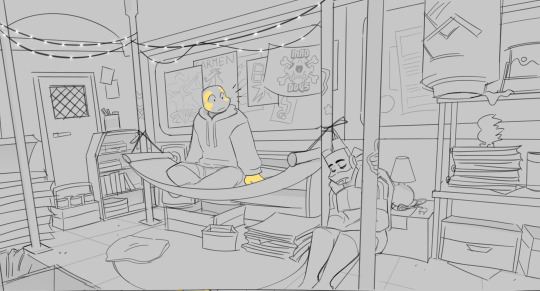
BONUS: I genuinely enjoy making backgrounds, so it's easier for me to stay patient and pay the attention to them that they need! :]
#ask#i have no idea how to tag this#art advice???#tutorial...#tuTORIEL#eh eh eh eh eh#why was the skeleton sad? because he was feeling BONELY or something i dont remember
339 notes
·
View notes
Note
HELLOO!!!!! :D
So like I'm just rlly curious since like ur my new fav artist for good omens fanart & I ADORE ur small skits if them together ;3
So like, I just wanna say first of all I LOVE your drawing of aziraphale & Crowley it's super cute how Imagine them if they were animated! And yeah ur art is amazinggjdhd and that I hope u create more art of them soon 🫶
And I wanna know how you draw them? Like a small tut on how to draw them in ur style I want to learn abit because in the future idrk but u inspire me to draw them tbh so yeah (if that's ogey)🔥😻💯


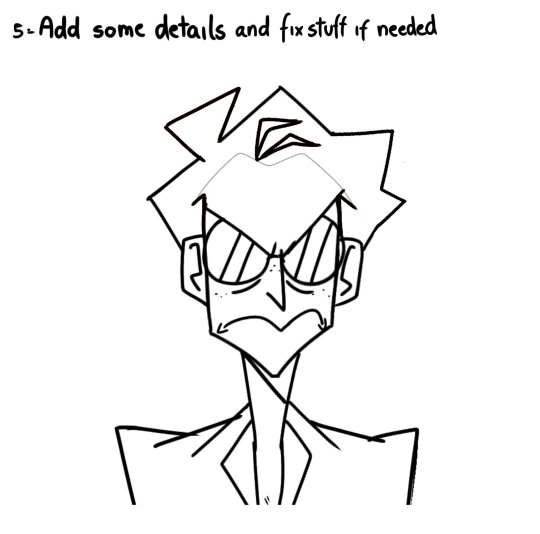

Hi!!! Lucky for you (me) I had this old thing lying around
I'll see if I can do Aziraphale later
(Thank you💛💛💛)
1K notes
·
View notes
Text
Appliquer le dark mode à une bannière
Il est d'utilité commune désormais d'utiliser un dark mode sur nos forums afin de rendre l'accessibilité la plus complète possible au maximum d'utilisateurices. Cependant un souci se pose souvent; c'est celui de la bannière. Une fois installé dans le panneau d'administration, il est difficile de savoir comment faire en sorte qu'elle change lorsqu'on clique sur le bouton de dark mode. Les couleurs; c'est souvent très bien expliqué mais la bannière, je n'ai personnellement pas trouvé de tuto' explicatif de comment faire. C'est pour ça que nous sommes là aujourd'hui ! Avec quelques petites modifications de template et de rajout de CSS, nous allons apprendre à mettre en place une bannière en deux "couches" afin qu'elle change au click du dark mode.
Il va falloir tout d'abord comprendre comment nous allons procéder. Nous allons tout simplement supprimer la balise dans notre template principal qui correspond à la bannière et en "recréer" une toute nouvelle. Ça semble compliqué de premier abord, mais pas du tout !
Dans votre template "overall_header" (Panneau d'administration > Affichage > Template > Général), vous avez cette ligne là :
<a href="{U_INDEX}" id="logo"><img loading="lazy" src="{LOGO}" alt="{L_INDEX}"/></a>
Cette ligne correspond à la bannière que vous allez entrer dans votre panneau d'administration au niveau des images, et qui est cliquable en renvoyant à l'accueil. Donc si on la supprime, allez-vous me dire, comment avoir une bannière qui s'affiche correctement et qui est ensuite cliquable ? Et bien, on va tout simplement simuler cet effet avec deux couches; un peu comme les calques sur Photoshop. Le premier calque correspondra à notre bannière qui va changer au dark mode et la seconde couche sera une bannière "invisible" à la même taille que l'on va poser par dessus, et qui sera elle, cliquable. C'est donc en décortiquant cet effet pour le reproduire en deux étapes simples que l'on va pouvoir avoir une bannière qui change avec le dark mode.
Alors avant de continuer, il faut que vous ayez d'ores et déjà installé un dark mode (celui de @code-lab, EDISON, est très bien, très bien expliqué et très pratique !) afin d'avoir dans notre CSS le root correspondant au mode de base de notre forum et le "data:root", correspondant aux valeurs du dark mode.
Commençons donc par installer les deux couches de bannière. À la place de votre valeur supprimée qui correspond à la bannière de base de Forumactif, vous allez rajouter ceci à la place :
<div class="dark_bann"></div> <div class="dark_bann_sup"><a href="/"><img src="https://2img.net/i.ibb.co/BTqHhnX/prdbirthday3.png"/></a></div>
Ici, vous pouvez voir que la première div est vide et que la seconde contient une bannière invisible. Votre affichage de forum après avoir enregistré le template sera tout vide en haut de la page d'accueil et c'est parfaitement normal ! On ne panique pas, et on va installer le CSS pour rendre tout ça un peu plus joli.
La première étape est d'aller créer une nouvelle valeur dans le root correspondant à l'image de la bannière de base que vous voulez afficher; comme celle que vous aviez installé dans votre panneau d'admin. Exemple :
:root { --imgbann:url(VOTREURLD'IMAGEICI); }
Une fois ceci fait, vous allez copier coller cette même valeur dans le dark:root (qui correspond à ce que le dark mode va aller remplacer), mais en changeant l'URL par la bannière en dark mode. Exemple :
[data-color-scheme="dark"]:root { --imgbann:url(VOTREURLDELABANNDARK); }
D'accord, c'est bien mignon mais rien ne change quand on clique sur le dark mode, oskour ! Pas de panique, c'est parfaitement normal. On vient simplement de configurer le changement d'image au click du bouton de dark mode. Maintenant, il va falloir appliquer cette même image par le CSS dans la bannière dont la div était vide. Et oui, elle servait à ça ! Retournez donc dans votre CSS, et rajouter ceci :
.dark_bann { width: 800px; height: 500px; overflow: hidden; background-image: var(--imgbann); background-size: 100%; background-position: 50% 50%; }
Ici, nous avons donné une largeur de 800px à notre bannière, une hauteur de 500; on a imprimé en image de fond notre bannière de base; on lui a appliqué une taille de 100% pour que ça prenne bien toute la place disponible et on l'a centré totalement. Et là, magie, notre bannière s'affiche bien et change au click du dark mode !
Cependant il reste un souci, notre bannière invisible cliquable apparaît en-dessous de notre "vraie" bannière qui elle n'est pas cliquable. Nous allons donc ajouter à notre CSS :
.dark_bann_sup { overflow: hidden; width: 1005px; height: 500px; margin-top: -500px; } .dark_bann_sup img { width:100%; }
Ici, on a donné la même taille à la bannière invisible (vous pouvez essayer de lui mettre un background d'une couleur bien voyante comme le rouge pour bien la voir) et on l'a "remonté" pour qu'elle se superpose à notre vraie bannière. Et là, tout est parfait ! On peut bien la cliquer comme une bannière "normale", et la couche inférieure est notre bannière qui change au dark mode.
Voilà voilà, j'espère que ce tuto pourra aider qui que ça intéressera et que ça ne sera pas trop difficile à utiliser !

#forumactif#tuto code#tutoriel#forum rpg#rpg forum#french rpg#ressources#forumrpg#forum#code#rpg francophone#partage de ressources
35 notes
·
View notes
Text
Partage
Hello ! Je vois de plus en plus de créateur-ices partager leurs ressources via les tableaux pinterest. Je vais donc faire de même et surtout tâcher de les maj régulièrement. J'ai tendance à enregistrer directement sur mon pc, mais les avoir tout ça dans un tableau c'est bien aussi. Voici donc les principales ressources / techniques photoshop et sources d'inspiration que je peux utiliser, ou pas xD : •• ressources graphiques •• techniques photoshop •• inspiration graph
Je précise que rien ne m'appartient, tout revient de droit aux auteurs originaux des images et tutoriels, comme toutes les photos que nous utilisons des célébrités.
Voilà voilà !
49 notes
·
View notes
Text

Get it here
These either will work great or make you question the way I paint, but here you go, have a try, tweak it to your preference, ect. Works best if you be a little sloppy with ‘em and keep brush sizes big
182 notes
·
View notes
Text
Tutoriais básicos com a ily! 🤓
( Algumas dicas e tutoriais sobre coisas básicas para você que quer começar a fazer moodboard!)
Olá meu anjinho, tudo bem? Hoje estou aqui para te ajudar em alguma dúvida que você tenha sobre mb, ou apenas queira começar a fazer moodboard.
Como fazer isso:


Bem, é bem simples e não dá nenhum tipo de trabalho. Para começar, abaixe o aplicativo: "Grid Maker For Instagram". Depois, entre no aplicativo (obv kk 🤓🤓)


Nesse aplicativo tem diversas opções para editar suas fotos e tudo mais, porém para criar o efeito que queremos, basta apenas clicar em Grid Maker. Adicione a foto que desejar e comece!
Ao entrar no aplicativo, vai aparecer diversas opções de ângulos para você colocar em sua foto, se quiser testar fique a vontade, porém para termos o efeito da última foto que mostrei, é preciso usar esse ângulo em específico:


E prontinho! Sua foto agora está novinha em folha. Não vai demorar muito para você se acostumar com esse app, ele realmente é mto fácil e prático. Espero que esse post tenha te ajudado!
Se quiserem mais tutoriais como esse, comente para eu saber, obrigado pela atenção:)
#moodboard#kpop moodbard#vintage moodboard#tutorial#tutoriel#cupcek !! .... 🎰#for you#messy moodboard#messycore
16 notes
·
View notes
Text

Thanks to my friend for introducing me to this game, I hope to make more fanart 🌼
4 notes
·
View notes
Text

Comment écrire un PNJ remarquable pour votre campagne ?
Imaginons que vous soyez en train d’écrire une campagne, ou même une partie one shot, pour votre jeu de rôles. Il est bien entendu tout à fait envisageable de faire un scénario où vos PJ sont absolument seuls dans un endroit désert ou abandonné, ou alors où il s’agit de l’exploration d’un donjon peuplé de monstres non doués de parole, auquel cas vous n’aurez pas à vous poser la question de le peupler de Personnages Non Joueurs. Mais les occasions de créer des PNJ sont nombreuses, et il n’est pas toujours facile de leur donner une personnalité remarquable. Il existe de nombreuses méthodes pour donner vie à ces créatures, et je vous propose de partager celles que j’ai pu appliquer.
La première chose à faire est de déterminer l’importance de votre PNJ pour votre scénario. Vous n’allez pas utiliser les mêmes techniques s’il apparaît pendant trois phrases pour indiquer le chemin ou s’il va accompagner (ou s’opposer à) vos joueuses et joueurs pendant une campagne de 80 heures. On va donc les séparer en trois catégories : les Silhouettes, les Utilités et les Acteurs.
Les Silhouettes sont des PNJ qui n’apparaissent que parce qu’il faut que quelqu’un soit présent. Il vous faut une voix, mais vous savez que vos PJ ne la recroiseront plus. Ce sont les plus faciles à improviser, et vous n’avez besoin que de savoir quatre choses : son nom (si vous n’en avez pas préparé vous pouvez être sûrs que vos PJ vont vous le demander…), pourquoi il est présent (pas plus d’une phrase !), ce qu’il sait (uniquement sur les éléments de votre scénario), et deux ou trois adjectifs concernant le ton de sa voix.
Exemple : les PJ sont venus assister à une assemblée politique en tant que simples spectateurs ; mais aucun n’a un background leur permettant de connaître les intervenants. Ils cherchent donc dans l’assemblée « quelqu’un qui a l’air de s’y connaître ». Arrive donc la Silhouette suivante : Charles Abernatty, un étudiant journaliste qui écrit un fanzine de théories du complot, connaissant le nom des politiciens présents et leur idéologie, et qui parle de façon empressée et a peut être malencontreusement été surpris en train de stalker certains sénateurs sur son temps libre. En quelques lignes le personnage est suffisamment fourni pour qu’il puisse être utilisé pour permettre à l’histoire d’avancer.
Viennent ensuite les Utilités. Ces PNJ vont avoir des interactions plus complexes avec les PJ, et peuvent revenir à plusieurs reprises. Pour ceux-là, l'écriture va être un peu plus complète. Vous devez toujours évidemment définir son nom, mais aussi les éléments suivants : - une description physique - son background (un paragraphe suffit), pouvant vous donner à l’avance des éléments à intégrer dans les dialogues de façon à le rendre plus vivant - son rôle (ce qu’il sait et ce qu’il veut) : tout personnage veut quelque chose dans votre scénario (ça peut être simplement de vivre une petite vie tranquille, ou alors retrouver une épée magique ayant appartenu à son oncle, peu importe c’est vous qui savez). Cela vous permettra de définir sa place dans votre histoire, et justifier éventuellement que ce personnage puisse revenir dans une autre sc��ne. - la façon de le jouer, ce qui inclut des indications de voix et de posture (ce qui vous permettra d’être cohérent entre deux apparitions du PNJ) mais aussi des réactions typiques (est-ce qu’il va être protecteur d’un PJ blessé, désapprobateur si on utilise des grossièretés, etc.)
Comme vous pouvez le voir, il s’agit grosso modo des mêmes éléments que pour la Silhouette, mais plus définis.
Enfin viennent les Acteurs. Ce sont des PNJ ayant un rôle intégral dans le scénario et revenant régulièrement. Ils s’écrivent de la même façon que les Utilités, mais avec deux éléments en plus : - le rôle va être étendu, ne contenant pas uniquement ce qu’il sait et ce qu’il veut mais aussi son implication à chaque niveau du scénario, et éventuellement son opinion sur certains sujets, permettant au MJ de le suivre au fil de l’histoire - les trois motivations : vos Acteurs vont avoir trois niveaux de motivation. Le premier est celui qui est affirmé, ce que le PNJ va ouvertement annoncer comme étant son objectif. Le second est celui qui est secret, ce que le PNJ va réellement rechercher mais ne va pas avouer. Le troisième est celui qui est enfoui, ce que le PNJ ne sait pas consciemment qu’il désire mais qui va le motiver malgré tout. Par exemple un capitaine pirate peut avoir comme objectif affirmé d’amasser une fortune pour se payer un palais, comme objectif secret de racheter grâce à son butin le domaine familial qui avait été saisi par un créancier, et comme objectif enfoui de retrouver une valeur aux yeux de sa famille qui désapprouve sa vocation de pirate. Ces trois objectifs vous permettront à la fois d’avoir un arc cohérent pour votre PNJ au fil du scénario, mais aussi de le faire se révéler, au travers de confessions ou de lapsus, auprès des joueuses et joueurs. Vous pouvez également, pour vos Acteurs, préparer certaines scènes-clefs avec des répliques pré-écrites. Ce n’est absolument pas obligatoire, et il est déconseillé de le faire trop souvent, mais cela peut être utile si par exemple vous voulez utiliser des phrases à double sens pour perturber vos joueuses et joueurs, ou si vous avez un PNJ qui utilise une façon de parler ou des tournures de phrases complexes à improviser.
Avec ces techniques, vous devriez obtenir des PNJ suffisamment profonds pour que vos PJ ne passent pas leur temps à se dire « attends, c’était qui celui-là déjà ? » tout en leur faisant passer les informations que vous souhaitez. Vous n’y échapperez pas totalement, mais toute amélioration est bonne à prendre ! Si cet article vous a intéressé j’en ferai d’autres à l’avenir, donc restez connectés !
Index
#jdr#jeu de rôles#MJ#maître de jeu#conseils#écriture#PNJ#personnage non joueur#tutoriel#tuto#contes du gris#chacaille
5 notes
·
View notes
Text
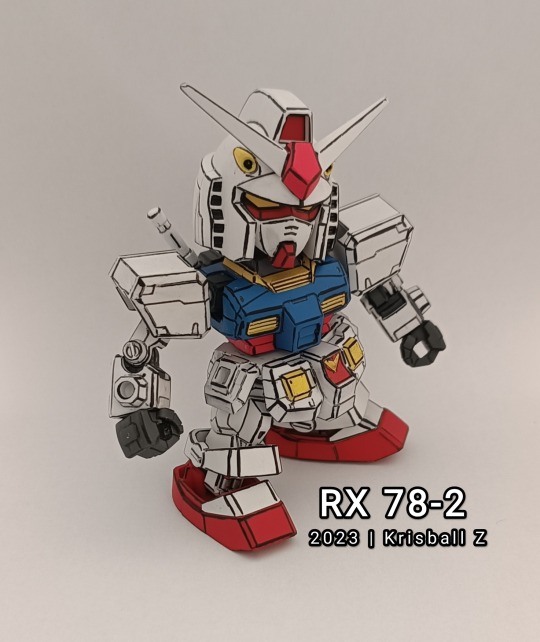
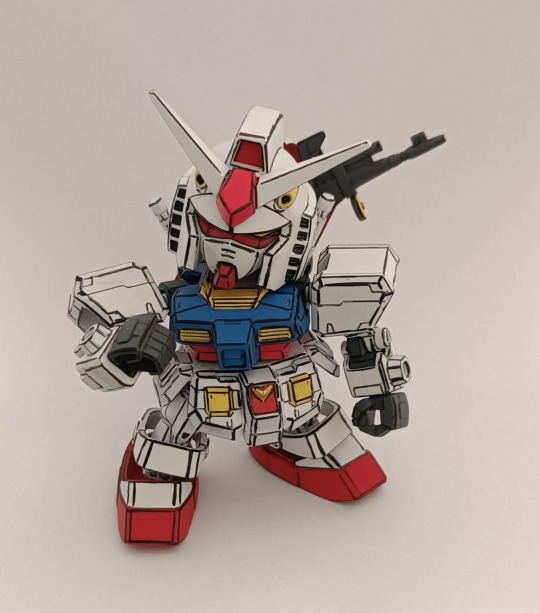
[SD GUNDAM] RX-78-2
Project finished, I got my first RX 78-2 🤩. Simple but adorable
#gunpla #plamo #modelkit #gundam #tutorial #Photographie #BANDAI #Video #Figurine #diorama #anime #figure #dspiae #custom #Plastickits #Plasticmodel #manga #unboxing #brick #Krisball_Z



42 notes
·
View notes
Note
Zu, how do you draw the back of a skull?

The main idea is that the skull is "mounted" on the spine, and the back of the skull (occipital bone) is much shorter than the front (mandible), so the jaw visually covers the spine in front but isn't visible from behind ☆
325 notes
·
View notes
Video
youtube
✏️ Tutoriel Apprendre à dessiner les cheveux tressés d'une fille vue de ...
#youtube#dessein#desseinfacile#drawing#draw#tresse#cheveux#apprendreadessiner#tressedessein#artsck#artsketch#art sketch#pencildrawing#pencil drawing#TutorielDessin#tutoriel#Tutoriel Dessein#drawingtutorial#drawing tutorial#hair drawing#hair draw#DessinerLesCheveux#Dessiner Les Cheveux#croquis#dessinaucrayon#dessin au crayon#artpassion#art passion#sketching#girl drawing
2 notes
·
View notes
Text
youtube
#tutoriel#ayurveda#alimentation#cuisine#nutrition#ayurvedic#ayurvédique#recette#youtube#débutant#facile#doshas#hiver#Youtube
4 notes
·
View notes