I'm Stacey and I make modern quilts in Ottawa, Canada.
Don't wanna be here? Send us removal request.
Photo


English paper pieced Dresden block: I’ve been wanting to make new pillow covers for a while, to replace the ones that I made about 5 years ago, which have been very well-used and worn.
I figured I would take the opportunity of having more time at home to do some hand sewing - English paper piecing. I decided on Dresden blocks, using a pull of Carolyn Friedlander fabrics. I used free Dresden templates from Occasional Piece Quilts - I have used her templates before, for a bag I made several years ago. They work perfectly with 2.5″ x 5″ pieces of fabric - which is half a charm square (a great project if you have some charm squares around!) I just printed one sheet of templates, traced shapes onto thicker cardstock for piecing, and cut them out by hand.
I finished off the first patchwork section the other day, which I’ll appliqué to a solid colour background. I think I’ll leave the centre open, like a ring or wreath. I’ll start on a second one, so I have a pair of pillows. I may hand quilt these as well, or at least add some hand stitching around somewhere!
23 notes
·
View notes
Photo


Inside-Outside Pouch: Last weekend (which at this point, feels like a million years ago!), I picked up Aneela Hoey’s pattern for an “inside-outside pouch” on her website. I really love Aneela’s pouch patterns, which have interesting and inventive designs.
Luckily, I had the fabric and notions needed for the project - including some vinyl that I bought years ago but had never got around to using for anything. Since we were staying home anyway, I had the time to mostly finish it in an afternoon! The hand binding was probably the trickiest part, especially around the bottom corners - otherwise, it was a great, straightforward pattern to follow.
The final pouch is so cute and very functional! I’ve been using it already for a new English paper piecing project I’ve been working on.
I hope you are all keeping safe and healthy!
15 notes
·
View notes
Text
HST Wedding Quilt

Last May (2019) I finished up this quilt for some friends our ours who got married. I wanted to make a quilt for them that had the same clean lines and modern feeling as their house and decor.
I made a bunch of HST blocks and arranged in a kind of gradient, mostly greys and neutrals with a few pops of colour in between.

Around that time, I went to a workshop with the Ottawa Modern Quilt Guild, with Johanna Masko on hand quilting.

I brought this quilt along to work on, and added hand quilting to several blocks around the quilt.

I finished it off with straight line quilting (my favourite!) and contrast binding.

I was really happy with how it turned out and the recipients really liked it too!

Quilty Details:
* 70” square, for a large lap quilt
* Mix of fabrics, mostly Kona Cotton and prints from Art Gallery Fabrics
* Backing and binding is a Guicy Guice Quantam print from Andover
* Straight line quilted at 0.5” spacing, using Wonderfil 40-wt thread, with additional hand quilting using DMC Perle cotton #8 size
I liked how the hand quilting was actually not too visible from afar, but gave a lot of texture when you have it up close, on your lap. I think I’ll try to add more of that hand quilted touch on more projects in the future!
#quilting#modern quilt#half square triangles#hand quilting#Johanna masko#HST quilt#grey quilt#triangle quilt
17 notes
·
View notes
Photo


Weight of Love quilt - Finished!
It took over 4 years, but I finally finished the Weight of Love quilt that I started with Libs Elliott back when I first moved to Ottawa.
It was my one project that for whatever reason, just never seemed to get done! I left it less than half-pieced for about 3 years (I didn’t touch it after our workshop). At a retreat in 2018, I finished up the patchwork section, but then I waited about another year before appliquéing it on to a backing fabric. Then I finally quilted it up this past November!
Quilty Details:
* Libs Elliott’s “Weight of Love” quilt pattern - started in a workshop with her back in 2015
* Approximately 65″ square finished
* Used a combination of Kona cotton and Cotton and Steel Basics
* Patchwork section is pieced with Y-seams
* Appliqued the pieced section on top of solid fabric; I didn’t cut out the back so it’s extra thick under the patchwork
* Straight-line quilted on my domestic with 1/2″ spacing, using Wonderfil 40-wt thread
* Backing and binding in Cotton and Steel basics
I’m so glad to have this long-time work in progress done! Do you have any projects like this that just take years?
58 notes
·
View notes
Photo


Grid Triangle quilt - Finished!
*
Hello! It’s been a while ... a long while :). I hope you are doing well!
I haven’t posted in over a year. 2019 was a tough one for me, for many reasons that I won't get into here. The result was that I didn’t do very much sewing, and didn’t feel much like blogging either.
But, I want to get back into sharing my projects. I always thought of this blog as something for me, a catalogue of the projects I’ve worked on since I started making quilts, and I want to continue that! I plan to post about some quilts from last year that I haven’t shared yet here. In the meantime, you can also check out my Instagram - slostudio 💕
Thanks for reading! Now on to the post ...
*
I started this quilt last summer, using a fat quarter bundle from Alanna at Fridays Off - a Canadian online shop that specializes in monthly fabric subscriptions. I didn’t get to finish it up until January - my first finish of the 2020!
Quilty details:
* Size is approximately 48″ x 60″
* Fabric is the Grid collection by Katerina Roccella from Art Gallery Fabrics, plus a mix of Kona cottons
* All equilateral triangles, with some longer strips at the sides
* Straight line quilted at 1/2″ spacing (my favourite!) using Wonderful 40-wt thread
* Backing is another print from Art Gallery, and binding is a Cotton and Steel basic
It was fun to take this pics in the backyard, with Ollie watching me curiously (you can see him in one of the pictures, with his winter coat on!)
I really like how this one turned out, I will always love using high contrast -especially black and white fabrics mixed with all the colour! I think this one would make a fun baby quilt or toddler quilt, we will see where it finds its home.
23 notes
·
View notes
Text


Farmer’s Wife quilt: A project that I’ve been working on for a while is the Farmer’s Wife quilt, from the book by Laurie Aaron Hird - which I started back in April 2017 at a workshop with Johanna Masko hosted by the Ottawa Modern Quilt Guild. I just finished my 25th block last week, which was a milestone. But, the book has 110 blocks so I still have a long way to go! I hadn’t laid the blocks out in a while, I’m liking how the colours are coming together. I’m just using Kona cotton and Carolyn Friedlander prints for this one.
96 notes
·
View notes
Text


Friendly Faces project: I’ve been having fun the last few weeks working on a project using Heidi Kenney’s “Friendly Faces” fabric panel.
I cut up the panel to blocks and I’m mixing in scraps to make these Irish-chain-inspired blocks. I intentionally designed the block to use 2.5” squares and strips — because I pre-cut my scraps to standard sizes (2.5” squares and strips) and have boxes full of them! So, this one has minimal cutting needed! I’ll just keep going, if I use the entire panel, this could make a twin-sized quilt!
PS - Happy New Year! I haven’t been around in the blog for a while, but I’ve got some posts I’m drafting to get caught up. It’s just around my 5-year anniversary of blogging this month! 💖
20 notes
·
View notes
Photo


Ultra Violet quilt: Finished!
This week I finished up the quilt I started earlier this year, during the Pantone Color of the Year Quilt Challenge, hosted by Sarah Sharp and Rebecca Bryan.
I had actually finished binding this one a while back, but it wasn’t straight and that was bothering me, so I took the binding off one side, trimmed it, and re-did the binding. I’m much happier with it now! (For the time being, some of the photos of that process are up on my Instagram “stories” about this quilt!)
Quilty Details:
* 55 x 68″ finished size
* Improvisationally pieced - no templates, mostly freehand cuts with my rotary cutter
* Used a variety of prints and solids, including the text prints from “First of Infinity” by Lecien fabrics
* Matchstick quilted on my domestic (that is, straight lines close together, about 1/4″ apart)
I’m happy that this one is done! It’s the only one that I’ll enter this year to Quiltcon. I think it will be tough competition in the improv category, as it always is. I’m not sure this one will make the cut - but regardless, I want to make the effort to try to submit something annually!
#quilt#modern quilt#quilting#pantone#color of the year#ultraviolet#ultra violet#improv quilt#improv quilting
91 notes
·
View notes
Photo


Kaleidoscope Blocks: For this month’s Not So Basic project, we are celebrating the release of Riley Blake’s newest basic - Crayola Kaleidoscope Basics!
We made Kaleidoscope Blocks, designed by Lee Heinrich (of Freshly Pieced), in various colours of the new basics. The blocks from all the quilters involved are going to be pieced together and made into a quilt - I can’t wait to see what it looks like all together!
Thanks so much to Riley Blake Designs and Christopher@the_tattooed_quilter (IG) for setting up the project!
13 notes
·
View notes
Photo


Bequest fabric - Plaid lap quilt: Over the past few weeks, I have been working on a project using Bequest fabrics, by Briar Hill Designs for RJR Fabrics. The ladies who make up the Briar Hill Designs team are fellow Canadians, and I’m happy to participate and support them!
The Bequest line is basically a gradient of blue fabrics, which is a really fun idea. I knew when I saw them that I wanted to try my hand at a plaid design to use all of the tones of blue.
After a few sketches, I came up with this design that has skinny and thicker stripes. It was fun to piece! Each block is 7.5″ finished, and this lap quilt ended up at 43″ square. With the leftover fabric I had, I pieced a back to show off some of the beautiful prints. I did some basic straight line quilting in a grid to finish up, which I hoped complemented the plaid look. Overall, I’m really pleased with how it turned out!
For more information on the Bequest Maker’s Tour, check out Briar Hill Designs’ website! There will also be a giveaway coming up soon on Instagram, so check out my feed if you’d like the chance to win a bundle of Bequest fabrics to make something, too!
38 notes
·
View notes
Text


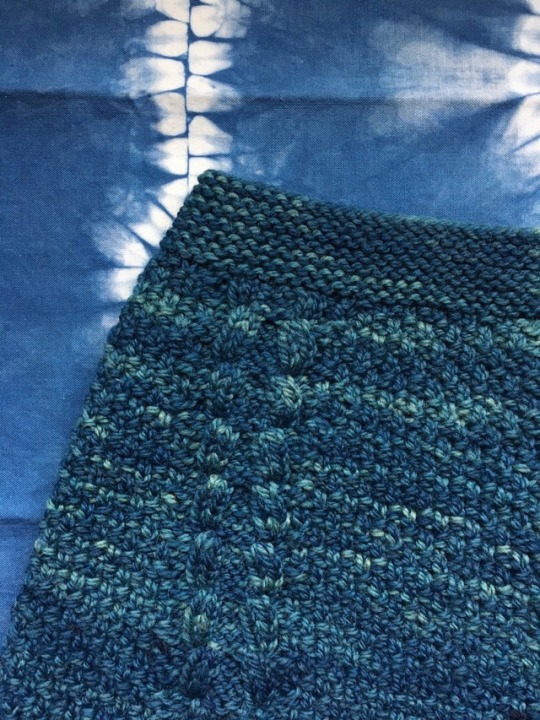
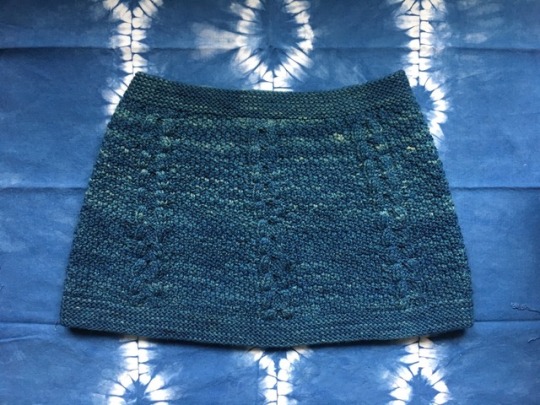
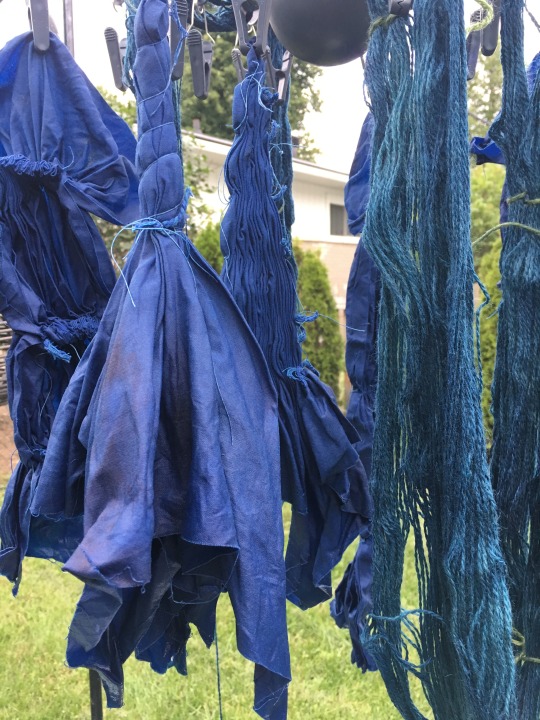
Furrow Cowl: When I did my indigo dye day, I over-dyed some yarn that was leftover from a sweater that I knit last year. After knitting a whole sweater with it, I was pretty tired of looking at the same colour (that pale green in the first photo). I dyed it and was really happy with the colour that it turned out.
I decided to use the indigo-dyed yarn to knit up a Furrow Cowl (pattern in the book “Woolens” by Jared Flood for Brooklyn Tweed). The dyed yarn wasn’t quite the same as in the pattern (was a smaller DK weight rather than worsted), and I didn’t have too much of the yarn, so I figured I’d make a slightly smaller version of the cowl.
I am super pleased with how it came out. After blocking and washing it, it’s very soft and comfy. I’ve been wearing it regularly already, and it makes me really happy to wear something that I both dyed and knit myself!
#knitting#brooklyn tweed#furrow cowl#furrowcowl#jared flood#hand dyed#yarn#cabling#indigo#indigodye#indigo dye#natural dye#natural indigo
15 notes
·
View notes
Photo


Modern Maple Leaf Table Runner: For this month’s Riley Blake Not So Basic project, we were challenged to use Riley Blake Designs “Shades” fabrics and a modern take on a maple leaf block to create a table runner.
I have made many maple leaf blocks and (many!) maple leaf quilts from when we sent charity quilts to Fort McMurray (and even have this tutorial)! So, I wanted to try something a little different than I’d done before.
I made two maple leaf blocks and a bunch of half-square triangles. I played around with the layouts until I found something I liked, then adding the blue and grey to square it off. I quilted with straight lines and did faced binding (so the binding doesn’t show on the front) to keep things simple and modern. It ended out at about 16 x 30″ finished.
We have already been using it on our table! It’s been a nice bit of colour and patchwork in our dining room. Thanks so much to Riley Blake Designs and Christopher @the_tattooed_quilter (IG) for the challenge!
#riley blake designs#fabric#sewing#maple leaf block#maple leaf quilt#quilt block#maple leaf#table runner#modern quilt
37 notes
·
View notes
Photo


Log cabin pillow: This month, our Riley Blake Not So Basic challenge was a Modern Log Cabin pillow, using Riley Blake Designs’ tone-on-tone basics!
I decided on a "courthouse steps" variation for my block, which was a first for me! I’ve done a lot of log cabin blocks before including a quilt I finished earlier this year, but I’ve never tried the courthouse steps arrangement. I liked how from afar, it has the clean look of using solids, but that the tone-on-tone prints give close-up interest - tiny white cherries, cream scissors and grey stars.
I did some big stitch quilting in a contrast colour, to give it a bit more texture. Then, I added basic machine cross hatch quilting to finish up!
I think this one fits in nicely in our living room! Thanks to Riley Blake Designs and Christopher @the_tattooed_quilter (IG) for the challenge!
9 notes
·
View notes
Photo


Fly Away Quilt - Finished!
I am finally finished one of my oldest works in progress - the Fly Away quilt that I started back in 2016! I wasn’t sure how to quilt it for a long time, but once I decided to use straight lines, I was able to get it done relatively quickly.
Quilty Details:
* 74″ square finished size
* Using “Fly Away” quilt pattern by Heather Jones, which I started during a workshop at Quiltcon in 2016
* Used Kona Cottons in Glacier, Bone and Wasabi
* Straight line quilted on my domestic machine with Wonderfil 50-wt thread
Glad to have this one finished and looking forward to having it gifted and into its new home soon!
22 notes
·
View notes
Text
Indigo dye day
A couple weeks ago, I tried indigo dyeing for the first time! I thought I’d share some of the process.

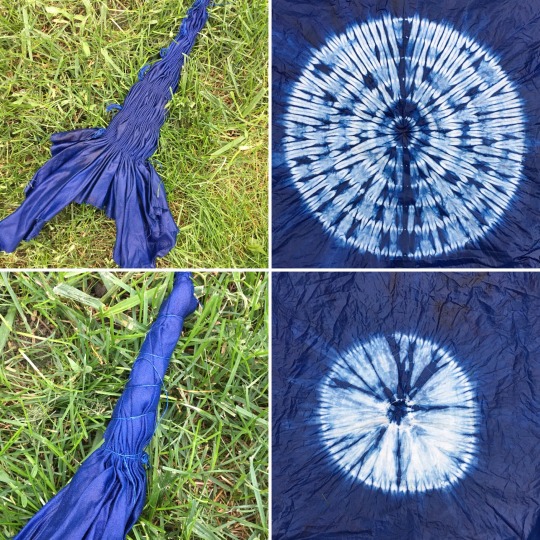
I had already prepared several pieces of fabric for dyeing, by stitching them up with various shibori stitch patterns. I used Kona PFD Bleach, and some painters canvas that I had pre-washed before stitching. I also had yarn that I wound into skeins.
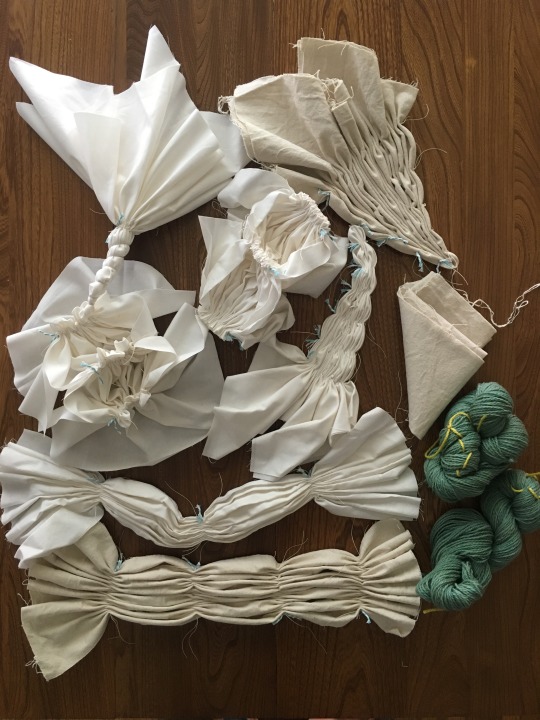
To make the natural indigo vat, I used natural indigo extract, calcium hydroxide thiourea dioxide as a reducing agent. (Side note - I’m using the term “natural indigo” because you can also use “synthetic indigo” and I specifically wanted to try the natural vat.) If you are curious about the details of the indigo recipe I used, you can check out and download lots of great, detailed information from Maiwa Supply Shop.
I collected other supplies over the last month from various stores (mostly Giant Tiger and IKEA, and white buckets from Canadian Tire). I was careful to get only stainless steel, glass or plastic because other materials could react with the dye or alter the process.

I first made the indigo stock solution. It started out pale blue but soon turned bright yellow! (See below). When I added it to the bucket, it turned a pale yellow-green, with a coppery sheen on top -- which is apparently how it’s supposed to look.
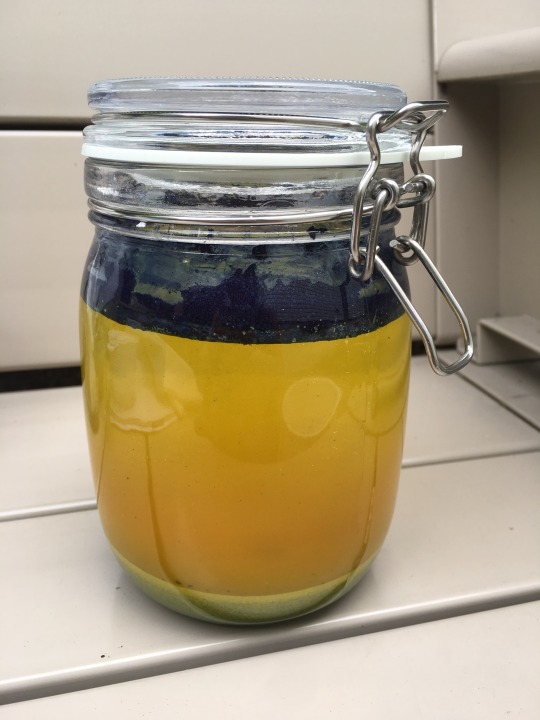
When I put my first few items in the vat, I wasn’t sure if it would work! I left the items in for about 15 minutes then slowly took them out. They were bright chartreuse coming out, but quickly started turning green, then aqua, then blue. It was amazing!

I did several “dips” in the vat for each piece -letting them sit in the vat for 10 minutes or so, then taking out to let oxidize in between dips. For my canvas, I did 3 dips each, and for the cotton squares I did 4 or 5. I also overdyed some yarn (more on that in another post!)
Then, it was the moment of truth - to see the final results! After the last dips, I rinsed the pieces in water, took out the stitching, and rinsed again. I was so pleased with the results and how the shibori stitching turned out! Here are the results from stitched piece to final design!
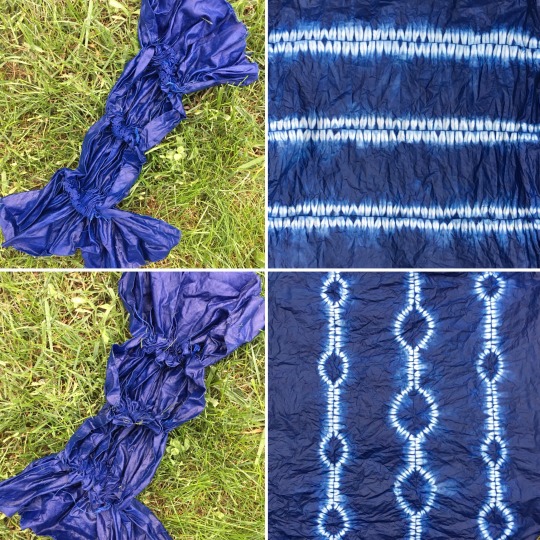

Now that I have all the supplies, I will do indigo dyeing again for sure! This time was definitely a learning process and I know next time I’ll tweak a few things. It’s so fun trying something new!
#indigo#natural indigo#indigo dye#dyeing#natural dyeing#fibre#cotton#tie dye#shibori#stitched shibori
66 notes
·
View notes
Photo


Shibori stitching: At the cottage last month, I also brought “prepared for dye” fabric that I wanted to stitch up, shibori style. Using “Stitched Shibori” by Jane Callendar as a guide, I tried a few different stitch patterns for different motifs. The book was great in terms of showing technique and methods. I also read a few library books about natural dyeing, including “The Modern Natural Dyer” by Kristine Vejar and “Natural Colour” by Sasha Duerr and really enjoyed and learned a lot from reading them both. If you have any other books to recommend on natural dyeing, I’d love to hear! It was lovely to spend a rainy day at the cottage reading and stitching, with Ollie underfoot relaxing, too!
(Note that these are not affiliate links, just sharing some of the books I read! :) )
12 notes
·
View notes
Photo


Maiwa scraps project: Back in February, I took a short overnight work trip to Vancouver. I had about an hour to myself before stores closed that evening after work, so I decided to go to Granville Island just for fun. I came across a store called Maiwa that I hadn’t heard of before. (I’ve since learned that they are probably the most well known source for natural dye supplies in the country!) They had a scrap bin up front full of bits and offcuts from their clothing products, all natural fibres and naturally dyed.
I filled a bag with square scraps and took it home, thinking I’d make a quilt during the summer months with these beautiful pieces. I didn’t touch the bag until last month, when I dumped out the scraps and started organizing. There were a lot of colours and options!
I started to have the idea to do something like an “Ocean Waves” quilt (in Denyse Schmidt’s book) or something similar. I made a few of these traditional-looking blocks, and I’m liking the results so far!
28 notes
·
View notes