
Welcome to Cooki Guide! I’m Rebecca, a chef passionate about food. Here, I share my love for cooking, culture, and creativity, inspiring fellow food enthusiasts like you!
Don't wanna be here? Send us removal request.
Statistics
We looked inside some of the posts by cookiguide and here's what we found interesting.
Average Info
Notes Per Post
12
Likes Per Post
12
Reblog Per Post
0
Reply Per Post
0
Time Between Posts
6 days
Number of Posts By Type
Text
17
Last Seen Tumblr Blogs


Fun Fact
28.6 is the average number of monthly visits per US mobile user.
Text
Bahama Mama Tropical Smoothie

If you’ve ever dreamed of sipping sunshine through a straw, the Bahama Mama tropical smoothie is your ticket to paradise. Packed with fruit-forward flavor and a creamy texture that feels like a beach vacation in every sip, this smoothie is a standout. But there's more to this tropical treat than just tossing fruit into a blender.
Let’s dive into what makes this island-inspired drink unforgettable and why it’s worth adding to your smoothie lineup.
The Magic of Fresh, Quality Ingredients
A Bahama Mama tropical smoothie is only as good as what goes into it. While many smoothies lean on added sugars or artificial flavors, this one celebrates the purity of whole ingredients. Think juicy strawberries, vibrant pineapple chunks, silky coconut, and a hint of indulgence with white chocolate.
Using frozen fruit instead of canned makes a huge difference in both taste and texture. Frozen strawberries, for instance, lock in flavor at peak ripeness and deliver a chill that makes every sip refreshingly thick. Opting for plant-based milk without added gums or fillers also helps keep things smooth and clean.
Choose fruit at peak ripeness or flash-frozen
Go for unsweetened plant-based milk for balance
Skip the artificial flavorings for natural depth
Curious about the full recipe? Discover every detail here 👉 Full Recipe
Achieving That Smoothie-Shop Texture at Home
We’ve all had those gritty or watery smoothies that fall short. The real secret to a Bahama Mama tropical smoothie that rivals your favorite smoothie shop? It’s all in the texture.
Blending order matters. Start with liquid first, then add fruit, and finally top with extras like coconut or chocolate chips. This method keeps the blender blades moving freely and avoids air pockets.
The result? A thick, frosty blend that pours like silk into your glass.
Tips for the perfect texture:
Use a high-speed blender for even consistency
Add ice only if needed, to avoid watering it down
Let frozen fruit thaw slightly for easier blending
Blend in short bursts, stopping to scrape the sides
A little patience during blending pays off with that signature creamy swirl that’s so satisfying to sip.
A Flavor Rooted in Island Vibes
The Bahama Mama flavor isn’t just a happy accident. This tropical twist has roots in the Bahamas and Caribbean-inspired drink culture. The name itself is believed to come from a popular rum-based cocktail, loved for its fruity, beachy flair.
Over time, the flavor profile—strawberries, pineapple, coconut—was embraced by smoothie shops looking to recreate a non-alcoholic, health-forward version of that same island experience. Today, the Bahama Mama tropical smoothie is a beloved favorite for its nostalgic, sunny-day energy.
Curious about the full recipe? Discover every detail here 👉 Full Recipe
Why This Smoothie Deserves a Spot in Your Weekly Routine
Beyond its island charm and indulgent taste, this smoothie packs in nutrients that support energy and wellness. With fiber from fruit, healthy fats from coconut, and optional boosts like plant-based protein, it’s both satisfying and nourishing.
Whether you enjoy it for breakfast, post-workout, or as a snack, the Bahama Mama tropical smoothie delivers more than just flavor. It’s a feel-good treat that takes care of both your cravings and your health.
Here's why it works so well:
Naturally sweet without added sugar
Easy to adapt for different dietary needs
Stores well as smoothie pops or bowls
Feels like a mini-vacation every time you sip
From Sippable to Spoonable: Make It Your Own
One of the best parts of this smoothie is how versatile it is. Want to turn it into a smoothie bowl? Just reduce the liquid a bit and pour it into a bowl topped with granola and fruit. Need a kid-friendly treat? Freeze it into popsicles for an instant win.
This flexibility makes it a go-to recipe no matter your age, taste, or time of day. It’s also a fun way to introduce tropical fruits to picky eaters in a way they’ll actually love.
Curious about the full recipe? Discover every detail here 👉 Full Recipe
Final Sip: Bring the Tropics to Your Blender
At the heart of it all, the Bahama Mama tropical smoothie is about joy. It's vibrant, refreshing, and easy to make, with flavors that instantly lift your mood. When you use high-quality ingredients and take the time to blend it right, the result is a smoothie that feels like a treat but fuels your day like a champ.
Whether you’re lounging on your porch or racing out the door, this smoothie brings tropical ease to every moment.
#bahama mama smoothie#tropical smoothie#healthy smoothie#smoothie recipe#vegan smoothie#plant based#summer drinks#easy recipes#fruit smoothie#coconut#pineapple#strawberry smoothie#white chocolate#aesthetic food#morning routine#breakfast ideas#smoothie bowl#smoothie inspo#healthy lifestyle#blender recipes
0 notes
Text
Biscuits and Sausage Gravy Breakfast Pizza

Transform your next brunch with a mouthwatering mashup that combines flaky biscuit crust and creamy sausage gravy into a shareable pizza format. It’s the comfort you love, reimagined for gatherings and lazy weekend mornings.
Curious about the full recipe? Discover every detail here 👉 Full Recipe
Why Quality Ingredients Matter for Biscuits and Sausage Gravy Breakfast Pizza
Great cooking always starts at the market. When you pick the best dairy, meat, and bread components, every bite delivers deeper flavor and more satisfying texture.
Premium sausage: Look for a blend with real spices, minimal fillers, and just enough fat to carry flavor.
Real butter and whole milk: Skip the substitutes. Full-fat dairy brings richness and helps your gravy cling perfectly.
Fresh eggs: Organic or pasture-raised eggs yield brighter yolks and silkier whites when baked.
High-grade flour: Whether for biscuits or gravy roux, choose unbleached, all-purpose flour with consistent protein content.
These simple upgrades turn a good recipe into a memorable one. Quality ingredients don’t just taste better—they also bake and blend more predictably, which means fewer kitchen surprises.
The Secret to Achieving Perfect Texture
Balancing crisp, creamy, and tender elements makes this brunch pizza stand out. Here’s how pros nail every layer:
H3 Par-Baking the Biscuit Base
Giving your crust a quick head start in a hot oven firms up the edges and prevents sogginess once you add warm gravy. Five minutes is all it takes.
H3 Layering for Moisture Control
Building a thin layer of shredded cheese right on the hot crust creates an effective barrier. The cheese melts into the biscuits, blocking excess liquid from seeping through.
H3 Gentle Egg Finishing
Scrambled eggs cooked softly on the stove then added to the pizza finish baking in the oven. This two-step approach keeps them creamy, never rubbery.
H3 Resting for Topping Stability
Letting the loaded pizza rest briefly after baking ensures the gravy and eggs settle in place. You’ll slice clean wedges instead of a saucy mess.
These texture techniques work in harmony to deliver a golden-crisp bottom, rich gravy layer, and custard-soft eggs—every single slice.
A Taste of Tradition: Cultural Roots and Modern Twist
The story behind this dish weaves together two beloved American traditions. Biscuits and gravy became a Southern staple in the 1800s, invented as affordable, hearty fare for early-morning laborers. Simple pantry staples—flour, fat, milk—transformed into a gravy thick enough to stick to fresh biscuits.
Pizza’s journey to brunch tables began mid-20th century, when diners and pizzerias experimented with egg toppings for morning crowds. The concept of breakfast pizza caught on, blending savory flavors into handheld convenience.
By uniting these legacies, Biscuits and Sausage Gravy Breakfast Pizza honors both regional heritage and inventive fun. It’s a comforting nod to history with a modern, share-and-slice twist.
Bringing It All Together
When you combine quality ingredients, proven texture tricks, and an understanding of culinary heritage, you create more than a meal—you craft an experience. Whether you’re feeding family or impressing friends, this recipe offers:
Reliable results thanks to premium basics
Perfect layering for crisp, creamy, tender bites
Conversation-starters rooted in food history
Serve it with a bright fruit salad or a side of roasted potatoes, and watch how quickly the plates empty.
Eager to master this brunch game-changer? Click through to get every tip, trick, and photo you need.
Curious about the full recipe? Discover every detail here 👉 Full Recipe
#BreakfastPizza#BrunchGoals#ComfortFood#SavoryBrunch#PizzaLovers#SouthernCooking#SausageGravy#BiscuitsAndGravy#WeekendBrunch#HomemadePizza#FoodPorn#RecipeShare#FoodPhotography#BrunchRecipes#FoodieFinds
0 notes
Text
The Best Roasted Zucchini and Carrots (Never Soggy!)

Roasted zucchini and carrots transform humble produce into a vibrant, crave-worthy side dish. This colorful combo dates back to Mediterranean tables, where simple ingredients met open-flame cooking for earthy flavor. Today, the technique remains a favorite for home cooks seeking minimal fuss and maximum taste.
Curious about the full recipe? Discover every detail here 👉 Full Recipe
Quality Ingredients Elevate Roasted Zucchini and Carrots
Great roast starts at the source. Choosing premium ingredients not only boosts flavor but also ensures nutrients stay intact. When you pick peak-season veggies and fresh pantry staples, every bite tastes brighter and more complex.
Selecting the Best Produce
Look for firmness and color: Seek zucchini with glossy, unblemished skin and carrots that feel heavy for their size.
Embrace seasonal picks: In-season vegetables boast higher sweetness and better texture than off-season imports.
Consider organic options: Organic produce often delivers cleaner flavor by limiting synthetic residues.
Choosing the Right Oil and Seasonings
Use extra-virgin olive oil for its depth and fruity aroma. A drizzle of quality oil coats each slice and fosters caramelization.
Opt for fresh herbs when possible. Dried thyme or oregano work well, but fresh sprigs of rosemary add an aromatic punch.
Favor coarse-ground salt and freshly cracked pepper. The larger crystals cling to veggies, creating little bursts of seasoning.
When you invest in superior ingredients, the end result speaks for itself. Each slice caramelizes evenly, the spices infuse deeply, and even a simple sprinkling of cheese or lemon juice can shine.
The Secret to Perfect Texture
Getting tender carrots and crisp zucchini on the same sheet pan might feel like juggling two worlds. Yet, a few key tricks can help you master the balance every time.
Balancing Heat and Moisture
The oven’s temperature controls how quickly water evaporates and sugars caramelize. Too low, and vegetables steam instead of roast; too high, and edges may burn before centers cook through. Aim for 400°F to 425°F and give the pan time to come fully up to heat before adding produce.
Preheat the oven thoroughly so blast of heat meets vegetables immediately.
Use a light-colored baking sheet to prevent excessive darkening on the bottom.
Avoid nonstick surfaces when seeking deep browning; bare metal conducts heat more directly.
Knife Skills for Uniform Cooking
Size matters. Uniform pieces cook at the same rate, preventing mushy ends or raw middles. Carrots benefit from quarter-inch rounds, which soften just enough without falling apart. Zucchini, being more water-rich, stands up better as half-inch thick slices.
Slice on a stable cutting board to ensure safety and consistency.
Keep your chef’s knife sharp. A dull blade crushes cells, releasing extra moisture.
Rotate pieces mid-roast for even browning on all sides.
Mastering these technical details makes the difference between a good tray of veggies and an unforgettable sheet pan masterpiece.
A Glimpse at the Recipe’s Roots
Though simple today, roasting vegetables has deep cultural roots. Ancient Mediterranean societies embraced open-hearth cooking, layering vegetables, herbs, and oil in clay pans. This method allowed families to stretch limited resources while maximizing flavor. Over centuries, North African and Middle Eastern influences added spices like cumin and coriander to the mix, inspiring modern riffs on roasted vegetable dishes.
This fusion of tradition and innovation underscores why roasted zucchini and carrots remain timeless. By honoring ancestral techniques while embracing contemporary seasonings, home cooks connect to culinary history with every tasty bite.
Bringing It All Together
With high-quality produce and precision technique, this side dish turns into a crowd favorite. The interplay of sweet carrots, tender zucchini, and aromatic herbs creates layers of flavor. A final squeeze of citrus or sprinkle of cheese awakens taste buds, making each bite pop.
Rest the veggies briefly on the hot sheet pan after roasting to crisp up the cheese.
Serve immediately while edges are still crunchy and interiors tender.
Pair with proteins like lemon-herb chicken or seared fish for a balanced meal.
Final Thoughts
Roasted zucchini and carrots offer a perfect example of cooking harmony. Quality ingredients lay the groundwork, knife skills and heat management deliver texture, and a nod to culinary tradition brings depth. Whether you’re feeding family or entertaining friends, this vibrant dish showcases how simple methods and mindful choices create memorable meals.
Ready to elevate your veggie game? Give this recipe a try and taste the difference premium ingredients and spot-on technique can make.
Curious about the full recipe? Discover every detail here 👉 Full Recipe
#roastedzucchinacarrots#sheetpanrecipes#roastedvegetables#healthyside#vegetarianrecipes#veganrecipes#glutenfreerecipes#easyrecipes#cleaneating#healthyfood#foodie#yum#sidedish#mealprep#homecooking#foodphotography#plantbased#weeknightdinner#comfortfood#seasonalproduce
0 notes
Text
Blue Spirulina Smoothie: Colorful Nutrition in a Bowl

Why a Blue Spirulina Smoothie Starts with Quality
A brilliant turquoise bowl turns heads, but its flavor still decides if you finish every spoonful. That flavor begins at the market. Fresh, top-grade produce carries natural sugars that make the algae pigment taste sweet instead of earthy. Certified organic spirulina delivers vibrant color without metallic aftertastes. Even the liquid base matters; low-quality milk alternatives can taste chalky and mute the hue.
Focus on these sourcing habits:
Pick fruit that smells fruity, not just looks ripe
Choose yogurt with minimal additives for better creaminess
Verify third-party testing on any spirulina brand
Store delicate greens in a breathable bag to keep them crisp
Investing an extra minute on ingredient labels pays off in every vivid bite.
Curious about the full recipe? Discover every detail here 👉 Full Recipe
Texture Secrets: From Blender to Bowl
Perfect texture feels thick enough to support a strawberry slice yet soft enough to glide off a spoon. Achieving that balance is a small science experiment in your kitchen.
Temperature Control
Frozen fruit chills the blend without diluting color. Spread pieces on a tray before freezing so they stay separate and blend faster.
Liquid Ratio
Start with less liquid than you think you need. You can always add a splash, but you cannot pull it back out. A gentle pour of creamy milk or coconut water loosens the mix just enough.
Layer Order
Placing heavier items on top of the liquid pushes everything toward the blades. Begin on low speed to pull ingredients together, then ramp up to high until the surface looks glossy. Finishing with a five-second low pulse releases trapped air for a velvety finish.
Quick checkpoint: If a spoon stands upright in the center, the smoothie is bowl-worthy. If it tips, give it another brief blend with a spoonful of fruit.
A Journey Through Time and Culture
Humans have enjoyed spirulina for centuries. Aztec traders harvested blue-green algae from Lake Texcoco and pressed it into stamina cakes for runners who delivered messages across the empire. Across the ocean, communities near Lake Chad still dry spirulina into flat discs called dihé for soups and stews. In the 1960s NASA studied spirulina as a nutrient-dense food for astronauts. This tiny organism has fueled exploration and trade long before it dazzled social feeds.
Serving Rituals and Flavor Tweaks
Presentation amplifies enjoyment. A chilled ceramic bowl keeps color vivid while toppings add textural contrast. Try these simple upgrades:
Fan thin strawberry slices for a pop of red
Scatter toasted coconut for crunch and aroma
Dust chia seeds for a subtle nutty bite
Drizzle a thin ribbon of honey if you crave extra sweetness
Each topping adheres best when the base is thick and cold, so serve immediately after blending.
Sustainability and Sourcing
Spirulina cultivation uses a fraction of the land and water required for animal protein. Pairing it with seasonal produce shrinks your footprint further. Support local farmers by buying fruit at weekend markets. Compost peels and cores to close the loop. Your colorful breakfast becomes a tiny vote for a healthier planet.
Curious about other creative smoothie bowls? Find inspiration in the full guide here 👉 Full Recipe
The Payoff in a Spoonful
Every bite delivers antioxidants from the algae pigment, natural electrolytes from fruit, and satisfying creaminess from quality yogurt or milk alternatives. The Blue Spirulina Smoothie proves healthy food can feel playful and luxurious at once.
Choose the best ingredients, respect the texture science, and celebrate the centuries-old story behind that striking blue. Breakfast has never looked or tasted so good.
#BlueSpirulinaSmoothie#SmoothieRecipe#SmoothieBowl#Superfood#HealthyBreakfast#FoodPhotography#WellnessBlog#PlantBased#BreakfastInspo#FoodieFinds#ColorfulFood#HomemadeGoodness#SpirulinaLove#HealthyEating#RecipeShare
1 note
·
View note
Text
Coffee Banana Bread Recipe That Actually Delivers

What Makes This Recipe Stand Out
If you're tired of dry banana bread or flavorless coffee cake, it’s time to meet your new kitchen favorite. The coffee banana bread recipe combines two comfort food icons into one deeply satisfying loaf. It’s sweet but not cloying, moist but never soggy, and loaded with personality.
This isn’t one of those recipes you make once and forget. This is the one you make on repeat—because the texture is perfect, the flavor is bold, and it smells like a café the minute it hits the oven.
Quality Ingredients = Quality Results
Let’s clear this up first. You don’t need fancy or expensive ingredients to make amazing banana bread, but you do need quality ones. The difference is night and day.
Here’s why it matters:
Bananas: Ripe bananas (the spottier, the better) add moisture and natural sweetness. Unripe bananas? Dry, bland bread.
Coffee: Skip the cheap stuff. Use instant espresso or strongly brewed dark roast for a rich, aromatic base.
Eggs & Dairy: Room temperature eggs and full-fat sour cream or yogurt help everything emulsify smoothly and bake evenly.
Vanilla: Pure extract over imitation. It rounds out the bitterness of the coffee and brings balance.
Small choices make a big difference. If you’re going to bake something worth sharing, give your ingredients a little attention.
👉 Curious about the full recipe? Discover every detail here 👉 Full Recipe
The Texture Trick Everyone Overlooks
A great banana bread lives or dies by its texture. You want it moist (not gummy), tender (not crumbly), and sliceable (not spongy). The good news? You can absolutely control that.
Here’s how:
Don't overmix. This is the golden rule. As soon as your dry ingredients hit the wet, stir gently just until the flour disappears.
Use the right fat. A blend of oil (for moisture) and butter (for richness) gives you the best crumb.
Sour cream is your secret weapon. It creates that dense-yet-light bakery texture that holds up for days.
Measure flour the right way. Spoon it into your measuring cup and level it off. Scooping directly can lead to too much flour, which dries everything out.
A little science, a little mindfulness, and boom—you’ve got texture worth bragging about.
A Quick Bit of History (Because It’s Cool to Know)
Did you know banana bread wasn’t even a thing until the 1930s? It was born out of resourcefulness during the Great Depression. People needed ways to use overripe bananas instead of tossing them, and voilà—banana bread started appearing in cookbooks.
Fast forward to today, and the addition of coffee is a modern twist. Inspired by café culture and our national obsession with banana-anything, the coffee banana bread recipe is a little bit retro, a little bit modern, and totally irresistible.
It bridges generations and taste preferences. You’ve got the homey feel of banana bread with the grown-up edge of coffee. Who said baking can’t be cool?
Why You'll Bake This Again (And Again)
Let’s recap what makes this loaf an absolute keeper:
Flavor-forward: Bold coffee meets mellow banana sweetness.
One-bowl ease: No mixer needed. Just whisk, pour, bake.
Flexible: Add chocolate chips, swap nuts, or turn it into muffins.
Perfect texture: Soft, moist, not-too-dense, and holds beautifully.
Freezer-friendly: Make it ahead and thaw as needed—still moist, still delicious.
It’s the kind of recipe that becomes part of your routine. The kind that turns “I had bananas to use up” into “Let’s bake that amazing coffee loaf again.”
And if you’re looking for a go-to bake that makes your kitchen smell amazing? This one delivers.
Final Thoughts: Bake Bold, Bake Better
There are a million banana bread recipes out there, but not many like this one. The coffee banana bread recipe is cozy, flavorful, and elevated without trying too hard. It’s easy enough for weekdays, special enough for brunch, and impressive enough to wrap up as a gift.
Great recipes don’t need to be complicated. They just need to be worth making. This one absolutely is.
👉 Don’t just bookmark it—bake it. Click here for the full recipe 👉 Full Recipe
#food#baking#recipes#foodie#homecooking#foodphotography#recipeblog#foodblogger#cozyfood#cooking#🍌 Niche-Specific Tags#banana bread#coffee banana bread#moist banana bread#coffee recipe#banana loaf#brunch ideas#homemade bread#easy bakes#fall baking#comfort food
1 note
·
View note
Text
Tejuino Drink Recipe: Guide to Silky Authentic Flavor
You’ve seen it in Jalisco street markets, maybe even tasted it from a plastic cup frosted with crushed ice. Tejuino feels rustic yet refreshingly modern—a malty, lime-bright sip that seems almost too easy to mess up. Truth is, the difference between an addictive batch and a forgettable one rests on two pillars: ingredient quality and texture mastery.

Why Quality Ingredients Define Your Tejuino Drink Recipe
Great cooks know the dish starts at the market stall, not the stove. Tejuino is no exception. Each ingredient tells a story that echoes throughout the finished drink. Skimp here, and no amount of whisking will save you.
Corn Matters
Fresh masa harina: Newly milled corn flour smells sweet and grinds finely enough to dissolve without grit. If your bag smells stale or feels clumpy, the flavor will broadcast that mistake.
Nixtamalization pedigree: Choose a brand that highlights traditional lime treatment. That alkaline soak unlocks calcium and deepens corn aroma that simple cornmeal can’t replicate.
Piloncillo Power
Unrefined sweetness: Dark brown cones glisten with tiny sugar crystals. Those crystals carry trace minerals—iron, magnesium, and potassium—that add body and earthy complexity.
No burnt edges: If the piloncillo looks gray or blackened, the sugar cane was scorched, not slow-evaporated. Expect bitter undertones.
Citrus Brilliance
Limes that feel heavy: Heavier fruit equals higher juice content and thinner pith, meaning less bitterness in every squeeze.
Juice on demand: Lime juice oxidizes fast. Cut and squeeze only when liquid meets glass for the brightest aroma.
Curious about the full recipe? Discover every detail here 👉 Full Recipe
Water Wisdom
Filter first: Hard tap water can muddy flavors with calcium deposits that cling to starch.
Room-temp starting point: Cold water slows fermentation, while hot water destroys beneficial microbes. Aim for a pleasant lukewarm touch.
With these choices locked in, you’ve already won half the battle. The other half? Texture.
Texture: The Silky Science Behind Every Sip
A flawless tejuino glides over the tongue, then tingles with gentle bubbles before finishing sweet-tart. Achieving that mouthfeel is less mystery, more mindful technique.
Hydration Stage
Masa harina acts like a sponge. Give it a brief rest after adding warm water, and starches will plump evenly. Skipping this pause creates dry pockets that stay gritty no matter how long you blend.
High-Velocity Blending
Once rested, the dough meets a blender. That minute of roaring blades breaks starch granules into microscopic particles, suspending them in water so the drink never settles into sludge at the bottom of the cup.
Low-and-Slow Thickening
Heat gelatinizes starch. Bring the slurry to a lazy simmer—just until it coats the back of a spoon. Overdo it, and gelatinized starch turns gummy, delivering an unwelcome pudding texture.
Post-Ferment Foam
Natural lactobacillus and wild yeast chew on piloncillo sugars, producing mild carbonation. Think of it as a homemade micro-soda: less aggressive than pop, but lively enough to lift corn and citrus aromatics up toward your nose.
A Sip Through History
Tejuino traces back to pre-Hispanic Nahua communities. The word tecuíni loosely translates to “beating of the heart,” referencing the energizing pulse people felt after drinking the lightly fermented corn concoction during communal dances. When Spanish chroniclers arrived, they documented giant clay vessels packed with snow from distant volcanoes, proof that early food culture already understood the magic of temperature contrast and texture.
Today, street vendors in Guadalajara honor those roots. They ladle thick concentrate into metal cups, add crushed ice, and pour the mixture back and forth to aerate before handing you a frothy masterpiece. One sip transports travelers straight into centuries of tradition.
Ingredient Upgrades Worth Your Peso
Sometimes you can’t find perfect products at the store. Smart swaps keep you close to the original spirit without losing quality.
Blue-corn masa for a nutty depth and Instagram-worthy indigo hue.
Meyer limes if you crave subtle floral notes and gentler acid.
Organic panela as a piloncillo cousin when cones are unavailable. It retains mineral complexity better than refined brown sugar.
Sparkling mineral water instead of still water for an extra pop that highlights carbonation.
Ready to experiment with these upgrades? Dive into the complete guide 👉 Full Recipe
Common Texture Pitfalls and Simple Fixes
Over-Thickening
If your drink slides out like pudding, dilute the concentrate with filtered water and whisk vigorously. Future batches benefit from a digital thermometer—pull the pot at 185 °F rather than guessing.
Undesirable Grit
Grittiness usually signals under-hydrated masa or a rushed blend. Next time, extend the rest period to ten minutes, then blend for a full sixty seconds at high speed.
Flat Bubbles
A dormant ferment often stems from temperatures below 68 °F. Place the covered vessel inside a switched-off oven with the light on for a gentle warm zone.
Healthful Bonus: Probiotic Perks
Because the drink ferments only two to three days, its alcohol content stays negligible, yet beneficial bacteria thrive. These probiotics may aid digestion, balance the gut microbiome, and even help the body absorb key minerals. Pair that with electrolytes from lime juice and a pinch of sea salt, and you have a hydrating pick-me-up that feels more nourishing than any commercial sports drink.
Home Bar Showmanship
Part of tejuino’s appeal is the pour ritual. At gatherings, line up two metal cups, then pass the mixture between them six or seven times. The high arcs introduce oxygen, boosting foam and impressing onlookers. No metal cups? A cocktail shaker offers similar drama. Serve each glass crowned with shaved ice or a scoop of lime sorbet, and watch shy guests become conversational extroverts after the first sip.
Celebrating Tejuino Beyond Borders
Making the drink at home connects you to a wider culinary narrative: indigenous innovation, colonial adaptation, and modern street-food creativity. In an era when fermented beverages like kombucha and kefir dominate wellness aisles, tejuino offers a corn-centric alternative rooted in deep cultural heritage. It illustrates how humble ingredients—corn, lime, cane sugar—can transform into something complex, communal, and downright celebratory.
Final Takeaway
Quality ingredients set the stage; texture perfection steals the show. Master those twin pillars, and you’ll pour a tejuino that honors centuries of tradition while delighting twenty-first-century palates. Every frothy cup becomes a small act of cultural preservation and culinary art.
Ready to turn theory into practice? Explore the full instructions, measurements, and fermentation timeline here 👉 Full Recipe
#tejuino#tejuinodrink#mexicandrinks#fermenteddrinks#mexicanrecipes#traditionalrecipes#streetfood#summerdrinks#probioticbeverages#cornrecipes#latinfood#drinkrecipe#foodblr#recipeoftheday#refreshingdrinks#foodie#homemadebeverages#tacotuesday#guthealth#drinks
0 notes
Text
Best Low Carb Mango Desserts
Because sunshine-sweet flavor should never break your carb budget.
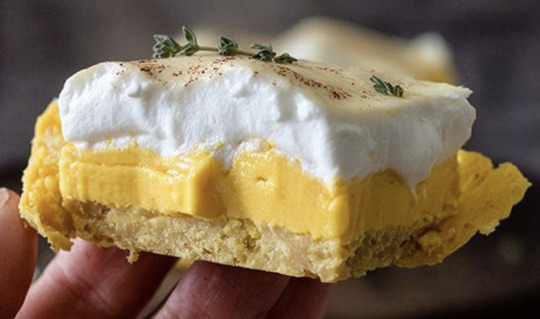
Why Low Carb Mango Desserts Are Worth Mastering
Mango sends most of us straight to a beach state of mind, but its natural sugars can hijack a low-glycemic plan. Crafting desserts that respect macros without dulling flavor is a game changer. When you nail that balance, you unlock treats that feel indulgent yet leave blood sugar steady and energy high.
Curious about the full recipe? Discover every detail here 👉 Full Recipe
Ingredient Quality: The Flavor Multiplier
Great desserts begin long before mixing bowls enter the picture. Think of each ingredient as a speaker in a sound system—you want them all tuned to deliver crystal-clear notes.
1. Choose mangoes with intent
Variety matters. Ataulfo or Champagne mangoes pack concentrated sweetness and low stringiness.
Ripeness test. A fragrant stem and gentle give signal peak flavor; underripe fruit tastes flat.
Frozen counts. Flash-frozen chunks harvested at peak season rival fresh when thawed and drained.
2. Sweeteners that behave
Allulose caramelizes, browns, and measures close to sugar while leaving net carbs near zero.
Monk-fruit blends offer a neutral finish—ideal when you want mango to shine.
Liquid stevia boosts sweetness in micro-doses without altering texture.
3. Fat as a flavor carrier
Full-fat cream cheese supplies velvety richness and helps emulsify fruit purée.
Sour cream lends tang that balances mango’s perfume-like sweetness.
Coconut cream gives dairy-free options lush body without added thickeners.
When you source ingredients with this level of care, every bite sings. Skimp here, and even the cleverest technique can’t fully rescue the result.
The Texture Blueprint
Getting texture right turns an ordinary slice into a dinner-party showstopper. The secret? Respect the science behind structure and mouthfeel.
1. Hydrate your setting agent
Gelatin or agar must bloom in cold liquid first, then dissolve gently in heat. Skip this and you risk unsightly clumps or a dessert that refuses to set.
2. Controlled aeration
A quick whip in the stand mixer incorporates micro-bubbles, transforming dense puree into a pillowy mousse. Overbeat, and you create pockets that collapse later. Strike a balance: firm peaks, no further.
3. Low-and-slow chill
Refrigeration isn’t just about temperature; it’s about timing. Cooling too fast can shock fats, causing graininess. Allow three to four hours for proteins to lock water in place and create a uniform, fork-clean slice.
4. Precision cutting
Dip a chef’s knife in hot water, wipe dry, and glide through. This small ritual avoids drag marks and preserves those Instagram-worthy layers.
Ready to watch these techniques in real time? Click for the photo-packed tutorial 👉 Full Recipe
A Brief Stroll Through Mango Dessert History
Mango trees have flourished in South Asia for more than 4,000 years, their fruit celebrated in poetry and palace kitchens alike. When Persian traders carried dried mango along early trade routes, the sweet-tart slices found new fans across the Middle East. European colonists later folded mango purée into custards and soufflés, intrigued by its tropical aroma.
Fast-forward to the 1970s fitness boom: early “diet” chefs tinkered with sugar substitutes to fit mango into calorie-restricted menus. Today’s ketogenic movement continues that spirit of innovation, marrying heritage flavors with modern nutrition science. The result? Low Carb Mango Desserts that respect both tradition and today's health goals.
Balancing Flavor & Macros: Practical Tips
Portion control without pain
Cut bars into two-bite squares for built-in moderation.
Serve on chilled plates to slow eating pace, encouraging mindful enjoyment.
Seasonal twists
Add lime zest for brightness in summer.
Sprinkle cardamom during cooler months for warmth.
Garnish with intention
Fresh mint sharpens tropical notes.
Toasted coconut flakes contribute crunch without extra carbs.
Frequently Asked Questions
H3. Can I swap sweeteners freely?
Different sweeteners crystallize or brown at varying temperatures. Stick as closely as possible to the recipe’s recommended option for predictable texture.
H3. Why does my filling weep after chilling?
Excess moisture from underripe mango or insufficient gelatin can cause syneresis. Proper fruit drainage and accurate bloom ratios solve this.
H3. Are dairy-free versions as creamy?
Yes—coconut cream mimics dairy fat, and a touch of xanthan gum can replicate cream cheese body if needed.
Sustainability & Storage
Reducing food waste begins with smart prep. Freeze spare mango cubes for smoothies, and store leftover dessert slices in glass containers to minimize plastic. Properly sealed, each portion keeps five days chilled or one month frozen without compromising texture.
Conclusion: A Tropical Treat Without the Guilt
Mastering Low Carb Mango Desserts lets you serve vacation vibes in every slice while steering clear of sugar spikes. With premium ingredients, precise texture techniques, and a nod to centuries-old culinary tradition, you’ll create a dessert that tastes decadent yet aligns with modern wellness goals. Ready to bring this sunshine to your kitchen?
Dive into the step-by-step guide now 👉 Full Recipe
#LowCarb#KetoRecipes#HealthyDessert#MangoLovers#MangoRecipes#CheesecakeBars#NoBakeDessert#SugarFreeTreats#GlutenFreeBaking#DessertInspo#FoodBloggers#RecipeShare#TropicalFlavor#SummerDessert#FoodPhotography#MealPrepIdeas#MacroFriendly#SnackGoals#KetoLifestyle#SweetWithoutSugar#cooking
1 note
·
View note
Text
Biscuits and Sausage Gravy Breakfast Pizza Guide

What Makes Biscuits and Sausage Gravy Breakfast Pizza Unique
The first bite sends you straight to comfort-food heaven. Flaky biscuit crust meets peppery sausage gravy, then gooey cheese ties everything together. It feels indulgent yet familiar, like a Sunday morning spent in grandma’s kitchen. This hybrid dish succeeds because it respects two beloved classics while daring to fuse them into something entirely new.
Curious about the full recipe? Discover every detail here 👉 Full Recipe
Why Ingredient Quality Is Everything
Flavor begins at the grocery store. The better the building blocks, the bigger the pay-off on your plate.
Start With Stellar Staples
Premium sausage Look for visible herbs and a coarse grind. Balanced fat ensures juicy crumbles without greasy puddles.
Fresh dairy Whole milk and creamery butter create velvety gravy. Anything ultra-processed can break or taste flat.
Block cheese Shredding cheese yourself avoids anti-caking agents that hinder melt.
Local eggs Deep yellow yolks enrich flavor and make the finished pie look camera ready.
Tiny Upgrades That Matter
A crack of fresh black pepper elevates aroma.
Finishing salt adds pop without overwhelming other flavors.
A sprinkle of chopped herbs provides color contrast and lightens a rich bite.
When every ingredient delivers its best, the entire dish sings. Think of it as an edible symphony where even the triangle must be perfectly tuned.
Secrets to Dreamy Texture
Texture can make or break any pizza, but it is critical with a gravy-topped crust.
The Par-Bake Principle
Giving the biscuit base a short solo in the oven firms its structure. Moisture from the gravy can no longer seep into the middle, so each slice lifts clean from the pan.
Roux Timing
A smooth roux sits at the heart of perfect gravy. Cook the flour just long enough to lose its raw taste yet short enough to stay pale. This balance delivers creamy body without bitterness.
Heat Control
Hot oven crisp edges fast without drying the interior.
Warm milk blends smoothly, preventing lumps.
Brief rest after baking lets gravy set, so cheese and yolk stay exactly where you want them when the knife goes in.
Quick Troubleshooting
ProblemFixSoggy bottomPar-bake two minutes longer next timeLumpy gravyWhisk in warm milk a tablespoon at a timeRubber-y cheeseLower oven rack if top browns too fast
A Bite of History
Biscuits date back to early American settlers who relied on simple flour doughs for cheap sustenance. Sausage gravy arrived soon after, making use of pork trimmings and rendered fat to create a rib-sticking breakfast. Pizza crossed the Atlantic with Italian immigrants in the late 1800s, quickly morphing into a blank canvas for regional creativity.
By the late twentieth century, Southern diners began topping biscuit crusts with sawmill gravy, then baking everything in cast-iron skillets. The result shocked no one: pure comfort, one slice at a time. Today the mash-up continues to evolve in home kitchens, potluck spreads, and brunch menus nationwide.
Elevating Flavor With Technique
Quality ingredients set the stage, but skillful handling seals the deal.
Brown, Don’t Burn
Sausage benefits from patient browning over medium heat. Slow caramelization unlocks deep savory notes and leaves fond on the pan for the gravy.
Season in Layers
Add a pinch of salt to the meat, another to the gravy, and a final flourish on the finished pizza. Layered seasoning tastes more complex than a single salt dump at the end.
Finishing Touches
Brush biscuit edges with melted butter right out of the oven.
Crack extra black pepper across the top for visual drama.
Scatter minced chives for a pop of green that breaks up all those cozy browns and golds.
Serving Ideas
This comfort bomb plays well with contrasting sides.
Crisp salad with lemon vinaigrette slices through richness.
Fresh fruit provides sweet relief after savory bites.
Cold brew or mimosas turn breakfast into an all-out brunch party.
Leftovers reheat surprisingly well. A quick blast in a hot oven revives the biscuit crust and melts cheese back to stretchy glory.
Final Thoughts
Mastering Biscuits and Sausage Gravy Breakfast Pizza starts with mindful shopping, continues through careful cooking, and ends with a table full of satisfied smiles. Use the best ingredients you can find, honor time-tested techniques, and respect the cultural roots of both biscuits and pizza. The reward is a dish that feels both nostalgic and new, humble yet impressive.
For detailed measurements, baking times, and a printable card, follow the link below and bring this comfort classic to life in your own kitchen.
Curious about the full recipe? Discover every detail here 👉 Full Recipe
#breakfastpizza#biscuitsandgravy#sausagegravy#comfortfood#brunchideas#weekendbrunch#breakfastgoals#foodblogger#recipeoftheday#homecooking#foodphotography#foodstagram#yum#cheeselover#southernfood#easyrecipes#foodiefeature#pizzalover#foodporn#cookiguide
1 note
·
View note
Text
Creamy Mushroom and Asparagus Chicken Penne Magic

There's something undeniably comforting about a perfectly executed pasta dish that brings together tender chicken, earthy mushrooms, and vibrant asparagus in a silky cream sauce. This creamy mushroom and asparagus chicken penne represents the pinnacle of weeknight dinner excellence—sophisticated enough for guests, yet approachable enough for busy families.
The beauty of this dish lies not just in its incredible flavor profile, but in how it transforms simple, quality ingredients into something truly extraordinary. When you master the art of balancing textures and flavors, you'll understand why this particular combination has captured hearts across kitchens worldwide.
The Foundation: Quality Ingredients Make All the Difference
The secret to exceptional pasta dishes starts long before you turn on the stove—it begins at the grocery store. When creating this creamy mushroom and asparagus chicken penne, ingredient selection can make or break your final result.
Fresh asparagus should snap cleanly when bent, with tight, compact tips and vibrant green color. Avoid spears that appear wilted or have woody ends that extend too far up the stalk. The sweetness and slight crunch of properly selected asparagus will elevate your dish from good to unforgettable.
Choosing the Perfect Mushrooms
Not all mushrooms are created equal for creamy pasta dishes. Here's what to look for:
Baby bella or cremini mushrooms: Offer robust, earthy flavor without overwhelming the delicate asparagus
Fresh shiitake: Add depth and umami richness that complements the cream base beautifully
Button mushrooms: Provide mild flavor and perfect texture for those preferring subtlety
The mushrooms should feel firm to the touch, with no dark spots or slimy texture. Fresh mushrooms will release their natural juices during cooking, creating layers of flavor that dried or old mushrooms simply cannot provide.
Mastering the Perfect Texture Balance
The hallmark of exceptional creamy mushroom and asparagus chicken penne lies in achieving the perfect texture harmony. Each component should maintain its individual character while contributing to the overall dish.
Chicken breast, when cooked properly, should be juicy and tender—never dry or rubbery. The key is understanding that protein continues cooking even after removing it from heat, so timing becomes crucial for maintaining that perfect bite.
Curious about the exact cooking techniques and timing secrets? Discover every detail here 👉 Full Recipe
The Cream Sauce Science
Creating a cream sauce that coats pasta without being heavy or overwhelming requires understanding the delicate balance between fat, protein, and starch. The sauce should cling to each penne tube, creating a luxurious coating that enhances rather than masks the other flavors.
Temperature control becomes critical during this phase. Too high heat will cause the cream to break, while insufficient heat won't allow proper thickening. The magic happens in that sweet spot where everything comes together harmoniously.
Cultural Roots and Modern Appeal
While creamy pasta dishes might seem quintessentially Italian, the combination of chicken, mushrooms, and asparagus in cream sauce actually represents a beautiful fusion of cooking traditions. Italian cuisine provided the pasta foundation and technique, while French culinary influence contributed the cream sauce mastery.
This particular combination gained popularity in American kitchens during the 1980s and 1990s, when home cooks began experimenting with restaurant-style dishes. The appeal was immediate—here was a dish that felt elegant and special, yet used ingredients readily available in most supermarkets.
The Evolution of Comfort Food
What makes this dish particularly appealing to modern home cooks is how it bridges the gap between comfort food and sophisticated dining. It satisfies our craving for rich, creamy textures while incorporating vegetables that make us feel good about our choices.
The asparagus adds not just color and nutrition, but also a slight textural contrast that prevents the dish from becoming monotonously creamy. This thoughtful balance reflects our evolving understanding of what makes food both satisfying and nourishing.
Professional Tips for Home Success
Restaurant chefs have several tricks that home cooks often overlook when preparing pasta dishes. Understanding these techniques will transform your creamy mushroom and asparagus chicken penne from good to restaurant-quality.
Pasta Water: The Secret Weapon
Professional kitchens never waste pasta cooking water. This starchy liquid becomes a crucial component in creating silky, cohesive sauces that bind beautifully with the pasta. The key is knowing exactly when and how much to add.
Timing Is Everything
The most successful version of this dish comes together through careful orchestration of cooking times. Each component requires different treatment, yet everything must be ready simultaneously for the final assembly.
Here's where many home cooks struggle:
Overcooking the asparagus: Results in mushy vegetables that break apart
Undercooking the mushrooms: Leaves them rubbery and flavorless
Rushing the cream sauce: Creates a thin, broken sauce that won't properly coat
Why This Recipe Works for Everyone
The universal appeal of creamy mushroom and asparagus chicken penne stems from its incredible versatility and crowd-pleasing nature. It's sophisticated enough for date nights, comforting enough for family dinners, and impressive enough for entertaining guests.
Parents love it because it sneaks vegetables into a kid-friendly format, while adults appreciate the complex flavors and satisfying richness. The dish also scales beautifully, making it perfect for meal prep or feeding larger groups.
Customization Possibilities
While the classic version is perfection, this recipe foundation welcomes creative adaptations. Some cooks add sun-dried tomatoes for acidity, others incorporate fresh herbs for brightness, and adventurous home chefs might include a splash of white wine for depth.
The beauty lies in having a solid foundation that can evolve based on personal preferences, seasonal availability, or dietary requirements.
The Final Touch: Bringing It All Together
Creating exceptional creamy mushroom and asparagus chicken penne requires patience, quality ingredients, and understanding of basic cooking principles. When you master these elements, you'll have a go-to recipe that never fails to impress.
The satisfaction of watching family and friends enjoy something you've created from scratch, seeing their faces light up with that first bite, makes every moment of preparation worthwhile. This isn't just about feeding people—it's about creating experiences and memories around the dinner table.
Whether you're cooking for a special occasion or simply want to elevate an ordinary weeknight, this dish delivers the perfect combination of comfort, sophistication, and pure deliciousness that keeps everyone coming back for more.
Curious about the exact cooking techniques and timing secrets? Discover every detail here 👉 Full Recipe
#creamy pasta#chicken penne#mushroom recipes#asparagus recipes#comfort food#homecooking#pasta night#weeknight dinner#italian inspired#creamy sauce#one pot meal#family dinner#cooking tips#recipe blog#food blog#kitchen secrets#cooking from scratch#home chef#pasta perfection#foodie life#cooking hacks#meal prep#dinner ideas#food photography#pasta porn#comfort food vibes#cozy kitchen#dinner aesthetic#food styling#creamy goodness
1 note
·
View note
Text
Perfect Blueberry Cottage Cheese Breakfast Bake

Starting your morning with a wholesome, protein-packed breakfast doesn't have to mean sacrificing taste or spending hours in the kitchen. The blueberry cottage cheese breakfast bake has become a beloved staple for families seeking that perfect balance of nutrition and indulgence.
This delightful dish transforms simple ingredients into something truly magical—a fluffy, custard-like creation that's both satisfying and surprisingly light. What makes this breakfast bake so special isn't just its incredible flavor, but the thoughtful approach to combining ingredients that work in perfect harmony.
The Foundation of Excellence: Quality Ingredients Matter
When it comes to creating an exceptional breakfast bake, the secret lies in understanding that every ingredient plays a crucial role. The cottage cheese serves as your protein powerhouse, providing that creamy, rich base that makes each bite satisfying and nutritious.
Fresh, plump blueberries are non-negotiable here. While frozen berries can work in a pinch, fresh blueberries bring a burst of natural sweetness and maintain their shape beautifully throughout the baking process. Look for berries that are firm, deep blue, and free from any soft spots.
The eggs in this recipe aren't just binders—they're the architects of texture. Farm-fresh eggs with bright orange yolks will give your bake a richer color and more complex flavor profile than their store-bought counterparts.
Ready to transform your morning routine? 👉 Get the complete recipe here and discover the exact measurements that create breakfast magic.
Mastering the Perfect Texture
The difference between a good breakfast bake and an extraordinary one comes down to texture mastery. Achieving that perfect balance—fluffy yet substantial, creamy yet not dense—requires understanding how each ingredient contributes to the final result.
Temperature control is absolutely critical. Your oven needs to be properly preheated, and the baking dish should be prepared correctly to ensure even cooking. The cottage cheese should be at room temperature before mixing, as cold dairy can create lumps and uneven texture.
The mixing technique matters more than you might think. Overmixing can lead to a tough, rubbery texture, while undermixing leaves you with pockets of unmixed ingredients. The goal is to fold everything together just until combined, preserving the delicate structure that creates that signature fluffy texture.
Key Texture Tips:
Allow all dairy ingredients to reach room temperature
Fold ingredients gently to maintain airiness
Use the right baking dish size for proper thickness
Don't open the oven door during the first 30 minutes of baking
A Taste of Tradition: The Cultural Heritage
The concept of cottage cheese in breakfast dishes traces back to European traditions, where fresh cheese was a staple in rural households. Farmers would use their excess milk to create simple, protein-rich foods that could sustain hard-working families throughout the morning.
The addition of berries to cheese-based dishes has roots in Scandinavian cuisine, where the short berry season made these fruits precious commodities. Blueberries, native to North America, were later incorporated into European-style dishes by early settlers, creating a beautiful fusion of Old World techniques with New World ingredients.
This blueberry cottage cheese breakfast bake represents that perfect marriage of traditions—the European appreciation for fresh cheese combined with America's abundant berry harvests. It's comfort food with a story, connecting us to generations of home cooks who understood that the best meals come from simple, quality ingredients prepared with care.
The Science Behind the Magic
Understanding why this dish works so well can help you appreciate the careful balance of ingredients. Cottage cheese provides both protein and moisture, creating a creamy base that sets beautifully when baked. The curds add interesting texture variation, while the whey contributes to the overall moisture content.
Blueberries bring natural pectin to the mix, which helps with structure while adding bursts of sweetness throughout each serving. Their slight acidity also balances the richness of the cheese and eggs, creating a more complex flavor profile.
The eggs serve multiple purposes: they act as a binding agent, contribute to the custard-like texture, and add richness. When properly incorporated, they create that signature fluffy, almost soufflé-like quality that makes this breakfast bake so special.
Wondering about the exact proportions that create this perfect balance? 👉 Access the detailed recipe and learn the precise techniques that guarantee success every time.
Elevating Your Morning Routine
This breakfast bake isn't just about feeding your family—it's about creating moments of connection and joy around the breakfast table. The aroma that fills your kitchen while it bakes is nothing short of heavenly, drawing everyone to gather and start their day together.
The beauty of this dish lies in its versatility and make-ahead friendly nature. You can prepare it the night before and simply pop it in the oven in the morning, making it perfect for busy weekdays or special weekend brunches.
Whether you're hosting overnight guests, planning a special family breakfast, or simply want to elevate your regular morning routine, this blueberry cottage cheese breakfast bake delivers on every level. It's sophisticated enough for entertaining yet simple enough for everyday enjoyment.
The result is a dish that looks as beautiful as it tastes—golden brown on top with jewel-like blueberries peeking through, creating an Instagram-worthy presentation that rivals any restaurant brunch offering.
Ready to make mornings magical? 👉 Get the complete recipe with all the insider tips and start creating breakfast memories that your family will treasure.
0 notes
Text
Garlic Butter Chicken Bites with Creamy Parmesan Pasta

There's something magical about the combination of tender chicken, aromatic garlic butter, and silky parmesan cream sauce that transforms an ordinary weeknight into something extraordinary. This beloved dish has captured hearts around the world, and for good reason – it delivers restaurant-quality flavors right from your home kitchen.
The beauty of this recipe lies not just in its incredible taste, but in how it brings together simple, quality ingredients to create something truly memorable. Whether you're cooking for family or entertaining guests, this dish never fails to impress.
The Foundation: Quality Ingredients Make All the Difference
When it comes to creating exceptional garlic butter chicken bites with creamy parmesan pasta, the secret starts long before you turn on the stove. The foundation of any great dish is built on the quality of ingredients you choose.
Selecting the Perfect Chicken
The star of this dish deserves your attention. Opt for fresh, free-range chicken breast or thighs, depending on your preference. Chicken thighs offer more flavor and stay incredibly tender, while breasts provide a leaner option that's equally delicious when prepared correctly.
Look for meat that has a fresh, clean appearance with no off-putting odors. The difference between average chicken and high-quality poultry will be evident in every bite.
The Garlic and Butter Partnership
Fresh garlic is non-negotiable in this recipe. Pre-minced garlic from a jar simply cannot match the pungent, aromatic qualities of freshly crushed cloves. When garlic meets high-quality butter – preferably European-style with higher fat content – magic happens.
The butter should be unsalted, allowing you to control the seasoning throughout the cooking process. This combination creates the aromatic base that infuses every piece of chicken with incredible flavor.
Ready to discover the complete recipe with exact measurements and techniques? 👉 Get the full recipe here
Mastering the Perfect Texture: The Art of Cooking Chicken Bites
Achieving the perfect texture in your chicken bites requires understanding a few key principles that separate good cooks from great ones. The goal is to create pieces that are golden and crispy on the outside while remaining juicy and tender on the inside.
The Science of Searing
Proper searing is crucial for developing that beautiful golden crust. The key is ensuring your pan is hot enough before adding the chicken – you should hear an immediate sizzle when the meat hits the surface.
Don't overcrowd the pan, as this leads to steaming rather than searing. Cook in batches if necessary, giving each piece enough space to develop that coveted caramelized exterior.
Temperature Control is Everything
Managing heat throughout the cooking process ensures your chicken bites cook evenly without becoming tough or dry. Medium-high heat for the initial sear, then reducing to medium allows the interior to cook through while maintaining that perfect texture.
The internal temperature should reach 165°F (74°C) for food safety, but removing the chicken just as it reaches this temperature prevents overcooking.
The Cultural Heritage Behind This Beloved Combination
While garlic butter chicken bites with creamy parmesan pasta might seem like a modern creation, its roots trace back to centuries-old culinary traditions that have evolved into today's comfort food favorite.
Italian Influences
The creamy parmesan sauce draws inspiration from traditional Italian cuisine, where the combination of butter, cream, and aged cheese has been perfected over generations. Parmigiano-Reggiano, often called the "King of Cheeses," has been produced in Northern Italy for over 800 years.
This cheese brings not just flavor but also the characteristic creamy texture that makes the sauce so irresistible. The Italian tradition of pairing rich, creamy sauces with pasta creates the perfect backdrop for tender chicken.
French Culinary Techniques
The method of creating perfectly seared chicken bites borrows from French cooking techniques, particularly the art of achieving proper caramelization. French cuisine has long emphasized the importance of building flavor through proper browning and the careful balance of butter and aromatics.
Building Layers of Flavor
Creating this dish is like composing a symphony – each element must complement the others to create a harmonious final result. The garlic butter provides the aromatic foundation, while the chicken adds protein and substance.
The Cream Sauce Excellence
The creamy parmesan sauce is where technique truly matters. The key is achieving the perfect consistency – thick enough to coat the pasta beautifully, yet smooth and velvety on the palate.
Temperature control becomes critical here. Too high heat can cause the cream to break or the cheese to become grainy. Gentle heat and constant stirring create that silky texture that makes this dish so memorable.
Pasta Perfection
The pasta serves as more than just a vehicle for the sauce – it's an integral part of the dish's success. Cooking it to the perfect al dente texture ensures it holds up to the rich sauce while providing the ideal mouthfeel.
The starch released during cooking also helps bind the sauce to the pasta, creating that restaurant-quality finish you're looking for.
Timing and Technique: Bringing It All Together
The magic happens when all components come together at the perfect moment. This dish requires a bit of orchestration, but the results are absolutely worth the effort.
The Art of Multitasking
Success with garlic butter chicken bites with creamy parmesan pasta lies in timing your components correctly. While the chicken rests after cooking, you can focus on creating the perfect cream sauce and finishing the pasta.
This approach ensures everything comes together hot and fresh, with each element at its peak flavor and texture.
Final Assembly
The final moments of preparation are crucial. Tossing the pasta with the sauce, adding the chicken bites back to warm through, and finishing with fresh herbs creates a dish that's both visually stunning and incredibly delicious.
Why This Dish Continues to Win Hearts
There's something deeply satisfying about a meal that combines comfort with sophistication. This recipe delivers on both fronts, making it perfect for everything from casual family dinners to special occasions.
The combination of textures – tender chicken, silky sauce, and perfectly cooked pasta – creates a dining experience that feels both familiar and special. It's the kind of dish that turns an ordinary evening into something memorable.
Whether you're a seasoned cook or just starting your culinary journey, this recipe offers the perfect opportunity to practice fundamental techniques while creating something truly delicious. The skills you'll develop making this dish will serve you well in countless other recipes.
The beauty of this garlic butter chicken bites with creamy parmesan pasta lies in its ability to transform simple ingredients into something extraordinary through proper technique and attention to detail.
Ready to bring this restaurant-quality dish to your dinner table? 👉 Get the complete recipe with step-by-step instructions
1 note
·
View note
Text
high protein pasta salad

There’s a reason pasta salad has stood the test of time. It’s easy, versatile, and crowd-pleasing—everything you want in a dish that can swing between casual and elevated with a few thoughtful tweaks. But when you turn up the protein and focus on high-quality ingredients, it stops being just another side dish. A high protein pasta salad becomes a go-to meal prep hero, a satisfying lunch, or a smart post-workout option that doesn’t taste like compromise.
Why Ingredients Matter More Than You Think
The truth is, a pasta salad is only as good as the sum of its parts. The days of limp noodles and bottled dressings are behind us—today’s best versions rely on fresh, whole, and thoughtful ingredients that elevate texture and flavor without overcomplicating things.
Here’s why that matters:
Pasta base: Opting for high-protein pasta made from chickpeas, lentils, or even edamame boosts the nutritional profile without sacrificing flavor or mouthfeel.
Vegetables: Fresh, vibrant vegetables add crunch and color—and when they’re seasonal, the taste difference is noticeable.
Herbs: Don’t skip fresh parsley, basil, or dill. These little touches layer in flavor and aroma that dried versions just can’t replicate.
Dressing: A simple homemade vinaigrette can bring acidity, richness, and balance. Store-bought dressings often mask flavors; homemade ones highlight them.
If you build the dish with care—treating it more like a composed salad than a dump-and-stir affair—the end result will speak for itself.
Want the full recipe breakdown? Find everything you need here 👉 Full Recipe
The Texture Trick That Changes Everything
What separates a forgettable pasta salad from one you dream about? Texture.
You can have the right ingredients, but if they’re not treated well, the result falls flat. Texture is what makes a salad feel satisfying—it’s that contrast between tender pasta, juicy tomatoes, crisp cucumbers, and the creamy bite of feta or avocado. When everything feels intentional, your salad suddenly feels gourmet.
Here are a few texture tips that work every time:
Cook pasta al dente: This means slightly firm to the bite. Overcooked pasta turns mushy, especially after absorbing dressing.
Dry your pasta: Once cooked, rinse with cold water to stop the cooking process, then pat dry gently with a towel. Dressing clings better to dry pasta.
Balance softness and crunch: Mix soft ingredients like cheese or roasted veggies with crunchier components like raw bell peppers or nuts.
Toss thoughtfully: Don’t dump everything in at once. Add delicate items like herbs last, so they don’t wilt.
The goal is to get variety in every bite—chewy, crunchy, tangy, and creamy.
From Ancient Roots to Modern Meal Prep
You might think pasta salad is a relatively modern creation, but its roots run surprisingly deep.
Ancient Roman cookbooks reference cold grain salads dressed with olive oil, vinegar, and herbs—simple but smart dishes meant to last through the day. These early versions were built for practicality and flavor, often featuring local vegetables and fresh cheese. They weren't called "pasta salads," but the spirit was there.
Fast forward to mid-20th century America, and pasta salad became a staple at backyard barbecues and family picnics. The focus shifted toward convenience—boxed pasta, bottled dressing, and minimal prep. Tasty, yes, but often lacking in both nutrition and depth.
Today’s high protein pasta salad finds its sweet spot by combining ancient wisdom with modern needs: it’s nutritious, portable, and packed with bold flavors. It’s also easy to customize for different diets—vegetarian, gluten-free, or dairy-free versions are all doable without losing the soul of the dish.
Want to see how history meets flavor? Check out the complete recipe here 👉 Full Recipe
Final Thoughts: Make Every Bite Count
Building a great high protein pasta salad isn’t about complexity—it’s about intention. When you prioritize quality ingredients and understand how texture and balance work together, you can turn something simple into something extraordinary.
Whether you’re packing it for lunch, bringing it to a cookout, or prepping a week’s worth of meals, this salad works harder than most. It’s flexible, filling, and far more exciting than the name suggests.
So next time you’re planning a meal, remember: pasta salad isn’t just for sides. Done right, it’s the main event.
Ready to make your own? Grab the full step-by-step recipe here 👉 Full Recipe
Key Takeaways:
Use high-protein pasta for better nutrition and texture.
Focus on fresh, seasonal, and vibrant ingredients.
Texture is king—balance soft, chewy, and crunchy elements.
Draw inspiration from both ancient traditions and modern preferences.
Treat it like a composed salad, not an afterthought.
When you combine thoughtful choices with a simple, flavorful approach, your pasta salad becomes more than a dish—it becomes your signature.
Enjoy.
1 note
·
View note
Text
1 note
·
View note
Text
Dense Bean Salad: The Perfect Protein-Packed Meal

There's something magical about a well-crafted bean salad that goes beyond its humble appearance. A dense bean salad isn't just another side dish—it's a nutritional powerhouse that can stand proudly as the star of your dinner table.
This hearty dish combines the earthy richness of legumes with fresh vegetables and aromatic herbs, creating a symphony of flavors that will surprise even the most skeptical eaters. Unlike lighter salads that leave you searching for more, this substantial creation delivers lasting satisfaction.
The Foundation of Exceptional Dense Bean Salad
The secret to an outstanding bean salad lies not in complicated techniques, but in the careful selection of your foundation ingredients. When you start with premium beans, you're already halfway to culinary success.
Quality beans should feel firm to the touch and have a consistent color without wrinkled skin or visible cracks. Whether you choose dried beans that you cook yourself or opt for canned varieties, this initial choice will determine the final texture and flavor of your dish.
Ready to discover the complete recipe with all the insider tips? 👉 Get the Full Recipe Here
Why Fresh Ingredients Make All the Difference
The vegetables you choose should be at their peak freshness. Crisp bell peppers, firm tomatoes, and aromatic herbs will elevate your salad from ordinary to extraordinary.
Here's what to look for when selecting your ingredients:
Vegetables with vibrant colors and firm textures
Herbs that smell fragrant and have no wilted leaves
Fresh citrus for the brightest, most flavorful dressing
High-quality olive oil that enhances rather than overpowers
Mastering the Perfect Texture Balance
The texture of your dense bean salad is what transforms it from a simple mixture into a memorable meal. Achieving the perfect balance requires understanding how different ingredients contribute to the overall mouthfeel.
Beans should maintain their shape while being tender enough to bite through easily. Vegetables need to provide contrasting textures—some soft, some with a satisfying crunch. The dressing should coat everything evenly without making the salad soggy.
The Art of Proper Preparation
Timing is everything when it comes to preparation. Some ingredients benefit from marinating time, while others should be added just before serving to maintain their fresh texture and vibrant appearance.
Temperature also plays a crucial role. Serving your salad at the right temperature allows all the flavors to shine and creates the most pleasant eating experience.
A Rich Cultural Heritage
Bean salads have nourished families across cultures for centuries. From Mediterranean three-bean salads to Latin American ensaladas de frijoles, these dishes represent the wisdom of traditional cooking—combining affordable, nutritious ingredients into something greater than the sum of their parts.
The beauty of the dense bean salad lies in its adaptability. Different regions have contributed their own signature touches, whether through specific bean varieties, unique seasoning blends, or traditional preparation methods passed down through generations.
Modern Nutritional Wisdom Meets Ancient Traditions
Today's nutritionists praise what our ancestors knew instinctively: beans provide complete proteins when combined with grains, plus fiber, vitamins, and minerals that support overall health.
This understanding has led to a renaissance in bean-based dishes, with the dense bean salad leading the charge as a perfect example of how traditional foods can meet modern dietary needs.
Want to bring this incredible dish to your own kitchen? 👉 Discover the Complete Recipe with Step-by-Step Instructions
Creating Your Culinary Masterpiece
The journey to creating an exceptional bean salad begins with understanding that this isn't just about following a recipe—it's about creating an experience. Each bite should offer a harmonious blend of flavors and textures that leaves your guests asking for the secret.
Remember that the best salads are those made with intention and care. When you invest in quality ingredients and take time to understand how they work together, you're not just making food—you're creating memories around your dinner table.
Whether you're planning a family gathering, preparing meals for the week, or looking for a dish that travels well to potlucks, this substantial and satisfying salad will exceed your expectations and become a treasured addition to your recipe collection.
#yummy#foodporn#baking#cooking#comfortfood#foodphotography#Mum's Cooking#Home-Cooked#Bitter Gourd Stir-Fry#Prawn#Minced Pork#Egg#Tomato#Braised Pork#Braised Chicken#Braised Bean Curd#Braised Egg#Shiitake Mushroom#White Rice#Dinner#Asian Food#Food#Buffetlicious
1 note
·
View note
Text
#yummy#foodporn#baking#foodlovers#comfortfood#cooking#delicious#foodie#foodphotography#tasty#drinks#drink water#cvm drinking#energy drink#ice cream#fruit#cake#food and drink
1 note
·
View note
Text
#yummy#foodporn#baking#foodlovers#cake#cakerecipe#birthday cake#wedding cake cookie#fionna and cake#cake decorating#cakesofinstagram#cake#chocolate#dessert#cakedecorating#cookies#ice cream#sweets
1 note
·
View note
Text
1 note
·
View note