
Isn't it wonderful that you can bring beauty into the world by joining pieces of fabric together?
Don't wanna be here? Send us removal request.
Statistics
We looked inside some of the posts by bellagbear and here's what we found interesting.
Average Info
Notes Per Post
5
Likes Per Post
4
Reblog Per Post
1
Reply Per Post
0
Time Between Posts
9 days ago
Number of Posts By Type
Text
17
Last Seen Tumblr Blogs


Fun Fact
BuzzFeed published a report claiming that Tumblr was utilized as a distribution channel for Russian agents to influence American voting habits during the 2016 presidential election in Feb 2018.
Text
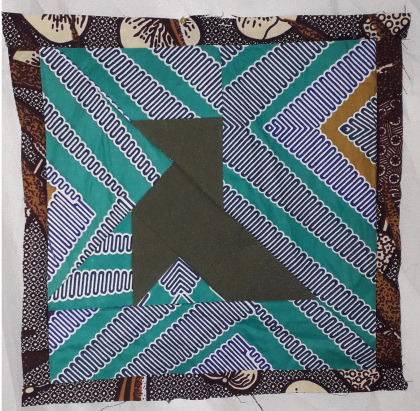
How to make a 'Coat of Many Colours' inspired embroidery patch, HQAL update
There are two stories connected to the coat of many colours, one from the bible and one from Dolly Parton. Their meaning is similar in a way, but also different. The embroidery patch below is my interpretation of the Coat of Many Colours. Also, given and made with love.
There are two stories connected to the coat of many colours, one from the bible and one from Dolly Parton. Their meaning is similar in a way, but also different.
In the bible, the coat of many colours is of Joseph. Joseph is the favourite son of Jacob because he reminds him of his beloved wife. Because of that, Jacob gave him a splendid coat of many colours. This made Joseph his brothers so…
View On WordPress
#aritsan#backstitch#BellaGBear#chainstitch#coat of many colours#colourful art#creative#dolly parton#dreamcoat#Embroidery#embroidery blogger#embroidery design#embroidery designer#embroidery patch#embroidery tutorial#hand sewing#handmade#handmade gift#joseph#madewithlove#satin stitch#splitstich#technicolor dreamcoat
4 notes
·
View notes
Text
A few weeks ago I published part 1 of a tutorial on how to make your own awesome patchwork star. Well, here is part 2! This tutorial will teach you how to turn the patchwork quilt block into a potholder. Potholders are ideal as a present: Everyone uses them and they are small so don’t take too much time and materials to make.
Quilt tutorial: how to make a patchwork star
This article is published before during the artisan craft week at projecteducate. I promise you a never-ending sense of pride and accomplishment when you’re holding your first finished quilt.
In this article, I will discuss the following techniques:
Basting of a quilt
Quilting a quilt
How to sew a border around your quilt
Binding a quilt
If you want to know a bit more about the separate part of a quilt or how to make a quilt, see the following articles:
A lesson in the basic elements of a quilt
How to make a scrap quilt with many pieces in 4 steps
Which materials do you need?
18 x 19.5 cm of fabric for the border.
18 x 18 cm fabric for the back
18 x 18 cm fabric batting; either a piece of a fleece blanket or you can buy it in a quilt or craft shop
Quilting thread (quilting thread is best, but embroidery thread or any other thread you have is also fine)
Standard sewing notions (scissors, pins, needle etc…)
Fabric choices: I used the fabrics I also used for the star. You can choose any you want though! A contrasting border fabric will look very good as well.
Step 1: Basting your quilt
What is it?
A quilt consists of three layers: the top, a back and batting. When you bast a quilt you temporarily sew the pieces together with big stitches so the layers won’t move when you start to quilt.
How do you do it?
1. Put the three layers together. The batting goes in the middle. The ‘right’ side of the backing and quilt block face the batting. The right side is the front of your fabric which will be visible when the quilt is finished.

2. Cut off the excess batting and background fabric. Leave a border of around 2 centimetres.
3. There are two ways to bast a quilt: with pins and with thread. Normally I would not bother with thread for a piece this small, but I will show you both techniques.
Basting with thread: For this, you can use any leftover thread you have because you will remove it from the piece when it’s finished.

Basting with pins: This follows the same principle as basting with thread and is quicker. This technique is not suitable if the quilting will take a long time or when you’re quilting a big quilt. The needles will either fall out or prick you when you’re handling a lot of fabric.

Step 2: The quilting
What is it?
The term ‘quilting’ or ‘quilt’ is confusing because they are both used for the finished object, a verb and for the process we’re going to do now. Quilting means sewing through the three layers of a quilt. This is both to keep the layers in place, but also has ornamental value. Small stitches used to be the norm, but it is more important to create stitches of a consistent length. Quilting can be done to exaggerate the original pattern or to create a new kind of pattern. You see an example of both below.
How do you do it?
1. Thread a needle. Tie a knot at the end. Start with the first stitch where you gently pull the knot through one layer of fabric. This will secure the thread into the fabric.
2. Quilt in any pattern you want. I decided to quilt around the star shape, but you can also draw X-es in boxes, stripes, circles, whatever strikes your fancy! The middle block is ideal for some initials as you see in my finished piece.
3. If your thread is almost gone, tie a knot near the fabric and finish in the same way you started by pulling the knot through one layer of fabric.
4. Keep repeating this process until you’re satisfied with the quilting.

Step 3: Putting a border on your quilt
What is it?
To speak in the words of the brilliant Beyonce: ‘if you like it, then you should put a ring on it’. And that is what we are going to do with this quilt! A border is like a ring around a quilt which finishes the raw edges.
How do you do it?
1. Cut your block to the right size. About half a centimetre from the points of the star.
2. Cut four border strips of 19.5 by 4.5 cm
3. Pin the border strips with the pretty side to the block and sew as you see in the picture. Use pins on the star points inserting them at 90 degrees from the line you’ll sew. This will make the quilt look neater. Also, make sure an equal piece of the border fabric sticks out at either side of the block. That’s why the border strips are longer than the block. You’ll need that length later. When sewing the second set of borders don’t sew over the borders already attached (as shown in the picture).

3. Now fold over the border fabric at the back and pin it down. You have to fold twice so the edge of the fabric is secured inside the border. The corner is always fiddly, the pictures show how I usually do it but stick to any way that works for you.
4. Sew the border to the back as shown in the picture, With this stitch, the stitches are nearly invisible.

Step 4: Finishing your quilt
1. This part is always a lot of fun: removing the basting thread.
2. If you haven’t done that already, you can sew your initials in the middle block to make this quilt your own.
3. If you make many of these blocks and sew them together you get a big quilt!
I added two pictures of the finished result so you can see the initials I embroidered onto the quilt.

And now your first quilt is finished. Congratulations!
If you have any questions about this tutorial or suggestions leave a comment or sent me an email at [email protected]! I am always open to help people to get into this quilting obsession.
I would love to see what you make with this tutorial, so please leave a link in the comments section once you do!
May this first quilt be the first of many more to come!
See my DeviantArt, Facebook page or Instagram (username: bella.g.bear.art) for more artwork and WIPs. You can also follow my blog by clicking on the button on the left or by filling in your email address. There will be a monthly update at the end of every month and a new blog post every Sunday or Monday.
A few weeks ago I published part 1 of a tutorial on how to make your own awesome patchwork star. Well, here is part 2! This tutorial will teach you how to turn the patchwork quilt block into a potholder. Potholders are ideal as a present: Everyone uses them and they are small so don't take too much time and materials to make. A few weeks ago I published part 1 of a tutorial on how to make your own awesome patchwork star.
#creative tutorial#handmade#handmade gifts#how to quilt#patchwork#patchwork star#potholder#quilt#quilt tutorial#quiltblogger#quilter potholder#quiltlove#tutorial
0 notes
Text
The word quilt or quilting is confusing because of all the different meanings the word has. To explain to you how tricky quilting terminology is I present to you this perfectly accurate description of a quilter:
Quilter: One who quilts and spend many hours quilting. Some people only make quilt tops and engage a quilter to do the quilting. Other quilters do their own quilting.
Yes, understandable right!? Let me explain some words in this sentence:
Quilt: the finished project. It is a blanket consisting of three layers which are sewn together through quilting
Quilting: Technically speaking, the verb quilting means sewing through the three layers of a quilt. Piecing is the term used for sewing fabric pieces together into a quilt block and quilt top. However, quilting is also used as a general term to describe every part of the quilting process. This includes all the steps from picking out fabric to putting on the final border of the quilt.
Quilter: Someone engaged in making quilts, be it as a hobbyist or a professional. Some quilters only make quilt tops, others finish the quilt tops for other people professionally.
Many of the readers of my blog already know about quilting because they are quilters themselves. However, for the people who don’t, I’ll delve into the different elements of a quilt in this post. I aim to inspire people to start making quilts. Basic knowledge is required for that. See these tutorials if you want to give quilting a go:
Quilt tutorial 1: how to make a patchwork star
Quilt tutorial 2: how to finish your awesome patchwork star
However, you don’t have to be disappointed in this post when you are an experienced quilter, I’ll use many fabulous quilts as an example. This will give you plenty of visual pleasure to enjoy this post.
What are the parts of a quilt?
There are four major components of a quilt:
A quilt top > the front of the quilt
The batting and backing > the padding and back.
The quilting > Which keeps the three layers together
The border > The sides which ties the quilt together
I’ve already talked about some of those parts before in this post where I talk about how to make a scrap quilt:
How to make a scrap quilt in 4 steps
There is also a glossary with explanations of quilt and embroidery terminology:
Glossary
1. The quilt top
A quilt top is the complete front piece of your quilt. A quilt top consists of several components, namely the quilt blocks and sashings. A quilt top either consists of one big quilt block or multiple quilt blocks combined and put together. The picture below shows a quilt top of a small bookcase quilt. Each book is a different block and you could call the brown shelving a sashing.
A mini-book quilt to calm one’s mind
1.1 A quilt block
A quilt starts with a quilt block. To make a quilt block a pattern is used. A pattern can be improvised or tailor-made. Also, the pattern can be big or small, abstract or life-like and everything in between. The choice of the pattern depends on the style of the quilter or the recipient.
A quilt block is pieced together with various techniques depending on the pattern. Techniques such as patchwork, foundation piecing, applique and English Paper Piecing are most commonly used.
The look of a quilt is greatly determined by the pattern choice together with the fabrics used to make the pattern. Below are three examples of a pattern. A pattern can be made with all the available quilting techniques.
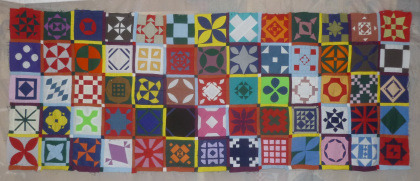
4 quilt blocks
How to combine various quilting techniques in one block
The Kenyan Quilt: quilt blocks showcase
1.2: The sashing
A quilt consists of either one big block, multiple quilt blocks placed directly next to each other or multiple blocks divided by a strip of fabric called the sashing. Sashing is used to help the quilt blocks stand out. Also, it gives the quilt a calm look.
How to use old shirts and ties to make a new quilt
1.3 The finished quilt top
Once all the quilt blocks are put together you have the completed quilt top. A quilt top is made from one big block or many different quilt blocks put together.
All those quilt blocks can be made from the same pattern or different ones depending on the design and preference of the quilter. For example, a sampler quilt consist of a lot of different blocks each made with a different pattern. This is to show your skills as a quilter or to teach the quilter many different techniques in one quilt. The Dear Jane Sampler quilt is a good example of that. The Splendid Sampler quilt by Pat Sloan and Jane Davidson is another good example of a quilt consisting of different blocks to teach the quilter new techniques.

A happy milestone: Five rows of the Dear Jane Quilt completed!
However, a quilt can also consist of the same pattern repeated many times over. This is usually done for utility quilts because it gives a calming look and increases the speed of piecing. Those patterns can be made with the same colours or with different colour and fabric combinations. This depends on the choice of the quilter. The quilt below is Delilah designed by Jen Kingwell. Members of a quilt group each made this quilt. You can see how different each of them looks.
Thes quilts below show the difference in using sashing or not:
Finished scrap quilt
And the quilt below shows the different look of using different size of sashing in one design. The design is inspired by the Gypsy Quilt by Jen Kingwell

Kenyan quilt block finished
The Kenyan Quilt top is finished!
Lastly, these quilts by Klazien Hoomans show the effect of using the same blocks over and over again in one quilt.

‘Look behind the lines’ miniature quilt and a quilt exhibition
2. The batting and backing of a quilt
2.1: The batting
Batting is a filling usually made from wool, polyester or a blend which gives thickness and warmth to the quilt. However, some people also use bamboo or any other materials they can find. Cheaper options are to use old blankets or fleece blankets. Although, not every batting is easy to sew through. The best choice for batting depends on the purpose of the quilt and the technique used to make it. The batting comes in between the front (quilt top) and back (backing) of a quilt. Batting is sold in big roles.

2.2 The backing
The backing is the backside of the quilt. This part can be pieced as well, but usually consist of a big piece of fabric. Big pieces of fabric are used because it’s quicker and easier. The back is usually not on display so it doesn’t have to be intricate or super pretty. A lot of people buy big pieces of fabric they like as backing or they use old bedsheets.
For my Kenyan quilt, I am using the fabric below. The piece was almost big enough for the complete back so it saved me a lot of time piecing. I thank my mom for her good insight to advise me to do so.

3. The quilting of the quilt
Quilting is the verb for sewing through the three layers of the quilt. This keeps the layers from shifting and also makes the quilt stronger. This can be done in 3 ways: 1. by hand 2. by a domestic sewing machine 3. by a long-arm quilting machine.
The quilting design people use varies from quilt to quilt and from maker to maker. Sometimes the quilting becomes the focus of the finished project and sometimes the quilting is used to emphasise the pattern used instead. Quilting in this style is not visible upon first glance. The pictures below show the different quilting styles.
In this project, quilting is an integral part of the design of the quilt.

Look behind the lines mini quilt
In these quilt blocks, the quilting is hidden and used to enhance the quilt pattern.

A Nearly Insane quilter quilting QAYG?
2. The border or binding of a quilt
Adding the border, also called binding, is the last part in making a quilt. The border closes up the raw edges and gives the quilt a neat finished look. There are different styles to do so. The style in the photo is called ‘mitred corners’. This style is my personal favourite.

Conclusion: Now you know more about quilts!
This article holds all the basic knowledge you need to start to talk about quilting and to start your own quilt! Quilting is not hard, it only looks hard because it is clever. Quilting makes use of a handful of basic tools and techniques and by ingeniously combining them almost any kind of design is possible.
Some quilts don’t follow the ‘rules’ for a quilt set down in this post though, because, exceptions confirm the rule. I’ll end this post with some of those ‘rule breakers’. Can you see where they break the rules? The person who comments with the right answers quickest gets a pat on the back and a boatload of praise from me.

Back of the scrap quilt
Front of the scrap quilt

Chilling rag quilt turtle
How to make a turtle rag quilt
Some questions for you:
Would you call yourself a beginning quilter or an experienced quilter?
What is your favourite part of quilting?
How would you describe your quilting style?
See my DeviantArt or Instagram (username: bella.g.bear.art) for more artwork and WIPs. You can also follow my blog by clicking on the button on the left or by filling in your email address. There will be a monthly update at the end of every month and a new blog post every Sunday or Monday.
Other places you can find me is email ([email protected]), Facebook (@BellaGBearArt Page).
If you want to support my work use the Kofi or PayPal button on the side.
The word quilt or quilting is confusing because of all the different meanings the word has. To explain to you how tricky quilting terminology is I present to you this perfectly accurate description of a quilter: Quilter: One who quilts and spend many hours quilting. Some people only make quilt tops and engage a quilter to do the quilting. Other quilters do their own quilting. The word quilt or quilting is confusing because of all the different meanings the word has. To explain to you how tricky quilting terminology is I present to you this perfectly accurate description of a quilter:
#artisan#artisan blogger#creative blogger#handmade#how to quilt#patchwork#quilt#quilt basics#quilt block#quilt blogger#quilt lesson#quilt top#quilt tutorial#quilter#sashing#tutorial
0 notes
Text

If your elders are like mine you have heard many times that mixing alcoholic drinks is a bad idea. I don’t agree with that, a cocktail can be a beautiful thing. The same way that a mix of various quilting techniques is a beautiful thing. I will tell you why in this article.
There are many different quilting techniques. I have already discussed several of them. And those articles don’t even touch on half of the techniques available. Sometimes it seems a new technique is invented every week. Therefore, it can be difficult to choose the right technique for the right pattern, especially because you also have to take into account the kind of fabric you are using!
However, I don’t want to discourage you from quilting with endless lists of techniques you can use. In this article, I will show you quilt blocks made from some classic techniques that have been around for a long long time. These techniques will help you on your way to become a master quilter yourself. These techniques I’ll show you with the help of some blocks of the Dear Jane sampler quilt. I will end the article with 4 tips to keep in mind when combining techniques.
If you know very little about quilting or just like to read my articles, check the ones below to learn more about the individual techniques:
Quilting techniques with Dear Jane 101: Foundation piecing
Quilting techniques 101 with the Dear Jane quilt: Y-seams
The Dear Jane quilt techniques: the magic reverse applique quilting trick
Dear Jane quilt: the quilting techniques you hate, or why practice is paramount: Applique.
See the article below to find out more about the Dear Jane sampler quilt. A sampler quilt is a brilliant way to teach yourself new techniques. Each block is made of a different pattern. Therefore, every block you make requires a different way of thinking to figure out how to sew the particular quilt block.
Introduction to the Dear Jane sampler quilt
Dear Jane Quilt H-2: Jacob Anthony
In block H-2 below I used a combination of patchwork and needle turn applique. The needle turn applique is used in the two red triangles positioned at an angle from the triangles in the middle. In a previous similar-looking block, C-2 Streak of lightning, I used the Y-seam technique to make this block. However, this pattern has sharp corners and the blue fabric is too thick to use that technique. Both needle turn and the Y-seam technique can be used for a block like this. When you use Y-seam I advise you to first sew the corners of the blue block together where the two pieces meet. When you use the Y-seam technique it is best to sew those corners last. This block shows that different techniques lead to similar results. However, not every kind of fabric is suitable for every technique, so choose accordingly. Adjusting a technique allows you to create a pattern with any fabric you want.
The colour combination of dark blue and red works really well for this block. It gives the block a lot of bad-ass attitude. Also, it reminds me of sailboats lolling in a lake. I realise this is a strange combination of associations.
Dear Jane Quilt Block G-12: Gloriae
This block was complicated. I pieced it with a combination of needle turn applique and reverse applique. Reverse applique places the fabric to be sown behind the background fabric instead of on top. In the pictures below you can see the steps used to construct this block.
First, I reverse appliqued the pink star on the green fabric. After that, I added the pink border with needle turn applique. I did it this way because I wanted to create a 3d effect. Now it looks as if the pink star is furthest away from the pink border. The pink border looks like a window sill. When you are combining techniques there are more possibilities of creating interesting 3d effects like this in your quilt blocks.
I love the combination of green and pink. I probably love it because it is not a frequently used combination. Combining unconventional colour combinations with more normalized ones is a great way to make your quilt pop and look interesting and still maintain the homely feel of quilts we all love.
Dear Jane Quilt Block J-10: Chieko’s Calla Lilly
The next block I’ll show you is an unsuccessful combination of techniques. I am showing you this block to show you we all live and learn. Also, maybe this helps you to prevent making the same mistake. This block combined the foundation piecing technique with needle turn applique and reverse applique. Both the applique techniques were used to create a similar 3d effect as in block G-12 Gloriae.
However, it turns out if your layers of fabric become too thick reverse applique doesn’t work anymore. In reverse applique, you cut the background fabric and fold it to the back. The hole you creates the shape of the pattern. However, the foundation piecing adds an extra layer which makes the block bulky. Also, it was difficult to fold the red fabric under because there was not enough space. Needleturn applique only folds one layer of fabric underneath the piece you’re sewing which prevents bulkiness. You can see the difference in neatness between the yellow petals (reverse applique) and the red ones (needle turn applique).
This is the first Dear Jane block I actually want to re-do. I am not sure if I will in the end though because I promised myself at the start to keep all the blocks. In that way, the different skill level of all the blocks will reflect my journey as a quilter. I even wrote about my less skilled blocks in a post to make that point. I am still disappointed with how this block turned out. I really love the colour combination and the reverse applique technique, but couldn’t make it work this time. I learned that it doesn’t work to combine a technique that creates extra layers of fabric with a technique that requires as little fabric as possible.
I’m not ashamed: humble Dear Jane quilt blocks
Dear Jane Quilt Block H-9: Snowflake Melt
I want to end this post with another nice block, number H-9 Snowflake Melt. The colour combination of dark green and blue is so nice and calming. Also, this block reminds me of a windmill and a windmill in a landscape is a beautiful thing.
This block combined the foundation piecing technique with reverse applique. I know I said with the previous block to not combine those techniques. However, this block shows us that there are rules, and there are times to break those rules. The previous block was very crowded at the places where the points of the petals meet. This increased the amount of fabric to be folded away under the same space even more than the layer foundation piecing adds. The block below has only four reverse applique pieces which are far enough apart to work out. So, the lesson with this last block is to always consider for each quilt pattern individually which techniques are best to use.
Conclusion: What have we learned about mixing quilt techniques?
Adjusting a technique allows you to make a pattern with any fabric you want
When you are combining techniques there are more possibilities of creating interesting 3d effects in your quilt blocks.
It doesn’t work to combine a technique that creates extra layers of fabric with a technique that requires as little fabric as possible.
Always consider for each quilt pattern individually which techniques are best to use
Even though the last lesson tells us that there are no rules, I still hope this article taught you wonderful things. And remember: the know-how to match a pattern with the best technique is something that comes with experience. Don’t be afraid to make some mistakes along the way. As you saw in my block J-10 a block will always come together no matter what. Don’t be too hard on yourself, keep practising and celebrate every block you finish with a kiss and soon you’ll notice yourself getting better and better.
If you need any help to decide which technique to use for a particular pattern feel free to send me a message. You can use the commentary section, email or find me on one of my social media accounts details of which are on the bottom of this article.
Some questions for you:
Which combination of techniques do you use most?
What is your favourite ‘conventional’ colour combination?
What is your favourite ‘unconventional’ colour combination?
Did you like this article and would you like more of this kind of articles in the future?
Would you like to know more?
The Kenyan Quilt top is finished!
A Nearly Insane quilter quilting QAYG?
A sneak peek of a future project and article
HQAL
This post is part of the hand quilting along organized by Kathy. We are a group of quilters who want to support each other in our quest for hand quilting. Since my Dear Jane is completely made by hand this project qualifies. If you are interested in joining us send Kathy a message. Also, check out the work of the other wonderful quilters in the links below.
Kathy, Margaret, Emma, Tracy, Deb, Susan,�� Nanette, Edith, Sharon, Karrin, Gretchen, Kathi, Bella, Daisy and Connie
See my DeviantArt or Instagram (username: bella.g.bear.art) for more artwork and WIPs. You can also follow my blog by clicking on the button on the left or by filling in your email address. There will be a monthly update at the end of every month and a new blog post every Sunday or Monday.
Other places you can find me is email ([email protected]), Facebook (@BellaGBearArt Page).
If you want to support my work use the Kofi or PayPal button on the side
How to combine various quilting techniques in one block If your elders are like mine you have heard many times that mixing alcoholic drinks is a bad idea.
#artisan#BellaGBear#bellagbearart#brenda papadakis#colourfulart#dear jane#Dear Jane quilt#grannyhobbies#hand piecing#hand quilting#Jane Stickle#needle turn applique#patchwork#quilt#quilt blogger#quilter#quilting techniques#quilting term#reverse applique#sampler quilt#solid fabric#solid fabrics#y-seams
1 note
·
View note
Text
I am a quilter. In this article, I will share my story of how I exhibited my first quilt in a national exhibition. The focus will be on how, step by small step, I found the courage to do so. This article is not only for quilters though. My hope is that this article will inspire everyone to find the guts to share their art, with friends, strangers and peers alike. A previous rendition of this article is published on DeviantArt for a group project.
How I convinced myself to exhibit my quilts

In the photo on top, you can see me and my quilting friends at the exhibition. I am the one in the orange pants. The quilt with the triangles and the yellow border is mine. This was in April 2019. By that time I had been quilting for about five years, of which the last two or three years intensely. However, for a long time, I was quilting in secret. Sure, my closest friends knew about it. Also, my mother knew because she is the one who taught me. But beyond those people, I was very much in the quilting closet. I was embarrassed and afraid people would laugh at me for my old-fashioned art.
Am I not too young to quilt?
How do you explain you are a student in the prime of your youth who spends her free time drinking wine and cutting up fabric alone in her room? Besides, my style is also unconventional and I like to use techniques and fabrics that other quilters might call wrong, at least that is what I assumed. Lastly, I feared I was not good enough to be accepted by serious quilting people. All turned out to be my negative assumptions, and exhibiting my art and participating in the quilting world helped me see that.
Once I dared to take steps to get out of the quilting closet I discovered people don’t think me or my art silly. Most of my friends were impressed I had the patience and skills to make my own bags or blankets. Also, familiarizing myself in the quilting world, I discovered that there are many quilters like me who love to break the rules. I was welcomed with open arms together with my enthusiasm, youth and love for the art. I also noticed that I learned much faster once I started to share my work and talk to people about it instead of working on my own in secret. The praise and encouragement I got from people motivated me, and the advice from experienced quilters helped to develop my technique. Through those quilting friends, I also got the opportunity to join my first exhibition.
Here is a sample of some of my earliest pieces:
How to make a penguin backpack from old curtains
How to make a scrap quilt with many pieces in 4 steps
A mini-book quilt to calm one’s mind with Oscar Wilde
Finished scrap quilt
Finished front
How I started sharing my quilts
It is key to find a small group of peers who support each other and push you to test the limits of your skill, creativity and courage. In the quilting world, we call those groups quilting bees. A quilting bee is a group of quilters who gather to quilt together, socialize and to inspire each other.
I took a long time before I dared to join my first quilting bee, though, because I used to fear to put my art out in the world. I started on DA because sharing art with strangers was easier. It felt safer. Of course, I told none of my real-life friends I had an account. However, soon I discovered a passion to share my art and to inspire other people with it. For that, I needed to extend my reach and this website was born, Bella G. Bear Art. The same as with DA, for the first few months, I didn’t tell anyone except strangers about the website for fear of judgement. However, when I eventually told some friends and family members they were encouraging. I started to share links to articles I wrote on my personal Facebook account.
Has my fear disappeared now?
It is my dream is to encourage people with my work to either take up quilting themselves or to be more conscious about the items they buy and discard easily. Because my quilted items are made with attention, skill and time, they are more valuable and counter the fast fashion industry. My aim is to encourage people to think about their consumption habits. One way to fight climate change is to buy fewer items which last us a long time. In the future, I’ll also be selling that kind of items myself. For that, check this website or my facebook page. I discovered that telling many people what you want to achieve is one way to build contacts, get support and ultimately to your opportunity for success.
Although I still fear judgement from time to time, I keep pushing myself to share my art. However, I also know that it is an insecurity I can overcome. It is not a reflection of my personality or my skills in quilting. Every person has their insecurities and fears and we cannot let those stop us from achieving our dreams or to do some good in the world. We all have the power to contribute to a better world if we dare. Currently, I am setting up a Facebook page, called Bella G. Bear Art. Please check it out and give the page a like!
The proud quilter
Sharing creates a sense of belonging
Besides, even if my quilts were bad I would still share them to show the world that anything made with love and attention is worth sharing. Exhibiting my art showed me my art is worthwhile and also taught me a lot on how to improve it. Exhibiting my quilt in the national exhibition was a key moment for me because I realized my quilt belonged there with all the other quilts. This made me realize that I belong with the other quilters. My quilt was not better or worse than the pieces of my peers, but of equal value. It made me believe that if I keep working and exploring my creativity I have it in me to succeed as an artist. This is the piece I sent in:

Look behind the lines mini quilt
And some pieces from other quilters:
‘Look behind the lines’ miniature quilt and a quilt exhibition
Four tips to kick-start sharing your art
My wish is that the tips below will encourage you to start you on the journey to share your art:
Find local groups to join to make friends and learn from each other.
Find local exhibitions for beginners without any major entry requirements.
Plan to go to the exhibit with friends or plan to meet them there. You can discuss all the quilts you see and you can be sure that there are at least some people who love your quilt!
Start small if you are nervous. You don’t have to tell everyone and you don’t have to start with a competition-based exhibition. You can start online on Deviantart or any other social media platforms and slowly work towards bigger, scarier places to share. Any step you can take towards a bigger goal is brilliant. A mountain is climbed by taking the first few steps downhill after all.
Conclusion: Now find bravado yourself!
At my quilt groups, I see a lot of people who fear to showcase their work. They fear their quilts are not interesting or good enough. However, the moment they dare to share their work they only get praise! Most people who love their own artform wouldn’t dream about criticizing people who love the same thing. There are exceptions of course, but they are overshadowed by the positive majority. I know for myself that the moment I started to participate and show my work to other people I started to enjoy my art a thousand times more.
I am a member of the quilting bee you see us in the picture below. We are basting a part of my Kenyan quilt together. We meet every month to talk about our work and to encourage each other to try new things. I feel blessed because my friends are way more experienced than I am, so I can enjoy their absolute wealth of experience. They like my youth and enthusiasm, so everyone wins! Through my quilt group, I participated in the exhibition. I thank them for accepting me in the group and to encourage me. I thank myself to take the step to find a group to join. First, I thought any true artist does everything on their own. Now, I realize that learning from the great and experienced is the smartest and best way to learn.

Some questions for you:
I’d like to hear about your experience with sharing your art. By sharing experiences we can get inspired by each other and make this blog a small virtual quilting bee.
Do you put your art in exhibitions? If yes, how did you manage that and what do you like about exhibiting your art?
What are other ways or platforms you use to share your art?
Do you have tips for people searching for the courage to exhibit?
Did you, or do you fear to share your art? Would you mind sharing some of your story in the comments?
Would you like to know more?
How to get good materials for quilting and embroidery creatively and cheap
I’m not ashamed: humble Dear Jane quilt blocks
Storytime with a smart cross-stitch dragon, a clever upcycle and a theft
See my DeviantArt or Instagram (username: bella.g.bear.art) for more artwork and WIPs. You can also follow my blog by clicking on the button on the left or by filling in your email address. There will be a monthly update at the end of every month and a new blog post every Sunday or Monday.
I am a quilter. In this article, I will share my story of how I exhibited my first quilt in a national exhibition. The focus will be on how, step by small step, I found the courage to do so. This article is not only for quilters though. My hope is that this article will inspire everyone to find the guts to share their art, with friends, strangers and peers alike. I am a quilter. In this article, I will share my story of how I exhibited my first quilt in a national exhibition.
#artisan#artisan blogger#colourfull art#courage#creative blogger#creative writing#fabric art#non-fiction#patchwork#quilt#quilt blogger#quilt exhibition#quilt life#quilter#share art
0 notes
Text
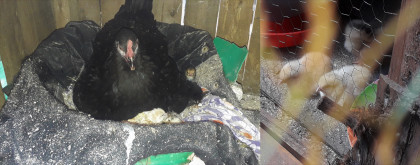
The last month of the year is often associated with finishing and endings. However, this month we had a broody chicken and she hatched ten chicks. This is the first clutch of chicks for our chickens, so for me, December 2019 will always be associated with a new start.
In this post, I’ll update you what about all the creative projects I’ve worked on in November and December. I won’t reflect on the new year because I do that on my birthday in November.
My birthday or wow what a year was 2019
It’s my birthday and wow what a year was 2018
I will mention one goal in the conclusion though because sometimes it is good to make a headstart with good intentions to avoid the rush in January.
New quilt or embroidery projects
Quilted kitenge fabric pillows
This month I worked on quilted pillows made with a combination of Kitenge fabric and solids. Kitenge is a fabric popular among places in East-Africa and thus also Kenya where I live now. In the picture, you see three of them. More information about how to make them and the patterns I used will follow in a post later this month.
All the fabrics used are sourced from tailors. Tailors are a great place to get cheap materials and also to turn waste into something valuable. I’ve talked before about more environmentally friendly ways to find materials in the post below:
How to get good materials for quilting and embroidery creatively and cheap

Quilted Kitenge fabric pillows
Kitenge quilted baby blanket
The wife of one of my friends is pregnant. My mother has as traditional to quilt a baby blanket for people and I want to honour that tradition. My blanket is going to be bigger than hers because it is more practical to give people something to carry their baby around in.
Quilted Kitenge baby blanket
Progress ongoing quilt and embroidery projects
Dear Jane Sampler quilt
Behold … ,
… this month I finished the top five rows of my Dear Jane Quilt! It is amazing to see all the quilt blocks come together like this. And this is not everything: this month I’ve also finished 129 of the 169 square middle blocks of this quilt. This means the middle blocks are more than three quarters done. A post will follow to celebrate that occasion. For now, I’ll present the post where I detail about the five rows milestone.
A happy milestone: Five rows of the Dear Jane Quilt completed!
Quilting of the Kenyan quilt
The Kentan quilt is another one of my long-term projects. The quilt top is done and now I am hand quilting it. If you do a little bit every month it’ll be done before you know it.
Why would you hand quilt: The HQAL and my Kenyan quilt
Foundation piecing Kenyan inspired quilt
Yes, I am making another Kenyan quilt. This is going to be made with foundation paper piecing (FPP). Also, I will design most of the patterns myself inspired by elements that fit with my Kenya experience. The block below is made with a pattern by Amarar Creacions. She has a lot of interesting FFP patterns with animals.
Stained glass cross stitch dragon
Before I started this cross stitch project I had been eyeing it for months. Therefore, you can imagine my excitement when I finish the dragon’s head this month! The pattern is made by the always lovely and amazing Pinkythepink.
Hot air balloons cross stitch
There was some progress on this piece as well this month. Not a lot of progress though, so we can play a game: do you spot the difference between the two pictures below?
The pursuit to finish very old projects
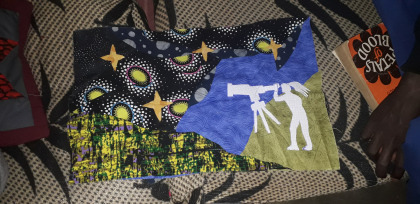
The project on the picture below I started a long time ago. The plan was to create a night scenery with a figure who is stargazing. That plan is still alive, however, I stumbled on execution. Most of my quilt designs are abstract. This means that more realistic scenery is a challenge. I am sure I will think of a way to finish this one eventually though. Sometimes it simply takes longer for a quilt to be born. This quilt hangs on my wall for me to find inspiration to finish it in the next year.
What do you do when you are stuck on a project?
Conclusion: beginning early to fulfil the scariest goals
Although I said I would not reflect on the next year, I am going to do it anyway. Often when I have an idea or plan to further my goals and dreams I struggle to execute it because of fear. It is some kind of self-sabotage that freezes my body and mind and makes me unable to do anything. However, I’ve also noticed that fear gets less when I talk about my plans and find a way to execute them step by step.
My big dream is to become a fabric artist and to inspire people to pick up embroidery or quilting through my work. One day I would like to pursue teaching as well and selling some of my work. For that, I need to be more active in social media. If nobody sees your work it is impossible to inspire people. Also, I think it is good to add my positive voice of making beautiful items out of discarded materials to all the voices telling us to consume more and more. Therefore a facebook page where I share my art is a good next move.
I haven’t started one yet though because of the fear I mentioned. It is partly a fear of failure and partly a fear of ridicule. Both are unlikely to be true because I’ve gotten a lot of positive feedback so far. Also, failure is unlikely when you set achievable goals and work towards them diligently. Fear of showing myself to the world has always been a part of me though. It took me more than a year to be comfortable sharing my blog with people and to be open about my passion for quilting and embroidery. Something I already talked about in this article:
How I convinced myself to exhibit my quilting art
So, to avoid spending even more time talking about it instead of doing it, here is the link to my facebook page:
Bella G. Bear Art Facebook page
I’d love it if you’d check it out and follow me. Also, any tips or feedback on how to run a facebook page is so much appreciated.
Some questions for you:
Do you have a creative facebook page for me to follow?
Which was your bravest creative achievement? How did you find the courage to go for your plans?
What is something you want to do creative wise, but you haven’t found the courage for yet?
Which social networks for creative people do you prefer? I have a website, Facebook, Instagram and DeviantArt and it would be good to know where people go so I know where to put my focus.
What have you missed?
Storytime with a smart cross-stitch dragon, a clever upcycle and a theft
Monthly Sewing Update Oktober 2019
Next week’s post:
Five lively Kitenge pillows to perk up your home
See my DeviantArt or Instagram (username: bella.g.bear.art) for more artwork and WIPs. You can also follow my blog by clicking on the button on the left or by filling in your email address. There will be a monthly update at the end of every month and a new blog post every Sunday or Monday.
This month I worked on quilted pillows made with a combination of Kitenge fabric and solids. Kitenge is a fabric popular among places in East-Africa and thus also Kenya where I live now. In the picture, you see three of them. More information about how to make them and the patterns I used will follow in a post later this month. The last month of the year is often associated with finishing and endings. However, this month we had a broody chicken and she hatched ten chicks.
#artisan blogger#artist life#creative blogger#cross stitch#Dear Jane quilt#fabric art#facebookpage#foundation piecing#hand quilting#kitenge fabric#patchwork#quilt#quilt blogger#quilter#recycle#sampler quilt#sewing update#upcycle
0 notes
Text
A happy milestone: Five rows of the Dear Jane Quilt completed!
I've finished the top five rows of my Dear Jane Quilt in November, which is incredible because that month my parents also came to visit me and my boyfriend in Kenya. We travelled around a lot and thus I wasn't home a lot. My parents' visit was vital to visit this part of my Dear Jane though because they came bearing gifts. Part of those gifts where my quilting and embroidery materials.

It’s been a while since I last gave you an update about my Dear Jane Quilt. However, that does not mean I’ve been sitting still! As you can see in the picture above, the top five rows are finished and are now beautifying my living room.
I’ve finished the top five rows of my Dear Jane Quilt in November, which is incredible because that month my parents also came to visit me and my boyfriend in…
View On WordPress
#artisan#artisan blogger#brenda papadakis#colourful art#creative blogger#creative writer#Dear Jane quilt#fabricart#hand piecing#hand quilting#Jane Stickle#patchwork#quilt#quilt block#quilt blogger#quilt writer#quilter#sampler quilt#solid fabrics
0 notes
Text
Like all good stories, this story has three elements. A book-loving dragon, a bookmark made with creativity and theft of something valuable, by the author even! And as all good fairytales, there might be redemption at the end when the bad person shows remorse. If she doesn’t there will be a bloody ending. Come, open this book with me, and listen to my story.

Materials used for the cross stitch bookmark
This bookmark is made from two rose cross stitch kits I got at the second-hand store. They are the packages on the left in the picture below. The pattern was confusing to me and somehow the kits included a whole variety of colours which were not in the pattern, so I decided to do my own thing. I buy a lot of cross stitch kits at second-hand stores because even if you don’t like the pattern, they are a great cheap way to get materials for. I wrote a whole post with tips on how to find cheap materials for quilting and embroidery:
How to get good materials for quilting and embroidery creatively and cheap
The cross stitch pattern and a confession
It is time for my confession of the theft.
I found the pattern of the reading dragon on Pinterest for free. And when I say free, I mean that somebody put it there who had no rights over the pattern. At that time I was young and inexperienced and I saw it as a great opportunity to have a free dragon pattern. I should have known better of course. There are after all sites such as Tineye and Google Reverse Image Search which allow you to search for the source of images, but I did not. When I started with my fabric art I wasn’t conscious yet about the importance of supporting artists and designers. Only when I started to pursue a creative career myself I realized how vital it is to pay for patterns with either money, recognition or both.
The designer of the pattern spends hours on it and a big chunk of her or his creativity. Not even all artists ask for money for their patterns, but it is still important to name them and link back to their respective pages when you use a pattern. It is incredibly discouraging when your work is stolen by someone else to flaunt. Pinterest is a good place to find inspiration for your artwork. Especially their function to search for particular words or key phrases has helped me out many times. However, Pinterest is a particularly bad place to find patterns, because often the images don’t link back to the source. Instead, the images come from websites displaying large quantities of stolen patterns and artwork. Each time it turned out I had used a stolen pattern I got them from Pinterest. To not discourage you completely I’ll share some great places to find patterns at the bottom of this post.
I hope by sharing my story, and how I prevented further mistakes, I’ll encourage you to be more conscious about the patterns you use and where you get them. It does not take a lot of time to find the original artist and compensate them for the work they’ve done. Especially if you compare it to the time spent in making the item. At any rate, most patterns these days are not expensive at all anyhow. Also, buying and sewing a pattern from a small designer often means you made a new friend because they will follow your updates with much enthusiasm and encouragement. And who doesn’t want a new friend?!
Sadly, in the case of the pattern of the reading dragon, I haven’t found the original yet. Therefore, I also can’t share the pattern. Once I do I will pay for it retroactively (please tell me if you know where it is!). However, I have found the artist and I encourage you all to go to her website and facebook and admire her talent in designing cute dragons:
Dragon Dreams artwork made by Jennifer Aikman-Smith
To end this unhappy tale I will share my interpretation of the reading dragon called Alfonse. I hope Alfonso brings you some cheer with his aura of highbrow intellectualism.


From cross-stitch to bookmark
In this section, I’ll tell you how to turn the cross-stitch into a bookmark.
In the pictures above you can see, I added colourfull lines on both sides of Alfonse. Those side-pieces form the back by stitching them together. To do that you fold the piece in half with the right sides inside as seen on the picture. After that, you stitch the outer edge marked with the pins.
Next, you turn the cross stitch inside out, and voilá, it is almost done. Press the piece to give it a nice, flat look. This can either be done by an iron or a stack of heavy books, whatever is available. But since you are reading a post about a bookmark, the stack of books is most likely.
To finish the bookmark you have to fold the seams of the top and bottom inside. After that, close the top and bottom with a tiny whip-stitch or blanket stitch. Press again to make the bookmark look neat by pushing the fabric in the right shape, and done!
This technique is only one way to make a cross-stitch bookmark. Other options are using specific pre-finished bookmark fabric, sewing the stitch of fabric or glueing it on cardboard. The technique used depends on the look you want and the kind of cross stitch fabric you used. The technique in this article works best with stiff cross stitch fabric.
The end of the story

The confession of my theft and how I mended my ways are too important to clutter the conclusion of this post with other things. Don’t make the beginner mistakes I made now you know better. This post was my redemption, more posts about this topic will follow later. Some questions for you to end this post:
How do you make sure you get your patterns legally?
Where do you get an awesome cross-stitch, embroidery or quilting patterns?
Have you ever used a stolen pattern by accident? If so, what did you do once you found out?
Where can you go for patterns?
The most obvious and well-known place is Etsy. Etsy has a HUGE collection of artists from all over the world selling their particular creativity. However, Etsy is overwhelming when you don’t know where to look. You can join facebook groups with your particular craft or creative groups on other social media such as DeviantArt. You can join general groups or more specific ones with for example only snarky cross-stitch or only patterns by a specific designer. By seeing the work of other people you can find patterns you want to make for yourself or get to know new pattern designers to be a fan of. Most of the pattern designers have an Etsy shop or a personal website which you can look up once you are ready to buy a pattern.
If you already know which kind of pattern you are looking for Instagram is the place to go. With Instagram, you can search using specific keywords. Those keywords can be as broad as #crossstitch and as specific as #rainbowcrossstitch. Also in themes, styles and disposition, there is something for everyone. It ranges from #kinkycrossstitch to #religiouscrossstitch. From angry stabby embroidery to heal a broken heart to the soppiest eternal love cross stitch full of flowers and baskets with kittens and rainbows. I am sure that once you start looking you will have an evening of entertainment and tons of new ideas for patterns to make!
Would you like to know more?
My birthday or wow what a year was 2019
Quilting patterns 101 with the Dear Jane quilt: The Four-patch block
How to turn a drawing into a cross-stitch piece: The any one colour design
See my DeviantArt or Instagram (username: bella.g.bear.art) for more artwork and WIPs. You can also follow my blog by clicking on the button on the left or by filling in your email address. There will be a monthly update at the end of every month and a new blog post every Sunday or Monday.
Like all good stories, this story has three elements. A book-loving dragon, a bookmark made with creativity and theft of something valuable, by the author even! And as all good fairytales, there might be redemption at the end when the bad person shows remorse. If she doesn't there will be a bloody ending. Come, open this book with me, and listen to my story. Like all good stories, this story has three elements. A book-loving dragon, a bookmark made with creativity and theft of something valuable, by the author even!
#artisanblogger#bookmark#bookmark tutorial#cross-stich#cross-stitch tips#crossstitch#crossstitch bookmark#dragon#dragon cross-stitch#dragon crossstitch#dragon love#Embroidery#embroidery tips#fabricart#newbietips#xstitch
0 notes
Text
It was my birthday on the 10th of November! – Happy birthday to me – Last year I wrote a post reflecting on the year that had gone by creative wise. I thought that’s a good habit to keep so here is my post for this year. The post is a bit delayed because I was on a holiday with my family and too busy laying in the ocean and too occupied relaxing to write. I’m sure you’ll all understand.
It’s my birthday and wow what a year was 2018
What kind of year did I have?
This year I spend most of my time in Kenya. First to finish my master studies and later because of love and to settle down in Kenya. I came back to Kenya for love, research and adventure. Read more about why I decided to come back here:
Kenya has my heart in more than one way.
The settling down has gone very fast because I’ve been in Kenya for three months, and we already have nine chickens and I’m working on a baby quilt for a friend.
My quilts of 2019
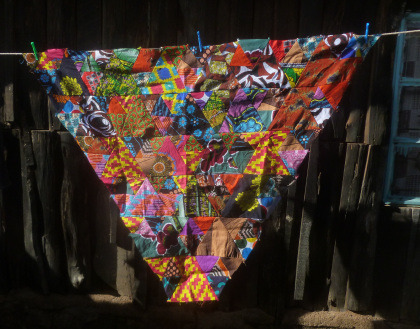
The first exhibition: Look Behind the Lines mini quilt
This year one of my quilts participated in a Dutch quilting exhibition. I’m very proud of the quilt I send in because it is one of my first pieces with a meaning behind it. Also, the process of exhibiting the quilt and visiting to see my quilt and those of my quilting friends made me reflect about sharing your own work. I wrote a blog post to honour the occasion:
‘Look behind the lines’ miniature quilt and a quilt exhibition
Look behind the lines mini quilt
Picknick blanket scrap quilt
One of the quilts I finished this year. I have some people in mind who should get this quilt, but it will be a while before I can get it to then. Until then, it will adorn my parents’ living room. So many scraps were used in this quilt, as I explain in the post below. The quilting is done by hand with glow-in-the-dark thread. However, it is unfortunately not visible in the dark. Does anyone have experience using glow-in-the-dark thread successfully?
Picknick blanket scrap quilt
The Kenyan Quilt
This is the quilt I started the first time I moved to Kenya. It is made completely out of fabrics I got there. Now I am back I am in the process of hand quilting this piece to finish it. It is a nice way to tie both my Kenya journeys together.
The Kenyan Quilt top is finished!
The Kenyan Quilt: quilt blocks showcase
Why would you hand quilt: The HQAL and my Kenyan quilt
Kenyan quilt block finished
The piece below shows what you can do with leftover blocks from your quilt! This is going to be a small blanket or scarf once it’s quilted.
Crazy quilt blanket
Nearly Insane Machine Sampler Quilt
This quilt is designed by Liz Lois based on Salinda Rupp’s original quilt. In between my two stays in Kenya, I worked a lot on this quilt. And although I didn’t finish this quilt I did make a lot of progress! The motivation to finish this quilt grew especially when I started putting the blocks together using the Quilt-as-You-Go method. This quilting technique allows you to put blocks together as soon as you finish a block instead of having to wait until all the blocks are done. I hope to finish this quilt when I visit the Netherlands sometime.
Introduction Nearly Insane Sampler Quilt
The Nearly insane quilt blocks showcase
A Nearly Insane quilter quilting QAYG?
The Dear Jane Hand Quilting Sampler Quilt
This is by far the biggest quilting project in my life so far. Dear Jane is a sampler quilt based on an original quilt made by Jane Stickle during the Civil War. Brenda Papadakis made patterns out of the more than 200 blocks of the quilt. Now, Dear Jane is seen as the ultimate proof of skill upon completion by quilters. Therefore, I started this quilt to teach myself to quilt by hand. My reasoning is that once I have completed this Dear Jane quilt I can call myself a skilled hand quilter. By now, I have finished almost half of the blocks and assembled a part of them. You can follow my progress by reading one of the many blog posts I have written about this quilt so far.
The Dear Jane hand sampler introduction
I’m not ashamed: humble Dear Jane quilt blocks
The Dear Jane quilt: white with shock
Click this link to see all the Dear Jane related posts:
Dear Jane quilt blog posts
Tutorial: How to make your own awesome star quilt
One of my goals is to one day become a quilting teacher. To get there, I am writing this blog and I also enjoy writing tutorials. This year I finished a tutorial to make your own star quilt.
Part 1: Quilt tutorial: How to make a patchwork star
Part 2: Quilt tutorial: How to finish your star quilt
Lastly: new beginnings with Kitenge and Kenyan fabric quilts
Here are some examples of other quilting projects I am working on made with Kenyan fabrics.
Embroidery and Cross Stitch of 2019
Death of Discworld cross stitch
This cross stitch is for an art trade. I made this cross stitch and get awesome crochet dragon gloves in return.
Bukowski Biscornu Cross Stitch
This was made for a competition where the prompt was to make something embodying positivity to you. I didn’t win, unfortunately, but I am very proud of the result nonetheless.
The cross stitch design is based on and inspired by this poem:
youtube
Crewel embroidery landscape
One of my goals this year was to learn how to make crewel embroidery. I bought a pattern by Sol Y Mano study to practice and the result is below. It turns out that crewel embroidery is tricky, especially to remember all the different stitches. However, I really love complicated embroidery pieces so I will keep on practising and developing this skill. Embroidery is like painting with thread and I love that idea.
Coat of Many Colours embroidery patch
The piece below is one of those places I’m developing my embroidery skills. This is going to be a patch for my man who is an MC and artist. He has a special connection with the Dolly Parton song ‘Coat of Many Colours’ on which this design is based. To keep true to the idea of a patchwork coat I am using leftover floss from previous embroidery projects.
Any one colour running cross stitch design
This piece was finished more than a year ago for another competition. However, I wrote a post about it this year so it fits in this post. In the post, I talk about my design process from idea to drawing to the finished piece.
How to turn a drawing into a cross stitch piece: The any one colour design
Other projects of mine
Other topics I wrote about
These stories fall under the category Artisan Life on my website.
Why would you hand quilt: The HQAL and my Kenyan quilt
When and how to quit a quilt
How to get good materials for quilting and embroidery creatively and cheap
Other websites of mine
I started a writing website to share my experiences of living abroad and to show-case my short stories.
Bella G. Bear Writes
Another website I am working on is focused on music, especially sharing music from all over the world. More about that project later.
Conclusion: plans for the new year
How am I doing?
Better and better! The past year I’ve been doing a lot of soul searching and looking at how my life has been functioning so far. I realized that I spend a lot of my time feeling stressed and anxious. Not for any particular reason, but more because of insecurity and worrying about other people’s opinion. This stress has stopped me from doing a lot of things I wanted to or should have done. Projects I didn’t dare to execute, people I didn’t have the confidence to befriend or people I didn’t help because I thought I was somehow wrong about what to do. The past year I’ve started the process of calming down and focusing more on my own life and goals, and I’ve noticed the more I focus on my own goals and values the calmer and more confident I feel! I wrote a bit more about this process in one of my Monthly Updates:
Monthly Sewing Update Oktober 2019
Goals for this new year:
Worry less and grow confidence.
Focus on my own projects and building a life that suits me.
Continue to learn embroidery and crewelwork.
Make and sell bags with Kenyan fabric.
Now to end this post with some questions for you:
Do you set periodical goals for yourself? If you, would you like to share some of them?
What is your proudest achievement this year?
What are the methods you use to feel calm and secure in life?
What kind of posts of mine do you like most and would you like to see more of?
Next week’s post: HQAL update with the Dear Jane Quilt! (big finishes)
See my DeviantArt or Instagram (username: bella.g.bear.art) for more artwork and WIPs. You can also follow my blog by clicking on the button on the left or by filling in your email address. There will be a monthly update at the end of every month and a new blog post every Sunday or Monday.
My birthday or wow what a year 2.0, 2019 It was my birthday on the 10th of November! - Happy birthday to me - Last year I wrote a post reflecting on the year that had gone by creative wise.
#artisan#birthday#biscornu#creative blogger#crewel embroidery#cross stitch#Dear Jane quilt#death of discworld#Embroidery#Nearly insane quilt#patchwork#pattern design#quilt#quilt tutorial#quilt writer#quiltblogger#quilter#yearly update
0 notes
Text
Why would you hand quilt: The HQAL and my Kenyan quilt
Why would you hand quilt: The HQAL and my Kenyan quilt
Hand quilting is amazing. Actually, I’m a fan of any kind of hand sewing. It is soothing, great for learning and works meditatively. That’s why I decided to join a nice group of ladies who organize a Hand Quilting Sew Along(HQAL). You can find their blogs at the bottom of this post and if you want to join contact Kathy. The idea of the HQAL is to post every month about our progress in hand…
View On WordPress
#artisan#blogger#creative blogger#Dear Jane quilt#educational#hand piecing#hand quilting#hand sewing#HQAL#Kenyan quilt#quilt#quilt blogger#quilt tutorial#quilter#quiltlove#writer
0 notes
Text
This Monthly Sewing Update is all about organization and finding your focus. I lost my focus after finishing my master thesis in July. After that, I moved to Kenya to build a life there. Also, I was a student for more than seven years and it is strange to not be anymore. As a student, it is easy to decide what you have to do because there is always an assignment, a test or a thesis to focus on. Also, you get gratification you get from the grades you get. When you are no longer a student gratification and motivation to work on projects, and most of all focus, has to come from somewhere else.
The past few weeks my posting schedule has been irregular because I was figuring out what to focus on next. One of the things I’ll keep my focus on is this website and my artistic career. I will switch focus towards articles about sustainable ways to execute your fabric art and inspirational articles about techniques and amazing fabric art by other people. In this way, I aim to motivate people to start quilting or embroidering for themselves in a sustainable way. Fabric art has brought me a lot of good in mental health and self-esteem and I want to transfer that to other people!
In this article, I’ll show you the projects I’ve worked on this October and I’ll tell you a bit about what’s going on in my life in Kenya. I got a lot of new Kenyan fabric, so the two things are related. Last month I published two posts, one monthly sewing update and an article about finding materials for quilting and embroidery in an environmentally friendly way.
Monthly Sewing Update: September 2019
How to get good materials for quilting and embroidery creatively and cheap
Inktober 2019
This is not quilting or embroidery, but because it’s my first year joining Inktober I’m going to talk about it. It is my goal to learn how to draw this year so pattern design becomes easier. Inktober was the perfect opportunity for me to start with that goal. Here are two examples of my Inktober quest: Day 15 legend and day 16 wild. See all my Inktober drawings on my DeviantArt profile: Bella Inktober 2019. I can proudly admit that I finished this years’ Inktober. It was a lot of fun.
Coat of many colours embroidery patch
The stitches in the coat are finished and my boyfriend loves it so far. Now I have to decide if I will stick to only the coat, or if I add some background to the embroidery. My man is an MC and artist and he wanted something with his artistic name, Jessey Baby. However, it depends on whether I can make the design work. This piece is based on the Dolly Parton song ‘Coat of Many Colours‘, which is about a patchwork coat. To symbolize the sentiment behind the song I used leftover floss from embroidery projects.
Positivity contest: Colourful cross stitch biscornu
There is a contest on DeviantArt with as prompt: make something that makes you happy. I love colourfull art and birds, so here you go. I am designing this piece as I go. The next step is to think of a good quote which will lift people’s spirit which isn’t cheesy. Does anyone have any recommendations? The deadline is for the 10th of November, my birthday, so I’ll report back next Monthly Sewing Update!
Dear Jane hand quilting sampler
This is one of my long-term projects, meaning that I plan to finish my Dear Jane quilt in 10 years. Considering I am quilting this one by hand and that there are more than 200 of the blocks you see here, that is not a pessimistic estimate. I am two years in and have finished 115 blocks so far. I also write about the Dear Jane blocks I finish. You can find the posts and more information about the Dear Jane Sampler Quilt here:
Dear Jane hand quilting sampler introduction
Kenyan quilt
I started this quilt the first time I came to Kenya. Now I am back I work on hand quilting this amazing project. I finished about 1/15th of the hand quilting so far. Read more about the Kenyan quilt and to see the finished top here:
I am designing quilt patterns: Kenyan quilt update
The Kenyan Quilt top is finished!
Conclusion
One of the nicest things that happened this month is that we got a bookcase! A home is only complete with a bookcase. This bookcase helped me to sort my quilting and embroidery supplies. Sorting my supplies has helped so much to have a clear mind and to figure out which projects I should be working on! You can see that some of my embroidery projects have also found their way outside the bookcase. I swear quilting and embroidery materials fly in at night into your home without anyone knowing!
That was my month. I hope your month was equally nice and filled with wonderful colourful projects. I’m especially pleased with my new bookcase and my steps towards having a more organized and focused life. Some questions for you:
How many projects can you work on at a time without losing the plot?
What is your best organization post?
Would you like to know more?
Kenya 2.0: I’m back! Or did I ever leave?
Quilting patterns 101 with the Dear Jane quilt: The Four-patch block
The Dear Jane quilt: white with shock
Picknick blanket scrap quilt
Next week’s post:
– An update hand quilting the Kenyan quilt
See my DeviantArt or Instagram (username: bella.g.bear.art) for more artwork and WIPs. You can also follow my blog by clicking on the button on the left or by filling in your email address. There will be a monthly update at the end of every month and a new blog post every Sunday or Monday.
In this article, I'll show you the projects I've worked on this October and I'll tell you a bit about what's going on in my life in Kenya. I got a lot of new Kenyan fabric, so the two things are related. Last month I published two posts, one monthly sewing update and an article about finding materials for quilting and embroidery in an environmentally friendly way. This Monthly Sewing Update is all about organization and finding your focus. I lost my focus after finishing my master thesis in July.
#bookcase#bookcase is a home#crewel embroidery#cross stitch#cross stitch design#cross stitch pattern#Dear Jane quilt#Embroidery#embroidery patch#hand quilting#Inktober#inktober 2019#Kenyan quilt#neglected floss#quilt#quilt sampler#quilter#sewing abroad#sewing update
0 notes
Text

The most obvious place to find supplies for quilting, embroidery and sewing is, of course, the quilt or embroidery shop. Those shops are either brick and mortar stores or online. However, there are many alternative ways to get supplies for quilting or embroidery. In this article will tell you about four of them:
Befriend a tailor or dressmaker.
Second-hand stores.
Give away groups.
Old clothes and other leftover materials.
I depend mainly on the options I’ve mentioned above. I don’t want to discourage you from going to official stores. Especially the small-scale indie designers do great things for the creative industry to keep it fresh and lively -I will dedicate an article to my favourites later. However, there are many reasons why it is sometimes better to find alternative ways to get supplies:
The environment: Every new item we buy needs to be made and requires resources to do so. It is better to use materials that are already created, be it second-hand materials or materials which had a different use before like clothes. This also prevents more waste from going to the landfill or waste incinerators.
Budget: Buying from specialist shops can be expensive. It is possible to find high-quality material cheaper if you learn how to look for it.
Creativity: Working with a limiting range of materials you cannot influence a hundred per cent triggers creative thinking. Also, I love that each piece becomes unique because you cannot buy the same materials time and time again.
I’ll discuss each alternative option below with some examples of my work. In that way, I want to motivate you to try alternative ways for yourself. It makes the whole creative process less predictable and controllable, and to me, that is part of the fun. And most importantly: it makes our beloved crafts more sustainable.
1. Befriend a Tailor or dressmaker
When I lived in Kenya for the first time in September 2018 I build my fabric stash with scraps from a tailor. At first, they gave me a long and strange look the first time I came round asking for their scraps. However, they gave me what they had and I showed them my work and both parties were happy. When I came home to unpack my scraps I discovered that scraps might not be the right word. Some of the pieces they gave me were HUGE. Most of the fabrics in my Kenyan quilt are from that tailor. Also, there were enough leftovers to give my mother as a souvenir.
The Kenyan Quilt top is finished!
Kenyan quilt block finished
Currently, I am living in Kenya again, and I am doing the same trick with tailors to build a fabric stash again. However, this time I am using different tailors to get more of the African kitenge fabrics. You can see some of my loot in the picture on top. The picture below will give you an idea of how many scraps I already got. I’m planning a paper-piecing quilt with the fabrics and also the Bible Sampler Quilt by Laurie Aaron Hird, creator of the Farmer’s Wife Sampler Quilt, with these fabrics. It will look amazing and colourful. And something says me my mother will be interested in these fabrics as well…
A treasure chest bag of scraps
The added benefit of getting fabrics through other creative people is that you will make friends. The last batch of fabrics I got through a new friend who makes souvenirs from kitenge scraps. Also in my experience, tailors love to see what you do with the scraps they give you which gives you a perfect reason to visit them again to check on their scraps. You don’t have to only focus on professions though, you can also ask hobbyists. I’ve seen many people in clothes sewing facebook groups wondering what to do with their scraps. You can do the honourable thing and relieve them of that problem.
2. Second-hand Stores
I love second-hand stores! They have such amazing potential to find the unexpected and awesome both in cloths and crafting materials. Plus, those stores are habituated by friendly old ladies which make you instantly feel at home (at least mine where). The start of my first fabric stash, both for sewing and cross stitch is from second-hand stores. Also, I got many cross stitch kits and finished embroidery pieces from those stories, which can be used in so many amazing ways. One example of that is the dragon bookmark you see below. This dragon is created from a pattern I found online. and two cross stitch kits with a rose pattern. I didn’t like the rose pattern, so I used the floss and fabric to create something else. I’ll write a detailed post about this process later.

Finished embroidery pieces add a nice original touch to sewn projects. And since I don’t have the time to embroider the number of pieces I’d like to use, I also save finished pieces from second-hand stores, because it makes me sad to see that something somebody has spent months or years to create ends up in the landfill. One thing I did with one of those saved pieces is making a small material bag:
To turn an embroidered pillowcase into a material bag
Embroidered material bag
Second-hand stores are an amazing source for materials, however, it depends on luck as well. I used to live close to a second-hand store which always had an amazing stock of fabric and embroidery materials. Which is interesting, because it was tiny. It felt as if all the old ladies in my old hometown were on a schedule to donate their materials so I could stumble upon it. Although, it is more likely that the manager of the shop knew embroidery materials sold well in that place, so all the national supply went to that particular branch. My tiny store was part of a chain of stores run for a good cause.
3. Give-Away Groups
Most of the giveaway groups I know are on Facebook. However, I also hear people getting materials from Craigslist and other websites. It serves to check local buying and selling groups and see what is available for free or a small price. I asked people for leftover fabrics and clothes in a local facebook group and got enough materials for more than two quilts! Creative people like to give stuff away because most of them have more materials in their homes than they can handle. My rally for materials ended in my first finished big quilt:
How to make a scrap quilt with many pieces

Finished scrap quilt
Also, sometimes your local quilt or embroidery guild gives away materials during meetings. At my local guild in the Netherlands, there is a table every meeting where people put fabrics and books they don’t want anymore. Members can take what they want and pay a price what they think is fair for the guild account. There, and second-hand stores, is where I got a lot of the fabric for my Dear Jane Quilt and my Nearly Insane Quilt.
Dear Jane Sampler Quilt Introduction
Nearly Insane Sampler Quilt Introduction
Nearly Insane quilt block 85
Lastly, there is a specific cross stitch facebook group where you can offer a WIP you don’t want to finish anymore. This group is perfect for people who get stressed by all the WIPs they have, but they fell out of love with:
Adopt a WIP facebook group
There are groups like this around for any kind of craft. Google and the search function will help you out here.
4. Old clothes and other discarded fabrics
The last way to get fabrics I want to discuss is using old clothes and fabrics. There is a particular style of quilt called a memory quilt where people use the clothes of persons as a memory to that person. This quilt I’m making for a friend is an example of that:
The big quilt for a lovely friend
The big Quilt example
Beyond this kind of quilts, clothes are in general not considered as suitable quilting materials. I don’t agree with that though, because it all depends on picking the right clothes, knowing the right techniques and the end look for the quilt you’re going for. I love the challenge of making any kind of fabric work in a quilt. It gives the quilt an original look and it teaches you lots of sewing techniques and tricks on how to make unruly fabric behave. And using any kind of scrap fabric is the tradition were quilting comes from after all: in the older days, quilts were made from any old scrap people had. The scrap quilt above has a lot of material from clothes, my Kenyan quilt has, and the quilts below are made from old clothes as well.
The most suitable clothes item is a shirt. Shirts can have amazing patterns, especially the funky shirts that are popular nowadays. Also, they are made from a non-stretchy material. The quilt below is made from shirts and ties. Ties are trickier to work with because the fabric is slippery, but nothing using a lot of pins cannot deal with. The shiny effect of the fabric compliments the shirt fabric nicely in this quilt below.
Using old shirts to make a new quilt

This bird tote bag is another example of what you can do with old shirts.
Geometric bird tote bag
Beside old clothes, there are also other fabrics you can use for your sewing projects. The bag below I made from leftover curtain fabric from a friend. It was a strong fabric, which makes it suitable for a backpack. Especially because I like to carry around a lot of stuff. It was a fun thing that when I visited that friend to see how long it took people to see the similarities between his curtains and my bag. Jeans are also very popular to work with. My aunt makes amazing bags and pillows out of old jeans.
Penguin backpack

Conclusion: And did you learn?!
Now, here are my suggestions to find quilting and embroidery fabric cheap. Now it is time for you to go out and to explore for yourself. Maybe you’ll save a tree by upcycling some long ago loved coats or you’ll keep the ocean a bit cleaner by using the forgotten cross stitch supplies of a neighbour. Anyhow, every little thing we do in our day to day life to reduce the number of resources we use and the amount of waste we create contributes to a better environment. And many small steps will add up into a big leap. Follow my blog to read more of this kind of articles in the future. Let me end this post with some questions for you:
Which alternative ways to get materials do you use?
Are there techniques you use to make your hobby more sustainable?
Which of my alternatives inspired you most and why?
Will you share some of your upcycled projects in the commentary sections?
Would you like to know more?
Melanie Brummer has created the Up-cycled cloth collective. She aims to motivate sewing people to re-use more materials and to buy less new materials. In this way, the creative communities become more environmentally sustainable. Her global facebook group is a good place to start:
Upcycle collective.
See my DeviantArt or Instagram (username: bella.g.bear.art) for more artwork and WIPs. You can also follow my blog by clicking on the button on the left or by filling in your email address. There will be a monthly update at the end of every month and a new blog post every Sunday or Monday.
There are many alternative ways to get supplies for quilting or embroidery. In this articleI will tell you about four of them: 1. Befriend a tailor or dressmaker. 2. Second-hand stores. 3. Give away groups. 4. Old clothes and other leftover materials. The most obvious place to find supplies for quilting, embroidery and sewing is, of course, the quilt or embroidery shop.
#artisan crafts#creative tutorial#cross stitch#cross-stitch tips#Embroidery#embroidery tips#memory quilt#quilt#quilt blogger#quilt tips#quilter#re-use#recycle#scrap quilts#sewing materials#sustainable hobbies#sustainable sewing#tutorial#upcycle
0 notes
Text
This blog is about quilting, embroidery and sewing. However, there are also other things in my life. That is why my new chickens are on top of this post. Me and my boyfriend acquired six chickens so far, and I derive great pleasure out of observing them and trying to understand their chicken ways. It is especially funny to see their excitement when they get human food. Sadly, they only lay one egg every two days, so I need to have a stern conversation with them about that. The names of the chickens and cock are Claus, Katrien, Patricia, Henkie, Wendy and Jeanet.
Now I’ve introduced my chickens I can continue with the purpose of this post: showing what I’ve been up to this month creative wise.
Finished sewing projects
It always gives a sense of accomplishment to finish stuff. Here are my accomplishments of this month:
Maasai Fabric Laptop Case
Most of my work I do in cafes because that are the places with WIFI. However, my new laptop was getting damaged because of all the carrying around. That’s why I decided to create a laptop sleeve. I prefer to make my own stuff because you can make an item precisely the way you want to.
If you are interested in one of my laptops sleeves email me [email protected].
Death of Discworld Cross Stitch
Death is a Discworld character and the quote is from the book Hogfather. It is about the importance of fantasy and believing in things. This YouTube video explains it all: Video. The pattern is made by Lyndisfarne Cross Stitch designs.
Projects I’m working on a lot
The Kenyan Quilt
I’m hand quilting this quilt and it’s progressing steadily. I love the moon landscape effect in the picture below. The biggest benefit of hand quilting is that it gives you time to contemplate every part of the quilt, quilting it in the way most suited to the patchwork.
See the posts below for pictures of the quilt top and the quilt blocks:
The Kenyan Quilt top is finished!
The Kenyan Quilt: quilt blocks showcase
A Coat of Many Colours Embroidery Patch
This is going to be an embroidered patch for my boyfriend. It is based on the Dolly Parton song ‘Coat of Many Colours’, which is one of his favourite songs. I am using left-over embroidery floss to keep the quilted feel of the coat in the song. The feature picture is a detail shot of this piece. I’m mainly using the satin embroidery stitch and the chain stitch. Find the song here: Coat of Many Colours.
Shards Of Fire Dragon Cross Stitch
This is a cross-stitch project I am making completely for myself. I love dragons and drama, so this was the perfect pattern for me. The pattern is made by Pinkythepink based on the original artwork by Euclidstriangle. The pattern uses a lot of special embroidery floss I had zero experience with before I started this project. That has made this cross stitch a fun challenge. I love experimenting with new things.
A Pillow Case Made from Recycled Materials
Alright, I admit that this is a boring picture. I am showing you this black pillow because of the plans I have with it! This pillow is made out of recycled materials, old clothes and unusable fabric scraps. I plan to make more pillows like this once I have more scrap fabric. Also, after I have gotten my nice African fabrics I will make pillowcases for the pillows to sell. This is in line with my philosophy to reduce waste and to create something beautiful or valuable out of waste.
The extreme long-term sewing projects
The projects below don’t have a clear finish date. I enjoy working on each of them now and then in the firm believe they will be done when they are done.
Dear Jane Sampler Quilt
This sampler quilt is for me to learn hand sewing and piecing techniques. I’ve been working on it for two years now and finished block 112th of the 169 middle squares. Read more about this quilt in the link below. I also wrote a post about my Dear Jane quilt this month:
Dear Jane Handquilting Sampler Introduction
Quilting patterns 101 with the Dear Jane quilt: The Four-patch block
Hot Air Balloons Cross Stitch
This project is about one year old and now one corner of this cross stitch is finished! For the longest time, I was afraid this cross stitch kit would look hideous, but it doesn’t and I am happy. Seeing how the corner came together motivates me to keep working on this piece.
Conclusion: An abundance of projects
That’s it! Seeing all the projects I work on, you must believe I am rarely bored when surrounded by my projects. I do feel itching fingers when I am gone for a long time without anything to work on. That is usually the time I get a lot of story ideas. Another thing I’ve been working on this month is a website to share the stories I write (Bella G. Bear Writes). Stories are one way I can share my research finding in pastoralism and nature conservation and my experience living abroad with a wider audience. I believe research should be shared. Now, I have some questions for you.
What have you been up to this month?
How long can you go without working on a creative project?
Which of my projects do you want to see finished most?
What else have I been up to?
I like to use the Monthly Sewing update posts to also share a bit about my life. This month I went to the farm (shamba) of my boyfriends family. On that farm, I found a way to make myself useful. It has been long I used skills learned in all the years I was a scout. His grandmother was pleased with the firewood we cut for her.
Would you like to read more?
How to turn a drawing into a cross stitch piece: The any one colour design
Kenya 2.0: I’m back! Or did I ever leave?
A Nearly Insane quilter quilting?
The Dear Jane quilt: white with shock
Next week’s post:
– The use and beauty of Sampler Quilts
See my DeviantArt or Instagram (username: bella.g.bear.art) for more artwork and WIPs. You can also follow my blog by clicking on the button on the left or by filling in your email address. There will be a monthly update at the end of every month and a new blog post every Sunday or Monday.
Monthly Sewing Update: September 2019 This blog is about quilting, embroidery and sewing. However, there are also other things in my life.
#artisan#creative blogger#creativity#cross stitch#Dear Jane quilt#Discworld cross stitch#embroidery blogger#embroidery patch#hand quilter#hand quilting#Jane Stickle#janiac#kenyan fabrics#laptop sleeve#Maasai fabric#quilt blogger#quilter#sewing update#upcycled projects#use old clothes
0 notes
Text
Quilting patterns 101 with the Dear Jane quilt: The Four-patch block
Quilting patterns 101 with the Dear Jane quilt: The Four-patch block

Source: Scientific Quilter Flickr
Dear pupils, this week I’m going to give you another lesson on how variations on a basic quilt block can alter the look and effect of that block. The basic pattern I’ll discuss this time is the Four-patch quilt block. The photo on top shows an example of that basic block. I’ll show you the variation possibilities through five blocks of my Dear Jane quilt.
All…
View On WordPress
#artisan#baby jane#brenda papadakis#creative blogger#dear jane#Dear Jane quilt#fabric art#hand piecing#hand quilting#Jane Stickle#janiac#quilt#quilt blogger#quilter#quilterofinstagram#quiltlove
0 notes
Text

This piece is originally made for a contest on Deviantart. The challenge of the contest was to only use one colour in a piece. Different shades of the colour was allowed. With this cross stitch piece, I taught myself how to use a drawing as a pattern, how to blend embroidery floss and how to use colours and design intuitively. In this post, I’ll explain to you how I did it, so you can learn as well. Cross stitch is a specific embroidery technique where you create a design by making Xs with embroidery thread.
From drawing to cross stitch: A running design
I always thought that a mandala would be a great basis for a cross stitch or embroidery design. This particular mandala caught my attention because I like trees and leaves. To get the design on the fabric the drawing was printed, cut out and traced around with a water-soluble pen. As you can see, the finished embroidery piece is different from the drawing. I ran out of the dark green and my local craft shop also ran out and I was finishing close to the deadline so improvisation was necessary. I like how the design came out because not it looks like the piece is running away.
This piece is made on some kind of linen. This allowed me to play around with the positioning of the crosses to give the piece the organic feel a nature-inspired piece needs.

Blending embroidery threads

Blending embroidery thread is a technique to create a shading effect in your embroidery pieces. Because I blended floss I could create the feel of many colours in this piece, while I only used three colours: a light green, a dark green and one in the middle. When you blend embroidery floss, instead of using two strands of the same colour floss you use one strand of each colour. The leaves are stitched with the two lightest threads and the bark with the two darker threads.
Intuitive cross stitch
In the picture below you can how I filled in the leaves. I started with the darkest colour, then added the blend, finishing up with the lightest colour. In this way, I could make sure the balance of colours in every leave was right. Not all the leaves are stitched the same to create an organic feel. I didn’t have a clear plan while stitching but placed the stitches where they felt right. The bark of the branches is build up in the same way. That is why I didn’t need a more precise pattern, I rather do what feels right in the moment. To work like this in an effective way the only thing I can say is to practise and make sure you stitch without many distractions so your creativity can flow.

Conclusion: the finished cross stitch
It’s always a fitting to end a story about a cross stitch piece with a photo of the back because they have the fantastic name the ’embroidery butt’. As you can see, I don’t mind carrying thread for long distances so I don’t have to end and start my thread. It is advisable though when you use white cross stitch fabric and dark threads to not to that too much because you might see the thread behind the fabric.

This piece taught me that cross stitch has more variation opportunities than I thought. Cross stitch is not defined by the strict grid of Aida and you can break pretty much every rule or convention to come up with something creative. Some questions for you to end this post:
Which technique in this article did you like most?
Have you ever blended embroidery thread?
What is your favourite embroidery or cross stitch technique?
Would you like to know more?
‘Look behind the lines’ miniature quilt and a quilt exhibition
10 years from now I’ll be a tree
Portrait of a turtle mini quilt
Next week’s post:
– Mixing quilting techniques in one block with the Dear Jane Quilt.
See my DeviantArt or Instagram (username: bella.g.bear.art) for more artwork and WIPs. You can also follow my blog by clicking on the button on the left or by filling in your email address. There will be a monthly update at the end of every month and a new blog post every Sunday or Monday.
How to turn a drawing into a cross stitch piece: The any one colour design This piece is originally made for a contest on Deviantart. The challenge of the contest was to only use one colour in a piece.
#artisan#artisanblogger#blending threads#creative#creativeblogger#crossstitch#design#Embroidery#embroidery floss#embroidery thread#kreuzsteek#kruissteek#mandala#point du croix
0 notes
Text
The Kenyan Quilt top is finished!
The Kenyan Quilt top is finished!

In this picture you see me and my quilting friends basting the border of my Kenyan quilt. Basting a border, in this case, means folding over the backing fabric and sewing it down with big stitches so the filling of the quilt is tucked in. It is nice to do cumbersome quilt jobs like this together. Last week I showed you some quilt blocks of this quilt. This week I’ll reveal the finished top! So,…
View On WordPress
#creative blogger#gypsy wife#hand quilter#handquilting#jane kingwell#kenyan fabric#kenyan quily#maasai#patchwork#quilt#quilt blocks#quilt blogger#quilt design#quilt designer#quilter
0 notes
Text

Kenyan Quilt top sneak peek
Remember last week when I promised to reveal the finished quilt top? Well, that’ll have to wait a week because first I want to show you the individual quilt blocks in this quilt. You can see a sneak peek in the picture on top though. The focus will be on the patterns designed by me, inspired by traditional blocks. Let me know in the commentary or through e-mail ([email protected]) if you would be interested to purchase the patterns.
The finished quilt blocks
The orange border strip
This is the first block I made. In the picture, it is only small, but in reality, I used it as a border on the left side of the quilt. I was inspired by the stripes in the pattern and thought this was a nice way to use that design. This is a simple block made from two kitenge’s which is a traditional Kenyan garment.

The organic space flower quilt block
Dear Jane quilt block G-8: Justin’s corner
One of my favourite quilt blocks is block G-8 -Justin’s Corner from the Dear Jane quilt. This block is a variation on block G-8 from the Dear Jane quilt, called ‘the organic space flower’. There are two versions of this block, with the difference in the number of seams and pieces. After sewing the first block, I decided to make another version of this block because the first version used too bold fabrics which did not match well. The second time I made this block I decided to experiment because I don’t like to do the same thing twice. Which version do you prefer?
Kenyan quilt block 1
Log cabin quilt block variations

There is something very soothing about the log cabin pattern. It is simple in its design, the pattern allows for a lot of variation, and it’s very aesthetically pleasing. Also, it has a great history rooted in the abolitionist movement in America. I made three variations of the log cabin quilt block:
I like how these blocks look more like a tribute to superheroes than something your granny made. There is a third log cabin quilt block variation which is a bit more static and reminds one more of the traditional block:

Sawtooth Star quilt block variations

Sawtooth star basic quilt block
The Sawtooth star is my favourite block. I even wrote a tutorial about this block. It made sense I would make some variations on this quilt block for my Kenyan quilt. The variation in my blocks was to re-design the middle block. Which one of the three below do you love best?
How to sew your own patchwork star


English paper piecing stars

I’ve once made Escher fishes with the English Paper piecing technique. English paper piecing works with pieces of cardboard around which you wrap fabric. After which, you sew them together. It is a nice, although time-consumptive technique. Because I had a lot of cardboard lying around I decided to use the technique again. And the border of stars was born! Here is an example of one of the stars.

Crewel embroidery mountain landscape
This piece ended up in the quilt because I started this embroidery in Kenya. I’ve always wanted to learn how to do crewel embroidery because it looks so gorgeous and I love the idea of drawing and painting with thread. This mountain landscape by Sol Y Mano Studio is where I started teaching myself. My verdict on embroidery so far is that it is nice, meditative but also takes a long time! I am pleased with the result:
Crewel embroidery mountain landscape
Magical SAL NYE 2018
This is another piece that ended up in this quilt because I made it in Kenya. One of my cross stitch friends, Magical Mystery hosts stitch-a-longs (SALs). Check her website if you like a good SAL because she has so many pretty ones! This one she designed for New Years Eve 2018. I used blue and glitter embroidery floss to give it a winter vibe.

New Years Eve SAL 2018
Conclusion: Onwards to quilt the quilt

So these are the quilt blocks! As you can see in the picture above, I’ve already started quilting this quilt. It seemed fitting to me to bring the Kenyan Quilt to finish during my second stay here. I’ve brought a box of quilting tools with me, and my boyfriend was very fascinated by them. If you’re wondering how to make a quilt for yourself, you can check this article I wrote:
How to make a quilt: a step by step guide
I am proud of the pattern I designed for this quilt. I’ve dabbled in pattern design before, and it is something I will continue to do in the future. Let me know in the comments or through email ([email protected]) if you are interested to buy my patterns. If things go well I’ll open an Etsy shop soon. Here are some other quilt patterns I created:
How to make a rose quilt design
A double wedding ring quilt for a doubly lovely couple
A mini-book quilt to calm one’s mind
An Owl shoulderbag
Would you like to read more?
The Dear Jane quilt: white with shock
When and how to quit a quilt
‘Look behind the lines’ miniature quilt and a quilt exhibition
New year resolutions: finish it SAL project list
Next weeks post:
– Reveal of the finished Kenyan Quilt top
See my DeviantArt or Instagram (username: bella.g.bear.art) for more artwork and WIPs. You can also follow my blog by clicking on the button on the left or by filling in your email address. There will be a monthly update at the end of every month and a new blog post every Sunday or Monday.
The Kenyan Quilt: quilt blocks showcase Remember last week when I promised to reveal the finished quilt top? Well, that'll have to wait a week because first I want to show you the individual quilt blocks in this quilt.
#creative blogger#Dear Jane quilt#etsy#hand quilting#kenyan fabric#Kenyan quilt#original artwork#patchwork#pattern design#quilt#quilt blocks#quilt blogger#quilt love#quilter#sawtooth star
0 notes