#you have a lot of 3d skulls and heads you can rotate at will there
Explore tagged Tumblr posts
Visit Tumblr Blog
Explore Tumblr blogs with no restrictions, modern design and the best experience.
Last Seen Tumblr Blogs


Fun Fact
Hackers stole 65M passwords from Tumblr in 2013.
Note
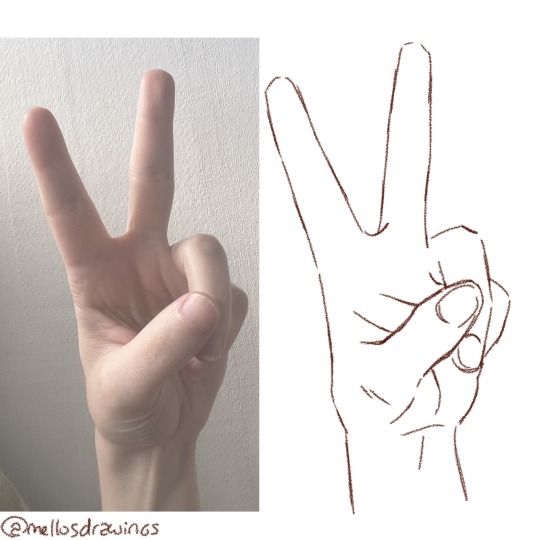
How do you do hands so well!?💀
I cheat lol
Ok, so that's a half truth half lie. Here's a few tuto, one about hand composition, one to teach you how to make a hand from scratch, and one to tell you that sometimes, in art, you gotta simplify your life.
First, hand composition:
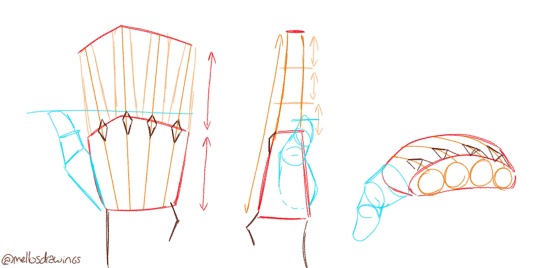
Red: palm shape and fingers size
From above, the palm will look like a pentagon, a bit wider towards the fingers, with the middle finger being the peak higher than the others. You can replicate that little knuckles hill at the end of the fingers. Fingers' size depends wildly on the person, some have palms longer than their fingers, others have fingers longer than their palms. For a base ref, make palm and fingers as long as each other and move the fingers' length from there.
From the side, the palm will look like a trapeze, base wider than the top.
From the front, the palm will never be completely flat! At rest, it will curve inward slightly. Draw a lump for the general shape.
Orange: fingers
From above, fingers tend to fan out at rest.
From the side, keep following the line of the top part of your hand. The inner side of the fingers will be straighter though. Fingers are composed of three mostly equal parts (the last one might be shorter depending on the person).
Blue: thumb
People tend to forget the thumb is surprisingly mobile! Unlike fingers that can only close and spread, thumbs can move forward and backward, up and down, and make actual rotations!
The base of the thumb will take at least half of the palm's side, but extra skin to allow movement will make it look like it take more space. Just like other fingers, it's actually composed of three parts. The thumb will usually be just a tad longer than the base knuckles of the other fingers (but as said before, fingers size change depending on the person).
Brown: knuckles and wrist
For the knuckles, you can make little elongated pyramids at the top of your palm shape. They will always follow the line of the fingers.
The inner part of the wrist will be mostly straight or curved inward, but the outer side should have a bump due to the ulna bone. Sometimes I place it as a hill, sometimes as a circle.
Second, the messy tuto:
1. Movement
First you should always draw a shitty shape indicating the general position and movements of your hand. Don't bother with proportions or details, you just wanna be able to tell what you want your hand to be doing.
2. Palm shape
Start by detailing your palm. Try to highlight where the fingers and the wrist will be. Refer to the hand composition above for the general shape.
3. Fingers implantation
Separate the top of your hand in four mostly equal circles for the base of your fingers, and the side of your palm in a roughly rounded triangle for your thumb. Once more, refer to the hand composition above.
4. Fingers
Place the three parts of all your fingers more or less following the initial shape/movement you wanted to go for. Fingers should be roughly the same size as your palm, but you can vary the length as no two people have the same hands.
5. General shape
Once you have placed all your finger parts, you will be able to draw them and connect them to your palm. Don't hesitate to start making adjustments starting from this step.
6. Details
Nails are, just like fingers, very different depending on the person. Globally you can put either an oval or a rounded rectangle on top of your fingers. You can make them longer after the finger for effeminate or well kept nails.
Add pyramids at the base of your fingers to place your knuckles and a circle or a pyramid on the outer side of your wrist to place your ulna bone.
7. Finish
Add details, adjust sizes, remove extra lines, and you have a hand.
Ok. Now, that technique I just showed you? Don't use it. No, I'm serious. Don't use it for hands that are part of the main focus. Do it for background characters or doodles or training or comics panels where hands aren't that important.
For illustration and panels with a focus on your character's hands, use the following technique instead.
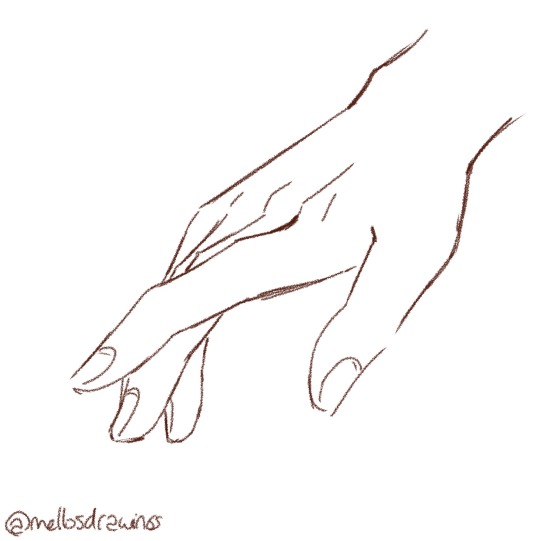
Third, how to make your life easier as an illustrator:
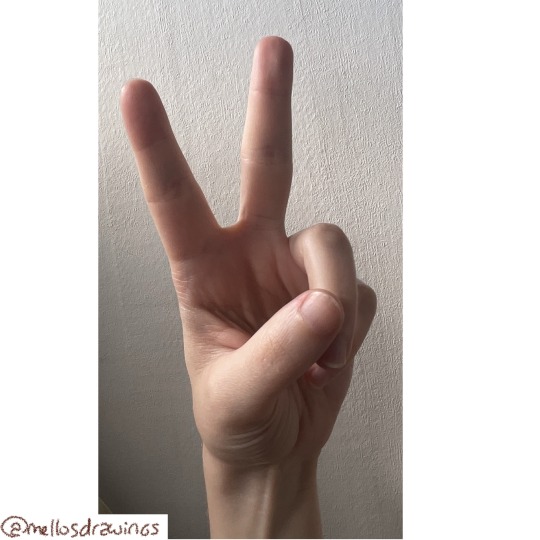
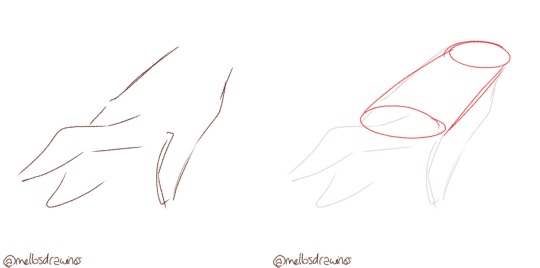
1. Reference
Yes. That's how you make good hands. You take a pic of your own hand doing the pose you want to use as reference.
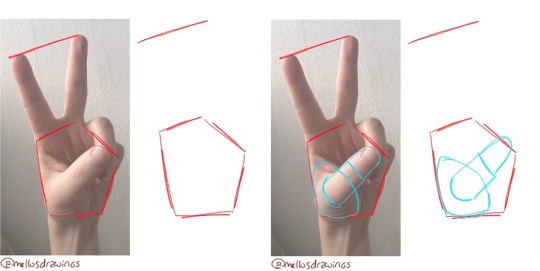
2. Palm
Just as the tuto explained before, you start by finding the shape of your palm on the pic and try to replicate it. It might be a bit difficult at first to copy proportions properly, but doing it again and again will make it easier in time. (Also refer to the last part of this post*)
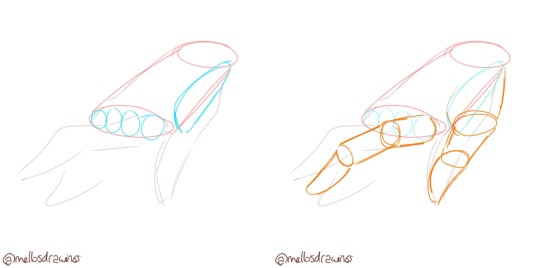
3. Thumb
Usually I'd go for the fingers first, but since the thumb is on the foreground I started with it here. First the implantation with the palm, then the two last parts. (As you can see I have tiny potato hands so I tend to artificially elongate the fingers compared to my reference to have prettier hands).
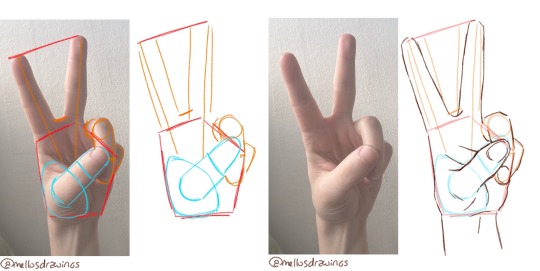
4. Fingers
Find the general movement of your fingers. Straight lines for fingers in tension and connected cylinders for fingers flexing.
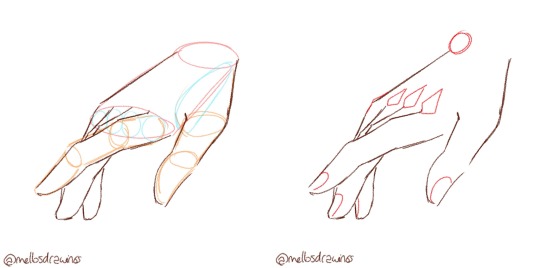
5. Once you are able to place the general shapes, you will have an easier time copying your own hand. Doing it without the previous steps is feasible when you are used to copying, but if you are new to this I would suggest deconstructing your hand to train your brain into remembering every detail.
6. Corrections, details, add a little movement if you are into dynamic-art, keep it realistic if you are into realism.
You now have a pretty hand.
Remember : You can (and you should) use references! Normal humans aren't made to remember every single details about everything, especially when those things are as complex as hands (or Gods forbid it buildings and cars and whatever else).
If you struggle with drawing hands, take a pic of your own hand to help. Try to find the big shapes composing your own hand so it'll be easier to yolo another time.
References are your friends! Don't think you're any less of an artist because you need to have your own shoe on your drawing table so you can draw your character's feet!
(*For new artists : TRACE! I'm sure you've heard everywhere that tracing is diabolical and you should never do it. It's FALSE. Tracing helps with your hand-eye coordination. 80% of art is reflex! I no longer need to think about all these steps because I have been drawing for more than 15 years. I started by tracing Winx Club stickers I had one my windows! It helped me have a sense of movements, proportions, and fluid lines.
What you shouldn't do with tracing is post it as your own art! You are free to trace as training, but you should never claim it is your own art.
Other than that, please, trace. Trace your own hands pic to get used to the shape. Trace your favorite artists to understand what you like in their lines or proportions. Trace that damn building because you don't have time to create a whole background from scratch for your webcomic.)
Art is cheating. Always. Don't feel bad for making your life easier.
#i cannot stress enough how much I am serious about making your life easier#art should be fun#you shouldn't suffer because you want to do anything from scratch#and tracing is healthy as long as you DON'T REPOST IT AS YOUR OWN ART#for hands in focus I use my own hands as ref#for standard hands I yolo with the first tuto#for doodles I just stop at the step 1 of the first tuto#it depends on how much attention your hand will get#also I do the same with feet#take pics of my feet when I somehow decide a foot should be the focus of my art#(doesn't happen a lot lol)#and I take my own shoes and move them around to draw the angles right#also SKETCHFAB is a perfect place if you can't get your head angles right#you have a lot of 3d skulls and heads you can rotate at will there#art#my art#helps me when I'm stuck on a kissing pose#ask me anything#step by step#hands#mello's drawings#art tips
122 notes
·
View notes
Text
Pose Reference Resources
I promised Dia (aka aerequets) that I will make a collection of pose references in the reply of one of her art posts, and then I completely forgot about it. Until now. I'm sorry for my bad memory.
So, yeah, better late than never I guess?
The pose collection I use the most is no longer free. They used to let you download a whole album (more than 8GB worth of data) to use offline, but now you have to pay $40/package or $200 for full sets. I still have the zip file for a very old version of theirs, but I can't legally share it. So, let's skip to the other options.
1/ First, you heard of those 3D dolls program that let you model your own reference pose? This one is an online one and for free, the whole ordeal. Of course since it's online and free, you can't save your model for next time, and it costs quite a lot of time to set the model up. So, you should take as much screenshots in as many tricky angles as you need once you done with the setting. Best using for complicated scenes where those below don't have what you need already available.
2/ This one is free and in 3D, you can rotate the model to any angle that you need. The only set back is the numbers of poses are quite limited. This one is best for using as a basic blocks then build up what you want to draw, or just as a practice to improve your understanding of human anatomy.
3/ This one is free for personal uses and the pose collection is massive. The setbacks are the language barrier (it's in Japanese, English is sometimes tag-a-long) and you have to search through their pages for what you need. The pics for each pose is static but they are in different angle in almost 360 degrees. There are many 2-person and 3-person poses too. Great for illustration inspiration.
4/ This one will only show reference photos of human head, at whatever angle you rotate the model. The web interface is easy to use. There are options like searching based on gender, ages, emotions, glasses, facial hair or not, etc. Good for practicing face drawing.
5/ This one will show reference photos for human body parts, at whatever angle you rotate the model, read the instructions for how to do it. The web interface is quite hard to use at first, just tinkering around for a bit, and you will be fine. There are options like searching based on gender and which particular parts that you need refs for. Good for that moment when you go "huh? how is this <body part> will look in this <situation>????"
6/ This one will only show reference photos of animal heads, and only the head, at whatever angle you rotate the model. The accurate skull refencence list is their best point. There are enough common species in the drop down list. Tbh, I don't use this much because I often need refs for the whole animal most of the time. But it's best for furry artists, I guess?
7/ Real model photos. They sell pose reference in themed packs, but there are enough free packs to use as drawing practice too.
8/ This is the best for general background reference. Lots of options. Not really good for very specific location results, but good for random background in drawings.
9/ Lastly, for specific objects or background references at strange angles, I often search for 3D models on this site then take screenshots of whatever I need.
That's all, folks. Hope this list can help ease some of the struggles that we will encounter on our quest of learning the art of drawing things 😂
304 notes
·
View notes
Note
Something that I always really like in your art is your use of shapes. They're simplified but still very believable if that makes sense. Do you have any tips on that? Or could you direct me to where you learnt that?
I'm glad you like the shapes! They're one of my favorite things to draw and see in art hahaha. I'm going to explain how I personally do them, so it might vary for others.
So when looking at objects, i do try to break them down in big shapes. I usually hold what i'm drawing as a 3d object in my mind, and then i just try to,,,, rotate it. It gives me a much better sense of how it looks. For example, if i'm drawing a head, i'm drawing it as a box - i can easily rotate a box in my head, so it gives me a stronger idea of how i want to draw it. Also i just try to feel something out. I can feel out the structure of my finger or face just by touching it. This helps me a lot for planes, which comes in handy when i try to render things.
Instead of looking at objects as a bunch of different, smaller lines, i try to break them down into bigger lines that kind of define a shape. For example, if i'm drawing a face, i'm not going to draw each individual slope or curve of a line. While it would look fine, i would have no idea what i'm trying to draw. I'm drawing lines, which are 2d, instead of shapes, which are 3d.
Here's a very rough example

(the angles are a bit different but you get the idea)
With the first one i tried to draw each little curve of the face, but in the other i just broke it down into big lines/shapes. While both look okay, the second one is much quicker to do and a bit more shaped. I want each line to count. So i have one line for the cheekbone, one for the jaw, etc. Also, most of my sketches are just a bunch of boxes, so i have shapes as a fundemental. Of course you can use any other shape, but i personally use boxes because they're the easiest for me to work with.
Then the one that definitely helped out the most was doing a shit ton of figure studies. Instead of focusing on the muscles and the details, my goal is to get the overall form down. For some reason i am horrible at drawing in large scale, so the figures are really small. And I just hold the fact that i want each line to count, breaking things into big shapes/lines and just rotating things in 3d in mind as i go.

These are super rough, and i can definitely spot some mistakes - but the idea is there. Almost each big muscle is a single line. If i have a good sense of the fundamentals, then i can build up on the rest of it.
What helps a lot is of course, practice. I have pages upon pages upon pages of just random poses and heads and other objects in slightly different angles. So something is bound to stick. Also getting a good sense of the fundamentals, aka anatomy. Skulls, muscles, facial planes, bones, you know the stuff. If you understand the fundamental rules, you can break them and adjust them however you like because you know how things are supposed to connect to make sense. Sinix on youtube has some really really great videos on the fundamentals of anatomy and how you can break things down into shapes! Also you can find those 3d references where you can rotate the thing you want to draw.
Also just do whatever shapes you like best! I personally prefer boxes (or squares and rectangled for that matter), i find they suit what i want best. The heads i draw are boxes, the fingers, the hands, the eyes - hell i will break a round object into boxes if i so desire.
Most of this is internalized at this point and became muscle memory, and honestly i never really paid it much attention. So apologies if this doesn't make much sense hahaha! Shapes in general are something i love seeing in art, so i probably absorbed some other things through osmosis (aka i just,, stare at things a lot. I will see a fucking lamppost and go "wow those are some really good shapes you have there" and in my mind i'm already breaking it down like "this is a cylinder, one big line for this side, a box there, some slopes and curves on the other side" so i can reference it from memory later). I mostly fouced on the human figure here, as that's something i draw the most - but this counts for literally any object! I could do figure studies of a chair, why not. My process is the same.
#asks#basically i just think in shapes. boxes my beloved.#i also generally work pretty quickly (for that i have speedpaints to blame) so i try not to dwell on a line or shape too much.#just a few quick lines and i move on
9 notes
·
View notes
Text
Okay, so firstly, I'm assuming you have access to a 3D printer or a 3D printing service. My chosen MO when my printer is on the fritz is "mooching off others, mainly my brother" but we have a maker lab an hour's drive away if I need something larger. This would be a project that is too large for my printer, assuming an adult human head.
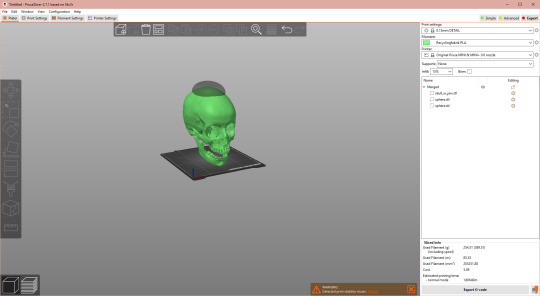
Secondly, you need a slicer that lets you mess around with models and add basic shapes. I use Prusaslicer, because it came with my printer, and anyone can download it for free. I'm gonna overexplain this as if you have a basic grasp of windows-style software, a sixth grade reading level, and have otherwise no other experience using this software. (aka. as if you're my mom)
Thirdly, we are working smart, not hard on this. Plenty of people have made skull models. www.thangs.com is your friend for cross-platform model searches. I went with this one because a) it has that slightly open jaw that was requested and b) it was popular around Halloween, so it is one that is possible to print. Will it still be after we mess with it? That's a different question.
Tutorial on how to do this behind a break, because it's 15 pages in Word.

First, open your model in your slicer. As you can see, this one doesn't fit my print bed. I'm not printing it, so... Eh. It usually comes out centered all by itself, so we don't need to mess with anything, either.


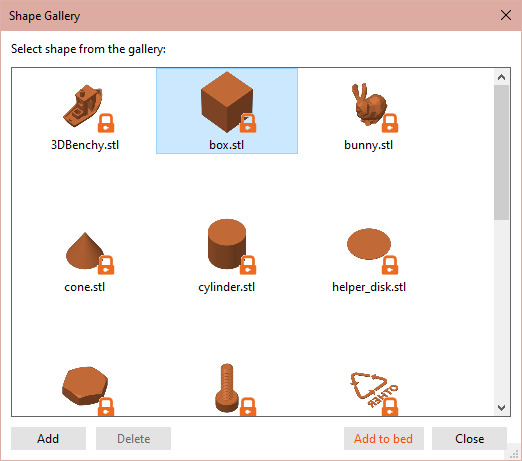
Next, we need what Prusaslicer calls the Shape Gallery. Pick a sphere and click "Add to Bed"


Select Sphere. Then press the little padlock in the menu called "Object Manipulation". Now mess with the values behind "Size [World]:" until your sphere is the shape you want your bowl to be, and roughly twice as deep.
While you're there: change the values under X and Y for "Position" to be the same as for your skull. This centers both objects on top of each other.
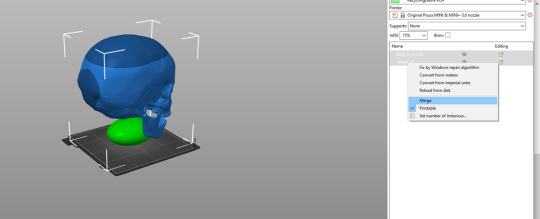
Now select both your Sphere and your Skull model at the same time, right click and choose "Merge". This lets you manipulate the Sphere further.
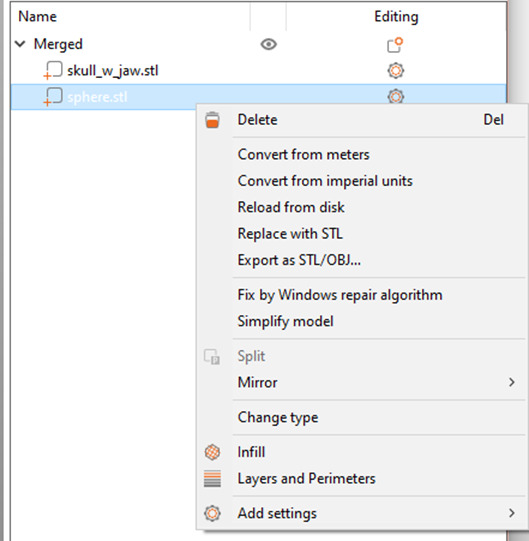
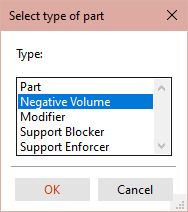
We need that Sphere to become a bowl. In the Name menu, right click the Sphere (just the sphere) and choose "Change Type". Pick "Negative Volume". This should turn the Sphere model transoarent.

Back to the Object Manipulation menu, which is now called Part Manipulation. With only the Sphere selected, adjust the Z position until half of the Sphere is poking out of the Skull. Then mess with this and the Y position until you have that dimple exactly where you want it.

At this point, it's smart to press that tempting "Slice Now" button to check where you are. (At this point, I resized the merged project to 80% to make it fit my print plate -- this button doesn't work if you're trying to print something larger than your print volume.) It wasn't even fully done slicing when I noticed that this might be a bit too ambitious for a key bowl. But filling an entire model with plastic is expensive and tedious, so let's McGyver a solution.
Hit Ctrl+5 to go back to the place where change is possible. Copy paste your Sphere, change Type to "Part" and adjust the Z position until it's juuuust peeking out from the Skull, basically flush again. Press "Slice Now" to re-check your progress.

Dear reader, we have a dimple.
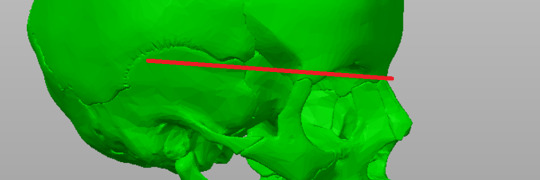
Next up, a way for glasses to stay put. You need an outcropping on the side of this stand if you wear glasses that were not adjusted to be worn without ears. I took a side profile selfie and based it on where the legs of my glasses usually sit. It seems to be just underneath this handy dandy curved seam on the model.

The next Shape Gallery we need is a Cylinder.

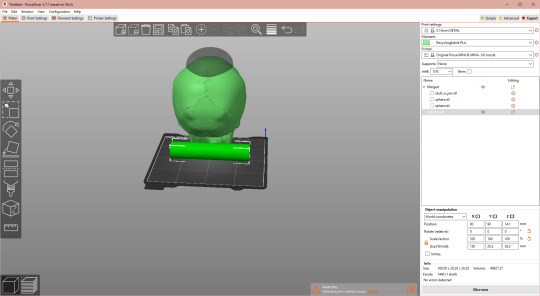
Back in the Object Manipulation menu, we rotate it 90° on the X axis, then mess with the proportions. I started out by making the real world X value slightly larger on the Cylinder than the Skull. (Reminder: my model is tiny, my values are meaningless)


You don't need it to be tall, so you can make the real world Z a lot smaller. You do need it wide, so see what Y value gives off good vibes. Again, merge with the Skull.

Again, adjust your Cylinder's Z position. This time, aim for just underneath where your glasses' legs are, as was figured out with that red line earlier.

Turn your model to see how it looks, adjust the dimensions if necessary. My X value looked way too big, so I shrunk it down a little.

Check with the "Slice Now" button if you've messed up in an obvious way. If not: Ridge! (Note: you can also achieve this by manipulating one or more different basic shapes, depending on the look you're going for.
Next up: the stand. I'm going to make that as a seperate object, because it lowers the material wasted if I goof up on either the skull or the stand. This is the most freeform part of this project.


Pick a shape for your base from the Shape Gallery. (Or import an STL with a shape that pleases you better.) I like the M3 Hex Nut. It's not too blocky, you just need to mess with the size a bit to make it look at home on someone's hallway cabinet. Position it underneath the hole of your skull, keeping the X position the same to keep it centered.

Next, pick another shape for the pillar of the stand. I went with Box. Copy the X and Y position of your base to center the two.

Mess with your pillar's dimensions until it goes into and through the hole at the base of the skull without touching it.

Merge your base and pillar (Here: Hex Nut and Box) to complete your stand. Do not merge with your Skull project unless you want it all to be one piece.
Side note: see those eye icons? They let you include or exclude files for slicing. Meaning you can make the print file for the stand and the print file for the skull by toggling them on or off, without having to export this project's objects as STL's and re-insert them into a seperate slicer instance. For now, ignore them and just press "Slice Now" again to check for whoopsies.

Nope, that looks just about like what it should be. Now you can adjust the proportions to fit that hat, add supports, tweak the print settings to whatever filament you prefer and whatever the Printing Gods approve of for your printer, and print it.
Looks like my basic settings would require 27+ hours and about 300 g of PLA... Without supports.

I've not hit the image limit yet, so lets add organic supports (because those come off easiest for me) everywhere the slicer thinks it needs them, just for the nightmare fuel image. We're looking at 47 hrs/ 400 g for the skull and 2 hrs/ 26 g for the stand. Again: This version would maybe fit a toddler's head. Maybe.
Congrats, you now know how to mess around with an STL you found that just needs some basic shapes added/gouged out to suit your needs.
Go use your newfound powers to confuse someone.
Things I would make if I had the skill, or would commission if I had the money: A decorative skull on a stand, maybe to rest on a cupboard by the side of the front door. Besides being a key bowl, it has other uses. Here's an illustration of it while it's not being used, when I'm out of the house:

And this is what it would look like when I'm at home:

#3d printing#tutorial#hat stand#glasses stand#key bowl#this one has it all#prusaslicer#human skull - anatomically correct by Peter from Belgium#skull#I had to#the alternative was going to bed on time#it's after midnight now#night night#organic supports on a skull#I'm not the first I won't be the last#it's basically adding spook for free
3K notes
·
View notes
Note
sorry to bother you, but seeing some of your art recently has inspired me to start doing (digital) painting again. it's going... surprisingly well, all things considered, but there is one thing i'm having problems with.
im really struggling with head shapes/angles (esp profiles), and i was wondering if you remembered how you improved on those? did you just do studies of existing art/photographs, did you use any of the construction techniques - some other third thing? i feel like i skipped a basic step somewhere and now idk how to go back lmao. tysm! (also it was implied above but i think your art is awesome and really enjoy looking at it!!)
Hey, it's no bother at all. I'm always extremely honoured when I hear I'd inspired someone to get back into art!
Imo heads are one of the more difficult parts of the human body to draw considering how many little details they have so don't feel discouraged if you can't get 'em quite right yet, especially since you're just getting back into the swing of things. Don't be afraid to pull up a reference even when you're doing personal work.
For me, 99% of it is studies. Make yourself a pinterest folder or a regular folder on your computer and hoard any face you think looks interesting. I try to stay away from having them all be typical instagram models with chiseled jaws and so on. Having variety in your references is an important part of building your visual library. I also like people watching when I'm outside.
Strengthen your observational skills - when I look at a face I don't just take in the whole, I try to take note of how individual features relate to each other: the distance between the bottom of the nose and the bottom of the chin (and between the top of the forehead & the eyebrows), how large the space between the eyes is, how large or small specific features are (both on their own and in relation to each other), etc. Eventually you'll be able to start mixing and matching these into unique faces, as well as exaggerating them to fit your style.
For guidelines, to be honest I've always been a bit resistant to using them, but that's more of a me problem lol. I got started off with the loomis method: here's the book if you want the instructions directly from the horse's mouth (all of his books entered free domain a while back I think). If you're more of a visual learner like I am, proko's got a series of videos breaking it down: basics, how to adapt it to more varied faces, freestyling it.
The important thing about this method (or really, any draftsmanship method) is that you'll have to adapt it to suit your own needs. Especially considering that these guidelines follow a more ''idealized'' face (according to loomis) that you'll probably wanna break out of eventually. Think of it as a springboard – the method is good for giving you the fundamentals to begin visualising how proportions work, but don't get bogged down in following it to the exact mathematical line every time you draw a head. Of course, this comes with time and practice (where those studies will really pay off); once you start to feel that you understand the proportions, you can start branching out.
Practice drawing the skull! This helped me a lot - if you know where all the bony landmarks underneath the skin & muscles are, like the cheekbones, browbones, eyesockets (the eyesockets are especially helpful for profiles – you can build the rest of the features around them), etc. it becomes easier to keep track of your proportions in perspective. Sketchfab has a lot of 3D skull models you can rotate around, here's one where you can visualise how the skin sits on top of it.
Learning how to break the head down into basic flat planes is also helpful. Here's an Asaro Head you can turn in 3D space.
It's a bit more advanced but I also really like doing this exercise to practice drawing the head at different angles. Especially how he starts off with simple blocky shapes in the beginning.
I know I mention this a lot, but try working in 3D. Whether with a digital program or real clay. Sometimes sculpting things out in three dimensions is what it takes for things to really click.
Doing studies from tv shows/movies is also fun 'cause you can get video footage of the head turning in real time.
Hopefully some of that was helpful (and coherent, I'm still a bit loopy from my fever/the cold meds)! Again, it all really boils down to time and practice - you'll be noticing new things and building up your knowledge for as long as you're alive, so the most important thing is to stay curious and observant!
(& thank you!!)
#ik how it feels feeling like you skipped some step somewhere too hahah. when in doubt it could be helpful to just go back to#the very basics and draw some squares circles cylinders at different angles#text#long post
76 notes
·
View notes
Text
the bad batch + items i would knit for them
a/n: i’m obsessed with knitting/crocheting bc i’m actually a very very ancient old elderly decrepit person trapped in the body of a sexy young lady. and i especially love knitting things for other ppl bc it makes me feel like a little christmas elf. so this is what i would make for each of the bad batch
***
Hunter: headband
yes this is an obvious one but i don’t care
hunter wears the same rotting headband every single day someone needs to provide him with extras so he can at least rotate them
headbands are really easy to knit so i could provide him with an endless supply of clean ones
ALSO it would be so cute to make the actual headband one of the bad batch colors (black, red, even white) and then crochet little appliqués to sew onto them
like the skull, 99, those would so cute on there like basically how the skull is on his already but more 3D
yarn is also most likely more breathable than whatever he’s currently got strapped on there so comfort wise it would be better too
Crosshair: beanie
crosshair is such a 2015 beanie dude
like i don’t mean that in any sort of way bc he’s a handsome young man BUT he’s very “i’m the misunderstood artsy loner guy who wears leather jackets and beanies and smokes cigarettes and reads classic literature”
and i love that energy for him so he deserves a beanie to compliment it
also i think crosshair is a very chronically cold person but is too proud to ever admit he’s cold so he won’t put on a jacket or use a blanket BUT he’ll wear his beanie bc he can pass it off as a fashion choice
Tech: tote bag
tech has so many god damn things
so many trinkets and gadgets and tools
HES GOT GADGETS AND GIZMOS A PLENTY HES GOT WHOZITS AND WHATZITS GALORE
but anyway he needs somewhere to put all of those things! and if that storage location is also mobile? even better!
I keep a lot of my things in tote bags (literally i keep my knitting stuff in a tote bag) bc it’s easier and then they’re ready to go if i need to transport them
i just think he would get a lot of use out of something like that, plus this is more of a time consuming project and he would have the patience to wait since it’s not a pressing need
i’m making a tote bag for myself right now and i’m knitting a design into it (eggplant emoji on one side, peach emoji on the other side) and i would def do a design on tech’s to make it more exciting and I think he would really appreciate the craftsmanship of it all
Wrecker: bucket hat
crosshair might be a beanie dude. but wrecker is 1000% a bucket hat dude
like wrecker is just such a chad in the best possible way (in the beloved himbo way) and i think his natural state is at like a tailgate (or some kind of outside day drinking event), hawaiian shirt unbuttoned, bucket hat on, sipping a bud light and playing cornhole
bucket hats are more of a crochet thing but they’re pretty easy and quick to make and they’re super cute with little appliqués sewn on like with hunters headband
he would love having a few different ones with different vibes like obvi some bad batch themed ones but other ones too
specifically the one i’m picturing in my head is like a pretty light blue with little white cloud appliqués sewn in all over so it looks like a beautiful blue sky
Echo: blanket
now this is a time consuming project. you gotta really love someone to devote this commitment to them
as much as i love all these lovely individuals, echo is the only one who deserves having these labors performed for his comfort
echo has had almost only the worst of times ever. now he’s like half robot and doesn’t even get to have a robot hand OR his own bed he sleeps in a fucking hammock
he deserves the world, the least i could do is make him a big cozy knit blanket
echo is also the only one who’s patient enough to wait for a nice blanket to be made. everyone else would get antsy too soon
i would use that big soft yarn they sell for baby blankets like i would just buy a fuck ton of it and it would be so comfy
Omega: sweater
omega is the only one i would make a sweater for
similarly to echo i think she’s the only one who deserves such a laborious task, but also she’s much much smaller than the rest so it would be way easier
not to be fully mrs weasley but i would def knit her initial into the sweater
NO I WOULD KNIT THE GREEK LETTER OMEGA INTO THE SWEATER THAT WOULD BE SO CUTE
i’d prob also make matching headbands for her and hunter but whatevs
#the bad batch#bad batch#tbb#tbb crosshair#tbb hunter#tbb tech#tbb wrecker#the bad batch x reader#tbb echo#tbb x reader#the bad batch headcanons#tech x reader#tbb tech x reader#hunter x reader#tbb hunter x reader#crosshair x reader#tbb crosshair x reader#wrecker x reader#tbb wrecker x reader#echo x reader#tbb echo x reader#tbb omega
238 notes
·
View notes
Text
I'm going to break down level 4-9 of Kirby: Mass Attack so that I don't break my 3DS instead.
the level requires 10 Kirbys (the maximum amount) to enter. it starts off with three gravestones, each signifying a previous miniboss (Pinnocuda, spiked snake, and gear). there are a lot of zombie beanbons, as well as two big zombie beanbons. there's also a key behind some star blocks.
next, there's two pushable graves: one with a fourth, never-before-seen miniboss, and one with a skull. getting close to the skull gravestone releases five skullys. the skull grave can only be pushed to the left, while the other grave can be pushed either direction. the skull grave, when pushed fully to the left, reveals the gay coin (rainbow coin), showing that the developers severely underestimated how difficult this coin was in comparison to the entire rest of the level.
pushing the grave with the miniboss unlocks the route to the "hub". in this area, you can enter any of the three previous minibosses. you have to fight each one to unlock the door at the bottom. the left door is Pinnocuda, the middle is spiked snake, and the right is the gear. personally, I go left-right-middle, but you can enter them in any order you like.
the Pinnocuda re-fight is pretty tough. the water is murkier than before, meaning that your oxygen runs out faster. you need to hit clams to get bubbles of air, star blocks to be able to go to the right (the screen scrolls automatically), and Pinnocuda's body to deal damage. Pinnocuda is made of 9 wooden blocks, a space for a 10th, a spiked spine, a harmless tail, and a deadly head. Pinnocuda will release bubbles to signal that it's about to go from right to left, or from left to right. it goes in a straight line and at a fixed speed, but the speed isn't always the same (it could go slow on one pass, and then go fast the next). if a wooden block is hit, it becomes damaged. if a damaged wooden block is hit, it breaks and reveals more of the spiked spine. if the spiked spine is hit, the Kirby that hit the spine will take damage. the tail cannot be hit. if the head is hit from the top or bottom, nothing happens. if the head hits a Kirby, that Kirby is instantly killed.
Pinnocuda is tough because, given the murky water, you want to go fast, but because of the spiked spine, you need to go slow, or you'll lose the gold medal. beating this boss breaks the leftmost chain.
the spiked snake is the easiest, but it's not a gimme. it pops out of the ground, and if you hit a spiked section (there are two non-spiked sections), you lose the gold medal. the first phase is the easiest, because you only need to hit a non-spiked section 5 times to move on. in the second phase, the snake has a chance to pop out of the ground 2/3 of the way, go back, and then pop out again. it also has a small chance to pop out of the ceiling instead. it can crush you if it does this. the third phase is the toughest, because the snake will take up two columns at once, with only a small chance to only take up one. this phase also takes the most damage to defeat. beating this boss gives you the key.
the gear boss is the most annoying. it can spit a green spiked ball, which will bounce in the direction it's spinning (left=counterclockwise, right=clockwise). there are two chains, one on the left and one on the right. there are rock enemies that will drop onto these chains, rotating the gear. if the chains are balanced, the glass portion will be exposed. if the glass is broken, the sensitive red gear will be revealed. breaking this gear takes you to the next phase. in phase 2, the floor becomes quicksand and two mummy beanbons are released. also, some stone enemies are able to become spiked, and if the chains balance, there's a chance that some stone enemies will come down and unbalance the chains. also, the floor randomly switches between quicksand and rock. if a Kirby hits a spiked rock or a spiked ball, falls through the quicksand, or isn't freed from a mummy beanbon's attack, you lose the gold medal. beating this boss breaks the rightmost chain.
when both chains are broken and the door key is in your possession, you can unlock the final miniboss of the level, the bat. in phase one, there are smaller bats in two rows beneath the bat. if you're lucky, you can take down the first phase before the gravestone part. in gravestone part, all the bats combine into a gravestone, which will float around at the top of the screen until it decides to smash down. if it smashes a Kirby, that Kirby dies. after smashing down twice, the bats go back to the arrangement they were in before the gravestone part. in phase two, the smaller bats are in circles that circle around the boss bat. there's also a bigger, spiked bat. if a Kirby touches that bat, you guessed it! you lose the gold medal. phase three starts with a gravestone part, and the gravestone can smash into the ground three times before it becomes bats again. there are six small bats and three spiked bats surrounding the boss bat. with more spiked bats and a longer gravestone part, this is easily the hardest phase.
I do not know what comes after the bat miniboss, but I'm assuming that that part has a locked chest (containing a gold coin) and a gold coin (not contained in a locked chest), as well as the end door.
also, this level is required to move on to the next non-miniboss and all gold medals are required to get 100% completion, so I'm not struggling for something useless. I'm struggling for something pointless. there's a difference.
2 notes
·
View notes
Text
Pachycephalosaur domes: Anatomy
Pachycephalosaurs were a group of ornithischian dinosaurs known exclusively from the Upper Cretaceous of the northern continents, best known for the distinctively domed skulls found in the adults of many species. Despite being among the most popular dinosaurs to be portrayed in media, the origins of the clade is shrouded in mystery, owing in part to a trend of poor preservation within the clade, especially regarding bones other than those of the skull. A ghost lineage of over 60 million years separates the earliest members of their sister clade, Ceratopsia, from the earliest known definite pachycephalosaur fossils (Xu et al., 2006). Also a source of debate has been the function of their frontoparietal domes, with proposed functions ranging from an anti-predator weapon to display to being simply the support structure for a much larger keratinous horn. In this series we’ll be taking a journey through the pachycephalosaur dome and different interpretations of it throughout history. Let’s start with the anatomy of the dome!

(Image: a 3D-printed skull of Stegoceras, a representative pachycephalosaur. Different bones are represented in different colours; the frontoparietal dome is the large blue bone on top of the head. Photo by me; scans for bones were provided by Jann Nassif and Larry Witmer)
The pachycephalosaur skull is notable for the extreme level of fusion present between the various cranial elements, making much of the skull seem almost like it’s made of one continuous bone. In particular, an extreme level of fusion occurs between the frontal and parietal elements, and they are referred to collectively as the frontoparietal (Gilmore, 1924).

(Image: A drawing of the skull of Dromaeosaurus, a theropod dinosaur. This image is here to serve as a more “normal” dinosaur skull in comparison to the modified pachycephalosaur skull. The frontal and parietal (above and behind the eye) are unfused! Image from [source]).
In most or all known genera, these bones are dorsally expanded and greatly thickened, forming a dome of solid bone that can reach up to 222 millimetres (8.75 inches) in thickness in the largest species (Sues, 1978)! [It is worth noting, however, that some specimens lack domed skulls, instead being flat-headed. Interpretations of these forms has been problematic and will be discussed in a future post, which will be linked here when it’s up.]
Because the dome is so thick, it’s able to survive damage that would destroy the rest of the body after death. ,Therefore many species of pachycephalosaur are known exclusively from the frontoparietal dome.

(Image: six different pachycephalosaur frontoparietal domes. Some of them are pretty badly eroded, but all are recognisable. Image from Peterson et al., 2013)
Pachycephalosaurs have been long known from the North American fossil record, though interpretation of their biology was long clouded by poor fossil remains. Joseph Leidy — who you should really read about - he did a lot of neat things! He also named some indeterminate tooth taxa that have shown up here before. —Joseph Leidy in 1872 described a partial squamosal as Tylosteus ornatus, though he did not recognise that it was a dinosaur and instead considered it to be indeterminate skin armour of a reptile or armadillo-like mammal (Baird, 1979).
The first pachycephalosaur to be recognised for its cranial dome was Stegoceras, though the only remains discovered were two domes and the taxon’s affinities were long contested. Lambe (1902) recognised the dome as a midline skull bone from a dinosaur; however, with no more complete specimens to draw on, he identified it as the nose horn of a Triceratops-like animal. Baron Nopcsa in 1903 was the first to identify the element as being formed in part by the frontal, though he mistakenly considered it to be a fusion of the frontal and the nasal, and considered it to have been a “unicorn dinosaur”, related to either ceratopsians or stegosaurids.
Hatcher (1907) believed that the domes did not belong to a ceratopsian or even to an ornithischian, but to “some other reptilian order”. Hatcher did however, correctly identify the domes as being formed from a fusion of the frontals and parietal (though he erroneously also included the occipital), and opined that the structure did not support a horn, but rather functioned to strengthen the skull roof. Several years later, Lambe (1918) described a partial posterior skull of Stegoceras which confirmed the identification of the domed element; Lambe created the new grouping Psalosauridae to contain the genus and considered it to be closely related to ankylosaurs and stegosaurs, but made scant comment on the function of the dome beyond armouring the brain (presumably against attacks from predators).
It was not until the 1920s that a more complete specimen of Stegoceras was described, leading to a better understanding of the anatomy of the clade (Gilmore, 1924). Based on the very un-thyreophoran-like body fossils, Gilmore assigned Stegoceras to Ornithopoda; however, due to their very similar teeth, he also placed it within Troodontidae.
This, incidentally created a confusion that lasted for over twenty years, in which pachycephalosaurs were confused with troodontids - two groups very distantly related. Pachycephalosaurs, of course, were ornithischian dinosaurs closely related to ceratopsians like Triceratops, while troodontids were a group of extremely bird-like theropods.

(Image: a meme in which the first panel shows two cards, with a troodontid and a pachycephalosaurid on them, with text saying “Corporate needs you to find the differences between this picture and this picture. The second panel contains an image of Charles Gilmore saying “They’re the same picture.” Art by @thewoodparable and @palaeoshley)
Gilmore also was the first to note that juvenile pachycephalosaur specimens, which he identified by their smaller size and lower degree of bone fusion, had much lower domes than did adults, though he did not elaborate on the biological implications of this. Further, Gilmore noted that the occipital condyle - the part of the skull that connects to the neck - was rotated downwards. This is really unusual; in almost all other animals the neck attaches to the back of the skull. (The only exceptions I know of are humans and woodcocks.)

(Image: An American Woodcock. Image by Mark Olivier, from Macaulay Library.)
From this, Gilmore concluded that the animal usually held its head with its nose downward. Gilmore was also the first to propose that pachycephalosaurs preferred upland habitats, and suggested that this may explain the scarcity of postcranial remains.
This series will continue with a look into ideas proposed into what exactly pachycephalosaurs were doing with their domes. Part II can be found here, and part III can be found here!
309 notes
·
View notes
Text
15 Up-and-Coming Trends About Mortal Kombat X Generator
Skin Packs.
Luckily, fighting games are best appreciated versus a human challenger, and also solo play is additional if you have the ability to discover a competing partner. MKX has plenty of nice touches that cater to competitive-level players, like comprehensive frame data, the option to include diagonals in your action inputs, as well as button checks (with push-to-set controls) at the personality pick screen. But there aren't sufficient guidelines to help bridge the space between professionals as well as newcomers. The few tutorials are sporadic, with virtually absolutely no guidance on exactly how to appropriately utilize each variation; there additionally aren't any type of trials to show gamers which combos ought to be their bread-and-butter attack strings.
Mortal Kombat Vs Dc, Mk9, And Also Mkx.
Good gameplay, ruthless battling, renowned preferred personalities past as well as present. I got this game not understanding that XL is kinda the very same game however with Jason. and various other fun competitors. I will pick up from this mistake and also maintain the bargain I won't return it yet possibly a close friend or relative might like the X copy? Sorry I did not recognize I honestly assumed they were different games, like sequels.
Mortal Kombat X incorporates unparalleled, cinematic discussion with all brand-new gameplay. For the very first time, gamers can choose from several variants of each character influencing both approach and also dealing with style. For regional single-player, the game supplies Story setting, a plot-driven setting with cutscenes between battles; as well as Living Towers, a progressed kind of Mortal Kombat's Obstacle Tower where the play conditions alter. Playing online, the play modes include 1 vs. 1, King of capital, Survivor, and Examination Your Good luck.
Besides, I feel it's more important to depict a personality's motivations and individuality via gameplay than cutscenes. The settings, meanwhile, are several and differed, thinking about that ultimately Mortal Kombat X adapts definitely to the template of a 3D arcade competitor used a 2D airplane. Tower mode offers the conventional game development design, as well as provides a number of rotates on dealing with the game's cast https://mortalkmobileguide.info/ back-to-back.

youtube
After that there's the tale setting; some five-to-eight hrs worth-- relying on your capacity-- of fights amidst reams of cut-scenes. Component character-spotters' follower solution, part guided tour of different boxers' designs, the story mode is teeming with hackneyed dialogue. Thus, while it's no instance of the computer game type's narrative potential, it does a marvellous job of evoking a feeling of those ridiculous gallery cut-scenes infamously located in light weapon games. And also somehow, it's a style that suits Mortal Kombat X rather well. Its astonishingly terrible strikes and also casualties-- which somehow take care of to trump even those of its 2011 precursor, Mortal Kombat, in their imaginative gore-- could verify hard even for some developed players to stomach.
Matt Elliott of PC Player had actually blended feelings about the online gameplay and also stated that "Mortal Kombat online just isn't durable enough to continue to be affordable".
For the very first time, Mortal Kombat X provides gamers the capacity to pick from numerous variants of each character influencing both method and combating style.
Players step into an original story showcasing a few of the game's most respected characters including Scorpion as well as Sub-Zero, while introducing brand-new oppositions that represent the forces of great as well as wicked and also tie the story with each other.
Mortal Kombat X is NetherRealm Studios' following extremely prepared for installation in its fabulous, critically acclaimed fighting game franchise that drives the iconic franchise right into a brand-new generation.
Players additionally will certainly come across solid however occasional blasphemy, consisting of "f-- k.". Precisely what you would get out of a fighting game or certainly a mortal kombat game, they made enhancements on all elements of the game, produced lots of game settings, presented some brand-new characters and also took a step forward. Mortal Kombat X offers the best story setting I have actually ever before directly seen in a fighting game. Its cohesive plot and also expanded cinematics makes you feel far more like a participant in a film than a player on the couch. The combating is frantic, fluid, and also dynamic, with the marvelous goriness of the X-Ray relocations commonly transforming the trends of fight.

DLC IntrusionGoro is plainly used in game modes as an A.I. He gets on the personality choose screen, but this serves only as a tease for the costs DLC. While the last game retold the classic narrative, Mortal Kombat X offers an entirely new tale. Though the story does not really take place during a competition, it strikes all the notes MK fans can desire from an all-new arc.
Yet beyond the blood and viscera is a really well-made combating game that's accessible to laid-back players as well as simultaneously gratifying for even more specialized gamers who invest time in finding out each character's seemingly endless range of strikes. Moms and dads require to recognize that Mortal Kombat X is an amazingly terrible fighting game with a few of one of the most extreme representations of characters eliminating one another ever before seen.
Fighters can do points such as punch openings in opponents' upper bodies to disclose their spinal columns, make use of swarms of insects to consume flesh to the bone, and cut skulls in fifty percent to allow their brains ooze out. Killing enemies is up to players, however also nonlethal assaults mid-match can show visuals representations of blood as well as gore, including X-ray shots of bones being damaged and organs obtaining shredded. All the combatants plainly take pleasure in carrying out these gory assaults and executions.
Mobile Game.
Honestly, both games are great simply the XL and also X being the same yet with bonus offer fighters kinda tossed me off. Mortal Kombat X has actually changed the game with the 3 variation fighting system, you pick a character, after that among 3 variations! there are brand-new brutalities, which occur when a gamer is at low health and you do an unique relocation, as well as quitality's, which occur when a player online quits, as well as there head explodes.
1 note
·
View note
Photo

Jakks Pacific 4" Magikoopa review! It is definitely Magikoopa! The sculpt and paint is perfect. I actually cant find a flaw. The glasses, teeth and claws are all very clean. It is also definitely 4 inches! I booted up Mario Maker to see that this guy is the exact right size! Fans that prefer 3D platformers might remember him being a lot larger though. And that's about all I can say... while I was happy that the 2.5" version could swivel at the shoulders and wrists, I've come to expect a lot more from the 4" line. (I mean just look at Bowser Jr.) Unfortunately you can see the extent of his posability in the first two pics. Some wrist hinge would have been nice, so he could move his wand a bit more realistically. There is no head motion at all. Additionally his right arm is permanently bent in lieu of an elbow joint..which would have been great. A more personal gripe is when figures are permanently asymmetrical, like 4" Skull Kid's and 6" Bowser's shoulders. I might be in the minority when I say likeness and size are most important to me (and this figure delivers) but posability is third for me and this figure fails in that regard. Like Boo before it, it's just an upscale of the 2.5" that can flap its arms in addition to rotating. What's most important to you when picking out a figure? Do you like these recent Jakks releases? https://www.instagram.com/p/B9XHMXhJUBj/?igshid=16cqxqns67nc2
2 notes
·
View notes
Text
short story: deathclocked
CN: This is something new for the blog, a piece of actual fiction. I was inspired. I am not actually a blonde ex-Polish trans hitwoman.
*
I strike at his throat with knuckled fist. I move the arm up to block, programming the motion before even it has a chance to happen. I'll also step aside and put my knee between his legs. Then either head butt him or bring my elbow down in his face. I don't know yet. As a child, I never ever fought. The thought of striking back was worse. It would have made me like them, and even then I knew I feared that. Better to run away, or else to let them. They wanted me to strike back, I know that now. If I had, they would have known I was like them, and we would have been friends. And I would have been something worse than being the nothing that I was. In a sense, they were so persistent because they were concerned for me, and perhaps scared as well - my existence as an oddity raised the potential things could have been different for them, too. We all fear the thought we might not be who and what we need to be, and it drives hatred of the strange all too often.
Ironic then that now I fight so effortlessly. It does not feel like aggression. It feels like stretching out. It feels like singing out loud. I miss that very much, but as time went by, it became less and less comfortable to hear myself, especially resonating in skull. Practicing martial arts, any kind, feels freeing. I feel present and moving and unbound by everything else. I decide my movement beforehand and execute it. If I am struck, I will be hurt, and accepting that makes it something I am not afraid of. In the training ring I don't feel or express anger, and my training mates accept that. When I fight for real, like now, they don't expect me to strike. In some ways, that is the point. It is because they don't expect it that I feel at peace being the one initiating. And ending it.
The man in front of me, I think of him as Boss Man, he wears sports gear slick enough for clubbing and laid back enough no-one will think he is gay or anything. God forbid. Sweatpants showing boxers. Tattoos, expensive wrist watch. He didn't have to queue to get into this club, which already sets him apart from 999 of 1000 people anywhere. There are several ways in which each of us stand out so. He and I share some, including, for me in recent years at least, spending significant time in the company of organized criminals. Boss Man is a criminal organizer, and I can only imagine this is why he passed the doorman directly whereas I stood in line. This place started as a gay club and in many ways still is, men give each other blow jobs among the smoky labyrinths that are the chill out area, the beat of a DJ I don't recognize but do like there in the background like a storm. Boss Man is the type of the leather bear doorman no more than I am in my skimpy sundress, but either he has the money or the fear capital from being a known gang leader that he gets in anyway. Even so, he still passes through the coat check, which means he has no weapon tonight and no body armour. Otherwise typically he does, and this is why I planned to take him down in here tonight. I too am unarmed, but as I now set out to demonstrate, this need not mean much.
I got close enough in the otherwise empty passage, so that first strike goes fine. He staggers, but he's been boxing; now he goes back and into something like stance. He'll strike next. Or will he? He backs up and stares at me. I followed him in here, when he was going to snort or inject I assume, or make a phone call. But when I did, he leered at me, smiling as I approached. Maybe he had not expected to, but he was fine with it, up until the point where I struck. There's enough of a code that he saw my following him as safe. It's what a girl would do if she was aware of his status and wanted him to share something of his - drugs, kisses, cock, recognition in some circles, though I don't know exactly which one. This city has several separate gang environments and they are not all hanging out. "My" criminals are part of other networks than his are. More to the point, "my" criminals live in little circles of salt surrounding a few people who also post on TOR-accessible truly anonymous forums.
Boss Man is an awful person. I know this because I read some of the police reports on things that happened with some girls who spent some time with him. None went to trial, and a few years back they stopped coming because none of them would risk filing one. This isn't why I'm here seeking him out. I'm not a vigilante, I just checked that before I decided to pursue the contract on him. Back in the old days, there were brokers who could connect clients and contract killers anonymously, for a cut. Apparently. They still exist, now they too are on the dark net. It works like a betting service, using crypto currencies and everything. Someone puts out a contract on a mark by anonymously depositing the prize with the broker. The broker verifies the money is legit and makes a bet on when the mark will die. Whoever comes closest wins the money, also anonymously. In theory someone could "kill steal" if they witness a contract killing, but the system works well enough. I was spending a lot of time on the dark web.
This also means that in principle a mark can know there's a contract on them. But in reality, most people where some shadowy figure want them dead will be just like Boss Man, a career criminal who is not all that computer savvy but rather very invested in his offline social network. I have no idea who wants him dead, I just looked into him enough to see if it was at all possible, and also on whether he has any redeeming traits that would make me feel guilty for it. I've cashed in contracts on people who were not gangsters too, some domestic abusers mostly. Still no idea on the client. Boss Man is just always paranoid, when on the streets he has a gun. His driver keeps that for him now I guess. If I guess closest for when he's dead, that's about 40K worth of bitcoins. The call was out for six months already. So either there aren't so many assassins around who'd take it, or some did and failed for whatever reason. I've tried and given up with several marks, sometimes others got them later. No idea on which other, either. I don't think I know any other contract killers, but then again, would I even know?
The thought strikes me that I should make a smartwatch app that bets on my time of death should my pulse stop, in case I find anyone contracting me. That way at least my death can be my own kill. But honestly, if my actual identity ended up there, something already is wrong. No one should know who I am. Heh. They'd have to use my deadname, since the road to a legal name change in my country of citizenship is... long. How fucking appropriate. Ha ha. Like cancer, fun for the whole family. I literally would have to sue my parents, which means I'd have to meet them again. It's been seven years now. They're still around in Krakow, I know, and my little brother hasn't moved out yet. He and I still talk every now and then. I wonder how he's going to make it.
Boss Man isn't going to shout, is he? Not that it makes all that much difference in this loud environment. No. He needs to do this himself or he'll lose face. He stares at me incredulously, already pretty coked up I guess, and leaps at me, all 95 kilo of muscle and bone and Axe bodyspray. I'm in the motion, I sidestep and rotate. Detachedly, I wonder again what precisely is wrong with me. I don't think I'm a sociopath. Is that even possible for me? If I were then surely I wouldn't have all these social anxieties, or feelings of inadequacy, and I wouldn't end up crying over youtube clips where little ugly fruits find other little ugly fruit friends. I do have empathy, for all that everyone tried to grind it out of me, growing up. I couldn't cry for years and years, it took me doubling the recommended dosage to get there finally. Now, it's not so much a matter on if something will make me cry, but when. I used to simply be unable. Now I cannot decide the "if", but I can delay it if I have to. There has to be something that I'm processing here though, it can't be just for the money. Maybe I'm processing my feelings of being an outsider by ensuring I must always be, that there is (yet another?) thing in my life that no-one ever will understand? Some sort of reaction formation? Or am I an adrenaline junkie?
"What the... fucking bitch! Fucking cunt!" he exclaims, slamming against the wall. I swing my fist at the back of Boss Man's head but he's already turned back and lifted a meaty arm for blocking. He has a tattoo of an eagle. He's in stance now. No more surprises.
He stares at me. With a sickening dread my guts recognize that look before my brain does. I shiver. He blinks. "What the fuck? You're a fucking man in a dress? A fucking tranny faggot?" Boss Man laughs. "That's why you fight like that. No fucking real girl could land a hit like that on me! Fuck! I can see it now, look at you, full of makeup and shit. But you've got balls, right? Show me you've got balls, man!" He takes fighting stance again, like he's challenging me. He smiles like a maniac. I'm staggering. It's like I'm split in two pictures like with those old 3D images, floating in different directions, none of them me. I can't sense my body, but it's like I see it from the outside. Tall, flat-chested. Tuck isn't perfect, is it? And I'm blonde, so plenty of electrolysis left before any kind of smoothness. Would any cis woman do contract killings like this? He's implying that, isn't he? That only someone incurably steeped in toxic masculinity would be a... a... hitman.
This is so dangerous, I know it. It feels like those times after meeting that support group when I couldn't stop idly thinking as the train approached the platform that it would be so easy to solve everything by just stepping in front. One part of me is deep in, one is detached. Neither really cares how this goes, right now. Am I angry with him? No way to tell. The important thing is, how dangerous to my beliefs about my identity are these implications? And are those just beliefs? He clocked me in a dark club corridor without me even speaking, so that horrible voice I have isn't it. What's wrong with me? I feel like I'm already dead. A waterlogged corpse having rotted, the bones move through soft flesh-mud. I freeze.
Boss man knocks me over and I feel a sharp pain as I hit the floor. Only luck it was not head first. Then again, if that damn head with it's fucking brow ridge and big nose cracked like a melon, then it would be over. He's on top of me. "What the fuck is this about, you little faggot? Huh? Did you really think you could fool me, you fucking ugly little cocksucker bitch?" I know it's over. I won't have to worry again on whether I'm actually just a sad, misandrist failure of a man, someone who still ticks off all the boxes of male stereotype and socialization. It'll be like with the train. Eventually it will all be over. Pain for a while. But only one outcome. It will be over.
He puts his hand on my left breast and there's another look of surprise on his face. Then his mouth is at the side of my neck. I feel rough, raspy stubble and smell the sour musk of his sweat and breath. He bites my neck hard and grunts. I feel his cock quickly growing hard against my thigh. Another rough hand moves up my thigh. He has to make sure now. The smell, I can't let it go. I remember my old training clothes. Four years ago? Before HRT. I used to smell like this. There is sausage on his breath, and beer. The stubble. When my hands had eczemas because I didn't moisturize, and they itched, I would scratch them against the stubble of the cheek of the body that I was in. The skin would eventually blister and bleed and get sticky, and it would hurt more and longer.
That's not me anymore.
That's who he is. I'm different. I always was. That never was me. That surface was no-one. I'm the will to motion. I'm the choice I made. I am me.
Boss Man isn't holding my hands in place because he's too busy groping at my tuck. So I press them against the veins at the side of the neck, holding and twisting as if I was opening a jar of pickles. I hear his neck snap, and slowly he goes limp on top of me. My head is spinning and for a moment I forget who I am, where I am, what I am. There is only the naked tube lights of the ceiling high above and the graffiti on the concrete walls. My back hurts.
I turn to get him off me. I squeeze his neck again to be sure, check the pupils. I kick Boss Man in the side of the head, first gingerly, carefully. Then again, harder. Again. A dozen times, with the hard toes of my pumps. I take out the phone, choose the camera settings to ensure there is a time stamp watermark as well as a GPS watermark. Then I remember. I have to remove the little coloured sticker they put over the camera lenses on your phone in this club. Check. Filter settings. Check. I upload an image of Boss Man's vacant gaze as he lies there to the server, through the TOR client app. It's done.
I hurry down to the bathroom, one floor down. I shy away from the mirror image because I can already guess what it would show, and I go in to hide in a stall. I lock the door carefully. Then I let the tears come.
4 notes
·
View notes
Text
Blender 2
Sculpting the Head
I have chosen to use Blender for this project (as opposed to Maya/C4D or Zbrush) for a number of reasons. For one, the project is completely free and is used widely - meaning there are lots of tutorials and online help available. I also really like the interface and shortcuts of Blender, whereas C4D and Zbrush are a lot less beginner friendly in my opinion - Blender just works as you’d expect it to, which I like. I also wanted to use it for sculpting the mask as I have previously attempted to make an animal mask in this program so I was already familiar with some of the techniques i’d have to use.

To get a new model that’s ready to be sculpted in blender, when creating a new file you can select ‘ sculpting’ which gives you a subdivided sphere, already in the sculpting mode tab.
To ensure that the model can be sculpted properly, ‘Dyntopo’ was enabled in the tools menu. This means that the model will generate more faces as they are needed - for example when using the draw tool to bring out the surface, it will add more polygons to accommodate this new space- rather than trying to stretch the existing ones.

The detailing was set to ‘constant detail’ which means the brushes will continue to add detail no matter how zoomed in/out you are. Relative detail will remove detail if you are zoomed further out and add it if you are zoomed in.
The resolution is the sizes of the faces that are created by the Dyntopo function as you edit the surface of the sphere. The higher the number, the smaller each face is, which creates a higher level of detail. In ‘relative detail’ mode, the faces created will be larger the further away you are from the sculpt, hence making it less detailed.
I started with a low resolution to get the rough shape I wanted, then increased it to add smaller and smaller details until I was happy. I also enabled symmetry in the X axis, so the model was symmetrical as I sculpted.

I mainly used the grab and snake hook tools to start off by bringing the muzzle out of the sphere to create the rough head shape. These brushes were pressure sensitive so that the harder I pressed with the tablet pen, the stronger effect they would have. I set them to a fairly low strength and large size to start off. I also used the clay strips brush to better establish the muzzle shape - as you can see this is where the Dynamic topology resolution can be shown (the visible polygons on the nose).
I had to ensure that I was constantly rotating the model in order to see if from all angles - as 3D sculpting sometimes may look okay from one orientation but be completely incorrect in others.

I used the grab tool to bring out the cheeks, and the clay strips tool to stary adding eyebrow ridges and cheekbones - which would inset the eyes. I used the clay strips brush to both add and remove material, and found it to be the most effective one out of all of them.

When the model would get too ‘pixelated’ to make it hard to see a good shape, I used the smoothing brush to refine the shape. At this point, I had gone over the entire model using the clay strips tool just so that it was all in the same resolution. As the tutorial videos recommended, it’s always better to start in a lower resolution with less polygons, then increase it as you want to add more detail and refine the shape.
In this stage i’m viewing the model at a three quarter angle to see how far the eyebrows and cheeks come out. I have looked at a number of animal skulls beforehand to get an idea of anatomy - but since I’m going for something highly stylised and cartoon there isn’t a lot of obvious resemblance to a realistic skull. I did however make sure to include the gap in the skull which is found diagonally (up/right) from the eyes as you can see in the image below. This gap between the forehead/eyebrows and cheekbones can be seen a lot clearer on my model in later pictures, but I think it looks really effective so I’m glad I did it.


Now that the basic shapes of the head were done, I changed my dynamic topology resolution so that it was a lot larger, thus making the polygons smaller (and adding a lot more).

This is how the model was in the current stage. I’m really happy with how it looks so far, except I think the eyes are too small and almost look closed, so I’ll try and refine them better next time I work on the sculpt.

These two videos were essential to me in learning how to sculpt.
youtube
youtube
0 notes
Text
Make your own Instagram filter
Blink, smize, pout, post. (Apostolos Vamvouras via Usplash/)
Ah, Instagram—my life, my love, my doom. Lusting over other people's vacations and brunch outings is an official hobby of mine, but as much as I love scrolling endlessly through the beautiful lives of people I mostly don't know, I love Stories more. They're quick, they're easy, and their limited lifespan allows me to be as silly as I want without ruining my whole grid aesthetic.
Plus, Stories allow you to add a filter to your photos—one of the most versatile features on social media nowadays. Want to horse around looking like a cute rodent? There’s a filter for that. Want to have silky smooth skin and try on lipsticks you can’t afford? There’s a filter for that. Want to look like the cover of a Pink Floyd album? Well, you get the gist.
For years, Instagram filters were only made by the platform itself or by a handful of studios and creators with access to Spark AR Studio, a tool Facebook designed specifically to create filters for their platforms. But that changed in early August, when Spark AR's closed beta version ended and the software became available to anyone dreaming of making their own filters.
So, as the Instagram addict I am, I volunteered as tribute and set about learning how to make my own filters—and then write about it so you can do it, too.
But before we start, there are some things you need to know:
It's not that hard (if you don't want it to be)
Building a filter can be complicated, but the difficulty depends on how elaborate your idea is. If you want to stick to something easy, you can create a lot of 2D effects in Spark AR that won’t require you to animate anything or spend hours on end trying to figure things out.
Experience is not required, but it makes things easier
If you’re already familiar with graphic editing programs such as Cinema 3D or even Adobe Photoshop, you may find it easier to navigate Spark AR. If this is your first encounter with such a tool, make sure to explore and experiment with the platform first. It’ll help you get to know it a little bit better.
Spark AR already did most of the work for you
When Facebook opened Spark AR to the public, it created a community of creators to help, inform, and inspire its members on the new art of filter-making. There's also a rich platform of content, materials, and tutorials to educate people on all things filter. In fact, when you download Spark AR, the first thing you'll see is a menu with preset projects such as an animated bunny face mask, a light streak, and floating particles. These will give you a pretty good idea of how the main types of filters work behind the scenes, but you'll also be able to play around with them until you've achieved something completely new and yours.
If you’re more adventurous and want to try animating 3D objects, there’s an entire library of preset elements for you to put in your filters, including all sorts of skulls, Pokeballs, anime characters, and even a realistic dancing crab, for whatever reason.
Since I have absolutely no animation experience and prefer minimalist effects anyway, I’ll build a simple 2D filter. Doing so is easy enough and a perfect initiation to making filters. You can combine 2D elements, use them separately, or even multiply them within a single project to create a richer effect.
Lesson No. 1—Know thy surroundings
Spark AR has a lot of elements. Knowing your way around is crucial. (Sandra Gutierrez G./)
Start by downloading Spark AR Studio. It's free, easy to install, and available for Windows 10 and macOS Mojave 10.14 and higher. Once it's installed, you can choose to work with various presets or start your own filter from scratch by clicking on the Create Project button in the bottom right.
Spark AR will open to the default workspace, which is divided into four areas. In the top left, there’s the “Scene” panel, which will show the basic structure of the objects in your filter. By default, you’ll see “ambientLight0” and “directionalLight0,” which are lighting elements.
Below the Scene panel is the “Assets” panel, which will contain all the materials that describe the objects in the Scene panel. For example, if you add a red rectangle to the Scene panel, the color element will show up in the Assets panel.
The space in the middle is the viewport. This will be your main workspace, offering two perspectives of your project. The bigger one in the center shows all the objects in your filter within the range of your device’s camera. This will help you create effects in camera space—which move with the camera—or world space—which stay put regardless of where the camera moves.
That little rectangle is your device, and the lines that connect it to the image show the range of your camera. (screenshot of viewport in spark ar/)
In the top right of the viewport, there’s another viewer called “the simulator” that shows how your filter will look as a final product. By default, you’ll see your work as it would appear on an iPhone 8, but if you hover over the viewer and click on the name of the device, you can change it. Options span a number of iOS devices (including the iPad) and Android smartphones (including some versions of the Samsung Galaxy, the Google Pixel, and the Google Nexus).
You can choose the specific device you want to build your filter for, or test how it looks on different screens. (Sandra Gutierrez G./)
Finally, on the far right of your workspace, there’s the “Inspector” panel, which will show the properties of the elements in your scene and allow you to edit color, texture, position, rotation, and other details.
Spark AR includes several test faces for you to try your filters on. You'll be able to see how they look on people of different genders and ethnicities, a blank canvas, and even yourself. You can play with your options by clicking on the camera icon to the left of the Scene panel and choosing the face you want to use from the pop-up menu. If you want to try it on yourself, choose Facetime HD Camera and you'll be able to build a filter on your own face.
Oh, hi there! Greetings from behind the red square. (screenshot of spark ar showing the live camera/)
At any point in the process, you can test your work on the Instagram app. Just click on the Send to Device button (second to the left of the Assets panel) and choose Send to App. You can test it on both Facebook and Instagram by clicking the Send button next to each one.
If you've never ventured beyond Microsoft Office, you may find this a little nerve-wracking, but don't worry—it'll all start making sense once you're actually working. If you'd like a little extra help, check out Spark AR's interface walk through.
Lesson No. 2—Teleport by changing the background
Let’s start with something simple. Swapping your background is technically called “segmentation” and is a basic, but fun, effect that offers tons of possibilities.
1. Choose an image to use as your background. You can select a proper photograph or create something new by playing with colors and effects in Photoshop or any other image-editing software. I chose one of the Hubble Space Telescope's pictures of the Bubble Nebula in the constellation Cassiopeia. Look how cool it is—of course you'd want to teleport there. Even its name is rad.
2. Add two rectangles. One will be the background (like a green screen) and the other one will display your face while erasing your real-world background. Head to the bottom right of the Scene panel, click on Add Object, scroll down the pop-up menu, and choose Rectangle. Do this twice. By default, your rectangles will appear as "Rectangle0" and "Rectangle1", but it's a good idea to change the names so you don't get lost. I changed "Rectangle0" to "Background" and "Rectangle1" to "Foreground, for example." To do so, double-click the name and a field will appear. Make sure both rectangles are nested under canvas0. This means both will be "children" of that element and will be subjected to any changes you make to their "parent."
3. Set the rectangles' sizes. Click on the Background rectangle (formerly known as "Rectangle0") and you'll see its properties in the Inspector panel on the right. Click on the Size fields and then the Fill Width and Fill Height drop-downs that appear. This will make the rectangle change size no matter which device a person uses it with. Do this for the second rectangle as well. Your viewport will be completely covered by the rectangles, which will be displayed as a checkered pattern called "alpha." This means they're transparent, but they're still there.
In this step, we aim to expand both rectangles to cover the entire filter. (Sandra Gutierrez G./)
4. Separate the layers. By default, any object you add will join the layer you last worked in. If you don't want it there, you'll have to move it to a different layer. For the segmentation effect to work, you'll need the rectangles in different layers so the background renders after the foreground. To do this, click on the Background rectangle in the Scene panel. On the Inspector panel to the right, click on the Layer field and choose Create New Layer. If you want to, you can rename the layers by clicking the Layers tab in the top right of the Scene panel, and double-clicking the name each layer in turn.
5. Create new materials. Time to give those transparent rectangles a solid form. That's what "Materials" are for. You'll assign each rectangle its own material by selecting each one in the Scene panel and then, in the Inspector panel on the right, clicking the plus sign next to Materials. When you do it for the second time, you'll see a drop-down menu offering existing materials or the option to create a new one. Choose the latter.
Once you’ve chosen your materials, they’ll show up in the Assets panel and it’s also a good idea to rename them to keep track. When you select your materials in the Assets panel, you’ll see a bunch of new options in the Inspector panel. You can change color, texture, opacity, blend, etc. If you want to experiment with your filters, play around with these options and see what you can come up with.
Materials are one of the main elements in Spark AR—they can be a picture or a block of color. (Sandra Gutierrez G./)
6. Create a segmentation texture. This will turn any video captured by your camera into a texture, which means it'll separate you (or whoever you're pointing your camera at) from the background. In the Scene panel, click on Camera, and in the Inspector panel, click the plus sign next to Segmentation. A new asset will appear in the Assets panel called, by default, "personSegmentationMaskTexture0".
7. Add "texture extraction" to the foreground material. First, click on Camera in the Scene panel, and in the Inspector panel, click the plus sign next to Texture Extraction. Another asset will appear in the Assets panel, named "cameraTexture0."
To use it as a new texture, click on the foreground material in the Assets panel. In the Inspector panel, change the Shader Type (first item on top) to Flat, which will give this material the properties of a flat, 2D element. If you want to give it a volume effect (ideal for 3D), the Physically-Based option is a good choice. You can also play around with these to see what types of effects you can come up with on your own.
Under Diffuse (the second item in the Inspector panel), find Texture and choose cameraTexture0 from the drop-down menu. Lower, check the box next to Alpha (it will look like it's "off" but clicking the box to the right will make it appear) and in the Texture field, open the drop-down menu and choose personSegmentationMaskTexture0.
8. Change the background. It might look like nothing happened, but you're almost there. You've set the foundation for your filter and now all you have to do is change the background. Click on the Background_Material and on the Inspector panel, under Diffuse, change the color to something that contrasts with the subject in the camera. This will help you adjust the edges of the segmentation by changing the Mask Size and the Edge Softness. You'll find these options in the Inspector panel when you click personSegmentationMaskTexture0.
If you like blocks of colors, you can stop there and play around with different background colors. But why do that when you can get a constellation? Let’s change that background.
Select your Background_material, and under Diffuse, reset the color to white. Lower, under Texture, click on Choose file from computer and upload the picture you want to use as a background. Keep in mind that large photo files may be too big for Instagram or Facebook to process seamlessly, so keep it as light as you can. I used a 720-by-734-pixel image weighing around 86KB, and the program was a little sluggish.
9. Add a little sparkle. As cool as teleporting yourself to Cassiopeia may seem, it's not cool enough. Not unless you have some shiny bits of flair floating around you. This is known as the floating particle effect, and it's a common feature in Instagram filters. Applying one to your filter will be quite easy and highly customizable.
Having the emitter as an independent object allows you to create a “world” effect. (Sandra Gutierrez G./)
First, in the Scene panel, click on Add Object and scroll all the way down to the end of the list to choose a Particle System. You'll notice a new element in the viewport emitting alpha squares in the middle of your viewer. This is your emitter, and the alpha squares are the particles.
When you create your emitter, it will appear in the Scene panel under your foreground rectangle, which means it will be subjected to the Focal Distance element (second under Camera) by default. If you want to create a "world" effect, click on the name of the emitter ("emitter0," by default), drag it down and drop it below Microphone. This will make the emitter an independent object.
You’ll notice three arrows coming out of the emitter. They represent the X (red), Y (green) and Z (blue) axis, and you can drag them around to change the emitter’s position. Also, when you click on the name of the emitter, you’ll find a list of every possible customizable option. We’ll go through a few of them.
The checkered pattern is called “alpha.” it means something's there, but it’s transparent. (Sandra Gutierrez G./)
<p><strong>Position, scale, and rotation:</strong> These all have X, Y and Z fields that will help you move the emitter around in relation to the camera (position), how far in each direction the particles will go (scale) and at what angle (rotation). You can play with the values of these fields (positive and negative numbers) to create the effect you want.</p>
<p><strong>Emitter:</strong> You can choose what type of emitter you want to use. Since I have a fixed background—it will not move if we move the camera—I'll use the <strong>Ring emitter</strong>, which will spray particles in a spherical radius. This will create a "world" effect that will make some particles appear closer and others further from the camera.</p>
<p><strong>Customizing particles:</strong> The <strong>Birthrate</strong> determines the number of particles the emitter will release. The more particles you want, the higher this number will be. <strong>Speed</strong>, <strong>Scale</strong> and <strong>Lifespan</strong>, are self-explanatory—the first one determines how fast your particles move; the second: how big your particles are; and the third: how long your particle will last before it fades.</p>
<p><strong>Force:</strong> This is like gravity. If you play with the values in the Y axis, you'll notice your particles will appear lighter or heavier. A value of 0.05 will slow your particles down—the lower the value, the heavier particles will be.</p>
10. Add a material. Until now, you've only have the idea of particles; simple alpha squares floating around your filter. Now, it's time to add a material. With the emitter selected in the Scene panel, go to the Inspection panel, scroll down, and click on the plus sign next to Materials and choose Create New. A new element will appear on the Assets panel. Double-click on it and rename it "Particle_material."
You'll notice your particles will have changed. Mine turned yellow, but yours might've turned some other color (if that is the case, don't worry). Select Particle_material in the Assets panel, and then in the Inspector panel, click on the Shader Type drop-down and choose Flat. All this works if you're using a 2D particle effect, but if you're using something with a 3D effect, you can use Physically-Based, instead. Further down, under Shader properties, next to Texture, click on the Choose file from computer option. An explorer window will open and you'll be able to select any file you like.
No, Spark AR guy, those are not fireflies. (Sandra Gutierrez G./)
Whatever image you end up using for your particles will have to have a transparent background. Most of the time, you’ll find these types of files in PNG format with a simple Google Image search. I looked for “spark, filetype:.png” on Google Images and chose the one I liked the most. Once you have a particle with its own texture, you might want to readjust your emitter. I went back and made the particles bigger (from 0.01 to 0.05).
Congratulations! You made your first Instagram filter. Now what?
11. Share your new filter. To do so, you'll have to upload it to the Spark AR hub, where it will be reviewed by Instagram's support team. Once they've seen it and have determined that your filter complies with the platform's community guidelines, your filter will be available in the Instagram gallery, on your profile, within Stories, and through a sharing link. The process takes about five business days.
Start by clicking the Export button to the left of the Assets panel (it's an upward arrow). Once there, save your project in an arexport file, which you will have to upload to the Spark AR hub. The program will automatically direct you there once the export is done.
Spark AR is a versatile tool that’s not that user-friendly, but stands out because of the vast possibilities it offers those who want to create filters. With a little imagination and tweaking, the segmentation and particle emitter effects alone can launch a myriad of experiences. There’s a lot of content out there for you to learn and experiment with, so it’s just a matter of investing the time and playing with it.
Now, if you excuse me, I have some stories to post.
I can see the view count going through the roof. (screenshot of woman with instagram filter/) from Popular Photography | RSS https://ift.tt/31fVmBM
0 notes
Text
Our Favorite Dumb (But Awesome) Games
New Post has been published on https://gamerszone.tn/our-favorite-dumb-but-awesome-games/
Our Favorite Dumb (But Awesome) Games
At some point in the past few weeks, some of us at the office were spitballing about when we thought the ludicrous new crustacean-themed battle game Fight Crab might come out.While we don’t know for sure (though their website alleges it will be some time by the end of the month), it got us thinking: this game, while undeniably awesome, is also undeniably silly and sort of dumb. But that’s not a bad thing – in fact, it reminded us that some of our favorite games aren’t much smarter.
IGN’s Favorite Dumb-But-Awesome Games
Check out the slideshow above for some of our favorite dumb-but-awesome games, or scroll through the entire list below.
I Am Bread
In I Am Bread, you are bread, and your mission is to become toast. Literally – it’s all about traversing a hazardous kitchen, apartment, or other mundane room as a slice of bread to get to a toaster and cook yourself.
The premise is silly as hell and it’s frustratingly, stupidly hard, but it also had me laughing so hard I teared up. Funny, because I had the same exact reaction to Bossa Studios’ other wacky game, Surgeon Simulator.
– Casey DeFreitas, Editor
This game was an absolute turd, so bad in fact that it was one of the first games to be approved for the PS Classic, the first mini-console desgined to showcase all of the worst titles in the history of an otherwise beloved system.
It was also the first and only 3D fighting game available for the system at launch (a couple months before Tekken and a couple years before Soul Blade would be released), so you better believe there were quite a few of us early adopters out there wasting hours mastering a game that would never really achieve widespread popularity. Even though I definitely know better in retrospect, I still can’t help but to remember my time with BAT fondly.
– Jeremy Azevedo, Head of Gaming Video
Blitzball
Final Fantasy X was a game about love, parenthood, responsibility, adulthood, and playing underwater basket-rugby with lots of dudes in big shorts. At least, it was for me. I am acutely aware that Blitzball, X’s take on the traditional all-consuming Final Fantasy side-game, is objectively bad. It’s slow, predictable and has, generously, about 4 animations in total. And I played it for dozens of hours, sculpting the perfect team of dudes in big shorts and winning everything I could. It was a chance for a distraction from the sad fact that Tidus’ dad had become an apocalyptic whale, and by god, I took that chance. I love it.
– Joe Skrebels, UK Deputy Editor
Blake Stone: Aliens of Gold
In my house, my dad didn’t let me play Doom. He let me play Blake Stone: Aliens of Gold while he played Doom. Blake Stone: Aliens of Gold is kind of like Doom, but it’s also not Doom. Doom came out the week after this game and ruined my life. Thanks, Doom.
– Ronny Barrier, Video Producer
Sneak King
Who’d have thought that one of the most memorable games of the last generation would have been a marketing stunt? Sneak King took my love of stealth games, and slapped it on the grill with my love of burgers to make a delicious, greasy, surprisingly unbroken adventure starring America’s only acceptable monarch, the Burger King. May his charbroiled reign last a thousand sneaky, greasy years.
– Jon Ryan, Senior Editor
Uno (Xbox Live Arcade)
When this game came out, I got way too into becoming the greatest Uno player of all time. I will never forget the lack of moderation on the pictures for my competitors leading each game of Uno to basically become a proxy for chat roulette. A unique time in gaming.
– Tate Fiebing, Product Manager
Roundabout
Expecting an FMV comedy romp, I was not expecting to be dumped into what is arguably the most absurd puzzle/platformer/racing game I’ve ever played. Yes, it also has FMV. Beginning with frustration and utter confusion as I tried to learn how to control my continually-rotating cab quickly gave way to howls of laughter as I crashed and exploded again and again, and I became obsessed with trying to top my previous high scores for each level. If I’d been playing by myself, I might not have found it quite as funny – but with friends, this game is comedic gold.
– Ginger Smith, Product Manager
Almost every single licensed NES game (not made by Capcom)
If it existed in the 80s, there was an NES game based on it. It didn’t matter if the underlying IP was rated R, or what the story might be, or if the developers had ever seen the movie or show it was based on.
This was before the internet and by the time you were suckered into buying the game, that was it, you were stuck with it. Rambo, Total Recall, TMNT, Bart vs The Space Mutants, A Nightmare on Elm Street, X-Men, Goonies, Karate Kid, Terminator 2, Friday the 13th, Night Rider, Airwolf, Bill & Ted, if you can remember it, there was probably an NES game based on it and it was almost definitely shit. But you’d play the hell out of it because you wanted to believe it was like the thing you loved, and because you had to justify the expense of a new game tape to yourself and your family. Unless it was made by Capcom (like Ducktails or Little Nemo), in which case it was, of course, bitchin’.
– Jeremy Azevedo
You Have To Burn The Rope
YHTBTR is a 30sec game with a great 2min end credits song. It’s not very difficult. The game literally tells you what to do right in the title. You could argue this isn’t even a game and instead is more of a music player with an interactive play button. No matter how you look at it, YHTBTR is definitely a “dumb” game but to this day is still one of my favorite time-wasters.
– Isaiah Smith, Software Engineer
50 Cent: Blood on the Sand
After G-Unit performs a sold-out show in an ambiguous Middle Eastern country, they’re outraged to learn the concert promoter can’t pay them in cash. Instead, he offers them a jewel-encrusted skull, which is immediately stolen by a beautiful ninja woman. 50 Cent, Tony Yayo, Lloyd Banks, and DJ Whoo Kid chase after her, which proves easier said than done because there are terrorists everywhere and they have to fight the terrorists.
Because this is a video game, new weapons and skills can be unlocked, but because this a 50 Cent video game, so can new swearwords. 50 Cent: Blood on the Sand is dumb as all hell, and way better that is has any right to be. It is a tragedy and an atrocity that it never got a follow-up where G-Unit goes to outer space or back in time.
– Max Scoville, Executive Mailroom Clerk
Chrome Dino
When you go offline…and you’re really bored…watchu gonna play? Chrome Dino! No, but seriously, Chrome Dino has saved me from complete boredom so many times over the years. From dodging pterodactyl and cacti to watching the world change from day to night and back again, Chrome Dino is a surprisingly addictive game that lives in the most unlikely of places. I still play it sometimes to this day when the internet goes out…
– Isaiah Smith
Cool Spot
A video game tie-in to promote Sprite’s bastard stepchild 7-Up, Cool Spot is profoundly dumb in theory, but actually quite fun to play. You play as the eponymous spot – 7-Up’s mascot in the United States – as he traverses through various generic ‘90s platforming levels, rescuing other Spots and collecting points. Strangely competent despite the relentless product placement.
– Lucy O’Brien, Executive Editor
Get On Top (Sportsfriends)
The awkard wrestling game where rounds last 2 or 3 seconds. Many laughs were had and bets decided from wierd round boys slamming eachothers heads into the ground by wiggling around in QWOP-like motions. Existed as a hidden mini game in Sportsfriends and on the best selling console of all time: Ouya.
– Drake Wempe Software Engineer
Dong Dong Never Die
One of the weirdest fighting games ever made, DDND is a Doujin (Fan-Made Indie Game) game from China made in Fighter Maker. It plays a little bit like the old King of Fighters series, but the game looks like you took the weirdest characters out of Kung Fu Hustle and put them in a digitized 2d fighter. You’ll laugh at how absurd each character and their attacks are, but actually get a kick out of the fighting engine too. The game is free on PC, so you can take a shot of using your Mian Hua Tang against Super Mario without spending a penny.
– Aaron Smith Sr. Mgr.of AdOps
Metal Arms: Glitch In The System
A long-forgotten game for GameCube that was in many ways ahead of it’s time. Quirky storytelling that reminds me of borderlands. A bunch of bizzare weapons that could be upgraded and customized.
A final boss fight that was utter insanity as you’re almost literally fighting a building. A ton of fun to play and even gave itself an arena to do PvP with. Sadly in spite of having all of the elements of other great games it never really caught on.
– Eric Becking Lead Engineer
What are some of your favorite games that make you go “this sucks, I love it?” Let us know in the comments!
Source : IGN
0 notes
Text
Here is what a new Aliens game in Unreal Engine 4 could have looked like
A lot of us were excited when it was revealed that 20th Century FOX had trademarked Alien: Blackout, right before the Video Game Awards 2018. Alien: Blackout was listed as a computer video game and even though it was not officially unveiled at that event, we’re pretty sure that it will eventually be revealed, perhaps for next-gen platforms. Still, and since a lot of gamers want a new Alien game, YouTube’s ‘Aklar_45’ has created the Raven xenomorph from Aliens, showcasing what a new Aliens game could look like in Unreal Engine 4.
In case you weren’t aware of, the Raven was a Xenomorph of unknown breed that was encountered on LV-426 by a squad of Colonial Marines from the USS Sephora. The creature was found dwelling in the sewers beneath the ruins of Hadley’s Hope. It was eventually killed by Corporal Winter, who fought the creature in a Power Loader.
As the Alien Anthology reads:
“It’s body resembles an ordinary Xenomorph, but larger and is almost entirely encased in an armored, spiked exoskeleton. Its tail has ridge of spines at the base of the tail’s harpoon-like blade and like the Queen, it also has high heel protrusions from its feet. Its head possesses a ridged carapace, much like a Xeno Soldier along with a row of spikes on the top of its head. The left side of the Raven’s face is scarred, revealing some parts of its skull consisting of an eye socket and a nasal cavity beneath the dome.”
Aklar_45 has also created a realistic Alien egg alongside the Xenomorph, and what’s really cool here is that the Raven is actually animated. Not only that, but the 3D model looks really detailed so hopefully the next Alien/Aliens game will match the quality of this model.
Below you can find a video showcasing the 3D model, as well as a 3D model viewer via which you can rotate and look from a close range the Xenomorph.
Enjoy!
sketchfab
Xeno Raven by Henrique Naspolini on Sketchfab
youtube
Here is what a new Aliens game in Unreal Engine 4 could have looked like published first on https://touchgen.tumblr.com/
0 notes
Text
Hyperallergic: An Uncanny, Carnivalesque Exhibition that Tricks and Tantalizes
One man (freak) show at Public Pool in Hamtramck, installation view (all photos by the author for Hyperallergic)
HAMTRAMCK, Mich. — Upon entering Jason J. Ferguson‘s solo exhibition, titled One-man (freak) show, the first thing you’ll encounter is the somewhat ramshackle, seafoam-colored entryway of Public Pool’s storefront gallery space and its much-abused off-white door, numbered 3309.
Jason Fersguson’s repeated entryway at Public Pool
This is also the second thing you’ll encounter, because just inside the original entryway, Ferguson has exactly replicated it, including the large, colorful mural on the left-hand wall and the constellation of dirty tape marks studding the door. If a sharp-eyed visitor looks, in a fit of confusion, for some kind of explanation, she might notice a laser-cut wooden plaque bearing a quote from Sigmund Freud, mounted on the lower-right-hand wall of both entryways. It reads:
That factor which consists in a recurrence of the same situations, things and events, will perhaps not appeal to everyone as a source of uncanny feeling. From what I have observed, this phenomenon does undoubtedly, subject to certain conditions and combined with certain circumstances awaken an uncanny feeling, which recalls that sense of helplessness sometimes experienced in dreams.
The quote is from Freud’s 1919 essay, “The Uncanny,” in which the psychiatrist expands upon ideas first identified by Ernst Jentsch in his 1906 essay, “On the Psychology of the Uncanny.” This is just one of several uncanny moments arranged by Ferguson in his show, which juxtaposes his original and oddly kinetic sculptural works with snippets of canonical literature on plaques.
“That entryway is just so strange already,” said Ferguson, in an interview with Hyperallergic at the gallery. “I just had to do it again. A lot of my work lately has been about replication, or duplicates, and the uncanny being experiencing something more than once.”
Ferguson’s strange optical illusion skull, paired with a Kafka quote
These duplicated moments extend beyond the double-entryway and immediately into the gallery, where a viewer is hailed by a grinning human skull. The endless repetition of a strange, looping strain of music, identified by Ferguson as a 10-second cut from Swedish electronica and folk music trio Detektivbyrån (“The Detective Agency”), imbues the gallery with a slightly whimsical, carnival feel. A second human skull — attached to a full skeleton that is an exact 3D-printed replica of Ferguson’s own — rotates slowly on a hanging circular platform. As you draw further into the gallery, a look back at the first skull might produce the jarring realization that what appeared to be a normally proportioned skull when viewed at the entryway, has warped into a dislocating optical illusion, inexplicably stretched and oversized when viewed head-on (Ferguson is likely familiar with and referencing the optical illusion in Hans Holbein the Younger’s famous painting, “The Ambassadors“). A quote from Franz Kafka’s The Metamorphosis punctuates this clever and disturbing transformation.
A dissected shoe, accompanied by a quote from Julia Kristeva
Ferguson’s works are technically accomplished and tidy in their execution. He meticulously calculates the average height of a viewer at the door of the gallery, calculating the angle to most effectively produce the shock of a bait-and-switch with his sculpture. His double entryway goes utterly unnoticed by some, and absolutely astounds others, including one gallery regular who backed her way out in confusion at the opening, and had to be chased down by one of the gallery staff. (“I swear, my intention wasn’t to confuse the elderly,” laughed Ferguson.)
The artist went to great lengths to access the medical scanners he needed to perform the skeletal scans that enabled the creation of his spinning avatar, driving to Chicago at a moment’s notice (and mysteriously getting a doctor’s note for his request). The effort and professional acumen that Ferguson brings to his works have the feel of Christmas morning: someone has worked extremely hard behind the scenes to create a sense of wonder, illusion, and excitement. In one corner, a neat pile of clothing is topped with an upside-down bowler hat rigged with an illusory tunnel of mirrored lights so compelling that a gallery visitor had to be discouraged from trying to pick it up.
Ferguson’s hat trick, and a Samuel Beckett quote
These plaques, and a number of other details of the installation, draw inspiration from carnival aesthetics, Ripley’s Believe It Or Not — an entertainment franchise with Depression-era roots that collected “oddities” and presented them in books, museums, and, eventually, on television — and the eponymously referenced circus sideshow. The front window features a large-format show poster in the style of the carnival broadside. On a little ledge, a tiny shark in an embalming tube is on display — Ferguson’s cheeky riff on Damien Hirst’s seminal work, “The Impossibility of Death in the Mind of Someone Living,” but equally a reference to the “cabinet of curiosity” style of old-school sideshow culture.
Ferguson’s thoughtful mix of high art and common culture makes for a playful and engaging exhibition — if one that, at times, can fall into the archetypical male tendency to mistake elements of one’s personal experience for universal truth. But this is easy enough to overlook in a show that has spared no effort in creating uncanny illusions for the purpose of the fantastic, rather than the indulgent.
One-man (freak) show by Jason J. Ferguson continues at Public Pool (3309 Caniff St, Hamtramck, Mich.) through October 21.
The post An Uncanny, Carnivalesque Exhibition that Tricks and Tantalizes appeared first on Hyperallergic.
from Hyperallergic http://ift.tt/2xNQsNv via IFTTT
0 notes