#with lemon cumin and chili powder served on the side
Explore tagged Tumblr posts
Visit Tumblr Blog
Explore Tumblr blogs with no restrictions, modern design and the best experience.
Last Seen Tumblr Blogs


Fun Fact
Tumblr’s reach among the 26-to-35-year-olds in the US is 11%.
Text
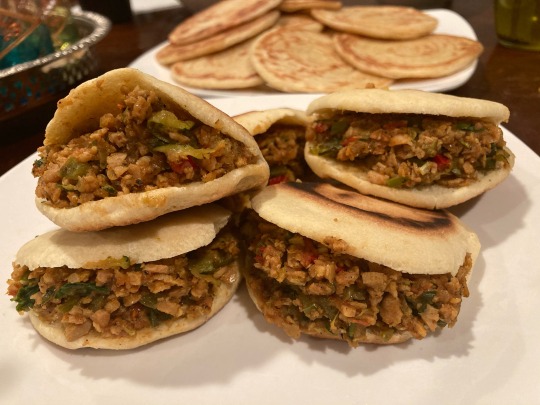
[ID: Small flatbreads stuffed with ground 'beef' and green olives; a plate of mlouwi and a Moroccan teaset are in the background. End ID]
بطبوط معمر بالكفتة / Batbout m'mr blkefta (Moroccan stuffed flatbreads with 'beef')
Batbout—also known as toghrift (تغريفت) or mkhamer (مخامر), based on the region—are Moroccan flatbreads which usually have an interior pocket. Large batbout are often served with grilled meats or to sop up juices from tajines, while smaller ones are stuffed with various fillings. Batbout are sometimes made thicker so that a pocket does not form, and then dipped in a honey-butter syrup like baghrir; some Moroccans reserve the term "mkhamer" for this preparation.
Batbout are eaten year-round, but are especially enjoyed during Ramadan as a side dish on the ftour (فطور; fast-breaking) table, where they are stuffed with ground beef, tuna, chicken, or cold cuts. You could also serve stuffed batbout as a main with a green salad or Moroccan cooked salad.
Recipe under the cut!
Patreon | Tip jar
Makes about 15 small flatbreads.
Ingredients:
For the flatbread:
1 cup (120g) bread flour
1 cup (165g) semolina flour
1/2 Tbsp active dry yeast
1 1/2 tsp kosher salt
1/2 tsp sugar
About 3/4 cups water
For the filling:
3/4 cup TVP (textured vegetable protein)
1/2 cup + 2 Tbsp water or vegetable stock
1 tsp soy sauce
1 tsp vegetarian beef stock from concentrate, or substitute more soy sauce
1 onion (yellow or red), minced or grated
3 cloves garlic, chopped
1 Tbsp tomato paste
1/2 small green bell pepper, minced
1/2 small red bell pepper, minced
Small bunch of green herbs (ربيع / rbi'): cilantro and/or parsley
2 tsp sweet paprika
1 tsp ground turmeric
1 tsp ground black pepper
1/2 tsp ground ginger
1/2 tsp ground cumin
Red chili powder or hot sauce, to taste
Squeeze of lemon juice (optional)
Olive oil, to fry
You may use your preferred ground beef substitute in place of the TVP; in this case, omit the water and stock concentrate.
Instructions:
For the flatbread:
1. Mix dry ingredients in a large bowl. Make a well in the flour and add in just enough water to make a smooth, slightly sticky dough. You may need more or less than 3/4 cup.
2. Once the dough comes together, knead it by hand for 10 minutes, or in a stand mixer with a hook attachment on medium-low for 7 minutes, until it is very smooth, soft, elastic, and tacky. Add additional water or flour as necessary.
3. Form the flatbreads. Larger flatbreads may be formed by breaking off a small handful of dough, rolling it in flour, and patting it flat until it forms a round about 1/4" thick. Small flatbreads are often made by rolling out the dough about 1/4" thick on a floured surface, then cutting circles of the desired size out with a cookie cutter or glass.
4. Set flatbreads aside in a single layer on a floured surface, cover, and allow to rest for one to two hours, until noticeably puffy.
5. Heat a large dry skillet on medium and add as many flatbreads as will fit. When they puff up slightly, flip each one to the other side. Continue to cook, turning over as necessary, until flatbreads have dark golden brown spots on each side. You may find that the flatbreads puffing up gives you room to add more to the skillet; continue in this way until all flatbreads are cooked.
Batbout breads may be kept at room temperature for a couple days at this stage, or frozen for use later.
For the filling:
1. Mix all ground spices in a small bowl. Hydrate TVP for about 10 minutes in hot water, stock concentrate, soy sauce, and a spoonful of the spice mixture.
2. Heat 3 Tbsp olive oil in a large pan on medium-high. Add TVP and spread it out in a single layer. Allow it to brown without agitating for a few minutes before stirring it, scraping the bottom of the pan. Repeat this process a few times, adding more oil as necessary, until the TVP is deeply golden brown on all sides. Remove TVP from the pan.
3. Heat another 2 Tbsp of olive oil and fry onion for a couple minutes until softening. Add bell peppers and spices and fry for another couple minutes until spices are fragrant.
4. Add tomato paste and stir to combine. Add olives and herbs and mix. Return TVP to pan and mix to combine. Remove from heat. Add hot sauce and lemon juice, as desired.
To serve:
1. Cut a slit in the side of each flatbread with a small, sharp knife. Stuff with hot filling and set aside. Serve warm.
98 notes
·
View notes
Text

Nutrient-dense meal prep recipes that are both healthy and delicious -
1. Quinoa and Roasted Vegetable Bowls:
- Cook quinoa according to package instructions.
- Roast a variety of vegetables (such as bell peppers, zucchini, and broccoli) with olive oil, salt, and pepper in the oven until tender.
- Assemble bowls with quinoa, roasted vegetables, and a protein of your choice (such as grilled chicken or tofu).
- Drizzle with a homemade vinaigrette made with olive oil, lemon juice, and herbs.
2. Turkey and Sweet Potato Chili:
- Brown ground turkey in a large pot with diced onions and garlic.
- Add in diced sweet potatoes, canned tomatoes, black beans, and spices (such as chili powder, cumin, and paprika).
- Let simmer until sweet potatoes are tender and flavors have melded together.
- Divide into individual containers for easy grab-and-go lunches or dinners.
3. Salmon and Asparagus Foil Packets:
- Preheat oven to 400°F.
- Place a piece of salmon fillet on a large piece of aluminum foil.
- Add trimmed asparagus spears, cherry tomatoes, and sliced lemon on top of the salmon.
- Drizzle with olive oil, salt, pepper, and herbs (such as dill or parsley).
- Seal the foil packet and bake in the oven for 15-20 minutes, or until salmon is cooked through.
- Serve with a side of quinoa or brown rice.
4. Chickpea and Vegetable Stir-Fry:
- Sauté diced bell peppers, broccoli, and carrots in a large skillet with olive oil.
- Add in cooked chickpeas and a sauce made from soy sauce, garlic, ginger, and a touch of honey.
- Cook until vegetables are tender and sauce has thickened.
- Serve over brown rice or quinoa for a satisfying and nutrient-dense meal.
These recipes are all packed with nutrients and can be easily prepped ahead of time for quick and healthy meals throughout the week. Enjoy!
#food for thought#food fight#comfort food#fast food#food photography#healthy food#foodie#food#foodpics#foodlover#japanese food#foodmyheart#tw food#lunch recipes#pasta recipes#pasta recipe#salad recipes#soup recipe#recipe#reciprocity#recipies#recipes#healthy salad recipes#cozy fall#cozyhome#cozy cozy#cozy living#autumn cozy#cozy cottage#cozy art
12 notes
·
View notes
Text
The Ultimate Guide to Healthy Fish Recipes
Fish is a versatile and nutritious ingredient that can be prepared in countless ways to suit any palate. Whether you're looking to incorporate more seafood into your diet for its health benefits or searching for the best fish recipes to impress your family and friends, this guide has you covered. We'll explore a variety of healthy fish recipes that are easy to prepare, delicious, and packed with nutrients.
Introduction
Fish is an excellent source of high-quality protein, omega-3 fatty acids, vitamins, and minerals. Incorporating fish into your diet can help reduce the risk of heart disease, support brain health, and provide essential nutrients that many other proteins lack. In this guide, we'll dive into some of the best fish recipes that are not only healthy but also incredibly tasty.
Table of Contents
Health Benefits of Eating Fish
Tips for Selecting Fresh Fish
Easy and Healthy Fish Recipes
Baked Salmon with Lemon and Herbs
Grilled Tilapia Tacos
Miso-Glazed Cod
Best Fish Recipes for Special Occasions
Herb-Crusted Halibut
Pan-Seared Sea Bass with Garlic Butter
Quick Fish Recipes for Busy Weeknights
Fish Stir-Fry with Vegetables
Crispy Fish Sandwiches
Conclusion
1. Health Benefits of Eating Fish
Fish is a powerhouse of nutrition. It is rich in omega-3 fatty acids, which are crucial for maintaining heart health, reducing inflammation, and supporting brain function. Regular consumption of fish has been linked to a lower risk of chronic diseases such as heart disease, stroke, and depression. Fish is also a great source of vitamin D, which is important for bone health, and selenium, an antioxidant that protects cells from damage.
2. Tips for Selecting Fresh Fish
When choosing fish, freshness is key to ensuring the best flavor and nutritional value. Here are some tips to help you select the freshest fish:
Look for Clear Eyes: Fresh fish should have clear, bulging eyes. Cloudy or sunken eyes are a sign of old fish.
Check the Gills: The gills should be bright red or pink, not brown or gray.
Smell the Fish: Fresh fish should have a mild, ocean-like smell. Avoid fish with a strong, fishy odor.
Feel the Flesh: The flesh should be firm and bounce back when pressed. It should not feel mushy or slimy.
3. Easy and Healthy Fish Recipes
Baked Salmon with Lemon and Herbs
Ingredients:
4 salmon fillets
2 tablespoons olive oil
1 lemon, sliced
2 cloves garlic, minced
Fresh herbs (such as dill, parsley, or thyme)
Salt and pepper to taste
Instructions:
Preheat the oven to 400°F (200°C).
Place the salmon fillets on a baking sheet lined with parchment paper.
Drizzle olive oil over the fillets and season with salt and pepper.
Top each fillet with lemon slices, garlic, and fresh herbs.
Bake for 12-15 minutes, or until the salmon is cooked through and flakes easily with a fork.
Grilled Tilapia Tacos
Ingredients:
4 tilapia fillets
1 tablespoon olive oil
1 teaspoon chili powder
1 teaspoon cumin
1/2 teaspoon paprika
Salt and pepper to taste
Corn tortillas
Fresh cilantro, chopped
Lime wedges
Salsa and avocado for serving
Instructions:
Preheat the grill to medium-high heat.
Brush the tilapia fillets with olive oil and season with chili powder, cumin, paprika, salt, and pepper.
Grill the fillets for 3-4 minutes on each side, until cooked through.
Warm the corn tortillas on the grill for about 30 seconds on each side.
Serve the grilled tilapia in the tortillas, topped with fresh cilantro, lime wedges, salsa, and avocado slices.
Miso-Glazed Cod
Ingredients:
4 cod fillets
2 tablespoons white miso paste
1 tablespoon soy sauce
1 tablespoon mirin
1 tablespoon rice vinegar
1 tablespoon honey
1 teaspoon sesame oil
Instructions:
Preheat the oven to 375°F (190°C).
In a small bowl, whisk together miso paste, soy sauce, mirin, rice vinegar, honey, and sesame oil.
Place the cod fillets on a baking sheet and brush generously with the miso glaze.
Bake for 15-20 minutes, until the fish is cooked through and the glaze is caramelized.
4. Best Fish Recipes for Special Occasions
Herb-Crusted Halibut
Ingredients:
4 halibut fillets
1 cup panko breadcrumbs
1/4 cup grated Parmesan cheese
Fresh herbs (such as basil, parsley, and chives), chopped
2 tablespoons olive oil
Salt and pepper to taste
Instructions:
Preheat the oven to 425°F (220°C).
In a bowl, mix together panko breadcrumbs, Parmesan cheese, chopped herbs, olive oil, salt, and pepper.
Press the breadcrumb mixture onto the top of each halibut fillet.
Place the fillets on a baking sheet and bake for 12-15 minutes, until the fish is cooked through and the crust is golden brown.
Pan-Seared Sea Bass with Garlic Butter
Ingredients:
4 sea bass fillets
2 tablespoons olive oil
4 cloves garlic, minced
1/4 cup unsalted butter
Fresh parsley, chopped
Lemon wedges for serving
Salt and pepper to taste
Instructions:
Heat olive oil in a large skillet over medium-high heat.
Season the sea bass fillets with salt and pepper.
Add the fillets to the skillet and cook for 3-4 minutes on each side, until golden brown and cooked through.
In a small saucepan, melt the butter and add minced garlic. Cook for 1-2 minutes until fragrant.
Pour the garlic butter over the seared sea bass and sprinkle with fresh parsley. Serve with lemon wedges.
5. Quick Fish Recipes for Busy Weeknights
Fish Stir-Fry with Vegetables
Ingredients:
4 white fish fillets (such as cod or haddock), cut into bite-sized pieces
2 tablespoons vegetable oil
1 bell pepper, sliced
1 zucchini, sliced
1 carrot, julienned
2 cloves garlic, minced
1 tablespoon soy sauce
1 tablespoon oyster sauce
1 teaspoon cornstarch mixed with 2 tablespoons water
Cooked rice for serving
Instructions:
Heat vegetable oil in a large wok or skillet over high heat.
Add the fish pieces and cook for 2-3 minutes, until they begin to turn opaque. Remove from the wok and set aside.
Add bell pepper, zucchini, carrot, and garlic to the wok. Stir-fry for 3-4 minutes until the vegetables are tender-crisp.
Return the fish to the wok and add soy sauce, oyster sauce, and the cornstarch mixture. Stir well to combine and cook for an additional 2-3 minutes, until the sauce thickens and the fish is fully cooked.
Serve the stir-fry over cooked rice.
Crispy Fish Sandwiches
Ingredients:
4 white fish fillets (such as tilapia or cod)
1 cup all-purpose flour
2 eggs, beaten
1 cup panko breadcrumbs
1/4 cup mayonnaise
1 tablespoon lemon juice
1 teaspoon Dijon mustard
Lettuce leaves
Tomato slices
Whole wheat buns
Salt and pepper to taste
Vegetable oil for frying
Instructions:
Season the fish fillets with salt and pepper.
Dredge each fillet in flour, dip in beaten eggs, and coat with panko breadcrumbs.
Heat vegetable oil in a large skillet over medium-high heat. Fry the fillets for 3-4 minutes on each side, until golden brown and crispy.
In a small bowl, mix together mayonnaise, lemon juice, and Dijon mustard.
Assemble the sandwiches with lettuce, tomato slices, crispy fish fillets, and a dollop of the mayonnaise mixture on whole wheat buns.
6. Conclusion
Incorporating fish into your diet doesn't have to be complicated or time-consuming. With these healthy and best fish recipes, you can enjoy delicious and nutritious meals that are easy to prepare and perfect for any occasion. From simple weeknight dinners to impressive dishes for special occasions, these recipes will help you make the most of the health benefits and culinary versatility that fish offers.
By following these recipes and tips, you can enjoy a variety of flavorful fish dishes that will delight your taste buds and support your overall health. So, head to your local fish market, pick up some fresh fish, and start cooking! Keeping Fish Andhra in mind and its initiative.
3 notes
·
View notes
Text
now listen to me closely. i am speaking directly in your ear. go buy an entire 6 pack of chicken thighs and then trim & chop them up into bite sized pieces and then marinate them in AT MINIMUM greek yogurt lemon juice turmeric powder cayenne garam masala cumin coriander ginger garlic and if you so desire some chilis as well (i diced a couple thai chilis up very finely and added them in) and then after marinating for at least an hour or so saute finely diced onion in a generous amount of butter and then add more garlic and ginger and more of previously mentioned spices and also peppers or chilis if you want and then add crushed tomato and heavy cream and chickpeas and chopped cauliflower and then sear the chicken on the side before adding to the pot and then let simmer until chicken & cauliflower are both finished cooking through. and then serve over rice. got that?
3 notes
·
View notes
Text
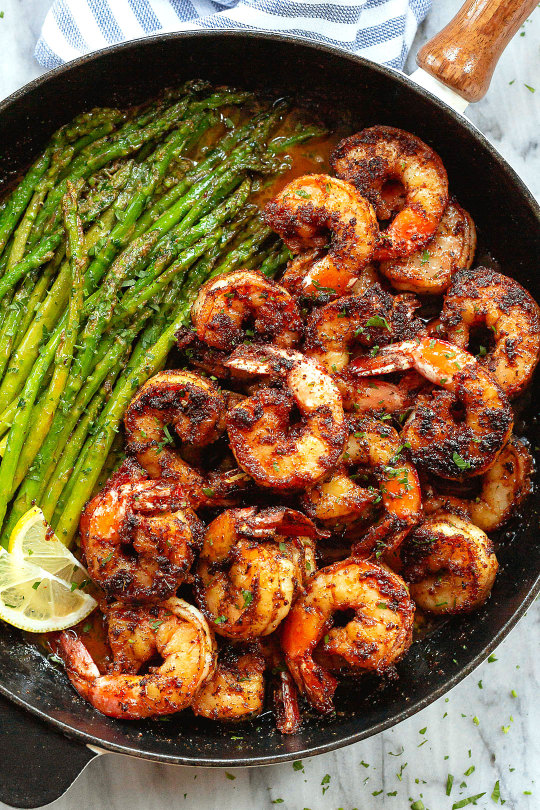
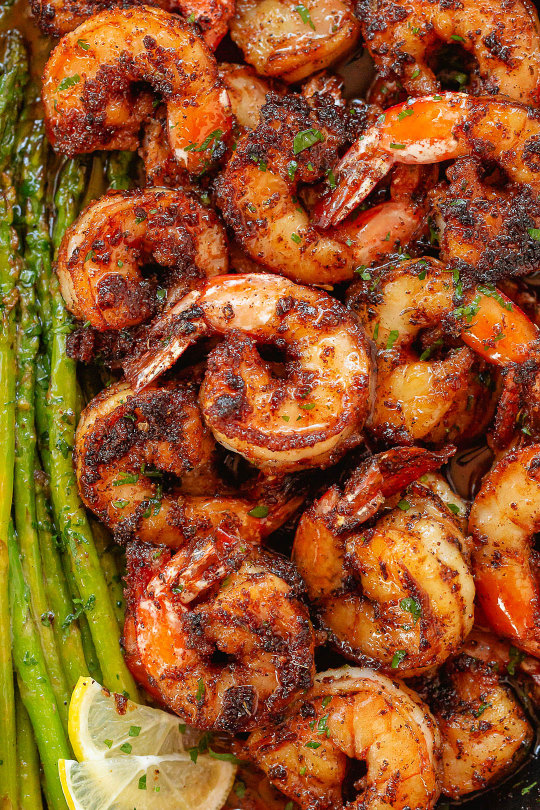
BLACKENED SHRIMP
Ingredients:
1 lb (450g) large shrimp, peeled and deveined
1 teaspoon chili powder
2 teaspoons paprika
1 teaspoon onion powder
1 teaspoon cumin
1/2 teaspoon garlic powder
1 teaspoon salt
1/4 teaspoon freshly cracked black pepper
2 tablespoons olive oil, divided
1 tablespoon olive oil or unsalted butter
1 1/2 pound (700g) asparagus (1 or 2 bunches) rinsed and trimmed
1/4 cup (60ml) vegetable stock
1 tablespoon hot sauce, optional (we used Sriracha)
1 tablespoon lemon juice
Lemon slices, red chili pepper flakes, fresh chopped parsley, for garnish
Directions:
1. To make the blackened shrimp and asparagus skillet: In a large bowl, add the shrimp, chili powder, paprika, onion powder, cumin, garlic powder, salt, and pepper. Coat well and set aside.
2. In a medium-sized skillet over medium-high heat, add one tablespoon of oil and cook seasoned shrimp on each side for 2-3 minutes or until browned and cooked through. Remove to a shallow plate and set aside.
3. In the same skillet (clean up if necessary, to remove brown bits), add 1 tablespoon olive oil and 1 tablespoon butter and reduce heat to medium. Add vegetable stock, lemon juice, and sriracha, and bring to a simmer. Allow the sauce to reduce a little, then add the asparagus and cook the asparagus until crisp-tender, approx. 4-6 minutes, turning the asparagus regularly to coat into the sauce.
4. Push the asparagus on the side and add blackened shrimp to the pan. Squeeze a dash of lemon juice on the blackened shrimp and asparagus. Allow reheating for 1-2 minutes, remove grilled shrimp and asparagus from heat, garnish with parsley, lemon slices, and red crushed chili pepper if you like. Serve your blackened shrimp and asparagus immediately, enjoy! You can serve the blackened shrimp and asparagus with a side of zucchini noodles, cauliflower rice, mashed potato, or just plain regular rice. ❤️
2 notes
·
View notes
Text
Homemade Kabobs & Garlicky Sauce
If you love middle eastern food but don't have a grill, give these kabobs a try! They can easily be made in a pan at home, but they would be even better on the grill (charcoal is best)
You can eat them as is, in your favorite pita/wrap, with some rice.
Here is how to make them:
We’ll start with the meat mixture. You can use just ground beef, but I prefer a mix of ground beef and ground lamb. To a bowl, add 1lb of 80/20 ground beef and 1/2 lb of ground lamb.
Season the meat with a couple generous pinches of salt and fresh cracked pepper, 1 tbsp paprika, 2 tsp aleppo pepper or chili flakes, 1/2 tsp turmeric, 1 tsp coriander powder, 1/2 tsp cumin, 1/4 tsp cinnamon.
To the seasonings and meat, add 4-6 finely minced garlic cloves, 1 finely diced red pepper (small is key!!), 1 large handful chopped fresh parsley (about 1/2 cup), 1 small handful fresh mint (about 1/4 cup), 1/3 cup crushed toasted walnuts, and optional, 1 small Serrano or jalapeno pepper finely diced.
Give it a really good mix, and ideally, you let this sit for 1-2 hours to soak up the flavors.
When you are ready to make these, dip your fingers in a bit of water to make it easier, then use your fingers/hands to roll them into logs, into patties, or whatever shape you prefer. You can grill these or if you don't have one, pan fry them on medium-high heat till they develop a nice crust on all sides. Time depends on how thick/thin you make them, but they're ready in about 6-8 minutes.
I plated these up and dusted them with more sumac, fresh parsley, and served it with a garlicky dip.
To make the sauce, I mixed 2 tbsp mayo, 4 tbsp sour cream, 3 minced garlic cloves, 1/2 tbsp sumac, 1 tbsp fresh parsley, the juice of half a lemon, and a couple generous pinches of salt and pepper. Mix together, give it a taste, and adjust. You can also sub the mayo and sour cream for yogurt if you want to keep it lower calorie.
ENJOY!
#delicioso#so yummy#good eats#healthy food#healthy eating#how to eat healthy#healthy food recipes#food#recetas caseras#recetas#Homemade Kabobs & Garlicky Sauce#Kabobs & Garlicky Sauce#delicious#homemade recipe#homemade food#middle eastern food#recipes#simplemente delicioso#recetas saludables#this is so good#good nutrition#good recipes
3 notes
·
View notes
Note
Can I ask how you made the chicken tacos please
Also I hope you had a good dinner
marinated boneless skinless chicken thighs in lemon juice (i bought a lime today but it just disappeared from my groceries??), cayenne, cumin, chili powder, brown sugar, garlic powder, s&p, (all eyeballed, i'm afraid) a dash of soy sauce (could do without), plus minced garlic and 2 serranos. just for about... a half hour? i think? while i did some other prep. fried the thighs in butter to get some browning, seasoned with more cumin, chili powder, and s&p, then added the marinade with some corn starch whisked in to the pan. cook on low as long as you want, adding more water if your sauce is too thick. i added a bunch more cayenne at the end because it wasn't spicy enough but ymmv. serve on corn tortillas (i did mine wrapped in foil with butter in the toaster oven to save washing a pan lol) topped with cheese, salsa, green onion, and cilantro, or whatever you desire!
if you were wondering, plantains are peeled and sliced diagonally, then just fried in oil about 7 minutes to a side, lightly dusted with salt beforehand.
2 notes
·
View notes
Text
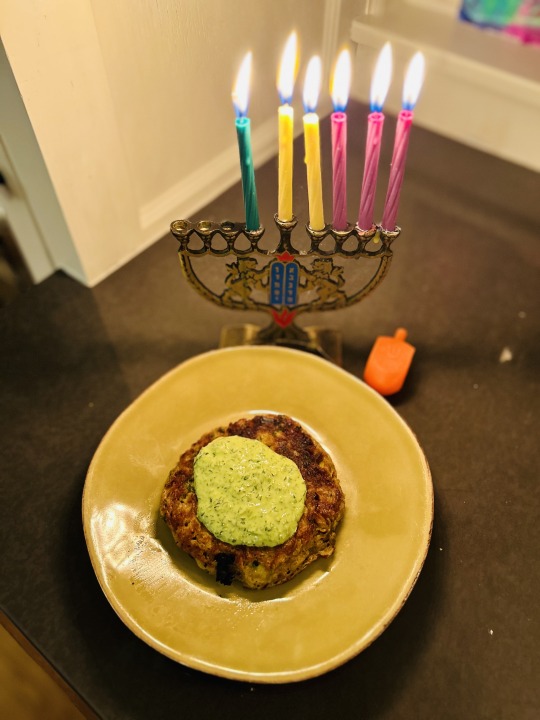
Beyond Latkes: Sephardic Hanukkah Recipes and Traditions 🕎
Hanukkah is here and if you are already tired from Latkes dipped in sour cream, here are some traditional alternatives from the Sephardic kitchen.
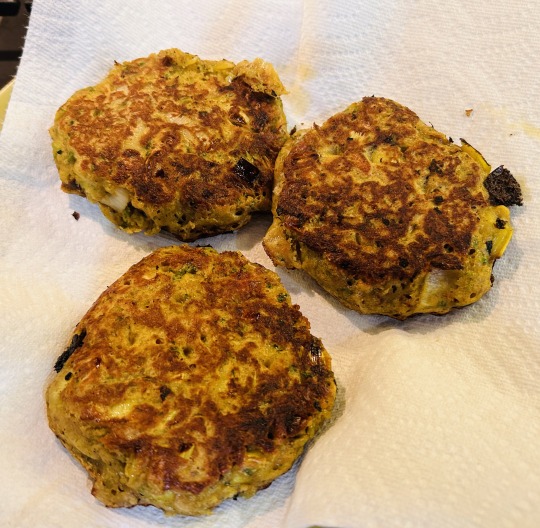
For a healthier version of Latkes, try Keftes de Prasa- leek patties- popular among Sephardim in the Balkan communities, such as Bulgaria and Turkey. Here the dominant flavor is leek, which is paired with herbs and sometime feta cheese. The use of leek is ubiquitous in the Sephardic repertoire from ancient times. In fact, according to Jewish folklore, being caught cooking leek or smelling of it during the Spanish Inquisition, immediately revealed one’s Jewish identity and led to a sentence of death by torture. Despite this dark chapter, Sephardim remained loyal to their favorite allium for its tender flavor, abundance and low cost. Leeks are the main ingredient in many Sephardic holiday dishes, and here is the Hanukkah one.
Leek Fritters (adapted from Yotam Ottolenghi’s Plenty)
For the sauce (optional but recommended)
-½ cup greek yogurt (I increased to almost 1 cup)
-½ cup sour cream (I reduced to 2 tbsp)
-2 garlic cloves
-2 tbsp lemon (I used 3 tbsp)
-3 tbsp olive oil
-½ cup parsley leaves
-2 cups cilantro leaves
-Blend all the ingredients together in the food processor until they turn green.

For the fritters
-3 leeks cleaned; white and light green parts sliced into 1 inch slices
-5 shallots finely chopped
-⅔ cup olive oil (you may use less depending on need)
-1 fresh red chili pepper, seeded and finely chopped
-½ cup parsley - leaves and thin stalks finely chopped
-¾ tsp ground coriander
-1 tsp ground cumin
-¼ tsp ground turmeric
-¼ tsp ground cinnamon
-1 tsp sugar
-½ tsp salt
-1 egg white
-¾ cup +1 tbsp self-rising flour
- 1 tbsp baking powder
-1 egg
-⅔ cup milk
-4 tbsp melted butter
-Sauté the leeks and the shallots for 15 minutes or until soft on medium heat.
-Transfer into a large bowl and add the pepper, all the spices, sugar and salt. Mix well and allow to cool.
-Whisk the egg white until foamy and add into the veggie mixture.
-In another bowl mix together the flour, baking powder (I recommend sifting dry ingredients to avoid bulks), whole egg, milk and butter to form a batter. Gently pour the batter into the veggie - egg white mixture.
-Put 2 tbsp of oil in a frying pan over medium heat. Spoon half of the mixture into the pan and form 4 large patties. Fry each side for 2-3 minutes or until golden and crisp. Transfer to a platter with paper towels to absorb the oil. Repeat the process to create 8 patties total.
-Serve warm with a spoonful of the green yogurt sauce on top.
On the sweeter side of things, the Israeli national obsession with Sufganiyot (traditionally jelly and nowadays extremely sinful) is definitely rooted in the diaspora. Almost each Sephardic and Mizrachi community makes its own variation of a sugary fritter using the spices common in their country of origin. In India, for example, Jews celebrate Hanukkah with Gulab Jamun- also a popular street food- that is yogurt based and often flavored with cardamom and rose water.

In Greece, Turkey and the Balkans, Jews made Bimuelos often scented with orange blossom, dipped in honey syrup and fried in olive oil. The Iraqi-Syrian’s Zengoula is closer in texture and shape to an American funnel cake.

Last but certainly not least- is the Sfenj- the ultimate North African competitor to the Ashkenazi Sufganiyot. Similar to its French cousin the beignet, Sfenj is simply pastry dough randomly shaped and coated with powdered sugar. It’s extra delicious when eaten fresh off the frying pan.

Ditch the Deep Fryer for Ricotta Pancakes
If frying is not your thing, rest assured that Hanukkah is also celebrated with dairy. Apparently, the miracle of the everlasting oil in the temple and the bravery of the Maccabees is not the only Hanukkah story. In fact, many Sephardic communities honor the heroic act of Judith - Yehudit. According to the Book of Yehudit and Talmudic tales, Judith lured into her home the Syrian Greek General Holofernes, who was attempting to besiege the city of Bethulia. She offered him salty cheese and wine. Once sedated, she killed him and displayed his corpse at the city gates. Seeing what had been done to their commander- terrified the soldiers, and they fled immediately. The liberation of Bethulia raised morale among the tired Maccabee fighters, and helped bring victory one step closer.

'Judith and Holofernes,' 1605, by Jan de Bray.
The crucial role of cheese in the story of Judith gave reason for certain cultures to celebrate Hanukkah with a variety of dairy dishes. A particularly decadent one is the Ataiyef- the Syrian answer to mundane breakfast pancakes. These are stuffed with ricotta cheese, dipped in rose water syrup, sprinkled with pistachio pieces and deep fried, in honor of Hanukkah of course.
A similar and more attainable recipe is the Roman-Jewish Cassola. This simple gluten-free sweet ricotta pancake is perfect for a weekend breakfast on Hanukkah and throughout the year.
Cassola (adapted from Claudia’s Roden Book of Jewish Food)
-1 lb (500 g) ricotta
-1 cup sugar (recipe calls for 200 gram I reduced to 170, and it was still a little too sweet)
-5 eggs
-2 tbsp oil (I subbed for 1 tbsp butter)
-Grated rind of 1 lemon (optional but adds significantly)
-Blend the ricotta and sugar with the eggs in a food processor.
-Heat oil/ butter in a large ovenproof pan.
-Pour mixture into the pan and cook on medium-low flame until the bottom has set firmly.
-Put under the broiler and let it brown for a couple of minutes.
I served it with cherries and berries and a spoonful of homemade granola. No syrup needed!


A Women’s Fest
The story of Judith inspired several Jewish communities to add other customs in addition to the dairy feast. In North Africa, the sixth (and sometimes seventh) night of Hanukkah was known as Chag Ha’Banot - (Eid Al Bana', in Judeo-Arabic), or The Festival of Daughters. During this night, women went to synagogue to pray for the health of elderly women in their community, and to ask for a good match for their single daughters. They lit the Menorah recalling remarkable Jewish heroines, such as Judith and many others. The praying sometimes turned into a lively party featuring singing, dancing and drinking wine.

The feast usually included dairy foods, followed by several desserts, such as sweet couscous with chopped nuts and dried fruit.
This ritual is representative of the endless number of mini traditions existing in the Sephardic-Mizrachi world around Hanukkah. To that point, I am sharing one last non-food tradition- the extra candle. Ladino speaking communities and in Aleppo, Syria, had the custom to light an extra candle each night of the holiday in honor of their ancestors, who were exiled during the Spanish expulsion of 1492. A popular song that accompanied the candle lighting was Ocho Kandelikas (8 little lights in Ladino). Enjoy listening!
youtube
#sephardic
#Hanukkah
2 notes
·
View notes
Text
Rohit Sharma's Favorite Food Recipe

When you think of Rohit Sharma, the “Hitman” of Indian cricket, images of towering sixes and elegant cover drives come to mind. But beyond the cricket pitch, this Mumbai-born maestro has a softer side that finds solace in simple, soulful food. Among his favorites, one dish is his ultimate comfort food: Dal Chawal.
This is an Indian recipe that is generally found in India, just like you found the Kosher For Pesach Sushi Recipe in Israel.
In interviews, Rohit has often expressed his love for this quintessential Indian meal, a dish that connects him to his roots, his family, and India's vibrant culinary culture.
With his South Indian heritage through his mother from Visakhapatnam, Rohit also enjoys variations like Rasam Rice. Still, Dal Chawal remains his go-to, a dish he claims he can eat “anywhere, anytime.”
Why Dal Chawal?
Dal Chawal, a combination of lentils (dal) and rice (chawal), is more than just a meal in India—it’s an emotion. For Rohit, it’s a nostalgic reminder of home, a dish that soothes the soul after a grueling day on the field.
As a cricketer who balances intense training with a demanding schedule, Rohit’s diet is meticulously planned, rich in proteins, carbs, and healthy fats.
Yet, Dal Chawal is his cheat-day indulgence, a dish that doesn’t compromise on nutrition but delivers unparalleled comfort.
Its simplicity, versatility, and universal availability make it a perfect fit for a globetrotting athlete like Rohit, who finds Indian restaurants worldwide serving this beloved staple.
This recipe is crafted to reflect Rohit’s personality: straightforward yet impactful, with a touch of flair.
Drawing from his Maharashtrian and South Indian roots, we’ve created a Dal Chawal recipe that’s hearty, flavorful, and easy to prepare, with a few unique additions to make it stand out, just like Rohit’s batting.
Ingredients (Serves 4)
For the Dal:
1 cup toor dal (split pigeon peas), rinsed and soaked for 30 minutes
1 medium onion, finely chopped
2 medium tomatoes, finely chopped
2 green chilies, slit
1-inch piece of ginger, grated
3 garlic cloves, minced
1 tsp turmeric powder
1 tsp cumin seeds
1 tsp mustard seeds
1/2 tsp asafoetida (hing)
1 tsp red chili powder (adjust to taste)
1 tsp garam masala
2 tbsp ghee (clarified butter)
1 handful fresh coriander leaves, chopped
1 small lemon, juiced
Salt to taste
3 cups water
For the Chawal (Rice):
1 cup basmati rice, rinsed and soaked for 20 minutes
2 cups water
1 tbsp ghee
1 bay leaf
2 cloves
1 cinnamon stick (1-inch)
1/2 tsp cumin seeds
Salt to taste
For the Special Twist: Roasted Papad Crumble
2 urad dal papads
1 tsp ghee
1/2 tsp chaat masala
Preparation Steps
Step 1: Cooking the Dal
Pressure Cook the Dal: Drain the soaked toor dal and add it to a pressure cooker with 3 cups of water, 1/2 tsp turmeric, and a pinch of salt. Cook for 3–4 whistles until the dal is soft and mushy. Set aside.
Temper the Spices: In a large pan, heat 2 tbsp ghee over medium heat. Add mustard seeds and let them splutter. Add cumin seeds and asafoetida, followed by grated ginger and minced garlic. Sauté for 30 seconds until aromatic.
Add Vegetables: Stir in the chopped onions and cook until golden brown (about 5 minutes). Add the tomatoes, green chilies, red chili powder, and remaining turmeric. Cook until the tomatoes soften and the mixture forms a thick masala base (about 7 minutes).
Combine Dal: Mash the cooked dal lightly and add it to the pan. Stir well, adding water to achieve your desired consistency. Simmer for 10 minutes, stirring occasionally. Add garam masala, lemon juice, and salt to taste. Garnish with fresh coriander leaves.
Step 2: Preparing the Chawal
Season the Rice: In a medium pot, heat 1 tbsp ghee. Add bay leaf, cloves, cinnamon stick, and cumin seeds. Sauté for 30 seconds until fragrant.
Cook the Rice: Drain the soaked basmati rice and add it to the pot. Stir gently to coat the rice with the spiced ghee. Add 2 cups of water and a pinch of salt. Bring to a boil, then reduce to low heat, cover, and cook for 12–15 minutes until the rice is fluffy and the water is absorbed. Fluff with a fork.
Step 3: The Special Twist—Roasted Papad Crumble
Roast the Papad: Heat a tawa or skillet and roast the urad dal papads until crisp (about 30 seconds per side). Alternatively, microwave them for 20–30 seconds.
Crumble and Season: Crush the roasted papads into small pieces. In a small pan, heat 1 tsp ghee, toss in the papad crumbles, and sprinkle with chaat masala. Stir for 10 seconds and set aside.
Step 4: Serving the Dish
Serve a generous portion of steaming basmati rice on a plate, topped with a ladleful of creamy dal. Sprinkle the roasted papad crumble over the dal for a crunchy, tangy kick that elevates the dish to a new level. Pair with a side of pickle or a simple cucumber salad for a complete meal.
Why This Recipe Resonates with Rohit
This Dal Chawal recipe is designed with Rohit Sharma’s preferences in mind. The dal is rich and flavorful, reflecting his love for hearty, comforting flavors, while the aromatic rice nods to his South Indian roots with its subtle spices.
The papad crumble adds a playful, modern twist, much like Rohit’s innovative batting style. As a cricketer who balances discipline with indulgence, this dish mirrors his ability to stay grounded while adding flair.
Nutritional Benefits
Dal Chawal is a nutritional powerhouse, perfect for an athlete like Rohit. Toor dal provides protein for muscle repair, while basmati rice offers carbohydrates for sustained energy.
Ghee adds healthy fats, and the spices—turmeric, cumin, and ginger—bring anti-inflammatory benefits. The papad crumble, while indulgent, adds a delightful texture without overloading calories.
A Taste of Home
For Rohit Sharma, Dal Chawal isn’t just food; it’s a connection to his childhood, his family, and the streets of Mumbai. Whether he’s in London, Dubai, or Mumbai, this dish brings him comfort and joy.
This recipe, with its unique papad crumble, is a tribute to Rohit’s love for simple yet flavorful food, offering fans a chance to savor the dish that fuels their favorite cricketer.
So, the next time you watch Rohit hit a six, whip up this Dal Chawal and celebrate the Hitman’s legacy, one bite at a time.
0 notes
Text

Enjoy the crispy, spiced goodness of vegan onion bhajis paired with cool and refreshing cucumber mint raita. This dish is perfect as an appetizer or snack for any occasion.
Ingredients: 2 large onions, thinly sliced. 1 cup chickpea flour. 1/4 cup rice flour. 1 teaspoon ground cumin. 1 teaspoon ground coriander. 1/2 teaspoon turmeric powder. 1/2 teaspoon chili powder. 1/2 teaspoon baking powder. 1/2 teaspoon salt. 1/4 cup water. Oil for frying. 1 cucumber, grated. 1 cup dairy-free yogurt. 2 tablespoons chopped fresh mint. 1 tablespoon lemon juice. Salt to taste.
Instructions: In a large bowl, mix together chickpea flour, rice flour, ground cumin, ground coriander, turmeric powder, chili powder, baking powder, and salt. Add water gradually to form a thick batter. Add thinly sliced onions to the batter and mix well to coat them evenly. Heat oil in a deep frying pan over medium-high heat. Drop spoonfuls of the onion batter into the hot oil and fry until golden brown and crispy, about 3-4 minutes per batch. Remove bhajis from oil and drain on paper towels to remove excess oil. In another bowl, mix together grated cucumber, dairy-free yogurt, chopped mint, lemon juice, and salt to make the raita. Serve the onion bhajis hot with cucumber mint raita on the side.
Prep Time: 15 minutes
Cook Time: 20 minutes
Eva gonzalez
0 notes
Text

Nutrient-dense meal prep recipes -
1. Chicken and Veggie Stir-Fry: Cook chicken breast strips with a variety of colorful vegetables (bell peppers, broccoli, snap peas, carrots) in a stir-fry sauce made with low-sodium soy sauce, garlic, ginger, and a touch of honey. Serve over brown rice or cauliflower rice.
2. Turkey and Sweet Potato Chili: Brown ground turkey with diced onions, bell peppers, and garlic. Add in diced sweet potatoes, canned diced tomatoes, black beans, and spices like chili powder, cumin, and paprika. Let simmer until sweet potatoes are soft and flavors have melded together.
3. Lentil and Vegetable Curry: Cook lentils with diced tomatoes, coconut milk, and curry powder. Add in a mix of vegetables like cauliflower, carrots, and spinach for a hearty and flavorful curry dish. Serve over quinoa or whole grain rice.
4. Greek Chicken Bowl: Marinate chicken breast in lemon juice, olive oil, garlic, and oregano. Grill or bake until cooked through. Serve with a side of Greek salad (cucumbers, tomatoes, red onions, feta cheese, olives) and a dollop of tzatziki sauce.
5. Tofu and Veggie Stir-Fry with Peanut Sauce: Marinate tofu cubes in a mixture of soy sauce, ginger, and garlic. Stir-fry with a mix of colorful vegetables like bell peppers, snap peas, and broccoli. Drizzle with a homemade peanut sauce made with peanut butter, soy sauce, honey, and sriracha.
6. Black Bean and Quinoa Stuffed Bell Peppers: Cook quinoa and black beans separately. Mix together with diced tomatoes, corn, and spices like cumin and chili powder. Stuff into bell peppers and bake until peppers are soft. Serve with a side of avocado slices and salsa.
#healthy food#comfort food#fast food#food log#low fodmap#food photography#food diary#foodie#food#foodpics#foodlover#japanese food#foodmyheart#tw food#lunch recipes#pasta recipes#pasta recipe#salad recipes#soup recipe#recipe#reciprocity#recipies#recipes#healthy salad recipes#autumn cozy#cozyhome#cozy fall#cozy cozy#cozy living#cozy art
5 notes
·
View notes
Text
How to Make Street-Style Pav Bhaji at Home with the Best Pav Bhaji Masala

If you love Indian street food, pav bhaji is surely one of your all-time favorites. This spicy, buttery, and flavorful dish made from mashed vegetables served with toasted pav (bread rolls) is a crowd-pleaser. But what if you could recreate that same street-style taste at home? The secret lies in using the best pav bhaji masala and following a few tried-and-tested cooking techniques. In this blog, we’ll walk you through everything you need to know to make authentic Mumbai-style pav bhaji at home using high-quality masala
What is Pav Bhaji?.
Pav bhaji is a popular Indian street food dish that originated in Mumbai. It consists of a thick vegetable curry (bhaji) served with soft buttered bread rolls (pav). Traditionally, the bhaji is made by mashing boiled vegetables like potatoes, peas, cauliflower, and capsicum, cooked with onions, tomatoes, and a special spice blend known as pav bhaji masala. The final dish is garnished with fresh coriander, chopped onions, lemon wedges, and a generous dollop of butter.
Why Pav Bhaji Masala Matters
The essence of authentic pav bhaji lies in the masala. A high-quality pav bhaji masala is a perfect balance of spices such as dried red chilies, coriander seeds, cumin, fennel, dry mango powder, black salt, and more. Using fresh and flavourful masala can significantly enhance the taste, aroma, and richness of your homemade pav bhaji.
Kichnam Pav Bhaji Masala is a great choice for home cooks. It's made from premium spices, freshly ground, and packed to retain maximum flavour and aroma.
Ingredients You’ll Need
Here is a list of ingredients for making authentic street-style pav bhaji:
For the Bhaji (Vegetable Curry):
2 large potatoes (boiled and mashed)
1 cup cauliflower (boiled and mashed)
1 cup green peas (boiled)
1 large capsicum (finely chopped)
2 large onions (finely chopped)
3 tomatoes (pureed)
1 tablespoon ginger-garlic paste
2-3 tablespoons butter
2 tablespoons Kichnam Pav Bhaji Masala
1/2 teaspoon turmeric powder
Salt to taste
Water as needed
Fresh coriander (chopped)
For the Pav:
8 pav buns
Butter for toasting
Step-by-Step Recipe to Make Street-Style Pav Bhaji
Step 1: Prepare the Vegetables
Boil and mash potatoes, cauliflower, and peas. Set aside.
Step 2: Cook the Onion-Tomato Base
Heat butter in a pan, add chopped onions, and sauté until golden brown. Add ginger-garlic paste and cook until raw smell disappears. Add tomato puree and cook till oil separates.
Step 3: Add Spices and Vegetables
Add turmeric powder, salt, and Kichnam Pav Bhaji Masala. Stir well. Now, add the mashed vegetables and mix thoroughly. Add water to adjust the consistency and simmer for 10-15 minutes, stirring occasionally.
Step 4: Toast the Pav
Heat butter on a tawa (flat pan). Slit pav buns in half and toast both sides until golden and crisp.
Step 5: Garnish and Serve
Garnish the bhaji with fresh coriander and a cube of butter. Serve hot with butter-toasted pav, chopped onions, and lemon wedges on the side.
Tips for the Perfect Pav Bhaji
Use Fresh Ingredients: Fresh vegetables and high-quality pav bhaji masala like Kichnam make a huge difference.
Butter is Key: Don’t shy away from using butter. It’s what gives pav bhaji its rich and indulgent flavor.
Mash Well: The smoother the bhaji, the more authentic it tastes.
Serve Hot: Pav bhaji tastes best when served hot with a squeeze of lemon and freshly chopped onions.
Health Benefits of Homemade Pav Bhaji
While street food often gets a bad rap for being unhealthy, homemade pav bhaji can be quite nutritious:
Rich in vitamins and fiber from vegetables
You control the amount of butter and salt
Avoids preservatives and artificial colors
Choosing Kichnam Pav Bhaji Masala also ensures your dish is free from unnecessary additives and full of pure spice goodness.
Where to Buy the Best Pav Bhaji Masala
You can easily buy Kichnam Pav Bhaji Masala online through our official website [www.kichnam.com]. It’s made using time-tested recipes and premium-grade spices to deliver restaurant-like flavor at home.
Conclusion
Recreating the bold, spicy, buttery taste of street-style pav bhaji is easier than ever with the right ingredients and techniques. Use premium masala like Kichnam Pav Bhaji Masala and follow the step-by-step method shared above to wow your family and friends. Add this classic Indian dish to your home menu and bring the flavor of Mumbai streets right to your kitchen!
Whether you're a spice lover, a food blogger, or just someone who loves cooking at home, this guide will help you serve the perfect pav bhaji every time.
0 notes
Text
10 Refreshing Summer Recipes to Beat the Heat
Summer's arrived—and so does the desire for light and simple food that cools and doesn't burden you. Whether it's organizing a hot family lunch or a relaxed dinner, summer food needs to be light, simple meal. With a bit of help from Mother's Recipe, you can make tasty, homely food that does the season justice.

Here are 10 fantastic summer recipes perfect for hectic days, family parties, or simply enjoying the sun.
1. Minty Curd Rice with Mother's Recipe Mango Pickle Curd rice is the traditional Indian summer dish. Combine cooled rice with fresh curd, a pinch of mint leaves, and a light tadka. Serve with Mother's Recipe Mango Pickle to have a zesty touch. It's a easy veg recipe that is warm and tasty.
2. Spicy Raw Mango Salad Raw mango grated and mixed with coriander chopped, red chili powder, and salt is an easy and tangy side dish. Add a spoonful of Mother's Recipe Mango THOKKU and it's a tangy summer salad instantly.
3. Refrigerated Aam Panna Pops Make your own Aam Panna coolers! Mix Mother's Recipe Aam Panna with some mint leaves and black salt, fill the mixture into the moulds, and freeze. Simple, refreshing, and even kids and adults would love it.
4. Masala Buttermilk with a Twist Combine cold curd, water, and Mother's Recipe Ginger Garlic Paste to create another new masala buttermilk variant. Combine roasted cumin and mint. Cooling and digestive-friendly—exactly what you require after a greasy meal.

5. Mother's Recipe PULIYODHARAI Paste with Tamarind Rice To make a speedy family dinner, have Tamarind Rice. Cook rice and mix Mother's Recipe PULIYODHARAI Paste. This easy paste gives the perfect hot and sour taste without any trouble.
6. Vegetable Raita with Pickled Punch Chop cucumbers, tomatoes, and onions. Top with curd and a spoonful of Mother's Recipe Mixed Vegetable Pickle. It is a spicy, crunchy raita to be served with any meal.

7. Lemon Rice with Peanuts Spicy, crispy, and easy to eat—lemon rice is a favorite in summer. Saute mustard seeds, curry leaves, green chilies, and peanuts and mix with lemon juice and rice. Mix with a spoonful of Mother's Recipe South Indian Pickle as a side dish.
8. Cold Pasta Salad with an Indian Twist Combine cooked noodles with grated veggies, curd, and a pinch of Mother's Recipe Green Chilli Pickle. It's a fusion food of sorts, which is pungent and cooling at the same time—ideal for a picnic or a side dish for dinner.
9. Stuffed Cucumber Boats Scoop out cucumbers and fill with a combination of mashed boiled potatoes, spices, and a pinch of Mother's Recipe Tamarind Chutney. It's healthy, delicious, and beautifully positioned on any menu of easy and light food.
10. Cold Moong Dal Salad Soak green moong dal overnight and lightly boil and chill. Add onions, tomatoes, coriander, and a pinch of lemon. A spoonful of Mother's Recipe Green Chilli Sauce gives a zing and a refreshingly cool taste.
Final Thoughts
These 10 recipes are not just a piece of cake to prepare but full of nutrition and taste—classic examples of quick family meal without keeping you tied up in the kitchen for hours. Whether you prepare an easy veggie meal for lunch or arrange for snacks for an evening in the summer, Mother's Recipe brings in that authentic Indian flavour that makes every meal a celebration. So this summer, keep your cooking easy, simple, and delicious—just like the weather.
youtube
1 note
·
View note
Text
How to Make Chicken Karahi: Bold Flavors in Every Bite
If you’re craving an aromatic, spicy, and deeply satisfying South Asian dish, Chicken Karahi is the answer. This beloved Pakistani and North Indian classic gets its name from the traditional wok-like pan called a "karahi" used to cook it. But don’t worry—you can make it in any heavy-bottomed skillet.
Let’s dive into a step-by-step guide to help you recreate this rich and rustic dish at home.
What is Chicken Karahi?
Chicken Karahi is a dry curry featuring tender chicken pieces cooked in a thick tomato-based gravy with green chilies, ginger, garlic, and traditional spices. Unlike some stews, there’s no onion in authentic versions, which gives the tomatoes and spices a bold spotlight.

Ingredients You’ll Need
Here’s a basic ingredient list for a traditional Chicken Karahi (serves 4):
500g chicken (bone-in pieces preferred for flavor)
3–4 ripe tomatoes (chopped or pureed)
4–6 cloves of garlic (minced or paste)
1-inch piece of fresh ginger (julienned + a little for garnish)
2–3 green chilies (slit)
1 tsp red chili powder (adjust to taste)
1 tsp cumin seeds
1 tsp crushed black pepper
½ tsp turmeric
1 tsp garam masala
Salt to taste
3 tbsp oil or ghee
Fresh coriander for garnish
Optional: a squeeze of lemon juice
Step-by-Step Cooking Method
Step 1: Heat the Oil
In a heavy pan or karahi, heat the oil over medium-high heat. Add the cumin seeds and let them crackle.
Step 2: Sauté Garlic and Ginger
Add the minced garlic and half of the julienned ginger. Sauté for 1–2 minutes until fragrant and lightly golden.
Step 3: Add the Chicken
Add the chicken pieces and fry until they start turning golden brown on all sides—this builds flavor. This step takes about 5–7 minutes.
Step 4: Add the Tomatoes and Spices
Stir in the chopped tomatoes, red chili powder, turmeric, and salt. Cook uncovered on medium-high heat until the tomatoes break down and the oil begins to separate from the masala (about 10–15 minutes). Stir frequently to prevent burning.
Step 5: Simmer and Thicken
Reduce the heat to low, cover the pan, and let the chicken cook for another 10 minutes or until tender. The gravy should be thick and clinging to the chicken.
Step 6: Add Green Chilies and Final Spices
Add the green chilies, crushed black pepper, garam masala, and the rest of the julienned ginger. Cook uncovered for another 5 minutes to let the flavors blend.
Step 7: Garnish and Serve
Garnish with chopped coriander and a squeeze of lemon juice. Serve hot with naan, roti, or steamed basmati rice.
Pro Tips for Perfect Chicken Karahi
Use bone-in chicken for maximum flavor.
Don’t skip the julienned ginger—it adds aroma and freshness.
Cook the tomatoes until the oil separates for authentic taste and texture.
Adjust chili and spices to your preference—Karahi is meant to be bold but customizable.
Final Thoughts
Chicken Karahi is more than just a dish—it’s a celebration of bold flavors, sizzling aromas, and heartwarming satisfaction. Whether you're planning a weekend feast or a cozy weeknight dinner, this recipe is sure to impress.
Ready to try it? Fire up your skillet and get cooking—your taste buds will thank you!
#Chicken Karahi recipe#How to make Chicken Karahi#Authentic Chicken Karahi#Chicken curry with tomato and ginger#Homemade Chicken Karahi#Chicken Karahi step by step#Scott Biffin
0 notes
Text
Feeling Snacky? These Indian Munchies Will Hit the Spot
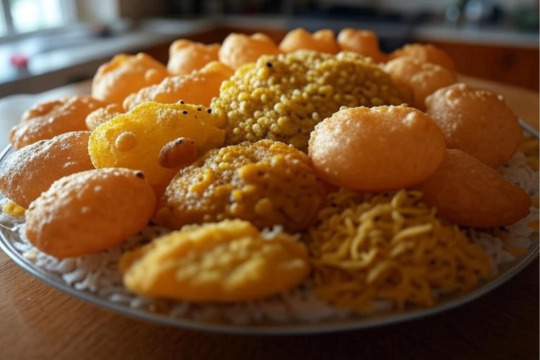
Craving something flavorful, crunchy, and comforting? Indian snacks are just what you need. Known for their bold spices, unique textures, and mouthwatering aromas, these treats are more than just fillers between meals—they’re an experience. Whether you're planning a tea-time platter or need something exciting for your next get-together, Indian munchies have you covered.
Why Are Indian Snacks So Loved?
From street-side stalls to homemade mixes, Indian snacks bring together taste, tradition, and variety. They're spicy, savory, tangy—and sometimes even sweet—all in one bite. Most are made from humble ingredients like lentils, chickpea flour, and grains, yet they deliver unforgettable flavor. Whether you love a fiery crunch or something mild and wholesome, there’s a snack just for you.
Must-Try Indian Munchies for Every Craving
1. Gathiya: Crunchy and Savory Strands
A beloved Gujarati snack, Gathiya is made from gram flour (besan), ajwain, and turmeric, deep-fried into soft, crunchy strands. Unlike most crunchy snacks, gathiya is slightly airy and melts in your mouth. Pair it with sweet chai or add a twist with garlic gathiya for a bolder flavor.
2. Sev: The Crispy All-Rounder
Sev is a fine, crispy noodle-like snack made from spiced chickpea flour dough, pressed through a mold and fried to perfection. Whether you're sprinkling it over bhel puri or just munching it straight from the jar, sev adds texture and taste. Variants like ratlami sev, palak sev, and thick sev bring their own distinct spin on this classic.
3. Puri: The Crisp Delight in Every Bite
Puri isn't just for chaats—it’s a snack in its own right. These small, crisp discs are fried until golden and puffed, making them perfect to eat with dips or on their own. Try these popular variations:
Bajra Puri – Made from pearl millet flour, this version is hearty and rich in fiber, perfect for health-conscious snackers.
Jeera Puri – Infused with cumin seeds, delivering a delightful, aromatic crunch in every mouthful.
Chaat Puri – Pre-seasoned with a blend of spices, it’s a ready-to-eat option that needs no dressing up.
Whether served with chutneys, pickles, or as the base for creative toppings, puris are always a crunchy delight.
4. Kathol: A Wholesome Protein-Packed Snack
Kathol refers to a range of Indian snacks made from pulses and legumes, especially popular in Gujarat. They’re hearty, nutritious, and full of flavor. Some popular variations include:
Dabela Chana – Tender boiled black chickpeas mixed with mustard seeds, green chilies, curry leaves, and a hint of lemon for a tangy twist.
Dabela Mug – A lighter version using boiled green gram (moong), sautéed with mild spices and garnished with coriander for a refreshing taste.
Dal Muth – Dal Muth – A crispy blend of fried lentils and nuts, seasoned with rich and aromatic spices. It’s spicier and crispier, making it a great option for those who love texture in their snacks.
Kathol is perfect for those seeking high-protein, fiber-rich options without sacrificing taste.
How to Enjoy Indian Snacks
Pair with Chutneys: Elevate your snacks with mint, tamarind, garlic, or mango chutneys.
Adjust the Spice: Add chaat masala or chili powder to match your taste preferences.
Serve with Drinks: They go beautifully with masala chai, buttermilk, or even cold drinks.
Create a Snack Platter: Combine sev, puri, and chutneys for your own chaat-inspired mix.
Where to Find These Munchies
Most Indian snacks are widely available in Indian grocery stores, street markets, and online platforms like Amazon or ethnic food websites. Many brands now offer ready-to-eat, packaged options that retain authentic flavors while offering longer shelf life and convenience.
Conclusion
If you’re in the mood for something flavorful and fun, Indian snacks never disappoint. From the spicy crunch of sev to the wholesome comfort of dabela chana or the puffed joy of jeera puri, there’s something to match every mood and craving. So the next time you're snacky, go beyond the usual and try these Indian munchies—they're sure to hit the spot!
0 notes
Text

These amazing cauliflower steaks are full of flavor and make a great main dish for vegans. They are seasoned with a mix of spices and roasted until they are soft and flavorful. This dish is sure to impress.
Ingredients: 1 large head cauliflower, sliced into steaks. 2 tablespoons olive oil. 2 cloves garlic, minced. 1 teaspoon smoked paprika. 1/2 teaspoon cumin. 1/2 teaspoon chili powder. Salt and pepper to taste. Juice of 1 lemon. Fresh parsley, chopped, for garnish.
Instructions: Preheat the oven to 425F 220C. In a small bowl, mix together olive oil, minced garlic, smoked paprika, cumin, chili powder, salt, and pepper. Brush both sides of cauliflower steaks with the spice mixture. Place cauliflower steaks on a baking sheet lined with parchment paper. Roast in the preheated oven for 25-30 minutes, flipping halfway through, until golden brown and tender. Remove from the oven and squeeze lemon juice over the cauliflower steaks. Garnish with chopped parsley before serving.
Prep Time: 15 minutes
Cook Time: 30 minutes
Elga Records
0 notes