#wanted to post this one on tumblr because it has higher upload quality and i love how the textures turned out
Explore tagged Tumblr posts
Text
The Lost Blossom Shampoo Commercial
During my very early days on Tumblr, I was loving all the GIFs and I wanted to join the community. Along with my love of video games, I love animation and I love Cartoon Network, and I wanted to contribute even if my main Tumblr, which is all that I had back then, wasn't animation focused. I wanted to give something that nobody else has posted. I knew non-American commercials have unique animation not seen anywhere else, so that felt like a good idea. I decided, to add some unique Cartoon Network GIFs to Tumblr, to look through various Cartoon Network commercial reels on YouTube and Vimeo. One of the videos I found on Vimeo was this reel from Brendan Rogan, a producer at Cartoon Network Latin America. I found a clip of the Powerpuff Girls I had never seen at 0:32.

Wait, is this...a shampoo commercial? Seems really fitting considering the Blossom hair wave scene in The Mane Event, and I shouldn't be surprised someone decided to use something inspired by that scene in advertising. Not going to lie: I was intrigued.
After the break, my entire history of my attempt to track down this commercial.
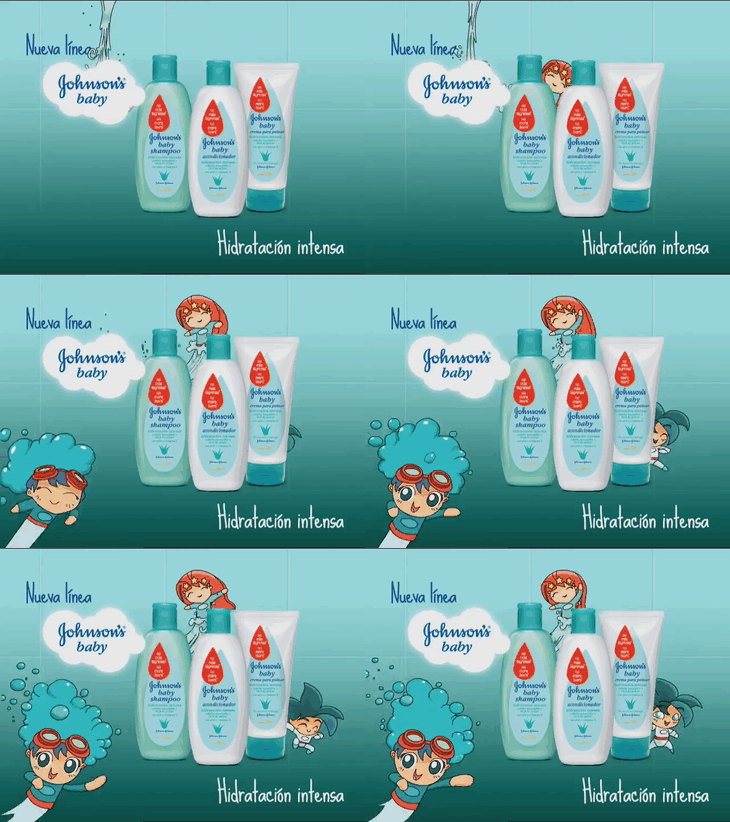
Right after this part of Blossom that I made the GIF from is this clip of three superhero-like mascots flying around three different bottles of different hair products. The one on the left has a bubbly hairstyle that is the same color as the bubbles shown in the Blossom part, suggesting that these two clips are from the same commercial. I did not want to believe it at first, but it did fit pretty well. The Powerpuff Girls are 6 years old at the most, and they could still be using baby shampoo.
After my searches went nowhere, I e-mailed Brendan Rogan back in 2015, who was pretty much my only lead at the time, about it. Rogan asked me why I wanted to see the "full spot". I immediately recalled one YouTube video about people trying to find the guy from Active Enterprises of Cheetahmen infamy only to be met with an all caps "WHY DO YOU WANT TO KNOW THIS INFORMATION" and no further replies, and I was hoping it was not going to end like that video. I did e-mail him with honesty, saying I just wanted to see the context of the full spot, and I'm a big Cartoon Network and Powerpuff Girls fan.
Rogan did not reply back.
I did not e-mail him again because I did not want to pester someone about a baby shampoo commercial, and I was holding onto the hope that it'll appear in a upload of commercials on YouTube so I do not have to test my anxiety. Of course, it'd be in way higher quality if I got it from someone who worked on the commercial rather than a VHS recording of commercials, but I was not thinking of that at the time. At least he indirectly confirmed a full spot exists.
Years later, I found a promotional reel based on the Toonix era of Cartoon Network Latin America, dated to 2011. It advertises The Amazing World of Gumball and Johnny Bravo Goes To Bollywood, both from 2011, so I can believe the year. It seemed to be made for investors and advertisers, showing off Cartoon Network's programming, and how they can have synergy with other brands. This includes a bunch of cross-promotion. Showing up at 4:52, to my surprise, is the Blossom ad. It was almost the exact same clip seen in the Rogan reel. The keyword is "almost." I got out my video editing software, and this is what I can see:
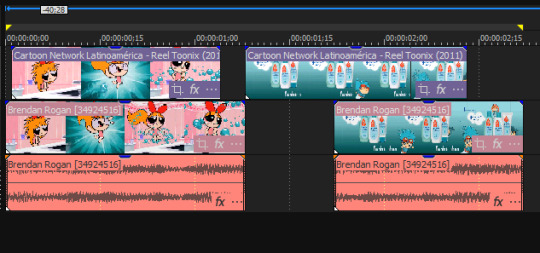
The Cartoon Network reel does have more of the commercial we did not see in the Rogan reel, though it's just more of the mascots flying in from outside of the frame and a little bit less of Blossom waving her hair around. This does confirm to me that neither reel was showing a single clip from the full spot, but two clips from different parts of the spot, showing the Cartoon Network character and showing what that Cartoon Network character was advertising. It also reconfirms that what I am looking for is not a Cartoon Network promo, but a baby hair product line commercial.
I also notice that even with these two different appearances, we only have 2.5 seconds of what could be a 15 or 30 second commercial. That alone does make that intriguing even with the possibility that Blossom only appears for that one second and the rest is just a generic baby shampoo ad. I hope that's not it, but it would explain why the full spot was not uploaded.
I did find one other piece of this campaign. It's not from the commercial, but it is related. Maybe it was an extremely lucky Google Image Search, or I just somehow stumbled across it in one of my searches. This was from a company named Bau Print, who specializes in different kinds of printing, including printing on vehicles, and, hey look!

There they are! It's even a photo taken from a camera that wasn't edited, meaning I could see from the metadata that it was taken in April of 2010. That does narrow down the beginning end of my search, though I had no doubt that the spot was at least post-Powerpuff Girls Movie. It also made me realize a bit of lore about these three super obscure mascots: they each represent the three different kinds of intense hydration: shampoo, conditioner, and combing cream. There are no Powerpuff Girls, showing either these superheroes were not just made for the commercial, or they wanted to use them without having to contact Warner Bros. or Cartoon Network.
This picture does prove that this campaign, at the very least, got to the point where it was advertised on trailer trucks. I did have a feeling this was a part of a scrapped campaign; maybe Johnson's got cold feet for having their clean baby shampoo brand be associated with girls that have beaten monkeys, criminals, talking dogs, and clowns to a pulp. However, wouldn't it be false advertising if a campaign that fell through ended up in a video that seemed to be made for advertisers?
And that's where my search runs cold. I have searched a lot of Cartoon Network Latin America commercial breaks on and off over the years, and I even used Filmot to search YouTube's subtitles for phrases that could be a part of it, like that "salud es belleza" tagline on that truck, and the full spot remains elusive after years of searching. I guess I could just imagine what the rest of the commercial could be.
The City of J&Jville, where our heroic trio responds to a dis-tress call: Blossom, superheroine of Townsville, is having a bad hair day and won't have the confidence to beat up Mojo Jojo and stop his "turn everyone into chickens with his chicken ray" plan. Lather, Rinse, and Repeat are called to action, and with their ultra-cleaning powers, they go into Blossom's hair as she stares at the mirror, and her hair magically turns luscious again. With her newfound confidence, Blossom flies to Mojo Jojo, and knocks his teeth out, bruising him with all of her techniques, her flurry of punches, her eye lasers, and the dreaded ponytail whiplash! The day is saved thanks to Blossom, and Johnson's Baby Hidratación Intensa! (Warning: Baby shampoo will not give your baby superpowers, do not let them fight crime.)
...okay, maybe that violence wouldn't have happened, but there is only one way we can find out for sure, and I can only wish I could find that way. So uh, here's another shampoo ad starring Hanna-Barbera characters that appears to be unrelated. Yes, the Powerpuff Girls are technically Hanna-Barbera. Bye.
youtube
< n/a - Part 2 >
47 notes
·
View notes
Note
Is there a better quality Tanz bootleg from 19.01.2012 (Berlin) than the one on vk? Not only the audio is off but there’s some higher quality videos of that same bootleg elsewhere. Do you know where it can be found?
There's higher qualities of every bootleg you can find on VK/Youtube/Bilibili. Those sites compress things down when people upload them. The original VOB files you won't be able to get off anyone other than traders. If you want to get into trading I'd recommend r/musicalbootlegs on Reddit and if you want to find someone with Tanz videos either ask on there or just Google search 'tanz der vampire trading' and find a website for someone who is active.
I don't have the original files of this video, but if you want to get into trading feel free to message me. A lot of traders will gift things to new traders who don't have anything, that's basically how you start, and then once you have things you can trade them with others. You might have to get gifts you don't care about that much and trade for a while to get the files you want, or you might find someone who will just gift you exactly what you want.
I've talked about this before on europeanmusicals but I'll say it here again:
Bootlegs really shouldn’t be posted publicly online, I know I’ve linked to a few before but I really didn’t like doing it and felt pressured. And I know people are going to complain about 'gatekeeping’ but it’s not about gatekeeping. It’s illegal to record these things and if the person who recorded it themselves posts it online or gives permission for it to be posted online that is fine. But people post bootlegs they didn’t personally film and it could get the person who recorded it into trouble. It’s posting footage of a crime online. I know that sounds dramatic, and it doesn’t matter as much with older boots, but especially with more recent ones it’s not that hard to find out who took it and also theatres may crack down more if they see boots are still being filmed and just ban phones inside the auditorium. Hell, there’s one Phantom boot on Youtube that opens with “Please do not post this on sites like Youtube. This video is not for trading, gifting or sharing.” which is so wrong for this person to have then posted it on Youtube. It means the video was NFT (not for trade). The people who film boots are called 'masters’ and they risk filming these things and when people share things they aren’t supposed to and especially post them on Youtube, masters stop sharing anything they film and then no one has bootlegs. I know that Korean traders have now mostly stopped trading with anyone from the West because people kept posting them to Youtube.
The reality of musical bootlegs is that for Broadway and the West End there are only like 2-5 people who record every bootleg for all of these musicals, and it's not much different in other countries. And the more boots get leaked the more masters quit filming. I think the West End is down to 2 video masters now and they're both on hiatus because of people posting their boots to Youtube.
And of course it's okay to post things that 1. you've recorded yourself 2. you have permission from the master to post 3. you are gifting them out (as long as they're not NFT) as in giving a link to where people can download them in a Tumblr post. But posting it as a public video on Youtube is about the worst think you can do. VK I suppose is better when it's in the private groups rather than a public upload to the biggest video site in the world, but I don't think a lot of the trading community would be super happy about it.
9 notes
·
View notes
Text
Update: I’ve been able to upload Nowhere Boys: the Book of Shadows at last! The same link still works, so search my blog for nowhere boys and you’ll find it, and now you’ll find all 4 series/seasons plus the movie there. There still aren’t unfortunately highest quality versions of S4, but as I said that’s alright, the versions available are good. And it’s still okay to share these posts and the link.
I had to get the movie from a different source than the episodes, and although it’s still high-quality and mostly HD, there are a couple of places where the quality drops or it behaves slightly strangely (fewer since I edited it!). The subtitles are heavily edited by me, colour coded by speaker (or the main/more important characters anyway) and I used non-standard colours to do a colour per speaker, and it might be that this makes them less useful, so if this is the case please let me know and I’ll make a version without colours, or at least with only standard colours. I also don’t know if the colours will even show up, depending on what player you’re using (they only worked for me in vlc player and the embedded player in the subtitle editing programme I used).
(Redo 2 of the Nowhere Boys drive link addition to my last Nowhere Boys post as a separate post in hopes at least one version will find people because the reblog doesn’t show up, this one without the link)
If anybody in the Nowhere Boys fandom (or otherwise, it’s a good show) hasn’t seen some or all of Nowhere Boys and would like to, or has seen it but wants to have the episodes to keep, I now have Series(seasons) 1-4 uploaded to a Google Drive (and I’m working on Book of Shadows/the movie, there’s a folder for it but it’s not in it yet, it will be when I can get everything sorted with it).
No link on this version, so hopefully Tumblr won’t eat this post, but you can message me for it, or search 'nowhere boys' (or tag variants '#nowhere boys' & '#nowhereboys' or even, if none of that works, the names of most of the main characters and actors) on my blog (or click/press on those tags from this post maybe?) and hopefully one of the two versions with the link, either the reblog to my original happy vaguepost or the very similar counterpart to this one but with the link instead of this paragraph, will show up for you! Or if there’s enough demand/it would be easier to find, I could pin the post with the link, or post the link in my bio or something?
Also, as this post hopefully won’t get eaten and people will actually see it:
it’s okay to reblog this post (and the other versions) if you want/think it will find other fans (or I guess share the link without my post, I’d appreciate if you’d please let me know if you’re doing that but obviously I can’t make you).
for reasons unknown to me, the video quality of series 4 (apart from episode 1, weirdly, which is as high-quality as series 1-3) is a bit worse than the previous series even at maximum, although still very watchable. If they (by which I mean the BBC because I’ve got the main series from the iPlayer) do ever post higher-quality versions, I’ll get them and replace the current ones, but as it is, those are okay and certainly better than nothing/some other sources.
I’ve included the (English) subtitles with everything, in case anybody else wants them (just .srt files at the moment, although I think I could maybe also get different file versions, like .ttml, if that’s wanted/needed for translation/whatever other reason).
I did this for a Twitter groupchat of fans (not very active anymore but if anybody wants to join we'd be happy to welcome you), but I thought it might get to a slightly wider audience here and it wouldn't hurt me to offer it to more people.
#nowhere boys#nowhereboys#nowhere boys abc#nowhere boys bbc#abc me#cbbc#bbc#felix ferne#jake riles#sam conte#andy lau#ellen o'donnell#heath buckland#niccolina pandelis#nicco pandelis#luke hamill#jesse banda#ben ripley#dougie baldwin#matt testro#rahart adams#joel lok#darci mcdonald#joe klocek#luca sardelis#kamil ellis#jordie race-coldrey#william mckenna#nowhere gang#nowhere boys two moons rising
27 notes
·
View notes
Text
How to gif without photoshop
Hello! By popular demand (of like 4 people) I am going to write out a tutorial of how I make gifs when I’m on my personal laptop and don’t have access to photoshop. There is another method I use with a different software that is a bit more complicated and if people are interested, I will make a tutorial of that method as well. I’ll do my best to keep this concise, so let’s get started.
Warning that this is VERY text and image heavy because I know how frustrating it can be when a tutorial feels like it’s skipping steps and I want this to be as clear as possible. Also please read this on desktop, tumblr mobile kills the quality of gifs inside text posts.
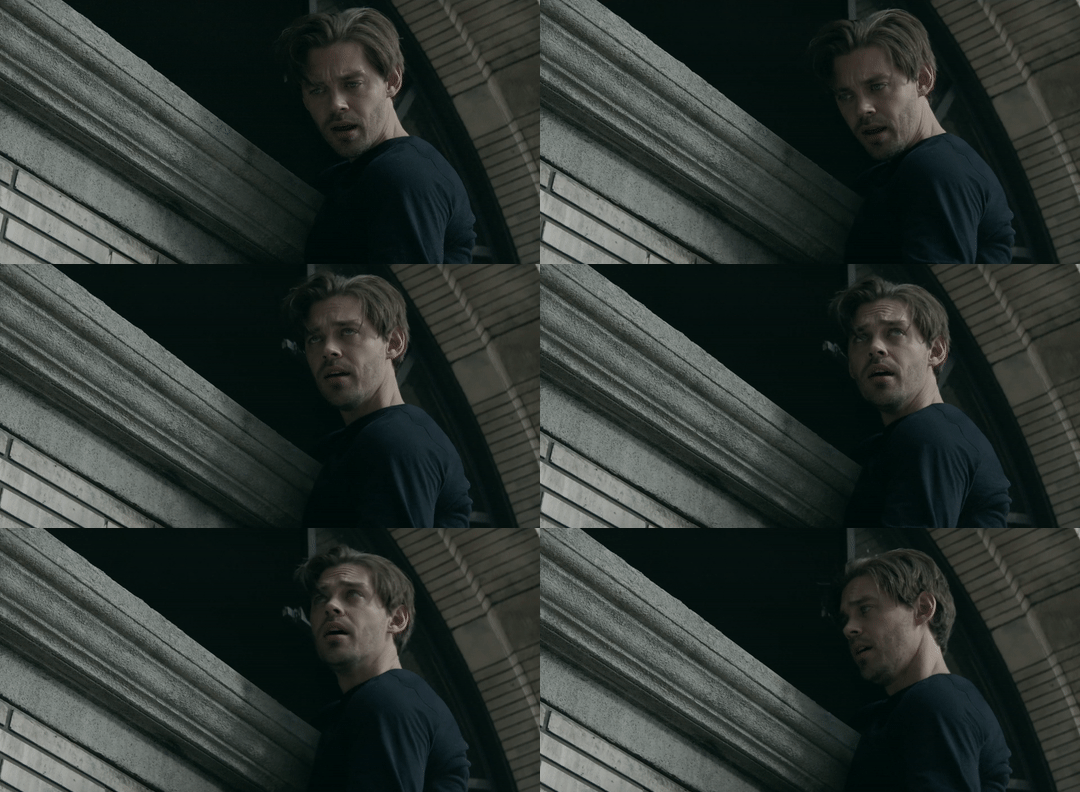
This is the video I will be giffing and here is the gif I will be making!

What you need:
A video to gif
For the best results, I recommend a video that is either 720p or 1080p (basically the higher the quality, the better). Videos with good lighting and bright colors also turn out the best. Unfortunately for me, I gif the TV show Prodigal Son a lot and that show has neither of those things, which is why my gif example is from that show; if you can make a scene with zero lighting or vibrancy look even somewhat decent, you can make anything else look good.
A video downloader or screen recorder
This is the video downloader I use and this is the screen recorder but basically any youtube video download website or screen recorder program works. Keep in mind that ezgif has a pretty low upload limit for videos, so if you want to gif something longer than like ~4 minutes, cut the video down to the specific parts you want first on a website like this one.
ezgif
A very straight forward website that anyone can access. You don’t need to download anything, it’s all online.
Bonus: Online Image Editor (not required, but I use this website to add text to gifs)
1. Making the gif:
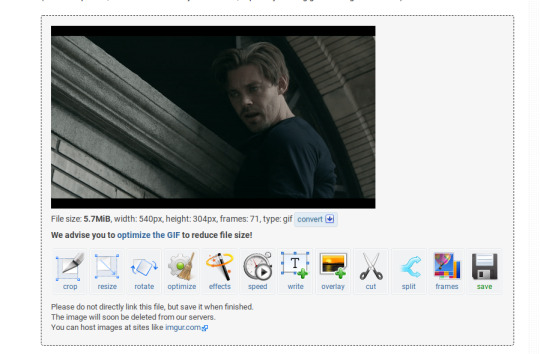
Once you have a video downloaded, you go to ezgif.com and go to the section video to gif. Click choose a file, scroll to your downloaded video, and hit upload video. Your screen should look like this now.
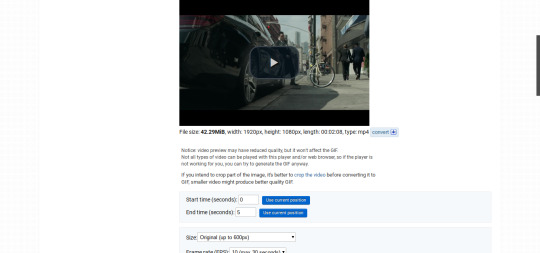
There are two ways to pull out the sections of the video you want to gif. You can either write in the start and end time in the little sections (you have to convert them to seconds: for example, if my gif started at 1:16 and ended at 1:20, it would be 76 seconds and 80 seconds respectively). Or you can do the method that I feel is easier, where you go to the section you want it to start on, hit pause, and hit the blue button that says “use current position” then let the video play until it hits your stopping point, hit pause again, and click on the second “use current position” button.

Once you have the start and end time recorded, scroll down to the next part of the screen with the size options. For size, select “540xAUTO (for Tumblr)” since tumblr gif sizes start at 540p and go down the more gifs are in a row. For frame rate, try to do either 20 or 25; the higher the frame rate, the smoother the gif will look. If you are trying to gif something in 540p that is longer, you might need to chose 10 to keep it under 5mb, which is the tumblr gif size limit. For method, leave it on FFMPEG. Then hit, convert to gif.

your gif will now look something like this!
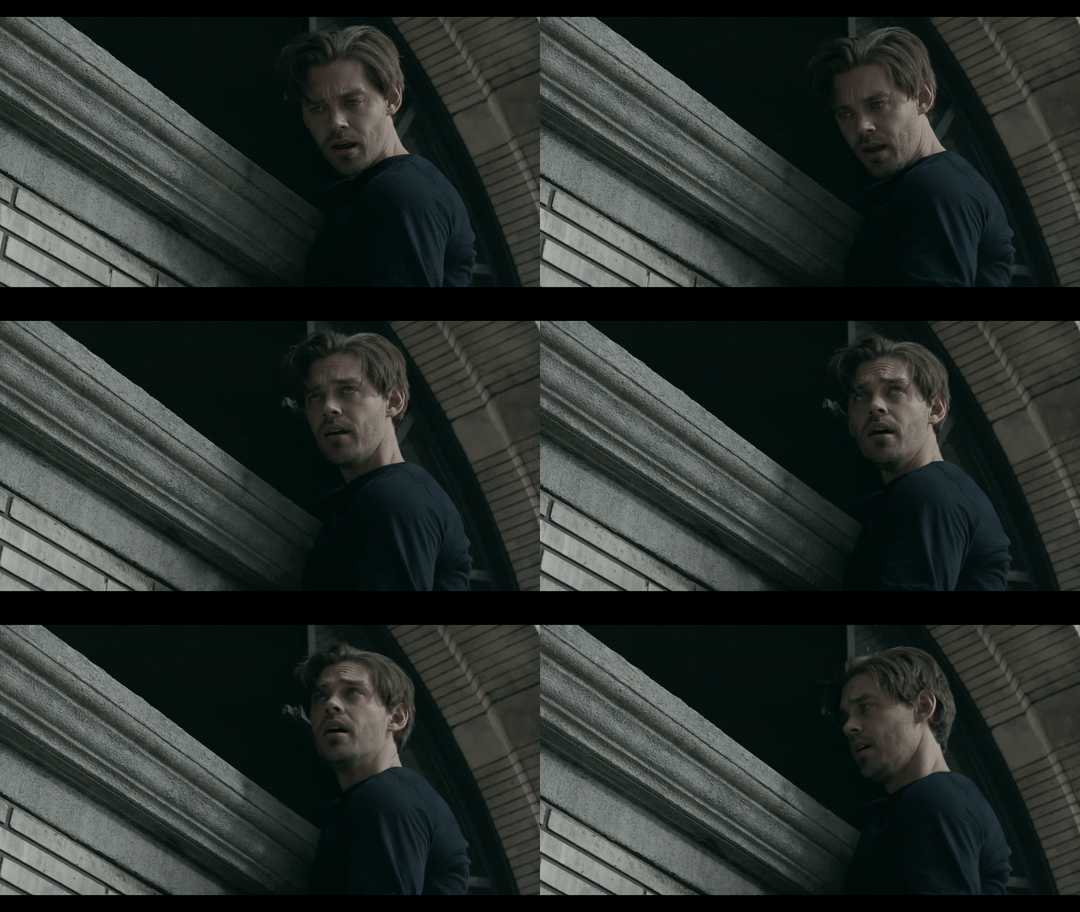
Now, this gif is currently 5.7mb, which is above the size limit for tumblr (5mb or above gifs will still play if I recall, but the quality will be really bad when you post them). If I was planning on keeping the gif this size, I would go back and change the frame rate to either 20 or 10 to get the size down. However, I am going to resize the gif to 268p, so I don’t need to worry about it being to big.
Using the correct gif size for tumblr is one of the easiest ways to make sure the gif looks good! For gifs that take up a whole row, the size should be 540p wide. For two gifs in one row, the size is 268p each. For three gifs in one row, the sizes are 177p, 178p, and 177p in that order. Here is a visual of it.
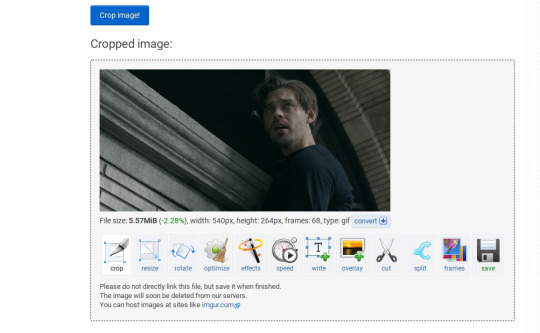
The next step would normally be resizing the gif, but Prodigal Son youtube videos come with a black banner on the top and bottom that I need to crop out. You will see a menu full of options under your gif, and you want to click on “crop.”
Cropping is pretty straight forward; you just move the little box over the part you want cropped, then hit the “crop image” button. Make sure width stays 540p!

Your gif now looks like this
Next, you look at the options under your gif again, and go to “resize.”
Again, resizing is pretty straight forward. I just put in 268 into the “width” section and leave the “height” section blank since the site will automatically resize the height. You can ignore the other menu options.
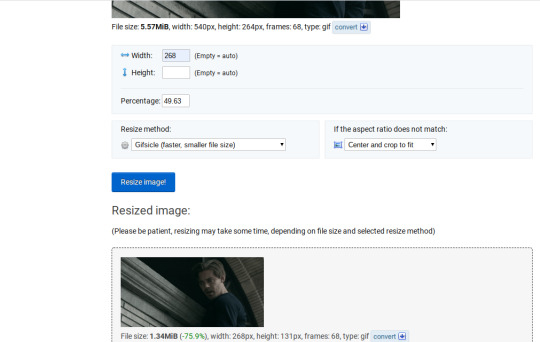
Your gif now looks like this

Next step is optional, but I usually do it. Once again, you go to the menu of options under your gif and select “speed.”

Speed is also super straight forward. I almost always reduce the speed of my gifs somewhere from 90% to 80% no matter what, just because I think it makes it look smoother. For gifs that are of short scenes that go really fast, I will reduce it to anywhere from 70% to 50%. You can try different speeds to test out what you think looks best. For this gif, I’m going to put it at 80%.
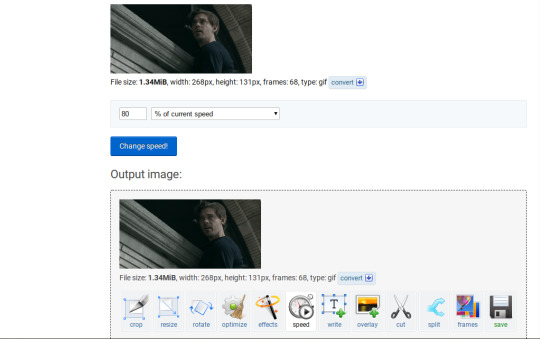
Here’s what we have so far. Congrats, you have made a gif!

Now for the fun part!
2. Coloring the gif
Go to the “effects” option, in the menu under your gif. You will see a LOT of options, but the panels I’m going to focus on are “colorize”, “brightness and contrast” and “color presets”. This section is going to vary a lot depending on what specific video you are giffing so remember to be flexible and try lots of different options out! It took me a while to get to a place where I can just eye a scene and know what settings to use. It’s super easy to go back and tweak a setting if the gif doesn’t look like how you want it the first time, but it’s a lot of trial and error.
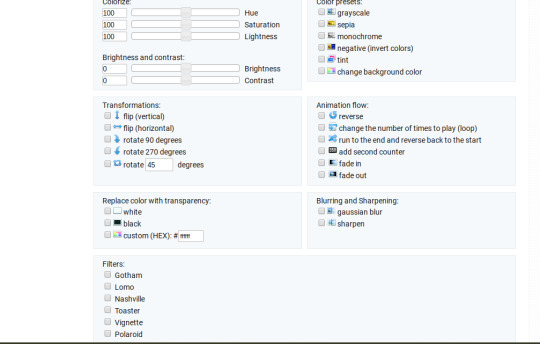
The main option I focus on in the “colorize” section, is “saturation.” This is what will make all the color in your gif pop out. The saturation I use varies a ton; for scenes that already are colorful/bright, I usually keep it around 120 to 150, since you don’t want it to be over saturated. If I’m making an edit that is supposed to look toned down or more grey/neutral tones, I’ll decreases the saturation in the range of like 90-40. For a show like Prodigal Son, where there is basically zero color vibrancy, I tend to go full out with saturation, usually in the 150-200 range. For this gif, I have it all the way up to 200.
Next is brightness and contrast. This also varies wildly, but a good rule of thumb is I always try to keep my contrast at least 5 points higher than whatever my brightness is, it just makes the lighting more even. You need to find a good balance; obviously, the darker the scene, the higher you want the brightness and contrast, but if you go too high, the gif with be staticy/grainy. For Prodigal Son, which has horrible lighting, my brightness is anywhere from 10-30 and my contrast is anywhere from 15-35. For this gif, my brightness is on the lower side since the scene is outside in natural light; brightness is 16, contrast is 26.

After you get those settings, I go over to “color presets” section and click on the “tint” option. It will pull up a color chart that looks like this
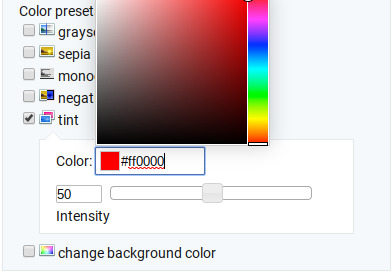
You ALWAYS want the intensity up to 100. This part is where the most trial and error occurs; there isn’t any one color option that works for every gif. The shade I use most often is light red/pink or light blue/light purple. For scenes that are lacking warm tones (which is almost all of Prodigal Son) I tend to go to the light reds, and for scenes that are lacking cool tones, I go to the light blues. The light reds are best for making characters skin tones look more...like actual skin tones and not totally washed out. To select a color, you just move your mouse around the chart. This is the range of color codes I tend to use.
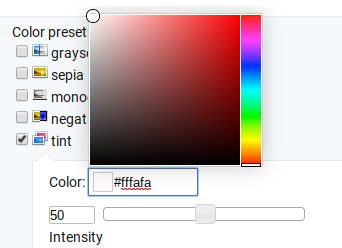
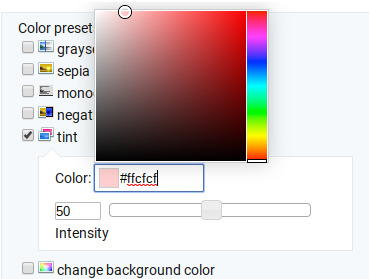
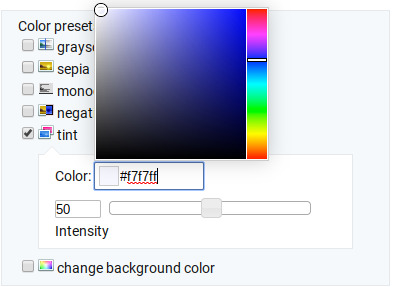
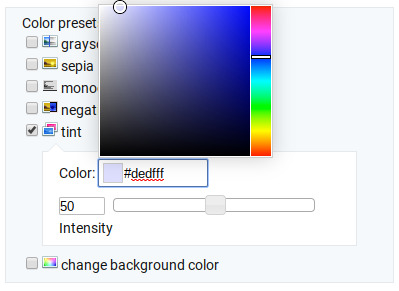
Again, intensity should be up to 100 (it automatically starts at 50 and I was too lazy to move it while getting screen shots :P).
For this gif, I actually used a new technique I’ve been trying out where I start with a light blue tint to even out the color tones, then once that gif is done, I go back to effects and add a layer of pink to make the colors brighter. Usually, one color works fine, but sometimes it’s hard to find a good balance (the red colors can get too red and the blue sometimes brings out too much of a yellow shade). For now, I have my color tint set at #eeebff.
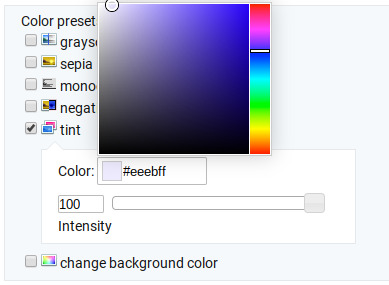
Ultimately, this is what my effect settings look like and this is what the gif looks like now.
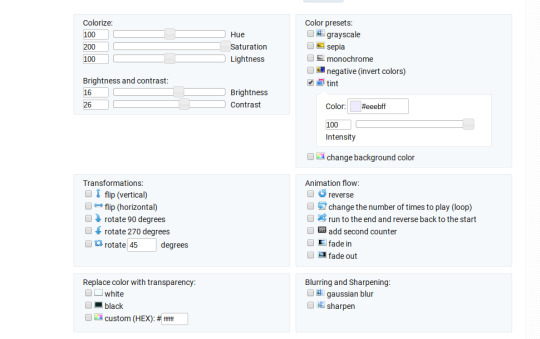

Now, like I said before, I added another layer of tint to this gif. All you have to do is go to the menu under your gif, and click on effects again.
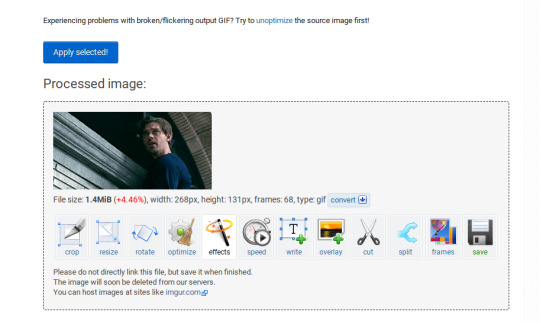
It will take you back to the panel you were just on, expect now your colored gif is on the top and all the settings are blank again. The only setting you need to use now is the tint option; go there, and select a light red shade. I used #fff0f0.

And here is the final gif! To save it, just right click and hit “save image as.”

I know it seems like a long process, but once you get a hang of it, it goes by super fast, especially if all your gifs are coming from the same video.
BONUS: Adding text
If you are trying to gif something with dialogue or you want a quote to put over your gif, you will want to put text over it. ezgif has a “text” option that you can use if you want, but I personally don’t really like their font options, so I use the website Online Image Editor.
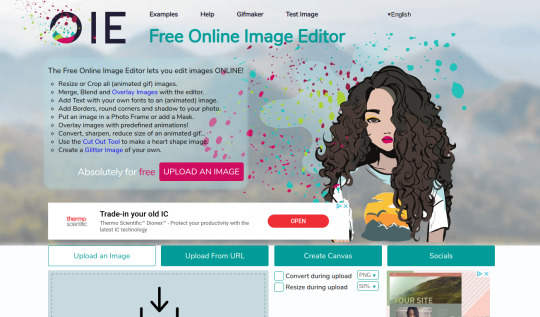
This is what it looks like. You can either hit “upload an image” and upload your saved gif, or you can go back to ezgif, right click the gif, hit “copy image url” and paste that url into the “upload from url” option. The web page should now look like this.
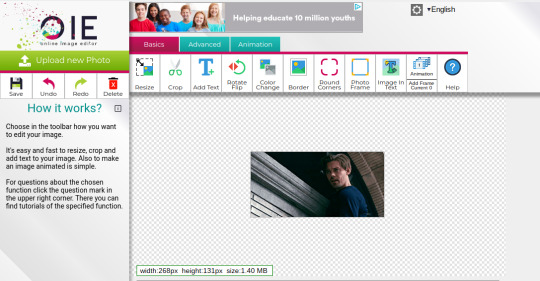
It’s pretty straight forward from here; click on the “add text” button and a menu will appear on the left hand with options for the text.
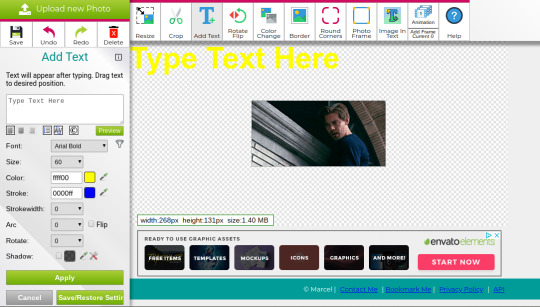
Type whatever you want the caption to be in the “type text here” box. This website has a ton of font options you can play around with, but when I just want to caption a gif, I stick with “Arial Bold Italic.” For a 268p gif, the font size should be 10-12, depending on how much writing you plan to put on each gif (if some gifs are going to have more writing than others, pick a smaller font size so it stays consistent!) When I make a 540p, the font goes up to 14-16. I use white for the color and black for the stroke. I make the strokewith 3 because it makes the caption stand out more. Once all these settings are selected, hit the “preview” button under the text box.
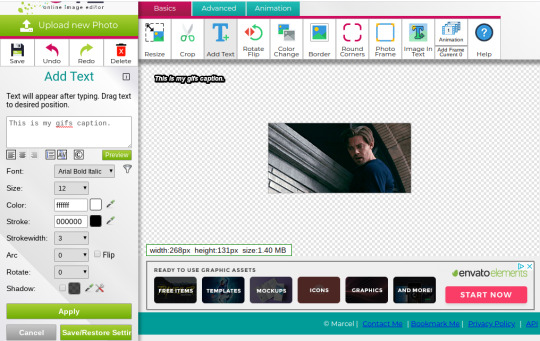
You can now drag your text anywhere you want on the image! The only bad thing about this website is that it doesn’t automatically center text, so you either have to eyeball it, or if you’re picky, like me, open up one of those online ruler applications and use it to measure out the center. For captions, I move the text just slightly above the bottom of the gif.
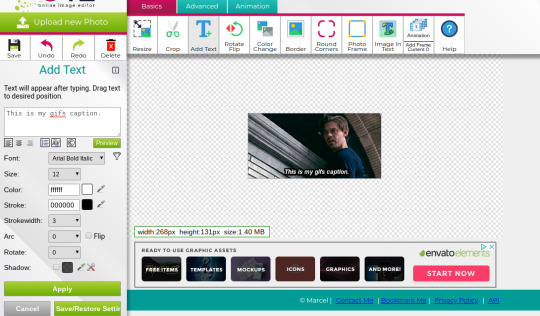
Finally, you hit apply. Once your gif has the text on it, all you have to do to save it is right click it and hit “save image as.” And here is the finished project!
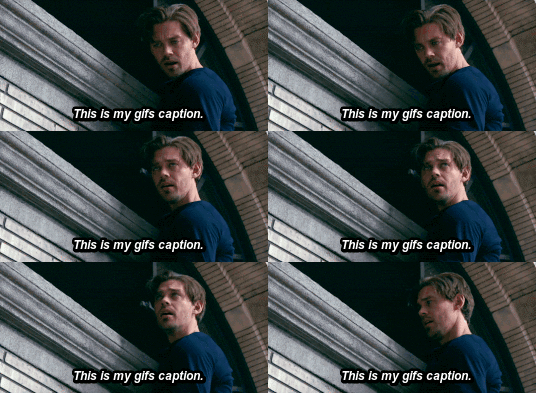
That got a lot longer than I thought it would, but I hope it was informative! If anything was unclear or if you have further questions, feel free to send me an ask. Thank you for reading.
#gif tutorial#giffing tutorial#giffing#gifmaking#mine#my gifs#long post#I hope this makes sense lol#pls rb if it helped!!!#also if mobile doesn't keep the read more...idek
378 notes
·
View notes
Photo

hi everyone! basically, when i start giffing on photoshop, i didn’t really know a lot of things and how to get started and so i’d be looking around searching on blogs for info all over the place and so i thought i’d give some tips and recommend sources for people who are new to giffing and put them into one place! i’ll be talking about downloading videos in high quality, fonts best for captions, dimensions for posting on tumblr, etc.
i’m honestly not an expert in giffing - it’s just a hobby as i’m crying full time from being a student so this is just stuff i’d personally recommend from my experience - and ofc, please like/reblog if you find this useful ♡♡
(this post was edited june 2020)
DOWNLOADING VIDEOS
1080p and 720p are best quality for giffing if you want your gif to look crisp and hd. here are some ways to download videos:
share mania is really good for music videos, documentations, live performances, etc. you make an account, find the forum that has the video you like, comment a “thanks,” and a download link will become available. sites like youtube compress the quality so on share mania, you can find the original files that are higher quality and file size.
if you’re unavailable to find what you want on share mania but it’s on youtube, you can download in hd by these:
4k video downloader is my best friend. it’s a free software. you copy the video link from youtube and paste it on here and it’ll download in very high quality
converto is a free online site if you’re not comfortable with downloading the above software. once you paste the youtube link, you’ll have to select “mp4″ and then click the gear icon to change the quality to the highest one available - it doesn’t always do that by default so always double check! i’ve used this in the past and it’s really good! the only issue is that sometimes, it won’t detect/download the video - i assume for copyright reasons but that only happens sometimes!
DIMENSIONS
as of october 2019, these are the best dimensions to use on your gifs if you’re posting on tumblr. i’ll give some examples of gifsets and their dimensions, if you’d like an idea of how they’d look
this set of 8 gifs is 268 px x 175 px
this set of 4 gifs is 268 px x 370 px
this set of 2 gifs is 540 px x 310 px
personally, when i’m unsure what exact length i want to make the gif, i save the uncropped/not resized version as a psd so i can quickly open that and change the dimensions later without having to upload that clip/frames again. but, make sure you don’t have too many frames (~70) that you’re saving uncropped/not resized because that’ll take time and you don’t want to risk your photoshop crashing/laptop slowing down.
the brighter and bigger the gifs + more frames, the bigger the gif size. you want to make sure your gif is under 10 mb because that is the tumblr gif size limit (currently in june 2020)!! your gif won’t move if it’s higher than that. if your gif isn’t moving, try to make it under 8 mb because for some reason, that is the limit for some accounts
COLORING
it’s hard to give a tutorial on coloring because everyone has different styles and tastes, but how i started was using coloring psds.
you can find a lot here and here!
you download the file, open on photoshop, and click and drag the folder of coloring on your gif. NOW!!! i really, really don’t recommend slapping on a psd and calling it a day. these colorings most likely won’t work perfectly with your gif because each scene is so different. different colors, brightness levels, objects, etc. so, you’ll have to adjust the settings. right click a layer and click “edit adjustment” and you can play around with them and delete + add some. this way, you’re making it look better for your gif and you’re learning what each tool on photoshop does.
over time, if you keep adjusting psds, you’ll get familiar with the coloring tools on photoshop and then you can create your own coloring from scratch!
FONTS
for using subtitles on gifs, i use the following settings. i add a stoke of 1 with 100% opacity

to show there’s another person talking (in the background or on screen), i change the text color to yellow (#fefc00). same settings as above, just a yellow font instead of white!
SHARPENING
there are two methods for sharpening.
first method of sharpening: smart sharpen
**if you use photoshop cs**
step 1: follow this tutorial to create a smart filter - when they say “select similar layers” it just means to select all the frames in your layer panel
step 2: do filter > sharpen > smart sharpen with these settings:
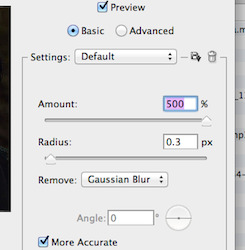
**if you use photoshop cc**
step 1: follow this tutorial to create a smart filter
step 2: do filter > sharpen > smart sharpen
step 3: follow this quick tutorial to see the settings
second method of sharpening: actions
action 1 and 2 - 1 is crisper than 2
action 3
action 4 with tutorial
+ more if you wanna try different ones
to use actions 1, 2, and 3 (basically these are actions that sharpen frames all together, rather than action 4 which does each frame individually), follow this tutorial. if you can’t open the action on photoshop by double clicking, go on windows on ps > actions > click the four little lines on the panel that pops up > load actions. and then play the action as shown in the tutorial! **when you play the action, make sure you don’t have your coloring/psd/text/anything other than the frame layer selected**
FRAME DELAY RATE
for videos that are 25 fps (frames per second), the matching frame rate is 0.05. for some live performances, the frame rate could be 60 fps. for that, the matching frame rate is 0.03.
when you convert to timeline, your frame delay rate will change automatically. it will either change to 0.03 or 0.07 (depending on which is closer to your set rate). these two rates would typically be too fast and too slow. so, once you’re done your gif, save it. then, reopen the gif and change your frame rate to 0.05 or whatever is appropriate and save it again - and make sure your loop option is on “forever”
i hope this helps you guys out!! my fave resource blogs are @yeahps and @completeresources so check out their tags for other tutorials and such!! and feel free to message me as well if you’re confused :”)
626 notes
·
View notes
Link
MOHANMEKAP
HOME
CONTACT
SITE MAP
USER POLICY
PRIVACY POLICY
COOKIE POLICY
Blog
Home>
Health Care>
NETMEDS.COM Review
NETMEDS.COM Review
mohanmekap
August 5, 2020
Health Care
0 Comments
With the increase in penetration of internet deep into Indian homes more and more people are now very much closer towards feeling comfortable for using electronic commerce. Amazon, Flipkart, Snapdeal among others is pioneering the driving towards distribution of consumer goods to and fro deeper into village markets.
This removes the difference of town market from the village markets. With the emergence of growth of mobiles and smart phones in people now finds easier to use apps instead of laptops and desktops.
Then comes the niche marketing phenomenon where we do find that more and more single product electronic ventures are coming up and this makes people believe this as the source of brand management.
Among other niche marketing concepts, netmeds.com has been emerging as the major electronic commerce in terms of medicines. It is trusted since 1914 and it has expertise in excellence of development of pharma in distribution of medicines.
Now, slowly it is turning into one of trusted medicine partners for many and there are many loyal customers including this author.
Netmeds.com is managed by Dadha & Company. It has more that 100 years of experience of dispensing quality medicines.
For prescription drugs users need to upload valid prescriptions and then wait for verification of these prescriptions and on average users find almost 20 percentages of rebates on prescription medicines.
For non-prescription drugs the percentages of rebate are lesser but still it is higher than the local markets.
It also offers best advice in order for providing best health services for people residing in India. Its search bar provides some interesting aspect for knowing of medicines.
It provides detailed generic medicines as well as the lowest value medicines on the same generic medicine levels. It has nice chat option which authenticates first with the phone number OTP and then it does ask for which disease you want a prescription for.
For most of pre-paid orders you get some cashback in their electronic wallets as well as some reward points. If you are using credit card or debit card of state bank of India then apart from 20 percentages rebate you will get ten percentages of cashback on your electronic wallet and those ten percentages of money you will have to spend within 31 days of the current purchases.
Apart from this for every purchase you will get some reward point and that accumulates slowly and becomes some rupees. So in this case you get awards from various sources such as rebates directly and then, money returns back to your electronic wallets and then get reward points which are then automatically changed into some rupees.
The time to reach medicines are very fast and these generally comes in the within three to four days. Packaging part of Netmeds courier service is very fine.
Most of the ordered medicines are packaged nicely so that you only have to keep it and use it. It offers generic alternatives to most of the medicines and for this the pricing of medicines becomes lower.
Most of offline pharmacy shops in yours locality do offers rebates on medicines but most of these rebates are mostly up to 11 percentages maximum. This compares to names which on prepaid offers on prescription medicines come far lower.
If you are on regular medication, then most of time due to the presence of heavy traffic, forgetfulness you missed the order of medicines from your favorite pharmacy.
Taking up medicines are important and for this regular and timely purchase of medicines is a must and for this with the conveniences of online medicine franchises such as netmeds.com, we do find plenty of ideas of how to save important timings in order to have comfortable medicine management.
With netmeds after ordering for a stipulated amount of rupees for medicines you get free of cost courier and also it provides a wide range of wellness products, vitamins, diets, fitness supplements, herbal products, pain relievers, diabetic care kits, baby care kits, other care products, beauty care products and surgical supplies.
In order to contact pharmacists which are a free service, online you can send questions y using either “Ask Our Pharmacist Your Questions” option available to all the drug information pages or by using the Contact Us segment. Netmeds is situated in Chennai.
In my last two months of experience with netmeds I have found paying with SBI credit card is not possible and payment with SBI debit card is possible and I hope they do rectify it.
All products are priced in Indian rupees. According to website they do not charge hidden prices. If by mistake they charge higher than they return the money in an electronic wallet to be used for reduction of price while ordering for next purchases. Delivery charges are Rs. 49 for all orders is however free delivery on medicines orders of Rs. 1000 or more.
After an order is processed the tracking number for your order is delivered and it reaches through phone and email registered with netmeds.com account.
After clicking of tracking order you will find the destination of your order and location of it. What I find convenience so far that I do not have to go to nearby Apollo Medicines for medicines and for some time one or two medicines will come later and for some time, I have to go there time and again to check the status of medicines.
For the last few months Apollo Medicines provides me ten percentages rebate and for some months now it is providing me 11 percentages but as comparing with netmeds I found extremely convenient for following reasons.
I just upload the prescription and it is approved within a day and then I ordered the products and got 20 percentages of rebate on prepaid order plus ten percentages cash back to my electronic wallet on the next purchases to be done within 31 days and then some extra points which will be slowly accumulating into some money after some purchases.
So, medicines reaches within three to four days and all comes with sorted formats and I do not have to worry about it as well as the savings are now much higher.
Technology aims to resolve the hardships for people and it remove the extra time and provides the leisure for you as well as it aims to provide another bunch of heavier rebates than that of offline shops.
This is because while dealing with electronic commerce you are dealing with business to business directly and thus removes, all bottlenecks in between, and the third persons and thus it able to provide share of their profits in terms of rebates to you.
Ultimately it is almost the similar situation that of the gain to all and removing all sorts of time limits those, are there for every human as valuable related to better health.
Mohanmekap
Computer knowledge: Microsoft Office, Microsoft Windows, Web designing, Web hosting, Search engine optimization, Microsoft Project, HTML, Email hosting, Domain Hosting, Blogging, Windows Vista, Windows 7, Windows 8, Windows 8.1, JavaScript, Android, Symbian, phpBB, MsAccess, Cyber security, Mobile telephony, Multimedia, Virtualization, Rich internet applications, Gaming, Advance web, Facebook apps, Chrome apps, Nano technology, Artificial intelligenceYOU MIGHT ALSO LIKE
How to Groom and Shave Your Beard
September 6, 2020
Diabetes is
July 11, 2020
How to Stop Alcoholism
July 2, 2020Leave a Reply
Logged in as mohanmekap. Log out »
Notify me of follow-up comments by email.
Notify me of new posts by email.
This site uses Akismet to reduce spam. Learn how your comment data is processed.
CATEGORIESCategories Select Category Apple (5) Companies (17) Development (72) Entertainment News (131) Facebook-companies (7) Financial system (92) Firefox (3) Games (19) Google (44) Google Chrome (9) google-android-mobiles (41) Hardware (21) Health Care (73) internet-explorer-browsing (5) Linux (8) literacy and Education (59) Management (104) Microsoft-companies (8) Mobile-computing (29) Music and Video (14) Networks (9) opera (13) Politics and conflicts (47) Religion and Spirituality (37) Science (55) Security (63) Software (22) Sponsored Content (22) the-web (58) Travelogue (100) Tutorials (26) Uncategorized (4) Windows (36) ARCHIVESArchives Select Month April 2021 (2) March 2021 (68) February 2021 (23) January 2021 (11) December 2020 (11) November 2020 (25) October 2020 (40) September 2020 (119) August 2020 (353) July 2020 (386) June 2020 (177) SUBSCRIBE TO BLOG VIA EMAIL
Enter your email address to subscribe to this blog and receive notifications of new posts by email.
Join 6,293 other subscribers
Email Address
SUBSCRIBE
BLOG STATS
112,778 hits
RSS - Posts
RSS - Comments
TOP POSTS & PAGES
How to stop emergency or distress number from Power Button of smart phone
How to remove one of two audio tracks in a mkv file?
Oriya to English names of fruits pulses
How to call, send and receive sms in JioFi sim?
Odia to English names of pulses cereals spices grains
The Web How To Positively Fix “jetpack Has Locked Your WordPress Site’s Login Page” 5 Secrets Revealed
Beware of Fake Jio 4G/5G Tower Installation Phone Scam
Mi Wallpaper Carousel Review
Oriya to english names of fruits / pulses
How to Increase Jio 4g Speed
Facebook
Twitter
YouTube
Medium
Tumblr
Copyright MOHANMEKAP 2021
1 note
·
View note
Text
Aperture, an Ichiruki fic
For @darisu-chan‘s prompt below, special thanks to @aesthetic-virgo for helping me find it because tumblr hates me.

The shot is beautiful. Goes without saying. Ichigo's always had an eye for beautiful things, and as a photographer, it's practically a requirement of the job.
But his latest Instagram post has the industry abuzz for reasons that have as much to do with his year-long hiatus as it does the subject of the image itself.
It's a pair of legs; one crossed over the other, set in a slant of lazy nonchalance; toes pointed as if the model were mid-stretch. There's a slash of pale skin, raised higher in the frame implying movement of the upper body, the hint of a chin catching in the shadow as if tilted in challenge, or offering.
It's the absence of, that attracts attention.
There's no face to attach the model to, shrouded as she is in darkness, but it's provocative nonetheless; ripe with secrecy and innuendo, captured in perfect contrast of shadow and light.
The consensus is her beauty, her mystery, the untouchable allure of her.
There's no looking away. Ichigo agrees.
More pictures are posted, bit by bit. And the quality and stylistic choice of the images are the same.
Like breadcrumbs, Ichigo unveils who they agree must be his muse, in snapshots of similar, potent and frustratingly teasing photos.
Whoever she is, there's something otherworldly about her.
There are delicate pale hands clutching flannel sheets under the watercolor softness of the dawn, the retreating night hiding the softness of her forearms before tendrils of dark hair and a pale forehead graze the bottom of the frame like the trailing fingers of a caress.
In another, there's that same spill of dark hair, a pale temple from that same forehead, a sharp, cleverly arched brow with wrinkles at an eye they haven't been graced to meet yet; against an overexposed wall. The sun, like a spotlight, is merciless and harsh, but the dimple at her cheek is more amused rather than afraid.
They start to think that if Ichigo doesn't love her yet, he will.
Washed out in honeyed yellow light is her legs once more. One of them is hooked over the arm of a chair, a black pump dangling from the toes while the other foot is propped up, shoeless, against it. Her knee just kissing at her chest before it's interrupted by another strategic glare of darkness. It's the same casual sort of stretch; automatic, unthinking, intimate.
There's a suspicion that the shots have been made to look that way, that the intention had been to convey snatches of a romance, dreamlike and fleeting; that Ichigo's model is just a foil for a muse in a metaphor of voyeuristic suggestion.
But he's made use of the dark to so carefully shelter her from his gaze even as the little she bares tantalizes him for moremoremore that they second guess it all together.
Perhaps that's why he's holding back. Ichigo's letting them see what he sees begrudgingly, an idea made more clear at the announcement of his next photo gallery.
He hasn't replied to any of the comments that have bombarded each post with questions in the three months since it all began which isn't surprising given that every image thus far had been devoid of captions, explanatory or otherwise.
A management made post changes that to announce that Ichigo's next photo gallery show is called Lover, and the accompanying picture is taken overhead of a table, coffee rings, and chips in the wood with a professional camera and a host of unidentifiable reels of negatives. It's suitably impersonal and meaningless, but it's so out of character that people take notice immediately.
The floor chosen for Lover, unsurprisingly, is packed to the rafters, and while the announcement photo was bland, the host of posts Ichigo actually did make previously to it is more than enough of a draw.
Each canvas lovingly renders his mysterious muse, bathing her in light whilst cradling her desperately, jealously in the dark. She appears to the audience in parts and pieces as she has on Ichigo's Instagram page like she's beckoning them to puzzle her out as Ichigo has.
And they think they do as they catch glimpses of the defiant lift of her chin, the tease of her grin and the flirtatious wink of her eye.
There are glimpses of her life in the lightning strikes across her skin, the damaged elastic of her body around her thighs, her stomach. There are other scars that litter her, less obvious in origin, that have healed in different shades of pink and white and brown.
She has freckles; flecks of starbursts in snow on the outside of her shoulders, the nape of her neck, the tip of her nose.
She squints a lot, the lines around her eyes aren't just for the quickness of her smile, though that's obvious too.
Her lips are full, but chapped. She bites at them, an oral fixation which more than one photograph attests to; teases her for, with every exposure of her teeth mid twirl of a straw, spoon stretching her mouth and lollipop bobbing from rosebud lips.
And while there's a rigidity to her posture when she knows she's the subject, there's also a fluidity in the splay of her arms, the relieved arch of her neck, the slump of her shoulders.
She's not used to being the center of attention, but according to Ichigo, she deserves to be. And in his eyes, she is all he would want to pay attention to at all.
For all that this is his show, Ichigo is nowhere to be found, and his muse is not amongst them either; ethereal creature that she is, they're convinced they'd know it was her by her sheer presence alone.
The opening night of the gallery ends without either of them making an appearance.
The following morning, an Instagram post is uploaded, and most would think it's a simple thank-you from Ichigo's management for everyone's support of the event. Instead, what it actually is, is a video:
It's from the evening before. Most of the overhead lights have been switched off though, except for one, and the gallery is empty save for one woman, and one man. Ichigo.
Their backs are to the camera, but his bright hair is an easy enough identifier.
But for all that she's standing there before their eyes, his muse; she's hidden from them still with the comforting bulk of Ichigo's shadow to guard her. Still protecting her, still hoarding her for himself.
As she stares at the photograph illuminated by the only light in the gallery, she murmurs, soft and brittle and hopeful, "Do you mean it?"
"Rukia." It's an incantation, a plea. The single word trembles in the whisper it's encased in.
Her inhale is shaky, "Do you mean it, the way you see me?"
And they all hear the undercurrent of her question: like I'm precious, like I'm lovely, like I'm fragile, like I'm perfect, like I'm not; like I'm yours?
His reply is a ragged exhale.
The video stops.
The caption reads: I wouldn't look anywhere else if you let me.
Kudos | Ko-fi
64 notes
·
View notes
Photo


No Hope // Always Hope
Not who you wanted me to be, but there’s still hope inside me
~Please click and/or open in new tab for better view!
So I felt bad for not posting any real art (as in I put major effort into it) in a while so here’s a piece I whipped up last night! The idea was that Bendy never wanted to turn into the demon everyone saw him as, because he still has Henry’s hope inside him from when Henry first lovingly created him so he’s waiting for when things will change and be made right
the image itself is like that viewing device with the golden messages that I thought would be a cool addition! hope you guys like it :D (also sorry about the low quality gif, tumblr won’t let me upload a higher quality one :|)
(please don’t repost or use w/o permission, and leave my description; thanks! reblogs always appreciated!)
#bendy and the ink machine#bendy the dancing demon#bendy the ink demon#bendy the demon#bendy#beast bendy#ink bendy#batim#horror//#melting// ?#gif warning#i love bendy so much man#my favorite in this drawing is inky#i named them in the SAI file bendy inky and beasty respectively LOL
3K notes
·
View notes
Note
What’s your opinion of tumblr versus AO3 for beginning fanfiction writers?
Tumblr is a social media platform that would rather put money toward marketing ploys for rich investors than give their users what they want. They have repeatedly told us to open wide and then shit down our throats when it comes to fundamentals like formatting long text posts and searching for fics. Anyone who posts fics to Tumblr has to deal with that, and the bugs are always present because the app is often changing and usually not for the better. There are also reports that Tumblr is losing money. That’s something we should be paying attention to as users. The site may go the way of LiveJournal, which is why it’s critical to follow your favorite writer’s other social media.
Tumblr’s audience these days is a mixed bag when it comes to participation. My data pulls I have running on the back-end since I started here suggests that following the NSFW ban in December 2018, the interactions between readers and writers has tanked. I’m hearing the same on many, many writer blogs, which likely explains the resurgence of networks. It’s so hard to get our works circulated here now with the way Tumblr has changed their search bar. Getting a blog started and growing a following from zero is very hard to do. I think it’s harder now than it used to be. Is it impossible though? No. I’m still seeing new blogs do well, although admittedly it’s often because well-established blogs are going to bat for them. My own blog gained a large following that way.
AO3 is less visually enticing than Tumblr is, but they don’t have formatting bugs. They also allow for users to leave large text blocks of feedback (vs. multiple asks on Tumblr), save fics to read for later, and has a subscription system that will send you an email when your favorite writer updates. That should be enough of a reason to post there, since those are the lead complaints about Tumblr. Posting there has been a very positive experience for me in two significant areas: 1) the Hit count has proven to me that my fics are getting read whereas Tumblr makes me feel like a has-been, and 2) the feedback on AO3 is of higher quality and is more likely to talk about what I actually wrote. Back when I asked my blog which platform they preferred, the majority of respondents preferred AO3, mostly because of the Bookmarks and ability to leave longer feedback.
I do have a lot of opinions about both platforms, but the most important one is that the “us vs. them” business regarding reader-inserts vs. shipping fics has got to stop. A lot of Tumblr vs. AO3 talk is centered on that. I am still reading that shipping fics *belong* on AO3 and reader-inserts *belong* here, and that’s a crock of shit. That’s voluntarily limiting one’s audience because one might be scared to be a small fish in a big pond. If you open up your blog showing that kind of fear from the jump, you’ll look like you have no confidence and no one will want to read your stories, no matter the platform. I have been posting reader-inserts on AO3 for a while now and have had zero hate for it. It’s also worth noting that I get more feedback on AO3 even though AO3 subscribers are only 5% of the audience I have on Tumblr. That’s how awful the silent reader problem is here.
Whether a writer is new or not doesn’t really matter anymore, at least from where I’m sitting. I am a well-established blog with a large audience of thousands of people and I’m getting the same amount of traffic and feedback that I was when I was about 3 months old. Just because one fic does well doesn’t mean they all will. Your audience will change as the fandom changes, so it’s important to self-examine and truly know the why behind your choice to upload.
If your main goal is to get popular ASAP, neither are the platform for you. If your goal is to upload stories but you want to invest time in making pretty banners for everything, Tumblr is your best choice. (I upload on AO3 only, but I still make posts for all my fics on here because I like doing banners and they advertise my fics well enough). If you want to upload with the least amount of headaches and you want your fic to be discovered via tags, AO3 is the best call. That platform is also is very stable as a non-profit; it’s not going anywhere. There are also other platforms to consider.
At the end of the day, you can mix it up, get creative about your marketing, play it safe, etc. There is no “one size fits all” method to getting out there and growing an audience. Each fandom is different. Each genre and trope are different.
22 notes
·
View notes
Text
Camgirl 101 - 2019 Edition (The Absolute tl;dr)
I wrote the first “Camgirl 101″ nearly 6 years ago - wild to think that so much time has gone by! So much has changed about this industry, and yet in many ways, so much has stayed the same. Since my initial “How 2 Cam” post is a tad outdated at this point, and since I have the time to kill typing away on tumblr dot com today, I figured I’d do an abbreviated, updated 2019 edition of the basics of the basics of webcam modelling, as well as my top tips and tricks to making the most out of your initial push as a camgirl.
What site should I cam on? The site I cam on is MyFreeCams, but there are other popular sites out there, such as Chaturbate and Nood (just to name two of many, many more). I would suggest sticking to sites that have been established for a while to be on the safe side, as many new sites are opening, but not all actually attract much in the way of traffic. MyFreeCams is female-only, where Chaturbate allows males and trans performers as well. Nood is a higher quality streaming platform, but you’ll need to be OBS savvy before starting, so it’s better for people who already know what they’re doing, at least to some degree.
Because I work exclusively on MFC (and have been doing so for the better part of six years), the advise I give is specifically about MFC. While most general advise can be extended to other platforms, things like payment processing and technical support I know nothing about outside of MFC.
What do I need to get started as a cam model? You’ll need a steady internet connection, a webcam, some sort of a lighting source, and yourself. You do not need fancy equipment, a perfect cam space, a complicated profile or an ungodly amount of self confidence to get started - while these things can help, they’re not required, and are things you can amass over time as you become more established.
How do I make money? Camgirls on MFC make money in tokens. One token = $0.05USD earned by a model. You make money by persuading paying patrons, known as Premium Members, to tip you tokens. Payments are processed on the 1st and 16th of each month, and can be sent to you via cheque, wire transfer, or through third parties. I advise you choose cheque or wire transfer, because third party payment processors have been notoriously unreliable over the years. For US models, you can also have your income direct deposited. For international models (aka anyone outside the US), you’ll either need to��‘make payout’ for a wire transfer, which is earn a minimum of 20,000 tokens ($1000USD), or you can opt for a cheque in the mail for free after earning a minimum of 400 tokens ($20).
Camgirls do not get paid hourly. All earnings come from tips.
What can I do to encourage people to tip or talk? Generally speaking, you entertain. Camgirls entertain by engaging in conversation, showing off their bodies, stripping, and doing live masturbation or sex performances, in addition to selling homemade content, whether in the form of videos and photos, or over apps like snapchat. The best way to increase your odds of making money is to make people like you. For this, you’ll need social skills, physical attractiveness, patience, and business savvy. While it may seem simple, this process is incredibly dynamic and complex; for this reason, I (nor anyone else) can tell you with any guarantee how to make money. My best advice is to read this blog for inspiration, watch cam models to see how others are doing it, and then most importantly, try it yourself. There is only so much you can learn by watching and asking questions: the rest you will have to figure out as you go.
Do I have to show my face? Yes. You cannot wear a mask, or hide your face; it’s against the Terms of Service of the site, and you can’t build relationships with human beings when you have a bag on your head. That’s just not how it works.
Do I have to get naked or masturbate? No! You don’t. While these things are definitely the norm on the site, there is no rule that says you have to get naked on MFC. You can literally log on and just stare at the camera, unmoving, silently, for hours on end if you want - no one will stop you - it just obviously wouldn’t be particularly entertaining, and would be unlikely to make you much money. If you choose not to strip, or choose to restrict your stripping to certain environments (only in private, only with certain people, only at certain price points), you’ll have to figure out how to entertain in other ways. I would like to highlight that this is not only something non-explicit models have to figure out: the best of the best on the site do far, far more than just strip. Sexuality is part of it, but not the whole story.
How often should I cam, and for how long? The most successful models on MFC tend to rely mostly on the support of their repeat customers, known as ‘regulars’, for the bulk of their income. Making regulars is an important part of camming, because members who return again and again build a relationship with you, and those who have supported in the past are more likely to support again in the future (a psychological concept known as the ‘foot in the door’ phenomenon). Rooms that have groups of returning regulars are also more attractive in a community aspect, because the members aren’t only returning for the model for a sense of togetherness and familiarity, they’re also there to talk with their other member friends.
In order to build a base of regulars, you should aim to cam relatively consistently, and at somewhat similar time slots. There are no real “best times” to cam - the best times to log on are times where you can expect yourself to be the most consistent over the long term. This way, people know where and when to find you. As far as how long your cam shows should be, this is up to you for the most part. I prefer to cam between 3 and 4 hours at a time.
What is camscore? Camscore is a rating system that is based off of tokens earned per hour. Every new model starts with a camscore of 1000, and depending on how many tokens she makes each hour, her camscore will either raise or drop. The goal is to make as many tokens as you can an hour so that you can raise your camscore - this will sort your icon higher up on the main page, making it more likely that random passerby’s will see your room and hopefully enter it. While camscore is important, it isn’t the only way that members find model’s rooms. For the first six hours of broadcast time (NOT account life: broadcast time, as in time actually live streaming), models are given a ‘new model’ badge on their icons, which can attract members to check out the room. While ‘sort by camscore’ is the default settings for members, they can also choose to sort by other styles, meaning a low camscore isn’t always a low placement on the page. Lastly, models can use social media to boost their visibility. All that said, a low camscore can make things increasingly difficult and frustrating for a model; please read here for more details on overcoming low visibility:
http://camgirlsurvivalguide.tumblr.com/post/169514561900/how-to-overcome-low-visibility
Will camming hurt my chances of getting a vanilla job? Depends on the job. There is always a chance that the people you know will find out that you cam. The best things you can do are weigh your options carefully before starting, geoblock any areas that you don’t want watching you (you can block regions from accessing your cam, but this doesn’t protect against VPNs, and doesn’t stop people from taking screenshots or recordings of your streams and uploading to other unblocked sites), and take caution not to use the same photos connected to your real name as you do for camming - but there is no way to ultimately protect yourself from the stigma of sex work. Facial recognition software is becoming more accurate each and every month, and I feel that soon, programs like google image reverse search will be able to quickly and easily pull up any and all profiles connected to certain faces; take that as you will.
Do camgirls pay taxes? Yes. You are in charge of your own business, including filing and paying your own taxes. This is different in each country/region, but it’s a good idea to save 30% of everything you earn for tax purposes. Hire a tax accountant to do it for you properly so you don’t get audited.
Do you have any additional tips to share? Why yes! Yes I do. Here are some miscellaneous shit knowledge that I’ve picked up over time. Enjoy.
- I cam using a mac. Before I cam, I’ll often take 10 to 15 cute selfies using the photobooth app, which I then quickly edit using VSCO cam on my phone. I upload these to an album on my MFC Share (the content hosting ‘store’ page that MFC has) so I can sell these cute photos to people for cheap. Often I’ll make a monthly selfie album that I upload photos to as the month progresses, which encourages members who purchase it early in the month to keep checking back for more photos. It’s a good way to hype myself up and feel cute before cam, while also creating content to sell that fosters the building of my regular base.
- Also with respect to camming and my mac, if I do something sexy on cam, like a strip tease or a bath show, I’ll hit record on my photobooth app while I’m streaming to record my webcam’s output. I can then edit this footage after I log off cam to sell for cheap, or to give to members who contributed toward my goal or something.
- It’s good practice to reply to all offline tips. While I might not reply to video or photoset sales through MFC share all the time (sometimes my inbox gets super busy), it is important not to let offline tips go unnoticed. Appreciating people’s tips makes them want to tip again. Ignoring them makes them not want to return.
- Do not just sit on your phone when you’re bored on cam. Get up, dance around, show off your body, talk to yourself about nothing. You’re not there to be entertained (although it’s fun when you are, of course) - you’re there to be entertaining. Shake off the anxiety and shake ya butt instead.
250 notes
·
View notes
Note
would u ever do a gif tutorial?? i love your gifs !! 💓
first of all, thank you 💖💖 and sorry this took a while to answer/make, i have had a lot going on and found it hard to make myself focus on this! but here it is now :D
i did make a tutorial earlier this year, but since i feel like that’s slightly outdated now (because i’ve changed the way i make my gifs quite a lot during this year), here’s a new one :’)
in this tutorial i included how i:
download
cut out the part i want to gif
import to photoshop
how to use actions (because i’ve started using that a lot and will in this tutorial)
crop (action)
put the text on (action)
sharpen (action)
colour (psd)
save
‘delay’ the gif so it’s a (in my opinion) good speed (again with an action)
i use photoshop cc 2018, but i think as long as you can open video clips in it and it has the ‘timeline’ you should be fine no matter what ps you have. (don’t hold me to it, though, that’s just my own speculation.)
i’ve included some things too:
an ‘action pack’ including: crop, sharpening, text and ‘delay’.
3 colouring psds (2 from the last tutorial+the one used for this tutorial)
i’ll be showing how i made this 540x300px type of gif:

from this gifset.
(tutorial under the cut! warning for a long post, with a lot of text and pictures. sorry if this is very in depth i just can’t stop talking sometimes. some things might be small details, but it’s things i wish i learned sooner myself. anyway lets get into it! also i’m not an expert, just speaking from my own experience.)
downloading the video
the first thing i do is download the video i want from clipconverter.cc. paste the link in the field, press continue, choose mp4 and highest possible quality (preferably high definition (hd) 1080p or 720p) and then press start. it takes a while to process the video, but once that’s done just press download and wait for the video to download, which takes another while.
if you know which part you want, and don’t wanna download a full video, you can just put in what part you wanna download like this at the bottom:

cutting out the part i want to gif
i use quicktime player (download link) to open the video and then i cut out the part i want to gif using the ‘trim‘ tool, found under edit -> trim… i always leave more than i need when trimming, just to be sure i get all of what i want to gif, then trim it a bit more later in ps.

trim by pulling the yellow things until you’re happy, then hit the button to the right.
when you feel like you have the part you want, just click file -> save… and name it and save it where you want.
importing the clip to photoshop
i simply import a clip by pulling it from the folder into ps, like this:
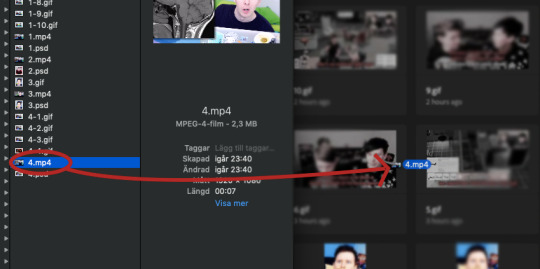
this will open up your clip like this:
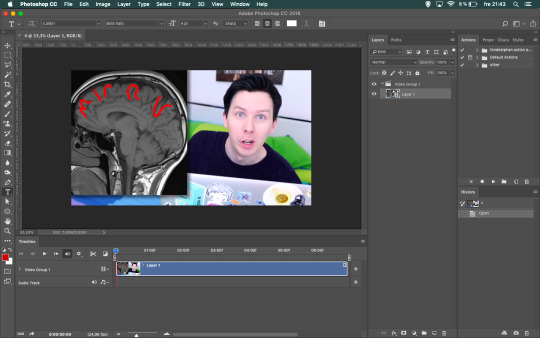
i always work in the video timeline like this, because i find it easier to move stuff around in it - especially text. and because you can listen to the video clip as you do the text part of the gif, so i don’t need to have it open on the side.
how to use actions
using actions may sound hard, but it’s honestly the best discovery i’ve done in ps this year! now i tend to use it more often than not, because it makes gifmaking simpler (in my opinion). basically, the action does the things for you instead of you having to click a lot of buttons
depending on how you’ve set up your ps, the ‘actions’ panel is on the right. if it’s not, open it by clicking window -> actions.
to import an action to photoshop, you click the little lines at the top right corner of the ‘actions’ window. then click load actions…

find the action (.atn) you wanna use and click it to add it to ps.
then you just click the action you wanna use in the actions window on the right, and hit the little play button (see pic below) and let ps do the rest.
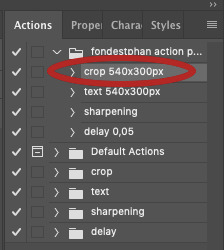
click the action (red circle), then play (blue circle)!
nothing more, nothing less!
crop (action)
following the steps above we’re now gonna crop the video.
my ‘big’/one line gifs are usually 540x300px because i find that to be a good size for those.
click the ‘crop 540x300px’ action and ‘play’. done!
and before we move on, this is usually when i trim the gif from the excess i left when trimming it in quicktime player.

place the marker (red circle) where you want to cut the clip, use the scissor (blue circle) to cut it. click the clip you don’t want anymore and delete it.
text (action)
when i make gifs with text, i find it best to do the text right after the cropping. if the gif doesn’t have text, i just go straight to ‘sharpening’.
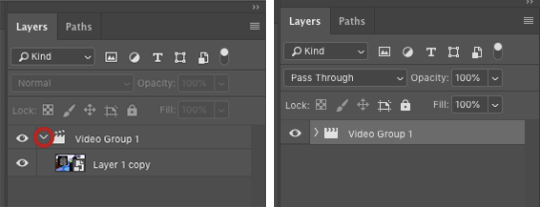
first close the video group by clicking the little arrow next to it, then click the video group:
add the ‘text’ to the gif using the action. the text layer won’t go all the way out, or it might be too long depending on the clip’s length, so just pull it so it fits the size of the whole clip:

this something to remember to check once we get to colouring as well.
then what i do is that i play (the button marked in blue below) the clip in ps, listen for what i want to be in that particular gif and then pause where i want to cut it, and simply cut it with the scissor. make sure the text layer is selected before cutting it.

you can either keep the layers like this, or you pull down the top one to the same line in the ‘timeline’. i always want them all in the same row because i find that simpler.
i keep cutting the text where i want the gifs to end. you could say that each section of text is a gif in the gifset, because that’s how i think when i gif like this.

then it’s just to put the text you want for each part of the gif.
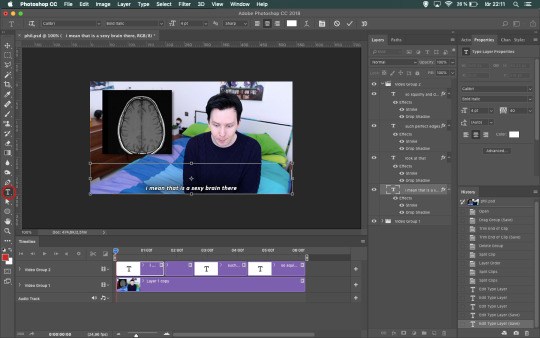
click the section of text you want to write in, click the ‘type tool’ and then the text on the gif to start writing.
i always make my text boxes higher than i need to, because i never know how many lines the text will be. then i just hit enter to jump down as many lines as i need in order for the text to be at the bottom of the gif.
sharpening (action)
when you’re gonna sharpen the clip, you’ll need to open the video group that you previously closed again.
click the ‘video’ layer and apply the ‘sharpening’ action just like with the other actions.
now that we’ve sharpened it, when saved the gif will look something like this:

colouring
i most often colour every gifset by itself nowadays, because i love experimenting with colours and try to find something that works for every gif/gifset. it can be challenging, but i personally enjoy that kind of challenge!
for the tutorial i made earlier this year i included some psds that you can find here. you can find the colouring i made for this tutorial there as well! if you just wanna apply the psd and not colour from scratch, i explained how you do that here!
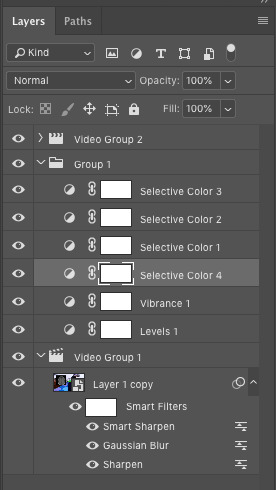
the layers i use are:
‘levels’ (to lighten/darken)
‘vibrance’ (to make the colours ‘pop’)
at least one ‘selective layer’, but usually a few more (to experiment with colours and change/desaturate colours completely)
sometimes a ‘curves’ layer as well (if the gif is very dark or just need some more light other than what the ‘levels’ layer can do)
sometimes i use ‘hue/saturation’ as well (if i wanna change a specific colour to another or saturate it completely)
all adjustments layers i use can be find at the bottom of the ‘layers’ tab, the button is called ‘create new fill or adjustment layer’:
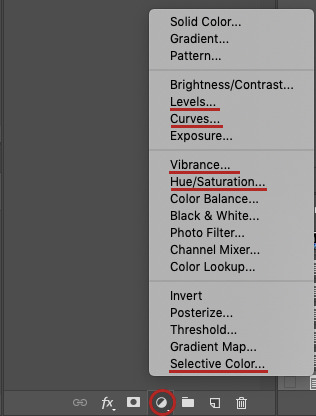
since my colourings differ from gifset to gifset, this is just generally what i do when colouring. it also varies depending on if it’s more colourful gifs (like this or this, or like the phil one i’m gonna show now), or just one more subtle coloured (like this, this or this).
if there’s requests for more colour tutorials i can make more :’)
but now back to this gifset!
i always start with adding a ‘levels’ layer. my settings for this gifset was:
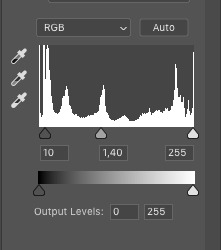
the first value is shadows, second is midtones and third is highlights. i usually keep my shadows value at 10-20, midtones 1,20-1,50 or 1,60-1,70 if i need to, and leave highlights as it is. (i don’t use the output levels at all.)
after ‘levels’:
second layer i add is usually ‘vibrance’. (sometimes i add ‘selective layer’(s) before ‘vibrance’, but i find it easier to do ‘selective layer’(s) last.) my settings for ‘vibrance’ is usually:
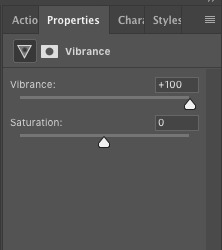
so i basically always turn ‘vibrance’ up to +100, sometimes i’ve used ‘saturation’ too and put it at like +10 or +20 but i find that to be a bit too much most times.
after ‘vibrance’:

‘selective layer’ is for me the most frustrating part, but also the most fun because you can get such cool colours with it - or even just enhance the already existing colours just a bit.
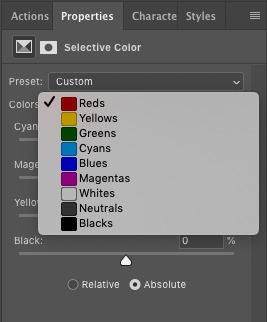
‘selective layer’ have many different options and depending on what my ‘goal’ for the gifset is, i use these differently. something i always try to have in mind, though, is that the colours ‘disappear’ a bit when i upload the gifs to tumblr and it’s okay if it’s a bit too ‘much’ in ps.
my biggest tip is probably to explore it on your own and play around with it a lot. that’s how you learn what works and doesn’t work and also what you personally like or don’t like. if it doesn’t look good, just delete the ‘selective layers’ and start from scratch again.
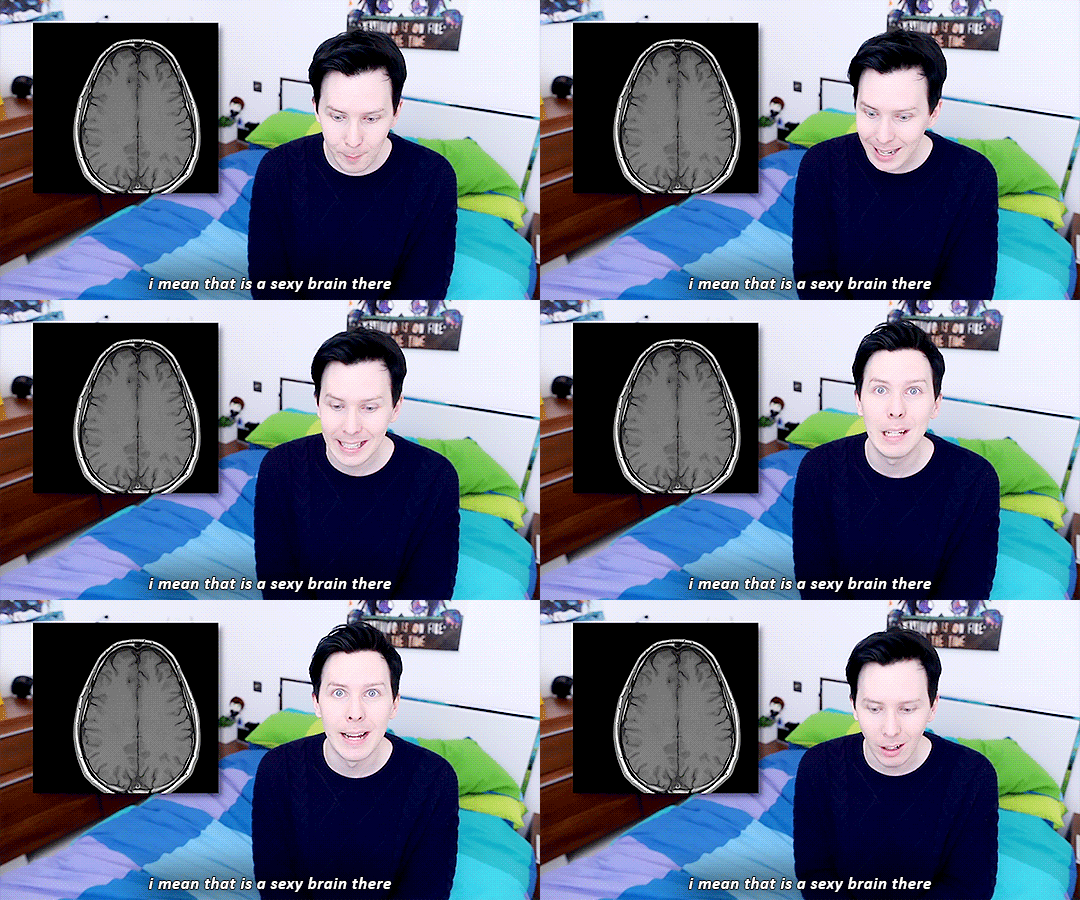
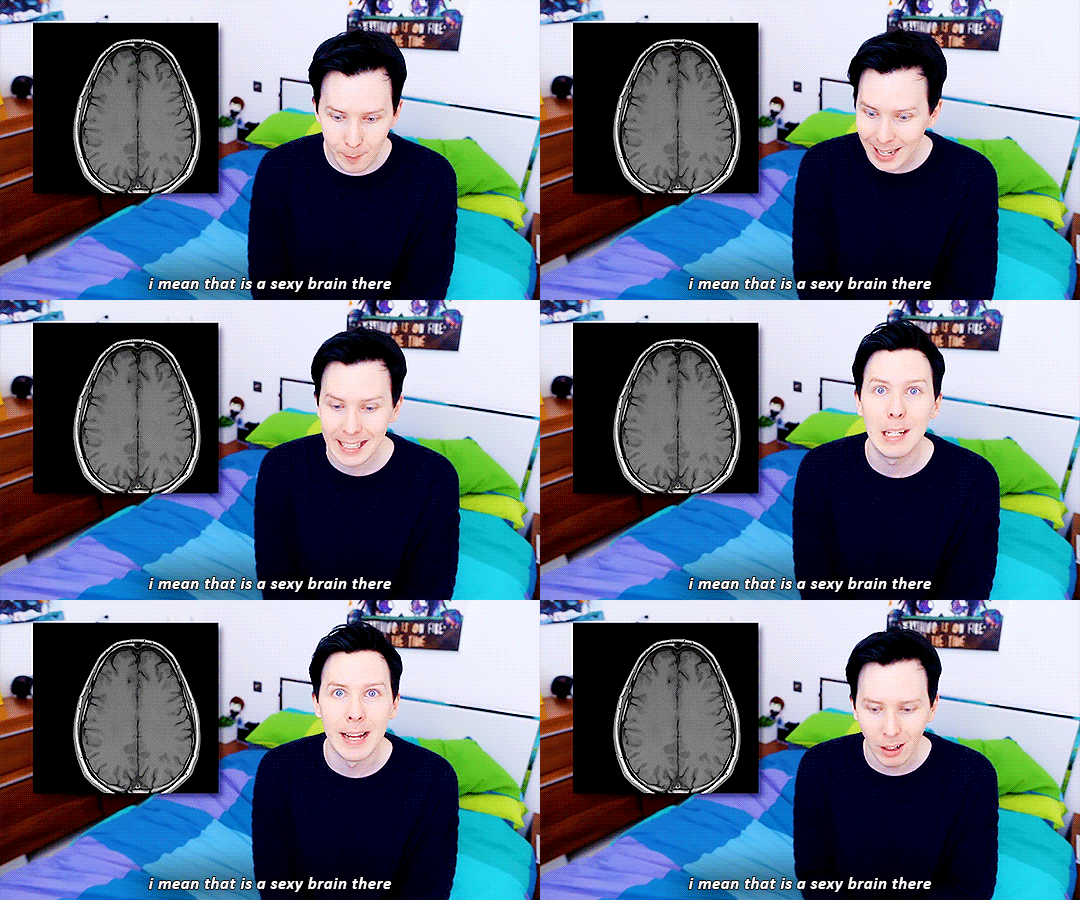
my first layer is always in the reds and often in the black one as well. for the phil gifset my settings were:
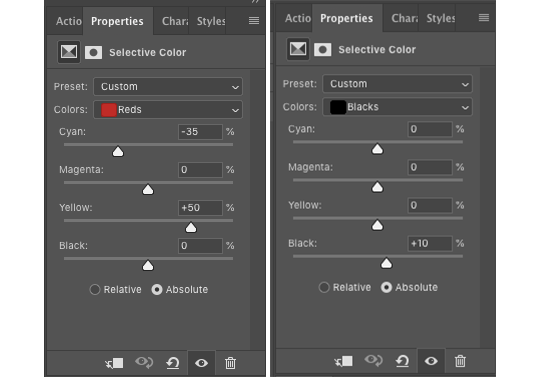
in the reds i enhance his skin colour and in the blacks i make everything black a bit darker. if it’s a colourful gifset i always make the reds a bit ‘stronger’ than i need to, because a lot of the skin colour disappears when i keep adding layers and changing the colours in those.
after this layer the gif looks like this:
in the second layer i played around with the blues and magentas, to try and change the blue and magenta colours in the gif - in this case phil’s sheets, his sweater and his eyes.
my settings ended up being like this:
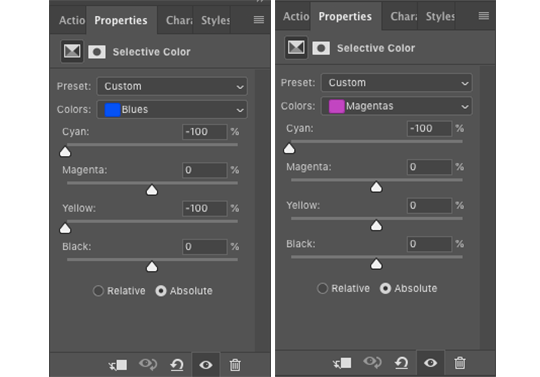
and then the gif looks like this:

layer 3 in this gif is just magentas, in which i kind of saturated the magenta and blue colours a bit.
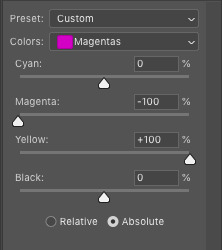
then it looks like this:
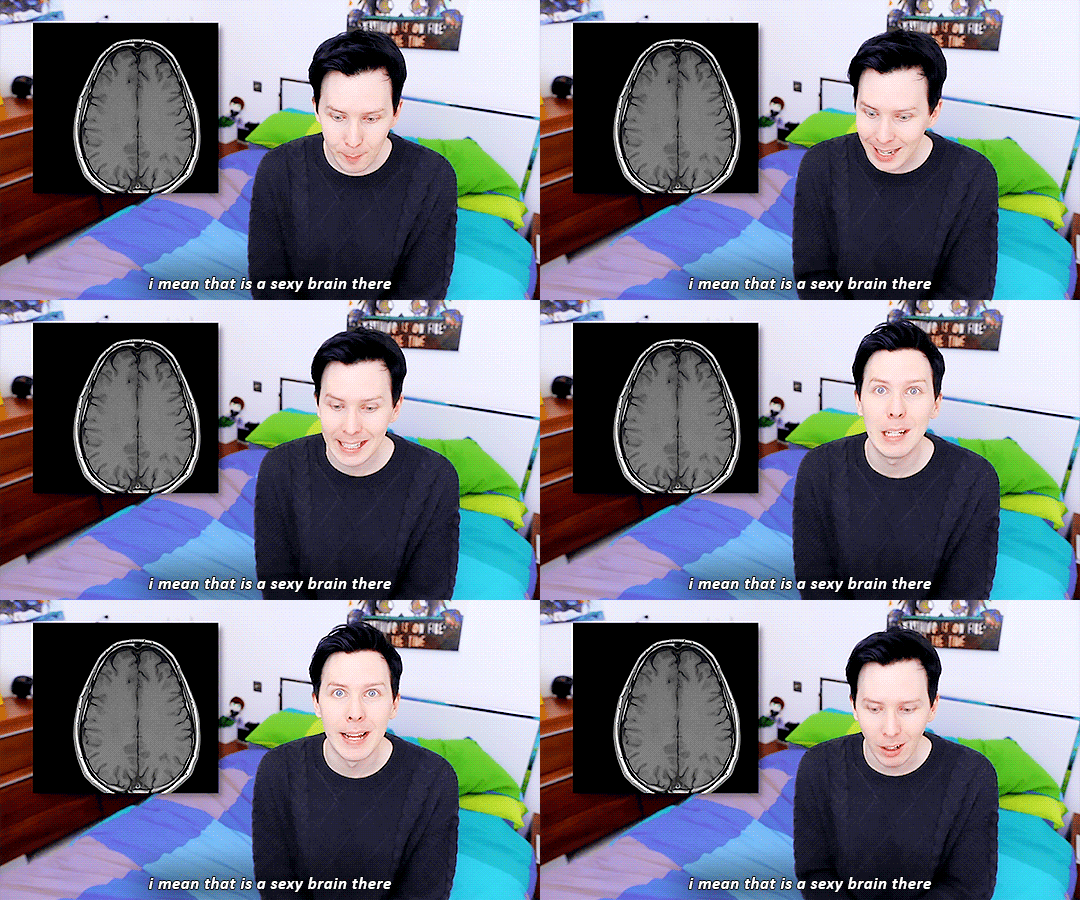
i wasn’t really happy with the green (the pillows) in the gif, so i added another layer in which i changed yellows and greens, and put it beneath the rest of the ‘selective layers’.
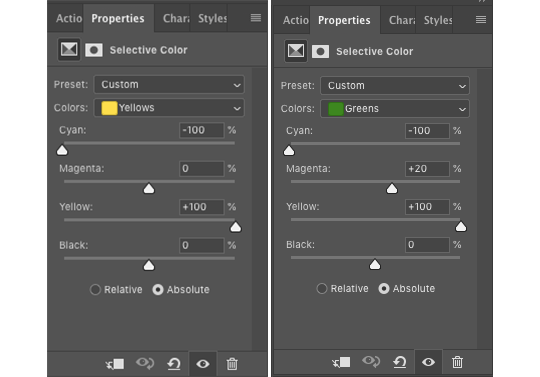
in this layer i played with the yellows and greens, because green always contains yellow and green. putting the cyan to -100 in the yellows layer will make it more reddish and the yellow at +100 will make it more yellow. changing the greens and putting the cyan on -100 made it more reddish too, the magenta at +20 gave it a kind of orange-ish tone and yellow at +100 made it a bit more yellow.
and this is how the gif looks now:
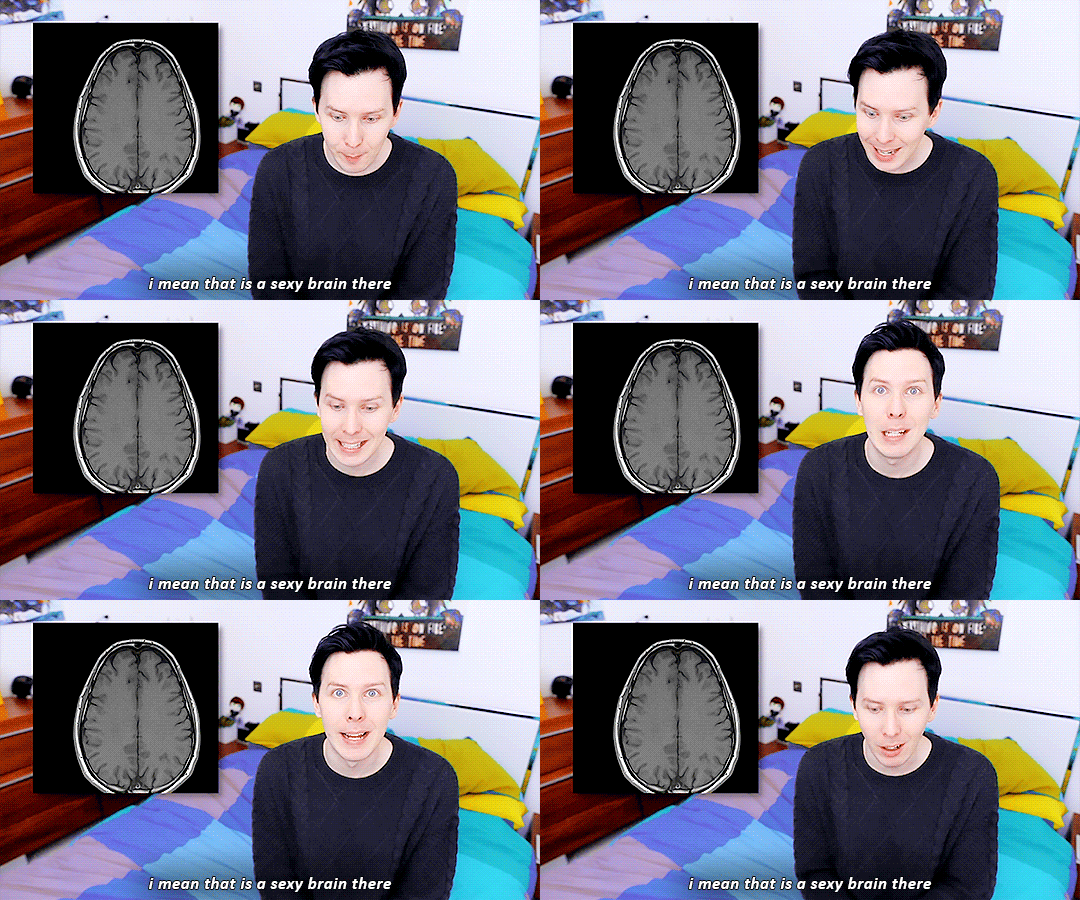
all in all, i find that to get good or interesting colourings you just have to play around with the different layers. and add more ‘selective layers’, to change the colours even more. as i said before - if it doesn’t work or looks weird, simply delete the ‘selective layers’ and start over :’)
saving
one of the final steps in gifmaking is saving. i save my gifs in two steps, and this is the first one.
to save the first gif, just place the markers like this:

so it matches with the ‘text’ layer.
click file -> export -> save for web… for my laptop it takes a little while to process it, but soon this window will pop up:

in the bottom left corner of the window you can see the gif size.

it needs to be under 3mb for it to work in a tumblr post. if it’s over that, you can either exit the window now and shorten the gif a bit more - or you can save it now and remove frames in the ‘delay’ step further down. i personally most often do the latter because i find that easier.
on the right of the gif are all the settings, mine are:
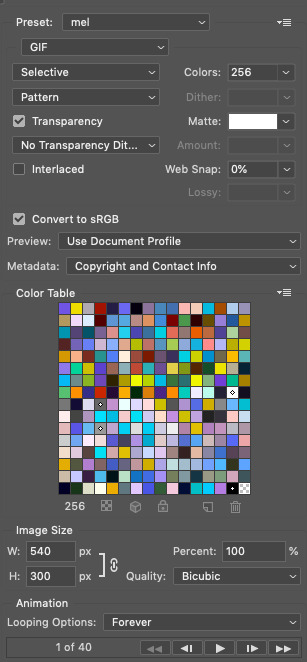
i mostly focus on the top half i find ‘selective’ and ‘pattern’ to be the best settings, but that’s a matter of taste really. you can always play around with it until you find what you think is best for your gifs.
and make sure the looping options at the bottom is set to ‘forever’, so the gif doesn’t suddenly stop.
when you’re done, click save… and save your gif where you want.
move the markers (red circles) to match with the next text layer to and repeat the steps to save the next gif.
‘delay’ (action)
once the gif is saved i always open it again to change the ‘frame delay time’ and sometimes (like for the gif used in this example) i add another ‘vibrance’ layer if i find that the gif lacks some colours. you can of course do this during colouring, but for me this works as well.
find your gif, open it in ps. choose the action called ‘delay 0,05’, then hit play. this will make the gif a bit slower than it is when you first save it in ps.
if you want to add another ‘vibrance’ layer, you can do so now. in the ‘layers’ tab, scroll all the way up and click the first layer and then add another ‘vibrance’ layer and set it to the value you want.
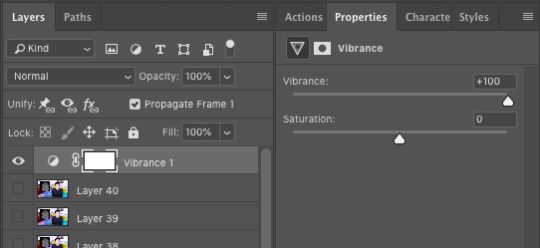
(i usually go for +50 or +100.)
if you know your gif is too big (over 3mb) from saving it earlier, you can now delete frames in order to make it smaller. what i do is delete one or two frames at a time until it’s under 3mb.

to delete frames, click the one frame, hold ‘shift’ and click as many frames back as you wanna delete. click the tarsh bin (blue circle) to delete them.
once you’re done, click file -> export -> save for web… again to save your gif. i usually save over the one i saved before, because i see no use having two gifs that’s almost the same. i only confuse myself so i don’t know which one is which without having to open ps again.
now you’re finally done and can post your gif(s) to tumblr :D
the final result!
before all effects:

after all effects:
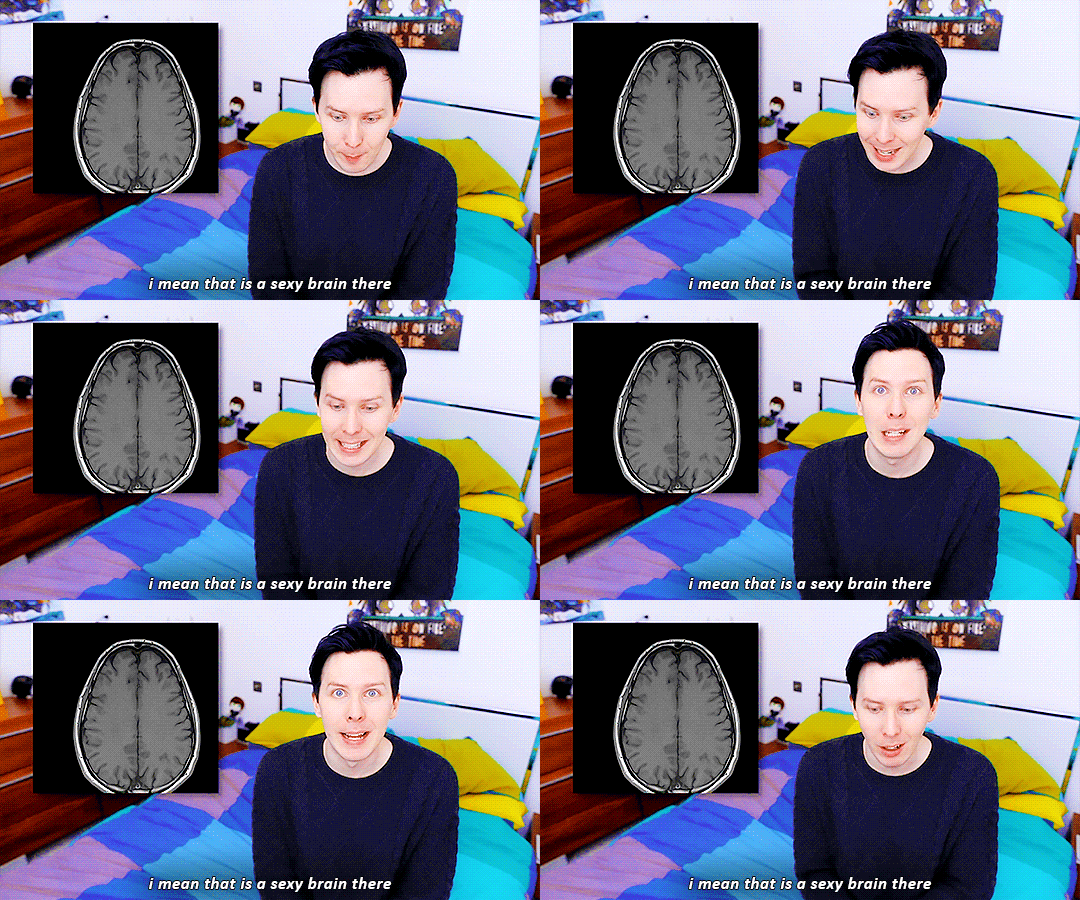
if you found this helpful, please like or reblog! thank you for reading :’) 💖
#anon#asks#gif tutorial#i really hope this makes sense and that i didn't miss anything hhhh iamanxious sjkdhjgdshfkl
126 notes
·
View notes
Text
Using iNaturalist Tutorial 1: Making Observations (Mobile App)
Welcome to the first part in a series of tutorials on using the world-wide citizen science website/app/paradise that is iNaturalist [link]. They have their own tutorials on using the website [link], but *coughs* they haven’t been updated in a while and the interface changed a little.
I’m trying to encourage tumblr peeps to try out iNaturalist, so I created an “iNatters of tumblr” group [link] for us all to see what everybody else encounters, help each other ID things, and otherwise just have a fun time while contributing to science! Want to join us? Just create an account on iNaturalist, and either send me your username (on tumblr or on iNat!) and/or follow the group (click the button in the top right corner of the group page). I will add you to the list of identifiers, and all of your observations, past and present, will be added to the group! Check out my tagged posts about this project! [link]
Figuring out any new website or app can be confusing and frustrating, and I hope these tutorials will make it easier to start using iNaturalist. If anything I say is unclear, confusing, or doesn’t match what you see, just let me know and I will update this tutorial with a better explanation.
These tutorials are image-heavy and kinda long, so they will be under a cut. Note: I have the iPhone version of the app, so you may see a slightly different interface on another device.
Observation Tutorial Part 1: Making Observations with the Mobile App
First Thing’s First! Let’s check out your settings!

Most of these settings are self-explanatory. Automatic Upload The app defaults to automatic upload, which means it will start uploading your observations as soon as you save them. If you are doing a bioblitz, or are in an area with limited cell reception, this option can slow down the app and drain your battery. If you turn off this option, you will need to push the “upload” button to post your observations so others can see them.
Suggest Species This option is MAGICAL. It was first rolled out about a year ago, and HOLY CARP it’s pretty good! But, it does have limitations. First, it requires a good signal and can slow you down and eat up your battery. Also, it works based off a machine-learning system from observations previously uploaded and verified on iNaturalist. What this means: The identify tool can only successfully identify things that have been observed and identified by other real humans. Also, it only uses your main photo (the first one), and it can get thrown off if it was taken at a weird angle, or if there is lots of other stuff in the background (like plants, rocks, other bugs). And, very important to note: it does not take your location into consideration. There is a very heavy user-base in New Zealand, so it is fairly common for species that only occur in New Zealand to be suggested. So, use your best judgement. If you think something is a Booger Beetle, but the app suggests Snot Weevil, ignore the app. OR, you can stick to a higher classification (Beetles) and come back to it later. You can always change your mind!
iNaturalist Network You don’t really need to worry about this too much. There are a bunch of “flavors” of iNaturalist, and which network you select is the one your data will stick to in the event that the iNaturalist Network breaks up. They are more or less regional. More information about the networks here [link]
Okay, let’s take some photos!
Wow, nice! You have two options for making observations with the mobile app. Option 1: Take the photo now, worry about iNat later Option 2: Take the photo using the iNat app
I recommend choosing Option 1 if you are taking photos of things that may move, because the app has a bit of a delay, and the quality tends to not be as good. I use Option 1 almost exclusively, because it’s easier to take my photos and do bulk uploads when I’m inside and not being chased by mosquitos. Option 2 is better if your subject isn’t moving too fast, and if you are just observing a couple things (and also if you don’t want to build up a several-month-long backlog of photos on your phone...).
You can take and select multiple photos! Try to get different angles, and photograph different parts of your subject to help with IDs later.
Advanced iNatter Option If you take photos with your phone to upload later, you have the option of annotating your photos! This is helpful if you have more than one specimen in the photo, or if your specimen is well camouflaged. You can also point out important features, like I did below. Any edits you do to your photos before you upload them can really help out people who do IDs!
Regardless of which option you choose, you will end up at your observation page!
Adding identifications to your observations
From your observation page (on the left above), you can add more photos, add an ID, write notes, and edit time and location information. More on those options later! First, let’s click “What did you see?” to get to the ID page.
If you have “Suggest species” turned on, the app guesses what you saw. Clicking the information symbol to the right will show you more information on each species to help you decide if that ID is a good fit. Feel free to pick whatever you think is closest, and other people will agree with you OR suggest other identifications later.
If you know what you saw, or if you have a guess, go ahead and type it into the search bar. If you have autocomplete on, it will (guess what!) autocomplete what you are typing. If you have a slow connection, LOOK OUT because you might accidentally select the wrong ID due to lag.
Editing Location and Privacy
Depending on your phone’s privacy settings, your photos will automatically have a GPS stamp on them, so if you are adding photos to iNat later, you usually don’t need to worry about remembering where you took them. If you have this feature turned off for your phone, that’s fine! Or, if you have that option turned on, and your photos are GPS tagged, you can still protect your privacy while keeping the location data useful for scientists and researchers.
If you are wondering, “Why is location even important? Why should I bother?” There are a couple answers! First, there are very few species present worldwide. For the most part, in order to identify something, it is essentially to know where it was. Sometimes, you can be vague, and just stating the country is good enough detail to identify something (common for larger animals, like birds and mammals, and larger plants like trees). But other times, you need to be extremely specific. Some insects look nearly identical to each other, but there will be different species living on one side of a mountain range vs the other side, even if they are only 20 miles apart. And also, researchers who are tracking the movement of species in response to climate change can benefit from having access to accurate data--showing that a species of plant is appearing even several miles north each year is crucial to understanding how to manage environmental stewardship.
If you are out and about, and have GPS phototagging on, you don’t really need to edit your location (unless you want to!). If you have GPS tagging off, or the location data was a little off, OR you want to protect your privacy (observations at your house, for example), here’s what ya do:

Click the area on your observation page with location (I blanked those details out of my screencap). You will be taken to a map. Clicking the green arrow takes you to your current location. You can zoom in or out of the map (unfortunately, you can’t just type in an address on the mobile app, but you CAN on the website, and you CAN edit posts you made from the mobile app on the website later!). When the location you want is centered on the map, zoom in or out to set your accuracy (if you can’t remember where you were, but you KNOW you were somewhere in Austin, you would basically do what I have above in my map).
If you don’t want to edit the location, but you don’t want the entire world to know where your photos were taken, you can change the GeoPrivacy setting (kinda cut off in the screencap, but it’s directly underneath location). You can select three options: Open: Everybody can see where your observations were made Obscured: iNaturalist will create large square that contains your true location at some random point within the square. All observations with obscured coordinates will be randomly assigned to one point in that square. Only you can see those coordinates (one exception is if you join a very specific type of project, and you have opted-in to let project curators see obscured coordinates). Private: No location information is shared. You may select this option if you want, BUT keep in mind it will be very difficult for people to help identify your observations! For more information on GeoPrivacy, iNaturalist provides more information here [link]
Adding Observations to Projects
iNaturalist has many different kinds of projects [link]. The “iNatters of tumblr” project is a “collection” project type, which automatically adds observations meeting specific criteria (in our case, all observations made by users I have added to the project). Another type of of project, the “traditional” project type, was originally the only type of project available. It’s great for collecting some very specific observations that you can’t really search for. Two of my favorites are “Mating Behaviour” and “Animated Observations” [both are links]. The downside of these kinds of projects is somebody has to manually add each observation to the project. If you have joined one of these kinds of projects, you can link them to your observation before you save it. You can also add observations to projects any time later.

To link your observation with a project, you must have joined a project first. Afterwards, just click the button and you’re done!
Saving and Uploading
You’re almost done! Just ONE final step. Save!!! Click the big green SAVE button at the bottom, and you see your beautiful observation:

If you have Auto Uploads turned off, you need to click the upload button to start uploading. That’s it! Congratulations!
If you take your photos with a camera, or if you want to upload a BUNCH of observations at one time, you will want to make your observations on the website, rather than the mobile app. Making observations on the iNaturalist website will be the subject of Tutorial 2!
September 18, 2018
#this post took me three hours you're welcome#tumblr inat project#inaturalist#inat#citizen science#inat tutorial#how to#informational#time to go home#insects#beetles
42 notes
·
View notes
Text
How to gif without photoshop (second method)
Hello! A couple months ago I made a tutorial on how to gif without photoshop using the website ezgif. I got a really great response for it and received some requests for the other giffing program I use when I don’t have access to photoshop. The program is called instagiffer; this is a software so it needs to be downloaded but I have never had any trouble with my version.
Warning that this is VERY text and image heavy because I know how frustrating it can be when a tutorial feels like it’s skipping steps and I want this to be as clear as possible. Also please read this on desktop, tumblr mobile kills the quality of gifs inside text posts.
Please reblog if you found this helpful!
This is the video I will be giffing and here is the gif I will be making!

What you need:
Instagiffer
This program has been around since 2013 and I have used it since 2016. Unfortunately, it hasn’t been updated since 2016 and the download link on the official website is broken. That being said, there are a few other websites that still have a working download, which is what I linked to above.
ezgif
Although we aren’t going to use this website to make the gif, we are going to use it to add more color and brightness to the gif.
A video downloader
This is the video downloader I use but basically any youtube/video download website works. There are two ways to gif on instagiffer; using a video and using the built in screen recorder. I will show you how to use both.
A video to gif
This program is a lot more forgiving about video quality than ezgif is, but for best results 720p or 1080p is still the standard. Scenes with good lighting and bright colors turn out the best, but you can still make good looking gifs from darker or unsaturated scenes if you know what you’re doing.
1. Making a gif with a downloaded video
Step One: Getting the frames
First, you download the video you want to gif. Then you open up instagiffer and click on “load video.” Scroll down until you find the video you want to gif and click on it.
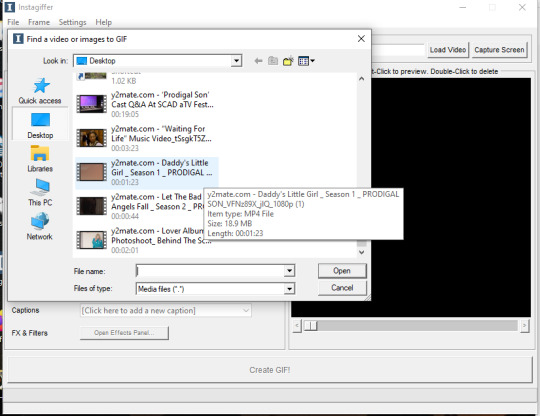
The video will appear on the screen in the right hand side. Go ahead and put “smoothness” up as high as it can go. This increases the frames per second and makes the gif look smoother. It also makes the gif longer, so you may have to bring it down later so it doesn’t go over tumblr’s size limit, but I always start as high as possible then work down.
Next, find the moment in the video you want to gif. You can either use the sliding bar or just type in the start time (you can use hours, minutes, seconds, and millisecond). You also want to put how long the clip you want to gif is. 3 seconds is the default but I usually bump it up to at least 4 (unless I know it’s a really short clip) just because it’s a lot easier to delete frames than add them.
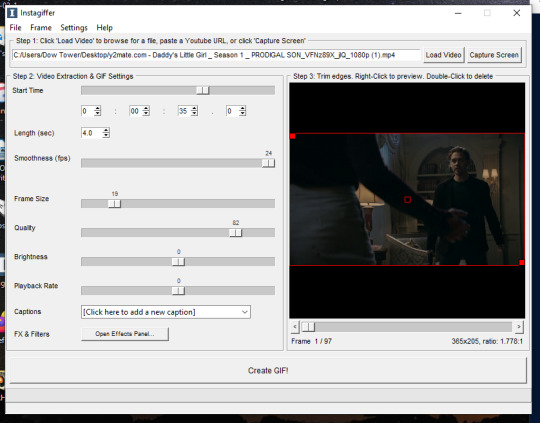
If you do this, you’ll quickly realize your gif has extra frames that appear slightly before and slightly after the moment you want to gif. It’s really easy to get rid of those frames; just click on them until you only see the frames you want in the gif. Use the scroll bar at the bottom of the gif to move around the frames, and use it to make sure the only thing on screen is the clip you want included in the gif.
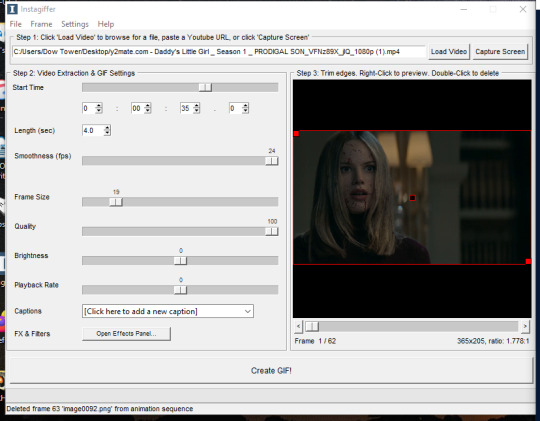
Step Two: Resize the gif, brighten the gif, change the speed and add captions
Now, it’s time to size, brighten, and color your gif! First look at the “frame size” option. Using the correct gif size for tumblr is one of the easiest ways to make sure the gif looks good. For gifs that take up a whole row, the size should be 540p wide. For two gifs in one row, the size is 268p each. For three gifs in one row, the sizes are 177p, 178p, and 177p in that order. Here is a visual of it. You can see what the width/height of the gif is in the bottom right hand corner of the gif screen. I am making this gif 268p. Get the frame size as close to the width you want as possible; right now, it is 269x151. To get it down to 268 exactly, go up to the top of the program, click on “frame” > “manual crop”. This little box will pop up. Just set the width to 268 and make sure the size is listed as 268 under the gif as well. The height can stay the same.

Keep quality up to 100 obviously. I almost always brighten by 2. Unless you’re giffing something with a huge spot of light, 2 is basically standard. Going up any higher usually makes the gif just look grainy, but if the scene is REALLY badly lit, you can go up to 3. Playback rate is usually -1, just to make the gif look smoother. Unless it’s a super long gif or a super short gif, I don’t mess with it further.
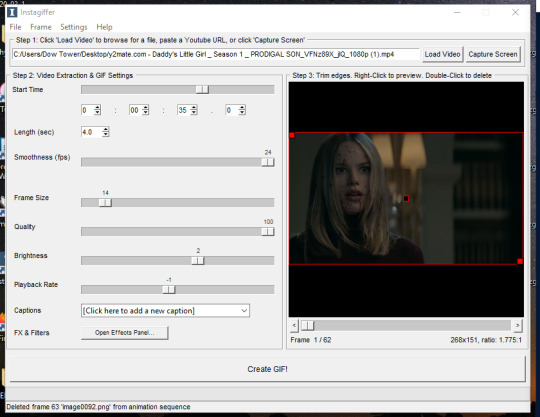
Captions are obviously optional but if you want to add one, click on “click here to add a new caption.” A box will pop up with options of how you want the text to look. I only use this to “caption” gifs (aka add dialogue). The settings I use are 12pt font, calibri, white, bold italic, bottom of gif, outline up to 3. You can also chose what frame you want the caption to start/end on if you want. Since this gif doesn’t have talking, I’m not going to include the caption in the final gif, but I wanted to show how to use this function.
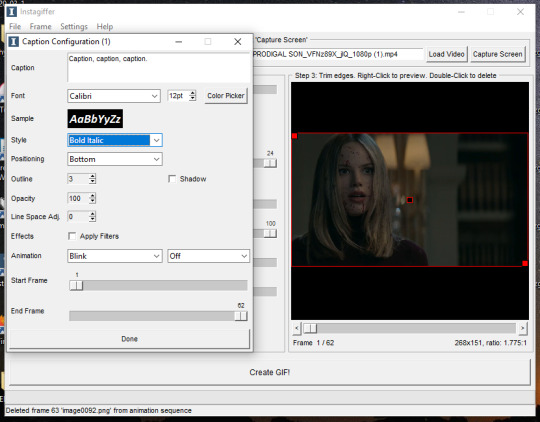
Step Three: Color the gif
There are two parts to this. The first place I color the gif is on instagiffer, and then I use ezgif to add more effects. The second part is totally optional but they have more choices for coloring there.
Click on the “open effects panel”. A window will open showing what the gif currently looks like, along with a variety of filters you can use. Ignore how grainy it looks, it won’t look that way when it’s finished.

First thing is keep “enhance” up to 100. This is basically a sharpening function and without it the gif will get super blurry. There are a ton of filters you can play around with, but the only two I focus on usually are “color fade” and “colorize.” For color fade, I click it on and set it at 10. Obviously, if you’re trying to make a desaturated gifset, you can raise it up for a faded color effect, but I use it more for color balance than desaturation. Next click on colorize, and then color picker.
I almost always pick a light shade of blue, purple or pink; it brings out the color in the gif and tends to keep skin tones from being washed out. This is usually my default:
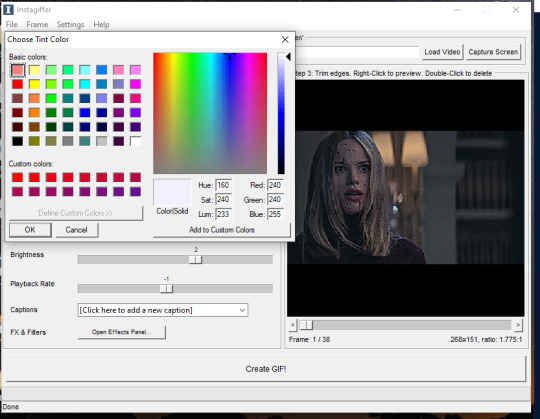
Then, I bring the “colorize” option down to 90 to increase the effects of shadows.
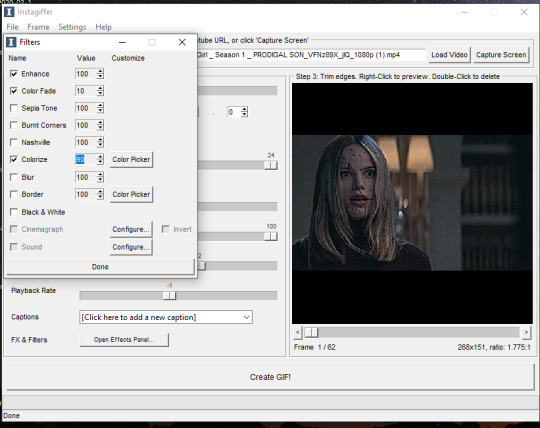
Last thing to do is click create gif! It’ll take a few seconds, especially for longer gifs, so be patient. ALSO there is a good chance you’re going to get a message saying something to the effect of “this gif is too big for tumblr’s photo limit.” Feel free to ignore that; the software being old means it still has the photo limit as 2gb when now it is 5-6gb so almost any gif you make will be considered “too big.”
Your gif now shows up in a preview tab! It should also show up as a file labeled “insta” on your desktop.
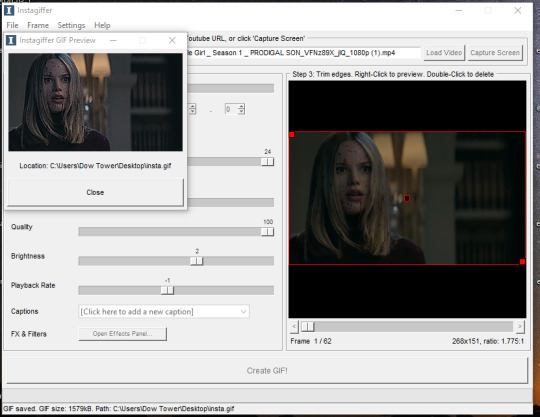
Here is the gif so far.

You can end here if you want. But when using instagiffer, I always go to ezgif to brighten up the colors further.
This part is basically the same as how you would color a gif you made in ezgif (see this tutorial) but I’ll quickly walk through what I do.
Go to ezgif.com/effects. Click chose file and upload your gif. First, you’re going to want to up the saturation, brightness, and contrast. You have to play around with these functions a lot because every scene is different, but in general, I have my saturation up pretty high and my brightness and contrast at at least 8. For a scene as dark and desaturated as this, I put saturation at 200, brightness at 12, and contrast at 16.
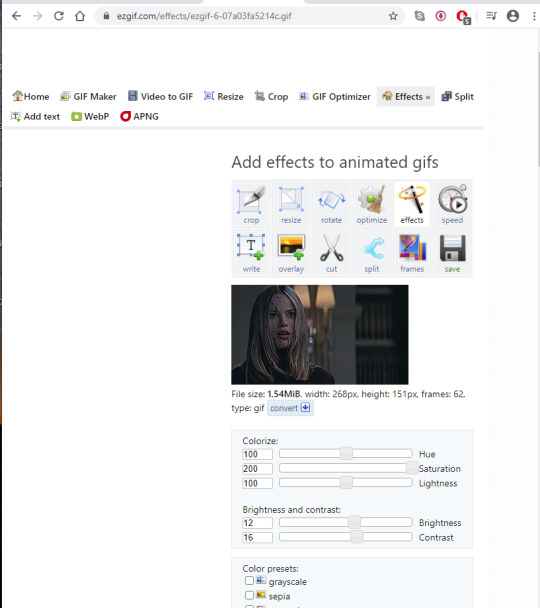
Afterwards, you want to go down to “color presets” and select “tint.” In my other tutorial, I recommended tinting with a light red or light blue, but for gifs made on instagiffer, I tend to use a light yellow/gold. I already tinted the gif purple in instagiffer so adding yellow in ezgif tends to balance it out. The shade I used for this gif is #fffcf0.
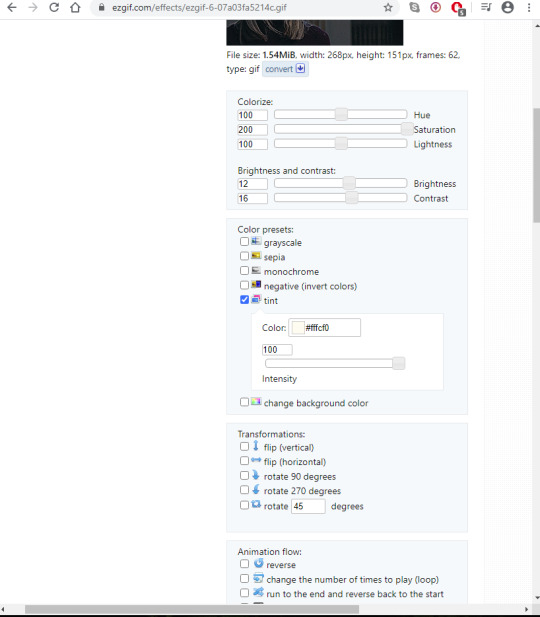
If the gif ends up looking too yellow, either decrease saturation, or click the “effects” button under the gif and add a layer of light purple to balance the colors more.
Your final gif should look like this.

2. Making a gif with the “capture screen” feature
This only changes the method of how you get gif frames. Everything related to resizing, coloring/effects, and adding captions is the same as above.
What if you don’t have a download of the thing you want to gif? The great thing about instagiffer is it has a built in screen recorder so you can gif any video you want, even if you can’t download it (or if you’re like me and don’t want to deal with downloading a 45 minute episode of something just to gif one scene).
To use this tool, click on the “capture screen” button on the top right corner next to “load video.” Then this screen will pop up.
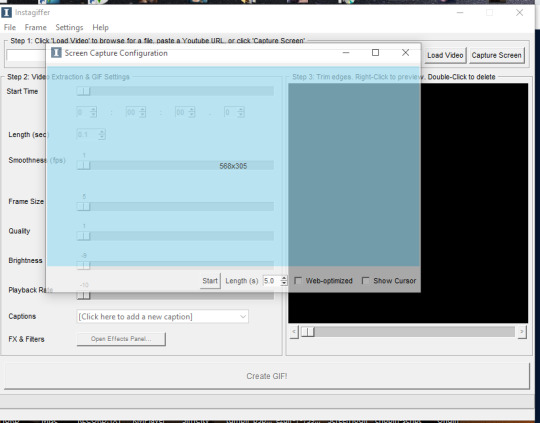
You’re going to want to take this blue screen over to the screen you want to capture. I’m going to put it over the youtube video I am giffing. Adjust it so the only thing it’s focused on is the video and set the length in seconds. I usually set it for longer than the clip is just because it’s easier to remove extra frames than rerecord a scene. There is also sometimes a lag so starting it right before the scene you want to gif helps with that. For example, if the clip I’m giffing is 3 seconds long, I set it to 3.5. Then start running the video and click “start” on the screen!
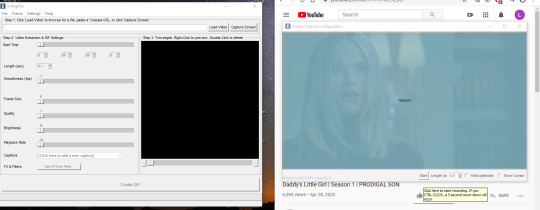
Your frames will now show up on instagiffer. Everything is the same, except you can’t change the frame rate or timing. Go ahead and delete frames that you don’t need by clicking on them. After that, just use the same resizing, and coloring method I outlined above.
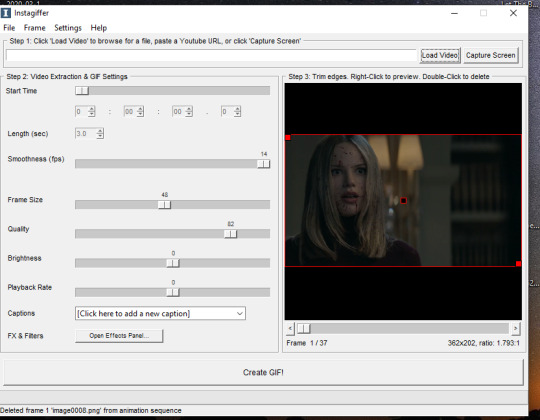
Some notes:
When using the video download option, the effects you use will save, as will the size of the gif. So if you gif one part of a video, then move the time stamp to another part, it will stay in whatever size you put the gif as. However, when using screen capture, you have to resize the gif and go to the effects menu each time because they reset after each use of the screen recorder.
You can also just paste a youtube link into the white bar at the top of instagiffer to gif it, but I’ve found that the quality is much better if you download or use the capture screen.
To crop a gif, move the red box around (just make sure it stays the right width size!)
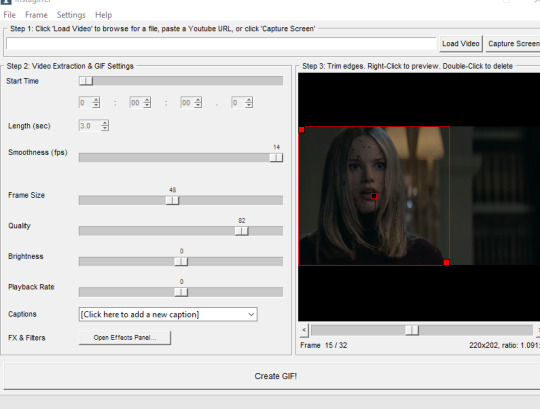
If you are using the screen recorder and only want to record part of the video (like just a characters outfit) size the gif recorder so it’s just surrounding the part of the video you want to see.
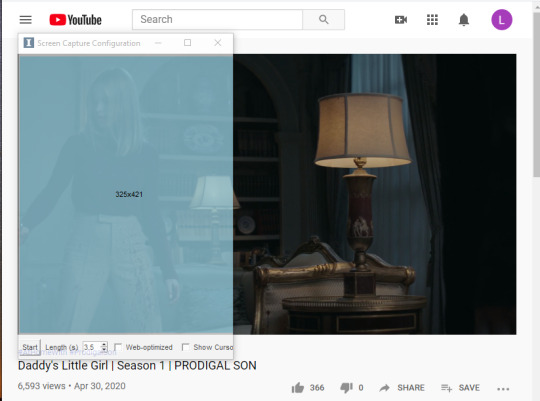
I hope this made sense lol, it took me a few days to write it all so please let me know if you have questions or need anything clarified! Support me on Ko-Fi if you’d like and are able 💕💕💕
#gif tutorial#giffing tutorial#giffing#gifmaking#mine#my gifs#blood //#long post#@ anon hope this helps!
79 notes
·
View notes
Text
A Look at Galaxy Angel II/3rd Manga Vol. 5
(tumblr why is your image upload function so weird, you either upload things as a tiny image or blow it up so big that it ruins the quality)
If you want to see more of my posts on this manga series, I’ve tagged them with “galaxy angel 2 manga” on my blog.
DISCLAIMER 1: I do not know Japanese at all so a lot of these “summaries” will be based on info I’ve gathered from the translated volumes that were officially released; as well as the Galaxy Angel fan wikia. I don’t claim any sort of plot accuracy in these posts, I merely wanted to give a brief run-down (as best as I can) of what happens in these volumes.
DISCLAIMER 2: I do not want to scan these volumes for fear of damaging the binding, so I’ve only taken photos. I’m not a professional photographer and don’t have a nice fancy camera so these photos are not so great. Due to my work schedule and life stuff that I need to take care of, I don’t have the time to touch these up beyond resizing and cropping them. Sorry.
~Chapter 21~
Volume 5 opens immediately with yet another video transmission sent out by Forte.
In the video transmission, Forte seems to make a reference to a network of satellites called “crust breaker.” They have enough power to completely destroy whole planets; and was the weapon used to take the planet Seldor hostage.
Nano Nano notices something strange about these video transmissions. If the manga is following the game’s storyline on this particular plot point, Nano realizes that Forte has been changing her words in every transmission. Takuto seems to pick up on this too.
The manga then suddenly switches scenes and the entire Luxiole crew is apparently given a short break to visit some hot springs located within the Luxiole. (Yeah, IDEK)
Tequila decides to make things more interesting and uses her magic to cover the entire area in a magical mist that (I assume) allows the people at the hot springs to see the person or thing they desire most. So Apricot and Kazuya end up seeing each other.

Takuto, predictably, gets to see Milfeulle. I have no idea if these are just illusions, or if Tequila was somehow magically able to teleport people temporarily to this place. Chalk it up to *magic* or something.

(anyway, Takuto’s and Milfeulle’s little reunion scene is the cutest thing and they are my OTP so I am biased)
So Lilly gets to meet with Forte (her mentor), Nano gets to meet Vanilla (who she considers a mom), Anise just gets a whole load of gold and treasure, and Tequila/Kahlua...
Get to meet each other.
The magic eventually fades, but everyone is refreshed afterwards and ready for the battle ahead.
~Chapter 22~
We get a brief flashback at the beginning of this chapter, to a time four years in the past. Milfeulle seems to be telling Apricot about the Absolute and the Central Globe.

There is... a lot of text here so I am not 100% sure about what’s happening. But I think Milfeulle is telling Apricot about how the Absolute and Gates to other galaxies work. Milfeulle so far is the only “Gatekeeper” that has been found, which means she’ll have to reside inside the Central Globe (the structure within the Absolute) for an unspecified amount of time in order to keep the Gate between Eden and Neue open.
Apricot is saddened by this, but Milfeulle accepts her fate with a smile.
Back in the present, the Luxiole has neared the planet Seldor. Kazuya and the other Angels set out in their ships and brace themselves in the battle against Forte’s fleet.

Suddenly, a transmission from Forte herself!

She and Takuto converse for a bit, and then it begins:
A full-on battle of might and wits between Takuto and Forte.

Magiic’s forces are also there to help out in the battle. They are led by Ranpha.
I didn’t explain this very well before (as it was already detailed in the officially translated volume 3), but Forte is only playing the villain here because she has her hands tied (figuratively) by some evil higher-up. This higher-up is threatening both her life and the entire existence of planet Seldor, forcing Forte to lead a coup as successfully as possible (under the higher-up’s orders). Forte’s only aiming for such high success because she doesn’t want there to be any possibility of an uprising or rebellion, which would increase casualties.
So anyway, there’s a big space battle against Forte’s own ships, and the Angel-tai are unusually absent from the fighting. But suddenly, they reappear to take out the crust breaker satellites encircling planet Seldor. Forte’s transmissions from before held hidden hints about the locations of these satellites. While Magiic’s fleet was holding off Forte’s forces, the Angel-tai members were working in the background to get close enough to take out the crust breakers.
One of the subordinates of the villain (behind this entire ploy) threatens Forte with a gun once he realizes that Forte was planning for these series of events to happen from the start.

but she’s just like “whatever”
Forte, however, appears to have something else up her sleeve (including a possible escape route).

Anyway, I love Forte, she’s a BAMF
~Chapter 23~
With the crust breakers destroyed, and Forte no longer playing along with his “game,” the main villain reveals his ship and himself to the Luxiole crew.
((I consult the GA fanwikia quite a bit for these next few sections))
Main villain dude is named Verel and he is an alien (he has some sort of wings on his back).
He shows the Luxiole crew a video transmission of himself and Milfeulle, who has apparently been put to sleep. Verel then embarks on a long, villainous monologue where he explains how he’s the last of his kind; and his kind were the original administrators of the Central Core; thus the Central Core and the Absolute belong to him. His desire to stage a coup on all of Neue was really just a part of his bigger plan to acquire the Absolute and become it’s sole ruler.

Takuto calmly asks about Milfeulle and Verel reassures everyone that Milfeulle is still alive and healthy (just asleep for the time being). He then rips a piece of her clothing I guess as a taunt or a threat.
Takuto gets MAD.
Verel then promptly flees, but not without causing some more ship carnage on his way out.
In the meantime, Forte has managed to escape her flagship by using a smaller vessel and is picked up by the Luxiole. There’s a happy reunion with every member of the Angel-tai. (...Except Anise, who has never officially met Forte until now.)

Takuto also personally arrives at the hangar to greet Forte, and there’s a really cute reunion scene.

Afterwards, Takuto calls a big meeting with the Angel-tai, so that he can explain some things.
Before the next big (and potentially final) battle, Takuto allows everyone to take a vacation on a nearby resort planet to rest up. And beach shenanigans ensue.
~Chapter 24~
These next few chapters basically play out like some sort of extended Beach Episode that shows up in a lot of anime, and I am pretty disappointed that this entire segment takes up so much of volume 5 (nearly half the book). These “beach chapters” do attempt to develop the main cast somewhat... but I can’t help but feel that it’s mostly an excuse to have the main girls be in bikinis and for there to be a lot of fanservicey moments.
Anyway...
Chapter 24 opens up with Apricot being suddenly afraid of Kazuya--most likely due to her developing romantic feelings towards him, as well as his swimwear making it more obvious that he’s male.
Some really dumb stuff happens that I don’t want to detail here, but it ends with Kazuya being punched into the sky by Apricot. We then get to see Forte and Ranpha having a convo about... something. (Probably catching up on things since they’ve been separated due to their work)
The other Angel-tai members eventually find out that Apricot’s suddenly real scared of Kazuya. Tequila tries to “help” again using her magic... to turn everyone into mermaids. Except Kazuya, who gets turned into some kind of pufferfish instead.
While in pufferfish form, Kazuya no longer scares Apricot and she’s really happy about this.
BUT SUDDENLY sharks appear and start chasing/attacking the Angel-tai. Apricot and Kazuya get separated from everyone else.
~Chapter 25~
While Apricot and Kazuya are lost at sea (still in their mermaid and fish forms), they’re discovered by a pod of dolphins and are led to some underwater ruins. Unfortunately, the ruins lie on top of a giant whale, which promptly swallows Apricot and Kazuya.
Apricot and (a human) Kazuya reawaken to find themselves on a little island inside of the whale’s stomach. And Tequila is also there... somehow.

The trio quickly find a way to escape, but Tequila notices that Apricot is still utterly afraid of Kazuya and can’t even bear to touch him. So Tequila gets the bright idea to turn Kazuya into a girl (temporarily).

Apricot takes this turn of events... uh. Badly.
Apricot and the now female Kazuya reunite with the rest of the Angel-tai... and they all marvel over/envy Kazuya’s new body.
I have no idea what happens in the next few pages, but Apricot seems to sort of get over her fear of (male) Kazuya by realizing that... there are other men way manlier than Kazuya is, and they scare her far more than Kazuya (with his boyish looks) does.
Uh. Yeah. *shoulder shrug*
~Chapter 26~
We then have a scene change to a later point in time, where Kazuya and Lily are having a secret training session.

All the other Angels are trying the enjoy the rest of their vacation in a relaxed manner.
(I mainly just took this photo because I love Tequila’s and Anise’s outfits and hairstyles.)

No one knows exactly what this “training session” entails. Apricot tries to play it cool and claims that she’s not bothered by it, but she seems spacier than usual...
The Angel-tai’s vacation finally ends. The Luxiole begins heading for the Gate to the Absolute. Some of Verel’s forces are stationed near this area.
Before another big battle, it’s revealed that Kazuya still has dreams about Mimoza. The two have become linked in some way--possibly through Kazuya’s ship, the Braveheart.
The battle against Verel’s fleet begins, and the Angel-tai fly out in their respective ships.

Lily asks Kazuya to merge the Braveheart with her Emblem Frame, the Eagle Gazer. Unexpectedly, Lily then completely blindfolds herself, to the shock of her teammates. She reveals that the “training” she underwent with Kazuya was basically to increase their trust in each other. By smashing watermelons (whilst blindfolded) with a stick, with only Kazuya to guide her; Lily and Kazuya are now able to work in perfect sync.
Or something like that.
Anyway this “training montage” panel is hilarious.

Lily’s completely insane strategy somehow works, and Lily and Kazuya quickly decimate Verel’s forces; clearing a path to the Gate.

Unfortunately, Kazuya and co. can’t celebrate yet; as more of Verel’s forces suddenly emerge from the Gate itself. Verel also apparently seals off the Gate itself, closing the entrance to the Absolute, where the Central Core and Milfeulle reside...

Volume 5 ends here.
Bonus pictures:
At the very end of the manga, we get a rare drawing from Kanan featuring Lester! (He almost looks like a completely different person without his signature eyepatch...)
There’s also a similar drawing featuring Takuto, but my photo of it was bad. So have a photo I found of it somewhere on tumblr instead.
My book also came with a mini postcard thingie. I think it was a bonus for people who bought the volume on release day? It features Lily, Apricot, and Mimolette (drawn by Kanan) and it’s pretty cute.

See y’all next time in the FINAL VOLUME!
3 notes
·
View notes
Note
Hello! 6th stage anon here o/ thanks a lot for your reply :) Well, now, I didn't download the stage from a "person" like in tumblr, etc. and there were no rules to dl, it was one of those sites that offers downloads for free that's why I think it's ok to share it. But I know there are people within the fandom that condemn, boycott and look down on people that doesn't buy stuff in spite of their motives (cont...)
(cont...) that's why I hesitated to display the site publicly, plus I just thought it would be easier to share the "lighter" version (10gb vs 40gb). I might be able to provide links to the live I have (without CREDITS since it's not mine for starters) if you or someone else wants it although I converted it myself, it's 1920x1080 and the sound is good imo but I'm not an expert converting videos so I guess it's a risk you'd take XD (cont...)
cont...) Also, about your reply, do you think you could share the original uploaders' post so the rest of the people who doesn't have the other lives could kindly ask them or look for the links? If you are hesitant about it because it could upset them or they don't want to share it anymore then that's ok but I just had to ask ^^U in any case, thanks for your attention.
Heyo, thanks for being polite in your response. I feel you my dude, it can be really hard to track down the original poster of some of these lives, especially the older ones. If you want to send me the link to the download for 6th stage (the one you encoded sounds good) I’ll gladly check it out and see if I’d be comfortable using it (which I probably owuld be.)
I do encourage people to buy them if they can since theyre such amazing content, and I certainly don’t condemn people who download since I 1000% know not everyone has the money to buy lives (because damn they can be expensive) or live with people who wouldn’t want to buy anime things, so downloading can be a fine option too. I hope I didn’t come across like I was trying to be elitist about it!
I myself have uploaded a version of 1st stage which is slightly higher quality than the other main version available online, but I havent shared the link outside of close friends yet (I may some point in the future.) I am also going to try to do the same with 2nd stage when the dvd arrives in the mail.
As for sharing the original posts for some of the lives, theres so many around in different quality with different rules etc, but you can find most through a google search. Generally you’ll find most downloads on tumblr, other blog sites (livejournal/wordpress etc), facebook, and 3rd stage is also on nyaa.se as a torrent. If people are still struggling to find some after searching on their own i may link them in provate messages, but I probably won’t make a masterpost with all the links myself for a few reasons that I don’t know how to put into words tbh.
Sorry for the long rambly reply. Feel free to ask again if theres anything else you need and apologies for any inconveniences!
4 notes
·
View notes
Text
Okay, Backstory Time
I started a Tumblr account because of NSFW content; they changed the accessibility of these pages/posts so that you couldn’t see them unless you were logged into an account that allowed those kinds of posts.
So I did. With absolutely no intention of meeting/talking anyone else, or sharing any kind of self-made art.
eventually I, somehow (frequent shitpost-y comments), befriended @satrinameno-art ( @satrinameno ) and I got interested in Skullgirls art wondering “If this game has such awesome sprite art...why are there no sprite edits that change the actual design of the character?” (I have to make this distinction because @skullgirls-imagines have numerous new palette choices)
So, one day (I honestly forget, maybe March or April), I got this incredibly stupid phrase that eventually translated to “Deacock,” or “Double-dressed Peacock.” I sent this stupid phrase to Satrin and they were able to draw it (still one of, if not most, favorite drawing I have from them). But, going back to the lack of sprite edits, I was able to track down a pre-release Crowdfunding Campaign backer release of all the characters (minus some of the attacks and the added intros of the Encore Expansions or any in-game palettes) in quality much higher than what would be possible from screenshots (unless 4K, maybe).
Once I got the sprite packs, I found some pieces that I could cut-and-paste together using my history in image editing and traditional-art to make my first sprite edits. Sent it in as a submission to Satrin, they loved it, I tried a different take on the Deacock idea (not very good), but then I made MareaCock. Which is still awesome, despite bein my first true sprite edit in how i make them today.
Made this blog and kept making new edits and sharing them so people kept Liking and sharing them. But, the original Source blog had been marked NSFW (hidden) which means that, even though the art that was being posted, and blog that it was actually present on, were technically marked as NSFW-hidden as well despite this blog (Murcis-gallereon) not having that setting checked in the option/setting page.
So, I’ve been meaning to change the blog’s ownership from an NSFW-source account to an SFW-source account in hopes that it frees the SFW posts to be seen by those that would also enjoy them (and then there’s the occasional NSFW post that I try to make sure is marked as such before posting).
However, there is a bit of a problem: any posts that were made+posted or queued by the original source account are still marked as NSFW for some reason, meaning that the reasoning for changing ownership wont affect all of the art I’ve been able to do prior when I actually had free time. So...it seems this was a bit pointless, unless I want to go and remove all the old posts and re-upload them (since I have kept every source file just in case I needed to re-share or edit them)
2 notes
·
View notes