#updated recipes
Explore tagged Tumblr posts
Visit Tumblr Blog
Explore Tumblr blogs with no restrictions, modern design and the best experience.
Last Seen Tumblr Blogs


Fun Fact
After the announcement of the deal with Yahoo!, there were 170K signatures of unhappy Tumblr users petitioning to prevent the sale in 2013.
Text

Recipes Masterlist - Ongoing: Prepped Ingredients Masterlist
Please check below for updated recipes (now with the option to cook with the Prepped Ingredients of the Chef Hustle pack). I also took the opportunity to correct some categorisations, fix a few other bits and bobs, and add in some new recipe interactions of my own 🥰
(In black are the recipes that are still on my list to update):
Breakfast Banana Pancakes Blueberry Pancakes Waffles & Berry Waffles Tomatoes on Toast Greek Yoghurt Honey Crumpets
Desserts Lemon Poppyseed Cake Little Clouds Cake Stork & Baby Cake Black Forest Gateau Ice Cream Cake Strawberries & Cream Swiss Roll Lemon Tart Chocolate Tart Raspberry Tartlets Kiwi Tartlets Peach Pie Pecan Pie
To be updated... Pizza Margherita Spaghetti with Meatballs Lasagne Chicken Fajitas Beef Fajitas Shrimp and Grits Meatloaf Egg Salad Sandwiches U.F.O Jam Sandwiches Cucumber Gazpacho Swiss Cheese Roasted Chestnuts
70 notes
·
View notes
Text
dear mojang
add more crops in minecraft im begging you im on my hands and knees give us tomatoes give us onions give us strawberries give us peppers
add more food recipes please give us sandwiches give us more pastries give us pudding or some shit
sincerely, the farmer of every minecraft server
#'just play it modded-' NO I WANT IT IN THE ACTUAL GAME#I WANT MORE FARMING I WANT MROE FOOD#I DONT WANT MORE MOBS OR MINERALS OR PLANTS I WANT CROPS I WANT RECIPES#we need an agriculture update i would go crazy over that#mojang please#please#miles rambles#minecraft
21K notes
·
View notes
Text


Scar seems keen to share with you a few recipes from home. Recipes included: Elven Kiss, Elven Cookie, Elven Surprise, Buttercup Cookie, Moo Pop, Jellie Cookie, Jellie Popsicle, Grain, Mumbo Gumbo
a mini dlc to my original swaggon mod! download it here! :D
#goodtimeswithscar#gtwscar#hermitcraft#hermitblr#trafficblr#stardew valley mods#咸鱼.jpg#咸鱼.json#tmw you make a mod to procrastinate on another mod#swaggon recipes will receive future updates eventually if any of the hermits make any food worth pixeling#i make silly little mods to fulfill rp fantasies
711 notes
·
View notes
Text


I got the God of War cookbook for my birthday AAAAA
#god of war#atreus#kratos#god of war ragnarok#god of war ragnorak#cooking?#I’m officially 18#no longer a minor now a major#I’ll update when I try out some of the recipes
179 notes
·
View notes
Text
Updated Mods
Recent Updated Mods -
Custom Food Interaction
Custom Drink Interaction
Air Fryer Appliance
VOID SODA
#sims 4#s4cc#ts4cc#sims 4 download#ts4ccmm#sims 4 custom food#sims 4 custom recipes#sims 4 mods#mods update
164 notes
·
View notes
Text
BLOG UPDATE 10-30-24


[ID: A photoset of three images. The first two images are a parchment texture on a black background. The first image is white text, and a navigation sidebar to the left of the main body of text. The sidebar reads: 'THE KING'S PHYSICIAN, written by Elliot Z. Chapter 00: Asclepius. NEW GAME, LOAD GAME, SETTINGS, GLOSSARY, MAP, CHARACTERS, ACHIEVEMENTS.' NEW GAME is highlighted with a distressed scroll image. At the bottom of the sidebar are links leading to Twitter, Tumblr, and Instagram.
To the right of the sidebar, the main text reads: 'PROLOGUE: ASCLEPIUS.
The ground stinks. It meets your hands in a shower of wet mud, an explosion of sick and blood, soaking the spaces between your fingers. When your vision focuses again, finally stops wobbling around and making double of itself, you find your palms soaked red. You crawl on your hands and knees to the body in front of you. You turn them over on their back. A man, not one of yours, and you slap his face a few times before you realize his eyes are milky and staring ahead, unblinking. There’s nothing you could do for him now. You look at his legs and find them still facing downwards. They didn’t move with the rest of him.
All the information comes to you backwards — his bisected waist, the guts spilling across the dirt, red, red and so much red. You stand up numbly. Your horse lies dead several feet away, and you remember in your haze that’s the reason why you were bucked off. You try and look at something — anything — else.
There is nothing else. All around you are limbs and blood and battle. Everything moving so slowly, mosquitoes caught in cooling amber, a slurry of death. You feel lost, a scarecrow in a burning field. Your ears ring. It all feels distant. Too distant. You need to move.
You turn to see a flash of white steel against the burning sun, and weakly raise your arms to try and block the blow with what little padding you have on. You move so slow.'
The other images feature the same text. The second image features a black background and red links. The third image is yellow parchment paper with red links and black text. /end ID]
happy update day!! i have to be up in. checks watch. six hours. so the update is coming at exactly midnight, and then i'll queue appropriately. but steady progress is being made on tkp!! im taking a small break from greenwarden to focus on making tkp and erinys look nice as a side project to querying agents for my book. it's a process. yk how it is.
what you see right now are mockups, the actual product looks uh. well. it looks like this

far cry from how i want it to look, but im working on it.
after finishing the css, all i have to do is write and edit chapter 1 and it'll be ready for demo release!
also, happy spooky season! im working on something for greenwarden that most certainly will not be done by Halloween, but i think you'll like it. it involves costumes and maybe stickers. watch this space
#blog update#excited to get back into coding again tbqh#the svgs are frustrating but i think i can figure them out given enough time and sleep#unfortunately they did put me in charge of the fall cocktail menu at work so im scrambling#and dont have a lot of time to write#[my drinks rock btw. ill give you the recipes if you ask]#[i didnt sign no nda and i dont give a SHIT]
84 notes
·
View notes
Text
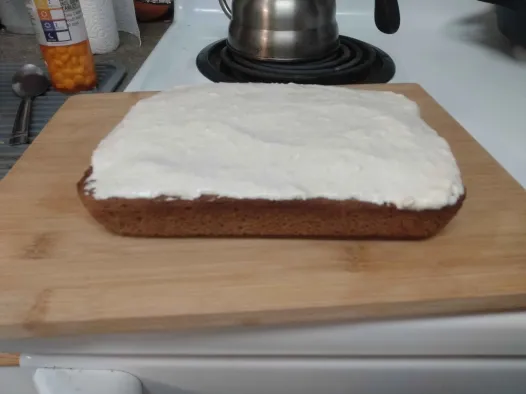
Baked for our partner's birthday today. Nothing fancy, I'm afraid.
Cinnamon Cake for a small pan (6x9):
2/3 cups all-purpose flour, spooned and leveled
1 teaspoon baking powder
1/2 tablespoon cinnamon
1/4 teaspoon salt
1/2 (just under) cups granulated sugar
1/4 cup unsalted butter, softened
1 teaspoons vanilla
1 large eggs
1/4 cup whole milk (or 2 tbsp cream & 2 tbsp water)
Bake 350 degrees for 25 minutes
Apple Cream Cheese frosting:
6 tablespoons cream cheese
4 tablespoons unsweetened applesauce
3 tablespoons butter
2 tablespoons heavy cream
2 tablespoons sugar
1 teaspoon cinnamon
Mix all ingredients together with a hand mixer. May benefit from some time in the fridge.
61 notes
·
View notes
Text


Just a girl drawing her feelings for rare-pair art and food ideation 💔
#update: edited typo in last pic. csp lags so hard with text i don't always catch the mistakes ;_;#uglydolls#because babo is in that bed lol#uglydolls babo#dollsona#dollsonas#in actuality one thought i had a lot was drawing a ship making a fried cheese sandwich together from beginning to end#but then my ambition got bigger than a fried cheese#i do genuinely want to draw tuesday and nolan following a recipe together#got it tucked away in the pipeline! kind of a coin flip between this idea and then my au after this ox drawing i'm doing *dead*
30 notes
·
View notes
Text
Elden ring modern AU where St. Trina & Miquella make a discord server that immediately turns terrible like most discord servers
#Leda for sure begs to be moderator#miquella has to revoke privileges because she bans too many people#thiollier wants a discord kitten#but we all know he is actually st trina's discord kitten#freyja is just happy to be there#her and father dane swap gym routines#every week frejya shares a photo of whatever protien filled abominations she calls breakfast#likewise#moore shares photos of cool rocks and bugs he finds outside#he ALWAYS finds the cool sticks too#you know the ones#sir ansbach is too old for this but thiollier and the tarnished convinced him to download the app#he doesn't even understand emojis#it's the equivalent of showing a viet veteran vtubers#hornsent also does not want to be there#he's a redditor by heart#but he shares his soup recipes with frejya and dane#the three of them are actually very wholesome to each other#he and leda try to ban eachother every other week tho#the tarnished is a certified lurker#sometimes they hop online to defend thiollier or moore#but most of the time they just send out of context selfies from the most insane places possible#like they take a pic from the top of the giza pyramids with the caption “went drinking in Birmingham with the lads last night”#everyone questions how they aren't dead#sometimes they post updates of their wife with sappy captions#ranni does have discord but only for a private chat with her siblings#her and blaidd haven't convinced iji to get a phone yet but they're trying#elden ring#elden ring dlc#shadow of the erdtree
31 notes
·
View notes
Text
make frozen fries yummier!!
mix together:
1 tbsp + 1 tsp paprika powder
2 tsp salt
1/4 tsp cayenne powder
1/4 tsp onion powder
1/4 tsp garlic powder
& sprinkle a little on your frozen fries before you put em in the oven!!
I'm not a very spice tolerant person, you could absolutely go up on the cayenne, but this tastes kinda like curly fries!! i put it on walmart waffle fries tonight and omggg they're soo much better now!!
if you decide you like it you can make a bigger batch so you have some already made up for the next time you have freezer fries!!
184 notes
·
View notes
Text
Magical lil' update: Occult Recipebook

✨Bibbety babbety boop! ✨The cookbook and the recipes have had some small updates.
-> You can find the recipebook HERE <-
Summary below: - icons added for each pie menu 🧛🧜♀️🌱👽🐺🧙 - shadows fixed on the book, and made book a little smaller - new swatches added!! 😍 - recipes updated
This update actually replaces the object, so you will have to buy it again from Build/Buy mode.
For translators, please note that the Name and Description of the Recipebook now have a new string hash, but all other strings remain the same.
#update#tianasims occult recipebook#tianasims recipe grimoire#occult cookbook#occult recipebook#the sims 4
73 notes
·
View notes
Text
I was thinking.
At first read, I thought Harding's apple pasta dish sounded uniquely gross, but then I remembered.
I'm Hungarian.
I'm no stranger to sweet pasta, especially not as a main dish; I grew up eating pasta with semolina and jam. I used to regularly have just straight up walnut- or poppy seed spaghetti. We fucking put sugar, black pepper, and steamed cabbage on pasta without batting an eye. We truly do not give a fuck. Pasta to us isn't even a carb, it's a vehicle.
I bet I could make an Apple Cheesy Butter Pasta that is actually good, and it would not even take as much finessing as I had initially thought.
Like, most I'd actually need to do to make it palatable is probably just swapping the semi-hard cheese I was envisioning to like a cottage cheese, and make the "apple" bit kind of an oldschool Hungarian granny-style apple pie filling with sugared cinnamon and grated tart apples.
Maybe I'd add a bit of goat cheese, or a bit of fresh mozz or some burrata to the top for the bubbly-cheesy-melty factor that Lace mentions, but other than that, if I disregard my first "ew, savory noodles swimming in too much store-bought applesauce with sharp cheddar on top" impression, it's not even that quirky a dish.
#squirrel plays datv#dragon age: the veilguard#dragon age the veilguard#lace harding#i'll keep you updated#honestly i might give it a go this weekend#my partner might reach the bit with the recipes then; it'd be fun to share another video game meal#it wouldn't be the first time a recipe from a game has entered the rotation#the potato chowder from bg3 is kind of a staple in our home honestly#good job spellcheck for asking me if by burrata i mean bureaucrat#i don't but thanks anyway
15 notes
·
View notes
Text
Guide to BotW Cooking: For Fun and Profit
Images taken with permission from Th3Element05 on Imgur
With Tears of the Kingdom coming out in less than a month, I figured I might as well make something on this before it needs to be completely reworked.
Ever wondered which dishes were the best to make for each effect? Look no further. Elixirs will be last in the guide, so skip to the end if you just want potions.
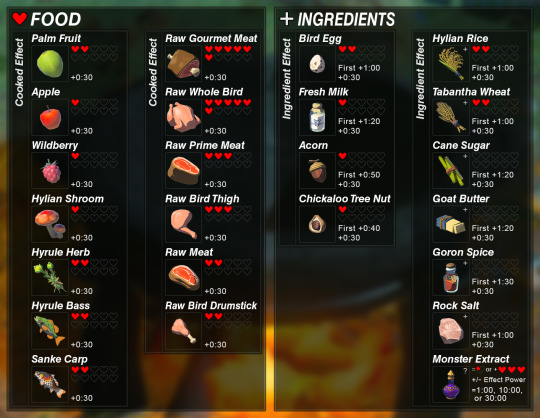
Up first, we have our plain ingredients. The lowest in value of these are the Wildberry, Apple, and Hylian Shroom, and the highest are the Raw Gourmet Meat and Raw Whole Bird.
Of these ingredients, however, only a select few are available on the Great Plateau, during which you only have 3 hearts. So the best 3-heart meals available to you are:
Steamed Fruit: 1 Apple + 1 Hyrule Herb
Fish and Mushroom Skewer: 1 Hyrule Bass + 1 Hylian Shroom
Meat and Mushroom Skewer: 1 Raw Meat/1 Raw Bird + 1 Hylian Shroom
Once you get out of the Great Plateau, however, things get a little different. Here's the most efficient/easiest to get recipes that are ONLY heart-restorative (including Fairies, which appear later in this post), from 3 hearts all the way to the max of 30—keep in mind that these definitely aren't the most exciting recipes out there. You're going to need a lot of meat, a lot of fairies, and a lot of apples.
3 hearts: 1 Raw Meat + 1 Apple
4 hearts: 2 Raw Meat
5 hearts: 2 Raw Meat + 1 Apple
6 hearts: 3 Raw Meat
7 hearts: 3 Raw Meat + 1 Apple
8 hearts: 4 Raw Meat
9 hearts: 4 Raw Meat + 1 Apple
10 hearts: 5 Raw Meat
11 hearts: 1 Fairy + 1 Apple
12 hearts: 1 Fairy + 1 Raw Meat
13 hearts: 1 Fairy + 1 Raw Meat + 1 Apple
14 hearts: 1 Fairy + 2 Raw Meat
15 hearts: 1 Fairy + 2 Raw Meat + 1 Apple
16 hearts: 1 Fairy + 3 Raw Meat
17 hearts: 2 Fairies
18 hearts: 1 Fairy + 4 Raw Meat
19 hearts: 1 Fairy + 1 Raw Prime Meat + 3 Raw Meat
20 hearts: 1 Fairy + 2 Raw Prime Meat + 2 Raw Meat
21 hearts: 2 Fairies + 1 Apple
22 hearts: 2 Fairies + 1 Raw Meat
23 hearts: 2 Fairies + 1 Raw Meat + 1 Apple
24 hearts: 2 Fairies + 2 Raw Meat
25 hearts: 2 Fairies + 2 Raw Meat + 1 Apple
26 hearts: 2 Fairies + 3 Raw Meat
27 hearts: 3 Fairies
28 hearts: 2 Fairies + 2 Raw Prime Meat + 1 Raw Meat
29 hearts: 2 Fairies + 3 Raw Prime Meat
Full Recovery: 3 Fairies + 1 Apple
Fairies can be obtained by cutting down tall grass, the easiest source of meat is foxes or herons, and apple trees grow just about anywhere in the southeastern quarter of Hyrule. Prime Meat can be obtained by shooting down deer across the world.
However, if we're going by rupee count, then by far the most profitable non-effect meal is:
Meat Skewer: 5 Raw Gourmet Meat — 490 Rupees
Of course, this is all under the assumption that you don't want to use any kind of extra benefits.
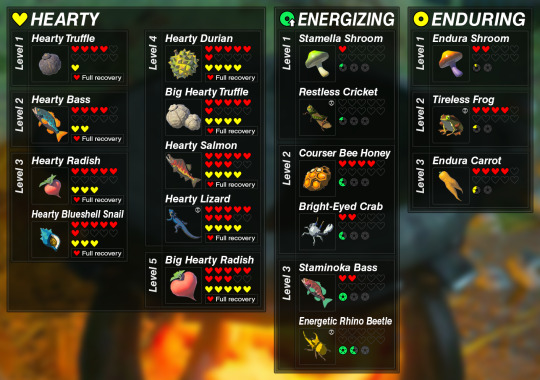
Hearty meals, as a default, give you a full recovery. A single Hearty Truffle, cooked into a Mushroom Skewer, restores all your hearts and gives you a bonus one, while only being worth ♢10 total. If you have one on hand, I highly recommend using it instead of fairies and prime meat.
When cooking Hearty meals, it's important to remember that you can only go up to a max of 30 hearts in total. So, starting at 3 hearts at the beginning of the game, you should only ever be going for +27.
That being said, here's the most efficient way to get to max hearts from any heart level, barring 3 hearts and 4, as the max number of hearts you can get without a bonus is +25. Keep in mind that the hearts here are NOT how many they give, they're how many YOU have:
5 hearts: 5 Big Hearty Radishes
6 hearts: 1 Hearty Durian + 4 Big Hearty Radishes
7 hearts: 2 Hearty Durians + 3 Big Hearty Radishes
8 hearts: 3 Hearty Durians + 2 Big Hearty Radishes
9 hearts: 4 Hearty Durians + 1 Big Hearty Radish
10 hearts: 5 Hearty Durians
11 hearts: 4 Hearty Durians + 1 Hearty Radish
12 hearts: 3 Hearty Durians + 2 Hearty Radish
13 hearts: 4 Hearty Durians + 1 Hearty Truffle
14 hearts: 4 Hearty Durians
15 hearts: 3 Hearty Durians + 1 Hearty Radish
16 hearts: 3 Hearty Durians + 2 Hearty Truffles
17 hearts: 3 Hearty Durians + 1 Hearty Truffle
18 hearts: 3 Hearty Durians
19 hearts: 2 Hearty Durians + 1 Hearty Radish
20 hearts: 2 Hearty Durians + 2 Hearty Truffles
21 hearts: 2 Hearty Durians + 1 Hearty Truffle
22 hearts: 2 Hearty Durians
23 hearts: 1 Hearty Durian + 1 Hearty Radish
24 hearts: 2 Hearty Radishes
25 hearts: 1 Hearty Durian + 1 Hearty Truffle
26 hearts: 1 Hearty Durian
27 hearts: 1 Hearty Radish
28 hearts: 2 Hearty Truffles
29 hearts: 1 Hearty Truffle
Satori Mountain is absolutely your go-to for the majority of these ingredients. Individually, durians can be found consistently throughout the Faron region growing on trees, big radishes grow north of Skull Lake in Akkala, truffles are pretty common in Hebra, and radishes grow around Hyrule Ridge, where those weird mushroom-trees are. If you need a quick-and-easy substitute, any regular-sized radish can be swapped out for a Hearty Blueshell Snail from the coast near Lurelin village.
Interestingly, the most hearty ingredient—the Big Hearty Radish—is NOT the most profitable. That'd be the Hearty Bass, which can be found here:

Hearty Fish Skewer: 5 Hearty Bass — 260 Rupees
The meat skewer beats this recipe by over 200 Rupees, though, and Gourmet Meat is frankly much easier to get if you spend a lot of time in Hebra or Eldin.
Now for Stamina dishes. You can get two wheels past your first one, and each is divided into 5 segments. This is tricky, because the game, does not like making whole-wheels beyond the first one; if you ever equal 2 wheels, it'll bump you up to 2.2 instead. On top of that, the first wheel likes to auto-complete itself; if you have 4/5ths of a wheel, it'll round it up to a whole. For the sake of simplicity, I'll be giving the ones that have at least the wheels described, in two lists—first is the fewest ingredients, then second is the easiest and cheapest.
Fewest Ingredients:
One Wheel: 1 Staminoka Bass
Two Wheels: 2 Staminoka Bass
Three Wheels: 3 Staminoka Bass
Staminoka takes the cake by far, and you can find it pretty easily in the river between the Dueling Peaks.
Easiest/Cheapest Ingredients:
One Wheel: 4 Stamella Shrooms
Two Wheels: 3 Courser Bee Honey + 2 Stamella Shrooms
Three Wheels: 3 Courser Bee Honey + 1 Staminoka Bass + 1 Stamella Shroom
Courser Bee Honey is easily found in the forest near Fort Hateno, but there's a few spots of it on the Great Plateau, as well. Stamella Shrooms, you can find early all around the old man's hut on the west side of the Plateau.
Money-wise, you need to go above the practical limit to make:
Energizing Fish Skewer: 5 Staminoka Bass — 260 Rupees
It's the same price as the Hearty Bass skewer, though much easier to get in the early game.
Next up, the Enduring stat. Like Hearty, this goes beyond what your current heart level is, and even a tiny bit replenishes your limited stamina. Unlike Hearty, however, you can still get those extra wheels even if you've maxed out your Stamina stat.
You can get up to two wheels extra. The best (read: only) way to do that in a dish is with Endura carrots:
Enduring Fried Wild Greens: 5 Endura Carrots
This is also the priciest Enduring-only meal, coming in at 420 Rupees. Endura carrots grow most abundantly on Satori Mountain, but a quick, easy way to get them early is behind the Great Fairy Fountain at Kakariko Village.
With these next effects, there's a new thing to factor in—time. These offer limited protection, but only for a certain period until they run out. I'm going to list out the best dishes for each level of a stat, with the max amount of time it can provide—both with, and without dragon parts.
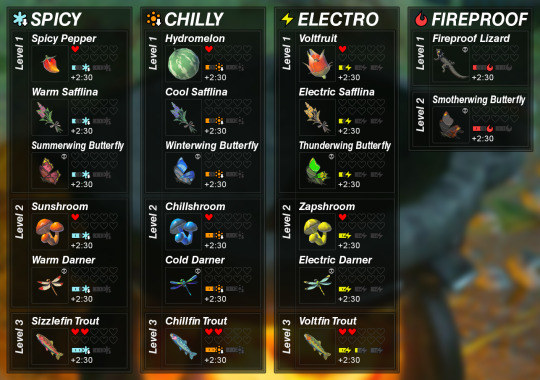
Cold Resistance
Level 1 12:30 : 5 Spicy Peppers
Level 2 12:30 : 4 Spicy Peppers + 1 Sunshroom
Level 1 30:00 : 1 Spicy Pepper + 1 Shard of Farosh's Horn
Level 2 30:00 : 3 Sunshrooms + 1 Shard of Farosh's Horn
Spicy Peppers grow at the edges of snowy regions, starting in the Great Plateau. Sunshrooms can be found in the forest behind Hateno, near Purah's hill. Farosh is listed for its horn because it's, by far, the easiest and most consistent to hunt—just go here:
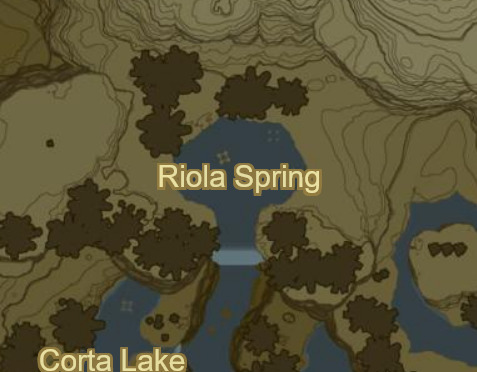
And wait until nightfall.
Heat Resistance
Level 1 12:30 : 5 Hydromelons
Level 2 12:30 : 4 Hydromelons + 1 Chillshroom
Level 1 30:00 : 1 Hydromelons + 1 Shard of Farosh's Horn
Level 2 30:00 : 3 Chillshrooms + 1 Shard of Farosh's Horn
Hydromelons grow exclusively in Gerudo Desert, but they're plentiful there. Chillshrooms can be found nearby, up in the Gerudo Highlands.
Electro Resistance
Level 1 7:30 : 3 Voltfruit
Level 2 12:30 : 5 Voltfruit
Level 3 12:30 : 4 Voltfruit + 1 Zapshroom
Level 1 30:00 : 1 Voltfruit + 1 Shard of Farosh's Horn
Level 2 30:00 : 4 Voltfruit + 1 Shard of Farosh's Horn
Level 3 30:00 : 2 Voltfruit + 2 Zapshrooms + 1 Shard of Farosh's Horn
Voltfruit, like Hydromelons, are all in the desert and Zapshrooms are everywhere in northern Akkala.
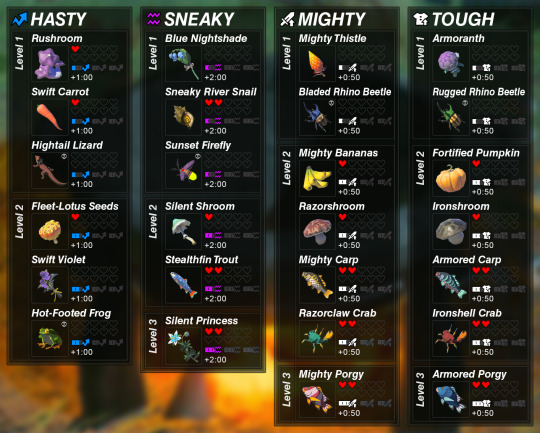
Hasty
Level 1 4:00 : 4 Swift Carrots
Level 2 5:00 : 5 Swift Carrots
Level 3 5:00 : 3 Swift Carrots + 2 Fleet-Lotus Seeds
Level 1 30:00 : 1 Swift Carrot + 1 Shard of Farosh's Horn
Level 2 30:00 : 1 Swift Carrot + 2 Fleet-Lotus Seeds + 1 Shard of Farosh's Horn
Level 3 30:00 : 1 Swift Carrot + 3 Fleet-Lotus Seeds + 1 Shard of Farosh's Horn
Swift Carrots can be bought in bulk in Kakariko, and Fleet-Lotus Seeds grow all around Zora's Domain, particularly near the shrine at its center.
Sneaky
Level 1 10:00 : 5 Blue Nightshades
Level 2 10:00 : 4 Blue Nightshades + 1 Silent Shroom
Level 3 10:00 : 2 Blue Nightshades + 2 Silent Shrooms + 1 Silent Princess
Level 1 30:00 : 1 Blue Nightshade + 1 Shard of Farosh's Horn
Level 2 30:00 : 2 Blue Nightshade + 2 Silent Shrooms + 1 Shard of Farosh's Horn
Level 3 30:00 : 3 Silent Shrooms + 1 Silent Princess + 1 Shard of Farosh's Horn
Blue Nightshades, Silent Shrooms, and Silent Princesses can all be found in the forest behind Kakariko, near the Great Fairy fountain.
Mighty
Level 1 3:20 : 4 Mighty Thistles
Level 2 4:10 : 5 Mighty Thistles
Level 3 4:10 : 3 Mighty Thistles + 2 Mighty Bananas
Level 1 30:00 : 1 Mighty Thistle + 1 Shard of Farosh's Horn
Level 2 30:00 : 3 Mighty Thistles + 1 Mighty Banana + 1 Shard of Farosh's Horn
Level 3 30:00 : 4 Mighty Bananas + 1 Shard of Farosh's Horn
Both Mighty Thistles and Mighty Bananas grow around Faron Woods in bulk. You can also buy bananas from some Yiga Clan members in disguise—albeit with a guaranteed attack to follow.
Tough
Level 1 3:20 : 4 Armoranth
Level 2 4:10 : 5 Armoranth
Level 3 4:10 : 3 Armoranth + 2 Fortified Pumpkins
Level 1 30:00 : 1 Armoranth + 1 Shard of Farosh's Horn
Level 2 30:00 : 3 Armoranth + 1 Fortified Pumpkin + 1 Shard of Farosh's Horn
Level 3 30:00 : 1 Armoranth + 3 Fortified Pumpkins + 1 Shard of Farosh's Horn
Armoranth is pretty easy to find in Akkala, and is absolutely everywhere along the western edge of Hebra. Fortified Pumpkins, on the other hand, are exclusive to Kakariko, and have to be bought; stock up whenever you can.
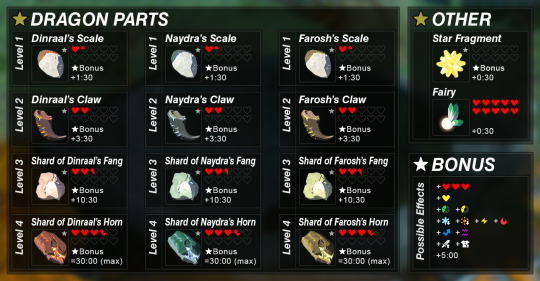
Dragon parts all have varying degrees of time-increasing properties and hearts added to a dish. However, they're barey worth anything cooked; if you're selling dishes, keep the dragon parts OUT of it.
Star Fragments are more useful for adding bonuses, which vary depending on what's in them; since all dragon parts give bonuses, never mix the two, especially dragon horns, as they can't even benefit from the +0:30 a Star Fragment grants.
Fairies are fantastic for hearts, but not much else. If you've got a dish that has an empty space, and you've got a fairy on hand, you should add it for the extra hearts.
Now, finally, we get to the potions.

There are two factors which contribute to a potion's value—its bugs, and its monster parts. While each tier of monster parts does the same thing to a potion's contents, Bokoblin Guts and Lynel Guts have WILDLY different rupee prices.
Because of this, I'll give you the strongest potion without dragon parts for each type, then the most cost-effective one to sell. Elixirs VASTLY outstrip meals in sell price.
Strongest
Hearty: 4 Hearty Lizards + 1 Keese Eyeball (+16 hearts)
Energizing: 2 Energetic Rhino Beetles + 1 Keese Eyeball (+3 wheels)
Enduring: 4 Tireless Frogs + 1 Keese Eyeball (+4/5 extra wheel)
Spicy: 3 Warm Darners + 2 Keese Eyeballs (Level 2 13:50)
Chilly: 3 Cold Darners + 2 Keese Eyeballs (Level 2 13:50)
Electro: 3 Electric Darners + 2 Keese Eyeballs (Level 3 13:50)
Fireproof: 4 Smotherwing Butterflies + 1 Keese Eyeball (Level 2 13:10)
Hasty: 4 Hot-Footed Frogs + 1 Keese Eyeball (Level 3 7:10)
Sneaky: 1 Sunset Firefly + 4 Keese Eyeballs (Level 1 14:40)
Mighty: 1 Bladed Rhino Beetle + 4 Keese Eyeballs (Level 1 13:30)
Tough: 1 Rugged Rhino Beetle + 4 Keese Eyeballs (Level 1 13:30)
In terms of strength, some elixirs can only get up to their first stage, due to the limitations in bugs. Mighty, Tough, Sneaky, and Enduring are all better done as dishes than as elixirs.
All the beetles can be found relatively easily near the Lakeside Stable in Faron, though you have to be incredibly sneaky to creep up on them. All kinds of darners can be found flying around Rutile Lake, just southwest of Satori.
Hearty Lizards are all over Faron Woods and Satori, Hot-Footed Frogs can be cut out of the grass in Tabantha, Smotherwing Butterflies are sold by Beedle at the Wetland and East Akkala stables, and Tireless Frogs can be cut out of the grass when it rains in the Ridgeland area.
Now, the most profitable. You're going to want to do some Lynel-hunting.
Energizing Elixir: 4 Lynel Guts + 1 Energetic Rhino Beetle — 2,330 Rupees

These are where the Lynels in Hyrule can be found. The higher tier of Lynel you have, the more likely they are to drop guts.
Happy hunting!
Resources: Interactive map Object map Effects Gallery BotW Cooking Sim
#loz#zelda#botw#long post#if you guys have better recipes I'd love to see them! i'll update this as needed#now edited so the unicode's been replaced with text#i have no idea how it looked on mobile
237 notes
·
View notes
Text


LYCHEE MENTION WE WIN
#cookie run#ill be honest chat im gonna start stacking up legendary pet potions for lychees inevitable buff#and hopefully costume???#these two disnt get any costumes for this update#so i am. a smidgen concerned#we dont talk about the double legendary buff though :)#foe's recipe book
41 notes
·
View notes
Text
Mods updated - March 2024
Custom Food Interaction
Custom Drink Interaction
Air Fryer
Functional Smoothie Blender
One Pot
Frozen Summer Ice
#sims 4#s4cc#ts4cc#sims 4 download#ts4ccmm#sims 4 custom food#sims 4 custom recipes#sims 4 mods#mod updates
159 notes
·
View notes
Text
this new dol update… my children ( me ) can feed forever now….
#. // ♡ 🌱 txt#but also im cackling bc i originally hc vani as someone with shit housekeeping skills but with this update#we’re grinding now to get these recipes on god#im still gonna hc that vani’s food still has like burnt edges or too much spices or sugar#let her fail in domesticity!!!#also the new update i didn’t realize that vani became recognized in all her postive fame??#whoops scratches out venus title she’s known as the orphan now#and harper somehow looks up to vani now which is so crazy like okay#i often don’t ramble on my tumblr and leave it to twitter but i’ll try to do it here sometimes#subjecting you all to my silly rambles 💖
11 notes
·
View notes