#tutorial attempt
Explore tagged Tumblr posts
Note
are you gonna do a hair tutorial for Kai's hair? (especially for his long hair)
Hello, thank you for the request. English is not my first language, but I hope this helps 🍊
Honestly, there is no secret.. I don't have any top secret techniques or miraculous abilities, but I can do a simple hair analysis, so no matter what style you have, you can maintain a similar appearance.
Sooo...
✨✨ How I usually draw Kai's hair tutorial lesgo ✨✨
I will use Kai's version from S1:

I usually use 3 of these for bangs, instead of 5.
These 1-5 parts I consider part 1. Parts 6-9, part 2 (just extra volume).
Now let's look at the hair shapes I like to keep:

Yellow and green are the same, only one is bigger than the other. I like to always keep the shape of the green. Orange is a loose, rebellious thread, I think it's charming.
I just keep in mind the point where all the strands start.
From there, we just put everything in our style. In my case, I just take out most of the volume. You can go for a more realistic or more stylistic style, but the logic will always be the same.
Here is a more "realistic" view of a haircut and a version closer to the original and stylized:

I always keep in mind the point where all the strands originate and in which direction they project.
It is always a circular movement and follows some level of gravity.
Once you have the hair strands in place, you can add extra strands for a more detailed result, always following the direction in which they project.
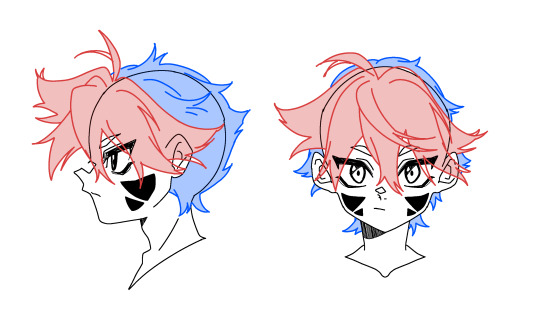
There really is no secret to this wahaha
One tip, though: Try to keep the strands roughly the same length, so you maintain the feeling of harmony. It's like a real cut, you tend to keep the strands at the same length in certain areas:

It's a suggestion btw ( ╹▽╹ )..
Ok!! But how does long hair work? It depends on what length we are talking about.
Lets divide his hair into two parts, the front and the back.
If we start from a mullet, only the hair on the back of the neck grows, you keep everything and only grow that region:

If we are talking about long hair at the back, the hair will start growing like this:

If it's all hair, well, it just all grows:

(I didn't have any hairstyle for these bangs, so, well...)
There are a lot of possibilities for haircuts, really. It's fun~

And that's it. Sorry for the delay and that it was long. But I hope I've been of some help (・∀・)💦
26 notes
·
View notes
Text


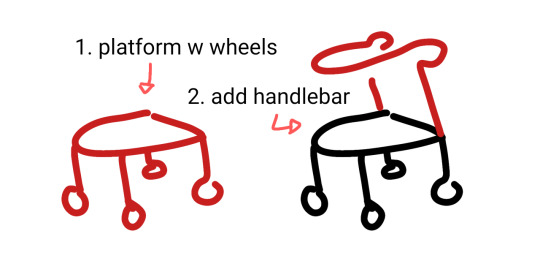
wheelchair, cane + forearm crutches, walker 90% chance if you're hesitant to draw mobility aids you're overthinking it. start somewhere. obviously these are not detailed references.
wheelchairs and walkers should be proportioned like chairs. in most cases canes are held on the opposite side of the painful leg because you want to put weight on the cane instead of the leg (dr house lied to you) but depending on the reason for the cane this can change!
[ image id: a title image that reads "learn how to draw mobility aids very fast" followed by three simplified drawings of different mobility aids broken down into two steps each. the changes made in each step are colored red.
the second image shows a wheelchair, with the steps "1. seat with footrest", showing a simple chair shape, and "2. wheels", which adds two large wheels to the back and two small wheels to the front.
the third image shows both a cane and forearm crutches, with the steps "1. stick", showing a single line of color, and "2. add handle", which shows a hand grip and a forearm rest on two different sticks. and additional label below this step reads "handheld stick height is where the hand rests at the hip" and "forearm stick height is the forearm".
the fourth image shows a walker, with the steps "1. platform with wheels", showing a backless chair shape with a wheel on each leg, and "2. add handlebar", which shows a handle raised above the seat. end id ]
✨ edited to remove italics for screen readers + also pointing out that I missed the handle on the forearm crutches! always use real reference photos when you can, this is just a starting point to help you understand the basics if you're not familiar :3
#are they perfect renditions? no. but first attempts at drawing anything rarely are#and tbf id rather people start drawing them and draw them badly than never draw them at all#art ref#tutorials#mobility aids#wheelchairs#canes#forearm crutches#walkers#sorry if there are typos blame the blindness#patch me through to palaven command
7K notes
·
View notes
Text
FF14 Battle Portrait Tutorial
For the past few weeks I was trying to find a way to recreate the battle portrait from FF14 as there was a few characters that I want to see in that style but don't officially have one yet. I think I got it down more or less (see image below) so I thought it's a good time to share what I did.

First of all, I made a few files that would help make life a little easier. They can be grabbed here .
Note: I did use Reshade to do a bit of work at the screenshot stage to help speed up the process but the same effect can be recreated in Photoshop with a vanilla screenshot. There are a lot of tutorials on how to do comic/cartoon effect in photoshop and those would make good bases to work off of.
Step 1: Take the screenshot with the PortraitBase Shader on. I usually take two screenshots. One with "Comic" on and one with it turned off. This is so that I have more to work with if needed.
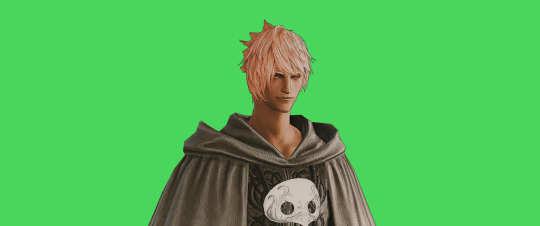

Step 2: Drag all the screenshots into photoshop and remove the background. In photoshop, arrange the layer so that the screenshot with the Comic lines visible is on top of the one with the effect off.
Step 3: Duplicate the the layer with the "comic" effect and apply Blur->Gaussian blur (radius 0.5)
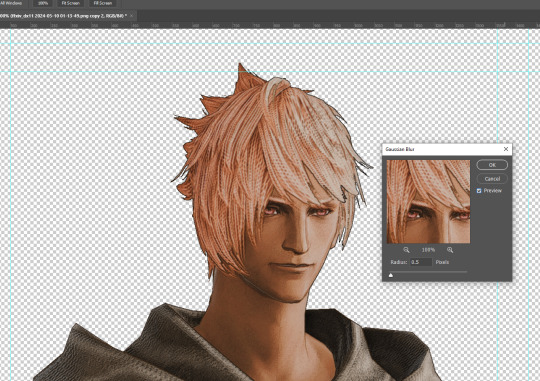
Step 4: Take a look at the hair. In Eric's case, It still doesn't look blur enough to me so I used the blur tool and blurred it a bit more
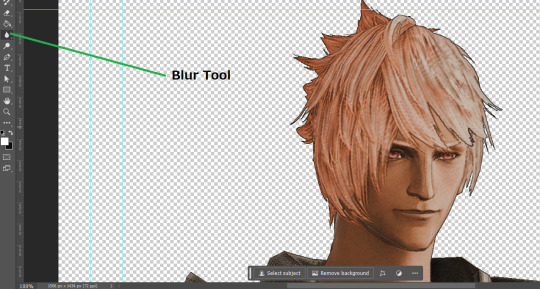
Step 5: Create a new layer above the layer in the previous step and use the brush tool to start outlining the edges. Where to outline is up to you but the idea is to make edges defined so that it looks more like a drawing.

Step 6: Duplicate the outline layer and then hide that layer. Step 7: Merge everything under the outline layer. Step 8: Drag and drop the "Texture.png" into the project and Clip it to your character layer. Set the blending of the texture to "soft light". Step 9: Drag and drop the "stroke Texture.png" into the project and Clip it to your character layer. Adjust the size till you are happy then set the blending to "overlay". Step 10: Adjust the opacity settings of both texture layers until it looks good to you.
Step 11: Click on your character layer and go to image->Adjustments->Hue/Saturation (note: you will see I dragged in the official Hades portrait as a point of reference to work off of). Adjust the saturation till you are happy.
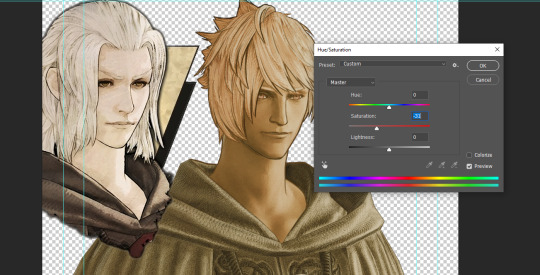
Step 12: Go to image->Adjustments->Color Balance and adjust the color till you are happy. In this example, since Eric is also wearing the Sophist robe, I tried to match that color to Hades' Sophist robe color.
Step 13: Once you are happy, drag the "Template.png" into the project and scale that to the size you want. Make sure it is completely covering the character. If it's not, you can just use paint more of it with the brush tool to extend it till it covers everything.

Step 14: Hide the "template.png" layer and select your character layer. Use the magic wand tool to select the outside of the character.
Step 15: With the selection still selected, click on the "Template.png" layer and press delete on your keyboard. You should now be left with a blank in the shape of your character.

Step 16: Drag the"Template.png" layer to be below your character layer. Then click on your character layer and clip it.
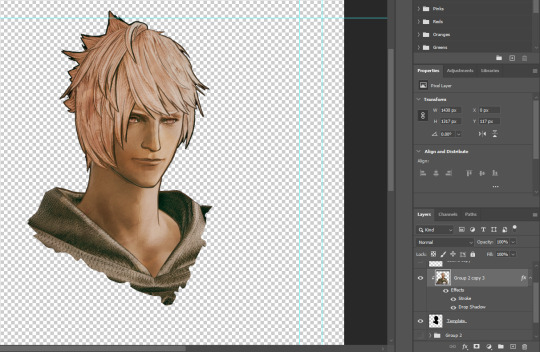
Step 17: Click on the "Template.png" layer and add a 2px stroke and shadow to it.
Step 18: Drag "Back_Deco.png" into the project and place it behind your character. Scale it till you are happy with it.
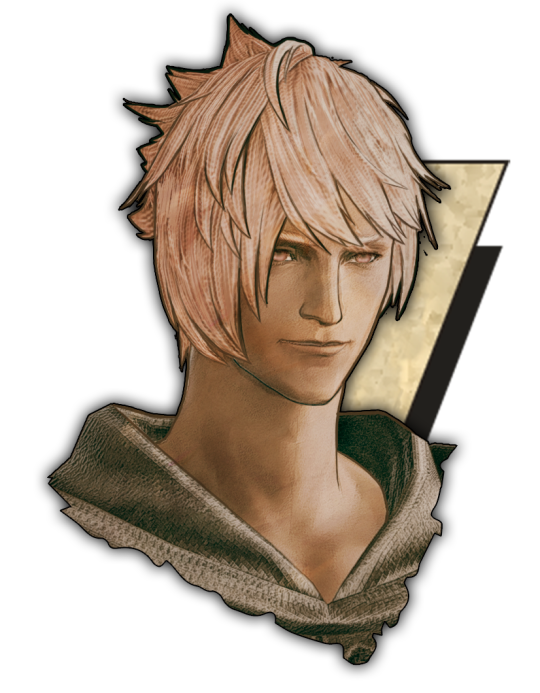
And that's it! Now you can recreate portraits for any NPCs that you want (in theory). A lot of it is also fine tuning to what you want but this should at least give you a decent base to work off of :)
972 notes
·
View notes
Note
I was wondering can u do a tutorial on Sonic eyes and face?
Okay so, my process for drawing Sonic characters usually amounts to 'severely winging it', like so:
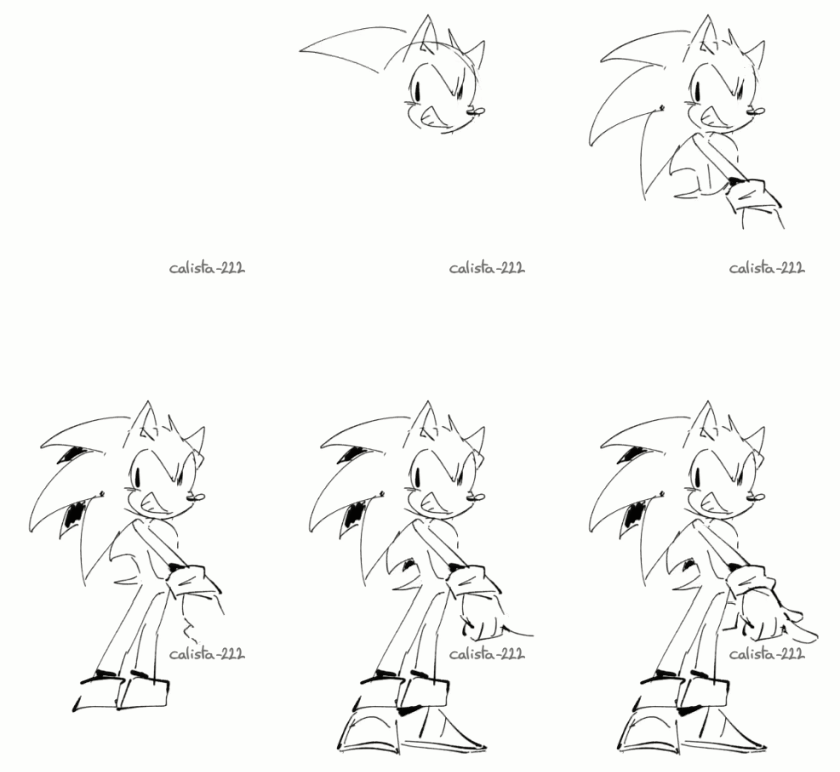
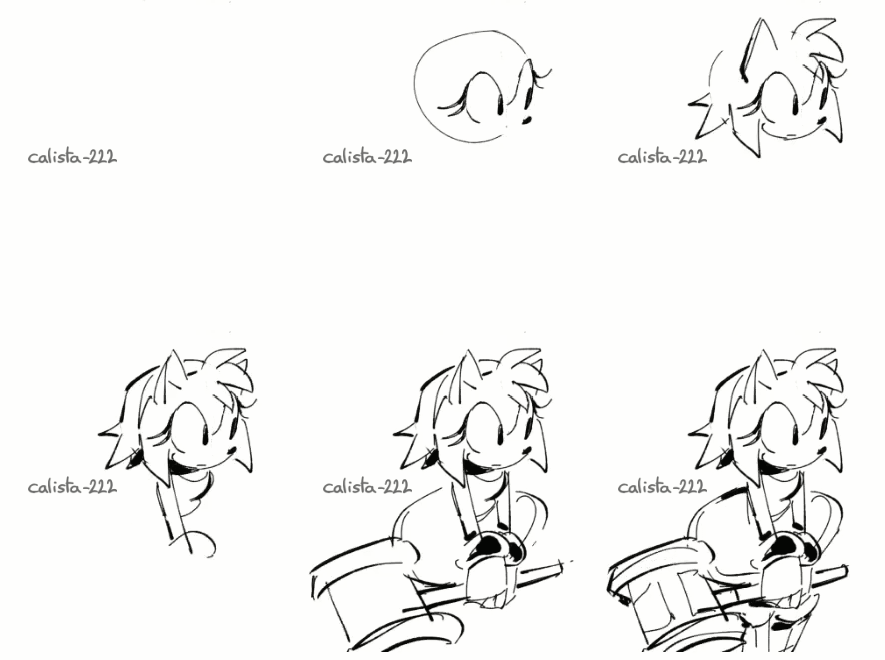
I draw a circle, I ignore the circle, you know how it is. I'm not sure I'd be super helpful trying to explain how I do it dfbfh
However!! I can redirect you to this really good tutorial by @tatck! A lot of the techniques in it are stuff I do as well!
#ask#my art#sonic#sth#sonic the hedgehog#amy rose#timelapse#speedpaint#gifs#gif#animated gifs#maybe I'll attempt to do a proper tutorial one day but rn? too tried fbff
886 notes
·
View notes
Text
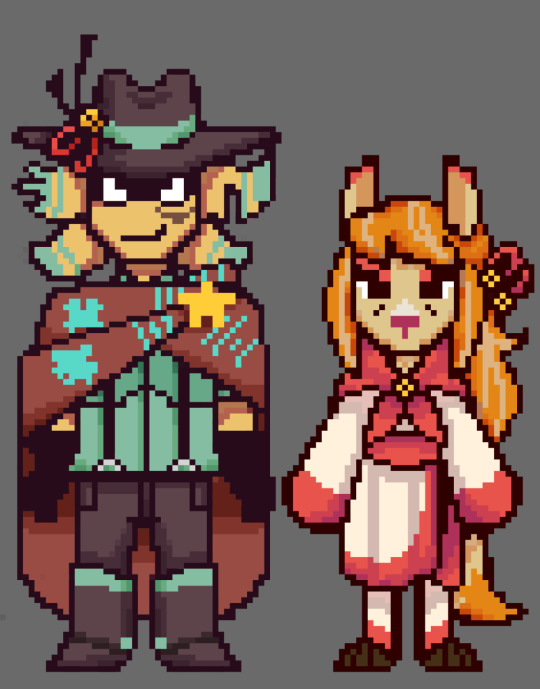

Totally real and canon older Staroba sprites from the upcoming Undertale Yellow 2 game
#undertale yellow#north star#uty starlo#ceroba#uty ceroba#staroba#starlo x ceroba#the cowboy hat draws#Okay but I have barely attempted pixel art before so these might not look stellar. I just wanted to practice with a tutorial I found#Obviously drew some heavy inspiration from their canon sprites!#lucky clover au
422 notes
·
View notes
Text


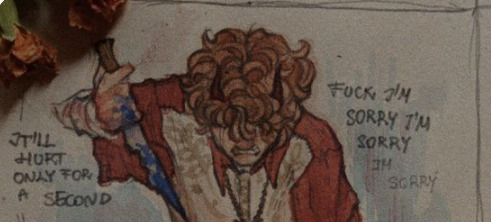



~ tommy fictive
#first attempt at a web weave !! can't find any tutorials :\#web weave#web weaving#ctommy#c!tommy#tommy#c!tommyinnit#tommyinnit#c!dsmp#dsmp#dream smp#c!tommy angst#angst
153 notes
·
View notes
Text
Me, several years ago: "I'll never try digital 3D art... just have no interest to learn it. Already have learned other art forms that I barely use anyway... so why add to that ?..."
Me, currently: [Is attempting to model a donut in Blender] "... uh... I can explain..."
#7rambles#idk what compelled me to attempt Blender finally but gosh...#no... actually I know why...#so I was thinking on how hard it would be to animate PJ... (yep it all comes back to that sass blob) in 2D...#and then I visualized him in a 3D art style and just went ....“welp - gotta at least attempt that...”#but man this program - even with my knowledge of ADOBE products and LIVE2D - feels overwhelming...#so... gotta go through a tutorial and the donut one seemed like the most comprehensive one!#soooooooooooooo will I ever get to the point of modeling PJ?#uh... after I give him an updated reference sheet XD#and who knows when that'll happen#gosh... this plus wanting to do that Miku Miku Beam meme thing... and a separate drawing thing I want to do for a KPop group...#now I'm running into the “all inspiration - zero time” rut of creating things XD
145 notes
·
View notes
Text


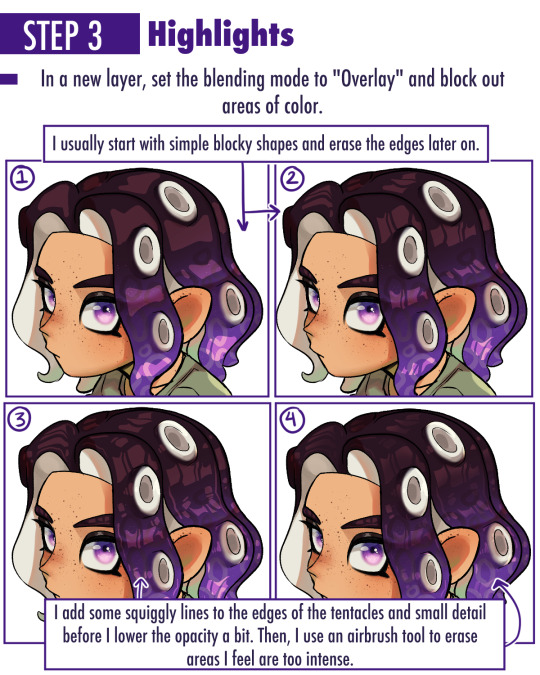
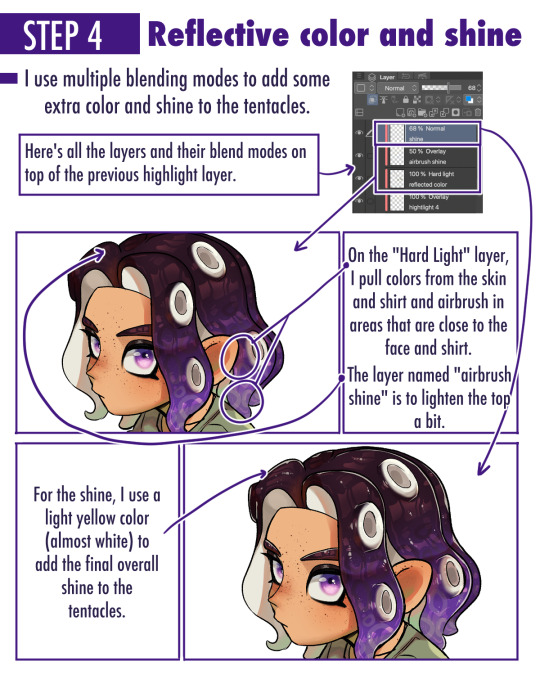
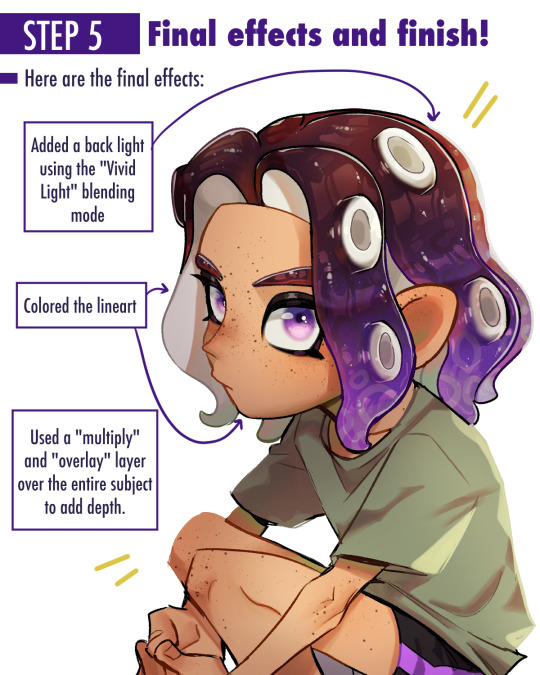
someone on ig asked for a tentacle color tutorial and I thought I'd post it here too
drawn in clip studio paint btw!
846 notes
·
View notes
Text
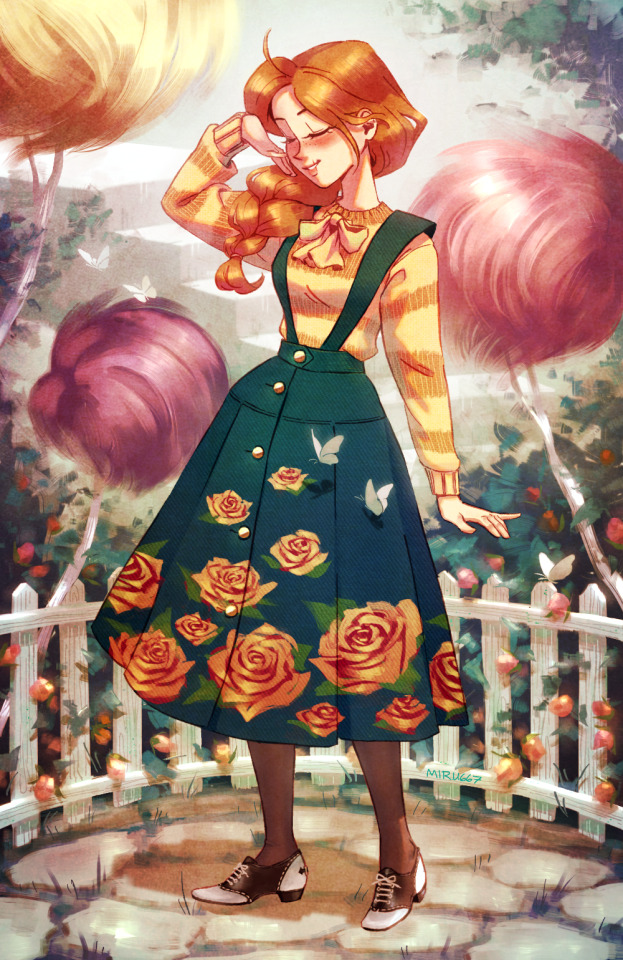
Audrey Grace in a vintage outfit! She went on a shopping trip with friends in a 1950s Thneedville and found some stuff she liked. 😊 I had fun researching dresses, sweaters and shoes, also this piece [link] from the Lies of P OST was the music I listened to the most while painting, I think the vibes fit...🥹 Click the readmore below to see a video of my WIPs!
#i spent literally the entire month of january from the 1st to the 31st working on this omg TTWTT#miru art#audtree#audrey grace#the lorax#truffula trees#thneedville#the rust factory#truffulas#vintage#vintage fashion#artists on tumblr#saddle shoes#saddle oxfords#7 hours on just the shoes#kind of embarrassing but i have so little time to work on art these days aaaa#im proud of me for attempting a background again!!!#tutorial
271 notes
·
View notes
Text
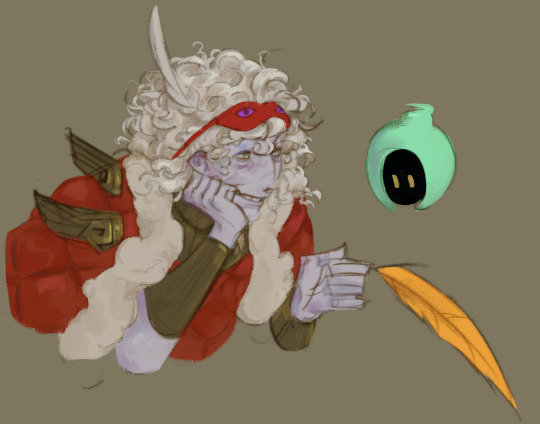
He’s real t me
#i cant colour gold. i cant. i have stares at multiple tutorials. i failed#hades game#hypnos hades#Hypnos my man my guy…#will attempt to draw his new portrait RAHHH#checkadii
143 notes
·
View notes
Note
Advice for basic poses/anatomy I’m really struggling with them. What’s ur process?

#zu art#ask#tutorial#cross!sans#rock band#undertale#undertale au#utmv#gif#tutoriel#zutorial#ha!!#bold of you to assume that I'm not struggling— xp#it's all just about trying different poses; sizes; angles <3#to draw 'perfect' from the very first attempt is hard and pointless#but you can /make/ it perfect! ☆#just make the first step╰(*´︶`*)╯#no naked bones this time sorry ;)#also thank you guys so much for 15 200+!! (*゚∀゚*)
435 notes
·
View notes
Text


front and back
(blue hydrangea from animal crossing)
#emieclat#embroidery#animal crossing#acnh#i don't actually know anything about animal crossing this is for my friend#also did you know if you're bad at something and you look up tutorials instead of stubbornly insisting you can figure it out on ur own#you'll actually get better at the thing#wild concept i know. maybe i will actually learn the lesson this time#(unpictured: very bad previous attempt at embroidery)#(this one i'm actually proud of)
187 notes
·
View notes
Text
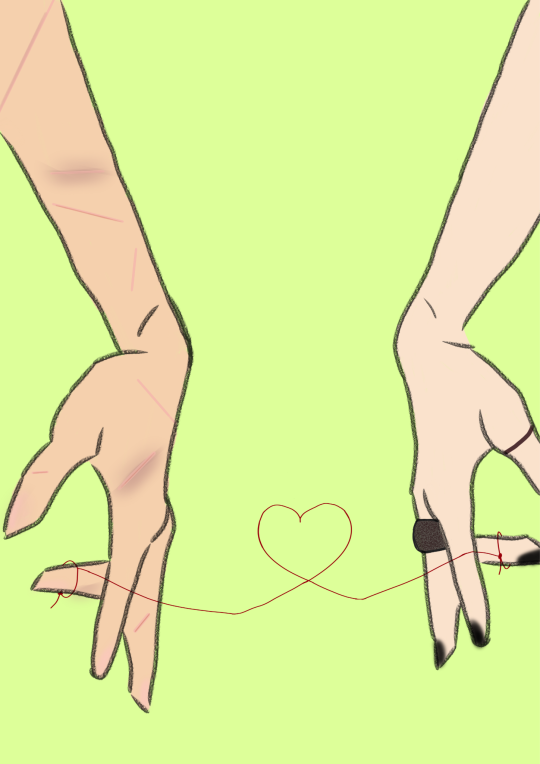
"For the Japanese, who know so much and intuit more, human relations are predestined by a red string that the gods tie to the pinky fingers of those who find each other in life. Legend has it that the two people connected by this thread will have an important story, regardless of the time, place or circumstances."
#disclaimer#i had this idea for a while#and didn't see anyone do it#So I looked for tutorials to draw hands and drew this in someone else's style#It was a tutorial on Google that I found in the pictures#I unfortunately wasn't able to find it again tho#so just note that#that aside#I thought this was so wolfstar coded#marauders#remus lupin#remus x sirius#sirius black#wolfstar#the marauders#james potter#peter pettigrew#fanart#wolfstar art#love#I'm no artist btw#this is my first attempt at making anything#I'm so anxious about posting it too#lol
23 notes
·
View notes
Text


Cyan is real now. Cyrus (aka this guy post timeskip) coming soon hopefully
#fe3h#fire emblem three houses#fe3h oc#fodlansona#FINALLY an attempt at this that I ACTUALLY LIKE AHHHH#I started off with Cyan bc he is a little easier I guess Idk#I didnt use a tutorial this time or anything I literally just stared at existing portraits really hard#Its not perfect but better than any of my previous attempts I Think#Btw I see the asks in my inbox I will get to them ty for sending ahhh#oc cyan gertrude fraldarius
48 notes
·
View notes
Text
I like visible mending because I love the idea of clothing living with you and being visibly changed by its lifetime and because I am terrible at sewing prettily and too impatient to take the time to learn but quite good at extremely tactical, sturdy stitching
#it’s a match made in heaven#anyway I do think my attempt at patching my jeans IS the worst sewing I’ve ever done in my life#but I had fun and was myself (did not even think abt looking at a tutorial before diving in)#and I think I got it so my knee won’t pop out of the giant hole in my fave jeans anymore#they’re not even cute jeans or jeans that fit me well#they were just $11 a few years ago and very comfy#and I basically just wear them to run errands so I am 0% fussed abt them being pretty#personal
22 notes
·
View notes
Text
i still distinctly remember when arb first came out i said i would reroll only until i got ssr ichiro or ssr samatoki, would have been happy with either! but before i got any roll with one of them, i got BOTH TOGETHER IN ONE SHOT
used up all my gacha luck for life there
or so i thought


IT
SOMEHOW
HAPPENED AGAIN??????
#crab plays#hypmic#hpdr#WTFFFFFFFFF#ok what i decided this time was any ichiro OR glass coffin samatoki#i did reset a different ssr samatoki because i just really wanted this coffin one#so when it popped i was like oh nice this is a keeper#THEN ICHIRO CAME AS WELL??????#full disclosure this was not the same multi#horse was the free tutorial multi#strawberry from the free 10-pull ticket#BUT BOTH IN ONE REROLL ATTEMPT#I CAN'R BELIEVE THIS HAPPENED AGAIN#kr you do love me after all 🥺🥹😭#this didn't take an obscene number of rerolls either i think it was like 6 or 7#i haven't even done the five free single pull tickets on this account yet!#GOD WHAT IF I GET ANOTHER ONE FROM THE SINGLE PULLS LMAO#no no let's not get greedy here... i did want ghost ichi but he can wait#this is legit. the perfect roll. KEEP
14 notes
·
View notes