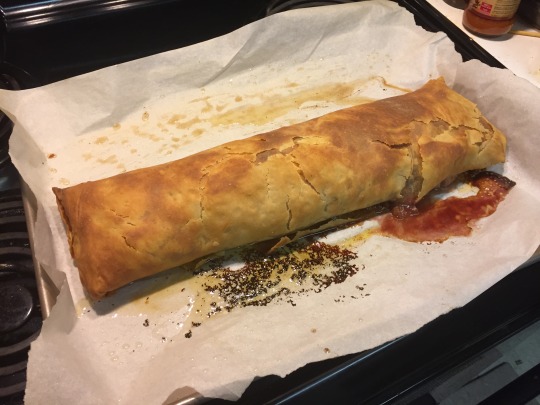
#things to better next time: more salt in the dough + roll them out thinner (cooking thmime was getting too long)
Explore tagged Tumblr posts
Visit Tumblr Blog
Explore Tumblr blogs with no restrictions, modern design and the best experience.
Last Seen Tumblr Blogs


Fun Fact
Tumblr.com rank in the US is 25.
Text


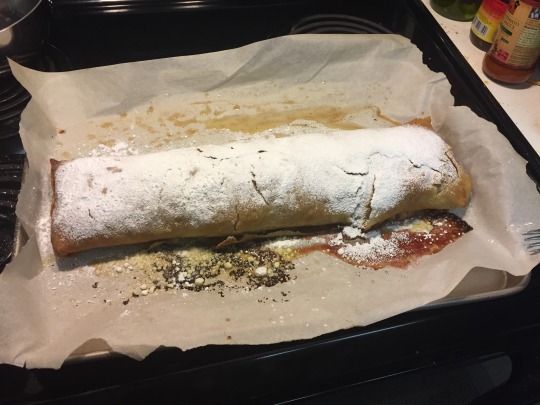
Promised scallion pancakes (first time making them) with dipping sauce (homemade sweet flavored soy sauce, chili oil crisp, chinese vinegar)
#meals#it was really good!!!!!#i didnt really believe the flaky texture promise but it worked perfectly.....#things to better next time: more salt in the dough + roll them out thinner (cooking thmime was getting too long)#they looked all orange yellow while rolling them out cause i was out of the neutral oil i wanted and used some of the chili oil instead#it was v cute and colorful but after cooking they just have some yellow tint i'm afraid
15 notes
·
View notes
Text
Wei’s Brown Sugar Mantou (黑糖馒头)

@ladymusashi asked for the recipe for these so here you guys go. @ctl-yuejie, this may also interest you!
Mantou (馒头) are traditionally just a plain steamed bun with no filling. Some variants will add a little sugar. You can also find similar recipes for this kind of swirled mantou, but this is what I’ve come to using a basic recipe and some experimenting.
Key notes: This has A LOT of sugar (100g of each) so the rising will take some time. Mantou are also steamed so you really should buy a steamer or use something with multiple steamer baskets. Feel free to adjust the size/amount of sugar as you like. I like things sweet so I added sugar until I could taste it to my preference.
Brown Sugar Dough: 300g flour 100g brown sugar 12 mL molasses 150 mL water split into 100 + 50 mL 1.5 tsp yeast dry active yeast pinch of salt
White Sugar Dough: 300g flour 100g white sugar 162mL water split into 112 + 50 mL 1.5 tsp yeast dry active yeast pinch of salt
For brown sugar dough, In the 50 mL portion, add yeast and allow to activate. You could add a pinch of your sugar to the yeast to help it along.
Add 12mL of molasses to the 100mL of water and add your brown sugar. Warm gently to dissolve and set aside until yeast has activated.
Mix flour and salt together and make a well in the middle. Using a spoon, stir in sugar water mixture. After most of it has combined with flour, add activated yeast. Mix until all flour is moistened and then begin to knead.
If dough is sticky, add a little flour to dust surface and continue kneading until dough is smooth and springs back when you poke it. Dough SHOULD NOT be very stiff and dry. A little more wet is better for this sort of thing so if your dough feels very tough and hard to knead, add a bit more water at a time until it slackens. This may make it more sticky, but try not to add too much flour.
Set dough aside to rise in a bowl covered with plastic wrap or a damp towel/cheesecloth.
Repeat process with white sugar dough.
Leave both dough balls to prove for 1.5-2 hrs. Dough will rise very slowly due to the amount of sugar. Keep an eye on it. If it doesn’t look like it’s risen very much after 1.5 hrs. cut the dough ball in half and make sure you are starting to see air bubbles form. If at least that much has happened, it’s okay to move on to the next step.
Punch down brown sugar dough to try and squash out all the air bubbles. You don’t want any really big ones left inside. Lightly flour surface and roll out dough relatively thin into a rectangle. About a centimeter/half an inch thick roughly 1ft x 2ft rectangle. Set aside and roll out white dough to roughly the same dimensions. Put white dough on top of brown dough and press gently to join.
If you want all of your buns to look the same, just roll up the long side to have the brown on the outside and the white on the inside. If you want to do half one way and half the other, split the joined doughs in half, flip one half over, and roll so that the white dough is outside.
Regardless, take your swirled dough and roll it against the surface to stretch the swirled dough sausage longer. As the dough puffs up, it will gain height and may topple over or squash. Stretching the sausage out thinner will help control the growth of the pieces you cut out of it.
Slice rolled dough into approx 2-2.5 inch wide sections. Lay cut dough, seam side down, in steaming baskets. Depending on the kind of steamer you have, you might have to put some parchment or a cloth under your buns for steaming to prevent them from sticking to the steamer. If using parchment paper, just cut slips large enough to hold the dough pieces.
Leave to rise for 15-30 minutes.
Fill basin of steamer with cold water and put steaming baskets on top. Then turn on medium-high temp. The slowly building heat will allow for more rising of the buns. Once steam starts to come out of the steamer, let steam for about 20 min. Once 20 min are up, shut off heat and allow buns to sit for a few min before removing lid to check on them.
Let cool and enjoy in your favorite way that you enjoy eating sweet buns. Can confirm it tastes good with condensed milk if that’s your jam. Have yet to try them with jam, but I might just do that soon too.
89 notes
·
View notes
Text
Blues In The Night 10. All of You

Previous Chapter | Chapter Song
Aimee couldn’t sleep after Todoroki had left. Lying in her bed she tossed and turned before looking at her alarm clock on her bedside table. 4:00 am. She groaned, finally getting out of bed and walking into her kitchen. Since she couldn’t sleep anyway, Aimee decided to get a head start on her favorite dessert and sometimes shameless breakfast item: beignets. Taking out a large mixing bowl and all her ingredients, she began to mix yeast, water, milk, sugar, salt, and eggs until they were blended well. As she worked, she felt her body and mind finally relax, her muscle memory kicking in and having a true zen moment late in the night. As she added the flour and shortening, she heard a familiar meow at her feet, Mochi alerting her to his presence. “Hello, pretty kitty. I know, mama is keeping you up huh?” She sighed as she continued to mix the dough. “I think I might have messed up, Mochi. I’m sending Shoto all kinds of mixed signals. I just don’t want to lose him.” Mochi let out an annoyed meow as he weaved between her legs, earning a small chuckle from the ravenette. “Don’t worry, you won't be replaced, little man. You really should give him a chance though. Prissy pussy isn’t a good look on you.” She smiled and covered the bowl of dough with plastic wrap before putting it into the fridge to chill and let the yeast rise. Picking up the fat cat with a grunt, she walked back into her bedroom in hopes of catching a few more Z’s before daybreak.
The next morning, Aimee was still pretty restless having not gotten much sleep. She once again returned to the solace of her kitchen, deciding to treat herself to more of favorite comfort foods: gumbo and cornbread. She had a large pot of the seafood stew simmering on her stovetop as she finished up mixing her dough for the cornbread. As she placed the pan into the oven, she heard a knock on her door. I wonder who that could be? Upon opening the door, she was meet with her favorite pair heterochromatic eyes, but this time they held a kind of sadness that looked foreign to her. Panning down, she noticed he had a large bouquet of red and white roses in his hand. “Shoto, this is a surprise.” The hero bowed deeply before speaking.“I wanted to apologize for last night. I pushed you too far physically and took advantage of your situation.” He paused, offering the flowers to her. “These are for you. The florist said the red represents love and white purity. I’m willing to wait for you, even until marriage if that’s what you wish.” Aimee’s heart ached, watching the man she loved. What happened last night was in no way his fault and the thought that he had been worried he had offended her was killing her. She held the flowers in her hands and let out a deep sigh. “Oh, mon cher… They’re beautiful. But you have the wrong idea.” Shoto gave her a confused look although he was greatly relieved to still hear the beloved pet name she had bestowed upon him. He must not have screwed up too much for her to still call him that. Aimee stepped aside as she gestured with her free hand, “Please come in.”
As Aimee lead Shoto into her home and to her kitchen, the warm aroma of spices hit his nose, causing his mouth to water. Upon reaching the kitchen table the pair had a seat on opposite sides as he looked around to see the somewhat messy kitchen, obvious she had been cooking all morning. He was pulled from his thoughts as Aimee took his hand in hers, an apologetic smile on her face as she laid the bouquet down on the table top. “You did nothing wrong last night. You were absolutely perfect, as usual. This was all me,” she paused, taking a deep before continuing. “The truth is… I was embarrassed for you to see me in my Spanx.” Once again, Shoto gave her a puzzled look, having never heard of the word before, “Spanx?” “It’s shapewear. A type of underwear to make me look a little thinner, smooth out my lumps and bumps and rolls. They’re not attractive.”
Shoto hummed, still not fully grasping the concept. If this was all due to a pair of underwear then he didn’t understand what the big deal was. “To be honest, I probably wouldn’t have even looked at your underwear long. I’d be too eager to undress you fully.” Aimee blushed as she bit her lip, her imagination running wild before she shook her head. “Even so… that’s part of the problem. I was also scared of what you’d think of my body with no clothes to hide behind.” The hero rubbed small circles on top of her hand with his thumb as his eyebrows knitted together. “What do you mean, my love?” Aimee sighed, her eyes cast down as she continued to nibble on her bottom lip. In an act of encouragement, Shoto brought her hand up to his lips to softly kiss across her knuckles, his eyes trained on hers. “Well… My body has always been a big deal in my relationships. Men either like my personality only to turn me away because they don’t find my body appealing, or they only want me for my body and curves. Some men just see me as a novelty. They’ve never been with a black woman before. I’m a rare bird of sorts here in Japan. But once they’ve had their taste, they drop me and move on to the next.”
The duel-quirked hero grumbled low in his throat as his lips pulled down into a frown. How dare these men treat his love so poorly. The woman before him was the most beautiful woman he had ever met and deserved the world. The more he thought of her being hurt by these low lives, the deeper his frown became. It wasn’t until Aimee continued speaking that he was brought out of his thoughts. “Shoto, you have been a literal dream come true to me. I couldn’t ask for a more perfect man to love and to love me. And trust me, I want you, in every way. I’m just so afraid that once you see me like that, with nothing to hide behind, you’ll change your mind and think maybe I’m not worthy of your love after all.” She paused, blinking back hot tears. “I just don’t want to be singing my blues in the night.”
Shoto’s heart was breaking as he watched his love crumble before his eyes. If she honestly thought that he would turn her away after seeing her in her purest state, then he was not doing his job as her boyfriend and lover. In fact, Shoto practically worshiped her body. He has had to hold himself back many times as visions of her curves laid bare before him danced in his head. Unable to take anymore, he stood from his seat, gently bringing Aimee up with him. “Come with me.” Shoto lead her by the hand out of the kitchen and into her small bedroom before stopping in front of her full-length mirror. He stood behind her as he stared into her eyes in their reflection, a puzzled look on Aimee’s face. “My apologies, my love. It seems I have failed you. You are the most stunning and unique person I have ever had the pleasure of knowing, let alone loving, and I’m going to show you all the things I love about you until you believe it yourself.” He paused and kissed her temple, his eyes still trained on her reflection. “And I’ll keep reminding you as well.”
Shoto took a single curl between his fingers, a small smile on his face as he released it, watching it bounce back into place. “I love your dark curls. I would have my hands in your hair all the time if I didn’t know better.” Aimee rolled her eyes, a smile pulling at her lips. “I told you, you get a free pass. You can touch my hair whenever you want.” Shoto chuckled lightly as he kissed her cheek. “Noted. I also love your large almond eyes. They’re so expressive and almost childlike. Sweet.” Aimee blushed as she looked down, only to have Shoto lift her chin once again to look back at her reflection. “I love your plump lips. The way they part slightly in your sleep, the way they feel on mine…” Her blush deepened as she suddenly felt warm all over, images of his lips on hers invading her thoughts. She bit her lip as she stared into his eyes through the reflection in the mirror. With a smirk, Shoto brushed his thumb across her bottom lip, releasing it from behind her teeth, “Even the way you bite them when you get flustered or nervous.” Slowly, he slid his large calloused hands down her smooth arms before taking her hands in his, lacing their fingers together. “I love the way your arms wrap around me… The way your small soft hands fit in mine.” Gently, Shoto lifted her right arm to drape around his neck before lightly brushing the back of his hand down her underarm and the side of her chest. “I love your full breasts,” he whispered in her ear before quickly tickling her side, earning a surprised giggle from the ravenette. “Especially the way they jiggle when you laugh.” Continuing to slide his large hands down her body, one came to rest on her stomach and the other on her hip. Watching her eyes for any signs of discomfort, he slid his warm left hand underneath her shirt, to knead at her soft flesh. “I love your tummy and wide hips. Maybe one day… perhaps they will house and birth our future children…” Shoto whispered into her dark curls, desperately trying to hide his now flushed face, embarrassed by his candid admission.
“Awww, mon cher!” Aimee smiled moving to turn her body to face him, only for Shoto to firmly keep her in place, facing the mirror. “I wasn’t finished.” “Oh, my bad. Please continue.” With a small smirk, Shoto continued to slide his hands further down her body, resting on her plush thighs. “I love your thick thighs and round bottom for…” he paused, quickly pulling her back flush against his body with a grunt. “Obvious reasons.” Aimee squealed from shock, laughing at herself as she covered her face and blush with her hands. With a gentle smile on his lips, Shoto finally turned her around to face him fully, taking her hands from her face to hold them tightly in his. “But even more importantly, I love your quick wit. You can reduce me to a flustered mess in five words or less. Sometimes it drives me crazy but I wouldn’t have any other way.” Aimee rolled her eyes playfully, before looking down once again, embarrassed by all the love and attention Shoto had shown her. Before she could pull away, The hero lifted her chin once more, his steely eyes staring into hers. “Do you want to know what I love and cherish the most about you, my love?” Aimee nodded wordlessly, completely entranced by her beau. “What I love most is your warm and kind soul. You give everyone your all. You go out of your way to make people smile.” Stroking her cheek with his thumb, he wrapped his other arm around her back to hold her flush to him, his eyes never leaving hers. “I love you. All of you. And I’m not going anywhere, for as long as you’ll have me.”
A bright smile grew across her face as she wrapped her arms around his neck, pulling him close. “Oh, Shoto.” The two closed the distance with a passionate kiss, their lips moving slowly and skillfully against each other. With her mind at ease, Aimee’s lips parted, allowing Shoto entry as their tongues explored each other. Nothing was rushed, they savored each other and the moment as if they had all the time in the world. “I love you so much, baby,” she whispered against his lips. He held her close as his hands slowly explored her body, kissing her lips softly before pulling away to trail feather light kisses down her neck, “I love you too.” Aimee melted in his arms as he began to gently suck at the delicate skin behind the shell of her ear, her fingers tangling in his hair. She moaned slightly as he kissed the small purple mark, proud of his new artwork on his favorite canvas. Capturing her lips again, they continued to lose themselves in each other, whispering sweet nothings until Aimee’s kitchen timer chirped loudly, startling the pair with a groan. “Come on baby. Let me feed you,” Aimee smiled, before placing a final kiss to his cheek. Reluctantly Shoto nodded, releasing her from his hold, opting to hold her hand instead.
Aimee lead him back into the kitchen, gesturing for him to have a seat at the table before taking the hot cornbread out of the oven and slicing it into squares. Next, she retrieved two bowls giving them each a generous serving of fresh gumbo, topping it with white rice. She served Shoto the gumbo and cornbread with a smile, before placing her own bowl opposite of him, a pitcher of ice cold water between them. “Bon appetit!” she giggled as she sat down. Shoto looked down at the meal placed before him. It smelled wonderful, full of warm spices. He especially liked the familiar sight of white rice on top of the foreign dish. Taking a spoonful, he took it into his mouth to be met with an explosion of flavors. The fresh shrimp and crab and the spicy flour soup base mingled together perfectly while the rice was a welcome cool. “This is delicious. What’s it called?” “Gumbo!” Aimee said with a bright smile. “It’s my favorite comfort food. It really warms the belly and soul.” Shoto nodded as they continued to eat, picking up his piece of yellow bread next to his bowl, “And this?” “That’s cornbread. It’s a semi-sweet bread made from cornmeal. It’s nice to have to cool down your mouth if you get too much heat from the spicy gumbo. I like it with a little butter.” Shoto watched as Aimee took out a stick of butter from the fridge, spreading a small pad across her piece of cornbread before doing the same himself. She made the dish herself so she must know the best way to eat it. He ate a small piece with a smile, as he hummed. “You really are quite the cook.” Aimee shrugged playfully as she giggled to herself. “Well I love to eat, therefore I guess I had to be a pretty decent cook.”
The pair continued to eat their meal in a quiet conversation, Mochi weaving between their legs under the table, hoping for some dropped scraps. After finishing, Aimee took their plates to the sink before calling over her shoulder. “Any room for dessert?” Shoto quirked an eyebrow, clearly intrigued. If her main course was this good, her dessert must be heavenly. “What’s for dessert?” Aimee smiled, taking out the dough from the fridge she had worked on in the early hours of the morning. “Beignets!” She cheered, heating a pan of boiling hot oil. “I have no idea what those are, but if you’re making them I’m sure they’re wonderful,” Shoto said with a smile as he watched her prepare the dessert. After rolling out the dough and cutting it into squares, she dropped a few into the hot oil, frying it on both sides before setting them out to drain on a paper towel. Next, she topped them with powdered sugar and a light drizzle of honey. “Careful, they’re hot,” Aimee offered them to her beau as he brought the plate back to the kitchen table, Aimee following close behind. As the two took their first bites, Aimee giggled watching Shoto’s eyes widen with delight, “Good, huh?” He nodded as he covered his mouth filled with the southern doughnut. “Everything was delicious, but these are easily my favorite.”
Aimee smiled as she finished her dessert, licking the remaining powdered sugar from her fingertips, “I’ll pack you up some of everything then. That way you can take a nice hearty lunch with you to work tomorrow.” Shoto shook his head with a polite smile, “You don’t have to that, beautiful. You should enjoy the fruits of your labor yourself. I’ve already imposed enough.” Aimee stood from her seat, ignoring his protest, taking out a few containers of tubberware. “Mon cher, now that you’re with me, there is one thing you will never be and that’s hungry.” Shoto watched on as she continued to fill the containers with food. “Your love language is giving gifts and experiences I otherwise would never have the chance to enjoy. My love language is cooking. I love cooking, but I love cooking even more for the people I love.” Putting the containers of food into a bag for him, she placed it in front of him on the table. The look on her face said it was not a option to refuse. “Take it, I insist.”
Shoto chuckled lightly, haven clearly been defeated, “Very well. But I also enjoy a nice cuddle, for the record.” He smirked, earning a playful eye roll from the dark-skinned beauty. “Who doesn’t enjoy a nice cuddle? But I have to say I’m quite partial to yours as well.”
Picking up the rose bouquet off the table, Aimee found a vase, filling it with water before placing it inside. “Thank you again for the flowers. They remind me of you.” Shoto quirked a red brow, confused by what she meant. Seeing his puzzled look, Aimee giggled as she placed the vase in the center of her kitchen table. “Red and white? You match,” She smiled as she gently brushed his peppermint locks out of his face. A pink blush dusted across Shoto’s cheeks as he nervously rubbed the back of his neck. “Ah, I didn’t even realize,” he mumbled. “I am glad you like them though.”
Shoto watched her carefully as she began to clean up the dishes. As he rose to help her, he cautiously posed a probing question since their earlier heart to heart, “Just to clarify, you’re... not a virgin?” Aimee blushed as she continued to wash the dishes, unable to meet his eyes. “No baby. Is that a problem?” Shoto shook his head quickly, his own blush deepening. “No, not at all. Honestly, I’d be surprised if you were, you’re so beautiful inside and out.” He paused, a low grumble in his throat. “Although I am jealous of the bastards that got to be intimate with my love before me.” A light scoff left Aimee’s lips as she began to dry the dishes, “If it makes you feel any better, I can count my experiences on one hand, most of them lackluster.” The duel quirked hero hummed, not exactly happy with the new information for a number of reasons, “Well, if I do ever have the honor to be with you intimately, it will be my personal mission to leave you breathless and beyond satisfied,” He smirked to himself as he shamelessly looked her up and down. “Maybe even a little sore.” Aimee blushed deeply as she fought to suppress a giggle. “Ooo Shoto! You kiss your mother with that mouth?” Shoto stopped his cleaning, stunned by a revelation.
My mother.
Taking her hand, Shoto lead Aimee back to the kitchen table, a puzzled look on her face, “Everything ok baby?” “Aimee… I just realized you have told me so much about your past, even though it’s uncomfortable for you. It’s only right that I do the same.” She nodded, giving his hand a supportive squeeze. With a sigh, Todoroki told her all about this traumatic childhood. He told her about his parent’s quirk marriage. About his father’s cruel training sessions and aspirations for him. About how his own mother gave him his red scar. About how he struggled to accept his left side. Even about the disappearance of his older brother Touya.
Aimee sat in silence, her eyebrows knitted together and her lips turned down in a frown. She opened her mouth only to close it many times, unable to find the words. Shoto finally sighed, rubbing circles on her hand in his, “Please do not think ill of my mother. She was driven to do what she did and has since gotten help.” Aimee shook her head before crossing her arms in a huff, “It’s not your mother I’m upset about. I understand she was a victim. It’s your father that sounds like a flaming bag of shit.” A light chuckle left Shoto’s lips as he sat back in his chair, “Well you’re not wrong, but he has owned up to his mistakes and is trying his best to do right by his family now at least.” Sucking her teeth with a pout, Aimee reluctantly nodded. “I mean, I guess. Once I meet him I’ll try to not give him the stink eye for you. I make no promises, though.”
Shoto chuckled as his cellphone pinged in his pocket, “Don’t hurt yourself, all that sass might bubble over with no outlet.” Dodging Aimee’s playful smack, he looked at the calendar alert on his phone. Humming to himself, he quirked a brow. “That day may come sooner than you think.” “Huh?” Aimee questioned. “Just keep next Saturday open.” “I’m meeting your father next Saturday?!” she panicked, her eyes widening as she watched her boyfriend closely, putting his phone back in his pocket. “You might, or you might not. But either way, I would like to monopolize your time again if that’s alright with you, my love.” Aimee’s expression softened as she heard her own favorite pet name. “I’d spend every day with you if I could.” Shoto smiled as he took her hand once more, giving it a soft kiss. “Good. Also, would you mind giving me Hatsume’s phone number? I have some sidekicks that are in the market for some support items.” “Sure thing, I’ll text it to you now,” she said, pulling out her own cell phone from her back pocket. “Maybe then she’ll stay out of our hair for a while.”
After hearing the ping of his cell phone, Shoto nodded, watching Aimee stifle a yawn. He knew she had been cooking all morning, it must be finally catching up to her. “Why don’t you go lay down on the couch and put on a movie,” he said standing up from his seat, pulling her up with him. “I’ll finish putting away the dishes. I’ll join you in a moment.” The ravenette nodded, clearly needing a rest, as she retreated to the living room, “Don’t take too long, baby.”
After finishing his task, Shoto walked into the living room to see Aimee laying on her back on the couch, her arms opened wide to him. “Get in here, cuddle bug!” she said sleepily, earning a smirk from the hero. “As you wish.” Carefully, he draped his body on top of hers, laying between her legs to rest his head on her full breasts. He hummed softly as he wrapped his arms around her waist as Aimee gently ran her fingers through his hair. This just might be his new favorite cuddling position. The couple watched the movie in a comfortable silence until Aimee’s breathing became slower and deeper, her tell-tale hums leaving her lips. Shoto slowly lifted his head to see that she was out like a light, glad that she was finally getting some rest. Careful not to wake her, he pulled out his phone from his back pants pocket, texting the new number he was given.
Shoto: Hatsume, this is Todoroki Shoto.
Shoto: I have a favor to ask.
Chapter 11
#blues in the night#chapter 10#ch 10#all of you#todoroki#todoroki shoto#todoroki shouto#shoto todoroki#shouto todoroki#todoroki x reader#todoroki shoto x reader#todoroki shouto x reader#shoto todoroki x reader#shouto todoroki x reader#todoroki x oc#todoroki x original character#todoroki x faurie#aimee faurie#black reader#chubby reader#plus size reader#bnha imagines#bnha oc#bnha original character#bnha writings#bnha writing blog#bnha romance#bnha fluff
62 notes
·
View notes
Photo

https://giordanos.com/tips-for-making-pizza-healthier/
For many people, pizza is likely at or near the top of the list of their favorite foods. Unfortunately for those who are watching their waistlines or want to eat a bit healthier, pizza isn’t always the ideal option. The average slice of plain, cheese pizza has nearly 300 calories, almost 10 grams of fat, 551 milligrams of sodium and nearly 34 grams of carbohydrates.
Fortunately, there are ways to make pizza healthier, whether you’re making a pie from scratch at home or are enjoying a slice or two — or three! — out at a restaurant.
Make Pizza Healthier at Home
If pizza night is a regular event at your house, but you’re starting to get concerned about the fat, carbs or sodium content of your homemade pizza, a few small tweaks can help to make it healthier. Start from the bottom of the pie and work your way up to the toppings with these healthy pizza options.
The Crust
For plenty of people, the crust of a pizza can make or break the entire pie. A crust that’s soggy or chewy or that doesn’t have that much flavor can really destroy what would otherwise be a delicious meal.
The crust of the pizza can also be a significant source of its calories and carbs. If you make your own crust from scratch, there are a few things you can do to improve its nutritional value.
Option one is to switch from all-purpose, refined flour to whole wheat flour. Whole wheat flour has more fiber and protein than white flour. It also has a stronger, nuttier taste, which can take some getting used to.
If you’re concerned that swapping out a standard pizza dough recipe for an entirely whole grain recipe will make your family less inclined to the pizza, you can start small. Instead of replacing all of the all-purpose flour with whole wheat flour, replace half of it. You’ll be boosting the fiber and the nutritional value of the crust, but the change in taste won’t be as dramatic.
Another way to make your homemade pizza crust healthier is to think beyond dough. That’s right. You don’t have to use a wheat-based dough as the base of your pizza. You can try to make a crust out of finely diced cauliflower, eggs and cheese for a low-carb alternative.
Another option is to make mini mushroom pizzas. Instead of rolling out dough for the crust, simply top a cleaned and trimmed portobello mushroom cap with sauce, cheese and other toppings.
Adjusting the size and thickness of your homemade pizza crust is another way to cut calories. For example, you can roll out the dough thinner than usual and enjoy a thin-crust pizza rather than a hand-tossed or pan pizza at home. Making pizza rounds that are slightly smaller will also reduce calories. For example, instead of rolling out a 14 or 16-inch circle, use enough dough to create a 12-inch crust.
Other healthy pizza crust options include:
Pita pizza: Use half of a whole wheat pita pocket for the crust.
Tortilla pizza: Use a whole grain tortilla as the crust.
Rice pizza crust: Use leftover brown rice to make a crust
Waffle pizza crust: Use whole grain frozen waffles to make individually sized pizzas
French bread pizza: Use a whole grain baguette as the crust
The Sauce
Jarred or bottled tomato sauces usually have a considerable amount of added sugar, not to mention high levels of sodium.
One way to make pizza healthier at home is to choose your sauce carefully. Read the ingredients list and the nutritional information on the label. Keep an eye out for added sugar — from sources such as corn syrup or sucrose — and look at the number of grams of added sugar listed on the nutrition label. If you’re concerned about sodium content, look for a bottled sauce that doesn’t have added salt.
Another way to improve the nutritional content of your pizza’s sauce is to make your own at home. Making your own sauce, from canned tomatoes or fresh, reduces the amount of sugar or salt in it, and it also puts you in full control over what goes into the sauce. That means if you want to sneak extra vegetables into the sauce, you can. A few vegetables worth considering include:
Onion
Carrot
Spinach
Bell peppers
Zucchini
If you’re worried about the additional vegetables affecting the texture of the sauce, you can always puree it after cooking. The additional vegetables will add to the complexity of the taste of the sauce, but their individual flavors won’t be so prominent that someone who dislikes spinach or peppers will be put off eating your pizza.
The Cheese
Next to the crust, it’s the cheese that can make or break a pizza, especially when it comes to nutritional content. Load up your pizza with cheese, and you’re essentially loading it up with fat and calories.
Luckily, there are many ways you can adjust the cheese on your pizza to cut calories and improve the pie’s nutrition, without sacrificing flavor. First things first, not all cheeses are created equally when it comes to calorie content. An ounce of cheddar cheese contains 114 calories, for example, while an ounce of part-skim mozzarella contains 72.
The flavor of cheese can also influence how much of it you end up using on a pie. If you believe in using multiple kinds of cheese on your pizza, look for varieties that have intense flavors, so that you can use less overall and cut calories without sacrificing taste. Flavorful cheeses that work well on pizza include:
Provolone
Parmesan
Blue cheese
Feta
If you are concerned about sodium content, it might be worth using fresh mozzarella on your pie rather than part-skim. Fresh mozzarella has 17 milligrams of sodium per one ounce serving. Meanwhile, part-skim mozzarella has 223 milligrams of sodium.
The Toppings
Ah, the toppings. What you put on your pizza not only gives you a chance to change its nutritional content. Pizza toppings also let you express your personality and preferences. Let’s start by talking about vegetables, as putting more vegetables on your pizza is one sure-fire way to make it a healthier meal.
What vegetables should you put on your pizza? A better question might be, what vegetables don’t belong on a pizza?
Adding leafy greens such as spinach, chard or kale will increase the calcium and iron content of your pizza. You can chop up the greens and toss them with a small amount of olive oil before you cook the pizza or you can steam the greens and pile them on the pie before cooking.
Some greens, such as arugula, are better off added to the pie after cooking it. Toss a bowlful of fresh baby arugula leaves with olive oil and some salt and pepper, then sprinkle it over the pizza after it’s come out of the oven.
If you’re making pizza at home, you can use pizza night as an excuse to clear out your refrigerator and use up any leftover vegetables — raw or already cooked. If you’re stumped about what types of vegetables belong on your pizza, here’s a list to get you started:
Artichokes — frozen or canned. You can use fresh artichokes, too, if you don’t mind preparing them
Broccoli
Sliced tomatoes
Mushrooms — all types
Zucchini and summer squash
Cooked sweet potato
Cooked winter squash
Onions
Eggplant
Asparagus
Hot peppers
Sweet peppers
Olives
Beets
Radishes
Garlic
Pepperoni, sausage and bacon — if you’re the type to enjoy meat on your pizza, you don’t have to give it up to get a healthier slice. It just helps to rethink the type of meat you use to top your pie.
For starters, it helps to trade meats that are high in fat for leaner sources of protein. Instead of pepperoni, pork sausage or bacon, try chicken sausage, salami or turkey bacon. Choosing meats that have a strong flavor, such as prosciutto, mean you can use less without giving up the taste.
It’s also fun and a bit more healthy to think outside of the box when it comes to pizza toppings. Instead of meats, consider lean sources of plant-based protein. For example, you can top your pizza with black or pinto beans to add fiber and protein to it. Or, crumble up drained, firm tofu to increase protein. You can also use tofu as a dairy-free cheese replacement on your pie.
Eggs are also a protein-packed, creative pizza topping. You can crack an egg on to the center of the pie a few minutes before it comes out of the oven or slice up hard boiled eggs and scatter them across the pizza after it’s finished cooking.
Healthy Pizza Hacks at Home
In some ways, making pizza healthier at home doesn’t have to do with what you put on the pizza, but rather with how you serve it. When it’s time to eat, try cutting the pizza into smaller slices. Divide the pie into eight pieces, then cut each of those slices in half. You’ll be able to trick yourself into eating less without feeling deprived.
Another trick is to put your pizza on smaller plates. Use a dessert or salad plate instead of a dinner plate. The pizza will take up more space on the plate, making it look as if you’re eating more.
Healthy Pizza Options When Dining Out
Even if homemade pizza night is a regular event at your home, the odds are you still go out for pizza from time to time or order a pie for take-out or delivery. While you don’t get to control what goes into the crust or sauce when you buy pizza from a restaurant, there are ways to order it to help make it healthier.
Essential Ordering Hacks for a Healthier Pizza
Wondering what you should ask for or say when ordering pizza to make it healthier? Try these hacks:
Ask for Half of the Cheese. Instead of ordering extra cheese on your pie, ask the server or cashier if your pizza can be made with half as much cheese as usual. You probably won’t miss the additional cheese, but your waistline will miss the extra calories.
Ask for Fresh Mozzarella. Many pizza restaurants offer fresh mozzarella and will prepare certain pies with it automatically, such as the classic Margherita pizza. You can also often ask for fresh mozzarella instead of the traditional shredded cheese. Fresh mozzarella has about the same number of calories as shredded, but a lot less salt.
Order a Salad, Too. If you’re in the habit of shoveling pizza into your mouth the second you get near a pie, filling up on salad first can help you cut back.
Get the Thin Crust. Remember, the less crust there is, the fewer calories you’ll be consuming. Choose thin or even an extra-thin crust pizza to cut back on carbs.
Get the Personal Size Deep Dish Pie. If you can’t say no to a deep dish or stuffed pizza, go for the smallest size available, make sure you load it up with veggies and order a salad so that you don’t over-indulge.
Get Meat Toppings on Half of the Pie. If you want pepperoni or pork sausage on your pizza, go for it. But ordering meat toppings on just one half of the pizza will help you cut calories and fat content, making your pie just a bit healthier.
Load up on Veggies. Get as many vegetables as you can stand on your pizza when you order at a restaurant or for delivery. Many pizza restaurants will let you customize your pizza with whatever toppings you want — from a list of choices.
Ask the pizza restaurant not to cut your pie. There are a few reasons to ask the restaurant not to cut your pizza when ordering. If you’re taking the pizza to-go or getting delivery, it often travels better when it hasn’t been sliced first. Once you get the pizza home or at your table, you’re able to cut it down to the appropriate sizes, which can help you avoid overeating.
To Blot or Not to Blot: That Is the Question
You’ve probably seen people take a paper towel or paper napkin and gently blot the surface of their pizza before eating it, to remove excess oil. Does blotting your pizza do anything to help make it healthier?
As it turns out, yes. When you blot a slice of pizza before eating it, you can remove an average of about 35 calories per slice. That’s about 10 percent of the average number of calories in a slice of plain pizza.
1 note
·
View note
Text
Keto Scones
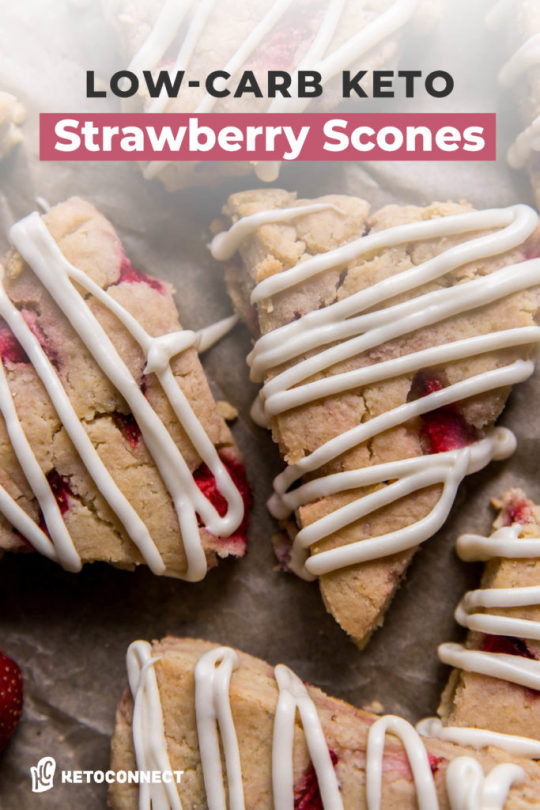
Strawberry Keto Scones
Scones are one of the best keto breakfast options because Keto Scones taste just as good as the high carb alternative. The fact that they are a dense pastry makes them well suited to being made with keto friendly flours and ingredients. Throw in some strawberries and a few simple techniques and you will come out with the perfect recipe for a lazy Sunday at home!
What is a Scone?
A scone is a baked good usually made of wheat or another type of grain and flavored with sugar and spices. This was a tasty way to eat wheat and oats, which were staples of European diets in the early 1500’s. Fast forward 500 years and scones have been completely transformed, often using berries, chocolate chips and a variety of other additions to make them a sweet compliment to any breakfast or lunch. The signature quality of a good scone is that it should be dense and satisfying. It is not like other breakfast pastries in that they are fluffy, and soft. This is perfect because baked goods made with almond flour tend to be on the denser side.
Are Scones Keto Friendly?
Scones are definitely not keto friendly. They traditionally use refined flour, refined sugar and a host of other ingredients you’re probably trying to avoid. This recipe uses almond flour and keto friendly sweeteners to turn scones into a perfect breakfast for a low carb diet. This recipe is gluten free, sugar free, and is very easy to make. Coming in at just 5g of net carbs per scone it is a great alternative to your typical 60+ grams of carb scone.
Most recipes can be made keto friendly through substituting flour for low carb keto flours such as almond flour and coconut flour. For the sugar we use a combination of low carb sweeteners to replace the sweetness.
How to Make Low Carb Keto Scones
If you want to make keto scones just follow the steps below. This is one of the easier recipes you’ll see and is great for a newcomer to keto baking that isn’t used to working with almond flour.
Mix the Dry Ingredients
For the best result it is a good idea to separate the wet and dry ingredients before combining them to form the final dough. The dry ingredients in this case are almond flour, coconut flour, erythritol (a low carb sugar alternative), baking powder and salt. Make sure you get rid of any clumps in your dry ingredients by mixing them with a whisk or fork.
Mix the Wet Ingredients
Next we will mix together the melted coconut oil, heavy cream, vanilla extract, stevia and 1 large egg. Be sure that the mixture is not too warm when you add the egg or you run the risk of the egg cooking before it is mixed in. You may notice that the wet ingredients are very small in comparison to the dry ingredients. This is because the dough for keto scones is very firm and loosely held together. It is not a wet batter and is more of the consistency of a pasta dough.
Combine Wet and Dry
Now comes the fun part. Add the wet to the dry and begin mixing together. I like to use a firm spatula for this step. The dough will be very dry and have a sandy consistency. It WILL NOT combine easily and you will need to use some force when you form the scones to get the dough to come together. This is necessary to get that signature scone texture. If you are struggling with this step watch the video for an example of what the texture of the dough should be before you form it into keto scones.
Add in Berries
We’re using strawberries for this recipe but any berry will work great with this recipe. We’ve made this exact recipe with blueberries, and raspberries and they both came out great. You could also add in some nuts, like pecans or walnuts, as well as some low carb keto chocolate chips. Whichever route you decide to go they will come out great. Once you add in your berries lightly mix them into the dough until they are evenly distributed.
Form the Keto Scones
Once you’ve got your completed mixture it is time to form the keto scones. The easiest way to do this is first to form the dough into a tightly packed ball using your hands. The dough should not be every sticky and should be easy to shape with your hands. Once you have a ball place the dough into your cooking vessel. Either a skillet or a baking sheet will do. Flatten your ball of dough into a disk that is about 1 inch thick.
Next you will cut the dough into 8 equal sized triangles and separate them from one another slightly. Separating the keto scones from one another will allow for the entire exterior of each scone to brown and harden.
Bake and Top With Glaze
The keto scones will bake at 350 degrees for about 20-25 minutes depending on your oven. The easiest way to know they are done is once the scones become browned slightly on the outside and they are firm to the tough. Despite the baking powder in this keto scones recipe, they do not rise very much. Allow the keto scones to cool on a baking rack for 20 minutes before topping with the homemade glaze.
To make the glaze you will just need two ingredients – erythritol and heavy cream. Erythritol is a sweetener we commonly use in our keto recipes. You can learn more about what your best options are when it comes to keto sweeteners by reading our comprehensive keto sweetener guide. To the erythritol we just add a splash of heavy cream and whisk together. Add more or less heavy cream depending on how thick you want the glaze to be. Reference the recipe video for a visual guide of what to look for.
If you want an even thinner glaze you can use almond milk or coconut milk in place of the cream.
If you decide to skip the glaze you may want to add additional sweetener to the scone recipe. This recipe is designed to include the glaze to achieve the correct level of sweetness so the keto scones themselves may not be sweet enough for your liking without the addition of the glaze.
Making Scones With Almond Flour
When it comes to keto baking you usually have to decide between coconut flour and almond flour for your breads and pastries and making keto scones is no different. With scones the decision is quite easy. We use a 9 to 1 ratio of almond flour to coconut flour in this recipe in order to achieve the traditional texture and crumble of a scone. This is one of those recipe that cannot be made with only coconut flour because the texture will be off. Stick to our almond flour ratio and you’ll come out with a perfectly tasty scone recipe.
Can I Only Use Almond Flour?
Yes you can, but it isn’t recommended. Almond flour scones are good but that little bit of coconut flour is what provides the softness and slight crumble. If you want to go with a fully almond flour scones recipe then you should add about 3/4 cup of additional almond flour and remove the 1/4 cup of coconut flour. Scones made with almond flour are very good but the tiny bit of coconut flour really takes them to the next level.
Can I Make Nut Free Scones?
You probably could make a recipe using only coconut flour but it would be very difficult and would definitely not be the same as this almond flour version. Almond flour is very important to this recipe and should not be omitted. If you do want to avoid nuts in your baked goods you could try some of the other keto breakfast recipes on our site. While this recipe is not nut free it is sugar free and gluten free.
Can I Make Dairy Free Scones?
Yes you can! The dairy in the recipe cones in the form of cream in both the dough and the glaze. To make scones that are dairy free you can simply use water, almond milk, or coconut milk in place of the cream in both instances. One thing to remember is that you will likely need a bit less of your substitute liquid because it will be thinner than cream is.
Tips for Making Low Carb Keto Scones
Here is a few tips to keep in mind to make sure your low carb scones come out as good as ours do.
# Use finely ground almond flour. In just about every low carb recipe you’re better off using flours that are finely ground. With almond flour you will often see “almond meal”, “almond flour”, and “finely ground almond flour”. We always choose the most finely ground version we can.
# Grease your knife before cutting the scones. Using coconut oil to coat the knife prior to cutting the scones will ensure they do not stick to the knife. This makes for an easier cutting process and guarantees your scones will come out nice and pretty.
# Allow the scones to fully cool before adding the glaze. If the scones are still warm when you add the glaze it will become thin and run off of the scones. If you want the scones to hold onto the glaze let them fully cool and a cooling rack for 20-30 minutes prior to adding the glaze.
More From Our Keto Bakery
If low carb scones aren’t your thing you should take a look at all of the other recipes we have to offer on our site. We have a long list of baked goods that would be perfect for a family gathering or a lazy weekend brunch before a big day of watching football. Here’s some of our personal favorites.
Diner Style Keto Pancakes – The best keto pancake recipe on the internet. This will take you back to your childhood days of enjoying pancakes at the local diner.
Keto Egg Loaf – This one might sound a little crazy but it is a super easy recipe that only requires 3 ingredients and tastes exactly like French toast! Are you a waffle, pancake or French toast person? I’m pancakes all day.
The Best Keto Bread – Bread is the recipe everyone wants to recreate for a keto diet and we’ve done it for you. This recipe is the most popular on our site.
Keto Cinnamon Rolls – No recipe has taken us longer to perfect than this keto cinnamon roll recipe. There is nothing that brings me back to my childhood like a tray of freshly baked cinnamon rolls.
If you can’t find a keto recipe you’re looking for just leave us a comment below and we will try our best to come up with the recipe you’re looking for.
Storing Strawberry Scones
With most keto low carb recipes storing them can be a bit of a challenge. You can’t just keep these on the counter at room temperature like you can with traditional pastries. Scones made for a low carb diet will require refrigeration in order for them to stay good for up to a week. If you want them to last longer you can stick them in the freezer where they will last for up to a month.
The nice thing about scones is they taste just as good two weeks later as they did on the day you made them. I’ll pull one out of the freezer and microwave it for 60 seconds, or place it in the oven for about 10 minutes and enjoy it with a cup of coffee in the morning!
youtube
#Keto Scones#Strawberry Scones#Strawberry Keto Scones#Keto Strawberry Scones#Low Carb Keto Scones#Easy Keto Scones Recipe#How To Make Keto Scones
0 notes
Text
Sourdough Crackers, Take II
I wouldn’t say that I love crackers. It’s not like I’m some sort of cracker connoisseur. But they are definitely my go-to snack. They’re quick, simple to transport, and easy to just eat anywhere (except your bed where you’ll just end up sleeping with crumbs). They can also store for forever, so it’s no wonder they were a thing in the pioneer days.
But I also have a way of neglecting my sourdough starter. My schedule prohibits me from baking constantly, and I just feel really bad about throwing away starter. It feels like a waste. So instead of using it or getting rid of it, I just sort of let it starve.
I know, I’m a terrible starter mom. At least I take much better care of my cats. At any rate, I decided to use it today for making crackers.
This is a documentation of my second attempt at making crackers. The first attempt was not recorded, as it was made pre-blog. This attempt is post-blog, P.B., so it gets documented.
The first attempt actually didn’t turn out so bad. My main beef with it was that I rolled the dough out very unevenly, so the crackers turned out, well uneven. Some of them were a bit thicc (only two c’s), thus coming out a little on the bready side when coming out of the oven, while others were too thin and came out like charcoal flakes.

I intend to fix that… hopefully. I got the recipe from King Arthur Flour, and it runs as follows:
Sourdough Crackers (https://www.kingarthurbaking.com/recipes/sourdough-crackers-recipe)
Ingredients:
1 cup (113g) King Arthur White Whole Wheat Flour
1/2 teaspoon sea salt
1 cup (227g) sourdough starter, unfed/discard
4 tablespoons (57g) unsalted butter, room temperature
2 tablespoons dried herbs of your choice, optional
oil, for brushing
coarse salt (such as kosher or sea salt) for sprinkling on top
Directions
Mix together the flour, salt, sourdough starter, butter, and optional herbs to make a smooth (not sticky), cohesive dough.
Divide the dough in half, and shape each half into a small rectangular slab. Cover with plastic wrap, and refrigerate for 30 minutes, or up to a couple of hours, until the dough is firm.
Preheat the oven to 350°F.
Very lightly flour a piece of parchment, your rolling pin, and the top of the dough.
Working with one piece at a time, roll the dough to about 1/16" thick. The dough will have ragged, uneven edges; that's OK. Just try to make it as even as possible.
Transfer the dough and parchment together onto a baking sheet. Lightly brush with oil and then sprinkle the salt over the top of the crackers.
Cut the dough into 1 1/4" squares; a rolling pizza wheel works well here.
Prick each square with the tines of a fork.
Bake the crackers for 20 to 25 minutes, until the squares are starting to brown around the edges. Midway through, reverse the baking sheets: both top to bottom, and front to back; this will help the crackers brown evenly.
When fully browned, remove the crackers from the oven, and transfer them to a cooling rack. Store airtight at room temperature for up to a week; freeze for longer storage.
I followed the recipe exactly, although leaving out the dried herbs (I really don’t have any) and I melted the butter. How was I supposed to mix it in well when it’s a solid? I also don’t use parchment paper. That’s for chumps. The dough went in the fridge to chill, but I don’t remember how long. Then I took it out and rolled it flat. I'm very good at rolling out amoeba-shaped dough:

I figured the edges would be thinner than the middle, so I cut those off in the hopes that the crackers would have a more even thickness. I put the dough on the pan, cut it up, brushed it with oil and salt, and poked holes in it to keep bubbles from happening. The end result was this:

The crackers are all uneven in size and shape, but it’s fine. Consider it artistic expression. At this point, I can already tell there are going to be some crispy bois.
I actually turned the oven down to 300 degrees instead of 350. I’m 99% sure it runs waaayy too hot, and that’s probably 60% of my problem baking. I baked them for 7 minutes, then switched the pans and baked them another 7 minutes. At this point, I took them out and removed some of the crispier ones, burning my arm in the process, and then popped the rest back in the oven for 5 more minutes to crisp up the rest.
I still ended up with some slightly burned ones, but its way fewer than the last batch:

Behold my lab snack for the next few weeks. All in all, I’m rather happy with them, and they came out tasty. Definitely something I’d do again.
0 notes
Text
Vegan Banana Bread Cinnamon Rolls
Aug 27
Meet the world’s best vegan cinnamon rolls: vegan banana bread cinnamon rolls! A cross between a cinnamon roll and banana bread, these fluffy, soft cinnamon rolls are homemade and make a delicious brunch or treat! This recipe is in partnership with Almond Breeze.
Coming to you with another glorious cinnamon roll recipe, but this time they’re completely vegan, dairy free and taste like a cross between a Cinnabon and banana bread. WHO ELSE IS READY TO GET THEIR BAKE ON?
I’ve tested these approximately 5 times now to get the perfect fluffy results that will make you better than Betty, almost ask cool as Ina, and definitely as legit as Martha. (Hoping we all get these references).
I tested these vegan banana bread cinnamon rolls last spring for the first time, hoping I’d get them to you in time for Easter, but it just wasn’t in the cards. I still needed time to make them better, so I decided to save the recipe for later in the year. And now it’s August. Funny how life happens so quickly.
Since we’ll soon be heading into Fall and all things cozy, I decided that it was the perfect time to whip the recipe out and introduce these beautiful cinnamon rolls to the world.
They’re fluffy, soft and taste like a cinnamon roll and banana bread had a baby. I MEAN COME ON, NOW YOU HAVE TO TRY THEM.
Let’s talk about a few key ingredients:
Bread Flour. The trick to keep these cinnamon rolls soft and fluffy is to use bread flour. You can read more about bread flour vs. all-purpose flour here, but basically bread flour has a higher protein ratio, which means it produces a lighter and softer cinnamon roll instead of one that’s dense. It’s meant to be used in breads and rolls, so do yourself a favor and pick up a bag ASAP.
Vegan butter. We’re using vegan butter in this recipe. However, if you aren’t vegan or dairy free, feel free to use regular unsalted butter. Or you can try my regular cinnamon roll recipe.
Mashed banana. Not only does mashed banana help to give the cinnamon rolls that banana bread flavor, but it also helps to keep the recipe vegan. Not only that, the banana adds a natural sweetness AND softness to the dough. SO addicting. Just make sure that you measure out the mashed banana to ¾ cup. DO NOT USE MORE. DO NOT USE LESS. Trust me!
Almond Breeze Unsweetened Vanilla almondmilk. YUM. This is my go to almondmilk. It keeps these cinnamon rolls dairy free and vegan, plus it adds a lovely hint of vanilla. Simply the best.
I’m not sure what else I could tell you other than to make them ASAP.
You’ll fall in love, I know it.
See how to make the cinnamon rolls:
If you make this recipe, be sure to leave a comment below and rate the recipe! You can also snap a picture and post it on Instagram using the hashtag #ambitiouskitchen. And of course be sure to follow Ambitious Kitchen on Instagram. Xo!
Vegan Banana Bread Cinnamon Rolls
Author: Monique of AmbitiousKitchen.com
Recipe type: Vegan, Dairy Free, Brunch
Prep time: 1 hour 30 mins
Cook time: 25 mins
Total time: 1 hour 55 mins
For the dough:
¾ cup Almond Breeze unsweetened vanilla almondmilk, warmed to 110 degrees F
¼ cup granulated sugar
2 ¼ teaspoons active yeast (1/4-ounce package yeast)
¾ cup mashed ripe banana (from about 2 medium bananas, but make sure you measure)
¼ cup melted vegan butter
4 cups bread flour
3/4 teaspoon salt
For the filling:
2/3 cup dark brown sugar
1 1/2 tablespoons ground cinnamon
¼ cup vegan butter, softened
1 medium banana, thinly sliced
For the vegan cream cheese frosting*:
2 oz vegan cream cheese, softened
1 tablespoon vegan butter, softened
1/3 cup powdered sugar
½ teaspoon vanilla extract
1 teaspoon Almond Breeze unsweetened vanilla almondmilk, to thin frosting for drizzling
Add warm almondmilk and sugar to the bowl of an electric mixer and sprinkle yeast on top. Stir in ¾ cup mashed banana (making sure you measured!) and melted vegan butter. Mix until just combined. Next stir in flour and salt with a wooden spoon until a dough begins to form.
Place dough hook on mixer and knead dough on low speed for 8 minutes. Dough should form into a nice ball and be slightly sticky. (If you don’t want to use an electric mixer, you can use your hands to knead the dough for 8-10 minutes on a well-floured surface.)
Transfer dough ball to a greased large bowl, then cover with plastic wrap and a warm towel. Allow dough to rise for 1 hour or until doubled in size.
After dough has doubled in size, transfer dough to a well-floured surface and roll out into a 14x10 inch rectangle. Spread softened butter over dough, leaving a ¼ inch margin at the far side of the dough.
In a small bowl, mix together brown sugar and cinnamon. Use your hands to sprinkle mixture over the buttered dough, then gently rub the sugar into the butter a little. Add banana slices on top.
Tightly roll dough up the dough, starting from the 9-inch side and place seam side down making sure to seal the edges of the dough as best you can. You will probably need to cut off about ½ inch off the ends of the dough as it won’t be as full of cinnamon sugar as we’d want it to be. Then cut into 1 inch sections with a serrated knife. You should get 9 large pieces.
Place cinnamon rolls in a greased 9x9 inch baking pan or round 9 inch cake pan. (I also recommend lining the pan with parchment paper as well, in case any of the filling ends up leaking out.) Cover with plastic wrap and a warm towel and let rise again while you preheat your oven.
Preheat oven to 350 degrees F. Remove plastic wrap and towel and bake the cinnamon rolls for 25-35 minutes or until just slightly golden brown on the edges. You want to under bake them a little so they stay soft in the middle, that’s why we want them just slightly golden brown. Allow them to cool for a 5-10 minutes before frosting. Makes 9 cinnamon rolls.
To make the frosting: In the bowl of an electric mixer or in a medium bowl, combine cream cheese, butter, powdered sugar and vanilla extract. Beat until smooth and fluffy. Add 1 teaspoon of almondmilk if you’d like a thinner glaze. Spread or drizzle over cinnamon rolls and serve immediately.
If you like a lot of frosting, I suggest doubling it.
To make overnight cinnamon rolls: After placing rolls into the greased pan, simply cover, place overnight in the fridge and then bake them in the morning as directed. I like to bring my cinnamon rolls to room temperature first by leaving them on the counter for 30 minutes before baking (this is known as the second rise).
*Feel free to use regular butter and cream cheese if you are not vegan or dairy free.
3.5.3251
Pin these cinnamon rolls:
Source: https://www.ambitiouskitchen.com/vegan-banana-bread-cinnamon-rolls/
0 notes
Text
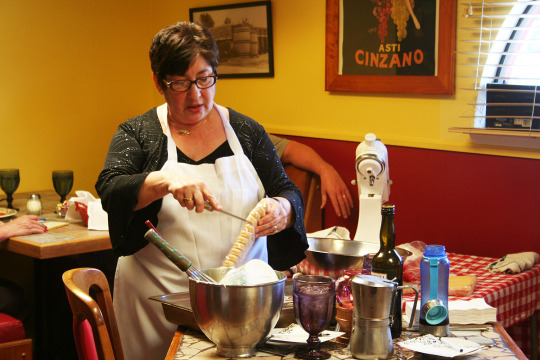
AUSTRIA/HUNGARY (Part One): Cherry Apple Strudel (Happy 150th)
Not straight from the

this is a horrible picture but it was midnight by the time I finished this and my dining room lighting is horrible
I’m not overinvested, your FACE is overinvested
Okay! So! Figuring out recipes for them is super tricky because, I mean, what makes it unique to the ship? They share so much food culture already. This and any other recipe one can come up with for both of them could easily belong to either of them individually. But, at least in my mind, I tend to associate apple strudel with Austria, and cherry strudel with Hungary. Both countries make both, but whatever, this is my brain. Hungary is also known for its sour cherries!
Note: I referenced several recipes for this, and I’m not 100% happy with the dough. This is only the second time I made strudel, and it was harder to work with this time around (by some miracle, I nailed the first one - I’m not even really a baker at all, so it was a pleasant surprise). So this recipe may be more of a guideline - if I make this again, and it comes out better, I’ll update. WARNING this is really image heavy.
Ingredients:
FILLING:
6 cups sliced apples (Granny Smith or Golden Delicious - more on this later) 1.5 cups sour cherries (WELL DRAINED if using jarred) 1 cup plain breadcrumbs 6 tbsp butter Lemon juice (half a lemon’s worth is fine, it’s just to keep the apples from browning) 1/4 tsp(?) of cinnamon (I think I used more - taste and check the balance to your liking!) 3/4 cup(?) granulated sugar (more or less, depending on the sweetness of your apples and cherries. Again, taste it to check!)
DOUGH** (again, I fucked up here, but this is what I started with):
2 cups all-purpose flour Pinch of salt 1 egg 100 ml lukewarm water (yes I just changed systems mid-post but most measuring cups have both cups and ml)
OTHER:
Melted butter Confectioner’s sugar A clean bedsheet (I’m serious)
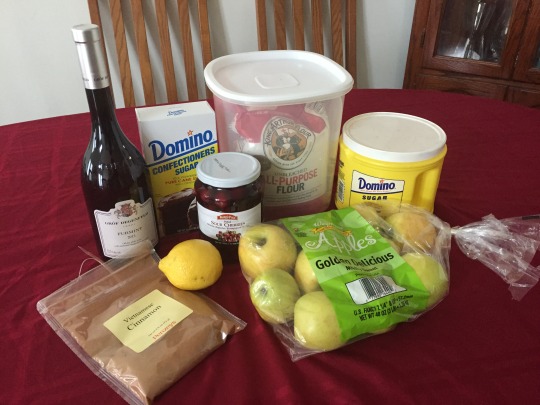
Here’s everything except the eggs, butter and breadcrumbs, plus wine - the recipe in my “Imperial Recipes” cookbook I got in Prague had 2tbsp white wine in the dough. I was skeptical, it was the only recipe I saw that had it, so I ended up skipping it.
A NOTE ABOUT THE APPLES: I knew Granny Smith apples were supposed to be best for strudel because of the tartness (they also don’t disintegrate easily). But since I was using sour cherries, I was worried it would come out too tart. In the end, it was just fine, if not a bit too sweet. If you’re using jarred cherries, which have added sugar, you’ll probably be fine with Granny Smith - and you may want to lower the amount of granulated sugar to 1/2 cup instead of 3/4 cup. If you’re using fresh sour cherries, bless you for having the patience to pit them, and since there’s no added sugar, keep it at 3/4 cup and Golden Delicious is probably fine.
Also:

i care about these things. also it’s what i had in the house
STEP ONE: PREPARE THE FILLING
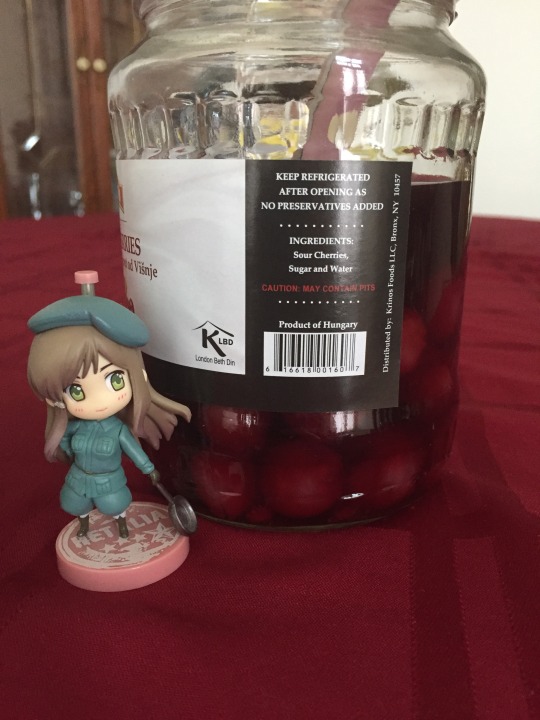
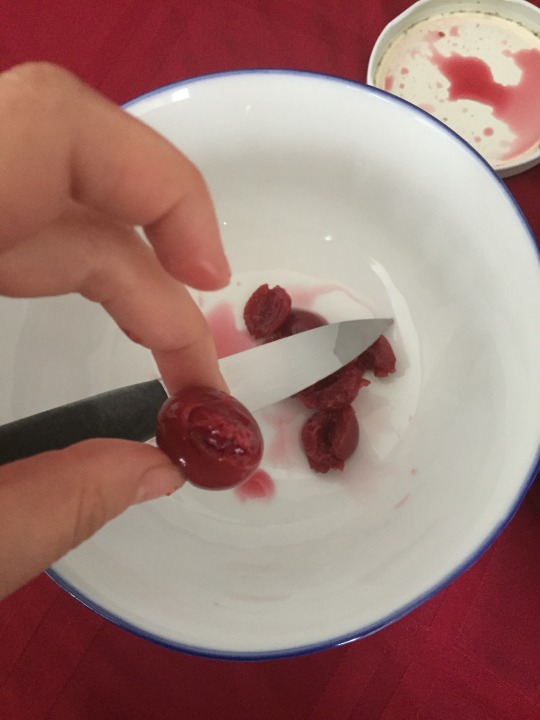
If you’re using jarred cherries, slice them, leave them in a bowl for a while, then leave them on a plate with a paper towel to dry. Slicing them will both ensure that there are no pits (see the picture!? it might still have pits even if it’s pitted!) and also that the texture is better with the apples. You do NOT want much of the syrup in this; it will create too much moisture and your strudel may burst while baking. (Spoilers: mine did anyway. So be careful. It still came out pretty well.)
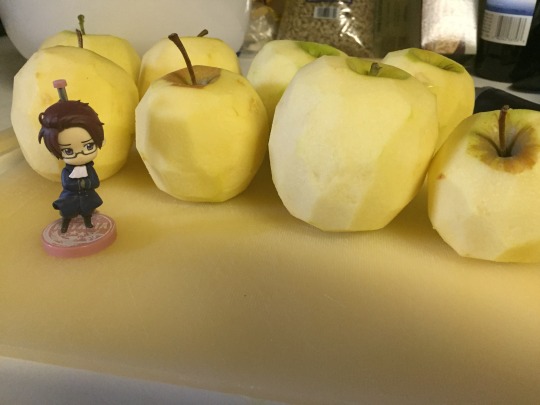
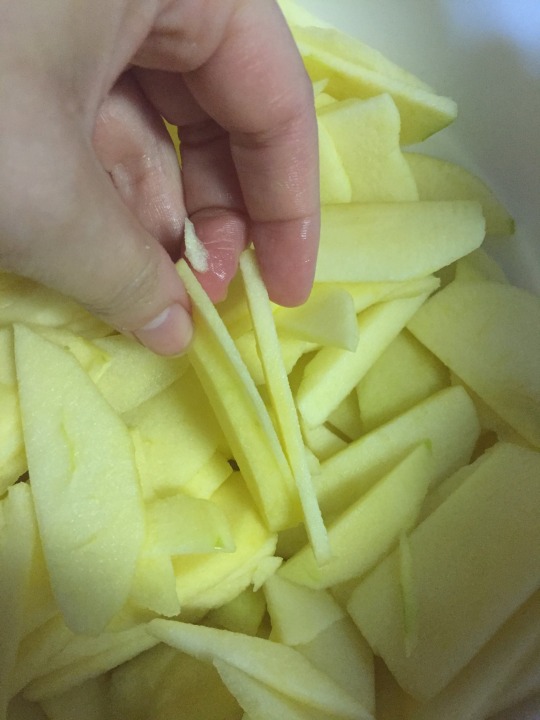
Peel and slice your apples like this. For best results, have an inanimate object look judgy over your handiwork
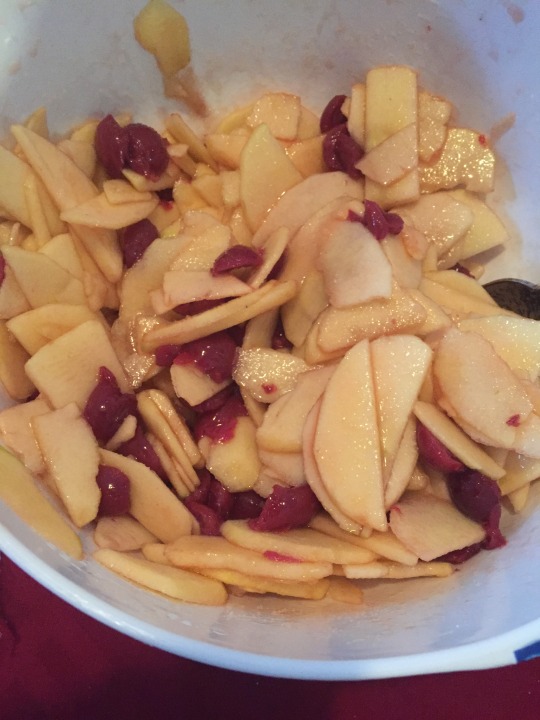
After the cherries are well drained, combine in a bowl with the lemon juice, cinnamon, and sugar, and cover while you prepare your dough. This seems backwards but trust me - even more liquid will come out of this while it sits there. AND IT STILL BURST IN THE END.
STEP TWO: PREPARE BREADCRUMBS
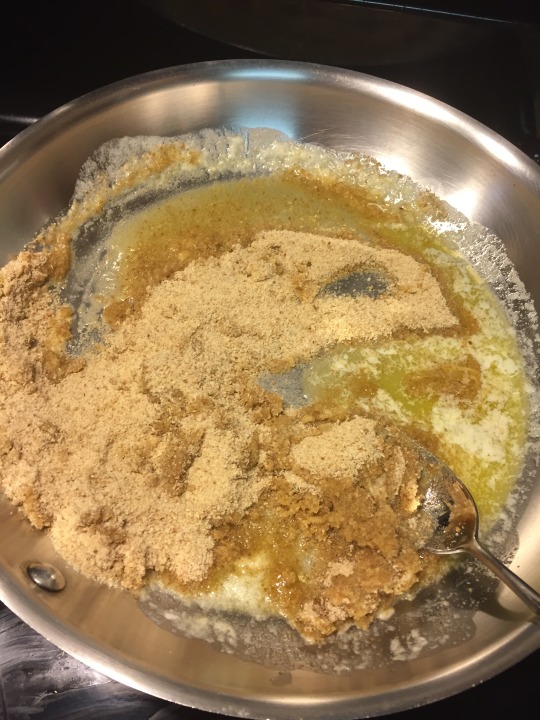
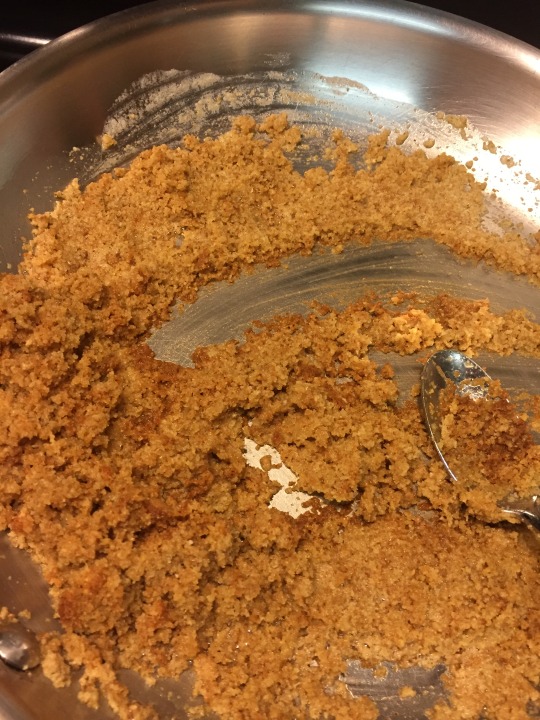
Melt butter in a pan. Throw your breadcrumbs in. Toast until brown. Don’t burn. Set aside to cool.
STEP THREE: DOUGH
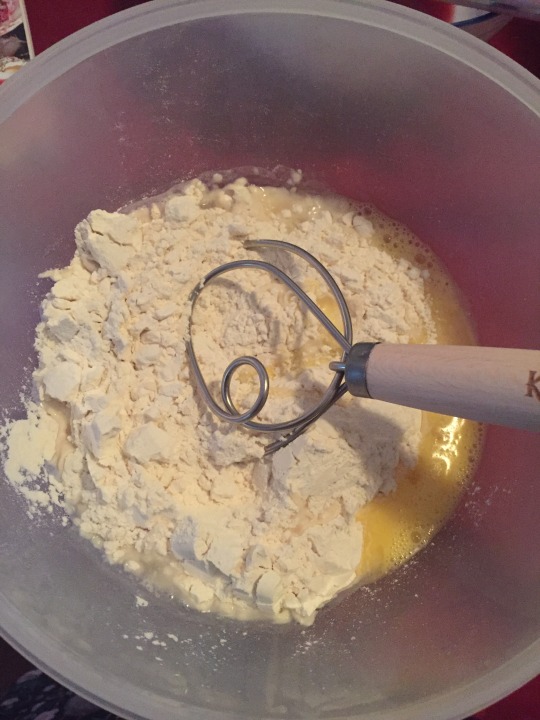
Combine flour, egg, and salt, and gradually add the water as you mix. Form it into a ball once it’s done. I didn’t get photos of this because you try holding your phone and doing it.
NOTE: I beat the egg well beforehand because some cute old lady on youtube with an incredible sturdy dough did. No other recipe I saw had it - many used a well, like when making pasta. This method may be better.
Here’s where my dough went weird: I noticed it looked too dry, so I added a tiny bit of water. Then I added a tiny bit of flour because it was too sticky. So I’m pretty sure my proportions were off. I should have been more patient with it - my guess is it would have been okay without anything extra if I just worked the dough more and trusted it. Also, I was approximating from a recipe that used grams, because I don’t have a scale. Bad idea. I’m going to buy a scale.
Knead the dough. You want to knead it a LOT. Science time: kneading activates the gluten which gives dough its elasticity. For something like pancakes, you don’t want to overmix because too much agitation activates the gluten too much and it can make them tough. But this is strudel - you’re going to be stretching the dough out a lot, and it should be paper-thin, and not tear. It’s going to need to be on the tough side. I had a video of myself doing a fun kneading technique but apparently you can’t directly upload and embed here (I’m not doing youtube)? So go to this video, which uses a different dough recipe which you may want to try (and canned whipped cream in the middle?! wtf), but the fun part starts at 5 minutes in:
youtube
Also, THAT VIENNESE ACCENT. If you ever wonder what Austria might sound like. I imagine something like this but 20 years younger and more oboe-like in timbre. Anyway.
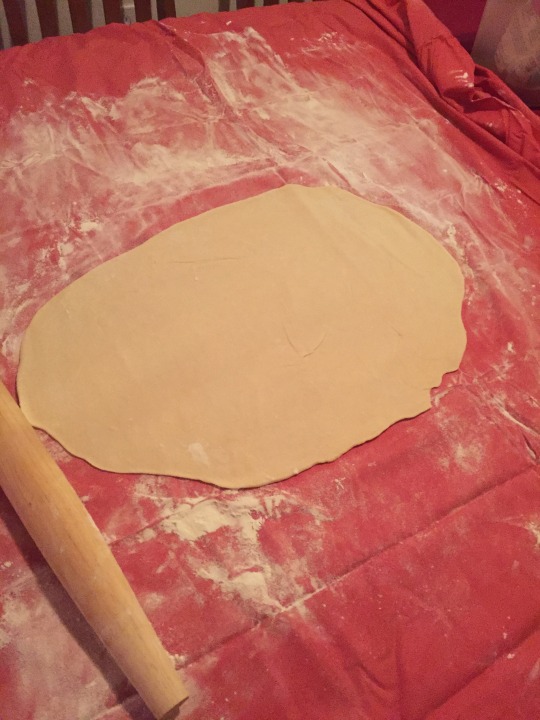
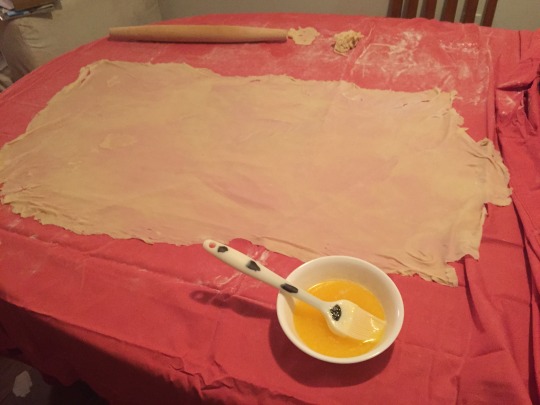
Spread your clean sheet over the table, and flour it well. Roll out the dough first, then stretch using your fists (phrasing). I also could not get footage of this because I was working alone. Again, refer to the above video. THIS IS THE HARDEST STEP. Be patient, but also work quickly. Gravity is both your friend and your enemy here - you want gravity to do the work, but if you leave it for too long on your hand, it’ll tear the dough. You may end up with a few holes anyway - depending on how big they are, you can either leave them or patch them up. This is going to get several layers upon rolling, so it’ll be naturally patched up, but it’s thinner in those spots so you risk bursting. If you look closely you can see where I patched it up. You also want to cut away the thick edges, because they will make the strudel lumpy and weird. Brush the whole thing with butter. I almost forgot, which you can see in the pictures below.
Also, I did this sideways, because it was late and I remembered wrong. DON’T DO IT SIDEWAYS. Put the filling along the LONG edge, not the short one. I was so tired. However, if you know you have a small baking sheet, this may be better. It’s your call but it’s better to do it the long way...

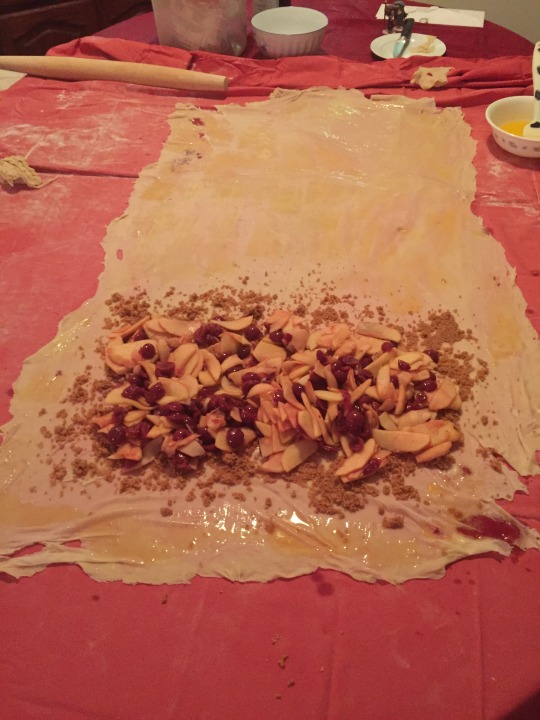
Whatever, the breadcrumbs HAVE butter in them, right? Nah, don’t forget this step like I did. Butter it, spread the breadcrumbs, then put the filling over it. I used a slotted spoon because it was so damn soppy.
For the next step, which is The Moment Of Truth, also please refer to the above video, because again, YOU NEED TWO HANDS FOR THIS.
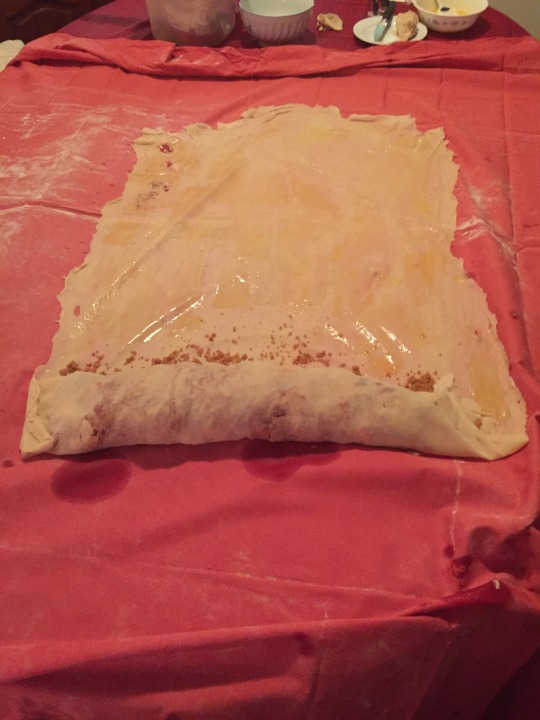
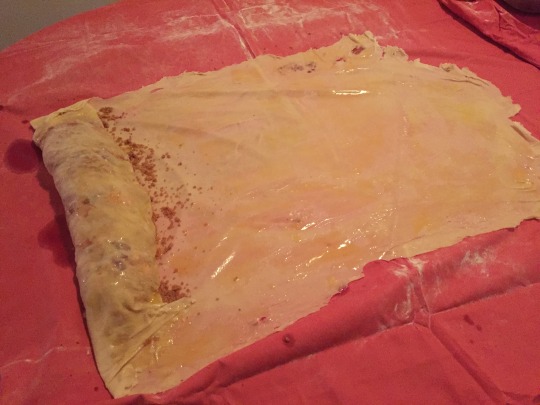
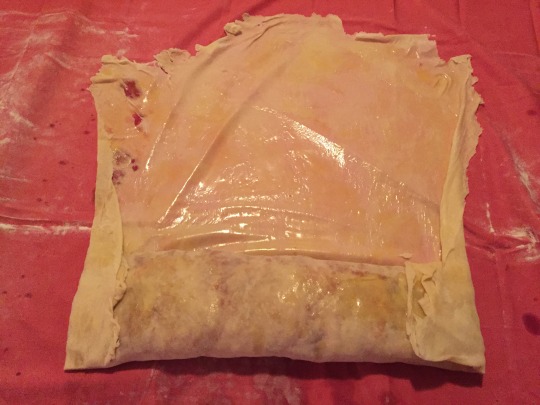
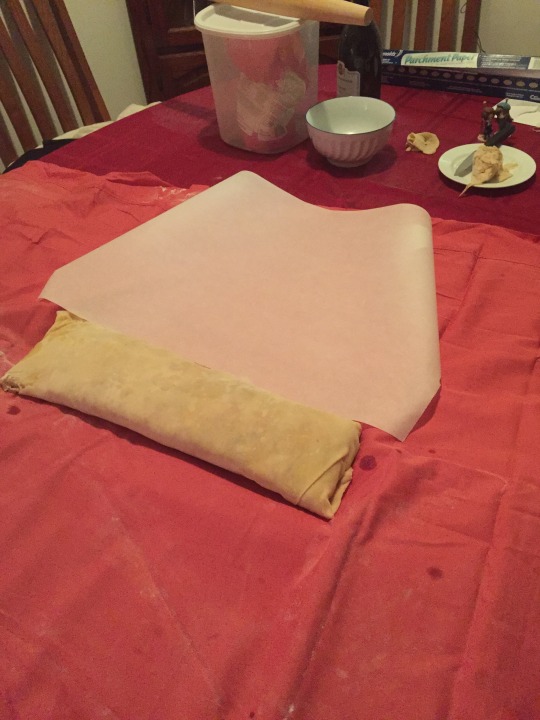
Yeah, so this was supposed to be rolled the other way, but what you do is pull the sheet up and flop it over on itself repeatedly, folding in the edges about halfway through like a gigantic egg roll or burrito. You can butter the top of the rolled part on each step, but I’m not sure how necessary it is because the other layer it’s touching is also buttered. I did it, because butter is great.
IF you do this the right way, you can place it on a baking sheet in stages and snake it, or a U shape like in the video. If you do it the wrong way or your baking sheet is small, roll it one more time onto the parchment, but butter the parchment first.
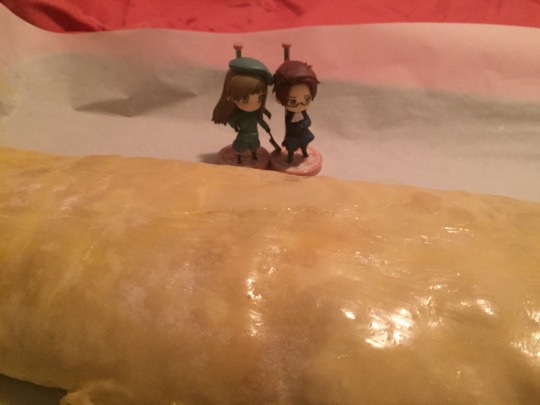
Brush the top with more melted butter. Don’t put One Coin figurines in the oven.
Bake at 375F for about an hour - it may need more.
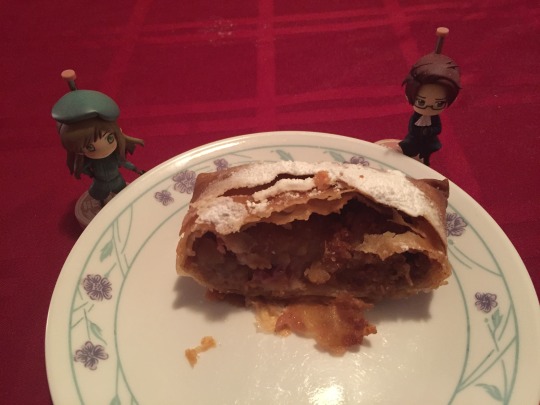
And now for The Other Moment Of Truth:


So this is what happens when it bursts. But it’s nicely golden brown at least! Top it with sugar while it’s still warm, but let it rest for a half hour before you cut into it.
NOTE: This serves A LOT OF PEOPLE, but strudel freezes incredibly well, if it’s well-wrapped. I had strudel that was several years old and it was still pretty immaculate. I think it survives better months in the freezer than it does for a week in the fridge, because the fridge can make it soggy. Freezing it preserves the crispiness, and you can reheat it in the oven. Please don’t microwave it, you’ll make Oma cry.
Enjoy!!!
4 notes
·
View notes
Text
All About Pie
I make very, very good apple pie. My mother made very, very good apple pie, won prizes for it at the fair. I don't eat bought-pie because that's paying good money for craptacular pie when I can do better myself. Now, I take my pie way, way too seriously. I'm also pedantic, wordy, and a big fan of Winesap apples. However, much of my advice, once you wade through the pedantic part, will probably be of some use to you, even if you insist on using nonstandard apples. All other fruit pies are modifications of apple, and the modifications are at the very bottom of this document.
Making good pie is like being able to play the piano. It takes some practice. If you try to make pie three or four times, have three or four less-than-perfect pies, and then quit because it's "too difficult", that's like sitting down at a piano three or four times in your life and being disappointed that you can't play Chopin's Concerto No. 2 in F minor like a pro. D'oh.
The ingredient missing from most pie crust recipes is practice. Learning to make very good pie will probably take you around twenty not-so-perfect pies, the vast bulk of which will be edible. You will learn most effectively if you can make at least one pie per week.
Here's how I make apple pie (read entire set of directions and commentary first before attempting to make pie):
Preheat oven to 350.
For 1 crust (you need two, a top and a bottom, so you will be making this twice):
1.5 cups white flour (I use Gold Medal all purpose. Have never tried the 'for baking' kind.)
.5 cup lard (Prior to 2004, I used blue Crisco unflavored shortening. In 2004, and again in 2007, Crisco was reformulated and it doesn’t work like it used to because trans-fats were what made it great. Lard is predictable,behaves better than modern Crisco, and works unless you’re vegan or abstaining from pork. If either of those apply, Crisco or similar is your best bet.)
half a teaspoon salt
Mash all the above together in a good-sized bowl using a fork or a pastry blender. Mash together well. You want something that looks rather like cornmeal and is all evenly mixed.
Add 3-4 Tablespoons ICE COLD WATER.
The cool water from your tap is not good enough. Please run a glass of water, add ice, and let it sit for ten minutes, then measure from that. Do NOT just use cool water from the tap. It makes a difference. I'm not kidding.
Start with the low end of the water and stir. Dough should just hold together in two or three big lumps when you've added the water. Stir it fifteen, twenty strokes in a 'round and round' pattern with a fork before deciding if it 'holds together' or not -- it holds together better with some stirring, so your initial assessment might be off.
If you add too much water, the dough will be too sticky. If you add too little water, the dough will be too fragile and won't hold together. This takes some practice and it varies depending on relative humidity, how much water's in your flour, etc. There is no way to fix the dough once you've added too much water. You also can't work the dough a whole lot or it will get tough, so don't overstir.
Er. I should mention that this is *not* a friendly pie dough. This is a melt-in-your-mouth pie dough that will impress eighty-year-old ladies from the heart of pie country. Said old ladies will tear up on having a bite and say, in their wavery old-lady voices, "I didn't think anyone still knew how to make crust like this." If you want friendly, easy pie crust, go somewhere else. This is not that. This is the OTHER kind of pie crust, the kind that led to people using inferior bought pie crust because they couldn't hack making this kind.
Turn out the dough, press into a flattened beef-patty shape with your fingers, and roll it out with your well-floured rolling pin. You do NOT get a second chance at this. If you screw the pooch and make some ovular thing that won't fit your pie tin, you are not permitted to wad it up and try again to roll a better circle. That will make pie crust like leather, and we do not wish to eat leather. Leather is bad.
Roll from the center to the edge. Do not try to roll across the whole thing, that is not good. Work from the center to the edge. Try for a good-sized, mostly round product.
Also: Forget the whole marble pastry surface or the ice-filled rolling pin. These things condense if properly chilled. Condensation adds water. Water is *bad* for sticking. Do not go that route. Gadgets do not make good pie crust. Practice makes good pie crust. Forget the gadgets and practice, practice, practice.
Once you've rolled it out, roll up the pie crust like a scroll of paper, using a flipper/turner to free it from the counter. Lift it up in 'scroll form' and unroll it over the pie tin. (This gets easier with practice.) Gently press the dough into the pie tin to make sure you got all the way to the corners. Patch any bare spots you might have with excess overhang.
Put pie tin (with bottom layer of dough) in fridge to keep it cold while you're working on the filling.
Peel 7 or 8 (depends on size) Stayman Winesap apples. These are round, unattractive, not-shiny apples with no shelf-appeal. They look like hell next to the shining Red Delicious, the glorious green Granny Smith, and the striped Gala apples. Don't worry. They might *look* like hell, but they don't taste that way at all. You can *sometimes* buy them in stores. I get mine from the local orchard. (I live in central Pennsylvania, arguably the best apple country in the world.) Winesaps ripen in October, about the middle of the month, and they store well for the winter, very suitable for xmas baking.
Slice the apples up for pie... this is more important than you think it is. You are aiming for uniform, NOT WEDGE SHAPED, flat pieces that are thin enough for you to just barely be able to see the knife blade through. If you can't see the knife blade when you're slicing, then you are slicing too thick. If the slices are thinner than 1/8", then you are slicing too thin. You want big, flat slices. You DO NOT want wedges and you DO NOT want little fiddley bits. Do big flat slices, turn the apple 1/4 turn, do big flat slices, etc. You will have leftover square cores with some pretty decent meat on 'em. This can't be helped. Do not cut the bits off and put them in your pie. The bits cook to mush and make a mushy pie. Mushy is bad.
Put the apple slices in a roomy bowl. In another, smallish bowl, mix 3/4 cup (Full disclosure: I personally like half a cup but most people think they like their apple pie sweeter than I do. In these directions, I compromised on 3/4 of a cup as an amount more in line with what people expect out of an apple pie. I use half a cup in my own pies.) of white sugar, 1 teaspoon cinnamon, and 3 Tbsp. white flour all together so that it's well mixed. I use a fork for this.
Forget the whole cornstarch thing, cornstarch is for peach pie and cherry pie and berry pie. FLOUR is for apple pie. For very juicy apples, you may need more than 3 Tbsp. of flour, but you'll learn what 'very juicy' looks like with experience.
Dump the cinnamon-sugar-flour mix over the apple slices and GENTLY fold the apple slices over and over until they are coated. You do not stir roughly or you will break the nice, flat apple slices you worked so hard to cut. (Some breakage is inevitable, but try to minimize it.)
Remove pie pan from fridge. Put apple slices in pie pan by dumping half of them in there, arranging them with your fingers (to fill all spaces fully), and then repeating the process with the second half of the apple mixture. The fruit should dome slightly above the pie tin. Give the pie tin a gentle back-and-forth shake to settle the fruit.
Many people have 'air' baked into their apple pies because they do not take care. Use uniform, flat slices that pack well. Employ only Stayman Winesap apples (in a pinch, Granny Smith OR Rome will work, but neither is as good) for best results. Attempt to settle the apples ahead of time. Avoid the air-pie.
Dot the top of the fruit with four or five small pats of real butter. This adds richness to the filling.
Fix the second piece of pie crust and put it overtop of the pie Use the same "roll it up as a scroll, then airlift it over the pie tin and carefully unroll it" method that you employed so successfully to get the bottom part of the crust in the pie tin. No, I'm not being sarcastic. It works quite well, once you get the hang of it. Then, trim off the excess dough. Tuck the edges under and crimp with your fingers for a pretty fluted edge. (Again, this is a practice thing and you'll get better the more you do it.) Using a sharp knife, do a "plus" pattern (use two jabs for each 'arm' of the plus), turn the pie 45 degrees, and do another "plus" pattern using single jabs to divide the pie into eight slices while creating steam vents. That's probably confusing as hell. (N.B. The world will not end if you fail to vent your pie the way I vent my pie. I like my method and think it's worthy, but you can do what you like.)
I am of the opinion that doing little fruit cutouts and other dough artistry is not conducive to making good pie crust. If you can do that sort of foolishness with your pie crust, it isn't short enough and it won't be tender enough. Aim for just this side of 'impossibly fragile' and you'll have pastry that melts in your mouth.
Put the pie in oven, bake 40 to 50 minutes. Pie is done when crust is lightly browned, apples are bubbling (usually you can hear 'em), and pie smells good. It really does take 40 to 50 minutes.
Remove pie from oven. Apple pie filling and crust will get firmer if you allow the pie to cool completely.
Crumb-topped apple pie is for people who can't make decent pie crust.
Cherry pie: Use sour Montmorency pie cherries. You will need a generous four cups of pitted sour cherries. To the fruit, add 1.25 cups of sugar, 1/2 teaspoon almond flavoring, and 4 Tbsp. of cornstarch. Do not add red food coloring. You don't need it and it will make people think you used sorry-ass bought pie filling like a lamer.
Peach pie: Use peaches that are ripe and give gently to the touch. Dead ripe peaches are juicier with less shape and will make a sloppier, but still tasty, pie. Unripe peaches (firm to the touch) are unsatisfactory. You will need about 7 peaches, peeled and cut into reasonably skinny wedges. Add 3/4 cup sugar, 1/4 teaspoon cinnamon, 1/4 teaspoon almond flavoring, 2 Tbsp. flour, and 2 Tbsp. cornstarch to the peaches.
Berry pie: You will need a generous four cups of berries. Add sugar to taste, usually about a cup. All berries are juicy and will need 3 Tbsp. cornstarch, 3 Tbsp. flour to help settle them. A small amount of almond flavoring (1/4 teasp.) probably wouldn't hurt, but you won't need cinnamon. Berry pies (blackberry, blueberry, raspberry) usually boil over. Badly. The prudent baker puts a cookie sheet on the oven shelf underneath his or her berry pie.
2 notes
·
View notes
Text
Homemade Flatbread Pizza Recipe
Adapted from my favorite pizza crust recipe, this homemade flatbread pizza bakes up into a thin and chewy base for your favorite flatbread toppings. Quicker, easier, and thinner than pizza, this flatbread dough takes about 1 hour start to finish and is perfect for beginners. I always love adding garlic and Italian seasonings for extra flavor!
Welcome to the April Baking Challenge! If you’ve ever wanted to try making restaurant-style thin crust flatbreads, I have the perfect starting point for you. This is my EASY homemade flatbread dough, a recipe I’ve been making for a few years since I first published it with my zucchini & herbed ricotta flatbread variation. (Pictured next!) Have you tried it yet?
Here’s why you must…
Make This Flatbread Pizza Because:
you don’t need many ingredients
it’s quicker than homemade pizza
the dough yields 2 flatbreads
1 full recipe is perfect for 2-4 people
it’s easier to shape than regular pizza dough
you can eat it plain or with toppings
In other words, it’s the easier, quicker, and more convenient version of pizza dough.
What’s the Difference Between Flatbread Pizza and Regular Pizza?
Flatbread can be made with or without yeast. My version requires yeast for the smallest bit of rise, similar to a thin crust pizza. If you want a no-yeast flatbread, I recommend searching for another recipe that’s modified without its addition. (Don’t simply leave the yeast out of this one!)
My regular pizza dough bakes into a thick, chewy, and soft-centered bed for your favorite toppings. It’s a deeply loved recipe on this website and the only pizza dough recipe I use. Flatbread pizza is just that– flatter pizza. Since it’s flatter, it doesn’t require as much yeast or rise time and is perfectly manageable if you’ve never made homemade bread before.
This flatbread is similar to my focaccia, another simple homemade bread recipe.
6 Ingredient Yeast Flatbread Pizza Dough
Yeast: You can use instant or active-dry yeast with zero changes. If you’re new to working with yeast, I recommend reviewing my Baking with Yeast guide. I used to make flatbread with 1 and 1/2 teaspoons of yeast, but recently reduced it down to 1 teaspoon. This is plenty for a thin flatbread crust. Note that 1 teaspoon is less than 1 standard packet.
Sugar: Granulated sugar feeds the yeast. You only need 1 teaspoon.
Water: Flatbread and pizza dough are lean doughs, meaning there isn’t a lot of fat present. While I make rich overnight cinnamon rolls and glazed doughnuts dough with milk, we don’t need that extra fat here. We’re aiming for chewy and crisp, not voluptuous and soft.
Flour: You can use bread flour or all-purpose flour. Bread flour leaves a slightly chewier texture, but the difference is barely noticeable since the crust is so thin.
Olive Oil: Adds flavor. We’ll also brush the dough with olive oil before baking, too.
Salt: Adds flavor.
Optional Additions: You can also add some flair to this dough with a little garlic and/or Italian seasoning. Or add chopped fresh herbs or freshly ground pepper, too.
Homemade Flatbread Pizza Video Tutorial
Watch this quick video tutorial. The process is really that easy!
Overview: How to Make Flatbread Pizza Dough
Mix the dough ingredients together by hand or use a hand-held or stand mixer.
Knead by hand or beat the dough with your mixer. I like doing this by hand and you can watch me in the video above.
Place dough into a greased mixing bowl, cover tightly, and let it rise for 45 minutes.
Punch down the slightly risen dough to release air bubbles. Divide in half.
Flatten the two doughs with your hands or with a rolling pin. The flatbreads can be any shape you want as long as they’re about 1/4 inch thick. (Very thin!) Dimple with your fingers or with a fork, which helps prevent any air bubbles. Brush with olive oil, which helps protect the crust from any sogginess lingering from the toppings.
Top with favorite flatbread toppings.
Bake at a very high temperature for only about 15 minutes or until lightly browned.
You Can Enjoy it Plain
If desired, you can skip the toppings and leave the flatbread plain. In the next two pictures, I topped the doughs with fresh garlic, sea salt, and freshly ground pepper. After baking, I sprinkled with fresh parmesan cheese. Freshly baked plain flatbread feels like a total treat when served with marinara sauce, hummus, homemade pesto, or even mashed avocado and fried eggs (for an avocado toast variation!).
Flatbread Pizza Toppings
Or you can get creative with various toppings. Add these before baking.
Margherita Flatbread (pictured today): See recipe note.
Sausage & Garlic Pesto Flatbread
Zucchini & Herbed Ricotta Flatbread
1/2 cup goat or blue cheese per flatbread (1 cup total) and 1/2 cup fresh apple or pear slices per flatbread (1 cup total), plus a handful of fresh arugula and/or drizzle of honey after baking
1/4 cup homemade pesto per flatbread (1/2 cup total) & 4 ounces sliced fresh mozzarella per flatbread (8 ounces total)
BBQ Chicken Pizza toppings*
Spinach Artichoke White Cheese Pizza toppings*
*If you’re using toppings from my pizza recipes, you’ll need about 2/3 of the amount. My pizza recipe toppings are enough for one 12-inch pizza and are more than plenty for 2 smaller flatbreads (the full recipe below).
Pre-cook: Any meats should be pre-cooked before using as a flatbread topping. If you want to top the flatbread with vegetables, feel free to sauté or gently cook them first. I usually don’t with spinach, peppers, and mushrooms, but with “harder” veggies like broccoli or cauliflower, they’ll taste better if they’ve been slightly cooked before using as topping.
Get creative! I can’t wait to hear about how you top your flatbread pizzas.
More Baking from Scratch
Print
Description
Follow these basic instructions for thin yeasted flatbread pizza crust. The recipe yields enough dough for two small flatbreads, each perfect for 1 hungry person or 2 people to split (2-4 people total). Freezing instructions listed below. See all of my detailed topping suggestions in the blog post above or recipe notes below.
Ingredients
1 teaspoon active dry or instant yeast
1 teaspoon granulated sugar
3/4 cup (180ml) warm water, (between 100-110°F, 38-43°C)
2 cups (250g) all-purpose flour or bread flour (spoon & leveled), plus more for hands and surface
1 Tablespoon (15ml) olive oil, plus 1 teaspoon for brushing the dough
1 teaspoon salt
optional: 1 teaspoon garlic powder or 1 clove minced garlic and/or 1 teaspoon Italian seasoning
Instructions
Place the yeast and sugar in the bowl of a stand mixer fitted with a dough hook or paddle attachment. Or, if you do not own a stand mixer, a regular large mixing bowl. Pour warm water on top. Whisk gently to combine, then loosely cover with a clean kitchen towel and allow to sit for 5 minutes. The mixture should be frothy after 5 minutes. If not, start over with new yeast.
If you do not have a mixer, you can mix by hand in this step. With the stand mixer running on low speed, add the flour, olive, oil, and salt. Beat on low speed for 1 minute as it all combines. The dough should be thick and shaggy. Transfer it to a lightly floured work surface, including any loose flour. Knead it with lightly floured hands for 2 minutes until it begins to come together and becomes smooth. If the dough is too sticky to handle, add 1-2 more Tablespoons of flour.
Place the dough in a greased bowl (I use nonstick spray to grease) and cover with plastic wrap, aluminum foil, or a clean kitchen towel. Allow to sit and rest for 45 minutes at room temperature. Once it has rested and slightly risen, you can place it in the fridge for up to 2 days. More instructions in the make ahead tip below.
As the dough is resting and rising, prepare your toppings. See blog post and/or recipe note below.
Preheat oven to 475°F (246°C).
Shape the dough: Punch the dough down to release any air. Divide the dough into two. On a lightly floured surface with floured hands and working with one dough piece at a time, begin shaping and stretching the dough until it is 1/4 inch thick. You can use a floured rolling pin for this too. Don’t worry about the shape of the dough, just make sure it’s pretty thin. Repeat with the second piece of dough. Carefully transfer both pieces of dough to a parchment paper or silicone-mat lined baking sheet, or use a pizza stone. (You can also shape/roll out the doughs directly on a silicone baking mat or a large sheet of parchment if that is easier for you and then just transfer the whole thing to the baking sheet.)
Poke your fingers all around the surface of the flatbreads or prick a few holes with a fork. Drizzle or brush each with 1/2 teaspoon of olive oil. Top each with your favorite toppings.
Bake for 15-20 minutes or until the crust and toppings are browned to your liking. Remove from the oven. Slice and serve warm.
Cover and store leftovers in the refrigerator for up to 1 week.
Notes
Make Ahead & Freezing Instructions: The dough can be prepared through step 3, then after it has risen, cover and place in the refrigerator for up to 2 days. Continue with step 5. To freeze the dough, prepare it through step 3. After it has risen, punch it down to release any air. Divide it in 2, if desired, then wrap in plastic wrap and place in a freezer-friendly container for up to 3 months. When ready to use, thaw the dough overnight in the refrigerator. Then let the dough sit at room temperature for about 30 minutes before stretching out/shaping and topping. If the thawed dough keeps shrinking back as you try to shape it, lightly cover it with plastic wrap or a clean kitchen towel and let it rest on the counter or your work surface for 15 minutes. (The gluten just needs a chance to settle.)
Yeast: You can use instant or active-dry yeast with zero changes. If you’re new to working with yeast, I recommend reviewing my Baking with Yeast guide. I used to make flatbread with 1 and 1/2 teaspoons of yeast, but recently reduced it down to 1 teaspoon. This is plenty for a thin flatbread crust. Note that 1 teaspoon is less than 1 standard packet. If you want a no-yeast flatbread, I recommend searching for another recipe that’s modified without its addition. (Don’t simply leave the yeast out of this one!)
Flour: I haven’t tested this recipe with whole wheat flour, but let me know if you do. You may need a little extra liquid in the dough.
Pictured Plain Flatbread: Top with 1/2 teaspoon each of olive oil as directed in step 7. Sprinkle each with 1 clove minced garlic. Sprinkle with your desired amount of sea salt and freshly ground black pepper. After baking, sprinkle with fresh parmesan cheese (if desired).
Pictured Margherita Flatbread: Slice 8 ounces of fresh mozzarella into thin slices. Top each flatbread with 4 ounces each. Top each with a handful of fresh tomato slices and a sprinkle of chopped fresh basil. If desired, sprinkle with fresh parmesan cheese too. After baking, feel free to top with more chopped fresh basil.
Optional Flavors in Dough: I love adding garlic and Italian seasoning to this dough, as listed in the ingredient list above. If you can’t find a spice labeled “Italian Seasoning” in the spice aisle, use dried oregano, dried basil, and/or dried parsley instead. Honestly, any herb (fresh or dried) that you love works.
Keywords: flatbread, pizza
How to Join Sally’s Baking Challenge
Make my homemade flatbread pizza recipe and either leave it plain or top with your favorite pizza toppings. If you’re not into this recipe, here is the alternate April Baking Challenge:
any previous challenge recipe OR
Biscuits (perfect if you don’t have yeast!)
After you make the flatbread pizza or alternate recipe, share your recipe photo with me any of the following ways:
Use #sallysbakingchallenge and tag me (@sallysbakeblog) on your public Instagram or Twitter account. (Instagram messages are hard to track, so please email instead.)
Upload your recipe photo to my Facebook page or Facebook group.
Email me your recipe photo.
For a bonus entry, leave a review on the recipe below!
By sharing your photo, you are automatically entered in the baking challenge for the $250 Amazon gift card prize. My assistants and I keep track of your photos and randomly select 1 winner at the end of the month. The challenge is open to the whole world. Challenge ends on April 29th 2020 at 5pm ET. The winner will be selected at random and posted in the May Baking Challenge blog post on April 30th 2020.
from WordPress http://sweetly.site/homemade-flatbread-pizza-recipe/
0 notes
Text
Transform your favorite cookie recipe: Learn how to make cookie bars
Sometimes cookie cravings hit hard and fast. All of a sudden, you find yourself dying for your favorite cookie. But all of that scooping and rotating of pans just seems like too much work. When that moment comes, you need something satisfying and sweet. This is when you pull out your secret weapon: you know how to make cookie bars from the best cookie recipes.
It might seem easy to whip up some cookie dough, throw it into a pan, and pop it into the oven to bake. But when you’re making something seemingly simple, it becomes even more important to bake it to perfection.
The last thing you want is to end up with dry, hard edges to your cookie bars while the center is still raw. You also don’t want the cookie dough to puff up and over the sides of the pan, spilling onto the bottom of your oven. You want freshly baked cookie bar magic and nothing less!
Here are five simple steps that’ll allow you to transform cookie recipes into the very best cookie bars.
Step 1: Choose the right recipe
Like many projects in the kitchen, set yourself up for success by choosing the right recipe. While practically any cookie recipe could hypothetically be made into cookie bars, some lend themselves to bar cookie format better than others.
The best choice? Drop cookies. Any recipe that calls for scooping and baking on a cookie sheet is a good place to start.
Are there any exceptions? Of course! Some recipes call for “scooping” the dough or batter onto baking sheets, like our Flourless Fudge Cookies or Almond Cloud Cookies. But these recipes have a consistency that’s unlike normal drop cookie dough. You can’t easily press it into a pan or roll it in your hands to form a dough ball.
Regardless of whether the dough is quite wet (i.e. Flourless Fudge Cookies) or thick and sticky (i.e. Almond Cloud Cookies), stay away from recipes that you can’t easily handle with your bare hands.
When you’re learning how to make cookie bars, start with these fail-proof choices: Soft Chocolate Chip Cookies, Oatmeal Cookies, Ranger Cookies, or my personal favorite, Chocolate Drop Cookies.
Shortcut: How to make cookie bars with no fuss
If you’re the kind of baker who just wants to cut to the chase, you can start with a recipe that’s designed to be baked as bars. There’s a whole treasure trove of tasty cookie bar recipes, including Hermit Bars, Take-10 Super Cookies, Camelot Dream Bars, or the ultimate classic, Chewy Chocolate Chip Cookie Bars.
But for those of you who want to have the ability to be nimble in the kitchen, read on. We’re going to show you how to make cookie bars from your favorite cookie recipes. Let’s bake!
Step 2: Pick your pan
Once you’ve chosen your cookie recipe, it’s time to pick the right vessel for the dough.
Here’s a general rule of thumb to guide your choice: The cookie dough should be between 3/4″ and 1″ thick when pressed into your pan.
Any thicker and you’ll have to bake the bars to the point where the edges become hard by the time the center is baked through.
Any thinner and you’ll have crispy bars that will likely crumble when sliced. If you’re a fan of crispy/crumbly cookies, then you’re more than welcome to use a large pan and press the dough out thinly. Just be sure to reduce the baking time accordingly so the cookie bars don’t burn.
Now if you don’t want to go pressing your dough out into all your pans until you find one that leaves you with the right dough thickness, we have some helpful guidelines based on the total volume of cookie dough.
To figure out the volume of cookie dough your recipe makes (i.e. how many cups), simply add up all of the major ingredients using cups. (For example, 1 cup of sugar + 1/2 cup of butter + 1 1/2 cups of flour + 2 cups of chips = about 6 cups of dough.)
Some ingredients change in volume once they’re mixed (i.e. sugar dissolves, flour compacts, etc.) but you’ll see that we give a range of 2 cups per pan size. A rough estimate of total volume is fine here. For this reason, you also don’t need to account for anything less than 3 tablespoons.
Remember that these are guidelines rather than hard and fast rules. Use the pans that are available to you. The final thickness of your cookie bars may vary slightly based on the dough volume to pan size ratio.
Bonus: Making a big batch
Looking to make more than just a 9″ by 13″ or half sheet pan of cookies? Maybe you want to make a full sheet pan of cookie bars and seriously feed a crowd.
If you not only want to know how to make cookie bars but also how to make a big batch of cookie bars, read our post, Big batch brownies and bars. It covers everything you need to know to scale up your recipes and bake your bars beautifully.
Step 3: Set the temperature
Now that you have the right recipe and the perfect pan, it’s time to turn to the oven. But how do you determine the right baking temperature for your cookie bars? Do you follow the temperature given in the cookie recipe or change it?
Most drop cookie bar recipes that are pressed into a pan about 3/4″ to 1″ thick bake well at 350°F.
Even if your cookie recipe calls for baking at 375°F or higher, I recommend turning the temperature down to 350°F. This will prevent those hard outer edges that we talked about — no one truly likes the overdone parts. (Crispy, OK. But hard and dry? No thanks.)
350°F it is for baking perfect cookie bars!
Step 4: Determine the best baking time
Then, how long do you bake your cookie bars?
Start with the bake time called for in the cookie recipe. Then multiply the suggested times by 2.5 to get a range of doneness.
Take our Chocolate Chip Cookie recipe for instance. It calls for baking the cookies for 11 to 12 minutes. If you multiply those numbers by 2.5x, you’ll know that the cookie bars should bake for about 28 and 30 minutes. (Multiply by 3x if you opt for a smaller pan and your dough is around or over 3/4″ thick.)
There’s just one catch! If you lower the baking temperature, you’ll need to add an additional 2 to 5 minutes to the baking time for each 25° increment of change.
With the Chocolate Chip Cookies, we lower the temperature from 375°F to 350°F, so we add 2 to 5 minutes onto our range.
That leaves us here: Bake at 350°F for 30 to 35 minutes. Voilà!
Remember to use your baking instincts and check for doneness. Cookie bars should puff up slightly around the edges and look set in the center. The top should be golden brown and your kitchen should smell amazing. You can even try inserting a toothpick or sharp knife into the center; the bars will be done when it comes out just a few moist crumbs clinging to it.
Step 5: Serve and enjoy
All that’s left to do is let your cookie bars cool slightly, then slice into squares or oblongs. A couple tips to make this last step just that much easier:
Use a parchment paper sling. (See full details about how to prepare your pan here.) It’ll make removing the bars to cool a breeze.
Consider using a bench knife or heavy duty dough scraper to cut your bars. It’s easy to hold the knife straight up and down so you get even, clean slices. Also, it’s won’t scratch your pan as easily as a sharp knife.
Freeze any leftovers. You might be thinking, “Leftover cookie bars? There’s no such thing!” I know. But it’s worth mentioning in case anyone wants to bake and get ahead. You can let your cookie bars cool then wrap in plastic (either as a whole or as individual bars) and keep in the freezer for up to 3 months. (That is if no one discovers your delicious treasure trove of treats before then!)
Transform your favorite cookie recipes into bars with five easy steps. No scooping required! Click To Tweet
Remember: Choose a drop cookie recipe, pick the right pan size, and bake at 350°F for 2.5x longer than the cookie recipe calls for. You can even follow these same steps if you’re looking to bake gluten-free. It’s an easy process with a delicious reward!
We hope you’ll take your favorite drop cookie recipe and turn it into bars the next time you’re looking to make something sweet.
Make your cookie bars extra elegant by garnishing them with a bit of flaky sea salt. The presentation is eye-catching and the flavors will pop!
Do you have more tips or secrets for how to bake cookie bars? Let us know in the comments, below.
Thanks to Anne Mientka for taking the photographs for this post.
Source: https://blog.kingarthurflour.com/2018/09/10/transform-your-favorite-cookie-recipe/
0 notes