#they need to make a button on the main page that links people to my blog and my blog alone
Explore tagged Tumblr posts
Text

art vs the artist 2023 oh boy i hope nothing terrible happened this year!
#artvsartist#artvsartist2023#2023#art#vs#artist#thats me in the middle with a fat zoot#digital art#artists on tumblr#they need to make a button on the main page that links people to my blog and my blog alone#tumblr devs please reach out to me i can make it happen#i coded my gaia online profile AND my neopets profile please let me in#uhhh what else#oh yeah im cooking some chicken on skewers#15 mins left on chicken
9 notes
·
View notes
Text
How To Make Your Own Fanfiction Archive, In Just Ten Easy Steps
As the go-to "person who knows about AO3" for quite a few people who read fanfic but aren't really linked-in to wider fandom culture, I've fielded a lot of questions about how to do certain things on AO3 to which my best answer is "you should really start your own archive!" I think, in general, more fans starting their own small archives would be a net good for fandom. AO3 was never meant to be the only archive for all fandom, or even the main archive, and the more spread out and backed up we are the more resilient we are.
But of course I have to be reminded that a lot of fans these days don't really have any idea how little "you should start your own archive!" really involves. (Also, that I should practice what I preach.) So I am now making my own fanfiction archive, and writing up this post as I do it to tell people how to make theirs!
Go to https://neocities.org/ and sign up for an account. It only needs a username (which will also be your website address), password, and email. Pick a username that will be related to your archive's title!
Choose the free account option (if you ever need more than what the free account offers for a text-only archive, you should probably look into graduating from neocities.) This should take you to a menu of "how to make a website" tutorials. You should do them! They're useful skills. But let's get your archive running first.
Hit the big red Edit Site button, or open the menu under your username and select "Edit Site".
Select the "Index.html" file to edit. You're now in an HTML Editor. Congrats, you're a web developer c. 1999!
Find where it has text between the < title> tags. Delete the filler text, and put in the title of your new archive. This text will be what shows on the tab when people go to your archive.
Find where it has text between the < h1 > tags. This will be big header text at the top of your page. Put the title of your archive here again. If you have no experience with HTML, you should read over the other sample text. It covers the basic basics very well! Once you've done that, you can delete everything else between the < /h1> tag and the < /body> tag. Save your index.html file.
Get an HTML file for a fanfic you would like to add to your archive. If it's on AO3, you can use the html download option built into AO3. If you have it as a word processor/google docs file, you should have the option to save as an html file. Save that html file to your computer.
Go back to Edit Site on Neocities and go to "upload". Find the html file you saved and upload it. (You can also drag and drop files to upload.)
The file you uploaded should now be showing with your other neocities files. Right-click on the title and select "copy link".
Go in to edit index.html again. Under where you put your header text, type < br> < a href=" . Then paste in the link you copied. Then type "> Then put in the title of the fic. Then type < /a> . Then save the index page again when you're done. You can do this for every fanfic you have.
Congratulations! You now have your very own personal private fanfiction archive that you are 100% in charge of and make all the rules for. It's at least as good as half the ones I was reading on when I started reading fanfiction and will serve its function well as a way to let people read your fic. You can link to it from anywhere you want! (Including your AO3 profile.)
Blogpost version, with FAQs and discussion
Anyway, here's my beautiful new fanfiction archive made using this tutorial:
Melannen's Fanfiction Archive
(I am honestly way more disproportionately proud of finally making that than I expected to be. It's nice to have your own archive.)
If you make one, share it here ! I want to see!
#ao3#archive of our own#fanfiction#fanfic archive#how-to#tumblr what are you doing to my angle brackets#why would you do that what's wrong with you
4K notes
·
View notes
Text
so i've been seeing this occasionally in the tags lately and i thought i'd bring up:
if you want someone to click or reblog your fic link you cannot simply post a link to the fic with either no description or a single sentence of description. if you do not put something beyond a link and a sentence, no one is going to click it.
part of this is basic internet safety (don't click links if you don't know where they're supposed to go), but a large part of this is that you have to catch someone's attention to make them click and leave the page they're on! people, in general, aren't going to click a link that doesn't interest them. you should interest them! so, how do you do that?
put some kind of image above your link in your post. this is BY FAR the most certain way to get reblogs and catch people's eye, but it's also the most time-consuming if you aren't already good at edits or art yourself. moodboards, little edited headers, or gifs can help you here (depending on fandom). art you've made yourself or have permission to use is absolutely the best option here, but it's by far the most time-intensive and difficult. full disclosure: i don't do this! that's because i am absolutely pants as a visual artist, even in the realm of editing or selecting gifsets. but if you have this skill and are sad your fics aren't getting attention on tumblr, this could be a potential answer!
write a summary and some kind of note with the link. there's a slightly cluttered cheat way to do this later in the list, but personally i find that formatting your fic post yourself is the best way to make these posts look good. i normally go fic link (making sure the link embed has the title) - summary of fic beneath that in a blockquote - an author's note about what to expect beneath that summary. however, everyone has different standards for how to do this! some people i know like to make sure tags and rating are present; some do not. some put some of this information beneath a cut; some do not. the main key here is to make sure there's just enough information above the cut in the main post that if i, a stranger, am browsing the tag and find your fic, i have enough information to know if it's something i might be interested in! i can always click to see the ao3 tags if i am intrigued, so it doesn't need to be all the information. just enough to catch my eye!
just post the whole fic to tumblr, including a link at the top or bottom. this is the most efficient non-art way to get notes on a fic you post, since, unlike a link with a description, a tumblr user doesn't have to leave the website to read and decide if they're interested or like it enough to reblog. however, there are two downsides. the first is that the fic almost always has to be short (~2k words if you use a cut, less if you don't), since most tumblr users aren't using the website expecting to read a bunch. the second is that doing this will mean most of your fic's readers likely will read it from tumblr, rather than following the fic to ao3. which, you may not care! i certainly don't when it comes to the ficlets i write directly to tumblr. however, it means i really don't recommend doing this with a multichapter fic.
use ao3's share button to automatically make a tumblr post. fics on ao3 have a "share" button, located above the tags and summary. this has a tumblr option, which you can then use to automatically post the fic link to tumblr. this is a bit cluttered since it includes all of the tags from the fic, alongside the full summary, rating, wordcount, etc. personally, i would then edit a little to remove some of that information so that it's more eyecatching and less overwhelming, but if you don't want to, that's also fine! that is still almost always going to be better than posting the link by itself with a single sentence to describe it, and isn't half-bad formatting-wise.
finally, you'll note my posts for ongoing chapters aren't normally given this treatment or fandom tags (although i almost always include a summary of some kind on them). this is because i generally don't want people finding my fic for the first time from a random chapter in the middle. i don't mind if they do, but i'm not going to spam the tag and i'm not going to make THAT much of an effort to make the post appealing. new chapters are things that might tell one of my followers that there's an ongoing fic they should look out for, and tell my current readers and followers that there's, well, a new chapter, but generally they aren't going to hook people. however, if you post chapters a lot more infrequently than i do, or if you simply have the energy to, there's nothing stopping you from applying these to chapter posts as well!
the thing is: look, at the end of the day, i agree with people who say you should write for yourself. how many notes you get isn't a big deal, i promise; the most important feeling is, ultimately, the feeling you get when you finish something and know you made it with your own hands. some of my favorite writing achievements are NOT my most popular, but are my favorites for reasons entirely unrelated to popularity. however, i see a lot of writers bemoaning how badly their fic posts do, when their fic posts are the ao3 embed and a single sentence that reads "this is my new fic enjoy"; the thing is, there are things you can do to make that link into something that someone is more likely to read and/or reblog! (i know i personally don't like reblogging links if i don't know their contents for the aforementioned internet safety reasons.)
just because you write for yourself doesn't mean that you can't give yourself a little leg up in finding your audience. it's worth it both for yourself and your readers, i promise.
#i always feel Weird making posts like this because i feel like they're like. influencer-y#but i do think that 'catching people's attention' IS part of writing fic! so here's a little guide on to how to post fics#hopefully this helps someone out there!#writing
207 notes
·
View notes
Text
Edit: the app launched and Is down- I have the initial apology video in a post here and I’m working on getting a full archive of their TikTok up ASAP. I’m letting the rest of this post remain since I do still stand by most of it and also don’t like altering things already in circulation.
Warning for criticism and what I’d consider some harsh to outright mean words:
So I’ve just been made aware of the project known of as ‘lore.fm’ and I’m not a fan for multiple reasons. For one this ‘accessibility’ tool complicates the process of essentially just using a screen reader (something native to all I phones specifically because this is a proposed IOS app) in utterly needless and inaccessible ways. From what I have been seeing on Reddit they have been shielding themselves (or fans of the project have been defending them) with this claim of being an accessibility tool as well to which is infuriating for so many reasons.
I plan to make a longer post explaining why this is a terrible idea later but I’ll keep it short for tonight with my main three criticisms and a few extras:
1. Your service requires people to copy a url for a fic then open your app then paste it into your app and click a button then wait for your audio to be prepared to use. This is needlessly complicating a process that exists on IOS already and can be done IN BROWSER using an overlay that you can fully control the placement of.
2. This is potentially killing your own fandom if it catches on with the proposed target market of xreader smut enjoyers because of only needing the link as mentioned above. You don’t have to open a fic to get a link this the author may potentially not even get any hits much less any other feedback. At least when you download a pdf you leave a hit: the download button is on the page with the fic for a reason. Fandom is a self sustaining eco system and many authors get discouraged and post less/even stop writing all together if they get low interaction.
3. Maybe we shouldn’t put something marketed as turning smut fanfic into audio books on the IOS App Store right now. Maybe with KOSA that’s a bad idea? Just maybe? Sarcasm aside we could see fan fiction be under even more legal threat if minors use this to listen to the content we know they all consume via sites like ao3 (even if we ask them not to) and are caught with it. Auditory content has historically been considered much more obscene/inappropriate than written content: this is a recipe for a disaster and more internet regulations we are trying to avoid.
I also have many issues with the fact that this is obviously redistributing fanfiction (thus violating the copyright we hold over our words and our plots) and removing control the author should have over their content and digital footprint. Then there is the fact that even though the creator on TikTok SAYS you can email to have your fic ‘excluded’ based on the way the demo works (pasting a link) I’m gonna assume that’s just to cover her ass/is utter bullshit. I know that’s harsh but if it walks like a duck and quacks like a duck it’s probably a duck.
I am all for women in stem- I’ve BEEN a woman in Stem- but this is not a cool girl boss moment. This is someone naive enough to think this will go over well at best or many other things (security risks especially) at worst.
In conclusion for tonight: I hope this person is a troll but there is enough hype and enough paid for web domains that I don’t think that’s the case. There are a litany of reasons every fanfic reader and writer should be against something like this existing and I’ll outline them all in several other posts later.
Do not email their opt out email address there is no saying what is actually happening with that data and it is simply not worth the risks it could bring up. I hate treating seemingly well meaning people like potential cyber criminals but I’ve seen enough shit by now that it’s better to be safe than sorry. You’re much safer just locking all your fics to account only. I haven’t yet but I may in the future if that is the only option.
If anyone wants a screen reader tutorial and a walk through of my free favorites as well as the native IOS screen reader I can post that later as well. Sorry for the heavy content I know it’s not my normal fare.
#it’s especially insulting the way this is marketed as solving a problem when the solution already exists#ableism#lore.fm#terrible app ideas that shouldn’t happen#serious#accessibility#screen readers#lore.fm should not launch#accessibility tools that are inherently ableist in design#I wish I was making this up
598 notes
·
View notes
Text

Create Your Own Main Menu for The Sims 4 - Tutorial
Hey folks!
This tutorial will walk you through creating your own main menu override for The Sims 4 based on my custom repository.
_________
What is required:
JPEXS Free Flash Decompiler
Sims 4 Studio
Raster graphics editor (e.g. Photoshop, Gimp, Photopea)
Your Own Main Menu repository
_________
Step 1: Download and unzip the Your Own Main Menu repository
It's available on my Patreon page for free.
_________
Step 2: Prepare your custom images
There are two images that you need to customize:
SimMattically_YourOwnMainMenu_MainBG.pngThis is the main background image, where you want to put the desired graphic.Size: 1440px x 1200px
SimMattically_YourOwnMainMenu_BarBG.pngThis is the second background for the navigation bar on the right.Size: 480px x 1200px
Prepare your own images based on these templates. Do not change the size of the images.
Tips: If you're using a more complex background, such as a screenshot from your game, I recommend blurring the Bar_BG with a Gaussian Blur (~60px). Additionally, I suggest adding a white overlay with ~50% opacity and a 5-pixel wide white bar on the left edge with ~10% opacity. This helps improve the readability of the navigation bar buttons and adds an extra layer of detail to your menu design.

The repository also contains the optional file "SimMattically_RefreshedMainMenu_ScenarioButton.package" from my other mod, which replaces the Scenario button icon with a semi-transparent white version. It's up to you whether you want to use it.
_________
Step 3: Import the images to the .GFX file
Firstly, open JPEXS Free Flash Decompiler and then open my SimMattically_YourOwnMainMenu_Template.gfx with it.


Select "No to all" when prompted.

On the left, choose "images" and scroll to the bottom where you will see the images you just edited in their original form. Right-click on each and select "Replace." Select the custom images you prepared in step 2.


Save the file.
_________
Step 4: Import the .GFX file into the .package file.
Open Sims 4 Studio, then click on "My Projects" and open SimMattically_YourOwnMainMenu.package. Select "Scale Form GFX" (the one with the "gameentrylauncher" description) and click on "Import." Select the modified .GFX file and import it. On Windows OS, you need to switch from .binary to all file types to see the file.


Save the .package file via File -> Save As... Give it a custom name and place it in The Sims 4/Mods folder.
That's it! Enjoy!
_________
IMPORTANT INFORMATION/TERMS OF USE:
Main menu overrides can become outdated with some game updates, causing them to break the game. You will have to remake your custom main menu with a new, updated template in this case. Always make sure you are using the latest available template and that it's not outdated.
Since these mods can break the game, I do not advise sharing your custom main menus with other players. You are free to do so, but be aware that since you're relying on this repository to create your own version, you most likely won't be able to update the mod and resolve issues for other players on your own, so you take responsibility for breaking their game.
If you decide to share your version with other players, please credit my repository and link to my Patreon post.
Do not put your custom main menu based on this repository behind any paywall or early access. I made this repository and tutorial free for everyone, so keep it fair.
I do not take responsibility for people misusing this repository or breaking your game with incorrectly modified files. I do not provide support for custom main menu overrides created by other creators using this repository.
_________
#sims#thesims#thesims4#sims4#sims 4 mods#sims 4 custom content#simblr#s4cc#ts4#main menu override#sims tutorial
286 notes
·
View notes
Text
even the darkest night will end and the sun will rise--
--as Victor Hugo didn't actually say.
The Winter 2025 Bishop Myriel Fundraiser is now open. This year will be dedicated to immigrants, many of whom are languishing in private prisons whose stock just went way, way up.
Our goal this year is at least 25 auction items and over $1000 in funds raised. If you've never participated before, this is your year. DM if you would like to participate but need advice!
Get your fic, art, books, crafts, costumes, and other offers ready. You can submit them according to the rules under the cut, and bidding on each item will start as soon as it is posted. Bidding in REPLIES, NOT REBLOGS, will continue through the end of December 21st, the darkest night of the year.
The recommended places to donate this year are: 1) RAICES Texas, an immigration-focused group which freed more than 2,000 people from immigration detention over the years. They fought to reunify families when children were ripped from their parents' arms during the first Trump administration, and have now pivoted to using funds to provide legal support for the detained, while continuing to pay bonds for those clients.
2) Annunciation House, a shelter serving immigrants. Run by Catholics in Texas who open their doors to the stranger without asking to see their papers, this year they faced down a vicious attempt by the Texas government to shut them down as a "stash house." The attorney general claimed in court that they followed "a more Bohemian set of ‘seven commandments,’ including commandments to ‘visit’ people when ‘incarcerated’ and ‘care (for them) when they’re sick.'” What could be more in the spirit of this fundraiser's namesake, Bishop Myriel? If you are not in the US and/or find it difficult to donate via those pages and/or want to support a particular organization doing good work to assist immigrants that's not listed above, please feel free to select another organization. From groups funding rescue ships in the Mediterranean to those supporting refugees stuck in camps around the world, there is a lot of good work to be done.
Rules for submitting your offers and bidding on them under the cut
Rules
1. Offering
SUBMIT your offering post to this blog! Include a link to this rules post in your own post, and also a minimum starting offer for your item, which can be a fic, art, or a physical item--be creative! Your offer does NOT have to be connected to the Les Misérables fandom, although such items are always welcome! Any terms and conditions of your offer should also be included in the post, eg what fandoms you are wiling to write for, any hard no’s on content, etc. Offer posts can keep coming in through the SUBMIT button until the auction closes.
2. Bidding
Bidding on each item opens as it is posted. Only bid on items tagged #Winter25. There will also be a masterpost to help distinguish this year's items from last years. Bid in REPLIES NOT REBLOGS (this is important because replies enable me to figure out who bid when and avoid conflicts) until 11:59PM Eastern Time December 21st, 2024. The highest bidder at that time will be the winner. Bidding can start as each item is posted.
3. Claiming or delivering your item
Please do not donate your bid until I have contacted you to inform you that you won the item!
If you have won an item, I will contact you directly via DM and ask you to provide a receipt or other verification for a donation to an immigration organization in the amount bid. This DM may come from either @bishopmyrielfundraiser or my main blog @lifeisyetfair. After you have made your donation, send such the receipt or verification [email protected] or in a screenshot on Tumblr. Make sure the proof contains the amount you donated!
AFTER I have verified your donation, I will contact the offerer to let them know they can deliver the item. If you do not respond at all to my attempts to contact you within one week, I will move on to the next highest bidder. So check your DMs.
4. Sending the item you offered
All items should be delivered by March 31st, 2025 at the absolute latest, unless you have made other arrangements, eg the custom item/fic takes longer than that to create or write and you communicate about this. Earlier is even better, but remember that the most important thing is to keep the winner informed and make sure everyone has a good time.
#bishop myriel fundraisers#bishopmyrielfrundraiser#les miserables#fandom auction#winter25#auction rules#immigration#refugees#freedom#resistance#bishop myriel#jean valjean#enjolras#okay i'm running out of tags#let's go
110 notes
·
View notes
Text
Check out our preemptive FAQ here!
Without further ado, here are the answers to your questions from the interest check:
☆ I would like to apply to be an art mod, but my Hetalia fanwork is a bit old and not up to date with my current skill level? Can I submit some non-Hetalia fanwork for my mod portfolio?
If this is the case, submit any work you're proud of, regardless of its relevancy to Hetalia!
☆ What does "spread" and "page" mean?
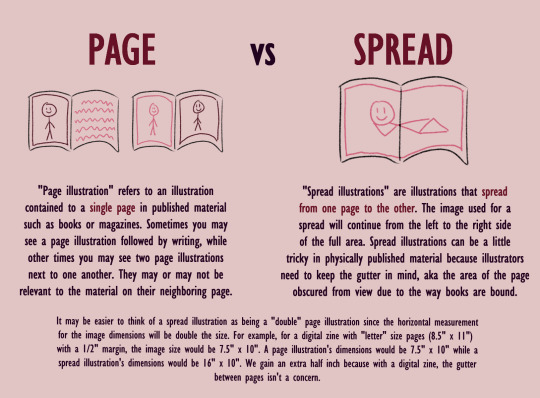
☆ Where do I sign up?
Contributor applications will be opening July 1, 2024. We’ll make a post with the link to the contributor apps at 3PM EST on July 1, but you’ll also be able to find a link to the apps on our Carrd when the time comes! Right now the button on our Carrd is a placeholder, but if you press it now, you’ll be rewarded with a cool and funky video :]
☆ Will page size/formatting guidelines be given?
Yes! At the moment, there are placeholder measurements in our info-doc. Proper formatting will be finalized before contributor apps open once we’ve onboarded our formatting mods and discussed what sizes are best!
☆ Can my contribution include multiple HetaGirls?
YES!!! Let them interact!
☆ Are ships allowed?
Yes! As of right now, our only restrictions are no Belarus x Ukraine and no NSFW content.
☆ How many contributors will you accept to the zine?
At the moment, we’re a bit unsure! This is both Soph and Arson’s first time hosting a zine so we don’t want to bite off more than we can chew. As of right now, we may accept up to ~30 visual contributors and ~10 writing contributors, but those are estimates. We’ve gotten a ton of support for this zine, but we need to find our footing first! Ultimately, the final number of contributors will depend on what the mod team feels they can handle and how many applications we get!
☆ Why are you putting limits onto how Nyotalia characters can appear in the zine?
This zine originally came to be with the canon women in mind. We want the zine to focus on Ancient Egypt, Belarus, Belgium, Czechia, Hungary, Liechtenstein, Monaco, Seychelles, Taiwan, Ukraine, Vietnam, and Wy, as much of their canon material treats them as supporting roles to the male characters. We additionally would love to see submissions for Ancient Greece, Kenya, and Zimbabwe!
The Nyotalia characters are understandably very popular because they're a different take on the main cast. While we also love Nyotalia, we worry that very popular characters, like the main 8, will overshadow the characters we created this zine for in the first place. Nyotalia women are allowed in supporting roles because it would understandably be a little difficult for the writers if they were only limited to a specific set of 12-17 characters.
Some examples of work featuring Nyotalia characters would be:
A frying pangle fic where Hungary interacts with Nyo!Austria and/or Nyo!Prussia
A group illustration centering Vietnam’s interactions with Nyotalia ASEAN
An AmeBela illustration where Belarus interacts with Nyo!America
Some exceptions may be allowed on a case by case basis.
TLDR: You can draw Nyotalia women so long as they play a supporting role to one of the canon ladies.
☆ How many OCs will be allowed?
It depends on how many applications we receive! So long as they're a nation & aren't already canon to Hetalia, it's fair game. We want to see ladies from all over the globe!
☆ Why do you want more than one pitch?
We don't want to force people to make work they're disinterested in, but we also don't want there to be a disproportionate amount of material for one girl over another. As of right now, Hungary is in the most demand with 69.2% of responses, but Wy (34.6%) and Monaco (42.3%) have the least amount! We want to encourage more work for the more neglected ladies!
☆ Can I make more than one submission?
As of right now, yes! So long as everyone isn't doing more than one piece and if the contributor thinks they can handle two pieces during the time frame, we wanna see those HetaGirls!
More on this to come when acceptances roll out and we start working on pitches...
Got more questions? Submit them to our inbox!
Thank you all for the love and support you've shown the zine thus far!
27 notes
·
View notes
Note
How can I start modding?!
To mod, you need to own the computer version of the game. Most importantly, the original Steam version (otherwise it won't work).
Once you have this set, you just go to Nexus and download the Tlou debug dev menu mod by Goghor (link here).
The installation is a bit tricky. If you have never installed mods in any game before, I recommend to ask someone who has experience. If you want to try it on your own, I advise you to download Vortex (which should be on the Nexus page) and install it via this utility.
When you finish installing Vortex, make sure to connect the game to it. It should be easy, but if you don't know how to do it, I'm sure there are a lot of tutorials on the internet. It's necessary to connect the game to it before doing anything else.
Then, when you're done connecting the game, go to the link I attached, and on the right, you'll see an icon called "vortex." Once you click on it, it should install the mod right into the game without you having to deal with it manually. This is perfect for beginners; this way you can be sure you're doing it right.
Then, after all this is done, the real fun begins. I'm not even shitting you when I say I spent over 5 hours figuring out how to work with the freakin' mod. I couldn't find out how to turn on the free roam camera, and it was driving me crazy.
So, just in case you went through all the previous steps and got the mod into the game, here's a little help on how to work with the dev menu!
Once the game launches and you're in the main menu, you need to open the dev menu to activate the mod. To do it, you need to press [CTRL] + [~]. When the little window in the left corner pops up, don't bother with the "camera" option. It doesn't work. To use the free roam cam, you have to go to "display" and press [1] - the one above Q and tab. This should open a quick menu. From here, you just go to "manual camera" and you're good to go.
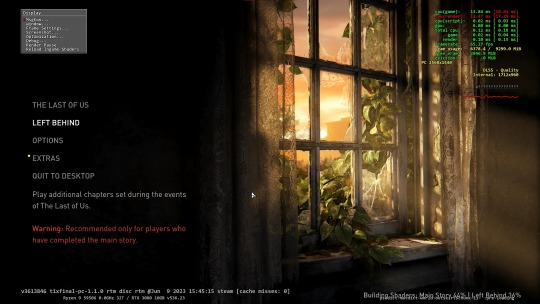
This is what it should look like before you press [1] and the manual camera option shows up.
I'm from Europe, and the keys work just fine for me. But I heard some people have trouble opening the dev menu with the keys mentioned. For those who can't use the [CTRL] + [~] option, try [CTRL] + [ ' ] to open it.
If you don't know where to find the [~] button, it's under the ESC key on your keyboard. The [ ' ] is basically the apostrophe you use in English grammar.
Also, when ready to mod, I highly recommend connecting a controller, because the manipulation with the camera is pretty sketchy, and unless you want to fall into mild rage, this is the easier way.
I wish you the best because I almost lost my fucking mind learning to work with this, lmao. So good luck!
#tlou debug dev menu tutorial#the last of us#tlou#tlou game#the last of us part 1#goghor#nexus mods#elliespuns answers#tutorial
10 notes
·
View notes
Text
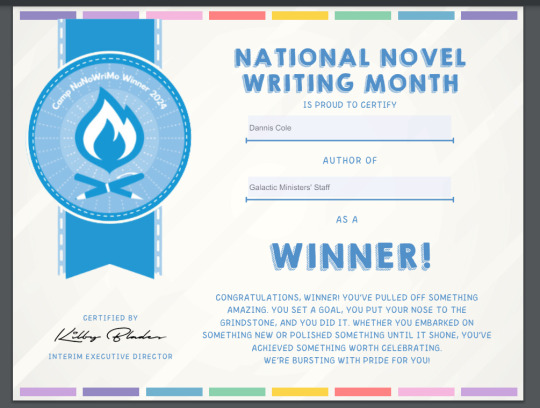
I finally got my 2024 Apr Camp NaNoWriMo Official Winner Certificate!
Did Tech Support finally answer my frantic plea? Well, no. But I had read something about recreating the record to get the record connected with the offical NaNo project. So, I searched in Support and found this.
I followed these directions to create an identical project. I copied every day's entered word count and put it in again.
NOTE: You must go to the Stats menu option
Go to your account's page
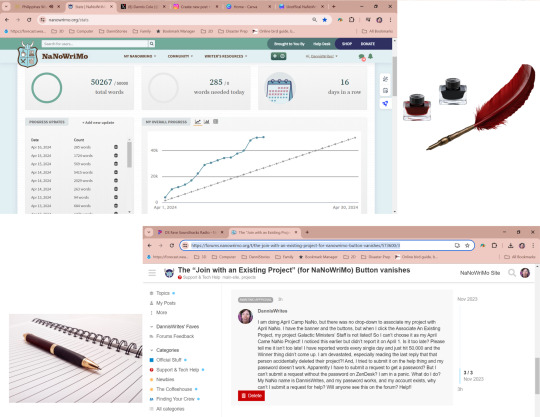
My plea for help that went unanswered. This post was actually deleted!
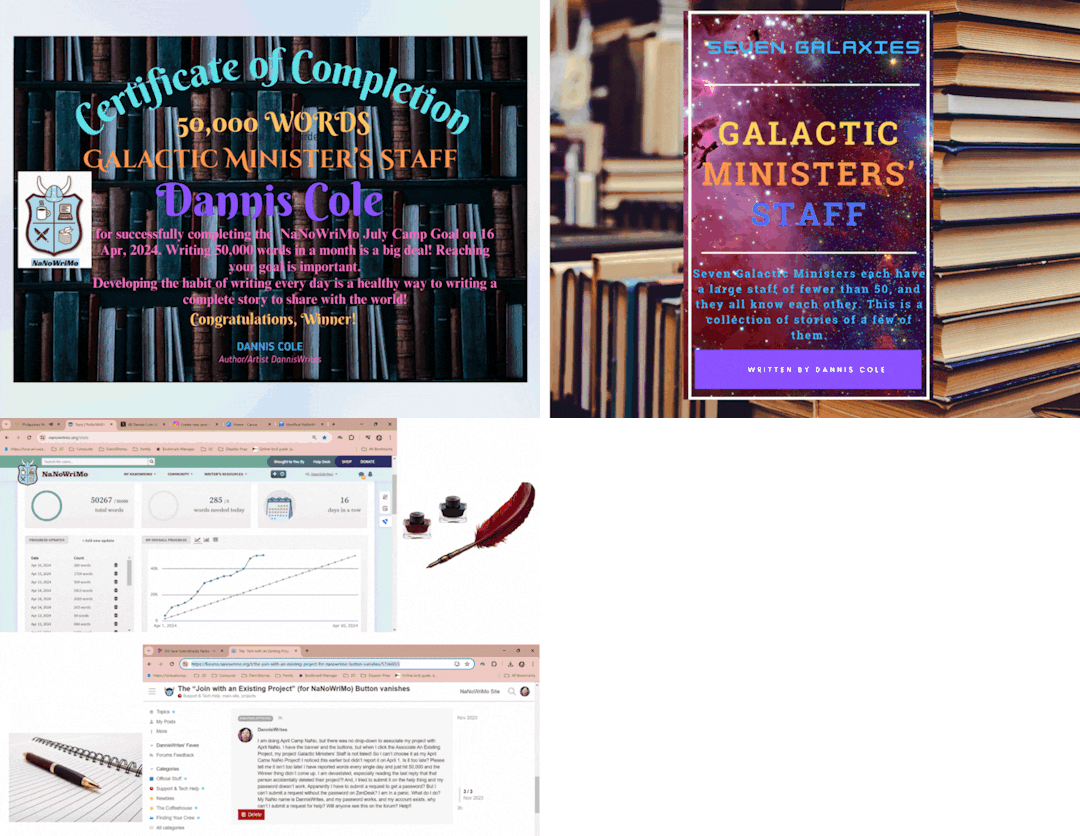
So I created an unofficial certificate on Canva.com and put it on social media. I was very upset.

Here was my official project, and I hit my goal and had badges...but no winner graffiti. It wasn't linked as an official project. I'd seen a banner telling me to link it, but when I tried, every project I ever did was listed...except this one, that I just won with.
I looked up on the forums what someone else tried, and they accidentally deleted their project! I posted on the forums about my problem. The other post had been from November. But both that one and mine got deleted! I figured no help was coming, so I made my Unofficial NaNoWriMo Winner Certificate and posted it to Twitter, with a link to the doc for others to create their own if they liked.
But, I'm not one to just give up. So, I tried creating a new project. First, i went to my account main page.
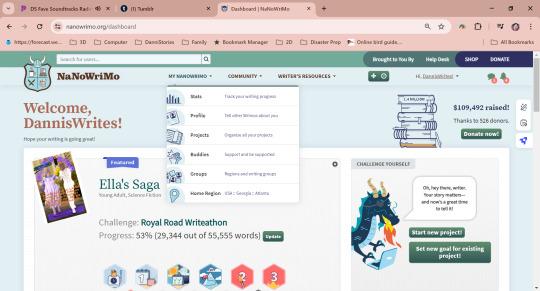
Under My NaNoWriMo on the bar, I chose Projects to get to this one, then Stats to get my word counts per day.

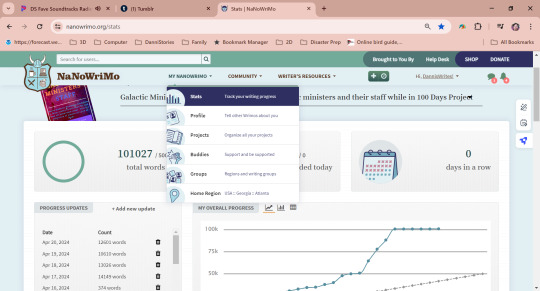
If you left click and drag your mouse so your daily counts are highlighted, you can Ctrl-C [or Control-C] on a Mac to copy this to the clipboard. Open a Notepad file and Ctrl-V to paste. Use this later.
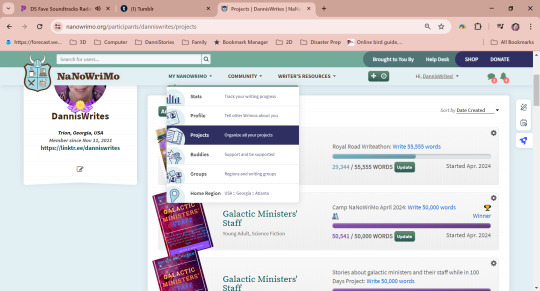
Go back to your Projects page and create a new project. Note that, you must do this before Apr 30 or you can't choose Camp NaNo for your Goal.
I then went in Stats on the NEW project I just created and did Add New Update. Only on the Stats page can you add words for a different day than today!

Now my project says Winner [the top one of the two Galactic Ministers' Staff Projects, on the right side of the bar]
And, I was able to click on it and download my official certificate! Yes, it's a .pdf, but I opened it and did a screenshot with the Game Bar, that's Windows-G if your keyboard has the Windows button on it. It brings up choices for screenshot or movie, and is handy. Find the screenshot in Video->Captures and double click. Use the cropping tool in Photos and save a copy. Now you can post your Winner Certificate to your social media!
That's how I fixed my project so it now says Winner. Good luck to all of you!
Yes, I am upset at what happened on the youth forums. This happens on a lot of forums, and I think the answer is for someone brilliant to write an AI that can detect these vile people! It is bad that it happened, but I still participated, not in support of perverts who took advantage of innocent youth just trying to enjoy writing. I still think the spirit of NaNo is good, and I will continue to set my goal and write 3 times a year.
But now I am adding the also 3 times a year Royal Road Writeathon to my yearly bucket. If you wanna read my latest project, it is
Ella's Saga
Ella stays busy to cope with her chaotic life, but she meets Farley, who gives her a new kind of pocket computer, and she realizes he's connected to SETI's discovery today. Farley also has some unusual knowlege of Ella's future, which makes her realize she needs to rethink her priorities. There is much more to life than good grades and pursuit of her programming career. Her skills are badly needed in Farley's home.
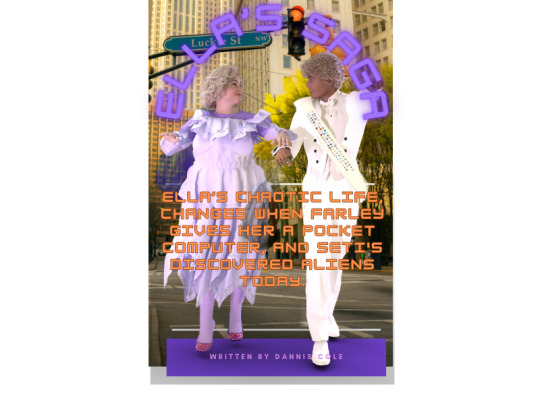
I had 988 views yesterday, so if it sounds interesting, please go read for free! I plan to add chapters daily 'til it's finished, then delete it from Royal Road and put it on Amazon Kindle. Comments and rating greatly appreciated! I love the Royal Road folks and I'm glad to be a member of the Penguins Group [LOL that's the default group for members of Royal Road and there's a forum post explaining it].
#april 2024#nanowrimo#camp nano april 2024#camp nanowrimo#nanowrimo scandal#frustration#solution#problem fixed
2 notes
·
View notes
Note
hii! if someone is interested in getting into the original granblue fantasy (mostly because I'm curious about the characters, specially belial he's so pretty omg) are there any tips/things you'd recommend keeping in mind?
I hope you have a great day/evening/night/what other times of the day exist!
oh hi!!! another victim to how pretty Belial is...... welcome abord!
I have a lot of various level of tips depending on what angle of the game you want to explore, but it might be a little overwhelming. I'll start just by "making the game work well for you" and "how to advance in the Visual Novel (especially to get to Belial)" as the starter guideline.
My inbox is also always opened for any type of clarification: no question is too dumb, i'm here to help, whatever level you're at (.... except if you're on super High Level but i don't think that's going to be the case for a while)
I usually use the tag ichablogging gbftips if you need to look through some things
First of all, how the game works:
Granblue Fantasy is a browser game. It means you don't need an app to play it. however it is chromium based so you will need a google chrome tab or the likes (if like me you're on firefox, i genuinely run chrome only for Granblue at this point)
it is accessible on this address:
the page will be Japanese upon arrival, but just scroll a little and you'll find the "set language" settings
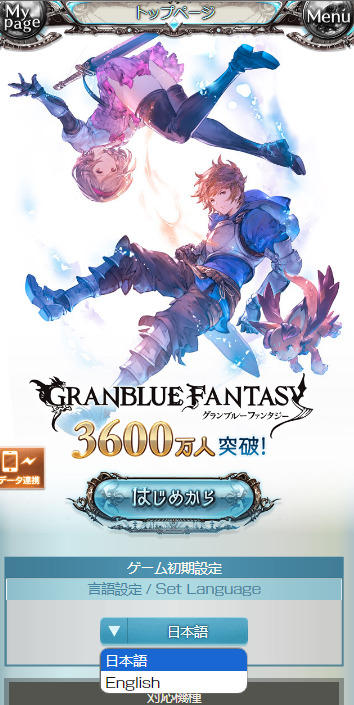
There all you need to do is press new game and start on your journey.
Note that the English and Japanese server are the same. Unlike most gacha we play, it means there is no delay between the stories-- both language get games and stories update at the same time.
Word of advice: when the game asks you to link your account, like here:

select Mobage. the page is in Japanese but it will be the most efficient way to save your progress. this page should help if it's not instinctive to you.
Once your mobage account done, tadaa, you can log in onto the game on whatever browser you would have, and you can be logged on multiple place at once! i'm currently playing on my phone while also taking screenshots on my computer! hell yeah!
On there the game will mostly hold your hand through the gameplay and the beginning of the main story, as well as your first gacha.
Slight information about the gacha:
-On your homepage, when the "Draw" button is blue, it means the rate up for SSR is really low. when the "Draw" button is golden, it means the rate up is at least doubled, and some rarer, limited units, are also in the pool. It is highly recommended that if you want to pull, you should pull when the Draw button is Golden (it's called "Gala" in general)
-there is a pity system called a Spark. After 300 pulls (or 30x10 pulls), you are allowed to choose one of any of the characters featured on this specific banner. Most people tend to wait until they have 300 pulls saved for when their fav is in the banner too pull as a result (or, as we say, we "save a spark"). This website can help you taking track of your spark.
-There ARE free pulls seasons: if you intend to be a seasonal (ie, not play for a time) it's good to come back in December, in March (it's the anniversary month, and next year is the tenth anni, so it might be even more of a celebration), and sometimes in Summer, in order to take advantage of the Free Pulls. Usually, in December and March, we get one free ten pulls a day at least, and then further into the month, we get "a roulette" that can double or triple that number. It's really worth keeping an eye on Free pulls seasons.
Others information:
-You will want to follow or keep an eye on the Granblue_en twitter account. It's a fan account that is always updating any information needed. It's a life savior gem.
-if you have any doubt gameplay wise, rely heavily on the gbf.wiki. It is EXTREMELY throughout gameplay wise. Genuinely a must-be-aware-of to play the game.
Important gameplay thing:
-If A Story Event is ongoing (it's not the case right now), and you don't want to read it for whatever reasons, do yourself a favor and actually go to the event page and manually skip every episodes of the event. It will save the event in your Journal, meaning it can be accessed later on when the event is no longer live.
(the current ongoing event, Dread Barrage, is a fighting event, i think you can kinda ignore it for now because it is when things start to be complicated, so don't mind it as of now)
Storywise:
There are three sorts of stories in Granblue:
-The Main Story Quest, which you will have to progress into in order to unlock the rest of the stories. It's the core of the Main Character's journey with Lyria and Vyrn as they travel the skies to reach their destination.
-Events and Side Stories, which are basically stories that happen when they dilly dally on their journey and go to new islands. Events and Side Stories often have their own casts that will not appear in the Main Story, but are still equally important to the game.
This type of story starts out as limited events: they run for ten days in Granblue. Then, they disappear for a while. Usually in the years that follow, this story gets a "rerun". It means the event goes back live, still limited for 10 days. And then, after a while, the event is ultimately added to the Side Stories tab, where it will always be accessible in game.
The Side Stories tab unlock after you finish Chapter 6 or 8 of the Main Story i'm not really sure. Some Side Stories will have requirements to be unlocked (like reading up to x chapter of the main story, or reading x over events before unlocking it) (it will be featured in the Gameplay Extras tab on the homescreen)
Some Side Stories are linked together. I personally call those "sagas". For example the Dragon Knights Saga (one of my favorite stories my icon and header are from) has about 10 events stories that have to be read in their publication order to be understood. It means you can expect the same cast, and a continuation to a previous story. Some Side Stories can also have casts from multiple sagas all together, so, have fun, explore the tab!
-Fate Episodes are the last type of stories you will have. They are linked to the characters units you will play with during the game, that you get by gacha or by completing events. Those are short stories that will be character driven. The characters can be Main Story Characters or Event Characters. Therefore they might further stories from their respective origins here and there. There is usually one starter episode unlockable as soon as you get the character, then one episode when you reach a certain level. SR and SSR characters who have a 5th star instead of only 4 also have another episode when you reach level 80, and then when you reach level 100. (the Fate episodes are available in the Quest tab and a shortcut to your list is also in the envelop menu on your homescreen)
SO THAT'S For the basic run down of some of the beginner things you want to keep an eye out storywise.
(Note that about every events are also available on youtube, so while missing an event sucks and all, if you wish to read an event which isn't in the side stories, or a fate episode of a character you can't get, youtube is here for you. also the transcript of every single stories are available on the wikipedia, though it's not as ideal.)
Gameplay wise, for the beginning, you'll get your hand held by the game. when it starts to get tricky, you're free to come and ask more precisions on here.
Now one last thing: how to get to Belial.
Belial is part of the side story saga known as "What Makes The Sky Blue".
The main story is a trilogy, respectively, "what makes the sky blue", "what makes the sky blue part 2: paradise lost" and "what makes the sky blue part 3: 000" After the trilogy, the summer event "The Maydays" is a sort of light hearted event following the events of 000 that involves the same cast. it is in the side stories. Last year, they also released another event including wmtsb characters, called The Mole Troupe. It has not been added to the side stories as of now.
To unlock the first part of wmtsb: you need to: -Reach Chapter 54 of the Main Story -Complete the side stories "Festival of Falling Flame", "The Cowardly Hero and the Captive Princess", and "Blade of the Young Champion" -(no one will blame you if you skip the side stories to read later, as it's mostly recommended because characters who appear in those events appear in wmtsb p1. But do read the Main Story though because the events rely a lot on the lore developed by the Main Story at this point.)
(and if you ever want to try out the Dragon Knights saga, it unlocks after Chapter 16 of the Main Story, and the first event is called Defender's Oath. Just to meet The Boyz.)
Also as a fair warning: early Granblue events tended to be shorter and perhaps a little less complex. After 2017 (wmtsb pt2), events started to grow longer and more complex. It might be jarring if you ever end up reading an early event and a more recent event back to back.
This would be my beginner outline at least.
One last warning: the gameplay will look intimidating at some point. don't let it intimidate you and just yolo. My ultimate beginner tip is that you should focus on stories and characters you like first. Discover the story, discover the characters. Don't let "trying to be good at the game" cloud you from just having fun with those characters. You can go far into the game without being hardcore into the gameplay, so take it easy and don't let it stresses you out.
Most importantly: have fun! take your time and enjoy yourself!
And if you have anything to ask - any tips, any recommandation, anything - my inbox is always opened ;D
Take care!
#even there it sounds large and intimidating but i just tried to break down things that could help#hope it does!!#take care!!#ichareply#anonymous#ichafantalks gbf#ichablogging gbftips
4 notes
·
View notes
Text
Home page directory
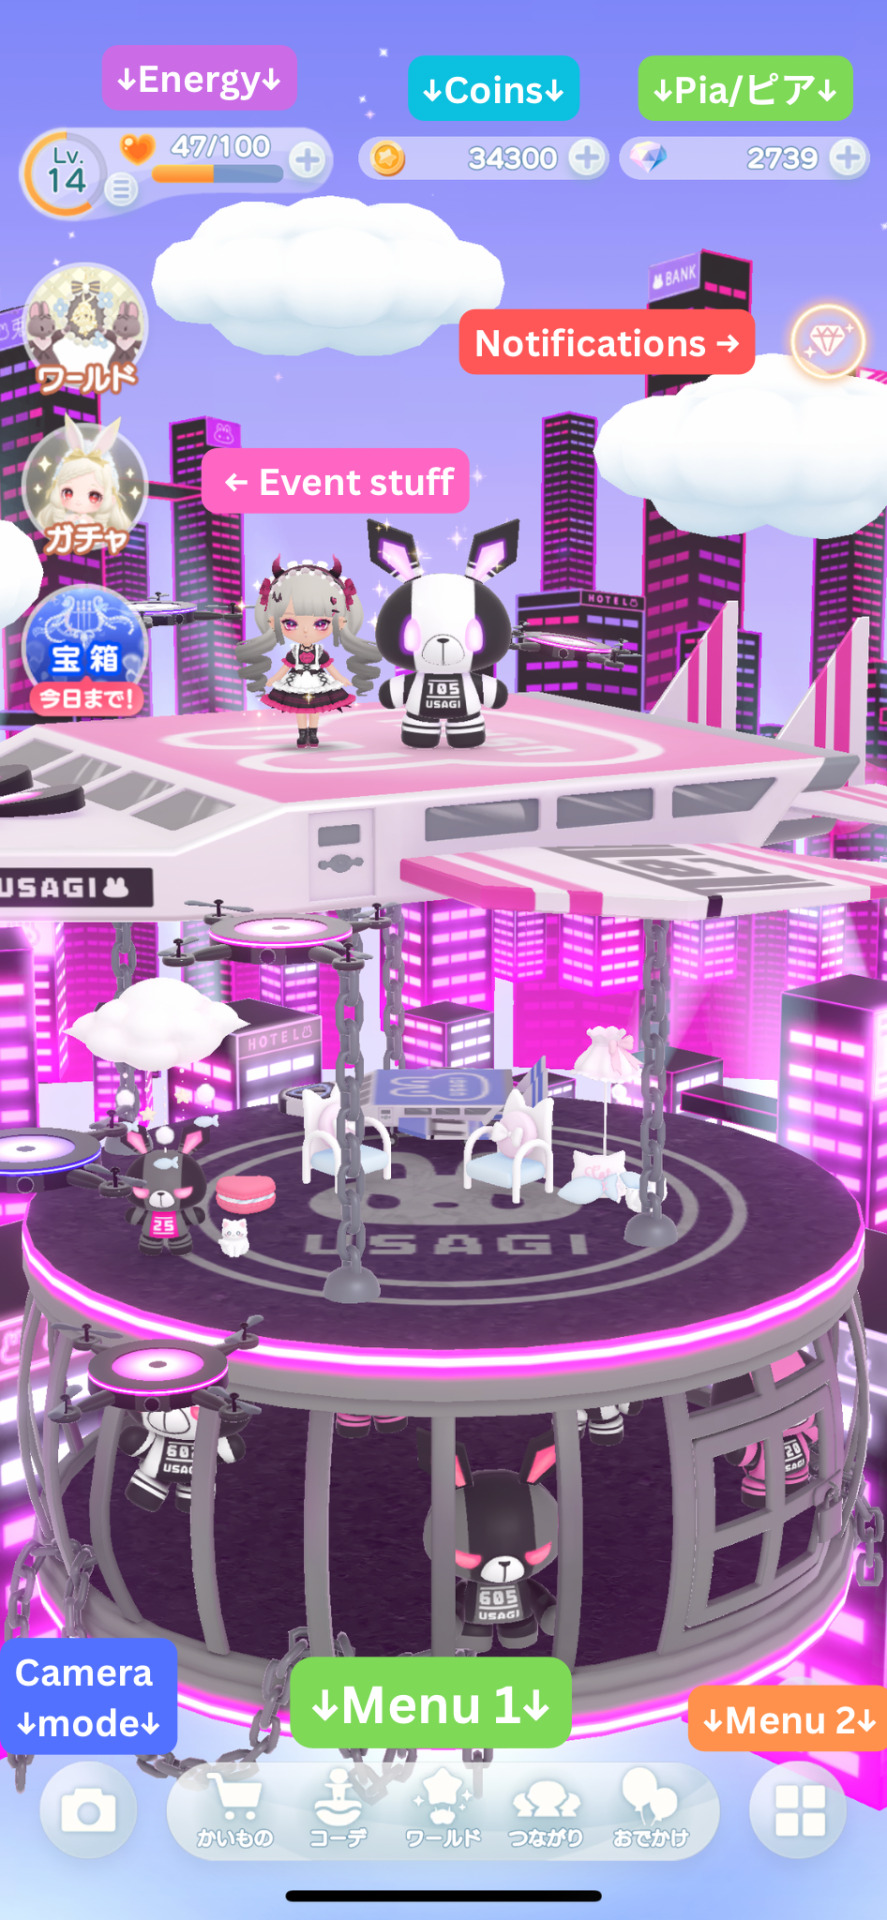
I’m going to go over each of these things from top to bottom! I’ll expand on each section over time if needed, but for now explaining menu 1 and 2 are my priorities.
Energy
Pretty standard; gets used up as you do things, refills over time.
There are two ways to get more energy immediately: 1). Pay 100 “pia” for 100 hearts 2). Go to “Popo’s star”, which is free but limited to a few times a day (more on that later)
Coins and Pia
The two main currencies of the game
You get both for free pretty often, but coins are the most abundant and can’t really be used for much
Pia are also easy to collect but come in smaller amounts, so it takes longer to save them. Pia are used for gacha turns, buying most clothes, and “shipping costs” when trading. Pia are the only things that are purchasable with cash.
Events and notifications
On the left of the screen are circles that serve as shortcuts to certain event pages
On the right side, little icons will appear, signifying a notification. If you tap the icon, it will bring you to the corresponding page. I’ll make a list of the different icons and what they mean later.
Camera mode
I’ll explain more later
Menu 1
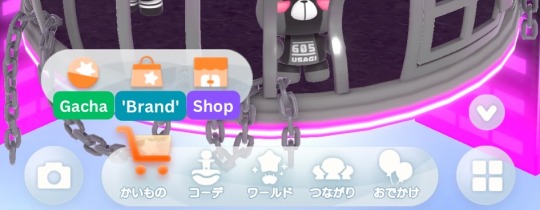
There are three different places to purchase items.
Gacha is gacha, duh. Gachas can include both clothing and furniture items. They are bought with pia and gacha tickets. It can be a bit confusing to navigate, so u can find a guide to it here.
‘Brand’ refers to collections of clothing ‘brands’ that are released occasionally for a limited time. These can only be bought with pia. I will have more info for navigating it soon.
The shop is pretty simple and doesn’t sell much. As of now, you can buy the other starter furniture and one simple outfit with coins. There’s also a simple gothic lolita outfit and some background colors for your star, which are bought with pia. There’s another section too, I’ll link a translation of it later but it’s basically just buying extra space for outfits, photos, and stuff.
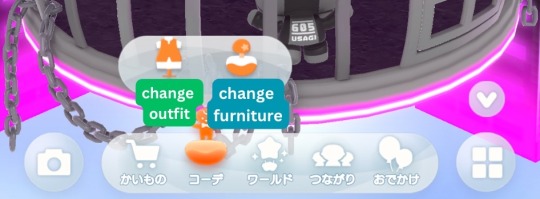
These two speak for themselves. I’ll explain a bit more about the furniture editor in the future since it can be kinda wonky.

This button will take you to a list of all of the ‘worlds’. Worlds are maps of a bunch of islands/stars that players can explore. Each one has a corresponding furniture and outfit set.
Each world has a limited period of time where, when exploring, a set amount of treasure boxes will spawn each day. Each treasure box contains a random furniture item from the corresponding set. Opening a box requires 10 hearts. There’s also an option to open it with a “magic wand” that raises the chance of getting rare items, but I still haven’t figured out where you can get those
The world’s outfit set can only be acquired through the gacha, but the furniture set is only available through the map at first. Eventually, the map will close, and then the furniture will only be purchasable as a full set with pia.
While exploring the map you can view “doppelgängers” of other players, and leave some of yourself. I’ll explain more in a future post.
Once you’ve visited every star on a map, you earn the ability to always be able to explore that map, even once the event ends.
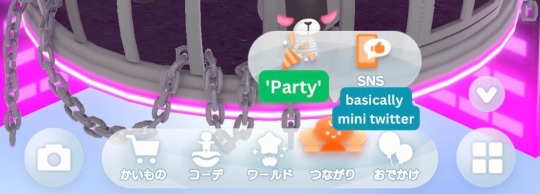
These are the two social aspects of the app
Parties are basically live rooms that you can start or join. There is a voice chat option and an option to only view the party. I imagine there’s also a text chat but idk bc i haven’t tried one yet. Will update soon
SNS is like a mini Twitter. You can make text posts and also post photos from the games album (so photos are limited to pictures of ur character or objects). This is also where people post trade requests. I will write more on trading later.
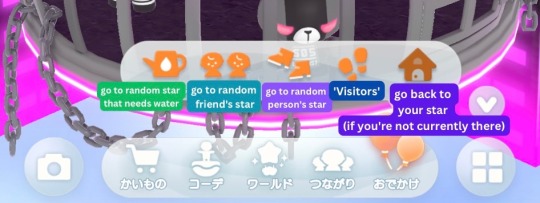
These speak for themselves. Visitors will bring up a list of the people who have visited your star and watered your ‘tree’.
Menu 2
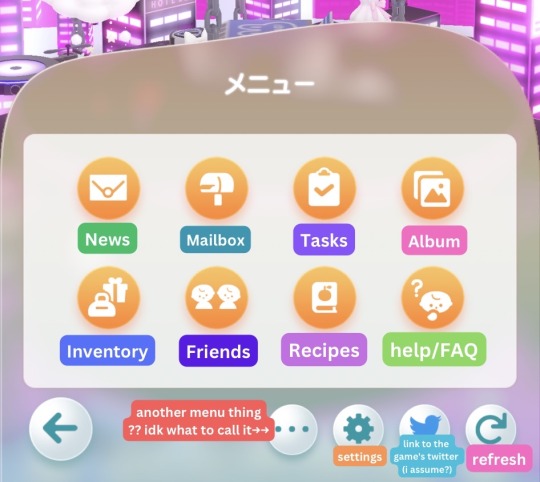
This menu has a bunch of other important things. Most are pretty easy to understand but there’s two that I’ll focus on right now.
Inventory has three lists, one with all of the items you have, one with any items you have 2+ of, and your wishlist. I’ll explain how to add items to your wishlist later.
Recipes will bring up a list of items that can be made using the “fruit” of the “tree” that each star has. Each new furniture set has a corresponding tree. Each type of tree produces a different type of fruit. After collecting enough of a fruit, you can craft a secret item.
BUT if you’re crafting the item for the first time, you can’t do it through the recipe book. In those cases, you have to go to Popo’s star and they will “give you instructions”. I’ll explain how to get there later.
9 notes
·
View notes
Text
hey, i'm sharky! welcome to my clip dump. the dedicated blog, anyway. i'm one of failboat's moderators, and i've been in his community for, as of writing this, over 6 years. which is more than a third of my life. which... doesn't really sound like something to be proud of lmao. anyway, i've witnessed a lot of weird and funny moments over that time, and i figured someone oughta make clips of those moments. so that's what i'm doing now! and why you're reading this post!
by the way, this is one of those things where i see other people doing something and i'm like "i wanna do that too!". so don't be surprised if i suddenly stop uploading clips. frankly i'd be shocked if i end up keeping this going for a while lol
submitting clips
look, i have a busy life, what with school and prepping for college, and there's probably MONTHS worth of content to look through. that's why i need YOUR help to find good clips! now, i'm only looking for the best stuff, not just something mildly interesting. i hope you don't mind me being picky. ...then again, i tend to laugh a lot at this guy's content. but anyway!
Here's how you can submit:
the "Submit a clip" button at the top of this blog
under this post via reblogs/replies (you cannot attach video files this way; links are not clickable in replies)
you can TRY sending an ask? i believe in order to send a link with an ask you need to break it up. generally they do not work
eventually i want to have a video on the channel dedicated to submissions. will update on that later
if you post your own clips, please let me know if you're ok with me uploading them! and whether or not you want credit for making the clip
Submissions must include either:
an already clipped video file with a link to the source (be sure it's high quality and shows nothing other than the video itself! i dont want to see video UI or any amount of the rest of the page. just to save me some time lol)
a link to the source with the clip timestamped (either in the post or linked to that spot) and a description of the clip
a link to a clip made using youtube's tool with a description of the clip
you can optionally include a title with your submission but be aware i may not use that title
Clips may be sourced from:
vods on stream storage or unlisted streams (PREFERRED)
videos from the main channel or dinghy (most of these are edited streams, if the moment can be found in a vod use the vod only unless the editing enhances the bit)
videos not on any of failboat's channels but that he appears in
i'd prefer that sources be only from within the past ~5 years. i'd rather not dig up anything too old and potentially cringe-worthy i hope you understand lol
this info is absolutely subject to change. if you have any questions or concerns, please let me know!
Links
The clip channel
My main blog -> @pankomako
2 notes
·
View notes
Note
please tell me why reblogging is better why reposting is bad? honestly cause i'm confused the reason why i repost is because i'm showing that i love their art and want it to be on my page as well that's all to show that i love it
so first off, theres really no need to send me almost the same ask twice. I feel like every time I talk to you, you're sending me 2-4 inboxes that all say the same thing and then sometimes you turn around an send me three more that say something else but those three also all say the same thing. The third thing you added is a valid addition which I'll also touch in here but this first and second thing you said to me are almost exactly the same and truthfully and honestly there is no reason for it.
Now. Tumblr is a form of social media people posting, especially posting fancreations a lot of time thrive on that interaction. Unlike most social medias, tumblr doesnt have a big algorithm that pushes content out to be seen.
On a normal social media, if you liked a post, the algorithm would say 'this is a post people like, lets show more people' and more people would see it. This is tumblr.
Reblogging is tumblr's best version of that. It boosts the content. Reblogging is how things get shared across here. Because if I posed something and you reblogged it and someone saw your reblog (which, yes, would be on your page) and liked it, both you and the person who made it will get that like. And you want the person who made the art you like to know people like it don't you? A lot of times that's what encourages them to make more.
If you repost it, you're stealing it from them, and any like only goes to you.
"reblogging: you are giving a direct link and source to the original art, and you can tag it so it reaches the target audience. you are supporting the artist and helping their art gain notes and show others who created it
reposting: you blatantly take an artists work and post it without credit to the artist when you can give a simple @ to them. it doesnt help the original poster gain any sort of traction and credit and notes they deserve for their work."
@cr4shqueen (who you wrongfully blocked and reported)
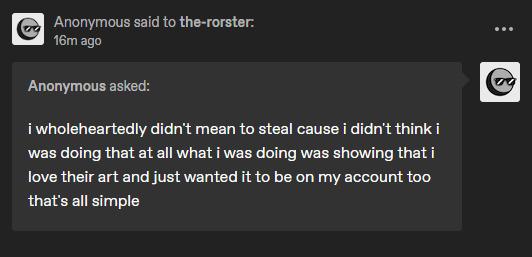
I really, really, really want to be ab;e to say that this is understandable. Because it would be. if you were 11. or 12. or 13. or MAYBE even 14. But you claim to be 25, so, if you aren't 25, you should admit that to me now because it changes a lot of the circumstance that you are in, but otherwise, you really don't have an excuse to have been on tumblr for 2+ years and still not understand what a reblog does. Either way, let me show you
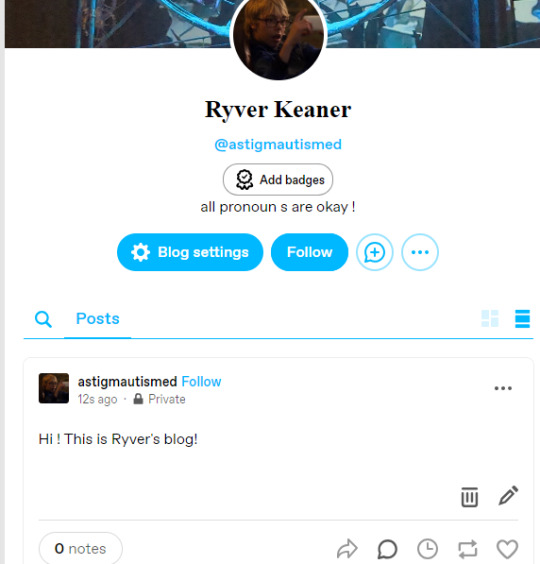
This is Ryver's blog
Now lets say Ryber is scrolling tumblr and she finds some artwork she really likes (im going to be using some of my own for this example)
In this examply, Ryver really likes this picture of tiny rory

Because this is my post, you see @the-rorster at the top. Because I drew it. You know who the artist is, me, because its my post.
Ryver can click this reblog button right here

Ryver now has the option to say anything on the main post or add tags
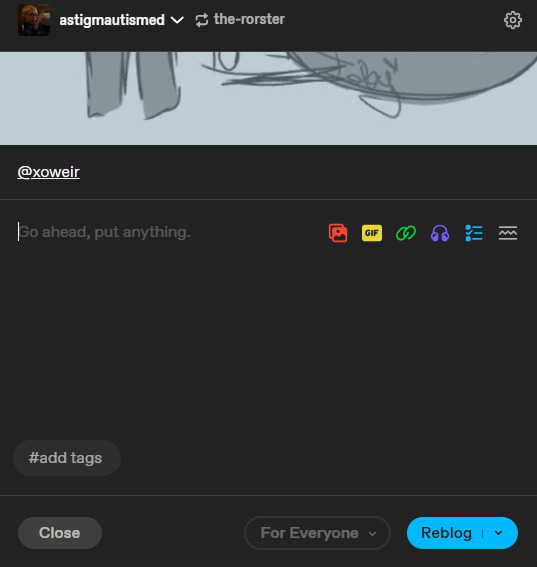
She might decide to say something nice right here, but you should never comment on how you want something changed, or don't like something. Ryver can say "This is cute!" but she shouldn't say "You shouldn't have made him tiny. I don't like him tiny" this is important to note. Dont talk about things you dont like in this section
When she's done, Ryver hits the blue reblog
The creator gets a notification like this
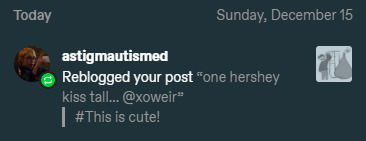
now they KNOW someone liked their content
this number (which was 21 before) goes up

this number shows how many people enjoyed the content you made/how many times someone has interacted with it
AND the post is on ryvers blog

The exact same way it would be if she reposted it, the only difference is that my name is still there, so you still know who drew it, and I still get any interaction it gets from ryvers blog
People have lost out on thousands of dollars because of other people reposting instead of reblogging. I definitely don't want my favorite Benny artists missing out on thousands of dollars. I don't think you do either, so maybe start reblogging so that you arent the reason it happens. Because I know you don't want to be a theif.
This is also why crediting the original creator is important if they give you permission to crop it. So that people who see it from your blog can go and see the whole thing. Which you should want if youre trying to show you love the art
1 note
·
View note
Text
How to Login Vidgo TV Account?
A well-known streaming service, Vidgo TV Login Account provides a selection of on-demand video, movies, and live TV channels. Vidgo offers something for everyone, regardless of your interests—sports, news, or family-friendly entertainment. This tutorial will show you how to get into your account if you're new to Vidgo or need a refresher. We can help with everything from account creation to login issues.

Why Opt for Vidgo TV?
Let's take a moment to talk about why Vidgo TV is worth your time and money before we get into the login procedure. Vidgo TV offers:
Affordable Plans: A range of price points to accommodate various spending limits.
Broad Channel Selection: Sports, news, entertainment, and educational channels are all available.
On-the-Go Viewing: Watch on a variety of gadgets, such as tablets, smartphones, and smart TVs.
User-Friendly Interface: Even for people who are unfamiliar with streaming platforms, it is simple to use.
Now, let’s move on to the steps required to log into your Vidgo TV account.
How to Access Your Vidgo TV Account
1. Go to the Vidgo App or Website Make sure you have a dependable internet connection before you start. You have two options for logging into your Vidgo TV account:
Website: Visit Vidgo's main website using your choice browser.
Mobile App: Get the Vidgo app from the App Store (for iOS) or Google Play Store (for Android).
2. Select "Login" from the menu. Find the Login button on the website or app's home screen, which is often located in the upper-right corner. You may access the login page by tapping or clicking on it.
3. Type in your details The following information will need to be entered:
Email Address: Enter the email address linked to your Vidgo account.
Password: Type in the one you came up with when you registered. Advice: To keep your login information safe, use a secure password manager.
4. Press the "Login" button. To access your account, enter your login information and then click or touch the Login button. You'll be sent to your Vidgo TV dashboard, where you may browse and enjoy the available programming, if the information you submitted is accurate.
How to Register for an Account on Vidgo TV
Before signing in, do the following actions to create a Vidgo account if you don't already have one:
Visit the official Vidgo website.
Select "Sign Up." Find the "Sign Up" button and click it.
Select a Strategy: Choose the subscription package that best meets your requirements.
Give your personal information: Create a strong password and enter your name and email address.
Details of the payment: To complete the subscription, add your preferred mode of payment.
Verification: Use your login information to access your account after it has been created.
Troubleshooting Login Issues
Occasionally, you might encounter problems while trying to log in. Here’s how to resolve common issues:
1. I forgot my password If you are unable to recall your password:
On the login screen, select the Forgot Password? option.
Enter the email address you registered with.
To establish a new password, look for a link to reset your password in your email inbox and follow the directions.
2. Inaccurate password or email Verify the email address and password you entered twice. Make sure there are no unnecessary spaces or errors.
3. Locked Account For security reasons, your account may be temporarily suspended if you repeatedly try to log in using wrong credentials. Try again after a few minutes.
4. Technical Issues
Sometimes, login issues may arise due to browser or app glitches. Try the following:
Clear your browser cache and cookies.
Update the Vidgo app to the latest version.
Restart your device.
5. Contact Vidgo Support
If none of the above steps work, reach out to Vidgo’s customer support for assistance.
Logging in on Different Devices
Vidgo TV supports multiple devices. Here’s how to log in depending on your preferred platform:
1. Smartphone or Tablet
Download the Vidgo app from the respective app store.
Open the app, tap Login, and enter your credentials.
2. Smart TV
Open the Vidgo app on your smart TV.
Use your remote to navigate to the login screen.
Enter your email and password using the on-screen keyboard.
3. Streaming Devices
For devices like Roku, Fire Stick, or Apple TV:
Install the Vidgo app from the device’s app store.
Open the app and log in using your credentials.
4. Desktop or Laptop
Visit Vidgo’s official website on your browser.
Click Login and access your account.
Conclusion
Whether you're using a computer, smartphone, or smart TV, logging into your Vidgo TV Login Account is simple. You may easily get your favorite stuff by following the aforementioned instructions. If there are any problems, customer service or troubleshooting advice can assist you quickly resume streaming.
Enjoying live TV and on-demand programming is made flexible and easy with Vidgo TV. It's a fantastic option for those who enjoy entertainment because of its extensive channel selection and easy-to-use interface. begin some popcorn and begin streaming now that you know how to log in!
#vidgotvloginaccount#vidgotv#vidgotvaccountlogin#vidgotvaccount#vidgotvsignin#vidgo tv login#vidgo tv#vidgo tv sign in
1 note
·
View note
Text
i just played the demo for beat, heart, beat
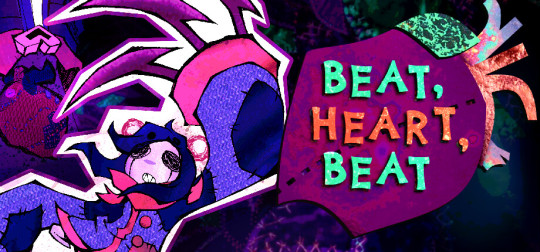
i think im just gonna start linking the steam page in everything i review. now its your job to click that link and try the demo. but read my post first cuz i like it when people do that
so this game kinda confounded me when i first saw it. i knew it was inspired by mad rat dead, like cmon the protagonist is a little rodent of some sort and theres this whole motif about following your heart. but then i saw the gameplay and it was an auto scroller with... idk the terminology but its a muse-dash like where youve got the top and bottom rows. and then i actually played the game and realized how much of its own thing this game was going for
so in muse dash your character is kind of in the centre between two single-width lanes, yes even if it looks like theyre on the bottom one, because the upper lane is always mapped to a dedicated upward button and the lower to a dedicated downward button. unless youre using a touch screen, this usually splits your controller in half, one side being up and the other down. i always end up holding it sideways
anyway, thats not how this works. its way more like a platformer, as in when you attack, you attack relative to where you are. the right key attacks in front of you, the up above, and down... down. this really fucked me up at first believe it or not, cuz my silly rhythm game brain is used to a perfect parity between lane and input
let me break it down cuz i dunno if that makes sense. if theres a note in front of you, hit ->. if theres a note above you, hit ↑, cuz youre on the ground and that note is in the air. now that youve done that, youre gonna hover in the air for a bit. theres another aerial note coming up, and since youre still in the air, you hit ->, because its in front of you, even through its in the air. i feel the need to be this granular because i really havent played a game like this before, lane relativity is uncharted territory (intentional pun)
they do some fun stuff with this! so theres this enemy that looks like a blueberry pancake and/or deflated balloon? look we were moving fast and i was focusing on the beat. anyway, its always gonna be below you (in the air over a pit) so you always down-attack it, but when you do you bounce right back up to the elevation you were at. this sets up for some really cool patterns where youve gotta be attentive to know what the inputs are thanks to the lane relativity, and that makes a fun and challenging section of the level! im really excited to see the patterns they use in the full game
i do have a few snags. first, the cue notes really fucked me up. all the notes are really visually distinct, and thats important cuz theyre gonna do different things to your character and fuck with your note relativity. but the cue notes are only different from their colour, which i find a lot harder to process than shape if ive got half-a-second to register what input i need. one cue has a different tempo, and another starts on an offbeat, so it really threw me off whenever i had to react to em
another thing, really minor, no controller support. not a problem since i, yknow, own a keyboard, but the menus use the mouse way too often? the main menu is permissable, but even the results screen makes you click confirm with your cursor instead of being able to highlight it with buttons and stuff. whats weird is that the song selection lets you use arrow keys, so i really dont get it. the last point was just me struggling with the gameplay, this feels like something that id actually wanna see changed in the full release
but heres some things i LOVE. first, the vibe, fucking obviously. i love the gritty overtoned garageband soundtrack i love the mishmash collage visuals, i love the design of the main character i wanna snuggle them to bed.
so heres something ive never seen a rhythm game do before, right? and i cant confirm this is the case, but i feel like this has to be what happened just watching the gameplay difference: they make the judgement windows tighter on higher difficulties. thats genius, why are you the first person to do that, that feels so obvious in retrospect but it just makes sense as a thing to do. i understand in a lot of more 'professional' traditional rhythm games, yknow the beatmania kind, wanna give you a more uniform experience across songs and let you personalize your input windows and yadda yadda we dont do that here. you are a little mousie and hard mode makes the timing harder too, thats badass
dont worry about the difficulty btw, from what i can tell the game is pretty forgiving to newcomers while still offering a challenge. all the levels defaulted to easy mode in the level select (no story mode in the demo, whatcha gonna do) but you still get tutorials and stuff on the higher levels, so its accepting if you just wanna jump into tough shit. either way though you cant really fail a level, theres no health bar and no minimum score. if you fall down a pit you just head back to your last checkpoint and you dont get a medal on the results screen, so if you dont care then you can just blitz through. they dont even have overstrum so you can just spam that shit and look at the pretty backgrounds
so i think BHB is gonna be something special. i love the looks, the sounds, everything has this raw vibe to it. like, the singer has a really scratchy and heavy singing voice, and i think that adds a really good emotional quality to all the songs. the cue notes are gonna fuck me up and itll probably take the whole game for me to get used to the lane relativity thing but you know i dig a game that lives on its own terms.
if you like rhythm games then youre gonna try the demo and youre gonna wishlist it because you like psychedelic visuals and alt-rock vibrations. if you dont like those youre gonna wishlist it anyway because that really helps the algorithm pick up indie games and more people need to see this, i think this really has potential to be a gem and it deserves the recognition for it. after youve done that youre gonna play the demo again until you like it. its a good demo for a probably good game, i dunno cuz its not out yet but i just have a good feeling about this one. its 1 am and i woke up early as shit today so thats the best youre getting
#beat heart beat#wishlisted#demo#yeah im gonna tag some extra shit cuz this game needs more eyes sue me#rhythm game#alt rock#alternative rock#psychedelic rock#indie game
1 note
·
View note
Text
I Deactivated My Facebook Page
Yep, I did it. It was about time. Ever since the birth of the algorithm, even though I had thousands of people on my friends list, I think three of them saw my posts (sarcasm, kind of). True. I had been reading about "shadow banning" on YouTube, Facebook, and a couple other platforms, and I wanted to see if this is what happened to my FB profile, so I logged into my other profile (come on, we all have one), and even though I was on MY OWN FRIENDS LIST, I saw virtually nothing -- no posts -- when I went to view my main profile. I thought, boy this is odd, I'm my own friend, but I see virtually nothing. I'm thinking this must mean that other people on my friends list see virtually nothing as well.
I think I figured out why.
I've been promoting my books on FB for years, literally YEARS, and I got a nice bit of back and forth, responses, comments, and the like, until FB started charging you to "run ads", to pay for "sponsored" ads, and I've seen quite a few of these ads come through my feed from other authors. But, hey, I don't make enough money off of anything to pay for promotion, and I'm not really sure how much I trust their spiel: "If you pay us $50 for an ad, it will be shown to 3000 people". No, I don't believe it.
So, there you go.
I have a private page now, consisting of family, a handful of people I know from The Real World, and a few internet friends I've had for years that I've become very fond of -- and I have a few more of these people that I need to reconnect with. Less than 30 people so far, and it feels much more cozy than 4000 people who were mostly total strangers.
I do want to say that with my private page I have now, I did take the opportunity to create three new public pages at Facebook, and I'm going to give you the links to those pages here:
The Mystic Crone click HERE
I began this page with a few posts which include episodes #30 to #37. From now on, when I post on The Mystic Crone Blog and The Mystic Crone YouTube, I'll make sure that I post the latest podcast on this Facebook page. Let it be known that there are a slew of podcasts @ this YouTube, if you haven't checked them out, and as we say -- spiritual readings are Timeless.
You'll find mystical readings inspired by Spirit using the tarot. They say that once you reach a certain age you become invisible, and to an extent, that's true. However, with age and invisibility comes a certain sense of power.
"Reclaim your power, O' ancient one. Walk the paths of your ancestors, communicate with the spirit world, and challenge the shadows. The universe will be still to hear your whispered words of wisdom." ~ Mystic Crone

Spirits n' Stuff click HERE
I have 22 podcasts uploaded to my Spirits n' Stuff YouTube, and I managed to post all of these to this new Facebook page. I will certainly try to post new podcasts, as they're created, to this page as well. You can subscribe to this YouTube channel to be notified when I upload a new video.Spirits n' Stuff explores the world of spiritualism, the supernatural, the paranormal, cryptids, myths and legends, hauntings, and the unknown.

BOOKS by Amythyst Raine click HERE
At this Facebook page, I've created ten posts, a post for each book, including info from the back cover text, a banner created for each book, and in the comments you'll find a link to purchase each book at Amazon. I won't be creating anymore posts on this page. Basically, you'll find my books here with the info you need to browse & purchase.
Amythyst Raine is a Best-Selling author of metaphysical books on tarot and intuitive reading, witchcraft, Wicca, paganism, women's mysteries, new-age spirituality, the pagan Goddess, gray magic, and green witchcraft.

There you have it, my new experience and journey on Facebook, going forward. I would be absolutely thrilled if you visited these pages and click the like or follow button, feel free to leave comments, watch podcasts, buy books, or enjoy an intuitive inspiring spiritual reading.
0 notes