#stim gif tutorial
Explore tagged Tumblr posts
Visit Tumblr Blog
Explore Tumblr blogs with no restrictions, modern design and the best experience.
Last Seen Tumblr Blogs


Fun Fact
Post activity is at the highest at 4:00 pm EDT; notes peak at 10:00 pm EDT.
Text


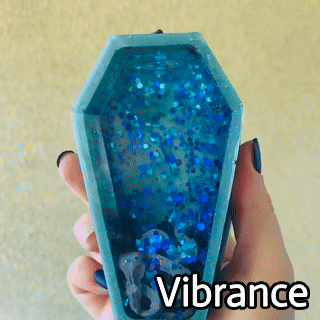
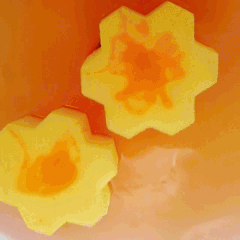
🌟How to make a neon pom pom sensory bottle!🌟
• Square Sand Bottle - SKU 1417054 Hobby Lobby
• Sequin Variety Pack - SKU 2265551 Hobby Lobby
• Neon Pom Poms 7mm - SKU 387282 Hobby Lobby
• Elmer’s Clear Glue
• Bottled Water
#stim#stimblr#sensory#sensory bottles#sensory bottle#tutorial#how it’s made#how to#neon stim#rainbow stim#visual stim#pom pom stim#confetti stim#shaker stim#also please please please don’t hate me because I shop at hobby lobby I know it’s a bad company :/
154 notes
·
View notes
Text
stim gifs in photopea
[PT: Stim gifs in photopea /End PT]
Hello! This is my (lengthy) tutorial for how I make GIFs for stimblr using Photopea. It's not going to be as extensive as how I make for shows, celebrities, etc, because I have different processes for both, however I'm still aiming to cover everything I think necessary!
It'll be split into multiple sections with headers, so feel free to skip whatever you want if you don't find it necessary :•] Reblogs appreciated if you found it useful, but no pressure obviously!
Sections:
Getting your video
Importing into Photopea
Making the GIF
Sharpening the GIF
Coloring
Exporting & Optimization (in EZGIF)
End results, and misc tips and comments
1. Getting your video
[PT: 1. Getting your video /End PT]
Short section! These are the ways I download and source videos for use
Youtube - yt-dlp (installation instructions)
Instagram
Tiktok (Allows without watermark)
Pexels
For yt-dlp, check out this basic list of commands I made solely for downloading material to GIF! If you have further questions, either send me an ask or refer to the github page.
2. Importing into Photopea
[PT: 2. Importing into Photopea /End PT]
There are two ways to import into Photopea, the first is importing footage directly, and the second is screencapping (which I won't cover in detail, but this tutorial is for installing the program I use on mac & how to use it, and this is for installing on windows)
Option 1: Importing footage directly (see end for comments)
On the home page of Photopea, you'll want to click "Open from computer", and select your clip, upon selecting you'll be presented with a popup like below

All that really matters here is where you see "30 FPS", that's the videos native frame rate. I always put whatever that number is as my frame rate because I find it to be the best, but you can use different presets (Like ezgif, which gives you 12, 20, etc). The less frames you have, the chopper it will be. If you plan to slow it down later, I'd also recommend having more frames so it looks smoother after slowing.
Now you just have to wait for it to load all the frames, then you're set!
Option 2: Importing screencaps
This is my personal way of doing things, so this is assuming you've installed a screencapping program and already have your frames ready.
For this, when you click "open from computer", select the first frame and open it by itself. Once that's loaded, look in the top left at the "File" tab, select "Open & Place", then ctrl + shift to select the rest of your frames. Once they've all loaded in, you can either rasterize them now, or wait until after cropping and resizing (goes faster then).
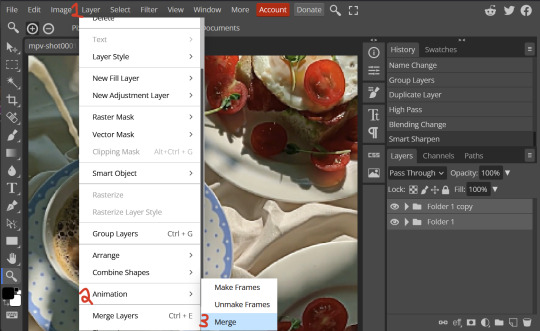
What's important though, is use the shift key to select all your layers, in the top left open the "Layer" tab, hover over "Animation" at the bottom to expand it, and select "Make frames". With your frames still selected, hit the folder button in the bottom left.

Without this, Photopea won't recognize this as an animation, therefore you'll be unable to export it as a GIF.
3. Making the GIF
[PT: 3. Making the GIF /End PT]
3A. Cropping
To begin with cropping, select the crop tool, which is the fifth one down on the left bar (if you hover over, it will say the name), or the "C" key on the keyboard.
Along the top now, you should have some new options. The dropdown menu that says "Free" is going to be how you select an aspect ratio or fixed size, and I always set to 1:1 since most people on stimblr use square GIFs, but you can do whatever works for you! Make sure to leave "Delete uncropped pixels" unchecked, because that lets you move stuff around later without having to recrop.
Crop your animation down as you see fit, then either hit the enter key, or the check button along the top bar. If you're unhappy with the placement, you can undo it OR, select all your layers, then use the move tool (First icon on the left, or the "V" key) and drag it around as you see fit.
3B. Resizing
With all your layers selected still, open the "Image" tab in the top left, towards the bottom select "Image Size", then select what you want to resize to.
Tumblr's exact GIF sizing
1 per row: 540px
2 per row: 268px
3 per row: 177px
HOWEVER. For stim GIFs, I find the quality difference so negligible, you can resize to what you want. It's also better for it to be bigger and scale down, then smaller and scale up. For this reason, I typically do 268px no matter what, or 300px.
As far as resampling goes, leave it turned on, and I personally leave it on bilinear, but the different options vary slightly, so experiment and see what works for you!
If you're happy at this step, go ahead and skip down to exporting! But when doing this way, I do recommend sharpening for better quality at smaller size.
4. Sharpening the GIF
[PT: 4. Sharpening the GIF /End PT]
The fun thing about this section is you get to experiment and find what works for you! I'll give you my personal method, but you can play around, add and remove bits, etc until you get something you're happy with!
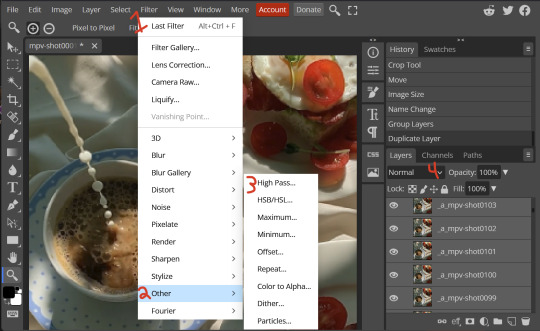
4A. High pass
High pass is my personal favorite way to sharpen GIFs, and for stim GIFs I'll often use only this.
(Steps 1-3 in image) To do, start by right clicking the *Folder* all your frames are in, and select "Duplicate Layer". Select all the frames in Only the folder on top, then go to the "Filter" tab along the top left, hover over "Other", and select "High Pass". The grey look is entirely normal! I normally set my high pass at 2-4, but play around with this step and find something you like!
Select the *Folder* all your high pass frames are in, and change the blending mode (fourth step in image) to "Soft Light", it should be on "Pass Through" initially. With that done, you've used high pass on your GIFs! If you're content here, skip the next section about smart sharpening, and see about merging animation folders under it.
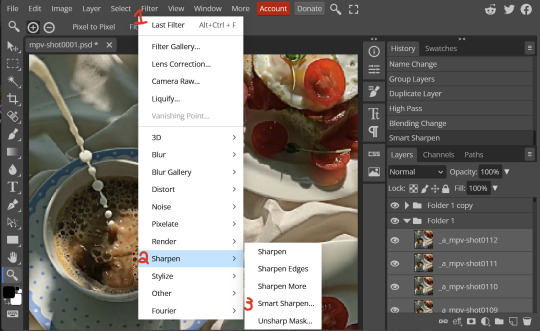
4B. Smart Sharpen
Note: I recommend testing your sharpening settings on one layer BEFORE applying them to all layers, as it will be easier on your computer.
I utilize this in addition to high pass usually, but you can do it all by itself as well! To begin, select all the frames in your folder (if you used high pass, select the frames in the *Bottom* folder). Open the "Filter" tab on the top left, hover over "Sharpen", and select "Smart Sharpen". Now find what you like!
For stim GIFs, if I used high pass, I'll go for 75-110% amount, and a .1 radius. I personally don't like the look of an over sharpened GIF, so I only use smart sharpen if I want to enhance some small details high pass didn't touch enough, which is why I use so little. If you don't like high pass, you might use more here!
4C. Combining animation folders
If you used high pass, you'll notice you have two animation folders. To fix this, select both folders using ctrl + shift, open the "Layer" tab, hover over "Animation", and select "Merge". It will give you a popup to confirm, and you can go ahead and accept!
If you don't merge these, Photopea will think they're two GIFs in one document, rather than only one, which is why this step is so important.
As a note, once you merge these folders, you can no longer shift the frames around to change where they are in the crop like you could earlier.
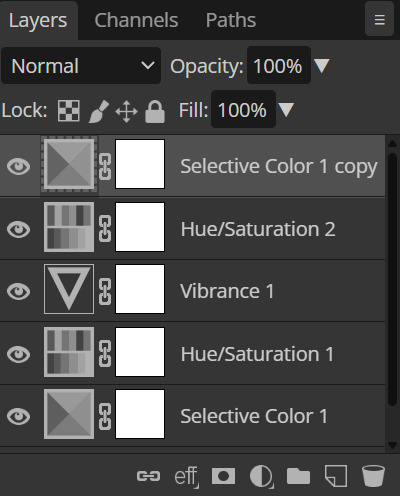
5. Coloring (Image Heavy)
[PT: 5. Coloring (Image Heavy) /End PT]
This section is going to be less of a tutorial and more a basic rundown of the adjustment layers and what they do. Coloring will change from GIF to GIF, and you can do light or intense coloring, so this is just a guide to begin with, but really just play around and find what you like!
To access the adjustment layer menu, in the bottom right where "New Folder" was, the one directly next to it that looks like a circle made of two half-circles, will bring up your adjustment layers.
As a note, I always group my adjustment layers in a folder above my animation, for ease of hiding to compare with and without.
5A. Levels
Levels is one I almost *Always* use on a GIF because it makes it look cleaner to me. In the first box, sliding the black square on the left *increases* the blacks, sliding the white square on the right *increases* the whites, and the one in the center changes the general brightness up or down.
Sliding the black box on the bottom bar *decreases* the blacks, sliding the white box *decreases* the whites.
If you change the channel from RGB to another option, you can change the balance of reds/cyans, greens/magentas, or blue/yellows, I personally don't touch this for stim GIFs. In the RGB channel, I set the top black box at ~10, and the top white box at ~245 usually.

5B. Curves
This is another way of adjusting brightness, blacks and whites, or color balance. By adjusting the dot in the bottom corner you adjust blacks, the top corner adjusts whites, and if you make a dot in the center, it adjusts general brightness! You can also make multiple dots to separately adjust some values. By changing the channels, you adjust color channels rather than white/black.

5C. Exposure
This is another way of adjusting the lights and darks of the GIF. Sliding the exposure up and down will add/take away light from the lighter parts of your images. Adjusting the gamma correction up and down will add/take away shadow from the darker parts of your image. Offset increases/decreases the brightness of the whole thing but I almost never use it.

5D. Vibrance
Vibrance is what I like to think of as a "softer" way to increase intensity of colors, instead of using a Hue/Saturation layer. It affects warmer colours more intensely than cooler colours, whether you use the vibrance or saturation slider. The saturation slider here is more intense than the vibrance one, but less intense than saturation in a Hue/Saturation layer.

5E. Hue/Saturation
This one is simple! Sliding the hue slider changes the colour, sliding the saturation slider increases/decreases saturation, and sliding the lightness is basically like directly adding black/white to a color. I use lightness only sparingly.
What's cool here, is you can adjust the range to target a specific batch of colours! If you find your reds are too bright compared to everything else, you can target the saturation of them specifically.

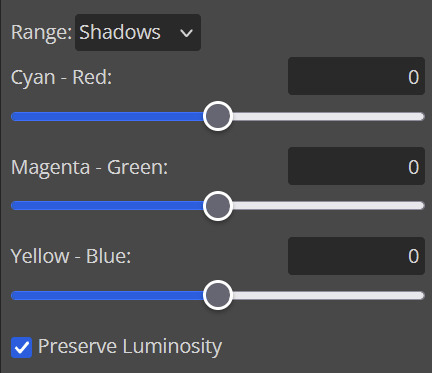
5F. Color balance
This is a simple way to adjust the base colors of an image, by changing it to be more cyan or red, magenta or green, or yellow and blue. This can be useful for making a GIF appear warmer or cooler!
I almost only touch the shadows & midtones, and highlights sparingly. "Preserve Luminosity" preserves the highlights and shadows of the image, so by unchecking it, you can achieve some more intense results.
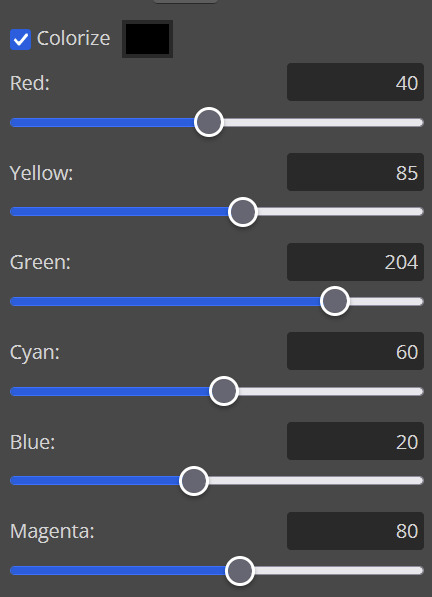
5G. Black & White
The black and white layer is useful because you can change exactly how light or dark a color appears after making it black and white. For that reason, I prefer it over a gradient map if I need to make something black and white.
5H. Photo filter
Photo filter is a simple way to add a color filter over the entire image, and adjust how strong or weak it is. "Preserve luminosity" once again just keeps the darks and whites of the original GIF.

5I. Channel mixer
I couldn’t even begin to cover channel mixer here, but this is for very intense color edits (I typically use it when I'm trying to make a GIF fit a board). However, here's another tutorial solely about channel mixer if you're interested in taking a crack at it!
5J. Selective color
Finally, selective color allows you to adjust the amounts of color or lightness/darkness of a specific batch of color.
By changing the color channel, you can affect different batches of color. The cyan slider controls cyan/red, the magenta slider controls magenta/green, the yellow slider controls yellow/blue, and the black slider controls black/white.
Checking the "absolute" is essentially like "Preserve Luminosity" in the other layers. With absolute, it's like shifting the color one way or the other, and without absolute, it's like adding to the pre-existing color.

6. Exporting and Optimization
[PT: Exporting and Optimization /End PT]
6A. Exporting
With all that done, we're ready to finish it up! To finish your GIF, open the "File" tab in the top left, go to "Export As", and select GIF!
Here you can rename, adjust the size (WILL ruin the sharpening you did), the quality (I leave at 100%), and the speed.
Another important thing to note is the "Dither". If you leave dither off, you can potentially encounter color banding, which is where (typically gradients) with look like strips of color, rather than smooth. This is because GIFs only have 256 colors they can render, so if something has too many, it bands.
By checking dither, it can get rid of color banding, at the cost of dots on the image (around where the worst color banding is usually). Sometimes the dots aren't noticeable and this is the better option, however it will Also increase your file size. It's up to you if you want to use it!

6B. Optimization
This is technically an optional step, as tumblr's GIF size limit is 10mb, so as long as you're under that, you can post, however, smaller GIFs load faster and I personally find are better for use in stimboards where you're loading a lot of GIFs! So to help this, let's head on over to the optimize section of ezgif. My personal goal is UNDER 4.5MB, ideally under 4MB.
The two main things I recommend are Lossy GIF, or removing frames, and I always start with Lossy GIF. I do anywhere from 5-15, and usually this will bring down GIFs a lot if you made them in Photopea! My example GIF was 6.7 MB to begin with, and afterwards it was 4.2MB.
However if you find that to be not enough, you can remove frames. When you remove frames, it speeds the GIF up, so I also recommend slowing it down (this is why I set my frames high in the beginning as well). I typically do "Remove every 4th frame" and slow it down to 75%-85%.
7. End results, and misc tips and comments
[PT: 7. End results, and misc tips and comments /End PT]


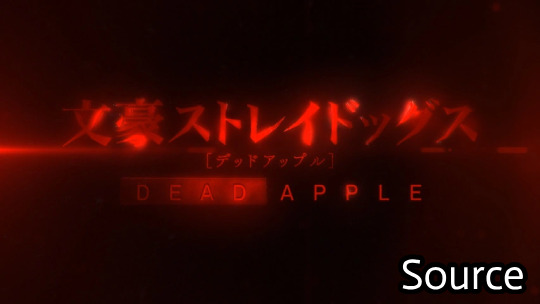
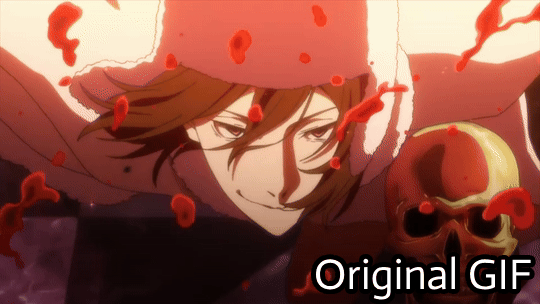
(source) The first GIF is without sharpening/colouring, the second is with sharpening but no colouring, and the third is with sharpening and colouring. I didn't color it much besides making it slightly warmer, but I hardly ever do much anyways!
As for misc comments:
In firefox, when you import footage directly, sometimes it glitches and tries to load 4000 blank frames, which is extremely resource intensive on a computer. The solution is import the footage in chrome, save as PSD, then open the PSD in firefox. (Or work in chrome but why do that /half silly). The other solution is screencap which I do since I do this often, but both work fine.
In firefox, sometimes you're unable to slow the GIF down upon export and it will export faster than it actually is. Slowing the video down to 50% restores it to native speed I've found, and you can do this in ezgif before other optimization.
When colouring, my number one tip is slide something all the way up first, then adjust down! By seeing it at max, you have a better idea of what's getting adjusted.
If you have any questions, drop me an ask :•]
And that concludes our tutorial! My apologies for the length, but I wanted to cover every possible thing here. It definitely seems like a lot, much more than working in ezgif, but when you get used to what you're doing, it goes extremely fast (even if you spend extra time screencapping). I personally find it worth it for the ability to sharpen GIFs alone, but as well as more detailed coloring opportunities.
Thank you for reading, I hope this has been useful!
#i did it :•]#not stim#stimblr#gif tutorial#photopea#big thanks to talos for proofreading this :3 🖤💚🖤💚🖤💚🖤
73 notes
·
View notes
Text
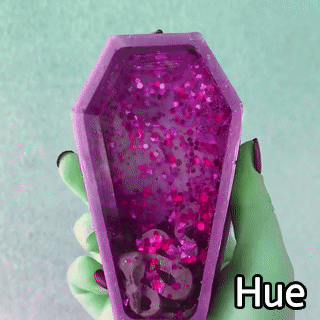
Stim GIF coloring tutorial
PT: Stim GIF coloring tutorial


Original GIF's are by gaystims
Here is a small tutorial on how to color GIF's! As a disclaimer I am not an expert at this.
Notes before this:
I intentionally chose an easy GIF to work with, some are a lot harder.
The final GIF (Heavy PSD) has been used in a stimboard that can be found here.
The layout of this is so messy, I apologize for this.
The Image ID's explain the color features changes in a lot more detail.
This post is GIF heavy and contains GIF's that are eye strain based.
GIF one tutorial- Light PSD
PT: GIF one tutorial- Light PSD
Okay, this is often the easiest thing you can do with a GIF which has a distinguishable color.
What do I mean by this? There is no other objects on the screen that is blue besides the OP's painted nails (which are minimal).
If the background was blue, changing the colors would possibly make it look less 'realistic'.
How do you use Hue/Saturation?
With a handy tool known as 'Hue and Saturation', it's one of the most useful tools at your disposal.
It can be found under: Layer > New adjustment Layer > Hue and Saturation.
Then this will pop up. Now it's important that you change the 'Master' to whatever color you're trying to change.


Things to note:
Orange is an awkward color to work with.
Blue is often cyan.
Sometimes the two colors merge together.
Yellow and red can often affect lighter skin tones of the hands/person in the GIF.
What do all of the options mean?
The hue changes the color of the GIF.
The saturation changes how bright/saturated the color is
The Lightness adds darkness or lightness to the color
All you need to do is mess around with the colors until you get one you like!
-
GIF two tutorial- Heavy PSD
The same rules apply here! Distinguishable colors are easier to work with.
How do you create this?
Sadly there is no definitive answer. You can use literally anything from the 'new adjustment layer' list. I'm going to admit that I don't use a lot of these besides Brightness and Contrast, Vibrance, Hue/Saturation, and Selective Color.

Wish me luck as I try to explain what these do.
Brightness and Contrast


This changes the brightness and contrast of the image. The best way to describe this is that brightness will make the image lighter or darker, eventually either making it completely black or white depending on how much you add.
Contrast is how much difference there is between colors.
Vibrance (and saturation)

This category adds both vibrance and saturation to the mix. They both have different styles but they're similar.
Vibrance is a lighter version of Saturation, it makes the image more 'vibrant'.
Saturation turns up the saturation, making the GIF's colors brighter.
Hue and lightness

Hue- Changes the color of the selected original color
Lightness- Adds white or black to the original color
I would always use the selective color option for this (talked about in 'Light PSD' one).
Selective Color


Selective color is hard to use, I only use the 'back' 'white' and sometimes 'neutral' option in the top corner (shown below)

It increases the colors that are shown, ie the black GIF increases the black color so it's clearer. 'Natural' does this with all of the neutral colors, but you can also add other colors to it, such as adding more red.
How do I achieve a good GIF?
Sadly you literally just have to mess around with all of these (often times multiple times) to achieve a random color that you enjoy. Here are the ones we used in the initial GIF:
#🐾 | talking#🐾 | edits#🐾 | tutorials#photopea tutorial#stim gif tutorial#if you find this useful please rb! This took forever
8 notes
·
View notes
Text


🧭🌟🧭
🌟🦴🌟
🧭🌟🧭
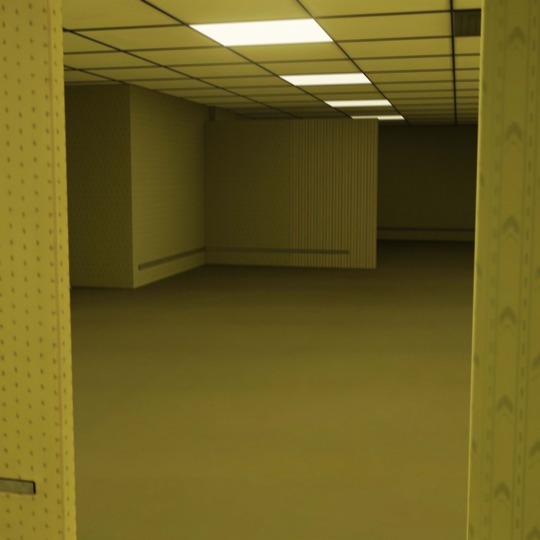
Backrooms level 0 stimboard!
I swear to god chat out of nowhere the backrooms hyperfixation hit me like a TRAIN so now im just gonna post backrooms themed stimboards! If you like that, consider following! /nf
#stimboard#stim#stimblr#stim blog#backrooms#the backrooms#level 0#tutorial level#unreality#unreality tw#unreality cw#warning#horror#horror tw#horror cw#horror warning#delusion#delusion tw#delusion cw#delusion warning#hands#hands tw#hands cw#hands warning#weirdcore#weirdcore tw#weirdcore cw#weirdcore warning#liminal tw#liminal cw
10 notes
·
View notes
Text
STIMBOARD TUTORIAL!! BUT DON'T FORGET ABOUT THIS ONE!


So my sibling asked how I do it, so here's a tutorial on how I make my stimboards! There is no right or wrong way to, this is just how I do it! The way I do it is listed below.

Since this was a 2 person thing, he sent me links. If no one is there to send you links, search up "__ stim" on mobile yourself! I prefer mobile at least because not every image saves as gif on computer.

Got all my images plus some tutorial ones, so now it's time for trial and error! Make sure that you have your sources and middle image(s)!


It took me 3 tries to get it right. The stimboards I post are the perfected versions.

Save these to computer or wherever you may be making them, know the format. I like to put these in a folder I don't use. I recommend having what your board is and then what the stim themes are, you can just type those as you go. Since I use this way, I just number them so they're easily organized, then highlight them all and put them here.
Final result, JACK x DAVE (DSaF) STIMBOARD WITH THEMES OF GEMS, MAKEUP, SLIME, GLITTER, HEARTS, AND NEON LIGHTS. REQUESTED BY: @thepizzeriasys (which is my awesome sibling. Go follow them)


#jack dsaf#dave dsaf#orange stim#purple stim#makeup stim#glitter stim#slime stim#gem stim#neon stim#stimboard#stimboard tutorial#requests wanted#art tutorial#tutorial
9 notes
·
View notes
Text


The Tutorial Man from Freddy Fazbear's Pizzeria Simulator Stimboard!
💸 💸 💸 | 💸 💸 💸 | 💸 💸 💸
#fnaf#five nights at freddy's#freddy fazbears pizzeria simulator#stim#stimboard#tutorial man#some fucking guy#cyan#star#drawing#tw irl hands#sponge#cleaning#orange#blue#yellow#clay cracking#bubbles#kidcore#slime#nail polish#pouring#dark blue#sparkles#stim toy#squeezyyy
55 notes
·
View notes
Text

hi this is a blog where i store things for later use (w/ credit ofc)! tags are below for easy navigation, and feel free to rb anything for urself :3!
layout by ME!
6 notes
·
View notes
Text
collab!!

Later this week we'll be collabing with one of your favorite slime brands! Repost with your vote and see if your shop wins!
#slime#clear slime#slime stim#slime tutorial#stimboard#slimestimboard#blueslime#slimecollab#slime creators
0 notes
Note
Can you do a person with parrot wings stimming please? :D


Zomb only learned to draw wings today! It used the tutorial in the image under! Unfortunately zomb got it from pinterest, and the original artist wasn’t credited 0__0 if anyone knows the original artist message zomb so it can credit them in this post!!

Zomb hopes you enjoy the emojis though <3

#emoji blog#custom discord emoji#custom emoji#custom emote#cute emoji#discord emoji#discord emojis#discord emote#emote#emote artist
12 notes
·
View notes
Text
100 followers event!

Inspired by: @deadboystims
All dividers from: this post
Tutorial can be found: here

Alright! I am doing a 100 followers event where you make a different stimboard based on the prompt for each day! Here we go!

Day 1: Your blog
Day 2: Your favorite Game
Day 3: LGBTQIA+
Day 4: Your favorite animal(s)
Day 5: Your favorite aesthetic(s)
Day 6: Your favorite CC
Day 7: Your partner or best friend
Day 8: Your name on Pintrest
Day 9: Your favorite stuffie or trinket
Day 10: Your favorite character(s)
Day 11: Your favorite ship(s)
Day 12: Your least favorite color(s)
Day 13: Your favorite book(s)
Day 14: Your favorite show(s)/movie(s)
Day 15: Your culture(s)
Day 16: A character you relate to/kin
Day 17: Your least favorite character(s)
Day 18: An emotion
Day 19: A mythical creature
Day 20: Remake an old stimboard or your least favorite animal
Day 21: A country
Day 22: Your favorite stim creator
Day 23: A core you like
Day 24: A fear you want to overcome/Creepy
Day 25: Your pet(s)
Day 26: An article of clothing
Day 27: Something you find overly hated
Day 28: A genre of stim you like
Day 29: Your favorite food(s)
Day 30: Chaos

That's it! Feel free to ask me questions in the reblogs or comments!
#tumblr game#tumblr milestone#stimmies#stimblr#visual stim#stim gifs#stimboard#stimming#stim#fymo stims#fymo chats
29 notes
·
View notes
Note
how
do i
stimboard
stimboard tutorial !!
im not that good at explaining but I'll try!! this is the way I do it btw >_<
alot of yapping undercut
i download or make three gifs of the characters or whatever you're making a stimboard of, and six stim gifs. I also use stimboard heading but it's not necessary !!
heres the stimboard heading i use lolz!!

you should have nine gifs :3
how i get gifs is either I try finding them on here or tenor, if not, I record a clip and make it a gif with this website :D
I align them like this! ⬇️

how to align it like this is to import the gifs by clicking it in this order= character-stim-stim-stim-character-stim-stim-stim-character
hope this helps!! if you need any other help feel free to comment/reblog with questions !!
10 notes
·
View notes
Text
The Slime Trend- What It Is and Why It's Great For Neurodivergent People

originally posted to www.onlyfunthings.org on December 13, 2016
Ciao Lovelies! I bet at least one or two of you have heard of the "Slime Trend" recently. If not, I'll explain everything below! (Images Updated as of January 2019)
(UPDATED AS OF 1/21/19 CLICK ME FOR PART 2!)
So recently, the subject of slime- all types, fishbowl, iridescent, traditional, floam, glitter, crystal, etc- has been trending everywhere. Anywhere you look, you can find YouTube tutorials for how to create slime, find "stim" blogs on tumblr and plenty of gifs of slime, kinetic sand, and more. There are even entire Instagram accounts dedicated to videos of slime!
But what IS stim, or stimming, you might be wondering?
Well, let's let Wikipedia sum it up for us!
"Self-stimulatory behavior, also known as stimming and self-stimulation, is the repetition of physical movements, sounds, or words, or the repetitive movement of objects common in individuals with developmental disabilities and most prevalent in people with autism spectrum disorders. It is also commonly seen in people with anxiety disorders such as obsessive–compulsive disorder, ADHD, and Tourette syndrome, and in people with neurological disorders or brain infections"
The Wikipedia article containing this information can be found HERE.
To summarize, stimming is some form of movement, sound, or texture that is common in neuro-divergent individuals and usually used to self soothe, control anxiety, or filter/block overwhelming sensations.

Autistic individuals are not the only people who stim, however. Some sufferers of anxiety stim to control themselves and calm down, often this manifests in behaviours like nail biting, hair twirling, or repetitive motions like rocking.
What does this mean in terms of the new slime (and other stimming toys) trend?
For one thing, it's good for neurodivergent people because now the things they do to relax are no longer stigmatized but seen as "normal" and acceptable. Colleges even have events around finals making "self-care" kits containing things like play-doh. While these are not advertised as "Stimming," many people use Play-Doh or other molding doughs and such to stim.
Another great thing coming from this trend is that it is opening up the discussions around being neurodivergent and normalizing the idea of talking about mental health. People are adknowledging that stress can be helped by non-conventional methods. Perhaps we are finally reaching the days where instead of someone saying "Oh, you're stressed? Just breathe! (or any other conventional method)", they would say "Well, try playing with some slime or chewing on a chewing necklace!"
Another great outcome of this "trend" is that stimming toys like chewing necklaces, fidget toys, tangles, kinetic sand, floam, and others are becoming much more common and inexpensive!
However, we need to ensure that this "trend" does not become offensive to autistic or neurodivergent individuals. All kinds of stimming are equally good, whether it's rocking, tapping, hand wringing or flapping, etc. If we are normalizing stimming methods like chewing and slime, we should also work to normalize non- "aesthetically pleasing" stimming!
Thank you for reading, remember to love yourself, stay awesome, and I'll see you in our next post!
#agere#age regression#sfw agere#sfw littlespace#age regressor#sfw age regression#agereg#sfw little blog#age dreaming#agere art#agere community#age re safe space#age regression blog#age regression community#age regression sfw#age regressive#agere activities#agere aesthetic#agere blog#agere boy#agere board#age regression caregiver#agere caregiver#agere cg#agere games#agere lifestyle#agere little#agere moodboard#agere outfit#agere outfits
27 notes
·
View notes
Text
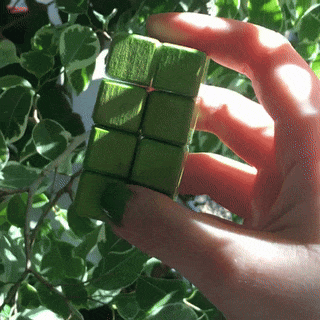
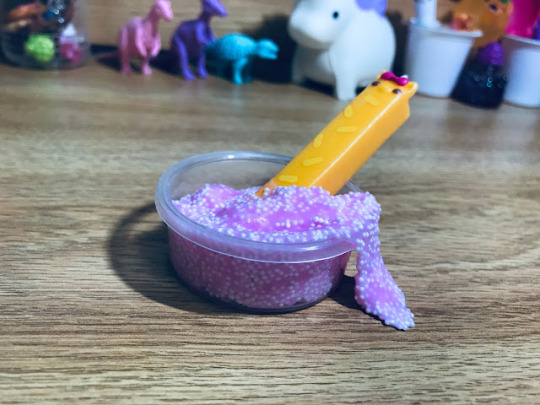
stimming in the sunlight by the plants🪴
the spinner has been painted with nail polish and the diy infinity cube is made based on this really cool tutorial!
ok to use in stimboards with credit
32 notes
·
View notes
Text
How to make GIF's from videos

I consider myself relatively knowledgeable on GIF making, but I am not an expert. This tutorial mainly focuses on making GIF's and sharpening, for a PSD tutorial see here.
A few things to note before starting:
I struggle with sharpening GIF's- Especially real-life GIF's. For some reason I can't quite wrap my head around when/if the GIF's look too sharpened, so the tutorial part on this may seem lackluster.
I only use photopea and ezgif for GIF editing and capcut for cutting videos. I won't be able to answer questions about other software's (ie photoshop).
Tumblr has a GIF size limit of 10MB. It's the bane of my life. Always check how big your GIF is.
And with no other questions let's begin.
How to make a GIF from a video
Find the video and download it (real life)
This is a very obvious step but one that is important. I would always recommend finding videos in good quality. I often use tiktok, free videos from sites (like pixabay) and Instagram.
As for downloading them, I would recommend avoiding '[website] downloader' sites for a few reasons. A) they get shut down and replaced with spam sites frequently, thus making them unsafe to use, and B) they often times make you watch an add or remove ad blocker before giving you the highest quality download option.
I would always use cobalt.tools for video downloading.
Find the video and download it (anime)
This is more complex and I won't detail my download methods publicly. All I can say is not to use the anime watch sites to download your videos from, they're often low quality and have watermarks- Plus a lot of the sites have pop-ups ect which make them unsafe.
If you want a video tutorial I can't link you one from YouTube. This is not a YouTube tutorial. Nope.
Anyway, once you have it you will need to use capcut to shorten the video length (and potentially change the file) however you will need to make an account. Annoying I am aware, but it's the best video cutting software I know of and has caused 0 issues for me.
Not that when I first used captut the video save settings had the video at 720 pixels, however you want 1080 pixels because it makes everything smoother and higher quality. Once you change this setting you don't have to change it again.
Make the GIF
I always use Ezgif for this part. You need to use the video to GIF option and upload your video. Then choose the length of the video you want to turn into a GIF.
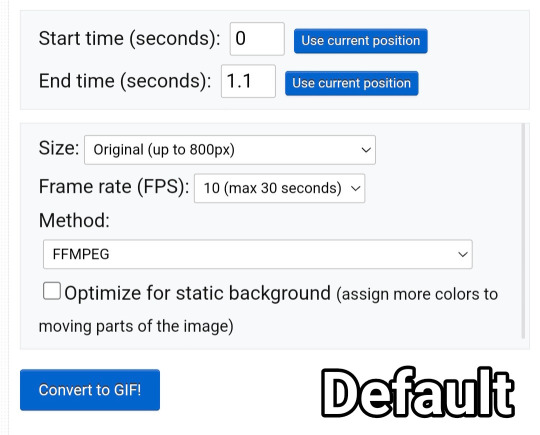
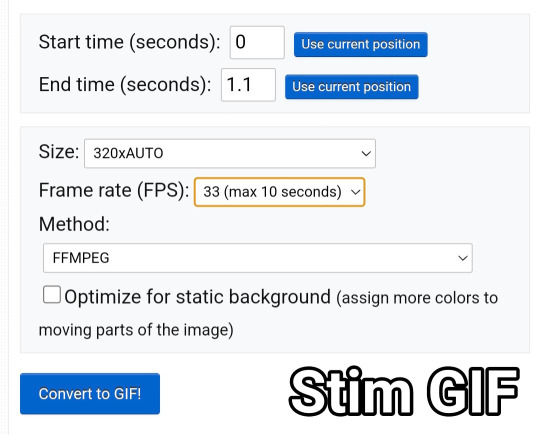
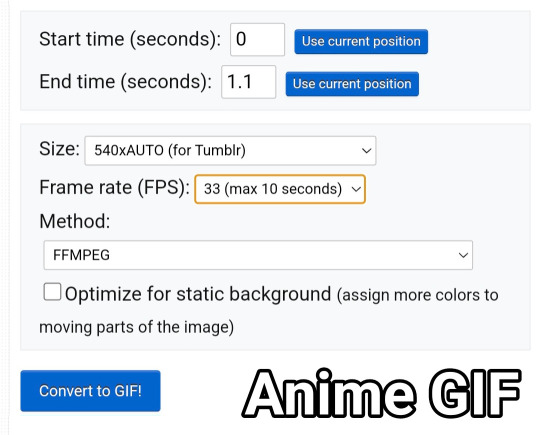
You will be met with a screen like this under the video.
Frankly I do not know what all of this means so that's why I only edit the size and frame rate.
With the size, you don't want it too big, smaller gives you more wiggle room for size with tumblrs size limit. However, with anime videos there's often less colors/detail, so they can be bigger and still look good.
The frame rate is important, the higher the frame rate the better quality it is, so regardless of GIF always have it this size
Then you hit convert to GIF and there you go.
If you need to crop the GIF use the crop tool and if there's any points of the video you don't want (ie frames of the next scene) you can use the frames tool (note that imo it's easier to use the photopea timeline for this)
Editing the GIF
You can just leave the GIF as it is, or you can make it sharper and/or add a PSD in photopea.
For stim gifs I will simply direct you to this tutorial because I can't understand the irl GIF sharpening process without photoshop's tools.
However, for anime ones you can use the smart sharpen tool, I either leave it on the default setting, or turn down the radius to 0.1-0.5
You can find the sharpening tool in filters > sharpen > smart sharpen
And here are some comparisons.


I spoke about PSD's here, but here's an example of the GIF with one and sharpened.

5 notes
·
View notes
Text


❌❗️❌
❗️❓❗️
❌❗️❌
Level 0 redrooms stimboard!
REDROOMS YOOOOOOO also the middle image is from a roleplay on reddit about someone pretending to come across the redrooms, if you struggle with unreality, delusions, or paranoia i suggest that you dont visit the middle link! :3
Also this isn’t about redrooms creppypasta! >_<
Also i couldn’t put this in the tags cuz of limit so uhh eyestrain tw cw warning whatever REMEMBER TO TAKE BREAKS IF UR HAVING EYESTRAIN!!!!
#stimboard#stim#stimblr#stim blog#backrooms#the backrooms#level 0#tutorial level#redrooms#red rooms#unreality#unreality tw#unreality cw#unreality warning#horror#horror tw#horror cw#horror warning#liminal#liminal tw#liminal cw#liminal warning#blood#blood tw#blood cw#blood warning#gore#gore tw#gore cw#gore warning
2 notes
·
View notes
Text
Running Prompt List
Last chance to add your Intrulogical Week prompt ideas before the poll tournament starts tomorrow night! (June 14.)
orange
beaker
experiment
hypothesis
listen to me
nerd
Halloween
birthday
quiet
tentacles
books
edible
secrets
hiding
slime tutorial
un-birthday
appreciation
truth or dare
clean up
drag
date or dates
rock n roll
music
glasses
bullies
sexuality
stress
stimming
pen
favorites
animals
Last updated 6/2/23 - 9:30 AM PDT

Keep 'em coming!
#intrulogical#logan sanders#remus sanders#ts logan#ts remus#sanders sides#platonic intrulogical#romantic intrulogical#thomas sanders#sanders sides fanart#sanders sides fanfic#sanders sides fanfiction#sanders sides creative events#prompts
66 notes
·
View notes