#tutorial level
Explore tagged Tumblr posts
Visit Tumblr Blog
Explore Tumblr blogs with no restrictions, modern design and the best experience.
Last Seen Tumblr Blogs


Fun Fact
If you dial 1-866-584-6757, you can leave an audio post for your followers.
Text


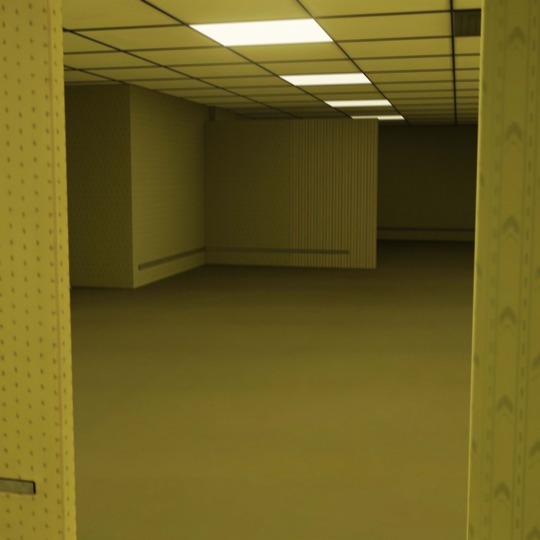


🧭🌟🧭
🌟🦴🌟
🧭🌟🧭
Backrooms level 0 stimboard!
I swear to god chat out of nowhere the backrooms hyperfixation hit me like a TRAIN so now im just gonna post backrooms themed stimboards! If you like that, consider following! /nf
#stimboard#stim#stimblr#stim blog#backrooms#the backrooms#level 0#tutorial level#unreality#unreality tw#unreality cw#warning#horror#horror tw#horror cw#horror warning#delusion#delusion tw#delusion cw#delusion warning#hands#hands tw#hands cw#hands warning#weirdcore#weirdcore tw#weirdcore cw#weirdcore warning#liminal tw#liminal cw
10 notes
·
View notes
Text
2024 was the tutorial for 2025.

#we're fucked#we're cooked#i'm scared#get ready#tutorial level#this year was hell I am literally terrified♡
92K notes
·
View notes
Text
Witch’s Castle: Life Potion Tutorial Level
Moves: 30
Chosen Cookie: 🍭 GingerBright
Skills: Disabled Enabled (for tutorial use)
🎯 Petrified Potions: 45
Rewards: Floor 1-3 Story Progression -> 200 Life Potions lobby reward -> Enable Cookie Skills, “Life Potions are Important!” Album Card (300 Collection Points)
⚙️ Tutorial refresher regarding the use of Cookie Skills aside, Petrified Potions are a replication of the wafers you dealt with before. It’s the fact that you have four colors, limited moves, and limited starting workspace that compose your problems. To progress through the level, either use a Puzzle Item, pop power jellies with these blocks in line of sight, or pop regular jellies right next to them (towards the BOTTOM of the stack).
Once you finish this level, you’ll unlock Cookie Skills (and the ability to choose which Cookie to bring with you) to use during regular levels! As a bonus, you’ll also have GingerBright to play with if you don’t have another Cookie from the gacha yet. Assuming you use Golden Star Jellies to advance the story immediately after completing levels, the earliest point where you can access this level is after Level 14. Unlike the level flow, this level is directly linked with the story and must be cleared at some point to advance the main plot itself.
Objective - Petrified Potions: These potions are petrified onto the board. Pop jellies next to them to free the potions and open up more space on the board. These potions are not affected by gravity. Break all the petrified tiles to win!


0 notes
Text
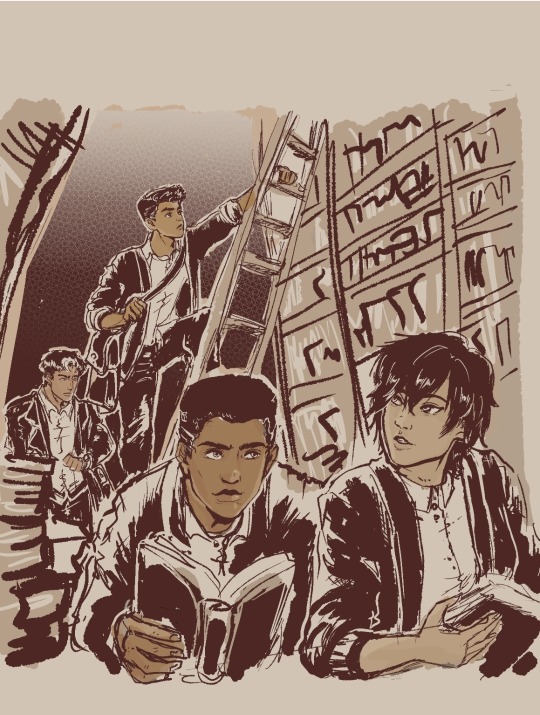
'Dead Poets Society' gang
Headcanon that these four drop poetry and literature quotes on their conversations unprompted.
Jason 'English-major-I-only-visit-the-manor-for-the-library' Todd-Wayne
Damian 'I-master-liberal-arts-unlike-you-plebs-PHD-holder' al Ghul-Wayne
Cassandra 'I-learn-English-thru-Shakespeare-as-god-intended' Cain-Wayne
Duke 'only-title-holder-of-vigilante-poet-and-will-cuss-you-just-as-poetically' Thomas-(future) Wayne
#My background is ass#I promise to practice but omg i am losing motivation coz its too ugly#started putting some on coloring that i started being happy about it#But my background is level toddler i hate it#the patience and discipline to make my lines straight and clean is nonexistent gdi...why did past me choose library gdi#Just writing some Duke in my fics and this image of them all just made me wanna do art...Duke is a poet and writes stories u kno?#Duke is not a wayne yet...and is not dead yet...but with how comics goes then its just a matter of time lol#They're all in school here...Cass and Jason are college watching over their juniors in high school#everyone use cardigans but Jason like his leather so no thanks lol#Duke and Cass in outsiders are cute#jason todd#dc comics#damian wayne#fanart#robin#cassandra cain#duke thomas#inking & background study#Damian is now 14!!!! He's getting old...he's like a baby yesterday omg#I need to stop obsessing over this so i posted a WIP so i can continue writing my fic!!! argh#Im gonna watch youtube tutorials again on drawing bookshelves coz i cannot do this without guidance
615 notes
·
View notes
Text
ok guys paris under siege is actually legitimately better than mrots (gameplay wise). like you can actually move the camera and the characters actually semi-respond to your button presses. this is so much more of a game than the other one
#i won't tag this as spoilers but#like. i'm not here gonna say this is SUUUCH a good game and i'm only past the tutorial level#but like. omg. this is so much better. <3 i love you mrots and your awful controls but mpus has you beat
375 notes
·
View notes
Text


wrong place wrong time
270 notes
·
View notes
Note
how in the world do u get hair so good in the dbz style ,, hair in general is so hard ToT
I put together a little "tutorial", but I just break it down into segments as close to the reference as possible, then as long as the generic "segments" are visible, you can mess them up with bending/swishing/swooshing/drooping/etc. as much as you want!
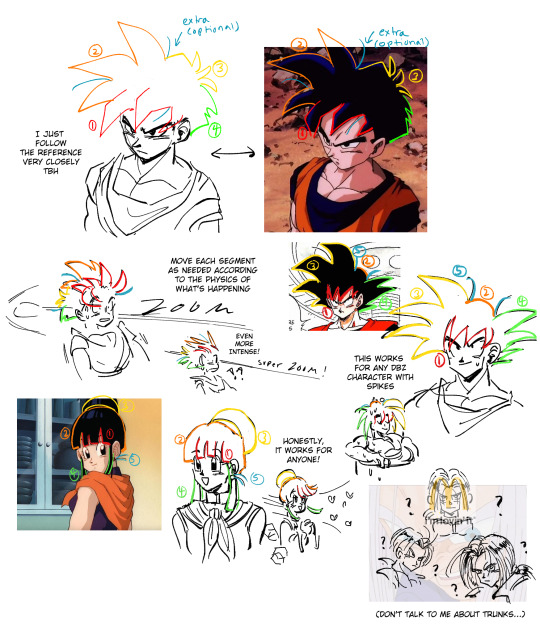
That's pretty much it (and practice, and fearlessness). Let me know if you need me to elaborate on anything!
#you don't need to be dragon ball super levels of stiff plastic with their hair#if you watch early dbz and early db or read the manga youll notice a lot of hair bending#it doesn't need to look perfectly in shape#except trunks idk i can never get trunks right don't ask me LOL#and bulma for that matter...#its the stringy hair that gets me#asks#tutorial#dbz#dragon ball#dragon ball z#db#sketch#oh also thanks for the compliemnt to my art!!! <3
287 notes
·
View notes
Text


TOMB RAIDER IV-VI REMASTERED (2025) dev. Aspyr, Crystal Dynamics
#tombraideredit#tredit#gamingedit#dailygaming#videogamewomen#miyku#radioactive-synth#userfray#userliliana#userophelia#userfarllee#userkarlo#userzevrans#userbrujah#anna.gifs#*creations#tomb raider#lara croft#flashing gif#i'm sorry if this looks like ass lol#i actually loved tutorial level even more now i'm glad they restored it back :D
162 notes
·
View notes
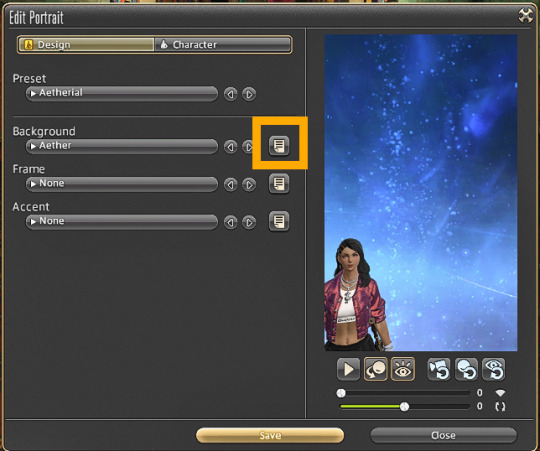
Text
How to Collect all the Framer Kits
There are a LOT of framer kits out there now for our adventure plates and dungeon portraits. But where to find them all?
You don't need to go hunting it up on websites; the game will tell you!
Open up your Portrait menu. I'll use a currently unused plate of Aeryn's.
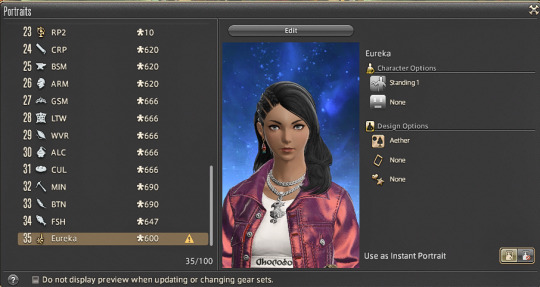
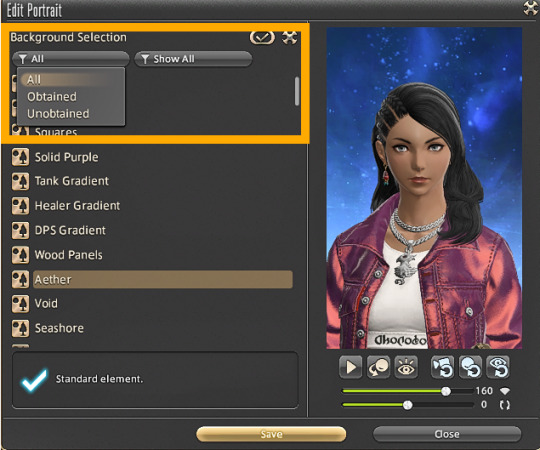
Select "Edit" above the center portrait. On that page, where it lets you select the Presets, Background, Frame, and Accent, there are the usual arrows, but also a page icon, the Background paper button boxed in yellow below to contrast with my dark mode UI.
At the top of that submenu are options to show obtained or unobtained, and also how/where you get the various backgrounds.
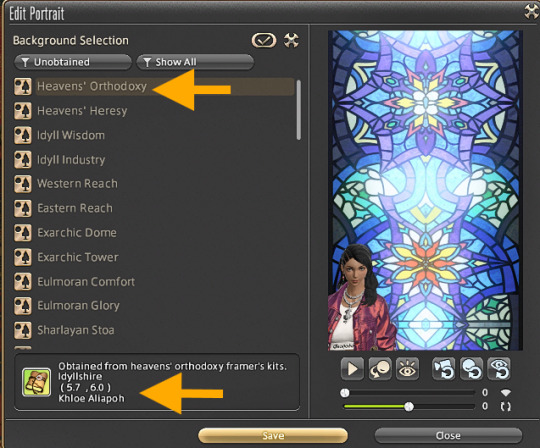
Filtering out the ones I own, I see I can get A "Heaven's Orthodoxy" (among others) and at the bottom of the list, it tells me where I can get it (from Khloe Aliapoh in Idyllshire; never free of that kitten...)
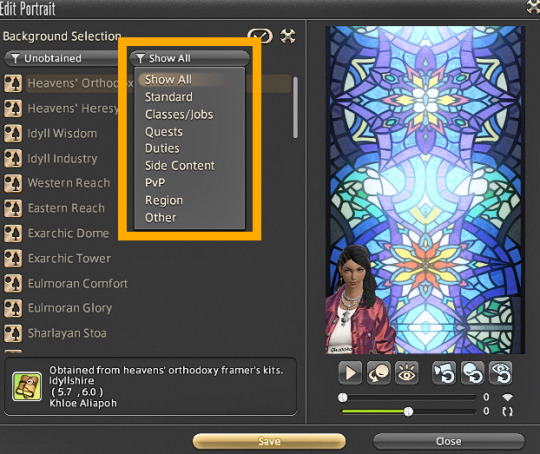
There are plenty out there! Every Allied Society has a framer kit now, talking to old Jonathas in Gridania about your achievements will nab a few, turning in bicolor gems to various vendors will add a few more, PvP for Job frames...the list goes on! The second dropdown in the submenu will give you ideas of all the ways to find kits.
And yes, it works exactly the same way for previewing Adventure Plate options!

Go forth, and make your WoL's ID cards pretty!
#final fantasy xiv#tutorial#how to#reference#resource#adventure plates#framer kits#portraits#I forgot my leveled crafters current ilvls are 666 at this time#tho leveling crafters isn't quite as devilish as it used to be...
157 notes
·
View notes
Note
hi! this is Insomniac Anon here!!! I noticed on some of ur artworks (specifically the unique magic posters), that u have a textured look to em, like paper or grain ... i wanted to ask how u get that effect? is it a brush, a filter, or like an overlay/png u use ... ? pls tell me!! ;v; I really like how the texture looks, so i wanted to know how 2 do it since ure a very big inspo 2 me LAWL ... I've been doing art practices in diff styles i find, so, i wanted to know a bit more how you do it :^D
thank you! :D :D :D it's usually photos/textures of paper that I've messed around with; I have a bunch of free/paid/ones I took myself. anytime I see good photos of paper I add it to the collection...it is my weakness. 😔
I mostly use Photoshop, but this should work in any program that supports blending modes (also I did this in like an hour to use as an example, please forgive it :')
image by itself before texturing:

with the texture pasted in (for this one I'm using this public domain one from Pexels):

then mess around with the blending mode to see how it looks -- in this case I went with overlay, but soft light and hard light are usually good ones too, it really depends on the texture:
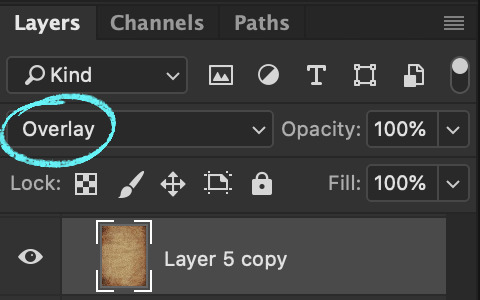

then with a bunch of messing around with opacity/colors/saturation/levels/adding in a bit more texture until I like how it looks:

et voilà, texture! (waves hands)
#art#how do art#twisted wonderland#it's a general tutorial i guess but just cause it's grim#usually i end up using a couple different papers on top of each other with bits masked out/levels super messed with and the like#it is super fun to just mess around with and throw things on and see how they look!#but it is also very easy to waaaay overdo so uhhhh exercise caution i guess. less is often more and all#once you start layering textures on there it's just difficult to stop#dangit art stop being so fun#(this also tends to screw with your colors and values a lot so always check and adjust as you go!)#(if you don't want any color influence at all you can just turn the saturation of the paper layer all the way down so it's pure grayscale)
418 notes
·
View notes
Text
hurlock emissary just cast fireball at me in the korcari wilds which i did not think they could do and i called it a son of a bitch out loud
108 notes
·
View notes
Text


❌❗️❌
❗️❓❗️
❌❗️❌
Level 0 redrooms stimboard!
REDROOMS YOOOOOOO also the middle image is from a roleplay on reddit about someone pretending to come across the redrooms, if you struggle with unreality, delusions, or paranoia i suggest that you dont visit the middle link! :3
Also this isn’t about redrooms creppypasta! >_<
Also i couldn’t put this in the tags cuz of limit so uhh eyestrain tw cw warning whatever REMEMBER TO TAKE BREAKS IF UR HAVING EYESTRAIN!!!!
#stimboard#stim#stimblr#stim blog#backrooms#the backrooms#level 0#tutorial level#redrooms#red rooms#unreality#unreality tw#unreality cw#unreality warning#horror#horror tw#horror cw#horror warning#liminal#liminal tw#liminal cw#liminal warning#blood#blood tw#blood cw#blood warning#gore#gore tw#gore cw#gore warning
2 notes
·
View notes
Text
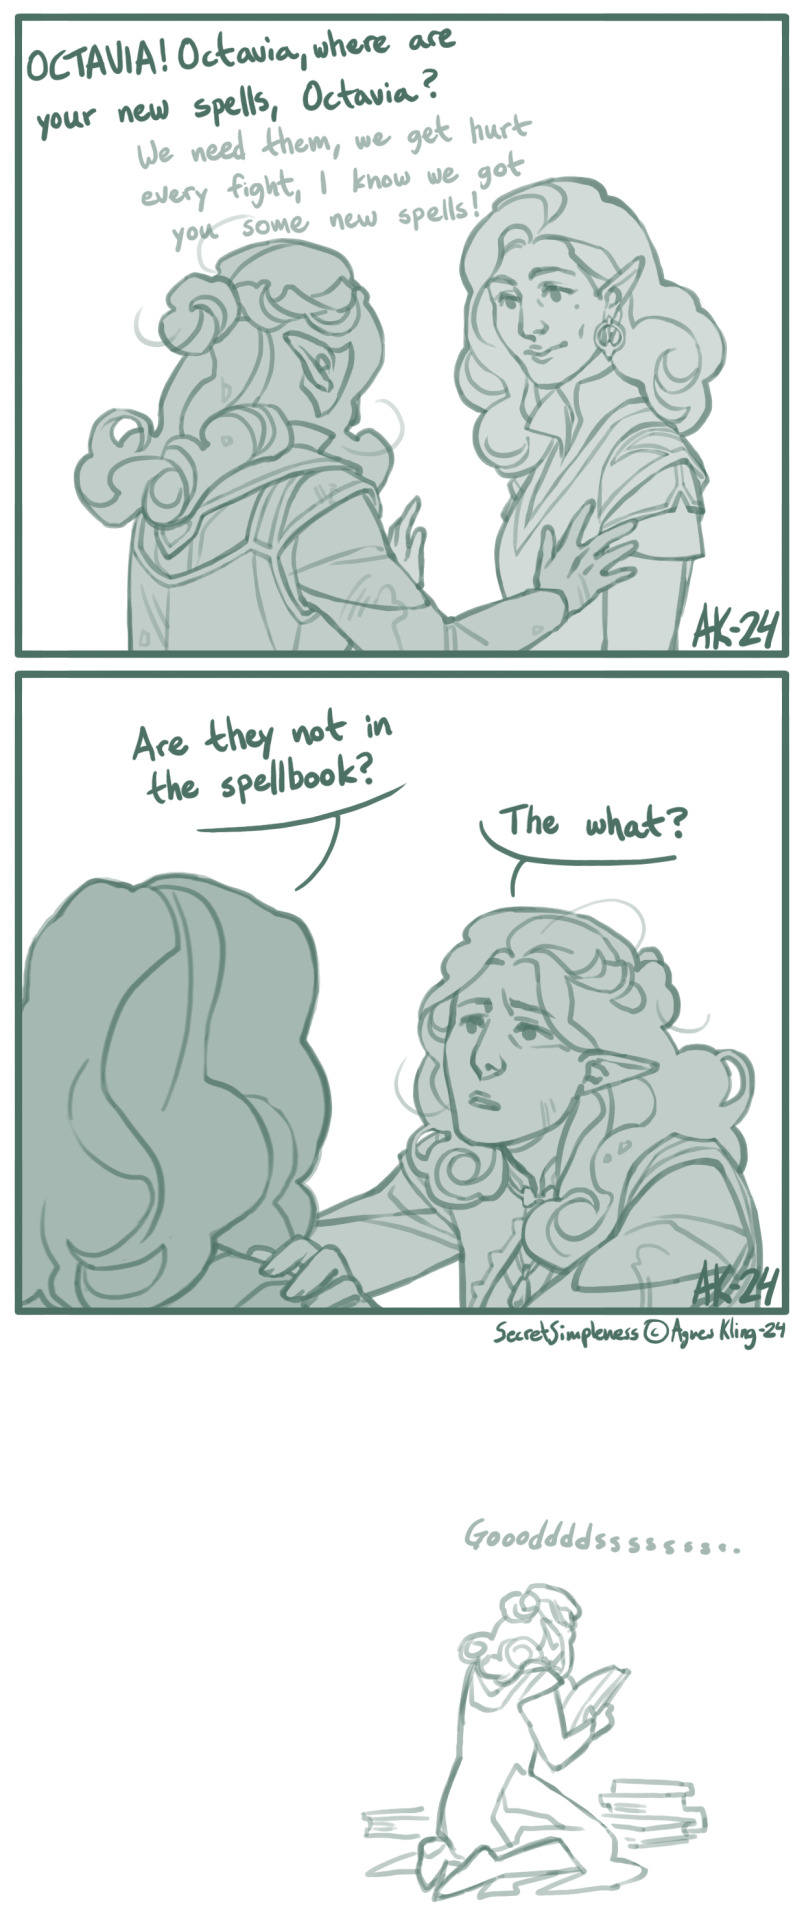
I figured this out somewhere along the second-to-last act. Octavia, the Baroness / Pathfinder Kingmaker (c) Owlcat Games
#pfkm#pfkm baroness#octavia#comic#pathfinder kingmaker fanart#pathfinder kingmaker#owlcat games#oc ailcha#spellbook#game mechanics#I tend to re-read tutorial messages for all sorts of things but this one apparently passed me right by. whoosh. gone.#“this class needs to prepare their spells” what like at camp or? and then I just forgot and was a tad annoyed after each level up.#almost all of the companions only had their level 1 and basic stuff. for most of the game. great. it was a great experience.
225 notes
·
View notes
Text
ROCKY PLANETS
rockycule real I hate the designs but oh well????

#solarballs#solarballs mercury#solarballs venus#solarballs mars#solarballs earth#solarballs fanart#Tumblr gotta have a tutorial level I can’t do this#Why does earth look like that#Humanized
134 notes
·
View notes
Text

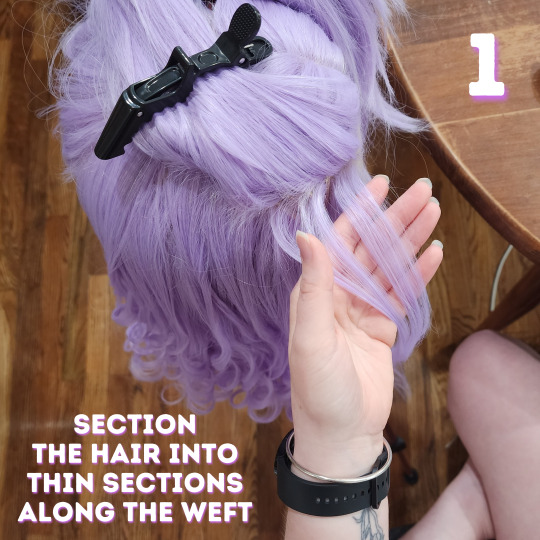


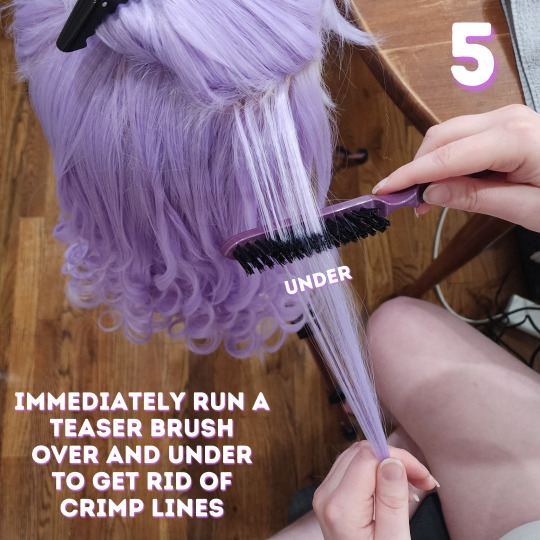


Here is our complete guide to curling a heat safe wig!
We specifically figured out this method worked best when styling this wig for my level 3 Imogen Temult cosplay. She's from campaign 3 of Critical Role. There are many other methods to curl wigs, but this is the one that got the best hold and our desired look on this particular wig! Of course, then I decided to cosplay Imogen at level 13 first and her hair is totally different so this wig is going in storage but at least we got to make a useful tutorial first.
We already have a video version of this tutorial up on our Tiktok and Youtube that we will move over to Tumblr, but honestly I struggle The Most with learning from video tutorials. I prefer things written out so we wanted to make this sort of tutorial as well for accessibility!
Additional tips & all of the products we use are under the cut. Feel free to shoot us a message if you have any questions or want more tutorials on wigs!
What We Use:
Wig: Pastel Purple Wavy Lace Front Synthetic Wig LF5110 from Wig Is Fashion. It technically comes with a curl but we straightened and recurled it differently. Whatever wig you get, just make sure you check that it's heat safe before attempting this!
Silicone Spray: Mane 'n Tail Detangler. Yes, this is technically for horses, but listen, it works SO WELL on synthetic wigs. It keeps it from getting all static-y and tangled. We've only ever used this brand but it works really well so we're def sticking with it.
Setting Spray: Schwarzkopf Got2b Glued Blasting Freeze Spray. This makes sure the curls you spent hours making actually hold!
Crimper: SixRiver Ceramic Waver Hair Tool with 4-in-1 Flat Crimping Iron Plates. This comes with four ceramic crimping plates and Nic uses the one with the "most wiggles" on the lowest setting (320). You can probably use any crimper that goes low enough. Crimp it fast, you aren't holding it like with curls.
Curling Iron: Conair 1 Inch Curling Iron. We use this on "19", whatever that means because it doesn't actually have temperatures. Any curling iron with low enough heat settings will do, you might need to play with settings to make sure you don't melt the hair. Test it on the bottom of the lowest layer of hair where you could cut it off if you melt it. As with curls on human hair, different barrel widths will give you wildly different curl looks.
Teaser Brush & Large Tooth Comb: Honestly these probably came with one of our first hair cutting or wig styling kits so ��\_(ツ)_/¯ Apparently the teaser brush is Revlon branded.
We aren't sponsored by anyone, this is just what we use! Feel free to substitute in anything that you have / know works well with wigs. We hope this helps! Please let us know what other cosplay or crafting tutorials you'd like to see <3
#wigs#wig styling#cosplay#cosplay wigs#critical role#imogen temult#imogen temult cosplay#bells hells#cr3#imogen temult cosplay level 3#nic crafts#work in progress#crafting#craftblr#cosplay wip#buy list#crafting guide#tutorial#how to#cosplay guide#cosplayer#wig#polycraftory
72 notes
·
View notes
Text
I've always found it quite funny that Milla's level in PN1 tutorialises hazards like spikes and electricity, and then you proceed to encounter zero spikes or electricity the entire rest of the game
#it's just an important part of a young person's education i suppose#i do think it's interesting on a meta level#it's an element that /seems/ like a tutorial. but actually it's establishing Raz's problems with water#or maybe they were going to put more spikes in the game and just never got round to it. who can say#(but there /are/ electricity hazards in the sequel! all of Raz's training finally coming in clutch)
52 notes
·
View notes