#so i want to try and emulate that process and use it as a tool to add to my sketching skills
Explore tagged Tumblr posts
Text
Computer, how to avoid same-face syndrome when drawing siblings
#lynx thinks#its a struggle fr#especially when stylized =n=#good news though: the anime style im attempting to test out seems to be working!#ive been meaning to work on my visual shorthand so i can draw some things faster and i figured anime was a good step in that direction#well. more like manga really. some manga have these beautiful expressive lines that convey a form so simply#so i want to try and emulate that process and use it as a tool to add to my sketching skills#i can sketch in charcoal but i wanna be able to draw faster and rely less on clunky hatchy lines#if i can eventually accomplish the communication of a more complex object with a single line then I'll be satisfied
2 notes
·
View notes
Note
Dear Kooks, do you have some tips to play D&D alone or some solo RPG? I want to play it so bad, I have a lot of characters sheets ready because I’m so excited, but none of my friends are interested. If you know and could tell me is there some online platform to discover groups to play?
Thanks always!
Hello!
(First of all I need to start posting a bit more about solo rpgs and solo gaming in general cos I gathered some really cool materials and games over last months, so thank You for reminding me of that. Just need some more free time but it's coming, oh it's coming)
I don't have experience playing specifically DnD solo, but I know there are tools for it people recommend. The GeekGamers YouTube channel has TONS (and i say it both as an encouragement and as a warning, because it can be a bit overwhelming) of advice materials, also regarding soloing DnD and solo roleplaying in general. She also wrote a book on solo gaming called Solo Game Master's Guide which if I recall correctly has a chapter on DnD specifically as well. I know people are recommending Mythic Game Master Emulator as a good tool, but I haven't personally tried it yet.
What I can recommend tho is... Ironsworn (check the link, the pdf for the first main game is free). I have been playing it solo recently and I find it very fun and satisfying. It's a system based on Powered by the Apocalypse rules framework, so not that close to DnD rules, but if you are looking for a solo rp with some more rules structure I recommend taking a look at this game because it is designed specifically for solo playing (but it can be co-oped and GMed too). You can alter the world of the game freely (and the author encourages you to do that) or use the rules in existing setting, so you can adjust it to your liking (tho i do encourage you to try the setting offered by the book first, together with its world creation process: 1) it's very cool, 2) you will get a grip of the rules in their natural environment)
I found I need a couple of additional oracle tables aside of the ones the book has, but these you can pick up as you go according to your needs, there is plenty online, and a lot of free ones too. Other than that everything you need you have in the free book.
I also recommend taking a look at some actual play of an Ironsworn game (or other games, you can find some examples of actual solo plays on GeekGamers channel too) to get a bit of an idea how people think about running a solo session and how they build a story on their own, and perhaps taking something away from it for yourself. For Ironsworn specifically I super enjoy and highly recommend The Bad Spot podcast. It has several seasons of Ironsworn: Starforge game (Ironsworn's younger brother set in space, but the rules and the idea of how the game runs are basically the same) but also some loose talks about solo gaming in general.
OTHER THAN THAT: I encourage you to look around and see what the solo gaming scene has to offer. There is so many interesting games (some with more rules structure, but also journaling games, choose your own adventure-like games, solo hacks for existing systems, and more etc etc, a whole new world to discover really), it's worth checking regardless of having a group to play with or not. I will try to get back to posting more actively on these topics, cos there is a lot of stuff I would love to share, so fingers crossed I won't get distracted lol.
Cheers!
#my apologies for not addressing the finding a group question#my dnd groups usually formed from existing groups#so im not sure where to look#but best of luck on this field too!#kooks talks#solo rpg#ironsworn
196 notes
·
View notes
Text
Some art-advice asks I've been meaning to reply to!

I use Clip Studio Paint Pro, though I'm not sure what tips I could give just in general. Just experiment with new things often, draw as much as your lifestyle allows, watch how other people do their work but try to avoid "Dont do THIS thing ever" type lessons and tutorials. Use as much reference as you'd like and take your time! To this day a simple sketch can still take me several hours to do depending on what it is.

Thank you so much!!! I didn't do any kind of formal art schooling but I've always been inclined towards arts and crafts, and started taking drawing semi seriously when I was about 17 (I'm 27 now). I draw a lot of inspiration from western comics and my favorite artists are jason shawn alexander and sean murphy.
Oh I'm so flattered to hear my stuff's inspired you to take up drawing again, I have a bunch of little crafty hobbies but art is by far the most fulfilling one to me - largely because you're constantly learning and improving.
You're definitely onto something already, I am constantly looking at other people's art (even If it isn't a style I would want to emulate) and analyzing how the pieces come together to create the final product. In my opinion this is pretty much the best way you can go about learning besides real-life reference drawing. You can even take something into your software of choice/print it out and trace it (just to yourself, of course) to get a sense of hand-motion and line use.
As a beginner I think there's no shame at all in taking heavy inspiration from your favorite artists, as long as you aren't straight up copying things and calling them your own. Your personal style Is likely to come out naturally, with time. That's very much how I started myself!
Also, just be patient with yourself, try to have realistic goals for your skill level while simultaneously being proud of everything you do. Even if you absolutely despise a drawing, you still drew something! And even if it doesn't feel that way you most definitely learned from it. Use learning tools and tutorials to whatever point you feel comfortable with but don't get stuck on people's arbitrary rules - unless we're talking about something tangible like real-life application of traditional art tools, things like anatomy, perspective and light are to be referenced from - but It's not the goal to emulate them 100% unless you ARE going for hyperrealism. As someone who uses a ton of reference these days, I can tell you first-hand that I often find myself straying from it on purpose to make a piece look more interesting.
Lastly, draw things you enjoy! Don't let anyone else dictate what you SHOULD be doing and don't fall into the trappings of wanting to stick to one specific style, process, or subject matter.
Good luck!!!

LOL thank you so much for your very evocative compliments! I haven't ever done a timelapse, not that I remember at least. I'm not sure how they work but I do so much of "I'm gonna try this thing 5 different ways and then decide what I like" that I'm not sure how comprehensive that would be LOL
I could put together a process showcase or something though, I feel like that might be better even, since I get to explain a little of what I'm doing through text and display how I use reference. Something to consider!
60 notes
·
View notes
Text
Bookbinding Process (1/2): The Wolf Queen, from The Elder Scrolls V: Skyrim
I have a very exciting comission— I’m binding The Wolf Queen, an in-game novel from The Elder Scrolls V: Skyrim. I’ve never played the game, but my client told me they enjoy collecting and reading the books in the game. According to the Elder Scrolls wiki, there are apparently 820 of them! I’m binding the one of the longer stories, which is actually broken up into 8 volumes.
In researching, it seems that the volumes seem to take on completely different binding styles, but we agreed on the style shown here. We also decided to condense these volumes into 1 book— the entire story is only about 12k words, and while the handwritten large text works well for reading the story on a small in-game window on your monitor, it’s not really practical for a physical book. That, and even if I were to print these true to size for the game, each volume would still be about 40 pages, which only equates to 10 sheets of folded paper, so it wouldn’t make for a very robust collection on the shelf.
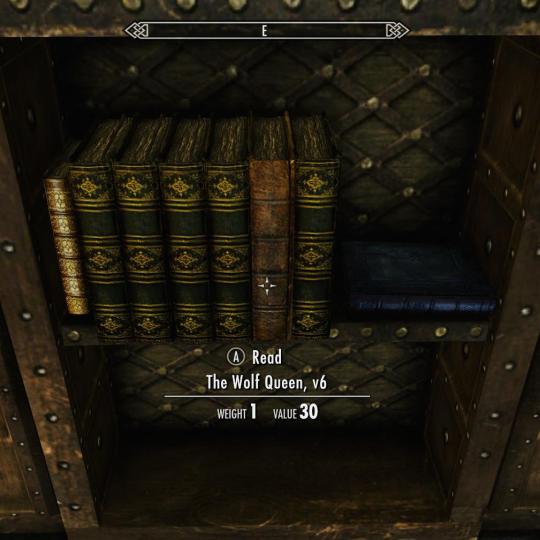

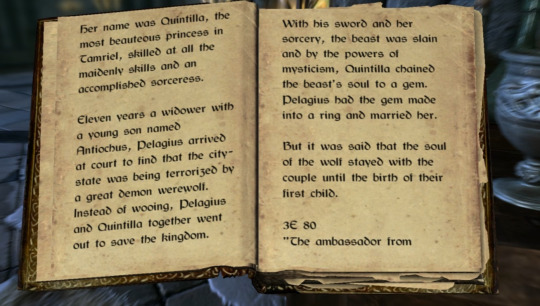
You can see that these books in this game are actually quite weathered, and it seems like all the paper is unevenly torn. If we were to equate Skyrim’s time period with our own based on technology, it’s likely these pages would have been parchment. The in-game textures definitely support this, even for the bindings that seem to be a few centuries ahead of their time.
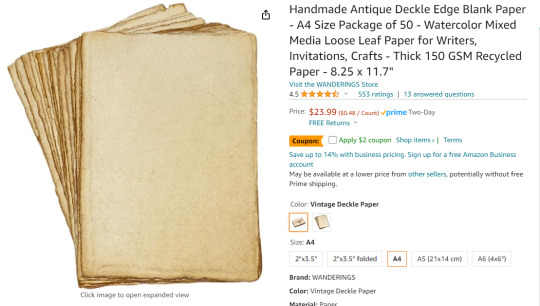
We agreed that antiqued cotton paper would be a suitable alternative, as enough parchment for this project would run a couple thousand dollars as-is, and I don’t believe I have the equipment necessary to print on it. I needed something with a quick turnaround for this project, so I went with this paper in the ‘Vintage Deckle’ finish in the A4 size. According to one review, it’s also short-grained, so it’s actually ideal for bookbinding.
Typesetting
I’m using Adobe InDesign to typeset this, but it can also be done with Word and other alternatives.
Here’s a guide by ArmoredSuperHeavy on tumblr.

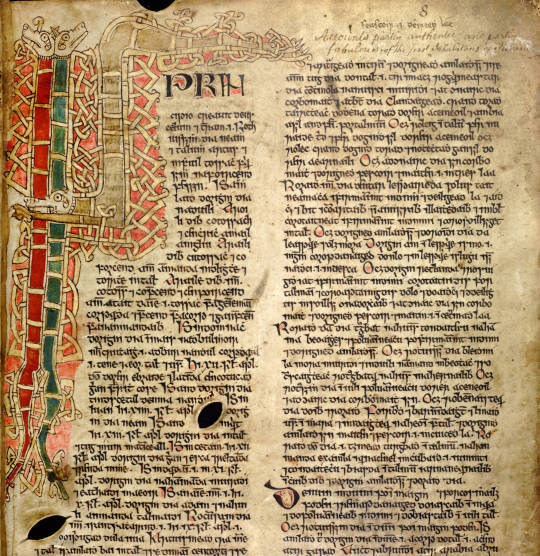
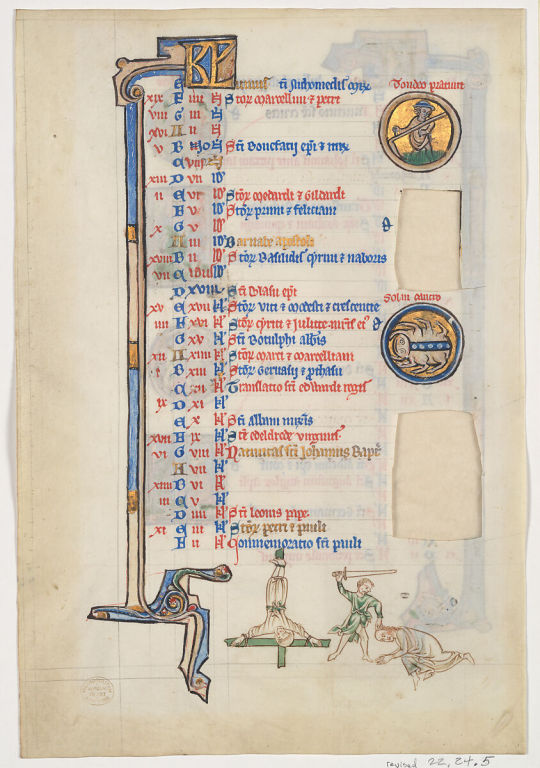
I think Bethesda owns the font used in the Elder Scrolls games, but there is a dupe of it on dafont.com called Cyrodiil. However, it definitely feels and reads more as a modern font; it was designed with readability after all. I’m definitely going for something that feels like a Celtic manuscript, based both on the decorative Celtic knot tooling, and the Gaelic look of the font. I eventually found Kelmscott, which carries the same Gaelic characteristics as Cyrodiil, and is still relatively easy to read, but feels more calligraphic.


I also downloaded Medieval Victoriana for the decorative first letters of each chapter.

To typeset the text, I followed a tutorial article by Grace Fussell and Adobe’s guide for creating book files.
I wanted the text to look dense and almost glyphic, as many old medieval manuscripts do, while still being easy enough to read. I played around with the paragraph tools and eventually settled on this layout. While certainly not all manuscripts have multiple columns, I want this typesetting to really break the boundaries seen in most modern prints of books, so I decided on this two-column format. Some manuscripts keep the text frame smaller and in the center of the page, much like you see in later centuries when the printing area was restricted by a press, but once again, I want to emphasize the look of ‘handwritten’ manuscript, so I made sure to use wide margins.
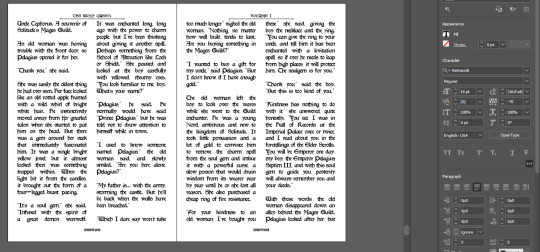
Some other fun details I added were glyphs at the beginning of each chapter, and surrounding the page numbers.
I exported the file for print with InDesign’s ‘Print Booklet’ feature, with the 2-up perfect bound with a signature size of 8 (2 pieces of paper/4 spreads/8 text pages).
Text Block
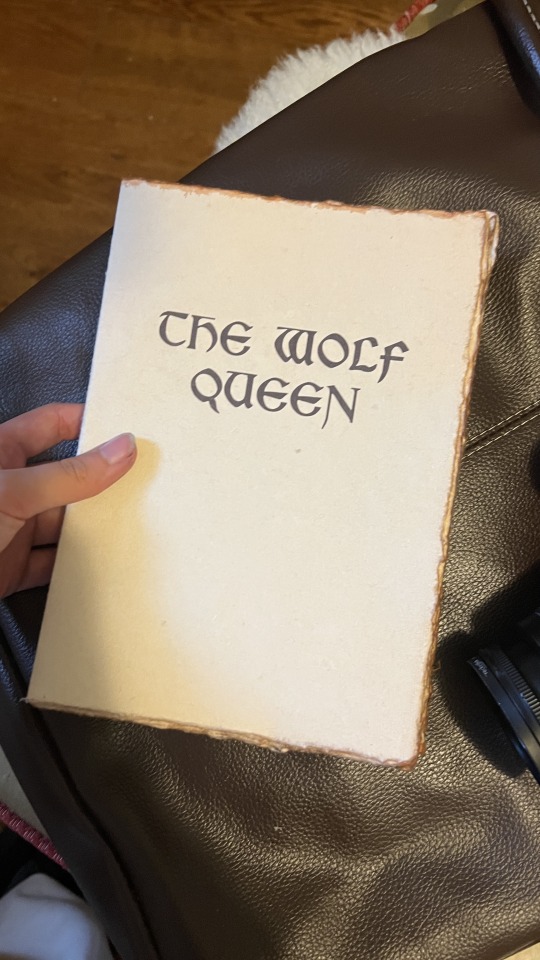
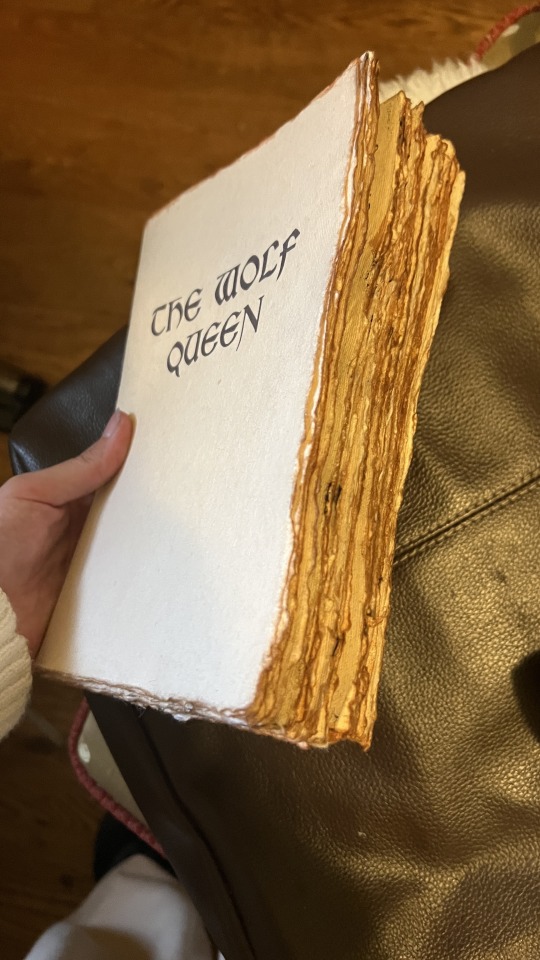
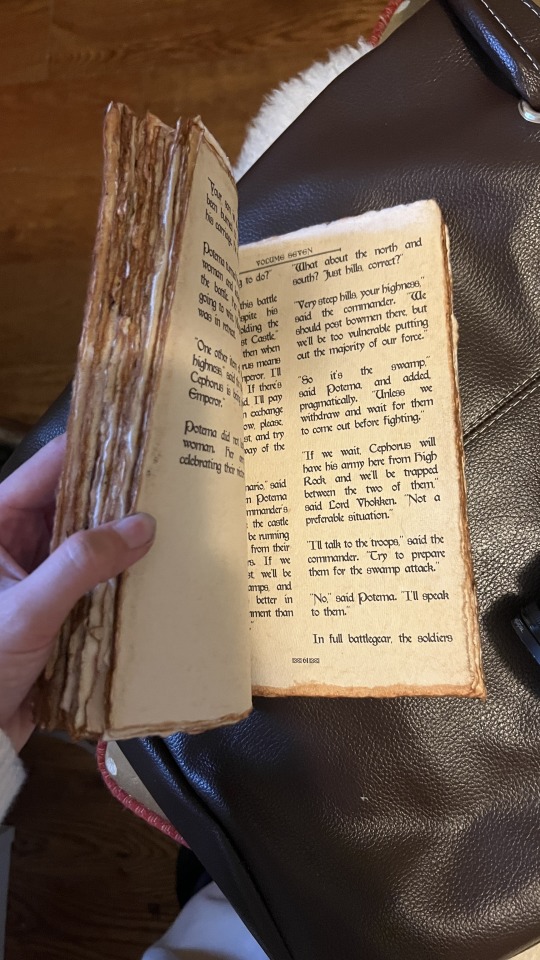
Here’s the printed and folded signatures! I’m really pleased with how these came out— it has the exact weathered look I was trying to emulate from in-game. As an added bonus, since the source material wasn’t particularly long, the thickness of the paper (150gsm) gave the text block a good amount of volume.
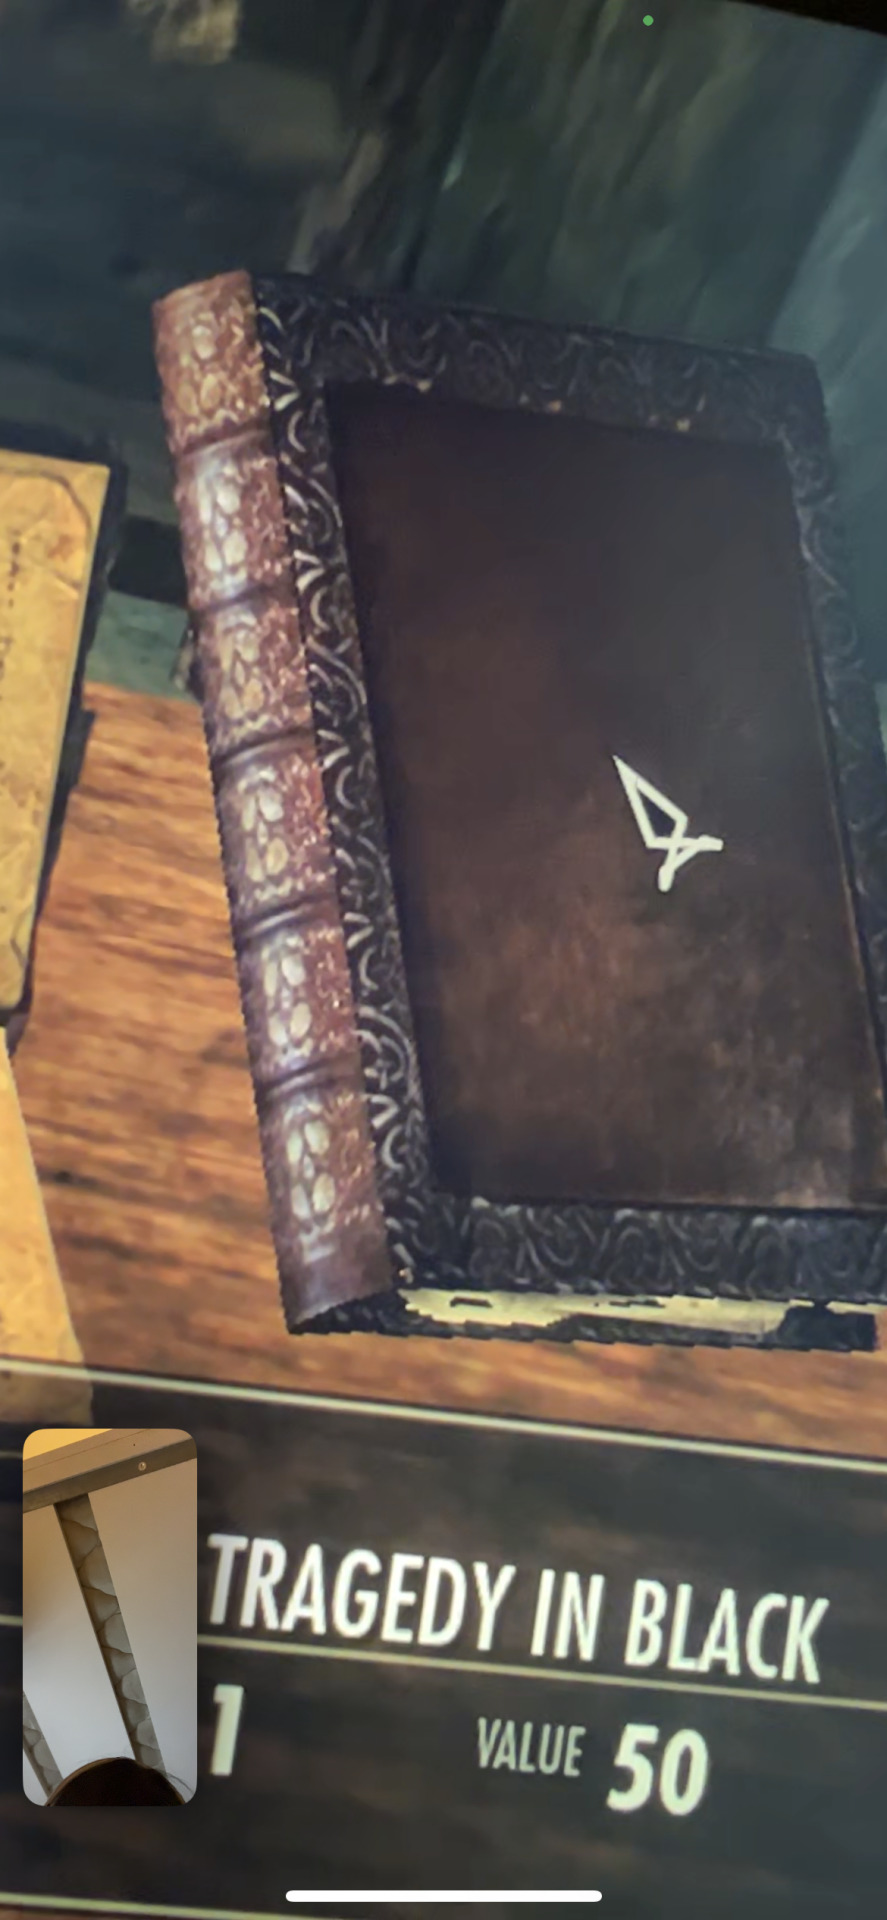

Out of lack of good online reference, my client ended up sending me photos of the book in-game. I was excited to realize this book seems to be bound on cords or leather straps— kind of difficult to tell from the model. We decided to go with a slit leather strap.

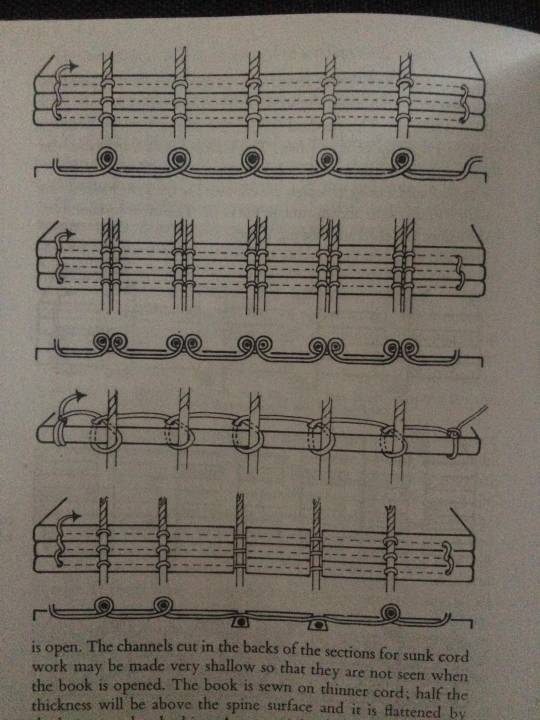
I couldn’t find a great reference image of the stitch for this, but I used the same technique of punching and sewing my signatures as this double cord instructional from The Thames and Hudson Manual of Book Binding.


Endpaper
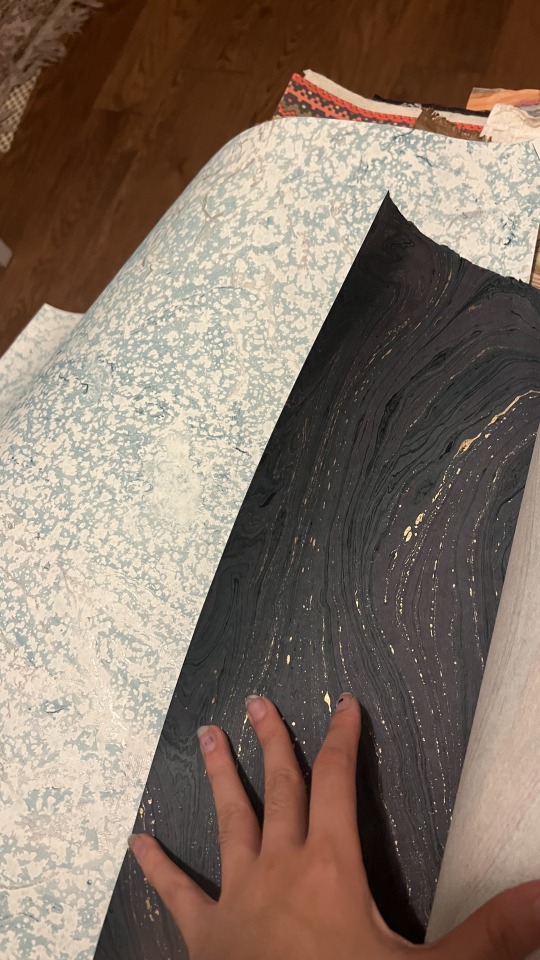
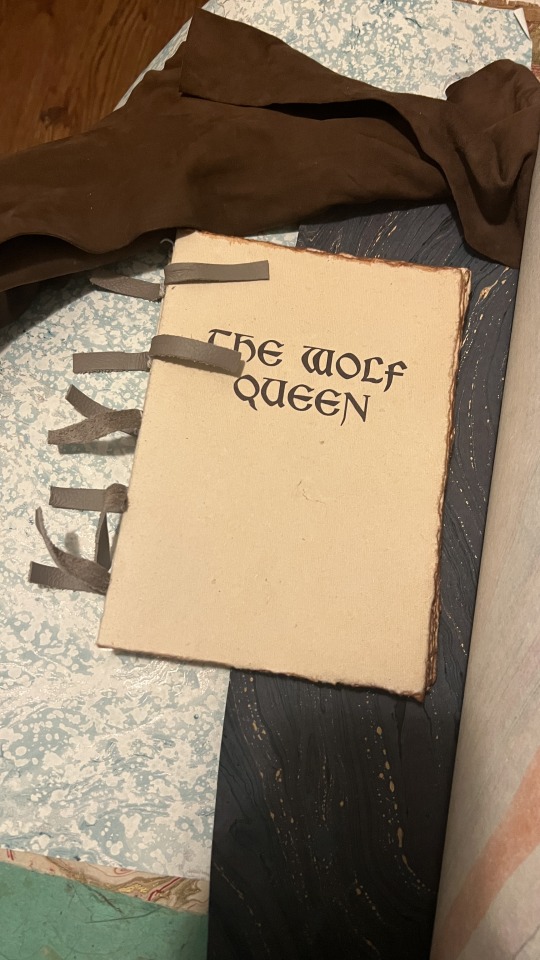
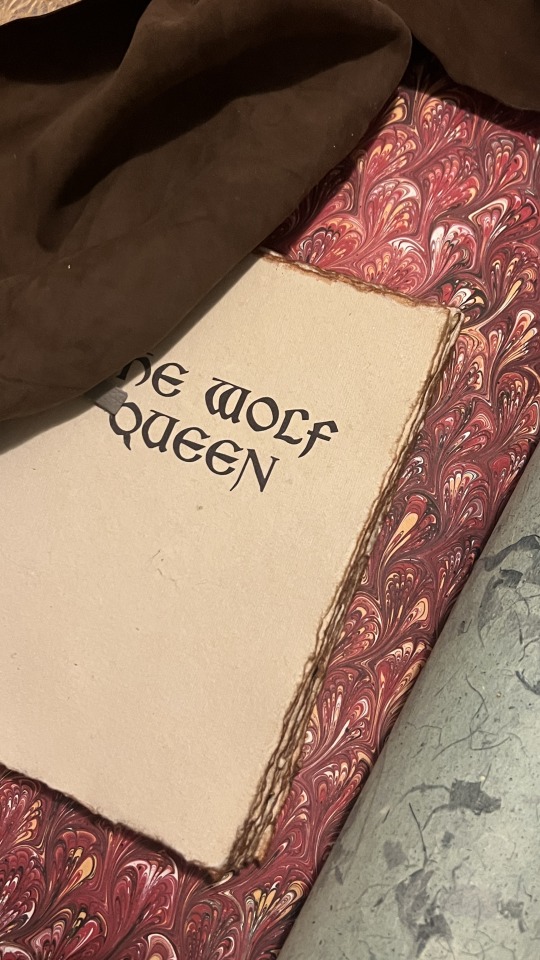
I definitely wanted to go for a more traditional endpaper, so I looked at what I had in my stash of marbled paper. I was initially drawn to this Renato Crepaldi peackock marble I got from Hollander’s, which has a beautiful red that screams “medieval” to me, but Skyrim is a cold place, so I was also drawn to go for this blizzard-esque marble. Though, I ultimately decided on this dark blue/indigo paper I got from the Paper Source.
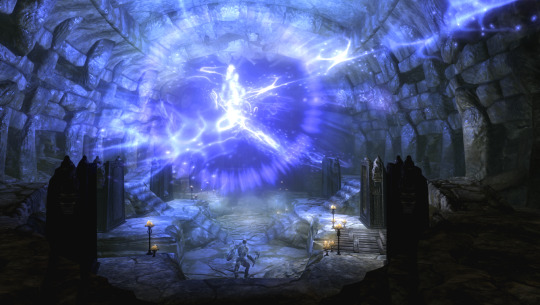

I went for the indigo because the protagonist of this novel I’m binding, Potema Septim, the Wolf Queen herself, is associated with the color purple. Since the goal of this binding was to recreate an in-game item as it would be in-game, a bookbinder in Skyrim would also most likely want to make design choices reflecting the contents of this specific book. Or maybe they’d be illiterate and just go for the red. Either way, my client also liked the dark indigo, so that’s what we went with.
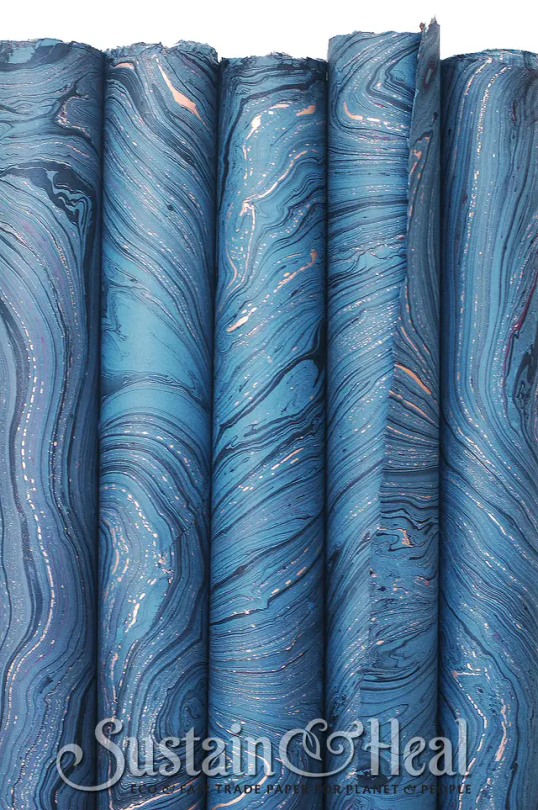
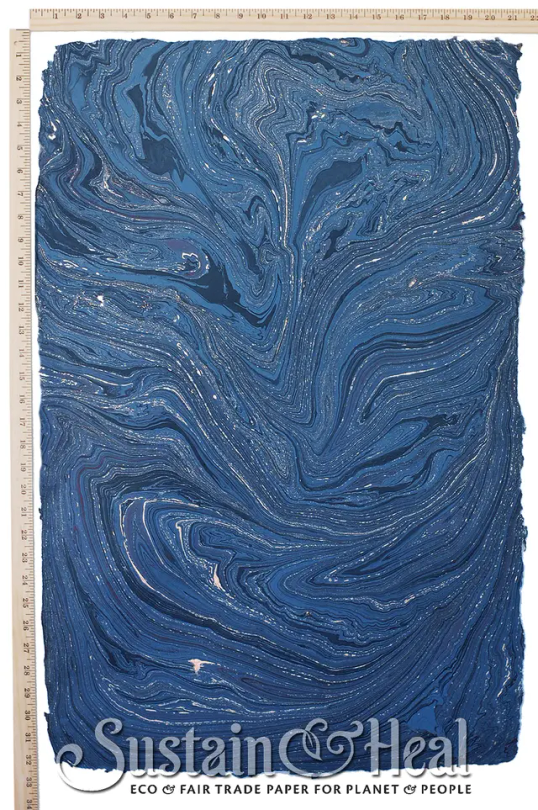
This endpaper is the cover weight of De Milo Design’s line of paper called Sustain & Heal. It’s fair trade, handmade in Bangladesh, from jute fibers.
It also has deckled edges, so I made sure to align my cuts to use that, and I tore the rest by hand to keep the natural edges consistent. This is a bit of an unconventional aesthetic choice, but it stemmed from that it’d be odd if the fly leafs were straight cut with the rest of the text block so extremely deckled.
Headbands
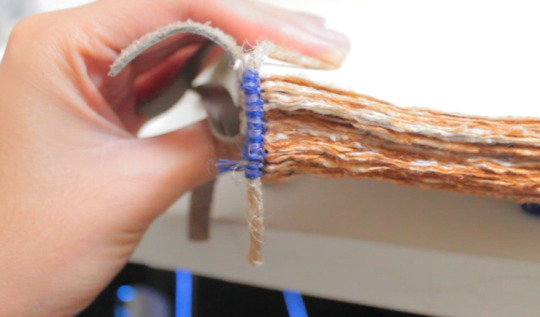

Keeping with the purple/indigo/blue theme, I made two-colored headbands around jute cord with DCM embroidery floss in colors 31 and 796. I basically used the technique outlined here. In retrospect though I’d recommend doing a big double endband or something bulky with this paper, since the deckled edges tend to push the endband back towards the spine and hide it.
Please continue reading here!
Process: Part 1 | Part 2 | Final Result
22 notes
·
View notes
Note
Hey friend! So I’ve been listening to a bunch of your Royai podfics lately and I just love them. Its the best way to get my fic fix while also being a productive adult lol. I’m blown away with how professional and polished your stuff is! You definitely could be recording full blown audiobooks, if you aren’t already! (And if you are, I’d love to know where to find those!)
I’m intrigued by your whole process: how you pick stories, record, edit, etc. Choosing when and where to use tone inflection, pacing, all that. You can fully nerd out if you feel like it! I’m so curious. ☺️❤️
Ahhhh what a wonderful message to find in my inbox!! 🥰🥰🥰 I'm so happy that my podfics have become something that you listen to in your daily routine! I don't record audiobooks or do this in any kind of a professional sense, but I do try to emulate what I love of different audiobooks/professional productions and other peoples' podfics, so your compliment means the world to me!
I started with a very stream-of-consciousness response and have tried to cohere it into something readable. You said I could fully nerd out, so here's over 2k of me taking you up on that xD
Choosing a fic:
I tend to gravitate towards fics that have more narration as opposed to dialogue. I love being in a character's head and fully living in their world and the way they experience it. When I am reading dialogue, I don't try to sound exactly like the voice actor (if it's from a tv show or movie) or adopt their accent, but I do try to embody the character in my voice, if that makes sense. If there are too many characters with dialogue, this gets difficult for me, which is why many of my solo podfics have two or fewer characters who speak, or why I create multivoice podfics with fellow podficcers.
In my podfic spreadsheet, there are several pages dedicated to fics that I'd like to record someday. Most of them are under 1k, though I do have a few that are around 3k (which would be on the longer side for me). I jot notes to remember what each fic is/what I would like to do with it—some examples of what those sound like with fics I haven't recorded yet: Zuko asks how Iroh survived when Lu Ten died because of Izumi feels; Al reflecting on Royai rebuilding Isvhal, no dialogue; Roy takes Riza out on a date (cover art would be a theatre program); good angsty Edwin moment after the boys come home (could have thunder in background); Ghost!Roy as Riza carried on, will need to build to this level of angst; Abbott Elementary book fair *chef's kiss*; Roy announces he’s engaged to some mystery woman but PSYCHE HE’S ALREADY MARRIED TO RIZA.
I used to have a pretty even split of recording fics with blanket permission versus asking authors for permission, but these days, I tend to be too lazy to ask lol. Not saying that I won't do it, but when the mood strikes me to record, I need to know pretty quickly if I can complete the project, and a bp statement really helps with that!
Prep work:
When I first began podficcing, I would put the entire fic into a google doc. This let me annotate the script for every little thing (highlighting dialogue, typing out phonetic pronunciations of difficult names/words, and putting spaces in between sections of text to help with breath control being the most common). The more I podficced, the less I had to annotate, until all I would do with my scripts was put in the spaces. I want my breath to be consistent/unnoticeable, so I read with that in mind. Often you can use the punctuation as your guide, but sometimes there are long stretches with no punctuation, and I have to figure out how a sentence should be cut up to make its meaning clear.
I didn't make these scripts for any of my solo podfics during Voiceteam this past May, and I still felt comfortable recording, so I think I may be past needing this tool for the most part. I just need to read through the fic a few times and look up any potential pronunciation issues right before I record.
Recording the podfic:
My early podfics were recorded with the microphone attached to my earbuds, and you can definitely hear it in the quality 🙈🙉 I did at least use a makeshift pop filter, so that helped with my plosives from the beginning.
After a few months, I got a blue snowball mic, which makes the quality so much clearer, and even more so once I got a computer that can run Audacity (more on why I love this program later).
I currently record in my closet, which is a long wide shape, so the doors don't close all the way when I'm inside of it. I shut them as best as I can to prevent outside noises, and I stand as I record. I used to sit at my desk with a soundproofing box around my mic, but I found it hard to get good breaths for long periods of time, so now I stand. The tradeoff is that I have to be wearing good shoes if I'm recording more than thirty-ish minutes (which could happen if the podfic is ultimately longer than twelve or so minutes because…)
My raw audio is usually at least twice as long as the final product. I often record several takes for lines, sometimes if I mess up, but usually if I don't think I captured the emotional quality that I can hear in my head when I read the line with my eyes. Sometimes it takes up to ten times for a line to feel right; other times, an early take ends up being the best one.
The previous point touches on how I handle putting inflection into my voice. The other part of it is thinking through how the speaker would say a particular word/phrase. If it's narration, I've emotionally been with that speaker for the entire fic, so I lean into that; if it's dialogue, it might be someone new, so I have to switch my brain. Either way, I have to (consciously or unconsciously) think through: 1. how would I personally say this? 2. how would the character say this? 3. how would the audience want to hear this? 4. how would the meaning be most effectively heard? Often there is overlap in these questions, but not always. If there's a conflict between these, I try to remember that my audience is probably just listening with their ears, not simultaneously reading with their eyes, so I need to prioritize their being able to understand what is happening and why. That's why I try to affect my voice in different ways and not literally mumble or shout, even if the fic has the character doing that.
Since you mentioned my Royai podfics, I will mention one way I distinguish their voices depending on who the narrator is. When Roy is the narrator, any of his dialogue is in my normal voice, and Riza's dialogue becomes slightly higher and slower; when Riza is the narrator, her dialogue is in my normal voice, and Roy's dialogue becomes slightly lower and faster.
I put a lot of pressure on myself to nail the first and especially the last line of a fic, so I will record a good number of takes for those. It's only happened once that I loved the first take I did of a final line. Sometimes I annoy myself at how many takes I record, but I'm thankful for the choices when I'm editing, so this is simply how I do things!
The hardest part of recording for me is keeping my voice quality consistent. I drink a lot of water throughout the day, but even so, I get dry mouth as I record, and once you're at that point, drinking more water doesn't really help. Tricks like chewing gum or brushing my teeth right before recording help me out.
Editing the podfic:
This has actually become my favorite part of the process! It feels like a puzzle and a treasure hunt, trying to find the best ways to pick out the best parts of my performance and turn it into a final product.
When I started podficcing, I had a chromebook, so the only audio editing software available was free online websites. I don't even remember the ones I used, but they did most of the things I wanted, and they let me get my foot in the door. The problem was that they were limited in tools, such as…
Noise reduction is my favorite feature of Audacity, which is the software I currently use. If you go back and listen to my podfics chronologically, you can clearly tell when I started using it because the general crackle in the background disappears. I have no plans to delete old pods, but it is as painful for me to listen to them for this reason as it is to reread fics I wrote in high school lol
The first round of edits is picking out the best takes for each line. Sometimes that means listening to several takes over and over before I choose my favorite; occasionally, I splice together the first half of one take and the second half of another. I'm very proud when I can do this with a single word and you can't tell the difference at all. I laugh when it sounds like I've done this with a word, but actually I just read it weird and I have no other take to substitute it with xD
Something else I do in the first edits is take out excessive space between sentences and paragraphs. I basically reset my breath/voice after every segment (could be a sentence or part of a sentence) so there's always extra space. I tend to edit down to one to two seconds between sentences, two to three seconds between paragraphs, and four to five seconds between entire sections of a fic. Of course, there are always exceptions (a character feeling very emotional, especially angry or excited, will have faster sentences; dialogue is formatted in paragraphs but it is inflection rather than time that indicates to the audience that a new paragraph/speaker has begun; an emotional line might require more space to let the audience process it).
Once I have all of the words edited together, I will do a second round of edits for tightening up the pacing. I listen to the edit without looking at the text, keeping my hands busy with a video game or coloring. As I'm listening, if something feels too fast or too slow, I'll make edits in real time, back it up, and listen again. The reason I can't read and listen during this pass is because my eyes are expecting too much and I can't properly hear what the audience will hear. When I began podficcing, I thought I had enough space in between words and sentences, but when I would listen back, I realized that I had cut too much out and the podfic's speed was faster than I liked. Now I leave more space in during the first edit and do this pacing pass.
Once I'm happy with the narration, I save it as a narration only file. I love adding in music and effects when I can, but I'm sure there are some who would rather only listen to the narration, so I make this available for accessibility and preference reasons.
I will usually make a final version with music and/or sound effects. This is one area where I'm specifically trying to emulate professional audiobooks and how they use music under the opening credits before fading out as the story begins.
Finding music is its own kind of scavenger hunt. I prefer to use public domain or creative commons music because it feels more true to the collaborative/transformative spirit that podfics have for me, and the idea of a podfic being taken down for copyright reasons does make me nervous. ccmixter and Purple Planet have a lot of songs that I've used in the past. The former has literally thousands of songs, which can overwhelm me if I'm working on a deadline, so I will sometimes just listen to random tracks and download anything that might be helpful in the future. That being said, if a fic uses a song lyric as a title or the author mentions a song as inspiration, I will try to use that song as the music if possible. I'm especially proud of how I used "Wait for It" at the end of An Endless Uphill Climb.
I use sound effects far less frequently than music, but they are fun when there is a natural place for them. I love the Star Wars audiobooks, and they often use sound effects and music in a way that heightens the emotions in the listener. That is always my guiding star, though I will admit to sometimes using effects just because they make me happy!
Cover art:
Like music/sound effects, this part is totally optional, but I usually do it because I have a lot of fun with it! I make everything in Canva, and again, I try to use public domain or creative commons images. Openverse is my go-to search engine because they make it really easy to tell which images I'm allowed to use in what ways. Sometimes I have a vision and try to find images to match; other times I have no idea and just see what I can find, or I can't find what I had in mind and have to switch gears.
Random facts that I couldn't find a spot for:
I learned how to read for an audience by being a lector at mass (reading either something from the Old Testament or something from the New Testament, other than the Gospels) in a church with lots of marble, which explains why I read on the slow side. Had to leave room for the echo before I started speaking the next line!
I've actually found that my own fic writing became easier to read aloud once I started podficcing. That doesn't make it better or worse—there are beautiful passages in literature/fic that are easier to read with the eyes than with the ears. But it is definitely a thing.
.
Thank you again for sending this ask! I hope this peek behind the curtain was interesting to you, even if it was probably far more than you were asking for xD And another thank you for listening to my podfics—it really does mean so much to me that something I've made can brighten up your day 💖
18 notes
·
View notes
Note
hiii ❣ it's a bit random but do you have any advice for a beginner writer?
i want to write web series and while i'm going to write for my pleasure, i still would love my work to be good enough to have readers.
but while i read stuff and write fics, i don't think it's enough to help me write an original several episode work. + i want to write in english but i'm not a native english speaker.
do you have a textbook or any resource in mind that you'd reccomend to a beginner writer?
Unfortunately, I don't have one single one-size-fits-all resource or silver-bullet magical writing improvement tool that I can recommend, as everyone learns/practices in different ways and some people swear by things that don't work for other people. I can't speak to the value of Grammarly or any other online tool that promises to make you a better writer, as they can often be used to feed your work into AI, make bizarre and/or flatly incorrect suggestions, or otherwise be confusing and unhelpful for a newbie writer, especially someone whose first language isn't English. If you work better within an interactive framework or just want to see if it does seem useful, then by all means do check it out, but don't feel like you HAVE to use it (or anything else) if it doesn't offer much to your process.
As ever, and unhelpfully, my advice for becoming a better writer is to write a lot and read a lot, in all kinds of genres. There's really no get-good-at-writing-quick hack to suddenly get you where you want to be overnight, but you CAN get there by dint of steady and sustained progress. You say that you already read things and write fics -- which is great! You clearly already have some practice with the overall concept, and you are not starting from total scratch. While a lot of writers have a goal of something they really want to do (i.e. in your case, write a web series) and feel like the first one they write has to be The Real and Good One that they only launch into after appropriate years of practice, that's not the case. You can start writing the series now, if you want to. You'll have to also share it with people who you trust to give you helpful and honest feedback (the mortifying ordeal of being known, etc) while also respecting the skill level that you're currently at and not tearing it down for being up to professional standards or something else that doesn't accurately reflect where you are and what you need feedback on. But yes, you will have to write steadily, share your writing with others, and challenge yourself to read and write in different kinds of texts -- i.e. not just fic or amateur fan content, but literature, nonfiction, genre fiction, academia, special interest subjects, and so forth. Writing by professionally published authors is not necessarily always better, but it does give you a sense as to what is deemed marketable, what the general skill level and standard is, and what you might like to emulate or try to do with your own projects.
Also, as a side note, I think that plenty of amateur or fan-written content on the internet is not necessarily outstandingly good, technically speaking. This doesn't mean it's bad -- plenty of people read and enjoy it anyway, and aren't coming in expecting it to be an award-winning piece of fine literature. Standards for what is good, enjoyable, or well-written vary dramatically by genre, medium, what your audience is expecting and/or paying for, and so forth. Some people also have high and/or picky standards for what they will read or what they find enjoyable to read, while others will just go along with the story and don't care as much about the format or technical prowess or so forth. So it is very much a subjective measurement, and if you get to a place where you enjoy reading your own stuff and find it engaging -- regardless of what arbitrary skill level you feel yourself to be on -- chances are that other people will too.
16 notes
·
View notes
Text
What to do when you keep having bad art days?
Regarding a comment on this post
First of all, it's normal to have a few bad art days every few weeks, but I don't want to give you a "just deal with it" answer, so here are some things you can consider or do that might help. @stardestroyer81
First a few questions you can ask yourself:
Have you had a lot of stress lately? Art is a way to relax, but if you have a lot of stress, you might just not be in a mindset to calm down and relax, so your art turns out bad, because you are in a bad mindset while doing it. (I will propose solutions a bit later)
Do you take enough breaks while creating?
Are you getting back into art after a long break?
If so, do you expect yourself to be instantly as good as before the break, without warming up first?
Are you actively trying to learn something new?
Are you unsatisfied with your art style?
Are you using all the tools at your disposal?
Depending on your answers there are a few things you can do.
You can let off some steam, do some sports, play a video game, go outside for a walk, change the scenery and get new, less stressful input. Than get back to your art and do some warm up sketches. Set a timer for 1-2 Minutes for each drawing. They will turn out shitty, but they are just to loosen up your wrist. Start drawing after doing 10 really quick warm up sketches.
Breaks are super important. Make sure to stretch, drink enough water, eat enough and get enough sleep. I know it's standard advice, but it really makes a difference. You are not a robot. You can't concentrate without fuel and you can't concentrate for infinite amounts of time. I know, I will ruin my art, when I don't take a break every 90 Minutes, because that's when I start making mistakes.
After a long art break (what's long depends on the person, but for me going a week without making art makes me rusty) do some warm up sketches as well, preferably in the area you are most interested in. Learning how to do Portraits? Draw the head from different angles and try to get the features roughly right. Draw individual parts of the face seperately, to study them and than try to put them, where they belong on the skull. DON'T BEAT YOURSELF UP! If it doesn't look right, try again, preferably with photo reference.
Lower your expectations. You are no old master. You are still learning. Don't compare yourself with other people, but compare yourself with yourself. That's why it's good to keep old artworks and look back on them every once in a while. I have come a long way since middle school and those old portrait studies I did back than are a great reminder of how much I've grown.
If you are actively trying to learn something new, don't beat yourself up if you don't get it right the 30th try. I needed to practice drawing the face for a whole year, before it didn't came out wonky anymore and I still screw up every now and then. Just search for some good drawing instruction videos and practice a bunch with pictures you find on the internet or take yourself. You will get good with a little bit of time and patience.
Do master studies. Your masters being the people you get inspired by AND whose art style you are trying to emulate. If you would like to draw like loish, try to break down how loish does art and copy that process. If you would like to paint like picasso, look at his art and try to break people down into forms. Learn a bit about the history of different art genres and see what you would like to include in your own art. If you are young and just starting out, you will not have a defined style yet. I certainly don't. But you can learn from everything and everyone and you will develop your own style and voice over time.
Use everything you can to help you learn and produce art.
There are no rules in art.
If you are working from photo reference, but can't get it right for the life of you? TRACE IT! You are allowed to trace something, if it helps achieving the end goal. If you are trying to learn how to do it without tracing, do it anyways, but in a specific way. What I usually do is:
Draw the thing I want to draw without tracing, trying to break it down into parts, trying to get the proportions right.
Put the image I try to recreate/use as reference under it with lower opacity, to see my sketch (you can do that with a window and a printed out image, if you are working traditionally)
Use another layer over my sketch and use a different colour to correct my sketch by tracing over the parts I got wrong.
Put the corrected sketch as reference to the side and try to draw the thing again, using the reference image and the corrected sketch as reference. (It's easier the second time, because you can see the parts you got wrong on the first try and can try to avoid making the same mistakes.)
Take your own reference pictures of things. Try to recreate a pose you want to draw. You will understand the pose better if you feel the movement of your own body and the position of your own muscles while striking the pose.
Use guidelines and reference pictures and probs and tools.
Again:
There are no rules in art.
And if nothing of what I've written is helping at all, maybe you just need to take a break. Some days off of doing art. That's okay as well. Refuel your creative energy by gaining different experiences. Go outside with some friends and have some fun. A change of scenery can make a lot of things better. (that said, look around your room. Is it a mess? Mine certainly is. And a cluttered space can also lead to a cluttered mind and influence your art badly.)
I hope any of this helps. This got longer than expected and I could keep going, so if you have any questions or need some recommendations for learning materials, feel free to reach out. I'm happy to help, when I can. :)
15 notes
·
View notes
Text

@levemetal Hope you don't mind my bringing this out to its own post - I saw your tags and wanted to try to help!
So, ripping models is going to be a different process depending on how the game was made; what console it was on, what game engine its built in... There's no one-size-fits-all process, and it's going to require some baseline tech-savvy-ness.
But given that these tags were regarding Grima; I'll tell you more or less how I get models out of Fire Emblem Awakening.
A Ramble-y Overview of Fire Emblem Awakening Model Ripping:
Step 0: Gather your Tools
There's a lot of tools floating around intended to help with 3DS model ripping. Some are very pleasant to use and others are janky, so brace yourself.
For this, you will need:
Citra emulator (for extracting game files)
Paragon (for figuring out where models you want are)
FEAT (for decompressing game files)
SPICA (for exporting models + textures to usable formats)
Blender (for actually working with the models) (or whatever 3d modelling program you like; I only know blender though)
Step 1: Get a ROM of Awakening
Legally obtain one, of course. Assuming you have the game cartridge the 3DS hacking community can help you more with that. Definitely do not download any game roms from any online websites, why, that would be piracy!
Step 2: Extract the Game Files
Open up Citra, add a game directory and tell it where your rom is.
Right click the rom and select "Dump RomFS" to get Citra to start extracting all the game files. This will take a while. Wait for it to be done.
Once its done dumping the files, you're going to want to go to File > Open Citra folder. From there, navigate into "dump", then "romfs", then click the big nonsense folder name - that nonsense is Awakening's game ID, so, this folder is Awakening's game files.
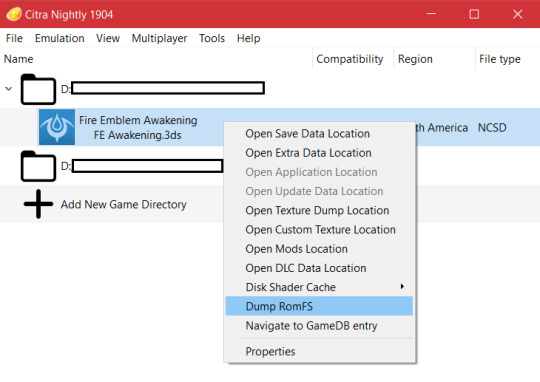
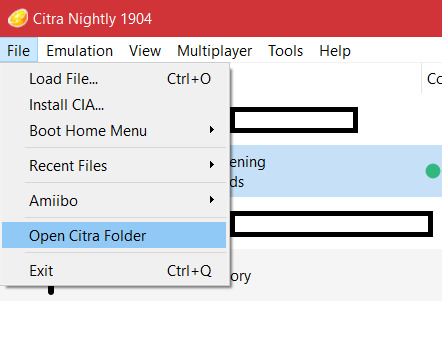
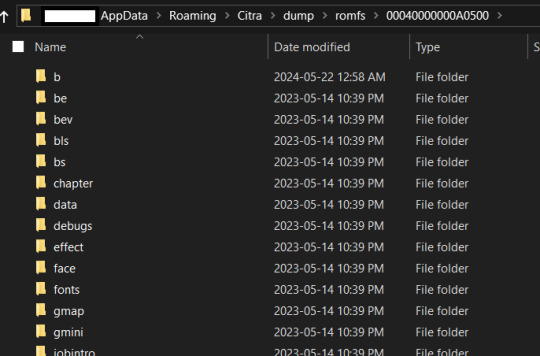
All the models you could ever wish for are in here!!! We just need to actually find them now.
Step 3: Figure out which model(s) you want.
Time to go open up Paragon. This is technically a tool for creating mods of several fire emblem games, but we're not going to mod anything, we're just going to use it to figure out what models belong to which characters.
The github page has instructions on it, but basically you want to open up Paragon and start a new project for FE13. Create some random output folder for it and direct it to that, we don't care. But the "Extracted RomFS Directory" should be the citra folder I just told you how to get to.
Once you have the project open, there will be a lot of buttons and things. Don't worry about all this. The only two you care about right now are "Asset Definitions" and "Presets".
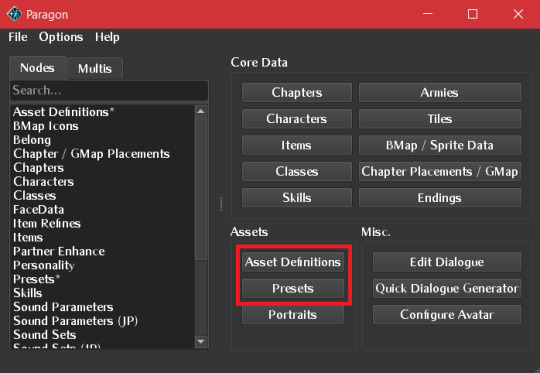
(Ignore the font; I changed paragon's font to awakening's font because i'm a nerd)
Most of the human characters are easiest to find in "Asset Definitions"; some under their english name, others (like Chrom) under their english base class' name.
Grima, though, you can find in "Presets" by searching for "boss".
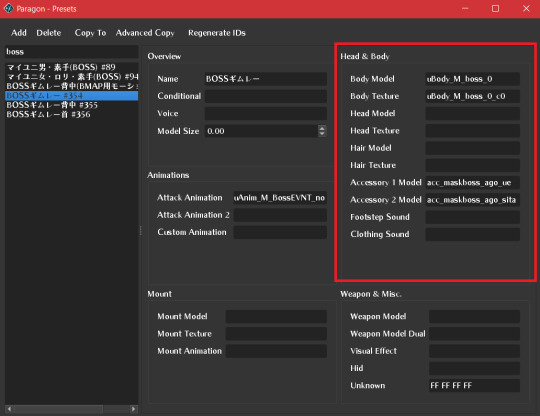
This entry specifically is the one pertaining to grima's full body model. There's a lot of info here, but the highlighted panel on the right is the information you need; this is telling you the names of the files containing Grima's models and textures!
For human characters, typically the head and body fields will be filled in, and possibly the hair for characters with long hair. some have accessories, some don't.
This complexity is why we use paragon to check instead of checking every single model file manually like fools. (it's me, i'm fools)
Keep this window open for reference at the side for the next step.
Step 4: Go Get the Models
Make a folder somewhere on your computer to keep this character's models.
Then, go back to that Citra folder we opened up earlier.
Awakening's assets are split up into several folders. The folder you want is "b", which has most of the character and weapon models and textures. (This organization scheme is Not consistent between Awakening and the other 3DS fire emblems, watch out.)
In here, find the files paragon is telling you belong to this character, and copy them into your dedicated folder for this model ripping project.
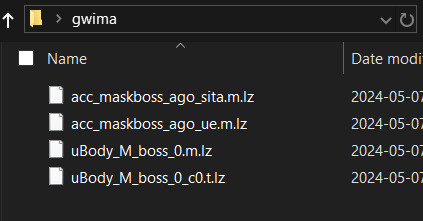
Wow, look at all those files we can't use. Time to make them usable.
Step 5: Decompress the Files
Open up FEAT. Drag all those files onto the FEAT window. It will decompress them; there will be a copy of each file without the .lz file extension. You did it! They're decompressed!
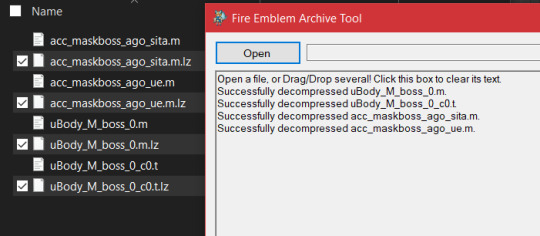
Step 6: Extract the Models and Textures
Open up SPICA.
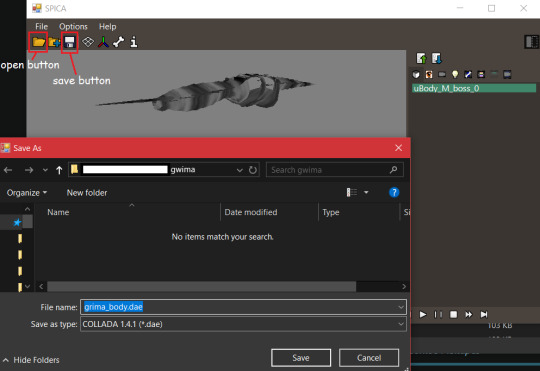
Click the little Folder button in the top left to open a file. Navigate to this folder you have your decompressed files in. Click on one of the decompressed files.
For MODELS, as in the .m files, you are going to click the Save button. Save each model as a .dae file, and give each a name that will make it clear which model this is - the body, the head, a specific accessory, whatever. (you can choose .smd instead if you want, but you will need a blender addon for importing smd files if you do.)
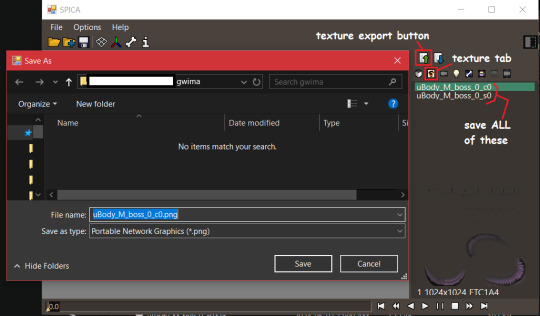
For TEXTURES, which are the .t files, there is an extra step. In the panel on the right, there is a small anime eye. That is the textures tab. Click on it, and the panel will change to a list of textures that are in that file. You should export all of them by using the special texture export button. DO NOT CHANGE THE NAMES the texture names are important.
Step 7: Blender Time
Tragically this is the most annoying part, and I can't even give you very detailed instructions off the top of my head because the exact steps are so tailored to each specific character.
Open up Blender. Go to File > Import > Collada (.dae) and import the character's component models one by one.
Each individual file will come with its own armature for posing! If you want to have a functional, posable model, you are going to have to join them together yourself. Normally this means taking a component armature, positioning it properly in relation to the body, parenting the component meshes to the body armature, joining the component armature to the body armature, and then taking whatever root bone the component had and setting it's parent bone to the right bone from the body armature. If you just joined a character's head on the body, take the root bone from the head armature and set its parent to the head bone from the body armature. Stuff like that.
Some of the weight painting may be broken, so when you pose joints on the armature some things will move incorrectly. I do not know how to get SPICA not to do that, and I haven't found any other 3DS model exporter that works with awakening that doesn't do that. Try exporting as an SMD instead. If neither dae format nor smd format works right, You're going to have to go in and re-do the broken weight painting manually. There is no shortcut to this. I am sorry.
You will also notice everymodel is split up into several meshes. If you need the character to be one singular manifold mesh, you're going to have to edit it to be that way yourself, in a way that does not destroy the UV maps. There is no shortcut to this. I am sorry.
Also: If it's Grima, be aware that their model is like 3000 blender units long. You will want to scale all their armatures down to 0.1 or something, because Blender does NOT play nice with stuff that big.
Anyway, textures.
In Awakening, a texture name ending in c0 is the base colours. A texture name ending in s0 is a specular map.
If the base colour file looks mostly transparent, that's because it's channel packed; the color and alpha channels contain two different textures. In Grima's case, the color channel is their actual colors, and the alpha channel appears to be an emission map.
So, go on into the shader editor, click on each mesh to open its material, and plug the textures into the right spots on basic shader node provided. Make sure to set the Alpha mode of the channel packed textures to say "Channel Packed". And you're good to go! You can see what the character looks like now!
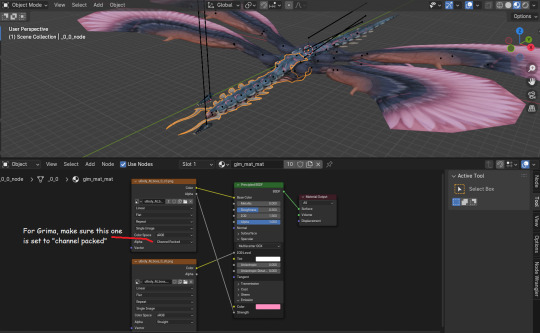
If parts of textures should be transparent but aren't (like grima's eyes and wing feathers) you're going to have to figure out a solution for that yourself. I manually made my own alpha map for grima's eyes and wings, and it was Annoying but it was the only solution I could find.
Congratulations, you've done it!
You have successfully ripped a model from Awakening. Now go on and modify it however you need to; make better shaders for it, clean up the mesh and unwrap its UVs again for free plushie patterns, do silly posing shenanigans with it. Whatever your heart desires.
Good luck, dear reader, for you will probably need it.
#let me know if you ever make any plushies with this knowledge i'm so curious actually#fe awakening#i really ought to make a more comprehensive guide to this#it took me so long to compile these tools and methods from random forum posts from 7+ years ago and shit
9 notes
·
View notes
Note
How would you describe your writing style and who is your writing influence(s)?
I don't even know what my writing style is anymore and if I stopped to think about it, I'd have an existential crisis so I just write.
I think that if you're looking to improve, you shouldn't think in terms of what your writing style is but in terms of what you need in order to accomplish your goals for the story. Every scene if not every paragraph requires different things in order to function optimally. What I do is think about what I'm trying to accomplish and then decide from there what kinds of tools I need which basically means that your style can (and often should) change with every scene. An action scene would need snappier, shorter sentences and more focus on actions rather than thoughts and emotions in comparison to a quiet, heartfelt moment between the characters. So in that sense a writing style should be versatile enough to accommodate your story's needs rather than hinder you if you're focusing too much on it. It's also completely possible and okay to experiment with different styles for different stories.
That being said, some thoughts on my own style just came to me. It's definitely become less flowery than it used to be and I am relieved because I was using the turns of prose and metaphors to fill in the blanks left by the lacking substance. Now I just focus on saying what I have to say as clearly as possible. If I can insert a clever play on words in it or some cool imagery, that's great but it's not my priority. My thoughts tend to be abstract so I focus more on grounding them in easily perceived images because otherwise they're completely incomprehensible. Metaphors come in great use for that purpose but I'm using them way more sparingly than I used to, only when I really want to emphasize some idea or emotion. Otherwise, I just focus on the physical aspects of a scene and the senses, sometimes character thoughts though I try not to overdo it on that front. I noticed a while ago that I tend to get stuck in a character's head and go on and on about their inner world, which is a problem when the story is supposed to be about the interaction between two (or more) characters or between the character and their surroundings. I've put conscious effort into fixing that and I'd say it's working, at least partially. I'm pretty happy with the changes I've implemented in my writing style and process as a whole but there's always further things to iron out as you evolve as a writer.
I feel confident in saying that I do not have writing influences when it comes to a writing style. I've never tried to copy the way someone's prose looks and feels. I could stop to admire someone's style if it's caught my eye but I wouldn't try to emulate it. For example, I admire Douglas Adams' way of describing things but I could never do that myself and I wouldn't force myself to because it's just not the way in which my brain functions.
When I read a story, I'm mostly looking to borrow a technique from it rather than a style. That is to say, I am looking at the way the plot is structured or how the author builds suspense, which is way more a matter of observing the bigger puzzle pieces, the plot beats if you will, rather than the writing style itself. To be perfectly honest in the last 5+ years I've leaned way more into watching movies and TV shows rather than reading to lead to that result as you can learn about story construction from visual media but not about a writing style. It works for me because that's what I want to focus on.
When it comes to writing style, my philosophy is that I will figure it out myself. I am dreadfully independent when it comes to my creativity and refuse to accept any guidance. If I read any writing tips or examine a story with the idea of learning from it, I fully trust my own judgment and process. I follow the principle of trial and error - I test out everything that I think might work for me and if it doesn't, I immediately discard it. And that's about it!
6 notes
·
View notes
Note
Just wanted to say that I adore your art style! It's the perfect blend of cartoon and realistic. I've been trying for a long time to develop my style into something very similar. Are there any resources, tools, or techniques you use that you'd be willing to share?
Thank you so much! 🥰❤️ I’ve always been fond of a kind of “semi-realism” look in art :P
To answer your question, I don’t really have any specific techniques, but I can try to describe the process! I always thought of stylization as more like interpreting what you see, rather than trying to make everything exactly like the source or technically correct. Noticing how the placement of certain features relate to each other is pretty important to “interpreting” a character’s face, for example. I kind of just go based on what feels right and try to lean into a bit of shape language. Having a good grasp on anatomy also helps with making the characters feel believable and grounded enough. There’s a user out there on Twitter and Instagram called Taco1740 who’s got great breakdowns for things like that.
For tools, I do have a clear answer for that! I use posing apps like Easypose and MagicPoser on my iPad (though I mainly use just MagicPoser). It helps a ton when you can’t get an accurate pose reference because you can just pose the models yourself.
Pinterest is also great because you can create your own reference board for just about any character or thing you want.
Most of what I learned came from copying a lot of Disney concept art (Glen Keane, Jin Kim, Shiyoon Kim) and a lot of Tetsuya Nomura’s Kingdom Hearts art when I was a kid. Studying the things you like or want to emulate is always the best way to practice :)
I hope this was helpful! ✨✨
5 notes
·
View notes
Text
Reply too big to keep in replies, forgive me
Flash emulation won't actually work with the way the site is coded. It's really difficult to truly illustrate HOW fucked the site is if you aren't familiar with it.
So the flash games are INTEGRATED into the site. They don't just play. They send scores and those scores are validated by the site and then affect the game in real time by awarding points. Thats backend stuff and it seems EASY. But flash EMULATION will not really let that process work. Not blanket. Ruffle is a browser add on for flash and you can play some games with it but every game has needed to be worked manually and individually to try and get it to play correctly and to let it send scores.
Here, so like. Last year you may recall having heard about the data breach. It was a long time coming. Neopets has terrible security and always has. So someone got backend access, downloaded the server and this had all of the usernames and passwords ever used. Were they hashed? Yes. Was the hashkey stored in the server and thus also available to the hacker? Also yes.
As a result neopets finally moved from http to https. Great!
Not for flash games.
Every game has links in it right. Backend stuff. Mechanics. But all those fucking links redirect to http, not https. And you cannot change that without editing the game and you can't do THAT without a program that makes flash elements. So they're basically unfixable on site. On one fell swoop, every single flash game broke at once. You could play them but scores were now unsendable.
The workaround neopets USERS found was, I shut you not, using developer tools to modify the way your entire computer communicates with the internet

"oh, that seems simple"
Look the fuck at what is IN the js file
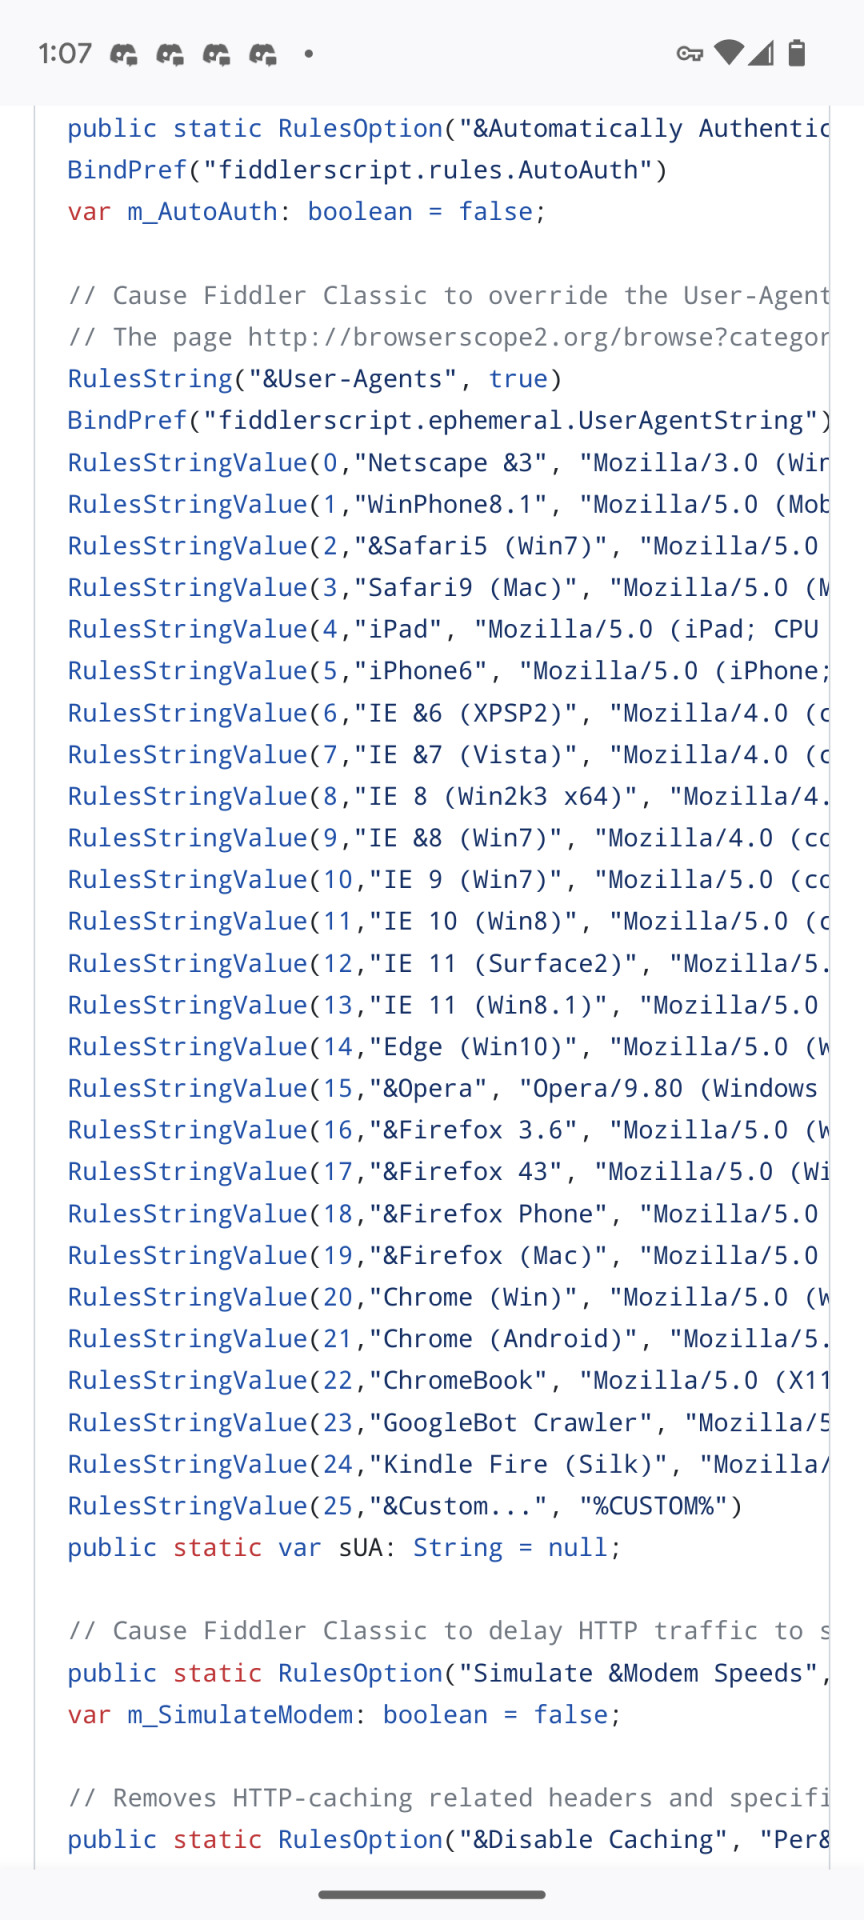
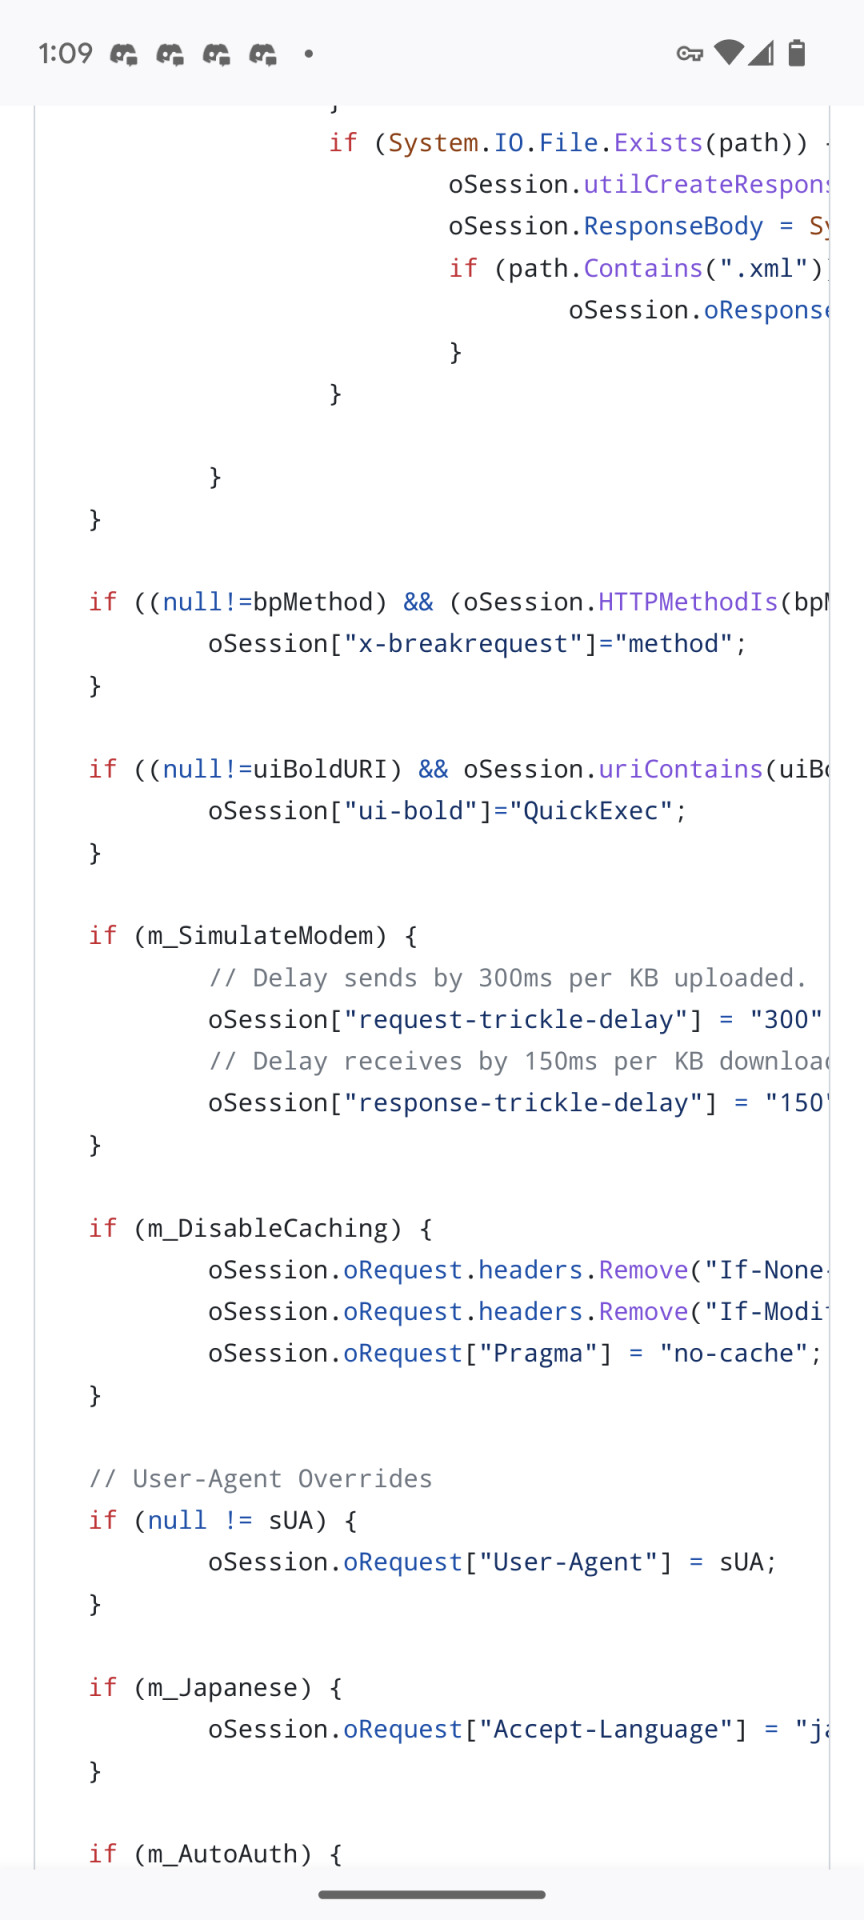

It is 538 lines! It is manually overriding the links used in these games. This IS hacking. Technically this is against the rules, it's just not being enforced.

Don't worry, I'm terrified.
The workaround before this STILL had you download a new browser, modify it, take your internet offline and manually reinstall an old version of flash to create a jury rigged flash browser. Oh my God this is so dangerous and we Still do this. Did I do all this fiddler stuff? Yes! I did! Because neopets is very much like transformers in that there is a small user base but every single person there is fucking insane!
So.... Emulation is not a solution. Every game needs to be individually ground up REMADE in html5. And you can't just import the old game and tweak it. It has to be made from scratch. That's why there are so few html5 games. It's incredibly difficult and time consuming and probably not all that worth it when there's so much to be done.
This is what I mean when I say the site is virtually unplayable. This is the kind of shit that we have to do to make the site work. You basically cannot play unless you are accessing fan sites and communities to find resources that can offer fixes to everything that is broken. There are legitimately pages of this website that have not been updated since 1999. Until like two years ago you still could not say "gay" on the forums because the chat filter caught it. And do you know why?? Staff literally did not know where the chat filter was stored in the backend. They could not find it. The site traded hands and staff so much that no one remained who knew where it was.
There is LITERALLY a guy who found backend access several years ago and can, whenever he wants, get into the server and look at everything. HE could have stolen those passwords (which the other hacker was selling for $10,000!!) At any time he wanted. Instead he just made an anonymous reddit account where he would post info about how the fucking site works and why things are broken and "yeah they lied about fixing this its still broken" or "yeah actually they secretly shadowbanned a bunch of people from submitting scores to the big yearly event next year if you dm me I can tell you if you're on the list"
And he IS STILL THERE!!!! HE STILL HAS SERVER ACCESS!!! ITS BEEN YEARS AND THEY HAVENT KICKED HIM OUR BECAUSE THEY STILL HAVENT FOUND THE BREACH!!!!!!!
This. THIS is what staff is dealing with. THIS is the absolute shit storm they need to tackle if they want this site to work. The way pets are stored, the way accounts work, all of those things cannot be changed without causing severe issues conflicting with users accounts, pets, items, and all of that was originally coded in 1998/1999 and it cannot be changed. It cannot be modernized. They need to find ways to integrate old code that cannot be changed into a site coded for a modern internet. That is beyond the scope of normal site building.
All that is to say... I'm hesitant to believe things will improve, not because I don't think staff wants to, not because I don't think they have the drive and the passion to throw everything they have at it. Just because... Jesus dude I don't know if they actually have the resources to fix this mess at all.
17 notes
·
View notes
Note
Hiya! I was thinking about the remastered animation Cel style evil Conan post you put up recently, and I just wanted to say how amazing and impressive it is! I love love love the look of old animation and you really nailed it. I’ve been trying for ages to mimic that look myself and haven’t been able to crack it, so if you ever wanted to talk about your process on this piece, I’d be all ears! Wonderful work, again!
Waaah hi liv!! Thank you, I'm so glad you like it, and that it comes across so convincingly!! One of my favorite things is to make digital art that can have a second life as a different medium, and I wish I had an easy answer for you as to how I go about doing that, but the truth is that it's mostly the result of a lot of trial and error. And a metric ton of references.
Here's a quick process video of my last piece to try to show off what all my layers are like, but I know it's mostly useless without an explanation!! I can't explain it all because I was kinda winging this one for funsies but I can give you general tips for this particular look.
Clip and words below the break!
As a disclaimer I didn't really go into this one intending for it to come out looking the way it did. So it's more of a hybrid look between my usual "clean" digital rendering and a fake screenshot.
[1] Reference, role models, and inspiration - I'm not kidding when I say I used to tote around an entire, dedicated folder filled with printed reference. These days that usually takes the form of about a million browser tabs ( ̄▽ ̄) I stare at early Detco and the first six movies a LOT. And Cowboy Bebop. And Akira. And and [insert your choice of 80s-90s anime film]. Depending on the exact look you're trying to replicate, you can always look to a more era-appropriate movie.
I love pulling inspo from films in particular (both animated and live action) because cinema is a whole other art that employs all kinds of techniques for our usual considerations (like lighting and framing), and looking to them can inspire some pretty poignant imagery, especially when you're trying to create something that's meant to mimic a single-frame capture of exactly that. I don't keep up with movies or anything, but I do have my favorites, and it didn't really occur to me to look to them until some of my favorite artists revealed that they do the same with theirs.
For this particular piece, I also had to establish some consistency with the other piece that bookends the scene, so I actually referenced my own art, too.
[2] BIG canvas! I usually work at two or three times the size I expect to export. Following standard aspect ratios for animated productions can help sell the look. Letterboxes have their own ratio, too, if you choose a widescreen canvas; and subtitle fonts are usually standardized to certain font families and colors since their primary purpose is to help make the media accessible. All this is usually a quick google search away, OR… if you're like me, and you still watch physical media… you can just yoink most of this from a real DVD.
[3] Thin lines!! I still can't quite nail the right line weight for these-- I definitely went too thick here-- but they tend to be very fine. And imperfections are good! Nobody has a perfectly steady hand, especially with traditional cels.
[4] Less is usually more when trying to sell a screenshot look… it's easy to over-ink and over-render and-- in my opinion-- restraint is necessary to sell it. This is the hardest thing to explain… it's design vs. rote emulation, I think. But that said, digital aids (next point) do a lot of the heavy lifting in these - as far as the art is concerned, a little will go a long way! These were some of my easiest lines and shading. So on that note…
[5] …Blending modes, masks, and filters are all your friends o___o I get a lot of mileage out of the default tools already available to me in the art software. There's plenty out there that's available for free, too! I recommend you find a fake anime screenshot tutorial, follow it once, and just go nuts when you get to the part where you can play with these settings. The make-or-break for a convincing screenshot-- in my opinion-- is texture and bloom, and all these digital tools will help you achieve that.
I hope this helps!! Hopefully the video can help you see a bit more of the process since I can only really offer tips. It shows everything at full size so you can see the details, so go nuts!
Thank you for the ask! Beaming plenty of good luck that you can find the look you want!!
ALSO I REALLY HOPE THIS IS THE PIECE YOU MEANT I'M LITERALLY ABOUT TO QUEUE THIS UP AND JUST REALIZED THE ONE THAT CAME BEFORE THIS IS MORE REMASTERED CEL ANIMATION LOOK SKSKSKSK
the same tips apply though so i hope they still help all the same :3c
10 notes
·
View notes
Text
I am sad about the way AI art technology is being developed. The thing that appealed to me the most about AI art was precisely its limitations. Like, to me weirdness was a feature, not a bug. The output new models keep churning out is so bland in comparison to earlier AI art. I liked it more when it felt like pictures out of a fever dream, like being pulled into the whacky fake reality of a digitally engineered world, beautiful and slightly disturbing. I think the deformities were awesome and that the value of AI art came precisely out of its capacity to abstract and fuse concepts together so clumsily, so thoughtlessly. In a "it makes no damn sense, compels me though" way.
And, I don't know, I just feel like it's gotten too good for its own good. Anyone can learn to paint like Michel Angelo if given enough time and practice. But can anyone paint in the style of like, dall-e crayon? That's harder. Because the process that goes into creating it is completely different. I know cuz I've tried. It's hard to replicate. It's hard to mimic the cognition of a computer. I think they should have left it like that, you know? It was way more interesting, in my opinion, and more inspiring. It gives you something to work with rather than a finished piece.
But now they are trying to get artists out of the picture entirely. And that's sad. AI art was a wonderful tool as it was, but they don't want better tool for artists to work with, they want a full replacement for them. One that won't ask to be paid.
I'm all for AI art, if it a. Is done with consent from artists it will be trained on, b. is free to use, open code and non-profit, and c. doesn't try to emulate human art, instead working towards a model that helps artists in their craft (by doing things like randomized noise, looking for references online, lightning, collaborative projects and such) or goes hard into the trippy nonsense it naturally leans towards. Because as it is, AI art is not only harmful to artists- it is also painfully boring, and every day tech companies are working towards making it even worse on that regard. And I don't like that at all. To think the medium had so much potential...
13 notes
·
View notes
Note
hi 3wd. i’ve tried to write before and i’ve never gotten far in the process, despite having many ideas im enthusiastic about. all your blogging about being a planner-writer has got me thinking i might have the same style of writing as you l- and a lot of the reason im struggling to put words on paper is because i don’t have a direction or fleshed out emotional/plot beats to write towards. what would be your advice to any fledgling planner-writers that don’t know where to start? how did you start writing with this writing style?
Hey nonnie 💜
It can be super frustrating to have a bunch of pieces you want to play with but not have them come together in a way that maintains traction. Outlining could definitely be a potential tool to help sustain momentum, so let’s see if I can get some gears turning for you.
For me personally, the outline-approach is one I just sort of fell into naturally. Part of it comes from my school days; we were encouraged to write dot-point plans to structure our arguments/ research/ storytelling for assignments ahead of drafting (some teachers even counted evidence of it towards the final grade), which set it as a habit early. Fun fact: I actually outlined this answer before writing it; I do it for most long posts. Another part of it is that I tend to come at writing from a very analytical angle - there’s a degree to which I try to solve or understand stories as I consume them. One of my earliest casual jobs was working as an English/Lit tutor for high-schoolers. I find a lot of joy in picking narratives apart, figuring out how they work and finding ones that hold up through several layers of examination, so as a writer I like to construct stories that way.
Part of it is also that, when I want to write something for release, I’m conscious of the fact that it will have an audience. A question that hangs around in the back of my mind is “if I found this story and wasn’t the writer, would I enjoy reading it?”
There’s another aspect that has to do with respect, in a way. I love the worlds and the characters that I use in my stories, and for me that means writing things that feel true to their spirit, giving significance to the times when that changes and making sure they have a meaningful journey (even if it’s not a happy one).
For me outlining suits this ethos, since having a map of future directions makes it easier to place foreshadowing fairly, identify themes, build character arcs and keep explanations/ lore consistent.
I’m also going to admit that I just got lucky with Deathly Weapons. There was a very specific emotional idea that I wanted to centre a story around, and the inspiration happened to come with both a starting premise and a concept for the ending. Then I also had wish-lists; some tropes I wanted to play with, and some existing series whose storytelling structure I wanted to emulate and pay homage to. Something I realised a few years after starting DW is that I’m a very project-and-output-oriented person. In a way, Deathly Weapons’ came to me as a project brief where I already knew the end-goal and a lot of what I wanted to work towards.
With that said, let’s talk outlining:
The value of having a plan
To me, an outline is a bit like having an itinerary for a road-trip. It gives you an idea of where you’re going, how long things will take, what key things you want to do, how much it might cost and it helps you anticipate potential problems. But, like an outline, an itinerary isn’t binding. There might be some things that take more effort to change (distance to travel, bookings you need to cancel/ reschedule/ extend - key plot points that a story hinges around or that need more preparation/ payoff to be effective) but you can adjust as you go; take extra time to explore an interesting spot, add a detour based on local recommendations, skip things that turn out to be less compelling than they first seemed, take a shorter route to get to a key destination faster, extend the trip to see a few more sights or decide to cut things short because something came up. The itinerary gives you the security of already knowing where you’re headed, letting you put down the mental burden of having to work out each stop as you go and enjoy the moment more.
Ways an outline can help:
Reassurance: if you have a tendency to be anxious/ self-critical/ have high standards about characterisation, plot holes etc. then an outline can be a good way to workshop the story and get ahead of potential challenges, as well as to concept-test whether this is a project you feel like committing to.
Scoping: blocking out an overview can help you get an idea of the size and complexity of the project, and how much time/resources/teamwork it might need.
Motivation: having a plan of future story moments that you’re looking forward to can provide a goal to help you push through the less exciting parts (e.g. connective scenes) and/or help you re-find your enthusiasm if you’re returning from a break or are feeling creatively flat for reasons outside the story itself.
Iteration: if you tend to come up with stories primarily by exploring and assembling ideas, then an outline method can be a way to quickly put a concept on paper, examine it and then decide if/how you want to use it, without the restriction of needing to write it all out as polished paragraphs first.
Splitting up the steps: useful if you tend to think faster than you can type full sentences, find that you move between ideas non-sequentially or if prose-writing/ sentence construction is something that takes a lot of mental energy or stop-and-starting from you. An outline can be a way to separate the processes of story crafting and story telling into more-distinct stages rather than trying to juggle both at once. Find the story first, then write it.
Non-sequential writing: having a roadmap of your story’s structure and direction can give you more freedom in how you choose to approach it, letting you jump ahead to work on planned future sections/scenes where the inspiration is flowing rather than waiting for the next scene to “come to you”.
For a more direct comparison, Screenwriting Bibles are a form of outline for professional TV/Film production. These “bibles” are key reference documents used by writers for information on the premise, characters, settings and other project elements, as well as to plan future episodes and seasonal arcs. (This podcast transcript, article and template are good starting sources if you want to learn more about TV Bibles.)
Much like a series bible, an outline can help you keep tabs on:
Consistency and continuity: this can be minor stuff like names of background characters or small details (running gags, item descriptions, character trivia) but can also be major stuff like character motivations, who has what abilities, event timelines or story-themes.
Direction: your outline can capture the overall arc(s) and conflict source(s) of your story and their intended resolutions, as well as mapping out how those conflicts are progressing.
Causality: whether planned events and character choices feel consistent and reasonable within the internal logic of your story.
If any of this sounded helpful to you then you might benefit from experimenting with an outliner/ planner approach. There are a bunch of different planner techiques (here’s a link for some) as well as hybrid “plan-tser” methods that you could try. But for now let's talk about the general process, starting with a focus question:
What is it that makes you want to tell this story?
This might seem like a daunting place to begin but it can help with figuring out the core of your story and what you find compelling.
It’s okay if you don’t have a neat-and-clean answer straight away. Sometimes inspiration just strikes out of the blue, and that’s fine. Sometimes you have a vague directional pull but you’ll need to do some story-work before you can identify what’s calling to you. However, if you did have a specific itch or passion that drove you to write then thinking about what and why that is can help you understand what you want from the story – and in turn what might connect with other people.
I also want to be clear that this is not about judging your motivations or their “artistic merit”. I had a specific story to tell is fine, as is I wanted to explore this concept/theme/emotion/issue, or this was a gift/commission for someone else, and so is I wanted to try writing a specific genre, or I wanted to experiment with a specific medium, or I wanted to do my own version of [existing idea] or I am fascinated by this character/relationship/world or I needed some vicarious catharsis, or I was horny. And a whole bunch of other things.
Knowing what you’re trying to get out of a story can help you decide what type of story you want to tell, as well as the overall scope and what medium/format/genre to tell it in. Maybe it’s a single-scene character/aesthetic study, or a one-shot vignette. Maybe it’s one long story, or it could be series of connected stories, or it could be a story-anthology centring on a common idea. Maybe this story would work well as a comic, or art piece(s), or podcast, video, or something interactive like a choose-your-own-adventure or a videogame.
Understanding where you’re coming from can also help you answer the questions of what is your story about? and what happens in your story? which are related but not the same.
What is your story about concerns the themes and thesis of your story, which can help you figure out the story’s tone, main emotional or thematic conflict(s), and how you want them to resolve by the ending. Put simply, it’s the message.
What happens in your story is the synopsis of planned events, character actions, worldbuilding and other content. Put simply, it’s the stuff your story has in it.
Let’s take my Deathly Weapons fanfic as a case study:
What made me want to write this story? Deathly Weapons started with me being unsatisfied with what felt like a gap in the Danny Phantom x Superheroes crossover fanfic space at the time. There was a trend where stories would kill Danny’s friends and family to justify placing him with the crossover’s other hero team but very few of those stories felt like they acknowledged the emotional consequences of doing so; the ones that allowed him to grieve frequently using it for nonspecific angst about Loss™ or mourning the generic archetypes of A Love Interest™, A Sister™, Parents™ or A Best Friend™ rather than the specific characters and bonds from the series. There were also some smaller itches around plot construction and mysteries that I couldn’t find many stories to scratch. I wanted to try writing something to fill those gaps. What is this story about? Thematically Deathly Weapon’s central emotional arc is about grief and healing: in particular the uniqueness of the bonds between people and how grief reflects the specific hole each individual leaves behind, as well as the process of finding closure, making new connections and moving forward in the aftermath of loss. What happens in this story? A lot. In my youthful hubris and overambition I planned out basically a half-season of a TV show. For the sake of not dragging this section out by a mile, here’s an arc/mission plot teaser list I made a little while ago.
Since Deathly Weapons Arc II is deliberately structured to emulate a TV show, you can sort of see how that summary has accidentally ended up mirroring parts of a top-down Pitch Deck. But, of course, that’s not the outline I actually use when writing.
Different levels and types of outline
Like a lot of creative terms, “outlining” covers a pretty broad umbrella’s worth of stuff.
Methods-wise there are plenty of different approaches: from specific story-writing software (Scrivener, Campfire etc.), to word documents, to binders and notebooks, to honest-to-goodness sticky-notes, thumbtacks and string. Personally I alternate between a documents folder on my computer and a physical notepad/sketchpad for when I’m on the go, but you should pick whatever format feels most comfortable for how you process/visualise information.
Functionally, I think it helps to conceptualise three main levels of outline: Brainstorming, Structural and Detail. To be clear, you don’t have to do all three. A short story or one-shot might be served by writing directly from a brainstorming or light structural outline. You also don’t have to keep them strictly separate. A brainstorming document might cover some early structure notes or test paragraphs. A structural or detailed outline might have some brainstorming or research sections as you uncover and solve smaller questions. Heck, you can have detail notes inside your initial drafts if they help you keep the story flowing. These are tools you can use, not prescriptions you need to follow.
Let’s talk about the levels:
Brainstorming
Brainstorming is the least structured. Like the name suggests it’s mostly about getting concepts down and coming up with ideas – this could include early notes for plots beats/ scenes/ character interactions, sketches, screenshots/quotes and possibly research questions for stuff you want to confirm or find out about (e.g. checking source material, or researching systems and potential setting-locations). You could consider this like early research notes for a class essay – where you know what your subject is and might start with some initial thoughts or focus questions but are still learning and figuring out the broad strokes of your content and stance.
Despite that comparison, brainstorming is probably the most creatively fun step in the process. This is not where you worry about things like “quality”, “cohesiveness”, “accuracy/canon compliance” or “cliches” – this is the time for rolling with whatever inspiration strikes you, pouring out any idea you find interested/compelling/cathartic, asking questions, going down internet rabbit holes and generally just enjoying unabashed creation. This is your raw material: you’re going to cut and shape it later.
Structural
Structural outlines probably have them most utility in giving your story shape and form, especially if your story is long or has a lot of components. If you were doing an essay, this is the part where you’d figure out your thesis and start grouping each main argument and its supporting points into planned body paragraphs. For a story, this is where you start sorting your ideas and putting them in order; deciding on your arcs, conflicts and resolutions, working out the order and causality of events, your character motivations and dynamics, where to place key foreshadowing, major scenes and the like. This is the level where you’re going to try and solve potential story problems – to come up with in-universe explanations and identify possible plot-holes before you write yourself into them. You’ll likely do extra brainstorming or research in this phase too but it’ll be more targeted – aimed at filling gaps, connecting dots or serving specific needs.
For longer or more complex stories you might have multiple structural outlines tracking different levels of granularity; some providing an overview of the whole story/ series arc, while other focus on specific characters/ subplots or break things down into individual plot beats and scenes. You might also spin some of your initial brainstorming into reference or meta documents – content that you aren’t going to directly cover in-story but that will inform or add depth/consistency to other elements. If you enjoy puzzle-solving then this can be a very satisfying part of the process: there’s nothing quite like hiding a subtle piece of symbolism/foreshadowing, coming up with a sneaky red-herring or finding a rock-solid explanation to make you feel extremely clever.
It’s also worth repeating that you are not beholden to whatever structural outlines you first come up with – your outlines can and should evolve with you as you develop your story and come up with new or alternate ideas. (Just last year I re-ordered two major subplots and added an extra character arc for Deathly Weapons).
Some stuff to think about for structural outlining:
Remember that, as the storyteller you have full control of the narrative and what happens inside it. Like I said at the start of my case study on YJ: Invasion’s writing, even the rules of a fiction piece are made up: there is nothing physically stopping you from making the sky be a different colour every five minutes if you felt like it. If you want something to happen then you can work backwards to reverse-engineer a specific scenario where those things would reasonably occur. Start at Scene B and figure out what needs to happen to get there from Established Starting Point A. If you need a character to act a certain way, then you can tailor a situation to trigger that response based on their established personality/ insecurities/ flaws. You can manufacture specific story problems whose solutions play toward or against the skills and abilities of different characters, or create scenarios which situationally discourage characters from using skills/abilities/tools that might otherwise be overpowered. You can also make the call to deviate from what has been established in order to facilitate a scene or plot point - temporarily imposing a trait for narrative purposes (sometimes referred to as carrying a ball) or Rules Lawyering your worldbuilding to create a technical loophole. This risk here is that this can feel artificial, jarring or unfair if not reasonably justified within the story logic. There’s also a limit on how often/ how far you can push this before it risks breaking the story. If things start to contradict or situations arbitrarily turn on a dime then your audience can lose trust that the characters and world will follow the expectations set by the narrative – they can start to feel narratively unsafe, until it reaches a point where the only way for them to reconcile the dissonance and inconsistencies in the story is to acknowledge that it’s all an artificial construct being externally steered by the hand of the author. You can do whatever you want… provided you do the work to make audience to believe it.
That being said, try not go get too wedded to the specifics of your early ideas. Sometimes an element is just not going to fit with the direction your story ends up taking; whether because it’s not compatible with the eventual trajectory of the characters/events/lore or simply because it would be hard to include without disrupting/diverting/distracting from the flow of the story at that point. In some instances you can take the core of an idea and modify it to find a new place in the narrative; for example by repurposing a scene or piece of dialogue, repackaging information, rescheduling a conversation, fusing concepts together or deconstructing them and integrating the component parts across other scenes. But in other cases you may decide that the potential problems (whether structural or narrative) introduced by including an element outweigh the value it could add – in which case it’s time to lovingly set it aside. This is what they mean when they say kill your darlings. Having a designated document for future story ideas and/or outtakes can help with this (or you could do what I did with Defining Moment and turn an idea into its own side-story).
This can be also a good place to consider more technical story elements, like pacing. Think about the peaks and valleys of intensity (suspense, intrigue, action, character drama etc.) across the beats of your story; where you might want to ramp things up or down, and how you might use scene and/or chapter breaks to space out information, create breathing room or hold the audience at a certain level of emotion/anticipation. (For a good short primer, try these videos about Pacing and Tension Cycles in games).
You may also like to use the structure overview as an opportunity to take stock of Tropes and Patterns. Not to avoid them – you can’t really avoid tropes – but just to see if any are showing up and what they might be saying, even if you didn’t intend for that to happen. (For a topical example: consider what tropes are showing up around different minority/minority-analogous characters - either in their depictions or how the story treats them - and what message that might be sending. There’s a lot of bias to the way certain groups and issues have historically been portrayed in media, some of which have baked themselves into now-common stock plots and archetypes. That isn’t to say you should never use them; just be conscious and careful, especially if your story intends to make some sort of commentary on those topics.) On a more positive note, this can be another way to learn about what story mechanics you like, both in your own writing and others’.
Detail
Detail notes are the most granular level of outlining, getting down into the specifics of an individual scene or conversation. These are the least strictly necessary – depending on the length/ complexity of your story, the granularity of your structural outline(s) and your personal writing preference, you may prefer to jump directly from a structural outline into a first draft. That said they can still be useful, especially if you want to hammer out the fine details of action, dialogue or information-flow while staying a step back from specific prose. This is where you get things like a bullet-point breakdown of each line/action/piece of narration (for when you have a detailed idea of what’s going to be said/done but not the specific words to describe it) or script-style notes (for when you have the character voices and lines but not the narration or action surrounding it). As mentioned earlier, you can blend detail notes and rough drafting together – writing some sections out in prose as the words come to you, then breaking into note-form to keep the ideas flowing in sections where wording might be starting to stick.
An example
Let’s look at my outlining system for Deathly Weapons:

Now, I want to make it clear: this is not the standard. This is not even the standard for me. Deathly Weapons got a bit out of hand, ballooning into a half-season of a TV show: it’s more a series of 12+ self-contained stories in a trench coat than your standard fanfiction. However, it is a decent example of complex outlining. I have multiple levels of structural outline – some covering the entire story arc, some covering the individual missions. I also have quick-notes that I made as a consistency-reference from canon, and some worldbuilding meta I did as a thought exercise to develop one of the character-backstories (the one shown ended up published here on Tumblr). You can see how I blend the outline types together in my detailed notes, as well as how my approach to outlines has evolved from more brainstorming-focused to more structurally-focussed as the story has solidified. Again, this is not the standard, but hopefully it gives you an idea of what you can get up to with outlines for a complex long-term project.
Okay, so that’s the basic breakdown of outlining as a process (at least the version I use). Hopefully it’s got some gears turning.
However, I also know that it’s more of a framework through which to approach story-building; it’s an organisational tool that helps you set out current and future-planned content in a way that lets you take stock, identify things that need attention and keep track of important details. On its own it’s not necessarily going to be able to help address the challenges it reveals; in the same way that knowing how to plan an essay won’t necessarily teach you how to research one effectively.
In Part 2 of this series (yep it's a series now) I'm going to go over some concepts for story-building and editing that might help you during the structural phase. Click here to go to the next part >>
#Writing advice#Outlining#Planner writing#Story planning#Stories#Post Series: Outlining Tips#this was originally meant to be one post but then Tumblr decided it was too long so here we go#Sorry this took ages for me to answer nonnie#I moved cities again and the burnout after last year whacked me very hard. Brain go (half-hearted raspberry noise)#Hopefully there’s enough stuff in here to make up for the wait#It might amuse you to know that I did 3 different outlines trying to figure out what would be useful#Learn from my example but maybe don’t try to follow it#Outlines Divided (who lives in a state of derangement and writes over 10000 words of background notes per paragraph)#is an outlier and should not have been counted#There’s a lot of talk about DW in here. How very self-indulgent telling you all about me. me. me.#(It’s mostly because I’m the creator in its case so I can talk about the processes used to make it without making guesses)#Anonymous#3WD#3WD Answers
12 notes
·
View notes
Text
An analysis on "Anime Rock, Paper, Scissors".
OR
"Debating the ethical and morals of an AI Tool with an E-Rate Artist."
youtube
Okay, so, like, first of all: I love this video. I've been watching and rewatching it all day. I love it that much.
It captures everything about anime I fell in love with. The over-the-top dialogue, the dramatization over something so mundane as, the the trappings of dark fantasy. It taps into a very specific core of nostalgia for me.
BUT!
Yeah, I love this video to hell and back. But, well, there's no real getting around the messy fact that AI was used in the process-hell, you can even see it in the video thumbnail. Even if this is a few steps above most AI art, AI art will always have a certain 'look' to it that makes it stand out.
So, full disclaimer: I'm not an animator. And I feel I have no real horse in this race, even as an artist. Hell, I wouldn't even really call myself an artist. Sure, I can say I have roughly 13 years of experience drawing, but I don't think my art is really on a level that makes it very appealing and I honestly feel as though I've reached a peak. Like I've reached the apex of my potential and, well, it's not much.
So excuse me for putting my foot in my mouth about a topic I don't really have much to contribute to.
So, Corridor Digital's animated short is 1/2 rotoscoping and 1/2 AI art generation. The AI was trained to emulator a dark fantasy anime style by feeding it screenshots of Vampire Hunter D. The process for how its done can be seen here.
youtube
I'm kind of on two minds on this. For the most part, I don't think AI is gonna replace actual artists. Cause there's just a lot of stuff an actual artist can do an AI can't do. And while the entire process isn't shown, a lot of editing and manipulating had to be done in order to get the AI where they wanted it. A lot of choreography and filming technique was needed. How effects work, writing-art is more than just scribbling on paper and an AI might be able to mimic art, but it can't 'draw'.
Hell, the video still has a lot of jank going on after what was most likely months of work. Like I said, AI art just has a very specific look to it.
But let's get to the nitty gritty: feeding the Vampire Hunter D art into the ai to replicate the style.
On the one hand, this is kind of what I think of when I think of AI being a tool to be used rather than an outright replacement of animators. And I think this is a good showcase of how amazing the technology can be. It looks amazing despite the hiccups.
And artists try to replicate art styles all the time. Hell, some people market themselves on their ability to replicate a certain show's look. I've seen people try to sell Hades style commissions, there's an artist who redraws screenshots of various anime as if they're an early cartoon network show, and don't get me started on Pokemon, Dragon Ball, and Sonic - the big three of style emulation.
BUT!!!
And yes, it's a big 'but'; that's not really what's happening.
I'm not smart enough to put what it does in my own words, but I'll do my best anyway: it's more-or-less a glorified trace job, with (ideally) hundreds of different pieces to work off of to generate a completely new image. Usually without the agreed upon consent of the artists.
I hate to throw around accusations like this, especially when I lazily and hungrily eat up this content like potato chips, but it really is art theft on a grand scale.
I still admire the technical skill that went into this. Even if 'anyone' can do it, there's still a lot of work that went into making this and getting something that's workable. But I don't blame people for calling Corridor Digital out on this when it's so damn blatant.
Now, I won't stop watching the video - like I said, I'm not someone with a real foot in this race, now do I wanna start some kind of revolution against or anything. It's just something to think about after seeing some backlash.
Now, the movie's out on YouTube. In fact, there are 3 different videos of this movie, dubbed.
youtube
And the movie came out roughly 23 years ago. This is NOT yanking it out of starving artists like many are claiming it is. It's practically collecting dust.
However, it's still blatantly robbing other artists who worked on this movie of their credit. But, again, they're using the ai to mimic a certain style and using their photos as a template to follow. But it's still using someone else's work as a reference. Speaking of, it's not like what I uploaded was a legit upload of the film - it's a pirated, uploaded without the rights holder's consent.
So...?
I don't know, I guess I can just kind of see both sides of the argument. I'm not here to tell you that the video is bad or that AI art is inherently bad or that AI generators need to be destroyed. And I'm not telling you that the video is completely and totally free of any shady practices. Personally, this all just feels morally gray to me and Corridor should've hired some concept artist to feed into the AI.
Just wanted to throw my thoughts out there.
2 notes
·
View notes
Text

This is a good question
And I mean that genuinely
Because I was only able to do most of the necessary change like this because I was finally in an environment that wasn't toxic and was actually supportive
Now with hitting my friends when I was a teenager I trained myself out of it by paying my friends. If I hit them I owed them money. And since I didn't have a lot of money I quickly motivated myself not to hit them
But I was still sometimes violent and full of rage and my words could hurt just as much
I was not a good friend when I was young
My home life was not good and I learned bad bad ways to deal with conflict
My husband however actually came from a healthy well adjusted family. They all like each other! There is no trauma! And when my crazy ass rolled in I suddenly had a new framework and example to work off of.
It actually made my mental health worse at first because I knew my old ways of coping g with things weren't appropriate anymore but I didn't know how to cope in a stable environment
So take my advice should be taken with a handful of salt because my experience was finding people who made compromises with me. Who were willing to, and even wanted to, find a middle ground first
But what I would advice is:
1. Accept any change is going to be slow. That's okay. It's not a race and there are a lot of tools you can use. My husband and I used a safeword system so I could tap out of disagreements and conversations when I knew I was nearing the flashpoint where I would stop being reasonable and start being cruel.
It also helped to diffuse tension because yelling "BANANA!" in the middle of an argument is silly
But it took years for me not need the safeword
2. Accept you can't change some things about you and that some people will be okay with it and others won't.
I will still get irrationally angry about things. I try to channel it a way from those around me but I still get waspish and have to isolate to emotionally regulate. And my husband and child give me that space and time. I can change how often this happens and to an extent how I react but I am still sometimes going to be a bit of a bitch. Not nearly as bad as I used to be but I'm still unpleasant at times. I have a lot of anger in me still and its always going to leak out a little.
I also will sob when my husband expresses his rightful frustration with me and I have to tell him to ignore the crying and that he's allowed to be annoyed and then we have to wait until it passes and I have to prompt him to keep talking
And thats just some of my more annoying and difficult issues. And a lot of people don't like me. I have friends and loved ones who do but I am loud and weird and uncomfortable to be around and a lot of people find me off-putting which means:
3. Accept some people shouldn't be in your life and you shouldn't be in theirs
This is sometimes painful to accept but sometimes your better off with people at a distance then you are up close. I don't think that's always someone's fault either.
It still hurts sometimes though
4. Try to find people who will adapt to you as much as you do them. It won't necessarily be smooth, it won't be fast, and could be a difficult process but if you are both trying to meet each other it is better
Lastly,
5. Try to find good examples of healthy communication and boundary setting to emulate
It's really hard to change when you have only been shown how to hurt others to protect yourself. Good examples of healthy communication and relationships and setting boundaries, fictional or real, really does make a difference
But the most important thing is you have to want to change
The changes I made was not someone else saying "you have to change"
I didn't want to repeat behaviours that had been used to hurt me
I didn't want to become what I feared
And I am far from perfect and it took so much time and effort. But I genuinely think I'm better than my parents were at my age so I think it was worth it
I wish you the best of luck
Since the OP made their post unrebloggable (and blocked me. Both actions they are well in with their right to do)
I’m going to make my response it’s own post because I think the point is important
-
As someone who is autistic and has BPD and CPTSD and loads of trauma yes you sometimes need to change how you interact with others to keep people around
When I was 13 I hit the few friends I had when I was angry
I had to change that in order to keep those friendships
When I was in my early 20s if I was losing an disagreement with my husband I would threaten to kill myself. My husband told me it hurt him and was cruel and manipulative behaviour, because it was.
So I worked hard to change that to keep my relationship
It’s easy to say “I shouldn’t have to change for others” and that’s true to an extent. You shouldn’t change your interests or passions or dim your light. And you should have space to be imperfect and flawed and not have to pretend your ugly bits aren’t real. But if something you are doing it causing other people harm you kinda need to change that.
That’s called “living in a society”
People adapt to each other and make space for each other in their lives. You adapt to them and they adapt to you
You start being more diligent about throwing away the empty toilet roll because it really bothers them. They start warning you before they run the blender because you hate loud noises
I stopped threatening to kill myself because I was mad I was losing an argument and my husband stopped being so vocally judgemental amount media he personally dislikes
There is a certain type of person who heard the phrase “your emotions are valid” and took that to mean “my emotional reactions and my behaviour are always objectively correct because my emotions are valid and if you have an emotional response or react to what I’m doing negatively then you are wrong and you can’t be hurt because my emotions are valid”
And that’s a recipe for disaster
Your emotions are valid to feel. They are how you feel and there are reasons you feel the way you do
However, your reactions and behaviour are something you can learn to control and can be irrational
We live in a society and we as people change each other as we interact and that isn’t necessarily a bad thing
38K notes
·
View notes