#sewing guide
Explore tagged Tumblr posts
Text
Beginner-Friendly Wrap Tulip Skirt Tutorial with Free Pattern
In this post, you will learn how to sew tulip skirt with free PDF pattern. Welcome to my step-by-step guide on creating your very own wrap tulip skirt! Whether you’re new to sewing or looking to add a versatile piece to your wardrobe, this tutorial is perfect for you. I’ll provide a free tulip skirt pattern in 8 sizes, ensuring a flattering fit for everyone. Customize the length to your…
#Beginner Sewing Tutorial#custom skirt length#DIY skirt#Free Sewing Pattern#sewing guide#tulip hem skirt#tulip skirt#tulip skirt pattern#wrap tulip skirt
12 notes
·
View notes
Text

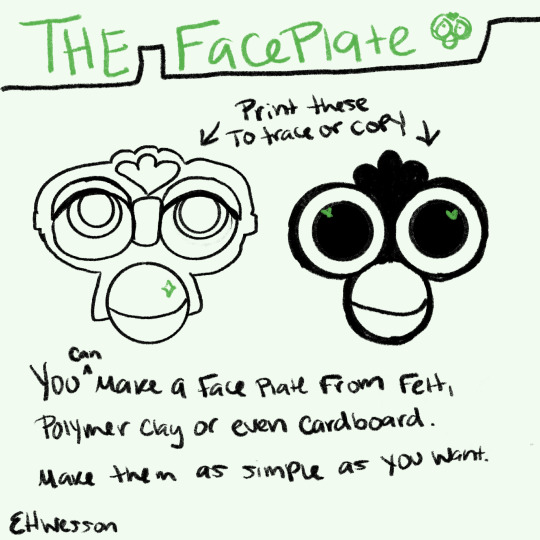
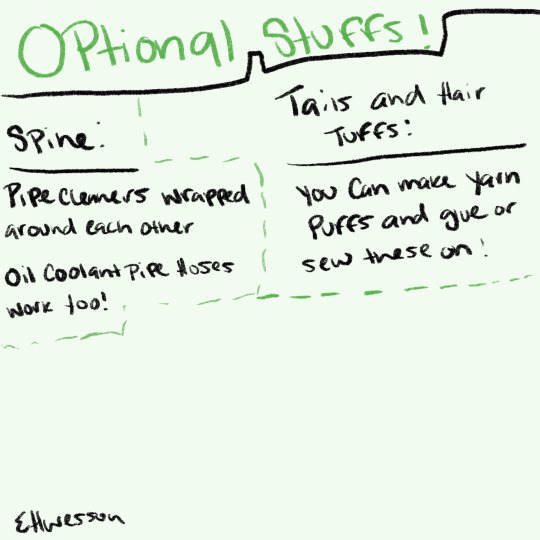


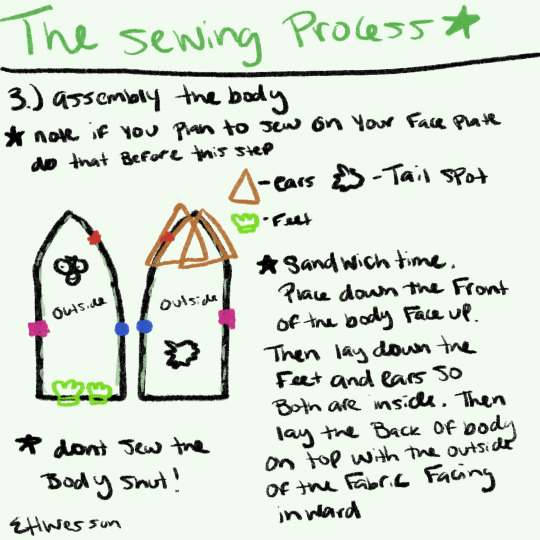
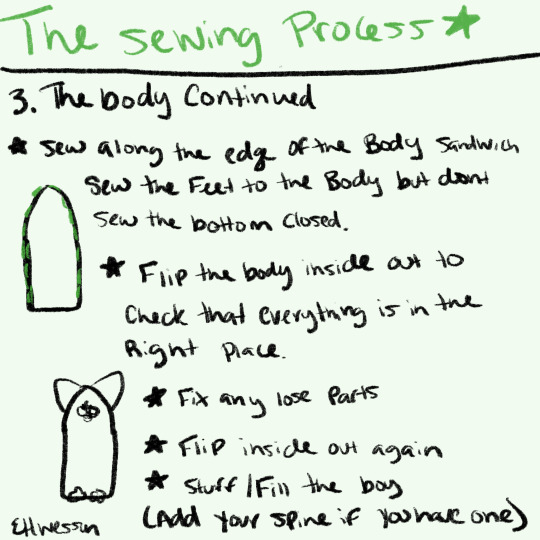

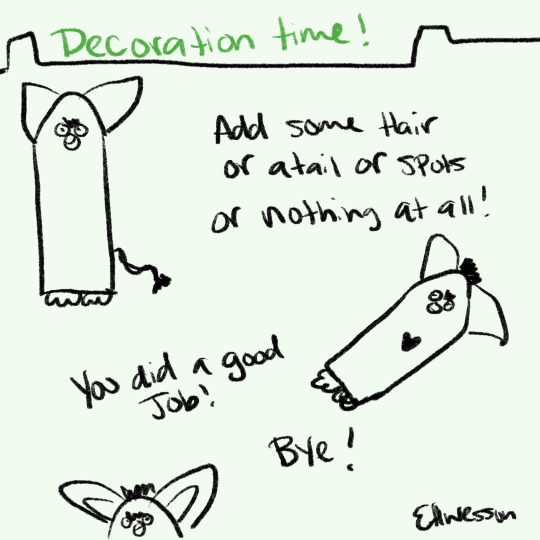
I decided to scribble out my basic long furby process. It’s simple and you can make one with stuff you already have.
If you make one please show me!
Kofi | Patreon | Other Links
80 notes
·
View notes
Text
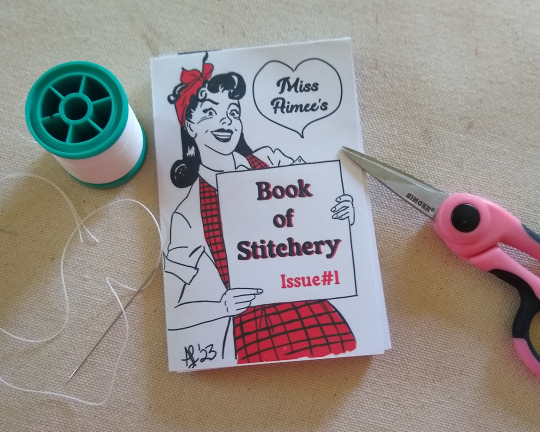
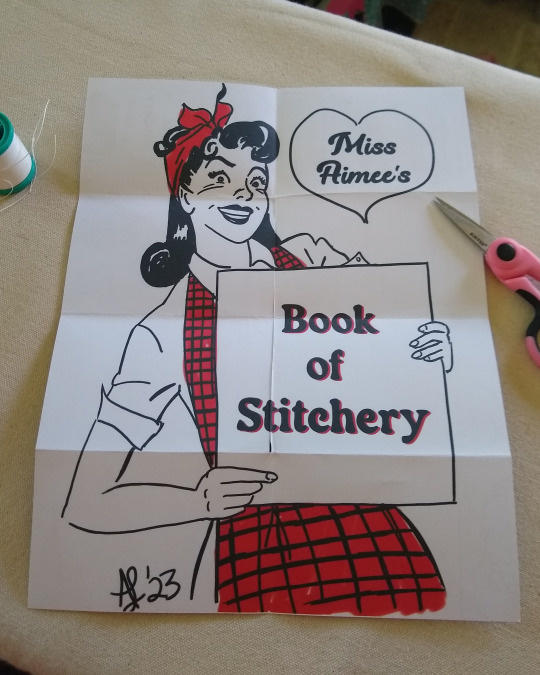
Miss Aimee's Book of Stitchery Issue#1
A guide to the most basic of sewing basics.
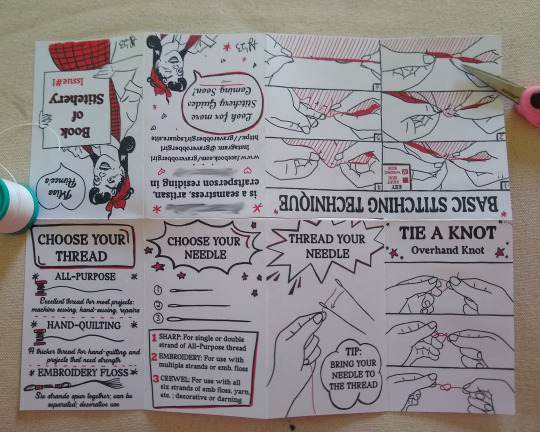
How do I choose a thread, a needle? How do I thread a needle? How do I tie a knot? How do I make a stitch?
Miss Aimee has the answers!
CHECK IT OUT BELOW
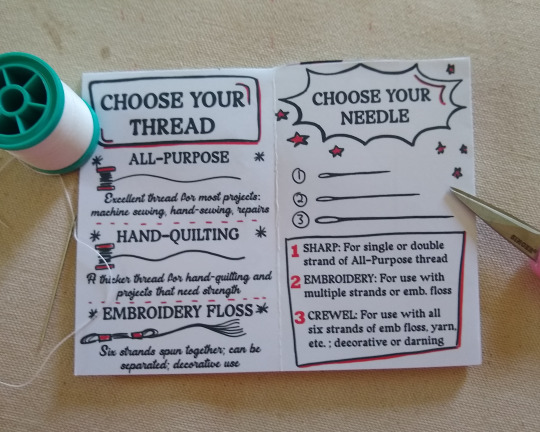
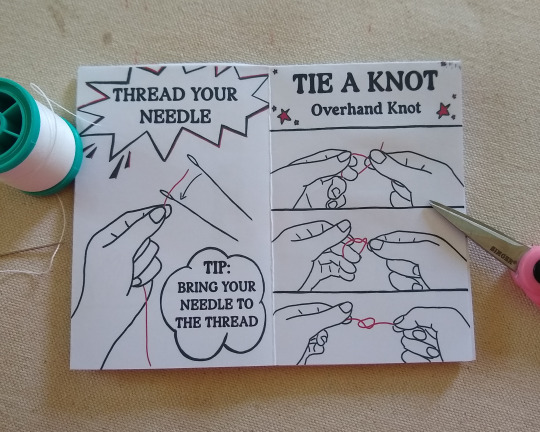
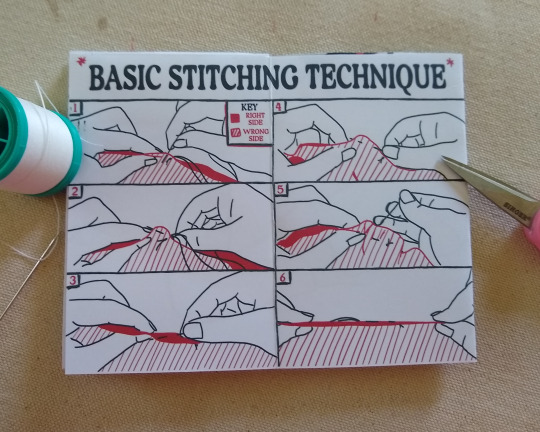
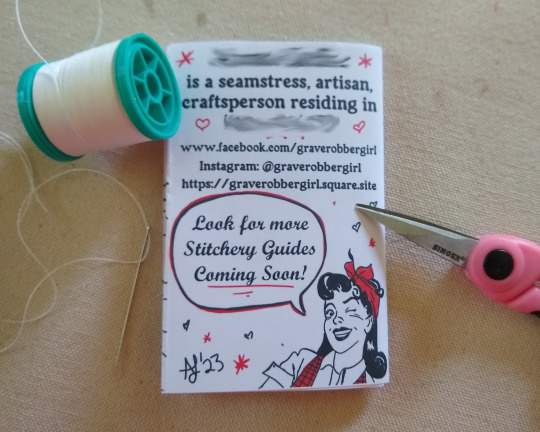
This mini-zine fits on one sheet of paper!
The reverse side is a print of the cover art:
72 notes
·
View notes
Text
🌼 Dive into Disney Dreamlight Valley and assist the Beast on his journey to friendship! Our latest blog post covers everything from finding Belle's books to fishing with Kristoff in the "Be Our Friend" Quest! 🐟✨ Check it out now!
#Be Our Friend Quest#Disney Dreamlight Valley#Disney Gaming#Dreamlight Valley Guide#Gaming Tips#Friendship Quests#Disney Beast#Mirabel Madrigal#WALLE#Quest Guide#Game Walkthrough#Friendship Level#Gaming Community#Video Game Quest#Gaming Adventure#Fishing Contest#Gardening Tips#Sewing Guide#Game Items#Merlins Library#Belle And Beast#Animal Crossing Style#Crafting In Games#Gamer Advice#Adventure Quest#Dreamlight Library#Game Strategy#Video Game Heroes#Disney Friends#Fantasy Gaming
2 notes
·
View notes
Text
TOS Dress Failures Post
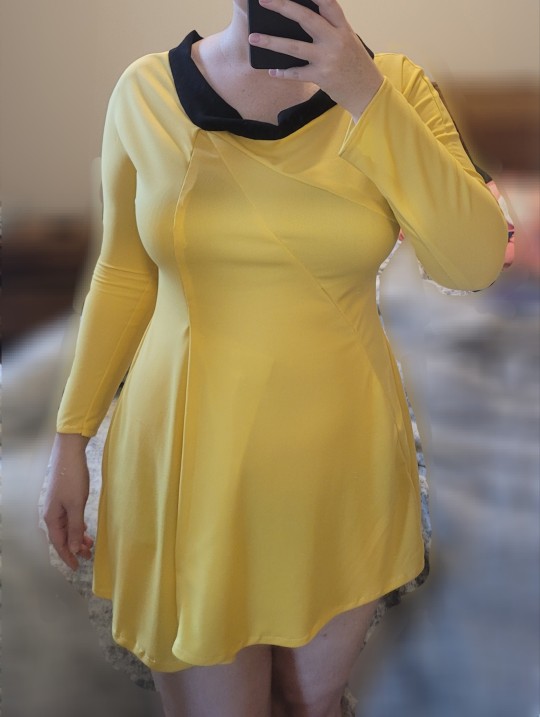
So as I mentioned, I'm beginning a little post here about things I did wrong with my first (yellow) Star Trek: TOS dress, and in the coming days I'll post a few updates about my second (red) dress, and try to show off what I'm doing differently! I am very much an amateur sewer, so maybe don't expect this to be super comprehensive, but I'm going to do my best to talk about the issues I had and just try to shed some light on what ended up being a pretty bare bones pattern. So much stuff I could have done better, some my own folly, some issues with the pattern.
To give you an idea, this is everything that came with the pattern:
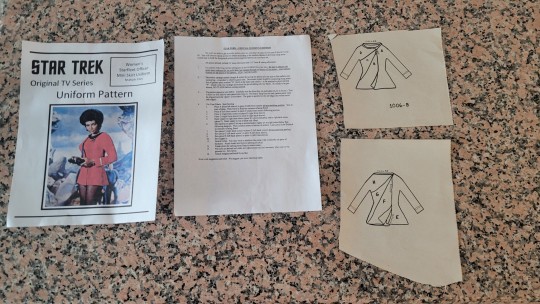
The instructions page is double sided, but the other side is just a sizing chart and recommended fabric types, in fact, the instructions occasionally mentioned diagrams that I did not receive, however, from my scouring the internet, this really is the best pattern if you want the right looking fit of the tos skant dresses, so I went with it anyway.
Some of the issue I ran into were:
Length: The little I saw online did suggest you lengthen the skirt and yeah, they were right. I did try to do this, but my lack a familiarity with the patterns made it really inconsistent.
Although the front is actually a good length, it's uneven because I tried to eyeball it (laziness strikes again), and the back (which I obviously didn't do as well) is waay too short for me to consider wearing in public. But the main issue was, being new to the pattern, I didn't realize that piece 'C' would also be forming part of the hemline, leading to this:
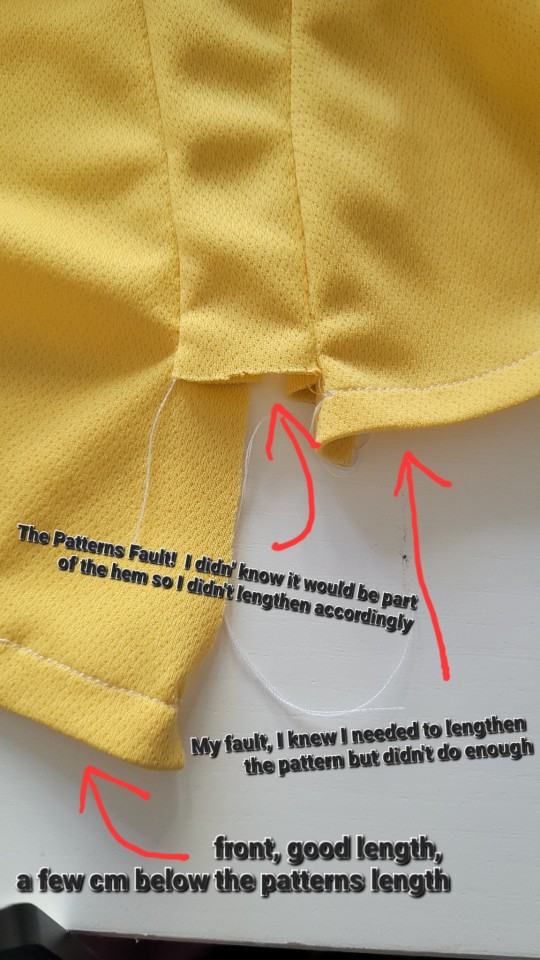
As you can see this was a combo of my own follies and lack of comprehensive instructions.
Solution: add a specific amount of CMs to the pattern length and add it every piece (except the H&D sleeve pieces). I will make a post about this when I begin cutting my red fabric to show you all exactly what I'm doing, because I want to make some more measurements before I settle on a length.
2. Sleeves: The guides also said the lengthen and widen the sleeves, which I didn't do but definitely should have, I ripped so many seams just trying it on because the sleeves were too tight:
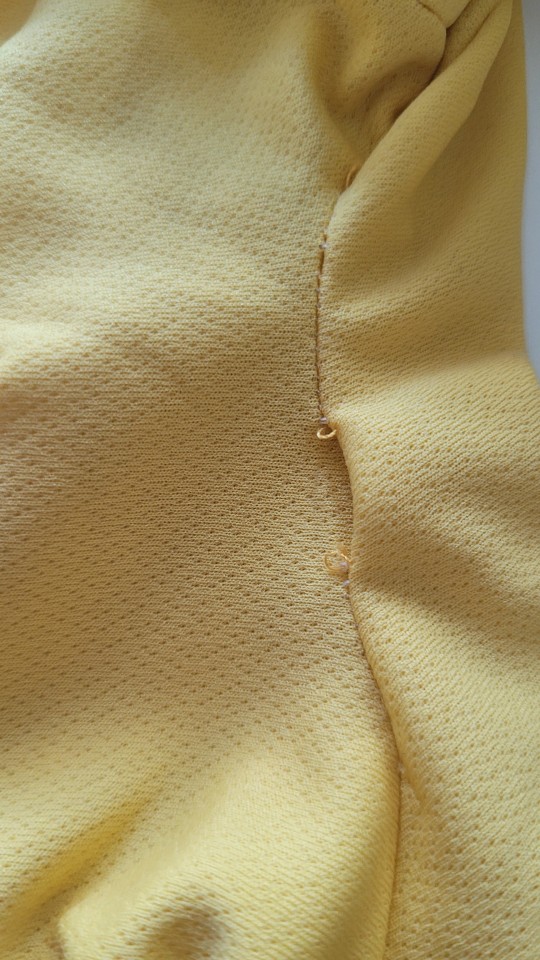
I also used super stretchy fabric for this yellow dress, so with the cotton I'm using this time I will definitely have to be careful about adding a fair amount of width.
I will say the sleeve length is more of a matter of taste, but for an accurate costume I want them at least to my wrists, and this pattern's sleeve barely reached them, so lengthening is also a good idea. It's always easier to take something in than to let it out!
Solution: Add a few cm to the sleeve width and length, I will probably be doing 5cm extra for both because it's a nice round number, and gives me some wiggle room. For Americans in the audience this is about 2 inches.
3. Zipper: With the stretchy fabric I used I almost definitely did not need a zipper. So I didn't fully put it in. Basting the zipper is step 5 of the pattern, so I just sort of... basted it in and then never fully attached it or made the zipper opening because I was confused about where it went. This is where the pattern insists I should have been following a diagram I did not have:

But I did have the little picture, where the zipper is hidden in the pleat, like so:
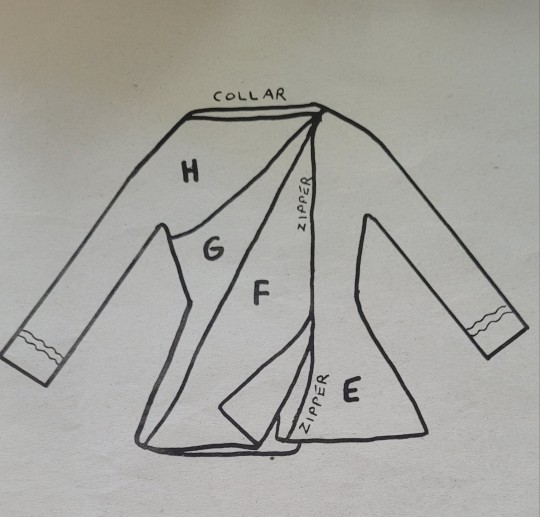
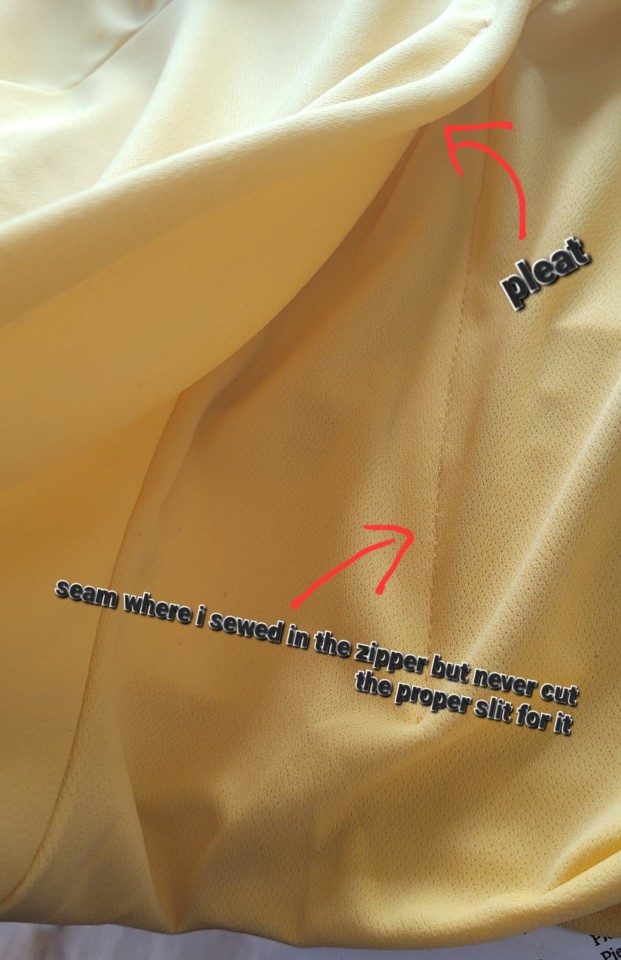
As you can see there is supposed to be a slit in the fabric for the zipper to peek through, but the fabric I used was stretchy enough that I could basically just pull it on. Therefore, I never actually cut the slit and just pulled it on. With my less stretchy cotton I will have to put in a zipper, which will be okay because I figured out how to do it properly.
Solution: Instead of sewing the zipper all the way down right away (what I did) you are only supposed to sew it to the top part of the pattern, and leave the hidden/skirt part to sew in later. To be fair, the pattern does say this, I was just confused about the pleating due to my inexperience which led to confusion about the zipper. Generally though, next time, I will start at the top of the garment and work my way to the bottom... that maybe should have been obvious.
So those were the major problems I dealt with with this pattern, and they're also why I'm excited to try it again and make a better version!
I also had a lot of trouble with the pleating, but that was genuinely just my inexperience and not the pattern giving me issues. I could make another post about the problems I had with that if there are other beginners who might want some tips though.
9 notes
·
View notes
Text
Hey everyone! I have a gumroad AND I posted my Beginner’s Guide to Sewing on it.
Check it out!
0 notes
Photo


(via Introduction to Sewing)
#introduction to sewing#diy sewing#sewing glossary#beginnner sewing#sewing guide#sewing#diy#sewing machine
0 notes
Note
The perfect shirt for dueling, or a love confession, or angsting in the rain, or angstily dueling in the rain until one of you breaks down and confesses your love.
Was it you that made the "how to sew a nice thing comic?
this one?

yes, that's an old one from before I had a tablet and (unfortunately) from before I started putting watermarks on them.
OH ALSO! speaking of watching sewing a nice thing videos, I would like to mention that I have my own sewing youtube channel now!
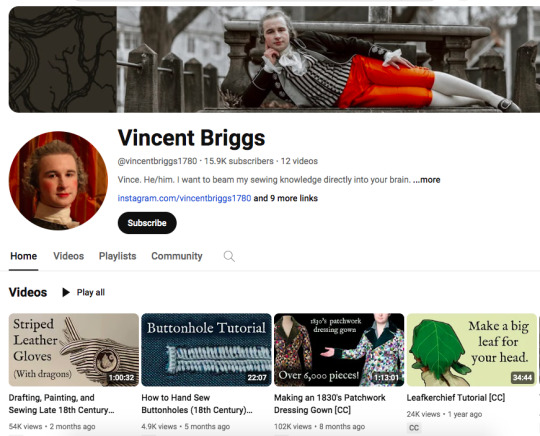
I am quite slow at making videos, but there are so many I want to make. If you've ever watched a sewing video and gone "Hey, wait, you're glossing over too many details, how did you do that? Oh, if only this video had more autism in it!" then you might like these ones, because I do my very best to explain every little thing as clearly as I can! Which is why it took me 22 minutes to say everything I had to say about basic 18th century hand sewn buttonholes, and an entire hour to cover making 2 pairs of gloves.
I'm working on a very very long one right now, and I've been posting monthly updates on Patreon. I started the patreon for the dinosaurs, and I still do 4 extra dinos a month there, but now I'm also doing monthly progress posts on whatever video stuff I've been working on. Quite a disjointed sort of patreon, alas.
3K notes
·
View notes
Text
PSA to all historical fiction/fantasy writers:
A SEAMSTRESS, in a historical sense, is someone whose job is sewing. Just sewing. The main skill involved here is going to be putting the needle into an out of the fabric. They’re usually considered unskilled workers, because everyone can sew, right? (Note: yes, just about everyone could sew historically. And I mean everyone.) They’re usually going to be making either clothes that aren’t fitted (like shirts or shifts or petticoats) or things more along the lines of linens (bedsheets, handkerchiefs, napkins, ect.). Now, a decent number of people would make these things at home, especially in more rural areas, since they don’t take a ton of practice, but they’re also often available ready-made so it’s not an uncommon job. Nowadays it just means someone whose job is to sew things in general, but this was not the case historically. Calling a dressmaker a seamstress would be like asking a portrait painter to paint your house
A DRESSMAKER (or mantua maker before the early 1800s) makes clothing though the skill of draping (which is when you don’t use as many patterns and more drape the fabric over the person’s body to fit it and pin from there (although they did start using more patterns in the early 19th century). They’re usually going to work exclusively for women, since menswear is rarely made through this method (could be different in a fantasy world though). Sometimes you also see them called “gown makers”, especially if they were men (like tailors advertising that that could do both. Mantua-maker was a very feminized term, like seamstress. You wouldn’t really call a man that historically). This is a pretty new trade; it only really sprung up in the later 1600s, when the mantua dress came into fashion (hence the name).
TAILORS make clothing by using the method of patterning: they take measurements and use those measurements to draw out a 2D pattern that is then sewed up into the 3D item of clothing (unlike the dressmakers, who drape the item as a 3D piece of clothing originally). They usually did menswear, but also plenty of pieces of womenswear, especially things made similarly to menswear: riding habits, overcoats, the like. Before the dressmaking trade split off (for very interesting reason I suggest looking into. Basically new fashion required new methods that tailors thought were beneath them), tailors made everyone’s clothes. And also it was not uncommon for them to alter clothes (dressmakers did this too). Staymakers are a sort of subsect of tailors that made corsets or stays (which are made with tailoring methods but most of the time in urban areas a staymaker could find enough work so just do stays, although most tailors could and would make them).
Tailors and dressmakers are both skilled workers. Those aren’t skills that most people could do at home. Fitted things like dresses and jackets and things would probably be made professionally and for the wearer even by the working class (with some exceptions of course). Making all clothes at home didn’t really become a thing until the mid Victorian era.
And then of course there are other trades that involve the skill of sewing, such as millinery (not just hats, historically they did all kinds of women’s accessories), trimming for hatmaking (putting on the hat and and binding and things), glovemaking (self explanatory) and such.
TLDR: seamstress, dressmaker, and tailor are three very different jobs with different skills and levels of prestige. Don’t use them interchangeably and for the love of all that is holy please don’t call someone a seamstress when they’re a dressmaker
#sewing#historical sewing#sewing knowledge#writing guide#PSA to writers#historical fiction#fantasy writing
19K notes
·
View notes
Text
Irregular Circle Flounces -How to Draft and Sew
In this post, you’ll discover how to draft and sew irregular circle flounces. Love what you see ? Support me by snagging some cool items from my shop! Every purchase helps me bring you more awesome content. Thank you! Shop Now Flounces add a dynamic, playful touch to garments, and an irregular circle flounce is an excellent way to introduce asymmetry and movement. Unlike traditional circle…
#Advanced Sewing#Asymmetrical Flounce#diy fashion#dressmaking#fabric selection#Fashion Design#Flounce Pattern#Garment Construction#handmade clothing#Irregular Circle Flounce#sewing guide#sewing patterns#Sewing Techniques
7 notes
·
View notes
Video
youtube
Diy how to make long bu-bu free dress #Easy Sewing tutorial
0 notes
Text
It's really cool that so many people have written books on how exactly to do their very specific jobs.
I'm looking through books on archive.org to see if maybe I can find some cool fonts in any of them, and there are books with names like "The complete carriage and wagon painter : a concise compendium of the art of painting carriages, wagons and sleighs, embracing full directions in all the various branches, including lettering, scrolling, ornamenting, striping, varnishing and coloring, with numerous recipes for mixing colors" (1903), "Elements of lettering and sign painting" (1899), and "The expert sign painter" (1911).
I have no intention of becoming an Edwardian sign painter, but it's comforting to know that there's such a thorough introductory course available at any time should I ever change my mind.
#now if only 18th century tailors had written such thorough guides about the actual sewing... alas.#books#19th century#20th century#history#graphic design
542 notes
·
View notes
Text


Don't tell anyone I gifted you anything!
Love Game in Eastern Fantasy · 2024
#永夜星河#love game in eastern fantasy#the guide to capturing a black lotus#cdramasource#dramasource#asiandramasource#dailyasiandramas#chineseartistsinc#cdramanet#cdramagifs#cdramaedit#cdrama#chinese drama#*4#ep9#ling miaomiao#yu shuxin#ding yuxi#mu sheng#ahahahahh i can't believe it's literally some fabric tied with a string i want to see him sewing 😂#the way he's looking around and sneakily gave her it#also liu dage looks lowkey comical holding the fish on a massive long stick#this show totally has me on full grip (new mobile header just for them!!
307 notes
·
View notes
Text


Not Batman but I made a quilt!
#my art#??????#causeimanartist#I have had little time to draw between puppy quilt and anxiety#I was on a deadline (today) since I made it for my friend's baby shower#(the fact that I have a friend who is pregnant is wack#anyway this was my first time sewing!#I've been wanting to learn and this seemed like the perfect excuse#I picked bears because she said forest greens and on her regristey was some bear related items)#I (mostly) had fun - I hated doing the binding (last night lol)#big shout out to my mom for guiding me through the process since she makes quilts all the time#quilt#quilting#first quilt
129 notes
·
View notes
Text

making slow progress on this project yayyyyyyyyyy.
84 notes
·
View notes
Text
Personally I love it when the whole team is captured, waiting for interrogation, and the first thing Whumper does is break the medic’s hands.
#dragging Medic out while the rest of the team pleads to take their place#Medic’s wrist being pinned to the floor#and the moment it dawns on them that they’re about to lose any value they added to the team#good shit#bonus points if Medic is hurt further and they have to guide another team member through setting a broken bone or sewing up a wound#screaming through their teeth even as they tell their team member to keep going#whump
136 notes
·
View notes