#satin stitch tutorial
Explore tagged Tumblr posts
Visit Tumblr Blog
Explore Tumblr blogs with no restrictions, modern design and the best experience.
Last Seen Tumblr Blogs


Fun Fact
In February 2021, Tumblr had 518.6 million blog accounts.
Text
youtube
A bouquet of stitches, a masterpiece in the making! 🌸✨ Learn how to embroider this charming 'Girl with Bouquet' design with my easy DIY tutorial. Let your needle paint a story!
#threadskalakari#crafts#handmade#embroidery tutorial#embroidery pattern#embroidery#diy#knitting#art#youtube#satin stitch#embroidery stitches#hand stitching#doll collection#creative#creative design#Youtube
1 note
·
View note
Text
Had a few folks interested in how I made the patches I posted for Solarpunk Aesthetic Week, so I thought I'd give y'all my step-by-step process for making hand-embroidered patches!

First, choose your fabric and draw on your design. You can use basically any fabric for this - for this project I'm using some felt I've had lying around in my stash for ages.

Next, choose your embroidery floss. For my patches I split my embroidery floss into two threads with 3 strands each, as pictured. You can use as many strands in your thread as you prefer, but for the main body of my patches I prefer 3 strands.
Next you're going to start filling your design using a back stitch.

First, put in a single stitch where you want your row to start.

Poke your needle up through the fabric 1 stitch-length away from your first stitch.

Poke your needle back down the same hole your last stitch went into so they line up end-to-end.
Repeat until you have a row of your desired length (usually the length of that colour section from one end to the other). Once you have your first row, you're going to do your next row slightly offset from your first row so that your stitches lay together in a brick pattern like this:

Make sure your rows of stitches are tight together, or you'll get gaps where the fabric shows through.
Rinse and repeat with rows of back stitch to fill in your patch design.

When you're almost to the end of your thread, poke your needle through to the back of the fabric and pull the thread under the back part of the stitching to tuck in the end. Don't worry if it looks messy - no one's gonna see the back anyway.
This next step is fully optional, but I think it makes the patch design really pop. Once your patch is filled in, you can use black embroidery floss to outline your design (or whatever colour you want to outline with - it's your patch, do what you want). I use the full thread (6 strands, not split) of embroidery floss to make a thicker outline.

I use the same back stitch I used to fill the piece to make an outline that adds some separation and detail. You could use most any 'outlining' stitch for this, but I just use back stitch because it's just easier for me to do.
Once you're finished embroidering your patch, it's time to cut it out!

Make sure to leave a little border around the edge to use for sewing your patch on your jacket/bag/blanket/whatever, and be careful not to accidentally cut through the stitches on the back of the patch.
If you have a sturdy enough fabric that isn't going to fray, you can just leave it like this. If not, I recommend using a whip stitch/satin stitch to seal in the exposed edges (I find that splitting your embroidery floss into 3-strand threads works best for this).

And then you're done! At this point you can put on iron-on backing if you want, or just sew it on whatever you wanna put it on. Making patches this way does take a long time, but I feel that the results are worth it.
Thanks for reading this tutorial! I hope it was helpful. If anyone makes patches using this method, I'd love to see them! 😁
#solarpunk aesthetic week#sewing#tutorial#sew on patch#punk diy#diy punk#punk aesthetic#handmade#solarpunk#handcrafted#embroidery#embroidered patch#how to#how to make a patch
18K notes
·
View notes
Text

One more tutorial. I think this is the last one I have for now.
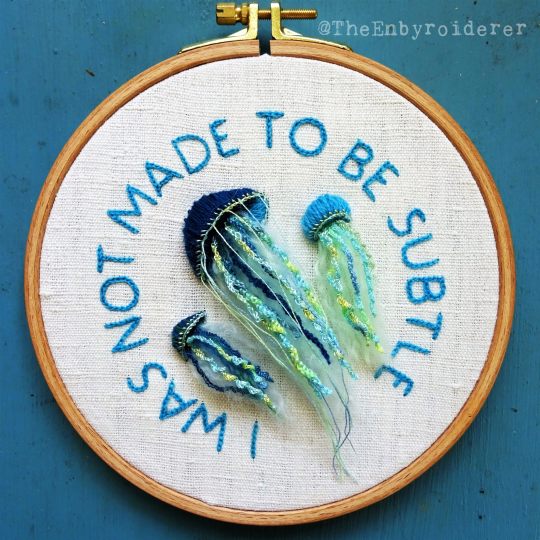
Here's how you stitch a 3D jellyfish. This is a more advanced tutorial. Prior experience with most of the stitches is recommended.
Materials: You'll need several needles, at least one shorter and one really long. I've used sashiko needles in three lengths, 4 cm, 5.5 cm and 8.5 cm. As for yarn, I think you can use whatever you have. Most of it can be done with six-stranded floss, but you'll need some thicker woolen yarn for the fluffy turkey stitch. I used fine d'aubusson (a fine wool embroidery yarn) for the body, six-stranded floss (2-3 strands) for most of the tentacles, a shiny silky embroidery floss for the edge of the body and a couple tentacles, and knitting yarn scraps for the turkey stitch.
Stitches: satin stitch, bullion stitch, padded satin stitch, buttonhole stitch, drizzle stitch and turkey stitch. Please look up stitch instructions on youtube, and do a bit of practice beforehand. This project is probably not a good practice run for these stitches.
Time: depends on the size of your jellyfish. I made quite a large one and it took me about 5 hours to complete.
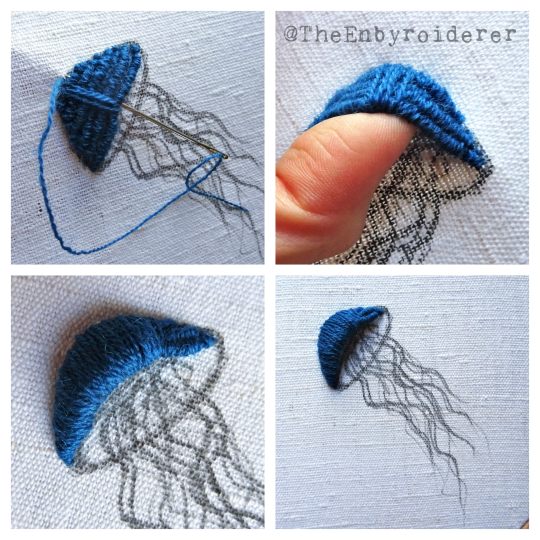
1. Make a sketch of your jellyfish. At least of the body. Fill this body from edge to edge with bullion stitch, make them a bit longer than the body is wide so that they are somewhat loose. You should be able to get a finger underneath the bullion, depending on the size of your jellyfish.
2. Then it's time to satin stitch the body. For this part it's important that the needle goes through the fabric as close to where it came up as possible. The goal is not just to make a 3D body, but to make it a hollow 3D body. Don't just stitch over the bullion, stitch around it. It's also important to not pull too tight. Bullion stitch of this lenght is rather malleable, so it's a bit tricky to keep the satin stitch even. Hold a finger in the hollow underneath the bullion as you pull the thread tight. This will stop it from getting to tight, as well as make sure you keep the hollow. As the stitching gets thicker the hollow will get smaller, but that's ok.
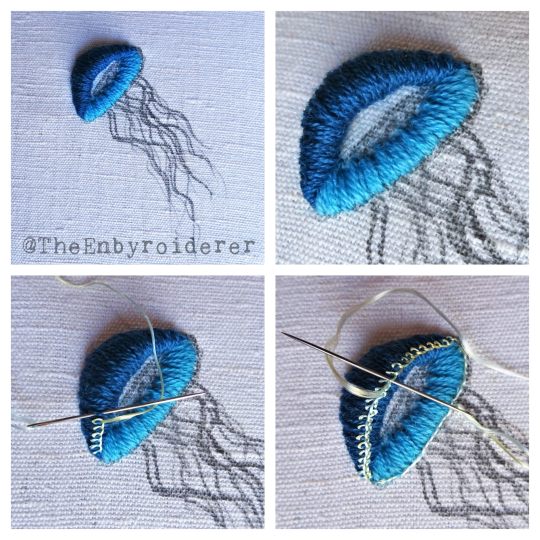
3. When the top part of the body is fully stitched it's time to do normal flat satin stitch for the bottom part, the inside of the body of you will. Leave an opening in the middle though, you'll need some space for the drizzle and turkey stitch later.
4. This is a good time to give the edge some definition. Do buttonhole stitch around the top edge, then you go around and do another row of buttonhole stitch, kinda the other way around, through the loops from the first row. Hopefully you can see from the pictures what I've done. The bottom edge of the body doesn't need defining and won't be very visible anyway, so I just did some sloppy stitches along there and called it good enough.
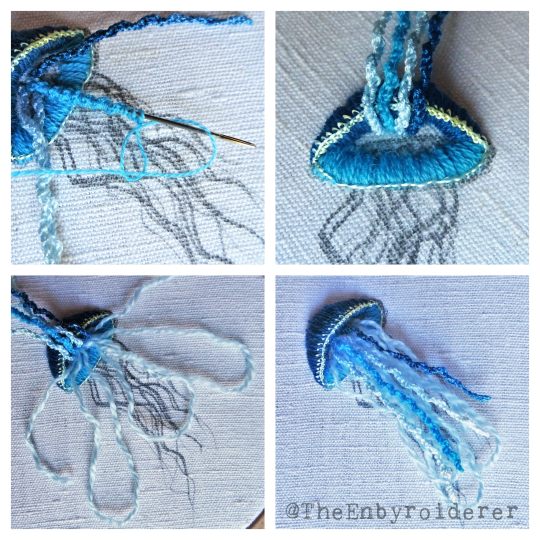
5. Now it's time for the tentacles. Start with the drizzle stitch, because the turkey stitch will just get in the way if you start with that... but do remember to leave space for the turkey stitch underneath the drizzle stitch. This is where you need the loooong needle. Pack as much drizzle stitch on that needle as you can. You'll notice that the drizzle stitch wants to rotate around your needle as it gets longer, do let it, that will just help you fit more stitch on there, as well as give the finished stitch a nice curl.
6. When you think you have enough drizzle you can move on to the turkey stitch. You will not need to do a lot of it. You'll probably overestimate how much you need, but that's ok, you can always give the fluff a bit of a haircut later. Do a few looong loops of turkey stitch, a little bit longer than your drizzle stitch. Cut the loops to slightly different lengths, otherwise you'll get a very blocky bit of fluff... tapered is better. Untwist the yarn and separate the strands, draw a needle through the strands to fluff them up.
7. As a finishing touch you can add some long and thin strands around the edge of the body.
Edit: Tfw a post has been up for years before you notice that you forgot a whole-ass step. Apparently #4 has been missing all this time. Oh well.
#embroidery#3d embroidery#fiber art#needlework#embroidery tutorial#fiber art tutorial#3d embroidery tutorial#tutorial#jellyfish art#theenbyroiderer
798 notes
·
View notes
Text
To Live In Color Bookbinding Tutorial(s)
Here's how I turned To Live In Color into a book.
This fantastic book binding tutorial by @armoredsuperheavy was incredibly helpful and insightful. It taught me how to format the fic in a Word document. I cannot overstate how detailed and wonderful this tutorial is.


After winning a battle of wills against Word headers, I sent the PDF to a printer in order for it to be printed in color. Shockingly, color was important for the artwork in a story whose title and main theme is about color. I used Armored Super Heavy's method for sewing signatures together using linen ribbon for stability. I took no chances on my masterpiece.


I used this bookbinding tutorial from youtuber Bitter Melon Bindery as a guide for the construction of the book. Two cutting boards still covered in cellophane and two clamps as my bookbinding press were my pressing tools. Is it fancy? No. Is it cheap and does the job? Yes. After the spine was glued, I cut the edges for a smooth, polished look using a box cutter and metal ruler. This was the most nerve wracking step, and the one I struggled with the most, honestly. Mistakes were made. Fine grit sandpaper was key for fixing them and achieving a smooth, professional look. Then I added mull (or the closest fabric I could find acting as mull) to strengthen the spine. I made two copies of the book, one for myself and one for @sparrowmoth, who was the biggest cheerleader for this fic. Seriously, their comments (and friendship which started because of this fic) were so wonderful that I'm gifting them a physical copy.


I measured and cut the book board. The cover is meant to look like Wylan's waistcoat in the fic, Cinderella blue with eye catching silver and blue embroidery. Sparrowmoth helped me design an embroidery pattern to fit the dimensions of the cover. The final design is an adjusted version of this embroidery pattern from Bella Savory on Etsy. I did buy the pattern, for the record. I would have liked the pattern to swoop diagonally across the cover (as pictured above on paper), but the narrow length made this difficult.
I cannot tell you how many times I drew this pattern. First, it was copied onto paper and also copied onto the reverse side of the paper. Then, it copied (backwards) onto the interfacing which was then ironed onto the wrong side of the blue satin used for the cover. All of this was a spacial awareness nightmare for me to make sure it was on the correct side of the cover and facing the correct direction. Woof. Finally, I held the satin up to the light and retraced the pattern AGAIN with pen onto the front of the satin.


I have no real experience embroidering, other than using a simple back stitch once for cosplay. But I looked up stitch tutorials online and made two practice samplers (once exactly as instructed by the original pattern I bought, and once with the modified pattern, satin fabric, and satin silver floss) before attempting the final version. It's not perfect, but I am very proud of how it turned out.


I then turned the satin fabric into bookcloth by using a double sided adhesive (shown with the square paper) and blue tissue paper. The color was not necessary because it's not seen when finished, I was just being extra. The adhesive had the added benefit of securing the back of the embroidery. Then I glued the cover boards. The glue warped the boards, but they were easily fixed by placing the text block between and pressing it down overnight with a heavy textbook.


Unfortunately, the corners were a mess. The satin frayed easily despite being glued and I was forced to use metal corner covers to prevent the fabric from damage. The corner covers actually worked in my favor. Now I like the look of them. They definitely make the book seem more polished and fairy tale fancy.


Finally, I glued the textblock to the cover, completing the book. It's not perfect by any means, but it is my masterpiece. Every part of the book (except for Sparrow's artwork) was created by me. I wrote the story, formatted the text, created all of the other artwork including the title image with the butterflies, and embroidered the cover. It was a labor of love from beginning to end. I am so proud of my fanwork-turned-book.

45 notes
·
View notes
Text
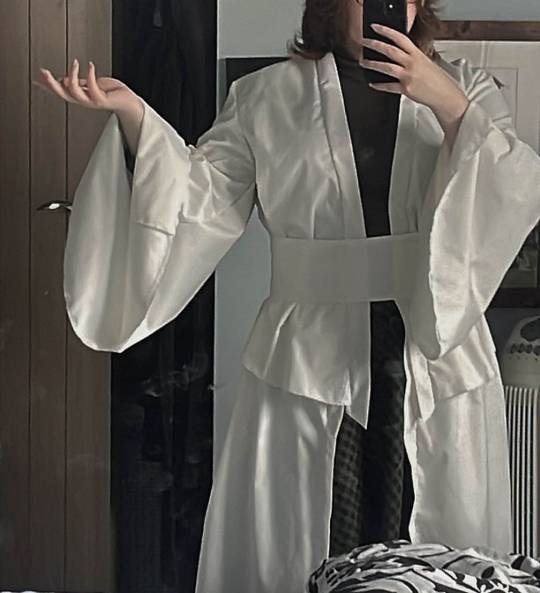
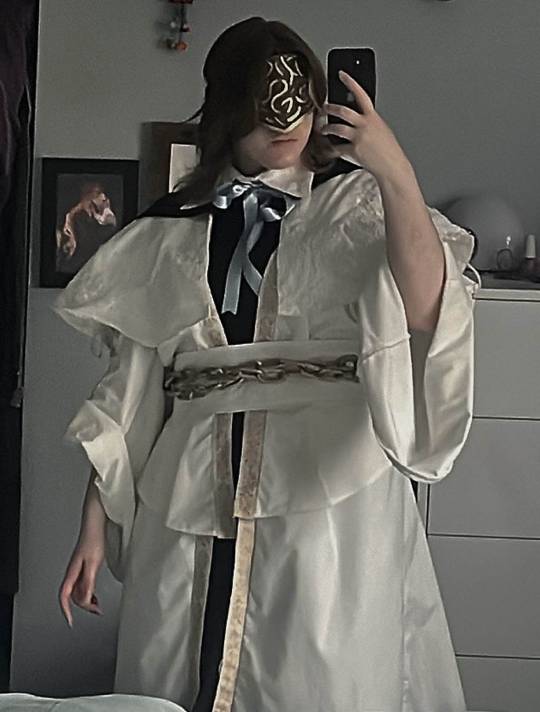
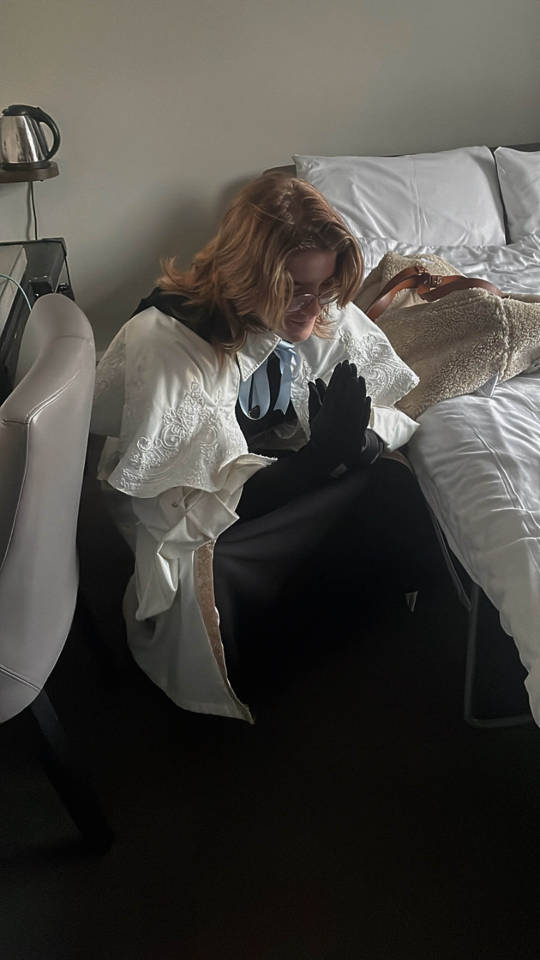
Hello!! breakdown of Choir Cosplay!! This is not really gonna be a step by step but a general vibe of what I did to make this cosplay :) To note: I haven’t sewn anything since I was in highschool which was 8 years ago, so a lot of this is like a ‘ya that works’ - make improvements where I could not :p Overall I wanted the cosplay to not be an exact copy of what is in game, personally I prefer more fitted clothing so I went close to my size with the pattern. Fabric: I used an ivory polycotton, ivory satin and black cotton. 1. I started hunting for a pattern that at least captured the vibe of the choir garb. I had split up the garment in my head into 3 separate parts: The base, the capelet, all the extra fancy bits. The big concern when picking fabric is I didn’t want the garment to be translucent, which is a problem for lighter coloured fabric. BUT!! I found that I didn’t have to make a lining and could instead flatline the fabric - where you cut double the piece and stitch them flat against each other - making it both thicker and opaque!
Flatlining tutorial:
https://www.youtube.com/watch?v=5N-qdP9tcc4&pp=ygUSZmxhdCBsaW5pbmcgc2V3aW5n
I found this pattern by Gunnar Deatherage on Etsy (as a beginner I loved this pattern, it’s very in depth and easy to follow)
https://www.etsy.com/uk/listing/1270370974/maxi-duster-wrap-pattern-instant?ga_order=most_relevant&ga_search_type=all&ga_view_type=gallery&ga_search_query=gunnar+deatherage&ref=sr_gallery-1-14&pro=1&sts=1&dd=1&content_source=95a164c411331c5aaff8fee029dee1e6377d3f92%253A1270370974&search_preloaded_img=1&organic_search_click=1
I did not use the sleeve pattern from it, instead I made my own to have the right fall and size.

Use the sleeve cap from the pattern so it can attach correctly to the bodice/back pieces - then where the sleeve starts to become longer draw out diagonally on both sides. For length I used the original pattern and went slightly longer! :) I used the same pattern for the peplum sorta top section and again for the skirt on the bottom. It creates a stitch line along the front but it’ll be covered by the belt!
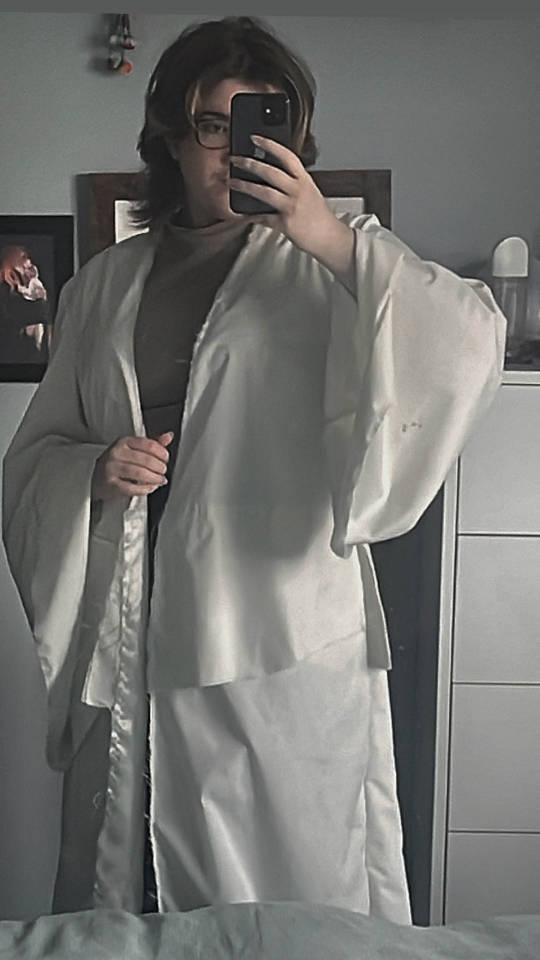
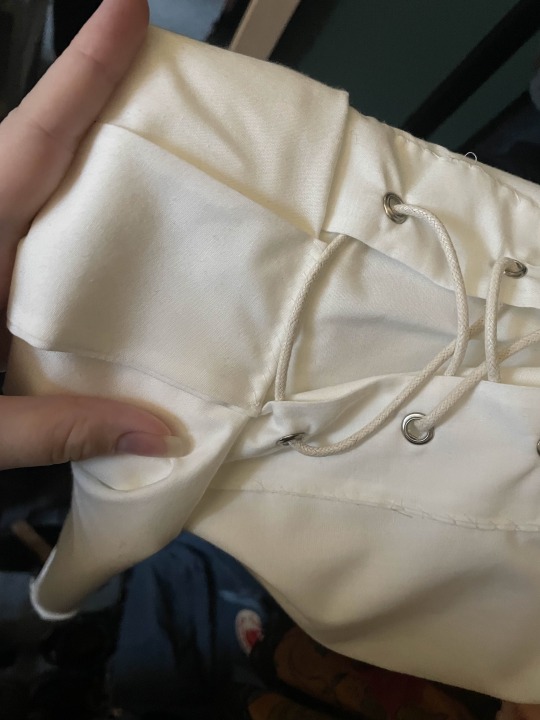
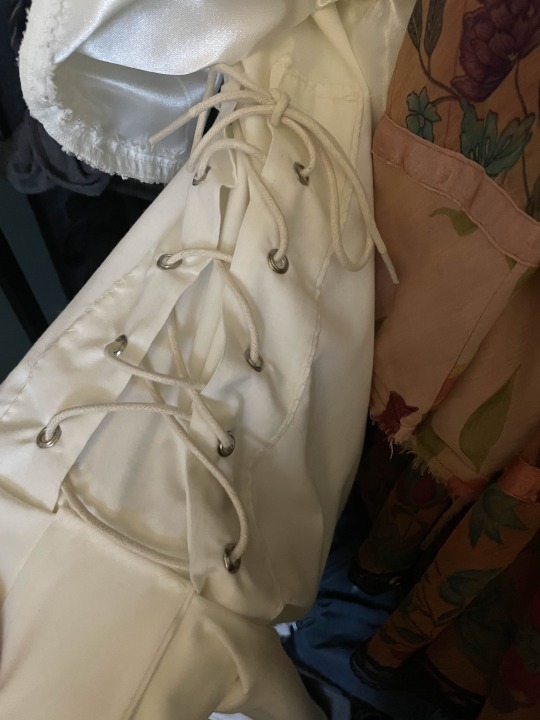
I bought this embroidered ribbon and attached it around the edges of the garment! https://www.etsy.com/uk/listing/840215852/35-mm-golden-victorian-jade-jacquard?click_key=2c042e9416627d9bf9d2f1e85385ba93e48ca464%3A840215852&click_sum=1fe453a7&ref=shop_home_active_1&sts=1 Corset/rolled sleeves: I did this last Corset pieces: Cut out 4 pieces (twice) - and attach them together leaving the end open to turn them inside out. Use a grommet tool and punch some holes through your fabric - make sure they line up. Roll the sleeves to roughly where your inner elbow is and attach another piece of fabric around the width of the roll - pin it in place. Hand sew the corset pieces on and the other piece of fabric so it is all secure :) Thread some similar coloured lacing to the fabric through the holes.
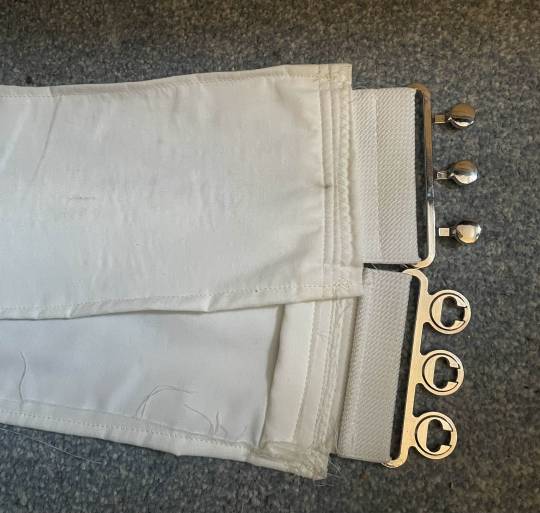
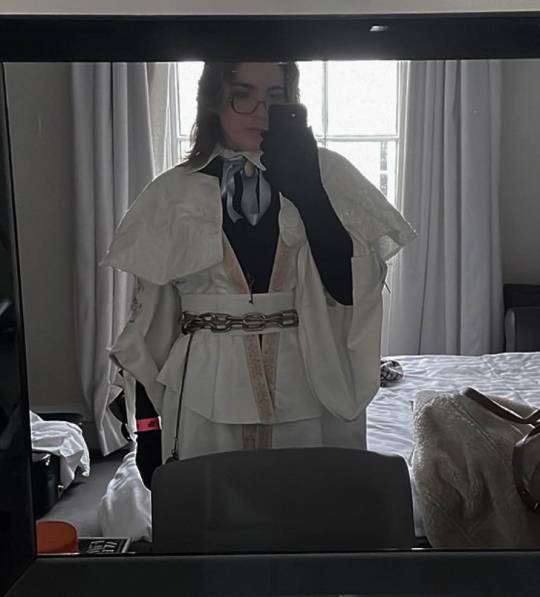
2. The belt! (My mum helped me a lot on this and was my voice of reason) Originally I had bought an elasticated belt with a clasp, but it didn't work at all and ruined the fall of the garment.
I chopped off the end of the belt, leaving me with some elasticated ‘fabric’ and the clasp. Measured my waist and cut out a thick piece of fabric twice and one piece of iron on interfacing. The measurement I did with the base on and added slightly more for both seam allowance and so there was breathing room for myself. Put the clasp piece on either end of the fabric and sew it all together! :) (marks are from the paint of the chain rubbing off onto the fabric :P)
3. The caplet! For the capelet I used this tutorial Easy DIY Capelets | For Halloween, Thanksgiving & Christmas🎃🍂🎄 (The only issue with this is I couldn’t get my head around how to attach a non circle collar) Ivory polycotton + Ivory satin used. Doing the base of this is pretty straightforward with the tutorial - it’s just a circle skirt but for your neck. If you want to be evil to yourself, you can do what I did and hand sew bridal applique all around the garment. If you can machine sew it please do :p I went for a big swooping shaped applique in ivory - any gaps I had were filled with more applique https://www.etsy.com/uk/listing/628065500/beaded-sequinned-lace-flower-wedding?click_key=d8b4937d8079ab34b301cf2d4dc7fbd0d6ede960%3A628065500&click_sum=81fb49a9&ref=shop_home_recs_1 I used poppers on the base and the cape to attach them together - it kept choking me if i didn’t 4. The collar - made me want to cry ngl I could not figure out for the life of me how to attach a non circle collar to the capelet (which is how I wanted it). Instead we have a removable collar!! I copied the size of collar from one of my own shirts and followed these tutorials TWO PIECE COLLAR TUTORIAL | KIM DAVE How to Sew a Collar and Collar Stand Easily by Sew Sew Live 5. Graduation hood???? For some reason you can’t just buy these in the UK without paying £30, so I made my own Cut out double for the pieces around your neck and one for the ‘hood’ part Gather the ends of the rectangular piece and attach them to the other pieces!
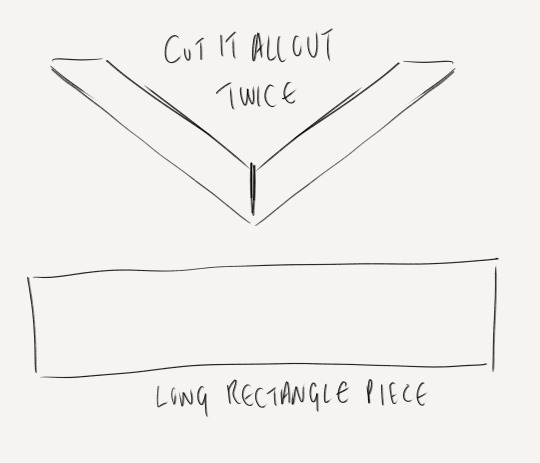
6. The Fancy back panel piece Measure from mid shoulder blade to the bottom of the garment for the main rectangular piece. Cut out two other rectangles of the same width coming into an arrow shape. Sew them all together and start sketching on the design. The great thing here is you can make it up, because it’s too complicated and nobody is gonna look at it and be like ‘u did it wrong’ I used a fabric medium and gold metallic acrylic
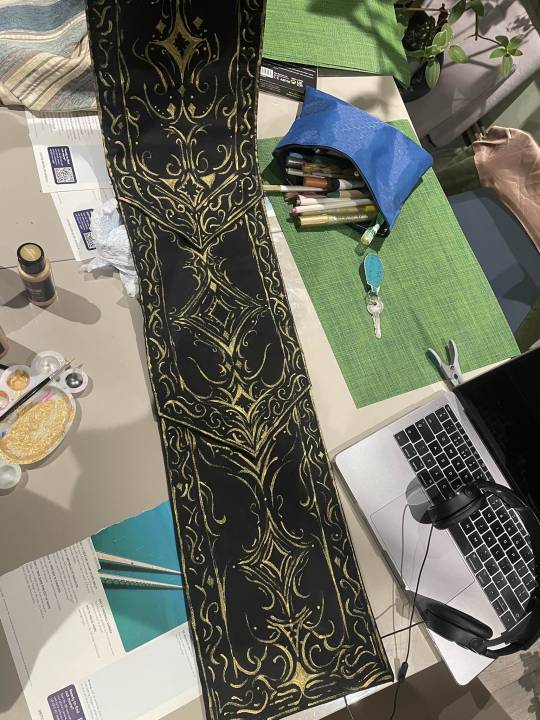
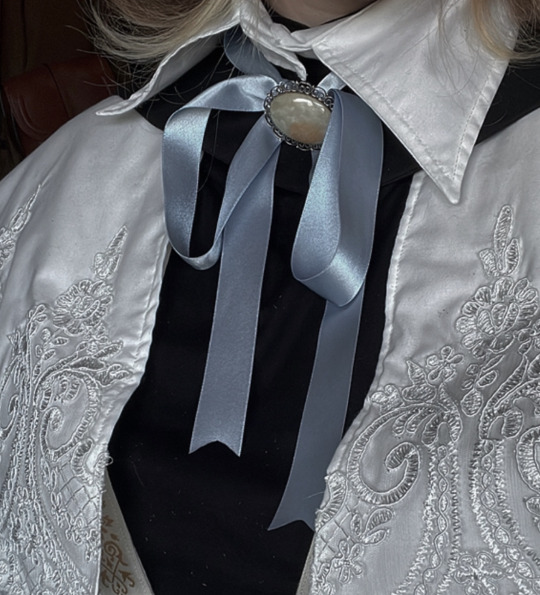
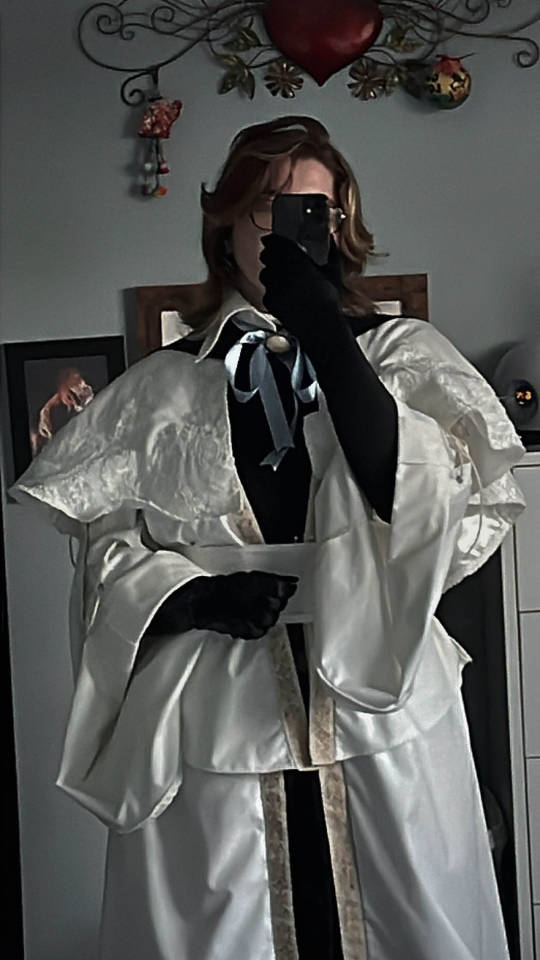
Once it’s all done, I machine sewed it to the back of the base garment because it’s hidden by the cape. 7. THE REST Chain: Me and the chain belt had a fight - Originally I used metal chain,, but I’m allergic to some metal and can’t deal with the smell,, I switched to a plastic chain with 2 D Ring clasps - had to sand it down but the gold spray paint loves to flake off. If I knew about it before, I’d use EVA foam chain :) Black pieces underneath: I bought a turtle neck and a long black skirt :P but you could make it as a dress or smth! Purchased long black velvet gloves, a pocket watch and a key necklace (I didn’t want to use a censer - and they are v expensive/idk how to make one) Ribbon + brooch: I bought chunky soft blue ribbon and found a vintage brooch on vinted
The mask: If you have contacts you’d probably be fine, but I don’t and this mask messed with my depth perception and balance so I had to take it off so I could wear my glasses :(
Use buckram plastic mesh - the thicker kind, used for fursuit eyes and in black! You can see out but nobody can see in. I made a mock up with paper but sorta looks like this shape :)

Eva foam pieces cut out into swirls and filigree like shapes, glue it onto the buckram I did a base coat in grey over the entire thing and painted it with black, gold and bronze acrylic! I hole punched and put the ribbon through it so the mask could be tied around my head.
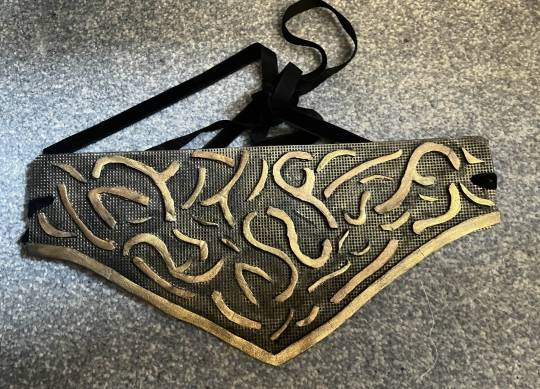
If you’re making the mask and hat - I’d attach the mask to the hat so it’s one piece :) Where I went wrong/what I’d improve I wish I had been able to attach the collar to the rest of the garment. There is a gap that appears between the collar and the caplet/base at the back (mainly due to gravity and it moving) that can be annoying, since my hair is on the longer side it was covered but still I wish it wasn’t there. I’d also want a bigger collar! I’d not use satin as a lining for the skirt and capelet - it’s so annoying to use and it’s so slippery Maybe would not hand sew all that applique because it took me over a week :P BUT OVERALL for a first cosplay, it’s pretty good! I’m mostly happy with the outcome and it was one of my dream ones to do! :) I hope this helps, I didn’t take photos of all the steps unfortunately but hopefully it makes sense :)
#Choir cosplay breakdown as best as I could#with links and things to where I got my patterns and tutorials from#I hope it helps - if you wanna know more or see more photos feel free to dm and ask idm showing!!#bloodborne#bloodborne cosplay#choir cosplay#bloodborne art#bloodborne choir#cosplay#fanart#art#artist#fromsoft
54 notes
·
View notes
Note
could you make a candy club hat tut and materials list...?
Okay!
Materials:
-white cotton fabric, you'll need about a yard
- white & light blue thread
-pink embroidery thread
-light blue ribbon
Pattern is a sailor hat pattern, you can probably use any sailor hat pattern that is round on the top but here's the free one I used
Pattern:
https://www.ja-academy.com/courses/free-sailor-hat-pattern
Tutorial: https://youtube.com/shorts/bYy5mcc8bQQ?si=LQet6S4pjJo0ZYnt
Add seam allowance to the pattern!!!
I used a sewing machine but you don't need one for this, if you can hand stitch, you'll be fine. Also while the creator surges the edges I didn't, I put a lining but you don't have to or you can zig zag stitch or use fray check on the inside raw edges
The pattern's brim was a bit too long to where you couldn't see the candy club logo so I'd suggest not adding the seam allowance to the top and bottom, do add your seam allowance to the side.
I sewed the ribbon after sewing the front brim, I marked where I wanted it and pinned the ribbon in place.
For the candy club logo I used I think a satin stitch.
I think that covers the things that need explaining, if you need help or have questions I'd be more than happy to help!!
29 notes
·
View notes
Text
Hace un par de días encontré este vídeo:
A couple of days ago I found this video:
youtube
Aunque no lo seguí al pie de la letra (utilicé una cinta de satin, doblada por la mitad y una puntada diferente), fue este tutorial el que me dio la idea para hacer este pin.
Although I didn't follow it exactly (I used a satin ribbon, folded in half and a different stitch), it was this tutorial that gave me the idea to make this pin.


(Casi todo lo que use son materiales que encontre tirados en las calles a lo largo de los años, tengo tendencia a juntar todo lo que encuentro en la calle y se ve mínimamente interesante.
Bueno, diria que todo lo encontre en la calle, pero sinceramente no recuerdo de donde vino la flor pequeña rosada, ni cuanto tiempo lleva dando vueltas por mi casa.)
(Most of what I used were materials I found lying around on the streets over the years, I tend to collect everything I find on the street and that looks even remotely interesting.
Well, I would say that I found everything on the street, but I honestly don't remember where the little pink flower came from, or how long it's been hanging around my house.)
Creo que en algun momento tal vez le agregue algo mas al alfiler de gancho, porque la cinta le queda un poco angosta, tal vez.
En fin, hice uno y tal vez haga un par mas, creo que uno inspirado en Hannibal y uno en Percy Jackson, no estoy segura.
I think at some point I might add something else to the safety pin, because the ribbon is a little narrow on it, maybe.
Anyway, I made one and I might make a couple more, I think one inspired by Hannibal and one by Percy Jackson, I'm not sure.
#diy#diy or die#solarpunk#solarpunk fashion#easy project#solarpunk aesthetic#spanish and english post#Youtube#ecopunk#reciclado#recycled materials
13 notes
·
View notes
Text


A Spring-themed post with some flower embroidery practice from April 2022 😃🌸🍃✨! This design, embroidered on a scrap of gorgeous red-purple dupioni silk 💜, is based on a tutorial by Slowly_embroidery (IG/YouTube), adding more intense pinks and some purples to the original all-pink palette, and also changing the sizes 🌸🌷. This was my first time doing leaf embroidery practice, so some of them are wonkier and others are actually upside down 😅🤣. Also my first time (out of two projects so far) trying the double cast on stitch, and it also came out a little wonky and quite different from petal to petal, but I don't hate the results, all in all! . . 🌿Stitches: Outline stitch for the stems, straight stitch and a bit of satin stitch for the smallest flowers, French knot stitch for the centre of the flower, lazy daisy stitch and herringbone/fishbone/leaf stitches for the leaves, and the most ambitious stitch here, double cast on stitch for the larger flowers. . Also on:
🌸ArtStation 🌸Cara 🌸Instagram 🌸DeviantArt
#embroidery#My art#flower embroidery#crafts#nature embroidery#embroidery art#embroidery design#flowers#nature#flower art#nature art
10 notes
·
View notes
Text
Demiurge doll pt 3 - Nendo/YMY clothes
I tried to make trousers, and the short version is I need more practice 🤣
The long version is below:
I ordered a cheap Nendo suit and took the trousers apart, noting the sewing order. Then I marked the separate parts with the stitches and folds and transferred that on to some 300gsm paper to make a pattern. I cut that out and used it on the printed cotton to draw the pattern on the fabric.


Cut it out and hand sewed with a back stitch as per my own idea of wtf to do. Turns out that handstitching is too chunky and I really need to look at a tutorial for how the crotch works.


The finished result was too short despite me adding length, and they look better on backwards with the way the side seams have laid. But it's a good start.


Oh and if you want to know how I got the fabric; I took the colours from the anime, put them into Clip Studio Paint, and averaged the shade. I then created a 300dpi 8x10 inch sample with the stripes at the correct intervals. His jacket has 8 stripes across the back, so I measured the doll and then lined up the ruler on CSP. I then sent it to a printing service, choosing Cotton fine warp satin as the fabric.
8 notes
·
View notes
Note
what did you do for your selkie costume? I am looking for inspiration hehe- I would have been so excited to see a selkie at the ren fair, smh to all the fairgoers
AHHH I'm so glad you ask! SO—I did two outfits. One was more siren style, the other was more wench. I took like *no* pictures unfortunately, but here's what I do have:

So I did a satin white skirt, black peasant blouse + corset, and then layered a few coin belts/skirts. I also had nude gloves that were black ombre, so my fingers were inky black, and then I just did my makeup to give me a seal nose and spots!
I made my cape out of grey, splotchy-patterned flannel and then painted the darker grey on after. I don't have a tutorial for the flippers, but I drew up a rough pattern that I used to make the main body of the "seal skin"

x1 Panel of Fleece x1 Panel of muslin - I folded my fabric in half and cut along the shape b/c symmetrical - Open, stitch up with the outside of each panel facing in leaving the neck unfinished for you to turn it right sides out - Finished the neck with a top stitch, but blanket and ladder work too - I added flippers to mine with upholstery padding and top stitches - Lastly, I used ornate hook-eye fasteners and sewed the eyes to my corset + the hooks to the cape shoulders!
#I hope this helps!#Please let me know if i can explain that better#costuming#mine#og breadsticks#selkie#cosplay#ohio renaissance festival#renaissance festival#renaissance faire#tutorial#anon ask#ask#anonymous
18 notes
·
View notes
Text
tried to film a little embroidery tutorial for how to get the nice smooth stained glass look with satin stitch but it’s too big for tumblr. so i guess i will make a youtube or vimeo playlist for them or something instead hmmmm
7 notes
·
View notes
Text


✨ Blooming Beauty in Every Stitch! 🌸💖
Hand embroidery brings flowers to life with delicate stitches and vibrant colors. Each petal, each leaf, a masterpiece of patience and creativity. 🌿✨
Learning hand embroidery is like painting with threads—every stitch adds beauty and charm! Whether you're a beginner or an expert, there's always something new to create. 🌸🌿
Start your embroidery journey today! 💕
#embroidery#diy#fiber arts#knitting#crafts#handmade#embroidery tutorial#etsy#youtube#threadskalakari#hand stitching#sewing#needlework#hand embroidery#flower embroidery#satin stitch
8 notes
·
View notes
Text
Hypothetical Structure of "Stitched with Love"
(Assuming it’s a modern, comprehensive guide for crafters)
1. Introduction to Sewing
Tools & Supplies: Detailed lists for hand-sewing, machine sewing, and quilting.
Fabric Science: How to choose fabrics (woven vs. knit, thread counts, stretch, etc.).
Machine Basics: Setting up a sewing machine, threading, tension adjustments.
2. Foundational Techniques
Hand Stitches: Running stitch, backstitch, slip stitch, blind hem.
Machine Stitches: Straight, zigzag, overcasting, buttonholes.
Seam Finishes: French seams, bias binding, serging.
Zippers & Buttons: Invisible zippers, fly fronts, shank buttons.
3. Quilting Essentials
Patchwork Basics: Cutting, piecing, chain-piecing.
Quilt Construction: Batting choices, basting, quilting (hand vs. machine).
Modern Quilt Designs: Improv piecing, negative space, bold colors.
4. Fiber Arts & Embellishments
Embroidery: Basic stitches (satin, chain, French knots), hoop techniques.
Appliqué: Raw-edge, reverse, and needle-turn methods.
Mixed Media: Incorporating beads, lace, or paint into sewing projects.
5. Project Gallery
(Likely stylish, beginner-friendly makes with step-by-step photos)
Sewing: Tote bags, aprons, elastic-waist skirts, simple tops.
Quilting: Table runners, baby quilts, wall hangings.
Fiber Arts: Embroidered pillows, felt ornaments, fabric scrap projects.
6. Troubleshooting & Pro Tips
Fixing Mistakes: Ripped seams, tension issues, uneven stitches.
Custom Fitting: Adjusting patterns for better fit.
Eco-Friendly Sewing: Upcycling thrifted fabrics, zero-waste patterns.
If This Book Doesn’t Exist… Try These Alternatives!
For Sewing:
"Love at First Stitch" – Tilly Walnes (garment sewing for beginners).
"The Sewing Book" – Alison Smith (encyclopedic resource).
For Quilting:
"Modern Quilt Bible" – Elizabeth Hartman (contemporary designs).
"Walk" by Jacquie Gering (modern quilting techniques).
For Fiber Arts:
"The Embroidery Book" – Christen Brown (stitch encyclopedia).
"Fabric Surface Design" – Cheryl Rezendes (painting/stamping on fabric).
Online Resources for Similar Content
YouTube Channels:
With Wendy (modern garment sewing).
Melanie Ham (beginner quilting tutorials).
Book :
Stitched with Love: A Modern Guide to Sewing, Quilting & Fiber Arts
4 notes
·
View notes
Text
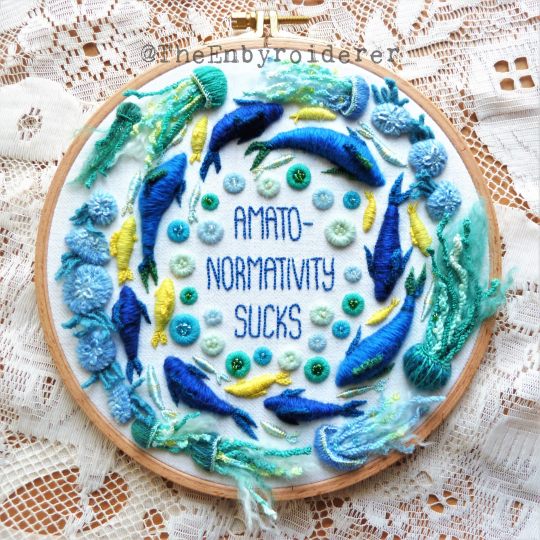
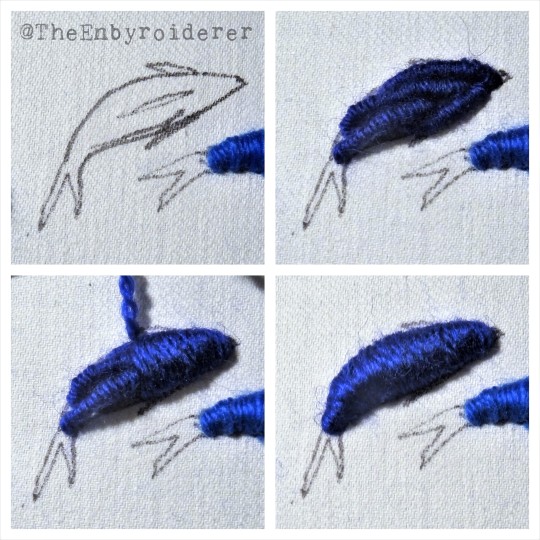
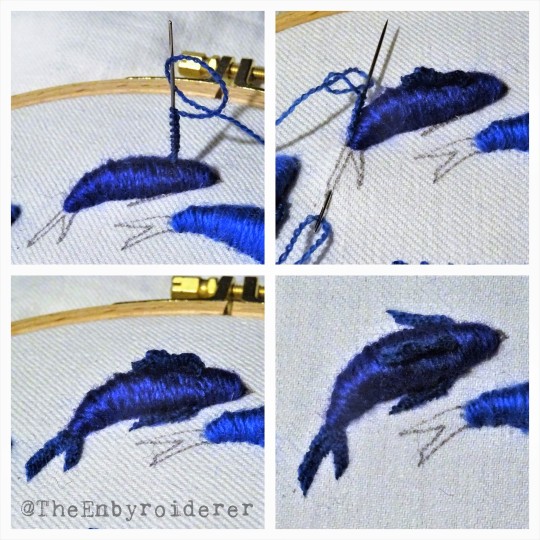
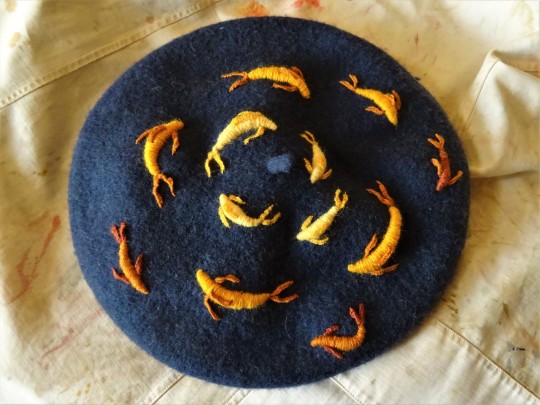
A simpler tutorial today. Here's how I made the 3D fish on my amatonormativity project. Used the same exact technique for the fish I've stitched on my fishy beret too.
First, fill outline with bullion stitch. Second, satin stitch over the bullion. Third, add fins with cast-on stitch.
#embroidery#3d embroidery#embroidery tutorial#fiber art tutorial#3d embroidery tutorial#tutorial#fish embroidery#theenbyroiderer
193 notes
·
View notes
Text
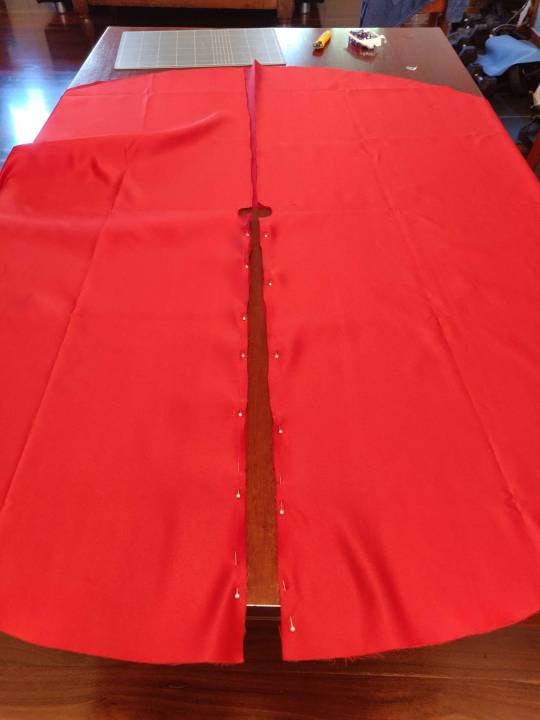
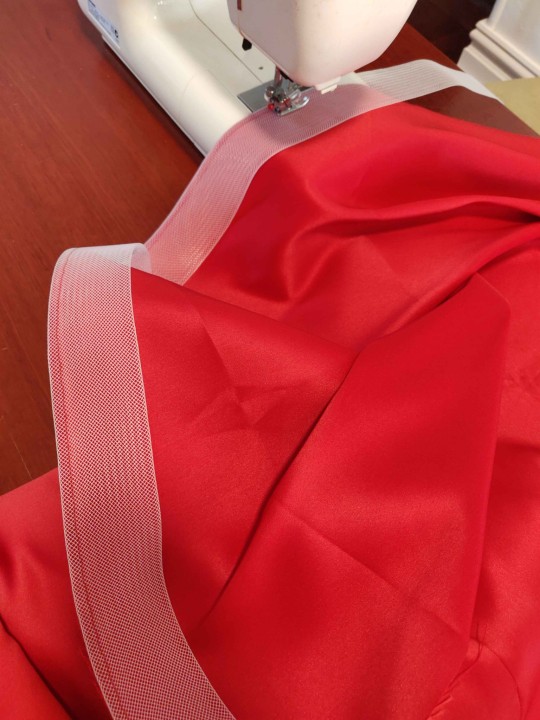
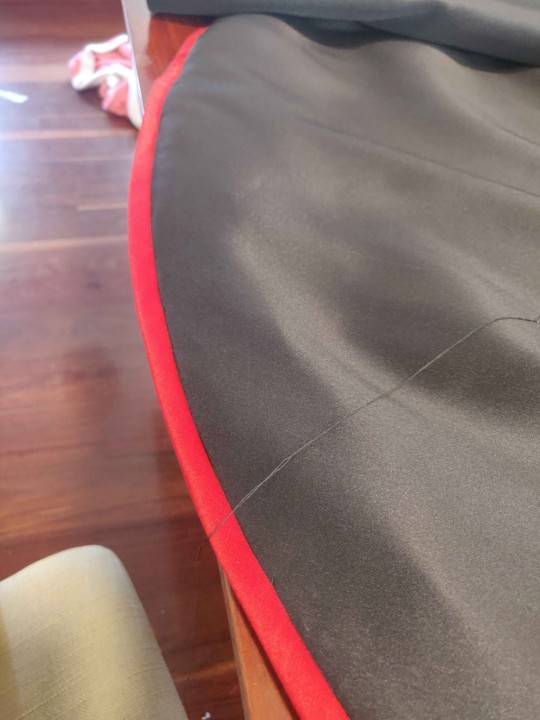
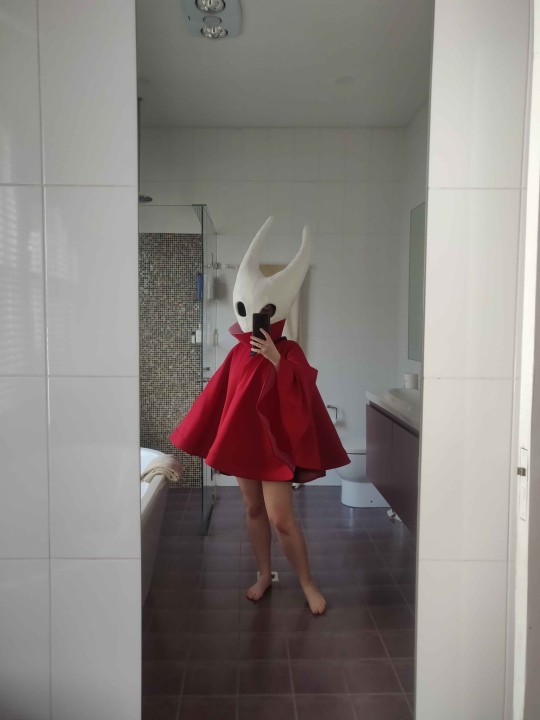
One more post from my recent Hornet cosplay, this time the wip/progress pics when sewing Hornet's cloak!
This was a bit daunting as I had never tackled anything so large before - my prior sewing experience was more accessories, belts, bows, stuffed tails, that sort of thing, and not full outfits! I had a couple ideas in mind for her cloak, (boning, petticoat, ballgown panels, etc) but ultimately ended up going for a double circle skirt with horsehair as it seemed like the easiest option for my sewing skill, while giving the perfect flowy look!
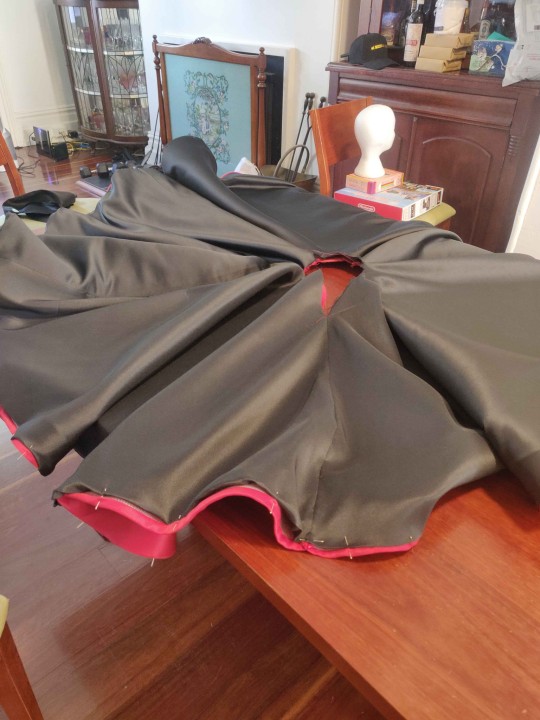
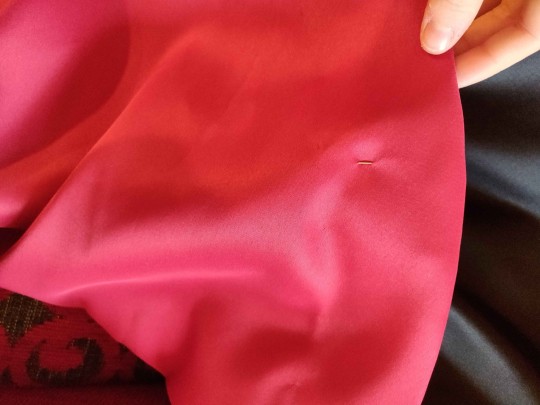
I decided on using duchess satin because obviously Hornet is a princess and deserves nice fabric ♥️ it was quite heavy but I think it ended working out well as the weight gave it some solid structure! I used a crimson satin for the outside, and chose to line it with black satin - that step maaay not have been necessary, but I think it made the overall cosplay look much sleeker and cohesive 😅
I drafted my pattern with the help of La Modéliste's YouTube tutorial and an online calculator, and got to work! I first cut out my pattern, sewed the pieces together as needed and then attached the horsehair first to the wrong side, and then folded and ironed underneath to give a clean finish. I then spent a solid amount of time hand stitching a catch stitch to keep the horsehair in place... this did take awhile.. orz Then it was time to attach the black lining underneath, for which I hand sewed a ladder stitch ALL the way around, 10/10 do not recommend, took me probably three days straight, but it meant there was NO ugly seam showing on the front!!
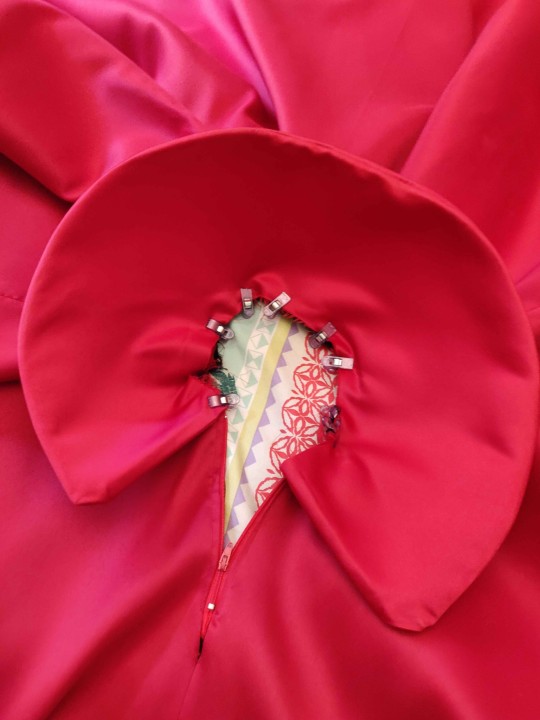
Last, but not least, I took some scraps from my crimson satin and attempted few different collar/cone shapes until I found one I was happy with; then used thick interfacing on one side to keep it stiff before sewing at the neck hole and attaching some snaps to keep it closed. I am still terrible at getting crisp corners, so that's something to improve on next time 🥲
I also accidentally forgot one poor lonely pin and entombed it inside the lining, and had to stage a rescue operation so that it wouldn't stab me at the convention 🫠
17 notes
·
View notes
Text
Book pouches
I've been meaning to make a post about my book pouches for a while. I saw someone selling them at a comic con a while ago but they were quite expensive and I thought "surely I can make something like that at home way cheaper?" These are the results.
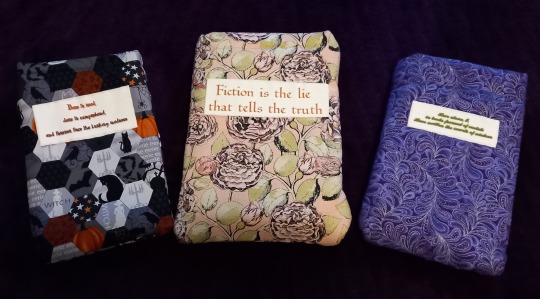
If you're the sort of person who often has a book in their bag, then you'll know there's usually a chance that the book will be damaged (scratched cover, crumpled or torn pages etc.) These are to stop that happening.
There are a lot of tutorials for how to make them on YouTube, but all you need are a nice patterned fabric for the outer layer, some quilt batting to pad the pouch (not too thick, just enough to protect the book) and a satin type fabric for lining. As fabrics and batting can be expensive I just went to a charity shop and bought a large, thin quilt for £3 which I was able to use for both the padding and the satin lining.
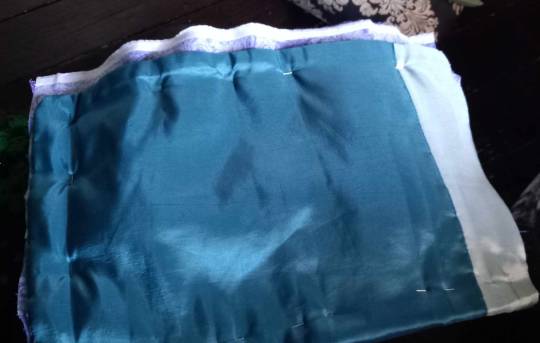
Get a book and draw a large rectangle around it, giving yourself enough space for seam allowance and the thickness of the book. You won't be able to make one that will fit all books but give yourself a bit of room and it should fit most. Also, this gives you an excuse to make several in different sizes!
Cut two pieces each of your lining, quilting and outer patterned fabric. Sandwich everything so the patterned fabric is in the middle, good side to good side, quilting outside of that, and satin liner last. Sew all around three sides, leaving the top open.
At the top edge fold down all three layers and sew around to hem the edge.
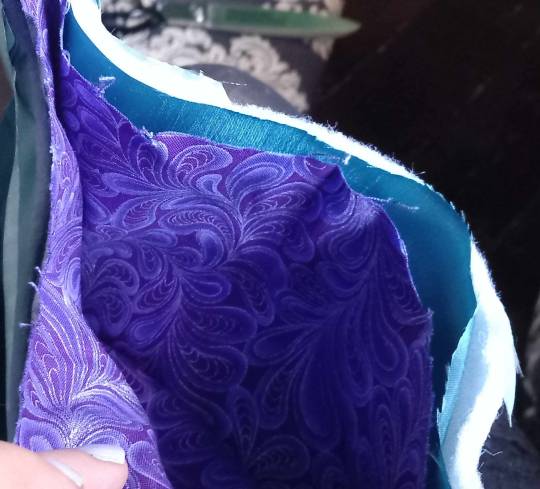
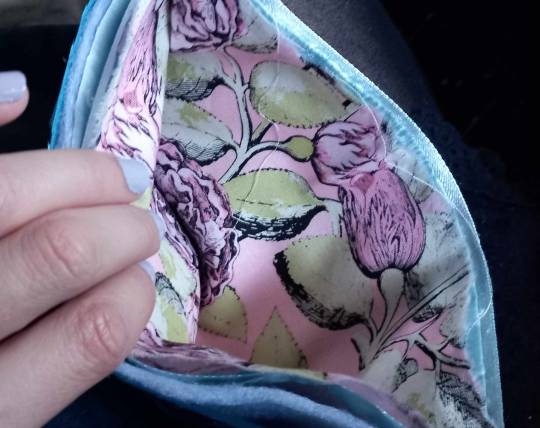
This next step wasn't part of many tutorials I found, but I did it because I didn't want the raw edges poking out and fraying. I made some home-made "bias tape" by cutting large pieces of my liner fabric, folding in all edges and ironing them down, then hand sewing them everywhere there was a raw edge. I used invisible stitching and made sure I only sewed them to the lining, I didn't go through all layers. This might not be very clear but hopefully this picture of the inside once I've finished will help. I used different colours of liner fabric here because I was running out. That doesn't really matter as it won't be seen.
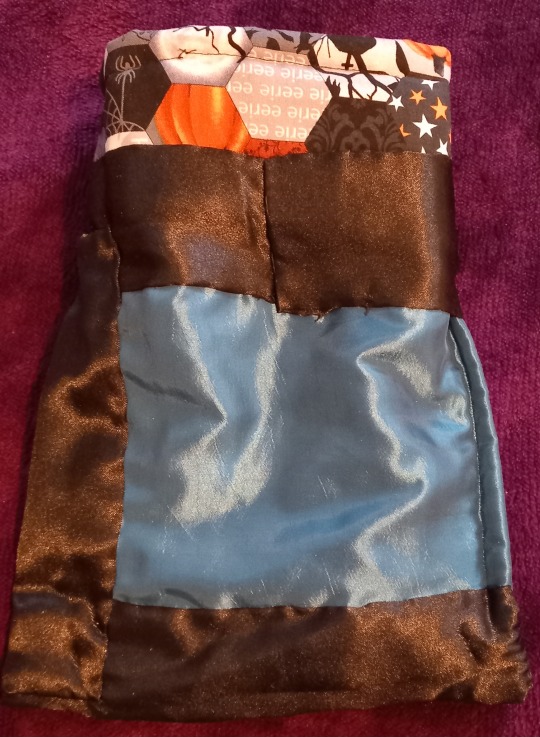
Turn right side out and you have a book pouch!
I could have made a flap to fasten them closed, but I didn't really feel the need for that. However one further step I did take was to decorate the front. There are many ways you could do this, but I decided to take some quotes to do with books and reading and use an online text generator (cooltext.com was the one I used, but there are loads of these) to give them interesting fonts and colours that match the fabric, then use iron on printer transfer paper to make them into patches.

"Here alone I, in books formed of metals, have written the secrets of wisdom", William Blake

"Dare to read, dare to comprehend, and forever face the lurking madness", HP Lovecraft
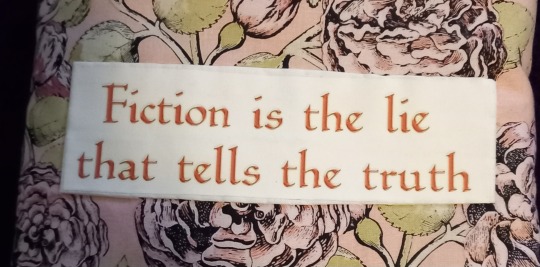
"Fiction is the lie that tells the truth" - Neil Gaiman (though a lot of writers have said this in one way or another).
#sewing#diy sewing#sewing patterns#book sleeve#beautiful books#books and reading#hand crafted#crafting#crafts
7 notes
·
View notes