#3d embroidery tutorial
Explore tagged Tumblr posts
Visit Tumblr Blog
Explore Tumblr blogs with no restrictions, modern design and the best experience.
Last Seen Tumblr Blogs


Fun Fact
Premium Tumblr themes are available from anywhere between $9 to $49.
Text
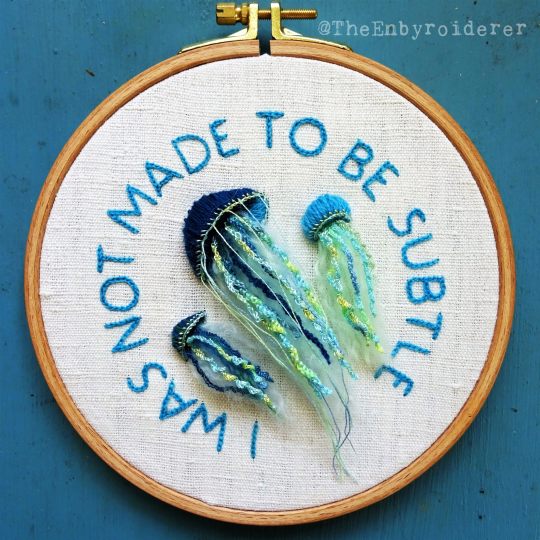

One more tutorial. I think this is the last one I have for now.
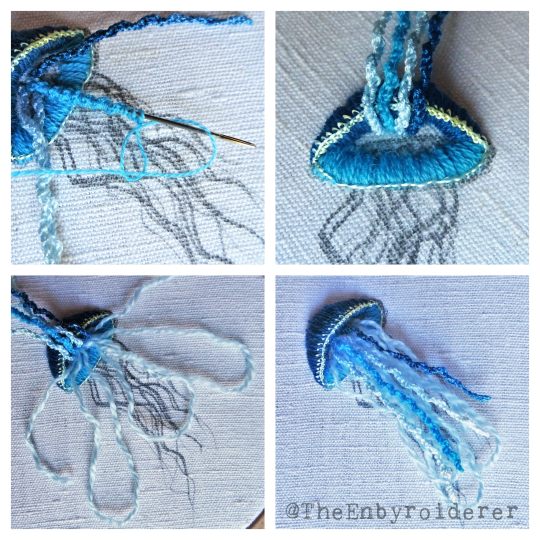
Here's how you stitch a 3D jellyfish. This is a more advanced tutorial. Prior experience with most of the stitches is recommended.
Materials: You'll need several needles, at least one shorter and one really long. I've used sashiko needles in three lengths, 4 cm, 5.5 cm and 8.5 cm. As for yarn, I think you can use whatever you have. Most of it can be done with six-stranded floss, but you'll need some thicker woolen yarn for the fluffy turkey stitch. I used fine d'aubusson (a fine wool embroidery yarn) for the body, six-stranded floss (2-3 strands) for most of the tentacles, a shiny silky embroidery floss for the edge of the body and a couple tentacles, and knitting yarn scraps for the turkey stitch.
Stitches: satin stitch, bullion stitch, padded satin stitch, buttonhole stitch, drizzle stitch and turkey stitch. Please look up stitch instructions on youtube, and do a bit of practice beforehand. This project is probably not a good practice run for these stitches.
Time: depends on the size of your jellyfish. I made quite a large one and it took me about 5 hours to complete.
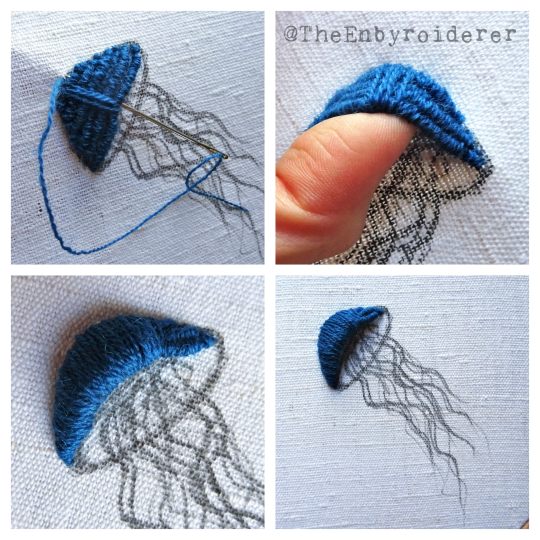
1. Make a sketch of your jellyfish. At least of the body. Fill this body from edge to edge with bullion stitch, make them a bit longer than the body is wide so that they are somewhat loose. You should be able to get a finger underneath the bullion, depending on the size of your jellyfish.
2. Then it's time to satin stitch the body. For this part it's important that the needle goes through the fabric as close to where it came up as possible. The goal is not just to make a 3D body, but to make it a hollow 3D body. Don't just stitch over the bullion, stitch around it. It's also important to not pull too tight. Bullion stitch of this lenght is rather malleable, so it's a bit tricky to keep the satin stitch even. Hold a finger in the hollow underneath the bullion as you pull the thread tight. This will stop it from getting to tight, as well as make sure you keep the hollow. As the stitching gets thicker the hollow will get smaller, but that's ok.
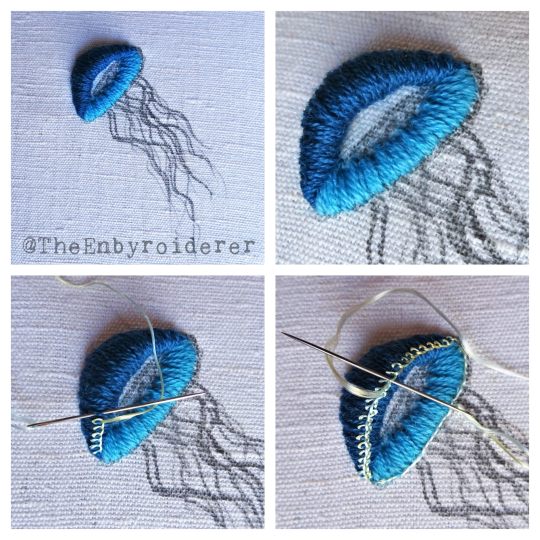
3. When the top part of the body is fully stitched it's time to do normal flat satin stitch for the bottom part, the inside of the body of you will. Leave an opening in the middle though, you'll need some space for the drizzle and turkey stitch later.
4. This is a good time to give the edge some definition. Do buttonhole stitch around the top edge, then you go around and do another row of buttonhole stitch, kinda the other way around, through the loops from the first row. Hopefully you can see from the pictures what I've done. The bottom edge of the body doesn't need defining and won't be very visible anyway, so I just did some sloppy stitches along there and called it good enough.
5. Now it's time for the tentacles. Start with the drizzle stitch, because the turkey stitch will just get in the way if you start with that... but do remember to leave space for the turkey stitch underneath the drizzle stitch. This is where you need the loooong needle. Pack as much drizzle stitch on that needle as you can. You'll notice that the drizzle stitch wants to rotate around your needle as it gets longer, do let it, that will just help you fit more stitch on there, as well as give the finished stitch a nice curl.
6. When you think you have enough drizzle you can move on to the turkey stitch. You will not need to do a lot of it. You'll probably overestimate how much you need, but that's ok, you can always give the fluff a bit of a haircut later. Do a few looong loops of turkey stitch, a little bit longer than your drizzle stitch. Cut the loops to slightly different lengths, otherwise you'll get a very blocky bit of fluff... tapered is better. Untwist the yarn and separate the strands, draw a needle through the strands to fluff them up.
7. As a finishing touch you can add some long and thin strands around the edge of the body.
Edit: Tfw a post has been up for years before you notice that you forgot a whole-ass step. Apparently #4 has been missing all this time. Oh well.
#embroidery#3d embroidery#fiber art#needlework#embroidery tutorial#fiber art tutorial#3d embroidery tutorial#tutorial#jellyfish art#theenbyroiderer
792 notes
·
View notes
Text
I think after a long back and forth process of trying different crafts I've finally found one that I enjoy; embroidery.
It makes me really happy since it's a smaller scale craft that keeps my hands busy and the finished effect is beautiful, and even more than that, it's versatile! I can embroider jackets or pants, or make patches for them, or even hang it up on the wall!!! I've always preferred hand sewing so I'm happy to finally have found a medium that's inexpensive and small. Like, I love crocheting so much but I don't want or need any more blankets or sweaters. I love watercolor but I find the set up and clean up process EVERY time I want to do a bit of work to be daunting. I tried my hand with perler beads and found that it didn't create the look I wanted - the pixel art aesthetic is nice but it looks juvenile for what I want and can only be a display piece - not to mention I completely fucked up half of my boards on my first attempt using them.
So happy that I found what I enjoy ;w;
#biggest thanks of all to youtuber Happyjasu for the amazing embroidery tutorials that got me to really try my hand at 3d style embroidery#its genuinely addicitive
5 notes
·
View notes
Text
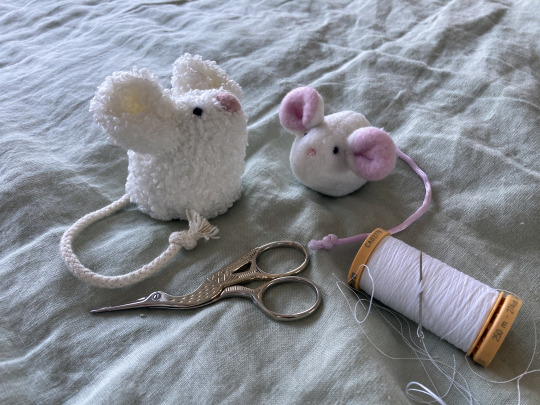

I've been sitting on this pattern and tutorial for a while now! so time to finally share it with you! I was lamenting that the jellycat pip and sugar mice were long retired and difficult to get your hands on unless you are willing to pay much more than they retailed for each mouse, so i decided to try and eyeball a pattern and make some myself! they're not exact as i only used constructed visual references but they're close! please note that this pattern set is intended for personal use only. Rough tutorial under the cut!
This pattern is for printing onto A4 but you can check your scale with the measurements I've provided or just play around with how big or small you want to try and make them! i didn't really get any wip photos of pip mouse but it's method is largely the same with the nose being the major change, which i will detail in text in the instructions below.
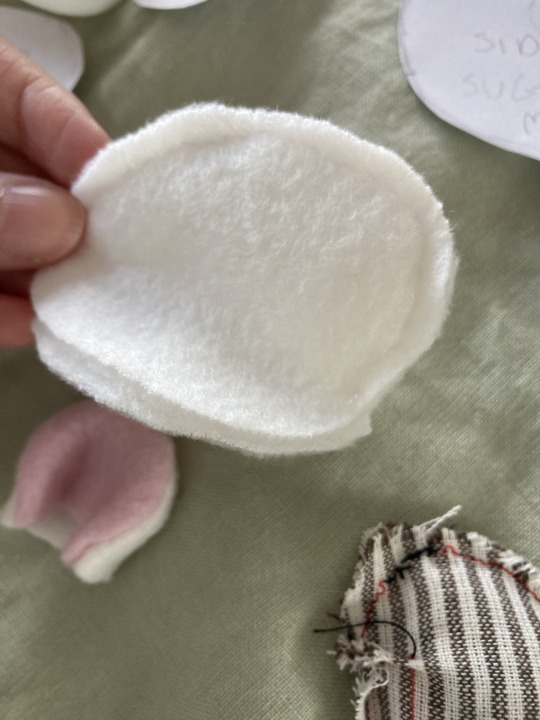
for sugar mouse i would recommend using polar fleece as it will act the right way for the ears to do their squishy marshmallow looking thing. but minky should also work or other similar fabrics! for pip mouse if you can find a similar curly looking fabric with a thin backing that'll be ideal but fleece will also work well, you just wont get the furry texture, you want a fabric with a little bit of stretch to it. i however would not recommend fabrics like felt or non stretch cotton for these guys as it's likely to not take shape the same as there's no give to the fabric.
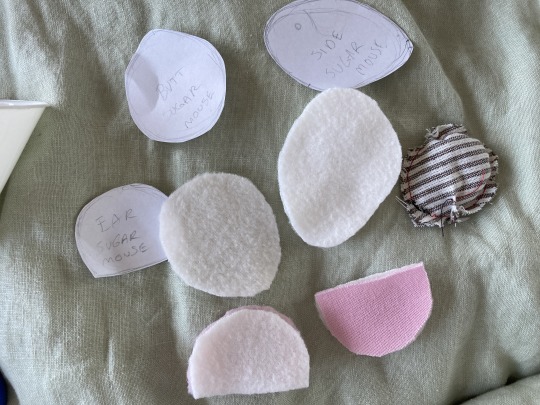
once you have printed out the pattern and cut the pieces in your fabric, you'll want to sew the ears up and turn them inside out, then put them aside for later. just leave them as is for now but here you can see i was playing around with pinching the turned through ear into shape.

Then moving on, sew the back pieces together along the spine and front of face. you then want pull the bottom open ends apart gently and place the open sides flat up against the base piece so that they're aligned, it can be good to pin this in place so it doesn't shift.
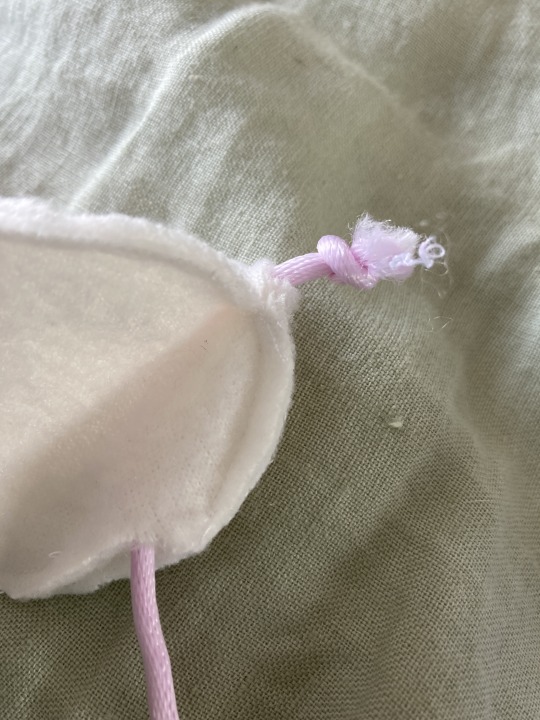
then, get your tail rope, and tie a knot at either end, placing the base of it inbetween the seam at the butt so that it'll sit in the right place, then sew the seam up directly with the tail in place, make sure you sew through the rope to secure it and make sure it doesnt shift. Sew around the bases seam leaving a hole in one side so that you can then turn your mouse through.
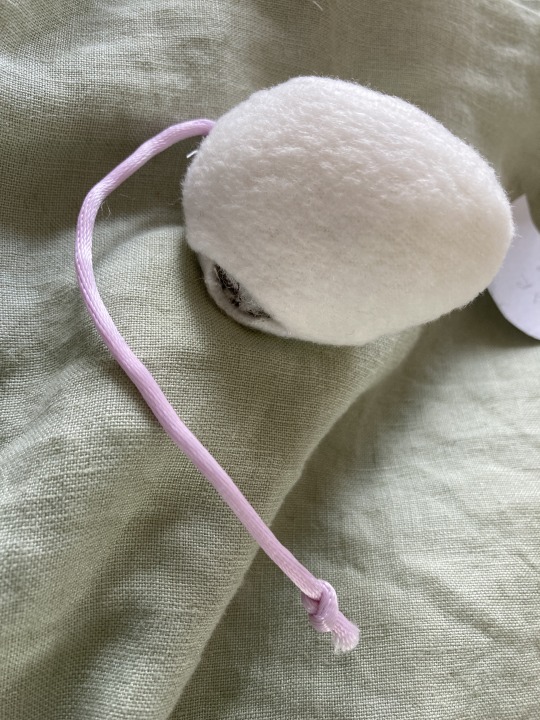
once turned through you will want to stuff your mouse with polyfill quite a bit so it takes shape! i like to put weighted beans in mine for extra effect, you can use dried rice or wheat too, just sew a little circle pouch a bit smaller that the mouses base with scrap fabric and fill and seal! then insert into the turning hole while you stuff. once stuffing is done you can sew the hole up with a ladder stitch. the weight from the beads will allow your mouse to sit up quite well.
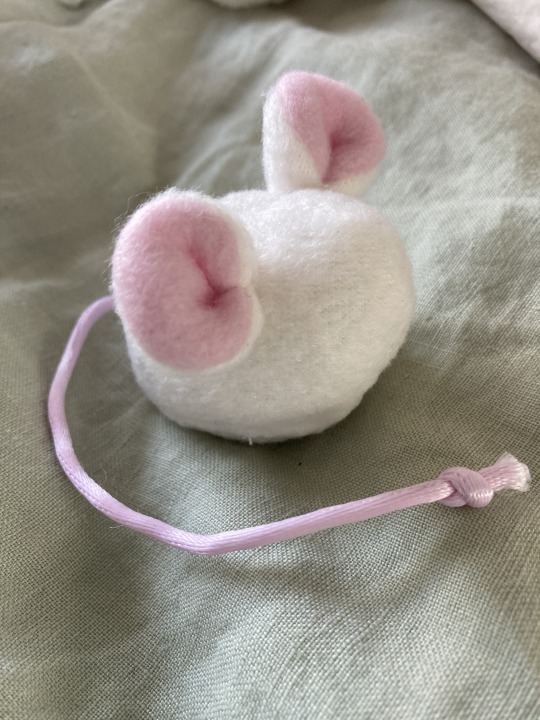
next you will want to get those ears you put aside, take each corner and bring the ends together in the middle. then sew them gently together at the ends with one or two stitches in about the same spot. you want them to look 3d so dont sew the ends to the back of the ear, just end to end so they meet in the center.

Then pin the ears in place on the head
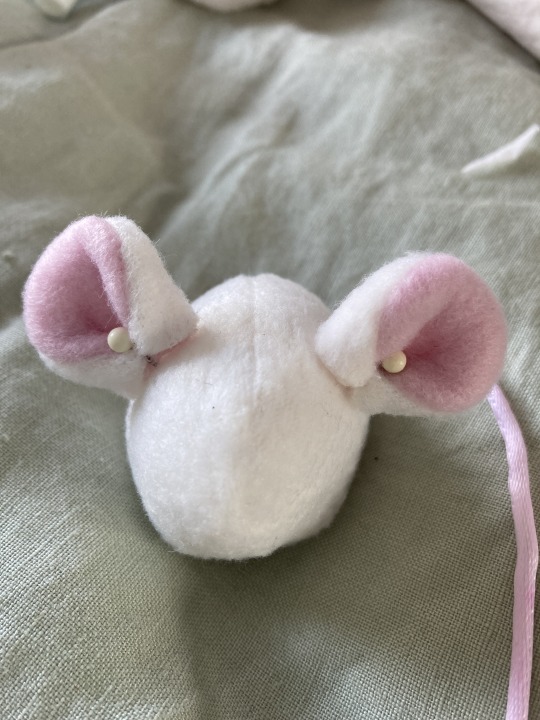
then you need to ladder stitch the ears in place while they're pinned so they dont shift around, go all the way around the outside edge of each.
now you're almost done! next they just need a face! sugar mouse only needs embroidery by way of a french knot for both the eyes and nose (you can find good video tutorials on how to sew a french knot online), pip mouse will also need a french knot for the eyes but has a separate process for it's nose. (for the pip mouses nose you will need to leave the marked nose hole open and then stitch the nose fabric to the square nose backing in line with the dotted direction on the pattern, (it should look kind of baggy when it's unstuffed) sew it up completley with no hole, then cut a tiny slit in the backing and add polyfill there before closing with a basic stitch, then you ladder stitch the nose directly to the marked nose hole)
in order to hide the embroidery anchor knots i find the best way is to start by going down through the middle of the ears and then coming back up where you want the eye to be, and then going back down and up through the ear for the finishing knot, as it creates a very easy cover for them and looks nice and clean!
then you have yourself a little buddy!

haha they're great to squish! if you use this pattern i'd love to see your results!
5K notes
·
View notes
Text
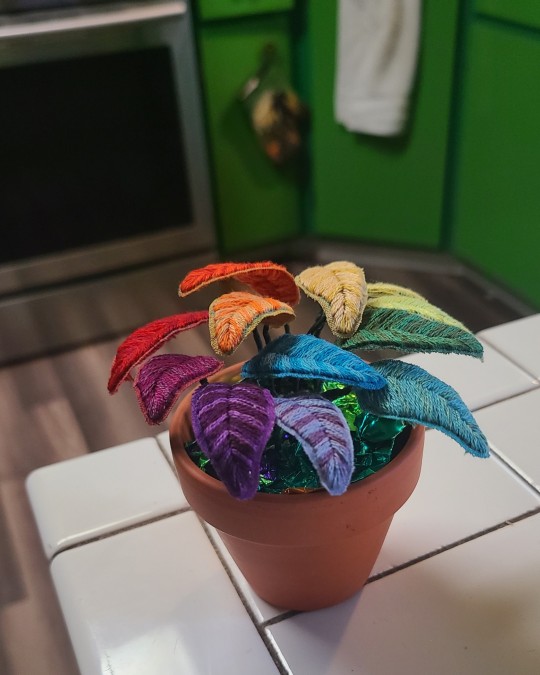
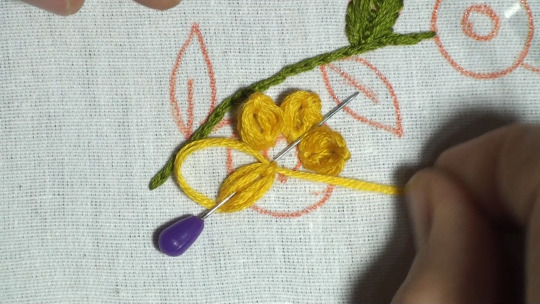
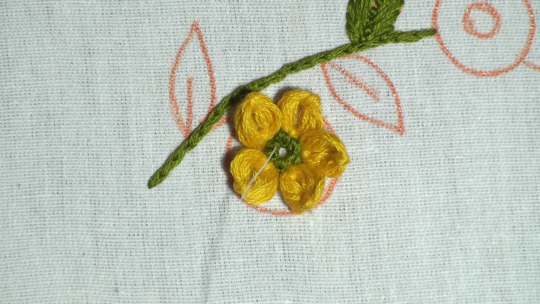
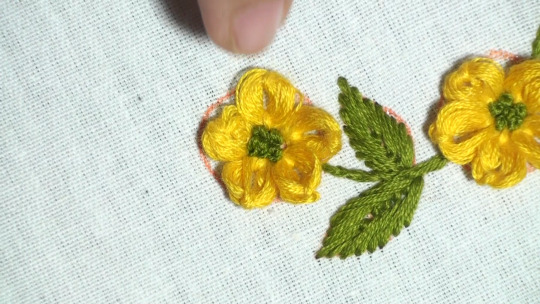
There isn't a pattern, sorry! I drew the leaves onto some hooped fabric (set into an embroidery hoop for tension). Then I bent wire into the shape of the leaves/stem, and sewed that onto my drawings. I embroidered the leaves as you see here, going just outside the wire.
Then I used some alcohol based markers to tint the fabric near the edges so it would show less when I cut them out. I put some florists tape around the stems and shoved them into a foam block that's sitting in the little pot.


I hope this helps! If you make your own please show me <3
Rainbow plant! Design and embroidery by me, 2023

#embroidery#the only plants i can take care of#my art#3d embroidery#stumpwork#the rainbow plant#tutorial#kinda#gif
684 notes
·
View notes
Text
Update on abby custom doll!


These pics are actually awful guys she looks great irl guys TRUST ME.
(First post here)
So she's like kinda sorta done for now. She's gonna be like a forever work in progress because ideally i'll be making her new clothes whenever i have the chance and one day she will have a full wardrobe but like for now. She has a complete outfit.
Progress pics + more info below the break!
Since the last post i made her lab coat, shirt, and skirt! Aka her first outfit. I also repainted her lips again as I didn't like the color I had done, and I cut her hair! Which actually made such a HUGE difference.
Lab coat was the first thing I made and still my favorite item. I was really winging it without a pattern and I'm super happy with the result, especially with the tiny NCIS embroidery :)

The shirt was actually the hardest part and I think turned out the "worst" as I messed up the sleeves connecting to the body a bit. Again no pattern here so you can't really blame me :P Originally i was gonna do all black but I had this burgundy fabric (it's darker irl) and wanted to try it! She will of course have a black shirt as well in the future


Then was the pleated skirt! I was nervous about this but it came out so well! This was the only item I had a tutorial for and I thought it would be super hard but it was actually pretty simple and I think it looks great! I will also be making more of these in a variety of colors and lengths


Then i went for tattoos... unfortunately these did not last as I used a Micron pen and that Doesn't Stay. I'm still working on figuring out what I'll use for this. I used watercolor pencil for her eyebrows and that's fine but the tattoos will experience more "wear and tear" from clothes coming on and off and rubbing against it, so I'll have to figure something out


No pics of me redoing her lip color, so last up is the hair. I cut it kind of impulsively but despite that I think it turned out alright. I can't believe how much cutting the hair turned her into Abby. Like it was very crazy.

Right now I'm working on 3D printing a Caf Pow! cup for her and finishing up her laptop screen. This was such a labor of love but soo worth it and fun. Thanks for reading if you made it this far!!!
12 notes
·
View notes
Text
Hardanger sampler

The heart design came from The Embroidery Stitch Bible. The diamond design was from a very clear and easy-to-follow tutorial on the Epida Studio website.
I'm definitely going to try hardanger again in the future. I especially think there's a lot of scope to work it into 3D/layered designs.
16 notes
·
View notes
Text
How I made little Haarlep


A few days ago I posted about my latest finished crochet project for my good friend @tavyliasin, and I wanted to share how I made them! This is for people who would also like to make a little Haarlep (Raphael, Karlach, or any other character with horns for that matter), those who are curious how I did it, and I just love to yap about my projects. When I started this project I had only been crocheting for about 8 months, and it really pushed me to step out of my comfort zone, try new things, and learn a whole lot. I took the time to explore, experiment, and try again if needed. And man, did I learn from little Haarlep.
Note that this isn't a tutorial; I have made mistakes, oversights, and stumbled against problems. I will try my best to list these here, but if you have any questions about the listed patterns I advise you to head over to the linked etsy store to ask the creator of said pattern. But if you have any questions specifically regarding this project I'll try my best to answer them as best as I can. There are also some parts of little Haarlep where I didn't use a pattern at all, and either freehanded it, or did a load of guesswork.
Now, let's get started!
Used patterns:
Body: Doll base Amigurumi Body Version 3 by TheLoftyLoop
Wings: Kawaii Bat by ZeroGravityCrochet (I have also used this pattern for my Batstarion plushie)
Horns: Horns (3 sizes) by KnottedLovebymima
Used Materials:
Body: Katia Bambi #312 (3x)
Hair: Twister Solid XL Black #105 (1x)
I had bought the yarn for the hair and horns in a local yarn shop, and have thrown away the labels a long time ago. Once I have found them again I will list them here as well.
Polymer stuffing
PLA filament (optional)
Small chains which were part of a jewelry repair kit.
Soft silver RVS rings, 1,5 x 7,0 millimeters
Epoxy Resin (optional)
Gold and orange pigment powder
Gold glitter
Red embroidery thread
Used tools:
Crochet needles (3,0 millimeters and 3,5 millimeters)
Knitting markers
Yarn scissor
Yarn needles
Row counter (optional although it literally saved my life)
3d printer (Optional)
Silicone half circle mold
Pliers (x2)
Cutting pliers
Mini hand drill
Instant glue
Tweezers (optional)
Step-by-step guide:
First, I needed to know what the hells I was getting myself into. For that I have used several references on Haarlep. I have used these as a guidelines for the entirety of the project. The screenshots have been provided by @tavyliasin.


Then, I made a list every single part of the doll I needed to make.
Body
Tail
Wings
Horns
Ears
Eyes
Face
Harness
Hair
The body


For the body I have used the 3,5 millimeter crochet needle because I wanted the stitches to be as tight as I could. I had ignored the advised crochet hook size on the label of the yarn because of this. Although I quickly found out that the yarn itself was too large for this pattern as well, resulting in the doll becoming bigger and longer than I initially expected. But this is not necessarily a mistake because that would mean that there would be more to cuddle!
The head ended up being way too long though, so after I finished the body I folded the part of the head that was too long and stitched it on the back of the head.
The Tail

I didn't use a pattern for the tail, instead I made a magic ring with 6 single crochet stitches, and increased the stitch each time I felt like I should make the tail wider. For this I also used the 3,5 mm needle.
The wings

I used my trusty 3,5mm needle for this part as well. I already had a pattern for a bat plushie, which I had used to make the wings. From there I diverged from the pattern, and created a bigger 'spiral' so to speak by adding 3 more rounds.
If you are using this pattern, I diverged from the guide from row 5:
r5.1: 5dc, inc.
r5.2: 6dc, inc.
r5.3: 6dc, inc.
After that I followed the pattern again, and diverted from it once more to add more single crochet stitches to each 'spike' of the wings, making them more bulky and longer.
The ears

I also didn't follow any pattern for the ears, I just made a triangle of single crochets (again, with my 3,5mm needle), and stitched the points of the ears to one another to make them more pointy and give them more depth. Then I attached them on the side of the head with *only* the base of the triangles. This is because I was going to add the hair and horns later on, and I didn't want the ears to get in the way of them.
The eyes.


I worked with resin before, and still had some. I mixed a small amount of epoxy resin with gold and orange pigment powder, and golden glitters. I poured it in a half circle silicone mold I have with various sizes. After it had cured I tested which size I liked the most for the doll, and used those for the eyes.
Next was the application, glueing the eyes directly on the head would be a surefire way for them to detach in the near future. So at first I tried to use these screw eyes by hanging them over the mold as the resin cured, so I could simply sew them in. But that didn't work as the resin swallowed the entirety of the screw, and the thread I hung them over the mold with. The 'eyes' were still semi-transparent even though I used a lot of pigment, so I could easily see the ends of the screws inside the eyes. So this was a failure.
On my second try I didn't mess with the resin as it cured at all, and used even more pigment powder just to be sure it wouldn't be transparent. This time, I used a small hand-drill to create 2 holes on each side of the half-circle, as close to the edge as I could. Then I drilled another 2 holes on the flat side where the end of the first 2 holes ended, making a little tunnel. I took some tweezers and stuffed and pulled the thread through the tunnels until I could pull it through. I tied them on each end, and superglued the knots for extra security.
Once everything was dry I sew the eyes directly on the spots I wanted them to be. But I wasn't too happy with the result, in all honesty...

... So I gave Haarlep some eyelids. Sure, they still look quite bug-eyed, but I decided to trust the process.
The horns (and a nose!)

I had completely forgotten to photograph any of my progress from when I was done with the eyes t'ill the horns were already finished. I had also decided to give Haarlep a little nose (which I made out of a magic circle with 10 single crochets, 2 rows of increases, and 3 rows of decreases).
In the original pattern there are 3 sizes available, and I used size 1 and 2 for the horns on this doll. The yarn I used for this was quite thin, but I made the mistake to use the 3,5 mm needle *again*. Which is why I could see directly through all the stitches, and see all the polymer filling within. I admit that the horns were about my least favourite part of this project, and I was struggling to get through them (no hate to the creator of the pattern at all, as it was a very well-written pattern! I just didn't enjoy making these because of some Morb-problems). So I was not ready to do it all over again. Instead, I noticed I had a lot of yarn I used for the horns left, so I used that as filling so the large holes in each stitch wouldn't be noticeable.
The Hair

Again, I forgot to take any pictures of this process, so I'll have to write down what I did. I used the Twister solid XL yarn for this.
First I gave Haarlep a much-needed hairline to map out where I wanted his hairdo to start and finish. For each 'strand' of hair I repeated one of 2 processes whether I wanted it to curl or not.
(fun fact, the 'curly' hairs are based on a very simple pattern a friend of mine created to make toys for her cat!)
Curls:
Chain (make it as long as you want depending on how long you want it to be, but for this project I used in between 8-15 chains per strand), single crochet in the 2nd chain stitch from the end of your chain. 3 single crochets in every chain (I did this for about 3-6 chain stitches). Than I did a bunch of single crochets in every chain until I reached the end of the chain. Then I put another single crochet in the 2nd chain, and put 1 single crochet per chain stitch until you reach the end, tie and cut your yarn on both ends. I kept about 15-20 centimeters of yarn on the end that's the furthest away from the curl so I could use that to sew the strand of hair directly onto the head.
You can also put 2 single crochets per chain, or more than 3 depending on how curly you want your strand of hair to be.
Straight strand:
Follow the same steps as the curls, but just keep adding single crochets per chain stitch after you've made your chain, and repeat this twice.
I then worked in layers when attaching each strand of hair onto the head, I added one or two rows of "hair" starting from the neckline. Once I sew in those strands I sew about 3-5 centimeters of hair directly onto the head (the point that's the furthest away from the curl/the part of the strand that's attached to the head). This is so if the hair on the doll moves it wouldn't go out of place, and you wouldn't see any bald spots. This way I also wouldn't have to make countless of strands and add too much hair.
I have no idea how I can explain this properly without pictures, so if anyone reading this really wants to know how I did it I'll recreate the steps mentioned above.


I also added some sideburns to give Haarlep's hair a bit more of a finished look. After I was completely done with the hair (checked that I had not left any bald spot unchecked) I attached their ears on their lower horns using a piece of the same yarn I have used for the body.
The Harness
This was arguably my favourite part of this entire project! I really enjoyed making this as I could use several types of materials into this. I wanted to make the harness without having to directly attach it to Haarlep's body, so that it could be tight enough for it to stay attached. Bit first I had to start with the basics.

The undies! I freehanded the underwear as well, which goes as follows:
I started with the front, and made a chain that reached the diameter of Haarlep's body. From there I worked down, adding a single crochet per chain stitch. And at each end of the row I made a decrease. I used knitting markers to attach the underwear on the body as I made it to get as much of an accurate fit as possible. I kept going until I reached the hind, which is where I had to "split" the underwear to accommodate the tail. At first I went to the left, making every row very small until it reached 3/4 of the top of the tail (while making sure it could reach the front side of the underwear). I then made a chain that went around the entire top of the tail, and kept going until I reached the other side of the underwear, and attached my chain on it. I did the same stitching as I did on the other side of the tail, except in reverse until I reached the rest of the underwear. From there I finished up the underwear by securing all sides of the underwear to each other using the same yarn so it would seamlessly fit across the doll's waist.


I have no idea how to write a comprehensive tutorial and/or a pattern. So again, if you don't understand how I did this from the text I wrote please send me a message. I'll draw how I did this instead, and edit it into this post.
Next was the harness itself. I used a chain with a double crochet per chain stitch, and measured the chain against the body as I made it. I started out from the middle (the back strap that divides on the shoulders, to the front of the chest where it splits. I made several different sizes of "straps", always making a pair. I then attached every strap on a chainmail ring (the soft silver RVS rings), and kind of worked my way from there. I opened each ring with 2 pliers, slid on the end of each strap in place, and closed the ring with the pliers again. This was very much a 'trust the process' type of work for me.

If I couldn't secure the strap just yet I held them in place with a knitting marker (see shoulders).
For the shoulder pads I only used a chain to make the straps that go under the arms, and almost followed the same steps as I did when creating the underwear. Start with a chain (except smaller, like 5 or 6 chain stitches), do a round of single crochets, decrease at the ends of the rows, a round of single crochets, etc. Until I got a tiny rounded triangle, which I attached to the shoulder chain.
Next, I wanted to create the spikes that go on top of the shoulder pads. At first I wanted to make the tiniest studs using some embroidery thread. But I recently acquired a 3d printer! And as I already was using metal in the harness, I wanted those studs to match.
So I created a simple design on Tinkercad.com using a simple cone, printed 10 of them (using a 0,25mm nozzle and neutral white PLA filament), and painted them silver. Then I figured that I could drill a little hole in it with the same small hand drill I used on the resin, but turns out that cured PLA filament is quite hard, and brittle at the same time. So I went back to Tinkercad, and designed a cone with a hole in it that would allow a larger needle to go through it. I made the cone 0,5x0,5 millimeters.


After that was done I painted them silver again. Below you also see the shoulder pads, which is the only picture I have of them before I attached them to the doll.

I used 5 studs per shoulder pad, and sewed them directly onto the pads with black thread. After I secured them with a tiny drop of instant glue so they wouldn't shift. I could've created another hole that ran opposite of the one already going through the cone, but I think that it would've made the integrity of the inner (teeny tiny) supports within the cone too vulnerable.
After that was done I attached the shoulder pads around the arms and the harness.


For the final touches I attached the small chains from the jewelry kit, mirroring the references I found. I simply opened them with the pliers, hooked them through a stitch in the harness, and closed them. I actually had run out of these chains, and literally dismantled a necklace as I wasn't going to wait around and buy another jewellery kit or a whole spool of necklace chains when I was so close to the end. And I'm glad I did, because my patience had run out after I had been working on little Haarlep since August 2024.
And with that, they were done!

As soon as I was done I made pictures, and sent Haarlep on their way to Lia along with some snacks and a few other bits and bops. This project was such a challenge, but very much a welcome one. I had started learning how to crochet in december 2023, and truly went out of my comfort zone, and learned so much about crocheting techniques, trusting the process, and Frankensteining several patterns into one.
If you have any questions regarding this project, or if I can clear up anything mentioned here I'd love to help to the best of my abilities! Other than that, thank you for reading this and following the journey of creating the most intricate and hardest crocheting project I have made so far. And it was a joy to make. But it will most likely not be the last one, and not the hardest as I have no plans of quitting crocheting anytime soon. Who knows I'll surprise myself with the next Baldur's Gate 3, or other fandom project I'll decide to undertake.
#my art#my crochet#crochet plushie#crochet project#crochet guide#baldur's gate 3#bg3#baldur's gate 3 haarlep#bg3 haarlep#baldur's gate 3 fanart
5 notes
·
View notes
Text
Sequins, Piñatas, and Teddy Bear Cake: Celebrating Two Joyful Years


Oh my my, two years of motherhood! My baby is growing so fast—I can hardly believe it.
This milestone has given me a chance to reflect on the journey, and one thing stands out: I’ve finally had the opportunity to try so many creative projects I’ve dreamed of for years. The irony isn’t lost on me. Before becoming a parent, I thought I’d never have time to sew sequins or dive into elaborate crafts. And yet, with less free time than ever, I’ve somehow found a way to make it happen. Motherhood brings a kind of resourceful magic.
Here’s a peek at what I created to celebrate my toddler’s second birthday:
Baby Shark Piñata


Finally, I made a piñata! This has been on my "things to make" list forever, and it was so much fun to create. I followed this helpful tutorial: How to Make a DIY Piñata, used Baby Shark coloring sheets from Kids Activities Blog to copy the shapes.
Teddy Bear Cake

This project kept me up at night, as my wannabe-engineer brain wrestled with how to make it work with my skill level and time. I had dreams of making a 3D teddy bear cake but ultimately decided to keep things simpler—and I’m so glad I did!
Here’s how I made it:
Cake pans: Two 6-inch round pans
Recipe: Eggless birthday cake (any box or standard cake recipe would work i would imagine.)
Details: I used white chocolate candy melts mixed with leftover cake tops to shape the ears and snout. The frosting was a classic American buttercream. It turned out adorable and delicious, even without the 3D ambition.
Felt Birthday Crown

I overcame my long-standing fear of sequins to create this beautiful felt birthday crown for my toddler. Using a single piece of craft store felt (9x11 inches) and some embroidery thread, I made an adjustable crown that can grow with her for years to come. It felt so satisfying to finally tackle this project—and the sparkly sequins added the perfect touch.
Balloon Garland

Since July, I’ve been inspired by balloon art, especially twisting unique shapes. While I couldn’t find the cool balloon designs I wanted (everything was sold out!), I improvised with what I had. The garland still turned out quite pinterest-y , if I do say so myself!
Pipe Cleaner Teddy Bear Party Favors


I LOVE making pipe cleaner animals. I glued on magnets, pin backings and key rings on to them for optimal practicality. I’ll share more about this craft in a future post. Sadly, photos came out streaky—it turns out buttery fingers and phone cameras only work for glamour selfies.
Furoshiki-Wrapped Gifts

Japanese cloth gift wrapping has always fascinated me, but I’d never remembered to try it! For this birthday, I used leftover fabric scraps and even some of my own scarves to create elegant, reusable wrapping. It’s officially a new tradition.
Wow wow, that was a lot. Now to get ready for my wedding anniversary and Valentines day..
Okay, byeeee <3

#Motherhood#mom life#diy projects#crafting ideas#birthday cake#birthday party ideas#balloon art#cake decorating#wholesome#furoshiki#moms of tumblr#artist moment#celebration
4 notes
·
View notes
Link
The Raised Needle Weaving Stitch is a dimensional stitch that is ideal for 3D embroideries.
8 notes
·
View notes
Note
Hi!! How did you learn to make maxis match clothes? I would like to start doing it uwu
Hi ! So to be fair I don't remember exactly how I went about starting making CC at the very beginning except from reading tutorials and downloading Sims4Studio but here are the steps I more or less followed in my CC making journey.
First off I was already quite used to some picture editing softwares (namely Gimp and Photoshop) which definitely helped so I would recommend familiarising yourself with one of these.
Then comes the gateway drug to CC creation that are ✨recolors✨. For those you just need S4S and a picture editing software of your choice. Recolors can be quite simple : maybe you just want to change an item's color or add patterns to it. But with a little more editing/drawing skills you can also remove/add some details to the diffuse texture.
Here is a link to a short tutorial for a simple recolor using gimp by @smubuh
To keep the maxis match aesthetic the easiest way to go is to be a 🙌scavenger🙌 : you want to add buttons / belts / lace / embroidery / whatever to your texture ? Steal it from an other Sims 4 item ! Just look at your CAS and BB in game as a catalogue of all the details and textures you could frankenstein onto your project.
Maybe you'll be content with making recolors forever but if like me you start wanting to make something with a shape that doesn't already exist in game or in the CC world out there, you will have to deal with mesh. (the mesh is the 3D shape of the item as opposed to the 2D texture that is applied onto it) Meshing has a steeper learning curve than recoloring for sure so arm yourself with as much calm and patience as you can muster. First you'll need to download Blender, I recommend downloading the same Blender version as the one used in the tutorial you choose to follow because if you're anything like me you'll get lost otherwise. Also use a mouse, the scroll wheel makes moving around in blender so much easier than using a laptop touch pad like I did at the start 🤡.
And now that you have blender and a mouse time to mess around with meshes and for that like everyone I started (and honestly I mostly still stick to it nowadays) by frankenmeshing. Sticking to the frankenstein/scavenger theme from earlier, this is quite similar to what I described with scavenging textures, except this time we're combining meshes aka shapes : see a collar you like on that blouse, a sleeve you like on that dress ? Bam put them together !
For example here is a handydandy frankenmesh tutorial by @deetron-sims
Outside of frankenmeshing other ways to tranform meshes are to inflate and stretch parts of it (want a bigger skirt ? a shorter jacket ? the O key is your friend). And if you want to go beyond what I have you can also learn how to create meshes from scratch.
That being said dealing with meshes is full of surprises (mostly bad ones unfortunately), since you may have to deal with distorted weights, UV1 and whatever else, so it involved a lot of trouble shooting and trial & error. Being part of the S4S forum or the Creator Musing discord can be very helpful when you're at a loss (but always google and search for yourself before going around asking people).
Finally it's important to keep in mind that it takes time to learn how to make CC so don't be too hard on yourself and take breaks when it gets too frustrating. Personally it took me many months to graduate from recolors to frankesmeshing, I had to give up and try again many times before I finally got what I wanted.
Here are some more tutorials and resources :
@myshunosun made this great post about Maxis matched CC : Tips: components of creating Maxis Match objects for The Sims 4
@powluna has great video tutorials for beginners, especially this well rounded one that goes in details throught all of CAS CC creation (from the use of S4S all the way to blender) with neat little chapters so you can watch only the parts that you're focusing on at a time
S4S forum in addition to the S4S software itself this forum provides plenty of tutorials and a CC creator community
The Creator Musing discord is also full of links to various tutorials and resources (and once again a community of peers)
Specifically for Blender :
@ravasheencc's Resources Archive, I remember especially her Blender Basics Video being quite helpful when I was starting out
@surely-sims's Edutainment Lives which you can find on her twitch, mainly focused on Build&Buy CC
PS : I didn't mention the normal/bump map and the specular map because they are very much optional. I honestly didn't use these until a few months ago and even now I don't bother with them most times
14 notes
·
View notes
Text


34 notes
·
View notes
Text

In the lull between fiber projects I'll just post another tutorial. Though this one is less a tutorial and more vague guidelines. There are parts that I can't really tell you how to do and I'm sure there are details that I don't have photos of... but I'll try to describe the process as best I can, and just hope that my words can fill in the gaps. Just ask if you have any questions and I'll try to answer them.
Materials: Cotton fabric, durable, not too thin. Pipe cleaners. Off white cotton thead. Off white wool yarn, a couple different thicknesses is preferable. One shorter and one longer needle, both sharp. (I used sashiko needles, one ~4cm and one ~6 cm.) Felting needles, for the top of the skull. Various green shades of wool yarn, perle, and other threads, for the foliage.
Step by step instructions:
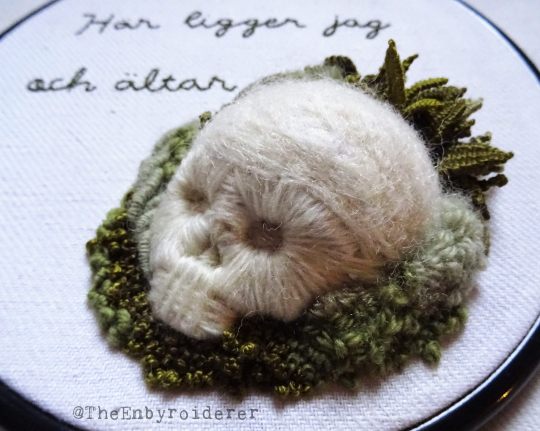
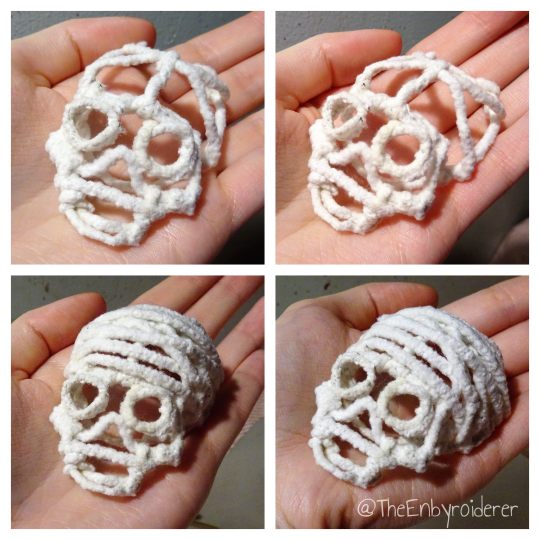
1. Make a skull out of pipe cleaner. Just do it, I can't tell you how.
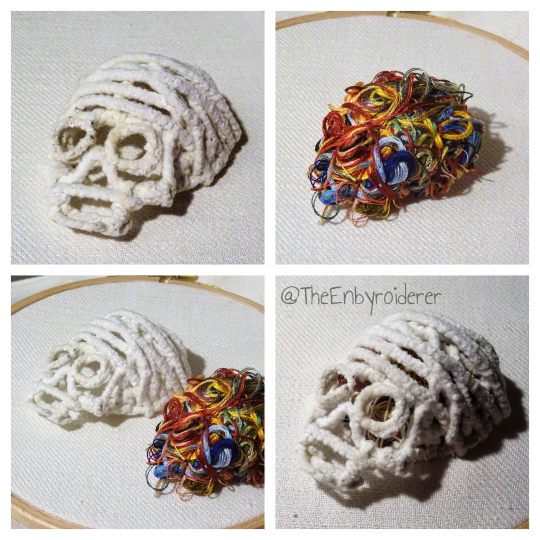
2. Find something to fill your skull with. I filled mine with a bundle of orts (thread scaps), so in my mind this skull will forever be known as Ort-For-Brains. I stitched around and through the bundle of orts a bit so that it was less a random tangle and more of a solid round shape. Then I tucked the orts into the skull and stitched the skull to the fabric with just a few stitches (using a durable cotton thread) around the edge. Make sure you fill the space inside the skull completely. Underneath the face of the skull the brains poked out a bit, so I did some stitches with the cotton thread there to hold the orts down. Another filler may be easier to work with, but I just couldn't resist the though of using colorful orts as brains...
3. Stitch over the pipe cleaner scaffold using wool yarn. I can't tell you exactly how to do this either, and depending on the shape of your scaffold you might encounter different challenges. Just be methodic, and don't overthink it. Use a thicker yarn, or more strands, on the top of the skull, and thinner/fewer strands when you are doing the face. When doing the face I'd say start with the eye sockets because they dominate the face. Stitch outwards from them, as if the sockets are suns and the thread sunbeams, if you get what I mean.
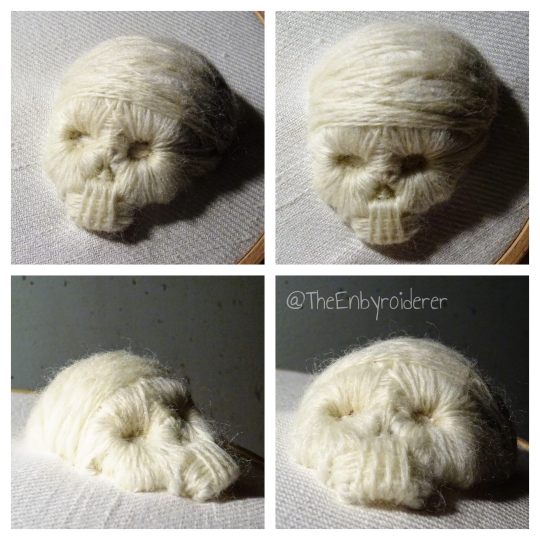
4. When you have stitched to your heart's content you may want to felt parts of the skull to make it smoother. I did anyway. I took bits of wool yarn and carded them a bit to make them less yarn-shaped and more like little sheets of wool, then I used felting needles to poke them into place on the top of the skull. If you have actual rowing wool, use that, it's probably better.
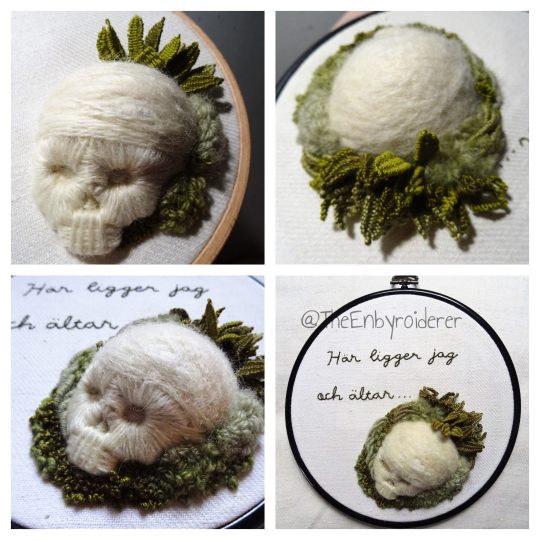
5.When you are satisfied with the skull you can do whatever you want with it of course. I added foliage. Techniques I used for that include: turkey stitch, drizzle stitch, woven picot stitch, bullion stitch and french knots.
#embroidery#3d embroidery#fiber art#3d embroidery tutorial#embroidery tutorial#fiber art tutorial#tutorial#kind of anyway#skull art#memento mori
425 notes
·
View notes
Text
nero plushie progress ramble [speedrunning this project i have like 3 weeks left lol] :
havent measured it in full but it will be BIG for my standards at least 40cm when standing. basing it on my simpler artstyle so the head is bigger you know how it is with humanoid plushies
not following any tutorial im following my heart . planned out almost everything for the body i need to measure some things and imagine them in 3d to understand if i need additional material in some places other than that its going great. im not fully sure how im going to layer the hair and getting its shape might be hard?
my nero design has very cartoony geometrical hair. idk how to explain it just look at how i draw it. and that fuckass swirl idk what to do with it i might just embroider it onto the fabric? like its impossible to do it in 3d whenever people with more complicated artstyles want to draw my nero i tell them not to worry about the hair because what the fuck are they supposed to do there. i drew his hair like that 4 years ago and said yuup it will stay like this. and it did
ok aside from the hair. im worried about making the clothes since i will have to replicate an actual sewing pattern but in a smaller scale and modify it and then do embroidery for golden elements. and idk how i will stylize shoes they might be totally flat fabric if shaping it into a shoe looks akward with the rest of the simple body. but im excited about the clothes and i hope i get to make more outfits later and dress him up all cutesy
3 notes
·
View notes
Text
ive never really gotten involved with cosplay discourse bc most of it is stupid but apparently sone people have been talking abt bought cosplays vs homemade cosplays and as a maker my head is full of thoughts. keep in mind that ive heard everything secondhand from my roommate (who also cosplays) bc i dont really use other social media (we have a joint cosplay insta i post on sometimes but they do everything else there).
ive been making my own cosplays since i was like 11 or 12, and im lucky enough to have had a mom who knows how to sew and could teach and help me those first few years. my dad is a nerd who was excited when i started cosplaying and going to cons with him and he's always has helped me with props. again, i know im lucky for this, and i had a pretty easy in to the hobby. this is all really just for context for my side here.
cosplay had a bit of a popularity boom over lockdown, because it was a way people could have fun at home, and that's great!! i love seeing people getting into things i love!! especially after being made fun of for it as a teen. but since then, ive noticed that the vast majority of new cosplayers are buying their costumes — and before i go further, i want to emphasize that i do not judge on an individual level whether or not youve made your cosplay, and nobody should. everybody's situation is different and it's important to remember the play part of cosplay. its supposed to be fun — and honestly that's really sad to me. what's even sadder is the amount of people saying things like 'everyone who makes their cosplays are rich' (i am absolutely fucking not, im currently unemployed bc im disabled) or 'if you make your cosplay youre not a cosplayer, youre a cosmaker' (this one doesnt even make sense. why are you alienating the creators of the entire hobby).
i get completely that its an intimidating thing to get into. making cosplays isnt just sewing. its also hair/wig styling, makeup artistry, foamwork, propmaking, etc... the list can really goes on bc it truly can be anything. resin casting, embroidery, beading... it all depends on what youre doing and how you want to do it. and im not saying it isnt a money- and timesink, because obviously you have to invest both of these things into it. but it doesnt have to be all fancy sewing machines and expensive fabrics!
did you know you can sometimes rent sewing machines from libraries? if theres a makerspace near you, thats a fantastic resource (they usually have things like sewing machines and 3d printers, and they usually host classes where you can learn to use their equipment)! youre even likely to find sewing machines at thrift stores! and speaking of thrift stores, bedsheets and curtains make great fabric sources, and if youre lucky you can find a piece you can alter or even just wear as part of the costume! and theres tons of tutorials and resources online for just about everything, even for specific costumes. there are also some good online fabric stores with much more variety and better prices than joanns, and you can look into if theres a place near you that sells recycled and donated remnants/unused fabrics, etc!
and like. idk. maybe thats all common knowledge among the specific group of cosplayers im talking about. theres nothing wrong with still choosing to buy a cosplay. i just ask: do you know how the people who made it are treated at the source you buy from? are they paid fairly? is it made out of cheap polyester and how comfortable is that for you?
i put — very literally, usually — blood sweat and tears into my costumes. im not saying everyone has to do this. im just. the making aspect is the heart of cosplay to me. its clearly not for everyone and thats fine. it just makes me sad to see so many people acting like its some elitist or inaccessible thing when its not
#genuinely. i miss the days when peoples first cosplays were 'bad'#bc they just started out and did things for the first time. its beautiful to me#anyway. yes i typed this up while sitting at my sewing machine. half-sewn cosplay piece on my lap. my head got too full while working on it#cosplay#slowmotalks
2 notes
·
View notes
Text


Lolita coord for Midsummer Scream :) First time to the event, and it was super fun! When my friend started talking about going earlier this year, I knew it was the perfect opportunity to figure out what I could do with my LeMiroir Skeletal Remains jsk. The embroidery is so beautiful!! But while I was super into gothic fashion as a teenager who wasn’t allowed to buy it, as an adult my wardrobe is still very much not gothic, so this jsk felt like my first big foray into a darker style. Very intimidating, but even more exciting!
My first shot at styling was with a basic black blouse from taobao, plain black tights with Mary janes, and not much else! It was way too plain, I didn't even have a headpiece! But it gave me a starting point. I sewed together a bow to pin on front and got 3D rose tights. Messed around with a few different headpiece ideas before eventually giving in and buying a basic black horn base to customize. I painted them to have more realistic colors and a more matte texture, and finished off with ribbons and trims to make it look more elegant. Originally planned to add bells to it as well, but I got convienced out of that by a friend (;´∀`)
Changed it up one more time before the convention! Got a black petti since the white one was just too visible, and my academy bag in black from Cotton Candy Feet came in! A fantastic event bag, if anyone was wondering, perfect to hide water bottles, handfans, and a parasol haha. Replaced the black ribbons on the blouse with the same red from the headpiece to tie them in more. I kept feeling like there was just too much black and trying to bring in more color, but Im not sure that replacing the ribbons was quite the best move, if only because it made it so visible how often theyd come untied (。ŏ﹏ŏ) Followed a gothic makeup tutorial on YouTube to finished things off since makeup is not something I touch too often.
I was really proud of how all this came together, and my friends loved the look too, so it's all a win! \(^o^)/
Next time, I think I would like to try this JSK with a red blouse, or perhaps something more sheer for the tights? Now that I have one way to wear it down, I want to explore more, and more gothic looks overall( ^ν^)My inner teenager is so happy! See mom, it's not just a phase!
Happy Midsummer Halloween, everyone!
4 notes
·
View notes
Text


Create a wonderful tiger head logo design for your business
I am a professional graphic Designer and with 7 years of Industrial Experience.
Looking for Professional /Unique & High Quality / Elegant / Modern / Abstract / Creative / Web Logo? I'm the perfect person!
tiger logo,logo,tiger,best tiger head embroidery logo,tiger logo design,tiger head,tiger head embroidery design,logo design,tiger head machine embroidery designs,tiger head logo desing,animal logo,tiger head 3d puff embroidery logo,tiger head logo silver color design easy,head logo,3d logo,logo tiger,head,digitizing embroidery logo,tiger head design,logo design tutorial,tiger head 3d model,tiger sport logo,tiger sport team logo
#tigerhead#tiger#jashujan#tigertattoo#jashujantigerhead#jashujanlucu#jashujanbagus#jashujankeren#hashujanmuslimah#jashujankece#gamisjashujan#jashujancantik#jashujanwanita#jashujancewe#jashujangamis#tigerheadtattoo#tattoo#tigerart#tigerjewelry#tigerdesign#traditionaltattoo#tradtiger#tigerring#serpentforge#mensrings#tigerjewellery#tattoos#tigerrings#like#angrytiger
0 notes