#quilting tutorial
Explore tagged Tumblr posts
Visit Tumblr Blog
Explore Tumblr blogs with no restrictions, modern design and the best experience.
Last Seen Tumblr Blogs


Fun Fact
Tumblr was named as a finalist in Lead411’s New York City Hot 125 in Aug 2010.
Text
Last Minute Christmas Crunch Sew and Quilting Gifts
Welcome to December and time for the Christmas Crunch. That lovely time of year when the count down to Christmas really hits crafters. Well here are a bunch of quick and easy last minute things you can make. These babies can be made using up scraps, leftover fabric, or fat quarters.
First off for the quilters and seamstress is hot pads, bow cozies, casserole dish cozies, pie cozies, and bowl covers. They make great gifts for those that cook or bake. Also very lovely to pair with the edible gifts or hostess gift for Christmas dinner.
Special Notes for these projects. If you want to be able to put the cozies in the microwave you need a special type of batting called wrap n zap. It is microwave safe. Insul-bright the heat reflecting batting used in many hot pads can not go in the microwave as it can catch fire or spark due to the material. When making hot pads make sure to use only 100% cotton batting as any with poly (polyester) in them will melt from the heat.
27 notes
·
View notes
Text
72 notes
·
View notes
Text

How to Make 32 HST (Half Square Triangles) at Once
Video https://www.facebook.com/reel/917441450329909
Tutorial https://lynsavenue.com/en-us/blogs/tutorials/how-to-make-32-at-a-time-half-square-triangles-hsts
#crafts#gifts#decor#sewing#quilting#briar rose quilts#bedding#shopping#quilters of tumblr#hst#half square triangles#quilt blocks#lynsavenue#tutorial#video tutorial#quilts#quilt tutorial#quilting tutorial
0 notes
Note
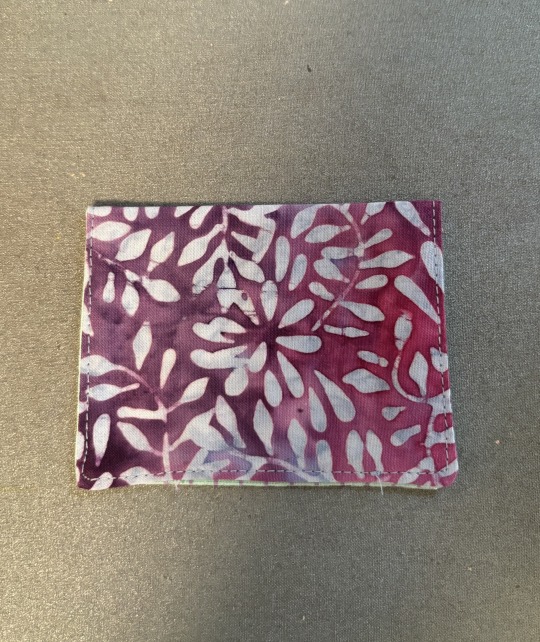
Hi! I just saw your quilted butterflies photo, and I was wondering if you would willing to share how to make them, or link to a tutorial? They're gorgeous and I'd love to try, but i don't know the right search terms to find those, i think.
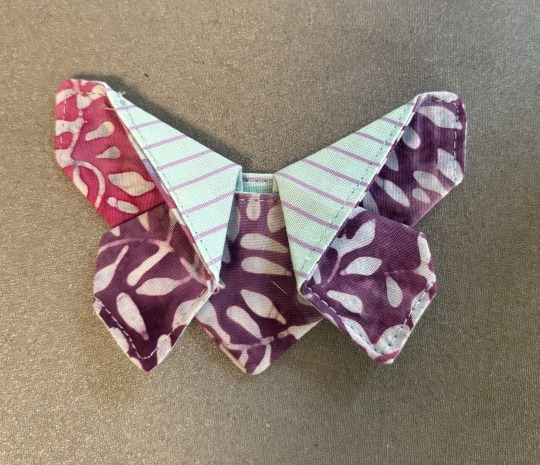
Oh absolutely! Everyone needs an easy craft to do right now. This will be a photo tutorial, so if you need a video the search terms are "origami butterfly bookmark". The instructions will be pretty similar.
*If you are using a sewing machine a single butterfly should take between 15-30mins, and if hand stitching my guess is ~1hr
Tools: -2 Scrap fabrics or 2x fat quarters, one for the main/outer fabric, one for the inner contrast -I recommend quilting cotton, though any easily ironable, non-stretch fabric will work -ruler and marking tools -scissors OR rotary cutter and mat -Pins (if desired) -Thread in a matching OR contrast colour - depending on preference -Iron and Ironing board - You can use a piece of cotton folded into a thin pad in a pinch as long as it's flat!
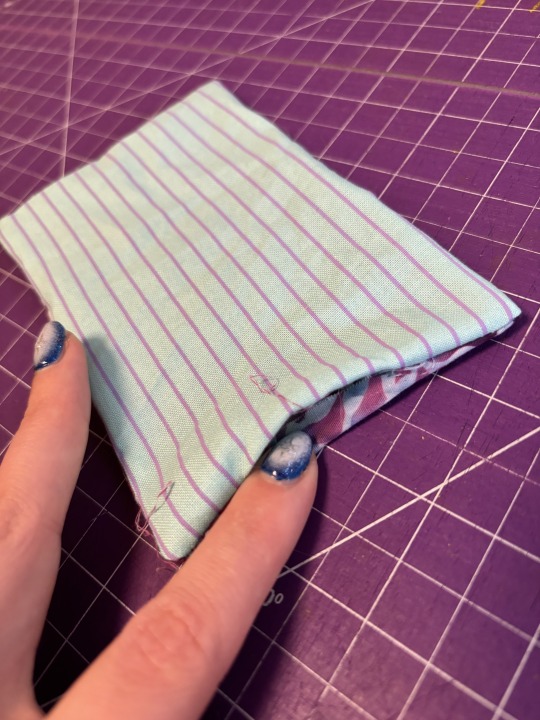
Step 1: Cut out two rectangles. You can make the butterflies as big or small as you'd like, as long as it's in keeping with the 2:3 ratio. For me, I like to use 4" x 6" rectangles. Use your marking tools to mark out the rectangle on the back/wrong side of the fabric, then cut them out!
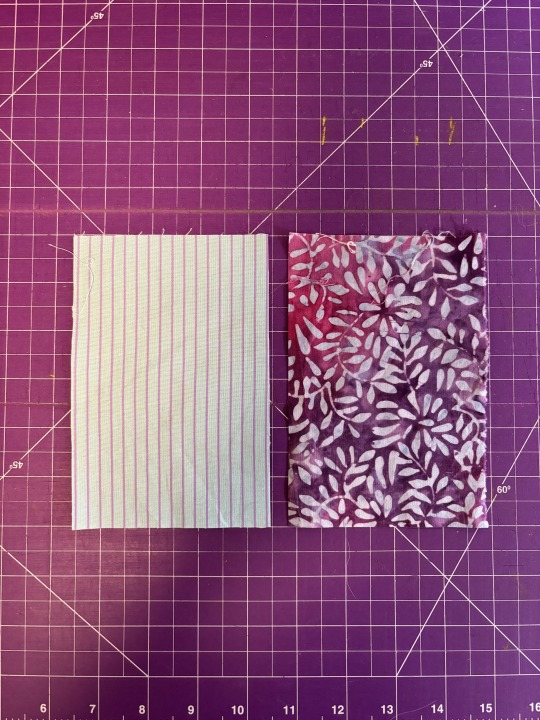
Step 2: Put the rectangles on top of each other, with right/patterned sides facing each other. Make sure all your corners and edges line up. Pin in place if using pins. (in this example one of my fabrics has the pattern on both sides of the fabric)
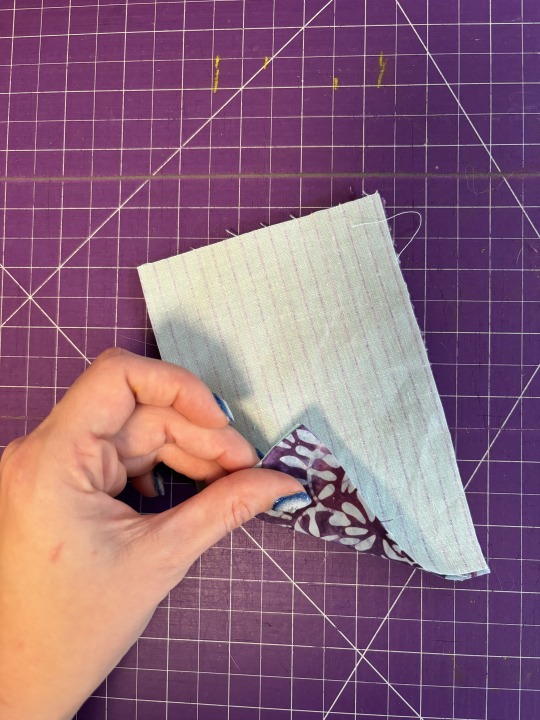
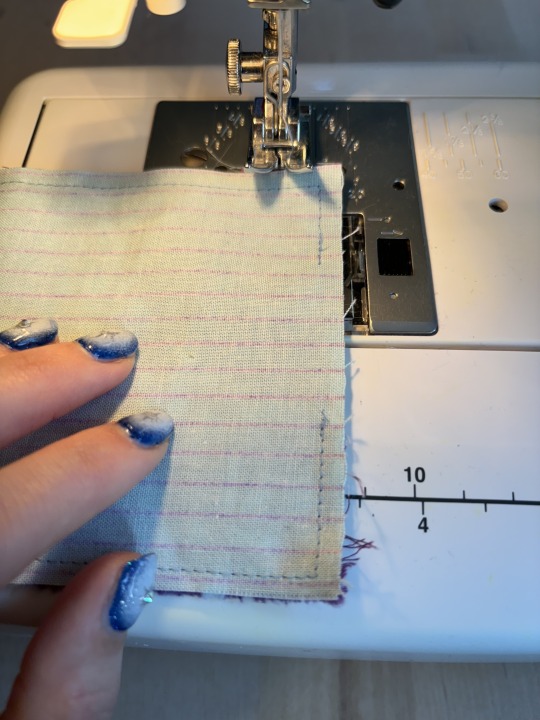
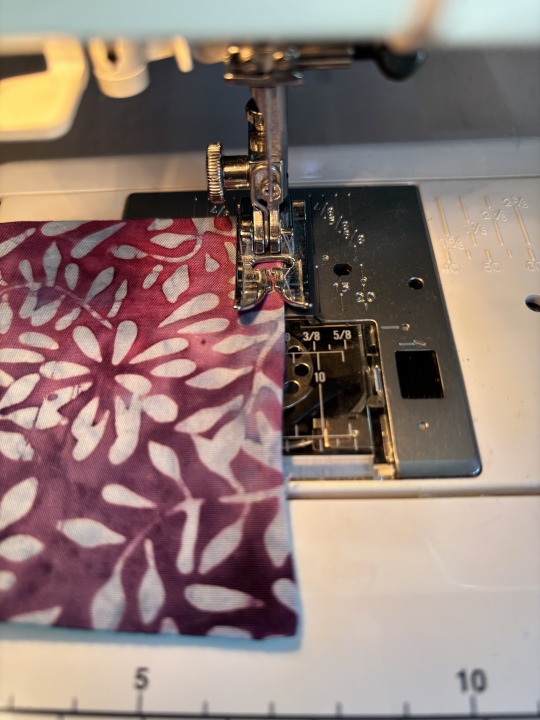
Step 3: Sewing! Mark a 2" gap on one of the short edges. If using hand needle mark out 1/4" distance from the edges. Sew. If using a machine, line up the edge with the 1/4" inch mark and sew. (Image is completed stitching, not placement on machine)
Step 4: Trim the corners without cutting into the stitching line, then flip the fabric inside out through the 2" gap you left. Make sure to stick your finger or something blunt but pokey -like a chopstick- into the corners to make sure they are nice and crisp!

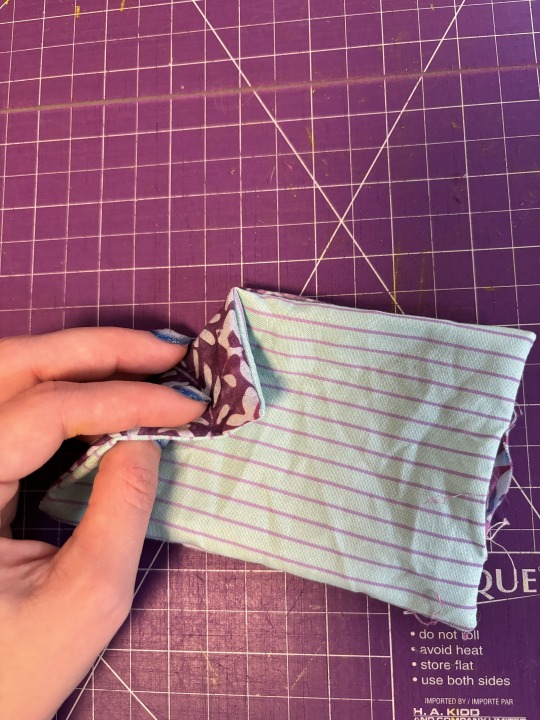
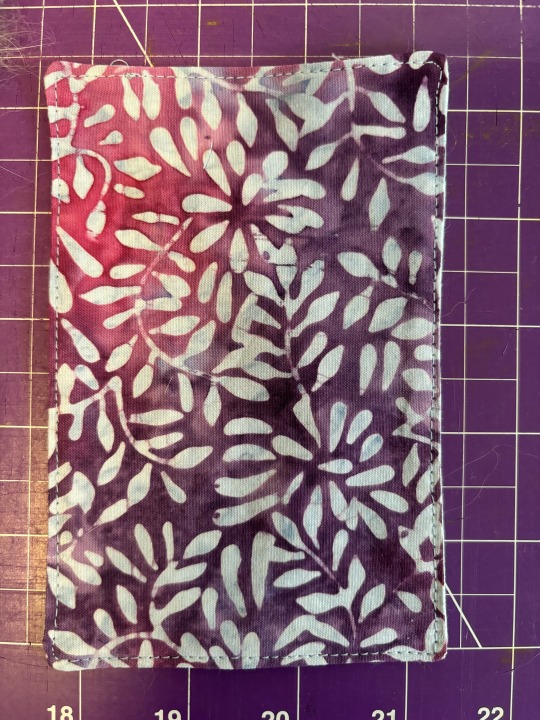
Step 5: Press all your frustrations out by pressing that fabric! Get it nice and flat and crisp! Make sure you've folded in the edges of the 2" gap to match the seam allowance of the already-sewn edges before you press. Then, if hand sewing, slipstitch the gap closed. If using a machine, set your fabric at a 1/8" distance and sew around the edges, effectively closing the gap and giving you a lovely topstitch detail.
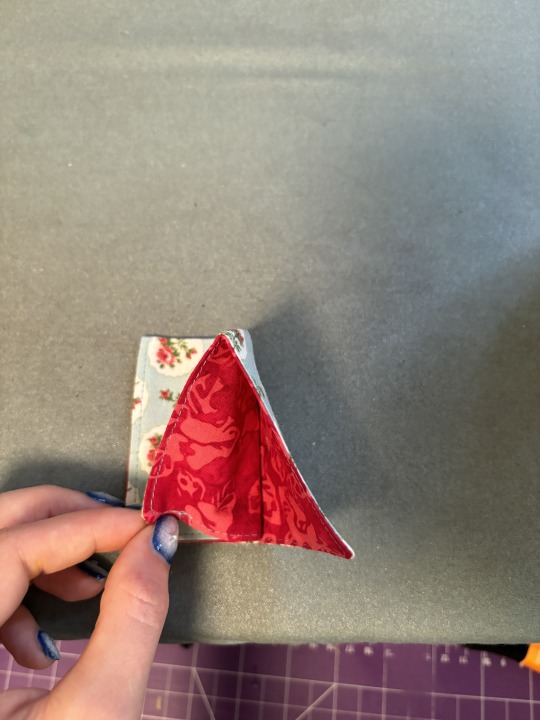
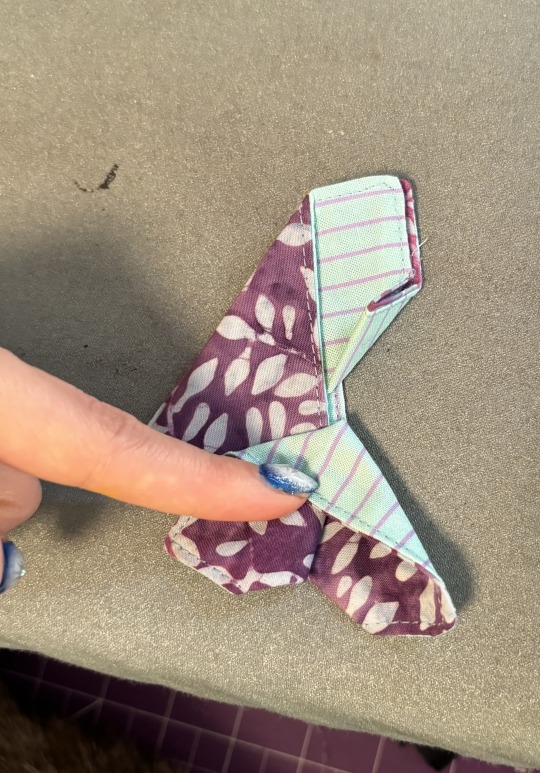
Step 6: Let's start folding! First move we're going to make is folding it in half, bringing the short edges together. Keep in mind, whichever fabric is on the outside will be the main fabric of your butterfly, and what is on the inside will be the contrast! Press hard! Then, make sure the edges you just brought together are facing you for the next step.
Step 7: Take the top fabric of the right open edge and bring it to the left side of the open edge. It will tent up in the corner, use this and press that tent down until you have what looks like a triangle of the outside fabric on top of two rectangles of the contrast fabric. Press! (I forgot to take pics of the whole process with the first one, don't mind the fabric switch).
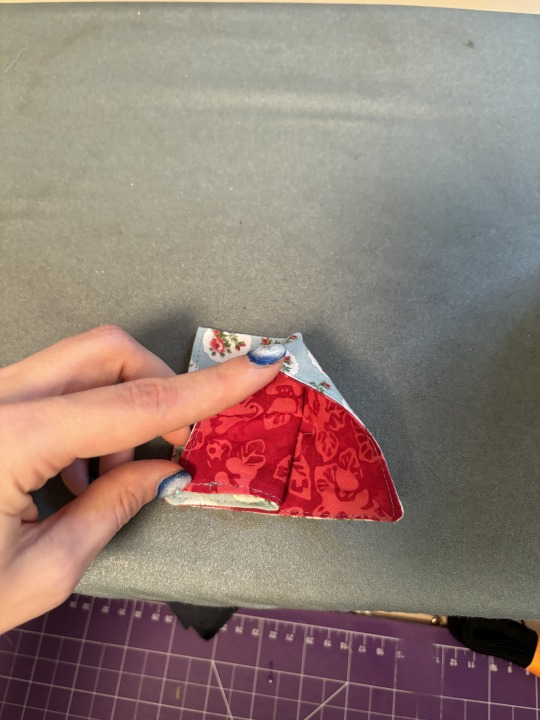
Step 7.5: Flip your butterfly and repeat step 7 on the other side until you have a strange looking triangle like this.
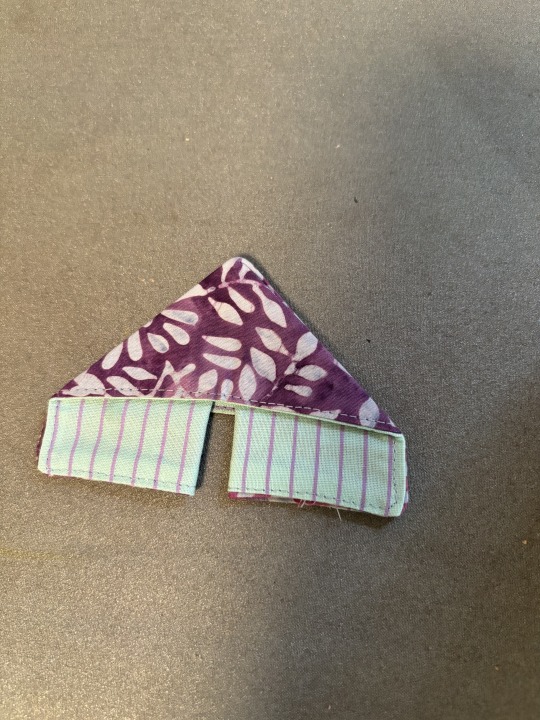
Step 8: Take the inner corners of the contrast fabric and fold it up towards the outer fabric. The bigger this fold, the more contrast fabric you will see in the final butterfly. Press.
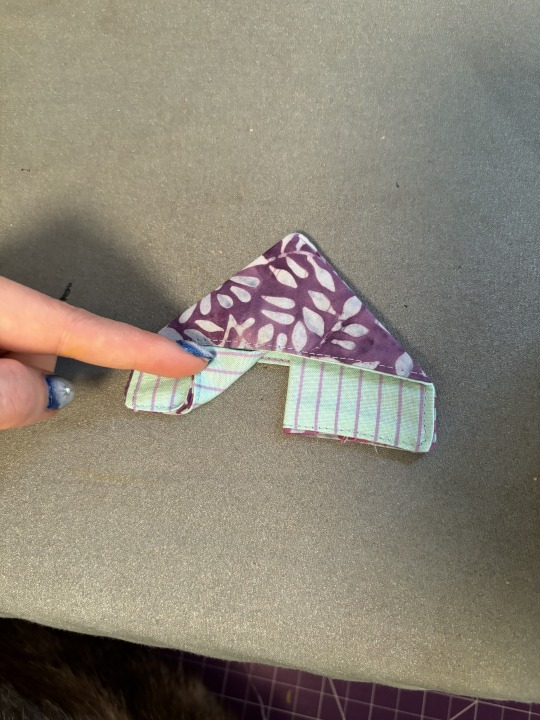
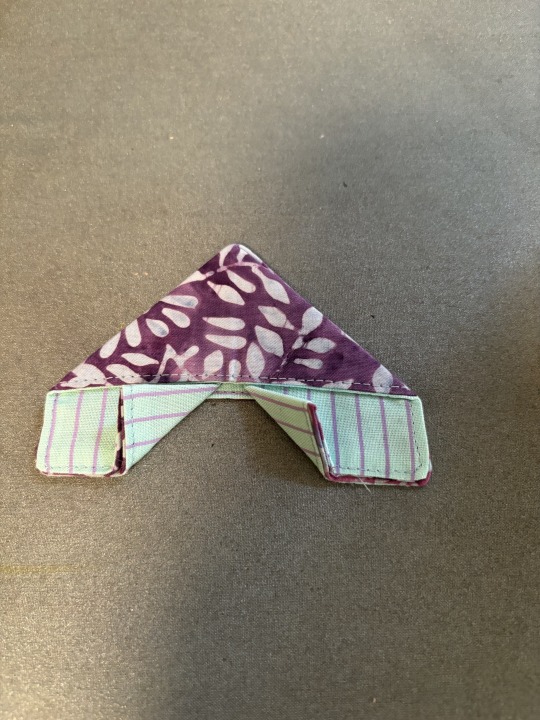
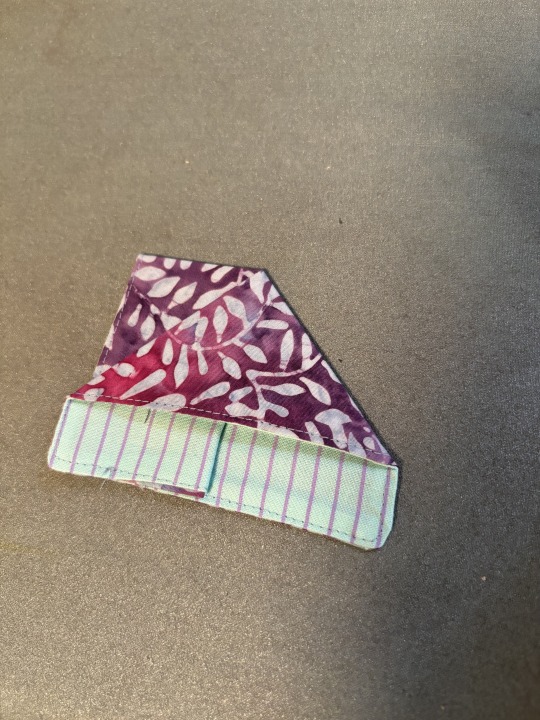
Step 9: Take the tip of one of the corners you just pressed up and bring it back to it's original position. Do not press. Gently press down on the tip of the corner, letting the fabric unfold. The butterfly wing should unfold, with the contrast fabric showing in the centre. Adjust until you have as much contrast showing as you'd like, then press hard. Repeat on the other side.
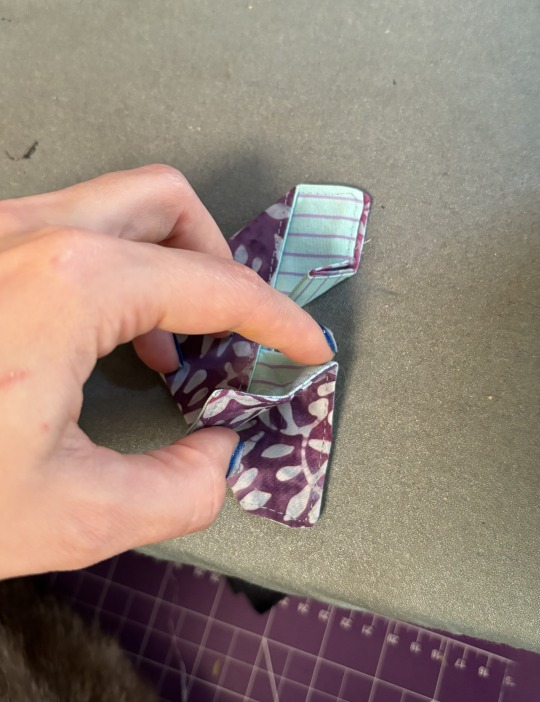
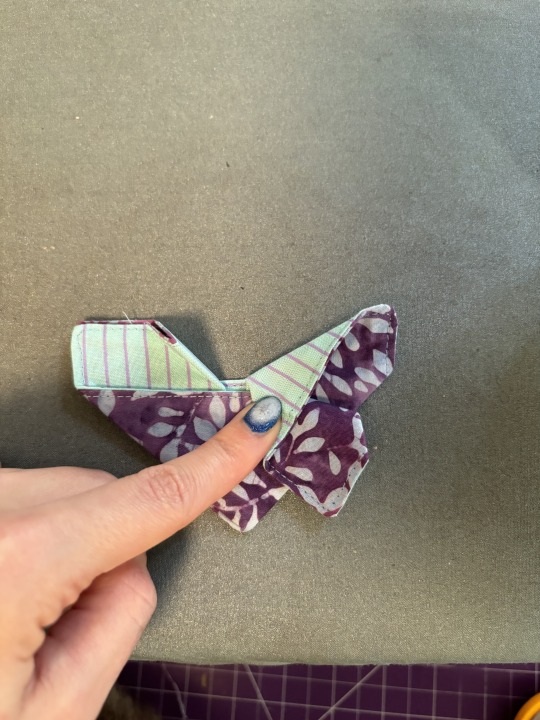
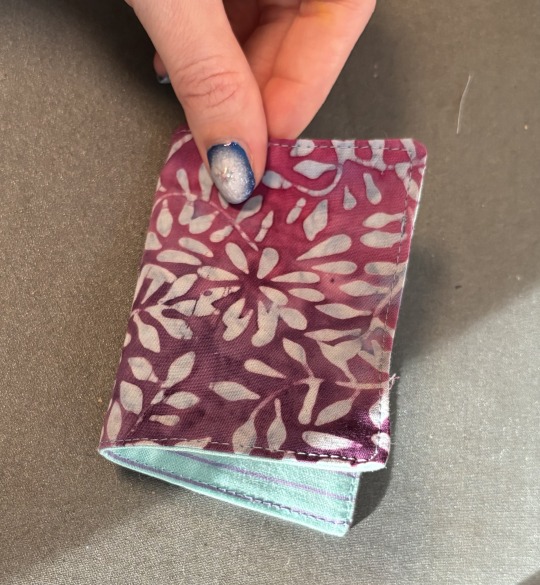
Congratulations!! You now have a butterfly!! You can make a garland, stick them on hairclips, or simply put them on your windowsill to keep you company! If you want to ensure that your butterfly doesn't unfold, you can add a small hand stitch in the centre of the two triangles that make up the "body" of the butterfly right along where the topstitching is.
Hopefully this was clear to follow, but if you have any questions, let me know!
205 notes
·
View notes
Text
So, @bi-dubmass11 asked how I got my squares symmetrical in the Twisted Snowball quilt, and I decided a little tutorial couldn’t go amiss! (Also, it got a little complicated to explain in just words so here’s a whole dang post lol)
So. I start by cutting my fabrics out. The focus fabric (orange) is 4.5” square, the blue is 6.5” by 2.5” and the pink is also 6.5”x2.5”
Nothing looks like it’ll fit, the accents are way too long for the focus block.

That’s okay! We’re gonna fix that.
Take your first accent and sew a partial seam. I backstitch on my partial seams so they remain sturdy for the rest of the block.


When you open it up and lay it back, things look a little better. Take that second accent strip (the blue one) and sew it on like normal since it fits now.

As you can see, the next pink strip will now fit in place. Go ahead and sew it on!

Now we have the last blue accent, and it fits… because you can fold back the piece that we only used a partial seam on. Sew that sucker on!

Now we can fold the first pink accent back into place and low and behold, it fits like a glove.


Finish sewing that partial seam, but don’t sew too far! I veer off into the seam allowance to give it space, but you can just stop and do a little backstitch again to secure it once you’re just past the original partial seam.

Open that block up and iron it flat and you have a nice, complicated looking block :D

I hope that was helpful!
<3
51 notes
·
View notes
Text
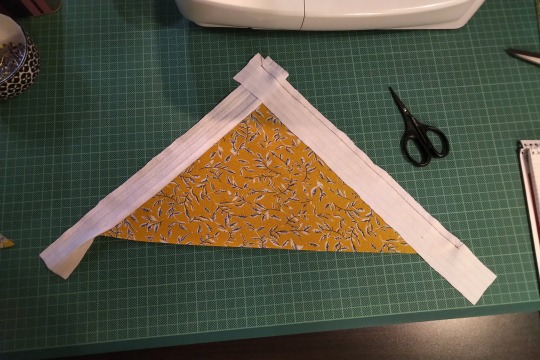
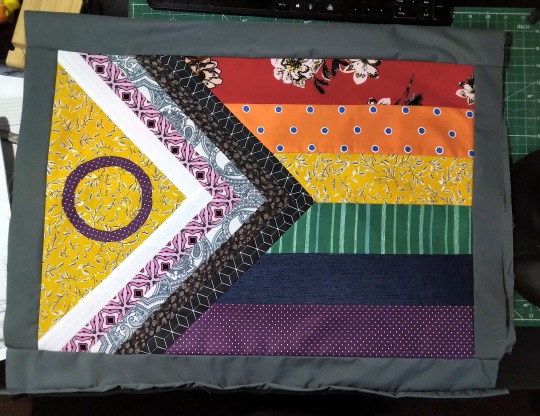
Progress Pride Flag Quilt Block Pattern & Tutorial
Don't you just love the flag of our people? Do you have an inner grandma that years to make stuff? Do you want to combine these two things and make a queer quilt?
Well, I've got you.
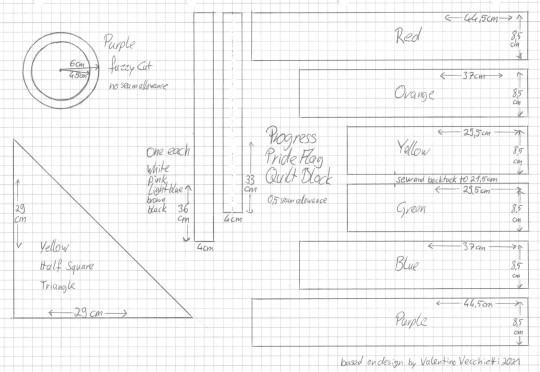
Behold the pattern! And my lack of graphic skills, so I drew it on paper!
Basically it's a bunch of rectangles, one half square triangle and a fuzzy cut circle. I don't know shit about quilting and I was able to come up with it. Why centimeter, you ask? Because I'm German and that's what I'm familiar with. Why weird measurements and not jelly rolls and layer cakes and stuff? Because I'm German and quilting is not really a thing here.
Onto the tutorial!
You'll need:
A scrap of fabric of red, orange, yellow, green, blue, purple, black, brown, light blue, pink, white each
additional fabric for the border
Cutting mat, quilting ruler, roll cutter
sewing machine
thread
pins
double sided interfacing
iron and ironing board
fabric sheers
compasses
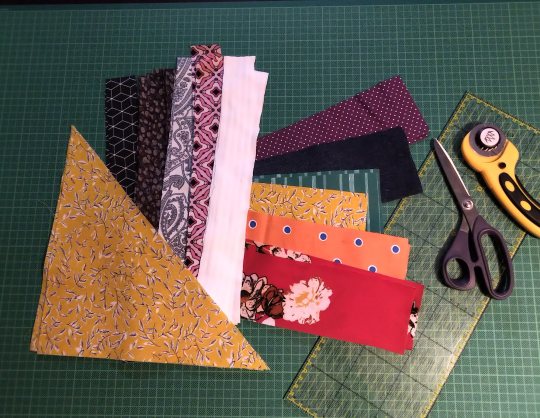
Step 1: Cut everything. Duh. We'll take care of the circle later, don't worry about that now. The half square triangle is exactly what it sounds like. A square and then you cut it diagonally. That's why I didn't give the length of the hypotenuse.
(Note: I'm making two blocks at the same time, that's why there's so much fabric. Also this is a middle of the night project, hence the lighting.)
I'm using all kinds of different fabrics, different weights and drapes, some stretchy, some transparent, so I needed to interface some of them.
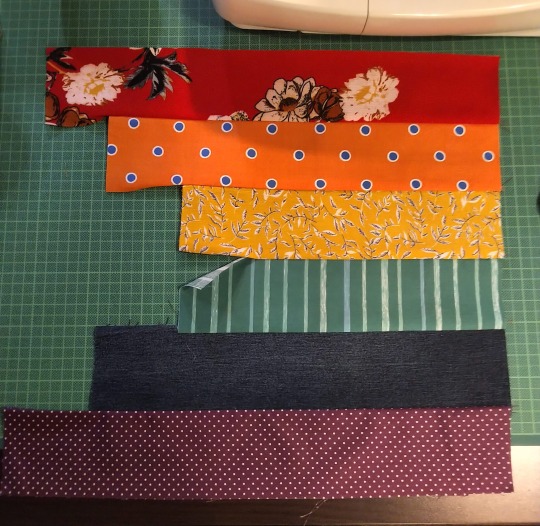
Step 2: Sew the rainbow together. 0,5cm seam allowance on everything, that's exactly the edge of the foot on your machine. Double and triple check that everything is facing the right direction before sewing. The seam of yellow and green does not get sewn fully, only 21,5 cm! That's important later! Also backtack there. Don't forget to iron.
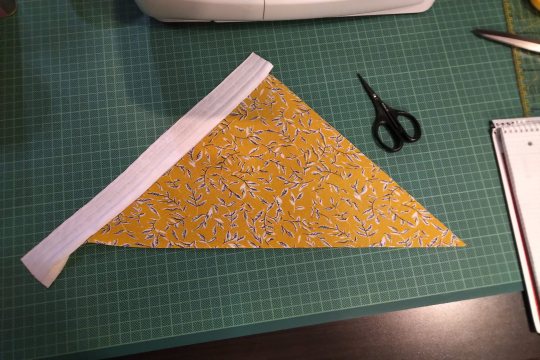
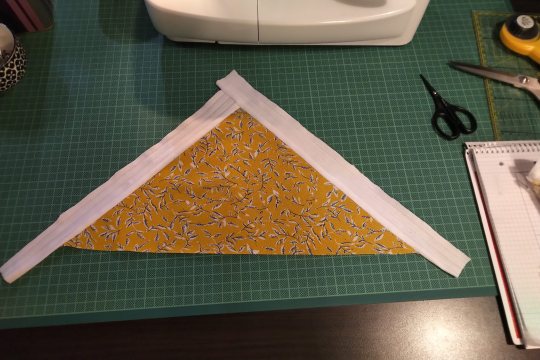
Step 3: Sew the strips to the half square triangle. For this you have to switch between the sewing machine and the ironing board constantly. Attach the shorter strip diretly to one side of the HST, iron it open. The second strip of the same colour gets attatched to the other side of the HST and the first strip. Look at the pictures closely if you're unsure how that works. Also the strips are longer than the triangle. We'll square that up later.
All strips attatched will look like this. See how the two strips meet at the tip!
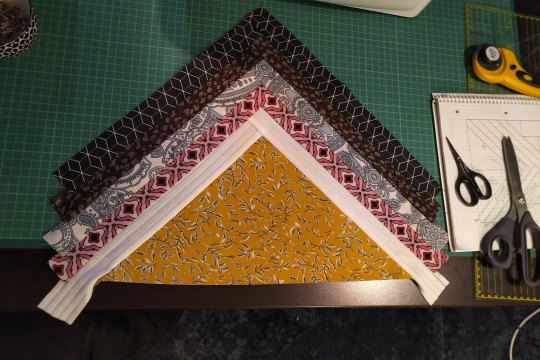
Step 4: Cut the rainbow part to size. The length between yellow and green is 22cm long. The shorter seam from before plus some seam allowance. The outsides of red and purple are 44,5cm long. These two points are the beginning and end of your cutting line. You will cut a little triangle from every single colour. Do this slowly and carefully. Maybe your fabrics have stretched a bit (mine did). Don't worry, it will be ok.

Step 5: The Y seam, part one. Y seams are tricky, but there's only one for this block. So put your strips part on your rainbow part and line them up so that the tip of the strip part overhangs the seam between yellow and green by about half a centimeter. Remember that it's not about the edges of the fabric, but where the seam will be. But don't sew all the way! Leave 0,5cm at the tip!
You can also mark on your strip piece two lines 0,5cm from the edges of the black. They should form a little square at the tip. There they meet is where the actual tip on the finished block will be. So place this spot directly on the seem between yellow and green and only sew right up to it. Not beyond.
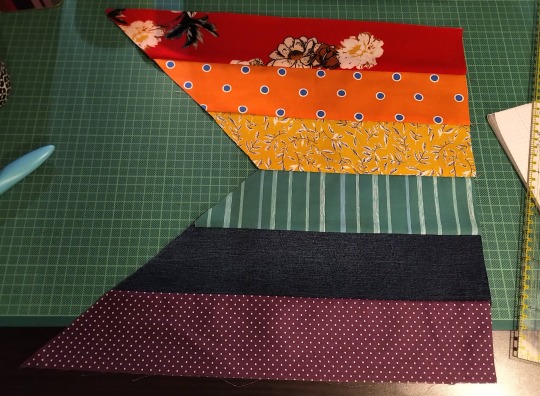
Step 6: The Y seam, part two. Now, fold both the rainbow part and the strips part in half and if you've done the last step correctly, the remaining two edges will allign. Pin and sew.
I can't explain it better than I've done here, I'm sure there are tutorias out there. Good luck!
Step 7: Square up. Iron your block to that everything is nice and straight and flat. Then use the fabric edges of the red and purple to cut the remaining ends of the strips. Use the HST to cut the white. Be careful, the long side of the triangle is on the bias and likely stretched a bit.
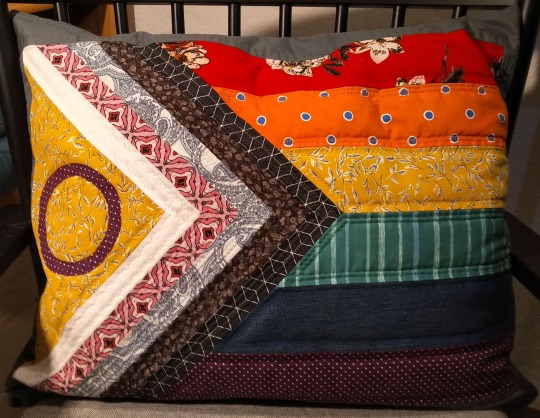
I already added borders here. I'm making a pillow case.
Step 8: Fuzzy cut and raw edge applique. Double sided iron on interfacing is essentially double sided tape. It has two types of glue, one gets activated by 2 seconds of heat, the other by 5 or so (depends on the product). The second side is also covered with a paper that needs to be removed before the second gluing. Read the instructions of the product you are using!
Use your compasses to draw a circle on the protective paper side of the interfacing. It's actually two circles from the same middle point, see pattern. Cut it out roughly. Then place it with the rougher side on the backside of your purple fabric and iron for 2 seconds on middle heat. If you've just ironed your fabric before and the ironing board is still hot, wait for it to cool down. Also let the fabric cool down after applying. Then cut out your circle. The interfacing will have stiffened the fabric, so that shouldn't be a problem. Then remove the protective paper, place the circle on the yellow triangle where you want it and iron for 5 seconds. Let cool.
And you're done! The applique at this point is only secured with the interfacing, but it should hold fairly well. The quilting will secure it further.
And that's it. BTW, did you know that this design was made by Valentino Vecchietti for Intersex Equality Rights UK in 2021? Now you do. Happy quilting!
#lgbt+#lgbtq+#lgbtq community#pride flag#progress pride flag#valentino vecchietti#quilting#quilt#quilt block#quilt pattern#quilt tutorial#sewing#sewing machine#sewing tutorial#sewing pattern
230 notes
·
View notes
Text


I made two cute Pencil Bags (that's just the name--it's not actually meant for carrying pencils exclusively, although I guess there's nothing stopping you from using it that way :P) designed by Jin Hee Kim (www.byhandsusa.com). I bought the pattern and the fabrics from their stall at a sewing convention, and it was very fun and simple to make. They were given as Xmas gifts 🎁
#sewblr#my post#sewing#craftblr#quilting#patchwork#purse#handmade#christmas gift#byhandsusa#Jin Hee Kim#normally I'd post my process#but I can't this time since it's not my pattern!#they are also on youtube if you want a tutorial
28 notes
·
View notes
Text
For the anon who asked about how I make bind-free coasters, here's how I do it
1. I first sew a simple basic line to secure the batting to the top. Then i trim the layers and lay the partially quilted top and batting right sides together with the backing. I like excess backing because that layer likes to shift, and I'm too lazy to pin them.


2. Next, I set up this nifty device Clover makes. Then, I sew a half inch seam allowance and leave a section free to pull the coaster right side out.


3. Trim the edges and cut off the corners. I make the corner cut about 1/8" from the seam.


4. Now, pull the coaster through the gap. Use a dull pencil to poke the corners out. Clover also makes a device for this, which I find super helpful. Most especially because I make coasters so often and don't fancy accidentally poking a hole through the fabric...again.

5. Press the edges flat. The large seam allowance makes it possible for it to lay flat because inside it's almost a quarter inch seam allowance.


6. I then sew a quarter inch seam allowance from the edges and machine quilt the three layers together, this time more detailed.

7. Small note I forgot to include. I handsew the small gap, so it looks consistent, with a hidden stitch. You can look up a video tutorial for that bit. It's super easy!
I hope this has been helpful! I love making coasters this way. It's also the way animal shelters require kennel quilts be finished. The binding is the first thing that needs repairs after frequent use. It's a hassle to repair the binding, especially for those who aren't quilters. Patching? Much easier.
36 notes
·
View notes
Text
youtube
This Layer Cake no-waste version of quick cutting a Hunter's Star has my mind properly blown.
#quilt block tutorial#quilt block#tutorial#quilt tutorial#hunter's square block#hunter's square block tutorial#video#hunter's square layer cake block tutorial#layer cake#layer cake block tutorial#layer cake hunter's star block tutorial#quilt#quilting#modern quilt#sewing#fabric#Youtube
15 notes
·
View notes
Text
unknown
1 note
·
View note
Text
So I've been struggling with chain piecing my latest project. Every time I'd end up with a knot of thread and I was losing my mind. Turns out I wasn't keeping enough tension between pieces. Was kind of venting to the husband and he reminded me that I was a beginner and it wasn't possible to just know everything.
So, for all you people just getting into crafting like me, here's a message from my husband. Be kind to yourself as your learning. Learning something new is hard enough without you kicking yourself over every mistake.
#quilters of tumblr#quilting#fiber crafts#Discovering there's a fine line between too much and too little tension.#Thinking of doing tutorial/tips Tuesdays as I'm amazed at how much I could learn
16 notes
·
View notes
Text

How to Make the Falling Leaves Quilt Block | a Shabby Fabrics Quilting Tutorial https://youtu.be/Z6zZJyUtIgc?si=o1Sa4Z0Bb4xLRR2L
#crafts#gifts#decor#sewing#quilting#bedding#briar rose quilts#shopping#quilters of tumblr#falling leaves#shabby fabrics#quilting tutorial#tutorial#quilt block#quilt#quilt pattern#block pattern
1 note
·
View note
Text
I think that starting a new medication with side effects of nervousness stomach pain and sweating was a really good idea at the same time that a bunch of stressful work things are happening
#it's good i feel good#i started playing the Jurassic world game to see if that would calm me down but i got so worked up about unsafe animal handling#i had to stop partway thru the tutorial#like it's accurate to the bad science and husbandry in the movies but it is TOO MUCH for me right now#i would like to get high but i have a zoom dr appt at three so that's a no go#and my partner won't be home till after three so i think I'm just gonna move my sewing machine to the living room#and watch something and get some quilting done
3 notes
·
View notes
Text
Embroidery Journal: Quilting + Applique For Only-Vaguely-Nefarious Purposes
I've finally cleared out my commission backlog enough to start a new project for myself, and this is one I'm really excited to tackle: an addition to my personal embroidery collection in the form of a horror art panel by @barbatusart. I spent entirely too much time last year embroidering cutesy little souvenirs for my coworkers. I think I'm allowed a little fun for myself now.
However: The solid color blocks in the background gave me brief pause. So I decided to whip up a quick little test project to experiment with how to work them in using a combination of quilting, applique, and lots of really really painstaking work with an x-acto knife. Experiment, steps, and final results below!
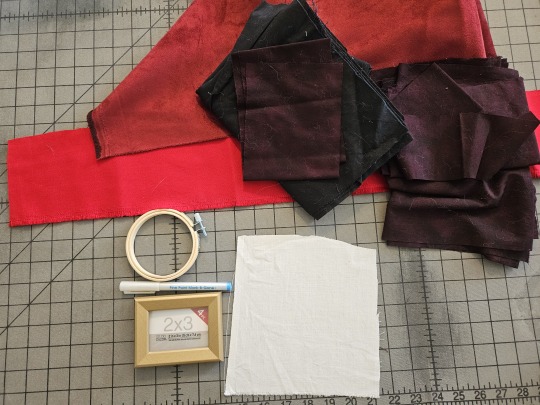
Step 1: Collecting Materials
Texture and fabric weight do make a very noticeable difference in any fiber arts project. For that reason, it's important to do test projects using the same fabrics you plan to make the final piece out of. Lucky for me, I have an abundant stash to choose from.
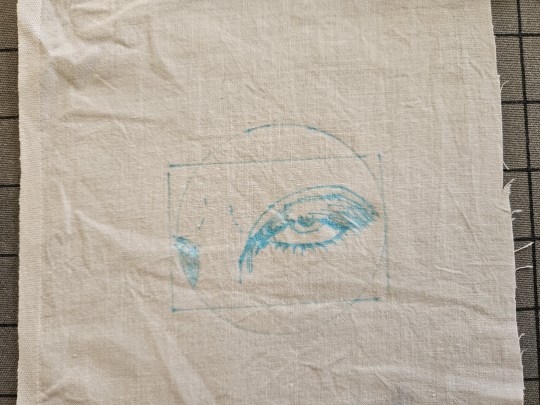
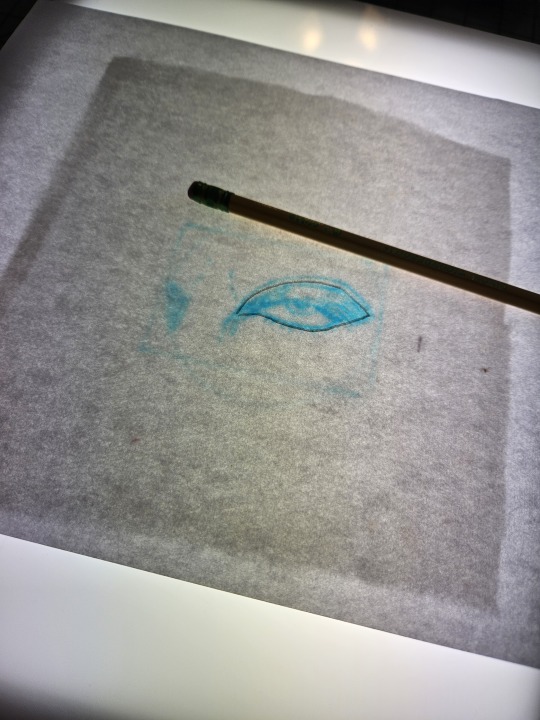
Step 2: Design
Alternately known as the step wherein I began to suspect I was going overboard by hand-drawing original artwork just for one little test project. In other news, guess what y'all - I can free-hand sketch eyes now!
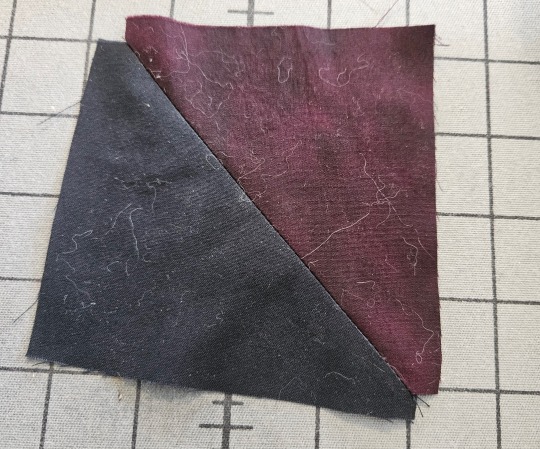
Step 3: Quilt The Background
Please excuse the cat hair. For this test I'm just going for two color blocks but I think it's clear how this concept would extend to the geometric background in the artwork we're building towards.
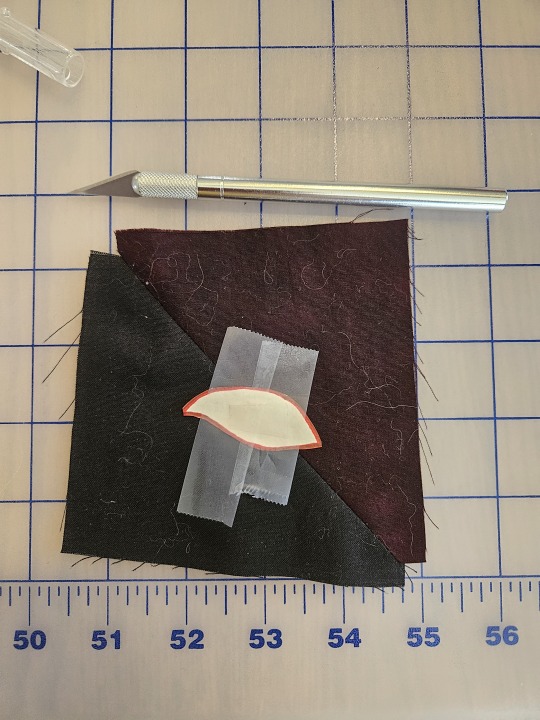
Step 4: Create A Stencil
The idea here is that we should create cut-outs in the quilted layer, from under which the white fabric will show through. My design is not ideal for this because it has a relatively light outline, so there's not much margin for error. However, looking back at the comic panel that is my ultimate goal, the outlines there are fairly heavy and bold. If I can make it work on my sketch, I'm confident I can make it work on the final piece.
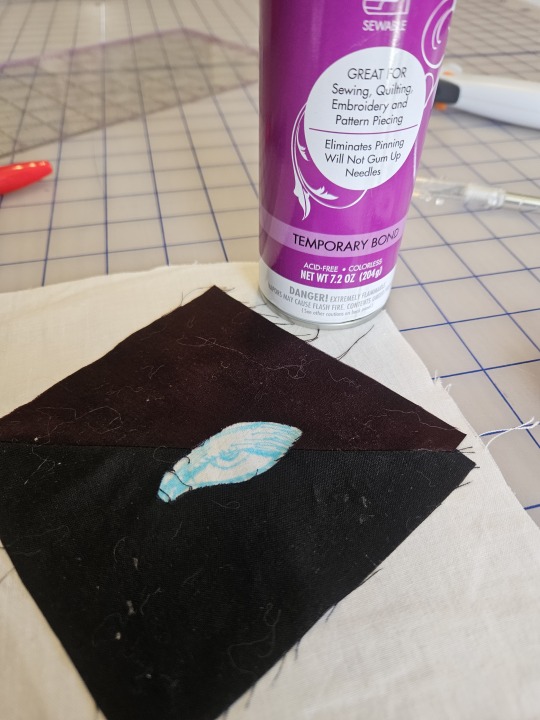
Step 5: Cut, Bond, and Hoop
A spot of quilter's spray adhesive was adequate to fix the two fabrics together. A keen eye will note that the final stencil was just a bit larger than intended and didn't quite perfectly line up. This is where the thin lines in my design aren't doing me any favors. But - good enough for now.
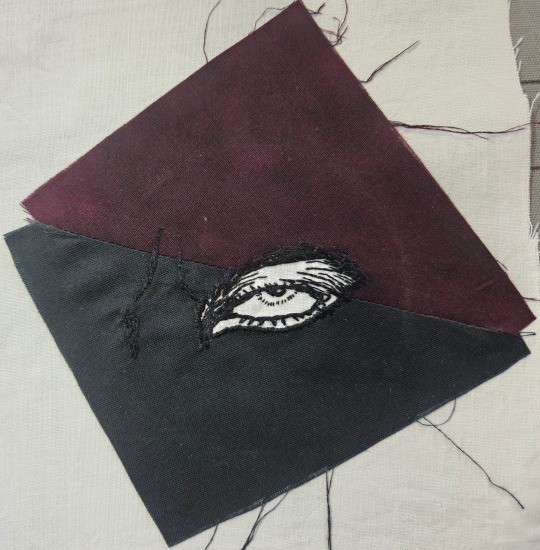
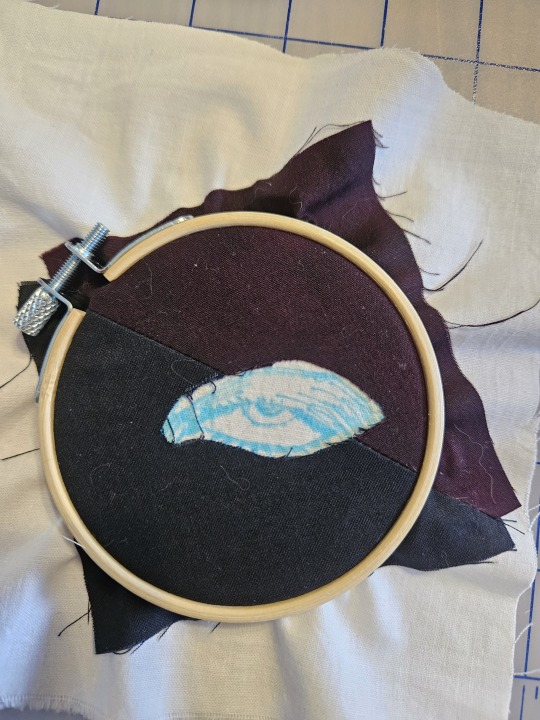
Step 6: Hey Look, It Worked
Would you look at that! I think this did actually do what I wanted to.
Notes For Improvement:
Using stabilizer on the quilted layer will help reduce distortion when it comes to placing it over top of the base layer - probably very important with a bigger design
Double sided iron-on stabilizer might be the way to go to keep both layers nice and bonded and prevent wrinkles
Thick outlines on the design border are definitely a must
That maroon fabric looks ok in this picture but in poor lighting, it very quickly disappears into the black, I might need to pick a different fabric
9 notes
·
View notes
Text
where would we be without half remembered pinterest tutorials
#in a car for the next 6ish hours so i’m hand quilting The Quilt#based on like. tutorials i read last year and also vibes#quiltposting#beeps
19 notes
·
View notes
Text
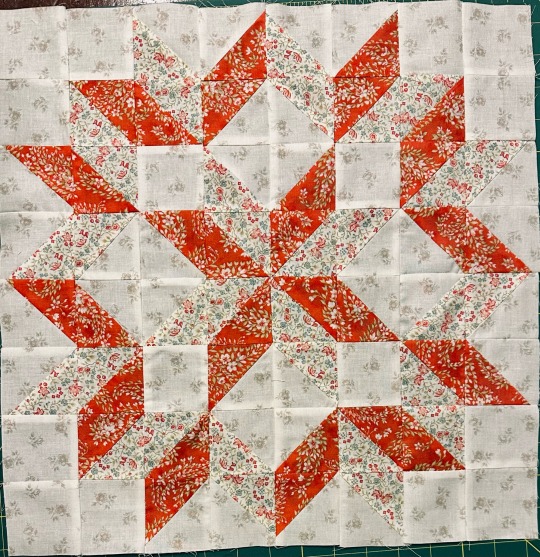
custom sorority jacket pt. 1: carpenter’s star to be featured on back
note: it’s theoretically possible to use this as a tutorial, hence writing style, but no guarantees of my math or clarity. tutorial disclaimer: read everything before beginning. yardage requirements assume continuous 42" wide.
fabrics: Bliss from Moda, designed by 3 Sisters
project: traditional carpenter’s star in two colors + background
other logistics+supplies: block measures 16” finished, border will eventually added to fit to back of denim jacket. background color: quarter yard exact, third yard safe w/no border, more depending on border. two star colors: quarter yard each. 2.5 inch square ruler with marked 45º, or other small ruler if you're a masochist (masochism directly correlates to ruler disproportion). fabric marking method. sewing machine, thread, yada upon yada.
step 1: cut two 3" strips from each star fabric; subcut sixteen 3" squares of each fabric. cut two 3" strips and one 2.5" strip from background fabric; subcut sixteen 2.5" squares and sixteen 3" squares. save the remaining background fabric for a border.
step 2 (tldr, half square triangles [hst]): hst's are made two-at-a-time; you could theoretically do eight-at-a-time but i haven't done that math. use chalk, air/heat erase pens, or plain old graphite pencil to mark a line diagonally down the wrong side of all sixteen 3" background squares and eight of the lighter star color. match the following, right sides together: eight background + color A, eight background + color B, eight color A+color B. sew a quarter-inch away from the line you marked on both sides. repeat for all matched squares. cut down the line you marked. press toward the more opaque side.
step 3: trim the hst's to 2.5" square. with the aforementioned ruler, this is easy. line up the marked diagonal on the ruler with the diagonal of the hst, trim two sides, flip and repeat. otherwise, use the diagonal on a cutting mat, or just use any other ruler and try to keep the diagonal as centered as possible. non-crisp corners tend to only be noticeable upon close inspection by other quilters.
step 4: lay out the star. all of it, using the 2.5" background squares where appropriate. check it once, check it twice. sew either rows or columns together and press to one side, alternating directions between rows. now we nest seams. instead of matching the ends, match each seam. if pressed correctly, it should be easy to place one seam right on top of the other, and pin along the seam. start in the center and work outwards. nested seams fit much more accurately with each other, while matching the ends of the row may misalign an entire row. this is more visible at a glance. press whichever way is least bulky.
quilt or use block as desired!
12 notes
·
View notes