#sewing tutorials
Explore tagged Tumblr posts
Text
Free Sewing Pattern: Janet Vest via Mood Fabrics


Written by Shavonne Cruz for Mood Fabrics, this vest pattern is modeled after Janet from The Good Place. The pattern is offered free via email subscription, and the tutorial provides detailed instructions. You can check it out here!
The CovidSafeCosplay blog and its admin are unaffiliated with the patternmaker or Mood Fabrics, and are simply sharing the resource. Blog admin has not personally tested this pattern. Please thoroughly read the pattern and tutorial for full instructions.
Do you have a favorite free pattern resource? Share in the comments or via a reblog! Bonus points for those that are free, include image descriptions, or contain detailed tutorials for newbies to follow.
#the good place#cosplay#sewing patterns#sewing pattern#free sewing pattern#free sewing patterns#vests#vest#the good place janet#janet the good place#sewing tutorials#mood fabrics#id in alt text
147 notes
·
View notes
Text
Last Minute Christmas Crunch Sew and Quilting Gifts
Welcome to December and time for the Christmas Crunch. That lovely time of year when the count down to Christmas really hits crafters. Well here are a bunch of quick and easy last minute things you can make. These babies can be made using up scraps, leftover fabric, or fat quarters.
First off for the quilters and seamstress is hot pads, bow cozies, casserole dish cozies, pie cozies, and bowl covers. They make great gifts for those that cook or bake. Also very lovely to pair with the edible gifts or hostess gift for Christmas dinner.
Special Notes for these projects. If you want to be able to put the cozies in the microwave you need a special type of batting called wrap n zap. It is microwave safe. Insul-bright the heat reflecting batting used in many hot pads can not go in the microwave as it can catch fire or spark due to the material. When making hot pads make sure to use only 100% cotton batting as any with poly (polyester) in them will melt from the heat.
27 notes
·
View notes
Text
Welcome back to Potato's "How To Bullshit Sewing"
First I showed my concept, now we're going to measure and cut out the pieces!

So I'm going to vocational college for graphic design, so I need a bag to hold a lot of books and papers. My largest paper pad I've used so far is this Bristol Board, so that's what were going go use to measure about how big to make it!
First you take your largest item and lay it on the fabric, and draw the shape of the bag around it, remembering to have extra material for seam allowance, and "opps I fucked up and now the edges are all frazzled"
(I forgot to mention that the canvas and other materials I have is doubled, from when they cut it off the bolt, so you only need the cut out the outer material once if that's the case for you.)
It's likely I'll trim this down a bit later, but its better to have more than you need, then less that you have to go back and get.

Next, stack the stuff you need in it and either take a leftover piece of material or paper and mark how wide the sides need to be. I had some leftover canvas that was about the width of the stuff I had, so I used it as a starting point.

From the bottom of the material I marked where the top of the lenght was, pretty much just made a line where I the top corner was.

Here I marked the width of the bag, but unfortunately I didn't have enough material to have one continuous line for the whole bag. But, since this material is folded, I can just mark about the middle of the bottom and have two halves.

Next, the Tazer Pocket I want to add to throw side.
The one on my messenger bag was fine, that one I top sewed the folded edges closer together so it wouldn't be completely flat on the side, if that makes sense.
But this time we're making side seams so it doesn't go inside the bag a bit, if that makes sense also.
Repeat the steps like with the Bristol board, giving plenty of seam allowance and trimming room. This scrap price was perfect to use, and I had enough to also use it for the side seam.


I folded that material hotdog style and that looked to be enough for the side seam, so it's good enough for me! If it messes up later it can be a snack pocket lol.


Next, I want to make a drawstring bag on the opposite side for trinkets or chapstick or whatever the hell, so I cut out a piece that was a little bigger than the side of the bag, which looking now I'll likely trim a bit of the lenght off later.

Sooooo, I forgot to take a picture of makeing the front flap for the bag. Since I used up the 10 image limit of the post, I'll make a drawing of how I made that later.
Thank you for reading! I know it's not a very comprehensive tutorial, but it's fun so oh well! Maybe in the future I'll make a better post about it.
#sewing#sewing tutorials#sewing process#sewing project#bag#messenger bag#cottagecore#bag diy#sewing diy#tutorial#bad tutorial
8 notes
·
View notes
Text
Can You Learn to Sew Online? A Comprehensive Look at Your Options with ONSA
At ONSA - Online Sewing Academy, the world of stitching and garment construction should be accessible to everyone, regardless of location or schedule. In today's digital age, online learning has revolutionized how we acquire new skills, making it possible to master intricate crafts like sewing from the comfort of our homes. But can you truly become an expert stitcher through virtual classes alone? Let's explore the options available and how ONSA empowers you to embark on an enriching sewing journey.
The Beauty of Pre-Recorded Video Lessons
Ah, the world of pre-recorded tutorials - a treasure trove of knowledge at your fingertips! ONSA's extensive library of meticulously crafted video lessons offers a comprehensive exploration of sewing techniques, from the fundamentals of threading a needle to the intricacies of advanced garment construction. One of the most significant advantages of this format is the ability to learn at your own pace, rewinding and revisiting lessons as many times as needed until each stitch and seam becomes second nature.
Our pre-recorded videos are thoughtfully designed to cater to diverse learning styles, combining visual demonstrations with clear, concise explanations. Whether you're a visual learner who thrives on observing each step or an auditory learner who appreciates detailed verbal guidance, our lessons ensure that no aspect of the sewing process is left unexplained.
While budget-friendly and convenient, we understand that pre-recorded content may lack the human interaction that many pupils crave – the ability to ask questions, receive real-time feedback, and benefit from the personalized attention of an experienced instructor. This is where our live, interactive classes come into play.
The Magic of Live, Interactive Classes
Imagine having a seasoned ONSA instructor by your virtual side, guiding you through the intricate sewing world with patience and expertise. Our live, online classes provide an immersive, interactive experience replicating the intimacy of a physical classroom setting. Through video conferencing technology, you can follow along with your instructor, ask questions as they arise, and receive real-time feedback on your technique.
One of the most significant advantages of live classes at ONSA is the ability to learn at a pace that suits your individual needs. Our instructors are adept at adapting their teaching methods to accommodate varying skill levels, ensuring that every student feels included and supported. Whether you're a complete novice taking your first tentative stitches or a skilled stitcher seeking to elevate your art, our talented teachers can customize lesson plans to align with your unique goals and aspirations.
From mastering the art of inserting invisible zippers to acquiring advanced draping skills for haute couture designs, our live classes cover various topics, catering to hobbyists and aspiring professionals. Private one-on-one sessions and small group workshops provide ample opportunity for personalized guidance, fostering an environment where questions are welcomed, and challenges are addressed with patience and expertise.
The ONSA Edge: A Holistic Approach to Sewing Education
At ONSA, we understand that sewing is more than just a practical skill – it's an art form that combines technical precision with creative expression. Our approach to online sewing education is rooted in this philosophy, nurturing both the technical and artistic aspects of this timeless craft.
Our team of expert instructors, each with years of industry experience and a passion for teaching, has thoughtfully crafted a multifaceted curriculum that covers the entire spectrum of sewing, from understanding fabric properties and pattern drafting to mastering advanced construction techniques and exploring fashion design principles.
By combining our comprehensive library of pre-recorded video resources with live, interactive sessions, ONSA provides a 360-degree learning experience tailored to your schedule, skillset, and aspirations. Whether you prefer the convenience of self-paced learning or thrive on the dynamic energy of a virtual classroom, our blend of educational formats ensures that your sewing journey is enriching, engaging, and tailored to your unique needs.
Beyond the technical aspects of sewing, ONSA also emphasizes the importance of nurturing creativity and self-expression. Our lessons encourage students to experiment with fabric choices, color combinations, and design elements, fostering an environment where individuality is celebrated and personal style is cultivated.
Sewing Mastery: A Journey, Not a Destination
At ONSA, we firmly believe that sewing mastery is a lifelong pursuit, a continuous learning and refinement journey. Our online academy is designed to support you at every stage of this journey, from your first tentative stitches to the creation of intricate, couture-worthy garments.
As you progress through our curriculum, you can participate in virtual sewing circles, where you can connect with fellow stitchers, share your creations, and seek inspiration from a community of like-minded individuals. Our instructors are not just teachers but mentors dedicated to your growth and success, offering guidance and encouragement every step of the way.
Sewing is more than just a hobby – it's a powerful form of self-expression, transforming fabric into wearable art that reflects your unique style and personality. At ONSA, we strive to empower you to unleash your creativity, one stitch at a time, by providing a comprehensive and immersive online learning experience tailored to your needs.
Ready to Start Stitching Your Dreams into Reality?
Whether you're a busy professional seeking a creative outlet, a stay-at-home parent looking to explore a new passion, or a lifelong stitcher yearning to elevate your skills, ONSA - Online Sewing Academy supports your sewing journey.
Explore our diverse online sewing courses today, from beginner-friendly introductions to advanced masterclasses, and unlock a world of possibilities that transcends time and space. With ONSA, the art of sewing is no longer limited by your location or schedule – it's a vibrant, accessible realm where your dreams can be woven into reality, one exquisite thread at a time.
Join our virtual community of passionate stitchers, where inspiration, camaraderie, and personal growth intertwine seamlessly. Embark on a transformative journey that will teach you sewing techniques, ignite your creativity, boost your confidence, and empower you to express your individuality through the timeless art of garment construction.
The world of sewing awaits, and at ONSA, we're committed to being your trusted guide every step of the way. Unleash your inner stitching prowess, and let your creativity take flight – the possibilities are endless.
#sewing#sewing classes#online sewing classes#learn to sew online#virtual sewing lessons#sewing tutorials#pre-recorded sewing videos#live sewing classes#interactive sewing instruction#ONSA sewing academy#sewing education#sewing mastery#garment construction#fashion design#pattern drafting#sewing techniques#creative sewing#sewing community#sewing journey#sewing skills#beginner sewing#advanced sewing#couture sewing#self-paced learning#personalized instruction#sewing mentorship#sewing creativity#sewing expression#wearable art#fabric art
14 notes
·
View notes
Text
youtube
#get your books while you can#buy a external storage device and download#Americas founding documents#history books#specifically marginalized history#all the banned books you can find#gardening and Great Depression era resources#sewing tutorials#download YouTube videos you find important#Youtube
2 notes
·
View notes
Text
Fabrics for Dresses and Tops: How to Choose the Best Fabric for Your Sewing Projects
In this post, you will learn what are the best fabrics for sewing dresses, tops, pants and shorts.. If you love sewing dresses, blouses, and tops, you know how important it is to choose the right fabrics for your dresses and tops. The fabric you use can make or break your garment, affecting its appearance, comfort, and durability. One of the main factors to consider when choosing fabric for…

View On WordPress
#diy dresses#fabric guide#fabric recommendations#fabric selection#fabric types#fabrics for dresses#sewing blog#sewing fabrics#sewing tips#sewing tutorials
14 notes
·
View notes
Text
4 notes
·
View notes
Text
hem the edges of the pants by 创意手工坊

3K notes
·
View notes
Text
I will only watch sewing tutorials from aged women who do not know how to cut footage. The more midwestern and hard to hear, the better
1 note
·
View note
Text
I like the duckbill patterned one!
I made a bunch of nerd themed masks for a fundraiser for college cosplay club back in 2020.
Like these ATLA themed masks:

Free Pattern Wednesday: DIY Mask Patterns For Covid-Safe Cosplayers!
Handmade cloth face masks are no replacement for a medical-grade mask, but using them over medical masks can be a snazzy way to better incorporate your COVID-19 safety measures into your costume! This list contains links to several different styles of mask, so you can choose what works best for you!
Note: blog admin has not personally tested all of these patterns. Please thoroughly read each pattern to determine which will work best for your health, costume, and aesthetic preferences. For information on selecting a proper medical-grade face mask, please see this guide from the People's CDC.
Mood Fabrics: How to Add Some Couture Details to Your Face Masks – Free Template
Japanese Sewing Books: Free Mask Pattern Download – Contoured 3D Face Mask
CraftPassion: Face Mask Sewing Pattern – 4 Sizes
The Spruce: How to Sew a Basic Face Mask
Sweet Red Poppy: How to Sew a Surgical Face Mask
See Kate Sew: 3d mask template – the most comfortable face mask
Shannie Makes: Simple Surgical Style 3 Pleats Face Mask Pattern
Shannie Makes: 2 Piece Style Face Mask Pattern
Shannie Makes: Duckbill Style Face Mask Pattern
Do you have a favorite face mask pattern? Share in the comments or via a reblog! Bonus points for those that are free, include image descriptions, or contain detailed tutorials for newbies to follow.
#cosplay#covid#sewing tutorials#atla#my addition#embroidery#also made a bunch of masks with d20’s embroidered and some with rainbows for pride#looking through these patterns I think duck bill is the one used#I remember there was also a variant of the pattern where you could fit a respirator mask inside the cloth mask but never tried those
270 notes
·
View notes
Text
How to Make Your Own Binder that Fits Well and Looks Good
A while back I was in need of some new binders and thought hey, I bet I can make one way cheaper than buying it from somewhere (especially cus some of the ones I’ve bought in the past didn’t really fit right). Except when I started looking for a binder patterns online, I was very surprised that I really… couldn’t find many that looked very nice lol. Most of them had really wrinkled necklines, or didn't bind well, or just overall looked weird. A lot of the patterns also required a serger, which I don't have.
So I just said fuck it and made my own pattern! And it ended up being relatively easy! And the binders fit REALLY WELL and are comfortable to wear, even for long periods. The neckline doesn't show under shirts with loose collars, and the bottom hem doesn't gap or stick out. Here's me wearing one:
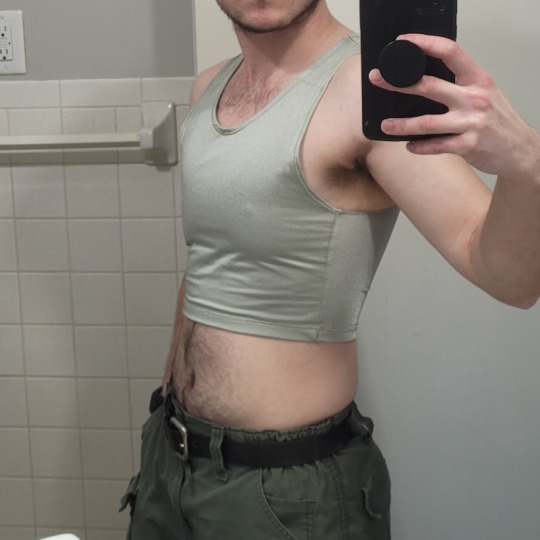
(plus I was able to make myself 5 of them for a total of like ~$50.)
So I figured I could throw together a guide to help out anyone else who wanted to make their own binder but was dissatisfied with the patterns available!
Disclaimer: This tutorial is going to assume a baseline level of sewing experience, and also will require access to a sewing machine. It is not a complicated pattern, but it will most likely require some tweaking and adjustments after you make the first one. Don’t be afraid to make alterations to make it fit better!
This tutorial is for a gc2b-style half-tank binder. It could be altered to be a full-tank binder, but all instructions will be for the half-tank design.
Materials needed:
Stretchy fabric, probably listed as 'athletic fabric' (I use this kind from Joann’s. Most athletic stretch fabrics should work, look for around 80% nylon/20% spandex blends)
Stiff fabric (I use this shirting cotton because I like how lightweight it is. If you want something a little stiffer with more structure, you can use a cotton or cotton/poly blend twill like this. gc2b binders use twill for theirs.)
Lightweight fusible interfacing (I use this kind) (get FUSIBLE not sew-in)
Fusible webbing like Pellon Wonder-Web (this is technically optional but it WILL make your life easier when you’re sewing - just make sure to get the kind with the paper backing!!!)
“But kiwisoap thats 4 whole kinds of materials, surely I don’t need that many!” Ok sure, you can probably get by without the fusible web and interfacing, but consider: they are both dirt cheap (im talking like $1-2/yard), they will make it much easier to sew the final product, and will give you an overall better-looking result. This tutorial is written with the assumption that you’ll use them.
"How much fabric will I need?" Measure the circumference of your chest below your armpits. Add 6 inches just to be safe. This is the yardage of stretch fabric you’ll need, and should give you enough material to make at least 3 binders without much excess left over. You will need around half as much stiff fabric.
Other supplies:
Big Paper (for drawing the pattern)
Flexible measuring tape
Sewing machine
Iron
Pins
Step 1: Measuring
You will need 4 main measurements for this pattern.

A) Measure the circumference of your chest just below your armpits, then divide the number in half. This will be the widest part of the pattern.
B) Measure from the top of your shoulder down to where you want the binder to end. For most folks, this will usually be around the natural waist (narrowest part of the torso), about 3-6 inches above the belly button. This will be the overall height of the pattern.
C) Measure the distance from below your armpit to where you want the binder to end. This will determine where the arm hole starts.
D) Measure the circumference of your waist where you want the binder to end, then divide the number in half.
So for example, after dividing A and D in half, my measurements are 17", 15", 7", and 14.5".
Next:
Subtract one inch from measurement A - This will help provide some compression. You might need to take it in even further depending on how it fits, but one inch is a safe starting point. I take mine in around 1.5 inches.
Subtract half an inch from measurement D. This will help prevent the bottom edge of the binder from gapping. Again, you may need to take it in more or less, depending on your own body.
Add 1.5 inches to measurement B and one inch to measurement C. This is to account for the hems and armhole placement.
This makes my final measurements
A = 16"
B = 16.5"
C = 8"
D = 13.5"
From here on out, we are only going to be working with the measurements that we have added/subtracted to, NOT the ones we initially took.
Step 2: Drawing the Pattern
You will need a piece of paper large enough to accommodate the entire pattern. This may involve taping multiple pieces together, or using a piece of newsprint, etc.
I recommend folding the paper in half to ensure that you get a symmetrical pattern. However, this means you will need to divide measurements A and D in half again, or else you’ll end up with a pattern that’s twice as wide as it should be!
Also note: the pattern is drawn with the seam allowance built in! You don’t need to add any seam allowance.
To draw the pattern:
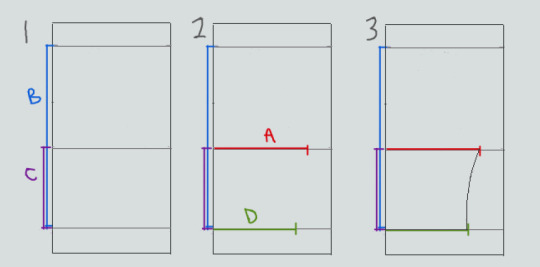
Begin with your folded paper. Measure and mark B and C on the paper, and draw a line extending across the paper. These will be your guidelines.
Measure and mark A and D along the middle and bottom guidelines, respectively. Remember, the paper is folded, so you only use half of the measurement for A and D.
Draw a loose curve connecting the endpoints of A and D. If needed, you can also just draw a straight line between the two.
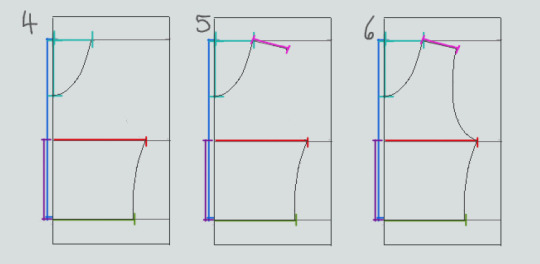
Mark the opening for the neck hole. Depending on your size, it will measure around 6-8 inches across at the top (remember to divide this in half for the folded paper) and about 5-6.5 inches deep. (mine is 6.5" across and 5.5" deep) Draw a curve to connect the two points. This part will take some tweaking and adjusting to get it to look right lol.
Measure the width of the strap - this should be somewhere between 2.5 - 4 inches wide. They will end up about 1/2” to 3/4” narrower once you sew them. Draw the line at a slight angle, as shown.
Connect the endpoint of the strap to the endpoint of line A with a curve like in the diagram.
This will be the pattern for the front piece.
To make the back piece, trace the front pattern, but make a very shallow curve for the neckline instead of a steep one, as shown:
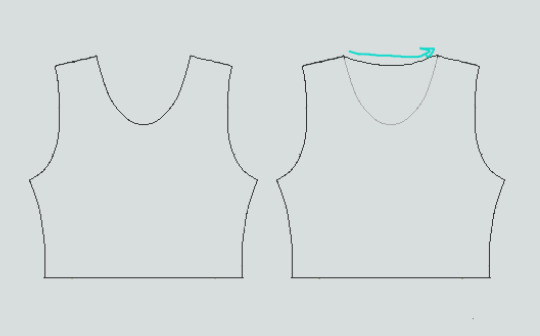
The last piece is the stiff front panel. This is what provides the flattening effect of the binder. To make the pattern, trace the front pattern again. Trim 3/8” in on the sleeves and neckline, and 3/4” to 1” along the bottom. This gives a flatter hem. Then trim the straps shorter by a few inches. This helps the binder lay flatter along the shoulders.
When you're done, you should have 3 pattern pieces that look approximately like this (stiff panel shown overlaid on the stretch fabric to show how it fits together).
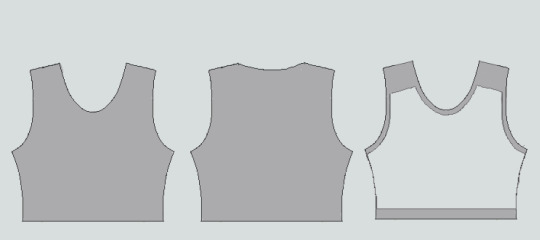
NOTE: If you want more compression or just want to make it a bit sturdier, you can add a second panel of stretch fabric to the back piece. Just use the bottom half of the back pattern (from the widest part down to the bottom hem) to cut out another piece of stretch fabric. Attach it to the back piece with a strip of fusible webbing and a zig-zag stitch along the top.
Step 3: Putting It All Together
Once you’ve made the patterns and cut out the pieces of fabric, you should have something that looks like this:
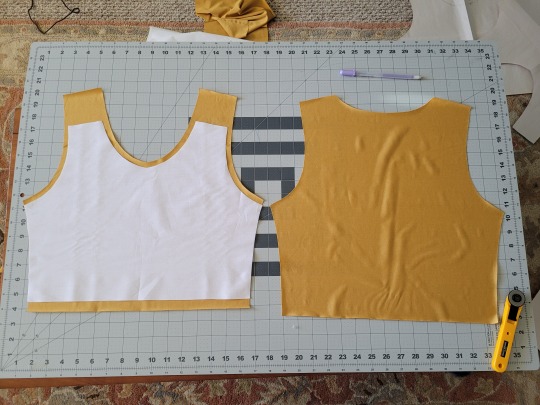
The next step is adding interfacing and fusible webbing. Use your pattern to cut out 3/8" strips to fit on the top of the straps for both pieces, and to the neckline, sleeves, and bottom hem of the back piece, as shown:
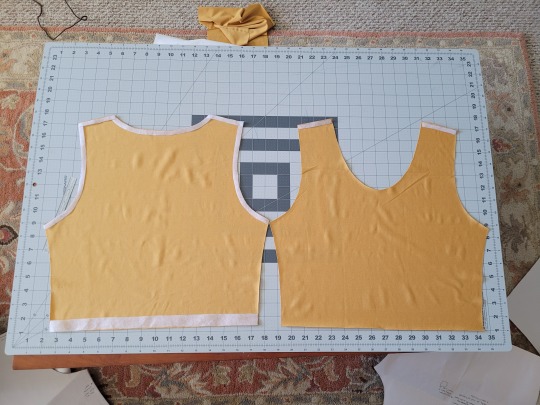
If you want to add it to the bottom hem of the front piece, it will help keep that hem flat when sewing it down later, but it's not essential.
If you choose to also use fusible webbing (WHICH I RECOMMEND), you will apply it to the stiff front panel similarly to how the interfacing was applied, ~3/8” strips along the neckline, sleeves, and top of the straps. Cut out two strips for the neckline and sleeves, because we'll use those later too.
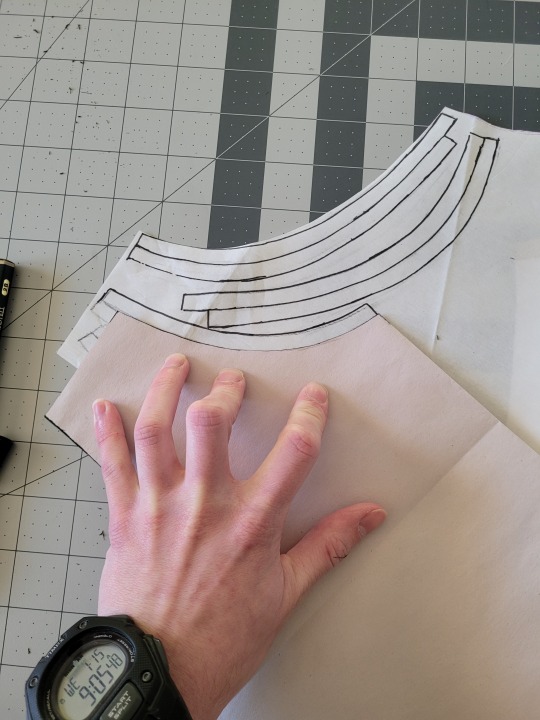
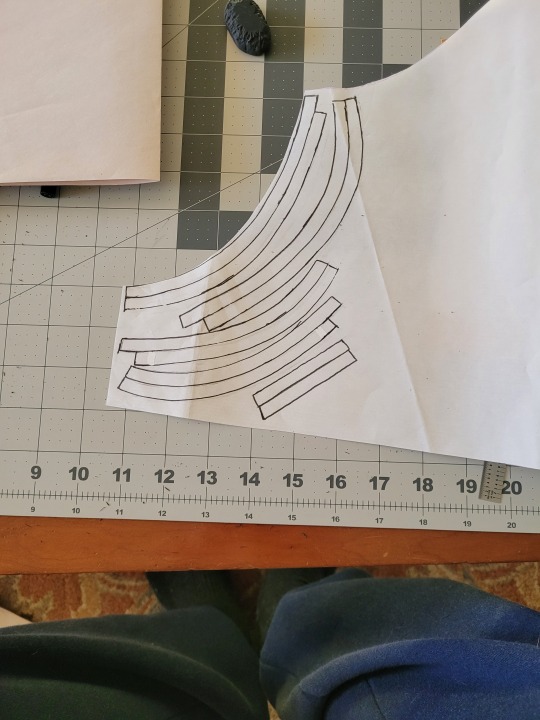
Iron the strips onto the front panel as shown:
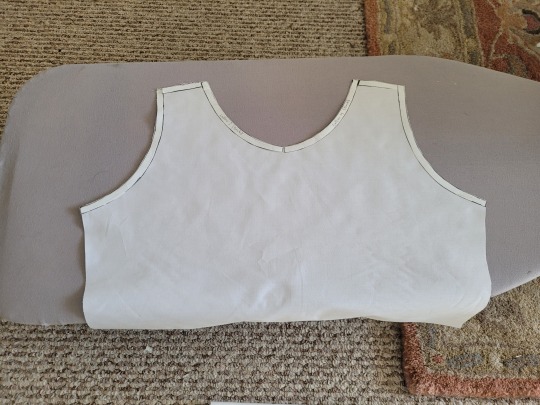
Once it's on, just peel off the paper, position it webbing-side down on the stretch fabric, and iron it to fuse the two pieces together so everything stays in place while you sew. THIS MAKES IT WAY EASIER TO SEW.
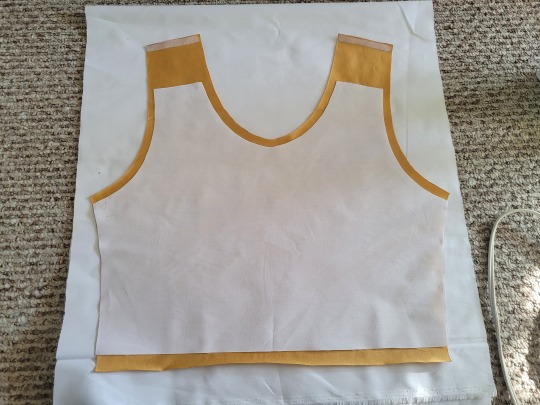
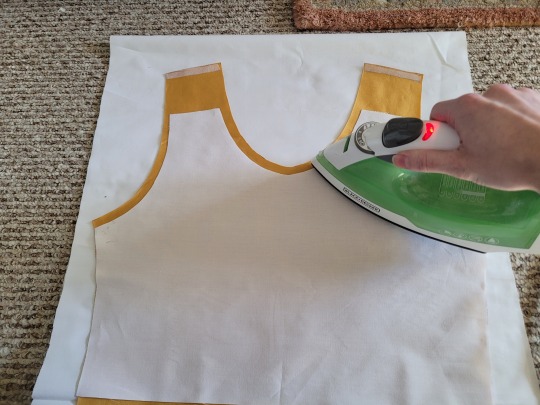
After the stiff front panel is fused to the stretch fabric, you’ll sew the straps of the front and back pieces together, then join the pieces along the sides. Pin the hell out of it to keep everything in place -this type of material is VERY prone to puckering.
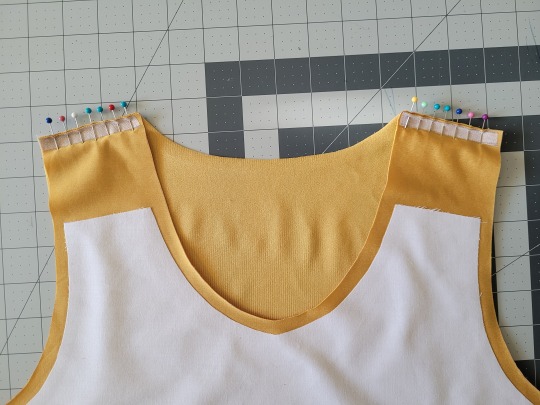
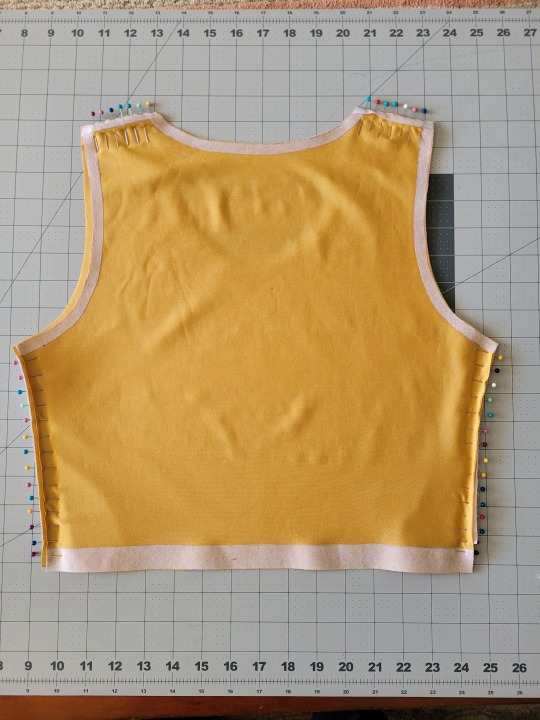
When sewing, USE A ZIGZAG STITCH. A straight stitch will NOT WORK for stretch fabric. I adjust mine to 1.3mm long and 3.5mm wide which has worked well. If your machine doesn’t let you adjust stitch length or width, well. That sucks, I don’t really have any advice.
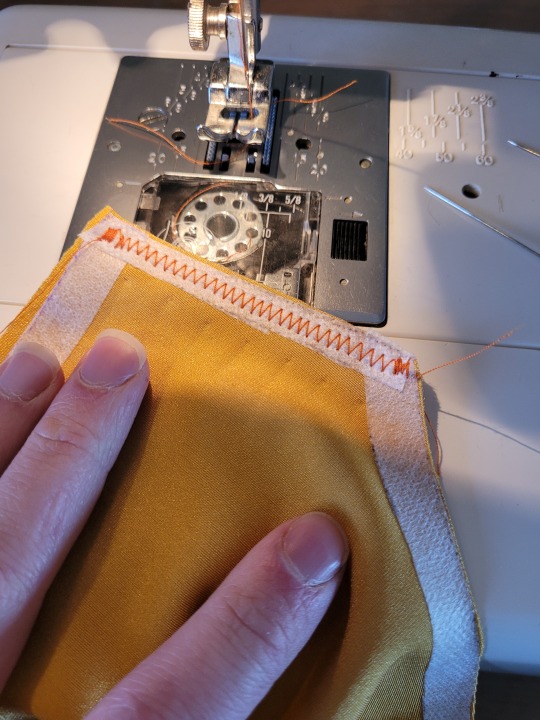
After you sew the front and back pieces together, you can add more fusible webbing to the front panel to help hold the hem down flat and prevent it from puckering while you sew it. Just add the strip, peel the paper off, then fold the hem over and iron it down. This part isn’t really necessary, but it does make the hems look nicer. If nothing else, I would recommend adding it to the neckline.
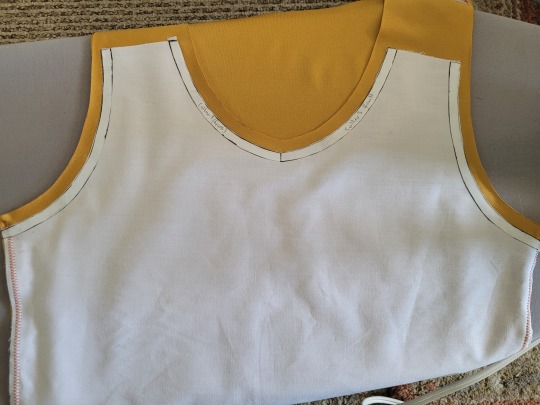
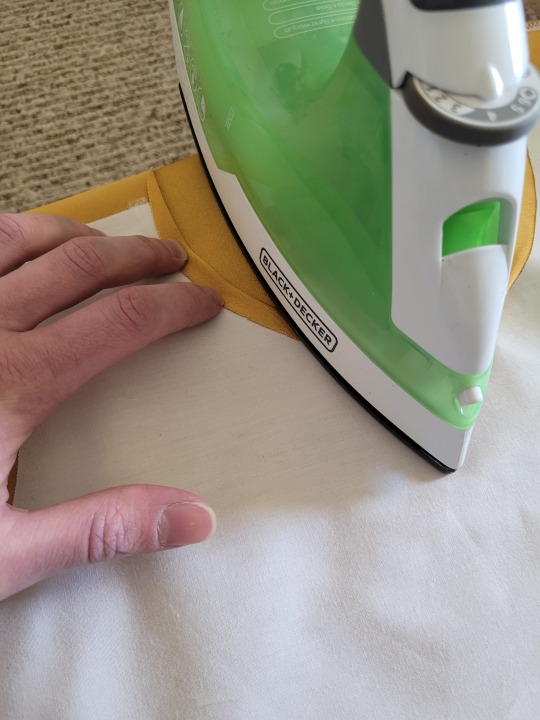
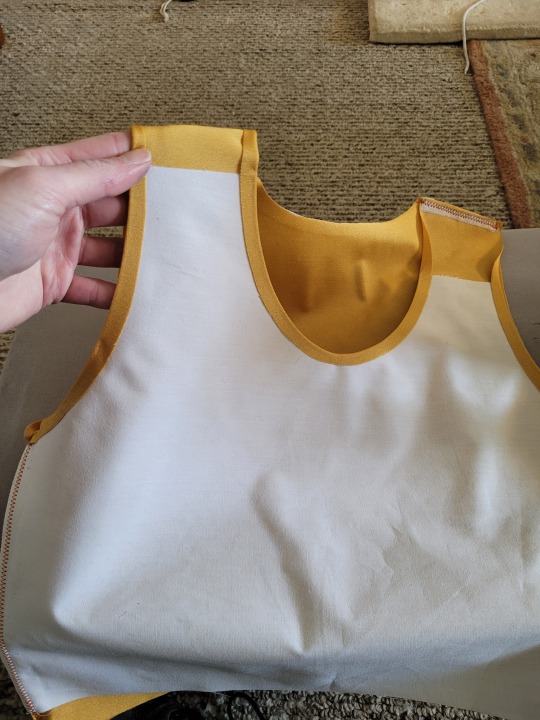
After that, you just fold & pin all the hems and sew them up with a zigzag stitch, then go over the raw edge at the top of the stiff panel (where we cut the straps shorter).
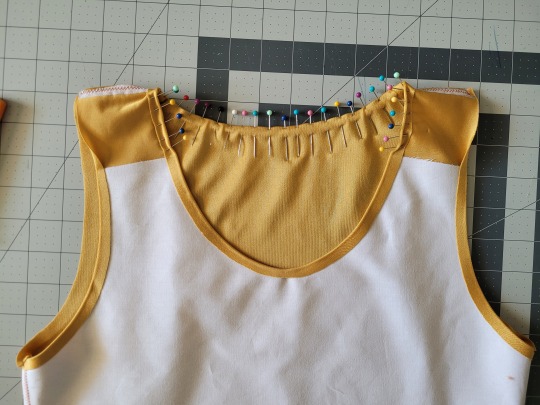
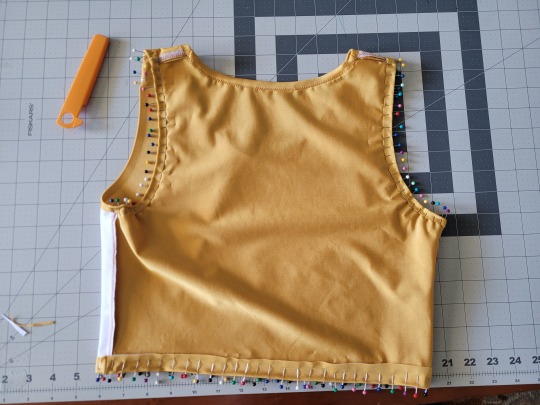
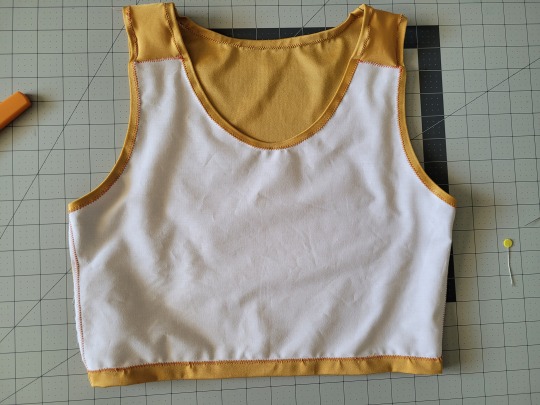
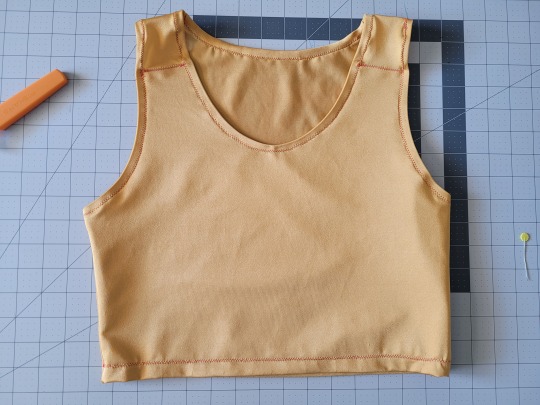
And that’s it! You’re done! And now you can make your own binders whenever you want!
And hey! If you used this tutorial and wanna throw me a dollar or two on ko-fi, I wouldn't complain.
1K notes
·
View notes
Text
Welcome to Potato's (the name for my pixie characters still a wild, lol) How to Bullshit Sewing!
So far I've made 2 messenger bags, both of which have served me well and the latter one I made for when I start vocational school, but admittedly made it a bit too wide so it's a little awkward to hold my books in and the pockets weren't quite as functional as I'd like, it being my first time makeing outside pockets in a while.
Anyways! Going off from my mistakes, I'm making an updated bag and taking YOU with me! Come see my floundering and bullshitery to make a weird but functional bag!

(Btw I hate the galaxy watermark, but tumblrs only letting me use my google photos, rip)
Here's the concept! Now I'm weird with my bags, I put the pretty patterned fabric on the inside; it's a weird 'don't judge a book by the cover, the magics on the inside' kinda thing, it's like "ooo people think it's a plain ole silly bag but on the INSIDE it's MAGICAL" idk. Anyways.
Atm as I'm typing it's late for my granny ass so I'll post this and tomorrow I'll post my measuring process (or lack thereof, I have antique kids sewing machines and darning stuff and weird shaped needles, but no ruler)
And my weird little shortcuts I do for projects for stuff I'm making myself, it doesn't need to be perfect, just as functional as you need it to be.
I also need to reread my witchy sewing book so I can at witchy shit to it
Stay tuned!!
#sewing#sewing process#sewing project#watch me fail#messenger bag#witchy#handmade#How to Bullshit Sewing#sewing tutorials
3 notes
·
View notes
Text
Had a few folks interested in how I made the patches I posted for Solarpunk Aesthetic Week, so I thought I'd give y'all my step-by-step process for making hand-embroidered patches!
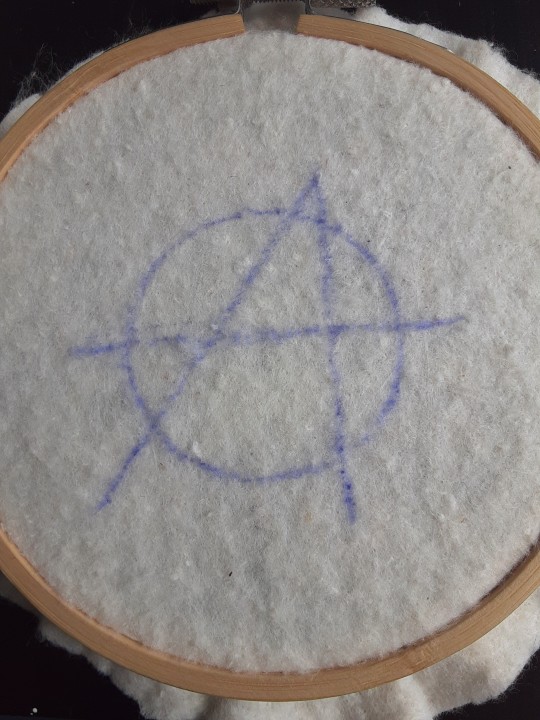
First, choose your fabric and draw on your design. You can use basically any fabric for this - for this project I'm using some felt I've had lying around in my stash for ages.
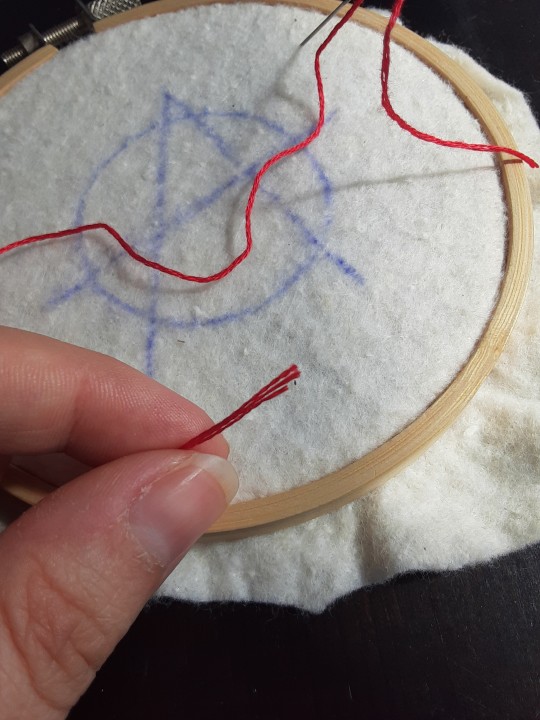
Next, choose your embroidery floss. For my patches I split my embroidery floss into two threads with 3 strands each, as pictured. You can use as many strands in your thread as you prefer, but for the main body of my patches I prefer 3 strands.
Next you're going to start filling your design using a back stitch.
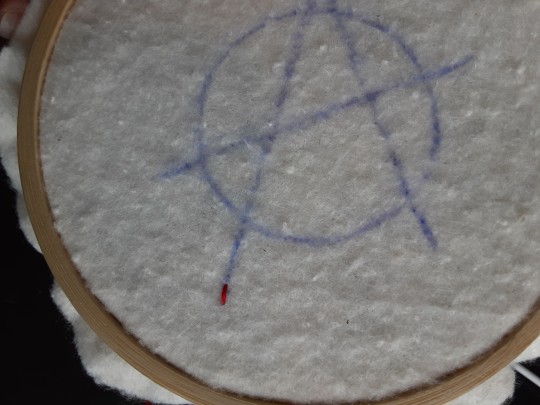
First, put in a single stitch where you want your row to start.
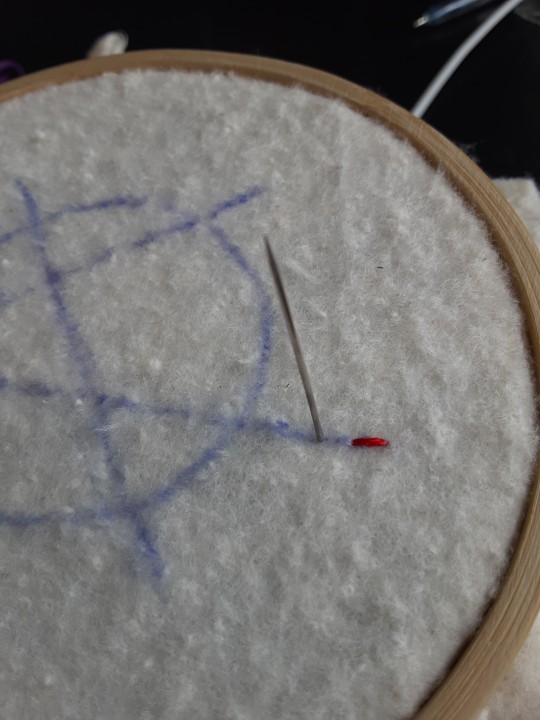
Poke your needle up through the fabric 1 stitch-length away from your first stitch.
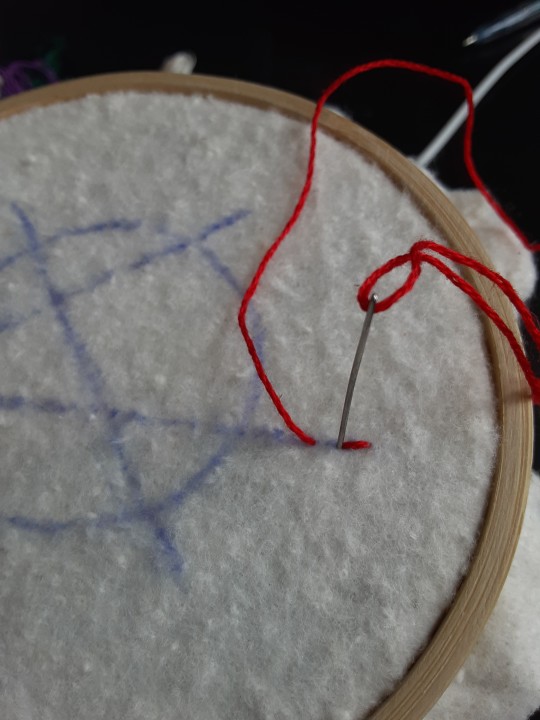
Poke your needle back down the same hole your last stitch went into so they line up end-to-end.
Repeat until you have a row of your desired length (usually the length of that colour section from one end to the other). Once you have your first row, you're going to do your next row slightly offset from your first row so that your stitches lay together in a brick pattern like this:
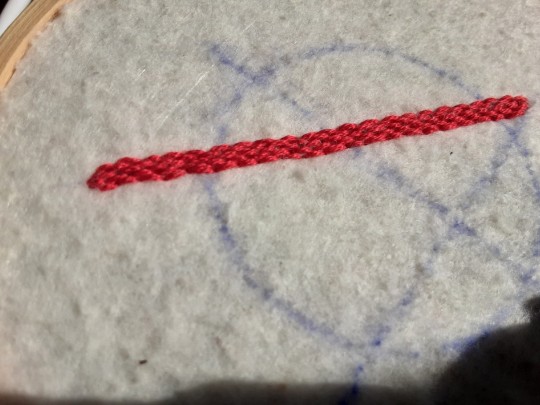
Make sure your rows of stitches are tight together, or you'll get gaps where the fabric shows through.
Rinse and repeat with rows of back stitch to fill in your patch design.
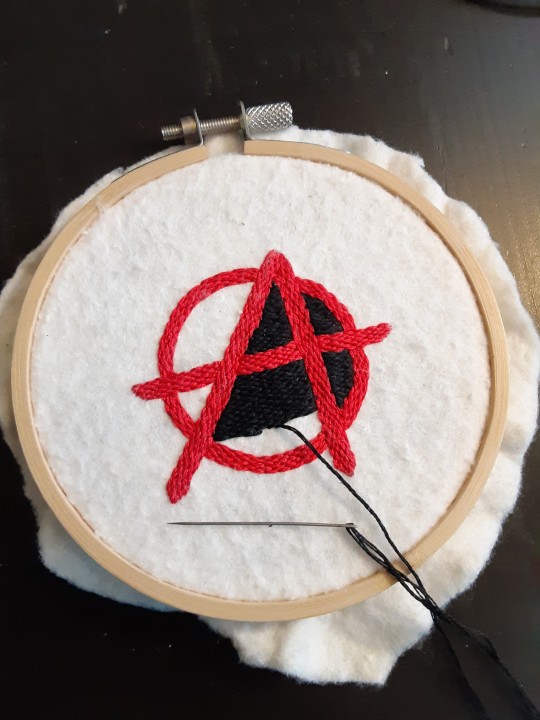
When you're almost to the end of your thread, poke your needle through to the back of the fabric and pull the thread under the back part of the stitching to tuck in the end. Don't worry if it looks messy - no one's gonna see the back anyway.
This next step is fully optional, but I think it makes the patch design really pop. Once your patch is filled in, you can use black embroidery floss to outline your design (or whatever colour you want to outline with - it's your patch, do what you want). I use the full thread (6 strands, not split) of embroidery floss to make a thicker outline.
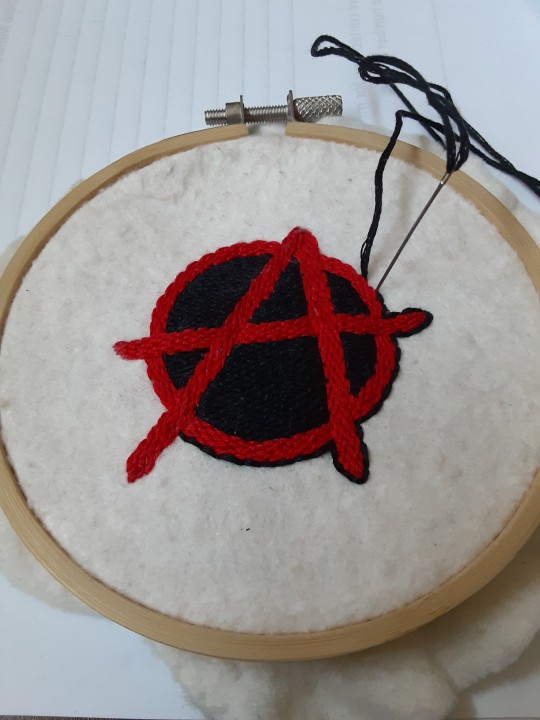
I use the same back stitch I used to fill the piece to make an outline that adds some separation and detail. You could use most any 'outlining' stitch for this, but I just use back stitch because it's just easier for me to do.
Once you're finished embroidering your patch, it's time to cut it out!
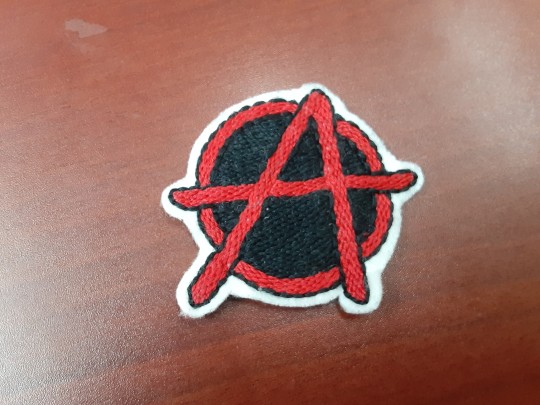
Make sure to leave a little border around the edge to use for sewing your patch on your jacket/bag/blanket/whatever, and be careful not to accidentally cut through the stitches on the back of the patch.
If you have a sturdy enough fabric that isn't going to fray, you can just leave it like this. If not, I recommend using a whip stitch/satin stitch to seal in the exposed edges (I find that splitting your embroidery floss into 3-strand threads works best for this).
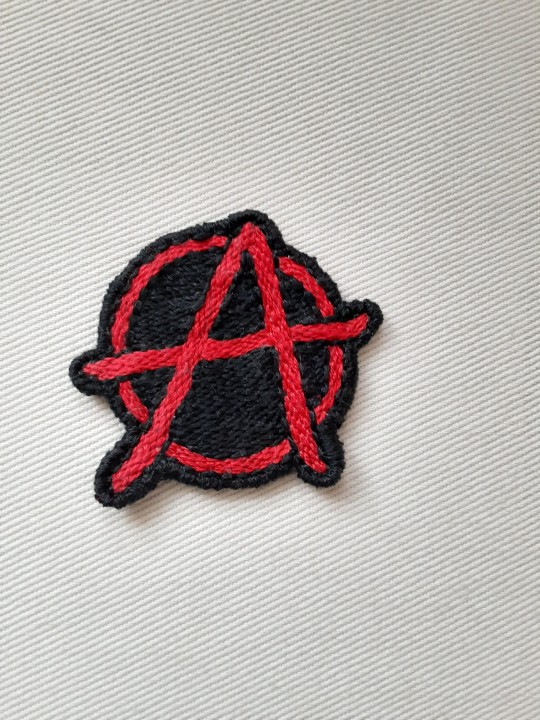
And then you're done! At this point you can put on iron-on backing if you want, or just sew it on whatever you wanna put it on. Making patches this way does take a long time, but I feel that the results are worth it.
Thanks for reading this tutorial! I hope it was helpful. If anyone makes patches using this method, I'd love to see them! 😁
#solarpunk aesthetic week#sewing#tutorial#sew on patch#punk diy#diy punk#punk aesthetic#handmade#solarpunk#handcrafted#embroidery#embroidered patch#how to#how to make a patch
18K notes
·
View notes
Text
Monogrammed Crochet Cup Cozie
Hi, Sweet Friends, This week I have created several Crochet Drink/Coffee Cup Sleeves just to start off Creative Thursdays Before Christmas. If you have followed my blog over these many years, Thursdays are Creative Thursdays, however, starting in August, I make craft tutorials on Homemade Christmas Gifts. Most of these gifts are short-hour projects whereas others can have many days to assemble.…

View On WordPress
#Christmas#CJD.Sign#Creative Day Thursdays#crochet#crochet cup cozies#Crochet DIY#Crochet gifts#DIY#Easy tutorials#Homade Christmas Gifts#photography by CJD.Sign#sewing tutorials#tutorials
1 note
·
View note
Text
Camisole Sewing Patterns -Easy Cami Drafting Tutorial
In this post, you will learn how to create your dream camisole sewing patterns . Welcome to my ultimate camisole sewing patterns tutorial, perfect for advanced beginners and seasoned sewists in sewing experience alike! Whether you’re looking to create a strappy top, a luxurious everyday top, or a versatile layering piece, my step-by-step guide has you covered. This tutorial includes detailed…
#Advanced beginners#Camisole sewing patterns#Detailed instructions#DIY camisole#Free Sewing Pattern#How to sew a camisole#pattern drafting#pattern instructions#pattern making#sewing machine#sewing tutorials#Top sewing pattern
5 notes
·
View notes
Text

Everyone has been discussing these lately! I know everyone's been sharing them on a rant post I made that weirdly got more notes than I expected, but I wanted to make one post to compile all the MLP Vintage Butterick Patterns we have to document them!
Please check it out Here on my website where I have uploaded all of the images, provided additional information, and credited every single person who has helped me by scanning or sharing their information!
You can make: Christmas ornaments, plushies, or cute sweaters and cardigans.
All of these patterns are Officially Licensed g1 patterns! Enjoy and feel free to share with me if you make any of these fun crafts!
510 notes
·
View notes