#purl
Explore tagged Tumblr posts
Visit Tumblr Blog
Explore Tumblr blogs with no restrictions, modern design and the best experience.
Last Seen Tumblr Blogs


Fun Fact
Tumblr was the first site to host the blog for President Barack Obama in 2011.
Text
How To Knit Woven Floats Technique

How To Do Woven Floats Technique
This hand knitting article will introduce you to the Woven Floats Technique. See what it looks like, how it is constructed, some different methods of knitting and check out the series of cowls I designed around this technique. Knitting that is worked using Woven Floats Technique creates a warm, multi-strand fabric which looks tidy on both the right and wrong sides. I found it so unusual, I decided to go exploring and create a series of knitting pattern designs. The designs start off basic, then slowly add features and skills as the series progresses. So, the easiest one is first and later ones have more to keep your concentration. I’ll continue to update and edit this article as I progress through the series. I have at least another 4 ideas I’d like to do but there are other projects looking at me with big, dewy eyes, begging to be given some attention. Subscribe to my news, because I will continue to create more designs and add them to this blog.
What is Woven Floats Technique?
Look At Regular Colour work First If you are familiar with Stranded Colour work or Fair Isle work, both of these techniques use 2 or more colours. Stocking stitch (also known as stockinette stitch) is used to create a pattern. It might be worked in the round or back and forth. Knitting in the round tends to create a more even result. Let’s use the example of working with Colour A and Colour B. The colour strands are held at the back (wrong side or WS) of the work and are lifted up to the needles when it is their turn to be added to the pattern. If Colour A is worked for a few stitches, then Colour B stretches out along the back of those stitches. This creates a long horizontal thread called a “float”. Practicing Stranded Colour or Fair Isle Technique allows you to find just the right amount of tension in the float. You are aiming for a float that it is not so tight as to pucker the stitches of Colour A and not so loose that it creates the shape of a hanging hammock. Catching the Float After Colour A is knit for 4 or more stitches, it is often good practice to catch the float of Colour B before continuing to knit the next stitches in Colour A. This keeps the back of the work tidy and reduces the chance of a super long float getting caught on a shirt button, your ring or fingers whilst dressing or undressing. You can catch the stitch by wrapping Colour A either up over or down over Colour B before you work the stitch on the needles. Repeat again if Colour A continues another 4 or more stitches. Essentially, both Stranded Color Work and Fair Isle use stocking stitch which is knit on the right side (RS) of the work. On the Wrong Side of the work, you can see floats, the places where the floats have been wrapped and the purl stitches. Compare to Woven Floats Technique With Woven Floats Technique, you flip the fabric over. Now the wrong side is the right side and vice versa. The pattern is created with the floats, the places where the floats are wrapped and the purl stitches. Some parts of the pattern are created by the long floats themselves. These can become bold, striking shapes and so I have called these my Main Colour (MC) in the designs. Other times, a more detailed, grid pattern can emerge from the method of wrapping up and down before each purl stitch. We do use more grid yarn than the float yarn in the design. However, the grid yarn is not as dominating in the over-all picture and so I call this my Contrast Colour (CC). In my series of knitting pattern designs, I’ve stayed with a staggered grid pattern for the background plus some slight variations on the theme. The most unusual feature which makes it different from Stranded Colour and Fair Isle is that the MC is never worked on the needle. It literally floats along, held against the fabric by the CC wraps. CC is the only colour that creates stitches along the row. All stitches are purl on the RS, wrapping up and down over the MC strands. This is not necessarily a rule for the technique over all but is the rule I used for the series. Where did it come from? As with many hand knitting techniques, it is hard to know when knitters started to experiment with this technique. I saw a designer talking about it on the net. She said that she saw it in a vintage photograph so, I assume that could be 100 years ago. There were no instructions attached to the vintage photo. Zooming in on the photo allowed her to work it out for herself. The Designer was about to teach a class which I could not attend so, I figured, hey, if she can work it out, maybe I can too.
How to do Woven Floats Technique
What do you need For this series I’ve mostly used 3 strands of yarn at once. - 1 Strand of CC colour for the grid pattern that wraps and is worked on the needles - 2 Strands of MC colour in the same weight as CC for the floats. As a variation, you can use one heavier weight strand of yarn for your MC to replace the 2 strands of MC described. For needles, you may need to experiment to see what suits best to match your yarn. For this series of designs, I used: - Fingering weight yarn, 3.5mm (US size 4) needles - DK weight yarn, 4mm (US size 6) or 4.5mm (US size 7) needles Length: The circular needle length is a little smaller than the circumference of the design. For practice, start with something small such as the 40cm (16 inch) length. Different Methods of Working Left Hand Throwing technique - Lay the foundation. Cast on stitches for your sample. As an example, for 40cm or 16 inch length cable, fingering weight cast on 97 sts. For DK weight cast on 89 sts. - Work a few rounds as a foundation. I like to use Moss stitch because it has a similar stitch width. You can use one strand of MC or one strand of CC for these rounds. It's up to you. - Starting the technique. Lay the other two strands over the work between the needles. If your base rounds were MC, lay another strand of MC and one of CC. If you base rounds were CC, lay 2 strands of MC. All 3 strands now stay on the Right Side of the work for this lesson. - UP. To create an up stitch, wrap your CC under, then UP OVER the front of the two MC strands and purl the stitch on the needle using CC. This very first stitch will look rather plain. The UP stitches after this will create a diagonal line up to the left with the CC yarn. - DN. To create a down stitch, wrap your CC DOWN OVER the front of the MC strands. Lift CC behind MC and purl the stitch on the needles. This creates a diagonal line down to the left with the CC yarn. - Continue to alternate between UP and DN (up and down) stitches creating a zig zag grid. Every few stitches, stop and space out the stitches on the needles and the floats to match the gauge. (I find 20 sts for DK weight and 22 stitches for Fingering weight every 10 cm or roughly 4 inches is ideal.) Don’t worry too much if the MC strands look a little kinky. They will straighten out a lot more when you block the project. Up versus down

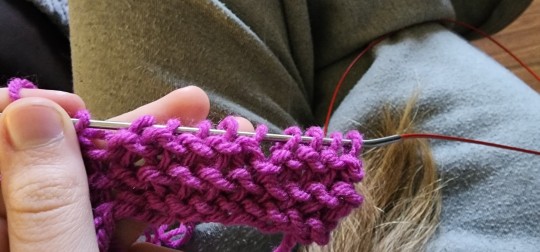
Dn Stitch (Down): White CC strand wraps DOWN over the teal MC floats. Purl the next stitch which looks like an up pointed triangle (see the white stitch on the left needle)

Up Stitch (Up): Wrap the white CC strand under, then UP over the floats. Purl the stitch on the left needle which is hidden behind the teal MC float. As you work more rounds you will find your mojo and the most efficient way of working the Technique to match your method of knitting. I use Left Handed Throwing for knitting generally and find it useful to create a loop in the wool for a DN stitch which then drops in behind the CC for the UP stitch. This way, I never have to juggle the balls of yarn. Continental technique My lovely test knitter Kitty provided this video tutorial because she most often works Continental style as her preferred method of knitting. - Lay the foundation. Cast on stitches for your sample. As an example, for 40cm or 16 inch length cable, fingering weight cast on 97 sts. For DK weight cast on 89 sts. - Work a few rounds as a foundation. I like to use Moss stitch because it has a similar stitch width. You can use one strand of MC or one strand of CC for these rounds. It's up to you. - Starting the technique. Lay the other two strands over the work between the needles. If your base rounds were MC, lay another strand of MC and one of CC. If you base rounds were CC, lay 2 strands of MC. All 3 strands now stay on the Right Side of the work for this lesson. - UP. Wrap your CC under, then up over the front of the two MC strands, purl the stitch on the needle using CC. This very first stitch will look rather plain but further UP stitches will create a diagonal line up to the left with CC. - DN. To create a down stitch, with CC yarn at the back, insert right needle into the next stitch as if to purl, lay the 2 MC strands over the needle and pierced stitch. Wrap the CC down over the MC strands, wrap under the needle and up the back, pull CC through under the stitch on the needle and the 2 MC strands. This places the tail of CC in front of the MC strands ready for the next UP stitch. - Continue to alternate between UP and DN (up and down) stitches creating a zig zag grid. Every few stitches, stop and space out the stitches on the needles and the floats to match the gauge. (I find 20 sts for DK weight and 22 stitches for Fingering weight every 10 cm or roughly 4 inches is ideal.) Don’t worry too much if the MC strands look a little kinky. They will straighten out a lot more when you block the project. Right hand throwing technique As neither of us work right handed throwing, I would be keen to see how you work the stitches with the strands in your right hand. Feel free to tag me if you record a video or take photos so I can describe it here in the article. First Round / Row As you work along the round up, down, up, down... You will see the pattern emerging.

The first round of woven floats beginning at Start-of-Round Marker. A pattern emerges from the up/down rhythm of the stitches. The Up stitch lifts to an upward pointing triangle. The Dn (down) stitch has a float in front of it. Pay attention to the difference between these two. They will help you spot mistakes, find where you are in the pattern and also can be used as an audit when you have lost your way.

One stitch is a pointed triangle, the next stitch has a float over the top. This will help you find your place in a pattern chart or when working the next round. Second Round / Row At the end of the round, with an odd number of stitches, you will be working the opposite stitch to the round below. If the first stitch of Round 1 was DN, the first stitch of Round 2 is UP. Keep going for a few more rounds and you will see the diamond grid starting to form. This can help prompt you to know what next stitch to do. - If you see an upward pointing triangle, use DN stitch to come down and meet the point. - If you see a stitch hiding behind a float, use UP stitch to lift up to meet it. Once you have laid out a few rounds, the spacing is much easier to keep even.

Using an odd number of stitches in the round, the stitches in the second round mirror the stitches in the round below which creates a diagonal grid. As the fabric develops, you will find your focus is drawn to the floats rather than the stitches. The floats fill in the gaps between the diagonal diamond grid lines. Correcting And Fixing Mistakes In Your Knitting Wrong wrap changes direction for all the next stitches The difference between the two stitches - the UP with a pointed triangle and the DN with a float in front - is really helpful. You can use it as an audit to check if you've made a mistake in the pattern. However, one wrong wrap can change the direction for the next stitches.

Two DN stitches side by side (2nd and 3rd stitches in the second round shown here) have reversed the pattern for the next stitches. If you see the next round placing an UP stitch over an UP stitch and a DN stitch over a DN stitch, then something has gone wrong with the work.

This is what it looks like in the knitting. See the two DN stitches side by side affects the next stitches and can interrupt the pattern. Look back over the round and the round below very carefully to spot the error. Use your Start-Of-Round Marker and any section markers if you are working a chart to find where the error occurred. For example, say, in Round 5 all the section markers start with a DN stitch. Check the beginning of each section in the round until you find the section that changed direction. This can be a quick way to locate the error. When I was first learning the technique, I made plenty of mistakes. I was focused on getting the tension right and would frequently wrap the wrong way. Other times I might need to pause the work to manage a distraction, then would continue, thinking I knew the last stitch I worked. Sometimes I would notice I was putting an UP stitch over and UP stitch, so would correct without going back. Now that can be really messy! Checking your knitting frequently can help you catch the error early so there is less work to undo. Floats too long It can take some practice to space out the first few rounds of stitches. If you find you’ve worked the first rounds too loosely and the floats are falling down into a curve, you can use a crochet hook or the tip of the knitting needle to gradually feed the floats back along the round, forward or back, and spread it out further to take up the slack. If the floats are too tight, it’s a lot more tricky to suck extra yarn in from the surrounding areas. Spacing the stitches as you go means you don’t have to unfurl (or rip back) your work and knit it again. Several wraps going the wrong way It may be possible to undo a purl column if a grid stitch needs to change direction. However, you can’t change a grid stitch that has been accidentally wrapped twice. Getting lost in the surgery If you undo the column, correct the error but then can’t find your way back up the column, put an open lock stitch marker through the last correct CC stitch in the column so it doesn’t unzip any further, then undo your work carefully back to that stitch. Patience may be required when you are first learning this technique but the end result is worth it. To save time, I recommend looking back over stitches just completed to find the errors early UPDATED
Creating the Woven Float series of Cowls
I have a bad habit of falling in love with a new yarn and adding it to the stash. Sometimes I’ll buy it specifically for a new design. Other times I’ll buy it because it is interesting and I’ll design around it. Either way, the yarn then sits waiting for me, hoping I will remember of its existence. For this series of cowls (which are circular scarfs) I decided the first rule was that I wasn’t allowed to buy any more yarn to make the designs. As is typical, I would sometimes come up with designs where I just didn’t have the colours I needed in my stash. Being resourceful, I was able to either acquire the yarn through the local Knitters’ Guild or swap colours I had from the local yarn shop I no longer needed.

Woven Illusion Cowl Working the Woven Illusion Cowl was really delightful using two DK weight yarns. The CC cream colour was a wool acrylic viscose tweed blend worked with MC of pure wool. I will be interested to see how the CC blend goes with wear and tear over time. Let’s see if it lasts as long as the wool. Generally speaking, wool yarn is known for its longevity and hardiness. However, it isn’t always suitable to make garments that sit directly against the skin. Many people have sensitivities and allergies to wool. They find it either scratchy or even to the point of creating a skin rash. So, it was a bonus having the blended yarn to use up against the neck.

One Tree Hill Cowl One Tree Hill Cowl (currently being tested) used a DK weight and a Worsted weight yarn that felt very similar in thickness and weight. It’s important you hold and feel the yarns, especially if they are coming from two different brands. Pinch the yarns and hold them side by side to see how they might work together. (Just another great reason to support your local yarn shop rather than buying on the internet.) I had the heather grey wool left over from another project and was given the beautiful forest green wool manufactured by Knitpicks.

UFO Sky Cowls The two UFO Sky Cowls (currently being tested) were meant to be one pattern. I made one but then thought I could include a different shape and couldn’t be bothered ripping out all that I had done. On checking with other knitters, they felt both versions had their benefits - one with embroidery and one without. They felt each would appeal to different knitters. The cowls were both worked in DK weight wool from the same brand with the embroidery worked in fingering weight colours left over from other knitting projects.

Peru Double Cowl The Peru Double Cowl was inspired by my love for fingering weight Drops Alpaca (from Peru). I paired the alpaca with a wonderful vintage bouclé yarn from New Zealand. I find, when I go out at night, that I like to wrap something around my head and ears to keep warm. Carrying a hat can be annoying and, if I use a shawl, my friends laugh and tell me I look like a Russian peasant. So, making a long cowl that can wrap up over the head and still keep my neck warm solved the problem. The was the first design I had someone offer me several hundred dollars for. Quite the compliment for a newbie. Read the full article
#cowl#knittingpatterns#design#diamondgrid#float#howtodowovenfloats#knit#knitted#knitting#knittingprojects#pattern#purl#scarf#stockingstitch#wovenfloatstechnique
32 notes
·
View notes
Text
🧶💛Knit and Purl Pinup💛🧶
Commission for @/manuka_gorgiosa

For more information about commissions Check out my carrd below!
#knit#purl#yarn#pin up#knitting#knitting needles#artists on tumblr#digital art#art#littleevil0ne#illustrators on tumblr#illustration#pin ups#pinup#pin up girl#pinup art#commissions#commission
63 notes
·
View notes
Text
Summary: The Hollow Knight learns to knit. It is one of the most important things they ever do.
Author: @publiccmenace
#official fic poll#haveyoureadthisfic#pollblr#internet culture#fandom culture#fanfic#fanfiction#tumblr polls#fandom poll#Purl#hollow knight#no romantic relationships#ao3
27 notes
·
View notes
Photo

~ White ~
110 notes
·
View notes
Text
Cubist Crown

55 notes
·
View notes
Text
achieved old lady fall by actively having carpal tunnel syndrome symptoms at age 23 due to how i purl my stitches when knitting
#ignore me#knitting#purl#yaaay#nothing screams symptoms like googling them at the dead of night#my fingertips were burning all day and i couldnt figure out why#tada#its almost def too cuz of an old wrist injury#from when i went to crack my wrist and pulled a muscle#lamest injury ever
13 notes
·
View notes
Text
Okay so, I'm doing something wrong when attempting to stockinette stitch and I require the help of the hivemind:
I have no issue with the garter stitch portion of things, it seems that I am somehow mucking up the purl portion as I have horizontal ribbing on both sides


I am inserting my right needle into the top of the stitch, bringing my yarn around to the front of the needle and making the stitch.
Where is my error? Is it tensioning that makes the ribbing prominent?
That doesn't seem correct to me so I'm lost trying to sort out where I must be misplacing my needle.
29 notes
·
View notes
Text

Another Artfight attack from this round, this time Ghostlycorvid's Purl! The month's gone by so quick, hard to believe there's just one day left of the event now
#McDoodles#purl#artfight#artfight 2023#that scarf's gonna be able to wrap around her entire body soon enough
24 notes
·
View notes
Note
Can i request Purl from dnd I miss her

she's soo!!!! :-D
20 notes
·
View notes
Text


I planted the last bird of paradise this morning for Wendy. She gave me a bunch of empty pots which is nice. Her cat Purl is living the life I want. I am still exhausted from gardening.
6 notes
·
View notes
Text


Current WIP! A knit blanket. I’m using 11mm circular knitting needles and Bernat Baby Blanket yarn.
To make the pattern, I’m switching the order of my knit and purl stitches every 15th row. Currently I am 91 rows in.
#kintblr#knitters of tumblr#knitting#hand knitted#knit blanket#soft yarn#bernat#yarn#handmade#knit#purl#super soft#blanket#my wips#current wip#wip#knit wip#fiber art#fiber crafts
5 notes
·
View notes
Text


2017 art.
Tbh I didn't realise I drew so much personal art this year, especially so many ones I like.
2 notes
·
View notes
Text

PEARL PRINCETON is thirty-five years old. She works at the Investment Department at BRO corp. She is the incarnation of Purl from the Disney film Purl.
+ Caring, Creative, Out-of-the-Box Thinker - Wallflower, Overlooked, Overthinker
ABOUT PEARL
Pearl Princeton, often referred to as "The Wallflower," is a figure known for her inspiring journey of self-discovery and empowerment within the corporate world. Her story is a testament to the challenges of staying true to oneself in environments that often demand conformity. Pearl began her career at B.R.O Corp, where she struggled to find her place among her more extroverted and seemingly confident colleagues. Naturally reserved, she felt like an outsider, disconnected from the social circles that dominated the workplace. In her earnest attempt to fit in, Pearl transformed her appearance and demeanor, mimicking the style and behavior of her coworkers. This shift garnered her the attention she had sought but came at a significant cost—Pearl lost sight of her true identity, becoming someone she hardly recognized. The turning point in Pearl's journey came when Lacey, a new colleague, joined the team and experienced the same sense of alienation that Pearl once did. Recognizing a kindred spirit, Pearl reached out to Lacey, offering her empathy and support. Despite facing resistance from their coworkers, Pearl boldly invited Lacey to join them for lunch, an act that challenged the existing social dynamics within the group. Over time, both Pearl and Lacey were gradually accepted by their peers, thanks to Pearl's courage and determination to include Lacey. As Pearl and Lacey's friendship deepened, it blossomed into a romantic relationship. However, this relationship eventually came to an end. Despite the breakup, Pearl emerged stronger, having learned the importance of authenticity and self-acceptance. No longer driven by the need for external validation, Pearl redirected her focus toward advancing her career, embracing her true self with renewed confidence. Pearl Princeton's story is a powerful reminder that authenticity is the key to lasting success and fulfillment. By finding the courage to be herself, she not only carved out a place for herself at B.R.O Corp but also became a beacon of strength for others facing similar struggles. Today, Pearl is celebrated for her resilience and her unwavering commitment to living authentically, inspiring many to do the same.
ADDITIONAL INFORMATION*
LIPSTICK LESBIAN
SHE IS A KNITTER GENTLEMEN, DIY GODDESS
Pearl is currently unavailable. Her faceclaim is Nicola Coughlan.
1 note
·
View note
Photo

Title: Purl
Rating: PG
Director: Kristen Lester
Cast: Bret Parker, Emily Davis, Michael Daley, Michael Frederickson, Erik Langley, Jimmy Lillard, Austin Madison, Kelsey Mann, Kyle McDaniel, Victor Navone, Michael Yates, Aphton Corbin, Mitra Shahidi, Domee Shi
Release year: 2018
Genres: comedy
Blurb: Purl, an earnest ball of yarn, gets a job at a fast-paced, male-centred startup company. Things start to unravel as Purl tries to fit in with this tight-knit group, but she must ask herself how far she is willing to go to get the acceptance she yearns for...and if, in the end, it is worth it.
#purl#pg#kristen lester#bret parker#emily davis#michael daley#michael frederickson#erik langley#2018#comedy
0 notes
Text


This is a project I've been working on for a while. The idea was to draw all the members of NSR in traditional clothes inspired by various ethnic groups/cultures residing in Malaysia (or/and which were implied in the game). Below, I have listed first the characters; then the names of their traditional clothes; and lastly the countries (or cultures) said clothes are derived from.
DJ Subatomic Supernova: Baju Melayu — Malaysia
Sayu: Kimono — Japan
Yinu & her mother: Cheongsam — China
Neon J & 1010: Hanbok — South Korea
Eve: Sari — India
Tatiana Qwartz: Koubasanan — Kadazandusun (Malaysia)
(The traditional clothes aren't hundred percent accurate and I have most likely made some mistakes while trying to incorporate them with the characters, and thus have ended up doing a disservice of some caliber to them. If you want to see all these traditional clothes in their full splendor, I highly recommend and encourage everyone to make good use of the various web browser's search bars and local libraries' collections.)
#No Straight Roads#No Straight Roads fanart#NSR#my art#DJ Subatomic Supernova#DJSS#DJSS gijinka#Sayu#Yinu#Yinu's mother#Neon J#Neon J gijinka#1010#Eloni#Zimelu#Rin#Purl-Hew#Haym#Eve#Tatiana Qwartz
797 notes
·
View notes
Text
💚 A message from 1010 💚


I don't use Adobe, but I still hate the way greedy art programs treat their artists nonetheless lmao, and in my heart, they do too ✨️
Image without text under cut:

#nsr#no straight roads#art#digital art#1010#nsr 1010#nsr rin#nsr zimelu#nsr haym#nsr purl hew#nsr eloni#fuck ai#mousse.png
960 notes
·
View notes