
Statistics
We looked inside some of the posts by annabelledrumm and here's what we found interesting.
Average Info
Notes Per Post
104
Likes Per Post
69
Reblog Per Post
35
Reply Per Post
0
Time Between Posts
4 months
Number of Posts By Type
Text
17
Last Seen Tumblr Blogs


Fun Fact
Tumblr has 411 employees.
Text
How To Knit Woven Floats Technique

How To Do Woven Floats Technique
This hand knitting article will introduce you to the Woven Floats Technique. See what it looks like, how it is constructed, some different methods of knitting and check out the series of cowls I designed around this technique. Knitting that is worked using Woven Floats Technique creates a warm, multi-strand fabric which looks tidy on both the right and wrong sides. I found it so unusual, I decided to go exploring and create a series of knitting pattern designs. The designs start off basic, then slowly add features and skills as the series progresses. So, the easiest one is first and later ones have more to keep your concentration. I’ll continue to update and edit this article as I progress through the series. I have at least another 4 ideas I’d like to do but there are other projects looking at me with big, dewy eyes, begging to be given some attention. Subscribe to my news, because I will continue to create more designs and add them to this blog.
What is Woven Floats Technique?
Look At Regular Colour work First If you are familiar with Stranded Colour work or Fair Isle work, both of these techniques use 2 or more colours. Stocking stitch (also known as stockinette stitch) is used to create a pattern. It might be worked in the round or back and forth. Knitting in the round tends to create a more even result. Let’s use the example of working with Colour A and Colour B. The colour strands are held at the back (wrong side or WS) of the work and are lifted up to the needles when it is their turn to be added to the pattern. If Colour A is worked for a few stitches, then Colour B stretches out along the back of those stitches. This creates a long horizontal thread called a “float”. Practicing Stranded Colour or Fair Isle Technique allows you to find just the right amount of tension in the float. You are aiming for a float that it is not so tight as to pucker the stitches of Colour A and not so loose that it creates the shape of a hanging hammock. Catching the Float After Colour A is knit for 4 or more stitches, it is often good practice to catch the float of Colour B before continuing to knit the next stitches in Colour A. This keeps the back of the work tidy and reduces the chance of a super long float getting caught on a shirt button, your ring or fingers whilst dressing or undressing. You can catch the stitch by wrapping Colour A either up over or down over Colour B before you work the stitch on the needles. Repeat again if Colour A continues another 4 or more stitches. Essentially, both Stranded Color Work and Fair Isle use stocking stitch which is knit on the right side (RS) of the work. On the Wrong Side of the work, you can see floats, the places where the floats have been wrapped and the purl stitches. Compare to Woven Floats Technique With Woven Floats Technique, you flip the fabric over. Now the wrong side is the right side and vice versa. The pattern is created with the floats, the places where the floats are wrapped and the purl stitches. Some parts of the pattern are created by the long floats themselves. These can become bold, striking shapes and so I have called these my Main Colour (MC) in the designs. Other times, a more detailed, grid pattern can emerge from the method of wrapping up and down before each purl stitch. We do use more grid yarn than the float yarn in the design. However, the grid yarn is not as dominating in the over-all picture and so I call this my Contrast Colour (CC). In my series of knitting pattern designs, I’ve stayed with a staggered grid pattern for the background plus some slight variations on the theme. The most unusual feature which makes it different from Stranded Colour and Fair Isle is that the MC is never worked on the needle. It literally floats along, held against the fabric by the CC wraps. CC is the only colour that creates stitches along the row. All stitches are purl on the RS, wrapping up and down over the MC strands. This is not necessarily a rule for the technique over all but is the rule I used for the series. Where did it come from? As with many hand knitting techniques, it is hard to know when knitters started to experiment with this technique. I saw a designer talking about it on the net. She said that she saw it in a vintage photograph so, I assume that could be 100 years ago. There were no instructions attached to the vintage photo. Zooming in on the photo allowed her to work it out for herself. The Designer was about to teach a class which I could not attend so, I figured, hey, if she can work it out, maybe I can too.
How to do Woven Floats Technique
What do you need For this series I’ve mostly used 3 strands of yarn at once. - 1 Strand of CC colour for the grid pattern that wraps and is worked on the needles - 2 Strands of MC colour in the same weight as CC for the floats. As a variation, you can use one heavier weight strand of yarn for your MC to replace the 2 strands of MC described. For needles, you may need to experiment to see what suits best to match your yarn. For this series of designs, I used: - Fingering weight yarn, 3.5mm (US size 4) needles - DK weight yarn, 4mm (US size 6) or 4.5mm (US size 7) needles Length: The circular needle length is a little smaller than the circumference of the design. For practice, start with something small such as the 40cm (16 inch) length. Different Methods of Working Left Hand Throwing technique - Lay the foundation. Cast on stitches for your sample. As an example, for 40cm or 16 inch length cable, fingering weight cast on 97 sts. For DK weight cast on 89 sts. - Work a few rounds as a foundation. I like to use Moss stitch because it has a similar stitch width. You can use one strand of MC or one strand of CC for these rounds. It's up to you. - Starting the technique. Lay the other two strands over the work between the needles. If your base rounds were MC, lay another strand of MC and one of CC. If you base rounds were CC, lay 2 strands of MC. All 3 strands now stay on the Right Side of the work for this lesson. - UP. To create an up stitch, wrap your CC under, then UP OVER the front of the two MC strands and purl the stitch on the needle using CC. This very first stitch will look rather plain. The UP stitches after this will create a diagonal line up to the left with the CC yarn. - DN. To create a down stitch, wrap your CC DOWN OVER the front of the MC strands. Lift CC behind MC and purl the stitch on the needles. This creates a diagonal line down to the left with the CC yarn. - Continue to alternate between UP and DN (up and down) stitches creating a zig zag grid. Every few stitches, stop and space out the stitches on the needles and the floats to match the gauge. (I find 20 sts for DK weight and 22 stitches for Fingering weight every 10 cm or roughly 4 inches is ideal.) Don’t worry too much if the MC strands look a little kinky. They will straighten out a lot more when you block the project. Up versus down

Dn Stitch (Down): White CC strand wraps DOWN over the teal MC floats. Purl the next stitch which looks like an up pointed triangle (see the white stitch on the left needle)

Up Stitch (Up): Wrap the white CC strand under, then UP over the floats. Purl the stitch on the left needle which is hidden behind the teal MC float. As you work more rounds you will find your mojo and the most efficient way of working the Technique to match your method of knitting. I use Left Handed Throwing for knitting generally and find it useful to create a loop in the wool for a DN stitch which then drops in behind the CC for the UP stitch. This way, I never have to juggle the balls of yarn. Continental technique My lovely test knitter Kitty provided this video tutorial because she most often works Continental style as her preferred method of knitting. - Lay the foundation. Cast on stitches for your sample. As an example, for 40cm or 16 inch length cable, fingering weight cast on 97 sts. For DK weight cast on 89 sts. - Work a few rounds as a foundation. I like to use Moss stitch because it has a similar stitch width. You can use one strand of MC or one strand of CC for these rounds. It's up to you. - Starting the technique. Lay the other two strands over the work between the needles. If your base rounds were MC, lay another strand of MC and one of CC. If you base rounds were CC, lay 2 strands of MC. All 3 strands now stay on the Right Side of the work for this lesson. - UP. Wrap your CC under, then up over the front of the two MC strands, purl the stitch on the needle using CC. This very first stitch will look rather plain but further UP stitches will create a diagonal line up to the left with CC. - DN. To create a down stitch, with CC yarn at the back, insert right needle into the next stitch as if to purl, lay the 2 MC strands over the needle and pierced stitch. Wrap the CC down over the MC strands, wrap under the needle and up the back, pull CC through under the stitch on the needle and the 2 MC strands. This places the tail of CC in front of the MC strands ready for the next UP stitch. - Continue to alternate between UP and DN (up and down) stitches creating a zig zag grid. Every few stitches, stop and space out the stitches on the needles and the floats to match the gauge. (I find 20 sts for DK weight and 22 stitches for Fingering weight every 10 cm or roughly 4 inches is ideal.) Don’t worry too much if the MC strands look a little kinky. They will straighten out a lot more when you block the project. Right hand throwing technique As neither of us work right handed throwing, I would be keen to see how you work the stitches with the strands in your right hand. Feel free to tag me if you record a video or take photos so I can describe it here in the article. First Round / Row As you work along the round up, down, up, down... You will see the pattern emerging.

The first round of woven floats beginning at Start-of-Round Marker. A pattern emerges from the up/down rhythm of the stitches. The Up stitch lifts to an upward pointing triangle. The Dn (down) stitch has a float in front of it. Pay attention to the difference between these two. They will help you spot mistakes, find where you are in the pattern and also can be used as an audit when you have lost your way.

One stitch is a pointed triangle, the next stitch has a float over the top. This will help you find your place in a pattern chart or when working the next round. Second Round / Row At the end of the round, with an odd number of stitches, you will be working the opposite stitch to the round below. If the first stitch of Round 1 was DN, the first stitch of Round 2 is UP. Keep going for a few more rounds and you will see the diamond grid starting to form. This can help prompt you to know what next stitch to do. - If you see an upward pointing triangle, use DN stitch to come down and meet the point. - If you see a stitch hiding behind a float, use UP stitch to lift up to meet it. Once you have laid out a few rounds, the spacing is much easier to keep even.

Using an odd number of stitches in the round, the stitches in the second round mirror the stitches in the round below which creates a diagonal grid. As the fabric develops, you will find your focus is drawn to the floats rather than the stitches. The floats fill in the gaps between the diagonal diamond grid lines. Correcting And Fixing Mistakes In Your Knitting Wrong wrap changes direction for all the next stitches The difference between the two stitches - the UP with a pointed triangle and the DN with a float in front - is really helpful. You can use it as an audit to check if you've made a mistake in the pattern. However, one wrong wrap can change the direction for the next stitches.

Two DN stitches side by side (2nd and 3rd stitches in the second round shown here) have reversed the pattern for the next stitches. If you see the next round placing an UP stitch over an UP stitch and a DN stitch over a DN stitch, then something has gone wrong with the work.

This is what it looks like in the knitting. See the two DN stitches side by side affects the next stitches and can interrupt the pattern. Look back over the round and the round below very carefully to spot the error. Use your Start-Of-Round Marker and any section markers if you are working a chart to find where the error occurred. For example, say, in Round 5 all the section markers start with a DN stitch. Check the beginning of each section in the round until you find the section that changed direction. This can be a quick way to locate the error. When I was first learning the technique, I made plenty of mistakes. I was focused on getting the tension right and would frequently wrap the wrong way. Other times I might need to pause the work to manage a distraction, then would continue, thinking I knew the last stitch I worked. Sometimes I would notice I was putting an UP stitch over and UP stitch, so would correct without going back. Now that can be really messy! Checking your knitting frequently can help you catch the error early so there is less work to undo. Floats too long It can take some practice to space out the first few rounds of stitches. If you find you’ve worked the first rounds too loosely and the floats are falling down into a curve, you can use a crochet hook or the tip of the knitting needle to gradually feed the floats back along the round, forward or back, and spread it out further to take up the slack. If the floats are too tight, it’s a lot more tricky to suck extra yarn in from the surrounding areas. Spacing the stitches as you go means you don’t have to unfurl (or rip back) your work and knit it again. Several wraps going the wrong way It may be possible to undo a purl column if a grid stitch needs to change direction. However, you can’t change a grid stitch that has been accidentally wrapped twice. Getting lost in the surgery If you undo the column, correct the error but then can’t find your way back up the column, put an open lock stitch marker through the last correct CC stitch in the column so it doesn’t unzip any further, then undo your work carefully back to that stitch. Patience may be required when you are first learning this technique but the end result is worth it. To save time, I recommend looking back over stitches just completed to find the errors early UPDATED
Creating the Woven Float series of Cowls
I have a bad habit of falling in love with a new yarn and adding it to the stash. Sometimes I’ll buy it specifically for a new design. Other times I’ll buy it because it is interesting and I’ll design around it. Either way, the yarn then sits waiting for me, hoping I will remember of its existence. For this series of cowls (which are circular scarfs) I decided the first rule was that I wasn’t allowed to buy any more yarn to make the designs. As is typical, I would sometimes come up with designs where I just didn’t have the colours I needed in my stash. Being resourceful, I was able to either acquire the yarn through the local Knitters’ Guild or swap colours I had from the local yarn shop I no longer needed.

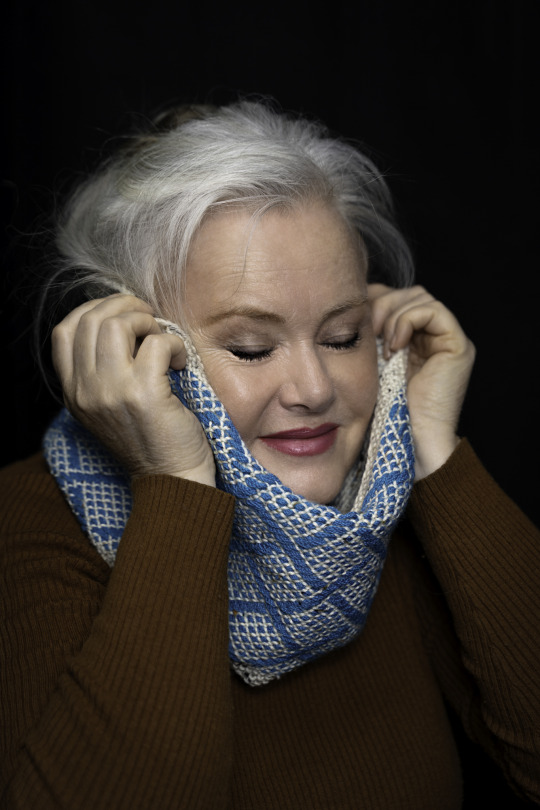
Woven Illusion Cowl Working the Woven Illusion Cowl was really delightful using two DK weight yarns. The CC cream colour was a wool acrylic viscose tweed blend worked with MC of pure wool. I will be interested to see how the CC blend goes with wear and tear over time. Let’s see if it lasts as long as the wool. Generally speaking, wool yarn is known for its longevity and hardiness. However, it isn’t always suitable to make garments that sit directly against the skin. Many people have sensitivities and allergies to wool. They find it either scratchy or even to the point of creating a skin rash. So, it was a bonus having the blended yarn to use up against the neck.

One Tree Hill Cowl One Tree Hill Cowl (currently being tested) used a DK weight and a Worsted weight yarn that felt very similar in thickness and weight. It’s important you hold and feel the yarns, especially if they are coming from two different brands. Pinch the yarns and hold them side by side to see how they might work together. (Just another great reason to support your local yarn shop rather than buying on the internet.) I had the heather grey wool left over from another project and was given the beautiful forest green wool manufactured by Knitpicks.

UFO Sky Cowls The two UFO Sky Cowls (currently being tested) were meant to be one pattern. I made one but then thought I could include a different shape and couldn’t be bothered ripping out all that I had done. On checking with other knitters, they felt both versions had their benefits - one with embroidery and one without. They felt each would appeal to different knitters. The cowls were both worked in DK weight wool from the same brand with the embroidery worked in fingering weight colours left over from other knitting projects.

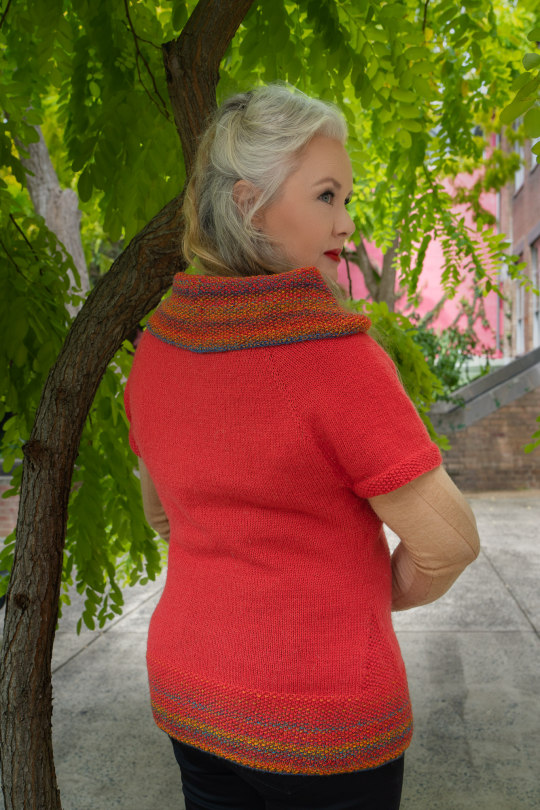
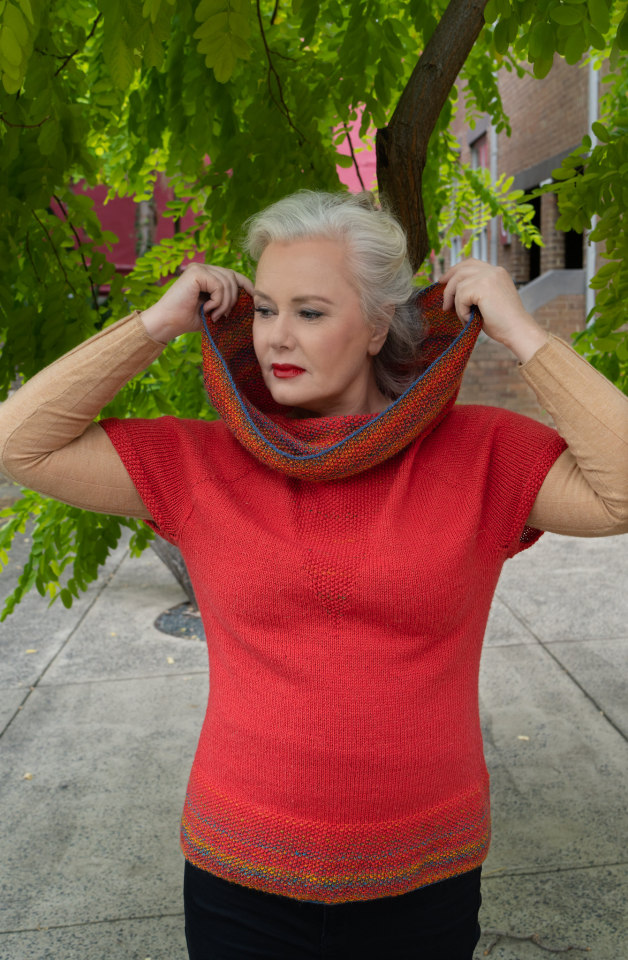
Peru Double Cowl The Peru Double Cowl was inspired by my love for fingering weight Drops Alpaca (from Peru). I paired the alpaca with a wonderful vintage bouclé yarn from New Zealand. I find, when I go out at night, that I like to wrap something around my head and ears to keep warm. Carrying a hat can be annoying and, if I use a shawl, my friends laugh and tell me I look like a Russian peasant. So, making a long cowl that can wrap up over the head and still keep my neck warm solved the problem. The was the first design I had someone offer me several hundred dollars for. Quite the compliment for a newbie. Read the full article
#cowl#knittingpatterns#design#diamondgrid#float#howtodowovenfloats#knit#knitted#knitting#knittingprojects#pattern#purl#scarf#stockingstitch#wovenfloatstechnique
31 notes
·
View notes
Text
Unlocking the Perfect Fit: Your Ultimate Guide to Women’s Size Charts

Unlocking the Perfect Fit: Your Ultimate Guide to Women’s Size Charts
Finding the perfect fit in women’s clothing can feel like a treasure hunt—exciting, yet often frustrating. With varying size charts and inconsistent measurements from a million knitting pattern designers, shopping can quickly become overwhelming. But fear not! Our ultimate guide to women’s size charts is here to simplify your journey and help you unlock the secret to a flattering fit. Whether you’re revamping your wardrobe or hunting for that one standout knit pattern, understanding size charts is essential. This will help you make better decisions that boost your confidence. By navigating these charts expertly, you’ll not only save time and money but also ensure your knits enhance your individual style. Join us as we delve into the world of sizing, debunk common myths, and provide tips that will empower you to embrace your shape and find clothing that feels tailor-made for you. Say goodbye to confusion and hello to a wardrobe that fits just right!
Understanding Women’s Size Charts
Finding knit patterns that fit perfectly is a common challenge for many women. Designer’s size charts can be complex and varied, often leaving us puzzled. These charts are essential tools, providing a framework that many brands and Designers use to categorise clothing sizes based on body measurements. Women’s size charts typically list measurements for key areas of the body such as the bust, waist, and hips. Some charts also include measurements for sleeve lengths and other specific dimensions. By comparing your own body measurements to these charts, you can identify the size that should theoretically fit you best. Knitwear Designers might interpret the sizes differently which can lead to discrepancies. So, these size charts are guidelines rather than absolute rules. At least with these charts handy, you can make more informed decisions and reduce the guesswork involved in finding the perfect size. Bookmark this page and Subscribe to the website for more tips on finding the knit patterns that are best suited to your body shape and style.
The Importance of Accurate Sizing
Accurate sizing is crucial not only for comfort but also for the overall appearance and confidence that well-fitting clothing can provide. When clothing fits correctly, it can enhance your natural shape, making you look and feel your best. Conversely, ill-fitting clothing can be uncomfortable, unflattering, and may cause you to leave that knit you spent hours making, gathering moths in the drawer. If you choose a size that is smaller than your body, it may warp and stretch leaving you looking like an over stuffed sausage. (I got that term from a Marilyn Monroe book in the 1950’s.) This actually makes you look BIGGER than you actually are or that, perhaps, you have not noticed that you have recently put on weight. It’s a great way to look low class. If you choose a size that is bigger than your body, sure, with knits, this can sometimes look good and it certainly feels very comfortable when hanging around at home. However, once you head out into the street or off to work, an oversized knit can make you look frumpy and… you guessed it… bigger than you actually are. Making your knits the right size impacts your confidence and the way that others perceive you.
Common Size Standards Across Brands and Countries
One of the most confusing aspects of women’s size charts is they often don't follow the universal standard. Different brands often have their own sizing systems, which can vary significantly from one another. For example, a size 8 in one brand might be equivalent to a size 6 or 10 in another. This variation can be attributed to different sizing philosophies, target markets, and historical influences. They can also change over time as the average measurements have increased substantially in recent decades. That might be to do with the quality of our food or the amount of exercise we get. In experimenting with my own food and exercise however, I would say it also has a lot to do with general toxins we are dealing with on every level - in the water, the air, the earth where we grow our food. If we could look at the frequency or vibration of yarns and fabrics, my guess is that we would find natural yarns keep us at a higher frequency than plastic and synthetic yarns and fabrics. We also need to consider our other bodies — electrical, magnetic and emotional bodies — which can really take a hit from internal worries/anxiety as well as yet more external influences. That’s a whole other story we can explore another time, particularly the synthetic yarns and textiles! Despite all the clothing sizing variations, there are some common size standards that you can use as a reference point. In the United States, the most widely recognised sizes range from 0 to 24, with each size increase typically corresponding to an inch or two in body measurements. European sizes, on the other hand, usually range from 32 to 54, with different increments. UK sizes are similar to European sizes but can also vary slightly. International Women’s Size Chart

International Women's sizing chart for knitted garments. To add to the complexity, some clothing brands use vanity sizing, which is the practice of labelling clothing with smaller sizes than the actual measurements to appeal to consumers’ desire to wear a smaller size. (Don’t know what happened in Italy but, looking at the sizes above, they obviously don’t follow that strategy.) This can make it even more challenging to find your true size. Being aware of these country standards and variations can help you navigate Designer size charts more effectively and reduce the frustration of inconsistent sizing.
How to Measure Your Body for the Best Fit

Use a soft tape measure for measuring the size of your bust. Measuring your body accurately is the foundation of finding the perfect fit. To start, you’ll need a flexible measuring tape, a mirror, and, ideally, a friend to help you ensure precision. Wear form-fitting clothing or measure yourself in your underwear to avoid adding extra inches to your measurements. If you want to make a jacket, coat or cardigan you plan to wear over, say for example, a t-shirt or turtleneck, measure over the top of those garments. First, measure your bust by wrapping the tape around the fullest part of your chest, ensuring that the tape is parallel to the ground and not too tight or too loose. Note this measurement and then proceed to your waist. Your natural waist is typically the narrowest part of your torso, usually just above your belly button. Wrap the tape around this area, keeping it snug but comfortable. If you have some extra bulk around the waist, still measure just above the belly button to match the length of the pattern. Finally, measure your hips at the widest part, usually around the midpoint of your buttocks. Other useful measurements might include your arm length, shoulder width, and neck circumference, depending on the type of clothing design you’re shopping for. Keeping a record of these measurements can be incredibly useful when consulting size charts and can help you make more informed decisions. Download my FREE Guide to Short Rows. There is a good measuring chart where you can record your measurements fpr all your future knitting patterns. Download Now
Size Conversion: Navigating International Size Charts
Designers can come from any country around the world and patterns can be set in Imperial inches or Metric centimetres. Here are some charts with the most common regular sizes to help you convert them. Women’s Regular Size Chart in America USA (inches)
Women’s Regular Sizing Chart in Metric (cm) in Europe, UK and Australia

Asian Designer size charts, such as those from Japan or China, often run smaller than Western sizes. For instance, a US size M might correspond to an Asian size L or even XL. When shopping with Designers from these regions, it’s particularly important to check their size chart and look at the bust inches and cm as your highest priority. Additionally, reading customer reviews can offer insights into how a particular Designer’s sizing runs.
Plus Size vs. Regular Size: What You Need to Know
The difference between plus size and regular size clothing is another important aspect of women’s size charts. Plus size clothing typically starts at size 14 or 16 and goes up to 24 or higher. These sizes are designed to accommodate fuller figures and often include additional considerations for body proportions, such as more room in the bust, waist, and hips. Understanding the differences between plus size and regular size clothing can help you choose pieces that flatter your body shape. Plus size clothing is not just larger versions of regular sizes; it’s designed with different fit models to ensure a better fit for curvier bodies. Women’s Plus Size American inches

Women’s Plus Size European cm Again, I’ve left the inches column there as a comparison.

The Role of Yarn and Fit in Size Selection
Yarn and style play a significant role in how clothing fits and feels. Different yarns have varying levels of stretch, drape, and breathability, which can influence the overall fit of a garment. Understanding these characteristics can help you choose the right size and style for your body and personal comfort. For example, yarns like cotton and linen are breathable and comfortable but have little stretch, so if the original pattern is knit in wool, you may need to go up a size to accommodate the lack of stretch in your yarn. On the other hand, stretchy yarns like spandex or elastane blends can accommodate a wider range of body shapes and sizes, offering more flexibility in fit. They can even be worked in a pattern size slightly smaller than your body for a “body con” snug fit.
The Importance of Ease
Most Designers will include in the pattern notes how much ease you can expect from the pattern. If you want the design to look similar in fit to the original photo, pay attention to the ease. For example, say you are looking at a sweater design and the notes say there is a 5cm or roughly 2 inch ease at the bust. Look at the measurements to see if the bust size they give is your bust size or the finished garment bust size. - If the measurement is your bust size, choose the size that most closely matches your bust and the ease will naturally be added in the pattern instructions. - If the measurement is for the finished garment bust size, you will need to choose the size that is 5cm (or 2 inches) bigger than your own bust.
Frequently Asked Questions About Women’s Size Charts
Navigating women’s size charts can be confusing, and it’s natural to have questions. Here are some frequently asked questions and their answers to help you better understand how to find the perfect fit. Q: Why do sizes vary so much between Designers? A: Sizes vary between brands due to differences in sizing philosophies, target markets, and fit models. Each Designer develops their own size chart based on their interpretation of standard measurements available online and its customer base. This lack of standardisation can lead to significant variations in sizing. Q: How can I find my size if I’m between sizes on the chart? A: If you’re between sizes, consider the fit and style of the garment. For fitted pieces, you might want to size up for comfort. For items with a more relaxed fit, you might be able to size down. Checking the yarn composition and reading customer reviews can also help you make a decision. Matching my body Q: What should I do if my measurements don’t match any size on the chart? A: If your measurements don’t align perfectly with the size chart, prioritise the area that’s most critical for the fit of the garment. For example, if you’re shopping for a sweater pattern, the bust measurement is more important than the waist and hip measurements. You can also consider alterations to achieve a better fit. I’ll be adding a lot more articles to the website on getting the best fit so, subscribe at the bottom of the page or in the top menu to keep in touch. Q: How do I measure myself accurately? A: To measure yourself accurately, use a flexible measuring tape and measure key areas like the bust, waist, and hips. Ensure the tape is parallel to the ground and not too tight or too loose. For additional accuracy, have a friend help you with the measurements. Q: How do I convert my size to international sizes? A: To convert your size to international sizes, refer to size conversion charts higher up this page. Keep in mind that conversions are not always precise, so it’s important to check the specific size chart for the Designer you’re shopping from.
Conclusion: Finding Your Perfect Fit
Finding the perfect fit in women’s knitted clothing patterns can be a challenging but rewarding endeavour. Understanding women’s size charts, the importance of accurate sizing, and the common standards across countries are essential steps in this journey. By measuring your body accurately, navigating international size charts, and considering factors like yarn and fit, you can make more informed decisions and find knitting patterns that enhance your style and confidence. With the right strategies, you can avoid size discrepancies and enjoy a successful shopping experience. Remember that size charts are guidelines rather than absolute rules, and being mindful of the variations between Designers can help you find the best fit. With this ultimate guide to women’s size charts, you’re now equipped with the knowledge and tools to unlock the perfect fit. Embrace your unique shape, make informed choices, and enjoy a knitted wardrobe that feels tailor-made for you. Say goodbye to the frustration of ill-fitting clothing and hello to a confident, stylish you! Want more help with styling your wardrobe and choosing the best knits to suit your body? Visit https://drummrollknitwear.com and subscribe to the news. Read the full article
#accuratesizing#american#americaninches#bustsize#bustwaistandhips#clothing#cm#designer'ssizecharts#european#inches#internationalsizecharts#measuring#plussizes#sizingcharts#sweaters#uk#us#women'ssizecharts
0 notes
Text
Egypt and the Emerald Tablets of Thoth
Audio recording of the Emerald Tablets of Thoth (in 7 parts) speaking of the Halls of Amenti under the pyramids and the advanced Beings who gave him guidance. https://insighttimer.com/annabelledrumm/guided-meditations/emerald-tablets-of-thoth-pt-1-of-7
#egypt#egyptian#ancient egypt#pyramidsofgiza#egyptian pyramids#giza#gizapyramids#underground#science
1 note
·
View note
Text


Peru Double Cowl hand knitting pattern by Annabelle Drumm from DrummRoll Knitwear. Buy the knitting pattern on her website store or on Ravelry. The hand knitted cowl can be worn down the front or back of your clothes. You can double it over for an extra warm neck or, try twisting and wrapping it up over your head to keep your ears warm. The border is bouclé though you can use any textured, Aran weight yarn. The centre is made from two colours of fingering weight yarn. The combination makes an exquisite design inspired by the textiles of Peru.
#annabelle drumm#knitting#knitting pattern#knit#knittersgonnaknit#knitblr#knitters of tumblr#knit cowl#cowl pattern
5 notes
·
View notes
Text

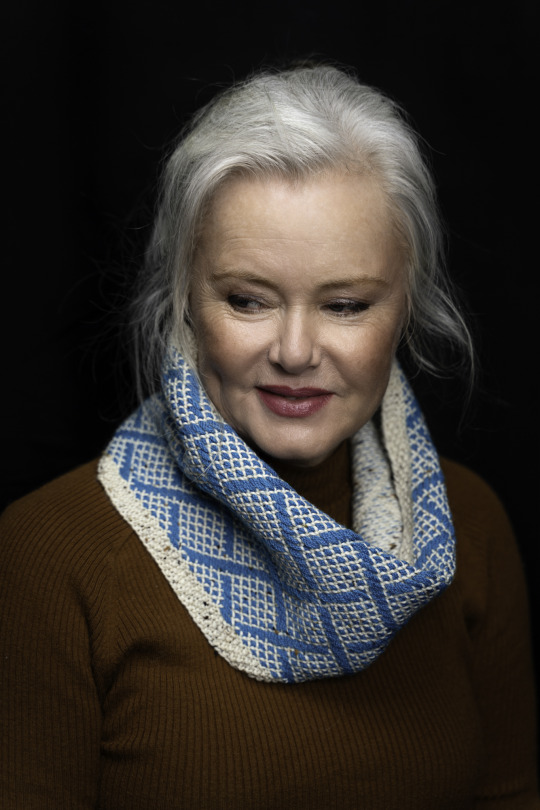
Woven Illusion Cowl knitting pattern by Australian Designer Annabelle Drumm from DrummRollKnitwear. Is it woven? No it's an illusion created with knitting needles! This snuggly, cuddly cowl used two colours of DK weight yarn. It's a great stash buster and is quick to make. The pattern comes with full written and chart instructions, a tutorial on how to do woven float technique and how to fix mistakes. You have a choice of sizes plus extra instructions on how to vary the length and height if you prefer to a different size. Check out where to buy the pattern on the blog article here: https://drummrollknitwear.com/woven-illusion-cowl-circular-two-colour-knitting-pattern/
#annabelle drumm#knitting#knitting pattern#slow fashion#knit#knittersgonnaknit#knitblr#knitters of tumblr
13 notes
·
View notes
Text

"Koala Mama Vest" hand knitting pattern by Annabelle Drumm from DrummRoll Knitwear. Skill level: best suited to advanced beginners or a quick knit for those more experienced. Unisex pattern adds short rows for women, covers sizes 80-150cm (32-60"), has charts with full written instructions in 4ply fingering weight and 8ply DK weight. I also have patterns for children and babies so you can make Koala vests for all the family. More information on my Ravelry page https://www.ravelry.com/patterns/library/koala-mama-vest or visit my website.
#annabelle drumm#knitting#knitting pattern#slow fashion#knit#knittersgonnaknit#slowfashion#vest#knitted clothing#women's vest#men's vest#unisex vest#australia#australian#knitters of tumblr#knitblr#fiber arts#fiber crafts#wool#koala#easy knit
11 notes
·
View notes
Text

"Koala Kid Vest" knitting pattern by Annabelle Drumm from DrummRoll Knitwear in Sydney Australia. Skill level would suit advanced beginners, pattern is fully written out for 4ply fingering weight and 8ply DK weight yarns. All charts have written instructions. This sample was made using Morris & Sons Estate 4ply 100% Australian wool. I also have patterns for babies and adults. More information can be found on the Ravelry page https://www.ravelry.com/patterns/library/koala-kid-vest or on my website
#annabelle drumm#knitting#knitting pattern#slow fashion#knit#knittersgonnaknit#slowfashion#vest#kids clothes#children's clothing#koala#australia#australian
2 notes
·
View notes
Text

"Koala Baby Vest" knitting pattern by Annabelle Drumm. Made with Patons Baby Dreamtime Merino 4ply 100% Australian wool. Pattern suits beginner knitters and is available for sizes newborn through to 24 months. There are full written instructions and a chart for the Koala on the front. Unisex patterns are also available for adults and children written out for 4ply fingering weight and 8ply DK weight so you can make Koala Vests for all the family! Find more information about these knitting patterns on my Ravelry page https://www.ravelry.com/patterns/library/koala-baby-vest and on my website.
#annabelle drumm#knitting#knitting pattern#slow fashion#knit#knittersgonnaknit#vest#baby knitting patterns#baby knitwear#newborn knitting patterns#easy knit#koala#koala one piece#australia#australian#drummroll knitwear#hand knit#hand knitted#australian wool
0 notes
Text

Shortcut Scarf, new worsted weight knitting pattern with two colour gradient fade, fringe and eyelet border. Comes with charts and written instructions. Learn more about it on my website, buy on Ravelry or on Payhip.
#annabelle drumm#knit#knitting#knitting pattern#knitters on Tumblr#fibre arts#wool scarf#easy knit#best#slowfashion#slow fashion#knittersgonnaknit
5 notes
·
View notes
Text
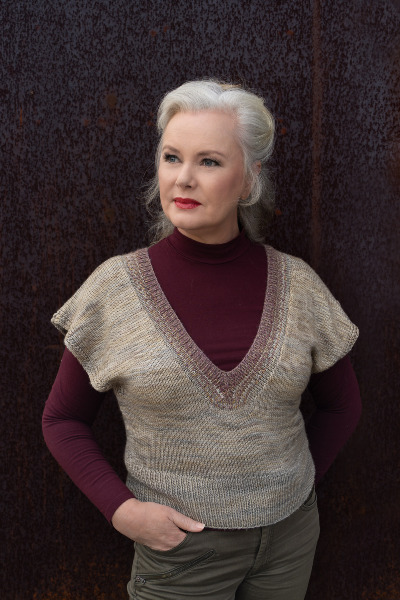
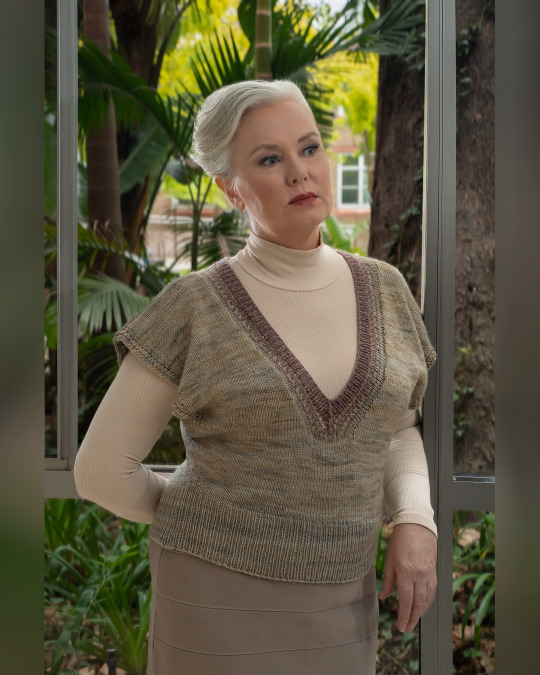

DEEP DIVE VEST from my Vivacious Vests collection. A hand knitting pattern for vest or slipover knitted bottom up in the round, then split at the underarms, knit back and forth, joined at the shoulders with plunging V-neck binding added in gradient colour. The yarn was from Lovecrafts, so very soft and ideal for the draped, drop shoulder sleeve. ** Buy the knitting pattern on Ravelry here: https://www.ravelry.com/patterns/library/deep-dive-vest ** Read more about the making and inspiration of the design on my website here: https://drummrollknitwear.com/deep-dive-hand-knitted-v-neck-vest-or-slipover-pattern/ ** Buy it on Lovecrafts with the yarn here: https://www.lovecrafts.com/en-au/p/deep-dive-vest-knitting-pattern-by-annabelle-drumm
#slowfashion#vest#slipover#patterns#easy#knit#knitter#knitting#handknit#handknitted#handmade#fiberart#slow fashion#knittingaddict#hand knit shawl#handdyed#wool#knitters#yarnblr#knitblr#knitters of Tumblr#knitting pattern#australia
6 notes
·
View notes
Text

LUCID DREAMS: Hand knitting pattern for vest / slipover by Annabelle Drumm. Knitted in the round, top down with gradient cowl and hem; moss feature panels, tapered at the waist. It's a lovely easy pattern which works well for casual to smart casual wear. Yarns used: WYS Signature 4ply and Schoppel-Wolle Zauberball Crazy. Find it on Ravelry here: https://www.ravelry.com/patterns/library/lucid-dreams
#knit#knitted#knitting#knitting pattern#fiber art#vest#slipover#knitblr#knitters of tumblr#slow fashion#australia#knittingaddict
6 notes
·
View notes
Text

First hand knit pattern uploaded for sale. The "Mae West" is a very close fitting, two tone hand knit in slip stitch and intarsia. Yarn used was a Luxury 4ply #wool from Bendigo Woollen Mills and a hand dyed fingering weight from YarnsByTheBay on Etsy. Buy the pattern here: https://www.ravelry.com/patterns/library/mae-west-2
12 notes
·
View notes
Text
MAE WEST VEST: My first hand knit pattern uploaded for sale. The "Mae West" is a very close fitting, two tone hand knit in slip stitch and intarsia. Yarn used was a Luxury 4ply #wool from Bendigo Woollen Mills and a hand dyed fingering weight from YarnsByTheBay on Etsy. Buy the pattern here: https://www.ravelry.com/patterns/library/mae-west-2
#yarnblr#knitblr#knitting#knitters of tumblr#handmade#hand knitted#slow fashion#knittersgonnaknit#hand dyed wool#knitting pattern#handcrafted#vest#slipover
12 notes
·
View notes
Text
So close now...
Gearing up for the launch of my first hand knitting patterns! Covid destroyed my last business so it’s time to throw caution to the wind and rediscover my creative self. #slowfashion is the way of the future. Knitwear using quality natural fibres (merino wool, linen, cotton, alpaca, camel etc.) creates high vibration clothes that help, rather than hinder, your health. Beautifully knitted garments can last a lifetime. You either knit them yourself or have someone knit for you. Choose the colours that perfectly suit your complexion and follow my patterns to help you customise the fit so you can step out feeling confident. Watch this space. #knitting #knitwear #fashion #design #sydney #australia
0 notes
Text
Financial Decisions made with Intuition
Financial Decisions made with Intuition
Today I interviewed Financial Planner Sim Chan for the Channel channel. She was adamant the decisions she makes on financial products to invest in and which people to deal with can best be done using her intuition. Sim explains how she tunes in to her intuition and has tips for you to practice tuning in to your intuition as well.
Her website is http://simwealth.com.au
Did you enjoy…
View On WordPress
0 notes
Text
Navigating the Shift Episode 6
Navigating the Shift Episode 6
In this episode we look at times when it’s not so good to give your love and light, the original definition of the Egyptian Ankh and the big energy wave that we were warned about. This conversation was filmed on 20 December 2018 and sure enough, the energy wave hit 3 days later as charted on the Russian site for Schumann Resonances.
Referred to in this conversation:
The X-22 report on…
View On WordPress
0 notes
Text
Annabelle Drumm on Intuition
Annabelle Drumm on Intuition
My turn! Sarah Biermann became my Guest Host for the Channel channel for the day. She thought it was about time I put in my own perspective on how intuition works, how I discovered my own connection and how you can build your own skills in intuition.
Did you enjoy this article? The Kitegirl Coach blog is dedicated to collecting and considering information on the planetary and human…
View On WordPress
0 notes