#pizzadoughs
Explore tagged Tumblr posts
Visit Tumblr Blog
Explore Tumblr blogs with no restrictions, modern design and the best experience.
Last Seen Tumblr Blogs


Fun Fact
There are dozens of funny blogs to kill time on Tumblr.
Text
A Delicious Twist on Buffalo Chicken: Stromboli!

For those looking for a delicious twist on classic Buffalo chicken, Stromboli is the answer. Stromboli is a type of turnover made with pizza dough and filled with a variety of ingredients. The Buffalo chicken version is loaded with flavorful ingredients like hot sauce, chicken, cheese, and more. The result is a delicious, comforting, and filling meal that is sure to be a hit with the whole family.
To make the perfect Buffalo chicken Stromboli, you'll need to start with the dough. Pre-made pizza dough can be used, or you can make your own from scratch. Once the dough is ready, it's time to get creative with the filling. Start with cooked, shredded chicken and then add in hot sauce, cheese, and any other desired toppings. The fun part about Stromboli is that you can really get creative with the ingredients.
Once the filling is ready, it's time to assemble the Stromboli. First, roll out the dough into a large rectangle. Then, spread the filling over the dough, leaving a border of at least an inch on all sides. Starting at one of the short ends, carefully roll the dough up, tucking the filling in as you go.
3 notes
·
View notes
Text

This quick and easy recipe will help you make tasty pizza dough at home in no time. Great for pizza night with friends and family!
Ingredients: 2 1/4 cups all-purpose flour. 1 packet 2 1/4 tsp active dry yeast. 1 tsp sugar. 1 tsp salt. 3/4 cup warm water. 2 tbsp olive oil.
Instructions: In a bowl, combine warm water, sugar, and yeast. Let it sit for 5 minutes until frothy. Add olive oil and salt to the yeast mixture and mix well. Gradually add the all-purpose flour and knead the dough until it becomes smooth and elastic, about 5-7 minutes. Place the dough in a greased bowl, cover it with a damp cloth, and let it rise for 30 minutes to an hour or until it doubles in size. Preheat your oven to 475F 245C and place a pizza stone or an inverted baking sheet inside to heat. Punch down the dough and divide it into two portions for two 12-inch pizzas or leave it whole for a thick crust pizza. Roll out the dough on a floured surface to your desired thickness and shape. Transfer the rolled-out dough to a pizza peel or another inverted baking sheet dusted with cornmeal to prevent sticking. Add your favorite pizza toppings, sauce, cheese, and other ingredients. Carefully slide the pizza onto the preheated pizza stone or baking sheet in the oven. Bake for about 12-15 minutes or until the crust is golden brown and the cheese is bubbly and slightly browned. Remove the pizza from the oven, let it cool for a minute, slice, and enjoy!
Prep Time: 15 minutes
Cook Time: 15 minutes
Erica R
0 notes
Text
https://rosevinecottagegirls.com/bread-machine-pizza-dough/
0 notes
Text

This easy recipe will help you make your own pizza dough at home. It's simple to make and makes a tasty, crunchy crust that you can decorate with your favorite foods.
Ingredients: 1 1/2 cups warm water. 2 teaspoons sugar. 2 1/4 teaspoons active dry yeast. 3 1/2 cups all-purpose flour. 2 tablespoons olive oil. 1 1/2 teaspoons salt.
Instructions: Warm water and sugar should be mixed in a small bowl. After adding the yeast, let it sit for 5 to 10 minutes until it starts to foam. Put flour and salt in a large bowl and mix them together. In the middle, make a well and pour in the yeast mixture and olive oil. Mix the dough together, then knead it for five minutes on a floured surface until it's smooth and stretchy. Slip the dough into a bowl that has been greased and cover it with a damp cloth. Set it somewhere warm for one to one and a half hours, or until it grows twice as big. Warm up your oven to 475F 245C and put a baking sheet or pizza stone in it to heat up. The dough has risen, so punch it down and split it in half to make two pizzas. Make each piece into the shape and thickness of pizza you want. Place the dough that has been rolled out on a pizza peel or parchment paper. Putting your favorite pizza toppings on top will make the crust golden. Bake in a hot oven for 10 to 15 minutes, or until the toppings are bubbly and done the way you like them. Cut up your homemade pizza and enjoy it!
Prep Time: 15 minutes
Cook Time: 15 minutes
MirandaN
1 note
·
View note
Text

It only takes two ingredients to make this pizza dough, which makes a delicious homemade pizza crust. When you mix Greek yogurt with self-rising flour, you get a dough that is easy to work with and bakes up beautifully crispy. Add your favorite toppings to your pizza and enjoy a quick and tasty meal!
Ingredients: 1 cup self-rising flour. 1 cup Greek yogurt.
Instructions: In a mixing bowl, combine the self-rising flour and Greek yogurt. Stir the mixture until it forms a dough-like consistency. Knead the dough on a lightly floured surface for a few minutes until smooth. Roll out the dough into your desired pizza shape and thickness. Top the pizza with your favorite sauce, cheese, and toppings. Bake in a preheated oven at 450F 230C for 12-15 minutes, or until the crust is golden and the toppings are bubbly and cooked to your liking. Slice, serve, and enjoy!
Olivia Henson
0 notes
Text

This thin crust pizza dough recipe yields a crispy and delicious pizza crust that's perfect for those who prefer a thin and crispy base. Customize it with your favorite toppings and savor the taste of homemade pizza.
Ingredients: 1 1/2 cups all-purpose flour. 1 teaspoon sugar. 1/2 teaspoon salt. 1/2 teaspoon active dry yeast. 1/2 cup warm water. 1 tablespoon olive oil.
Instructions: Put the flour, sugar, and salt in a bowl and mix them together. In a different bowl, mix the yeast with warm water. Then, let it sit for 5 minutes until it starts to foam. Add the lemon juice and olive oil to the dry ingredients and mix them together until a dough forms. For about 5 minutes, knead the dough on a floured surface until it gets smooth and springy. Put some oil in a bowl and cover it with a clean cloth. Let the dough rise for one to two hours, or until it doubles in size. Warm your oven up to 475F 245C and put a baking sheet or pizza stone inside to get hot. Separate the dough into two pieces. On a floured surface, roll out each piece into a thin circle. Put the dough that you rolled out on a piece of parchment paper. Then, add your favorite pizza toppings. Carefully place the pizza on top of the parchment paper and slide it onto the hot stone or baking sheet. Put the pizza in an oven that has already been heated up. Bake for 10 to 12 minutes, or until the crust is golden brown and the toppings are bubbly and cooked to your liking. Take your thin crust pizza out of the oven, cut it up, and enjoy!
Nathalie
0 notes
Text

https://pane-bistecca.com/2024/08/19/rustikale-broetchen/
#food#essen#italian#italienisch#brot#broetchen#bread#breadrolls#fruehstueck#breakfast#pizza#pizzadough#pizzateig
1 note
·
View note
Text
How To Make Round Table Pizza Sauce Recipe

Round Table Pizza Sauce is the secret behind the signature flavour of Round Table's famous pizzas. This rich and savoury sauce perfectly balances tangy tomatoes, aromatic herbs, and garlic, creating a delicious base for your favourite pizza toppings. With this homemade recipe, you can recreate the authentic taste of Round Table Pizza in the comfort of your own kitchen. Let's dive into the recipe and learn how to make this irresistible pizza sauce!
#pizzasauce#pizza#pizzalover#food#foodie#pizzatime#pizzaday#instafood#pizzanight#pizzalove#pizzadough#pizzas#pizzapizza#pizzaislife#homemade#pizzapie#pizzalovers#pizzaparty#homemadepizza#foodphotography#cheese#pizzaria#pizzanapoletana#foodporn#pizzaholic#instagood#pizzastyle#pizzagram#pizzasunday#pizzaexpress
0 notes
Text

Authentic Italian Pizza Dough.
0 notes
Text
How Can I Make A Perfect Pizza Dough From Scratch?

Are you tired of ordering pizza from your favorite restaurant and want to try making your own delicious pizza at home? Look no further! In this article, we will guide you through the step-by-step process of making the perfect pizza dough from scratch. Get ready to impress your family and friends with your homemade pizza skills! Making pizza dough from scratch may seem intimidating, but with the right ingredients and techniques, you can achieve a dough that is flavorful, light, and perfectly textured. We will share with you some valuable tips and tricks that will elevate your pizza game to a whole new level.
Gathering Ingredients
Gathering Ingredients When it comes to making the perfect pizza dough from scratch, the first step is gathering all the essential ingredients. To achieve that mouthwatering homemade pizza taste, you'll need the following: - Flour: The foundation of any good dough, choose high-quality bread flour or all-purpose flour for a chewy and flavorful crust. - Yeast: This tiny organism is responsible for the dough's rise. Use active dry yeast or instant yeast for best results. - Water: The main hydration source for the dough. Make sure to use warm water, around 110°F (43°C), to activate the yeast. - Salt: Enhances the flavor of the dough and helps regulate the fermentation process. Use kosher or sea salt for optimal taste. - Olive oil: Adds richness and helps create a crispy crust. Opt for extra-virgin olive oil for its distinct flavor. Once you have gathered all the ingredients, it's important to measure and prepare them correctly. Precision is key in achieving the perfect pizza dough. Use a kitchen scale to measure the flour accurately, as it can vary in density. When measuring the water, use a liquid measuring cup and ensure it's at the right temperature to activate the yeast properly. Don't forget to properly dissolve the yeast in the warm water before adding it to the dry ingredients. Properly measuring and preparing the ingredients is the first step towards creating a delicious pizza dough. Remember, each ingredient plays a crucial role in the final taste and texture of your homemade pizza. So, take your time and gather everything you need, ensuring that you have the right quantities and follow the proper preparation techniques.
Mixing and Kneading
Mixing and kneading are crucial steps in the process of making perfect pizza dough from scratch. These techniques are essential for developing gluten, which gives the dough its elasticity and structure. By mastering the art of mixing and kneading, you can achieve a dough that is easy to work with and results in a deliciously chewy crust. When it comes to mixing the dough, there are a few key points to keep in mind. First, it's important to properly measure and prepare your ingredients. Gather the essential ingredients for pizza dough, such as flour, yeast, water, salt, and oil. Measure them accurately, following the recipe guidelines, to ensure the right balance of flavors and textures. Once you have your ingredients ready, you can begin the mixing process. The most common method is to mix the dry ingredients first and then gradually add the wet ingredients. This helps to evenly distribute the yeast, salt, and oil throughout the dough. You can use a stand mixer with a dough hook attachment or simply mix by hand. Whichever method you choose, make sure to mix until all the ingredients are well combined and a cohesive dough forms. After the initial mixing, it's time to move on to the kneading stage. Kneading is essential for developing gluten, which gives the dough its elasticity and structure. It involves stretching and folding the dough repeatedly to activate the gluten strands. This process helps to create a dough that is strong and stretchy, making it easier to shape and stretch later on. There are various techniques for kneading dough, and you can choose the one that works best for you. One common method is the push-fold-turn technique. Start by pushing the dough away from you with the heel of your hand, then fold it over itself and give it a quarter turn. Repeat this process, using the heel of your hand to push and fold the dough, until it becomes smooth and elastic. Another technique is the stretch-and-fold method. Simply stretch the dough out and then fold it back onto itself. Repeat this process several times, gradually incorporating more air into the dough. This method is particularly effective for developing a light and airy crust. Remember to knead the dough for the recommended amount of time specified in the recipe. Over-kneading can lead to a tough and dense crust, while under-kneading may result in a dough that lacks structure. Practice and experimentation will help you find the perfect balance. In conclusion, mastering the techniques of mixing and kneading is essential for making perfect pizza dough from scratch. By understanding the importance of gluten development and using the right methods, you can achieve a dough that is easy to work with and produces a deliciously chewy crust. So, roll up your sleeves, gather your ingredients, and get ready to mix and knead your way to pizza perfection! Choosing the Right Flour Choosing the right flour is crucial when it comes to making the perfect pizza dough. Different types of flour can greatly impact the texture and taste of your dough, so it's important to understand the characteristics of each. There are several types of flour commonly used for making pizza dough, including all-purpose flour, bread flour, and Tipo 00 flour. All-purpose flour is a versatile option that works well for most pizza recipes. It has a moderate protein content, which helps create a balanced texture in the dough. Bread flour, on the other hand, has a higher protein content than all-purpose flour. This extra protein leads to a chewier and more elastic dough, which is ideal for those who prefer a thicker crust with a hearty bite. Bread flour is particularly great for deep-dish or pan pizzas. Tipo 00 flour, often used in traditional Neapolitan pizza, is finely milled and has a lower protein content compared to other flours. This results in a softer and more tender crust. Tipo 00 flour is known for its ability to produce a light and airy dough, perfect for those who enjoy a thin and crispy crust. It's important to note that the type of flour you choose will also affect the amount of liquid needed in your dough. Different flours absorb liquid differently, so you may need to adjust the water or other liquid ingredients accordingly. In addition to the type of flour, you may also consider using specialty flours like whole wheat flour or gluten-free flour for a healthier or dietary-friendly option. These flours will have their own unique characteristics and may require additional adjustments to the recipe. To summarize, choosing the right flour for your pizza dough is essential for achieving the desired texture and taste. Whether you prefer a chewy, thick crust or a light and crispy one, understanding the different types of flour and their impact will help you create the perfect dough for your homemade pizza. Adding Yeast and Water When it comes to making the perfect pizza dough from scratch, one of the most crucial steps is adding yeast and water. Yeast is responsible for the dough's rise and gives it that light and airy texture we all love. However, activating yeast properly is essential to ensure it does its job effectively. To activate yeast, you need warm water. The water should be around 105°F to 115°F (40°C to 46°C) to activate the yeast without killing it. Too hot, and the yeast will die; too cold, and it won't activate. You can use a kitchen thermometer to measure the water temperature accurately. Once you have the right temperature, sprinkle the yeast over the warm water and let it sit for about 5 minutes. During this time, the yeast will dissolve and start to bubble, indicating that it's active. If the yeast doesn't bubble or foam, it may be expired or the water temperature might be incorrect. After the yeast is activated, you can incorporate it into the dough. In a large mixing bowl, combine the yeast mixture with the other ingredients, such as flour, salt, and oil. Gradually add the water while mixing everything together. The amount of water you add will depend on the desired hydration level of your dough. Generally, a hydration level of around 60-65% is recommended for a balanced texture and flavor. It's important to note that different flours may absorb water differently, so adjust the amount accordingly. You want the dough to be slightly sticky but not overly wet. If the dough feels too dry, gradually add more water. On the other hand, if it's too wet, add a bit more flour until you achieve the right consistency. By mastering the proper way to activate yeast and incorporate it into the dough, along with the right amount of water for optimal hydration, you'll be well on your way to creating a delicious and perfectly textured pizza dough from scratch.

Adding Salt and Oil When it comes to making the perfect pizza dough, salt and oil play a crucial role in enhancing its flavor and texture. These two ingredients not only add depth to the taste but also contribute to the overall structure of the dough. Salt, besides being a flavor enhancer, helps to strengthen the gluten network in the dough. It regulates the fermentation process, allowing the dough to rise properly and develop a desirable texture. Additionally, salt also helps to control the yeast activity, preventing the dough from over-fermenting and becoming overly elastic. Oil, on the other hand, adds moisture and richness to the dough. It helps to create a softer and more tender crust, giving it a delightful chewiness. Oil also aids in the browning process during baking, resulting in a beautifully golden and crispy crust. When adding salt and oil to your pizza dough, it is essential to measure them accurately to maintain the right balance of flavors. Too little salt may result in a bland-tasting dough, while excessive salt can overpower the other ingredients. Similarly, using too much oil can make the dough greasy and heavy, while too little may lead to a dry and tough crust. To ensure even distribution of salt and oil, it is recommended to add them gradually while mixing the dough. This allows for better incorporation and consistency throughout the entire dough. Remember to use high-quality salt and oil for the best results. In summary, salt and oil are key ingredients in pizza dough that contribute to its flavor, texture, and overall quality. They work together to enhance the taste, strengthen the gluten network, and create a deliciously tender and crispy crust. By understanding their roles and using them in the right proportions, you can elevate your homemade pizza dough to a whole new level of perfection. Kneading Techniques Kneading Techniques Kneading is a crucial step in making the perfect pizza dough. It helps develop gluten, which gives the dough its elasticity and structure. Mastering the art of kneading will ensure that your dough has the ideal consistency and texture for a delicious pizza crust. Here are some different techniques and tips to help you achieve the perfect kneading: - Finger Method: Start by pushing the dough away from you using the heels of your hands. Then fold the dough in half and repeat the process. Continue kneading, adding more pressure with your fingers, until the dough becomes smooth and elastic. - Folding Method: Gently flatten the dough with your hands and fold it in half. Push the dough away from you using the heels of your hands, then fold it in half again. Repeat this process, using the weight of your body to help stretch and develop the gluten. - Stretch and Fold Method: Stretch the dough out on a lightly floured surface, then fold it in thirds like a letter. Rotate the dough 90 degrees and repeat the stretching and folding process. This method helps create layers in the dough, resulting in a light and airy crust. Regardless of the technique you choose, keep these tips in mind: - Be patient: Kneading takes time, so don't rush the process. Give the dough enough time to develop gluten and reach the desired consistency. - Use the right amount of flour: Too much flour can make the dough dry and dense, while too little can make it sticky and difficult to work with. Add flour gradually as needed, but be mindful not to overdo it. - Pay attention to the dough's texture: The dough should feel smooth, elastic, and slightly tacky. It should spring back when gently pressed with your finger. - Practice and experiment: Kneading is a skill that improves with practice. Don't be afraid to experiment with different techniques and adjust the kneading time to achieve the perfect consistency for your pizza dough. By mastering the art of kneading and following these techniques and tips, you'll be well on your way to creating a pizza dough with the perfect consistency and elasticity. So roll up your sleeves, get your hands in the dough, and enjoy the process of creating homemade pizza from scratch!
Proofing and Rising
Proofing and rising are crucial steps in making the perfect pizza dough from scratch. During the proofing process, the dough is given time to rest and rise, allowing the yeast to ferment and create carbon dioxide gas. This gas is what gives the dough its light and airy texture, resulting in a deliciously fluffy crust. Proper proofing is essential for achieving optimal fermentation and developing the dough's flavor. The ideal conditions for proofing include a warm and draft-free environment. A temperature of around 75-85°F (24-29°C) is ideal for yeast activity. You can create a warm environment by placing the dough in a lightly greased bowl, covering it with a damp cloth, and leaving it in a warm spot in your kitchen. It's important to note that proofing time can vary depending on several factors, including the room temperature and desired crust thickness. Generally, the dough should be left to proof for about 1-2 hours. However, if you prefer a thicker crust, you may need to extend the proofing time to allow for more fermentation. To determine if the dough has proofed properly, you can perform a simple test. Gently press your finger into the dough, and if it springs back slowly, it is ready for the next step. If it springs back quickly, it needs more time to proof. On the other hand, if it doesn't spring back at all, it may have overproofed, and you may need to start over with a new batch of dough. During the proofing process, the dough will visibly increase in size as the yeast ferments and produces gas. This rise is a sign that the dough is developing properly. Once the dough has proofed, it is ready to be shaped, stretched, and baked into a delicious pizza crust.

Proper Proofing Time When it comes to making the perfect pizza dough, one of the crucial steps is allowing the dough to proof and rise. The proofing time plays a significant role in developing the flavors and achieving the desired texture of the crust. However, determining the appropriate proofing time can be a bit tricky, as it depends on various factors such as room temperature and desired crust thickness. So, how do you determine the proper proofing time for your pizza dough? Let's break it down: - Room Temperature: The ambient temperature of your kitchen or the place where you are proofing the dough can greatly affect the fermentation process. Warmer temperatures speed up the proofing time, while cooler temperatures slow it down. It's essential to find a warm spot in your kitchen, around 75-85°F (24-29°C), for optimal proofing. - Desired Crust Thickness: The thickness of your pizza crust also impacts the proofing time. Thicker crusts require longer proofing periods to allow the yeast to fully activate and create air pockets. On the other hand, if you prefer a thin and crispy crust, a shorter proofing time may be sufficient. As a general guideline, the proofing time for pizza dough typically ranges from 1 to 2 hours. However, it's crucial to keep a close eye on the dough and monitor its rise. You can perform the "poke test" to determine if the dough is ready. Gently press your finger into the dough, and if it springs back slowly, it's properly proofed. If it springs back quickly, it needs more time, and if it doesn't spring back at all, it may have overproofed. Remember, the proofing time may vary depending on the recipe and the specific conditions in your kitchen. It's always best to follow the instructions provided in your pizza dough recipe and make adjustments based on your own experience. With practice, you'll develop a sense of the ideal proofing time for your desired crust. Creating Ideal Rising Conditions When it comes to making the perfect pizza dough, creating the ideal rising conditions is crucial. This step ensures that the dough rises properly, resulting in a light and airy crust that is a delight to bite into. So, how can you create the perfect environment for the dough to rise? Firstly, it's important to consider the temperature. Yeast, which is responsible for the dough's rise, thrives in warm environments. Aim for a room temperature of around 75-80°F (24-27°C) to provide the ideal conditions for fermentation. If it's too cold, the dough may take longer to rise, while if it's too warm, the yeast can become overactive and lead to an undesirable taste. Another factor to consider is humidity. The dough needs a slightly humid environment to prevent it from drying out. You can achieve this by covering the dough with a damp cloth or placing it in a covered bowl. This helps to retain moisture and ensures a softer and more pliable dough. Additionally, giving the dough enough time to rise is crucial. The rising time can vary depending on factors such as the amount of yeast used, the room temperature, and the desired crust thickness. Generally, allowing the dough to rise for about 1-2 hours at room temperature should be sufficient. However, keep an eye on the dough and look for visual cues, such as doubling in size, to determine if it's ready. Lastly, avoid disturbing the dough while it's rising. Moving or touching the dough excessively can cause it to deflate and lose its airy texture. Allow it to rest undisturbed in a warm and humid environment to ensure optimal rising conditions. By creating the perfect rising conditions, you can ensure that your pizza dough achieves the desired lightness and airiness. Remember, a well-risen dough is the foundation for a delicious pizza crust that will impress your family and friends. Read the full article
0 notes
Photo

Lucia has a good protein and gluten content and is ideal for making pizzas with average leavening times from 24 to 48 hours at a temperature of + 4 ° C.
https://macrigi.co.uk/product/soft-wheat-flour-for-pizza-dough/
0 notes
Text
Steak and Cheese Pizza Loaf
Behold, the Steak and Cheese Pizza Loaf. This is similar to a Stromboli, which I love (you as well my Calzone friend) but it’s not rolled like it’s counterpart. Instead, this delicious beauty has seasoned shredded beef and melted cheese wrapped in pizza dough (hence the loaf)with more cheese sprinkled on top to give this a little extra cheesy crunch when baked. This can easily be sliced and…

View On WordPress
0 notes
Photo
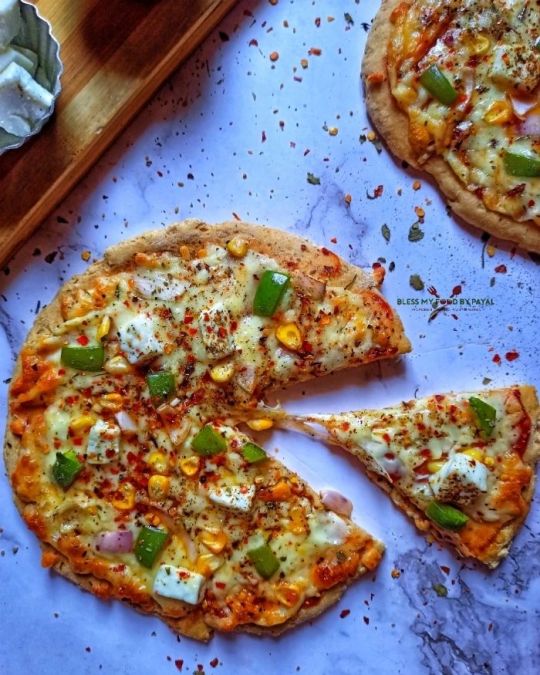
Are you finding it strange that why I am sharing a Pizza recipe which is so basic and common and everyone knows how to make? But I am sharing it because it is totally different. When you prepare a pizza, including base at home, it almost takes 2 hours including dough kneading, fermentation, baking the base and finally making a pizza. But what if instead of 2 hours, your pizza gets ready in 25 minutes including kneading a dough, fermentation, base baking and pizza making? And yes, I felt that the present recipe using no yeast no rise made better pizza than the one made with yeast and rise. So here's the timeline of making this pizza in 25 minutes from beginning to end : *5 minutes of dough prepration, *5 minutes of base baking, *5 minutes of topping and *10 minutes of pizza baking. Tap bio for Written Recipe (+video) https://blessmyfoodbypayal.com/no-rise-no-yeast-pizza-dough/ #pizzadough #pizzadoughrecipe #pizzadoughfromscratch #instantpizza #instantpizza #5minutespizzadoughrecipe #noyeastpizza #norisepizza #pizzain25minutes #pizza #vegpizza https://www.instagram.com/p/Cp7c2xNP6Bx/?igshid=NGJjMDIxMWI=
#pizzadough#pizzadoughrecipe#pizzadoughfromscratch#instantpizza#5minutespizzadoughrecipe#noyeastpizza#norisepizza#pizzain25minutes#pizza#vegpizza
0 notes
Photo

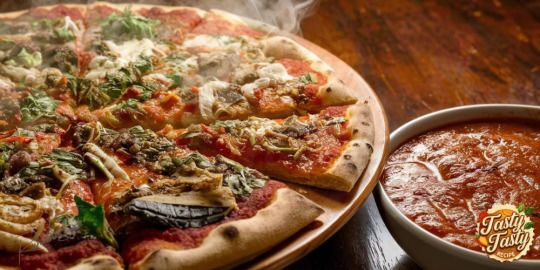
marinara pizza best I’ve tasted outside of Napoli . thx Chris Bianco @pizzeriabianco for your warm hospitality and tasty treats… #pizza #marinara #pizzapie #pizzaoven #chrisbianco #laeater #marinarapizza #dough#pizzadough #chefstable #lafood #icravephilly #craveLA #travelerstorytellerchef (at Pizzeria Bianco DTLA) https://www.instagram.com/p/CpwIa2yjbrW/?igshid=NGJjMDIxMWI=
#pizza#marinara#pizzapie#pizzaoven#chrisbianco#laeater#marinarapizza#dough#pizzadough#chefstable#lafood#icravephilly#cravela#travelerstorytellerchef
1 note
·
View note
Photo

#fbf #flashbackfriday They see me rollin', they hatin' #pizzadough https://www.instagram.com/p/CpnPcA9Or1n/?igshid=NGJjMDIxMWI=
0 notes