#photo image editor free
Explore tagged Tumblr posts
Visit Tumblr Blog
Explore Tumblr blogs with no restrictions, modern design and the best experience.
Last Seen Tumblr Blogs


Fun Fact
Tumblr has been banned in Indonesia for providing people with access to pornographic content.
Text
Revolutionize Interior Design with Styly AI

Discover the future of home decor with Styly AI Room Design. Our cutting-edge AI technology analyzes your preferences to create personalized, stunning room designs. From color schemes to furniture placement, Styly AI ensures every detail is tailored to your liking. Experience the perfect blend of technology and creativity, transforming your home into a stylish sanctuary.
#ai room design#ai interior design free#home interior ideas#interior design for house#interior design styles#design my room#interior ai free#living room ideas#ai architecture#design interior online#photo image editor free#architectural firms#home decoration#bathroom ideas#home decor ideas
1 note
·
View note
Text
Color Separation Method In Adobe Photoshop
COLOR SEPARATION IN ADOBE PHOTOSHOP, WE CAN SEPARATE THE COLOR PLATE THROUGH THE DESIGNING SOFTWARE AND KEEP THE COLOR ONE PLATE. ALSO MOST OF TIME WE KEPT RGB COLOR MODE TO DOING DESIGN IMAGES.
#color plate#adobe color#adobe color wheel#adobe color palette#adobe kuler#coloradobe#adobe rgb#adobe palette#free photo editing software#photo editing#image editor#ai image editor
0 notes
Text
BeautyBrush: Your Gateway to Effortless, Professional-Grade Photo Editing for Free
In the era of smartphone photography, capturing the perfect shot is just the beginning. The real magic happens in the editing process, where you can transform a simple image into a work of art. Whether you’re an aspiring photographer, a social media enthusiast, or just someone who loves to enhance their memories, BeautyBrush is the photo editor you’ve been waiting for.
Why BeautyBrush is the Ultimate Photo Editor for Everyone
BeautyBrush is more than just another app in the crowded world of photo editing. It’s a powerful yet easy-to-use tool that brings professional-grade editing to your fingertips—without costing you a cent. Here’s why BeautyBrush stands out among the best photo editing apps available today.
Features That Make BeautyBrush a Must-Have
Edit Pictures for Free with No Compromise on Quality: BeautyBrush allows you to edit your pictures without any hidden fees or watermarks. Unlike many free editor image apps that limit your capabilities, BeautyBrush offers a full suite of editing tools that are free to use, ensuring that your photos look their best every time.
Pic Image Editor with Advanced Tools: From basic adjustments like brightness, contrast, and saturation to more advanced features like selective color correction and layer blending, BeautyBrush provides everything you need to make your photos pop. Whether you’re fine-tuning the details or applying a dramatic effect, this app has got you covered.
Free Picture Editing with a User-Friendly Interface: BeautyBrush combines power with simplicity. Its intuitive design ensures that you don’t need to be a pro to use it. Whether you’re cropping, rotating, or applying filters, every tool is designed to be accessible and straightforward, making the editing process a breeze.
Versatility Across All Photography Styles: BeautyBrush isn’t just for selfies and portraits; it’s a versatile tool that excels in all types of photography. Whether you’re editing landscapes, macro shots, or artistic compositions, BeautyBrush offers the flexibility to enhance any image to perfection.
Editor for Pictures That Keeps Getting Better: The team behind BeautyBrush is committed to continuous improvement, regularly updating the app with new features and enhancements. This dedication ensures that BeautyBrush remains at the forefront of mobile photo editing, offering users the best tools available.
How BeautyBrush Compares to Other Photo Editing Apps
When it comes to photo editing apps, BeautyBrush is in a league of its own. While many apps either charge for premium features or bombard you with ads, BeautyBrush provides a seamless, ad-free experience with all its powerful tools available at no cost. This makes it one of the best photo editing apps for users who want to edit pictures app without breaking the bank.
Create Stunning Visuals with BeautyBrush
If you’re searching for a free photo editor that doesn’t skimp on features, look no further than BeautyBrush. It’s designed to help you make the most of your photos, whether you’re posting to social media, printing out memories, or just perfecting your digital photo album.
BeautyBrush is the ultimate tool for anyone who wants to elevate their photography game. With its combination of professional-level tools and a user-friendly interface, it’s never been easier to create stunning visuals that stand out.
Conclusion
BeautyBrush is more than just an app; it’s a creative partner that helps you bring your vision to life. Whether you’re editing for fun, for work, or for art, BeautyBrush gives you the tools you need to turn ordinary photos into extraordinary ones—all for free. Download BeautyBrush today and experience the best in mobile photo editing.
#app for editing pictures#free editor image#edit picture for free#free picture editing#app for editing images#photo editor#add effects to pictures app
0 notes
Text
#online image converter#best free photo editor online#meme generator#convert color image to black and white#free online meme generator
0 notes
Text
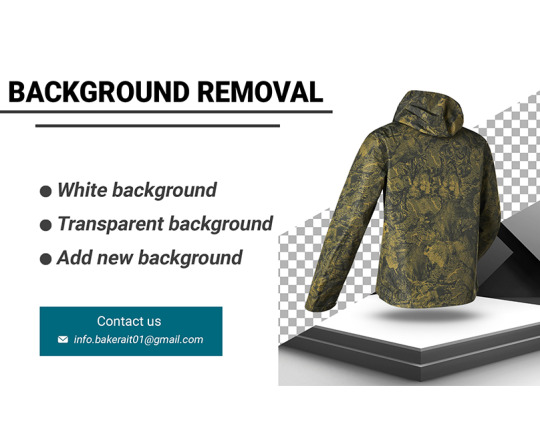
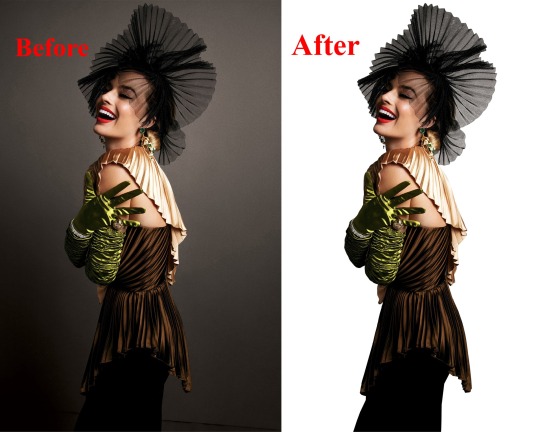
Professional product background removal services
Are you looking for a way to improve your product photos and make them more eye-catching and professional?
Are you looking for a way to improve your product photos and make them more eye-catching and professional? Do you want to get rid of the unwanted background from your images and replace it with a solid color or a transparent one? Do you want to save time and money on photo editing? If you said yes to any of these questions, then you are in the right place. I am a professional photo editor with…
View On WordPress
#background changer#background editor#background eraser#background free#background removal#clipping path#ecommerce#graphic design#image manipulation#photo cut out#photo editing#photo enhancement#photo fix#photo retouching#photomagic#photoshop#product photography#removebg#transparent background#whitebackground
0 notes
Text
0 notes
Text
#I am Nora Layla from Photo Editor PH. I am a professional graphic designer and Love Photography. 24-48 hour turnaround normally. If you need#We can do it asap.#I have 6+ years of experience. I can edit weddings#maternity#family#boudoir and any type of retouching.#Feel free to send me a couple of test images so we can see if we'd be a good fit.#Email for details: [email protected]#newbornphotography#newborn#photography#newbornphotographer#baby#photographer#babyboy#babygirl#babyphotography#familyphotography#photoshoot#love#maternityphotography#newbornbaby#familyphotographer#weddingphotography#photooftheday#newbornsession#babyphotographer#lifestylephotography#motherhood#babies
0 notes
Text

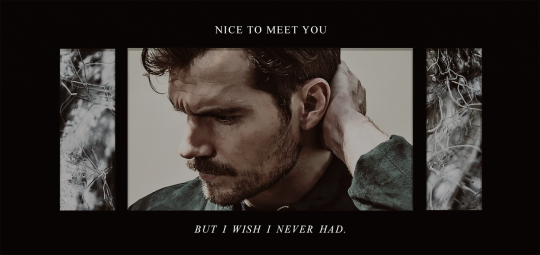
▀ / 𝐓𝐄𝐌𝐏𝐋𝐀𝐓𝐄 𝟏𝟏 ……………............... [ 𝐓𝐑𝐈𝐏𝐋𝐄 𝐒𝐇𝐎𝐓 ] 𝘣𝘺 𝐀𝐒𝐌𝐎𝐃𝐄𝐔𝐒 — 𝐅𝐑𝐄𝐄 !
ya boi is back with another psd and this time its based off of my starbucks order - triple shot of espresso, please. this psd features a main image bordered by a texture, with a short quote above and below. there are also optional top and bottom border lines! within my coloring psd (Espresso) is an optional contrast editor. the instructions in the top layer will tell you how to edit it! the font used is times new roman, so you should have it on your computer already! if not, you can download it from google fonts :)
FEATURES:
1 smart psd
my espresso coloring psd
5 sample photos (the ones in the post plus an additional)

DOWNLOAD: DEVIANTART (FREE) or GOOGLE DOCS (NO ZIP) x VIEW MORE TEMPLATES
shameless plug of my own muse's graphic using this template ↓
#rpc#rph#rpt#dearindies#supportcontentcreators#free rp resources#character template#indie rp#rp resources#free resources#free psd#templates.#mine.psd#mine: ch temp.#mine: pinned temp.
366 notes
·
View notes
Note
I actually forgot asking you this XD
So imagine a type of personality - like a shy, sweet, easily flustered MC, maybe in pastel or cozy comfort clothes / A badass, take-no-shit-from-no one MC with the combat boots, jacket and tight jeans. (Stay with me here)
Then the ROs discover (whether through online, insta post or just a friend msging) one of those black and white model pics - and it's soft!MC being hot, sexy and a 'status fatale' (gender neutral way of femme fatale? ;; closest description I can get at 4am) vibe OR badass!MC being classy, elegant and fabulous in a fancy, charming way? How would the ROs feel seeing that?
(and just so Cam doesn't get jealous of another photographer took this photo - let's say the photo was taken by a mutual friend of MC and Cam, who is also a photographer, is happily dating/engaged/married AND is totally doing this to tease both MC and Cam 🤣)
Feel free to decide if this is in rela or not :3 enioy~
Lol, where you playing Fields this late!? Status finale really has a ring to it~ (lets do crush stage!)
❤️Cam - He was just doom scrolling when he saw the photo, it took him less than a minute to recognize MC. Dressed up like that. They look hot and he is definitely pouting. Pouting and screenshotting the image for future...inspiration? Yeah, yeah inspiration. He needs to do a new shoot anyways. He will try and beat around the bush about it, why MC took the photo, why they didn't tell him. Then he will just say that as your bestie, you owe him a shoot. That is totally how this works. He needs to be allowed to capture you in the same way...this isn't for selfish reasons. He will get flustered, looking at the photo again. MC captured in a different way, its thrilling to him. When MC gives him a questioning glance Cam will stutter pretend he has something to do. That friend who took the photos is going to get a very rude wake up call, because Cam wants all of them. Very gimme gimme gimme.
💙 G - They get strangled on their tea, smacking themselves on the chest to try and catch their breath. G was just looking at the recent clothing line coming up, knowing they needed to get something nice to wear to see their parents. What they didn't expect was to see MC, clothes hugging their body, the look in their eyes made G's skin heat. Had they seen it before? Those eyes looked so alluring and yet, G can't remember if this is the first time they've seen it or not. G will be annoyed that they enjoy how MC looks, that it does more than make them think about MC. A thought they will try to knock out of their head as soon as it pops in. They will bury the emotions as deep as possible, after they look at the photo a few more times. No matter how much they hate to admit it, they always thought MC was attractive. With a bitter taste in their mouth there is one thought in G's mind, I wasn't the only one who thought so.
💚 Kara - Too cute! She's screen shotting, sending MC a text. "Why don't you ever take cute photos with me?" She was serious in her question, though she ensured to send a few emojis to come off as playful. Granted Kara's online presence is high, these photos she would keep to herself. Just like she did with the memories of when she would spend time with MC when they worked together. There's nothing wrong with thinking your sibling's ex-fiancé is attractive, sweet, funny. Especially when they're your friend. There's no underlying meaning as to why Kara makes the photo her background...none at all.
💛 M - They had seen the photo when scrolling, just something to break up the time between when they waited for their editor to reply back. M had tossed their phone behind them, and hopefully somewhere that they could find later. Their face bloomed with a blush, one they covered under their palms, face pressed so hard against the desk that it would likely leave a mark. They might have squealed appreciatively at the photo...maybe...possibly. To them it almost seemed impossible to be MC, they never looked like that before. Maybe that's why their so flustered, because they looked different. Should they ask MC about it? Damn it....why are you so....in a maid costume though? Alright...time to find their phone.
💜 Isaac - They try to ignore that feeling in their chest, the one that is telling them they like what they see, they want to see more, want to be around MC more. In fact they go so far as to close out the page and try and push the image from their thoughts. Which is easier said than done. MC looks good, great even. So good that it's leaving Isaac feeling like they should have saved that damn photo. That worries them, this feeling of wanting to hold on to them, even just a fraction. They'll make a flirty remark later on when they see MC, because that's what they do, a nice little cover. Flirt and feign ignorance. Ignorance of what they feel for MC, of the potential there.
🖤 Ardent - Damn, color him impressed. In fact color him more than impressed. Who knew the person he sees fighting to keep their eyes open, dressed in pjs, hair all messed up when its time for rent could look like this. Well....to be honest Ardent thought MC looked good like that too, but he will deny it. He thinks MC looks hot, too hot. Unfair really considering he doesn't get to see MC all dressed up. Ardent would be a bit annoyed, because why does the people who get to photograph MC get to witness how good they look and not him. That picture is coming with him, across the hall where he will annoyingly knock on the door until MC answers, and he will make a quip about if you're making such good money modeling he will want more rent. (just to get under mc's skin) "Ya know what, I need a decoy date. Mom's coming in down. Call it a favor? Or..I'll even let you skip out on next months rent."
138 notes
·
View notes
Text
Frogman's Camera Buying Guide
A few weeks ago someone asked if I could recommend an interchangeable lens camera (ILC) to supplement their smartphone photos and hopefully get better pictures of important things like vacations and pets.
I decided to go very extra with my response and due to that... I'm still not finished with it.
I'm worried I am letting this person down because they did not ask for a giant post explaining every detail about cameras in the history of forever.
So I am going to do a camera recommendation post without as much explanation and hopefully I can finish the giant post at some point in the near future.
If you want to take better pictures you are probably going to need a camera with a decent sized sensor, a fast lens, a tripod, and a flash.
The bigger sensor gives you more dynamic range so you can capture brighter and darker things in the photo.
A fast lens has a giant hole in the front that lets in a ton of light. That hole is called the aperture and the bigger it is, the better your photos in dark environments will be. So you will want something that does f/1.8 or f/1.4 (lower f-stop number = bigger hole = more light). This can also help you get a lot of cool background blur.
A tripod will help get you longer exposures without any blur from camera shake. Especially good for landscape photos.
And a flash is for taking photos of pets and other moving subjects when you are indoors and don't have a lot of light. A flash is an absolute game changer for indoor photos.
HOWEVER, never point it directly at your subject.
Point it at a large white ceiling or wall. The flash happens so fast that it freezes motion. It is how I got all of my indoor photos of Otis.
Here he was playing and being rambunctious and he is not blurry.
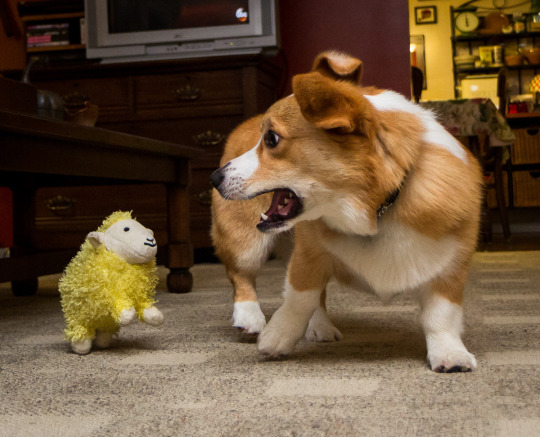
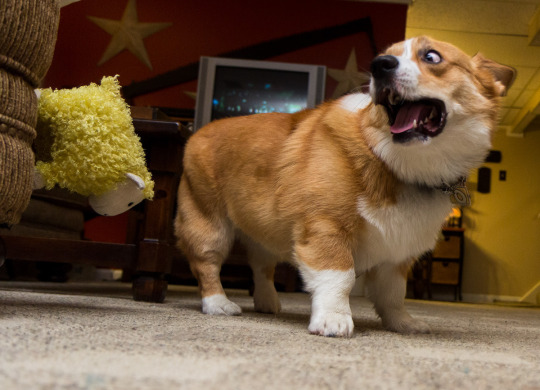
I used no special settings. I just stuck on a flash and pointed it at the ceiling and suddenly sheep are sticking to things.
Oh, and one other huge benefit of using a flash... you can take much better photos of pets with dark fur. So if you have a cute little void in your home, a flash can help you capture detail in their fur.
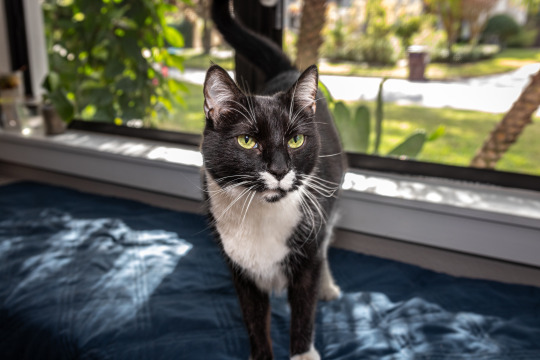
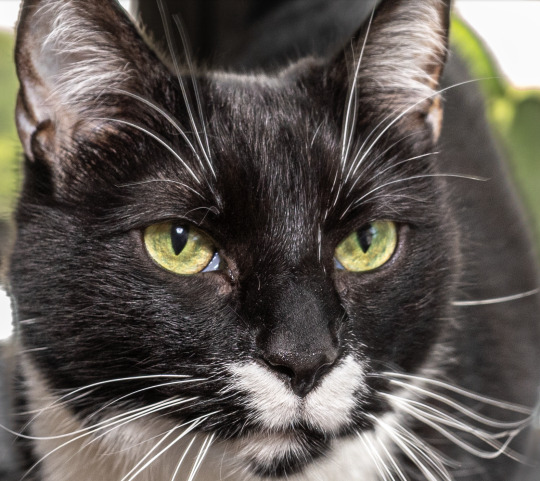
Just lift the shadow slider in your image editor and that beautiful fur will reveal itself.
If you get an ETTL or TTL flash, it will output the correct amount of light automatically. You can literally just put your camera in automatic mode, aim the flash at the ceiling, and press the shutter button.
Before I talk about recommendations I want to make one thing very clear.
GETTING A GIANT CAMERA WILL NOT AUTOMATICALLY GIVE YOU BETTER PHOTOS.
Aside from my flash aimed at the ceiling trick, a big boy camera is not a magic solution for better photos. In some cases, you might actually get *worse* photos than your smartphone. You need to learn the basic fundamentals of photography and you also need to learn some basic photo editing skills.
Smartphones employ powerful algorithms and computational processes to make every photo you take look as good as possible.
ILCs say, "Here is your RAW data, you figure out the rest."
You don't have to become an expert, but if you watch this free 6 hour photography course, that will ensure you have the knowledge needed to improve your photos.
youtube
Okay, let's get into the nitty gritty of buying a nice new old ILC.
If you are on a tight budget and cannot afford a fancy mirrorless camera, I would highly suggest a used DSLR. You can get them for very reasonable prices. And unlike just about every other modern technological gadget, cameras and lenses are built to last for decades. So I have no qualms about recommending used photography gear.
However, I do highly recommend using either KEH or MPB, as they have a long trial period and decent customer service. If something goes awry with your used gear, KEH has a 180 day warranty and MPB has a 6 month warranty. So there is much less of a risk than eBay or Facebook Marketplace. You pay a bit of overhead, but the piece of mind is worth it.
Before I start my recommendations I want to quickly explain the difference between APS-C and Full Frame camera bodies. (For brevity's sake I am going to omit Micro Four Thirds bodies as they are not typically geared toward beginner photography.)
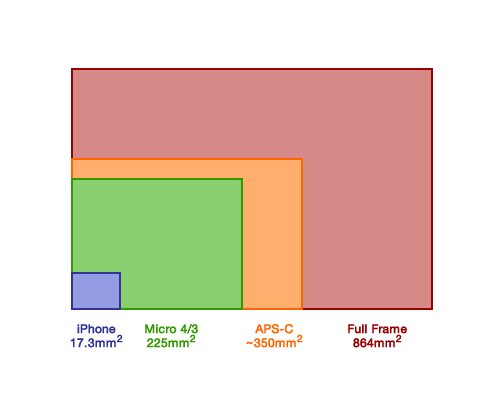
APS-C has a "crop" sensor. It is a bit smaller than full frame and does not perform as well in low light (more noise). However these bodies are cheaper and can still produce great photos. You can see above the sensor is still significantly larger than a smartphone. APS-C adds a 1.5x zoom to all lenses. This can be annoying in small spaces but advantageous for outdoor photography like wildlife and sports. You can use full frame lenses on a crop sensor body (within the same brand). APS-C lenses are usually cheaper but of lower quality.
Full frame has a larger sensor that will give you less noise in low light. It is also much easier to get background blur. Full frame also allows you to work in more cramped spaces. You *cannot* use APS-C lenses on a full frame body. However, the lenses meant for full frame cameras tend to be better quality in general.
If you can save up a little more and get a full frame body, I would recommend it. These bodies used to be geared more toward professional use, but since mirrorless cameras became popular, used full frame DSLRs have become much more accessible to those on a budget. Full frame cameras make it easier to get better results in challenging circumstances. And challenging conditions are really the main area where ILCs still kick a smartphone's ass.
For tight budgets I would recommend the following...
Canon or Nikon APS-C DSLR camera body
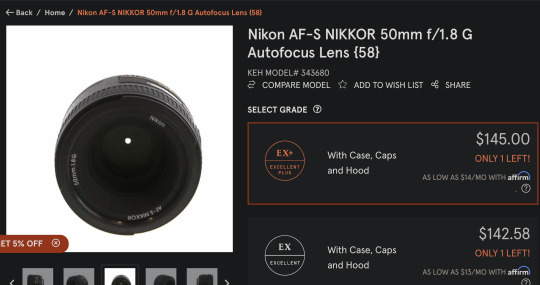
50mm f/1.8 lens (Nifty Fifty)
18-55mm APS-C lens (good for landscapes and portraits)
Yongnuo ETTL Flash
There are lenses called "superzooms" which can go from (as an example) 18-200mm or 70-300mm and other crazy focal lengths. That sounds fantastic and very versatile... but these are usually utter shite. You may be tempted to get one of these lenses hoping it can do everything you need, but there are no free lunches in lens land. Unless you are spending many thousands of dollars, the wider the focal range, the worse the lens will be.
When you stick to the 18-55mm range, you can be assured the images will be decent. And if you find yourself really needing a telephoto lens, you can save up and add it to your collection later on. The 18-55 will give you wide angle for landscapes all the way to slightly telephoto for portraits and moderately close wildlife. This lens cannot be used indoors or at night without a flash. Which is why I recommend the Nifty Fifty for that purpose. $100 for a moderately sharp low light lens is a no brainer.
Also, stick to Canon, Nikon, Sigma, or Tamron lenses. You can try exotic 3rd party lens brands when you know more what you are doing. And always make sure the lens has autofocus before buying.
It's hard to give you exact recommendations as used items are not reliably in stock. So I'm going to show you an example of the above, but I am not necessarily saying you should buy this *exact* combination. You might be able to get something similar with Nikon as well.
Canon 60D APS-C DSLR
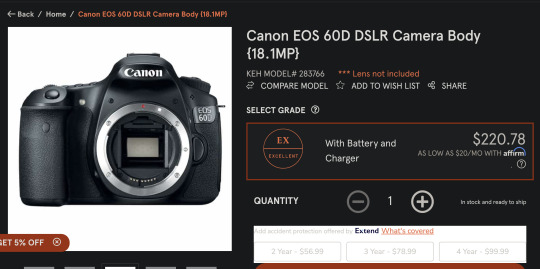
50mm f/1.8 lens

Canon 18-55mm APS-C lens (EF-S mount)

Yongnuo TTL Flash
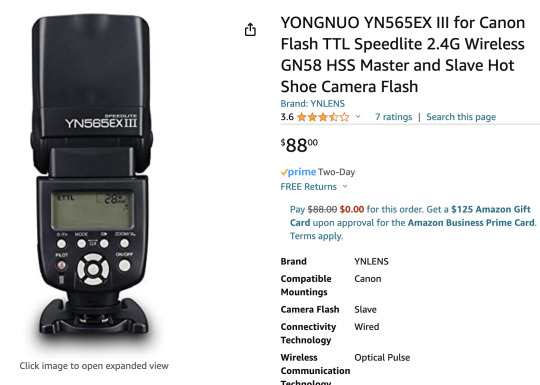
(I wouldn't recommend getting a used flash, as the Yongnuo is already a great price and you can't know if someone used the flash 100,000 times or 20 times.)
Altogether that is about $500. You can start with the 60D and the 50mm Nifty Fifty for $330 and add on the other two items later on.
My recommended full frame setup...
Full frame Canon or Nikon DSLR body
50mm f/1.8 lens (same as before)
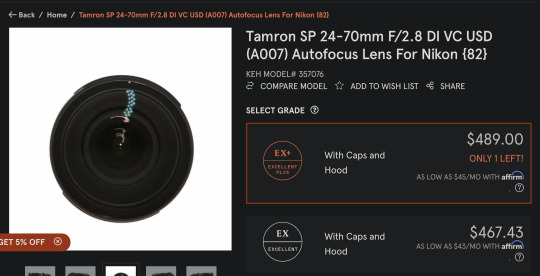
24-70mm full frame zoom lens (full frame equivalent to 18-55mm)
ETTL Yongnuo flash (same as before)
And an example from KEH might be...
Canon 6D Full Frame DSLR


Canon 50mm f/1.8 Lens
Sigma 24-70mm Full Frame Zoom lens (EF mount)
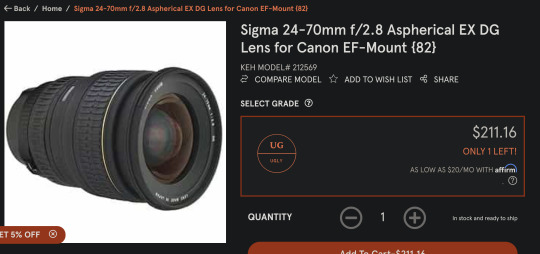
Yonguo ETTL Flash
And that would be about $800 total.
Again, you can start with just the camera and 50mm lens and add the other items later. So invest $500 initially and go from there.
And just to give a Nikon example as well...
Nikon D600 Full Frame DSLR
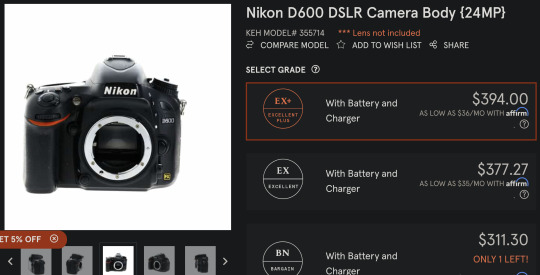
Nikon 50mm f/1.8 Lens
Tamron 24-70mm
Yonguo ETTL Flash (Nikon version)

I highly recommend researching any camera body and lens before purchase. I can vouch for the items above, but you should definitely check out some YouTube videos before buying.
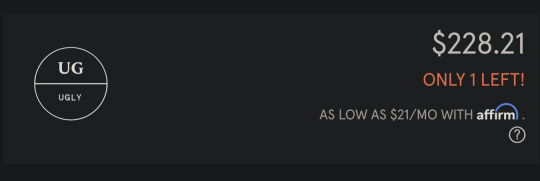
All of the stuff on KEH and MBP is marked down in price for aesthetic reasons. They do test everything to make sure it is functional. If you care if the camera or lens looks pristine, it will cost a little extra. But if you don't mind if it is beat to hell, you can save some money. Ugly or not, you will get the same photos out of the gear. As I said, photography stuff is built to last for a long time. Almost all repairs are due to user damage and not defects. And usually defects manifest when the product is brand new.
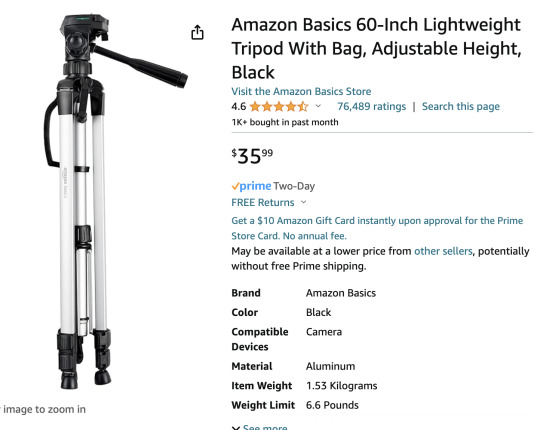
Oh, I forgot about the tripod!
Amazon's $35 tripod is surprisingly decent. It even got a good review on a very picky tripod review site. I recommend starting with this and then upgrading when you know more what you need out of a tripod.
Amazon 60 inch Tripod
I worry I'm leaving out a lot of important information, but hopefully I can expand in the other post I am working on.
That said, if anyone is thinking of buying a camera and you are not sure about the items you selected, please feel free to message me and I will help you assess your choices. Please make sure you include a budget range when asking for buying advice.
I hope that helps. I will try to finish the more in depth post soon. And it will include tips for how to get better photos from your smartphone if you cannot afford an ILC at the moment.
Further resources...
Recipe for Landscape Photos Froggie's Encyclopedia of Lens Terms
204 notes
·
View notes
Text

divider made by me using halloween decor garland, hp photo scanner, phonto, and online image editor. free to use as long as you don’t claim as your own.
#bloody weapons#dividers#glittercore#glitter graphics#web graphics#my glitter edit#free to use#click for better resolution
585 notes
·
View notes
Note
So when I do finish this book I am writing (speaking it into existence bc adhd is a BITCH) Like what's your experience with publishing? How much does it usually cost? What kinda income does one get? I don't really care about making money but it would be super neat to make something since I cannot work. How do taxes work on that also? Google is confusing me
So far i have an idea and half a first chapter with thrilling notes such as " add a cat" and "insert spell here"
So I self publish, so that's the world I know. If you want to find a traditional publisher, you'll need to query agents and do a bunch of other stuff. My only advice for traditional publishing is that when going that route, money should always flow towards the author. If they're asking you to pay for something, they aren't a traditional publisher and there's a good chance it's a grift.
So let's talk about what I do know.
(And this turned out to be long as hell, so I'm putting in a "keep reading")
When you self publish, you are effectively acting as the publisher. If you want someone to do edits? You'll have to hire an editor. If you want someone to do the book layouts? You'll have to hire someone to do it if you can't do it yourself. You need a cover? You get the idea.
Now I don't pay an editor, so I can't really give you a price range on how much they cost off the top of my head. I do know they can get expensive though.
I also do all my own interiors, but I have a graphic design background and have been doing print layouts for decades. If you want to hire someone to do the interiors, that can run you $100-500, so I recommend just... learning to do it yourself.
Frankly, it's not terribly hard. I do mine in Apple Pages on my Mac for my paperbacks and Amazon has a free program for formatting eBooks (which you can export both as the Kindle format OR the more universal ePub format). With your print version, you just want to make sure you get your margins right, along with using a standard font like Times New Roman.
Like, literally just pick up a book and study the layout. Look at the front matter (copyright page, title page, etc) of a handful of books and mimic what you find there. I don't know why so many self published authors get that bit wrong. It's a book. Format it like a book.
Now the cover... this is where you'll probably end up spending something. I do my own covers for my comics, but hire out for my novels because I can't do the kind of covers expected of my genre. And you do want to match your genre, because you want a potential reader to know what they're getting into. I've seen so many self published books with terrible covers and it drives me nuts.
Cover design can run you anywhere from $35-$400 depending on who you choose to contract, and this is where I recommend you spend your money. On the cheap end you have companies like GetCovers. Now they primarily do covers made from edited stock photos, and I've honestly been pretty satisfied with their work... but you have to hold their hand and be very clear with what you want.
GetCovers is a part of Mibl Group, and it's pretty much all of their most inexperienced employees. The whole point of it is to get them the experience to work on bigger projects down the road. They have cheaper packages, but for their best work you'll probably only spend like $35-$45. If you're working in a genre that mainly uses stock images, that's who you want.
I often end up retouching the covers they do though, because I'm impatient. Like there are edits to The Witch and the Rose and Shadowcasting I made after they handed me the completed files. You're going to have to be very specific with what you want. The first version of the Bloody Damn Rite cover they did... was awful. But they did the revisions I asked for, and the version they delivered in the end was great.
Now if you want, like, original art or just more complicated, custom stuff? You're looking at at least $250 on the cheap end, but sometimes you end up in the ballpark of $700-$1000. Like on their regular site (just to use the same company as GetCovers for comparison), the Mibl group charges like $300 for a more complicated stock photo based cover (that requires more complicated edits) and at least $700 for covers that require digital painting, 3d modeling, etc.
There are a wide range of prices depending on what you're asking for. But, y'know, you're paying that once for a commercial piece of graphic design.
I'm cheap and can do some of the work myself, so I go for the $35 cover. I also figure out what fonts they used for the covers, so I can go buy my own commercial license for them and replicate a similar logo on my title page. You don't need to do that bit, I'm just finicky.
Actually publishing the book is easy. You'll want to use a self publishing platform like Kindle Direct Publishing or IngramSpark (or, if you're like me, both). I sell KDP books on Amazon, but all other distribution is through IngramSpark. You make more money on Amazon by using KDP, but even though they offer distribution, no book store will ever order through them. So I turn that option off, and then I take the same book and I make it available through IngramSpark.
On amazon I make a little more than $2 on a $3 ebook, and about $4.00 on a $12.99 paperback. When a bookstore buys an IngramSpark version, I make about $2.50 on a $14.99 book (if you wondered by my books cost more when not buying it through Amazon... that's why). Now if you buy yourself author copies, they cost way less -- in the end I think I can get them for like $5 a book? So when I sell them in person, my margins are much higher.
But, y'know, you have to actually sell them.
Because that's the hard part. When self publishing, you only have you to market it. I don't know how many books I'd be selling if I didn't have a pre-existing audience -- and even then it's not a huge amount. I've sold about 200 books this year? Which isn't nothing, and I appreciate every single person who's purchased one of my titles, but it's obviously not enough to quit my day job for, y'know?
That said, I've known people who do sell enough to make a steady living. So it's possible for sure.
But it's not going to happen overnight, and it won't be easy.
As for taxes, you'll need a 1099 and do stuff with the Schedule C. I always forget exactly what until I'm actually doing them, but it's not super hard, just annoying.
68 notes
·
View notes
Text


It’s Feral Friday!
This week we’re diving into zine history.
Zines amplify marginalized voices & stories excluded from conventional publishing, challenge authority, and provide egalitarian channels for creative expression and alternative community building.
Though often dated to the sci-fi fanzines of 1930s, some argue that zine history originated in the context of early printing in the 16th century with Martin Luther’s self-published 95 Theses. Given Luther’s use of vernacular, critiques of established ideologies, and use of pamphleteering to spread his message, we tend to agree! Following suit overseas, the cheaply produced broadsides of the 18th century American Revolution were quickly disseminated to influence public opinion.
In the 1920s artists in Europe produced radical journals and periodicals which spread the ideas of Surrealist and Dada movements and critique of bourgeoise culture. In the 30s sci-fi fanzines provided platforms for fan content and dialogue. The Beat poets produced low-cost mimeographed chapbooks and broadsides in the 40s & 50s, challenging the censorial nature of American society with writing on civil rights, the anti-war movement, environmentalism, and free love.
During the same period the Soviet Union DIY (aka Samizdat) movement, in which Eastern Bloc activists reproduced and distributed state censored publications by hand (often on typewriters), emerged. Xerography became popularly available in the 60s and low-cost offset printing and the electric typewriter were introduced, spurring the rise of underground comix & alternative newspapers.
Punk zines appeared in the 70s, followed by the DIY movement and the indie music scene. In the 80s copy machines became ubiquitous, and in the 90s the Riot Grrrl underground punk movement and rise of third wave feminism produced a slew of new publications.
Because forms of zine production have proliferated in various contexts throughout printing history, even a Western-centric overview was hard to capture succinctly. Stay tuned for more in future posts!
Images:
Dada germanico. Gabriele Mazzota editore, Milan, 1970. Facsimile edition of 1920 original.
Dada germanico.
from Disputatio D. Martini Luther theologi, pro declaratione virtutis indulgentiarum, a bound edition of Martin Luther's 95 Theses. Adam Petri, Basel, 1517.
How industrial unionism was won : the great Flint sit-down strike against General Motors, 1936-1937. Progressive Labor Party, Brooklyn, NY.
Prose contribution to Cuban revolution. Allen Ginsberg. Artists' Workshop Press, Detroit, 1966.
Russian samizdat and photo negatives of unofficial literature in the USSR. Moscow. Wikimedia Commons.
The Bunch's power pak comics. Aline Kominsky-Crumb. Kitchen Sink Enterprises, Princeton, WI, 1979.
Plunger. Alison. Team Plunge, New York, NY. Dec. 1994.
FAT! SO?. Marilyn Wann. San Francisco, CA. no.4 1995.
Angry black-white girl : reflections on my mixed race identity. Nia Diaspora. Publication year unknown (between 2000-2009).
View more Feral Friday posts.
View more posts with zines.
--Ana, Special Collections Graduate Intern
#feral friday#zines#history of zines#labor rights#dada#martin luther#95 theses#riot grrrl#samizdat#underground comix#Aline Kominsky-Crumb#Allen Ginsberg#Nia Diaspora#Nia King#Detroit Artist Workshop Press#dada germanico#feral#feral fridays#Ana#Detroit Artists Workshop#zine culture#Kitchen Sink Press#Marilyn Wann#Plunger#beat generation#Angry Black-White Girl#Power Pak Comics
89 notes
·
View notes
Text
Capture, Edit, and Perfect: Experience Next-Level Free Photo Editing with BeautyBrush
In the ever-evolving world of digital photography, the right tools can make all the difference. Whether you’re capturing memories on your smartphone or curating the perfect social media feed, having access to a powerful yet free photo editor is essential. BeautyBrush, a standout in the crowded market of photo editing apps, offers exactly that—a robust, user-friendly platform to edit your pictures for free and bring your creative visions to life.
Why BeautyBrush is the Editor of Choice:
BeautyBrush isn't just another app; it's a game-changer for anyone passionate about photography. Designed with both casual users and professional photographers in mind, this free editor image app offers an extensive suite of tools that rival even the best photo editing apps on the market. Whether you're looking to make minor adjustments or completely transform your images, BeautyBrush has you covered.
Unmatched Features of BeautyBrush:
Edit Pictures for Free: BeautyBrush gives you access to premium editing tools without the hefty price tag. From basic adjustments to intricate edits, you can perfect every shot at no cost.
Advanced Pic Image Editor: The app offers a wide range of editing options, from color correction and cropping to filters and effects, allowing you to enhance your images with ease.
Intuitive and User-Friendly: BeautyBrush’s interface is designed for seamless navigation, making it one of the easiest apps to use for both beginners and experienced editors alike.
Comprehensive Free Picture Editing: With BeautyBrush, you don’t need to compromise on quality. The app provides high-quality editing tools that ensure your images look professional, every time.
How BeautyBrush Enhances Your Photos:
BeautyBrush’s powerful editing suite allows you to unleash your creativity and polish your photos to perfection. Whether you’re editing for social media, professional use, or personal enjoyment, BeautyBrush’s versatile tools help you achieve the exact look you desire.
Conclusion:
If you're searching for a comprehensive, user-friendly photo editor that offers professional-level features for free, look no further than BeautyBrush. This app is truly one of the best photo editing apps available, providing everything you need to turn your ordinary photos into extraordinary works of art. Download BeautyBrush today and start transforming your images with ease.
0 notes
Text
In today's digital age, the need for efficient image conversion tools is more crucial than ever. Whether you're a designer, marketer, or simply someone looking to enhance their online presence, having the right image converter at your fingertips can make all the difference. Enter Luletools, your ultimate solution for seamless and hassle-free image conversion.
#online image converter#meme generator#best free photo editor online#convert color image to black and white#free online meme generator
0 notes
Text
NEW EDITOR 101: A GUIDE FOR GIFMAKERS by v @shangs
Hi friends! I know I said I would do this way back in April/May when this change was announced but I've been massively busy lately so thank you all for being patient with me :)
Based on the results of this poll, I will be trying my level best to help make a guide for gifmakers to best deal with any problems that have been present with the new editor. However, it's worth noting that I have personally not experienced any of these problems myself and I have no record of any problems from other people that I could send to staff and get guidance on, so for some of these issues I will unfortunately be a broken record.
That being said, I have been using the new editor for a few months now and it hasn't been too bad. So don't be discouraged by the new editor if you still love to make gifs and share them. You may need to adapt a bit, but it's doable!
This is meant to be comprehensive and will be explanation and image heavy. Full guide under the cut.
CONTENTS:
What is the new editor?
Steps to take before posting
Making a post
Troubleshooting
01. WHAT IS THE NEW EDITOR?
Some of you may be asking yourselves what the point of the new editor even is and why it's being implemented in the first place when we already had a (mostly) functional editor. My very limited understanding of it as a CS student is app compatibility and flexibility. I'm not totally clear on the details nor am I 100% certain this is the case, but NPF posts (basically, posts made with the "new editor") first started with the mobile app. I'm unsure if the different post types were simply too unwieldy to transfer to the app - having to make a whole bunch of post types when with the new editor you can now have posts with any elements you want without the rigidity of a set post type - or if it was simply not able to be implemented, but the apps have always used NPF. The majority of Tumblr users are coming from the mobile apps. Then it became a case of having the legacy editor for the web users (which were fewer in number) and the new NPF editor for everyone else. That takes resources to keep around and it's pretty inefficient. Naturally the older editor that was used by less people was going to get the axe, especially since you couldn't tell on mobile that there was even a difference between NPF or legacy posts.
So now here we are and the posts are NPF. This means they're in "Neue Post Format." Basically, every post you make is by default a text post, containing "blocks" of other media - as gifmakers we will primarily be dealing with photos.
I understand that it's frustrating to many to see "our gifs are now rendered as text posts" and ask WHY it's happening when photos should logically be rendered as photo posts - but the fact is, there's now no real delineation between a "text post" and a "photo post." The reason NPF posts are now "text posts" is because that's how they are rendered for desktop themes, not because everyone is going to see your post as text and your gifs are going to be compressed into the quality of a potato (though I know some have seen this issue - more on that later.)
02. STEPS TO TAKE BEFORE POSTING
The long and short of it is that you may have to update your theme. More detail here for those who are interested, but check that your theme supports "new editor posts" or "NPF posts" AND that this is true for original posts (you can read more about why in this ask and, although this may be a bit time-consuming, test it out on your blog). I can say with certainty that my second theme Cygnus supports original NPF posts. This is NOT true of my first theme, though.
You can try to add the NPF Fix by @glenthemes to your own theme (beware if you don't know HTML/CSS) or try this tip by @burningblake for original posts.
Feel free to add theme makers with fully NPF-compatible themes in the notes! I have been happily using my own theme so I can't say to what degree others' themes are NPF-friendly.
03. MAKING A POST
If you're sticking around to post on the new editor and you have trouble ordering your gifs around, here's a little guide on how to post.
If I click on "Photo" from web and open up the editor, here's how it looks:
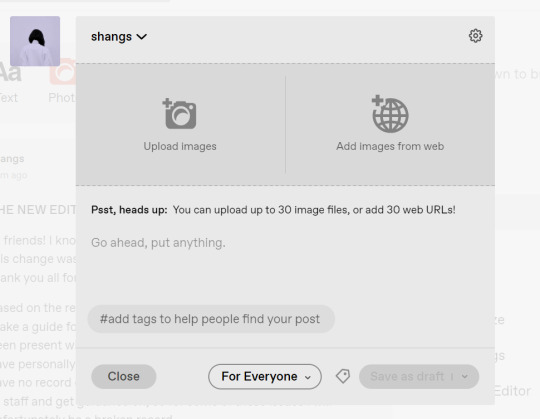
I went ahead and added three full-width gifs and the editor put them in like so:
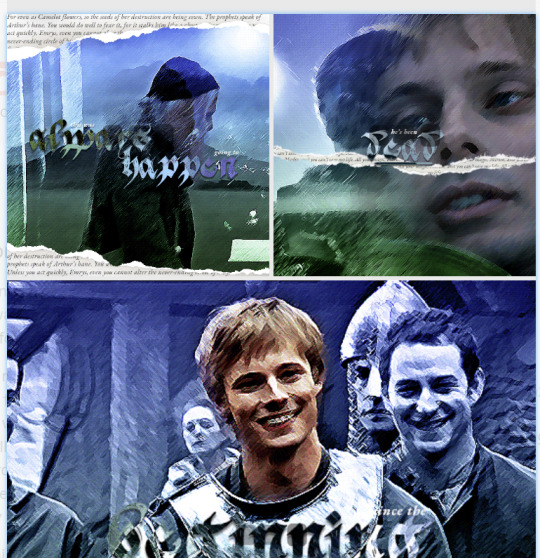
You'll most likely also have to order your gifs around in the way you want them. You can go ahead and hover over your gifs to see the button to orient them (the four dots in the top left corner) and the button for an image description (the three dots in the bottom right corner). I've attached images of all three below:


If you hold the orientation button, move your gif around until you see the blue line that shows where your gif will end up in the spot that you want it. For example, I wanted to move the second gif below the first one, so I oriented it so that the blue line would show the marker between the two gifs:

Now my gifs are oriented nicely! Of course, this is a simpler layout, but the principles still hold.
If you save your gifs as a draft and reopen them or you just notice a large gap like this in between your gifs when you're in the editor, don't worry.

This will not show up in dash view or on a desktop theme that supports original NPF posts. For example, this is how the gifs' gap (without modification) looked in my desktop theme:

With your gifs ordered, the final step is to add alt text. You can read more about alt text and why you should use it here. (Feel free to ignore the sections about the captions on the legacy editor since it is no longer relevant. It's also unnecessary to clearly mark descriptions if they're not in the caption of your post because they will clearly show up under "ALT" on Tumblr.)
If you click the three dots in the bottom right corner as seen above, and click "update image description:"

You can add the description you like and click "update." Your photos' alt text will show up under the "ALT" bubble on Tumblr. This is generally a good practice to get into to make your content more accessible, so I hope you guys will consider using alt text regularly :)
Also, I've noticed that in the editor, if you go back and edit something it will take some time to show up. You may have to refresh the page or load it again after some time, but your edits should be there. I would not go back and edit posts again if you see your posts haven't shown up. I also advise against editing your posts on mobile because it's easier to make a mistake.
And there you go, you've successfully made a post with the new editor!
04. TROUBLESHOOTING
I'm sure you've all been waiting for this. Unfortunately I am probably going to be extremely unhelpful if the editor hasn't been refined in the last few months for those experiencing issues. I'm going to go in the categories that I listed out in my original poll, but keep in mind that I haven't personally seen any of these issues on my end so I haven't been able to contact staff with any evidence that this happened other than my poll.
Dashboard view quality issues: I haven't noticed this issue. I'm not sure if this has been fixed since the original poll was posted. If you're experiencing this issue, this is not something I know how to fix so I would contact staff with screenshots of the issue.
Desktop theme side padding: As noted before, this is a theme issue. If you change themes to something that is NPF-compatible with original posts, there shouldn't be any more issues here.
Small gifs on mobile: In my experience this was happening regardless of what editor was used; it's a bug that seems to have been fixed since this poll was created. If you're still experiencing it, at the risk of sounding like a broken record, I would advise contacting staff.
New editor doesn't accept gifs of size 9.8MB < x < 10MB: I haven't experienced this issue so I would say the only workaround would be to either trim the size of your gif so that it is under 9.8MB or whatever threshold seems to be the cutoff or contact staff (I am so sorry for constantly having to suggest this 😭 unfortunately there's no trick I can offer because the new editor has been taking all my gifs just fine)
Logistical issues ordering gifsets: I hope this guide has been able to answer the majority of questions and shed some light on some of the more buggy behaviors of the new editor, but if you have any more specific questions you can feel free to shoot me an ask!
HTML issues / colored text: Unfortunately it seems colored text may be deprecated entirely? This could be for accessibility purposes because I believe screen readers would read out every single letter of gradient text in captions which I imagine can get quite frustrating for users of this technology. I recommend just using the normal rich text editor. If you want small text, you can highlight and click the <s> button!
Other: If it seems like something I may be able to answer, please feel free to ask me. Otherwise... hound staff 😭
Here's where you can hound staff, btw. If you're having major issues I would advise you guys to submit support tickets. That way if there are any widespread bugs, staff will hopefully be able to fix them.
I hope this guide was helpful to you guys in dealing with the new editor, and happy giffing <3
#gif tutorial#new editor tutorial#completeresources#userphotoshop#resourcemarket#userrobin#userbells#arthurpendragonns#ughmerlin#userbecca#usersameera#usermarsy#alielook#tuserlucie#tutorial
557 notes
·
View notes