#or like weird 3d mapping stuff
Explore tagged Tumblr posts
Visit Tumblr Blog
Explore Tumblr blogs with no restrictions, modern design and the best experience.
Last Seen Tumblr Blogs


Fun Fact
China blocked Tumblr because of pornography and censorship problems in 2013.
Text
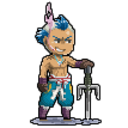
i dont actually think hes blond
#half live vr but the ai is self aware#hlvrai#benry#benrey#gordon feetman#gordon freeman#benrey is very easy to draw when u feel like u cant draw anything#been in a creative rut lately#but thinking about benrey fucking up his model by trying to take off the helmet was too funny to resist#i think i read a fic where a similar thing happened?#but it was something like instead all there was were pixels#or like weird 3d mapping stuff#but he could still take it off#my art
449 notes
·
View notes
Text
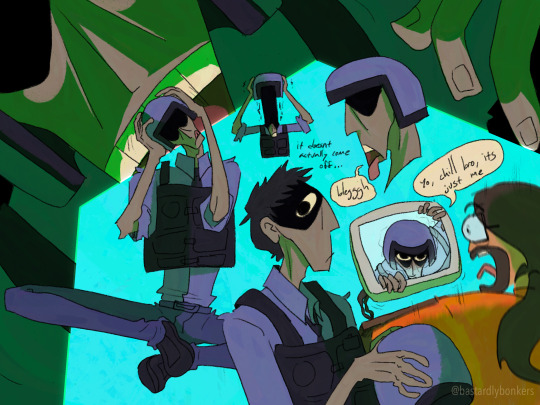
has anyone tried reverse engineering the source code to facade or whatever because i am deeply interested in how that game works
not even in just like, the language processing stuff (i think that's probably just a HUGE tangle of if -> then statements that only picks out certain keywords at certain times)
i mean like,
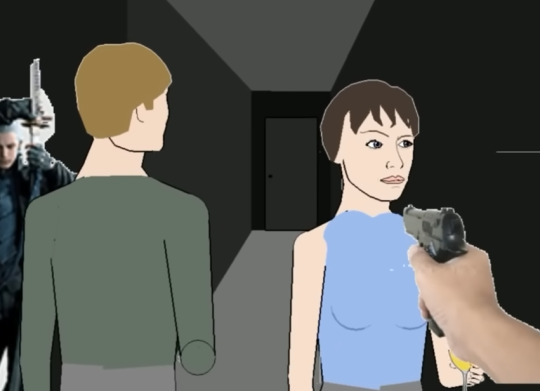
(ignore vergil and the gun please)
i am incredibly curious how the code for rendering this scene functions, i am curious how you get this art style, that seems to be 2d shapes pretending to be 3d, with all the weird clipping and compromises,

the broken seam on trip's pants, the weird Blobby Circles that ostensibly make up the neckline of grace's shirt, the weird circle on the elbow coming from something not meant to be seen at this angle.
you can't look up or down and all the textures on the room's geometry warp and distort when they get near the camera, the sky texture scrolls out of view if you clip out of the map.
there's a lot going on here in this engine that i'm 80% sure was coded from scratch just for this game, and i am so curious how you make something that looks this distinct
4K notes
·
View notes
Text
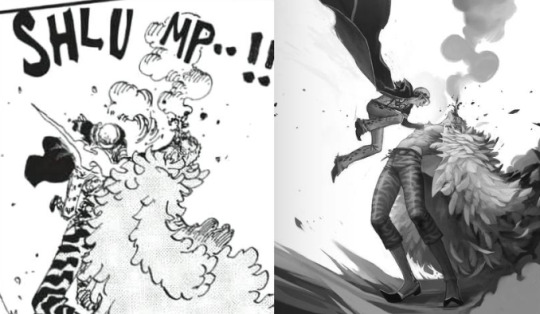
Gamma Knife - painting process
I had so much fun painting this piece and I want to share some behind-the-scenes stuff on how it was made.

I would like to thank MagicPoser for making it possible to try poses, scale, angles and lighting and saving my ass so many times. I use the app on my iPad but there's a free browser version too.
So I wrangled these 3D dudes into the poses I wanted and then I cut them to pieces and stretched them out to make them as leggy as they're supposed to be. Before I did that though I spent forever trying to pick the angle I wanted to paint. Including two other screenshots I considered using before settling, because it's fun. (nevermind Doffy's weird arm angle, it wasn't going to show anyway. The smoke-placeholder makes it looks like he's in The Sims though which is cute. That thing's about to go so red.)
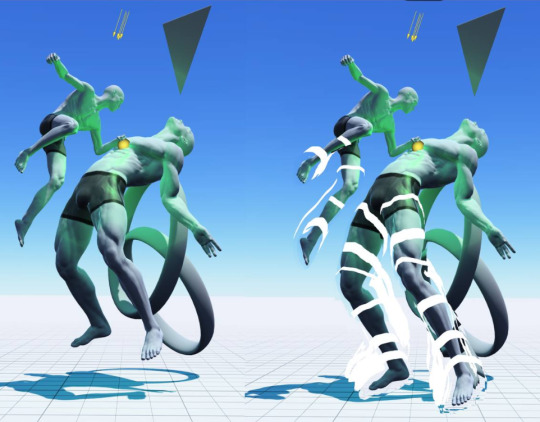

Then I started sketching. I quickly moved Law higher up and changed his pose to make him more curled up, elbow-to-knee, legs bent etc for more intensity. MagicPoser is great as a reference but the end result gets pretty stiff and boring if you follow the 3D models too closely, and I wanted swoosh. So I painted some swooshy shapes to figure out the movement I wanted for the whole painting. Purple swooshes for the curve of Law and the direction of his jump. Pinker purple for Doflamingo's leg and spine arcs.
The b/w image below also shows the rough base for the feather coat. It's painted with a flat, tapering oil brush that created nice curves that I could refine later.


Skipping lots and lots of work to get to the next step. It's all rendering and detailing, mostly done with the HB pencil brush.
Coloring! I started by creating a gradient map bit lots of color steps. I kind of knew what I wanted but there's a lot of trial and error involved while picking colors and dragging sliders. In Photoshop I'd do this on an adjustment layer but in Procreate I do it by copying all visible layers (three finger slide, copy all visible) and making a new layer out of them where everything's merged (three finger slide, paste)

I then put that layer in Color-mode on 77% over the grayscale image after playing around and testing lots of things. I rarely know what I want before I see it. I copied that layer again and put it in Add-mode on a very low opacity because it looked neat. Every image is a new adventure when it comes to layer blending modes, there is no right or wrong here, you just have to test things until you find an effect that you like. Huge potential for happy accidents in this step.
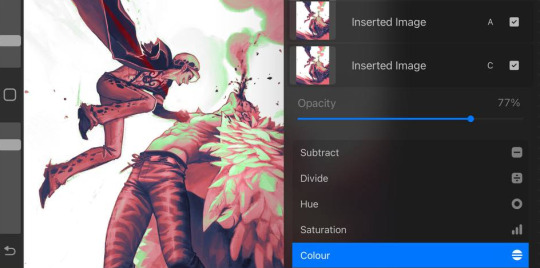
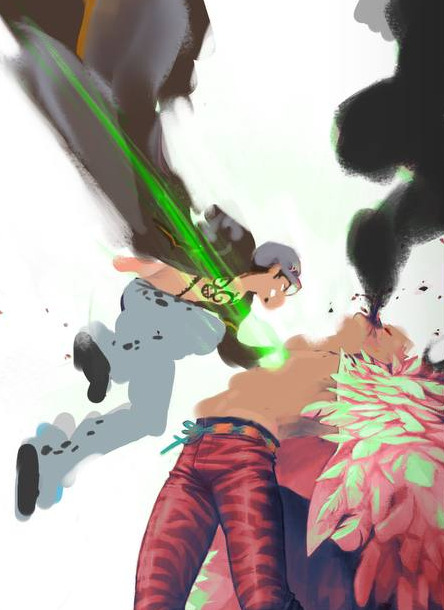

I didn't want everything to be pink so I created a new Color-layer to paint skin, clothes and radiation. Lowered opacity to let the pink base shine through slightly, for a cohesive and more natural look. Color-mode on full opacity often looks a bit flat and washed out unless combined with something else.
There's a lot more that happened after that but it's all detail stuff, effects, lots of layers with soft airbrushed gradients on various blending modes. Also directional perspective blur where I masked out some feathers to still be sharp against the blurry ones in the back, a quick and easy way to create a sense of movement and depth.
Again, thanks MagicPoser, I would have cried so much and probably given up over the angle of Doflamingo's head without your help 🙏
115 notes
·
View notes
Note
Hihi!! Do you prefer RPGmaker with the 3d plugin or Godot for CFGF?
hi ^^ since dabbling with engines i can pretty confidently say im leaning towards godot for any dev stuff because im a shader and lighting pervert and thats much easier to do in godot than trying to figure out how to reverse engineer mv3d's code as well as learn babylonjs.... rpgmaker (even without mv3d) has optimization issues too (like having a lot of parallel events on your map is bad which drives me nuts because thats how i do my environments. frowns)
rpgmmv + mv3d is really cool though for little experiments/short projects... but due to the lack of a 3d viewport it hurts my brain to use for larger things
i havent made much progress cuz i burnt myself out working on it but ive been toying with the idea of working on it again and making it feel like a point n click cd rom game ... im taking a lot of visual insp from Total Distortion (also if you know any weird or interesting 3d cd rom games i can find screencaps of to look at pls lmk im trying to build a visual library)
23 notes
·
View notes
Text
Just blabbering/complaining about pixel clothing here. I'll cut it for your dash's sake. :)
Lately, my "simming" has been more about overhauling shit. Like, I've gotten tired of having huge amounts of clothing that my sims don't generally wear cluttering things up, which they don't wear mostly because I don't like how it looks in-game or because it doesn't take patterns well, etc. And of the things they do wear, I've gotten tired of looking at a lot of it.
So, I decided to download/install new clothing for all ages, and I decided to try out higher-poly, more realistic-looking stuff, as opposed to the more painted-on and/or photoskinned stuff that I had a lot of. I spent a lot of time downloading and recategorizing and adding preg morphs and stuff, and then, after testing it out in actual gameplay in a test world for a while...I decided that I really didn't like it. LOL
I mean, it looks great for taking pictures and playing pixel paper dolls (Do the young 'uns even know what paper dolls are? Probably not.) and stuff like that, but with the game as a background and with sims moving around and doing sim-things while wearing it, it just looks weird to me. Too much 3D, too bulky, too much folding/shading that didn't look right as the sims move around, etc. So, ultimately, it was a lot of time wasted, but I don't really begrudge it because now I know for sure that I don't like that stuff, so I can stop downloading it. LOL (I also don't need any more hoodies or jeans. LOL )
What I settled on? I decided that I like truly Maxis-match clothing. As in, straight Maxis stuff but with just a bit of editing, like changes to the mapping, reduced shine, removed painted-on accessories, etc. (Like the things that @sweetdevil-sims does, for instance.) Separated Maxis outfits. Frankenmeshed stuff using Maxis bits as the "donors." The rare completely custom stuff that looks like it could've come from EA, only without EA's offensive shininess and stuff. Stuff like that. So I downloaded all of that that I could find, went through the recategorizing and preg-morphing, and I'm just liking it...so long as I use the mod that removes the shine from clothing, that is, for stuff that hasn't been shine-edited. I guess it's not too surprising, since it's actually made to fit in the game, so it doesn't stick out like a sore thumb in it.
I also like some conversions from EA stuff for TS4, but only some. It seems to me that there are some scale differences between 3 and 4, perhaps? Because the EA stuff converted from 4 often has giant buttons/buttonholes, giant zipper pulls, giant knitted textures, seams that look too big/dark, etc. I suppose it'd be fine if I only used that stuff, but if there are two sims and one's wearing stuff from 3 and the other is wearing stuff from 4, it just looks odd together, in my opinion. So I was very choosy about the converted 4-stuff I kept.
I did keep some of the old stuff that I like as well, even some of the photoskinned stuff. Mostly because sims in my active saves are wearing some of it and I don't want to have to change out their outfits, but also because I just like and often use some of it and it blends in well enough with the more EAxis-y stuff.
Overall, I'm liking the far more uniform nature of my pixel clothing now, and while I have less stuff now, I know that I will potentially use all of it, rather than having a lot of stuff that I will never use. Now to do the same thing with the shoes. But I'm going to leave that for later because...Ugh.
I do have a couple of complaints, however. Like, why is EAxis so obsessed with goddamned bows on clothing? Female clothing from toddler to elder has sooooo many things with bows stuck on them, ugh. I wish there was an easy way to remove them. Also? What is the current thing with super-short skirts, mostly in custom clothing? Like, if it was a real person wearing that stuff they wouldn't be able to move without showing off their whole ass and all their ladybits. (Trust me, as a tall woman, I know this. I can't wear miniskirts bought off-the-rack for this very reason.) It's just weird to me. I'm all for a miniskirt here and there, but geez!
#just rambling#i don't know why i posted this#maybe as a future reminder to me#to not download stuff that i know i won't like lol
34 notes
·
View notes
Text
Updating... The Tattooer (ver. 3.4)!

Finally! Took me a while, huh. This is the updated version of the Tattooer project. It skips some steps, making the workflow much, much faster! Huge thanks to @applewatersugar for his suggestion on how to bake textures while preserving the transparency. This is kind of a repost of the original Tattooer post, but it actually has some new stuff and a few changes here and there, so please take a look if you want to learn how to use this new version.
This is a series of Blender template files already set up to quickly bake textures from The Sims 4 to The Sims 2. The different Blender files will allow you to: -Bake body textures from TS4 to TS2 (Female) -Bake body textures from TS4 to TS2 (Male) -Bake body textures from TS4 (Female) to TS2 (Male) -Bake body textures from TS2 (Female) to TS2 (Male) [Bonus!] -New! Bake face textures from TS4 to TS2 (Unisex) [Bonus!] -Bake head textures from TS4 to TS2 (Face + Scalp) (Unisex) [Still experimental] Check the file names to see which one is which, and the resolution of the baked texture it will give. Everything you see in the render above was 100% converted using those Blender files.
Download here! SFS / GD
Update: Version 3.4.1 (27/08/2023) Fixed some issues on the shoulders for the AF-body-4t2-1024 and AF-body-4t2-2048 templates. Now the top straps on most converted underwear/swimwear should look right.
Update: Same version (13/12/2023) As requested, added a new spanish version of the included pdf guide!
These templates were made mainly to bake and convert tattoos, but there’s more you can do with them if you get creative. I have to say, these are NOT perfect. Results may vary depending on what you are trying to convert, so! With that in mind, this is all the stuff you will be able to convert almost seamlessly from TS4 to TS2: -Tattoos. -Other body details such as body hair, scars, freckles, supernatural/occult details… -Body painted underwear and swimwear, as well as some other clothing that’s mostly painted on the body. -Socks, stockings and maybe leggings. -Even skintones! In some areas they will look weird, so I recommend editing and blending them with other existing TS2 skins. -Makeup, eyebrows and beards. In the old version this was just a proof of concept, but now I’ve added a new Face file template which gives some pretty decent results! -Hair scalps. Very useful when converting some hairs! Although keep in mind part of that texture might also need to be baked on the face mesh, you know, that hairline makeup stuff.
Got your attention? Nice! Editing some of the textures from TS4 to match the UV mapping in TS2 using a 2D editing program can be incredibly hard. That’s where texture baking in Blender comes to the rescue!
You will need to download Blender, at least version 3.4, but you could always use a newer version. It is only incompatible with versions older than 3.4. -You can download Blender for free here. -You will also need Sims 4 Studio to extract the original Sims 4 CC textures you want. In the first version of these Blender files, there was a necessary step using Photoshop, but that’s no longer needed. However, there’s still a tiny extra step which requires resizing the newly baked texture on some of the high resolution templates, so you might need a 2D editing program like Photoshop. More on that later.
So, before we begin, let’s clear out some questions you might have. What the heck is this texture baking thing and what does it do? Well, let’s imagine you have a video projector and point an image into a blank wall. Then you pick up some brushes and start painting and copying that projected image in that wall. Texture baking is kinda like that when it comes to 3D models. You align two models and match them as closely as you can in shape and form, and once you adjust some parameters and values, Blender does the rest for you: it will give you a new texture for a new model with a different UV map. These files I’m sharing have everything already set up, so it’s a matter of plopping in that Sims 4 texture and you will get that new texture for TS2 in just a few clicks.
This tutorial assumes you know literally nothing about how to use Blender, so if you feel uncomfortable with it, worry no more! This will guide you with pictures showing where you need to click and explaining what is happening. For Sims 4 Studio and Photoshop the process might be a bit less detailed, but still this should be pretty beginner friendly. For this tutorial, I will use some tattoos as an example (properly credited at the end of the post). Alright, enough with the rambling. Let’s get started!
·EXTRACTING TEXTURES IN SIMS 4 STUDIO: First things first, you will need to extract as pngs all the textures you want to convert from TS4 using Sims 4 Studio. It should be pretty straightforward. Just open the packages and export the Diffuse textures. Keep them organized in a folder for easy access.
·BAKING THE TEXTURES IN BLENDER: PRELIMINARY STEP 1: CONFIGURING BLENDER’S GRAPHICS SETTINGS: Open your preferred Blender file depending on what you’re going to bake and the desired resolution (in this example I’m going to use the AF-body-4t2-1024 file). Before we start messing around in Blender, there’s one thing you should set up. It is a onetime step, and once it’s done, you won’t need to do it again. So, does your computer have a dedicated graphics card? If you don’t know or you’re not sure, just skip to the next step. Configuring Blender so it uses your graphics card instead of your CPU will make the baking render much faster, so it is recommended you set it up correctly. If your computer has a dedicated graphics card, click File (1) > Preferences (2) > and on the window that pops up click System (3) > and select CUDA and make sure your graphics card is there and tick it (4). I have an Nvidia Graphics card but your case may vary. Once you’re done, click on the tiny button on the bottom left corner and Save Preferences (5).

PRELIMINARY STEP 2: CHOOSING THE RENDERING DEVICE: Click on the tiny camera button on the right, called Render Properties (1), and on Device (2) select GPU Compute if it’s not already selected. If you’re not sure if you have a graphics card or not, just select CPU. Then select the Material Properties tab (3) and Save your changes, either by pressing Ctrl + S, or clicking File (4) > Save (5). You might need to do this second step with the other Blender files, but once you have it done and saved, you won’t need to do this again. Okay, time to get into the good stuff!

·STEP 1: LOADING YOUR TS4 BASE TEXTURE: In the Material Properties tab, click the folder icon that says Open (1) and on the window that pops up, navigate through your folders and select your first texture. To navigate easily, the 3 buttons on the top right (2) are for the display mode. They will show your files in list mode, vertical and horizontal, and the one on the right will display the file thumbnails, pretty useful if you want to easily preview your textures here. The icons on the left side (3) will let you go one folder back and forward, go to the parent directory, and refresh the folder in case you just dropped something new in there. Double click on the image you need and that will load the texture into the Sims 4 body model, named “ts4 body”.

·STEP 2: SETTING UP YOUR SELECTION AND BAKING THE TEXTURE: On the top right of the screen, you will see the names of the 2 models in the scene. Hold the Ctrl key in your keyboard and left click on the “ts2 body” model (1). If you did it correctly, you should see “ts2 body” in a yellowish orange color, and right down below, “ts4 body” should look more like a red orange. If not, try again by clicking first on ts4 body, and then while holding Ctrl click again on ts2 body. Then switch to the Render Properties tab by clicking the tiny camera icon (2) and click Bake (3). Depending on your screen resolution, you might need to scroll down a bit with your mouse to see the Bake button. Wait a few seconds for it to finish. You will see the progress percentage down on the bottom of your screen. Don’t panic if you notice your computer fans start ramping up, that’s completely normal! As I said in the beginning, using your GPU will bake the textures much faster than the CPU.

·STEP 3: SAVING YOUR NEW TS2 TEXTURE: Once it’s finished, switch to the UV Editing Mode by clicking “UV Editing” on the top of your screen. And there it is: your new texture! You might have to scroll up your mouse wheel a bit to zoom in and see it in all its glory on the left side of the screen. We’re still not done yet though. You need to save it to yet another new folder (always try to keep your stuff organized!).

You can save it by pressing Shift + Alt + S, or clicking on Image* (1) and then Save As… (2). That will pop a window where you’ll need to navigate again and save it somewhere. Give it a proper name (3) and hit Enter to save it… well, Enter doesn’t always work for me for some reason, so if that happens just click Save As Image (4). And that’s it! You’ve successfully converted your baked texture. Congrats!

·STEP 4: GOING BACK TO STEP 1: Alright! If you’re done with your textures, you can close Blender without saving and call it a day. But let’s say you want to keep baking other swatches. In order to go back to step 1 and start the process once again, click Layout (1), go back to the Material Properties tab (2), select “ts4 body” (3) and click on the folder icon (4) to open and load your next swatch.

Then it’s just a matter of repeating the process from step 2. When you’re ready to move on, close Blender without saving. If you see a small check telling you it will save some images, make sure you uncheck it, so you will be able to use it again in the future from the starting point with no issues. I don’t think it really matters if you accidentally save your progress in these files, but I like to keep it clean and fresh so I can do the process where I left it from the beginning next time I open it. And in case you mess up and save somewhere, you can always just delete the .blend file and download the template files again.
In case you’d like a video tutorial on how to use these files, the amazing @platinumaspiration recorded this fantastic video showcasing the process! You can watch it here.
One final note: some of the baking .blend files save the textures with a resolution of 2048x2048 pixels, as clearly stated at the end of their file name. That’s way too overkill, because TS2 only properly supports up to 1024x1024 for most of its textures and you should always resize your final product to that max resolution (or lower if needed). I just made those 2048 versions because there might be some really tiny and slim details on some tattoos that might look a little too blurry when baked into a 1024 resolution texture, so for those cases use that if you want and then resize them using your 2D editing software of choice. In Photoshop, in the Resample mode of the Image Size menu, there are a few options to choose. For the fine details, I like the Nearest Neighbor (hard edges) option, which, even if it looks a bit pixelated, it still preserves most of the texture and quality.

For anything else, I would just directly bake them using the 1024 versions in Blender (512 for the face and scalp).
And for the folks who feel comfortable playing around in Blender, this is just the beginning! Texture baking opens a LOT of possibilities, so feel free to move stuff around and edit the models to your liking! If you notice the baked textures look warped or stretched somewhere, or don’t like where some textures are placed in the S2 body, poke around that area moving stuff and then give it another try. The main objective of the baking process is keeping both overlapping models as close in shape as possible. You may also edit and save new copies of the templates, or make new ones from scratch using mine as a reference (keep a close look on those Baking settings and values, I think they work pretty well) and share them if you want to. Go ham, do whatever you want with them! I still have plans on making templates to convert body textures from Sims 3 to Sims 2, but for now it’s not on my priorities, so we’ll see when that happens.
Whew! Hope none of this was too confusing. Need help or have any issues with these? Please ask/message me here and I’ll be glad to help when I’m able to!
Credits for the CC used in the render demonstration: -Skin by Sims3Melancholic. -Eyes by Northern Siberia Winds. -Eyebrows by PeachyFaerie. -Tattoos by xtc. -Top by SerenityCC. And the Tattoo I used for the tutorial can be found here, by ValhallanSim.
Last but not least, a huge thanks to all the people who somehow contributed to make this project and update possible, either by doing initial testing, finding issues to fix, or teaching me new Blender tricks to make the workflow way faster and easier. So thanks again to @elvisgrace @moyokeansimblr and @applewatersugar on Tumblr! <3
And thank you for reading! Hope you have fun playing with this (not so) new toy hehe.
#tattooer project#tattooer update#ts2 tutorial#ts2 resources#ts2 blender#ts2 overlays#ts2 texture baking#4t2 conversion tutorial#this took me so LONG to update#im really sorry for the delay :(
411 notes
·
View notes
Text
HELLO AGAIN POKEMON PEOPLE IN MY SCREEN
got busy 3d modeling for a video game concept my bad
um uhhh
heres some stuff i was working on related to creepypasta concept
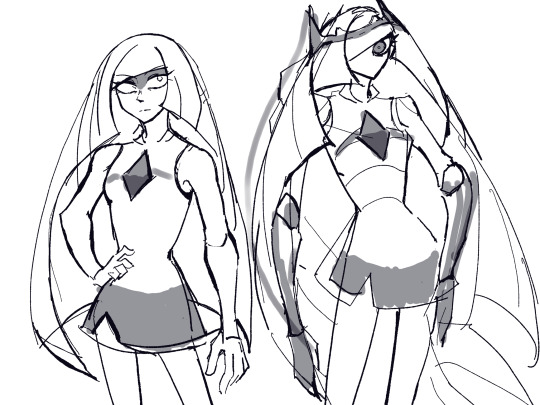
nothing special just some sketches but yeah
there are two (2) types of people crashing out:
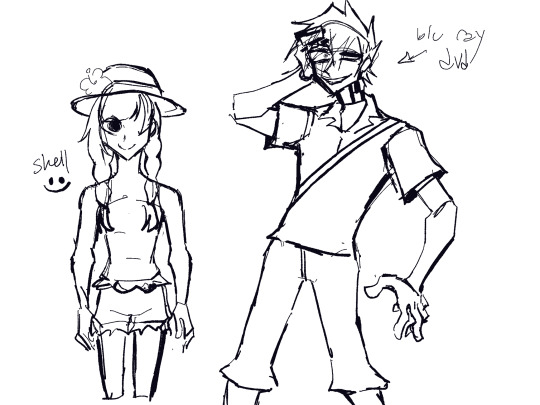
yes ik weird collection of characters
red is also involved i just haven’t drawn him yet ok
heres a bit of the concept below the split for anyone who wants it
copy of ultra moon that, when it resets, and every time it resets, kind of recycles itself and its past save data instead of completely wiping things
so over the course of time it just gets. weirder and weirder.
parts of the map duplicate themselves, the player character you didn’t choose appears in front of the main character’s house, characters remember things that haven’t happened yet, people get merged with pokemon, etc.
the second thing that tampers with the game is the postgame ultra wormholes.
instead of visiting little pocket dimensions where you can find random encounters and possibly legendaries, the game treats this in a similar fashion to the resets and makes the timeline a more garbled mess.
now here’s the weird(er) bit:
some of the characters become aware of this.
the player in the draft of the story i wrote decides to put all the affected characters in two categories based on their reactions:
STAGNANT, because some of them seem to completely stop functioning, or ABERRANT, because some of them begin to deviate further from the base game and even on a few occasions, confront the player behind the screen
(i was originally going to call the idea aberrant moon. i wrote like five pages and then i was like “im literally still in the introductory piece no one is gonna want to read the whole thing if i finish it wtf”)
society
#pokemon#justafrosmoth#pokemon sun and moon#pokemon creepypasta#creepypasta#pokepasta#pokemon ultra sun and moon#pokepasta oc#this is a moment in history#pokepasta fanart#hi im back
9 notes
·
View notes
Note
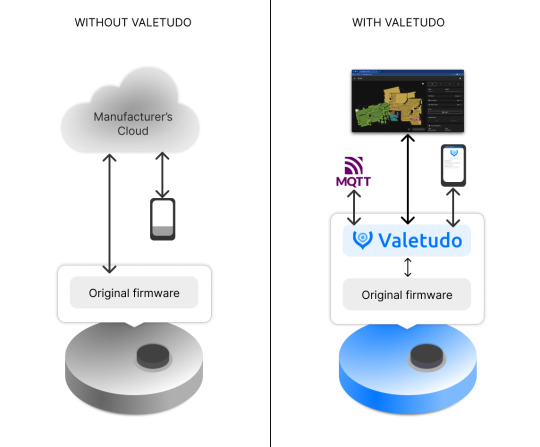
I'm thinking of getting one of those robot vacuums, but don't know how to start picking the right one. Do you have opinions on the matter? Do you like yours, and if so, what model is it?
I have a Xiaomi S10 EU, which is a midrange model that I think is now discontinued in favour of the S20? Xiaomi does a pretty good job with their designs, my family have various Xiaomi models that all work fine. Roborock is another brand I've heard good things about, and they're an offshoot of Xiaomi and seem to be where a lot of design innovation is so presumably that's a good sign. I assume iRobot is still making Roombas but I've never used a Roomba.
(The craziest new stuff from Roborock includes a robot arm for picking up and moving small objects out of the way? Crazy, you can now teach stabby to thrust!)
A few notes
1) They work best if you can keep your floor clear and generally free of small objects, and obviously don't navigate stairs and steps well. My apartment has very little stuff on the floor, and all my cables and wires are tucked into corners and along skirtings. If your wife has filled your house with chintz you may have a hard time getting a robot around on the floor.
Robovacs love to eat bag straps and shoelaces and charging cords, so if you tend to have those laying around on the floor and don't have the wherewithal to clear them up, you'll probably spend a lot of time untangling things from the brush.
2) They can handle most area rugs, but not all, e.g. it handles my thin cotton living room rug with short tassels without an issue but I have to move my thick kitchen floor mat out of the way or it'll eat the longer, thicker tassels. You can mark areas as no-vacuum zones if this isn't your bag.
3) Definitely spring for one with at least LiDAR, which you can see by the little stick-up lighthouse module on the top that houses the LiDAR module. Without LiDAR the robot has to just bump around semi-randomly to navigate, which is slow and inaccurate. It can build a map but the map is very poor and it barely knows where it is.
With LiDAR it knows exactly where it is, because it knows where it isn't. The very newest and most expensive bots do away with rotary LiDAR and just use forward looking cameras and 3D depth sensors to do VSLAM but if you're going for that price range from a big manufacturer you'll probably be fine. Most companies list their sensors on their site, but they often use weird names so it can be hard to tell.
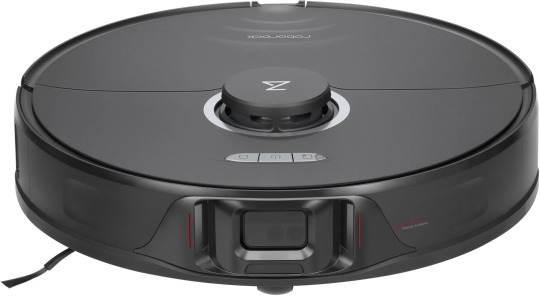
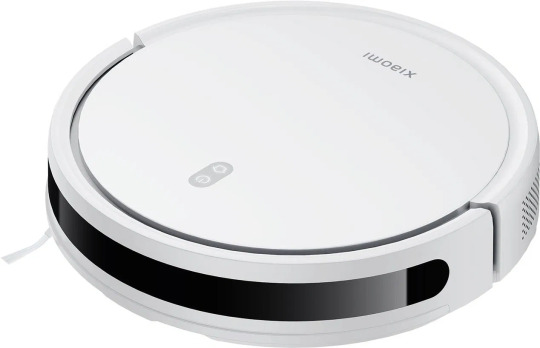
(see above, with and without a LiDAR tower. Some very new models can retract the LiDAR tower to go under low furniture.)
4) You can cover a lot of house without needing the self-emptying base stations even if you run it regularly, I'd say probably around 200m² in a fairly ordinary dust environment. In my 50m² apartment I run it at least every weekday and empty out the integrated dust container once a week and that's usually fine, and I don't have any particular air filtration running, but I do keep the windows mostly closed when I can.
5) Speaking of maintenance, I don't use the mop feature on mine but it does keep your floors cleaner while requiring more attention to be paid to water levels. I'm actually going to try using mine more now and see how that goes. This is one thing where I think the stations might make sense even for a pretty small apartment. My brother uses the mop feature on his all the time and he likes it.
6) General maintenance: not that much! It'll buzz you on your phone when it thinks a component has hit end of life but so far I don't think anyone is using DRM to force you to use first-party parts or making you throw away things that are working, you can just manually reset the timers, although so far when the warnings do come up I tend to agree that it's time to replace a part.
You have to empty out the dust and change the water, and if it eats something you might spend a few minutes detangling the rotating brushes. The brushes will get knotted with hair and need cleaning every couple weeks to months depending on how much hair and how long it is, but most models come with a little knife tool for cutting the hair. Never tried the models that advertise that they don't get tangled.
7) Bonus nerd shit you probably shouldn't do. If you really do not want your Robovac connecting to the cloud, there's some work on developing self-hosted management servers that you can point a rooted robot at, and of course you can root your vacuum cleaner, because it's just an embedded Linux box on wheels. The open source management server software is called Valetudo.
16 notes
·
View notes
Note
So your art tutorial is living in my head rent free and it’s really helping me with drawing Sunstreaker in general (he is my besides Wheeljack) and I was wondering do you have any times with drawing transformers from like different angles??? I’m having difficulty with that even with references.
I’m so happy that my little tutorial has been able to help you!
I’m looking through my photos for a picture of how I draw them at different angles (jokes on myself I’m terrible at taking pictures of stuff in the process) and here’s what I found as well as some very scattered thoughts. This might be kinda long…
I really hope this is what you’re asking for haha
—
I will be honest and admit that this is smth I am still working on myself.

Here’s a really sad in the process sketch a drawing I did a bit ago. Here’s a link to the finished thing. Please ignore all of my comments on it….
I usually will try to look at human references for the pose and the general idea mostly stays the same. You just need to think a bit more about depth when making your shapes. If that makes sense?
It’s a lot of the same concepts as before with how you build the body and add the details.

Here’s some line art from an old sketch of a character I never finished.
Theres a lot of 3 dimensional stuff on it, and to be honest…. It’s far from perfect. But theres a good chunk of overlapping that can help with making it have more depth. I’d recommend working on studying 3D shapes to help with different angles and if you want to get more detailed with that.
Another thing I recommend (though I don’t perfectly execute it) is avoiding tangent lines. When two lines sit close to each other, they almost line up or they just barely touch, it can make the depth feel weird. It also can clutter the design. There are a lot of those in my drawing and it’s kinda weird ngl.
Once again. I still struggle with them so…. Yeah.
But if your more like me and doing a bunch of 3D shapes is a lot of work for one sketch (why I stopped drawing like that for the most part) then you don’t really have to make everything look like 3D. You just trick people into seeing it.

With sideswipe I only add a few lines to give it depth. I mentally map out (or draw it in the sketch layer) the dimensions to stuff. There are still some things that are awkward in it, but it generally works.
I am doing terrible job at explaining this my goodness. I’m so sorry.

Another example of a doodle that’s kinda at a weird angle. Once again, far from perfect lol.
I did absolutely nothing with trying to give the shapes depth. Instead I just worked on how things would overlap and how the angle affects it. Instead of making the upper arm long it gets shorter and wider because of the angle—stuff like that.
I’ll admit that I just do a bunch of guessing and winging it. I also accept that it’s not going to be perfect and move on. I’ll make small comments to myself and if I can’t fix it after several tries I continue with my life. Most people won’t see it and getting caught on small things like that can get frustrating quickly.
I feel like I’m rambling and not being very helpful.
I can try to make a more helpful version of this if you want I’ll just have to think about it for a couple days so I understand my own process. But I didn’t want you to be ignored.
#transformers#art#doodles#transformer art#my art#asks#art tips#i’m trying#I also struggle with doing angles and stuff#if you need me to elaborate more I will try#please don’t be afraid to ask#I don’t think I explained this well#I’m terrible at this#I’m sorry#but hopefully it can help a little bit?#I didn’t know how in depth you wanted to go#I can make a more official version of this if you want
8 notes
·
View notes
Note
hiii what are your thoughts on Mario Galaxy 1, 2 and 3d land specifically ʕ·ᴥ·ʔ
mario galaxy 1 and 2 are fantastic and in my opinion A tier platformers both separately and together, and 3D land is mid and i get bored of it every time i try to play it. I never played it when i was younger, this is my adult opinion, i think 3D land is mid.
I think what frustrates me about like, 3D land, 3D world, and bowser's fury is that they don't even attempt to pull me into their worlds. Every mario game has some level of abstraction in its worlds for the sake of a platforming challenge obviously, but for some reason the design philosophy here was to cut all of the fat and only leave behind the things that have some form of player interaction. Both of the galaxy games at least try to contextualize their stages, there's a framework for interacting with abstract platforming challenges (you're on a spaceship traveling to alien galaxies, if the galaxies are weird it's because, you know, space is weird), and some of the stages you visit try to convince you there's little aliens living on whatever galaxy you're visiting even if it's completely impractical, but i appreciate the effort a lot more than the non-effort that 3D world/land stuff puts in.
and bowser's fury felt cobbled together in a weekend, they just put a bunch of straightforwardly linear stages together in a box and made you travel between them by plessie instead of by map and called it open world. It's kinda sucks, in my opinion.
19 notes
·
View notes
Text
Wake up babe, I fixed your son.


It's not perfect but I tried, kept the heart bc I thought it was cute, but got rid of the rest of the random lines bc I don't get why they were there in the first place. They don't even line up with any actual articulation points or anything.
In the original, he's smiling but doesn't have any skin crease under his eye, so the smile doesn't read as "I'm a friendly fellow who's glad to see you!" it comes across more as "I am about to bite you😀 "
All of his iris and pupil are visible which almost always looks creepy bc you only ever have a completely unobscured eye if you're pulling a surprised/scared or really angry expression. His eye closest to the camera is also slightly too small and looking in the wrong direction so he looks really vacant and like he's not actually "seeing" anything, just staring blankly. He also didn't seem to have an eyelid of any kind. like a crease just above the visible eye where the eyeball is lying under the skin and makes a slight lump, without it his face looks really flat and weird.
I gave him a tad more nose bridge just because his nose is so tiny that on a 3d model under any bright light it just completely vanishes. Also, i get that his eyes are meant to look like camera lenses, which is a very cool idea in theory but in practice looks REALLY creepy to have his whole eye like that, I could see it working if it was just his pupil (03 kinda does this in close-ups when he scans stuff) but having that texture on the iris too just looks grim. not to mention that it'd be a massive robot giveaway that would mess with the whole secret identity thing they're planning.
Got rid of his individual teeth and turned them into just one white slab bc they p much always look horrifying on cartoon characters and this is no exception. And lastly, I smoothed out the weird dent in his hair because I don't get why it's there in the first place, it looks like he was dropped on the head.
Also, this is very much a random thing I noticed, but the lines on his chest are really warped on one side which looks to me like his model isn't mapped/rigged (< not a 3d artist so idk if that's the right term) very well and it's causing weird texture stretching because of the extreme posing.
#When in doubt make the lash line thicker#idk why they keep trying to make him 3d#it don't look good...#astro boy#astro boy reboot#tetsuwan atom#osamu tezuka#edit#screenshot edit
48 notes
·
View notes
Text
A
It's kinds frustrating not really enjoying stuff that's fun! Why do I have a romanticized idea of fun in my head where I want to do things that are fun to most people (like play games) but I usually either get frustrated or bored really quickly and end up turning stuff off in like 15 minutes.
TRULY the stuff I have the most fun with is storytelling, art, etc! Also learning about stuff, listening to videos and music. Sonic games are actually some of the few games that can keep me engaged for a long time, but that's probably because I'm actually engaged in their world and stuff! (Specifically the 3d games.)
But I just... Struggle doing other stuff. I have gotten the sims 4 so many times and just. Left it to rot. I just redownloaded it and started playing, but... I don't know why but I can't stay on it too long because I'll just want to get off. If I'm being honest, I only got it again to make 3d models of buildings and environments to draw over but I suck at building!!! And idk how to traverse the gallery!!! And that leads me to just get off the game and look up a map of San Francisco (where I want my STH MLB AU to take place and just look around, but that also only made me realize how little ik about San Francisco (so any San Francisco experts, hmu /silly)
But my point is, I can't engage in anything fun without treating it like work! Like I need to be doing something to make this worthwhile for my art, stories, and AUs.
It's weird to say I basically have 3 hobbies. Drawing, writing, and storytelling. Gaming is an additional one from my hyper fixation. But honestly, I'm just not sure what to do. The way I unwind is almost exclusively with my creative media, but that also makes me feel worse when I don't feel like doing anything or have a creative block because I can't do the one thing I'm supposed to do.
I feel like my art and stories haven't been fulfilling enough recently. I don't know what it is but I'm just not satisfied with it. Is it the quantity? Quality? Content? Response? I don't know, I just feel like I'm slipping
Maybe this is why I'm getting back into my older stuff, chasing a time where I felt fulfilled.
Sorry for rambling this is probably incoherent
12 notes
·
View notes
Note
Your art is so pretty and clean and colorful!! I’m still thinking about happy Chert in their summer dress.
Do you think maybe you could talk about your process? Especially coloring and rendering? Im working on understanding my own style, so I’m asking some of my favorite artists how they learned and refined theirs. Practice, obviously, but what kind of practice? What were the hardest things to figure out?
Hi!!
First of all: AAAAA?????
Second of all: This genuinely made my day reading this <3 Thank you so much, like seriously :’}
A part of me doesn’t feel all that qualified to answer this, I’m still learning and refining my own style and it genuinely feels so crazy (in a good way) that people have been really enjoying the stuff i do, but in regards to what kind of things i do for practice/ things I’ve learned over the years-
1. Be insane about a character
Like 0 joke, there was a 6ish month period a few years ago where i got really obsessed with a couple of my ocs and used them for pose practice ALOT. Using references was a BIG help to learn anatomy. I’d usually find a pose i was looking for on google, paste it into my canvas and do a few tracing passes.
One where i map out the skeleton in one colour. Another where I map out the BIG shapes in a different colour. And then another where i map out little shapes or shapes that I’ll need to add (wings, horns, etc) in a third colour. I’d then hide the reference image and set the traced skeleton off to the side and try to recreate it step by step!
These were only a year apart!! Left- Pre obsession (2022) Right- Post obsession (2023)

I had another bout of it late 2023-early 2024 with some Baldur’s Gate ocxcanon shenanigans that also boosted my art in the same way. And now I’m in my Mylo/Startners era!
2. My basic art process
The sketch is done on a mid grey canvas with coloured lines (mostly for eye problems lmao). I learned from a post SOMEWHERE on tumblr that blurring the sketch and putting it on REALLY low opacity helps a lot with line confidence and it really does work.
Lines are done in a non-black colour depending on what the main colour scheme is. Most of my furry works and my oc works are done in brown because i use a lot of natural browns and beiges in them but almost all of my outer wilds stuff is done in navy blue or dark purple. There are some works even done in pinks and reds just because i thought it would look pretty! I also LOVE using textured brushes and use the same textured pencil on 7px width for like everything now.
Colours are done by half manual colouring and half fill bucket. It’s a pain in the ass but Krita is weird to work with sometimes. I throw down basic flats, 2 layers of blush, and things like eye shines etc. Almost every single thing has its own layer, usually grouped into things like ‘Skin, clothes, eyes, etc’ and then regrouped into specific characters if theres more than one.
Rendering is still something I’m working on. I have a really hard time understanding light and shadows but it REALLY helps to understand the 3d form in some way whether thats with references or with a 3d model!
I personally love my layer adjusters (cannot think of the right word rn) when it comes to shading. I mostly use Multiply, Colour burn, and Luminosity (Sai) for shading. Screen is used for glass and Overlay is used for things like eye shines and sparkles!!
Then to finish everything, if theres no background i love adding a light colour border around everything to make it look kinda like a sticker :3
3. Don’t be a perfectionist.
I know saying that to artists is like asking the world to stop turning but i swear to you that it doesn’t matter. It’s not very often that i sit and do proper line work, a lot of the time (if the sketch is clean enough) i just colour in the sketch or just post the sketch as is. And even when i do line work leaving in line gaps or shaky/sketchy lines isn’t the end of the world. If anything i find that textured lines and colours look NICER that perfect crisp works a lot of the time.
4. The hardest things I had to learn
Anatomy, colour theory, shading, perspective, and backgrounds were some of the hardest thing’s I’ve had to learn, and honestly sometimes i don’t feel like i understand them at all. I hardly ever do backgrounds or weird camera angles because it hurts my brain to try and figure out stuff like foreshortening, but sometimes you just have to try it out.
You gotta get weird with it sometimes. Go to a colour pallet generator online and colour in something using it. Draw the same character a million times. Try different brushes if you do digital or try different mediums if you do traditional. Get out of your comfort zone!
I know it’s very controversial these days but steal style things from artists you like. My art is a mishmash of so many different artists who have inspired me over the years that i no longer know where half the things I do come from. Sometimes you even just have to go ‘What if…?’ And try something!!! That’s how I started doing eyes and lips the way i do! Even if you don’t do it consciously, a lot of the time your art will be influenced by something you’ve seen like games or shows and that’s okay!!!
In short, i really hope this made like a lick of sense.
I’m not a professional in the slightest, I’m just a man who’s been drawing since elementary school (and almost dropped out of art college), and I’m i don’t really know how to give coherent advice, but I genuinely hope this was helpful!! I’d post like examples of my art process but the laptop I’ve been doing all my art of is kinda down for the count rn! If/when it’s back up and running i might add some stuff to this but for now!!!
Thank you so much again for coming in and asking!! <3
5 notes
·
View notes
Note
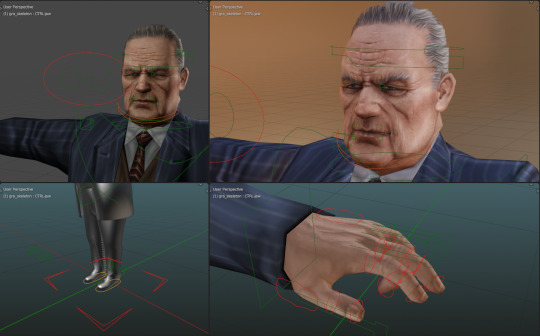
Yo your rigging skills are immaculate! Where did you learn such dark magics, I'm still learning modeling as a baseline. But I figured I might aswell ask then post it for others!
Helloo! Thanks for your compliment 🥹 I'm glad the stuff I do looks cool enough to make you say that.
Part 1st - The Inception
When it comes to 3D I still consider myself more on the hobbyist side than the professional one.
I have a weird past in self-taught 3D modeling and game development at the same time so the logic for topology, weights, constraints and such seems to have a dedicated core in my brain that developed through sheer trial, error, tutorials and some actual studying. But I don't think I can exactly pinpoint a linear path that has taught me all of this.
Part 2nd - The Ruse
On the other hand, low poly models are much more manageable than modern high fidelity stuff. That certainly works in favour of hiding my weak spots hahaha.
Part 3rd - The Rigs
When it comes to the rigs I use in my videos, I've been testing different approaches. Thankfully, the extraction tools do preserve the original weights for the most part, but I have had to do weight necromancy to recover missing information sometimes, I made a script to recover missing weights whenever that happens.
My older MGS animations use just some basic IKs and Drivers on top of the deform bones (I should get fined for those crimes) because they were a ton of characters, I wanted to save time and the extraction workflow was pretty new to me and I didn't know what to expect next.
For the newer ones, I started adding more complex control rigs until I hit a limit where it was not scalable.

To speed things up, I now have a custom set of tools to quickly name bones and then I map them to a Rigify uh... rig. That's how I rigged The Boss for a recent video.
Part 4th - The Craftpersonship
I do continue to make new rigs for original characters from scratch because I like to learn and improve in that front rather than just rely on tools to make them for me whenever I have the time for that.
55 notes
·
View notes
Note
idk if you've answered this before, but what made you want to learn 3d modeling? :3
i don't mind answering again!
i love the uncanny feel of older games. sometimes the low fidelity of the textures and the vacant backgrounds of older games due to limitation makes it creepier than it intends. i especially clue in on ps1 games as i write this because of the weird jitter effect that comes from erroneous texture mapping. the movements are uncanny and cryptid-like. even in games that aren't horror (og final fantasy comes to mind).
recently i got into modeling monsters because the designs are so varied and more could be done horror wise via monsters (silent hill is a game i'm citing for this but mostly falin's chimera form kickstarted it). i'm in a process of translating bloodborne and bloodborne inspired creatures into lower poly/ps1 inspired. i made it a personal rule not to worry about the standard poly count (300-550 polys for a model) for fromsoft beasts. a lot would be sacrificed. it'd be a beast, sure, but not a fromsoft one.
that being said, my madoka64 stuff will be low poly. the fromsoft inspired beast stuff? definitely not.
7 notes
·
View notes
Note
What is 17776? All I know about it is that it has characters, could be a book, tv show, video game, etc, so go wild with infodumping.
If you send an ask back, I'd prefer you send it to my second blog, @k-owo-sher unless you are requesting a drawing, as my main is my art blog
i like to call 17776 a multimedia experience! because while 17776 does generally follow a webcomic format, it also makes use of video and nonstandard formatting and i LOVE that about it. 17776 introduces itself in a super weird way, it made me think my computer was broken at first, it makes you scroll a bunch in the first chapter and then never again, and it's so good while being only like 13 chapters long. i don't really want to spoil anything plot wise because i SWEAR it is so good with all the reveals and worldbuilding in the beginning.
but i will say that like. 17776 is such a earnest and genuine story. it feels very made with love and you can see that in some of the janky camera moment in the videos or the way that characters speak with each other or the specific details the story chooses to focus on - all of it feels so, so real because it's so heavily based in real* life. it's all based in the usa and it is so immediately and usamerican story, but the lives and hopes and fears of each character feel like a message to everyone in the world that it's okay to keep going. 17776 doesn't try to explain everything about its own world, just the things relevant to the current plotline and it's! so good! i like that it doesn't try too hard with explanation even though you Know the author probably thought a lot about some of the stuff.
17776 makes heavy use of google maps (screenshots of it and moving along 3d maps itself) to emphasize the Space and Scale of the story and it's SO good. especially when there's dialogue going along as you move through a particular area it just really feels like a dream or a movie you saw as a child. it feels very loving and i like that
*Albeit an alternate version of reality, but very grounded nonetheless.
15 notes
·
View notes