#ts2 overlays
Explore tagged Tumblr posts
Visit Tumblr Blog
Explore Tumblr blogs with no restrictions, modern design and the best experience.
Last Seen Tumblr Blogs


Fun Fact
China blocked Tumblr because of pornography and censorship problems in 2013.
Text
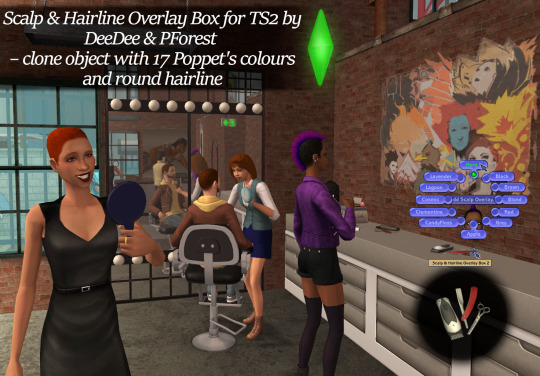
Scalp & Hairline Overlay Box 2 - 17 PV2 recolours and round hairline
@pforestsims & @deedee-sims made this awesome Scalp & Hairline overlay box. Some creators already made recolours in their prefered hair systems BUT since these are all recolours using the same packages they all conflict with eachother and you can have only 1 box. I wanted to have one of Simgigglegirl's in my game and also separate one that would have colours I post therefore I made this box. Looks the same, works the same but doesn't conflict with original box nor it's recolours.
Box's object is the same as original (because I like it), only two colours are new: PForest's hair trimming accessories found in Buymode → General → Dressers, for 25 Simoleons:
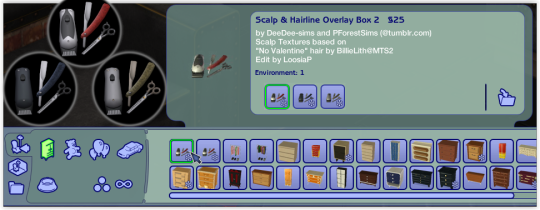
Scalp's and hairline's textures and alphas are the same as in this second PForest's version with round hairline instead of original widow peak (credits for the texture PForest's used goes to BillieLith). Recoloured in colours I usually upload: Poppet's V2 natural and unnatural colours as well as BerryNooboos’ Cosmic, Wyxii’s Mint, Furbyq's Afterglow and PMG's Amphitrite; aditionally I added Volatile and LightGrey colours that @rudhira's adding to her custom hair retextures.
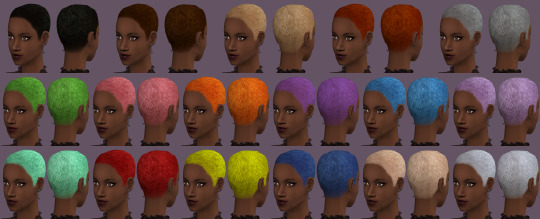
↑ Shown on base game's hairbald mesh using PForest's mesh default and my hairbald texture default. I recommend downloading PForest's no shine default or Rudhira's v1 default or my hairbald texture default so colours won't look dull on this mesh. Swatch included in the download. Avialable for all ages and unisex.

DOWNLOAD: MF | SFS
Textures are in standard size (512x512px), format DXT5, I included all textures in the download in png format just in case someone wants to edit them or recolour or smth (delete them otherwise)
There are some additional informations in the README.txt file included in the download, you check it out 👉👈 (lmk if you think I should add some more info)
Also Thank you @themeasureofasim for great tutorial!
162 notes
·
View notes
Text
Updating... The Tattooer (ver. 3.4)!

Finally! Took me a while, huh. This is the updated version of the Tattooer project. It skips some steps, making the workflow much, much faster! Huge thanks to @applewatersugar for his suggestion on how to bake textures while preserving the transparency. This is kind of a repost of the original Tattooer post, but it actually has some new stuff and a few changes here and there, so please take a look if you want to learn how to use this new version.
This is a series of Blender template files already set up to quickly bake textures from The Sims 4 to The Sims 2. The different Blender files will allow you to: -Bake body textures from TS4 to TS2 (Female) -Bake body textures from TS4 to TS2 (Male) -Bake body textures from TS4 (Female) to TS2 (Male) -Bake body textures from TS2 (Female) to TS2 (Male) [Bonus!] -New! Bake face textures from TS4 to TS2 (Unisex) [Bonus!] -Bake head textures from TS4 to TS2 (Face + Scalp) (Unisex) [Still experimental] Check the file names to see which one is which, and the resolution of the baked texture it will give. Everything you see in the render above was 100% converted using those Blender files.
Download here! SFS / GD
Update: Version 3.4.1 (27/08/2023) Fixed some issues on the shoulders for the AF-body-4t2-1024 and AF-body-4t2-2048 templates. Now the top straps on most converted underwear/swimwear should look right.
Update: Same version (13/12/2023) As requested, added a new spanish version of the included pdf guide!
These templates were made mainly to bake and convert tattoos, but there’s more you can do with them if you get creative. I have to say, these are NOT perfect. Results may vary depending on what you are trying to convert, so! With that in mind, this is all the stuff you will be able to convert almost seamlessly from TS4 to TS2: -Tattoos. -Other body details such as body hair, scars, freckles, supernatural/occult details… -Body painted underwear and swimwear, as well as some other clothing that’s mostly painted on the body. -Socks, stockings and maybe leggings. -Even skintones! In some areas they will look weird, so I recommend editing and blending them with other existing TS2 skins. -Makeup, eyebrows and beards. In the old version this was just a proof of concept, but now I’ve added a new Face file template which gives some pretty decent results! -Hair scalps. Very useful when converting some hairs! Although keep in mind part of that texture might also need to be baked on the face mesh, you know, that hairline makeup stuff.
Got your attention? Nice! Editing some of the textures from TS4 to match the UV mapping in TS2 using a 2D editing program can be incredibly hard. That’s where texture baking in Blender comes to the rescue!
You will need to download Blender, at least version 3.4, but you could always use a newer version. It is only incompatible with versions older than 3.4. -You can download Blender for free here. -You will also need Sims 4 Studio to extract the original Sims 4 CC textures you want. In the first version of these Blender files, there was a necessary step using Photoshop, but that’s no longer needed. However, there’s still a tiny extra step which requires resizing the newly baked texture on some of the high resolution templates, so you might need a 2D editing program like Photoshop. More on that later.
So, before we begin, let’s clear out some questions you might have. What the heck is this texture baking thing and what does it do? Well, let’s imagine you have a video projector and point an image into a blank wall. Then you pick up some brushes and start painting and copying that projected image in that wall. Texture baking is kinda like that when it comes to 3D models. You align two models and match them as closely as you can in shape and form, and once you adjust some parameters and values, Blender does the rest for you: it will give you a new texture for a new model with a different UV map. These files I’m sharing have everything already set up, so it’s a matter of plopping in that Sims 4 texture and you will get that new texture for TS2 in just a few clicks.
This tutorial assumes you know literally nothing about how to use Blender, so if you feel uncomfortable with it, worry no more! This will guide you with pictures showing where you need to click and explaining what is happening. For Sims 4 Studio and Photoshop the process might be a bit less detailed, but still this should be pretty beginner friendly. For this tutorial, I will use some tattoos as an example (properly credited at the end of the post). Alright, enough with the rambling. Let’s get started!
·EXTRACTING TEXTURES IN SIMS 4 STUDIO: First things first, you will need to extract as pngs all the textures you want to convert from TS4 using Sims 4 Studio. It should be pretty straightforward. Just open the packages and export the Diffuse textures. Keep them organized in a folder for easy access.
·BAKING THE TEXTURES IN BLENDER: PRELIMINARY STEP 1: CONFIGURING BLENDER’S GRAPHICS SETTINGS: Open your preferred Blender file depending on what you’re going to bake and the desired resolution (in this example I’m going to use the AF-body-4t2-1024 file). Before we start messing around in Blender, there’s one thing you should set up. It is a onetime step, and once it’s done, you won’t need to do it again. So, does your computer have a dedicated graphics card? If you don’t know or you’re not sure, just skip to the next step. Configuring Blender so it uses your graphics card instead of your CPU will make the baking render much faster, so it is recommended you set it up correctly. If your computer has a dedicated graphics card, click File (1) > Preferences (2) > and on the window that pops up click System (3) > and select CUDA and make sure your graphics card is there and tick it (4). I have an Nvidia Graphics card but your case may vary. Once you’re done, click on the tiny button on the bottom left corner and Save Preferences (5).

PRELIMINARY STEP 2: CHOOSING THE RENDERING DEVICE: Click on the tiny camera button on the right, called Render Properties (1), and on Device (2) select GPU Compute if it’s not already selected. If you’re not sure if you have a graphics card or not, just select CPU. Then select the Material Properties tab (3) and Save your changes, either by pressing Ctrl + S, or clicking File (4) > Save (5). You might need to do this second step with the other Blender files, but once you have it done and saved, you won’t need to do this again. Okay, time to get into the good stuff!

·STEP 1: LOADING YOUR TS4 BASE TEXTURE: In the Material Properties tab, click the folder icon that says Open (1) and on the window that pops up, navigate through your folders and select your first texture. To navigate easily, the 3 buttons on the top right (2) are for the display mode. They will show your files in list mode, vertical and horizontal, and the one on the right will display the file thumbnails, pretty useful if you want to easily preview your textures here. The icons on the left side (3) will let you go one folder back and forward, go to the parent directory, and refresh the folder in case you just dropped something new in there. Double click on the image you need and that will load the texture into the Sims 4 body model, named “ts4 body”.

·STEP 2: SETTING UP YOUR SELECTION AND BAKING THE TEXTURE: On the top right of the screen, you will see the names of the 2 models in the scene. Hold the Ctrl key in your keyboard and left click on the “ts2 body” model (1). If you did it correctly, you should see “ts2 body” in a yellowish orange color, and right down below, “ts4 body” should look more like a red orange. If not, try again by clicking first on ts4 body, and then while holding Ctrl click again on ts2 body. Then switch to the Render Properties tab by clicking the tiny camera icon (2) and click Bake (3). Depending on your screen resolution, you might need to scroll down a bit with your mouse to see the Bake button. Wait a few seconds for it to finish. You will see the progress percentage down on the bottom of your screen. Don’t panic if you notice your computer fans start ramping up, that’s completely normal! As I said in the beginning, using your GPU will bake the textures much faster than the CPU.

·STEP 3: SAVING YOUR NEW TS2 TEXTURE: Once it’s finished, switch to the UV Editing Mode by clicking “UV Editing” on the top of your screen. And there it is: your new texture! You might have to scroll up your mouse wheel a bit to zoom in and see it in all its glory on the left side of the screen. We’re still not done yet though. You need to save it to yet another new folder (always try to keep your stuff organized!).

You can save it by pressing Shift + Alt + S, or clicking on Image* (1) and then Save As… (2). That will pop a window where you’ll need to navigate again and save it somewhere. Give it a proper name (3) and hit Enter to save it… well, Enter doesn’t always work for me for some reason, so if that happens just click Save As Image (4). And that’s it! You’ve successfully converted your baked texture. Congrats!

·STEP 4: GOING BACK TO STEP 1: Alright! If you’re done with your textures, you can close Blender without saving and call it a day. But let’s say you want to keep baking other swatches. In order to go back to step 1 and start the process once again, click Layout (1), go back to the Material Properties tab (2), select “ts4 body” (3) and click on the folder icon (4) to open and load your next swatch.

Then it’s just a matter of repeating the process from step 2. When you’re ready to move on, close Blender without saving. If you see a small check telling you it will save some images, make sure you uncheck it, so you will be able to use it again in the future from the starting point with no issues. I don’t think it really matters if you accidentally save your progress in these files, but I like to keep it clean and fresh so I can do the process where I left it from the beginning next time I open it. And in case you mess up and save somewhere, you can always just delete the .blend file and download the template files again.
In case you’d like a video tutorial on how to use these files, the amazing @platinumaspiration recorded this fantastic video showcasing the process! You can watch it here.
One final note: some of the baking .blend files save the textures with a resolution of 2048x2048 pixels, as clearly stated at the end of their file name. That’s way too overkill, because TS2 only properly supports up to 1024x1024 for most of its textures and you should always resize your final product to that max resolution (or lower if needed). I just made those 2048 versions because there might be some really tiny and slim details on some tattoos that might look a little too blurry when baked into a 1024 resolution texture, so for those cases use that if you want and then resize them using your 2D editing software of choice. In Photoshop, in the Resample mode of the Image Size menu, there are a few options to choose. For the fine details, I like the Nearest Neighbor (hard edges) option, which, even if it looks a bit pixelated, it still preserves most of the texture and quality.

For anything else, I would just directly bake them using the 1024 versions in Blender (512 for the face and scalp).
And for the folks who feel comfortable playing around in Blender, this is just the beginning! Texture baking opens a LOT of possibilities, so feel free to move stuff around and edit the models to your liking! If you notice the baked textures look warped or stretched somewhere, or don’t like where some textures are placed in the S2 body, poke around that area moving stuff and then give it another try. The main objective of the baking process is keeping both overlapping models as close in shape as possible. You may also edit and save new copies of the templates, or make new ones from scratch using mine as a reference (keep a close look on those Baking settings and values, I think they work pretty well) and share them if you want to. Go ham, do whatever you want with them! I still have plans on making templates to convert body textures from Sims 3 to Sims 2, but for now it’s not on my priorities, so we’ll see when that happens.
Whew! Hope none of this was too confusing. Need help or have any issues with these? Please ask/message me here and I’ll be glad to help when I’m able to!
Credits for the CC used in the render demonstration: -Skin by Sims3Melancholic. -Eyes by Northern Siberia Winds. -Eyebrows by PeachyFaerie. -Tattoos by xtc. -Top by SerenityCC. And the Tattoo I used for the tutorial can be found here, by ValhallanSim.
Last but not least, a huge thanks to all the people who somehow contributed to make this project and update possible, either by doing initial testing, finding issues to fix, or teaching me new Blender tricks to make the workflow way faster and easier. So thanks again to @elvisgrace @moyokeansimblr and @applewatersugar on Tumblr! <3
And thank you for reading! Hope you have fun playing with this (not so) new toy hehe.
#tattooer project#tattooer update#ts2 tutorial#ts2 resources#ts2 blender#ts2 overlays#ts2 texture baking#4t2 conversion tutorial#this took me so LONG to update#im really sorry for the delay :(
402 notes
·
View notes
Text

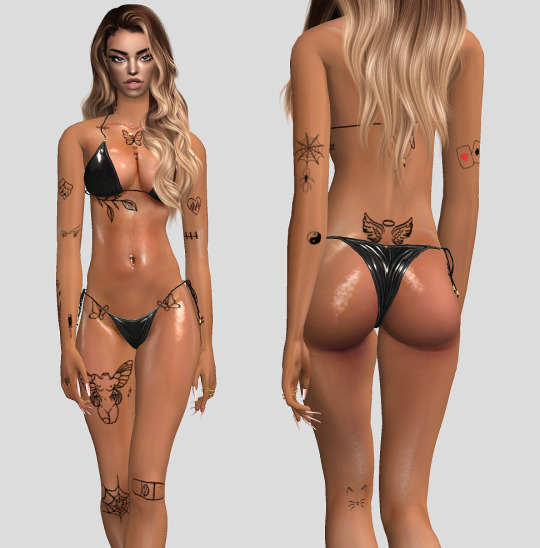
All Myshunosun Tattoos in One
Yep, just like it says, I combined all the tattoos of Myshunosun's into one overlay box. You save on time and GUIDs. Win. Win.
Remove this and this tattoo box if you have them. The new box includes Heartlines, Flash, Homemade, and Caroline
Download - SFS | MF
Please let me know if issues!
credit: myshunosun, paluding (tattooer)
#4t2 cc#4t2#s2cc#sims 2 cc#sims 2 download#ts2cc#ts2 download#4t2cc#4t2 conversion#the sims 2 cc#sims 4t2#4t2 download#download#dl:tat#dl: tattoos#tattoo overlays#dl:box
1K notes
·
View notes
Text


Deep in the Alpine Mountains lies a small secluded town of Crystal Cove, stuck in a slumber and mist, where nothing seems to happen ever. Forgotten, fated to oblivion and ruin… or it seemed to be till a certain group of young individuals decided to make it their home. Will they succeed or despite their best efforts the town will cease to exist?
This is the very first time I will be playing with the entire hood (that I also made myself) and first time playing sims 2 in few years so please bare with me while I figure things out. I'm beyond excited to introduce sims 2 to my blog and I hope you all will enjoy it.
The gameplay is inspired by build a city challenge but I won't be following any specific rules so I don't limit myself on what I can do. It's mostly because I'm not yet familiar with the game. As for now though, I plan on using money cheats only for decorating purposes, not to make my sims' lives easier in any way. I'm also looking into providing a randomized challenge or an event for each household every round to hopefully make things interesting.
Each round takes about one sim week in this neighborhood and we will be starting on the last day of summer. Currently there are 6 households which include a total of 8 residents. Any new households that move in will be added at the end of a round so I can keep the original rotation.
the hood directory page will be made, I just need some time :)
#ts2#ts2 gameplay#ts2 scenery#lin plays ts2#crystal cove#crystal cove 1.1#I tried to layer sort of mist overlay over these screens#I think it came out quite cute#it’s a never-ending work in progress for this neighborhood so if it seems empty you know why#I was just desperate to play and I think it fits the storyline#the founders are supposed to slowly build upon it and that’s what I will be doing
107 notes
·
View notes
Text


Though she could never prove it, Ophelia was almost entirely sure Olive had been trying to get rid of her for weeks. Her previously cold and disinterested aunt had started spending more time with her, making special meals for her, handing her pills when she was sick.
Sometimes, Ophelia would find the gas stove still lit, its fumes warping the air around it. Electrical cords would be placed inches away from the bathtub, just itching to be pushed into the water. The worst, though—the one that kept Ophelia up at night—was the new slab of stone that had appeared in their cemetery…and the seemingly Ophelia-sized hole waiting beneath it.
#ophelia is not dead guys i SWEAR lmao#oh btw the pics with this dusty/orby overlay are flashbacks#strange2#strangetown#ophelia nigmos#olive specter#ts2 premades#sims 2 premades#sims premades#premade sims#ts4 story#sims 4 story#sims story#sims#the sims 4#simblr#ts4#ophelia specter
170 notes
·
View notes
Text

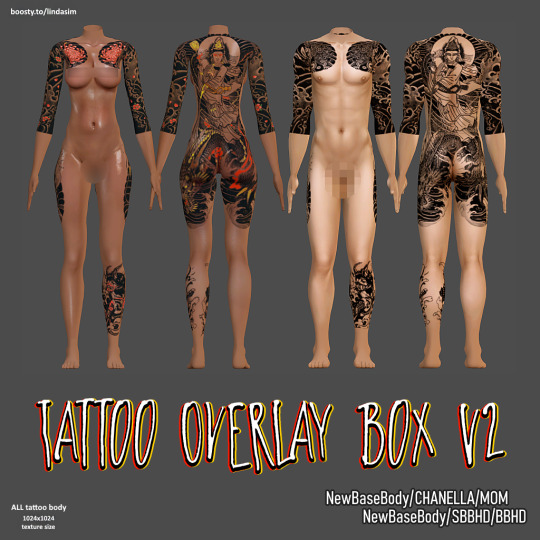
Tattoo overlay box v1 / Tattoo overlay box v2
#ts2cc#ts2 custom content#thesims2#ts2#sims2#sims#ts4 to ts2 conversion#ts2 download#the sims 2#ts2tattoo#ts2overlay#ts2tattoo overlay box#ts2NewBaseBody#ts2CHANELLA#ts2MOM#ts2SBBHD#ts2BBHD#ts2teen#ts2adult#ts2female#ts2male
109 notes
·
View notes
Text

#ts2#sim pics#yet more blorbo ship content that caters to me specifically from yours truly. surprise! /s#there's a severe lack of j on my blog so i'm fixing that#bc contrary to what it might seem j's actually my favorite lmao#i actually have a few ideas for more elaborate pics of her only but they'll take some time still#also i really love her expression here. i tried to mix overlays to get something natural#also. the way i had to completely reconstruct (aka handpaint) several of z's fingers bc of clipping. smh#hopefully you can't tell 😅#mine#wanted to add a song to this but i'm blanking rn so
33 notes
·
View notes
Text


UMMMM HELLO????? FOUND THIS STUFF BY zeta_reticuli ON SIMBLR.CC THIS IS TS1??????
#god great now i want to be on this level#i can actually imagine pretty vividly how to create this stuff for ts1 but do i have enough willpower in me to do it?#okay maybe in 2025. im still not done learning how to create overlay boxes or convert hairs for ts2 i need to do that first#btw im pretty sure that this is the person on simscord that was nice to me and super funny all the time so im personally biased#but this stuff is objectively INCREDIBLE#i love most ts1 cc i see but ive only seen heads like this twice one is vivacious and the other one is what seth showed me once#crazy happenings in the ts1 fandom#omg also simfreaks had some really cool heads.#even though they broke their own website and also had a shitton of paywalled stuff this is still my favorite ts1 website#not to stir the pot of this paywalling discussion AGAIN but as much as i heavily dislike paywalling it's unfortunately always been there#okay im done talking. i think
29 notes
·
View notes
Text


bambi sent niko off to work & got a new tattoo :-) miram was there for emotional support
#p#ts2#sims 2#sav: bloom valley#y04sum#f: kimchi-soyka#this was the next day btw. they just went to work in the prev day#omg hi randomly generated tattoo artist bj nash.............#that's his name. i love it and him.#when he returns he'll actually have tattoos#i did an oopsie here and goofed up bambi's tattoo. it'll be fixed next round but sadly i don't remember which overlay box i used as the bas#so i couldn't tell you which one it is#i took a swatch and kept only the writing on the arm
16 notes
·
View notes
Text


Lilith Pleasant my beloved <3
#long post#sims#the sims#simblr#ts2#sims 2#the sims 2#pleasantview#sims 2 pleasantview#ts2 pleasantview#lilith pleasant#i gave her a tattoo overlay hehe
9 notes
·
View notes
Text
Sims 2: Trill Spots Overlay Box
My initial instinct was to do a Trill skin, but I realized overlays had a lot of advantages, mostly people can use whatever skin they want and aren't stuck with my choices, also you can have Klingon/Trill or Andorian/Trill hybrids. So... I learned how to do overlays just for this.
Spots are from this skin, I considered doing options from the genesims skins as well but I wasn't too thrilled with the looks of those spots, so I just recolored those spots a few times.
There are four different colors, labeled Alpha, Beta, Gamma, and Delta: A medium brown, a dark brown, a black, and a dark blue-grey. From left to right on the preview, Alpha on a tan default, Alpha on a light default, Beta on a medium default, Beta on a dark default, Gamma on the darkest of my Klingon skintones, Delta on the lightest of my Andorian skintones, and Delta on a skin the color of Pooklet's Hangfire. They're all wearing Castaway conversions so you can see the spots on the body.
My recommendation is Alpha for lighest skintone - Maxis tan, Beta for Maxis medium - Maxis dark, Gamma for anything darker, and Delta for aliens, but of course you can choose whatever, it just might take a bit of fiddling to get the spots to show up if your skin happens to be close to the color of the spots. Hopefully I included enough options...
Works for toddler-elder, both genders, the overlay box is a mannequin head with the Trill spots found in Misc > Dressers. Huge thanks to @themeasureofasim and @platinumaspiration for their tutorials (1) (2), because I was a bit lost at first and both of those helped me stumble through. Will I do another overlay box in the future? I have no idea. For now, though, I need to go back to something with less GUID fuckery.
Please let me know if there are any issues with this as this is my first overlay box!
DOWNLOAD: SimFileShare
42 notes
·
View notes
Text

WIP
Idk what I'm doing or where I'm going with it but it looks kinda nice from nhood view. Makes me think of lego houses or something.
#sims 2#ts2#pleasantview#montsimpa#remember to get recolors for the concrete stairs!!!#and the pool water color overlay thingy#sims 2 build#sims 2 uberhood
18 notes
·
View notes
Text


June wastes no time testing out her new bed, and finding new ways to keep warm in the chilly spring weather.
#ts2#sims 2#sims 2 gameplay#windflower bay#snapdragoned#round 9: st. davis#june st. davis#bettina lafontaine#i gave june lots of body hair and i love it tbh#is there an overlay for armpit hair? i'd love that...
14 notes
·
View notes
Text
Nebula Greene, from Greenwood, aspiring actress and just adorable.
#ts2#I'm having a blast customizing all the aliens in this hood with platasp's overlay boxes#pheeb plays greenwood
13 notes
·
View notes
Text


☀️ Sunburn [BV] & Overheat [SSN] txtr default
Includes AM overheat texture fix by Epi*
Download: SFS | BOX
*In vanilla game AM overheat body overlay 3IDR is incorrectly linked to AF TXMT. @episims has kindly made a fix for it - it's incorporated with my overlay default.
Update: Added new (alternative!) version of the Sunburn default with teen overlay fix created by @episims - it contains GZPS resource overrides so now teens get correct textures BUT you need to make sure no teen sims in your game have old sunburn / suntan overlay applied when you install it!
More under the cut:
*This is obviously for The Sims 2

*Guys also get tan lines, archive contains preview pic
NOTE: TF overlay is borked - it uses AM overlay - unfortunately this issue goes deeper than TXMT / 3IDR. Tan overlay is also not right, in that case the TM is using AF texture. This default doesn't fix that.
With Epi's teen GZPS override / fix installed (it is optional, sunburn txtr default without this fix is also available) old suntan / sunburn overlays on teens (body) become non-removable. Can be removed only with Sim Blender (change appearance/..), but first you need to age sim to adult and apply tan or sunburn overlay again for the 'remove' option to appear.
So it's best to make sure you don't have any sunburned or tanned teens when you install the default with a fix.


Sunburn (pics above) consists of universal scalp and universal face texture, plus three body textures for CU, UF and UM. I've noticed PU texture in the game files but it's not used so I haven't touched it.

For Seasons EP, Eaxis recycled the BV sunburn texture. Overheated texture consists of universal scalp and universal face texture, plus four body textures: PU, CU, UF and UM, all of these are used (children and toddlers in TS2 might get overheated but are much more resistant to extreme weather than teens/adults).
My replacement has no redness on the scalp and nose. The body txtr was desaturated, made more transparent and darker, otherwise it's unchanged.
Some crunchiness cannot be avoided with transparent body overlays, especially with light-on-dark - there's always gonna be artifacts, even if actual texture looks ok. But I'm sure you'll argee it's way better than original.

Pic above: Sunburn & overheating. Fun! 🤪
912 notes
·
View notes
Text
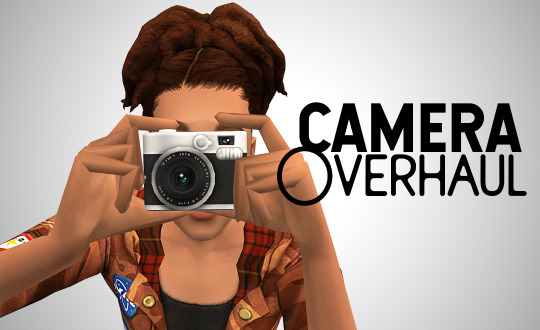
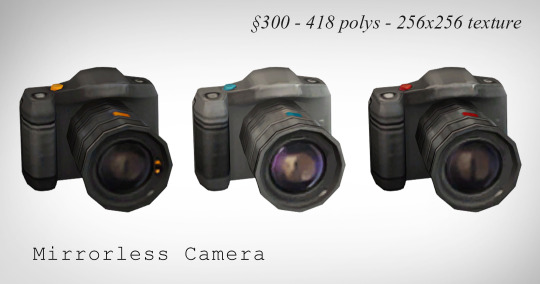
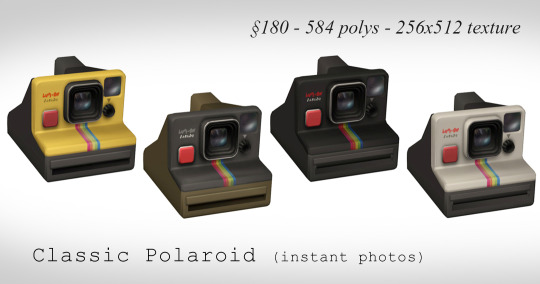
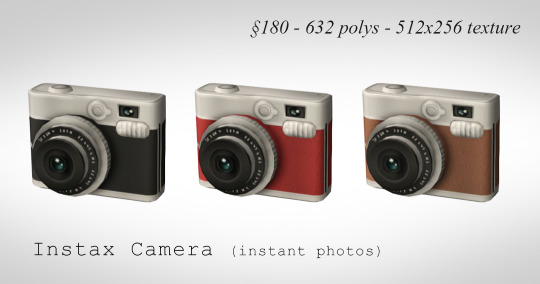
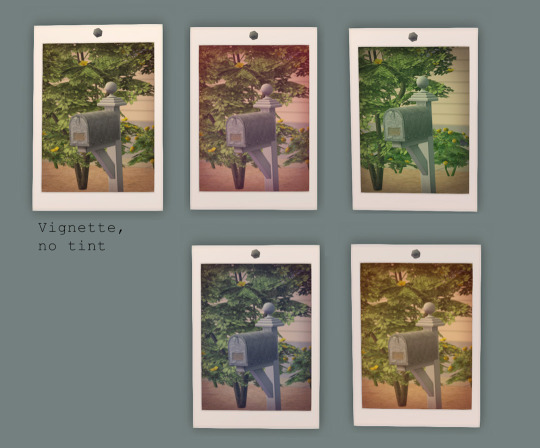
Done in collab with wonderful @pforestsims – it's 2024, high time to rework how cameras work in TS2!
With this mod, sims can only take pictures if they have a camera in their inventory. To make this more feasible, the default camera is now buyable under Electronics / Small for §120. (If your sim happens to leave on a vacation without a camera, they can still ask kind locals and tourists to take pictures for them.)
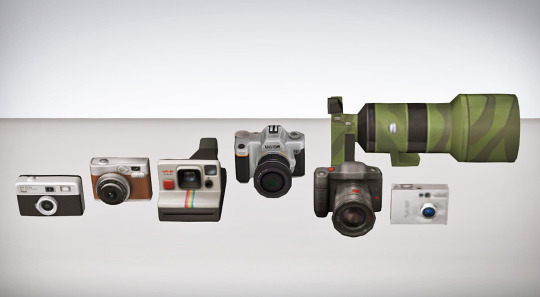
In addition, there are six new functional custom cameras.
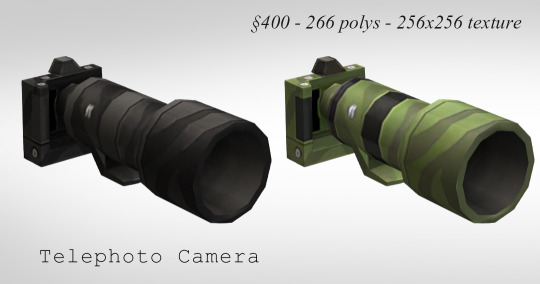
For most cameras, you'll need to order the photo with a computer to get a printed version, as is the default behavior.
Instant cameras: With Classic Polaroid and Instax cameras, the photo will be added to your sim's inventory right away. They require the instant photo mesh to work (included with the download). The photos taken with instant cameras can't be ordered with computers.
By default, the instant photo has a clear vignette overlay. You can add a tint to it by clicking the mesh and choosing either blue, green, red, or orange tint from the pie menu. It's also possible to revert it back to being clear.

There are two versions of this mod: the 'cellphone' one makes the cellphone work as a camera and is meant to be used together with my phone default. The cellphone will get picked for taking pictures only if the sim doesn't have another camera in their inventory.
The 'no cellphone' version has all the other functionality but the default cellphone won't work as a camera with it.
📷 Download (SFS) (alternate)
Files are compressed. Requires Bon Voyage and maybe University too. A collection file for the custom cameras is included; you can keep only those that you like, the mod works with or without them.
🚨🚨 Conflicts with the custom smartphone camera mod by @jellymeduza. Meduza has shared compatible versions in that same post.
This mod conflicts and isn't compatible with no bad photos mod by @picknmixsims.
There's also a conflict with the snowproof accessories mod by guirnaldas. Both mods will work if you make the camera overhaul load after the snowproof accessories.
This mod is compatible with camera default replacements that don't include an OBJD override, for example this one by @vegan-kaktus or this one by me works perfectly.
Update (12.5.2024): The default camera and all custom cameras are now sellable in OFB businesses. The cameras will also appear in the correct position when moved away from a sim's inventory.
Update (24.4.2024): Visiting sims can now be asked to take a picture for you if they have a non-instant camera in their inventory.
Update (29.1.2024): Taking pictures with instant cameras now fulfills the want to take a picture just as the normal cameras do. Sims using instant cameras also correctly gain art enthusiasm from it.
Update (28.1.2024): Both the default and the custom cameras won't get covered in snow anymore if used outdoors when there's snow on the ground.
The mirrorless camera was converted from TS4 by @lordcrumps, thank you for sharing the textures! The telephoto camera was converted from TS4 for this project, thank you @deedee-sims for extracting! The DSLR camera was converted for this project as well, from ACNH.
2K notes
·
View notes