#might pop it in photoshop later idk
Explore tagged Tumblr posts
Visit Tumblr Blog
Explore Tumblr blogs with no restrictions, modern design and the best experience.
Last Seen Tumblr Blogs


Fun Fact
Hackers stole 65M passwords from Tumblr in 2013.
Note
hi, idk if you take gif tutorial requests or not, but how did you make the text appear in the ghost story set with thobm? thank you!!
Hi!! I'm more than happy to explain :D Making a text fade in is, in my opinion, is a relatively simple process that you can do both on video timeline and frame animation, but I have a tendency to overexplain things, so this tutorial is probably longer than it should be. I hope you can bear with me lol

with video timeline
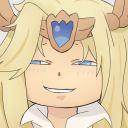
okay so, if you are working with video timeline, go to your text layer and click the little arrow. so that this list of options will pop up.
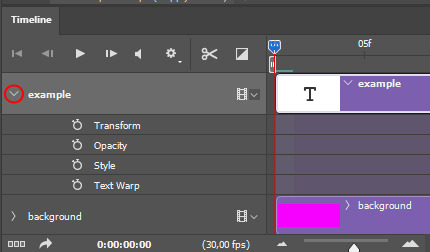
click on the little clock next to the word opacity and a little diamond will show up where your indicator (the blue arrow) is. That is your first keyframe, where the fading in will start. Go to the layer window and change the opacity to 0%.


then move the blue arrow to where you want the fading effect to end and then change the opacity to 100%, photoshop will automatically create a new keyframe. And it's done, that's your fade effect!
You can move the keyframes too, if you want to change the length of the effect. Personally I prefer to have the first keyframe a little later (not at 00:00), I think it looks smoother when it doesn't start right at the beginning of the gif, but that is a personal choice.
If you want your text to fade out, the process is the same but reversed. You go to the end of your gif (or to whatever point you want your text to fade out at) and create 2 keyframes. Make first one have 100% opacity and the second have 0% opacity.
with frame animation
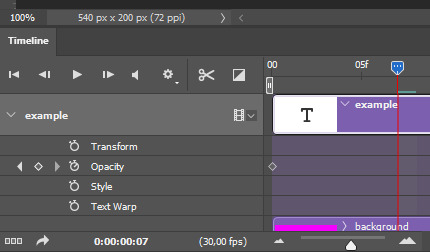
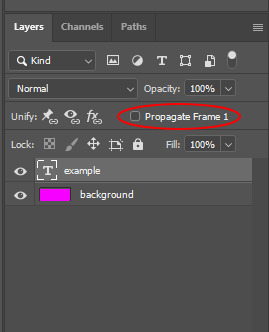
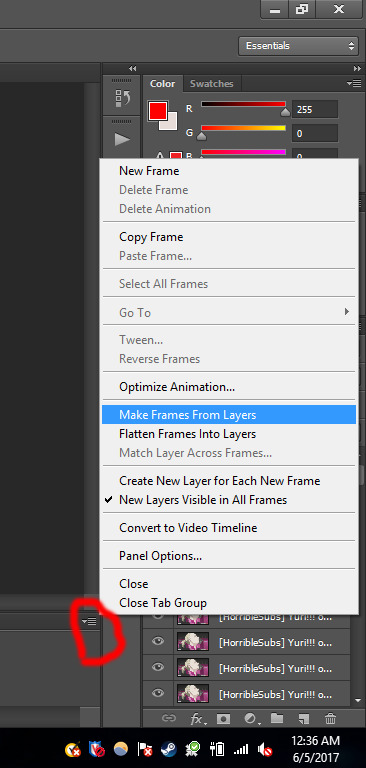
if you are working with frame animation, first you need to make sure that this little box is NOT ticked off (basically make sure it looks like in the picture). This is important because otherwise any change you make to the first frame will apply to the rest and that would be a mess
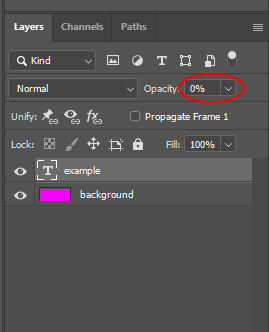
Now, with frame animation you have to manually change the opacity of each frame. So say you want to use 5 frames for the effect, for example, since 100/5=20 the opacity would increase by increments of 20% for each frame. Select the frame where the effect will start and then change the opacity to 0%
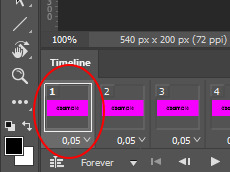
Then select the next frame and change the opacity to 20%, etc etc. Here is what it would look like:

if you want the effect to be slower, the increments will have to be smaller. So, for example, for 10 frames it would be like this:

Depending on the amount of frames you want to use, you might not be able to use the same increments. For example, here I used 7 frames and the increments sometimes were 14% and sometimes 15%, but it is not noticeable, the gif runs just as smooth.
If you want the effect to start later, not right at the first frame, just make the frames have 0% opacity until you reach the point where you want the fading to start, then start increasing the opacity. And of course, if you want the text to fade out, the process is the same, but you decrease the opacity with each frame.
And that is it! I really hope that was understandable, especially the frame animation part. If you need me to explain myself better, or you would like more screenshot to see what I mean, feel free to ask!
#ask#icanneverbesatisfied#gif tutorial#tutorial#photoshop tutorial#/i really hope this was helpful/understandable
37 notes
·
View notes
Note
t*ennie is such a unique case. yg don’t really gaf about dating rumours, and even with kai and bohyun i believe sm and jisoo herself confirmed them instead of yg. afaik h*be has never confirmed a rs before and it’s very unlikely that they will any time soon as it seems their policy is more of a “if we ignore it hopefully it will go away” type of situation (bcs they know what *rmy are like). just as you pointed out, yg only confirms it if the other company involved confirms it first, and as * is a h*be artist, their rs was never going to be officially confirmed
news broke bcs of that infamous jeju car pic. then they were hacked. even though the hacker had access to multiple idols accs (kai, j*min, the rest of bp etc), they focused on t*ennie bcs that car pic was such big news. it’s two of the most popular members of the biggest k-pop groups in the word, ofc k-media went crazy so obviously the hacker knew they’d get the most attention by revealing their business. his fans tried to say the pics were edited but it is literally impossible to photoshop that. how do you edit items of clothing and areas of their homes that hadn’t been publicly seen yet?
like i said, bp and *** are the biggest k-pop groups in the world so ofc global media took an interest too. bp especially are known by french media and french paparazzi are pretty notorious too. they have “exposed” jennie and lisa’s rs now. his fans were determined to deny it by saying it was cosplayers, even after a better pic of * in the same outfit on the same day was revealed. and jennie was over it atp and posted her cute fit pics months later (good for her!)
yes an official confirmation would have been nice but did we need one? perhaps no bcs of all the evidence, but perhaps yes bcs by not confirming anything it allowed fans to keep being delusional and horrible. idk, i’ve been into k-pop for so long but t*ennie is such an interesting case to me
yeahh there was so much proof of them dating that anyone denying must have been living on a different planet lol 🥴🤷🏻♀️
and well, they didn’t owe us a confirmation (as no idol does) but generally speaking publicly confirming relationships has its advantages — since the gp and media are aware of the rs, the two celebs have more freedom to go out and be seen together moving forward since the sight of them as a couple is no longer “scoop-worthy”. ie, they might attract less media attention. with taennie, that was very complicated though bcs *** have a lot of interest in keeping up the façade of the members being single at least publicly (way more than bp) so that made confirming it more risky for him. i don’t think confirming would’ve been bad for her — actually i think it would’ve had a very positive effect as it would have assuaged a little bit of the hate she received and receives from his fans. i think the idea of not confirming to give them more privacy is pretty dumb, especially from a pr standpoint
0 notes
Text

We sketching 🤔🤔🤔 @dimensionwriter
#demondraws#yall already know#android#demonsketches#sketch#if you squint you can pinpoint the exact moment the pen died#rip to my v5 ✊🏻😔 you will be missed#traditional art#might pop it in photoshop later idk#deadass forgot what he wears n i didnt have the cell service to pull it up#android x reader#f in the chat for verizon
32 notes
·
View notes
Text
Painting Tutorial!
Hello and welcome to a kind-of tutorial for my colouring technique! I’d like to preface this by admitting that my art style is a mess of actual things I learned in art school mixed with ‘things that look good but idk why lol’ and some lazy shortcuts thrown in for good measure. If something doesn’t make sense it’s probably because it was never meant to, and I’m just winging most of this with no coherent plan. Cool? Cool.
Program used: Procreate (I use the same techniques in Photoshop, so they should work in programs like CSP, Krita and Sai)
Brushes:
-Derwent for sketching (Procreate default) or your favourite sketching brush
-GvW Elder 2. 0 1 for shading (from Georg’s free ink set)
-Basic round brush
-Basic airbrush
Step 1: The sketch (Derwent Brush)
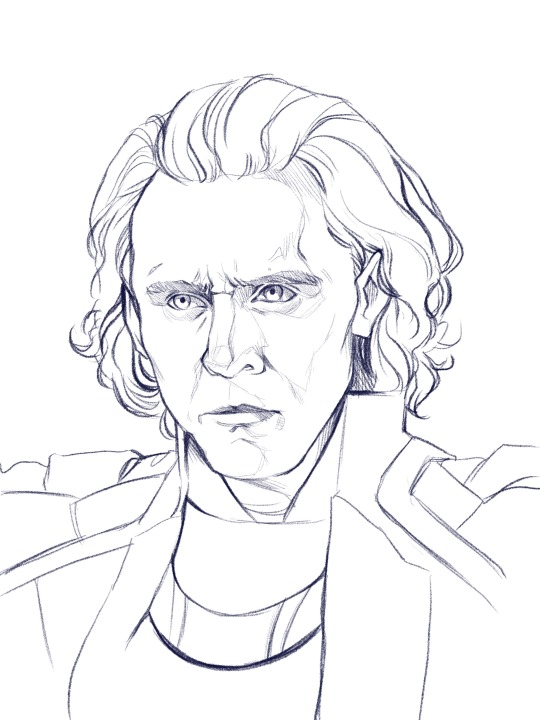
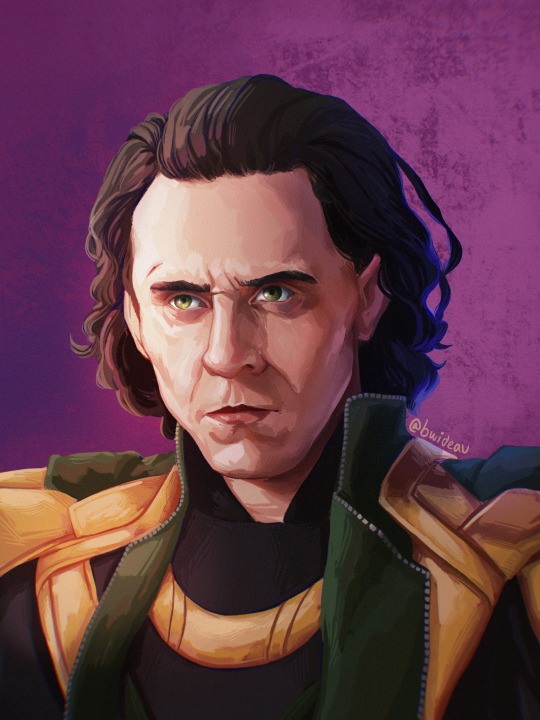
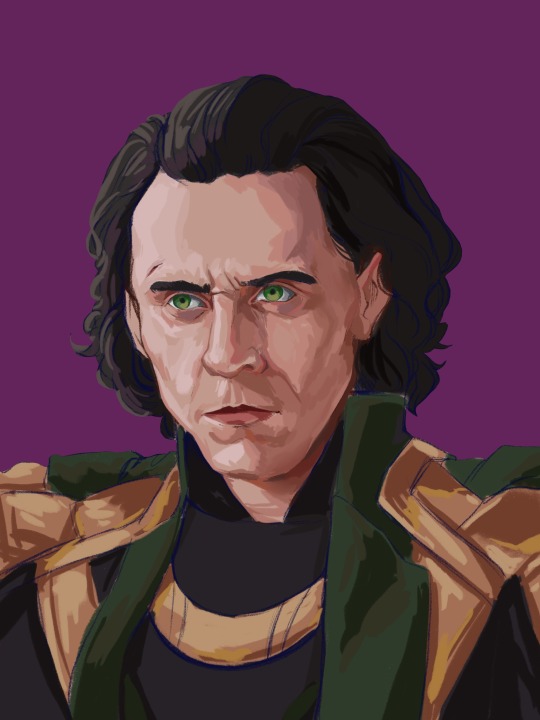
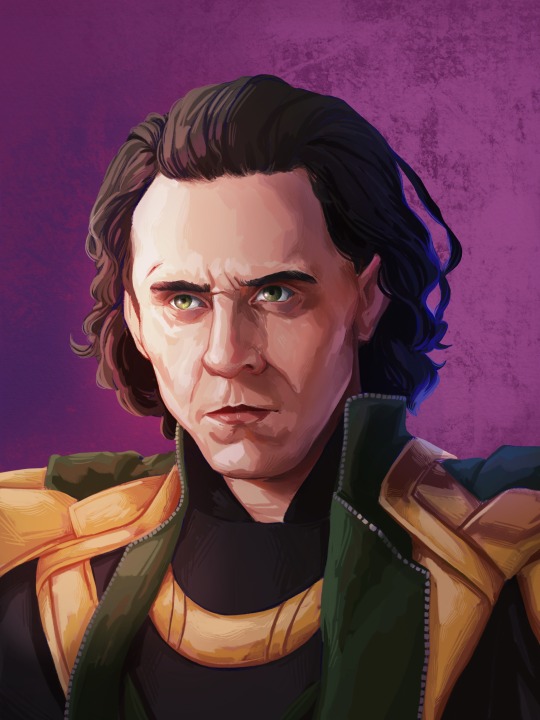
Today we’re painting my favourite murder boy, Loki! I won’t go into much detail about the sketch, because this is about colouring, not sketching. Make sure you have a solid sketch before starting on your colours. I know it gets frustrating to work on a sketch for so long, but anything you fix in this stage won’t need to be fixed later.
Use references for anything you’re not 100% sure about, and flip your canvas often to make sure nothing’s wonky. Your brain gets used to staring at the drawing, so flipping it lets you see mistakes you might otherwise miss.
I like sketching in colour because black just feels daunting to me. We’re gonna change the colour later anyway, so just pick any favourite!
Step 2: Clipping Layer
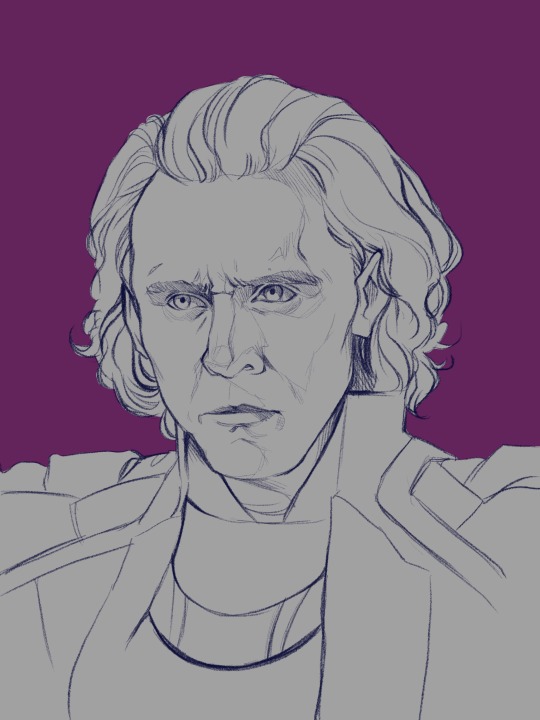
This is one of the most important stages. All your colour layers for the character will be clipped to this one so you don’t have to worry about going outside the sketch. I usually have a single clipping layer for organic portraits, but my lined pieces will have a layer for each section. We’ll be painting over the sketch eventually, so go ahead and clip the sketch to the base layer as well. It’s also time to pick your base background colour. I decided to go in a completely different direction than the reference image, so I’ll mostly be making the colours up.
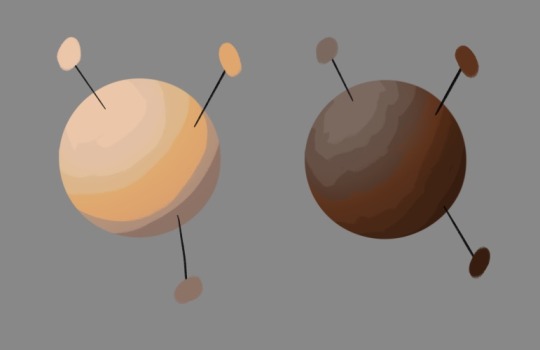
Step 3: Base Shading (Elder Brush)
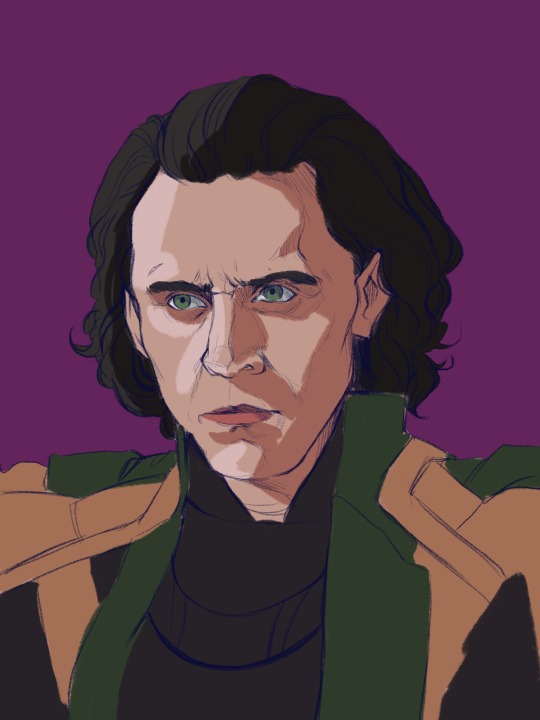
I know this looks like a big jump, but bear with me! All I’ve done is add basic shadows to the form. I’ve picked a midtone for each section of colour, and added a basic shadow and light.
Go ahead and start by locking your sketch layer and changing its colour. I’ve used dark reddish tones in the face, and left the rest blue. I like how the blue pops up here and there when I get to painting over the sketch.
To pick your light and shadow tones, look at the colours you’re using in the background. Something useful to remember is that warm lighting will cast cool shadows, and cool lighting will cast warm shadows. In this case, since the background has a cool tone, the shadows in the face will be warmer in comparison.
Always remember that your character and your background exist in the same environment; the colour of the background will influence the character. Here, the light source has a pinkish tinge to reflect the character’s environment.
Look at your reference to see where light hits, and squint your eyes to determine the big geometric shapes of the light and shadows. At this stage, stick to three tones maximum: a base, a shadow, and a light.
Step 4: The Shit Stage
This is when the feeling of ‘oh no this looks like garbage and I hate myself’ will hit. Don’t let it fool you! Paintings look like trash before they get better. In the early stages, you’re just laying in the foundation for the details that will come in later. Just push through!
Here, I’ve started adding tones in-between the light and shadows to make the shapes blend into each other and look rounded and softer. This is all done on a layer over the sketch, still clipped to the base layer.
I pick my midtones by zooming in and colour-picking at the border between two shades I’ve already laid down. It’s a little tricky since the brush I use doesn’t have an opacity setting, but I like the sharp chunky look it gives my pieces.
Remember: Skin is not one uniform colour, and light will peek through in some places. This is called sub-surface scattering, and it’s the key to beautiful, alive-looking skin. Light will scatter under the surface of the skin, and certain parts neighbouring the shadows will look more saturated because the blood vessels under the skin are illuminated. This piece doesn’t use bright sunlight, so it’s more subtle but still visible.
Notice the strip of warm saturation right before the shadow? It’s going to look orange under sunlight, but for Loki I’ve gone with a pink since the light is cool.
Step 5: Slightly Less Chunky
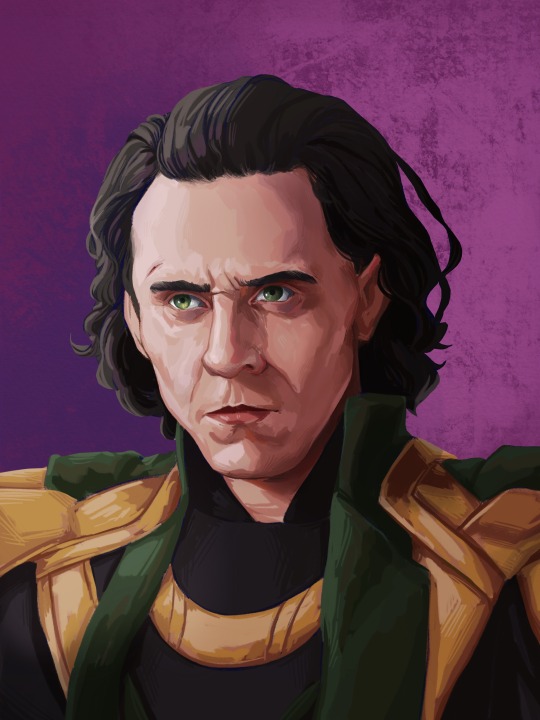
I like the chunky look in my paintings, but if everything is equally as sharp, nothing really stands out. A wise tip from one of my painting professors is to smooth out the shadows, but keep the lights sharp.
Use a mixture of more colour-picking and the blending tool to round out shapes. You can also use the airbrush if you’re more familiar with it.
Be careful of overblending! Blending too much is a common mistake in digital art, and can make a face look flat and off-putting. Blend some areas, and colour-pick them before going back over them in with your solid brush. This will make your shadows look softer, but not too soft.
Texture is extremely important and often forgotten. It gives your eye something to look at, even in a seemingly smooth space. Remember: Unlike in traditional art, digital media has no surface texture.
A smooth gradient on a cotton canvas is never completely smooth, it will always have the canvas texture underneath it that keeps it from looking too unnatural. In digital, you’re working from nothing. When working digitally, any texture you want, you need to create yourself. This is why depending too much on the blending tool will make skin look unnatural; you need to compensate for the lack of interesting surface underneath.
Step 6: Lighting
Interesting lighting can go a long way to make your painting spectacular. Note that the light source was chosen in the third step; this step simply enhances what you’ve already done.
In this piece, I’ve picked a primary light source (where the majority of the light is coming from) and a secondary light source to keep things interesting. Since the background is cool-toned, I picked a warm orange for the main light source to contrast it. The secondary light source is a cool blue, so it doesn’t quite have as much contrast. I want the secondary light source to be noticeable, but I don’t want it to be fighting for dominance with the main light source.
I clip a colour dodge layer on top of the colour layers, and put another unclipped colour dodge layer over it.
The clipped layer is the secondary light source, because I don’t want it to bleed into the background. Leaving the primary light source unclipped will give a glowy effect to the lighting, since the area around the character will also be affected. I use a large airbrush for this step.
If there are areas that need more contrast, you can deepen the shadows with a clipped multiply layer underneath both colour dodge layers.
Step 7: Details
This is the time to add little things like a more refined eye shine or little flyaway hairs. The eyes also looked a bit wonky to me, so I fixed them up. Not much else to say about this stage, just add little things that will tie the piece together.
Since the face is the focal point, it’s painted in more detail than the armour. If the piece was equally detailed everywhere, the viewer’s eye wouldn’t know where to look! You don’t have to slave away over details in areas where they won’t be noticed or would be distracting.
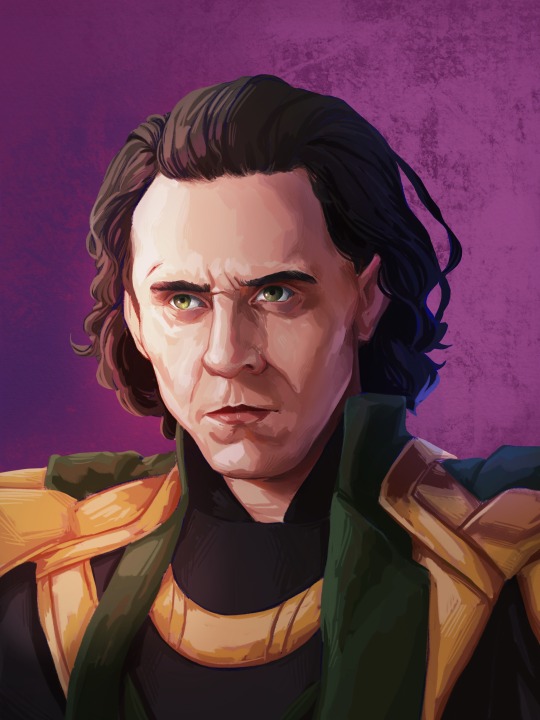
Step 8: Finishing Touches
This is the final step! Once the painting itself is done, I like to merge all my layers and apply a bit of noise to the whole image. I find it adds a bit of grain and texture that makes the piece even more cohesive. Don’t add too much though, or it will grey out your colours.
In certain pieces, I also add a slight chromatic aberration. I don’t add it to all my pieces, and I use it differently every time. Be careful though, it can become an eyesore if you overdo it! Keep it away from the focal point of the image (in this case, Loki’s eyes) or it can actually make the painting off-putting and difficult to look at.
Since my drawing program has a dark background, I like to export the image as a test and see if it still looks good in my photo gallery with a white interface. Sometimes things look really bright against a dark interface, but will look dull and too dark when put against white. If your piece needs adjusting, use the curves tool to adjust the contrast.
All that’s left to do is sign your artwork on a separate layer (so it can be moved or removed if need be), and voilà! A lovely portrait!
—
I hope you found this tutorial helpful! If you have any questions or comments, feel free to leave them in the notes or message me! If you’d like to chat about art, (or anything really) my ask box and messages are always open to new friends!
129 notes
·
View notes
Text
Colouring rainbow gifs
The lovely @buckiecap and @djarsdin requested a tutorial of some gifs from this TFATWS rainbow set.


My colouring process is kinda chaotic and it always depends on the gif itself. These three gifs will highlight the similarities and differences in how I colour my rainbow gifs.
You’ll need some understanding of basic gif making and adjustments. I use Photoshop 2021 but I imagine these processes will still work in other versions.
Some basic tips:
When doing rainbow sets, once I've got my base gif ready, I always make a hue/saturation layer on saturation +100 so I can see what colours I'm working with. I just keep it hidden so i can check how my colours are doing throughout the editing process.
Also something to stick at the back of your mind: you want your final gif to be as “monochromatic” as possible - make sure your final palette will be only black + shades of whatever colour you're targeting. This is not only to make the gif as colour-focussed as possible, but it also helps with saving your gif under 10mb. That saturation +100 layer I always keep hidden at the bottom of my gif so I can keep an eye on what colours are present.
It’s also helpful to understand how RGB and CMYK colours work and what to add/subtract when you want to bring out a certain colour. A good example of this is with Colour Balance:
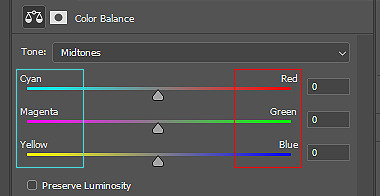
You’ll notice the colours on the left are Cyan, Magenta and Yellow (CMYK), while the other side is Red, Green and Blue (RBG). So if you want more cyan in your image, you’d push the bar towards cyan, but then you’re compromising the reds. In Selective Colour adjustments, the panel is reversed.
This knowledge is absolutely necessary when you’re doing any adjustment, so keep this in the back of your mind as I work through the tutorial.
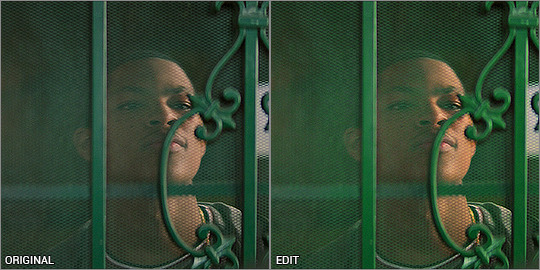
Green gif - Eli's door
So I start with my hue/saturation on saturation +100 to check what I’m working with here. This gif of Isaiah's grandson opening the door has green, yellow and red as the dominant colours, and I can see a bit of cyan on the right. I’ll keep that hue/saturation layer hidden as a reference.
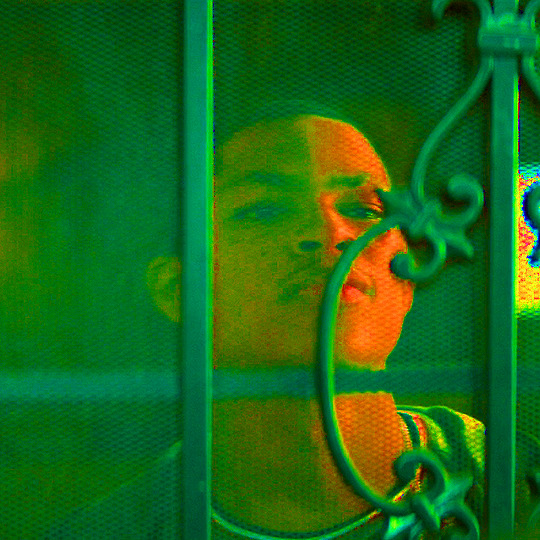
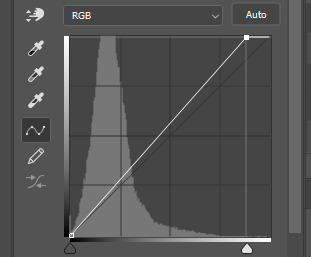
Normally when I make gifs I start with a curve or levels layer to get any unwanted hues or create a more visible scene. But in this gif, I'm pretty happy with the colours, so I'm just using a simple curves adjustment, because I want to have whatever is behind the door as the ‘background’ and the door frame is the ‘foreground’, so only a slight adjustment is needed here.
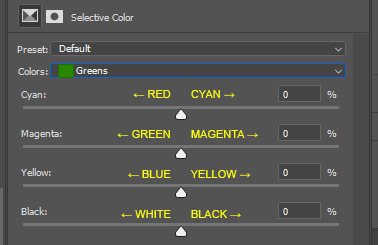
Since the colours are already prominent, I'm going to make the green more visible and vibrant. I do this by using selective colour in the green colour to make the green stand out. When thinking of CMYK adjustments, you might think that Magenta -100 would work, as that normally pushes the greens, but I find that this makes things grainy and patchy looking, as you can see here:
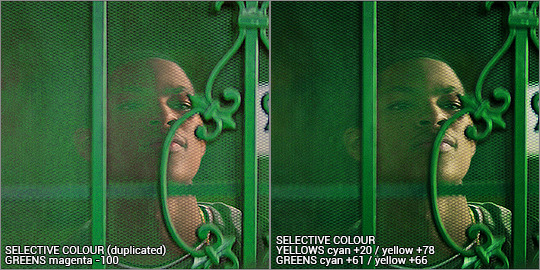
Instead, I’m enhancing cyans and yellows, and only pushing the magenta back just a little bit towards green. I’m not sure why green specifically does this, but it’s useful to know this when you’re colouring.
With the yellows, I want to push those more as well, since the amount of yellow usually influences the green-ness of the gif.. I'm also going to max yellow too since that will also make the green pop, but I also have to be careful not to distort the skin colour too much. I also want to balance the skin tone with a little redness so he doesn’t look like he has jaundice (skin tone will be explored later in the gif process)
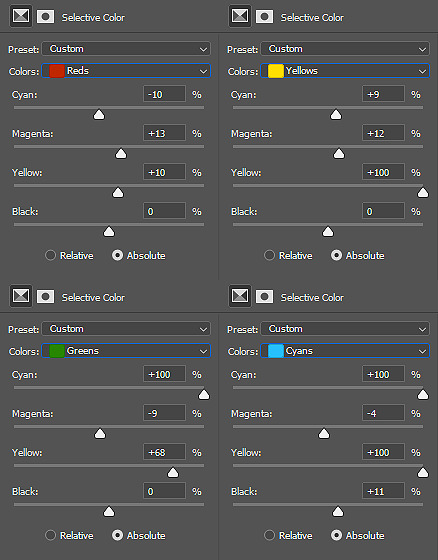
I've added another selective colour layer on top of that, only adjusting the greens just to make it pop a little more. Don’t be afraid to use more than one selective layer, this can really bring out vibrant colours if you use it right.
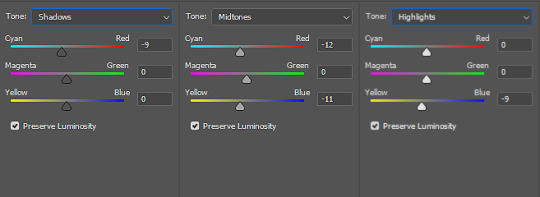
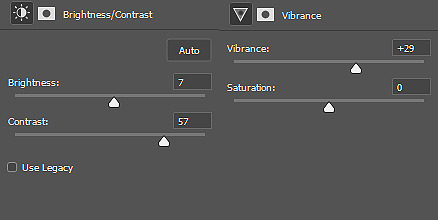
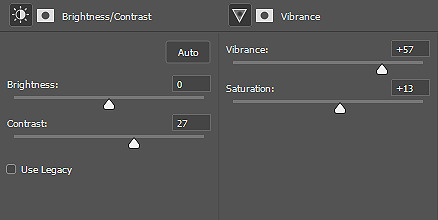
Just to get some more depth, I add a colour balance layer, again just subtly pushing the cyan and yellow up and not playing with the green too much. Then my usual last layers are with a vibrance and brightness/contrast - I’m usually quite generous with contrast so I can bring out the different shades and it makes things a little more vibrant too.
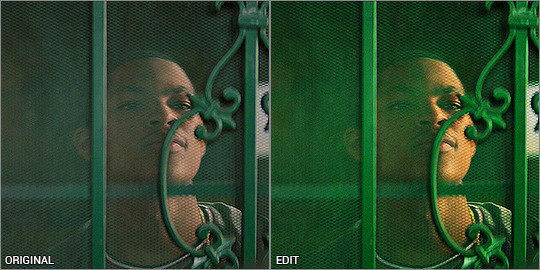
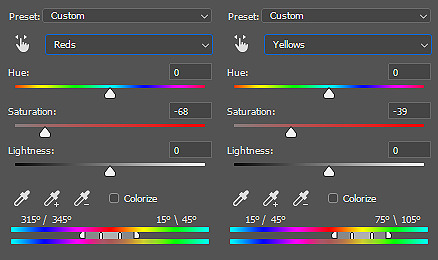
This next step is really important when colouring people with dark skin - you want to lower the redness from their skin so they don't look unnaturally orange, as you can see here:
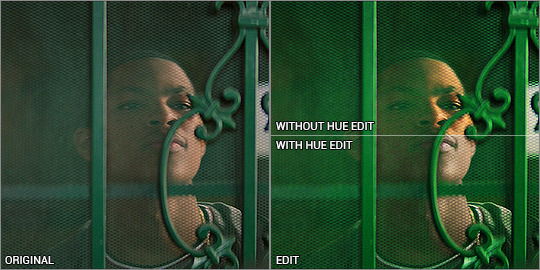
There is a fantastic tutorial here about colouring dark skin tones and avoiding the orange-washed look, and I recommend all gif makers to take note! It's difficult especially when doing rainbow gifs, and it takes some practice. I do this with a hue/saturation layer, and specifically targeting red and yellow and reducing saturation. I might need to play with selective colour or colour balance to get it right. Luckily Eli doesn’t move around too much, so I can use a mask to adjust only his face.
And that’s the end product! now just ignore me as I re-upload the green gif in my set so you don’t see such a horrible jaudiced skin tone sldkfjsldkf
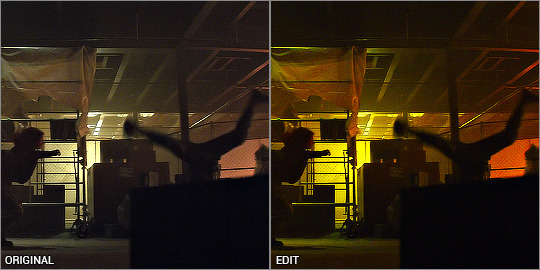
Yellow gif - Karli vs Sam
I'm gonna be completely honest here - this gif was very tricky to do. I actually have about three different versions of it. At first I thought "this is the yellow gif so I'm only going to have yellow tones", and did selective colour to get rid of any traces of green AND red, because I didn't want any orange at all. It ended up looking quite dull:

I mean.. yeah it’s yellow........... but it’s kinda boring. So I deleted all adjustments and watched the raw gif, and noted the orange light contrasting with the pale light. The raw gif itself already had some beautiful lighting - why get rid of it? It depends on what you want, but I like my rainbow gifs to have a different colour there to contrast with the main colour.
Starting off with a hue/saturation layer with saturation 100+, I can see there are clearly yellows and reds and a bit of green on the ceiling.
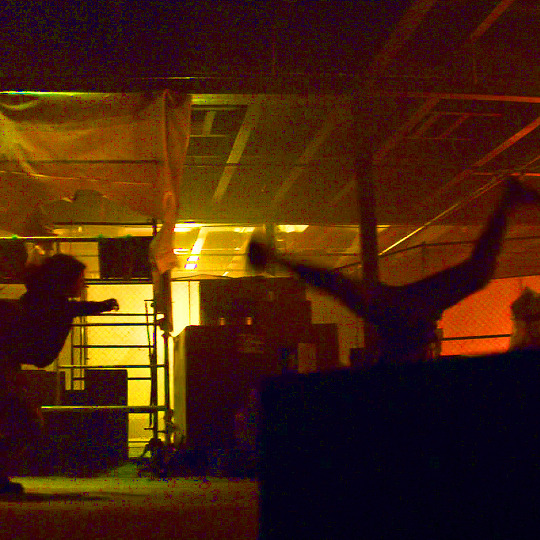
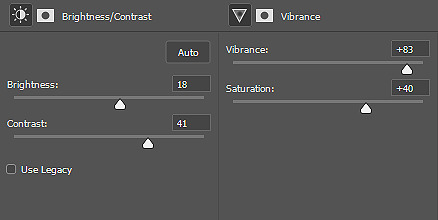
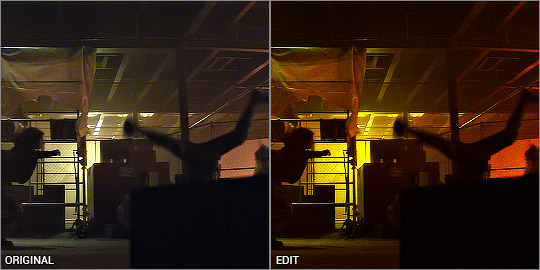
I thought the contrast of the orange and pale lighting was too good to mess up so I started with that. My first layers are vibrance and brightness/contrast to exaggerate the silhouettes and bring out the colours that are already there.

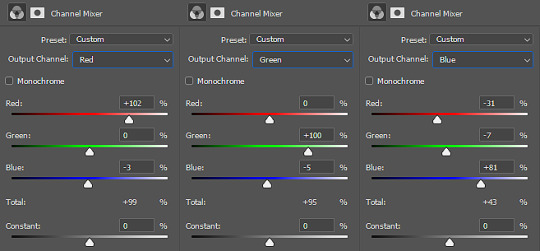
I added a channel mixer layer to narrow down the colours. I wanted to fill the white bits with yellow, and with channel mixer I’m able to manipulate colours into something else while still looking natural and blended. I won’t be doing too much colour manipulating here so the settings are very minimal. I don’t know how to explain it but it just takes a little fiddling to figure out what works for your gif. You’ll notice the white reflections on the ceiling are now a solid yellow colour:
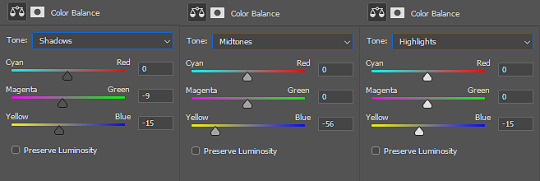
Next is a colour balance layer. I'm basically trying to bring out the yellow out. This is really just trial and error. I added a bit of magenta to bring the depth of the orange colours in the darker shades:
Now for selective colour. I'm often adjusting all of these while hiding/showing the hue/saturation layer I have kept at the bottom. This time, I’m aiming to subtract the reds and bring it down to a warm orange, and I do that by bringing it towards cyan/away from red, and away from magenta/towards green.
Then I max out the yellows so it becomes the most dominant colour. I've also manipulated the green to make sure it is excluded from the gif - again, checking with the hue/saturation layer at the bottom, while keeping my eye on the ceiling and other places where I’ve noticed green lurking about. I don’t want any unwanted shades ending up in the final colour table.

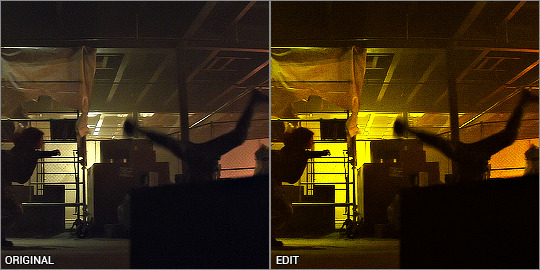
Finally, I finish with yet another vibrance and brightness/contrast layer, just because I like things bright and vibrant!
And there it is! The orange is still there and adds a contrast, but you can tell that the main colour is the yellow. This gif seems very straightforward but I assure you, it took me quite a while to get this one right. This gif was a joy to work on because Sam was so very extra in this fight sequence lolll
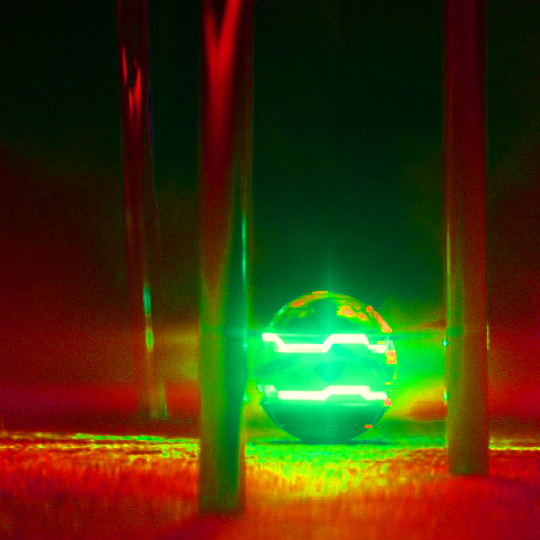
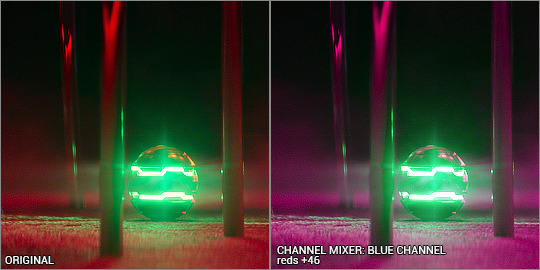
Pink gif - suspicious mechanical grenade? idk
While this gif may look simple, it actually took a couple of tries before I got the colouring right. You'll notice when the ball activates, there is a bright green light that highlights the gas released and it reflects on the chair legs and carpet.
At first I tried this with the above mentioned selective colour method - which I thought turned out okay but it didn't sit with me right. Notice the reflection of the blue light on the carpet - it definitely isn't blue and more like a green-orangey kinda colour, and it doesn't look natural at all.

So I re-started from the beginning and had a look at what I’m working with, starting with hue/saturation at saturation +100. I can see that the original gif has red and green as the dominant colours, with yellow bits blending the two on the carpet. That’s what I was having issues with the selective colour - so I’ll be doing it differently.
Enter: channel mixer. I’m gonna be honest............. I have ZERO idea how the channel mixer really works! It’s all a matter of trial and error, but I’ll try and explain my process step by step.
I normally start in the blue channel (again - no idea why, it just works for me). I start with the reds, and I know if I go over 0, it will push the reds towards cyan, which will get it more purple-y:
Ooooh looking good!!! then I want to push the greens towards magenta, so that needs to go over 0 as well:
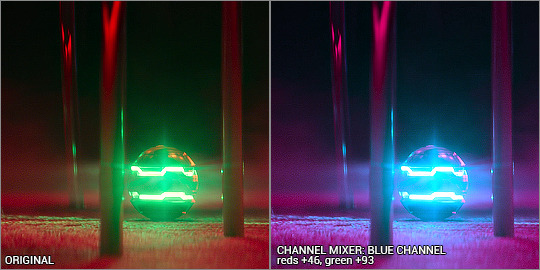
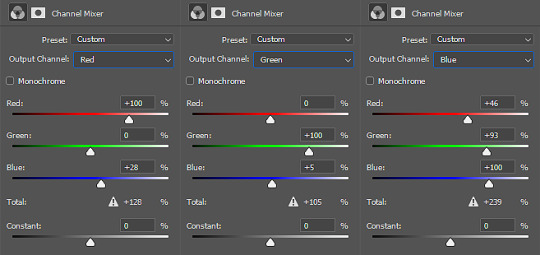
Woohoo! It’s already starting to look good. The green light and the way it blends into the red/pinks have all been completely changed into the cyan hues, so there’s a perfect reflection you can see on the carpet! Yay! I had a fiddle with the green and red channels but nothing too drastic. Here are the settings:
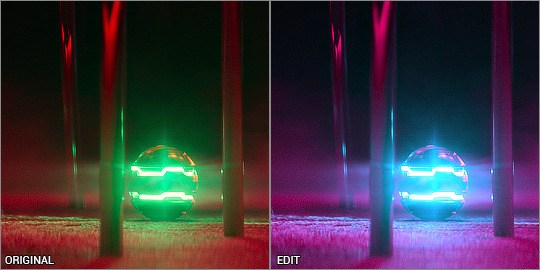
Even with just the single adjustment, I was already pretty happy with it and only did a few touch ups: I added a selective colour layer to bring out a more pinky-purpley colour, then a levels layer to brighten things up. It might seem very backwards to add a brightening tool at the end, but I didn’t want to mess up the original colour shades because I liked having the dark shadows lit up by the ball’s light.

And that’s it! Only three adjustment layers, but it took some time to play with the different adjustments and what worked best. Channel mixer can be really intimidating but it works like a charm when you manage to figure it out.
the end!
Finally I have to give credit to some amazing content creators and their brilliant colouring tutorials that have made such a huge impact in the way I edit. Some brilliant guides include:
this colouring tutorial by @favreaus
this colouring tutorial by @inejz-ghafa
this colouring tutorial by @meliorn
I hope this tutorial has been helpful! I’ve tried to explain myself as best I can, but let me know if you’d like any clarification or have any questions. I’m still learning how to do things, and honestly most times it’s just randomly clicking things until something works out!
#gif tutorial#coloring tutorial#rainbow gif tutorial#gif editing#completeresources#dailyresources#chaoticresources#allresources#photoshop tutorial#fyeahps#dailypsd#**mytutorial
266 notes
·
View notes
Note
Hey Kati, I'm a newish admin (I've attempted to start around 4 RPs in my time) and I was wondering if I could get some advice? All my RPs are dead, like, dead-dead. I get absolutely no traffic, no questions, no apps, nothing for any of my RPs and at this point I feel like I'm just clogging up tags and annoying people with my promos. I guess I'm wondering how people actually get traffic to their RPs? At this point with all the genres I've done I feel like I must be missing something important.

hi ! first of all, i’m so sorry that things haven’t been taking off. it’s so frustrating when you’re so excited about something and all you want to do is write and no one else seems to be on your wavelength. however, i do think there are a couple factors that go into starting something that takes off and i’d like to think that i’m pretty good at spotting when something’s gonna be a hit or not ? idk ! let me try to break it down for you.
AESTHETICS. it’s sad, but this is probably the #1 reason why a cool rp wouldn’t get the traffic it deserves. a nice, readable theme is most important, but then a color scheme with some graphics with a matching psd and all that. i’m not saying they have to be crazy, my personal photoshop knowledge is just slapping some pics from unsplash or some other image hosting site under a psd and i’ve had pretty good success with that. if you can’t do it, there are plenty of nice people out there who can probably help you fancy things up a bit. in addition, it helps to pay attention to rp trends – stylized dash icons, urls without dashes, using small gifs/icons, that sort of thing goes a longer way than you’d think.
SETTING A DATE/GOAL. honestly, there hits a point where if a roleplay is getting no attention then it’s NEVER going to, because onlookers will see that it’s going nowhere and there’s the ‘bandwagon effect.’ if it shows no signs of opening within a week, people tend to lose interest. it helps to set an opening/acceptance date pretty quickly, even if all the apps you want aren’t there yet – push it back if you need to, but create a sense of urgency within interested people ( within reason, give people enough time to figure out their character. ) if people see no signs of opening, they’ll look for something else – personally, i tend to not send my app until the rp sets an opening/acceptance date because i’ve been burned too many times getting excited for things that haven’t panned out.
ACTIVITY/PROMOING. people like to see you on the dash, and those pre-opening days are crucial. it sucks, but a new rp pretty much needs the admin to pop on daily and make their presence known. if you can’t keep up with that, it’s not a big deal – you should just get a co-admin to help you out ! in addition to promoing in the tags, reach out to blogs for shoutouts. if you notice you’re not getting traction, some rps do OPINIONS, which can be a constructive way to learn a few reasons why people might not be applying.
there’s a ton of factors that go into it, whether it’s timing, genre, etc, but another thing is just…knowing when to call it. if you’ve gone a week or so without any applications or interest, it might just be the wrong time for your idea. better to just hang up your hat and revamp it later than waste your time. if you’d like to message me privately ( or even publicly ) i’d be happy to take a look at what you’ve got going and try to give you some insight ! good luck – i know that if you’re passionate about your ideas, you’ll wind up persevering and i’m completely rooting for you, so lmk if there’s anything else i can do to help you out.
1 note
·
View note
Text
lyndsey’s first ever gif tutorial!!!
hello world, it’s me, lynds! by request, I’m gonna walk you through how I make my gifs! I’m going to just show a basic gif tutorial (like the one below). This tutorial will walk through the steps of getting the footage, creating the gif, editing it with some minimal coloring, and then exporting! :) let me know if you have any questions, I hope you enjoy!

I use the following programs:
Photoshop CS6 (mac download tutorial)
QuickTime Player
let’s get started!!!
step one: find what you want to gif
For me, my first stop is almost always netflix. I make supernatural gifs, and I am lucky enough to have 13 seasons right at my fingertips. But Lyndsey, how do you get netflix video onto your laptop?! Well, that’s where QuickTime Player comes into play. For purposes of this tutorial, I’m going to gif a nice little family hug from episode 12x22. So first step, find the part you want to gif and pause the video about 10 seconds before you would want your gif to start, and make it full screen . Like so:
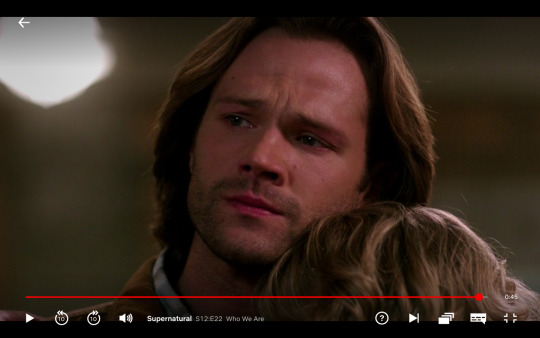
It’s important to start the recording before the actual first gif frame because you want all the extra things to go away (the play button, the rating that pops up in the right corner, etc) before you get to the actual moment you want to gif.
step two: begin recording
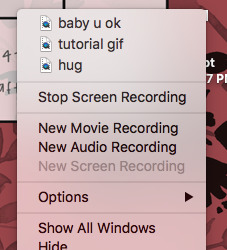
Open up QuickTime Player. On mac, it should pop up in your toolbar. A quick trick I use is to do a spotlight search (Command + Spacebar) and search for Quicktime Player. This will begin to run the program. Two finger click on the icon, and a small menu will pop up. It should look like this

Select New Screen Recording. A box should pop up on your screen that looks like this:
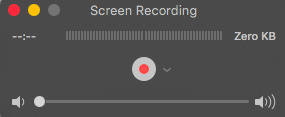
Click the red record button. Another box will appear that looks like this:

Click anywhere on your screen and boom! Your laptop is recording your entire screen! Now you can swipe over to your browser tab and it will continue recording your show as you watch! Make sure you move your mouse so all those annoying menus and things go away and it’s just the show on your screen.
Once you have finished recording the whole part you want to gif (make sure it’s short!!), swipe back over and open the menu again. It will have changed slightly to look like this:
Click on Stop Screen Recording. A box will appear where you can play the video you just recorded. Now, click the red x to exit the window that just appeared (trust me on this one) and it will bring up a new box like so:

Title your clip whatever you like and save it wherever! Now you have your clip! Hoorah for you, you’re doing great!!!
step three: getting it into photoshop
Now we’re ready to make our actual gif! Yay! Open up photoshop and then click on File -> Import -> Video Frames to Layers like so:

A new window will pop up where you can browse through your files. Go find the video clip you just recorded and select it. Now, your screen should look like this:

I always select the “Limit to Every 2 Frames” option to fit more content into my gif. I also toggle until I find only the part I want to gif (since we had to record a little extra to get to rid of the menu bars and such. Do this by dragging the small, dark pieces below the gray line until the image you’re looking for pops up on the little mini screen. Make sure to do both sides! Then, press okay!
step four: finding duplicate frames
No technology is perfect, but photoshop is far from it. Often, there are duplicate frames in gifs, which makes them look choppy and sad :( So, after completing step three your screen should look like this:

All the little boxes at the bottom are frames, while the list on the side are the layers. We’ll worry about the layers later. For now, click through each individual frame one by one, and if you find a duplicate, delete it (click the little trashcan below all the frames)!
tip: I’m not sure if this is universal, but in my program, every fifth frame is a duplicate. idk why. but, I can go through and delete frames until one of the duplicates are on a multiple of 5 (i.e, frame 15 and 16 are the same) and then I select all the ‘5′ frames (Hit command and click frame 15, then frame 20, then frame 25 and so on and so forth). It minimizes the constant clicking. But, this might be confusing to some, so if it doesn’t make sense, just click through and delete the duplicates!
step five: cropping
Now that all those pesky frames are gone, it’s time to crop! Select the crop tool from the side toolbar (it’s selected in the next frame) and drag until you’re satisfied with what you have!
tip: for individual gifs, it doesn’t matter too much, but if you’re doing gifsets, they need to all be the same size. I recommend using one of the preset ratios, which you can find if you click on “unconstrained” in the top left hand corner
Now, it looks like this! Double click and it will crop the image to the selected size!

step six: coloring
Now comes the fun part! Coloring/Adjustments! For me, I usually up the brightness, lower the contrast and lower the saturation. I will post the settings I used below:


Make sure these layers are above all your other ones (you can drag them up to change the order). This is totally up to you! Click the buttons and mess around, see what they all do! You can always delete the layer you created and your gif will go back to normal :)
step seven: frames per second
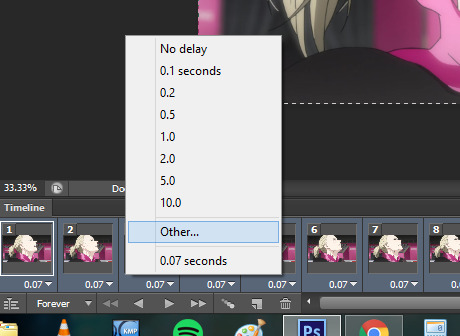
The final step before export for me is to change the frames per second. By default, mine go to .02 seconds, which is much too fast. The frame rate is shown at the bottom of the frames. I usually set my gifs to .07 seconds. The easiest way to that is to select all frames, by clicking on the small menu on your timeline (the little three lines with the arrow in the top right corner)

And then select “select all frames” from the menu. This will highlight all your frames! Next, click on one of the arrows (next to the timestamp) on any of your frames. A window will appear like so:
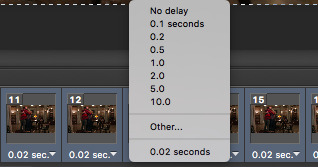
Click on “other...” and type in “.07″

Now we’re ready for export! Woo hoo!!
step eight: export
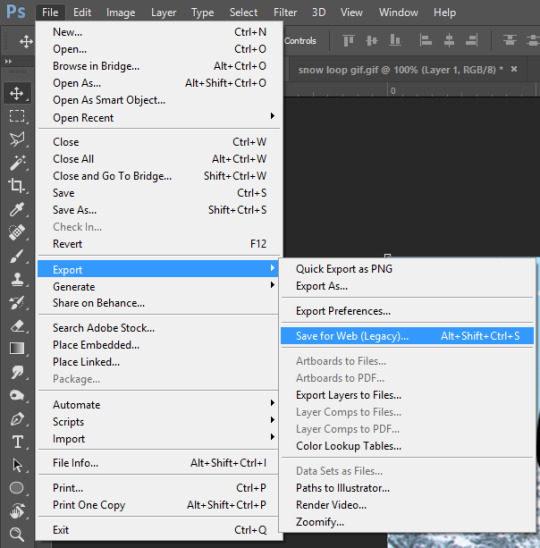
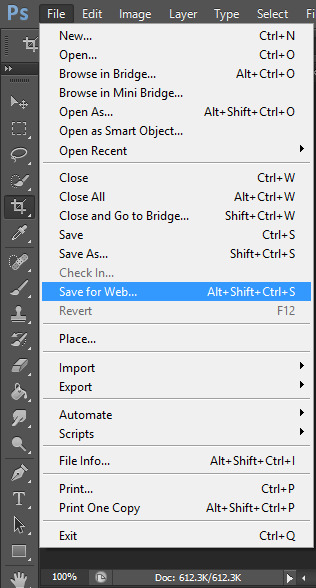
This is the most tedious, and my least favorite part of gifing. Sigh. Anyways, first you will go back to file and open the menu, then select “Save for Web”

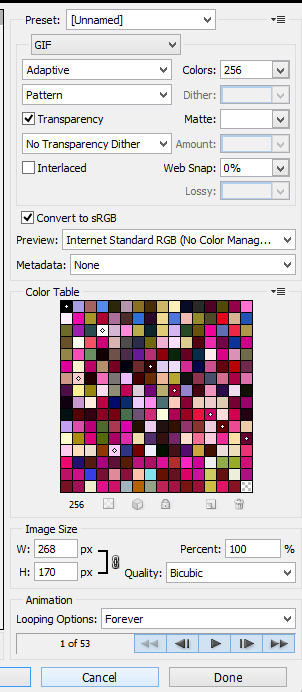
The next page it will bring you to is very important:

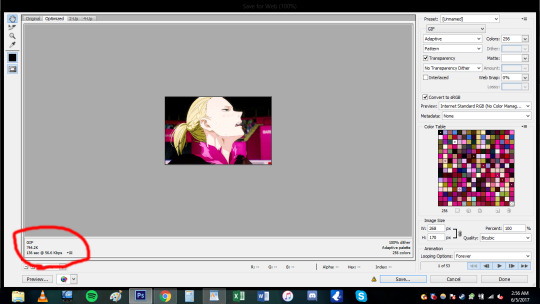
The most important part of this window is the GIF size, shown here:

Tumblr has a gif size of 3M, so obviously this gif is way too big. Never fear! It’s time to change the image size. If you just change the width, it will keep your gif in proportion and minimize the size. I changed my width to 475px, and now we are at 2.763M, which means we’re good to go for tumblr!

Now, it’s time to save! it will automatically save as a .gif file, and you’re golden! time to upload your beautiful creation to tumblr!

I hope you found this helpful, please like it or reblog it if it helped, mainly so I don’t feel like I did all this for nothing haha. Happy gifing everyone!!! -lynds
#here you go beans!#hope this makes sense#please feel free to ask questions if you have them!!!#gif tutorial#my gifs
41 notes
·
View notes
Note
hi! i was wondering how you make gifs. (not the "normal" subtitle ones, but the fancier ones, if that makes sense) you make such pretty ones, i love them so much! ♡♡ :)
hi!! thank you so much for asking! sorry this took so long for me to get to omg school has been absolutely tedious and i haven’t had time to make any new edits until now! since i was making a new header for my festive theme, i thought that i might as well answer this ask while i’m at it.
first off, the program i use is photoshop cc. highkey acquired it for free so if anyone ever wants help with that just dm me cuz it’s actually very easy to get
for this i’m just going to assume that you already know the basics of photoshop and giffing by how you phrased the question so i’m just going to jump straight into the step of putting the edit together and skip the removing background and stuff. (if any of you want a tutorial on the basics i’d be more than happy to put one together! just send me an ask!)

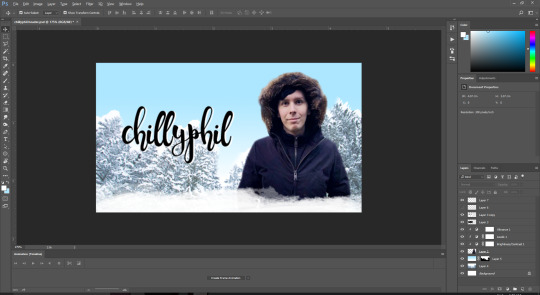
so this is how my photoshop is set up with the photo that i’ll be using for my header with the background removed and the colouring set.
usually i start with an extremely rough idea of what i want to do. like here i’m thinking of adding some snow, having a white bottom that would blend in with my mobile theme, and perhaps a blue gradient-ish background with some snowy pine trees blended in. since it’s a header i also need to find a good font to put my url in. i’m not going to do any fancy text animations though because those require editing in after effects and i’m kinda shit at after effects oops.
sidenote: my favourite site to find fonts on is dafont.com! the one i’m using in this tutorial is called seventeen! also because i can’t download the fonts directly, i screenshot the previews and a handy trick that i learned from this to easily remove a background of something with a solid white/black background is by changing the blending mode of the layer.
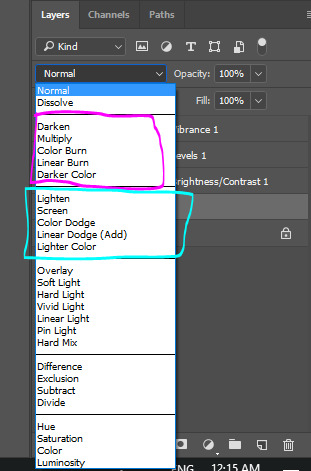
the options in the pink box are used for removing white backgrounds and the options in the blue box are used for removing black backgrounds.
(this will also be used later when adding the snow)
anyways, making the background is done with basic photoshop skills of moving and resizing stuff so i’m just gonna skip ahead to the animated snow part because that’s a new concept for people who haven’t made gif edits before.
(white border thing was created with one of these brushes)
wooo look at that! time for snow!
i already have a snow gif texture downloaded on my computer but i’ll show you how to find one!
first go to google images and search up “snow texture”. then use the handy dandy search tool option and select image type “animated” and colour “black”

scroll through some of the images and find one that you like!
then save the image to your computer and open it in photoshop.
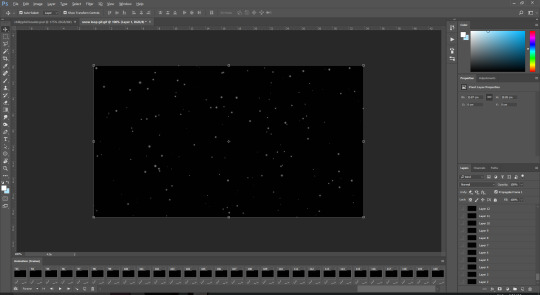
ew the one i have is 120 frames long :/
usually the sparkle textures that i have are around 29 frames long so this is going to be annoying :/
highlight all the frames in the animation panel (select frame 1 and then shift + click the last frame) and press the three line thingy at the top right of the panel. select copy frames.

then go back to the edit and create the number of frames needed to cover the entire snow animation (*cries in 120 clicks*)

there’s probably a faster way to do it but idk it so if any of you do know, please hit me up!!
anyways, after those painstaking clicks, select all of those frames and click on the three lines thingy and select paste frames
now this menu pops up:

select “paste over selection” and press ok
now it looks like this

MAKE SURE TO HAVE THE FRAMES ALL SELECTED STARTING FROM FRAME 1 TO THE LAST FRAME WHEN YOU DO THESE STEPS OR ELSE PHOTOSHOP WILL BE STUPID AND MESS UP YOUR EDIT BY APPLYING YOUR CHANGES TO SOME FRAMES BUT NOT ALL AND WE DON’T WANT THAT TO HAPPEN
select all of the snow layers and group them using the folder button in the bottom of the layer panel
then resize the snow layers to fit the area of the edit.
now we change the blending mode to remove the black background of the snow!
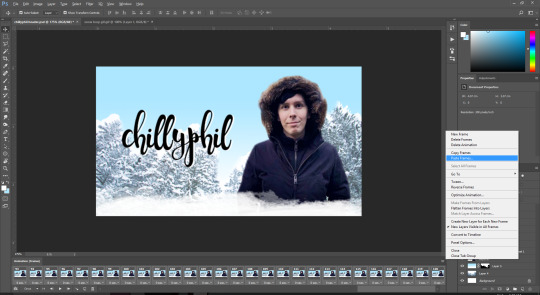
select the group that you put all of the snow layers in and change the blending mode to any of the options in the lighten section
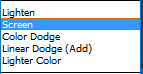
i personally like using screen for most things but i ended up using linear dodge (add) for this one because the background of my edit is very light in colour and the snow doesn’t show up that well if i use screen.

now we don’t want snow covering phil’s face so go and move the snow group layer below the layer of the pic used:
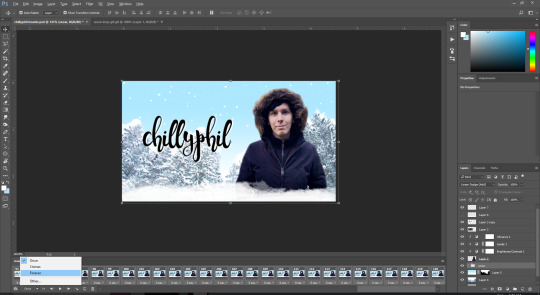
yay! now remember to select “forever” as the frame loop option and let’s export!
these are the export settings i use for basically all of my gifs:
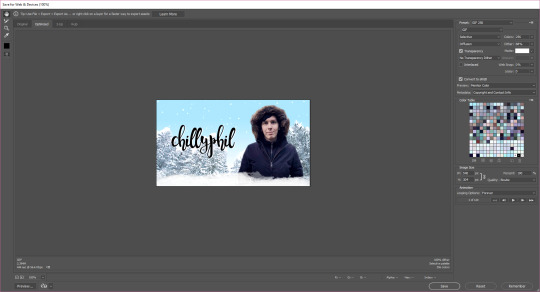
save it and there you go! you have your very own snazzy gif edit!

~ the finished product that i’ll be using as a header when i finally change over to my festive theme tomorrow ~
i really hope this helped! feel free to dm me or send me an ask if you have any more questions! :)
#gosh that took me an hour and a half to make lmao#tutorial#photoshop#perhaps i'll have a tutorial tag now#yuletidegays#jessica answers stuff#crap the screenshots of my full screen are wayyyyy too small sorry about that! i forgot about tumblr's dumb 500px width rule#resources
54 notes
·
View notes
Text
I ’m making a tutorial for @victuuri-moonandsun on how I downloaded the YOI episodes and how to make a basic gif. I decided just to make a tutorial for everyone else who wants to learn? I’m like hella basic at making gifs so ill be providing resources in hopes it will help!
The tutorial includes:
How to download
Capturing Method: VLC vs KMPlayer
Importing + Making the gif (Timing, Cropping, Sharpening, Saving)
Ill teach u how to go from:

to this:

+ A shit ton of screencaps to make up for the fact i’m bad at explanation. ++ what is grammar n spelling? +++ cursing a lot of it
its like legit 3 am and this tutorial is so bad good luck
You will need:
Vuze
Photoshop (I use CS6)
VLC Player or KMPlayer (I will later discuss the difference usage of these programs)
I. Downloading
Sup yo! Okay let’s start with downloading the actual episodes! I usually use torrents when i’m downloading the episodes. This is what Vuze is for. Like most things u wanna be careful when you download shit off the internet but idgaf i’ve been downloading shit off the interwebs for a while.
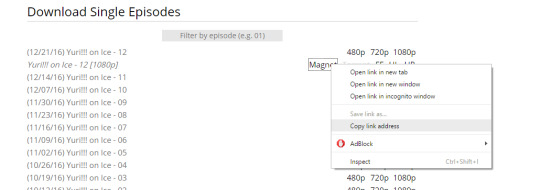
So you wanna either google “yuri on ice 1080p torrent”, but im gonna use HorribleSubs for my example. You wanna make sure you download the 1080p version of the episodes so you can have the clearest/more HQ gifs.
If you’re using the horriblesubs site then you wanna click on “1080p” for whatever episode you want and right click the magnet link.
Yay! Now we gonna wanna open Vuze. First you gonna want to click the “add” folder > Add Magnet > Paste URL > Then hit okay.
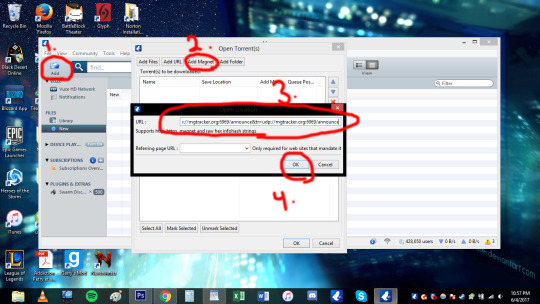
Okay. So once you hit ok this should pop up:
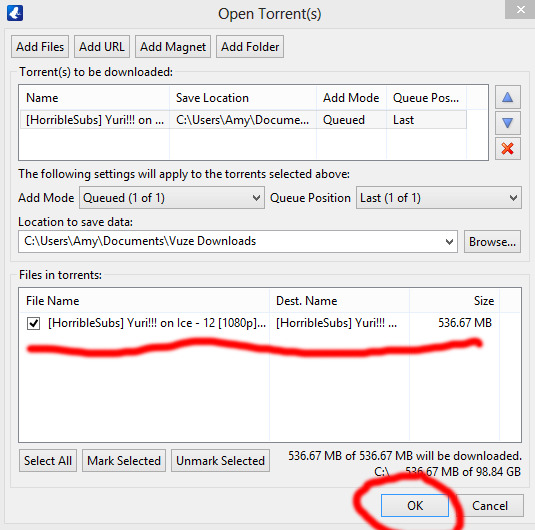
Then hit ok again! You can also change where you wanna save it at this stage too. Okay now your file is downloading and now we wait! The more seeds the faster the download.

Once the file is done downloading we can move on to actually capturing for gif making.
II. Capturing:
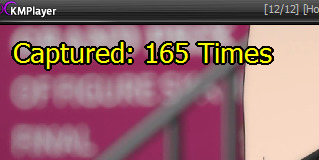
OKay. SO I personally use the VLC capturing way because it’s easier for me. With VLC you;re basically recording the scene you want so you can import it into Photoshop. With the KMPlayer you’re taking a shit ton of sceencaps and you’re importing each image into Photoshop. I used both methods and they both get the job done. The only time i use KMPlayer is when VLC is acting wonky. Ill show the VLC method first then the KMPlayer (cringes).
Yay VLC. My fav bby right here. OKay So you’re gonna wanna open that shit up. Okay, so the first thing you wanna do when you open the program is go to view > advance controls. This gives you the option to record!

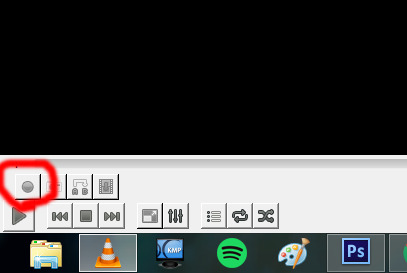
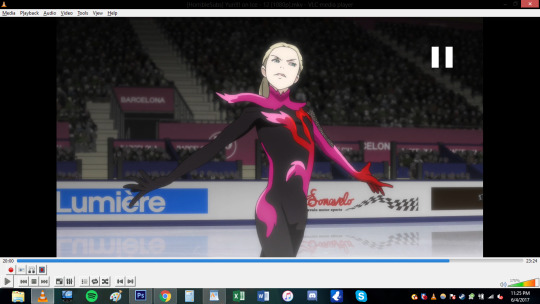
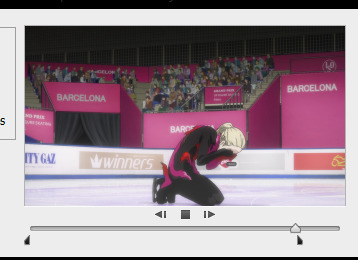
Hell yeah bro now we in business. Okay you’re gonna wanna open the episode you wanna be gif-ing. Since I showed how to download episode 12 i’m just gonna use episode 12 for this too cause fuck it man. You’re gonna wanna decide what scene you’re gonna want to make a gif of. I think for the purpose of the tutorial i’m just gonna do the scene where yurio finishes his program and creys cause hella yeha bro.
okay so for myself, i tend to start recording couple seconds (like 5-10 *my computer is really wonky ) before the actual scene because I want to make sure I record the whole scene without cutting anything out.
You also notice that the record button is red now. So you’re basically just gonna click it once and let it record until you want it to stop!
Where i began to record (actual a couple secs before becuz i forgot to screencap):
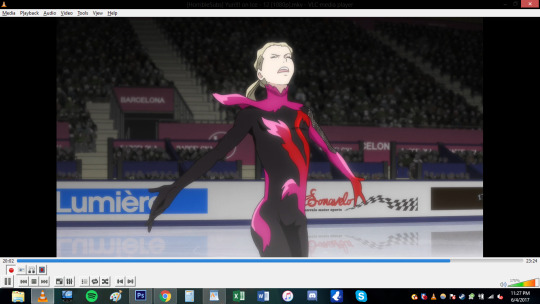
Where I ended:
***note: Notice how the record button changes while you’re recording vs not recording! (i’ve done the dumb thing where i forgot to stop recording and watched the rest of the episode .-. )
Now that short clip will be saved. my video was saved in my video file im sure you can change where you want it saved but idk how. This is where it is saved on my computer. Probably can search “vlc” on your computer if it is absolutely lost (sorry I can’t help much in finding the file).

Basically after this step you’re done deezy. You can skip the KMPlayer and go directly to the gif making portion of this shit tutorial.
OKAY FOLKS HERE’S THE KMPLAYER TUTORIAL ON HOW TO DO GIFS HAHAHAhahaha *sobbing*
I need to explain this program a bit more. So unlike VLC you’re not recording or anything like that. This captures screencaps into jpg or png files. When you do the VLC method, photoshop will make the screencaps for u. This method you’re gonna have to load the each photo (This usually takes photoshop longer to load for me, but than again my computer is old as shit so it may not matter to you).
OKay u gonna wanna open that satan spawn and open the episode u wanna do. Again here im gonna do the same scene cause yeah. Basically just go to the scene you want.

Okay here the annoying shit happens. SO unlike VLC for me, I don’t have to a big gap of recording time. I can get closer to the actual scene and want and start capturing (ctrl+G).

When you hit ctrl+G, this window pops up and this where all the settings happen. 1. You decided where you all the pictures will be saved! 2. You can pic the image quality. I go for JPG because my computer just cant handle doing png. If you’re computer can do the png go for it. 3.) Seconds refers to how long you want the program to capture for. I just put 5 seconds to make sure i get the whole scene. You also want the images to be in the original size. 4.) I WILL DISCUSS THE TIMING THING MORE INDEPTH LATER, but for the time being i’ll do every 1 frame.
When you click start on the small window your video has to be playing to actually capture. I just hit start and hhit play cuz fuck it.
When the program finish capturing this will pop up in the corner. *note: I ended up doing 10 seconds because my computer hates me. So there’s a lot more caps than i needed. this is what you end up with!

A shit ton of fucking photos! YOU READy TO GO TO PHOTOSHOP.
III. IMPORTING-VLC
*if you need help downloading photoshop send me an ask and ill try my best to help you. I downloaded ps cs6 a long time ago and the link i used to download it doesn't exist anymore.
THis step is gonna be different depending on what method you used for the capturing. I’m going to begin with the VLC method. So you’re gonna wanna go to file > importing > video frame to layers.

Find the clip file and hit open. a window will open and now you can select what part of the video you want to actually gif! the two point thingies on the bottom are adjustable. FOr example maybe you recorded too much in the beginning? drag the 1st arrow thing to where you want the gif to start. Same with if you recorded to much at the tale end of the video. You can adjust the right one.
Make sure to have frame animation box is check.
And now we’re at the frames part.This is where I feel conflicted and you will see why when I get to the timing part of the video. (I use to make a lot of gifs for real action tv shows and this is the first anime I ever edited and I just feel like i haven’t found the best timing yet?). For this screencape i left the limit box and just do every frame.

So my video was too long at the end and decided to cut that unwanted shit out. (you can hit the play button just to make sure you’re happy with what you got. Hit ok when u done deezy
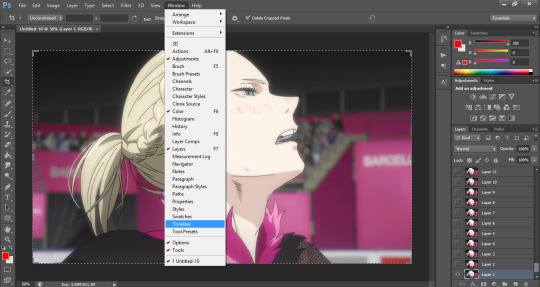
THEN BOOM THIS IS WHAT IT LOOKS LIKE. THAT BOOTIFUL ASS YURIO’S FACE HELL yeAH. Okay. So on the right hand side you have all your layers. but we missing the timeline bro. SO you go to window> timeline
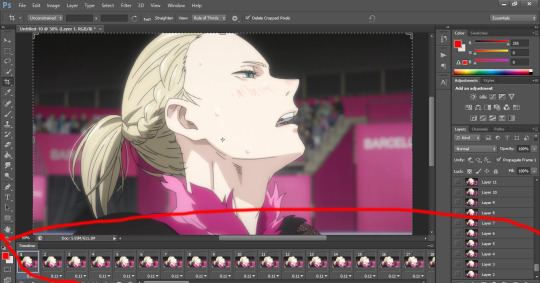
DAMN LOOK AT YOU YOU’RE READY TO MAKE A GIF. You can skip ahead and learn about timing. Keep reading for the KMPLAYER way.
III. IMPORTING- KMPLAYER
oKAY. You’re gonna wanna go to file> scripts > load files to stacks
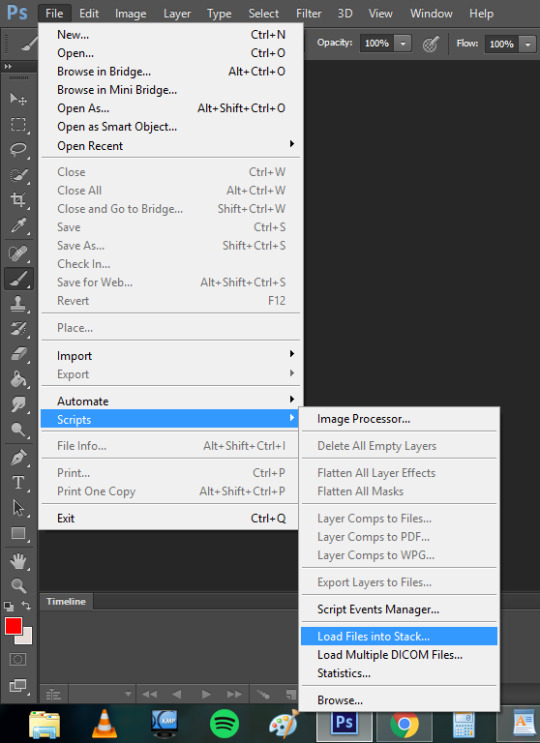
A window will pop up and basically you’re gonna select all the screencaps you want for the gif and hit okay.
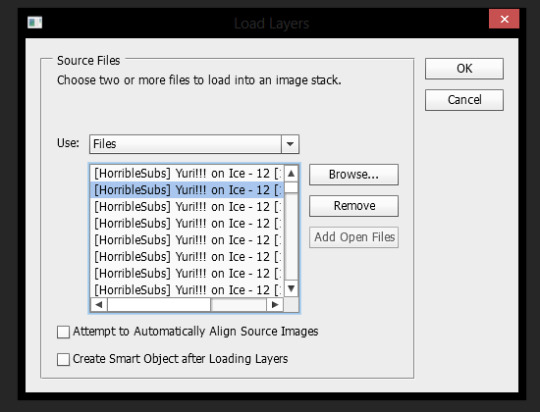
This shit takes my compouter f o r e v e r (compared to the VLC method.) to load and even longer afterwards when it’s being uploaded as layers. This method took my computer to load the files 3 minutes compared to the 5 seconds the VLC method took me. Like i’ve mentioned before it might just be my ancient ass computer’s fault. But this it what it looks like when it’s done loading
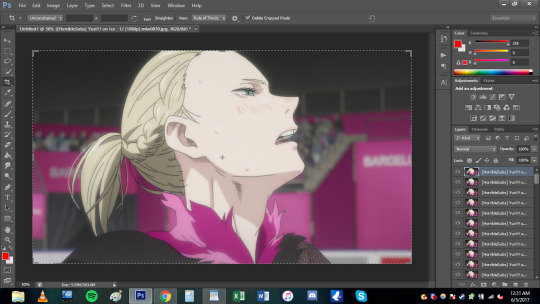
Okay you;re gonna wanna do the same step as VLC to create the timeline (Window>timeline).

But because this was loaded in differently the the stacks will not automatically have frames. You’re gonna want to click create timeline and you will notice you have one frame only.
So on the top right corner of the timeline you will have the option to make the layers into frames.
Now you maybe noticed that the frames are fucking backwards son like wtf man. a simple fix to that! in the list of options where you made the frames from layers, you can reverse the frames.
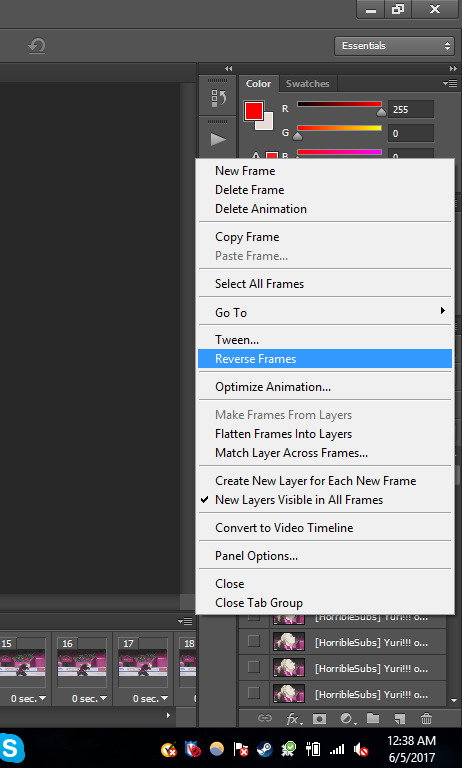
NOW YOU’RE DONE DEEZY. WE CAN MOVE ONE.
IV. TIMING
OKay this gets really iffy for me. I’ll just basically show you the times I use and what it may look if you capture every frame of you choose to do every 2 times (anything else isn’t recommended). In this section it’s what I use and probably not the best, but you can play around with photoshop and you can do whatever the fuck you want yo!
Anyways as you can imagine if you decide to do every frame youre gonna get a shit ton of layers(i’m gonna be working with the vlc method from this point on. any kmplayer question can be sent my way!). But it may look smoother! *will make a note on this*. Downside, the file is prob gonna be WAY bigger.
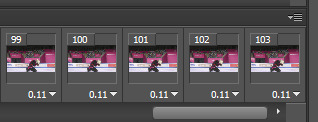
For ex: Every frame. 103 FRAMES FUCK MAN.
Every 2 frames: 53 frames
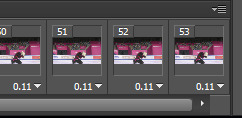
So it’s basically about half cuz u know math
OKay. so when i do gifs I usually set the time to “0.06″ but I put “0.07 for every 2 frames. To change the timing make sure you have all the frames selected (click the first frame then go to the last frame and Shift+click it). Now that all the frames are highlighted you want to hit the down arrow and click other. This is where you set the time and hit okay.
every frame @ 0.06 (No cropping/no coloring/no sharpening)

every 2 frames @ 0.07

So it’s really personal preference. I just have it so ingrained to do every frame at 0.06 since i started making gifs years ago, but i feel like the every 2 frames at 0.07 looks smoother for anime? Really guys experiment and see what you like better!
V. CROPPING
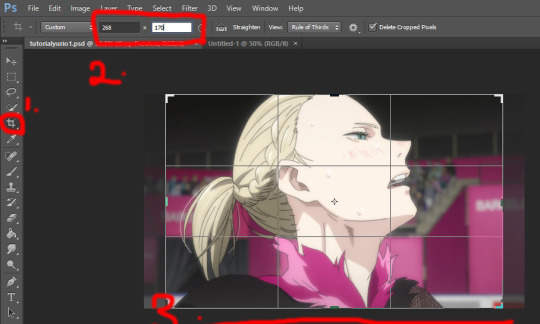
Yay lets get to cropping! These are the current dimensions for tumblr
one picture/gif: 540px width two pictures/gifs: 268px three pictures/gifs: 177px, 178px (middle), 177px spaces: 4px
-itsphotoshop
I always crop my gifs. I just think they look nicer when they’re crop.To start cropping you either wanna hit “C” on your keyboard or clip the crop tool. Afterwards you can put a value of the dimensions (i tend to do 268x165 or 268x170 when I to he gifset with 8 different gifs). Now you can drag the box over the gif to position it where exactly you want the focus to be. You either double click the box or hit enter when you wanna crop.
You might not want to have it dead center. so yeah this what it looks like if you just dragged it:
Damn yurio is looking good dead in center, but you noticed the 2nd half yurio isn’t in the middle no more. When you’re cropping you wanna keep this in mind. (you can always make two separate gif to have it all centered but i can make a dif tutorial for that).
This what it looks like if i decided to keep the cropping in the center:

Overall both scenes are more centered.
BUT WHAT IFF YOU JUST WANNA ZOOM IN ONTO YURIO’S FACE?? i got chu bro. I’m goning to delete the 2nd half of the gif for the purpose of this example. So what you’re gonan want to do is drag a side of the square until you’re happy with what you want.

Here i just dragged the bottom. Since I have my measure inplace from before, no matter what side i drag it it’s always gonna be the same ratio of 268x170 so no need to worry !
Regular crop:
Crop to zoom in on the face:
THE MORE YOU KNOW ABOUT CROPPING :D!!!
OKay. Once you’re done cropping you’re gonna want to resize that!
I’m going back to the original gif with both scenes.
To resize an image you either can hol the CTRL+ALT+i or go to image>image size
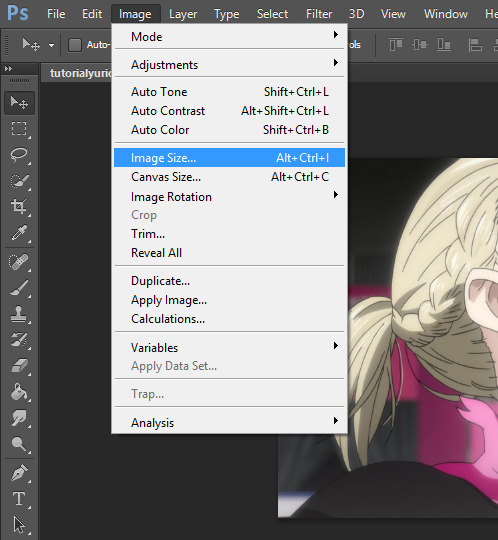
a window will pop up and youll type in what size you wanted. Because i had the dimensions typed in while i was cropping it will basically do the ratio for u

the original size was 1702x1080. Once i typed 268, the program kept the ratio and changed the height. SORRY IM NOT EXPLAINING THIS WELL I REALLY DONT KNOW HOW.
We went from this:
to this:

it’s not a HUGE change but there is a change!
VI. Coloring *bonus
I have no authority on color tbh It takes me to forever to color shit and i’m h o r r i b l e at it. so i aint gonna discuss this much but here what coloring can do for u!
original:
to this garbage:
I don’t really like it but i just did it quickly for the sake of this tutorial. If you wanted an idea of what I did

The best way I learned to color was from PSDs others made or just fucking around in PS. Here are some resources:
PSDs: x x x Tutorials: x x
VII: Sharpening:
Oh man okay so i use an action for my gifs but the thing is i downloaded a long ass time ago. It may be this, but im not entirely sure. This hella easy yo!
so you wanna select all the layers:

then you wanna convert the frame animation to a timeline (make sure you changed the time you want the frames to be before you convert!)

You will notice the frames changed on the bottom. Now you wanna go to filter>convert to smart layer

Now you only have one layer!
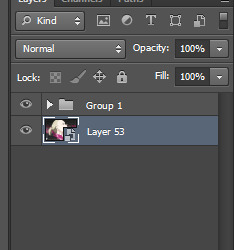
With this one magic layer you can sharpen all your goddamn layers all at once.
If you don’t have the action you can do the basic sharpening. Okay now go back to the filter tab>Sharpen>smart sharpen. I have use this option in YEARS but i believe the kinda go too was this:
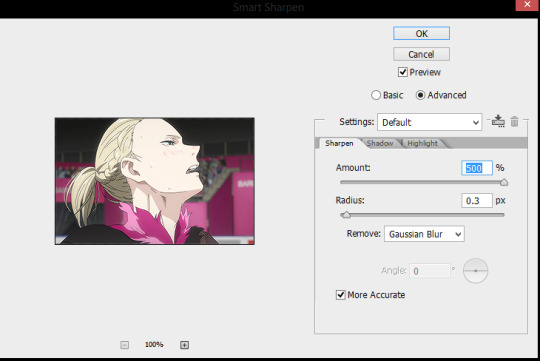
and hit okay!
Before sharpening:

After sharpening:

the lines are more defined in the 2nd gif, If you were able to download the action this is how you use it.
GO to Windows> actions.

WHere the red circle you click, and find the option for load actions. Once you load it you wanna make sure you selected the smart layer and hit th eplay button and the action should sharpen it for u
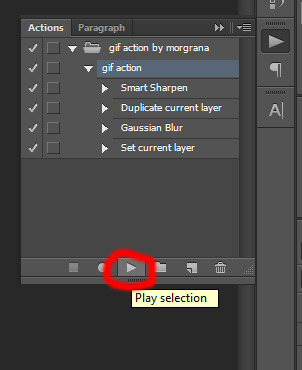
BOOM. your gif is sharpen. So lts compare all three now.
No sharpening:

Smart sharpening only:

Action (Smart sharpening + blur)

I like the action th most because it’s not as intense as the smart sharpening only. WOW U FINISH A GIF CONGRATULATIONS NOW YOU WANNA SHOW THIS BABY TO THE WHOLE WORLD RIGHT? WELL IMMA SHOW U HOW,
VIII. SAVING THAT SON OF A BTICH
So basically you either hold alt+ctrl+shift+S or file>save as for web
and a window aPPEARS. These are the settings i use to save:
BE CAUTIOUS OF THE SIZE OF THE GIFS: I BELIEVE THE MAX SIZE IS 2MB

this gif is under 1mb so im safe yo! Some tips if gif is too large is to add a selective layer>black> then +5-10
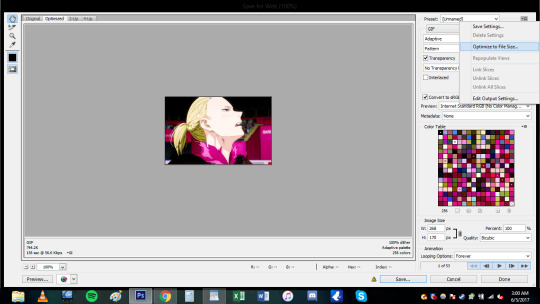
another tip is to use optimize tool if yOU HAVE TO: go to the top right corner

now u done deezy
u save that shit
and cry
send me an ask if you need shit cleared up.
124 notes
·
View notes
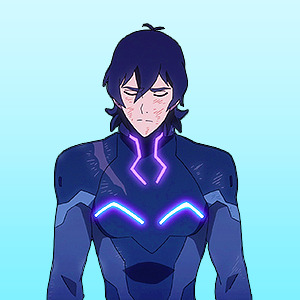
Photo

i was asked to do a tutorial on how i make my icons by anonymous, so here’s my super easy way of doing it. there’s no major editing or backgrounds simply because i’m super lazy and i prefer the look of clean, bright icons. i’ve only ever used this method on cartoons (voltron. i’ve only ever made voltron icons lol), so i can’t say for sure whether this method would work well with real people. just keep that in mind!
for some examples of what you can make, here’s my icons page.
please like/reblog if you try it out, and feel free to ask me any questions.
in order to follow this tutorial, you’ll need a basic knowledge of photoshop - i use cs6, for reference. you might be able to create a similar product on other programs like gimp? idk.
one. choose a screencap to use for your icon. generally, i take my own screencaps right from netflix on my computer, but there are a wide array of websites you can get better quality ones from. i’m just lazy and this works for me.
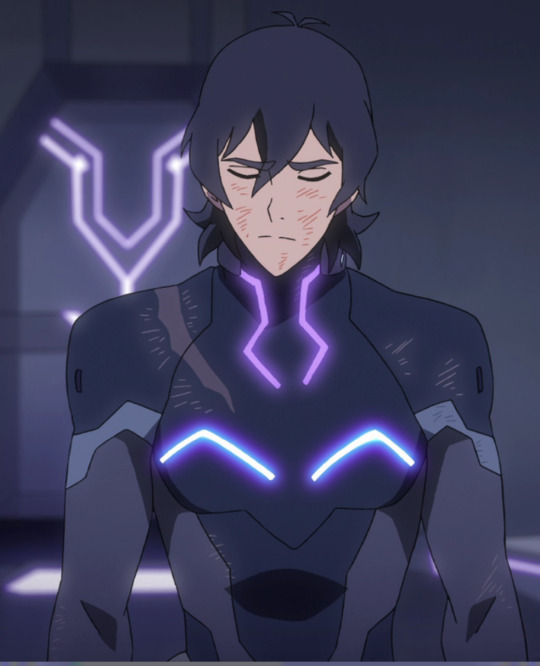
it’s best to choose a scene where the character’s body is in full view, and one with a simple background, as this makes it easier for you later on.
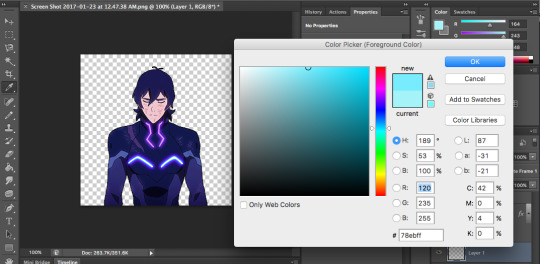
two. isolate the character from the background. for this, i like to use the magnetic lasso tool. it can be a little fussy to deal with at times, but i find it’s a quick, effective way to get the job done. if the background is one solid color, i’ll sometimes use the magic wand tool, but other than that i use the lasso.

once i’ve got the subject outlined, i right click and choose the option ‘select inverse.’ then i delete the background.
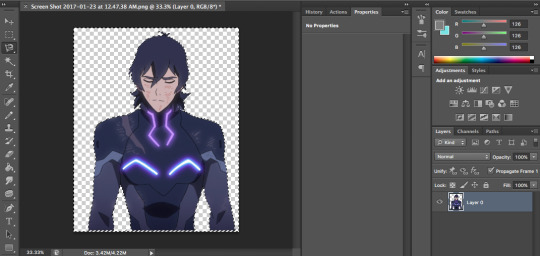
three. next, you’ll want to clean up any areas the lasso tool might not have gotten. for this, i zoom in at 100% and use the eraser to get rid of any weird bumps or leftover background.
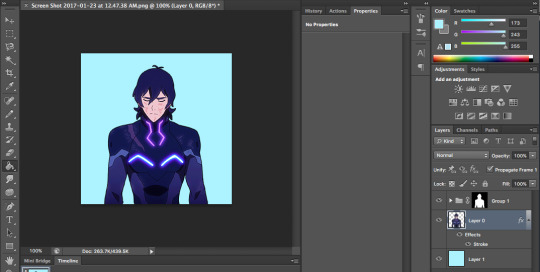
four. i find that my icons look best when i use the stroke option on the subject. i double click on the layer and select stroke, leaving whatever default options are set. since my screencap is so large, having a 3 pixel border makes it look like the original drawn outline is still there (something that the magnetic lasso tool usually erases). plus it just makes the subject look a lot more crisp.
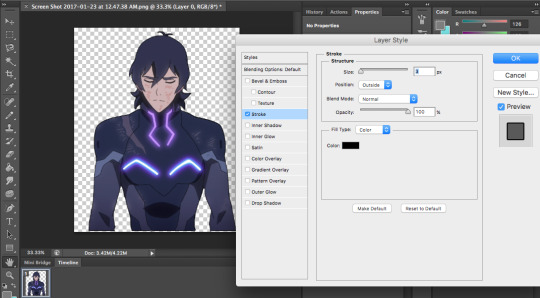
i clean up with the eraser one more time after applying the stroke, because it’s easier to see imperfections and stuff once they’re outlined.
five. i crop the image so that it’s square, and resize it to 300x300 pixels. i like this size because they look nice in photosets and that way, people who want to use them can crop them if they want.
six. coloring! for this, i use my own psd that i use for voltron gifs as well. i couldn’t find a good psd that didn’t whitewash hunk, lance, and allura, so i made my own on a whim and now i’ve been using it for everything. because i’m lazy. if you ask nicely i might post it.
the general idea for icon coloring is that you want higher contrast and bright colors because of their small size. most voltron screencaps are bright enough already, so it’s really just a matter of adding contrast and a little vibrance.
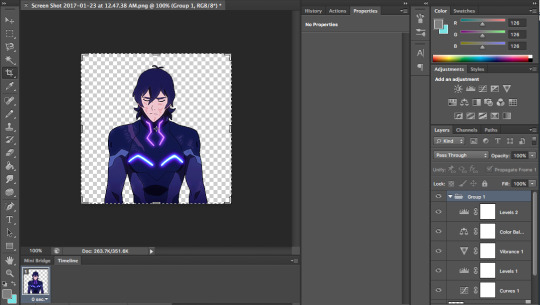
so that the coloring doesn’t interfere with the background, you should right click on the subject layer, select ‘select pixels,’ then go to your coloring group and apply a layer mask.
seven. create a new layer and bring it to the bottom. for background colors, i usually like to pick out colors from the subject because i find it makes everything feel a lot more cohesive.
then you’ll want to use the paint bucket tool to create a solid background.
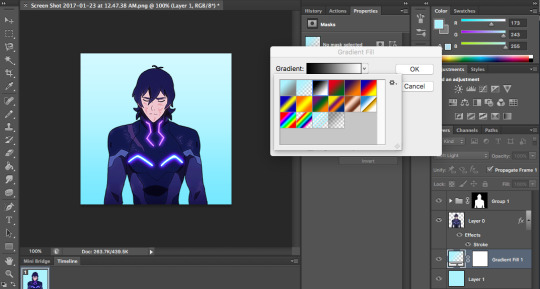
eight. so that nothing looks too flat or boring, i add soft light layers of gradient. the first one goes right in between the background and the subject. go to layer > new fill layer > gradient...
set mode to soft light, and choose the black to white gradient. adjust accordingly, depending on how strong you want the background gradient to be. for this one, i’ve kept it at 100%
the second gradient i add goes over the entire icon, at the top. do the same thing in creating a new gradient level on soft light, but this time choose the color to transparent one. this just helps make the icon look a little more put-together imo.
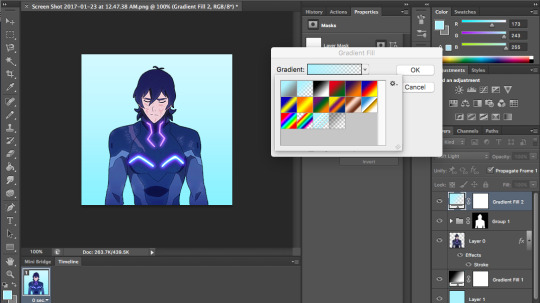
again, adjust opacity to your liking. i adjusted mine to 90%.
nine. sharpen the subject layer. i use smart sharpen, and the default settings. if it looks oversharpened, that’s fine because it looks better when it’s actually icon-sized.
ten. save (for web) and use! i save my icons using the png-24 settings... i think they’re default - i don’t remember tweaking them ever. does everyone with photoshop have a png-24 option??? i know nothing about photoshop truly.
here’s my final product:
this tutorial was actually a lot longer than i anticipated... i promise it doesn’t take that long to make these!!! usually it’ll take me anywhere from 5-20 minutes to make an icon, depending on how often i fuck up the magnetic lasso tool.
hope this is helpful to some people. any questions, feel free to pop into my ask box and i’ll do my best to help you!
#icon tutorial#photoshop tutorial#itsphotoshop#yeahps#ps tutorial#idk i hope this helps#i've never written a tutorial before rip i feel like this might be long-winded#lmk if there are any grammar mistakes too i didn't really edit this#bye
375 notes
·
View notes