#manual testing tutorials for beginners
Explore tagged Tumblr posts
Visit Tumblr Blog
Explore Tumblr blogs with no restrictions, modern design and the best experience.
Last Seen Tumblr Blogs


Fun Fact
BuzzFeed published a report claiming that Tumblr was utilized as a distribution channel for Russian agents to influence American voting habits during the 2016 presidential election in Feb 2018.
Text
#manual tutorial#manual testing tutorials for beginners#manual testing tutorial#manual testing#online training#tutorials#testing#india
0 notes
Text

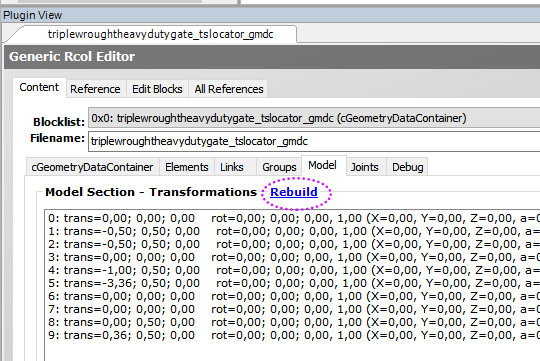
Tutorial: How to adjust joint position (in TS2 object skeleton)
This tut is NOT meant for beginners because I don't explain how to use SimPe or Milkshape. But actual process is very basic: you change joint coordinates and do GMDC model rebuild. The tricky part is to get coordinates right.
If you don't know much about joint assignments, start with this tutorial: "Retaining object animations in your new package" by Bluetexasbonnie @ MTS2, which explains how to add joint assignments to custom stuff cloned from functional objects (to make parts of the mesh move when Sims interact with it).
The pic above: SimPe GMDC skeleton preview. You can click on each joint name to see which part is assigned to it. Gate is here.
This will work for simple object skeletons without IK Bones.
There are no plugins that would allow us to properly import TS2 CRES skeleton data with IK bones - like sims, pets and more - to any 3D program
If object has IK Bones - you'll find out when importing CRES to Milkshape. If it displays a notification "joints with rotation values found...", IK Bones are present and there's a high risk that skeleton: A. will not be imported. B. if it's imported, it will get mangled. C. will be mangled after using model rebuild option.
I've experimented with car skeletons (those have IK Bones), managed to edit car door joints but it required removing wheel bone assignments - because wheel movement becomes wonky after doing model rebuild
/FYI: steps 1 - 5 are optional, you can edit CRES joint coordinates right away if you know the right values - which is usually not the case/.
Export GMDC with your custom mesh
Export CRES (if you wish to preview entire skeleton and/or joint names)
Import GMDC to Milkshape
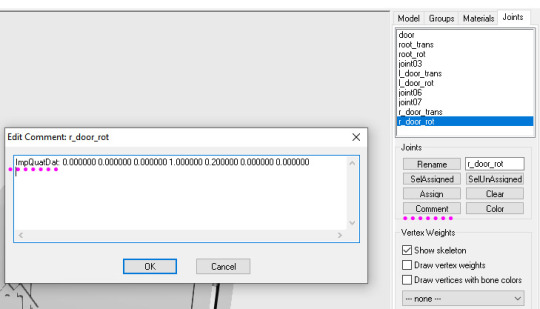
Import CRES (if you need it. Plugin is called: Sims2 AniMesh CRES Skeleton Import. Click 'yes' to 'replace all bones?'). You should be able to see entire skeleton imported. Note that Milkshape won't let you export a GMDC after you imported CRES skeleton unless you change joint comments (point 7.)
Measure how much you need to move the joint. You can create a box as ruler substitute, then check the distance with extended manual edit plugin. If you're not sure where to place your joint, you can move it and test if object animations look alright (import CRES again to reset joint position).

tip: when working on GMDC in Milkshape you can rename the model parts in model list (door right, door left etc). Only names inside the model comments actually get exported.
6. Go back to SimPe, open CRES resource. Remember TS2 is using flipped coordinates: X = -X, -X = X, Y = Z, Z = Y. Edit joint Translation data, commit, save.
Optional: you can export CRES skeleton again and import to Milkshape to test if joint has moved to the right position.
7. Go to GMDC, Model tab - hit rebuild, commit, save.
if you have the edited object placed on a lot, it's gonna look weird when you load the game. You need to re-buy it from catalogue to see results.
If for some reason you'd like to export entire GMDC with your imported CRES skeleton, Milkshape won't let you do that. You'll get "ERR: No quaternion values stored" error. You need to go to Joints tab and edit each Joint comment to ImpQuatDat: (that's imp, with capital i )
Notes:
if you go to GMDC Joints tab, there's also a rebuild option to update single joint - but I've tried it on car door joints and it didn't work.
If you edit joint coordinates in CRES, for example- move the car door forward, and preview skeleton in GMDC viewer, your model is gonna look fine. But in the game every vertex assigned to that joint will also be moved forward. That's why you need to use model rebuild option. In theory, if you'd like to skip rebuild, you could import GMDC to milkshape and move the door backwards to compensate for joint adjustments? I haven't tried that (yet).
74 notes
·
View notes
Text
HELLO @okartichoke I AM HERE WITH MOSSY'S GUIDE ON HOW TO START SEWING: A VERY MESSY TUTORIAL
I am extremely self taught, so this is gonna be a lot of links and infodumping!!!! Hopefully this helps a even just a little bit :>
SO! I honestly got into sewing through youtube during covid, largely bc i wanted silly fun clothes! There are a loooot I could recommend to you out there, but I personally find that the more chaotic and learn-as-they-go people help me the best! Rachel Maksy and The Stitchery are, to me, some of the best to learn from! Which is honestly pretty funny since they tend to just fully wing it most of the time lol. While i could recommend excellent sewists like the amazing Bernadette Banner (who is actually the first sewing channel I watched!), I find that the more loosey goosey the process, the more i can learn, if that makes sense? I find it helpful to watch people trial-and-error their way through projects and show where they succeeded and failed since I get a better grasp on their process that way.
The best way to start sewing, in my humble opinion, is to grab whatever sewing machine you can get your hands on and play around with it! Read the manual, find a tutorial video on how to thread the machine, grab some scrap fabric and play around! You don't really need any special needles or feet (the little thing that holds the fabric down), unless you wanna get started sewing denim or velvet or something Speaking of which, learn about fabrics!!!!! I learned mostly by going to joanns, touching the fabrics, and looking at the content labels. Everything has different uses, and while two things might both be cotton, one could be knit while the other jersey (tshirt fabric). I like this video for learning the basics! Tbh this one took me a while. Usually patterns have recommendations for what fabrics to use, so that's always a good place to start!
Patterns. Ah my arch nemesis. Unless you decide to start drafting your own patterns (or get a mannequin and learn how to drape fabric), you're probably gonna need to use one. There's two major things i recommend for this: 1) Make sure there's a video tutorial online before buying, and 2) start with something you might actually use/wear. Pattern instructions are notoriously vague, but thankfully many wonderful people make video tutorials for them! And while you might be tempted to grab one of those beginner friendly patterns, they can sometimes be. real ugly and not well fitting. Also boring! Finding something you like will hold your attention better and make you actually wanna finish it!
Ok SO. getting into more of the cosplay sewing stuff. First things first my knowledge here is a bit more limited, unfortunately. Fortunately there are many wonderful people out there with tutorials!! So if you wanna learn more definitely look there!!! General tip for cosplays + more complex sewing: MAKE MOCK UPS PLEASE IT SUCKS BUT IT HELPS SO MUCH. Go find the ugliest fabric in the sale bin and buy a few yards, then use it whenever you wanna test patterns. It might be tempting to immediately start cutting and sewing the finished garment, but the truth is that patterns rarely fit perfectly well (especially if they're fitted/tighter on your body). Make an ugly, barebones version first with your bad fabric, take notes, and then start making the finished piece. It'll save you money and sanity.
As for cosplay youtubers, I heartily recommend Sarah Spaceman, since not only do her videos show her process, she also does segments teaching you more about sewing!! She tends to tackle more complex projects, and watching her take those on has helped me a lot :} For cosplay patterns etsy usually has quite a few! I like Indigo Patterns (they have a good array of loz patterns I need to buy) as well as Alice in Cosplay Land. Please note that I haven't bought from either, but both their etsy shops have wonderful reviews and I plan to buy from them in the future!
not gonna lie I am getting very sleepy so I'm gonna cut it off there for now! Hopefully my rambling helped lol. Feel free to ask me any questions or for any clarification!
#wowie this is longer than I thought#and i didnt even get into any specifics#tbh my whole method for learning things is mess around and find out#you'll only get better once you start!!!#it looks really daunting at first#but you gotta start sometime!#the time will pass anyways#anyways you're more than welcome to dm me with any questions!!!#i will do my best to answer them :]#I was gonna include pictures of my projects and mockups#but *apparently* i deleted them all for some stupid reason#and i'm currently trying to finish all my half done projects before I start any more#so no pictures for now 😔#mossy’s sewing adventures#sewing#mossy talks
28 notes
·
View notes
Note
Haiiiii
I love ur work so much omg
I just came across ur stuff on my dash
How do you practice pixel art? I have tried makin fur on my mc skin but it never works well
oh hi!!! first of all, a lot of my work is through just... doin it a lot. i've been doing modeling n texturing for a lil over a year now so i have a lot of practice with it. but i can give you a few lil tips! there's basically 2 mistakes i see a lot of beginners make, and that's using noise and not hue-shifting their palettes.
noise is a way to add randomness to textures by randomly makin pixels darker and lighter. uhh... do not do this. noise tends to look messy and disorganized, i'd *highly* recommend you do your coloring by hand/paw (whichever you have!) with your own color palette. below is two versions of a basic skin, just the front of a torso with grey fur and a white chest. the left version is done with noise, the second is done manually.
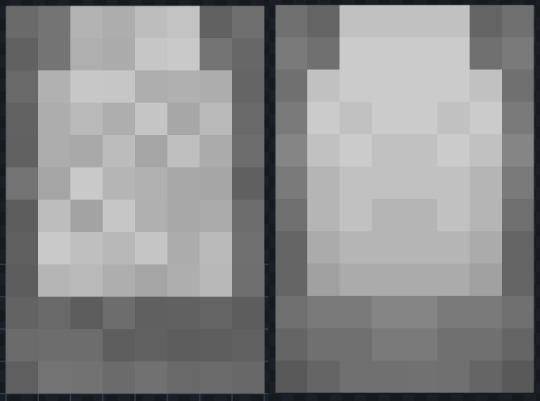
doin things manually adds SO much detail to your texturing. it helps things feel more cohesive by giving it order. there are a lot of lil things i've picked up with how i texture that are just things i've learned through practice. try this out! try different patterns and see if you like how they look. if you look closely at my texturing you can see a *lot* of little repeats with how things are textured.
hue-shifting is basically addin some color - or 'hue' - to your palettes! this is another thing noise does poorly- noise tools usually just make things straight up darker or lighter which looks really boring! here's an example with the palettes i just used. my palettes use 5 colors, but you can use as many as you like. on the left are the ones the skin already used, they just get directly darker or lighter. the ones on the right add some hue in there! the creamy tones for the chest use start dark with an orange hue but shift towards yellow as they get brighter, and the darker fur goes from almost purple light blue. hue shifting adds a LOT of flavor to texturing, add a lil more than you think you need- you can always tone it down later.

and here's how those colors work on that example from earlier!

mwah! this isn't perfect, it's just a quick example i threw together for a test, but it's a big improvement! as one last lil tip specifically for mc skins- USE DETAIL LAYERS!!! those are the layers that hover just above the skin. they can add a wonderful amount of depth to your texture work. avoid using them in little random dots because it can make the texture look messy- try grouping them together in patches to make things feel more connected. as for other stuff- follow tutorials! this is a very brief lil explanation of some of the biggest mistakes i see, but there's so much more material online! one of my fav texture artists Jingles makes really wonderful vanilla skin stuff, and teaches a lot of similar stuff to this! the biggest thing you can do to improve your art, no matter the medium, is to practice!!! do it a lot!!! i have a lot of experience with this because i do it a lot, and i've picked up a lot of lil things with time. awawa apologies for this being sorta scattered n all over the place! in the future i ought to make some proper tutorials to direct people too, but i hope this helps for now! i wish you a lot of luck on your modeling journey!!! awooo!!!
13 notes
·
View notes
Text
The Complete Manual for Understanding Ethical Hacking
In order to evaluate an organization's defenses, ethical hacking—also referred to as penetration testing or white-hat hacking—involves breaking into computers and other devices lawfully. You've come to the correct spot if you're interested in finding out more about ethical hacking. Here's a quick start tutorial to get you going.

1. "Getting Started with the Basics"
Networking and computer science principles must be thoroughly understood before getting into ethical hacking. Here are some crucial aspects to pay attention to: Operating Systems: Acquire knowledge of several operating systems, with a focus on Linux and Windows. Learning Linux is essential because a lot of hacking tools are made to run on it. Networking: It's essential to comprehend how networks operate. Find out more about
protocols include HTTP, HTTPS, DNS, TCP/IP, and others. Understanding data flow across networks facilitates vulnerability detection. Programming: It's crucial to know at least a little bit of a language like Python, JavaScript, or C++. Writing scripts and deciphering the code of pre-existing tools are made possible by having programming expertise.
2. Making Use of Internet Resources To learn more about ethical hacking, there are a ton of internet resources available. Here are a few of the top ones: Online Education: Online learning environments such as Pluralsight, Coursera, and Udemy provide in-depth instruction in ethical hacking. "Penetration Testing and Ethical Hacking" on Pluralsight and "The Complete Ethical Hacking Course: Beginner to Advanced" on Udemy are two recommended courses. Channels on YouTube: HackerSploit, The Cyber Mentor, and LiveOverflow are just a few of the channels that offer helpful tutorials and walkthroughs on a variety of hacking tactics.
3. Exercising and Acquiring Knowledge The secret to being a skilled ethical hacker is experience. Here are some strategies to obtain practical experience:
Capture the Flag (CTF) Tournaments: Applying your abilities in CTF tournaments is a great idea. CTF challenges are available on websites like CTFtime and OverTheWire, with difficulty levels ranging from novice to expert. Virtual Labs: It is essential to set up your virtual lab environment. You can construct isolated environments to practice hacking without worrying about the law thanks to programs like VMware and VirtualBox. Bug Bounty Programs: Websites such as HackerOne and Bugcrowd link corporations seeking to find and address security holes in their systems with ethical hackers. Engaging in these initiatives can yield practical experience and financial benefits.

Dedication and ongoing education are necessary to learn ethical hacking. You can become a skilled ethical hacker by learning the fundamentals, using internet resources, and acquiring real-world experience. Always remember to hack wisely and ethically. Cheers to your hacking! I appreciate your precious time, and I hope you have an amazing day.
6 notes
·
View notes
Text

Econometrics Demystified: The Ultimate Compilation of Top 10 Study Aids
Welcome to the world of econometrics, where economic theories meet statistical methods to analyze and interpret data. If you're a student navigating through the complexities of econometrics, you know how challenging it can be to grasp the intricacies of this field. Fear not! This blog is your ultimate guide to the top 10 study aids that will demystify econometrics and make your academic journey smoother.
Economicshomeworkhelper.com – Your Go-To Destination
Let's kick off our list with the go-to destination for all your econometrics homework and exam needs – https://www.economicshomeworkhelper.com/. With a team of experienced experts, this website is dedicated to providing high-quality assistance tailored to your specific requirements. Whether you're struggling with regression analysis or hypothesis testing, the experts at Economicshomeworkhelper.com have got you covered. When in doubt, remember to visit the website and say, "Write My Econometrics Homework."
Econometrics Homework Help: Unraveling the Basics
Before delving into the intricacies, it's crucial to build a strong foundation in the basics of econometrics. Websites offering econometrics homework help, such as Khan Academy and Coursera, provide comprehensive video tutorials and interactive lessons to help you grasp fundamental concepts like linear regression, correlation, and statistical inference.
The Econometrics Academy: Online Courses for In-Depth Learning
For those seeking a more immersive learning experience, The Econometrics Academy offers online courses that cover a wide range of econometrics topics. These courses, often led by seasoned professors, provide in-depth insights into advanced econometric methods, ensuring you gain a deeper understanding of the subject.
"Mastering Metrics" by Joshua D. Angrist and Jörn-Steffen Pischke
No compilation of study aids would be complete without mentioning authoritative books, and "Mastering Metrics" is a must-read for econometrics enthusiasts. Authored by two renowned economists, Joshua D. Angrist and Jörn-Steffen Pischke, this book breaks down complex concepts into digestible chapters, making it an invaluable resource for both beginners and advanced learners.
Econometrics Forums: Join the Conversation
Engaging in discussions with fellow econometrics students and professionals can enhance your understanding of the subject. Platforms like Econometrics Stack Exchange and Reddit's econometrics community provide a space for asking questions, sharing insights, and gaining valuable perspectives. Don't hesitate to join the conversation and expand your econometrics network.
Gretl: Your Free Econometrics Software
Practical application is key in econometrics, and Gretl is the perfect tool for hands-on learning. This free and open-source software allows you to perform a wide range of econometric analyses, from simple regressions to advanced time-series modeling. Download Gretl and take your econometrics skills to the next level.
Econometrics Journal Articles: Stay Updated
Staying abreast of the latest developments in econometrics is essential for academic success. Explore journals such as the "Journal of Econometrics" and "Econometrica" to access cutting-edge research and gain insights from scholars in the field. Reading journal articles not only enriches your knowledge but also equips you with the latest methodologies and approaches.
Econometrics Bloggers: Learn from the Pros
Numerous econometrics bloggers share their expertise and experiences online, offering valuable insights and practical tips. Follow blogs like "The Unassuming Economist" and "Econometrics by Simulation" to benefit from the expertise of professionals who simplify complex econometric concepts through real-world examples and applications.
Econometrics Software Manuals: Master the Tools
While software like STATA, R, and Python are indispensable for econometric analysis, navigating through them can be challenging. Refer to comprehensive manuals and documentation provided by these software platforms to master their functionalities. Understanding the tools at your disposal will empower you to apply econometric techniques with confidence.
Econometrics Webinars and Workshops: Continuous Learning
Finally, take advantage of webinars and workshops hosted by academic institutions and industry experts. These events provide opportunities to deepen your knowledge, ask questions, and engage with professionals in the field. Check out platforms like Econometric Society and DataCamp for upcoming events tailored to econometrics enthusiasts.
Conclusion
Embarking on your econometrics journey doesn't have to be daunting. With the right study aids, you can demystify the complexities of this field and excel in your academic pursuits. Remember to leverage online resources, engage with the econometrics community, and seek assistance when needed. And when the workload becomes overwhelming, don't hesitate to visit Economicshomeworkhelper.com and say, "Write My Econometrics Homework" – your trusted partner in mastering econometrics. Happy studying!
13 notes
·
View notes
Text
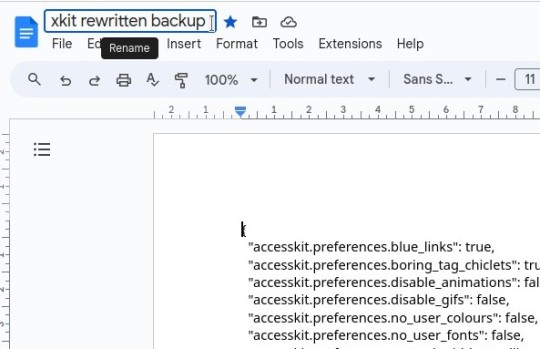
Xkit Rewritten settings across devices?
just a v quick little guide (with pictures!) for people who don't know how to transfer their XKit rewritten settings across their devices easily
(putting it under a cut because I've added alot of images and it takes up alot of room)
this is a pretty beginner guide, all you need to know/be able to do is to sign in across devices with the same account to access bookmarks or Google Docs on both devices, or just manually copy the Pastebin link
alternatively, you can use this basic recommended setup I made for a friend, to save you a little time, and tweak the settings to suit your needs
I'm running Google Chrome, but there's a Firefox version of XKit Rewritten too, and this should work the same
I've tested this so far on a Windows laptop, Chromebook and a Steam Deck, and all are working perfectly
here's a tutorial on getting Google Chrome on the Steam Deck (and getting it to open in Game Mode if you prefer that)
here's a tutorial on a workaround to use XKit Rewritten on mobile Firefox browser mode
I'm currently writing up my own tutorial on getting XKR to work on mobile, along with Chromium based browsers
(XKit Rewritten = XKR for simplicity)
my XKR backup is too long to paste into in a new Text Post and Save as Draft, which is usually my go to for saving/hosting things for Tumblr, and trying to check if I can add it to a new page on my blog crashes the tab/Chome entirely on both my Chromebook and my Steam Deck, so neither of these options are viable
On the Exporting Device
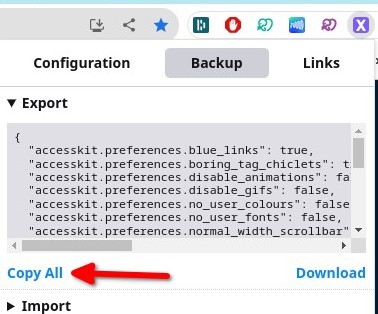
go to your addons bar, select the XKit Rewritten "X" icon, backup, then "copy all"
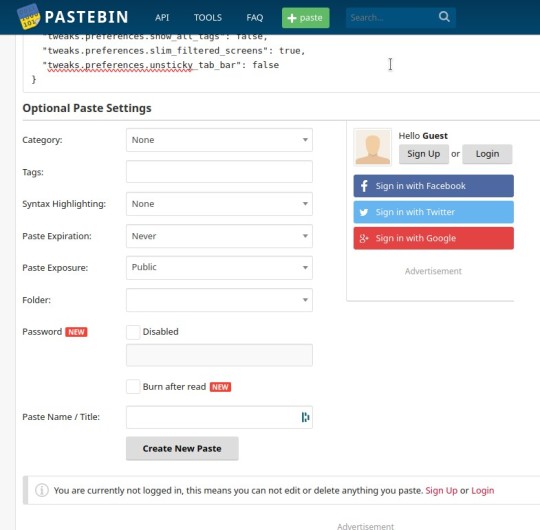
Pastebin method:
open pastebin, "+ paste", paste the code/text log into the box, and "Create New Paste". you don't need to add any tags or be signed in for this. you can leave everything blank
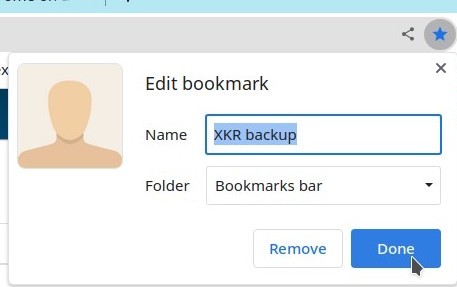
bookmark this text file and save it as something obvious like "xkit backup", for example. save it to a bookmark folder or just your bookmarks bar. not important as long as you can find it again
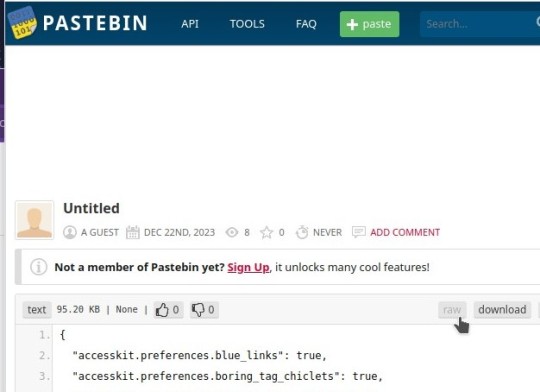
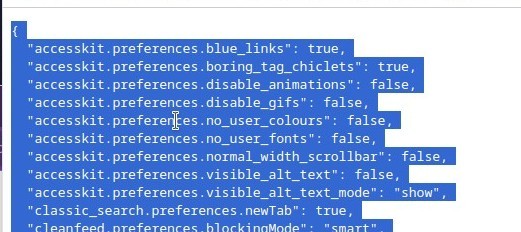
on the device you want to import the settings to, open the bookmarked page, then select all the text by selecting the "raw" option, click in the text somewhere and hit CTRL+A, CTRL+C. this will highlight all the text and copy it
Google Docs method:
open Google Docs and log in with your Google Account. hit the big "+", "Create a New Document", and paste your code/text log in here. Save as something you'll remember like "xkit backup" for example
(you can bookmark this Doc for ease of finding, but it will be the last file in your list until you add more Docs)
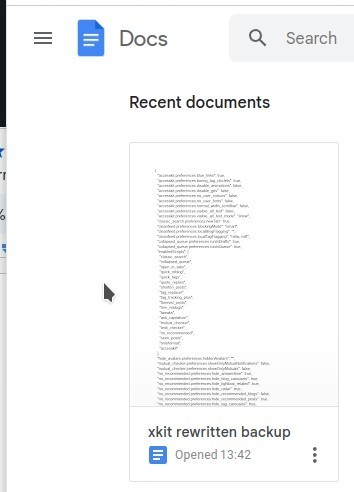
on the device you want to import the settings to, open the Google Doc, Select all text either by selecting "Edit", then "Select All", Right click, then "Copy", or just hitting CTRL+A, CTRL+C
On the Importing Device:
open the XKR addon tab again, "Backup", this time "Import", then paste the text into the box. When you hit "Restore" it'll say "Successfully restored"
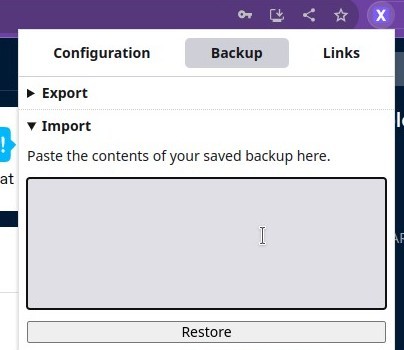
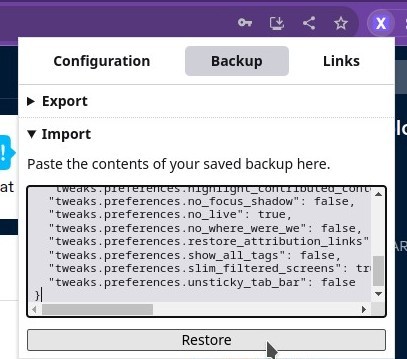
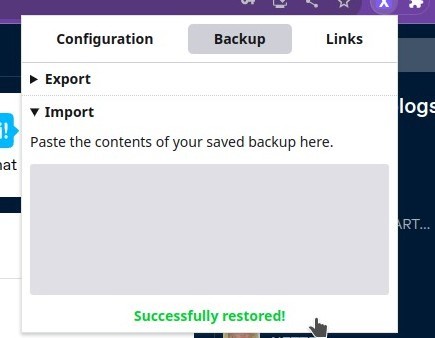
refresh your Dashboard and you should have all your settings restored!
Remember if you're transferring to a different blog, such as between RP Blogs, you will have all the tags and filters from your other blog, so you may need to go in and fiddle with those, but overall it's easier to import your existing settings than to start over from scratch!
#vatta tuts#xkit rewritten#rp ref#tumblr tips#steam deck#ok to rb#idk what else to tag this as lol#I got a REALLY bad leg cramp in the middle of doing this and had to take a break for a bit....#I'm using the Steam Deck to post this I'm not great with the editing software for the screenshot crops he's fiddly#a friend asked me for ways to get the settings over from their PC to their Laptop so! I obv decided to make a full on guide lmao#readmore.
10 notes
·
View notes
Note
I'm very curious, what kind of animation program do you use?
I personally also animate and use a program called Blender, it's both good for 2D and 3D animation and is both friendly for beginners and more experienced people, once you start understanding all of the controls
(Also, your animations look amazing and I love your content!)
ooh okay, so if you'd asked me this about two or three months ago i would have said procreate, (which is actually what i still used for this one bc i procrastinated trying other programs even after i snagged them... oof.)
anyway a few months back i was introduced to a program called toonsquid, which is an ipad app. it's probably one of the most intuitive (for a procreate user anyway) animation apps i've ever seen. i've never really got on well with flipaclip no matter how hard i tried, so i was blown away by the capabilities of toonsquid in comparison (i was even able to transfer a brush or two into it, tho i did have to manually edit them so they would behave). that's what i used for the animation i just posted.
it's paid, but i personally don't mind that since it's a one time purchase atm and not a subscription model. there are a bunch of youtube videos out there for tutorials too, so i've been having a great time now that i finally gave in and swapped. i've heard a lot about blender over the years, but since i do basically everything on my ipad i've never had the chance to test it.
(thank you btw!! they're definitely not where i want them to be yet, but swapping to a program that actually imports audio has been a godsend ;; lipsync is so much easier that it hurts lol)
#ney's art tips (art questions)#ney's chatter (ask answers)#hope this helps!#i know a lot of people absolutely love blender#personally can't say if it's any good or not#but between that and like... toonboom?#the animation scene seems really broad#i'm just here to experiment—there are loads of people with more experience that would probably be of more help#case in point: before now i would literally count the seconds for each mouth movement#and just cross my fingers before i imported it into a seperate editing program#whiiiich is why the first real animation i did is slightly off#lol
23 notes
·
View notes
Text
Level Up Your Selenium Skills: The Ultimate Course for Test Automation
Are you looking to enhance your test automation skills and become a proficient Selenium user? Look no further! In this article, we will introduce you to the ultimate course that can help you level up your Selenium skills and take your test automation abilities to new heights. Whether you are a beginner or have some prior experience with Selenium, this course is designed to cater to all skill levels. So, let's dive into the details and explore the exciting journey of becoming a Selenium pro!

Why Test Automation Education Matters
In today's rapidly evolving IT industry, staying ahead of the curve is crucial for success. With software systems becoming increasingly complex, manual testing alone cannot keep up with the pace of development. Test automation has become a necessity to ensure the efficiency, accuracy, and scalability of testing processes.
By investing in test automation education, you empower yourself with the knowledge and skills required to excel in the competitive job market. Test automation specialists are in high demand, and having expertise in Selenium can open numerous career opportunities. Furthermore, by leveraging Selenium, you can save time, reduce effort, and deliver reliable results, making it an indispensable tool for any software tester.
The Power of Selenium in Test Automation
Selenium is a powerful open-source framework that has revolutionized the world of test automation. It provides robust capabilities for automating web browsers and enables testers to perform cross-browser testing effortlessly. With Selenium, you can write automation scripts in various programming languages like Java, Python, C#, and more. Its vast ecosystem of plugins and frameworks further extends its potential, making it the go-to choice for many automation professionals.
Key Features of Selenium
Selenium boasts a rich set of features that make it highly suitable for test automation. Some of the notable features include:
Cross-Browser Compatibility: Selenium allows you to test web applications across multiple browsers, ensuring your website functions flawlessly regardless of the platform.
Multi-Language Support: Selenium supports multiple programming languages, enabling you to choose your preferred language based on your comfort and project requirements.
Fast and Reliable: Selenium empowers you to execute tests swiftly and consistently, providing accurate results while maintaining the integrity of your automation suite.
Flexible and Extensible: Selenium's architecture allows you to integrate it with various frameworks and tools, providing flexibility in designing automation solutions that fit your specific needs.
Parallel Execution: Selenium allows you to run tests in parallel, significantly reducing execution time and enhancing productivity.
Community Support: Selenium enjoys a vast user community, providing ample resources, tutorials, and support when encountering challenges during automation implementation.
The Ultimate Course for Leveling Up Your Selenium Skills
Now that you understand the significance of Selenium in test automation, let's explore the ultimate course that can skyrocket your skills in this domain. This comprehensive course is designed by industry experts with extensive experience in test automation using Selenium. It covers everything from the fundamentals to advanced topics, ensuring a comprehensive and well-rounded learning experience.
Course Curriculum Highlights
Here's a glimpse of what you can expect to learn from this ultimate Selenium course:
Introduction to Selenium and its various components
Understanding Selenium WebDriver and its core functionalities
Hands-on exercises to master Selenium IDE and Selenium Grid
In-depth exploration of best practices for test automation using Selenium
Utilizing TestNG for efficient test case management and optimization
Advanced techniques for handling dynamic elements, AJAX, and other challenging scenarios
Integrating Selenium with frameworks like JUnit and Cucumber for improved test reporting and maintenance
Leveraging Selenium with Continuous Integration tools like Jenkins for seamless integration into the development pipeline
Exploring Selenium's compatibility with cloud platforms for distributed test execution
Target Audience and Prerequisites
Whether you are a beginner stepping into the world of test automation or a seasoned professional aiming to enhance your Selenium skills, this course caters to all skill levels. However, having a basic understanding of programming concepts and web technologies will be beneficial in grasping the core concepts effectively.
In conclusion, if you are looking to take your test automation skills to the next level, investing in the ultimate Selenium course at ACTE Technologies is the perfect choice. With Selenium's powerful capabilities and the comprehensive curriculum of this course, you will acquire the knowledge and expertise needed to excel in the field of test automation. So, why wait? Embark on this exciting journey and empower yourself with the skills that will set you apart in the competitive IT industry. Level up your Selenium skills and unlock endless opportunities!
8 notes
·
View notes
Text
learn to digitizing your embroidey designs

From Sketch to Stitch: A Comprehensive Guide to Digitizing Your Embroidery Designs
The world of embroidery has embraced the digital age, allowing you to transform your own unique designs into stunning stitched masterpieces. But how do you bridge the gap between a simple vector graphic and a complex stitching pattern? This comprehensive guide, crafted with 2500 words, will teach you the art of digitizing your embroidery designs, from software choices to stitch considerations and finishing touches. Before We Embark: Understanding SVGs and Embroidery Files Scalable Vector Graphics (SVGs): These text-based descriptions of images offer infinite scalability, making them perfect for digital design. Embroidery files: These contain specific instructions for your machine, including stitch types, colors, and placement (DST, EXP, JEF, PES formats are common). Step 1: Choosing the Right Software Consider these factors when selecting your digitizing software: Skill Level: Are you a beginner or an experienced digitizer? Some programs cater to novice users, while others offer advanced features. Budget: Free and paid options exist, each with varying capabilities and functionalities. Compatibility: Ensure the software outputs files compatible with your embroidery machine. Here are some popular choices: Free: Inkscape: A free vector graphics editor with the Ink/Stitch plugin for basic digitizing. Sewing & Embroidery Software (SERF): Free software with limited but beginner-friendly digitizing features. Paid: Wilcom Embroidery Studio: Offers powerful tools for advanced digitizing and editing. Embrilliance Enthusiast: User-friendly software with various features at a good price point. Brother PE Design: Ideal for beginners with Brother embroidery machines. Step 2: Preparing Your SVG Simplify the design: Remove unnecessary details or intricate lines that might not translate well to embroidery. Optimize colors: Limit your color palette to what your machine can handle (usually 6-12 colors). Convert to paths: Ensure all elements in your SVG are outlines (paths) for proper stitching. Step 3: Importing and Converting Import your cleaned-up SVG into your chosen software. Follow the software's specific instructions for converting to an embroidery file. This typically involves: Choosing stitch types: Select appropriate stitches for different parts of your design (satin stitch for filling, backstitch for outlines, etc.). Setting stitch parameters: Adjust stitch density, length, and direction for desired effects. Color mapping: Assign thread colors to different parts of your design. Step 4: Digitizing Tweaks and Adjustments Preview and test: Most software allows you to preview your design on a virtual embroidery machine. Check for stitching issues and adjust paths or settings if needed. Refine stitch types and parameters: Experiment with different stitch combinations to achieve the desired look and texture. Consider thread types and colors: Choose thread that complements your fabric and design aesthetic. Step 5: Export and Embroider! Once you're happy with your design, export it in a file format compatible with your embroidery machine. Transfer the file to your machine and prepare your fabric and thread. It's finally time to see your creation come to life! Embroider your design, following your machine's instructions. Bonus Tips for Success: Start simple: Begin with basic shapes and designs to get comfortable with the conversion process. Practice digitizing: The more you experiment, the better you'll understand how different stitches and settings affect your final outcome. Join online communities: Connect with other embroidery enthusiasts for tips, advice, and inspiration. Don't be afraid to ask for help: If you get stuck, consult software manuals, online tutorials, or seek assistance from experienced digitizers. Remember, with a little practice and this guide as your compass, you'll be well on your way to transforming your SVG dreams into beautiful embroidered realities! Further Resources: Websites: Needlework Tips and Techniques: https://www.needlework-tips-and-techniques.com/ Books: "The Complete Book of Digitizing" by Jeannette Douglas, "Digitizing Designs" by Laura Ashley YouTube Tutorials: CreativeBug Cutwork Embroidery Masterclass, Bluestone Creations Cutwork Basics Online Forums: Embroidery Forum With these additional resources and the knowledge you've gained, you Read the full article
3 notes
·
View notes
Text
Rigel Review 2025: Is This AI-Powered App Worth It?

Welcome to my comprehensive Rigel Review 2025 . Are you tired of struggling to make ends meet while trying to break into the world of online income? The frustration of spending hours learning complicated strategies, setting up ads, driving traffic manually, and still not seeing results can be overwhelming. You’re not alone—many aspiring entrepreneurs face the same challenges when starting out in affiliate marketing.
But what if I told you there’s a way to simplify everything? Imagine having an app that does all the hard work for you, from finding profitable offers to generating free traffic and converting sales. Sounds too good to be true, right? Well, it isn’t. Enter Rigel, the revolutionary AI-powered tool designed specifically for WarriorPlus affiliates who want to start earning quickly and easily. With its advanced DeepSeek technology, Rigel automates every step of the process so you can focus on enjoying the rewards. No more wasted time, no more guesswork—just pure profit potential at your fingertips.
In this review, we’ll dive deep into how Rigel works, its features, pricing, and whether it’s worth your investment. So buckle up, because by the end of this article, you’ll know exactly why thousands are already using Rigel to achieve their financial freedom dreams!
What is Rigel?
Rigel is a cloud-based app powered by DeepSeek AI, designed to revolutionize affiliate marketing for beginners and seasoned marketers alike. It simplifies the entire process by automating key tasks such as traffic generation, offer selection, and promotion. Specifically tailored for WarriorPlus affiliates, Rigel turns any link into a money-making machine without requiring technical expertise or upfront costs. Key highlights include:
One-click installation
Hands-free operation
Proven ability to generate passive income (up to $529/day)
Who Created Rigel?

Rigel was developed by Billy Darr, a renowned internet entrepreneur and software developer with over a decade of experience in online marketing. Known for launching multiple six-figure products like Emerald, Ignis, Vesta, and A.I Podcastr, Billy has built a loyal community of 100,000+ users worldwide. His dedication to creating innovative solutions ensures Rigel delivers accurate results backed by real-world testing. Backed by a dedicated support team, Billy guarantees success through personalized mentoring and step-by-step training.
Billy’s track record speaks for itself—he knows how to help people succeed.
Top Benefits of Rigel
Effortless Automation: Let AI handle everything from selecting high-converting offers to promoting them across platforms.
Risk-Free Investment: Enjoy a 365-day money-back guarantee, ensuring peace of mind
Scalability: Start small and scale up as your confidence grows.
Accessibility: Works seamlessly on all devices, including Android, iPhone, and desktops.
Beginner-Friendly: Requires no prior knowledge or technical skills—perfect for newbies.
>> Get Instant Access <<
How Does Rigel Work?

Step 1: Access – Click any buy button to gain instant access to the app.
Step 2: Install – Set up Rigel in one click, even if you’ve never used similar tools before.
Step 3: Earn – Watch as DeepSeek AI promotes your affiliate links and generates consistent traffic and sales. Behind the scenes, Rigel uses advanced algorithms to analyze data, identify top-performing offers, and distribute links strategically across free traffic sources.
It’s that simple—you don’t need to lift a finger!
>> Get Instant Access <<
Best Features of Rigel
✅ Brand-New Rigel App: Full access to DeepSeek-powered technology.
✅ Rigel Offer-Selector: Instantly discover the most profitable offers daily.
✅ Rigel Auto-Promoter: Drive traffic and generate sales hands-free.
✅ Rigel Pocket Edition: Operate the app on-the-go via mobile devices.
✅ Over-the-Shoulder Training: Easy-to-follow tutorials ensure quick mastery.
✅ World-Class Support: Dedicated team available to assist with any questions.
>> Get Instant Access <<
Who Should Buy Rigel?

Anyone looking to simplify affiliate marketing without sacrificing results.
Beginners eager to learn but short on time or resources.
Experienced marketers seeking ways to streamline their processes.
People interested in side hustles or full-time online businesses.
If you fall into any of these categories, Rigel could be your ticket to financial independence.
Rigel Pros and Cons
Pros:
✔️ Super easy to use—no tech skills required.
✔️ Saves time by automating tedious tasks.
✔️ Works on any device, making it highly convenient.
✔️ Proven track record of delivering results.
✔️ Risk-free due to the generous refund policy.
Cons:
❌ Limited availability—prices may increase soon.
❌ Requires immediate action to take advantage of current discounts.
Rigel Pricing and OTOs
Front-End Price: $17 (one-time payment).
Upsell Options (OTOs):
Infinite ($147/$47/$37)
Plug & Play ($297 → $197)
Set & Forget Edition ($39 → $29)
Done For You Funnel ($297 → $97)
And many others offering exclusive bonuses!
Act fast—the price will rise soon, and the early bird discount won’t last forever.
>> Get Instant Access <<
Should You Buy Rigel?
After reviewing Rigel’s capabilities, affordability, and risk-free guarantee, it’s clear this app is a game-changer for anyone serious about affiliate marketing. At just $17, it offers unparalleled value compared to other tools on the market. Plus, the ability to test it for an entire year gives you ample opportunity to see tangible results.
Rigel combines cutting-edge AI with user-friendly design to deliver automated affiliate marketing success. Whether you’re a beginner or a pro, this tool eliminates barriers and accelerates growth. Its low cost and robust refund policy make it a no-brainer for anyone ready to seize control of their financial future.
Sign off: Ready to unlock your earning potential? Click the link below to grab Rigel now and start building your dream lifestyle!
FAQ Section
• Do I need experience to get started? Nope! All you need is internet access and a device to operate the app.
• Are there monthly fees? Not if you act now. After the promo period, prices may shift to a recurring model.
• What happens if I don’t see results? We’ve got you covered! Show us proof of effort, and we’ll issue a full refund—or even double your money back.
• How long until I start earning? Many users report their first sale within hours of setup.
Thank you for reading Rigel Review 2025: Is This AI-Powered Affiliate Marketing App Worth Your Time and Money? We hope this guide helped clarify whether Rigel aligns with your goals. Remember, success starts with taking action—so don’t hesitate to try it today! 🚀
Affiliate Disclaimer :
Some of the links in this article may be affiliate links, which means I receive a small commission at NO ADDITIONAL cost to you if you decide to purchase something. While we receive affiliate compensation for reviews / promotions on this article, we always offer honest opinions, user experiences and real views related to the product or service itself. Our goal is to help readers make the best purchasing decisions, however, the testimonies and opinions expressed are ours only. As always you should do your own thoughts to verify any claims, results and stats before making any kind of purchase. Clicking links or purchasing products recommended in this article may generate income for this product from affiliate commissions and you should assume we are compensated for any purchases you make. We review products and services you might find interesting. If you purchase them, we might get a share of the commission from the sale from our partners. This does not drive our decision as to whether or not a product is featured or recommended.
0 notes
Text

#manual#manual testing#manual testing tutorial#manual testing tutorials#manual testing tutorials for beginners#tutorial academy#tutorial for beginners#tutorials#tutorials for beginners
0 notes
Text
Exploring the Ansible Playground on LabEx
Automation is at the heart of modern IT practices, and tools like Ansible have become indispensable for managing infrastructure efficiently. For professionals and learners alike, having access to an "Ansible playground" is critical for hands-on experience. LabEx’s online Ansible playground provides the perfect environment to practice, experiment, and enhance your Ansible skills. This tutorial highlights what makes LabEx’s platform a top choice for those diving into the world of configuration management and automation.
Why Use an Online Ansible Playground?
Ansible, known for its simplicity and power, enables users to automate repetitive tasks, deploy applications, and manage systems. However, to harness its full potential, practice is essential. Here’s where an online Ansible playground comes into play. This digital environment provides:
Convenience: No setup required; start practicing instantly.
Accessibility: Access the platform from anywhere with an internet connection.
Cost-Effectiveness: Avoid the expense of setting up physical servers or virtual machines.
Risk-Free Learning: Experiment without affecting live systems.
LabEx’s Ansible playground stands out as a tailored solution for both beginners and seasoned professionals looking to refine their skills.
Features of LabEx’s Ansible Playground
LabEx offers an interactive and user-friendly interface designed to simplify your learning journey. Key features include:
Pre-Configured Environment: The playground comes with Ansible pre-installed, eliminating the need for manual setup.
Interactive Tutorials: Guided exercises and scenarios help users understand key concepts such as playbooks, modules, and inventory files.
Real-World Scenarios: The platform provides challenges that simulate actual use cases, bridging the gap between theory and practice.
Error Handling Support: The playground includes resources to help users troubleshoot common issues.
Progress Tracking: Monitor your progress and see how your skills develop over time.
Multi-Platform Access: Whether you’re on a laptop, tablet, or smartphone, LabEx’s online Ansible playground ensures a seamless experience.
Who Can Benefit from LabEx’s Ansible Playground?
The Ansible playground is ideal for:
IT Professionals: Enhance your automation skills and stay ahead in your career.
Beginners: Start with the basics and build a strong foundation in Ansible.
DevOps Engineers: Practice creating and deploying playbooks in a safe environment.
Students: Gain practical knowledge to complement academic learning.
How to Get Started
Using LabEx’s online Ansible playground is straightforward:
Sign Up or Log In: Visit the LabEx website and create an account if you’re a new user.
Access the Playground: Navigate to the Ansible tutorial section.
Follow the Steps: Choose from a variety of lessons and scenarios to get started.
Experiment and Learn: Test commands, create playbooks, and automate tasks in real-time.
Evaluate Your Skills: Use the provided challenges to assess your understanding.
Conclusion
LabEx’s online Ansible playground is a game-changer for anyone looking to master Ansible. Its pre-configured environment, real-world scenarios, and guided tutorials make it a must-try for automation enthusiasts. Whether you’re just starting or want to sharpen your existing skills, LabEx provides a risk-free, interactive platform to take your expertise to the next level. Start exploring today and unlock the full potential of Ansible!
0 notes
Text
Top Benefits of Taking a Selenium Course for Career Growth
Introduction
The demand for skilled automation testers is skyrocketing, and Selenium stands out as the most popular automation tool in the industry. If you are looking for a high-paying, in-demand IT career, enrolling in a Selenium course can be a game-changer. Whether you are a beginner or an experienced tester, mastering Selenium can open doors to lucrative job opportunities.
In this blog, we will explore the top benefits of taking a Selenium course online, how it helps in career growth, and why Selenium certification training can set you apart from the competition.
1. High Demand for Selenium Professionals
Automation testing has become a crucial part of software development, and Selenium is the go-to tool for businesses worldwide. Companies seek skilled Selenium professionals to improve testing efficiency and software quality.
Industry Statistics:
According to MarketsandMarkets, the automation testing market will grow from $24.7 billion in 2022 to $52.7 billion by 2027.
Selenium is the most preferred automation tool, used by over 60% of organizations globally.
LinkedIn lists over 50,000 job openings for Selenium professionals in the US alone.
Job Roles You Can Target:
Automation Test Engineer
Selenium Tester
QA Automation Engineer
Software Developer in Test (SDET)
DevOps Test Engineer
Taking a Selenium certification course boosts your credibility, making you a top choice for recruiters.
2. Open-Source and Versatile Tool
One of the biggest advantages of Selenium is that it is open-source, meaning it is free to use. This makes it a preferred choice for startups and large enterprises alike.
Why Selenium Stands Out?
✅ Supports multiple programming languages (Java, Python, C#, Ruby, JavaScript) ✅ Compatible with multiple browsers (Chrome, Firefox, Safari, Edge) ✅ Works across Windows, macOS, and Linux ✅ Integrates with popular testing frameworks like TestNG and JUnit
Since Selenium is widely used, mastering it through a Selenium course training increases your adaptability in the job market.
3. Hands-on Learning for Real-World Applications
A quality Selenium course online does not just cover theoretical knowledge. It provides hands-on learning with real-world examples and industry use cases.
Key Learning Areas in a Selenium Course:
✔️ Writing test scripts using Selenium WebDriver ✔️ Automating web applications with real-time projects ✔️ Integrating Selenium with tools like Jenkins, Maven, and Docker ✔️ Using Selenium Grid for parallel execution ✔️ Implementing Page Object Model (POM) and Data-Driven Testing
This practical exposure helps learners apply their knowledge directly in job environments, making them job-ready.
4. Better Salary and Career Growth
Professionals with Selenium expertise enjoy higher salaries and faster career growth.
Selenium Salary Insights:
The average salary of a Selenium Automation Tester in the US is $85,000 - $120,000 per year.
Experienced Selenium Test Engineers earn up to $140,000 annually.
Selenium-certified professionals receive 30% higher salaries than non-certified testers.
Career Growth Path:
Manual Tester → Selenium Automation Tester
Selenium Tester → Senior QA Automation Engineer
Senior QA Engineer → Test Automation Architect
Automation Architect → DevOps & Cloud Testing Expert
Investing in Selenium certification training can accelerate your career progression and lead to leadership roles in automation testing.
5. Strong Community Support and Learning Resources
Selenium has an active community, making it easier to find solutions, get updates, and stay ahead of industry trends.
Benefits of Selenium’s Strong Community:
Thousands of free tutorials and learning resources available
Regular updates and enhancements to the tool
Large GitHub repositories with Selenium projects
Active forums and Selenium user groups for discussions
Taking a Selenium certification course ensures structured learning, covering all essential concepts with expert guidance.
6. Selenium Certification Boosts Credibility
Employers value certifications as proof of expertise. A Selenium certification course validates your skills and increases your chances of landing top-tier jobs.
Why Get Certified?
📌 Demonstrates expertise in Selenium automation 📌 Adds credibility to your resume 📌 Helps in career advancements and promotions 📌 Gives a competitive edge in job interviews
Enrolling in a Selenium certification training at H2K Infosys ensures you gain industry-recognized certification with hands-on training.
7. Flexible Learning Options with Online Courses
A Selenium course online allows working professionals and students to upskill at their convenience.
Key Benefits of Online Selenium Training:
Learn from industry experts with real-world experience
Flexible schedules (weekend and evening classes)
Access to recorded sessions for self-paced learning
Interactive doubt-clearing sessions and mentorship
Hands-on projects to build a strong portfolio
With H2K Infosys, you get high-quality Selenium course training with expert-led live sessions.
Key Takeaways
🔹 Selenium is the most in-demand automation testing tool with excellent job prospects. 🔹 A Selenium course online provides hands-on training for real-world applications. 🔹 Selenium professionals earn high salaries and have multiple career growth opportunities. 🔹 A Selenium certification course boosts your credibility and job prospects. 🔹 Enrolling in a Selenium course training with H2K Infosys provides structured learning and expert guidance.
Conclusion
If you want to build a rewarding career in automation testing, learning Selenium is a smart choice. Enroll in H2K Infosys’ Selenium certification training today to gain hands-on experience and accelerate your career growth!
#Selenium certification#Selenium certification training#Selenium certification course#Selenium course#Selenium course online#Selenium course training
0 notes
Text
How Can Beginners Get Started with Selenium Automation Testing?

Introduction
In today’s software development world, delivering high-quality applications quickly is crucial. Manual testing, while important, is becoming increasingly inefficient in keeping up with the pace of modern software development. That's where automation testing comes in, and Selenium is one of the most popular tools for automation testing.
For beginners, the world of Selenium automation testing might seem intimidating at first. However, with the right guidance and resources, anyone can master it. One great way to start is by enrolling in a Selenium course online that provides structured learning and hands-on experience. In this article, we will walk you through everything you need to know about starting your Selenium journey, from understanding its core concepts to taking your first steps with the tool..
What is Selenium Automation Testing
Selenium is a powerful open-source automation testing tool designed for automating web applications across different browsers. It provides a suite of tools that help developers and testers create scripts that simulate the behavior of users, ensuring that web applications function as expected. With Selenium, you can write automated tests for a web application in multiple programming languages such as Java, Python, C#, Ruby, and more.
The main reason for the widespread adoption of Selenium is its flexibility. It supports various browsers, including Chrome, Firefox, Internet Explorer, and Safari. It is also highly extensible, making it a go-to solution for automation testing in the industry.
Why Should You Learn Selenium
If you’re a beginner considering a career in software testing or looking to enhance your skills, learning Selenium offers many benefits:
High Demand in the Job Market: Automation testing skills are highly sought after by employers worldwide. According to industry reports, there is a growing demand for testers who can handle Selenium automation. By gaining proficiency in Selenium, you increase your chances of landing a high-paying job in the testing domain.
Open-Source and Free: Selenium is free to use and open-source, making it accessible to everyone, including those just starting their career in automation testing. You won’t need to worry about expensive licensing fees to get started.
Cross-Browser Testing: Selenium provides cross-browser support, which is crucial for ensuring that web applications work consistently across all browsers. This feature makes Selenium an attractive choice for developers and testers looking for efficient automation solutions.
Support for Multiple Programming Languages: Selenium allows testers to write automation scripts in multiple programming languages like Java, Python, C#, and more. This flexibility allows beginners to leverage their existing programming knowledge.
Large Community and Resources: Since Selenium is widely used, it boasts a massive community of professionals who contribute to its continuous development. There are countless resources available online, including forums, documentation, and tutorials, making it easier for beginners to get started.
Key Concepts in Selenium Automation Testing
Before diving into Selenium, it's essential to understand a few core concepts that will help you get a solid foundation.
Selenium WebDriver: Selenium WebDriver is the most popular component of Selenium. It provides an interface for automating browser interactions. With WebDriver, you can write scripts to simulate user actions like clicking buttons, entering text in forms, and navigating between pages. It supports multiple browsers and programming languages, making it a versatile tool for automation testing.
Selenium IDE: The Selenium Integrated Development Environment (IDE) is a browser extension that allows you to record and playback your actions on a web page. While it's not as powerful as WebDriver, Selenium IDE is an excellent tool for beginners to get started with basic automation tasks.
Selenium Grid: Selenium Grid allows you to run your tests on multiple machines and browsers in parallel. This tool is particularly useful for running large test suites and speeding up the testing process by executing tests concurrently.
Locators in Selenium: Locators are used to find web elements on a web page. In Selenium, you can use locators like ID, Name, Class Name, XPath, and CSS Selector to identify the elements that you want to interact with during automation.
Getting Started with Selenium Automation Testing: A Step-by-Step Guide
Now that we have a basic understanding of Selenium, let’s dive into the practical steps that beginners can follow to start using Selenium for automation testing.
Step 1: Choose the Right Selenium Course
For beginners, one of the best ways to get started is by enrolling in a Selenium course online. Online courses offer a structured learning path and are often taught by experts in the field, giving you access to industry-relevant knowledge. One such course to consider is a Selenium certification course that can provide you with hands-on experience in writing automation scripts and understanding advanced testing strategies.
If you prefer more flexibility, you can also find online Selenium courses that allow you to learn at your own pace. Regardless of the format, the key is to choose a course that covers both the basics and advanced aspects of Selenium, offering practical examples and exercises.
Step 2: Install Selenium and Set Up Your Environment
Once you’ve chosen your course, the next step is to set up your testing environment. Follow these steps:
Install Java (for Java users): If you plan to write Selenium tests in Java, you need to install the Java Development Kit (JDK). You can download it from Oracle’s official website and follow the installation instructions.
Set Up Eclipse or IntelliJ IDEA: These are the two most commonly used Integrated Development Environments (IDEs) for Java. Download and install one of them, depending on your preference.
Download Selenium WebDriver: After setting up your IDE, the next step is to download the appropriate version of the Selenium WebDriver for your desired browser (Chrome, Firefox, etc.). You can get this from the official Selenium website.
Install Other Dependencies: Selenium also requires additional libraries and frameworks for running tests, such as TestNG, JUnit, or Maven. Depending on the language and framework you choose, you can easily install them via the respective package managers.
Step 3: Write Your First Selenium Script
With your environment set up, it’s time to write your first Selenium script! A simple script could be one that opens a web page and interacts with an element.
Here’s an example of a simple Selenium script in Java:
java
import org.openqa.selenium.WebDriver;
import org.openqa.selenium.chrome.ChromeDriver;
public class FirstSeleniumTest {
public static void main(String[] args) {
// Set the path to the ChromeDriver
System.setProperty("webdriver.chrome.driver", "path/to/chromedriver");
// Create a new instance of ChromeDriver
WebDriver driver = new ChromeDriver();
// Open a website
driver.get("https://www.example.com");
// Close the browser
driver.quit();
}
}
This simple script uses the Chrome browser to open a webpage and then closes the browser. As a beginner, starting with simple scripts and gradually progressing to more complex automation tasks is a great way to learn.
Step 4: Practice with Real-World Projects
As you progress with the Selenium certification course, it’s important to practice with real-world projects. Many online courses provide sample projects where you can apply the knowledge gained in the course to solve practical automation problems.
You could also try automating testing for popular websites like Amazon or Google, testing the functionality of various elements on those pages.
Step 5: Troubleshooting and Debugging
Like any other technology, you’ll encounter errors and issues while working with Selenium. It’s important to develop troubleshooting skills, such as identifying failed tests, checking browser compatibility, and debugging code. The Selenium community is a great place to get help with debugging and troubleshooting.
Conclusion
Getting started with Selenium automation testing as a beginner may seem challenging at first, but with the right resources and guidance, it becomes an exciting and valuable skill. Whether you choose a Selenium course online, enroll in a Selenium certification course, or engage in hands-on practice, the key is persistence and continuous learning.
Key Takeaways:
Selenium is a versatile and powerful tool for automation testing.
Beginners should start with an Online selenium course that provides structured learning and hands-on experience.
Set up your environment, write simple scripts, and practice regularly to improve your skills.
Troubleshooting and debugging are essential skills when working with Selenium.
By following these steps and committing to your learning process, you’ll be well on your way to mastering Selenium and becoming an expert in automation testing.
Ready to get started with Selenium? Enroll in a Selenium certification course today and begin your journey towards mastering automation testing!
0 notes
Text
Trade Smarter with Tradetron
For anyone entering the stock market, the ultimate goal is to trade smarter, not harder. Over the past two decades, automation has transformed financial markets, making Tradetron an efficient and accessible tool for achieving consistent results with minimal effort.
This guide explores why Tradetron is the easiest and most effective way to elevate your trading game.
Why Tradetron?
1. Speed & Efficiency
Human traders can analyze only a few stocks at a time, but Tradetron processes massive amounts of market data instantly. This ensures you never miss profitable opportunities.
2. Emotion-Free Trading
Emotional decisions often lead to poor trades. With Tradetron, trades are based on pure logic and data, eliminating human bias.
3. Customizable Strategies
Whether you are a day trader or a long-term investor, Tradetron allows you to customize strategies based on your goals and risk tolerance.
To read full blog Click Here
How Tradetron Simplifies Trading
1. Full Automation
Tradetron automates your trading strategies, saving countless hours of manual work. It scans thousands of stocks, identifies profitable patterns, and executes trades within milliseconds.
2. Backtesting for Better Decisions
With Tradetron, you can test strategies on historical data before putting real money at risk, helping you make informed decisions.
3. Risk Management
Set stop-loss and position-sizing rules to protect your capital and prevent overexposure.
4. Trade Anytime, Anywhere
Markets like Forex and Crypto operate 24/7. Tradetron allows you to monitor and execute trades even when you're away.
Key Benefits of Using Tradetron
✅ Scalability – Handle high trade volumes without performance drops. ✅ Adaptability – Adjust strategies instantly based on market changes. ✅ Data-Driven Decisions – Access deep insights and analytics for smarter trading.
Getting Started with Tradetron
✔ Choose the Right Platform – Ensure it supports backtesting and smooth execution. ✔ Start with a Simple Strategy – Learn the basics before scaling up. ✔ Educate Yourself – Use webinars, tutorials, and forums to gain knowledge. ✔ Monitor & Adjust – Keep refining your strategies for the best results.
Conclusion
Trading with Tradetron isn’t just for experts—it’s for anyone looking to trade smarter and faster. With automation, efficiency, and emotion-free execution, getting started has never been easier.
🚀 Start Small. Learn. Explore the Possibilities.
FAQs
🔹 What is Tradetron? Tradetron is a powerful automated trading platform that executes trades based on pre-defined strategies.
🔹 Why is Tradetron better than manual trading? It eliminates emotional bias, ensures faster execution, and improves efficiency.
🔹 Can beginners use Tradetron? Yes! It provides user-friendly tools to help beginners start with ease.
🔹 What is backtesting? Backtesting allows you to test strategies on historical market data before live trading.
🔹 How does Tradetron improve trading efficiency? By automating trades, providing real-time market insights, and optimizing risk management.
0 notes